

The Science of Duo in Space, Pt. 1: What the @#%! Were We Thinking?
During DEF CON 24, you may have heard about a crazy project we did that involved attempting to perform the first (at least as far as we know) Push authentication from space. If you joined us via the Duo in Space live stream, then you had the chance to spend a little more than five hours watching us set up, launch, drive like crazy people and finally hike through the desert, all to pull off this stunt. What the live stream didn’t show you was the incredible amount of work that went on behind the scenes to make it happen.
Mikhail Davidov, Senior Security Researcher at Duo Security, was the nerd behind making the technology behind Duo in Space work. In hindsight, when we began planning this project I don’t think I appreciated the full scope of work involved. But Mikhail was up for the challenge, and with some help from his friends and many long nights, he pulled off something that was not only unique in our space but also pretty amazing.
This week, we’ll share a series of blogs complete with photographs and insights from Mikhail about the various aspects of this project.
—Steve Manzuik, Director of Security Research
One Small Step for Duo...
When we decided to attempt a Duo Push from from the boundary of space, I was tasked with figuring out what that meant and how to accomplish it.
It just so happens I had an idea of where to begin, thanks to helping launch two separate high-altitude balloon (HAB) missions with Hackerbot Labs about a decade earlier out here in Seattle. Back then, when GoPros were not yet a viable option, we ran custom CHDK firmware on stripped-down Canon Powershots to periodically shoot HD stills. A lot had changed technologically since then, but the principal operation and regulatory requirements remained the same.
While we wouldn’t be able to cross the Kármán line — the standard boundary between the Earth's atmosphere and outer space — we were still looking at potential altitudes in excess of 18 miles, well into the space equivalent zone (the stratosphere, to be exact). Were you to suddenly appear there without a spacesuit, your bodily fluids would begin to actively boil off; that was high enough in my book.
After plenty of brainstorming, we decided on the idea of sending a Duo Push to a smartphone up in the stratosphere on a helium-filled balloon and having an animatronic astronaut hand approve the request.
To launch a high-altitude balloon within the U.S., you’re required to comply with a simple set of FAA regulations known as “FAR 101.” The FAA sets restrictions on proximity to an airport, the size of payload you can launch without having to file a notice, and reflectivity requirements so that passing planes can see your payload on radar.
Because there were several challenges to overcome, we planned to perform a proof-of-concept test flight, which would help determine whether our plan was even remotely feasible.
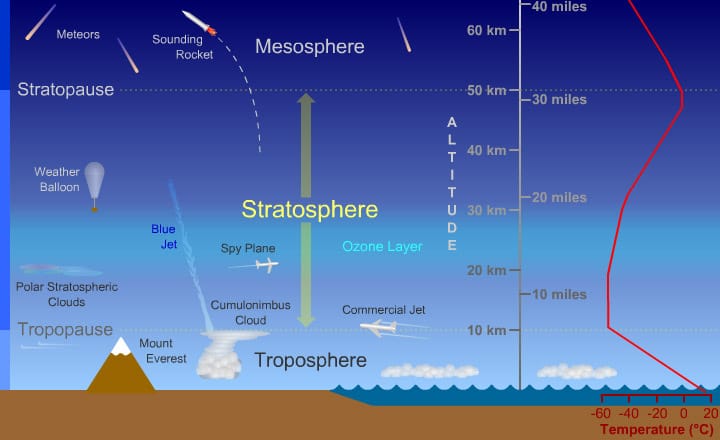
Image via the University Corporation for Atmospheric Research (UCAR)
One challenge that quickly emerged was the temperature swing of more than 100 degrees Celsius. As you ascend from the ground, the temperature quickly drops to well below -60 degrees Celsius (-76 degrees Fahrenheit), potentially causing batteries to freeze, optics to fog and servos to freeze solid. When you hit the tropopause, ranging from about six to 11 miles up, ultraviolet radiation from the sun breaks down ozone into oxygen and heat, causing a temperature inversion to occur. At a projected maximum altitude of around 18 miles, ambient temperature would be a balmy -40 degrees Celsius/Fahrenheit.
The second challenge was the pressure. At peak altitude, the air pressure of 4.6 millibars is 0.5 percent that of the ground. For comparison, the surface of Mars has twice as much air pressure. This has an unintuitive effect on anything that you send up; because there are fewer gas molecules to absorb energy, if a component produces heat it won’t be able to shed it as quickly as it would on the ground, accumulating it and inevitably overheating.
Consequently, I needed to insulate the parts enough that they wouldn’t freeze over at relatively low altitude, but not so much that they’d overheat later in the flight. That said, this was only for the journey up; the payload would also need to survive the exact same journey in reverse.
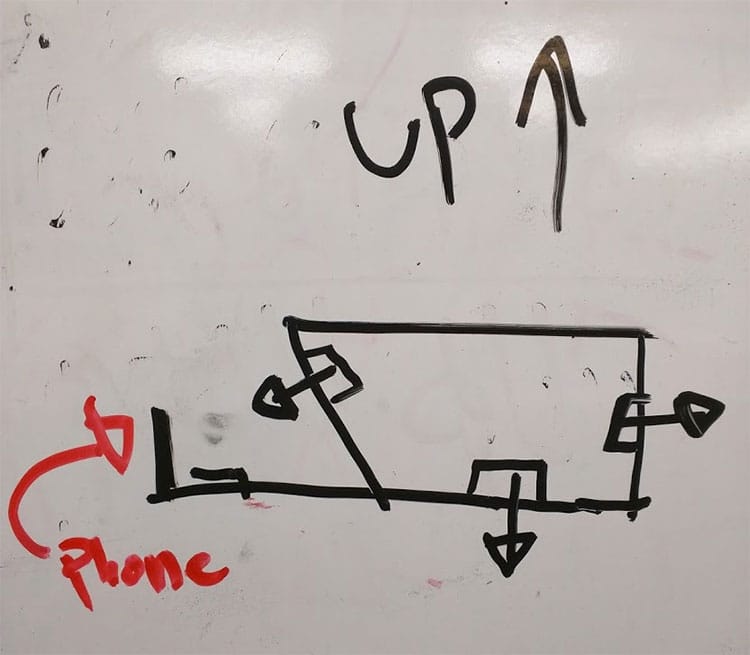
After some back and forth with our amazing creative team, we developed a payload shape and camera configuration for the test flight: a Sandcrawler-shaped box with a smartphone attached to an exterior boom. We’d send a Duo Push request from the ground to the phone, and a 3-D printed finger on a servo would press the “approve” button. Three GoPro HERO4 Black cameras would document the trip, shooting in 4K with the Earth in the background and the blackness of space above.
With this functional design in mind, and after a large amount of research on how best practices have changed in the past decade, I devised a component list of what should fly to make this idea a reality.
To send a Duo Push, we needed to have internet connectivity. As anyone who’s ever “accidentally” taken their phone out of airplane mode while on a flight knows, cellular signals don’t reach that high. I considered various radio point-to-point solutions but decided against them; building and running a ground-based tracking station would be too complicated, and amateur radio regulations prohibit the use of encrypted communications.
Ultimately, I settled on a design in which a commercial satellite phone connected to the Internet via dial-up networking and provided connectivity to a Raspberry Pi 3 that would in turn broadcast a Wi-Fi network for the smartphone to connect to. The Raspberry Pi would monitor the traffic between the phone and the Sat-Link to know when to actuate a servo to press the accept button.
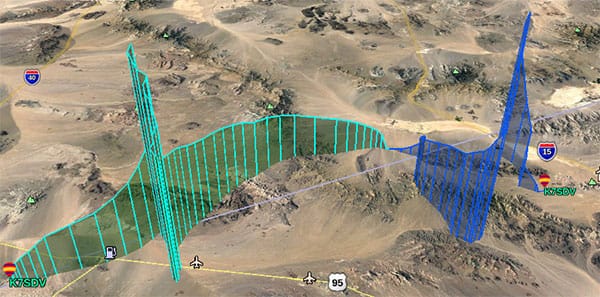
Having tragically lost balloon payloads before, and the thought of losing thousands of dollars worth of camera gear weighing on my mind, tracking was of the utmost concern. I had to have redundant methods to locate the payload — a little tricky because HABs can get caught in winds and travel across state lines.
What Makes it Go?
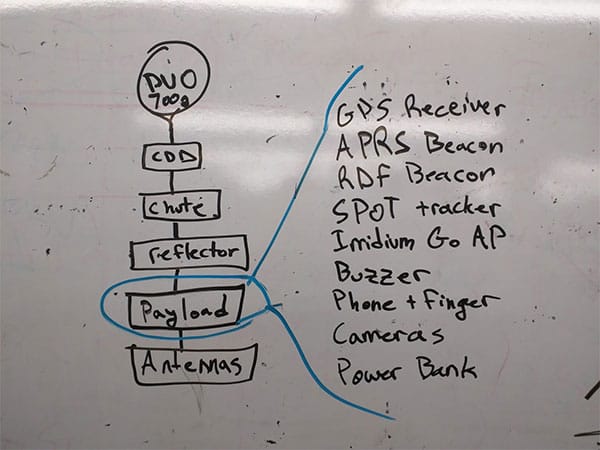
The component list, and how everything would string together, took shape:
Latex Balloon
This is the engine that gets you up to into the stratosphere. Made of thick latex, these purpose-built balloons are designed to stretch to massive diameters before bursting. For both flights we ended up flying the 2000g variant, which burst when they reached a diameter exceeding 34 feet. Source from Kaymont.
CDD (Cut-down Device)
One of the major risks that can occur during a launch is that the balloon is underfilled and becomes a derelict airship. The FAA really frowns on this happening, because they can stay up for months at a time. To prevent this, you add a cut-down device. This is a completely discrete component attached to the rigging lines that come off of the balloon. After a prescribed amount of time elapses (maximum flight time), the CDD heats up a piece of nichrome wire and severs the line, ensuring that the balloon comes back down to Earth. This had to be custom built.
Near-Space Parachute
Ideally, you want to be going 20 mph or less when your payload hits the ground. A 1-2 meter parachute can help facilitate this. Parachutes are easily to research and purchase online, and the optimal size depends on your payload weight. It could take up to an hour for the payload to fall to the ground, so depending on descent rate and prevailing winds the payload could go much further than where the detachment and popping occurs. Source from The Rocketman or High Altitude Science.
Radar Reflector
This component helps you meet FAA compliance and overall safety. Source from Davis.
In addition, we used several devices to keep track of the payload for the duration of the flight:
APRS GPS Beacon
Military export regulations (CoCom) require consumer GPS devices and standalone modules to become non-functional at speeds above 1,200 mph or altitudes above 59,000 feet. (This is due to worries of use in intercontinental ballistic missiles, seriously.) Luckily for us, there are many non-compliant receivers out there pre-vetted to ignore at least the altitude limit!
To transmit what the GPS beacon is reporting, we utilized Automatic Packet Reporting System (APRS). This is an amateur radio pseudo-standard for position reporting, with many Internet-connected and repeating listening stations around the world that facilitate live tracking in remote locations. APRS operates on the 2-meter radio band; this requires a ham radio license to operate, which you can obtain by taking a test. In the past, APRS GPS beacons had to be hand built for HAB applications, but now there are many commercial solutions available complete with pre-vetted GPS modules, such as the Micro-Trak 1000.
SPOT Tracker
If something goes wrong, APRS might die before the recovery team can get within radio direction finding (RDF) distance. For additional tracking support, we used a discrete satellite-based redundant position reporting system. A couple things to keep in mind: the SPOT tracker also relies on the Iridium satellite network and needs to be oriented correctly to function, and we needed to build an encompassing gimbal for it in the probable event of off-axis landing.
RDF Beacon
Once the payload comes back down to Earth, you still need to find it! Descent rates and violent landing may disrupt GPS & SPOT functionality, so we placed a radio direction finding (RDF) beacon on the payload. Operating on the 70-centimeter amateur radio band, it periodically pings a tone at a certain frequency to facilitate direction finding using specialized equipment. A suitable choice for this is the BeeLine.
Loud Buzzer
Just like the name says, this beeps and beeps loudly. Once you’re within audio range of the potentially occluded payload, the sound of the buzzer should lead you right to it.
Iridium Satellite Phone
Iridium operates a global satellite network for voice and data service. Even with the best conditions, it could only provide a theoretical maximum throughput of 0.3Kb/s at a latency of 1.5 seconds round trip — not much, but something. I managed to find a relatively cheap Iridium 9505A handset and serial adapter for sale in Australia and ordered it along with a ludicrously expensive Iridium SIM card.
Raspberry Pi 3
To orchestrate everything, we used a Raspberry Pi 3 running Ubuntu. It bridged the satellite phone connection to the smartphone and triggered a servo.
Phone + Finger + Camera Assembly
Once the Duo Push authentication request came in, a servo or linear actuator engaged to attempt approving the push within view of the cameras.
Power Banks
To power everything, we sourced two 20000mAh Anker USB battery banks. The GoPro consumes a lot of power recording in 4K resolution, and the duration of our launch and recovery exceeded what the built-in GoPro batteries could sustain.
Photo from Histoire Des Ballons et des Aéronautes Célèbres 1783-1800 via the Internet Archive / Public Domain
Up next: Putting it all together