
Documentation
Duo for Outlook Web App (OWA) on Exchange 2013 and Later
Last Updated: January 17th, 2024Contents
Duo adds two-factor authentication to Outlook Web App (OWA) logins, offering inline user enrollment, self-service device management, and support for a variety of authentication methods — such as passkeys and security keys, Duo Push, or Verified Duo Push — in the Universal Prompt.
Support for the traditional Duo Prompt experience and Duo Prompt delivery via iframe ended on March 30, 2024.
See the update instructions for Microsoft OWA to update an existing deployment of the iframe-based Microsoft OWA software to the latest release. Authenticating once with the updated Duo software is a required step before you can enable the Duo Universal Prompt for your existing Microsoft OWA application.
Please visit the Duo Universal Prompt Update Guide for more information about the traditional Duo Prompt end of support.
Walkthrough Video
Video shows Duo for OWA v1.x installation experience. Please read this page in its entirety for the current v2.x installation instructions.
Prerequisites
Check your server versions before starting. These instructions are for Exchange Server 2013 and 2016, running on Windows Server 2016 or newer, and Exchange Server 2019, running on Server 2019 or newer.
Duo for Microsoft OWA also requires the .NET Framework 4.7.1 or later runtime installed on your Exchange server.
Duo's two-factor solution for OWA 2010 reached its last day of support on February 15, 2021. Microsoft Exchange 2010 reached the end of support on October 13, 2020. Do not attempt to install Duo's OWA application for Exchange 2013 and later on an Exchange 2010 server. Plan your migration to a supported Exchange version.
This application communicates with Duo's service on SSL TCP port 443.
Firewall configurations that restrict outbound access to Duo's service with rules using destination IP addresses or IP address ranges aren't recommended, since these may change over time to maintain our service's high availability. If your organization requires IP-based rules, please review Duo Knowledge Base article 1337.
Effective June 30, 2023, Duo no longer supports TLS 1.0 or 1.1 connections or insecure TLS/SSL cipher suites. See Duo Knowledge Base article 7546 for additional guidance.
TLS Requirements
Effective June 30, 2023, Duo no longer supports TLS 1.0 or 1.1 connections or insecure TLS/SSL cipher suites.
Duo for OWA v1.3.3 supports TLS 1.2 when installed on Exchange servers running a version of Windows that also supports and uses TLS 1.2 or higher.
Duo for OWA v2.0.0 and later require TLS 1.2 as the minimum version.
See the article Guide to TLS support for Duo applications and TLS 1.0 and 1.1 end of support for more information.
First Steps
Before moving on to the deployment steps, it's a good idea to familiarize yourself with Duo administration concepts and features like options for applications, available methods for enrolling Duo users, and Duo policy settings and how to apply them. See all Duo Administrator documentation.
- Sign up for a Duo account.
- Log in to the Duo Admin Panel and navigate to Applications.
-
Click Protect an Application and locate the 2FA-only entry for Microsoft OWA in the applications list. Click Protect to the far-right to configure the application and get your Client ID, Client secret, and API hostname. You'll need this information to complete your setup. See Protecting Applications for more information about protecting applications in Duo and additional application options.
Previously, the Client ID was called the "Integration key" and the Client secret was called the "Secret key".
- Download the Duo OWA Installer Package for Exchange 2013+. View checksums for Duo downloads here.
The security of your Duo application is tied to the security of your secret key (skey). Secure it as you would any sensitive credential. Don't share it with unauthorized individuals or email it to anyone under any circumstances!
Duo Universal Prompt
The Duo Universal Prompt provides a simplified and accessible Duo login experience for web-based applications, offering a redesigned visual interface with security and usability enhancements.
| Universal Prompt | Traditional Prompt |
 |
 |
Migration to Universal Prompt for your Microsoft OWA application is a three-step process:
- Install an update for the Microsoft OWA application, which implements a redirect to Duo during authentication to support the Universal Prompt.
- Authenticate with Duo 2FA using the updated application so that Duo makes the Universal Prompt activation setting available in the Admin Panel. This first authentication after updating shows the traditional Duo prompt in a redirect instead of an iframe.
- From the Duo Admin Panel, activate the Universal Prompt experience for users of that Duo Microsoft OWA application. Once activated, all users of the application see the Duo Universal Prompt in a redirect.
Before you activate the Universal Prompt for your application, it's a good idea to read the Universal Prompt Update Guide for more information about the update process and the new login experience for users.
New Microsoft OWA Applications
When you install the latest version of OWA you're ready to use the Universal Prompt. If you're configuring Microsoft OWA now, proceed with the installation instructions in this document.
The "Universal Prompt" area of the application details page shows that this application is "Ready to activate", with these activation control options:
- Show traditional prompt: (Default) Your users experience Duo's traditional prompt via redirect when logging in to this application.
- Show new Universal Prompt: Your users experience the Universal Prompt via redirect when logging in to this application.

Existing Microsoft OWA Applications
OWA needs a software update installed to support the Universal Prompt. The "Universal Prompt" section of your existing Microsoft OWA application reflects this status as "Update required". To update OWA application to a newer version, follow the update directions below.

Once a user authenticates to OWA via the updated Duo plugin, the "Universal Prompt" section of the Microsoft OWA application page reflects this status as "Ready to activate", with these activation control options:
- Show traditional prompt: (Default) Your users experience Duo's traditional prompt via redirect when logging in to this application.
- Show new Universal Prompt: Your users experience the Universal Prompt via redirect when logging in to this application.
In addition, the "Integration key" and "Secret key" property labels for the application update to "Client ID" and "Client secret" respectively. The values for these properties remain the same.
Activate Universal Prompt
Activation of the Universal Prompt is a per-application change. Activating it for one application does not change the login experience for your other Duo applications.
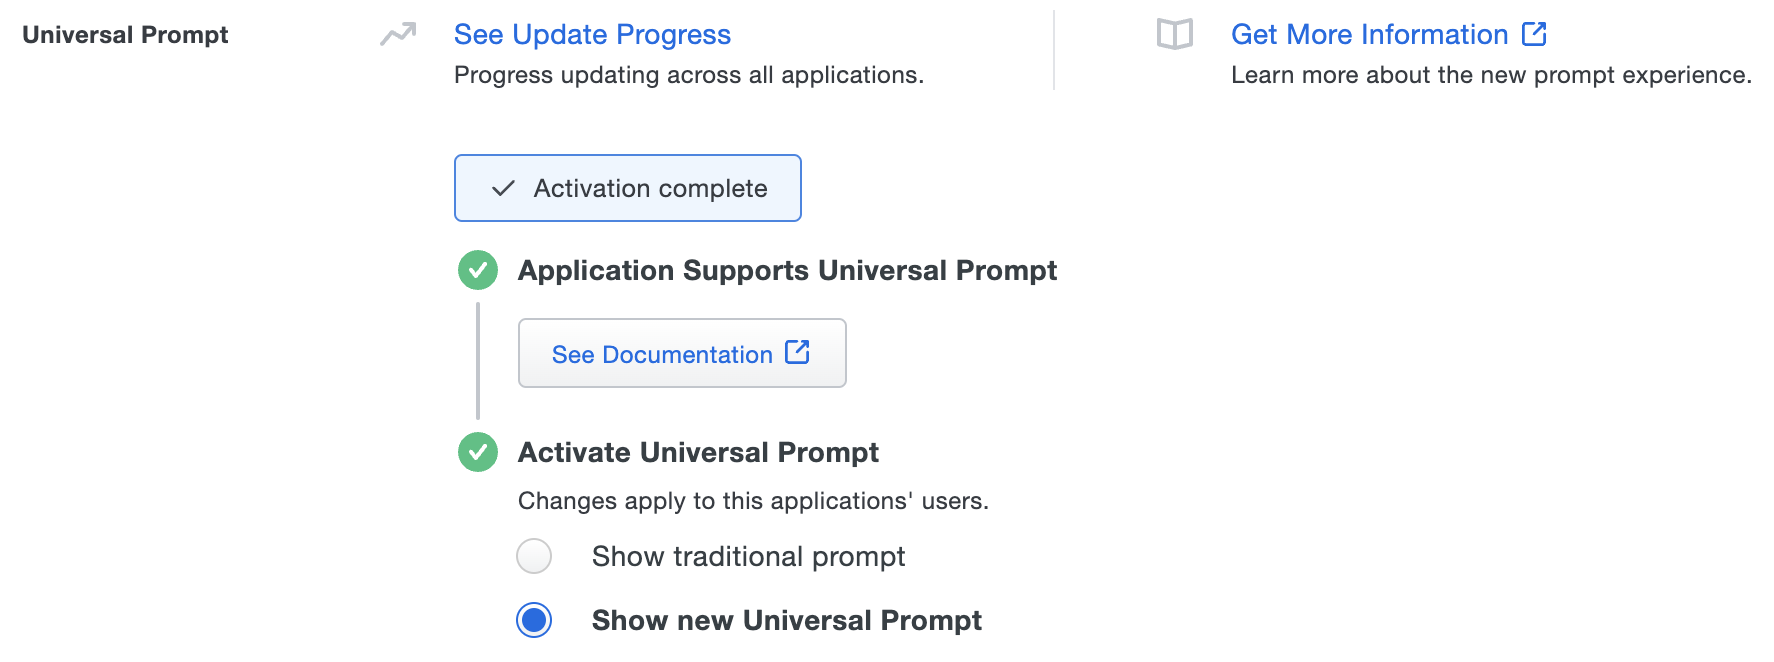
Enable the Universal Prompt experience by selecting Show new Universal Prompt, and then scrolling to the bottom of the page to click Save.
Once you activate the Universal Prompt, the application's Universal Prompt status shows "Activation Complete" here and on the Universal Prompt Update Progress report.
Should you ever want to roll back to the traditional prompt, you can return to this setting and change it back to Show traditional prompt. However, this will still deliver the Duo prompt via redirect, not in an iframe.
Universal Update Progress
Click the See Update Progress link to view the Universal Prompt Update Progress report. This report shows the update availability and migration progress for all your Duo applications. You can also activate the new prompt experience for multiple supported applications from the report page instead of visiting the individual details pages for each application.
Deployment Tip
Try setting your application's New User Policy to "Allow Access" while testing. Users that Duo knows about will be prompted to authenticate with Duo, while all other users will be transparently let through.
Users that have a phone (or hardware token) associated with them will see the authentication prompt. All other users will be able to add their phone through Duo's self-service enrollment (see Test Your Setup).
Then (when you're ready) change the "New user policy" to "Require Enrollment." This will prompt all users to authenticate (or enroll) after they type in their usernames and passwords.
Run the Installer
Install Duo on the Microsoft Exchange Server instances running the Exchange 2010/2013 Client Access Server role or the Exchange 2016/2019 Client Access services. The installation process varies slightly depending on how many Client Access servers you have. The Duo installer stops and then restarts IIS services on your Exchange servers automatically.
-
Launch the Duo Security installer MSI from an elevated command prompt (right-click "Command Prompt" and select the "Run as Administrator" option). Accept the license agreement and continue.
-
Enter your Client ID (formerly called the Integration key), Client secret (formerly called the Secret key), and API hostname from the Duo Security OWA application page when prompted.
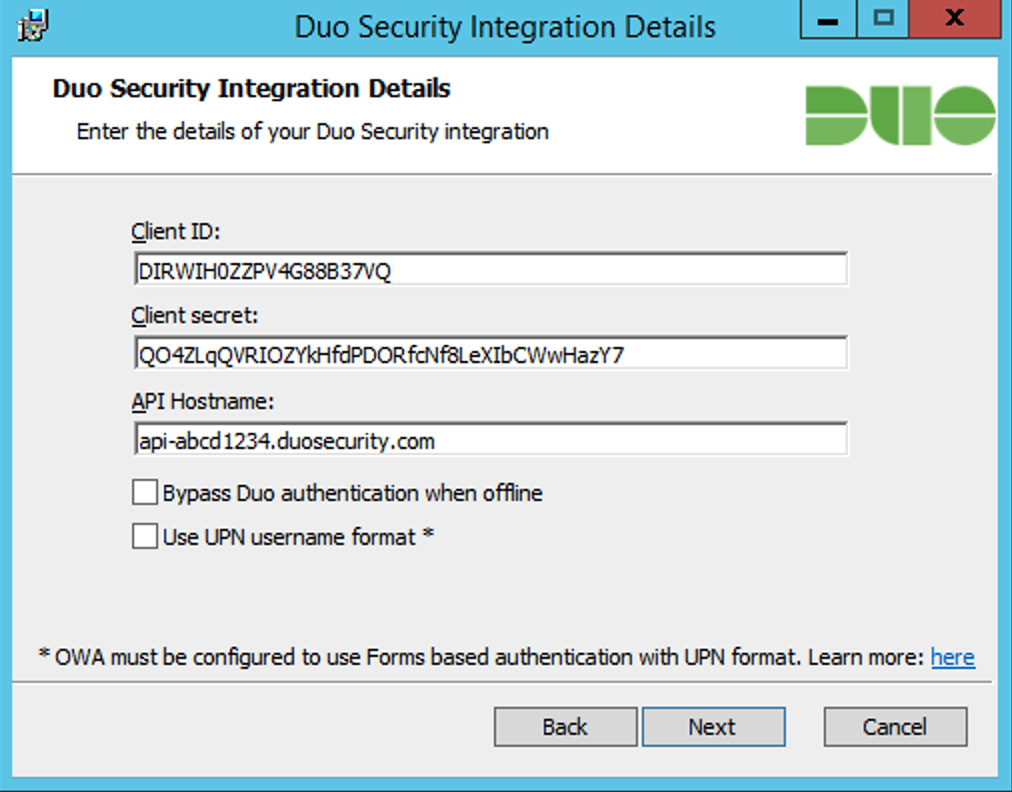
If the Bypass Duo authentication when offline option is unchecked, then Duo for OWA will "fail closed" when Duo Security cloud services are unreachable and users will not be able to access protected federated resources. Check the box if you want users to be able to access protected applications without Duo authentication if Duo's cloud service is unreachable. This setting can be changed post-install from the registry.
Duo for OWA sends a user's Windows
sAMAccountNameto Duo's service by default. To send theuserPrincipalNameto Duo instead, check the Send username to Duo in UPN format box. For this to work, OWA and ECP must be using Forms-Based Authentication (FBA). Learn how to enable FBA for Exchange at Microsoft TechNet.If you enable the UPN username format option, you must also change the properties of your OWA application in the Duo Admin Panel to change the "Username normalization" setting to None. Otherwise, Duo drops the domain suffix from the username sent from OWA to our service, which may cause user mismatches or duplicate enrollment.
-
If you only have one Exchange Server running the Client Access Server role, select the option to automatically generate a new key. However, if you have multiple Client Access Server servers then you should manually generate a random string at least 40 characters long, and use the same string as the session key during installation on each of the servers.
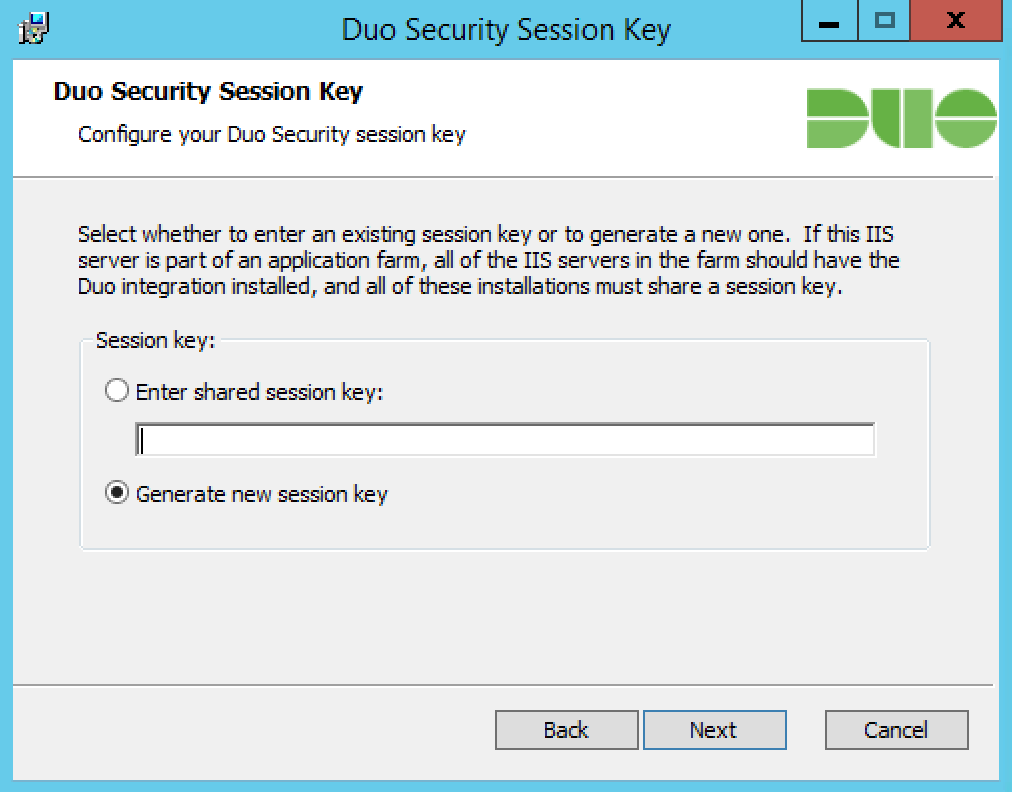
For example, you could use the following PowerShell commands to generate a suitable session key:
$bytes = new-object "System.Byte[]" 30 (new-object System.Security.Cryptography.RNGCryptoServiceProvider).GetBytes($bytes) [Convert]::ToBase64String($bytes) -
Complete the Duo installation. The installer stops and then restarts IIS services automatically.
Test Your Setup
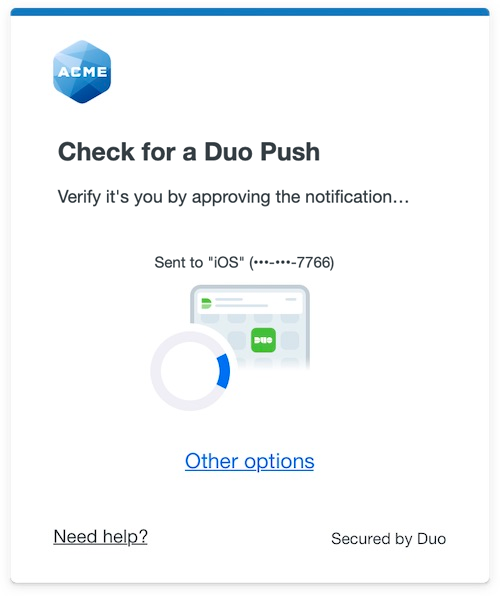
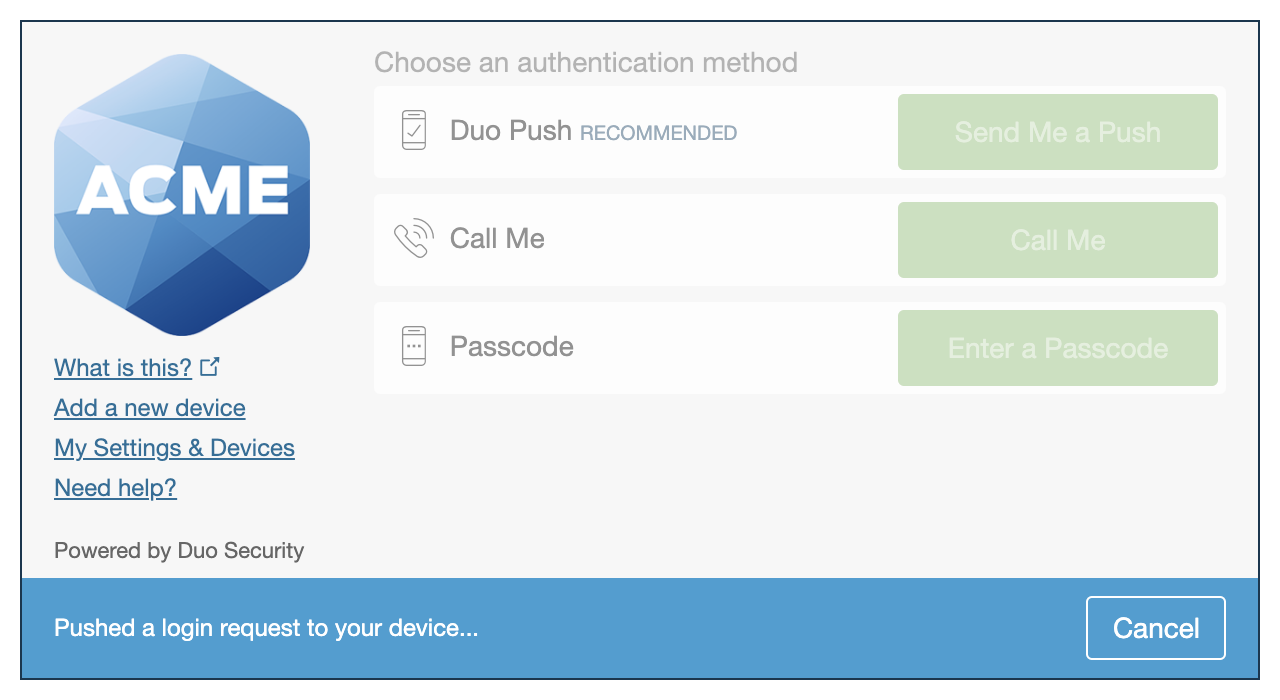
To test your setup, log into OWA. Successful verification of your username and password redirects you to Duo. Complete Duo two-factor authentication when prompted and then you'll return to OWA to complete the login process.
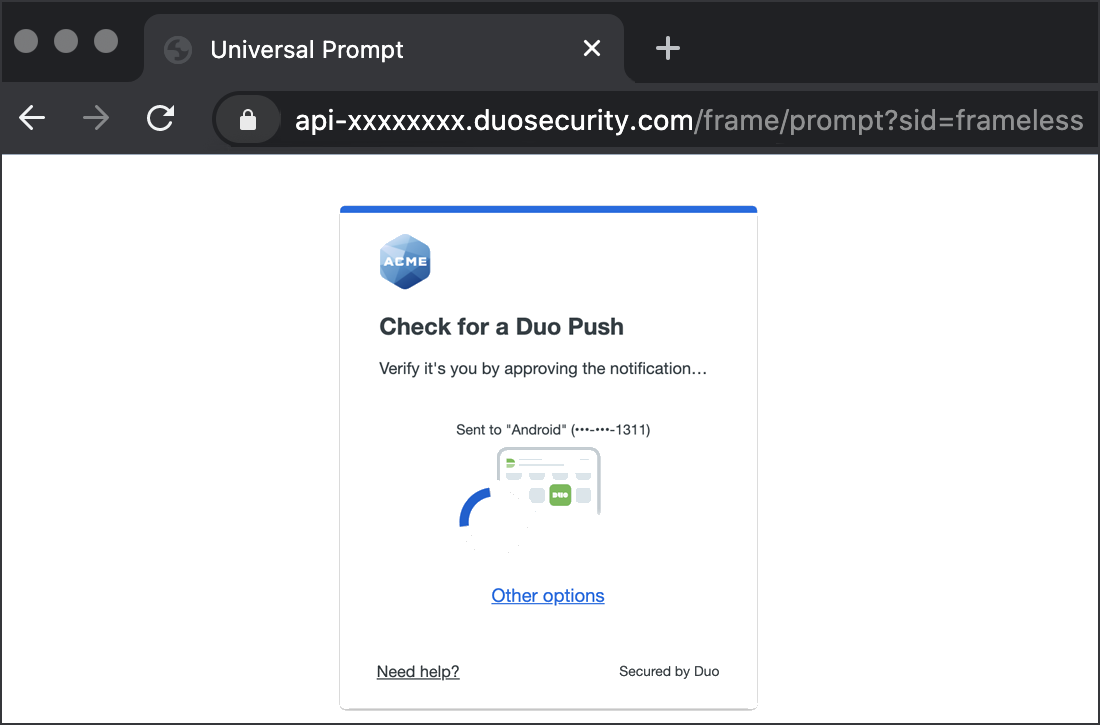
*Universal Prompt experience shown.
If you plan to permit use of WebAuthn authentication methods (security keys, U2F tokens, or Touch ID) in the traditional Duo Prompt, Duo recommends configuring allowed hostnames for this application and any others that show the inline Duo Prompt before onboarding your end-users.
The Duo Universal Prompt has built-in protection from unauthorized domains so this setting does not apply.
Troubleshooting
Need some help? Take a look at the OWA Frequently Asked Questions (FAQ) page or try searching our OWA Knowledge Base articles or Community discussions. For further assistance, contact Support.
Advanced Configuration
If your organization offloads SSL requests to OWA via a load balancer, please see the FAQ for additional Duo configuration instructions.
Update Duo for OWA
You can upgrade your Duo installation over the existing version; there's no need to uninstall first. Note that the installer restarts IIS services.
-
Download the most recent Duo OWA Installer Package for Exchange 2013+ and run the MSI from an elevated command prompt. View checksums for Duo downloads here.
If you're upgrading from a v1.x plugin to a v2.x plugin then verify you have also installed the .NET Framework 4.7.1 or later runtime on your Exchange server.
-
Follow the on-screen prompts to complete the upgrade installation.
The installer now defaults the Bypass Duo authentication when offline option to off when upgrading from v1.x to v2.0.0. If you want to allow users access to OWA without 2FA when Duo's service can't be reached then select this option during your upgrade install. Upgrades from v2.0.0 to future releases will preserve your choice.
-
Repeat the upgrade on all your Exchange client access servers.
If you are updating an existing Duo OWA deployment to use the Universal Prompt, you will need to authenticate once with the traditional Duo Prompt using the updated Duo for OWA v2.x plugin first before you can enable the Universal Prompt for this OWA application in Duo.
Network Diagram

- OWA connection initiated
- Primary authentication
- Exchange Client Access connection established to Duo Security over TCP port 443
- Secondary authentication via Duo Security’s service
- Exchange Client Access receives authentication response
- OWA session logged in