The Hitchhiker’s Guide to Shibboleth

Shibboleth (IDP Version 5): Are you Sure?
So, you’ve decided you want to configure a Shibboleth IDP for the first time. Brave soul. Read on to learn a bit about how it works, and how to get it to work.
Overview
Shibboleth is a Java-based web application that emerged from the Internet2 initiative and is now maintained by the Shibboleth Consortium. It is comprised of an Identity Provider (IDP) and a Service Provider (SP).
It is free software that comes with all the benefits AND drawbacks thereof.
Due to its origins and its price, it is extremely popular with higher education institutions, and some of its default configurations cater to their needs.
The base product is capable of SAML 1 and SAML 2 authentication only. However, the architecture is extensible with a variety of plugins that enhance its capabilities widely. (For example: OIDC support). There is a script-based command-line interface for managing these plugins.
The principal drawback to Shibboleth is that its developers make it very clear in their documentation that it has never once occurred to them that a potential user might not be an expert Java developer with 20 years of experience working with SAML and Java web applications alongside a strong desire for complete control over SSO parameters that haven’t been seen in the mainstream in decades.
If that happens to be you, boy, are you in for a good time! If not, you’ll need to find such an expert if you hope to customize the web views that will be presented to end users.
The Basics
Shibboleth is packaged as two separate installers, one for the IDP software, and one for the Jetty web server container that will host it. Oddly, the Jetty software must be installed AFTER the IDP that it will host, as it is installed into the IDP’s folder structure.
Shibboleth has NO ADMIN UI. None. Don’t go looking for it; you won’t find it. Why would an expert Java developer, like yourself, need one anyway?
Instead, it is configured in large part by individual configuration files, many of which reference each other for configuration data and variables. Editing config files by hand is fun, right?
An overview of these configuration files can be found at: https://shibboleth.atlassian.net/wiki/spaces/IDP5/pages/3199506590/ConfigurationFileSummary
When changes are made to these files, it is often possible to have the IDP rescan them using one of the scripted CLI tools, but other changes require restarting the shibd-idp service from the Windows services panel or using Linux’s systemd. Since restarting the IDP service is a catch all for reloading all of the files, I recommend taking this approach by default, as it is fast and less prone to causing errors because a file was missed.
Note: Some early primary config files will prevent the service from starting if they are misconfigured. This becomes a low risk once you move on to configuring relying parties and attributes.
Configuration
Initial setup will involve four tasks:
Configuring the web server and securing it.
Configuring the connection to the identity store (Active Directory in this case).
Configuring attribute extraction and encoding from the identity store.
Configuring the SAML relying party and metadata.
Installation:
Installation instructions for IDP version 5 (current as of this writing) can be found at: https://shibboleth.atlassian.net/wiki/spaces/IDP5/pages/3199500577/Installation
These initial instructions are reasonably clear and can be followed without issue. Once completed, the next step will be to configure the web server for authentication to the identity store.
Note: We will henceforth refer to the installation directory as “%{idp.home}” when discussing file paths. This is how Shibboleth refers to it when referencing paths in its configuration files.
By default, this will be in C:\opt\shibboleth-idp\conf on Windows or /opt/shibboleth-idp/conf on Linux, but can be customized if desired.
Log levels can be configured in %{idp.home}\conf\logback.xml. It is strongly recommended to raise the level from “-INFO” to “-DEBUG” for any of the logging level shortcuts relevant to the area of the system you are configuring. Some examples include:
idp.loglevel.idp
idp.loglevel.ldap
idp.loglevel.opensaml
Configuring the Web Server
The first step is also the most poorly documented, as it has changed over the course of Shibboleth’s history, and many search results will return old procedures. Go to %{idp.home}\jetty-base\start.d\idp.ini. Here, you’ll find the keystore settings for the webserver. It will be configured for a PKCS12 (.p12/.pfx) file by default. It’s recommended that you leave it that way.
Populate the following properties with the location and passphrase of your web server SSL certificate:
Save this file and restart the shibd-idp service. Ensure you have placed your .p12 file in the location you specified.
Configuring Authentication Methods
Initial instructions for configuring authentication can be found here: https://shibboleth.atlassian.net/wiki/spaces/IDP5/pages/3199501666/Configuration
Many of the core properties of the IDP are in the somewhat aptly named idp.properties file located in %{idp.home}.
This file will contain the IDP’s EntityID and the locations of the IDP’s signing and encryption certificates for SAML assertions. These should have been autogenerated by the installer. A cryptic property in this file: idp.searchForProperties=true causes the IDP to search for other files named *.properties within the installation folder and import their properties.
Our first stop will be %{idp.home}\authn\passwd-authn-config.xml . This file contains the line that will enable the LDAP password validator that we will use to configure Active Directory.
Look for a block like the one below, and ensure that shibboleth.LDAPValidator is uncommented:
<util:list id="shibboleth.authn.Password.Validators">

                   	<ref bean="shibboleth.LDAPValidator" />

         	      <!-- <ref bean="shibboleth.KerberosValidator" /> -->

            	      <!-- <ref bean="shibboleth.JAASValidator" /> -->

            	      <!-- <bean parent="shibboleth.HTPasswdValidator"           p:resource="%{idp.home}/credentials/demo.htpasswd" /> -->

                 </util:list>
This enables theldap.properties file in the main configuration folder, and this is where we’ll configure Active Directory. Note: The underlying password module should be automatically enabled, but if not, there are instructions for enabling it at the link in the beginning of this section.
There are other configuration files in %{idp.home}\authn that govern which identity store will be used, but they are pre-configured to expect an LDAP directory. As such, they can be left untouched for the purposes of this guide. However, be aware that they do exist, and will need to be modified if you intend to use an non-LDAP auth source.
The LDAP Connector
The ldap.properties file allows you to configure the LDAPConnector. Some documentation for it can be found here:
https://shibboleth.atlassian.net/wiki/spaces/IDP5/pages/3199503855/LDAPConnector
Some of the key values will have been set by the installer if you chose to select Active Directory during the setup process. However, familiarity with Active Directory and LDAP attributes will be a MUST, as the document does not explain the formatting very well.
If your directory uses LDAPS/TLS, you will need to place a copy of the AD certificate in %{idp.home}\credentials and specify the filename in the property idp.authn.LDAP.trustCertificates
If you are not going to be using LDAPS/TLS, then the following properties must be modified:
idp.authn.LDAP.useStartTLS=false
idp.authn.LDAP.sslConfig=disabled
idp.authn.LDAP.ldapURL=ldap://…:389   (not ldaps://…:636)
Confirm that the installer has correctly listed an AD service account that you have created and specified for Shibboleth under:
idp.authn.LDAP.bindDN= youruser@yourdomain.comAnother tricky but important property is:
idp.authn.LDAP.dnFormat. By default, it will be set as:
idp.authn.LDAP.dnFormat=%s@yourdomain.comThis might initially seem logical since one generally logs into AD with sAMAccountName. However, most users of SAML applications are accustomed to logging in with their full email address. In this configuration, if they do this, the authentication will fail. As such, I recommend changing it to:
idp.authn.LDAP.dnFormat=%sThe remaining properties can be left as-is.
To test AD authentication, we will use the built-in “Hello World” module. Documentation for it can be found here: https://shibboleth.atlassian.net/wiki/spaces/IDP5/pages/3199510241/HelloWorldConfiguration
This module can be accessed via a web browser at:
http://<yourdomain>/idp/profile/admin/helloTest a login here with your full email address and AD password.
Note: If successful, you will proceed to the next screen where you will be told that you don’t have access to any resources (this is OK). If AD auth has failed, or if the credentials were wrong, you will see an incorrect username/password message.
Customizing the Login View
You will have likely noticed that the Hello World module had a placeholder for a logo. Significant modifications to these views require a knowledge of Spring Webflow language and/or Java.
Changing this is not documented very clearly, because it appears to be assumed that it’s all very clear to an expert Java developer. For the rest of us, though, it is much harder than you might think:
The web views are served from a pre-compiled .war file that is stored in the %{idp.home}\war directory. This file cannot be edited manually and must be rebuilt by a scripted CLI tool.
The logo path is configured in %{idp.home}\messages\messages.properties. Within this file is a property called idp.logo. You will notice that it uses a relative path:
/images/placeholder-logo.png.
“Where is this location on disk?” you might ask. Well, it’s in two places, depending on which view you are modifying. Best, therefore, to modify both.
The first location is %{idp.home}\edit-webapp\images, the second is %{idp.home}\dist\webapp\images. It is not directly served from either of these locations, but they are used to build the idp.war file that is actually served.
Replace and RENAME the logo in both places. If you attempt to replace the placeholder with a different image but the same name, it will not work. There is hard-coded logic somewhere that pulls the placeholder from a jar file somewhere if it doesn’t detect a file of a different name.
Now, we must rebuild the idp.war file that actually serves the pages. Open a command prompt and navigate to %{idp.home}\bin. Run build.bat. Text should appear on the screen to indicate that the .war is being rebuilt from the two folders discussed above. Once that is done, restart the shibd-idp service for good measure, and you’re good to go.
Easy, right? Who needs an admin UI?
Configuring a SAML Service Provider/Relying Party
I wish I could say that this will be as easy as SAML configuration usually is on modern SSO platforms—an exchange of certificates and metadata, maybe a mapping of attributes from a dropdown box of available ones, and done.
I wish I could, but I can’t.
While the principles are the same, there are a LOT more steps and config files. The key ones are as follows, all located in %{idp.home}\conf folder unless otherwise noted:
attribute-resolver.xml: This file determines where to pull user attributes from (Active Directory for this document) and then determines how to encode them into SAML in a way that the Service Provider/Relying Party (SP/RP) will accept. In the unlikely event that the SP/RP likes the default format that Shibboleth uses, and likes the exact attributes Shibboleth likes to send, this process can be abbreviated, but never completely eliminated.
default-rules.xml: This file, located in %{idp.home}\attributes, contains a call to another file inetOrgPerson.xml that contains default encoding for most common AD attributes, and may need to have that call commented out if your IDP does not like having the attributes sent in duplicate.
attribute-filter.xml: This file is a policy file, and allows for the configuration of which attributes retrieved above can be released to which SP. This can be done by domain name/IP Address/EntityID, etc. We are going to do it by EntityID, as this is the recommended approach. In the absence of this file, the IDP will refuse to send ANY attributes in the SAML response.
metadata-providers.xml : This file defines where to find the metadata xml for each relying party. You will declare the location where you have placed your SP/RP metadata file locally, or the web address for the SP/RP’s online metadata endpoint (there is a %{idp.home}\metadata folder provided for storing local files, but using it isn’t mandatory). You can even configure an online endpoint along with a local file backup. It is not actually clear, apart from any certificates and the EntityID, what parts of the metadata are used by Shibboleth. Requested attributes and NameID format MUST be separately present in the other listed files and are not auto-populated from the metadata.
relying-party.xml : This file contains the property definitions for the SP/RP including things like encrypting assertions, signing assertions, signing responses, and the NameID format.
saml-nameid.xml: This file determines which retrieved attribute from attribute-resolver.xml should be used for NameID in the SAML response. Since multiple SP/RPs could be configured, it also allows this to be tied to the SP/RP EntityID.
With all six of these additional files configured, you should then be ready for SP-initiated SSO using your Shibboleth IDP. Let’s begin:
Attribute Resolution – attribute-resolver.xml -
https://shibboleth.atlassian.net/wiki/spaces/IDP5/pages/3199502864/AttributeResolverConfiguration
This file serves two purposes:
To connect to one or more identity attribute data sources
To define which attributes should be retrieved, from which data connector, and how those attributes should be formatted for presentation to the SP/RP application
The first part of the configuration is performed using a <DataConnector> xml element. A data connector can point at a live source, like an Active Directory domain, a static source, like a database, or even a computed source, like a script that does post-processing on an attribute from yet another data connector.
For the purposes of this guide, we will configure an LDAP Data Connector. As such, many of the connection properties can be referenced from the ldap.properties file.
Note: The password for idp.attribute.resolver.LDAP.bindDNCredential must be provided in %{idp.home}\credentials\secrets.properties or the connection will fail. Also note that it has the “id” of “myLDAP.” This will be referenced frequently below.
The next section of the file is one or more <AttributeDefinition> elements:
<DataConnector id="myLDAP" xsi:type="LDAPDirectory"

        ldapURL="%{idp.attribute.resolver.LDAP.ldapURL}"

        baseDN="%{idp.attribute.resolver.LDAP.baseDN}"

        principal="%{idp.attribute.resolver.LDAP.bindDN}"

        principalCredential="%{idp.attribute.resolver.LDAP.bindDNCredential}">

        <FilterTemplate>

            <![CDATA[

                %{idp.attribute.resolver.LDAP.searchFilter}

            ]]>

        </FilterTemplate>

        <ConnectionPool

            minPoolSize="%{idp.pool.LDAP.minSize:3}"

            maxPoolSize="%{idp.pool.LDAP.maxSize:10}"

            blockWaitTime="%{idp.pool.LDAP.blockWaitTime:PT3S}"

            validatePeriodically="%{idp.pool.LDAP.validatePeriodically:true}"

            validateTimerPeriod="%{idp.pool.LDAP.validatePeriod:PT5M}"

            validateDN="%{idp.pool.LDAP.validateDN:}"

            validateOnCheckout="%{idp.pool.LDAP.validateOnCheckout:false}"

            validateFilter="%{idp.pool.LDAP.validateFilter:(objectClass=*)}"

            prunePeriod="%{idp.pool.LDAP.prunePeriod:PT5M}"

            expirationTime="%{idp.pool.LDAP.idleTime:PT10M}"/>

    </DataConnector>
https://shibboleth.atlassian.net/wiki/spaces/IDP5/pages/3199502907/AttributeDefinitionConfiguration These elements define an ID for each attribute that can be referenced in other files, as well as the xsi:type of the attribute, which can enable some automatic encoding options. See the link above for details.
Within the <AttributeDefinition> element, we can use an <AttributeEncoder> element to define the format of the attribute along with defining things to be added to the resultant SAML message, like a “friendlyName.” The AttributeEncoder has its own documentation here:
https://shibboleth.atlassian.net/wiki/spaces/IDP5/pages/3199504855/SAML2StringEncoder
The main encoder we will be using is “SAML2String.” Below is a sample attribute definition for the AD attribute “displayName.”
<AttributeDefinition id="displayName" xsi:type="Simple">

    <InputDataConnector ref="myLDAP" attributeNames="displayName"/>

    <AttributeEncoder xsi:type="SAML2String"

        name="DisplayName"

        nameFormat="urn:oasis:names:tc:SAML:2.0:attrname-format:basic"

        friendlyName="DisplayName"

        encodeType="false"/>

</AttributeDefinition>
In this case, we chose an “id” that matches the raw AD attribute. The “xsi:type” is Simple. This is used for string values on which we do not want any of Shibboleth’s automatic encoding.
Next is the <InputDataConnector> element that references the name “myLDAP” we gave the <DataConnector> element and the AD attribute name to retrieve.
Finally, the <AttributeEncoder> element tells Shibboleth to send a SAML2String attribute element to the SP/RP, with the defined “name”, ”nameFormat”, “friendlyName”, and optional “encodeType.” Each of these will be added to the SAML assertion sent to the SP/RP.
In theory, these can be derived from the SP/RP’s metadata. However, not all SP/RPs provide a <RequestedAttribute> group, so this may require some trial and error. In Duo’s case, it requires specific naming for the attributes sent to Duo SSO, and this is where that gets configured. The encoding for the name format is:
urn:oasis:names:tc:SAML:2.0:attrname-format:basicNormally, this is the main mechanism for defining and encoding SAML attributes to SP/RPs. Repeat this step for EACH attribute that needs to be sent to the RP/SP.
AttributeRegistry/SAML2 Transcoding
However, it is important to be aware that there is a second mechanism present in modern versions of Shibboleth: the Attribute Registry. This is a newer system that is meant to automatically format and localize SAML2 attribute strings based on standard naming conventions, or drawn from metadata. It also has the capacity to perform automatic localization of naming strings and is pre-configured for many standard AD attributes:
In theory, this is meant to simplify attribute definitions, to allow dynamic (at runtime) RP/SP-specific definitions, and simplify multiple language environments. However, this new system is based on the assumption that the RP/SP metadata is provided in a very specific, standard format. Duo does not provide its metadata in the format the registry would require. As such, manual modifications at least as significant as the attribute definitions would have been required. Since localization was not an issue for this implementation, these modifications would have required an unnecessary effort that would only have made it harder to track where configurations came from.
Note: The Attribute Registry is active whether you configure it or not. If you retrieve various standard attributes from AD, it is likely that they will match values in the registry, and you may discover that the same values are being included in SAML assertions in duplicate. This is because they matched both the AttributeRegistry and the AttributeResolver.
Note 2: The Attributes you are retrieving STILL need to be defined in the attribute-resolver.xml, one can simply skip any encoding setup in that file if using the registry. But it does not exempt an admin from configuring attribute-resolver.xml
A number of default attribute registries are provided, many of which contain attributes well suited to educational users. One key registry is more general: %{idp.home}\conf\attributes\inetOrgPerson.xml
This particular registry contains many common AD attributes such as: displayName, givenName, sn, userPrincipalName, etc
Since we are providing custom attribute definitions for Duo in attribute-resolver.xml , and we don’t wish to perform localizations, we want to prevent this registry from being processed.
In %{idp.home}\conf\attributes\default-values.xml, comment out the line
<!-- <import resource=”inetOrgPerson.xml” /> -->. This will prevent the transcoder from being used and make the attribute definitions authoritative.
Attribute Filter
At this point in the configuration, we have configured authentication, attribute collection, and encoding. The last thing we need to do with regards to attributes is apply a policy that authorizes them to be released, either globally, or to specific entityIDs.
It is more secure to do this on a per-entityID basis, so that’s what we’ll do:
<AttributeFilterPolicy id="releaseToDuo">

        <PolicyRequirementRule xsi:type="Requester" value="<YOUR Duo EntityID provided during SAML config in the Duo Admin Panel>" />


        <AttributeRule attributeID="givenName">

            <PermitValueRule xsi:type="ANY" />

        </AttributeRule>


        <AttributeRule attributeID="sn">

            <PermitValueRule xsi:type="ANY" />

        </AttributeRule>


        <AttributeRule attributeID="username">

            <PermitValueRule xsi:type="ANY" />

        </AttributeRule>


        <AttributeRule attributeID="displayName">

            <PermitValueRule xsi:type="ANY" />

        </AttributeRule>


        <AttributeRule attributeID="email">

            <PermitValueRule xsi:type="ANY" />

        </AttributeRule>

    </AttributeFilterPolicy>
The above policy defines a release to Duo based upon the entityID provided in the Duo Admin Panel for the integration. It then defines each attribute we intend to transmit using the id value used in attribute-resolver.xml There is a required line to define formats of the release that are allowed, but in our case, we don’t care, so we permit “ANY.” Our policy is now complete.
Relying Party (RP)/Service Provider (SP) Metadata
As part of the SAML standard, all identity providers (IDPs) and relying parties/service providers (RP/SPs) exchange metadata about connectivity, unique identifiers, and attributes via an XML document.
To accomplish this in Shibboleth, there are two steps:
Placing the Duo metadata in the appropriate folder {%idp.home}\metadata
Referencing that metadata file in %{idp.home}\conf\relying-party.xml
The relying-party.xml file contains default settings for SAML relying parties, and a section where settings can be overridden (or in this case provided when they’re not present in the metadata). The overrides section should look as follows:
<util:list id="shibboleth.RelyingPartyOverrides">


        <!--

        Override example that identifies a single RP by name and configures it

        for SAML 2 SSO without encryption. This is a common "vendor" scenario.

        -->

        <!--

        <bean id="ExampleSP" parent="RelyingPartyByName" c:relyingPartyIds="https://sp.example.org">

            <property name="profileConfigurations">

                <list>

                    <bean parent="SAML2.SSO" p:encryptAssertions="false" />

                </list>

            </property>

        </bean>

        -->

        <bean parent="RelyingPartyByName" c:relyingPartyIds="< YOUR Duo EntityID provided during SAML config in the Duo Admin Panel>">

    	    <property name="profileConfigurations">

                <list>

                    <bean parent="Shibboleth.SSO" p:postAuthenticationFlows="attribute-release" />

                        <bean parent="SAML2.SSO"

                            p:encryptAssertions="false"

                            p:encryptNameIDs="false"

                            p:signResponses="false"

                            p:signAssertions="true"

                            p:nameIDFormatPrecedence="urn:oasis:names:tc:SAML:1.1:nameid-format:unspecified" />

                </list>

            </property>

        </bean>

    </util:list>
The highlighted section specifies a c:relyingPartyIds that matches the entityID in the Duo metadata. We can then configure common SAML settings like whether assertions must be signed or encrypted and, importantly, the format for the SAML NameID.
SAML NameID Designation
Our final configuration step is another that may seem redundant based on our designation of the SAML NameID format in the previous step, but it is a necessary one.
We must again list the NameID format that we want and also designate which attribute from attribute-filter.xml should be used for that purpose. This, too, is linked to the entityID of the relying party/service provider:
<bean parent="shibboleth.SAML2AttributeSourcedGenerator"

            p:omitQualifiers="true"

            p:format="urn:oasis:names:tc:SAML:1.1:nameid-format:unspecified"

            p:attributeSourceIds="#{ {'email'} }">

            <property name="activationCondition">

                <bean parent="shibboleth.Conditions.RelyingPartyId" c:candidates="< YOUR Duo EntityID provided during SAML config in the Duo Admin Panel>" />

            </property>

        </bean>
Summary
At this point, you should be ready to perform an SP-initiated single sign-on using Shibboleth, and you will have, hopefully, gained a massive new appreciation for how easy the Duo SSO IDP is to configure by comparison. Note that your login page will be the default Shibboleth login page. Customization will require a Java web developer and familiarity with the Spring messaging framework that Shibboleth uses. This is outside the scope of this document.
Happy SSO!
Appendix – Troubleshooting
The following link from AWS provides instructions for capturing SAML assertions during test authentications:
https://docs.aws.amazon.com/IAM/latest/UserGuide/troubleshoot_saml_view-saml-response.html
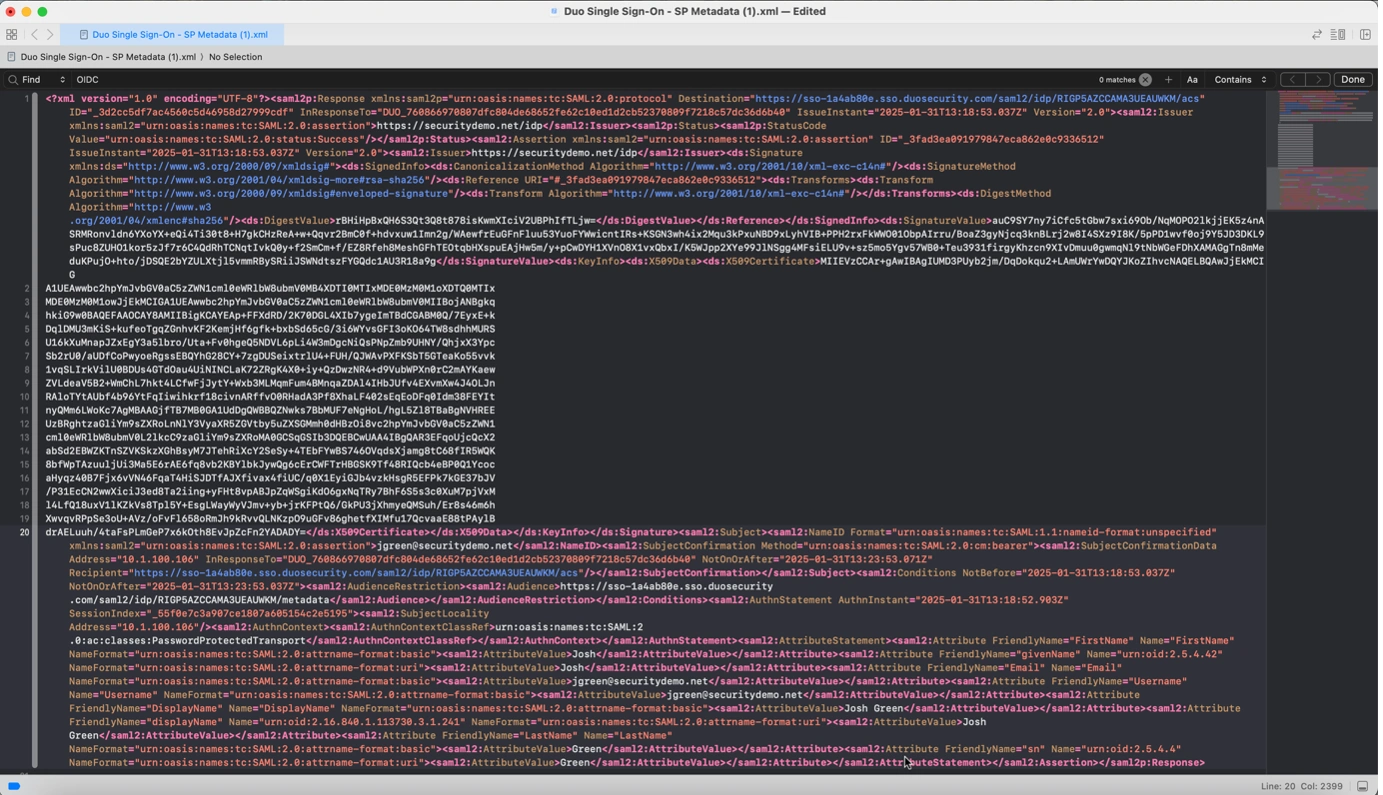
Below are some sample screenshots of capturing a SAML response in flight, decoding it (it is base64 encoded), and reading it to see what attributes were sent:
Figure 1: Capturing a SAML assertion using developer tools in Chrome. (Network tab, preserve log). In Duo’s case, the response will be found in an element called acs in a sub-tab called payload.
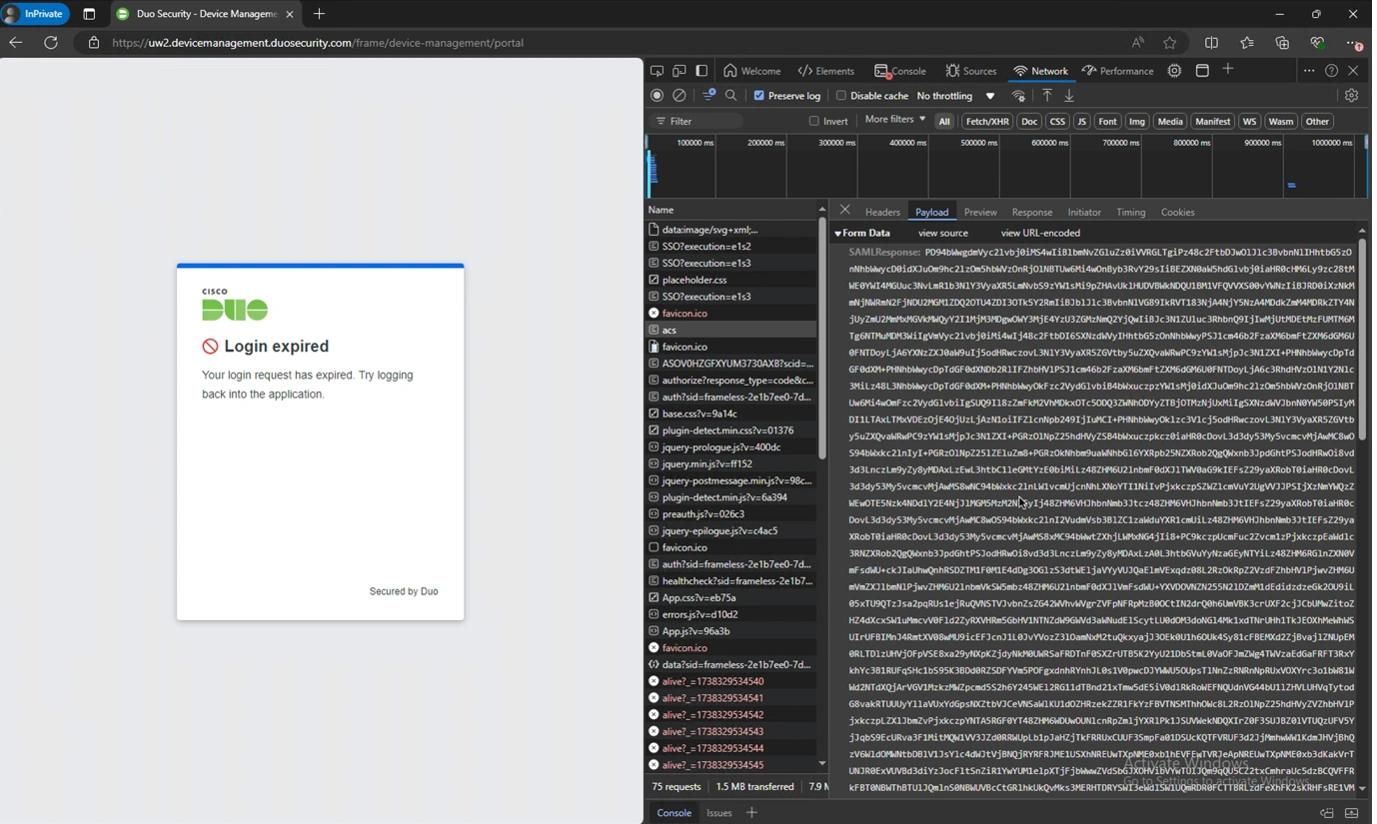
Figure 2: A screenshot of base64decode.org with the resulting XML of the SAML assertion.
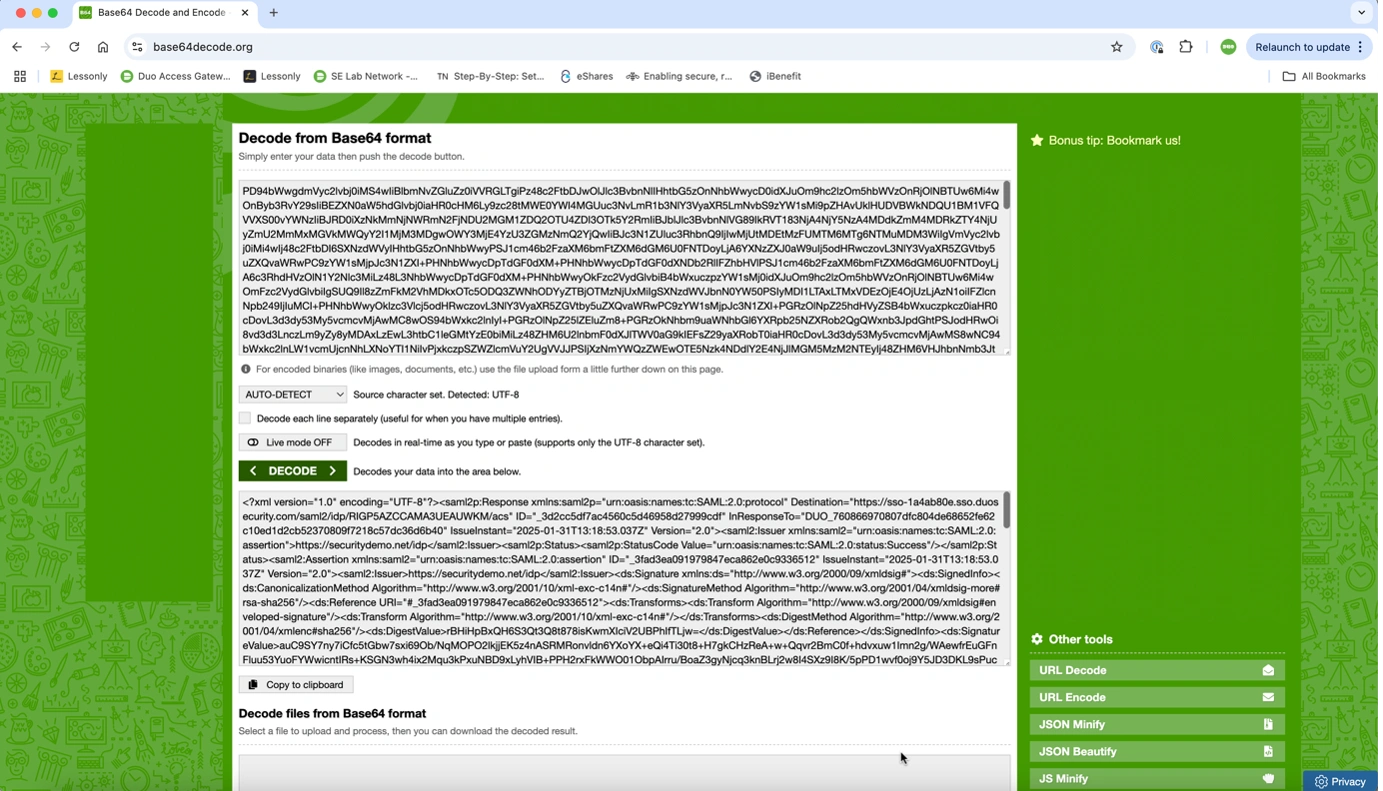
Figure 3: The SAML from base64decode copied into a proper XML editor (Xcode in this case) with syntax highlighting making it easier to read. The sent, encoded attributes are in the bottom section below the X509 certificate.