Duo Two-Factor Authentication for LDAP Applications
Last updated:
Action Required: April 15, 2026 Duo CA Bundle Expiration
Duo products that use certificate pinning, such as the Duo Authentication Proxy, require a software update for uninterrupted use. Legacy clients could stop working at any time after April 15, 2026.
Check your Duo Authentication Proxy installations used for LDAP authentication and upgrade them if they are not running version 6.5.1 or later.
Please visit Duo Knowledge Base article 9451 for more information and guidance.
Overview
To integrate Duo with your application using LDAP authentication, you will need to install a local proxy service on a machine within your network. This Duo proxy will accept incoming ldap connections from the downstream application, perform primary authentication against an upstream LDAP directory server, and then add Duo secondary authentication.
If you are already running a Duo Authentication Proxy server in your environment, you can generally use that existing host for additional applications, appending the new configuration sections to the current config.
Once configured, Duo sends your users an automatic authentication request via Duo Push notification to a mobile device or phone call after successful primary login.
This configuration doesn't support inline self-service enrollment. You'll need to create your users in Duo ahead of time using one of our other enrollment methods, like directory sync or CSV import. Read the enrollment documentation to learn more.
Supported Devices
Duo can be integrated with most devices and systems that support LDAP for authentication.
LDAP authentication does not pass client IP information to Duo. Therefore policy settings based on available IP address information, like authorized networks or user location have no effect on LDAP logins to Duo-protected applications.
This application communicates with Duo's service on SSL TCP port 443.
Firewall configurations that restrict outbound access to Duo's service with rules using destination IP addresses or IP address ranges aren't recommended, since these may change over time to maintain our service's high availability. If your organization requires IP-based rules, please review Duo Knowledge Base article 1337.
Effective June 30, 2023, Duo no longer supports TLS 1.0 or 1.1 connections or insecure TLS/SSL cipher suites. See Duo Knowledge Base article 7546 for additional guidance.
First Steps
Before moving on to the deployment steps, it's a good idea to familiarize yourself with Duo administration concepts and features like options for applications, available methods for enrolling Duo users, and Duo policy settings and how to apply them. See all Duo Administrator documentation.
You should already have a working primary LDAP authentication configuration for your LDAP device users before you begin to deploy Duo.
To integrate Duo with your LDAP device, you will need to install a local Duo proxy service on a machine within your network. This Duo proxy server will receive incoming LDAP requests from your LDAP device, contact your existing local LDAP/AD server to perform primary authentication, and then contact Duo's cloud service for secondary authentication.
If you are already running a Duo Authentication Proxy server in your environment, you can use that existing host for additional applications, appending the new configuration sections to the current config. You don't have to set up a new Authentication Proxy server for each application you create. However, there are some cases where it might make sense for you to deploy a new proxy server for a new application, like if you want to co-locate the Duo proxy with the application it will protect in the same data center.
If you will set up a new Duo server, locate (or set up) a system to host the Duo Authentication Proxy installation. The proxy supports these operating systems:
- Windows Server 2016 or later
- CentOS 7 or later
- Red Hat Enterprise Linux 7 or later
- Ubuntu 16.04 or later
- Debian 7 or later.
We do not recommend installing the Duo Authentication Proxy on the same Windows server that acts as your Active Directory domain controller or one with the Network Policy Server (NPS) role. If you must co-locate the Duo Authentication Proxy with these services, be prepared to resolve potential LDAP or RADIUS port conflicts between the Duo service and your pre-existing services.
Then you'll need to:
- Sign up for a Duo account.
- Log in to the Duo Admin Panel and navigate to Applications → Application Catalog.
- Locate the entry for LDAP Proxy with the "2FA" label in the catalog. Click the Add button to create the application and get your integration key, secret key, and API hostname. You'll need this information to complete your setup. See Protecting Applications for more information about protecting applications with Duo and additional application options.
The security of your Duo application is tied to the security of your secret key (skey). Secure it as you would any sensitive credential. Don't share it with unauthorized individuals or email it to anyone under any circumstances!
Install the Duo Authentication Proxy
If you will reuse an existing Duo Authentication Proxy server for this new application, you can skip the install steps and go to Configure the Proxy.
The Duo Authentication Proxy can be installed on a physical or virtual host. We recommend a system with at least 1 CPU, 200 MB disk space, and 4 GB RAM (although 1 GB RAM is usually sufficient). See additional Authentication Proxy performance recommendations in the Duo Authentication Proxy Reference.
We do not recommend installing the Duo Authentication Proxy on the same Windows server that acts as your Active Directory domain controller or one with the Network Policy Server (NPS) role. If you must co-locate the Duo Authentication Proxy with these services, be prepared to resolve potential LDAP or RADIUS port conflicts between the Duo service and your pre-existing services.
- Download the most recent Authentication Proxy for Windows from https://dl.duosecurity.com/duoauthproxy-latest.exe. Note that the actual filename will reflect the version e.g. duoauthproxy-6.8.0.exe. View checksums for Duo downloads here.
- Launch the Authentication Proxy installer on the target Windows server as a user with administrator rights and follow the on-screen prompts.
When installing, you can choose whether or not you want to install the Proxy Manager. The Proxy Manager is a Windows utility that helps you edit the Duo Authentication Proxy configuration, determine the proxy's status, and start or stop the proxy service. Learn more about using the Proxy Manager. Installing the Proxy Manager adds about 100 MB to the installed size.
If you do not want to install the Proxy Manager, you may deselect it on the "Choose Components" installer screen before clicking Install.
To perform a silent install on Windows, issue the following from an elevated command prompt after downloading the installer (replacing version with the actual version you downloaded):
duoauthproxy-version.exe /SAppend /exclude-auth-proxy-manager to install silently without the Proxy Manager:
duoauthproxy-version.exe /S /exclude-auth-proxy-managerEnsure you have compiler toolchain packages installed. On most recent RPM-based distributions — like Fedora, Red Hat Enterprise, and CentOS — you can install these by running (as root):
$ yum install gcc make libffi-devel zlib-devel diffutilsOn Debian-derived systems, install these dependencies by running (as root):
$ apt-get install build-essential libffi-dev zlib1g-devIf SELinux is present on your system and you want the Authentication Proxy installer to build and install its SELinux module, include
selinux-policy-develandchkconfigin the dependencies:$ yum install gcc make libffi-devel zlib-devel diffutils selinux-policy-devel chkconfig$ apt-get install build-essential libffi-dev zlib1g-dev selinux-policy-devel chkconfig-
Download the most recent Authentication Proxy for Unix from https://dl.duosecurity.com/duoauthproxy-latest-src.tgz. From the command line you can use
curlorwgetto download the file, like$ wget --content-disposition https://dl.duosecurity.com/duoauthproxy-latest-src.tgz. Depending on your download method, the actual filename may reflect the version e.g. duoauthproxy-6.8.0-src.tgz. View checksums for Duo downloads here. Extract the Authentication Proxy files and build it as follows:
$ tar xzf duoauthproxy-6.8.0-src.tgz $ cd duoauthproxy-version-src $ make-
Install the authentication proxy (as root):
$ cd duoauthproxy-build
$ ./install
Follow the prompts to complete the installation. The installer creates a user to run the proxy service and a group to own the log directory and files. You can accept the default user and group names or enter your own.
If SELinux is present on the target server, the Duo installer will ask you if you want to install the Authentication Proxy SELinux module. Your selection affects whether systemd can start the Authentication Proxy after installation.
SELinux Mode Default Response Result Enforcing Yes Choose 'yes' to install the Authentication Proxy's SELinux module. This permits start of the Authentication Proxy service by systemd. If you choose 'no' then the SELinux module is not installed, and systemd cannot start the Authentication Proxy service. Permissive No Choose 'no' to decline install of the Authentication Proxy's SELinux module. The Authentication Proxy service can be started by systemd. However, if you change SELinux from permissive to enforcing mode after installing the Duo proxy, systemd can no longer start the Authentication Proxy service. If you plan to enable SELinux enforcing mode later, you should choose 'yes' to install the Authentication Proxy SELinux module now. If you choose to install the Authentication Proxy SELinux module and the dependencies
selinux-policy-develandchkconfigare not present, then the installer fails to build the module.The proxy listens for LDAP connections on ports 389 and 636 by default. Privileged ports below 1024 are reserved for the root user. Therefore, the proxy will not start if you choose any user account other than "root" to run under during installation.
To install the Duo proxy silently with the default options, use the following command:
sudo ./duoauthproxy-build/install --install-dir /opt/duoauthproxy --service-user duo_authproxy_svc --log-group duo_authproxy_grp --create-init-script yesAppend --enable-selinux=yes|no to the install command to choose whether to install the Authentication Proxy SELinux module.
Configure the Proxy
After the installation completes, you will need to configure the proxy.
The Duo Authentication Proxy configuration file is named authproxy.cfg, and is located in the conf subdirectory of the proxy installation. With default installation paths, the proxy configuration file will be located at:
| Operating System | Authentication Proxy Version |
Path |
|---|---|---|
| Windows | v5.0.0 and later | C:\Program Files\Duo Security Authentication Proxy\conf\authproxy.cfg |
| Windows | v4.0.2 and earlier | C:\Program Files (x86)\Duo Security Authentication Proxy\conf\authproxy.cfg |
| Linux | All | /opt/duoauthproxy/conf/authproxy.cfg |
Note that as of v4.0.0, the default file access on Windows for the conf directory is restricted to the built-in Administrators group during installation.
The configuration file is formatted as a simple INI file. Section headings appear as:
[section]Individual properties beneath a section appear as:
name=valueThe Authentication Proxy may include an existing authproxy.cfg with some example content. For the purposes of these instructions, however, you should delete the existing content and start with a blank text file.
Duo Authentication Proxy Manager
The Duo Authentication Proxy Manager is a Windows utility for managing the Authentication Proxy installation on the Windows server where you install the Authentication Proxy. The Proxy Manager comes with Duo Authentication Proxy for Windows version 5.6.0 and later.
The Proxy Manager cannot manage remote Duo Authentication Proxy servers, nor can you install the Proxy Manager as a stand-alone application. There is no Proxy Manager available for Linux. The Proxy Manager only functions as part of a local Duo Authentication Proxy installation on Windows servers.
Learn more about using the Proxy Manager in the Duo Authentication Proxy Reference before you continue.
To launch the Proxy Manager utility:
- Open the Start Menu and go to Duo Security.
- Click the Duo Authentication Proxy Manager icon to launch the application. You must have administrative privileges on the Windows server and accept the prompt for elevation.
- The Proxy Manager launches and automatically opens the
%ProgramFiles%\Duo Security Authentication Proxy\conf\authproxy.cfgfile for editing.
Use the Proxy Manager editor on the left to make the authproxy.cfg changes in these instructions. As you type into the editor, the Proxy Manager will automatically suggest configuration options. Accepting these suggestions helps make sure you use the correct option syntax.
As you follow the instructions on this page to edit the Authentication Proxy configuration, you can click Validate to verify your changes (output shown on the right).
When you complete the Authentication Proxy configuration steps in this document, you can use the Save button to write your updates to authproxy.cfg, and then use the authproxy.cfg button to start the Authentication Proxy service before continuing on to the next configuration steps.
If you do not use the Proxy Manager to edit your configuration then we recommend using WordPad or another text editor instead of Notepad when editing the config file on Windows.
Configure the Proxy for Your Primary Authenticator
In this step, you'll set up the Proxy's primary authenticator — the system which will validate users' existing passwords. The primary authentication source for Duo LDAP must be another LDAP directory. In most cases, this means configuring the Proxy to communicate with Active Directory.
Active Directory
Add an [ad_client] section if you'd like to use an Active Directory domain controller (DC) or LDAP-based directory server to perform primary authentication. This section accepts the following options:
Required
host
|
The RFC-1034-compliant hostname or IP address of your domain controller or directory server. If this host doesn't respond to a primary authentication request and no additional hosts are specified (as |
service_account_username
|
The username of a domain account that has permission to bind to your directory and perform searches. We recommend creating a service account that has read-only access. This parameter not required when using SSPI authentication; see the |
service_account_password
|
The password corresponding to This parameter not required when using SSPI authentication; see the |
search_dn
|
The LDAP distinguished name (DN) of an Active Directory/LDAP container or organizational unit (OU) containing all of the users you wish to permit to log in. For example: |
Optional
host_2
|
The RFC-1034-compliant hostname or IP address of a secondary/fallback domain controller or directory server, which the Authentication Proxy will use if a primary authentication request to the system defined as |
security_group_dn
|
To further restrict access, specify the LDAP distinguished name (DN) of a security group that contains the users who should be able to log in as direct group members. Nested groups are not supported. Users who are not direct members of the specified group will not pass primary authentication. Example: Starting with Authentication Proxy v3.2.0, the |
username_attribute
|
LDAP attribute found on a user entry which will contain the submitted username. In most Active Directory configurations, it should not be necessary to change this option from the default value. OpenLDAP directories may use "uid" or another attribute for the username, which should be specified with this option. Default: "sAMAccountName" |
For example:
[ad_client]
host=1.2.3.4
host_2=1.2.3.5
service_account_username=duoservice
service_account_password=password1
search_dn=DC=example,DC=com
security_group_dn=CN=DuoVPNUsers,OU=Groups,DC=example,DC=com
For advanced Active Directory configuration, see the full Authentication Proxy documentation.
Configure the Proxy as an LDAP Server
Next, you need to set up the Authentication Proxy to handle LDAP authentication requests. Create an [ldap_server_auto] section and add the properties listed below. If you've already set up the Duo Authentication Proxy for a different LDAP application, append a number to the section header to make it unique, like [ldap_server_auto2].
Required
ikey
|
Your integration key. |
||
skey
|
Your secret key. |
||
api_host
|
Your API hostname (i.e. api-XXXXXXXX.duosecurity.com) |
||
client
|
The mechanism that the Authentication Proxy should use to perform primary authentication. This should correspond with a "client" section elsewhere in the config file.
This parameter is optional if you only have one "ad_client" section. If you have multiple, each "server" section should specify which "client" to use. |
Optional
port
|
Port on which to listen for incoming LDAP connections. If you have multiple LDAP server sections you should use a unique port for each one. If you have another service running on the server where you installed Duo that is using the default LDAP port 389, you will need to set this to a different port number to avoid a conflict. Default: 389 |
||||
failmode
|
Either "safe" or "secure":
|
||||
ssl_port
|
If If you have multiple LDAP server sections with SSL certs configured you should use a unique port for each one. If you have another service running on the server where you installed Duo that is using the default LDAPS port 636, you will need to set this to a different port number to avoid a conflict. Default: 636 |
||||
ssl_cert_path
|
Path to UTF-8 PEM-formatted SSL/TLS server certificate. Both |
||||
ssl_key_path
|
Path to UTF-8 PEM-formatted SSL/TLS private key. Both |
||||
exempt_primary_bind
|
If set to "true" (the default) then multi-factor authentication will not be performed for the first successful LDAP authentication in each connection. Use this if the device using the Authentication Proxy first connects as a service user and then authenticates the user who is logging in. |
||||
exempt_ou_1
|
Specify either the DN of a single user or an OU. Multi-factor authentication will not be required for these users. Set this option if the device using the Authentication Proxy first connects as a service user, disconnects, and then authenticates the user who is logging in with a separate LDAP connection. The exemptions should cover those service user(s). |
A completed config file, using Active Directory as the primary authenticator, should look something like:
[ad_client]
host=1.2.3.4
service_account_username=duoservice
service_account_password=password1
search_dn=cn=Users,dc=example,dc=com

[ldap_server_auto]
client=ad_client
ikey=DIXXXXXXXXXXXXXXXXXX
skey=XXXXXXXXXXXXXXXXXXXXXXXXXXXXXXXXXXXXXXXX
api_host=api-XXXXXXXX.duosecurity.com
failmode=safe
ssl_key_path=ldap_server.key
ssl_cert_path=ldap_server.pem
Make sure to save your configuration file in your text editor — or validate and save in the Proxy Manager for Windows — when you're finished making changes.
See the Duo Authentication Proxy Reference for additional Authentication Proxy LDAP configuration options.
Start the Proxy
If you installed the Duo Authentication Proxy Manager utility (available with 5.6.0 and later), click the Start Service button at the top of the Proxy Manager window to start the service.
To start the service from the command line, open an Administrator command prompt and run:
net start DuoAuthProxyAlternatively, open the Windows Services console (services.msc), locate "Duo Security Authentication Proxy Service" in the list of services, and click the Start Service button.
Authentication Proxy v5.1.0 and later includes the authproxyctl executable, which shows the connectivity tool output when starting the service. The installer adds the Authentication Proxy C:\Program Files\Duo Security Authentication Proxy\bin to your system path automatically, so you should not need to specify the full path to authproxyctl to run it.
From an administrator command prompt run:
authproxyctl startIf the service starts successfully, Authentication Proxy service output is written to the authproxy.log file, which can be found in the log subdirectory.
If you see an error saying that the "service could not be started", open the Application Event Viewer and look for an Error from the source "DuoAuthProxy". The traceback may include a "ConfigError" that can help you find the source of the issue.
Stop and restart the Authentication Proxy service by either clicking the Restart Service button in the Duo Authentication Proxy Manager or the Windows Services console or issuing these commands from an Administrator command prompt:
net stop DuoAuthProxy & net start DuoAuthProxyTo stop and restart the Authentication Proxy using authproxyctl, from an administrator command prompt run:
authproxyctl restartOpen a root shell and run:
# /opt/duoauthproxy/bin/authproxyctl startTo ensure the proxy started successfully, run:
# /opt/duoauthproxy/bin/authproxyctl statusAuthentication Proxy service output is written to the authproxy.log file, which can be found in the log subdirectory.
To stop and restart the Authentication Proxy, open a root shell and run:
# /opt/duoauthproxy/bin/authproxyctl restartIf you modify your authproxy.cfg configuration after initial setup, you'll need to stop and restart the Duo Authentication Proxy service or process for your change to take effect.
You can view information about your Authentication Proxy in the Authentication Proxy Dashboard.
Configure Your LDAP Client(s)
Once the proxy is up and running, you need to configure your LDAP clients to use it for authentication.
In your clients' settings, set the LDAP server to the IP address or host name of your Duo Authentication Proxy. Set the LDAP server port to 636 to secure the connection with SSL.
The service user name and service password configured on the LDAP client(s) should be the same as it would be if you were configured to connect directly to the AD or LDAP server.
If your clients allow you to configure the LDAP timeout, set them to values such that the clients will not give up for at least 60 seconds. This is necessary if your users choose to use Duo's out-of-band factors (phone callback, push) to log in, as the Authentication Proxy will not be able to respond to a LDAP authentication request until the user responds to the authentication challenge. If your clients do not allow you to configure the LDAP timeout behavior, then your users may be unable to authenticate with Duo's out-of-band factors.
Test Your Setup
To test your setup, attempt to log in to your newly-configured system as a user enrolled in Duo with an authentication device.
When you enter your username and password, you will receive an automatic push or phone callback.
Alternatively you may add a comma (",") to the end of your password and append a Duo factor option:
| push | Perform Duo Push authentication. You can use Duo Push if you've installed and activated Duo Mobile on your device. |
| phone | Perform phone callback authentication. |
| sms | Send a new batch of SMS passcodes. Your authentication attempt will be denied. You can then authenticate with one of the newly-delivered passcodes. |
| A numeric passcode | Log in using a passcode, either generated with Duo Mobile, sent via SMS, generated by your hardware token, or provided by an administrator. Examples: "123456" or "2345678". |
For example, if you wanted to use a passcode to authenticate instead of Duo Push or a phone call, you would enter:
username: bob
password: hunter2,123456
If you wanted to use specify use of phone callback to authenticate instead of an automatic Duo Push request, you would enter:
username: bob
password: hunter2,phone
You can also specify a number after the factor name if you have more than one device enrolled (as the automatic push or phone call goes to the first capable device attached to a user). So you can enter phone2 or push2 if you have two phones enrolled and you want the authentication request to go to the second phone.
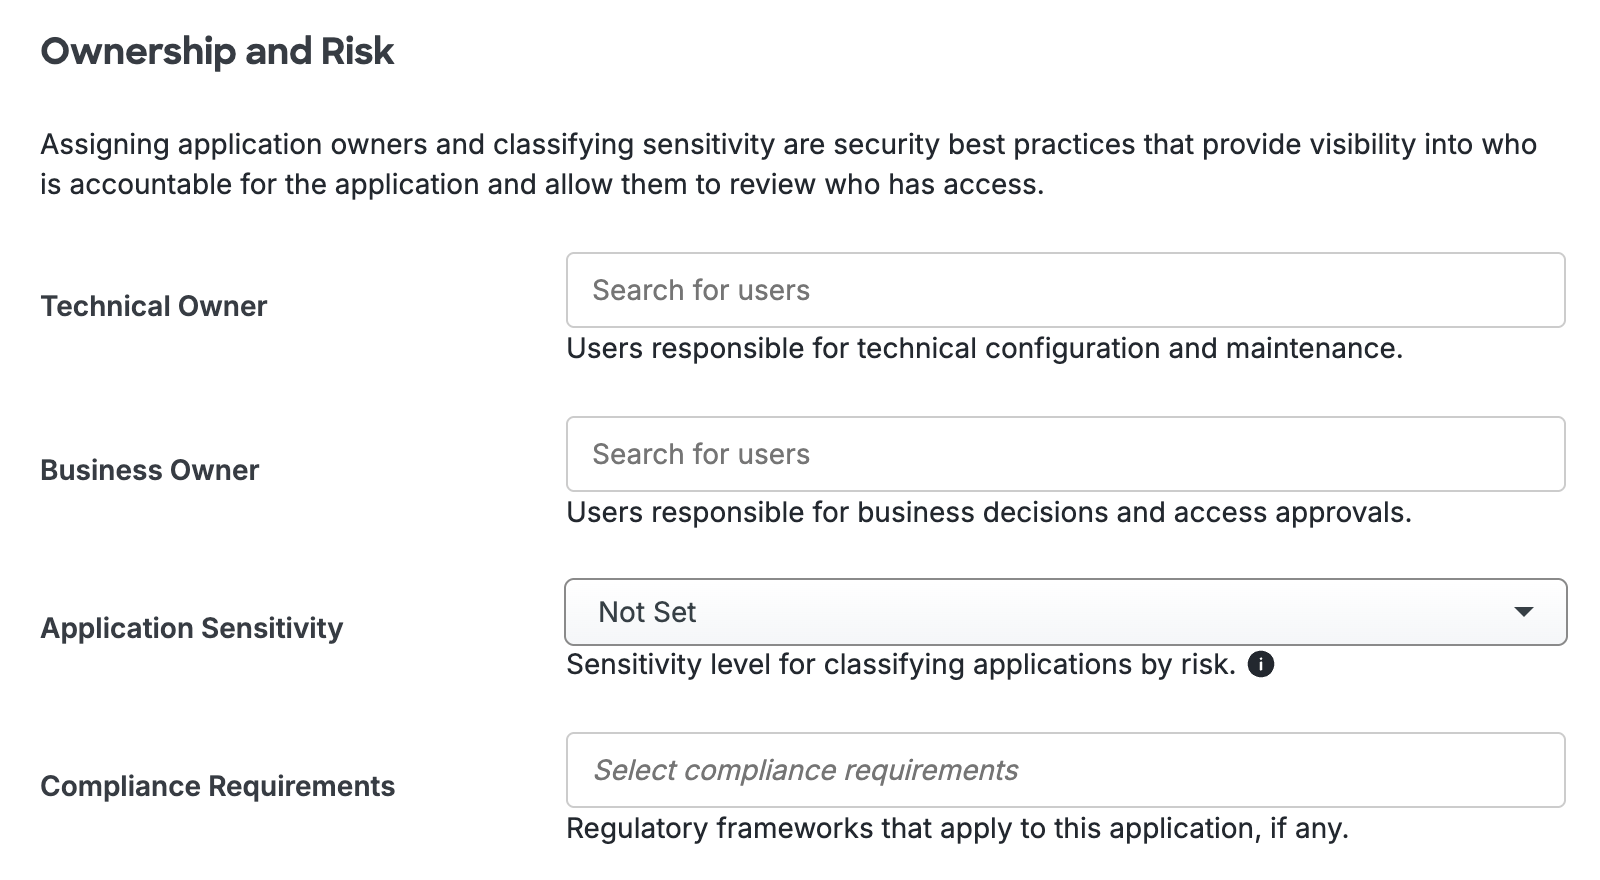
Add Ownership and Risk Information
Go to the "Ownership and Risk" section of the application's page in the Duo Admin Panel to assign application owners and classify the application's risk level. Cisco Identity Intelligence automatically imports this information to populate relevant fields for Duo Advantage and Premier customers. Duo Essentials and Duo Federal plans exclude Cisco Identity Intelligence features.
You may set any of the following:
- Technical Owner: Search for and assign Duo users responsible for technical configuration and maintenance of this application.
- Business Owner: Search for and assign Duo users responsible for business decisions and access approvals related to this application.
- Application Sensitivity: Select this application's risk level from the drop-down list. Default: Not Set.
- Compliance Requirements: Select any applicable regulatory frameworks for this application (SOX (Sarbanes-Oxley), HIPAA, PCI-DSS, etc.) from the list.
Scroll to the bottom of the page and click Save to apply your changes.
Grant Access to Users
If you did not already grant user access to the Duo users you want to use this application be sure to do that before inviting or requiring them to log in with Duo.
Troubleshooting
Need some help? Review troubleshooting tips for the Authentication Proxy and try the connectivity tool included with Duo Authentication Proxy 2.9.0 and later to discover and troubleshoot general connectivity issues.
Also take a look at our LDAP Knowledge Base articles or Community discussions. For further assistance, contact Support.
Network Diagram
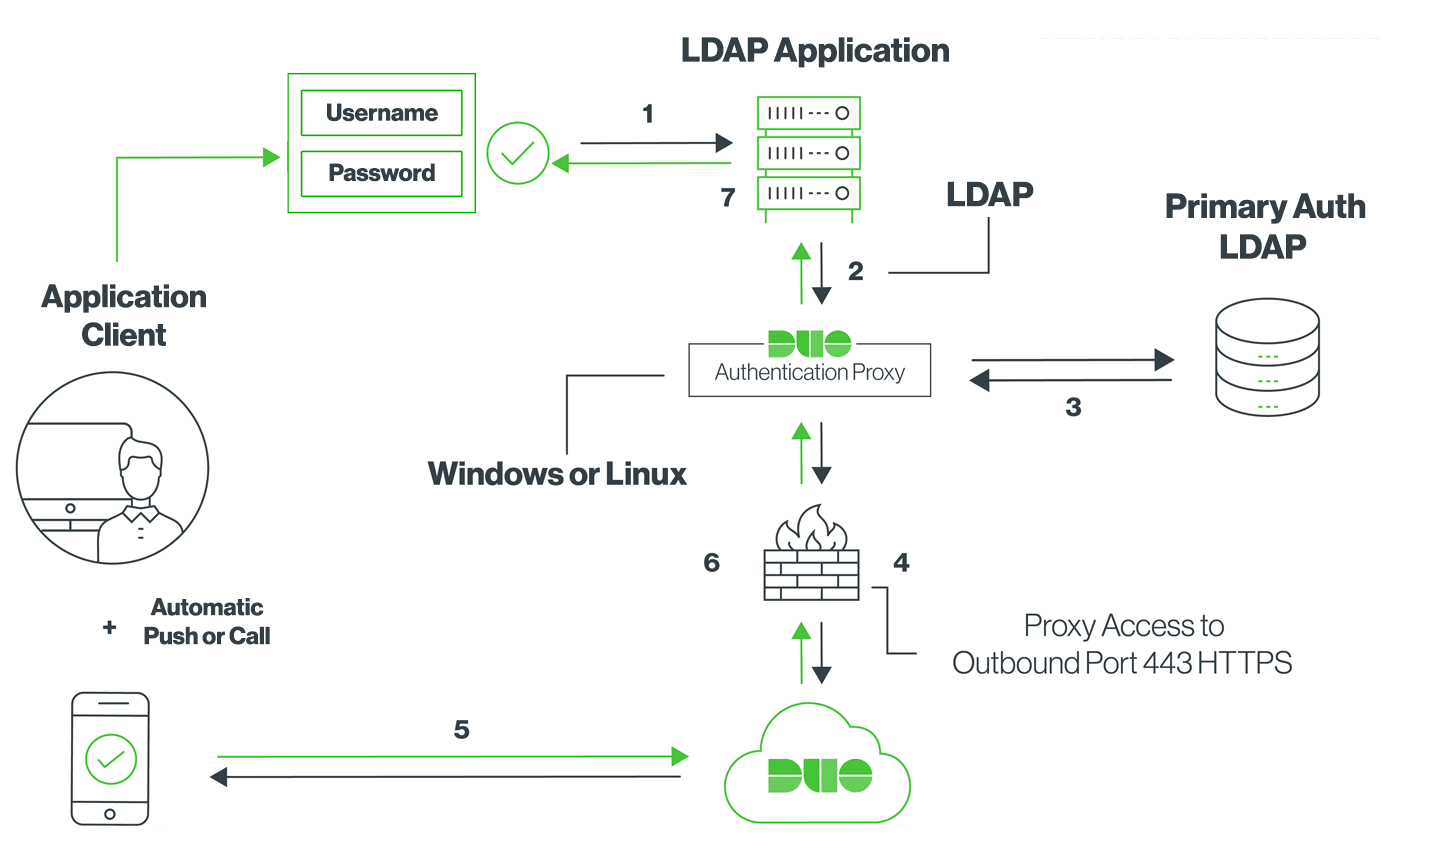
- Primary authentication initiated to application or service
- Application or service send authentication request to the Duo Security Authentication Proxy
- Primary authentication using Active Directory
- Duo Authentication Proxy connection established to Duo Security over TCP port 443
- Secondary authentication via Duo Security’s service
- Duo Authentication Proxy receives authentication response
- Application or service access granted