Security Agent Detection Utility
Last updated:
Overview
The Security Agent Detection Utility (ADU) is a standalone tool that enables administrators to create or verify security agent definitions for use with the Duo Desktop application. The utility uses the same detection mechanisms as Duo Desktop, ensuring that definitions built with this tool work as expected when integrated into Duo Desktop.
Use the Security Agent Detection Utility to:
- Create new security agent definitions for agents not yet supported by Duo Desktop.
- Validate that a definition detects an installed agent on your machine.
- Update an existing security agent definition that no longer works.
- Export agent definition files for submission to Duo Support.
Once accepted, your agent definition submission will become a selectable security agent in the "Device health" Duo policy options in a future release. We only accept definitions for commercial software agents, not custom agents.
System Requirements
Windows
- Windows 10 build 1803 and later
- Windows 11
- Windows Server 2016 and later
macOS
- macOS 14 and later
Linux
- Duo Desktop for Linux 4.6.0 and later include the Security Agent Detection Utility. See the Duo Desktop Linux system requirements.
macOS
Download the Utility
-
Download the most recent Security Agent Detection Utility to a system running the security agent you want to detect. View checksums for Duo downloads here. Note that the actual filename will reflect the version, e.g., SecurityAgentDetectionUtility-1.0.0.dmg.
-
Double-click the downloaded DMG file to open it in Finder.
-
Double-click the Security Agent Detection Utility.app icon to launch the utility without installing it on the system. If you're asked if you're sure you want to open the app, click Open.
If you want to install the utility on the target system for future use, copy it to the Mac's "Applications" folder:
-
Double-click the downloaded DMG file.
-
Open another Finder window with Command key ⌘ + N.
-
Click Applications in the list on the left side of the new Finder window.
-
Drag the Security Agent Detection Utility.app file into Applications.
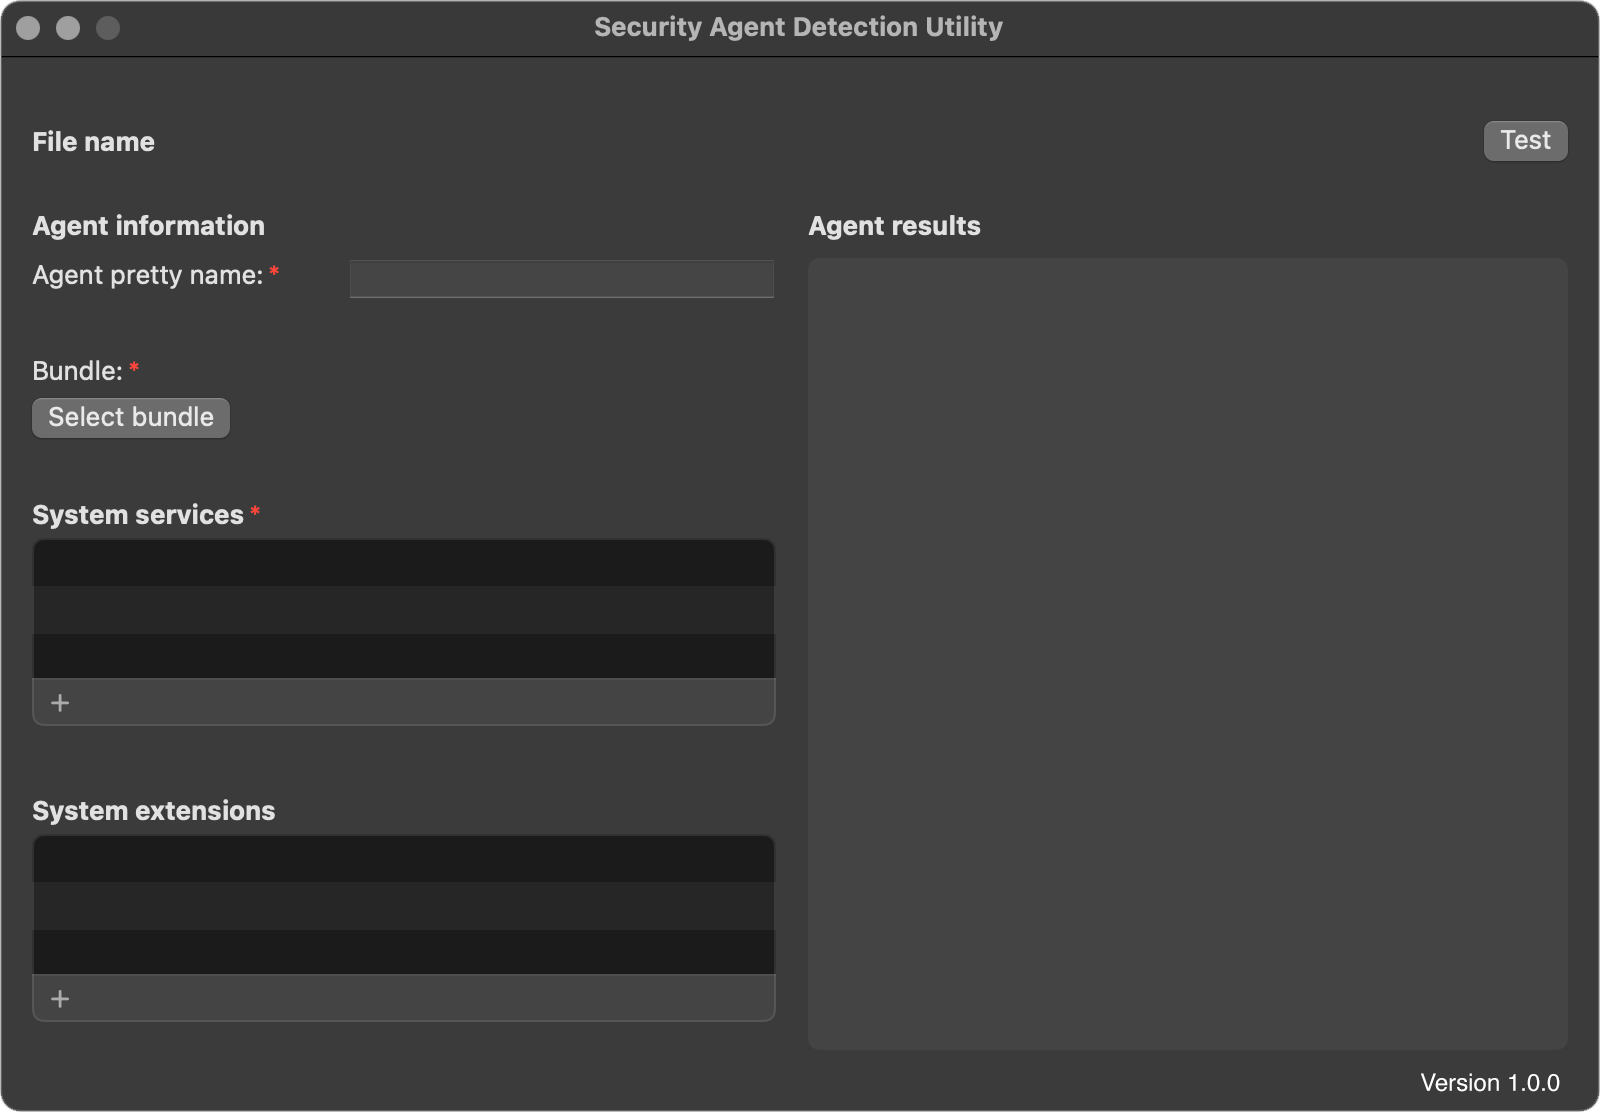
Utility Interface
The ADU displays the Agent Information form on the left and the Agent results pane on the right.
| ADU Element | Description |
|---|---|
| File name | Displays the full path of the currently loaded agent definition file (the working file). Blank before you save a definition. |
| Agent pretty name | (Required) The display name for the agent, shown in Duo authentication log and policy. |
| Bundle | (Required) The application or bundle associated with the agent. Also displays the bundle location. |
| System services | (Required) One or more system services that must be running to consider the agent active. |
| System extensions | (Optional) One or more system extensions that must be enabled to consider the agent active. |
| Test button | Performs a scan for the agent using the current form values. |
| Agent results | Displays the detection results after clicking Test. |
Create a Security Agent Definition
To create a new security agent definition on macOS:
-
Launch the Security Agent Detection Utility.
-
Enter your agent's name in the Agent pretty name field. Duo uses this as the display name for your agent in authentication logs and the policy editor.
-
Click Select bundle and choose the application associated with the installed agent. If the agent has multiple bundles, select the one that matches the expected product version.
-
Click the + icon under "System services" and type in the service that must be running to consider the agent active.
You can find a list of system services by running the following command in Terminal:
sudo launchctl listIf you have Duo Desktop version 7.18.0 or later installed and running, suggested system services appear below the form input field. Click on a service name to select it.
Repeat this until you've added all services associated with the running agent.
-
Optionally, add one or more System extensions that must be enabled to consider the agent active. Below the System extensions input field you will receive suggested system extensions. You can find a complete list of system extensions by running the following command in Terminal:
systemextensionsctl list -
Click Test after defining the agent. If the utility detects the agent using the definition, the results appear in the Agent results pane. If the utility does not detect the agent, confirm there are no form validation errors.
-
If the test detected the agent, go to File → Save As... to save the agent definition to a JSON-formatted file.
The full file path appears in the File name field as the working file.
-
Disable the security agent you just defined, then click Test again to confirm the agent is no longer detected.
-
Contact Duo Support to create a new case and submit the saved agent definition file for review.
Update an Existing Agent Definition
-
Go to File → Open file and select the agent definition JSON file you want to update.
If the file is in the required format, it populates the agent form. Otherwise, a warning indicates the configuration failed to load.
-
Make the necessary updates to the definition.
-
Click Test to validate that the updated definition detects the agent.
-
Save the updated definition using File → Save or File → Save As....
-
Disable the security agent, then test again to confirm the agent is no longer detected.
-
Submit the saved file containing the updated agent information to Duo Support for review.
Windows
Install the Utility
-
Download the most recent Security Agent Detection Utility to a system running the security agent you want to detect. View checksums for Duo downloads here. Note that the actual filename will reflect the version, e.g., SecurityAgentDetectionUtility-1.0.0.msi.
-
Double-click the downloaded MSI file and follow the prompts to install the utility.
Utility Interface
The ADU displays the Agent Information form on the left and the Agent results pane on the right.
| ADU Element | Description |
|---|---|
| File name | Displays the full path of the currently loaded agent definition file (the working file). Blank before you save a definition. |
| Editions supported | (Required) Checkboxes indicating whether the agent supports Windows Desktop and/or Windows Server editions. |
| Agent pretty name | (Required) The display name for the agent, shown in Duo authentication log and policy. |
| Agent install name | (Required) The value used to retrieve the version of the installed agent. Corresponds to the DisplayName value under the registry key HKLM\SOFTWARE\Microsoft\Windows\CurrentVersion\Uninstall. |
| Security center label | (Conditional) The displayName value of an AntiVirusProduct registered in Windows Security Center. Required if you do not provide "Services" and "Registry" definitions. |
| Services | (Conditional) One or more Windows services that must be running to consider the agent active. Required for all Windows Server definitions, and for Windows Desktop if you do not define a "Security center label". |
| Registry | (Optional) One or more registry keys/values that must exist to consider the agent active. Each entry includes a Key (registry path), Subkey (value name), and optional Expected Value (validates the data; if omitted, the utility confirms existence). |
| Test button | Performs a scan for the agent using the current form values. |
| Agent results | Displays the detection results after clicking Test. |

Create a Security Agent Definition
To create a new security agent definition on Windows:
-
Launch the Security Agent Detection Utility from the Windows Start Menu.
-
Enter your agent's name in the Agent pretty name field. Duo uses this as the display name for your agent in authentication logs and the policy editor.
-
Enter the Agent install name for the agent you want to detect. The field provides suggestions based on application names found on your machine. Select a suggested value to ensure accuracy.
-
Click on the Security center label to see suggestions based on agents detected within Security Center on your machine. Select a suggested value to ensure accuracy.
Note that Security center label detection is not supported on Windows Server. If this definition targets both Desktop and Server editions, provide both sets of detection criteria.
-
Select Desktop and/or Server under "Editions supported" to indicate whether the agent supports Windows Desktop and/or Windows Server editions.
-
If you did not select a value in Security center label, then click into the Services field and choose from the suggestions based on running Windows services found on your machine. Select a suggested value to ensure accuracy.
-
Click on Add registry key to configure optional registry key validation. Enter the following information:
- Key: (Required) The registry key path, such as
HKLM\Software\AgentName. - SubKey: (Required) The value to check.
- Expected Value: (Optional) A value the agent should use to confirm the subkey.
Note that if detection finds a specified Windows Security label, it ignores any defined Windows services and registry keys.
- Key: (Required) The registry key path, such as
-
Click Test after defining the agent. If the utility detects the agent using the definition, the results appear in the Agent results pane. If the utility does not detect the agent, confirm there are no form validation errors.
-
If the test detected the agent, go to File → Save As... to save the definition to a new file, or File → Save to update the currently loaded file.
The full file path appears in the File name field as the working file.
-
Disable the security agent you just defined, then click Test again to confirm the agent is no longer detected.
-
Contact Duo Support to create a new case and submit the saved agent definition file for review.
Update an Existing Agent Definition
You can update an existing agent definition by loading it from a custom configuration file or by selecting a Duo-verified configuration.
Update a Duo-Verified Configuration
-
Go to File → Open → Duo Verified Agent.
-
Select the agent you want to update from the Agents list.
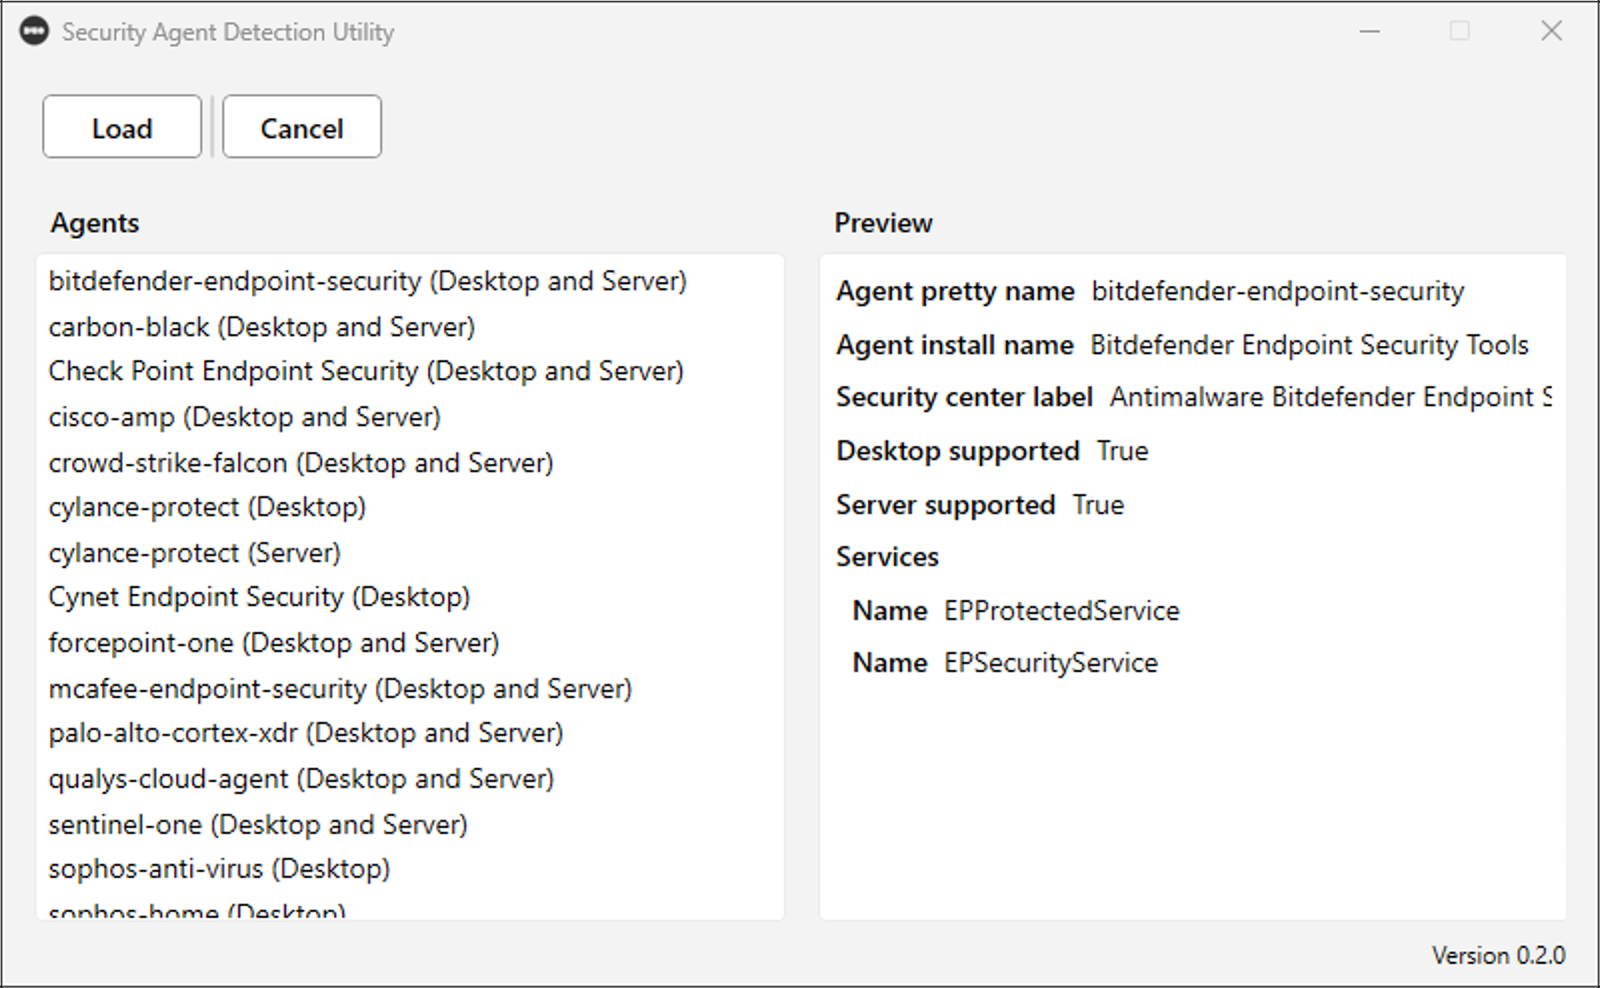
-
Click Load. The app navigates back to the home page with the agent's detection details in the form.
-
Make the necessary updates to the definition.
-
Click Test to validate that the updated definition detects the agent.
-
Save the updated definition using File → Save or File → Save As....
-
Disable the security agent, then test again to confirm the agent is no longer detected.
-
Submit the saved file containing the updated agent information to Duo Support for review.
Update a Custom Configuration
-
Go to File → Open → Custom Agent and select the agent definition file you want to update.
If the file is in the required format, it populates the agent form. Otherwise, a warning indicates the configuration failed to load.
-
Make the necessary updates to the definition.
-
Click Test to validate that the updated definition detects the agent.
-
Save the updated definition using File → Save or File → Save As....
-
Disable the security agent, then test again to confirm the agent is no longer detected.
-
Submit the saved file containing the updated agent information to Duo Support for review.
Linux
Install Duo Desktop
Install Duo Desktop for Linux 4.6.0 or later, which includes the security agent utility arguments for /opt/duo/duo-desktop. There is no separate utility download for Linux.
Command Reference
| Command | Description |
|---|---|
--get-security-agent-config-template |
Outputs an example security agent config template. Redirect output to a file to begin creating a custom security agent definition. |
--validate-security-agent-config <config-file> |
Validates a security agent config file against the running system using the same detection mechanisms as Duo Desktop health checks. Outputs the detection results as JSON. Exit code 0 indicates success; exit code 1 indicates a validation failure or error. |
Config File Structure
The config file is a JSON document with the following fields:
| Field | Required | Description |
|---|---|---|
api_label |
Yes | Unique identifier for the security agent. |
pretty_name |
Yes | Display name for the security agent. |
linux |
Yes | Section containing all Linux-specific information. |
linux.package_name |
Yes | Name of the installed package, used for version detection. |
linux.services |
Yes | One or more systemd service definitions. |
linux.services[].name |
Yes | Systemd service name. |
linux.services[].user |
No | User running the systemd service. Defaults to root. |
linux.services[].lacks_main_service_pid |
No | Specifies if the service doesn't maintain a main PID. Default: false. |
linux.services[].processes |
No | Expected processes for the service. |
linux.services[].processes[].name |
Yes | Process name to match. |
linux.services[].processes[].user |
No | User running the process. Defaults to root. |
Create a Security Agent Definition
To create a new security agent definition on Linux:
-
Generate a config template JSON file using the Duo Desktop binary with the
--get-security-agent-config-templateoption:/opt/duo/duo-desktop --get-security-agent-config-template > my-agent-config.json -
Edit the generated config file with detection criteria for your security agent, saving the file when done. See Config File Structure for information about the config fields.
-
Ensure the security agent you defined is active on the system, then validate the config with the
--validate-security-agent-configoption:/opt/duo/duo-desktop --validate-security-agent-config my-agent-config.json > validation-result.json -
Verify that
found_agentsinvalidation-result.jsoncontains your security agent with the correct version. -
Disable the security agent you just defined, then validate again to confirm the agent is no longer detected:
/opt/duo/duo-desktop --validate-security-agent-config my-agent-config.json -
Confirm the agent is not listed in
found_agentswhen inactive. -
Contact Duo Support to create a new case and submit the saved agent definition file for review.
Update an Existing Agent Definition
-
Open the existing config file in a text editor.
-
Make the necessary updates to the definition and save.
-
Ensure the security agent is active on the system, then validate the updated config with
--validate-security-agent-config:/opt/duo/duo-desktop --validate-security-agent-config my-agent-config.json > validation-result.json -
Verify
validation-result.jsonand confirm the utility detects the agent with the expected values. -
Disable the security agent, then validate again to confirm the agent is no longer detected:
/opt/duo/duo-desktop --validate-security-agent-config my-agent-config.json -
Confirm the agent is not listed in
found_agentswhen inactive. -
Submit the saved file containing the updated agent information to Duo Support for review.
Troubleshooting
Need some help? Take a look at our Security Agent Detection Utility Knowledge Base articles or Community discussions. For further assistance, contact Support.