Duo Auth API v1 (Legacy)
Last updated:
Version 1 Note
This version of the Auth API remains supported, but will not receive new features. We recommend that you build new clients and migrate existing ones to the current version.
Overview
Authentication Process
When a user (bob) wishes to authenticate, your application usually would proceed roughly as follows:
- Authenticate bob via primary factor (e.g. password)
- Perform a preauth request to Duo to get a list of factors available for bob and ensure they are currently permitted to authenticate.
- Display a list of factors to bob and allow them to select one
- Perform an auth request to Duo with bob's chosen factor
Normally, the auth method will not return a response until the authentication process has completed. However, it permits an optional parameter, async. If the application provides a value of '1' for the async argument, then the auth method will instead return a unique identifier which can be used to poll the status of the authentication attempt.
Review the API Details to see how to construct your first API request.
Documented properties will not be removed within a stable version of the API. Once a given API endpoint is documented to return a given property, a property with that name will always appear (although certain properties may only appear under certain conditions, like if the customer is using a specific edition).
Properties that enumerate choices may gain new values at any time, e.g. the device platform value could return new device platforms that did not previously exist. Duo will update our API documentation with new values in a timely fashion.
New, undocumented properties may also appear at any time. For instance, Duo may make available a beta feature involving extra information returned by an API endpoint. Until the property is documented here its format may change or it may even be entirely removed from our API.
This application communicates with Duo's service on SSL TCP port 443.
Firewall configurations that restrict outbound access to Duo's service with rules using destination IP addresses or IP address ranges aren't recommended, since these may change over time to maintain our service's high availability. If your organization requires IP-based rules, please review Duo Knowledge Base article 1337.
Effective June 30, 2023, Duo no longer supports TLS 1.0 or 1.1 connections or insecure TLS/SSL cipher suites. See Duo Knowledge Base article 7546 for additional guidance.
Limitations
Auth API v1 no longer receives feature updates. Some newer policy and configuration options have no effect on v1 clients. Please review these limitations to understand how they affect the usability and security of your Auth API v1 applications.
-
Verified Duo Push: The Verified Duo Push policy option has no effect on Auth API v1 applications. When the authentication methods policy requires users to enter a verification code, Auth API v1 delivers a standard Duo Push login request instead. Auth API v1 clients cannot prompt users for a verification code. To enforce Verified Duo Push, use Auth API v2 with
client_supports_verified_push=1. -
Risk-Based Factor Selection: Risk-Based Factor Selection has limited support for Auth API v1. When Duo detects risk and restricts available factors, Duo removes
pushN(Duo Push) andphoneN(phone callback) from thefactorslist in the/preauthresponse. Users may authenticate with a Duo Mobile passcode, a hardware token passcode, a passcode previously received via SMS, or a bypass code provided by a Duo administrator. Note that whilesmsNremains visible in the/preauthresponse, requesting new SMS passcodes via/authwithfactor=smsis blocked during step-up. Roaming and platform authenticators are not available with Auth API. See Risk-Based Factor Selection and the Auth API for more details.
First Steps
Before starting:
-
Log in to the Duo Admin Panel and navigate to Applications → Application Catalog.
-
Locate the entry for Auth API with the "2FA" label in the catalog. Click the + Add button to create the application and get your integration key, secret key, and API hostname. You'll need this information to complete your setup. See Protecting Applications for more information about protecting applications with Duo and additional application options.
Treat your secret key like a passwordThe security of your Duo application is tied to the security of your secret key (skey). Secure it as you would any sensitive credential. Don't share it with unauthorized individuals or email it to anyone under any circumstances! -
No active Duo users can log in to new applications until you grant access. Update the User access setting to grant access to this application to users in selected Duo groups, or to all users. Learn more about user access to applications. If you do not change this setting now, be sure to update it so that your test user has access before you test your setup.
This setting only applies to users who exist in Duo with "Active" status. This does not affect application access for existing users with "Bypass" status, existing users for whom the effective Authentication Policy for the application specifies "Bypass 2FA" or "Skip MFA", or users who do not exist in Duo when the effective New User Policy for the application allows access to users unknown to Duo without MFA.
API Methods
The Auth API was formerly named "Duo REST API", so the v1 API endpoint paths reflect that older name.
/ping
The /ping method acts as a "liveness check" that can be called to verify that Duo is up before trying to call other methods. Unlike the other API methods, this one does not have to be signed with the Authorization header and may be sent over HTTP for speed.
GET /rest/v1/pingA successful response will be returned in the standard container format described above and will contain pong in the response field.
Example successful response (JSON):
{
  "stat": "OK",
  "response": "pong"
}
/check
The /check method can be called to verify that the integration and secret keys are valid, and that the signature is being generated properly.
GET /rest/v1/checkA successful response will be returned in the standard container format described above and will contain valid in the response field.
Available parameters:
None.
Response codes:
| Response | Meaning |
|---|---|
| 200 | Success. |
| 401 |
The "Authorization" and/or "Date"
headers were missing or invalid.
|
Example successful response (JSON):
{
  "stat": "OK",
  "response": "valid"
}
/logo
The /logo endpoint provides a programmatic way to retrieve your stored logo.
GET /rest/v1/logoParameters
None required.
Response Codes
| Response | Meaning |
|---|---|
| 200 | Success. |
| 404 | No logo was found. |
Response Format
On success, the response body is Content-Type image/png, containing the logo.
On failure, the response is the standard error JSON.
/preauth
The /preauth method determines whether a user is authorized to log in, and (if so) returns the user's available authentication factors.
POST /rest/v1/preauthAvailable parameters:
| Param | Required? | Description |
|---|---|---|
user
|
Required | The username of the user to be authenticated. |
ipaddr
|
Optional |
The IP address of the user to be authenticated. If an Auth API client does not send the ipaddr value in a request, policy settings based on available IP address information, like authorized networks or user location have no effect. If this information is available to your application, you should provide it.
|
hostname
|
Optional | The host name of the device accessing the application. |
The response will be returned in the container format described above. For successful responses, the payload will contain the following key/value pairs:
| Key | Value | ||||||||||
|---|---|---|---|---|---|---|---|---|---|---|---|
result
|
One of the following values:
|
||||||||||
status
|
A message describing the result. This field will not be present if |
||||||||||
prompt
|
A textual prompt describing the factor choices available to the user. This field will only be present if |
||||||||||
factors
|
A series of key-value pairs, where each key is a number, and each value is a factor name. There may also be a key named 'default', containing a factor name which should be used if there is no opportunity to prompt the user to select a factor. The numbers represent a loose priority ordering; lower numbers should be considered more preferable. The numbers will match numbers contained within the The factors available for use may be limited by an effective authentication methods policy or Risk-based Factor Selection policy that disables use of some factors. Note that hardware tokens do not have any associated capabilities. This field will only be present if |
Example successful response:
{
  "stat": "OK",
  "response": {
      "result": "auth",
      "factors": {
          "default": "push1",
          "1": "push1",
          "2": "push2",
          "3": "phone1",
          "4": "phone2",
          "5": "sms1",
          "6": "sms2"
      },
      "prompt": "Duo login for bob\n\n 1. Duo Push to XXX-XXX-1234\n 2. Duo Push to XXX-XXX-5678\n 3. Phone call to XXX-XXX-1234\n 4. Phone call to XXX-XXX-5678\n 5. SMS passcodes to XXX-XXX-1234 (next code starts with: B)\n 6. SMS passcodes to XXX-XXX-5678\n\nPasscode or option (1-6): "
  }
}
/auth
The /auth method performs second-factor authentication for a user by verifying a passcode, placing a phone call, or sending a push notification to the user's smartphone app.
POST /rest/v1/authParameters:
| Param | Required? | Description | ||||||||||||
|---|---|---|---|---|---|---|---|---|---|---|---|---|---|---|
| user | Required | The username of the user to be authenticated | ||||||||||||
| factor | Required |
The factor to use for authentication. Currently, the following choices are supported:
|
||||||||||||
| ipaddr | Optional |
The IP address of the user to be authenticated. If an Auth API client does not send the ipaddr value in a request, policy settings based on available IP address information, like authorized networks or user location have no effect. If this information is available to your application, you should provide it.
|
||||||||||||
| hostname | Optional | The host name of the device accessing the application. | ||||||||||||
| async | Optional |
If this parameter is not provided, then the If you enable "async", then your application will be able to retrieve real-time status updates from the authentication process, rather than receiving no information until the process is complete. |
Additionally, you will need to pass some factor-specific parameters:
| Factor | Param | Required? | Description |
|---|---|---|---|
| passcode | code | Required | Passcode entered by the user |
| phone | phone | Required | Phone selected by the user (i.e. 'phone1', 'phone2', etc.) |
| sms | phone | Required | Phone selected by the user (i.e. 'phone1', 'phone2', etc.) |
| push | phone | Required | Phone selected by the user (i.e. 'phone1', 'phone2', etc.) |
| push | pushinfo | Optional |
A set of URL-encoded key/value pairs with additional contextual information associated with this authentication attempt. The Duo Mobile app will display this information to the user. For example: The URL-encoded string's total length must be less than 20,000 bytes. |
| auto | auto | Required |
Passcode, or factor name from the 'factors' dictionary returned by the /preauth method (e.g. 'phone1', 'push2', ...)
|
| auto | pushinfo | Optional |
A set of URL-encoded key/value pairs with additional contextual information associated with this authentication attempt. The Duo Mobile app will display this information to the user. For example: This information is currently ignored unless a 'push' factor was selected. The URL-encoded string's total length must be less than 20,000 bytes. |
The response will be returned in the container format described above. For successful responses, the payload will contain the following key/value pairs:
If "async" was not enabled:
| Key | Value |
|---|---|
result
|
Either "allow" or "deny". If "allow" was returned, your application should grant access to the user, otherwise it should not. |
status
|
A string describing the result of the authentication attempt. If the authentication attempt failed, it may identify a reason. This string is intended for display to the user. |
Example successful response (JSON):
{
  "stat": "OK",
  "response": {
    "status": "Success. Logging you in...",
    "result": "allow"
  }
}
Example failure response due to factor restriction as a result of Risk-based Factor Selection policy:
{
  "stat": "OK",
  "response": {
        "result": "deny",
        "status": "Selected number is restricted from Duo Push authentication"
  },
}
If "async" was enabled:
| Key | Value |
|---|---|
txid
|
A transaction ID to be used to query the authentication status using the /status.
|
Example successful response (JSON):
{
  "stat": "OK",
  "response": {
    "txid": "45f7c92b-f45f-4862-8545-e0f58e78075a"
  }
}
/status
The /status method "long-polls" for the next status update from the authentication process for a given transaction. That is to say, if no status update is available at the time the request is sent, it will wait until there is an update before returning a response.
GET /rest/v1/statusAvailable parameters:
| Param | Required? | Description |
|---|---|---|
txid
|
Required |
The transaction id of the authentication attempt, as returned by the /auth method
|
The response will be returned in the container format described above. For successful responses, the payload will contain the following key/value pairs:
| Key | Value |
|---|---|
result
|
This field will only appear when the authentication process has finished, and will contain either "allow" or "deny". If "allow" was returned, your application should grant access to the user, otherwise it should not. If this field is absent, then authentication is still in-progress. |
status
|
A string describing the status of the authentication attempt. If the authentication attempt failed, it may identify a reason. This string is intended for display to the user. |
Example successful response (JSON):
{
  "stat": "OK",
  "response": {
    "status": "Success. Logging you in...",
    "result": "allow"
  }
}
API Details
Base URL
All API methods use your API hostname,
https://api-XXXXXXXX.duosecurity.com. Obtain this value from the Duo Admin Panel and use it exactly as shown there.
Methods always use HTTPS. Unsecured HTTP is not supported.
Request Format
All requests must have "Authorization" and "Date" headers.
If the request method is GET or DELETE, URL-encode parameters and send them in the URL query string like this: /rest/v1/preauth?user=narroway. They still go on a separate line when creating the string to sign for an Authorization header.
For POST requests, send parameters as URL-encoded key-value pairs in the request body. The header "Content-Type: application/x-www-form-urlencoded" must be present.
When URL-encoding, all bytes except ASCII letters, digits, underscore ("_"), period ("."), tilde ("~"), and hyphen ("-") are replaced by a percent sign ("%") followed by two hexadecimal digits containing the value of the byte. For example, a space is replaced with "%20" and an at-sign ("@") becomes "%40". Use only upper-case A through F for hexadecimal digits.
A request with parameters, as a complete URL, would look something like this: https://api-XXXXXXXX.duosecurity.com/rest/v1/preauth?user=narroway (substituting the actual API method path and parameters used in your request).
Response Format
Responses are formatted as a JSON object with a top-level stat key.
Successful responses will have a stat value of "OK" and a
response key. The response will either
be a single object or a sequence of other JSON types, depending
on which endpoint is called.
{
  "stat": "OK",
  "response": {
    "key": "value"
  }
}
Values are returned as strings unless otherwise documented.
Unsuccessful responses will have a
stat value of "FAIL", an integer
code, and a
message key that further describes the failure.
A message_detail key may be present if additional information is available (like the specific parameter that caused the error).
{
  "stat": "FAIL",
  "code": 40002,
  "message": "Invalid request parameters",
  "message_detail": "username"
}
The HTTP response code will be the first three digits of the more
specific code found inside the JSON object. Each
endpoint's documentation lists HTTP response codes it can return.
Additionally, all API endpoints that require a signed request can
return the following HTTP response codes:
| Response | Meaning |
|---|---|
| 200 | The request completed successfully. |
| 401 | The "Authorization", "Date", and/or "Content-Type" headers were missing or invalid. |
| 403 |
This integration is not authorized for this endpoint or the ikey was created for a different integration type (for example, using an Auth API ikey with Admin API endpoints). |
| 405 | The request's HTTP verb is not valid for this endpoint (for example, POST when only GET is supported). |
| 429 | The account has made too many requests of this type recently. Try again later. |
Authentication
Auth API v1 uses legacy v2 request signing with HMAC-SHA1. v5 signing is not supported. For applications that require v5 signing, use Auth API v2.
The API uses HTTP Basic Authentication to authenticate requests. Use your Duo application's integration key as the HTTP Username.
Generate the HTTP Password as an HMAC signature of the request. This will be different for each request and must be re-generated each time.
To construct the signature, first build an ASCII string from your request, using the following components:
| Component | Description | Example |
|---|---|---|
date
|
The current time, formatted as RFC 2822. This must be the same string as the "Date" header. |
Tue, 21 Aug 2012 17:29:18 -0000
|
method
|
The HTTP method (uppercase) |
POST
|
host
|
Your API hostname (lowercase) |
api-xxxxxxxx.duosecurity.com
|
path
|
The specific API method's path |
/rest/v1/auth
|
params
|
The URL-encoded list of If the request does not have any parameters, include a blank line in the string that is signed. Do not encode unreserved characters. Use upper-case hexadecimal digits A through F in escape sequences. |
An example factor=auto&user=narroway
|
Then concatenate these components with (line feed) newlines. For example:
Tue, 21 Aug 2012 17:29:18 -0000
POST
api-xxxxxxxx.duosecurity.com
/rest/v1/auth
auto=auto&factor=auto&hostname=wks01&ipaddr=10.2.3.4&user=narroway
GET requests also use this five-line format (note the blank line as this request has no parameters):
Tue, 21 Aug 2012 17:29:18 -0000
GET
api-xxxxxxxx.duosecurity.com
/rest/v1/check
Lastly, compute the HMAC-SHA1 of this canonical representation, using your Duo application's secret key as the HMAC key. Send this signature as hexadecimal ASCII (i.e. not raw binary data). Use HTTP Basic Authentication for the request, using your integration key as the username and the HMAC-SHA1 signature as the password.
For example, here are the headers for the above POST request to api-XXXXXXXX.duosecurity.com/rest/v1/auth, using DIWJ8X6AEYOR5OMC6TQ1 as the integration key and Zh5eGmUq9zpfQnyUIu5OL9iWoMMv5ZNmk3zLJ4Ep as the secret key:
Date: Tue, 21 Aug 2012 17:29:18 -0000
Authorization: Basic RElXSjhYNkFFWU9SNU9NQzZUUTE6MzM5MTZlMTJhYjI4MjZkNTRmMDcyNjY5ODc3ZmRjYTIxMTJlNTE1ZA==
Host: api-XXXXXXXX.duosecurity.com
Content-Length: 92
Content-Type: application/x-www-form-urlencoded
Separate HTTP request header lines with CRLF newlines.
The following Python 3 function can be used to construct the "Authorization" and "Date" headers:
import base64, email.utils, hmac, hashlib, urllib
def sign(method, host, path, params, skey, ikey):
"""
Return HTTP Basic Authentication ("Authorization" and "Date") headers.
method, host, path: strings from request
params: dict of request parameters
skey: secret key
ikey: integration key
"""
# create canonical string
now = email.utils.formatdate()
canon = [now, method.upper(), host.lower(), path]
args = []
for key in sorted(params.keys()):
val = params[key].encode("utf-8")
args.append(
'%s=%s' % (urllib.parse.
quote(key, '~'), urllib.parse.quote(val, '~')))
canon.append('&'.join(args))
canon = '\n'.join(canon)
# sign canonical string
sig = hmac.new(bytes(skey, encoding='utf-8'),
bytes(canon, encoding='utf-8'),
hashlib.sha1)
auth = '%s:%s' % (ikey, sig.hexdigest())
# return headers
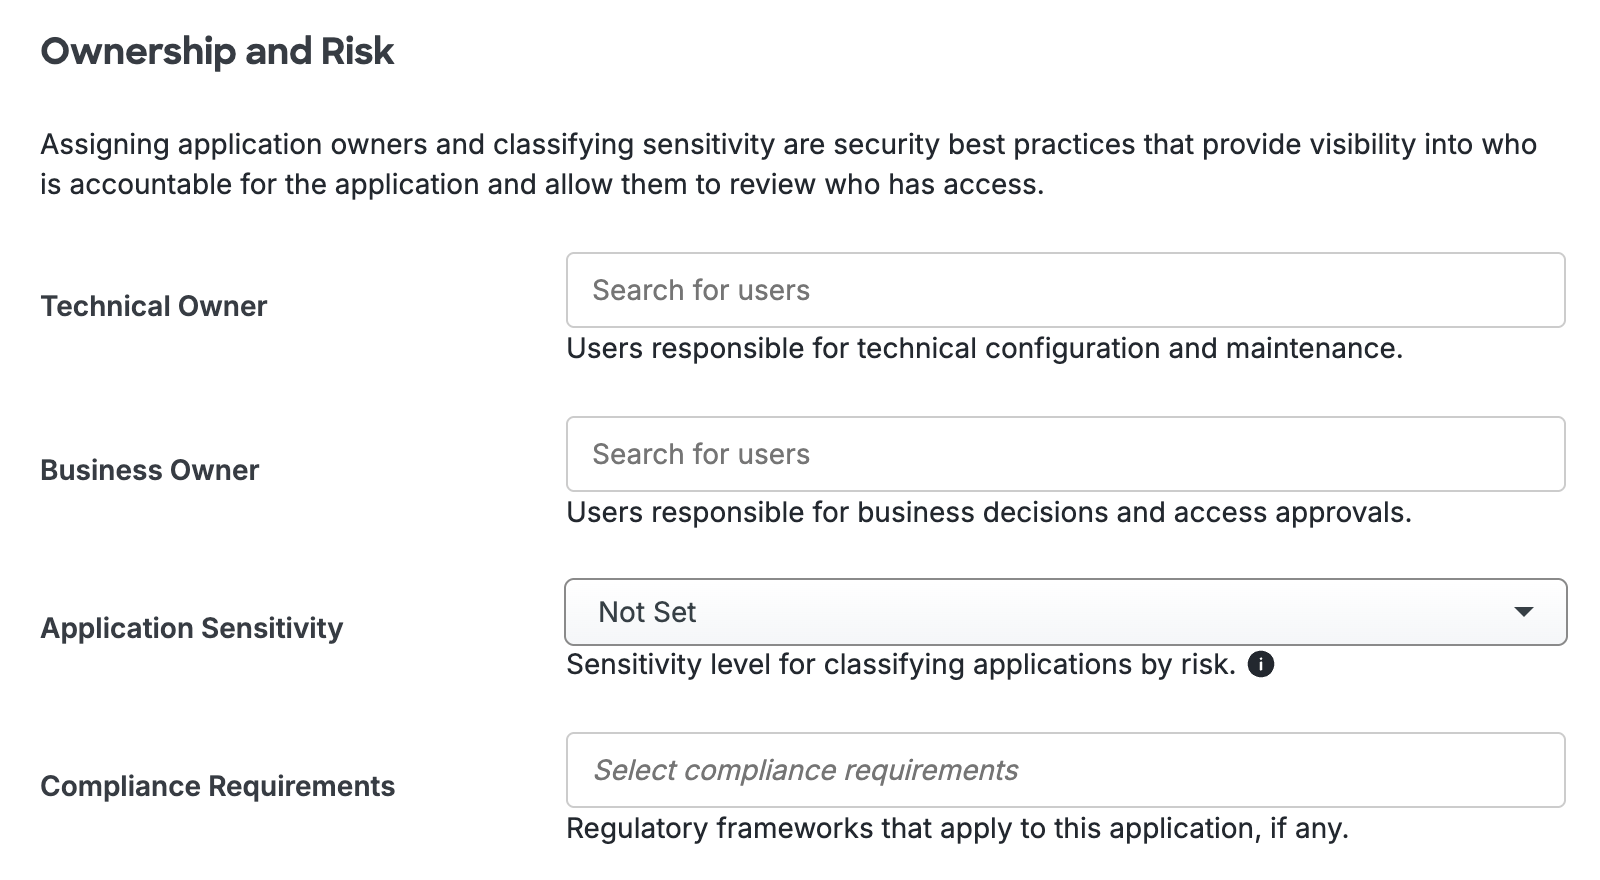
return {'Date': now, 'Authorization': 'Basic %s' % base64.b64encode(bytes(auth, encoding="utf-8")).decode()}Add Ownership and Risk Information
Go to the "Ownership and Risk" section of the application's page in the Duo Admin Panel to assign application owners and classify the application's risk level. Cisco Identity Intelligence automatically imports this information to populate relevant fields for Duo Advantage and Premier customers. Duo Essentials and Duo Federal plans exclude Cisco Identity Intelligence features.
You may set any of the following:
- Technical Owner: Search for and assign Duo users responsible for technical configuration and maintenance of this application.
- Business Owner: Search for and assign Duo users responsible for business decisions and access approvals related to this application.
- Application Sensitivity: Select this application's risk level from the drop-down list. Default: Not Set.
- Compliance Requirements: Select any applicable regulatory frameworks for this application (SOX (Sarbanes-Oxley), HIPAA, PCI-DSS, etc.) from the list.
Scroll to the bottom of the page and click Save to apply your changes.
Grant Access to Users
If you did not already grant user access to the Duo users you want to use this application be sure to do that before inviting or requiring them to log in with Duo.
Troubleshooting
Need some help? Take a look at our Auth API Knowledge Base articles or Community discussions. For further assistance, contact Support.