Duo for NetScaler - Basic Secondary Authentication Instructions with Classic Policies
Last updated:
Action Required: April 15, 2026 Duo CA Bundle Expiration
Duo products that use certificate pinning, such as the Duo Authentication Proxy, require a software update for uninterrupted use. Legacy clients could stop working at any time after April 15, 2026.
Check your Duo Authentication Proxy installations used for NetScaler RADIUS authentication and upgrade them if they are not running version 6.5.1 or later.
Please visit Duo Knowledge Base article 9451 for more information and guidance.
End of Support Information
The iframe-based traditional Duo Prompt in NetScaler RADIUS configurations reached end of support on December 31, 2024. Customers must migrate to a supported Universal Prompt solution or a RADIUS configuration without the iframe for continued support.
We recommend you switch to either Duo for NetScaler Web - OAuth, which delivers Duo authentication via a direct OIDC connection, or Duo Single Sign-On for NetScaler to protect NetScaler or Citrix Gateway with Duo Single Sign-On, our cloud-hosted identity provider featuring Duo Central. Both offer your users the Duo Universal Prompt authentication experience.
If your NetScaler deployment does not meet the requirements for Duo via OAuth or Duo Single Sign-On, the alternative is to reconfigure your existing radius_server_iframe Duo Authentication Proxy application so that it does not use the iframe, for example, Duo RADIUS Challenge Text Prompt for NetScaler nFactor or RADIUS with Automatic Push.
Learn more about options for out-of-scope applications in the Universal Prompt update guide, and review the Duo End of Sale, Last Date of Support, and End of Life Policy.
The instructions for this solution were removed on September 30, 2024. Customers who had this configuration deployed before then and need to refer to the original instructions may contact Duo Support.
Universal Prompt Solutions
If you have a NetScaler running 14.1-29.63 or later and Advanced or Premium licensing, please deploy Duo for NetScaler Web - OAuth.
If you have one of the following with a Citrix Federated Authentication Service (FAS) deployment:
- Citrix Gateway build 12.1-51.16 or later with an Advanced or Premium edition license
- Citrix Gateway build 13.0-67.x or later with an Standard, Advanced, or Premium edition license
- NetScaler 14 or later with Standard, Advanced, or Premium edition license
Try Duo Single Sign-on for NetScaler (FAS required).
Both of these solutions include Duo Universal Prompt support.
Learn more about the differences between Duo's NetScaler deployment configurations.
Troubleshooting
Need some help? Review troubleshooting tips for the Authentication Proxy and try the connectivity tool included with Duo Authentication Proxy 2.9.0 and later to discover and troubleshoot general connectivity issues.
Also take a look at the NetScaler Frequently Asked Questions (FAQ) page or try searching our NetScaler Knowledge Base articles or Community discussions. For further assistance, contact Support.
Please see our FAQ if you are having an issue with iframe Duo web authentication after installing NetScaler firmware 14.1-29.63.
Network Diagram
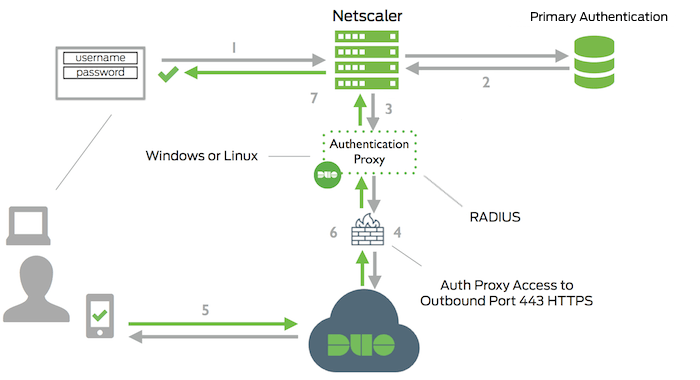
- Primary authentication initiated to NetScaler
- Primary authentication using Active Directory or RADIUS
- NetScaler sends authentication request to Duo Security’s authentication proxy
- Duo authentication proxy connection established to Duo Security over TCP port 443
- User completes Duo two-factor authentication via the interactive web prompt served from Duo's service or text input to the NetScaler and their selected authentication factor.
- Duo Authentication Proxy receives authentication response
- NetScaler access granted