Duo Central
Last updated:
Overview
Duo Central, part of Duo Single Sign-On, is a cloud-hosted portal that your users can visit to get access to your organization's applications and links.
Prerequisites
Before you start using Duo Central make sure to meet all the requirements described below:
- A Duo Admin with the Owner, Administrator, or Application Manager role.
- Duo Single Sign-On configured to use Duo as the authentication source or with an external authentication source.
Browser Support
Duo Central supports Chrome (Desktop and Mobile), Firefox, Safari (Desktop and Mobile), and Microsoft Edge. Not all browsers support all Duo authentication methods equally, so for the widest compatibility we recommend Chrome, Edge, or Safari.
Check the table below for supported browser versions.
| Browser | Recommended Version |
|---|---|
| Chrome | latest |
| Safari | latest |
| Firefox | latest |
| Edge | latest |
| Internet Explorer | None. Duo Central support for Internet Explorer 11 was deprecated and ended in April 2026. |
While other browsers may work with Duo Central, we actively test and support the browsers listed in the table.
Get Started with Duo Central
Role required: Owner, Administrator, or Application Manager
-
Log in to the Duo Admin Panel, and navigate to Applications → Duo Central.
-
From the Duo Central page you can add application tiles or update configuration and effective policies.
Configure Duo Central
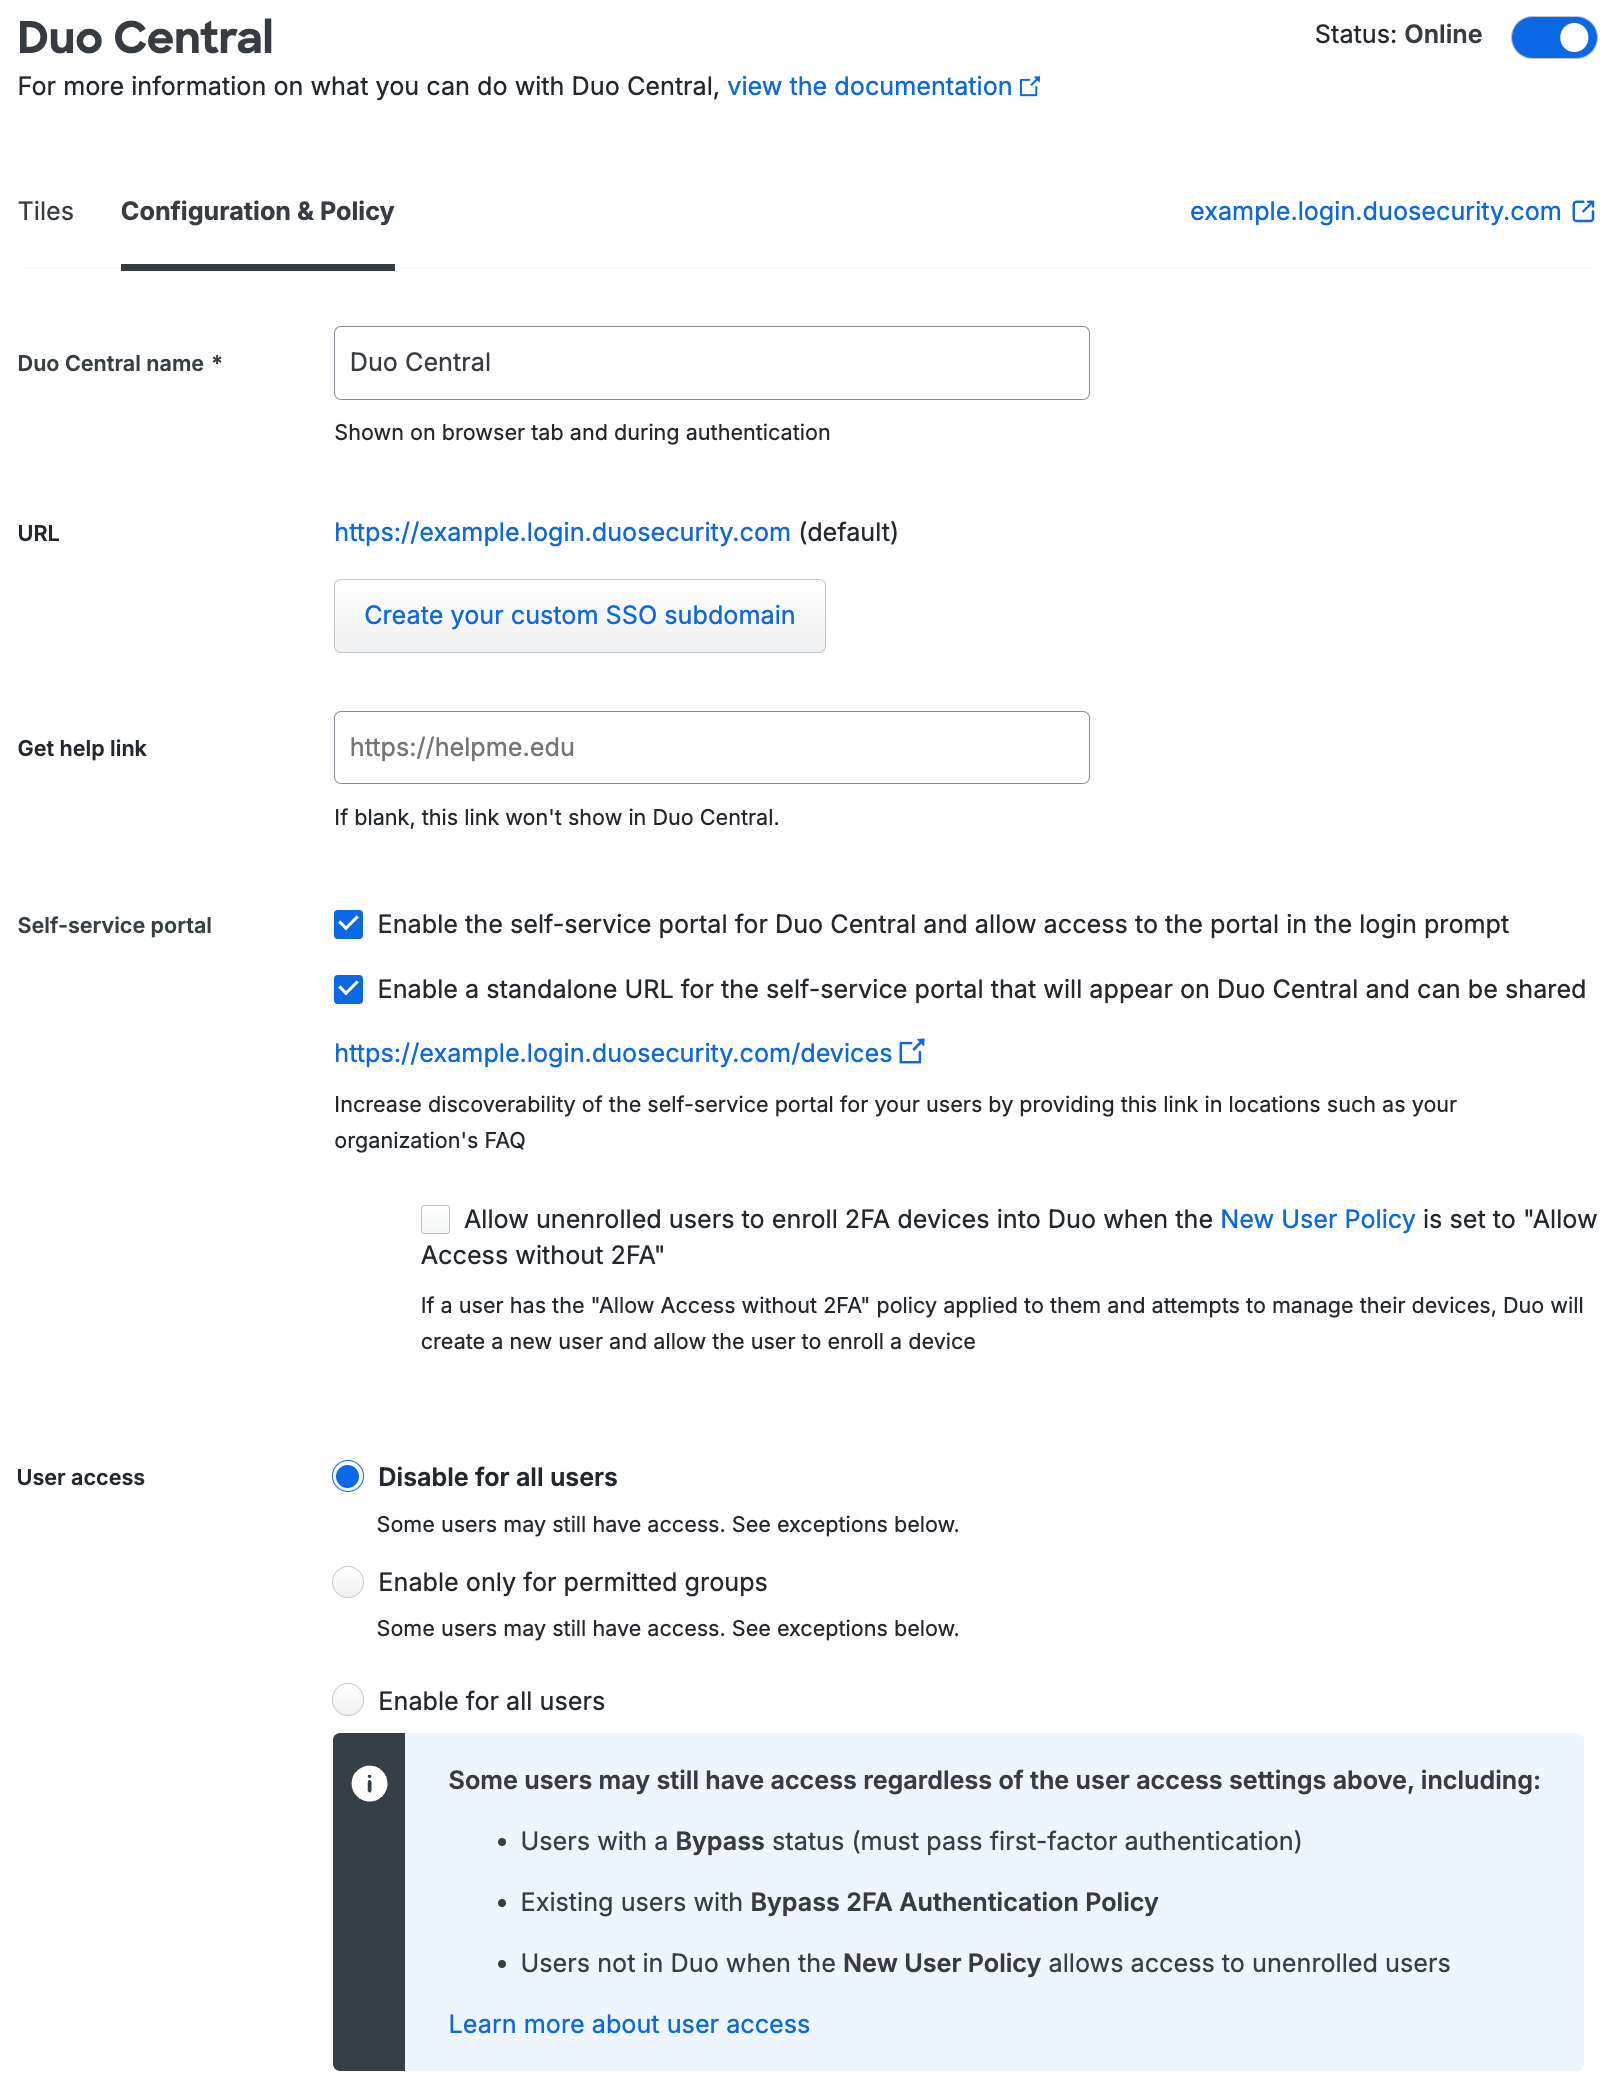
The Duo Central Configuration & Policy tab allows you to configure a help link, custom URL, custom policies and more. If you make any changes, scroll to the bottom of the page and click Save settings.
Duo Central Name
The descriptive name you enter as the Duo Central name appears in Duo Push requests when logging into Duo Central, and is shown in the browser tab and on the Duo Central page.
URL
The URL is the website address users will visit to log into Duo Central. If you do not already have a custom subdomain set, you can navigate to Applications → SSO Settings to do so.
Get Help Link
Optionally set the Get help link to the URL for your organization's help desk or internal instructions. Your users will be able to access that link from the Duo Central page to get support.
Self-Service Portal
The Self-service Portal lets existing Duo users add, update, and remove authentication devices from the Duo prompt or from Duo Central. New users who log into Duo Central and are subject to a policy that requires two-factor authentication can manage devices from the authentication prompt or from within Duo Central. The primary self-service options for Duo Central are enabled by default.
See the self-service portal documentation for more information about self-service for existing enrolled Duo users.
The Enable the self-service portal for Duo Central and allow access to the portal in the login prompt option allows access to device management for enrolled users as they log in to Duo Central to access SSO applications and other bookmarked apps. This provides access to the "Manage devices" option in the Duo Universal Prompt during login.
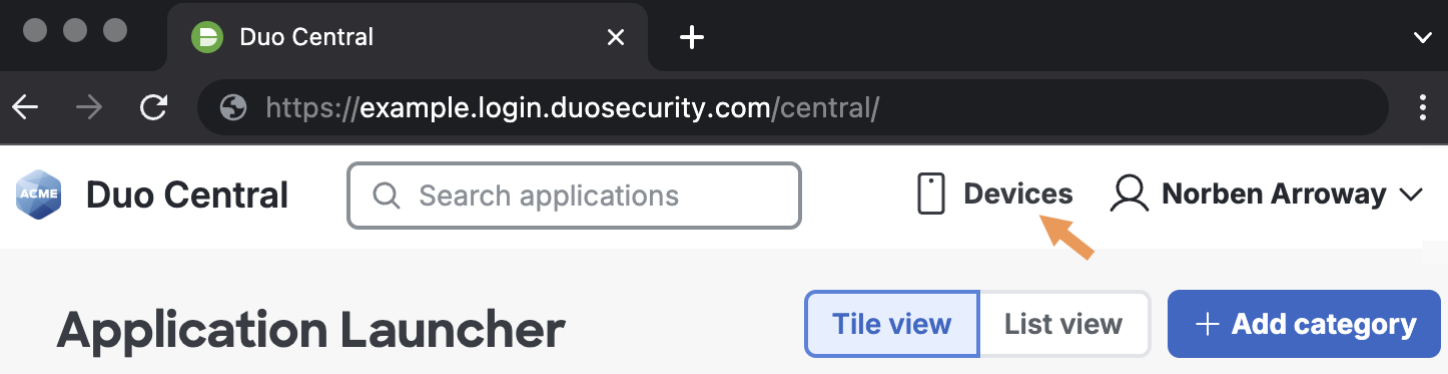
The Enable a standalone URL for the self-service portal that will appear on Duo Central and can be shared option makes Duo Central show a "Manage Devices" link at the top of the page which will let enrolled users — that is, users who exist in Duo with one authentication device — add, update, and remove authentication devices after they've already logged in to Duo Central.
Check the Allow unenrolled users to enroll 2FA devices into Duo when the New User Policy is set to "Allow Access without 2FA" option to allow a user unknown to Duo to access self-service device management if they successfully complete first-factor authentication and the New User Policy is set to "Allow Access without 2FA". Duo will automatically create a user for them in Duo when they access device management.
If more than 30 seconds have passed between the user logging into Duo Central and the user clicking the "Manage Devices" link, then the user must repeat both primary SSO login and two-factor authentication, regardless of an existing SSO authentication session or whether the user chose to remember their access device.
Users who access Duo Central but do not exist in Duo, which is possible when you have applied a new user policy that allows access to unenrolled users, do not see the "Manage Devices" link. If the effective authentication policy is "Bypass 2FA" or "Deny access" then the device management link isn't shown either.
The Duo Central device management site can also be accessed by users directly using the standalone URL shown on the page, which is something like https://example.login.duosecurity.com/devices. You can share this direct Duo Central device management link from your internal IT help sites and or other communications you send to users.
Users can securely end their device management session by clicking Logout. Sessions not explicitly ended via logout automatically terminate after 15 minutes.
User Access
The "User access" setting allows you to specify which Duo groups can access Duo Central. Restrict active Duo user access to Duo Central by choosing the Enable only for permitted groups option and selecting the Duo groups whose members you wish to allow access to Duo Central. Learn more about restricting user access to applications.
Policy
Create and assign application and group policies to Duo Central that control device security, allowed authenticators, and more. Learn more about working with policies.
Additional Settings
Optionally configure a custom voice greeting for phone call authentication, add administrative notes, or assign administrative units for Duo Central in the "Settings" section.

Duo Universal Prompt
The Duo Universal Prompt provides a simplified and accessible Duo login experience for web-based applications, offering a redesigned visual interface with security and usability enhancements.
| Universal Prompt | Traditional Prompt |
 |
 |
We've already updated the Duo Central application hosted in Duo's service to support the Universal Prompt, so there's no action required on your part to update the application itself. If you created your Central application before March 2024, you can activate the Universal Prompt experience for users from the Duo Admin Panel. Central applications created after March 2024 have the Universal Prompt activated by default.
If you created your Central application before March 2024, it's a good idea to read the Universal Prompt Update Guide for more information, about the update process and the new login experience for users, before you activate the Universal Prompt for your application.
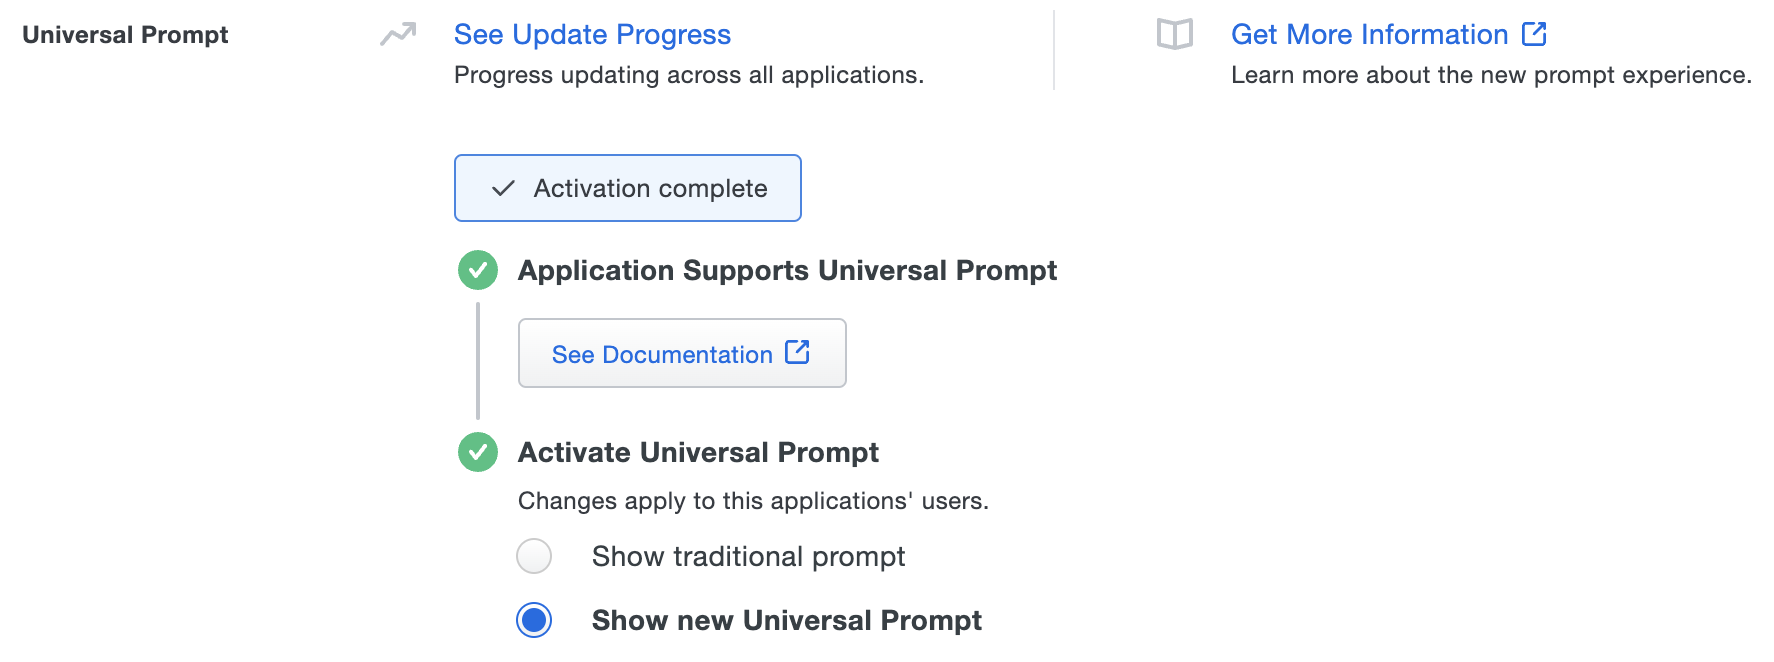
Activate Universal Prompt
Activation of the Universal Prompt is a per-application change. Activating it for one application does not change the login experience for your other Duo applications.
The "Universal Prompt" area of the application details page shows that this application is "Ready to activate", with these activation control options:
- Show traditional prompt: Your users experience Duo's traditional prompt via redirect when logging in to this application.
- Show new Universal Prompt: (Default) Your users experience the Universal Prompt via redirect when logging in to this application.
The application's Universal Prompt status shows "Activation complete" here and on the Universal Prompt Update Progress report.
Should you ever want to roll back to the traditional prompt, you can return to this setting and change it back to Show traditional prompt. However, this will still deliver the Duo prompt via redirect, not in an iframe. Keep in mind that support for the traditional Duo prompt ended for the majority of applications in March 2024.
Universal Update Progress
Click the See Update Progress link to view the Universal Prompt Update Progress report. This report shows the update availability and migration progress for all your Duo applications. You can also activate the new prompt experience for multiple supported applications from the report page instead of visiting the individual details pages for each application.
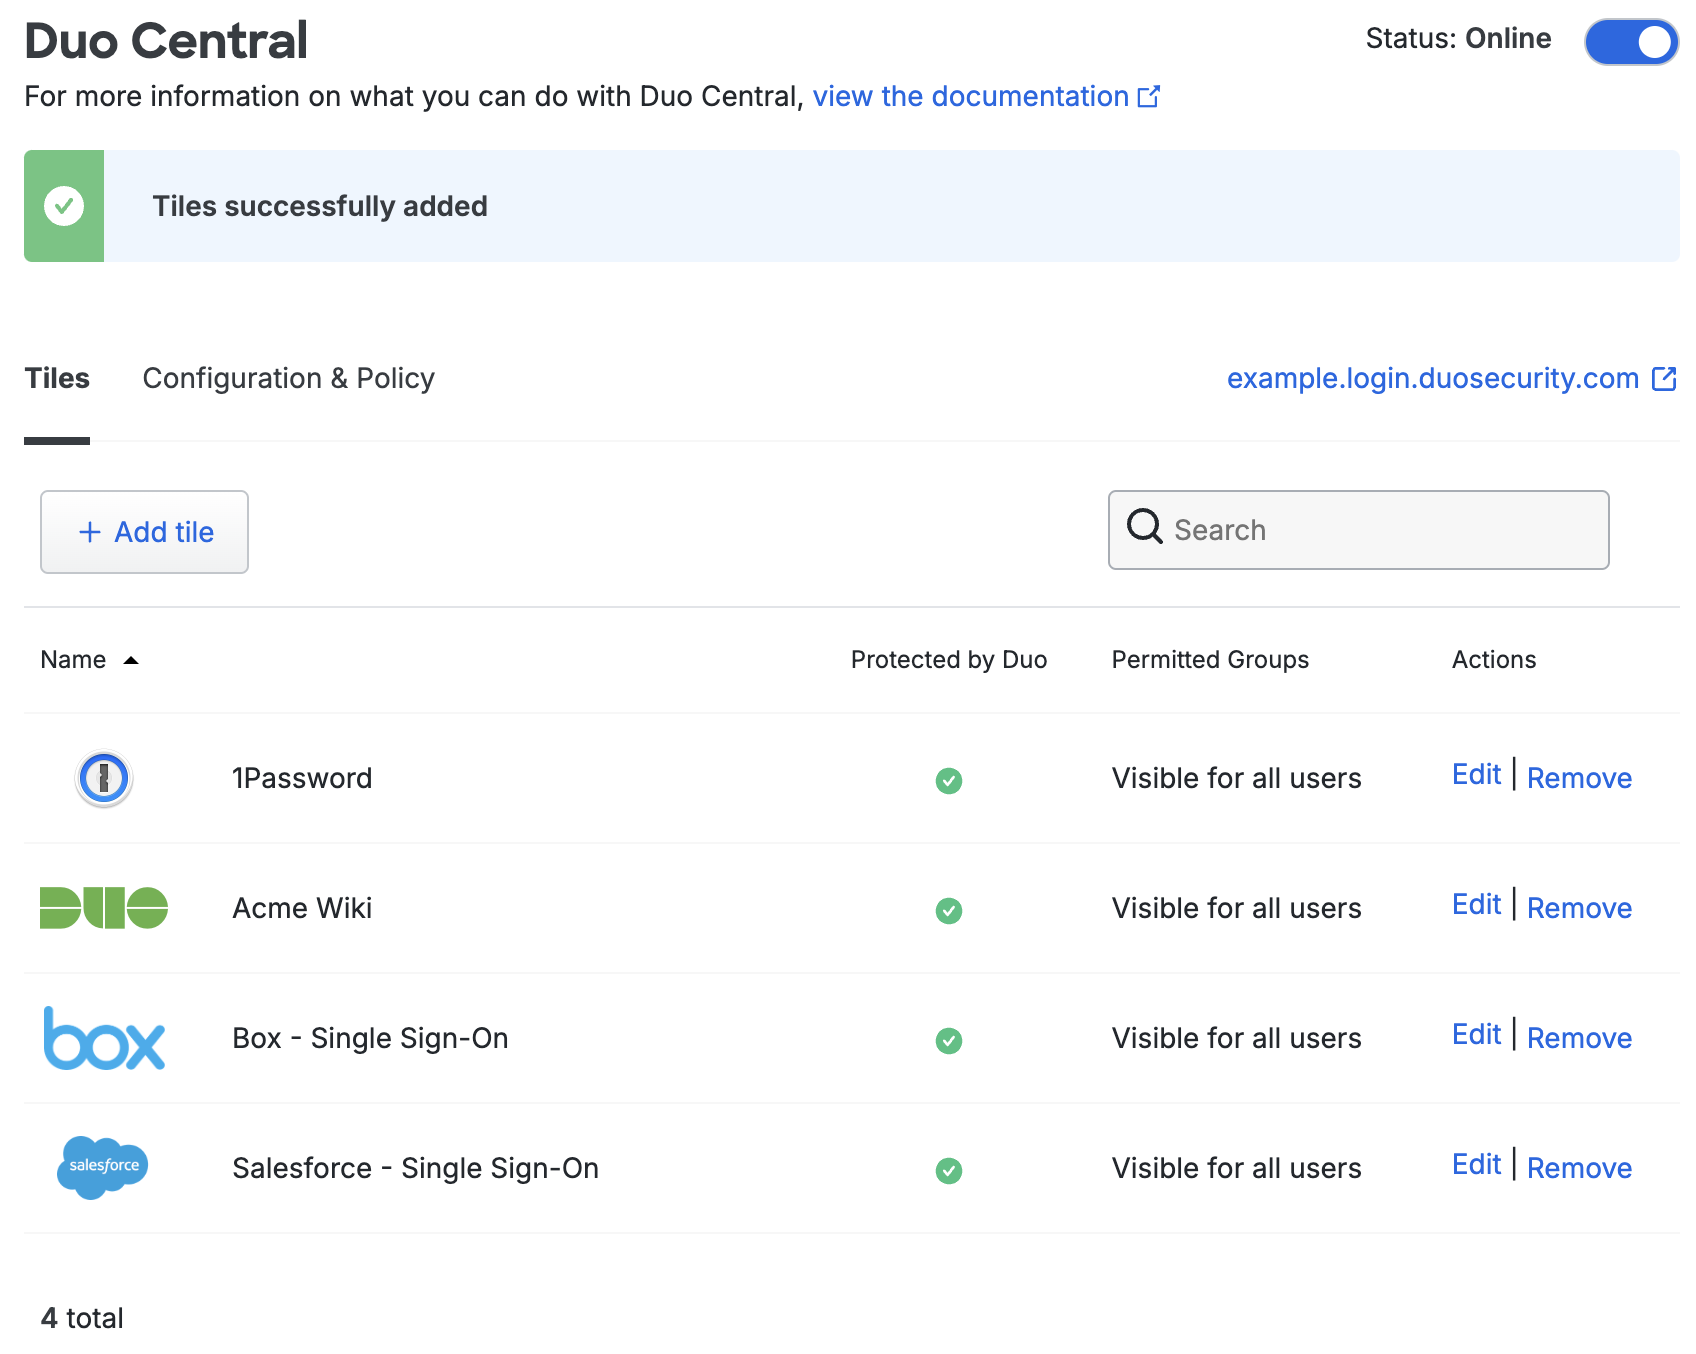
Manage Tiles
There are two different types of tiles you can add to Duo Central:
-
Application Tiles: Tiles that are for Duo-protected applications. These tiles inherit their names, user access, and default logo from the Duo application's configuration page.
- Duo Single Sign-On applications must support IdP-initiated authentication to be available as application tiles.
-
Bookmark Tiles - A customizable tile which can provide one-click shortcuts to any URL not protected by Duo.
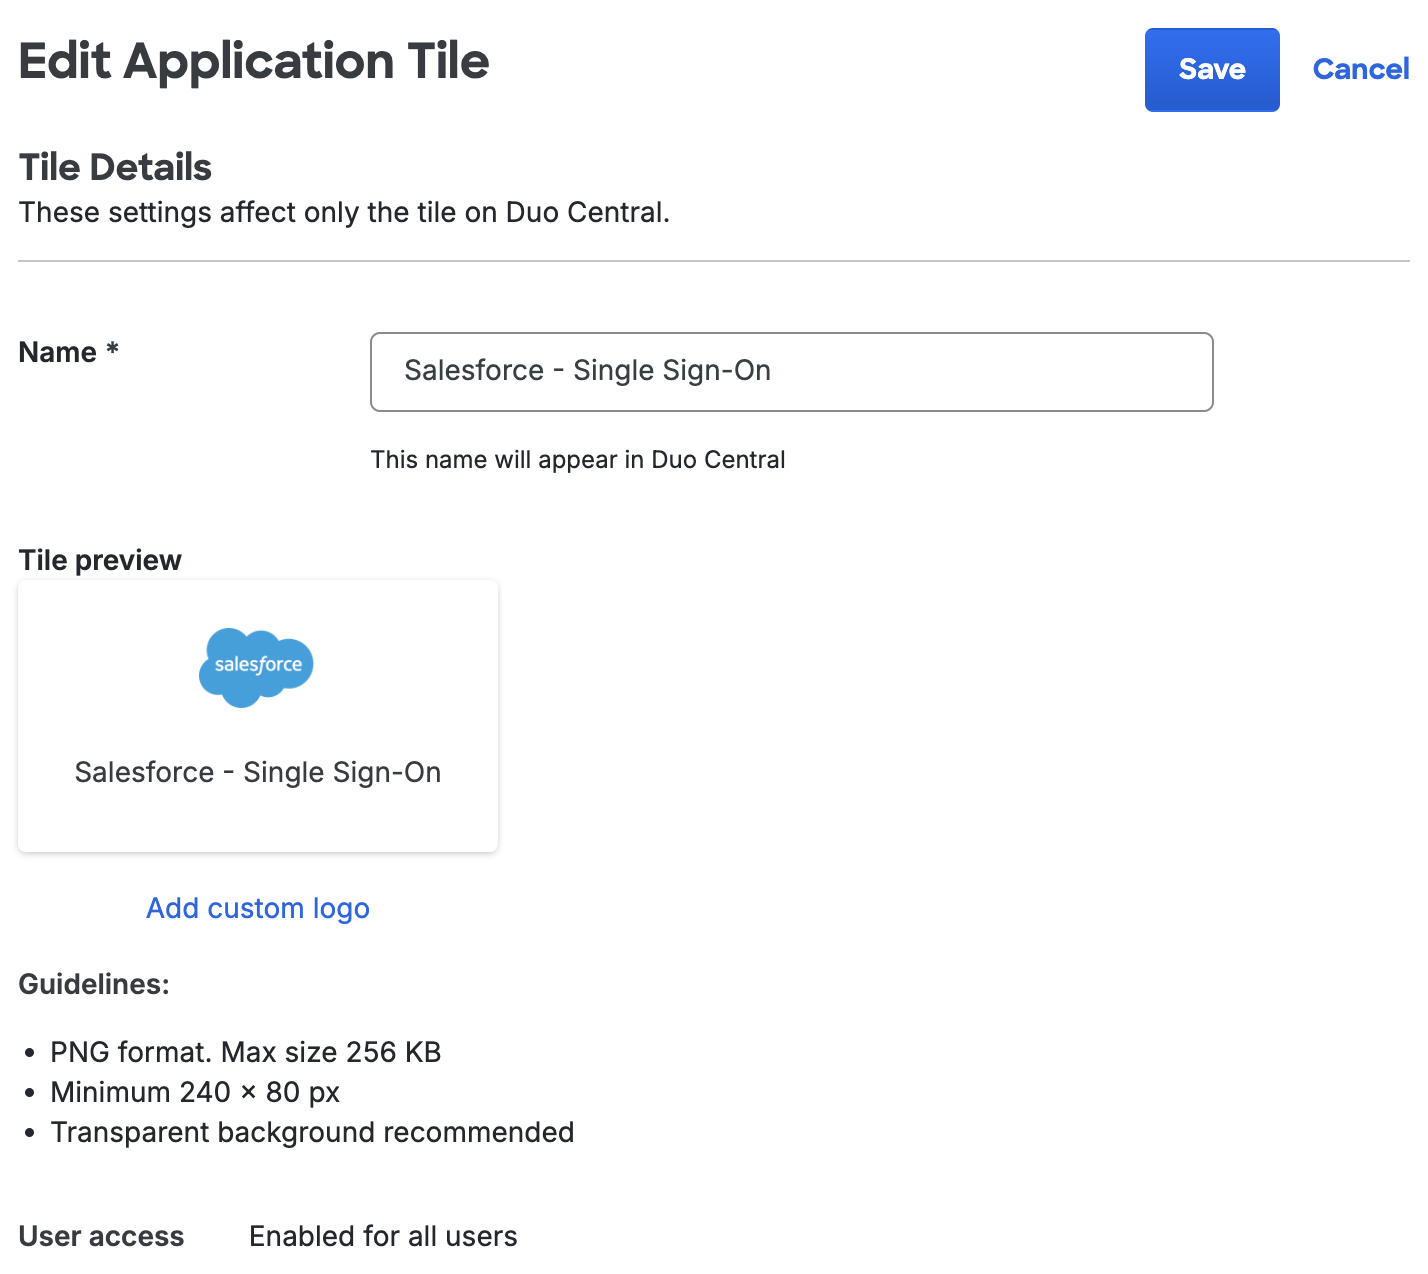
Add Application Tiles
-
On the Duo Central "Tiles" tab click Add tile. A pop-up will appear.
-
In the "What do you want to add to Duo Central?" pop-up click Add application tile. You'll be taken to a new page.
-
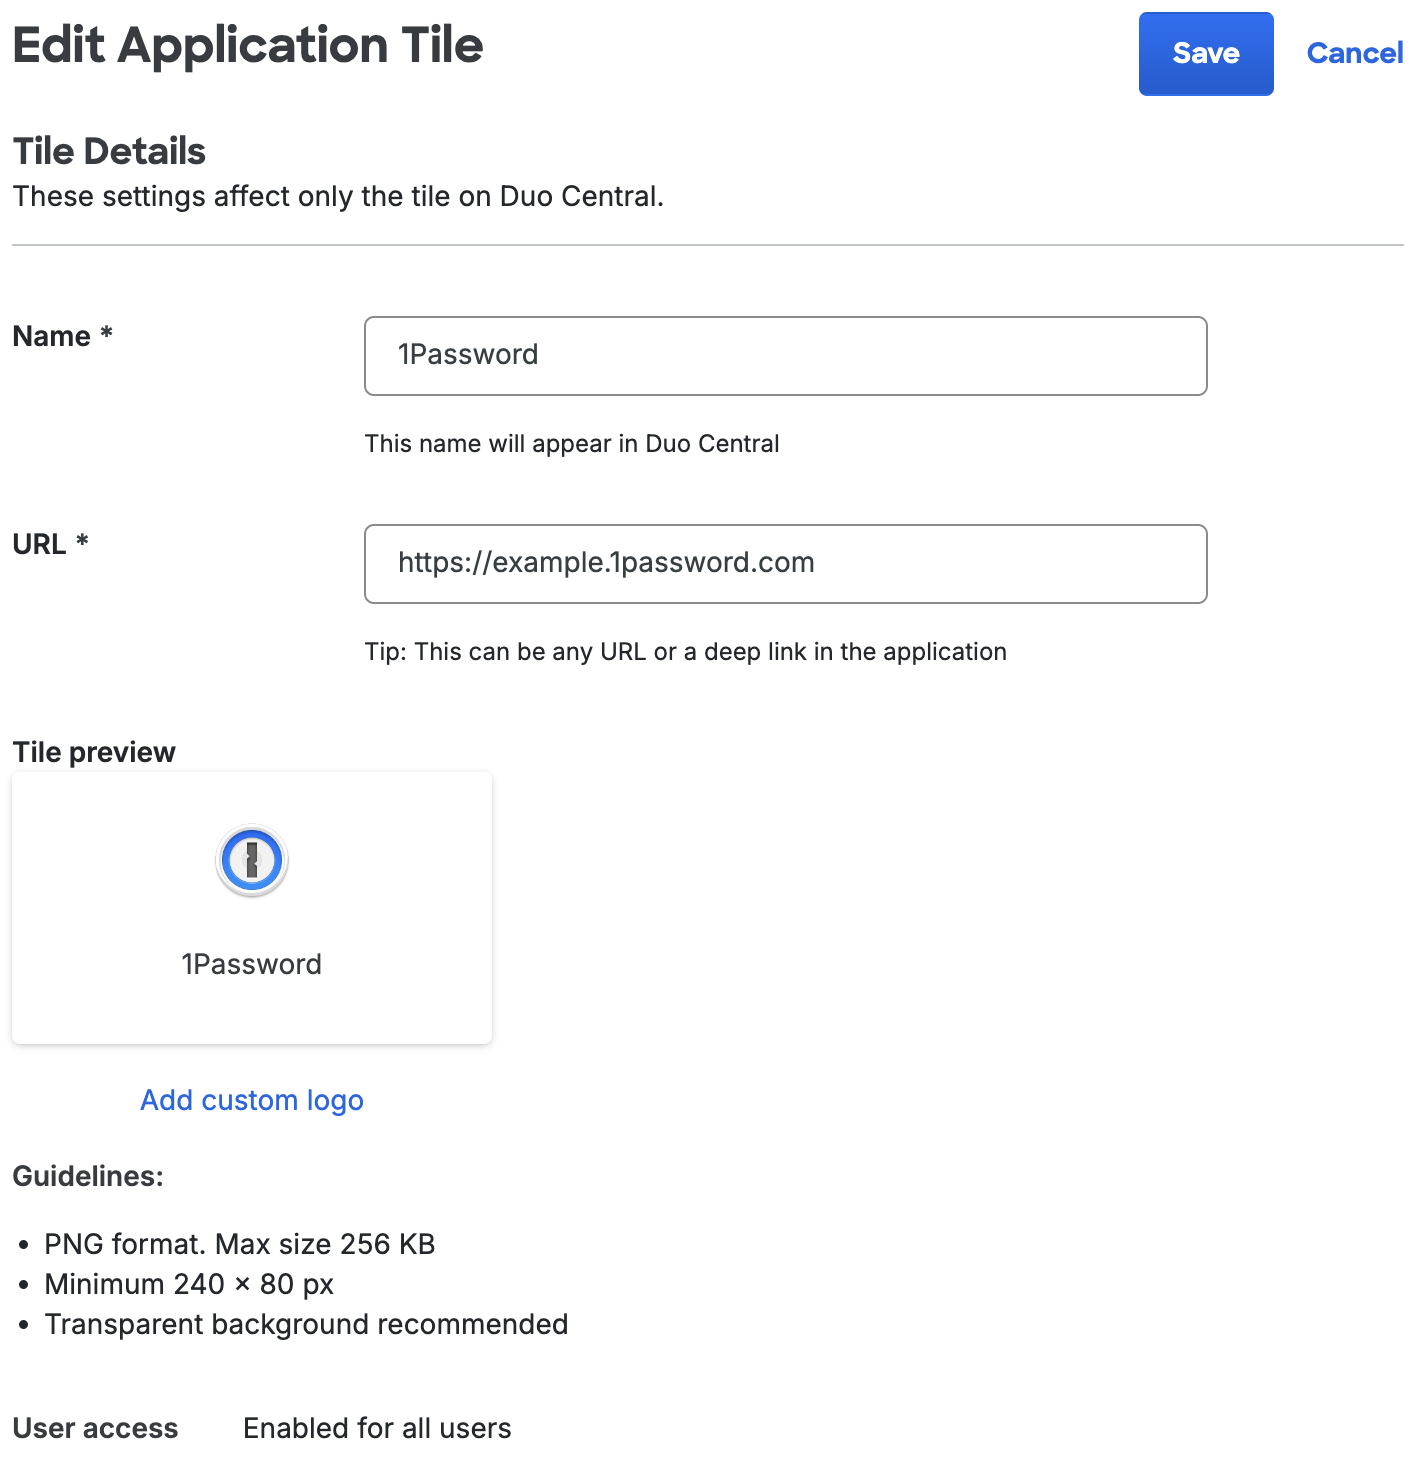
On the "Add Application Tiles" page you can select any of your existing Duo-protected applications to be added to Duo Central. Upon checking the box next to the application if the application does not have a checkmark in the "SSO" column you'll need to provide the Login URL of this application.
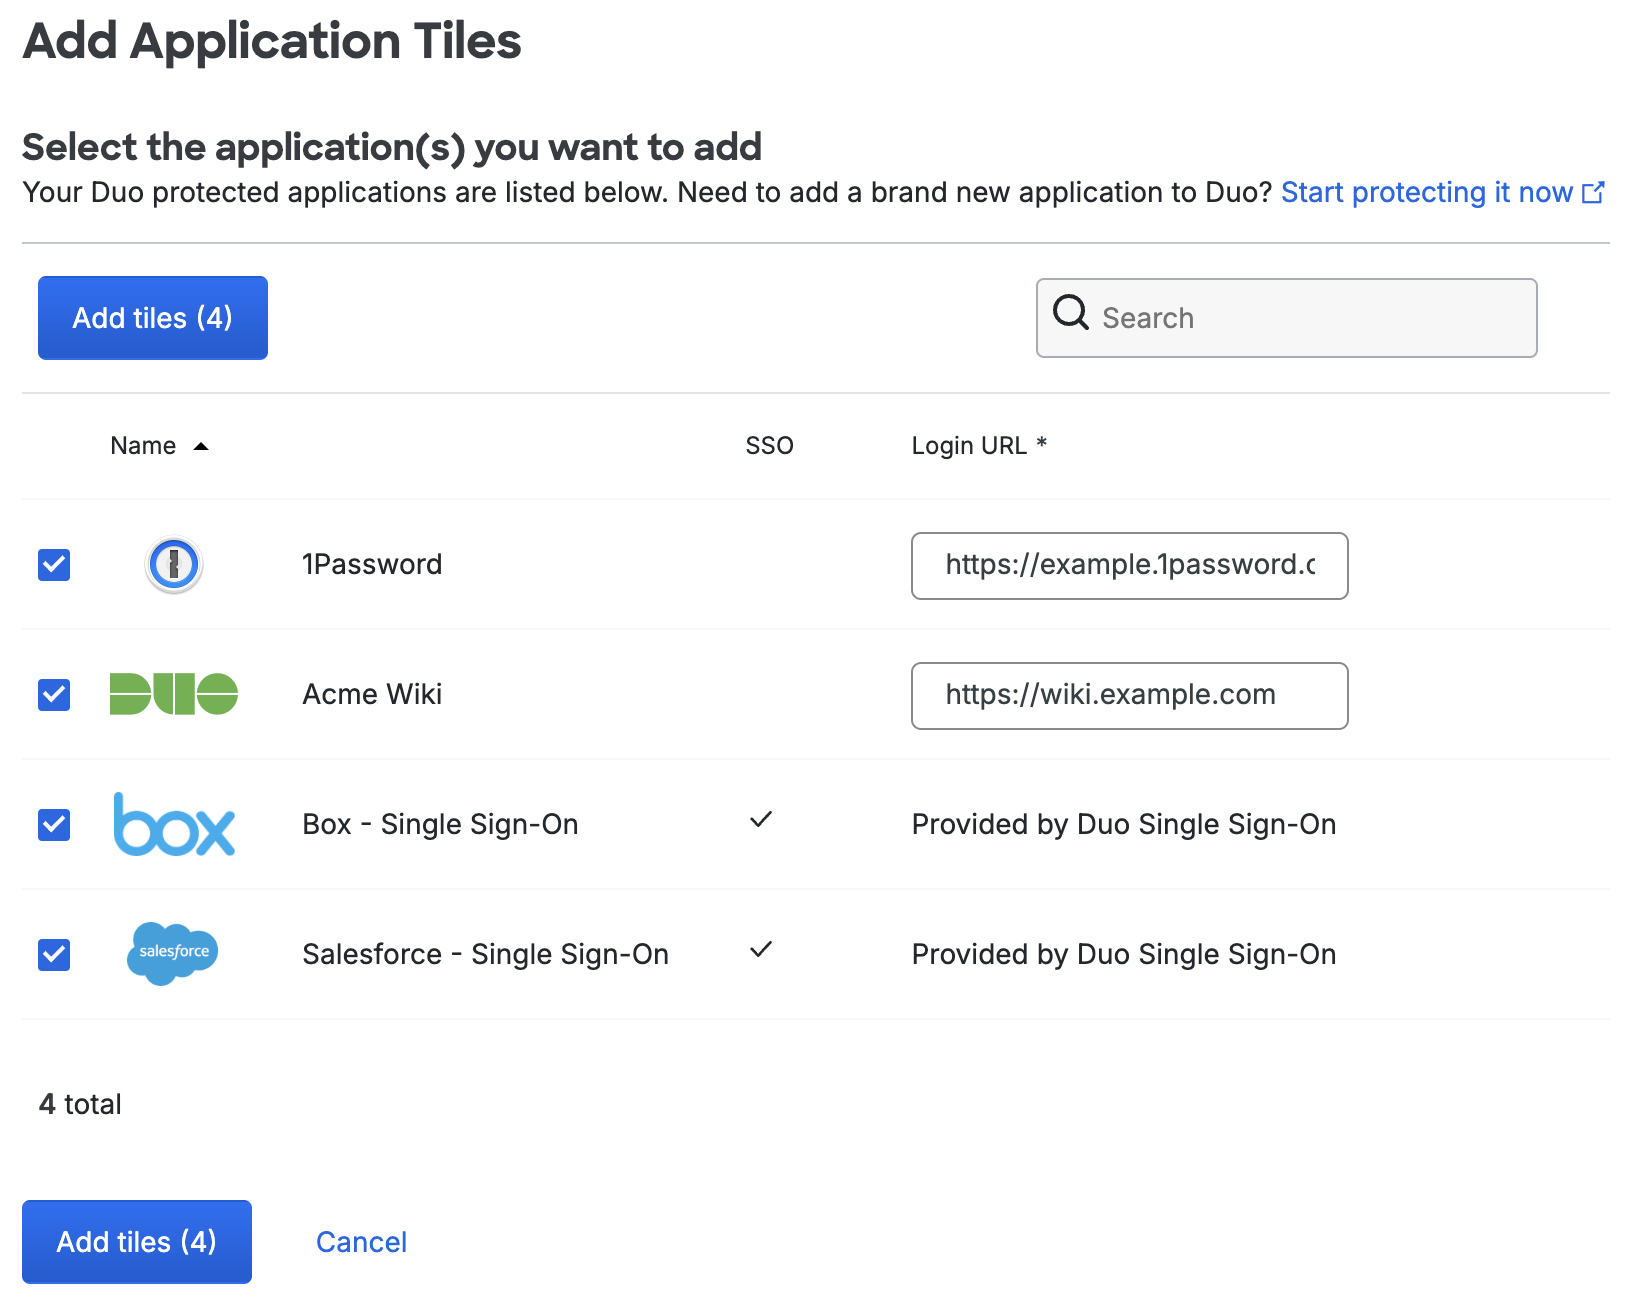
-
Once you've selected all your Duo applications you'd like to add as tiles click Add tiles. You'll return to the Duo Central "Tiles" tab.
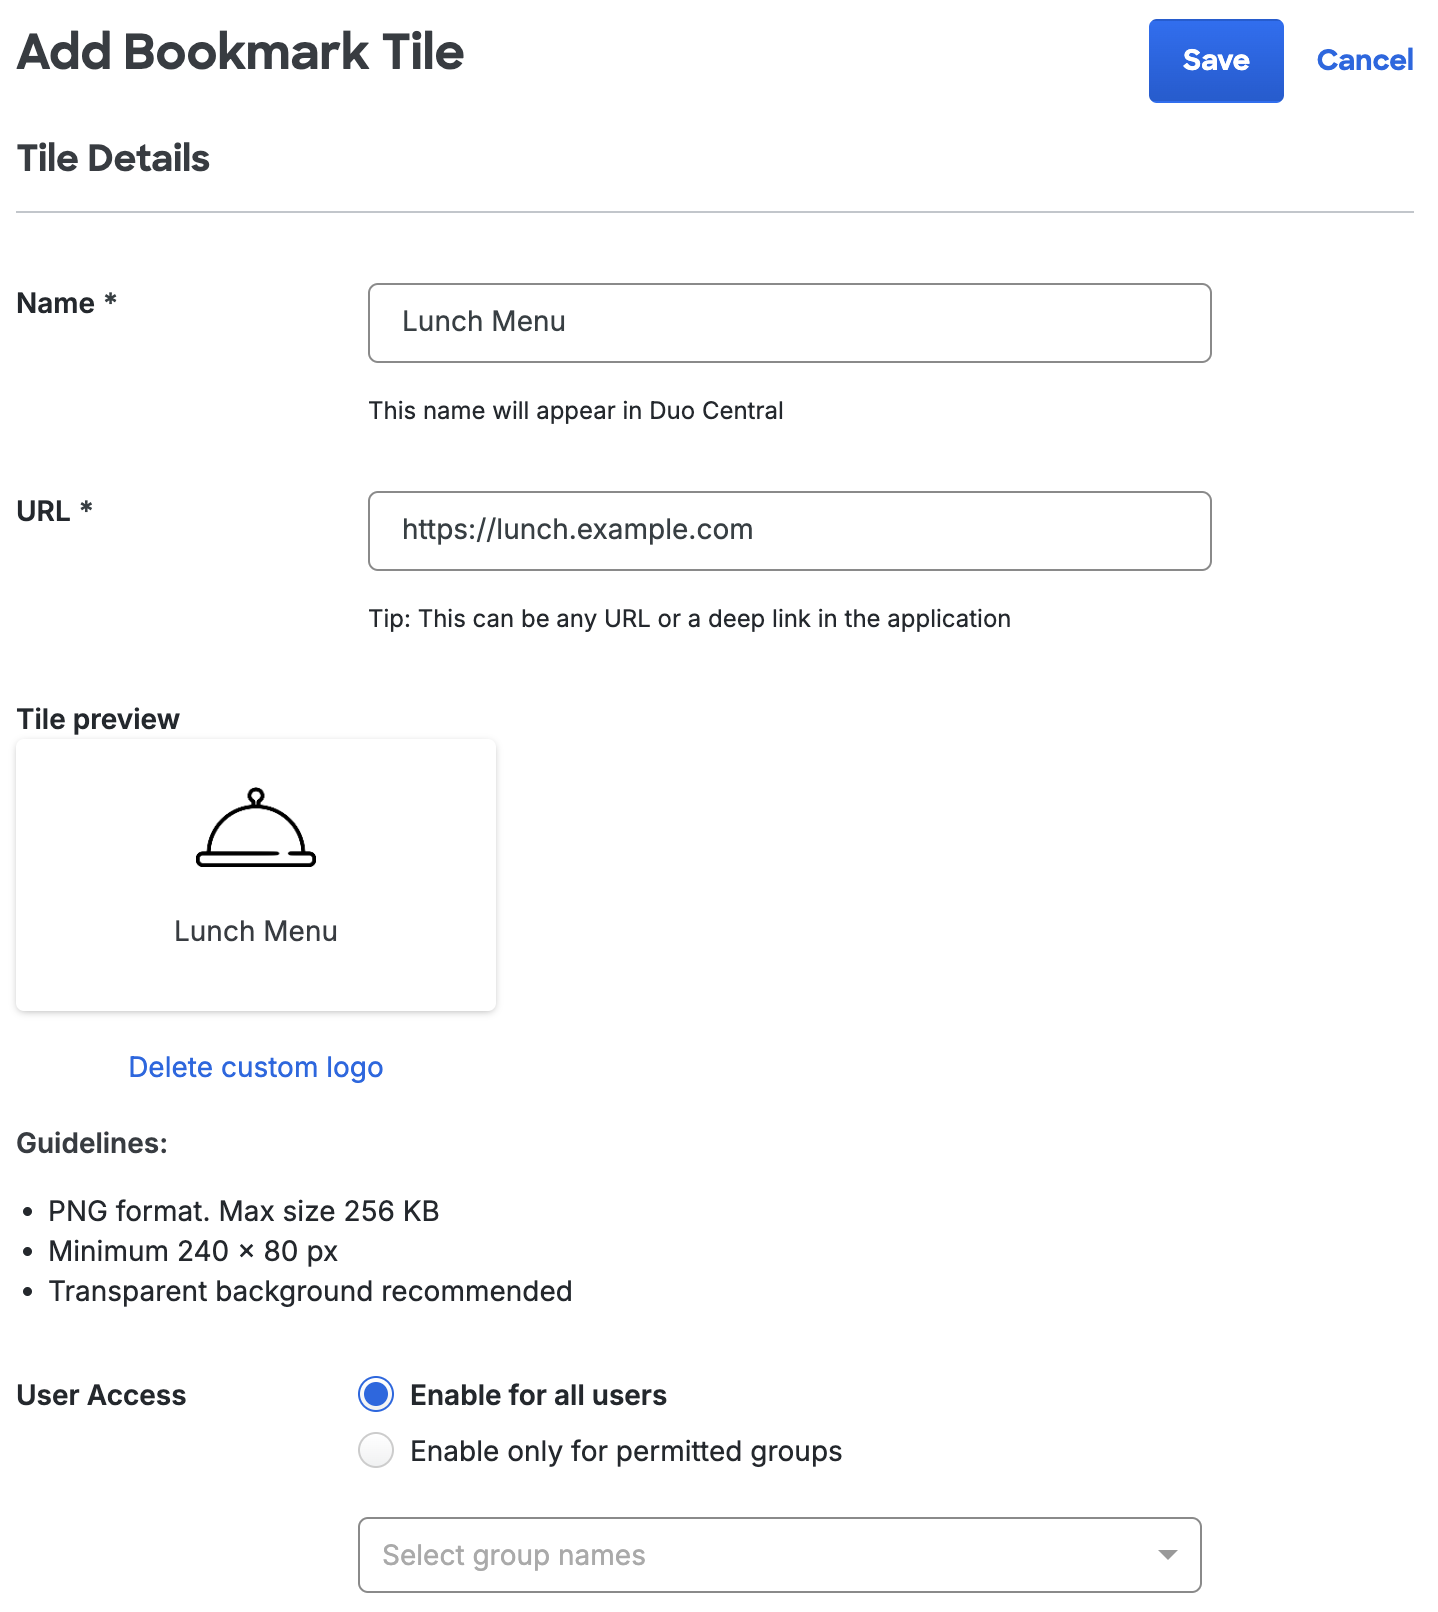
Add Bookmark Tiles
-
On the Duo Central "Tiles" tab click Add tile. A pop-up will appear.
-
In the "What do you want to add to Duo Central?" pop-up click Add bookmark tile. You'll be taken to a new page.
-
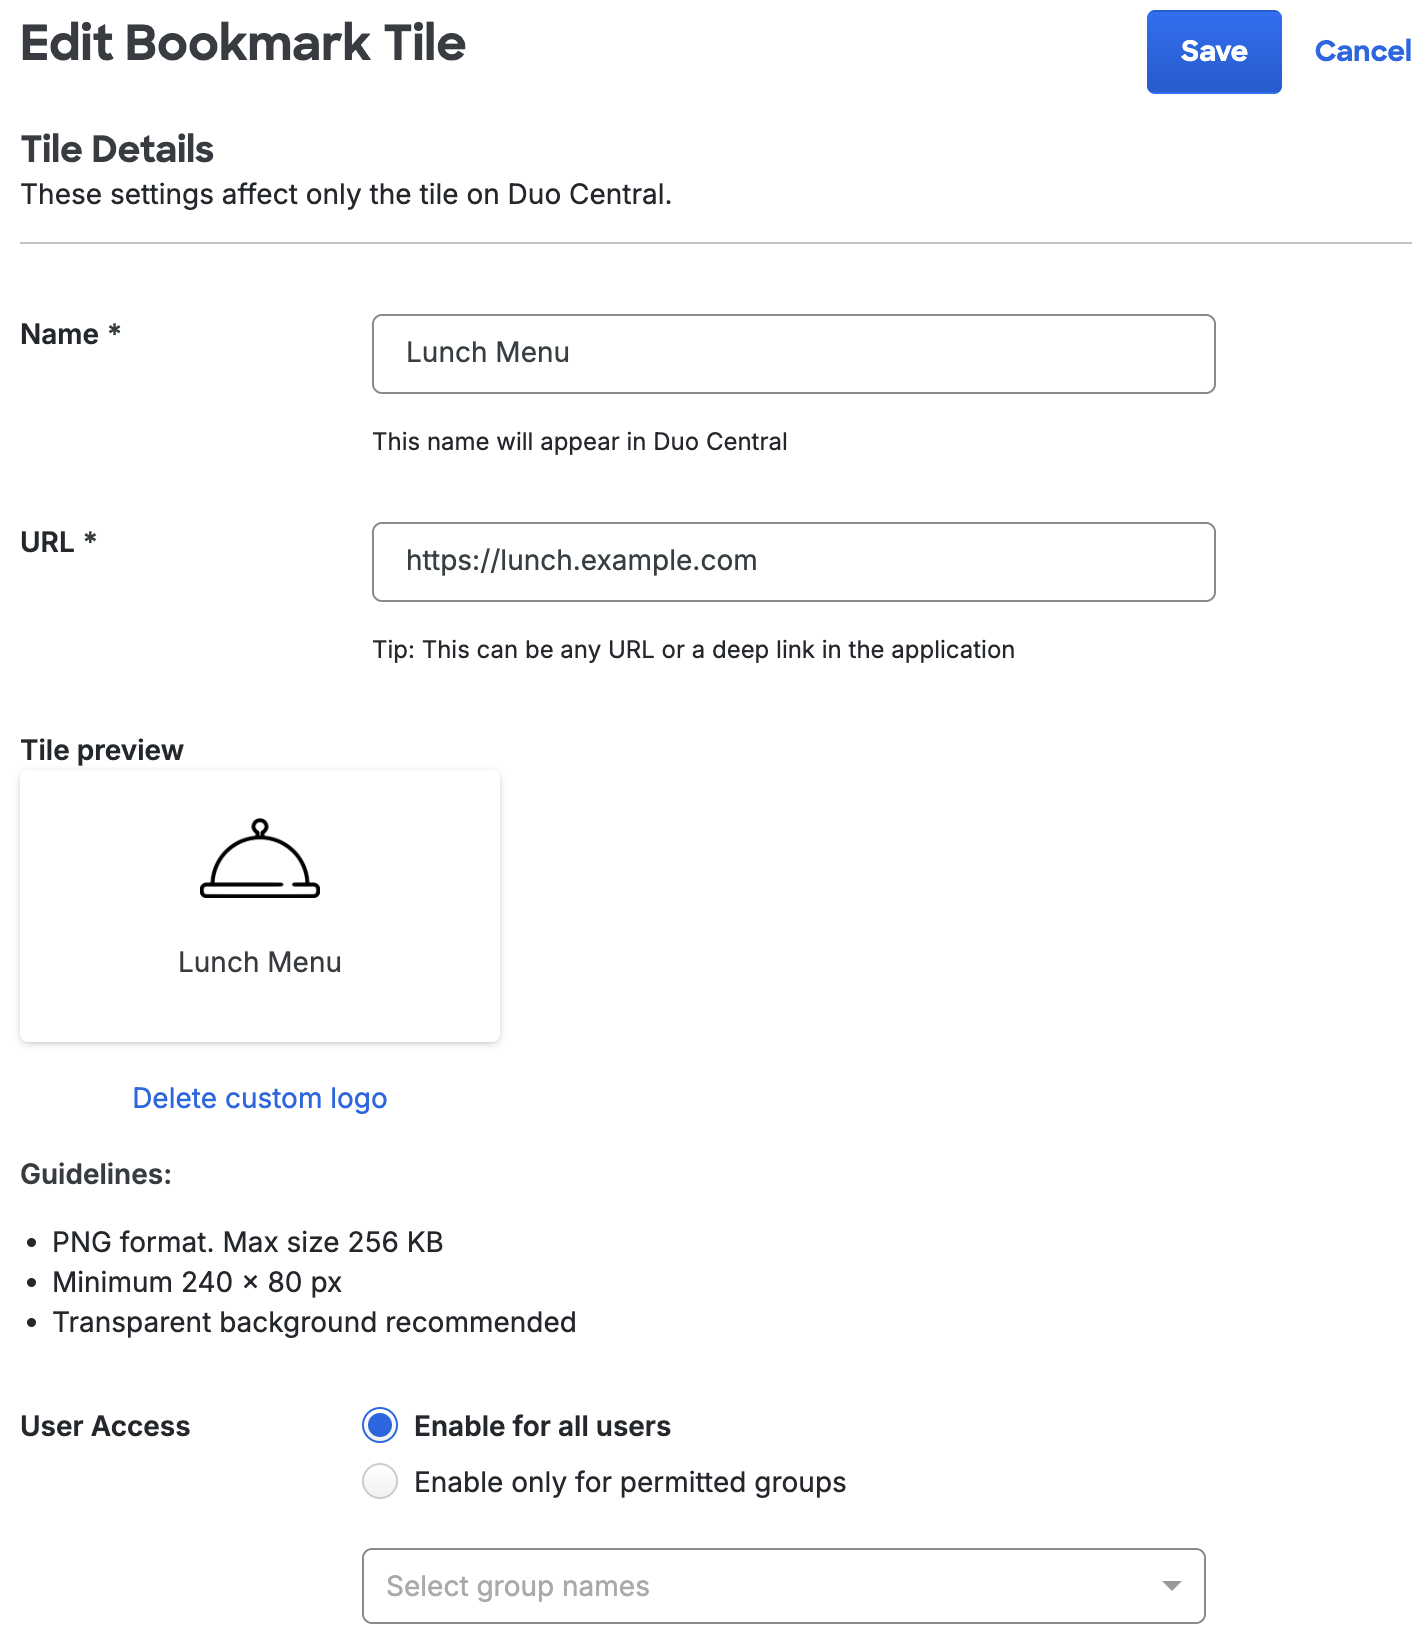
On the "Add Bookmark Tile" page type in the name of the tile into the Name field. You should see the name automatically updated in the "Tile preview".
-
Type the URL you'd like the tile to link to into the URL field. You can use any URL scheme to open up different kinds of websites or applications, for example:
-
A URL that begins with
https://to bookmark a web site for launch in the browser i.e. https://www.example.com -
A URL that begins with
ssh://to bookmark a link to create a SSH remote connection by launching the local client for SSH i.e. ssh://server.example.com -
A URL that begins with
rdp://to bookmark a remote desktop link that launches the local client for RDP connections i.e. rdp://server.example.com
-
-
Under "Tile Preview" you can click Add custom logo to upload a custom image to your tile. The tile preview will automatically update to reflect the new image. If you'd like to remove the image click Delete custom logo.
-
Next to "User access" you can use Duo groups to control which users see a bookmark. By default all users will can see a bookmark but you can restrict this by selecting Enable only for permitted groups and then choosing which groups should be able to see the bookmark.
-
Once you've made all your changes, click Save at the top of the screen. You'll return to the Duo Central "Tiles" tab.
Edit Tiles
-
On the Duo Central "Tiles" tab find the tile you'd like to edit and click Edit under the "Actions" column. You'll be taken to a new page.
-
Depending on type of tile, you'll be able to edit different properties.
-
SSO Application tiles will let you edit the name and custom logo. Changing the name will also update the application's name as well. To change the user access restrictions you'll need to visit the application's configuration page.
-
Non-SSO Application tiles will allow you to edit the name, login URL, and custom logo. Changing the name will also update the application's name as well. To change the user access restrictions you'll need to visit the application's configuration page.
-
Bookmark tiles will allow you to edit the name, URL, logo, and user access restrictions.
-
-
Once you've made all your edits to a tile click Save at the top of the page. You'll return to the Duo Central "Tiles" tab.
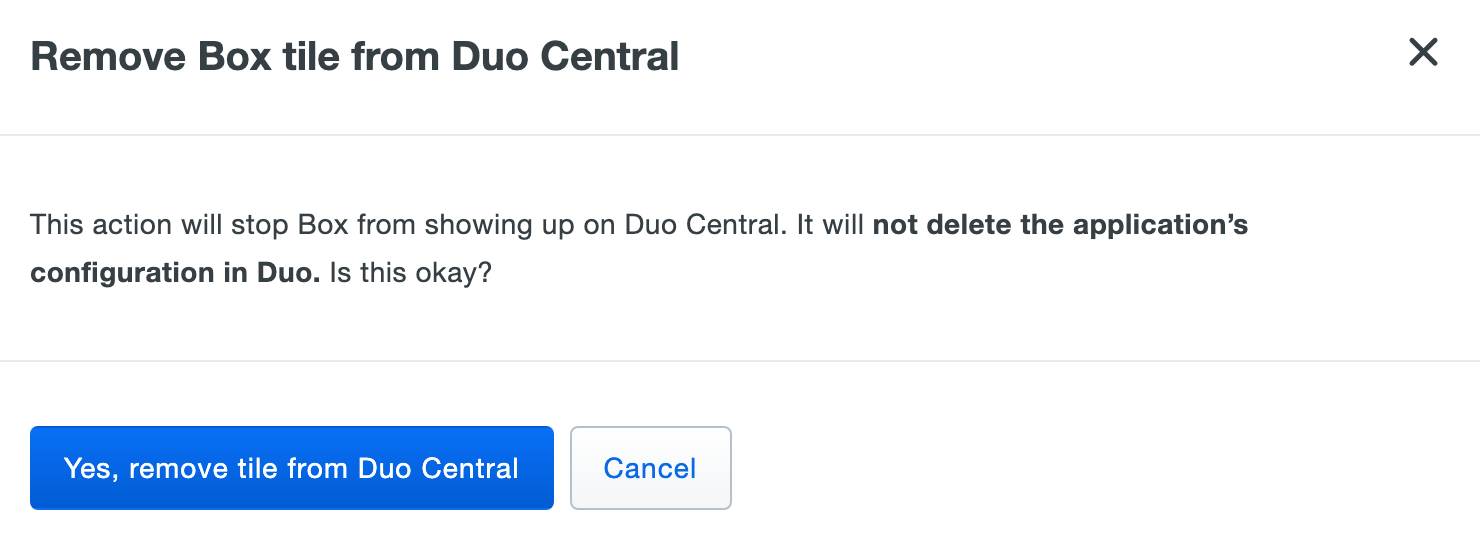
Delete Tiles
-
On the Duo Central "Tiles" tab find the tile you'd like to edit and click Delete under the "Actions" column.
-
A pop-up will appear asking you to confirm the tile deletion. Deleting an application tile does not delete the Duo-protected application. Click Yes, remove tile from Duo Central.
-
The tile will be deleted and you'll return to the Duo Central "Tiles" tab.
Log into Duo Central
Once you've configured Duo Central and added tiles, you're ready to login!
-
Navigate to the URL link found at the top of the page.
-
You'll be required to authenticate through your Duo Single Sign-On authentication source and complete Duo two-factor authentication.
Once you've successfully authenticated into Duo Central, you can:
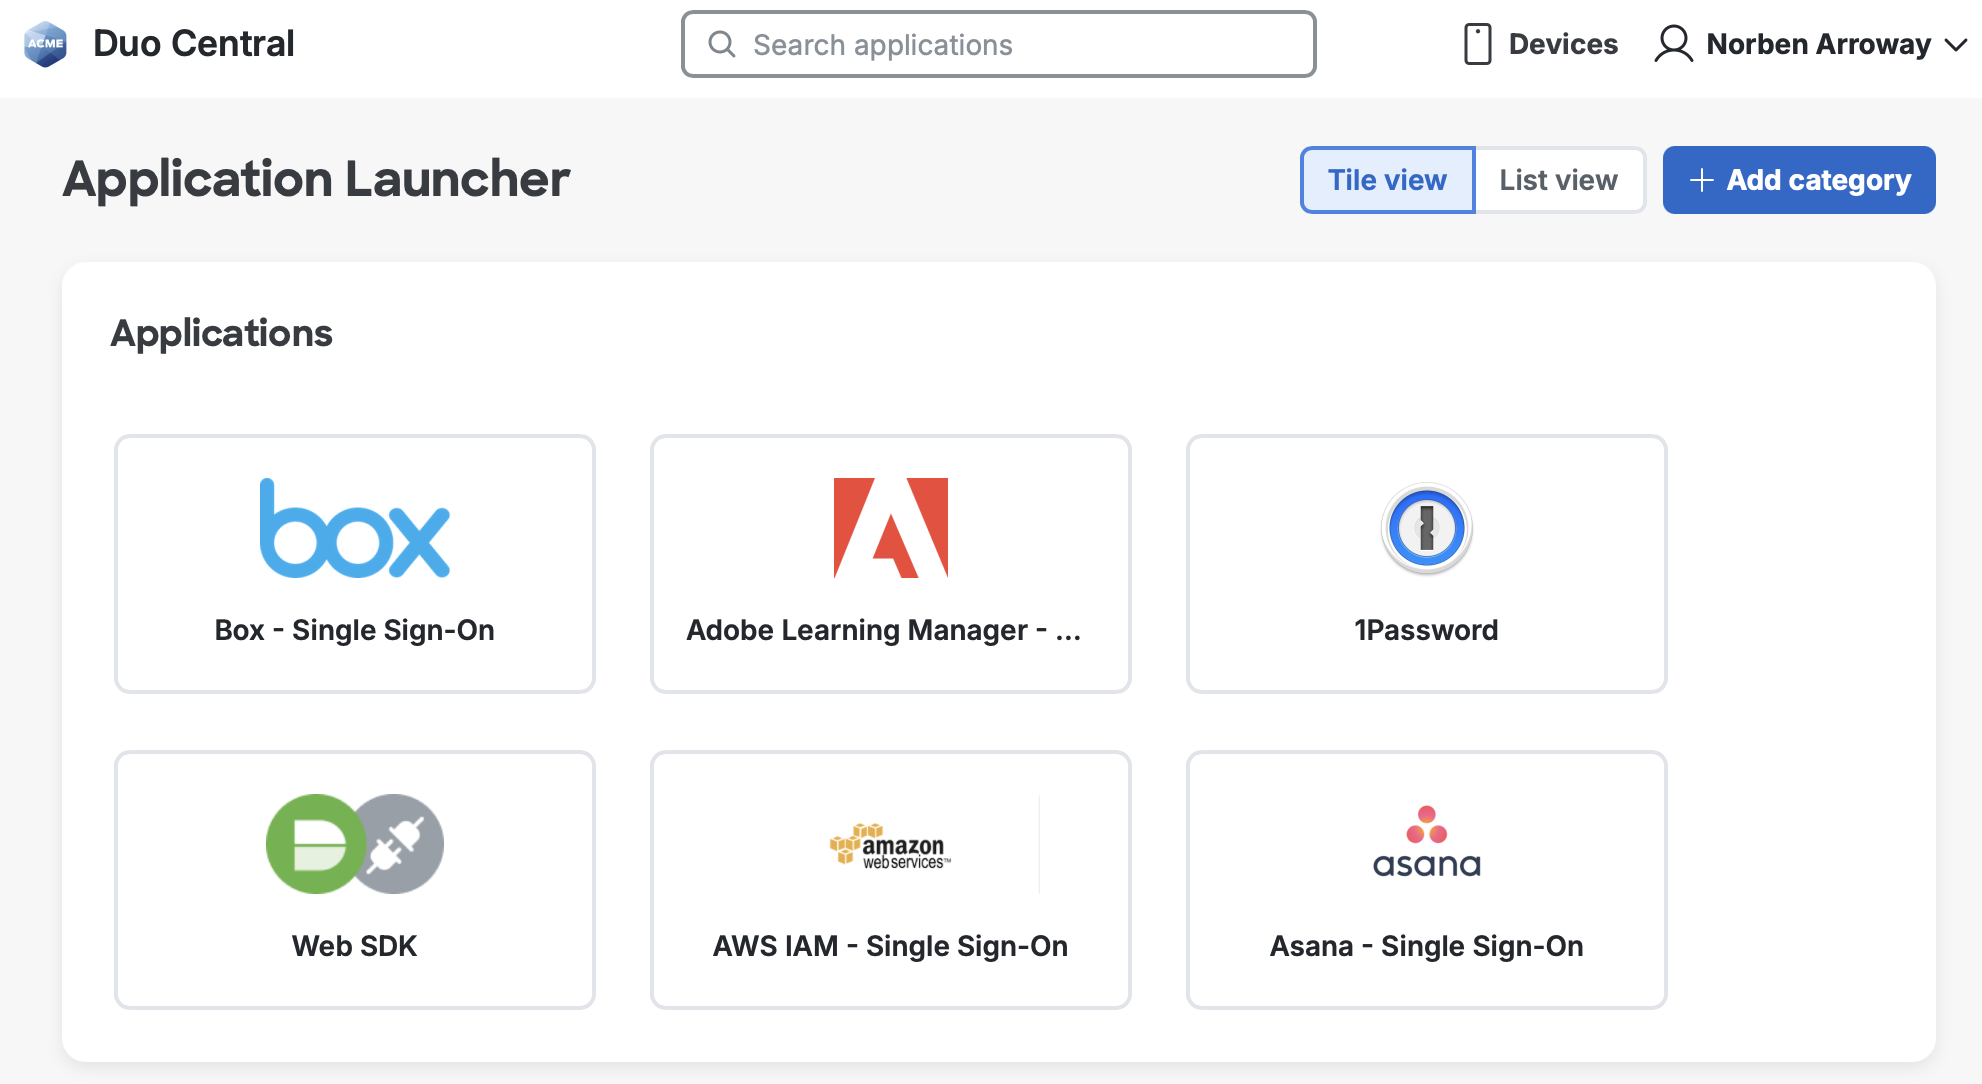
- See all the tiles your account has permission to access.
- Search for tiles by typing into the search bar at the top of the page.
- Click on a tile to open a new tab taking you to the URL of the tile.
- See your customer logo in the upper left-hand side of the page. Note that the logo must be part of the custom branding published to all users for it to show up in Duo Central or on the Duo SSO login pages.
- See your Duo Central name, which was configured on the Configuration & Policy tab on the "Duo Central" page.
Clicking your name in the upper right-hand side of the page will let you:
- Find the "Get Help" link. If you do not add a "Get Help" link, this is not shown.
- Logout of Duo Central.
On the "Application Launcher" page, you can switch between tile and list views.
You can also create custom categories to manage your applications in Duo Central. Learn more in the End User Guide.
Manage Devices from Duo Central
If you enabled the self-service portal in Duo Central's configuration with the standalone URL option then a Devices link appears at the top of the Duo Central page. Users who performed Duo primary and secondary authentication into Duo Central can click that link to access the Universal Prompt self-service device management. From this portal they can add new authentication devices, modify or reactivate existing devices, or delete devices no longer needed. Users will need to reauthenticate to access device management. This may require re-entering their primary password and completing Duo MFA.
Disable Duo Central
If you don't want your users to access Duo Central you need to disable it.
-
Locate the "Status" information and toggle at the top of the Duo Central configuration page.
-
Allow access to Duo Central by toggling the Status from "Online" to "Offline". A pop-up will appear asking you to confirm the change. This will globally control if the service is available for login.