Duo Single Sign-On
Last updated:
Overview
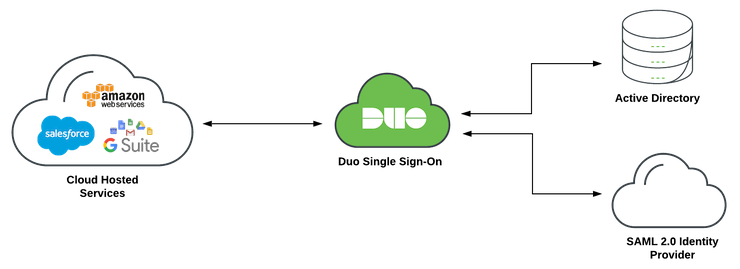
Duo Single Sign-On is a cloud-hosted single sign-on solution (SSO) solution which can act as a Security Assertion Markup Language (SAML) 2.0 identity provider or OpenID Connect (OIDC) provider that secures access to cloud applications with either Duo Directory credentials or your users’ existing directory credentials (like Microsoft Active Directory or Google Workspace accounts). SAML and OIDC delegate authentication from the application to an identity provider, and is used for SSO.
Duo provides SSO connectors for enterprise cloud applications like Amazon Web Services, Salesforce and Workday. Duo Single Sign-On also offers generic connectors with the ability to provide your own metadata and connect to just about any app that supports the SAML 2.0 or OIDC standard.
Protected cloud applications redirect your users to Duo Single Sign-On, authenticate your users using Duo credentials or your existing primary authentication source for credential verification, and then prompt for two-factor authentication and perform access and device checks before permitting access to the application.
Duo Single Sign-On is available in Duo Premier, Duo Advantage, and Duo Essentials commercial plans, and is not available in Duo Federal plans. Learn more about Duo's SSO solution.
If you choose not to use Duo Directory as the primary identity store, Duo Single Sign-On supports on-premises Active Directory (AD) and cloud or on-premises SAML IdPs as external identity sources.
Authentication Sources for Duo Single Sign-On
Duo SSO can verify users from these authentication sources:
-
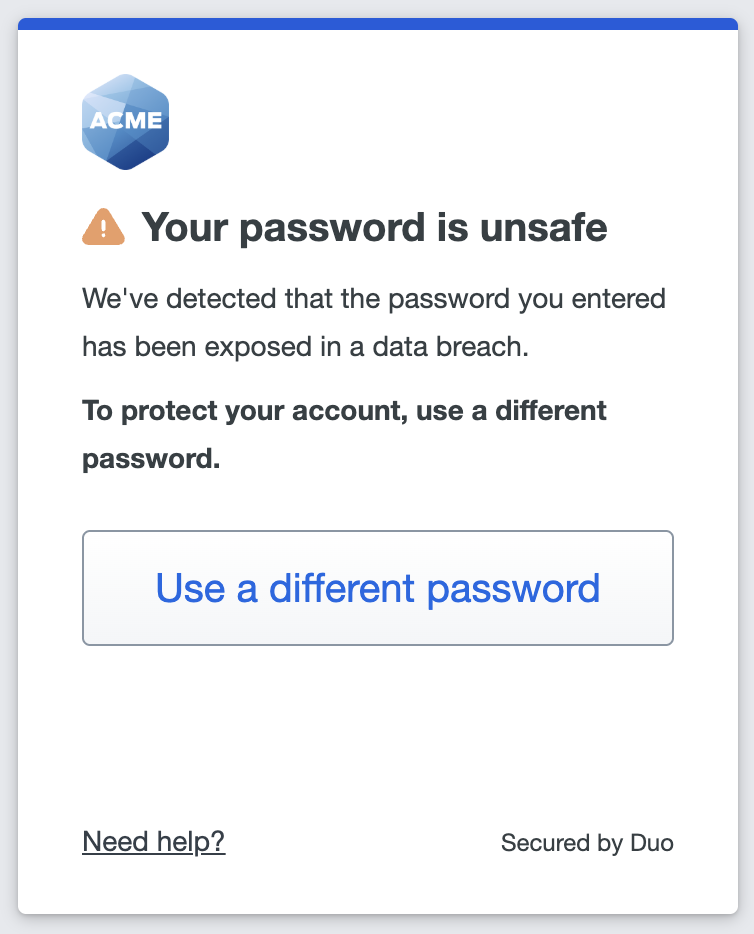
Duo Directory: Your users are hosted in Duo's cloud service and this is the only directory used for primary authentication. No additional SSO configuration is needed to use Duo Directory as the authentication source. Duo-hosted users may set login passwords or not, as determined by your enrollment policy.
Duo passwords get checked at use against a regularly-updated database of breached passwords. Users may not set a new password found in the breached password database. If we find a user's current password value among the compromised password lists, then the user must set a new, safe password before continuing to the application.
-
External authentication sources: Your users are hosted in an existing Active Directory (AD) domain, or in an existing external SAML identity provider, such as Microsoft Entra ID, Google Workspace, Okta, etc. The external authentication source manages passwords and relevant policies. You will need to perform additional configuration steps to add these external identity providers. The users in your external authentication sources could be employees, contractors, third-party vendor users, etc.
You can have users who will log in to apps with Duo SSO exist in multiple, co-existing authentication sources, such as Duo-hosted directory and Active Directory, and use Routing Rules to seamlessly direct users to the correct authentication source for primary authentication when they log into SSO applications e.g. authenticating your organization's internal users against Duo's directory, while directing login requests from third-party users to the external authentication source capable of verifying their credentials.
Authentication Context Information
Duo SSO includes identifiers for the authentication methods used during the authentication in its responses, using values defined by RFC 8176 (Authentication Method Reference (AMR) Values). Duo sends AMR values upon interactive authentication success, indicating the strength of the authentication method used. Duo includes the same AMR information from the initial success for subsequent remembered device authentications as long as the device cookie remains valid. Duo does not send AMR information when a user bypasses Duo authentication due to effective status or other policy settings.
| Factor Category | Example Factors | AMRs Sent |
|---|---|---|
| Push/Desktop/Passwordless | Duo Push, Verified Duo Push, Duo Desktop, Duo Mobile Inline Auth, Passwordless Push | mfa, pop, user |
| FIDO2/WebAuthn | Passkey, Security Key, Platform Authenticator, Roaming Authenticator, U2F | mfa, pop, user |
| SMS | SMS Passcode | mfa, sms, otp |
| Phone | Phone Call | mfa, tel |
| OTP/Passcode | Hardware Token, Duo Mobile Passcode, Yubikey OTP, Desktop Token, Bypass Code | mfa, otp |
| Non-interactive | Remembered Device | Inherits original authentication AMR values |
| Bypass | Authorized Network, Bypass Status | Not Sent |
Prerequisites
Before you start using Duo Single Sign-On, make sure to meet all the requirements described below:
- A Duo Admin with the Owner, Administrator, or Application Manager role.
- If you don't want to use Duo as the primary authentication source: an Active Directory or a SAML identity provider that can be used as your primary authentication source for Duo Single Sign-On.
- This can be the same Active Directory domain or SAML identity provider that you use for directory sync, but you still need to complete all the Duo SSO authentication source setup steps separately from directory sync setup.
- If you're using Active Directory you'll need:
- At least one standalone Windows or Linux server that can communicate with your Active Directory domain controller(s) (three servers recommended for resiliency).
- Service account credentials for Active Directory.
- Access to DNS for the user email domains you'll use with SSO to add TXT records.
You should also identify the SAML 2.0 service provider or OIDC relying party web applications you want to protect with Duo Single Sign-On.
Configure Duo Single Sign-On Settings
Role required: Owner
-
Log in to the Duo Admin Panel.
-
Navigate to Applications → SSO Settings. From here you can begin configuring Duo SSO authentication sources and other options.
SSO Controls for Users Hosted in Duo
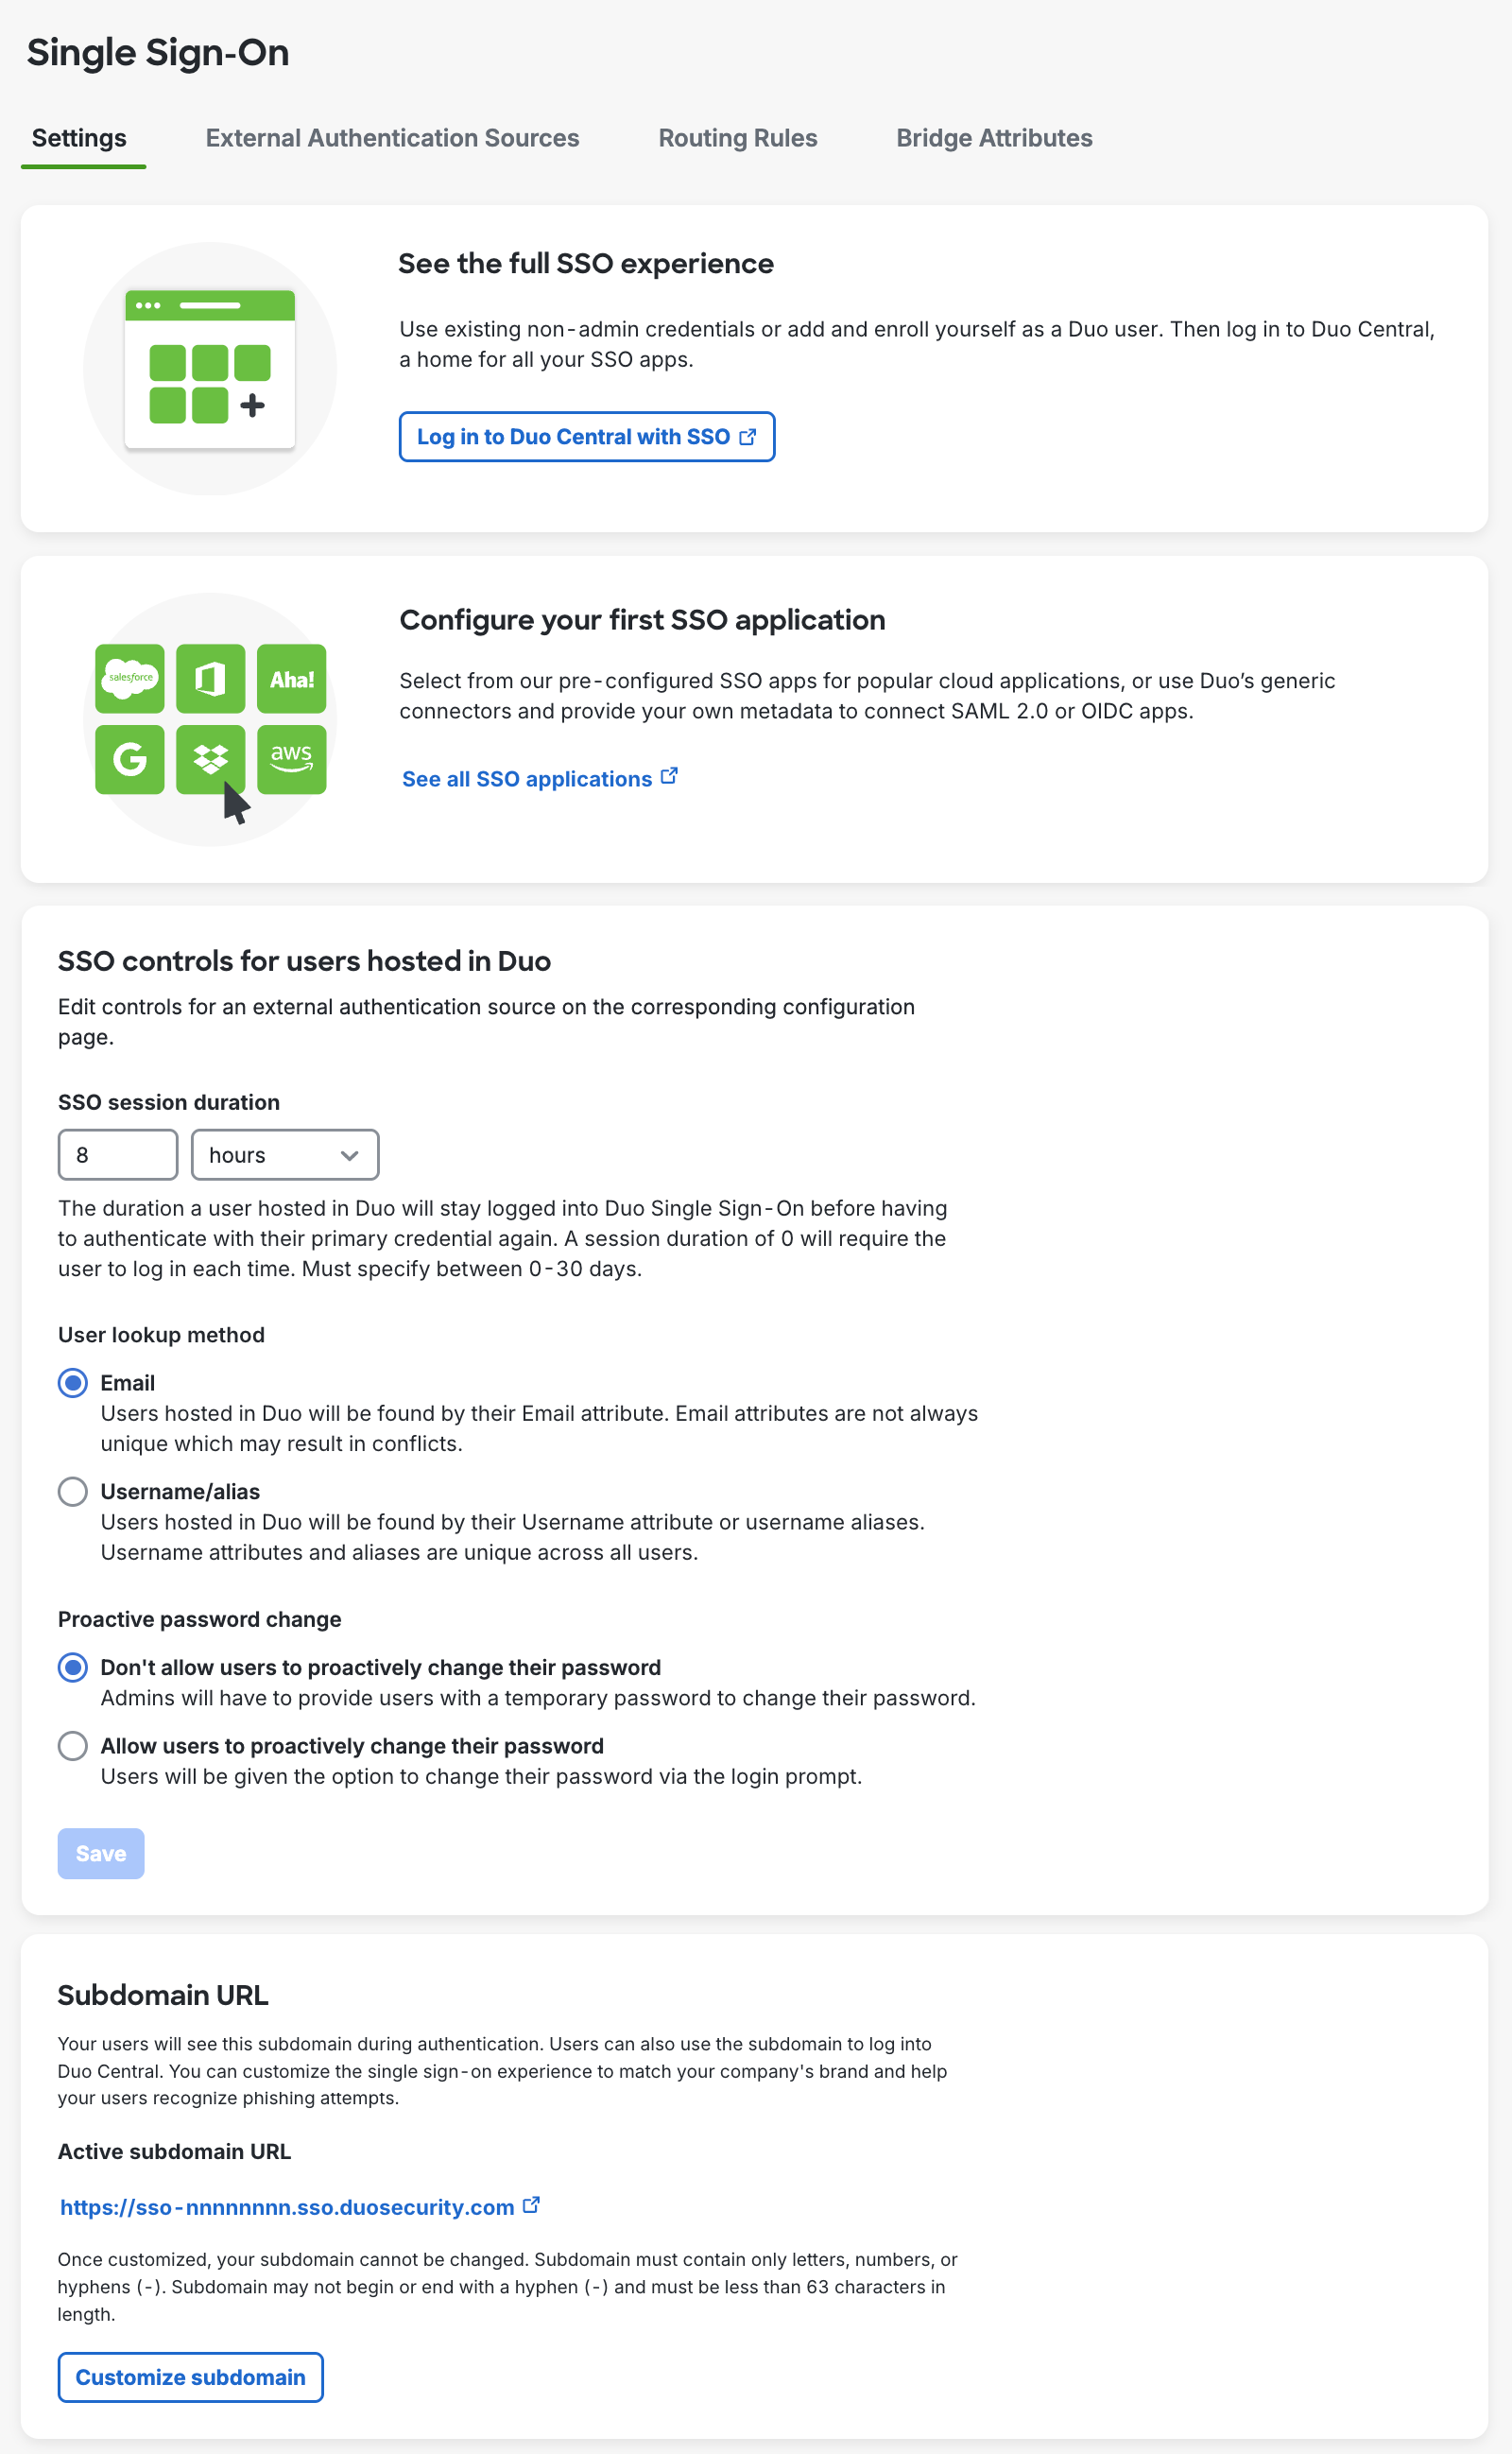
If you plan to use Duo as your primary authentication source, you can configure the "SSO controls for users hosted in Duo" now. Click Save if you make any changes.
-
SSO session duration: This controls how long a user will stay logged into Duo SSO before having to authenticate with their primary credential again. You can set the duration in days or hours, from 0 to a maximum of 30 days. If you set this to 0 then users will need to log in every time they access an SSO application.
Changing this value will affect existing Duo SSO sessions by forcing any logged-in users to authenticate again if they were logged in longer than the new set duration. Duo SSO session expiration does not affect the session established independent of Duo between the end-user's client and the application.
-
User lookup method: Choose whether users hosted in Duo will be found using their Email or Username/alias attribute values.
-
Proactive password change: This allows you to control whether users are allowed to proactively change their password. When enabled, users can change their password via the login prompt.
The Duo Password enrollment policy options determine the complexity requirements for new Duo Directory passwords. You may also configure password expiration options in your enrollment policy, such as a maximum password age and whether to show a warning at login before the password expires.
This setting only applies to Duo Directory users. Proactive password reset for AD users is configured in the Active Directory external authentication source settings.
Subdomain URL
The subdomain URL is what your users see when signing in to Duo SSO applications, and is also the access URL for Duo Central. A default URL is already assigned to your Duo account, with the format https://sso-nnnnnnnn.sso.duosecurity.com.
You can create a custom subdomain URL to make it easier for your users to remember. Note that you can't change the custom subdomain once you set it.
Duo trial accounts may not create custom subdomain URLs.
To customize your subdomain URL:
-
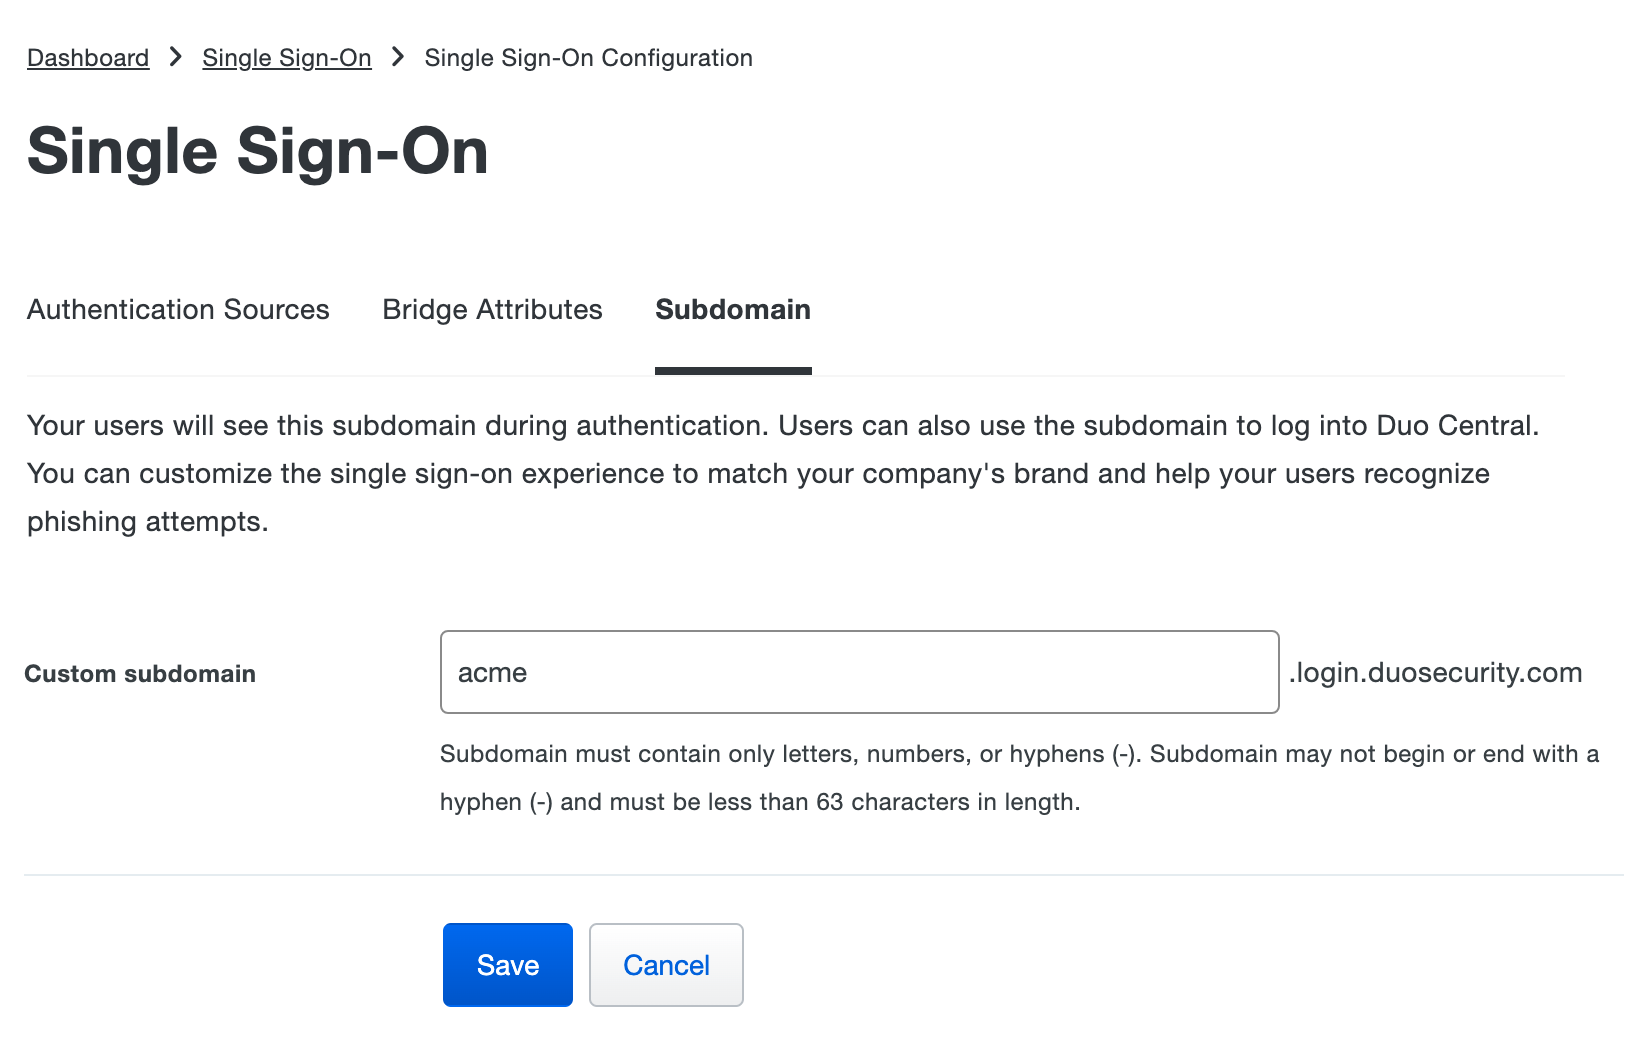
While on the Single Sign-On "Settings" tab, click Customize subdomain to start creating a custom SSO login URL.
-
Enter the subdomain you'd like your users to see when they are logging in with Duo Single Sign-On. For example, you can enter acme and users would see acme.login.duosecurity.com in the URL when logging into Duo Single Sign-On. Click Save.
-
Review the information in the "Confirm Custom Subdomain" prompt and then click Confirm subdomain. You'll see a success message and the "Subdomain URL" information now displays your custom subdomain.
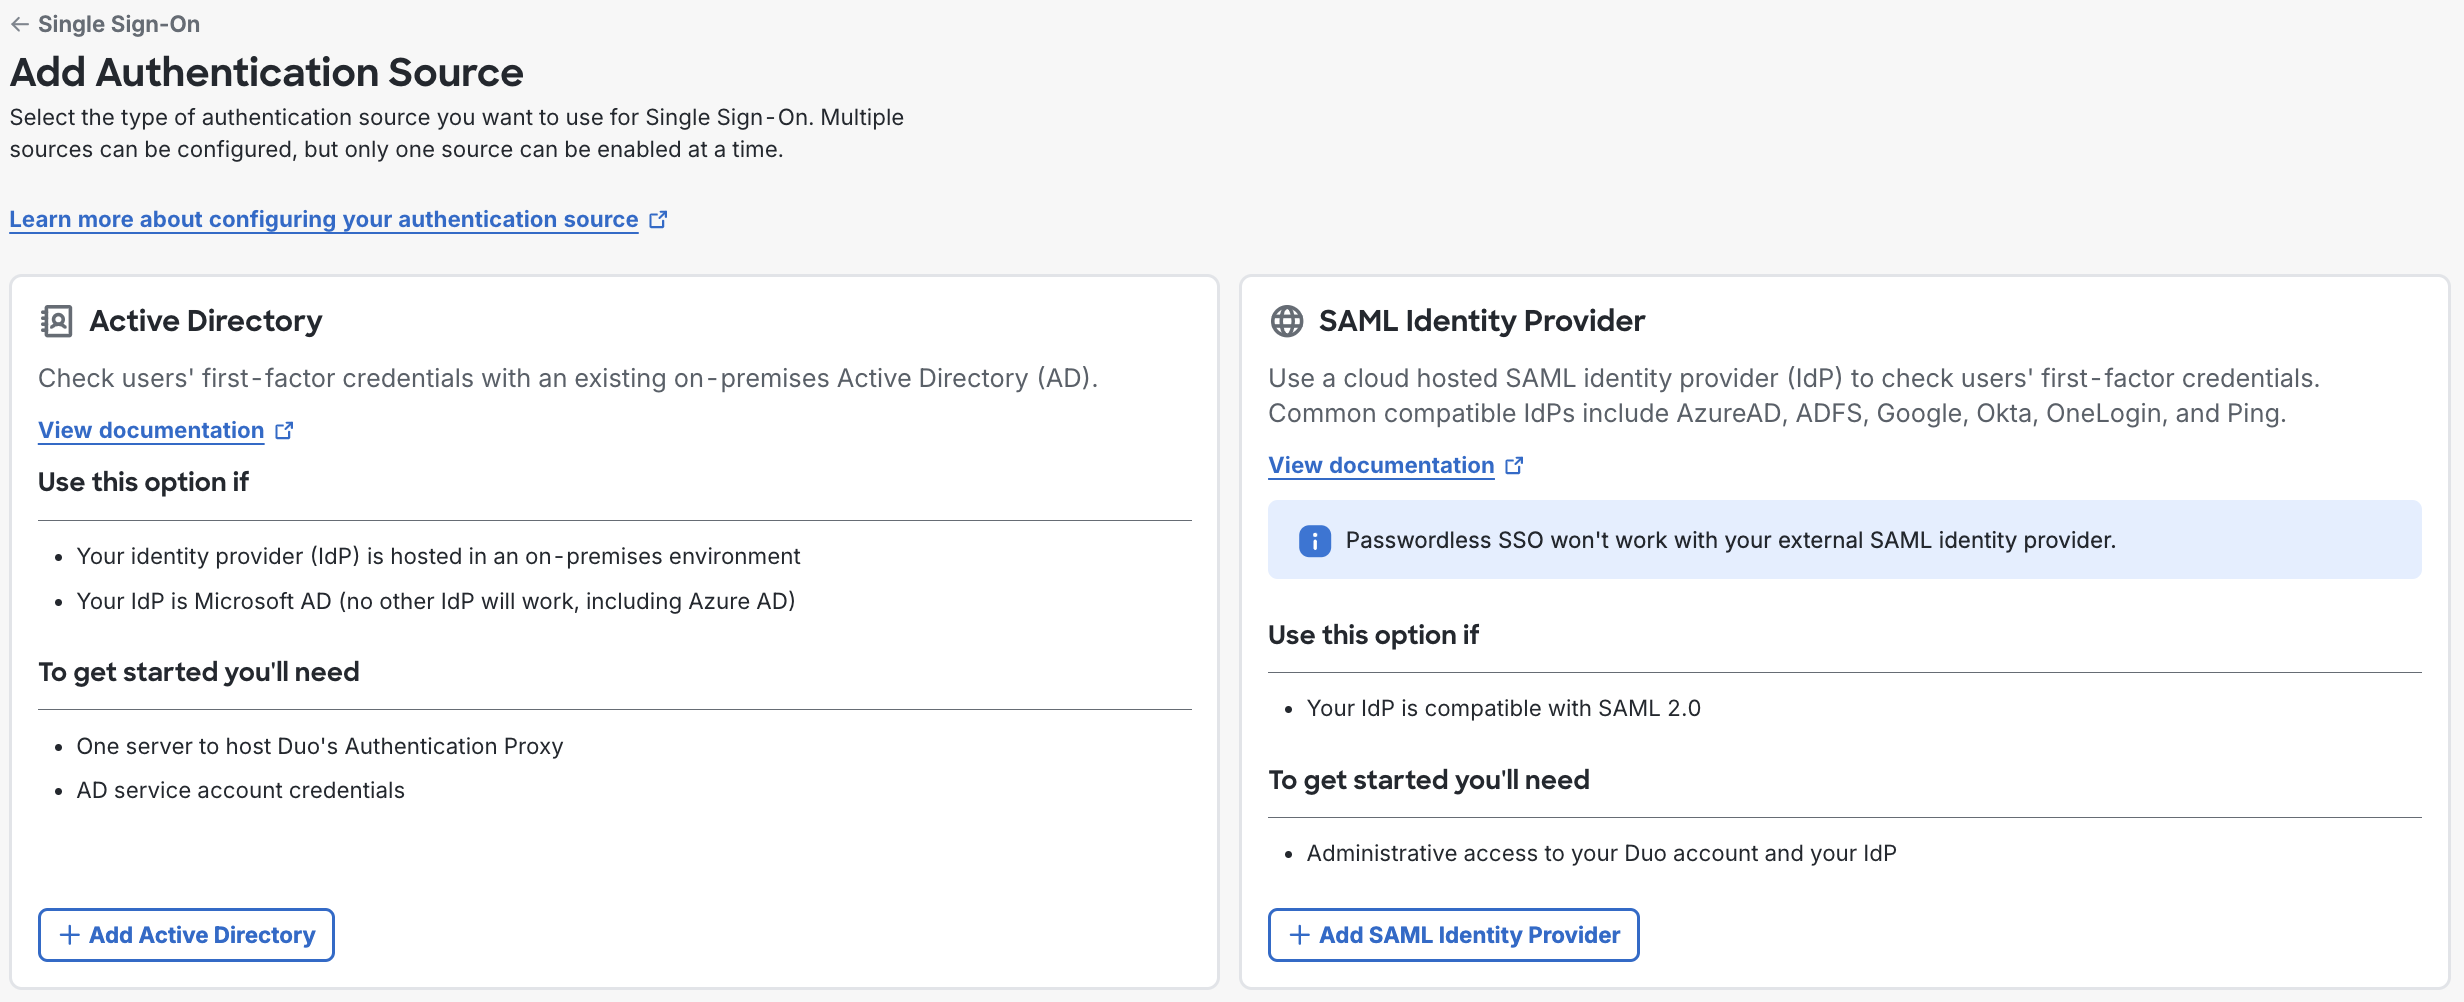
External Authentication Sources
If you don't want to host your user identities and primary credentials in Duo, then you can configure Duo Single Sign-On to use your existing on-premises Active Directory (AD) domain or an existing SAML Identity Provider as your first-factor authentication source.
External Identity Source Authentication
To add an external authentication source:
-
Go to the "External Authentication Sources" tab on the Single Sign-On page in the Duo Admin Panel.
-
Choose between using Active Directory or a SAML Identity Provider as your authentication source. Click the button at the bottom of the option you'd like to use to add that source type, and follow the instructions in the next section.

If you are configuring your first Active Directory, when you click Add Active Directory you will be prompted to review and accept a privacy statement. The privacy statement won't be shown again for additional Active Directory authentication sources or for SAML sources.
-
Go to the Active Directory or SAML authentication source sections of this page and follow the steps for setting up your external authentication source.
Active Directory
Action Required: April 15, 2026 Duo CA Bundle Expiration
Duo products that use certificate pinning, such as the Duo Authentication Proxy, require a software update for uninterrupted use. Legacy clients could stop working at any time after April 15, 2026.
Check your Duo Authentication Proxy installations used for Duo SSO Active Directory external authentication and upgrade them if they are not running version 6.5.1 or later.
Please visit Duo Knowledge Base article 9451 for more information and guidance.
Follow the steps below to configure an on-premises Duo Authentication Proxy server to connect to Duo Single Sign-On. You'll then configure Duo Single Sign-On to talk to your Active Directory domain controllers through the Duo Authentication Proxy.

During Duo SSO login, the authentication request gets sent from Duo's cloud service to the Duo Authentication Proxy server(s) you deploy on-premises. The Authentication Proxy, in turn, contacts one of your domain controllers using the IP/host name and port you enter in your Active Directory external authentication source configuration to look up users and groups and perform LDAP authentication with the password provided by the user.
If the user account submitted by the user during login isn't found in your connected Active Directory domain, the user's Active Directory account is disabled or locked out, or the password is incorrect, then the user may not log in. If the user's password has expired, and you allow expired password reset in Duo SSO, a user may set a new password while logging in to Duo SSO and continue on to access the application.
Duo Passwordless for External Active Directory Users
Duo SSO performs a check against the connected Active Directory when a user who resides in an external Active Directory SSO authentication source logs in to an application with Duo Passwordless to ensure the AD account is not disabled or locked out. If either AD account state applies to that user, the SSO login fails.
If the password for the Active Directory account has expired, the user must log in with their AD password and Duo MFA instead of performing passwordless authentication. The user can then update their AD password from Duo SSO (requires expired password reset). The user may resume using Duo Passwordless authentication at their next login.
Plan for AD Authentication
When planning your Active Directory authentication configuration to support SSO, determine whether Duo Single Sign-On needs to authenticate users from a single AD domain, or from multiple AD domains organized in an Active Directory forest. You can create up to 10 separate Active Directory authentication sources which allows you to support additional domains and forests.
Single Domain
If all the users who will sign in to applications via Duo SSO reside in a single domain, that is, all the user accounts are located in organizational units (OUs) and containers immediately under your domain's base distinguished name (DN) value, then when you configure the AD source for Duo SSO you will:
- Enter the IP addresses or host names for the domain's AD domain controller servers.
- Specify port 389 to communicate with the domain controllers using LDAP/STARTTLS or port 636 to use LDAPS.
- Enter the base DN value that is the root of the domain.
Example Information for a Single Domain:
Domain:               acme.corp
Domain DC:            dc1.acme.corp
Base DN:              DC=acme,DC=corp
DNs of Domain Users:  CN=narroway,OU=Users,DC=acme,DC=corp
                      CN=sogilby,OU=Users,DC=acme,DC=corp
Forest with Global Catalog
If the users who will sign into applications via Duo SSO reside in different domains within a single Active Directory forest, consider making use of Active Directory's global catalog, which replicates attributes between domain controllers throughout the forest so that a domain controller from any forest member domain can answer LDAP queries for any other domain in the forest.
The benefit of configuring a Duo SSO AD authentication source to use your forest's global catalog instead of adding domains in the forest as individual SSO authentication sources is that the AD authentication source backed by the forest's global catalog can look up user and group information in Active Directory and perform authentication for users faster than if Duo SSO had to repeat the same operations in separate authentication sources.
If the users who will sign in to applications via Duo SSO reside in domains within a single forest, then when you configure the AD source for Duo SSO you will:
- Enter the IP addresses or host names for the AD domain controller servers from any or all of the forest member domains. The domain controllers must have the "Global Catalog" option enabled from Active Directory Sites and Services or with the
repadmintool. - Specify port 3268 to communicate with the domain controllers using LDAP/STARTTLS or port 3269 to use LDAPS.
- Enter the base DN value that is the root of the forest.
Example Information for a Forest with Multiple Domains:
Forest Root Domain:       acme.corp
Forest Member Domains:    amer.acme.corp
                          emea.acme.corp
DCs from Member Domains:  dc1.amer.acme.corp
                          dc1.emea.acme.corp
Forest Base DN:           DC=acme,DC=corp
Domain Base DNs:          DC=amer,DC=acme,DC=corp
                          DC=emea,DC=acme,DC=corp
DNs of Domain Users:      CN=narroway,OU=Users,DC=amer,DC=acme,DC=corp
                          CN=sogilby,OU=Users,DC=emea,DC=acme,DC=corp
By using the global catalog this AD authentication source can lookup and authenticate users from either the AMER or EMEA forest member domains against the domain controller from either domain.
The expired password reset and proactive password change options in Duo SSO will not work with this setup because the Global Catalog is unable to change user passwords.
Learn more about Microsoft's Active Directory global catalog.
Multiple Domains as Separate Authentication Sources
Your organization will require multiple Active Directory authentication sources if you have users in different forests. You can configure Duo Single Sign-On to have up to 10 enabled Active Directory authentication sources at a time.
When a user attempts to log-in and you have multiple enabled Active Directory authentication sources:
- Duo Single Sign-On will reach out to all your Active Directories simultaneously and get results back from each Active Directory when the effective routing rule is "All Active Directories".
- Duo Single Sign-On will reach out to the Active Directories defined in your custom routing rules in order of priority when you have custom rules defined that specify Active Directory authentication sources.
If Duo Single Sign-On gets results for multiple users matching the email address, it will show an error to the user. All email addresses that users log-in with should be unique across all the directories.
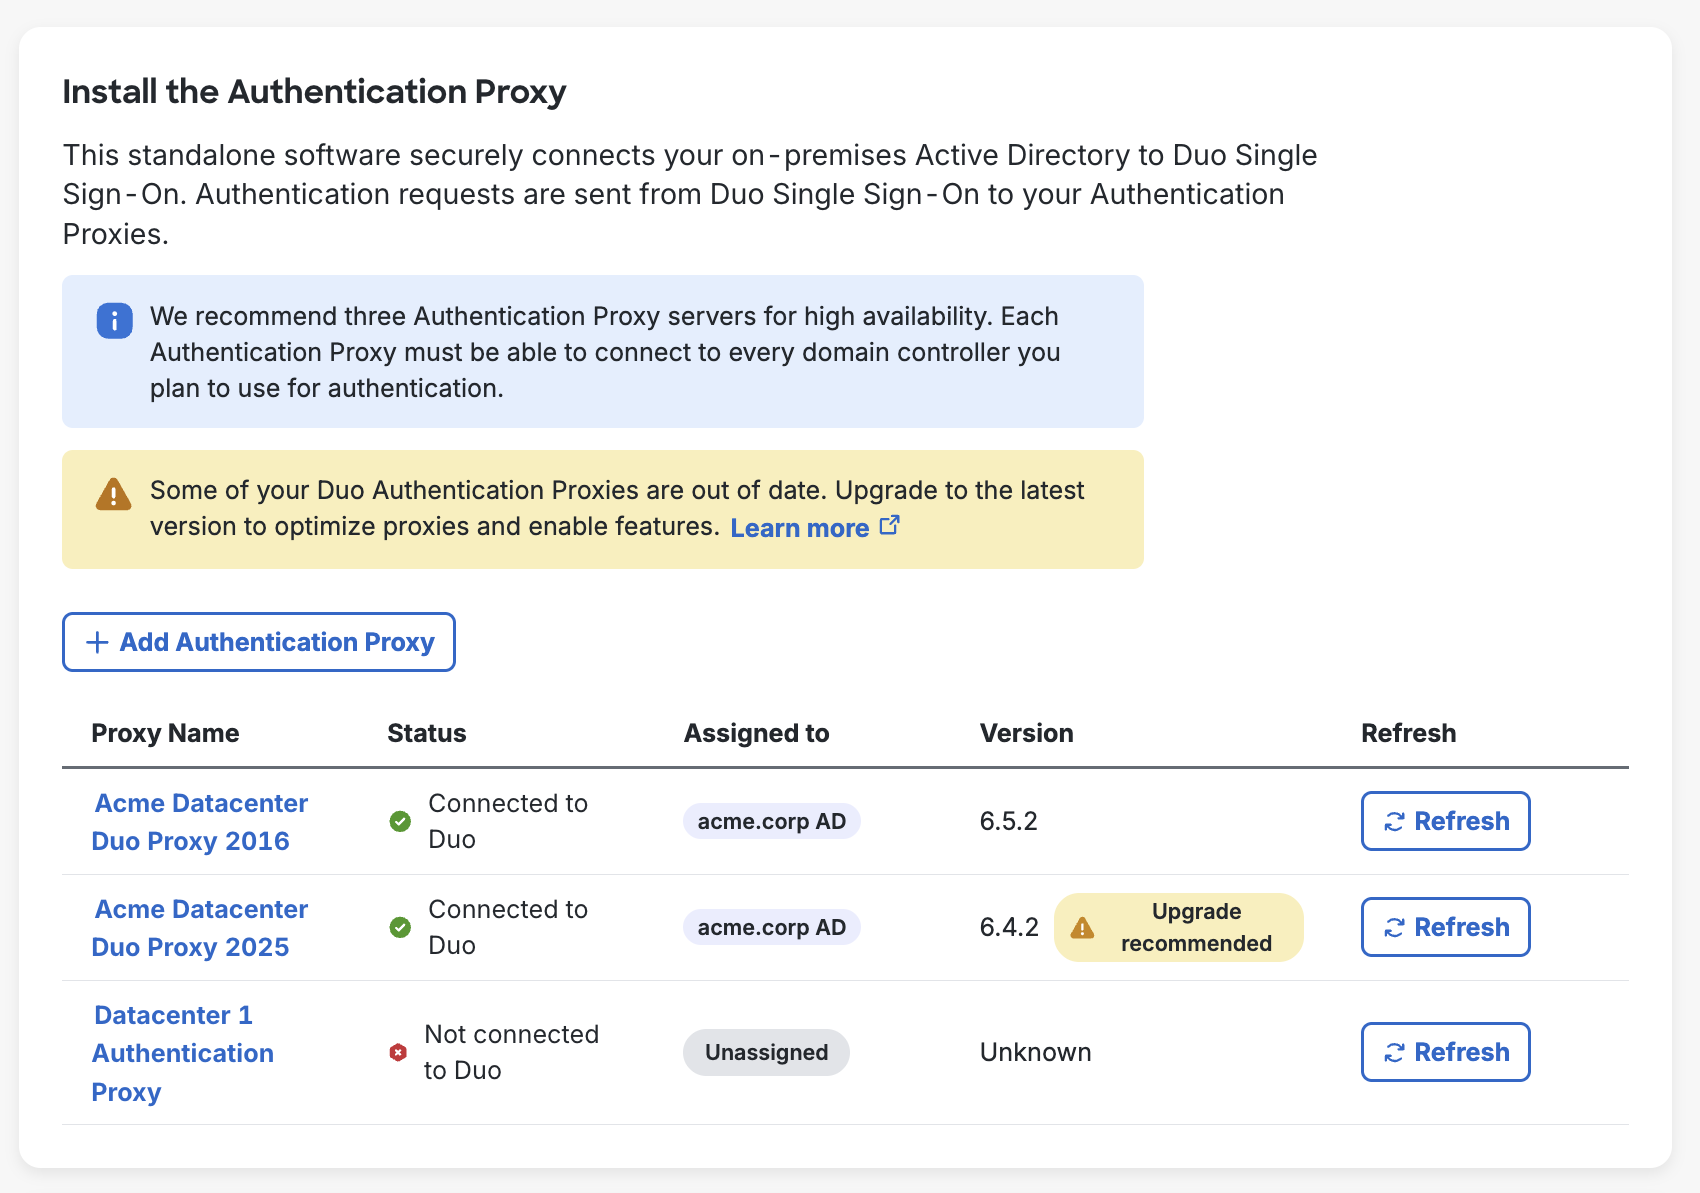
Install Duo Authentication Proxy
Duo Single Sign-On communicates with your Active Directory by having an Authentication Proxy installed and configured on-premises to connect Duo Single Sign-On and Active Directory together.
We recommend three Authentication Proxy servers for high availability. During authentication the order of which Authentication Proxy to use will be chosen at random. Each Authentication Proxy must be able to connect to every domain controller you plan to use for authentication.
-
Install Duo Authentication Proxy 6.5.1 or higher on a Windows or Linux server following the installation instructions. If you already have a Duo Authentication Proxy that you'd like to use, you can upgrade the proxy to a supported version.
- We've raised the minimum Duo Authentication Proxy version needed for SSO authentication from 5.5.1 due to the 2026 Duo certificate authority bundle expiration. Please visit Duo Knowledge Base article 9451 for more information and guidance.
-
Confirm that your Authentication Proxy can communicate with your Active Directory domain controllers over LDAP/LDAPS (commonly ports 389/636).
-
Confirm that your Authentication Proxy has outbound internet access over port 443.
Connect Authentication Proxy to Duo Single Sign-On
If you do not complete connecting an Authentication Proxy to Duo Single Sign-On you will see unassigned proxies appear on your Active Directory pages.
-
On the "Active Directory" page under "Install the Authentication Proxy" click Add Authentication Proxy. This redirects you to a new page.
-
You can rename your Authentication Proxy by editing the Name field to give it an easily identifiable name. You can add a description of the proxy in the Description field.
-
Select the "Windows" or "Linux" tab based on your Authentication Proxy install to view platform-specific instructions.
-
On your Authentication Proxy server locate and open the
authproxy.cfgfile in a text editor or the Proxy Manager application (available for Windows servers starting with Authentication Proxy version 5.6.0) with elevated permissions.OS Path Windows C:\Program Files\Duo Security Authentication Proxy\confLinux /opt/duoauthproxy/conf -
Click Copy under "1.2 Add SSO section and service account credentials to the configuration file." and append this to your
authproxy.cfgfile. A first time Authentication Proxy install may include an existingauthproxy.cfgwith some example content. For the purposes of these instructions, however, you should overwrite the existing sample content and paste in the copied data. -
If you plan to use NTLMv2 or Plain authentication then uncomment and populate the
service_account_usernameandservice_account_passwordlines with the credentials for a service account in your Active Directory. You do not need these lines in yourauthproxy.cfgif you plan to use Integrated authentication.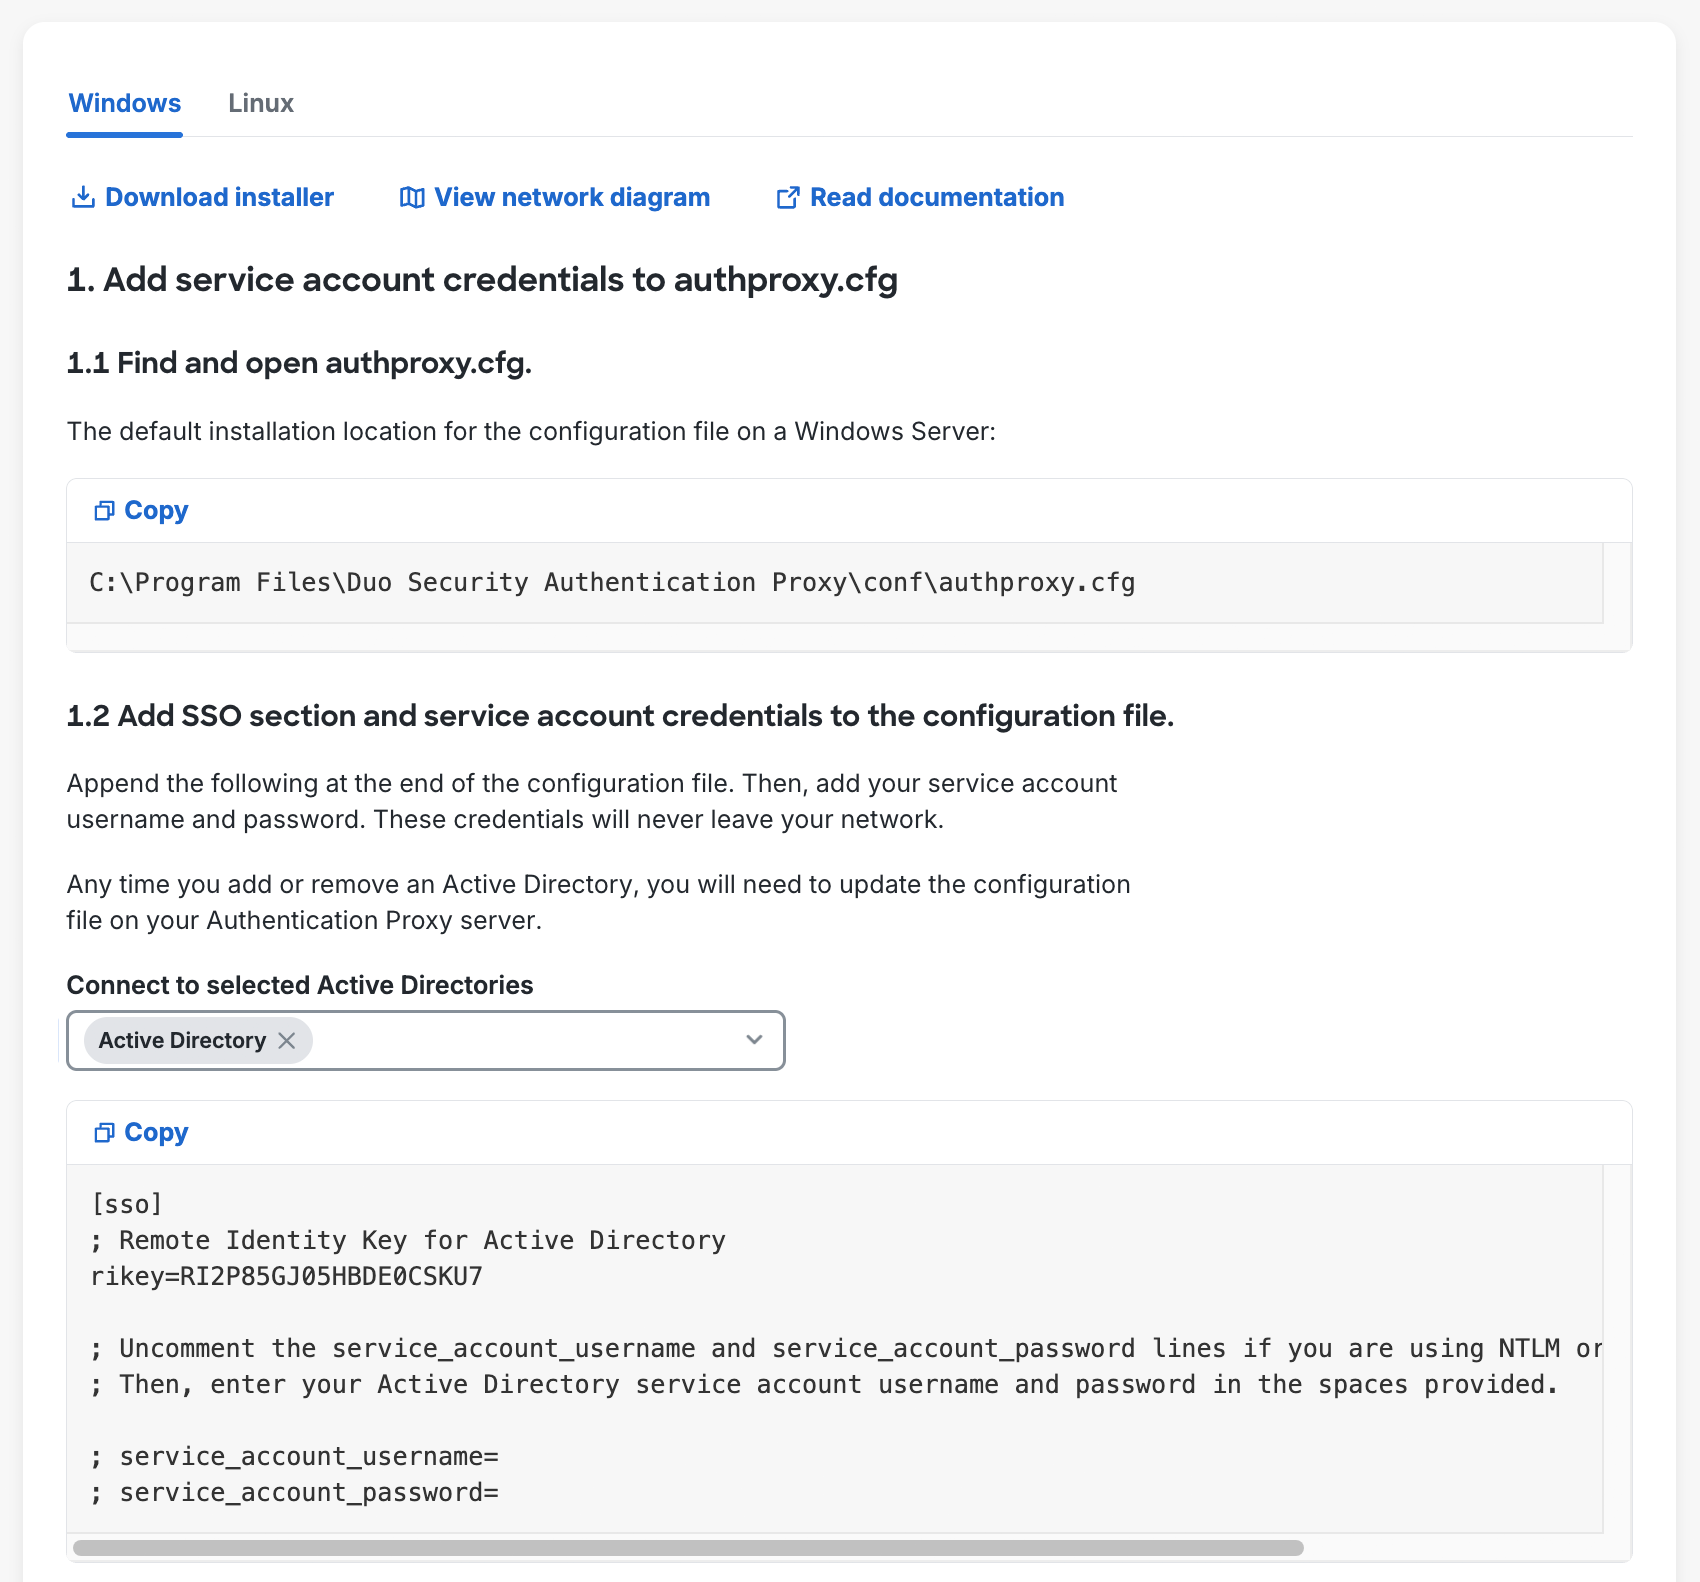
Any service account credentials specified in the config will be ignored during user authentication if you select Integrated authentication when completing Active Directory configuration.
-
Save and close the
authproxy.cfgfile. If using the Proxy Manager for Windows, click Validate to check your configuration, and then click Save before closing the application. -
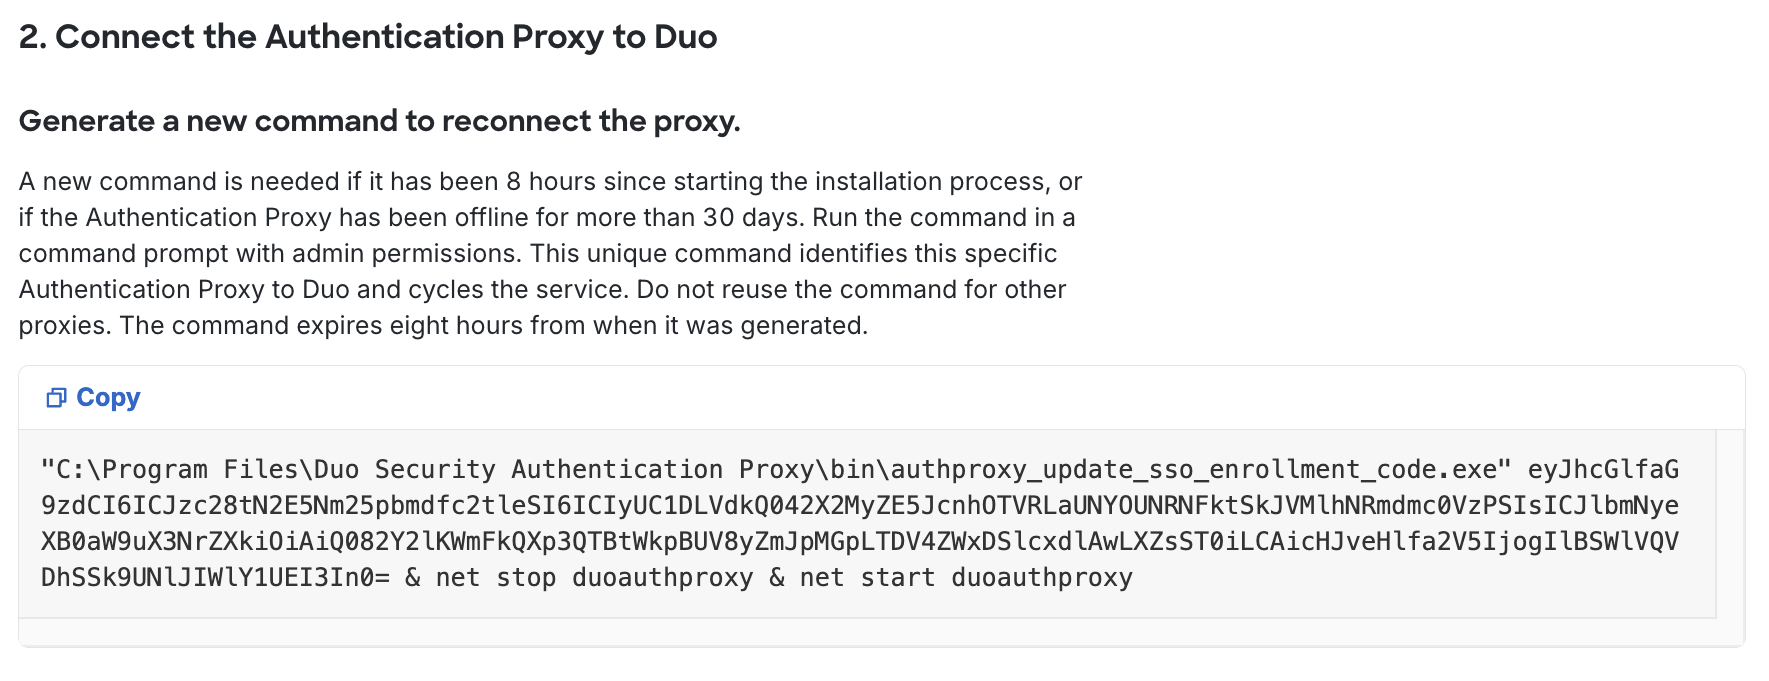
Follow the "2. Connect the Authentication Proxy to Duo" instructions shown in the Admin Panel to generate and then copy the command to run on your proxy server to connect your Authentication Proxy to Duo Single Sign-On. Note that the specific command syntax differs depending on whether you installed the Duo Authentication Proxy on a Windows or Linux server.
-
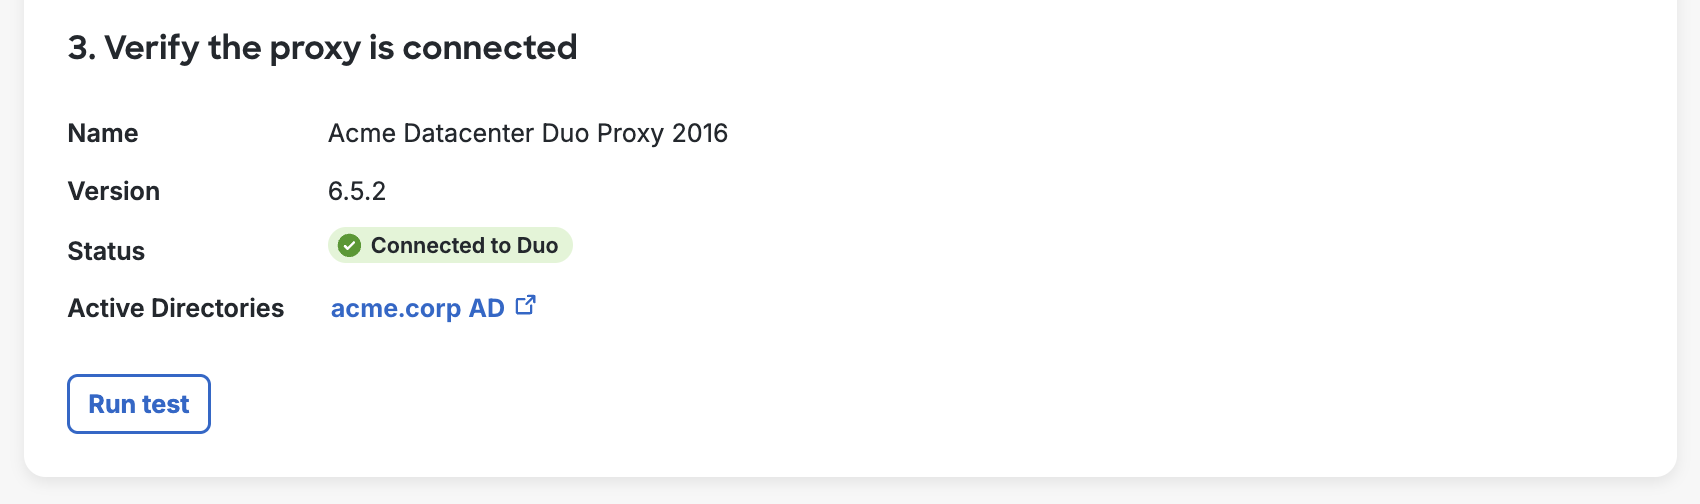
Click Run test under "3. Verify the proxy is connected" to confirm your Authentication Proxy is connected to Duo. If you encounter any issues check the logs on the Authentication Proxy.
-
Once the Authentication Proxy is connected to Duo return to the Active Directory configuration page.
-
You can add additional Authentication Proxy servers by repeating steps 1 through 9.
Viewing Information about Connected Authentication Proxy Servers
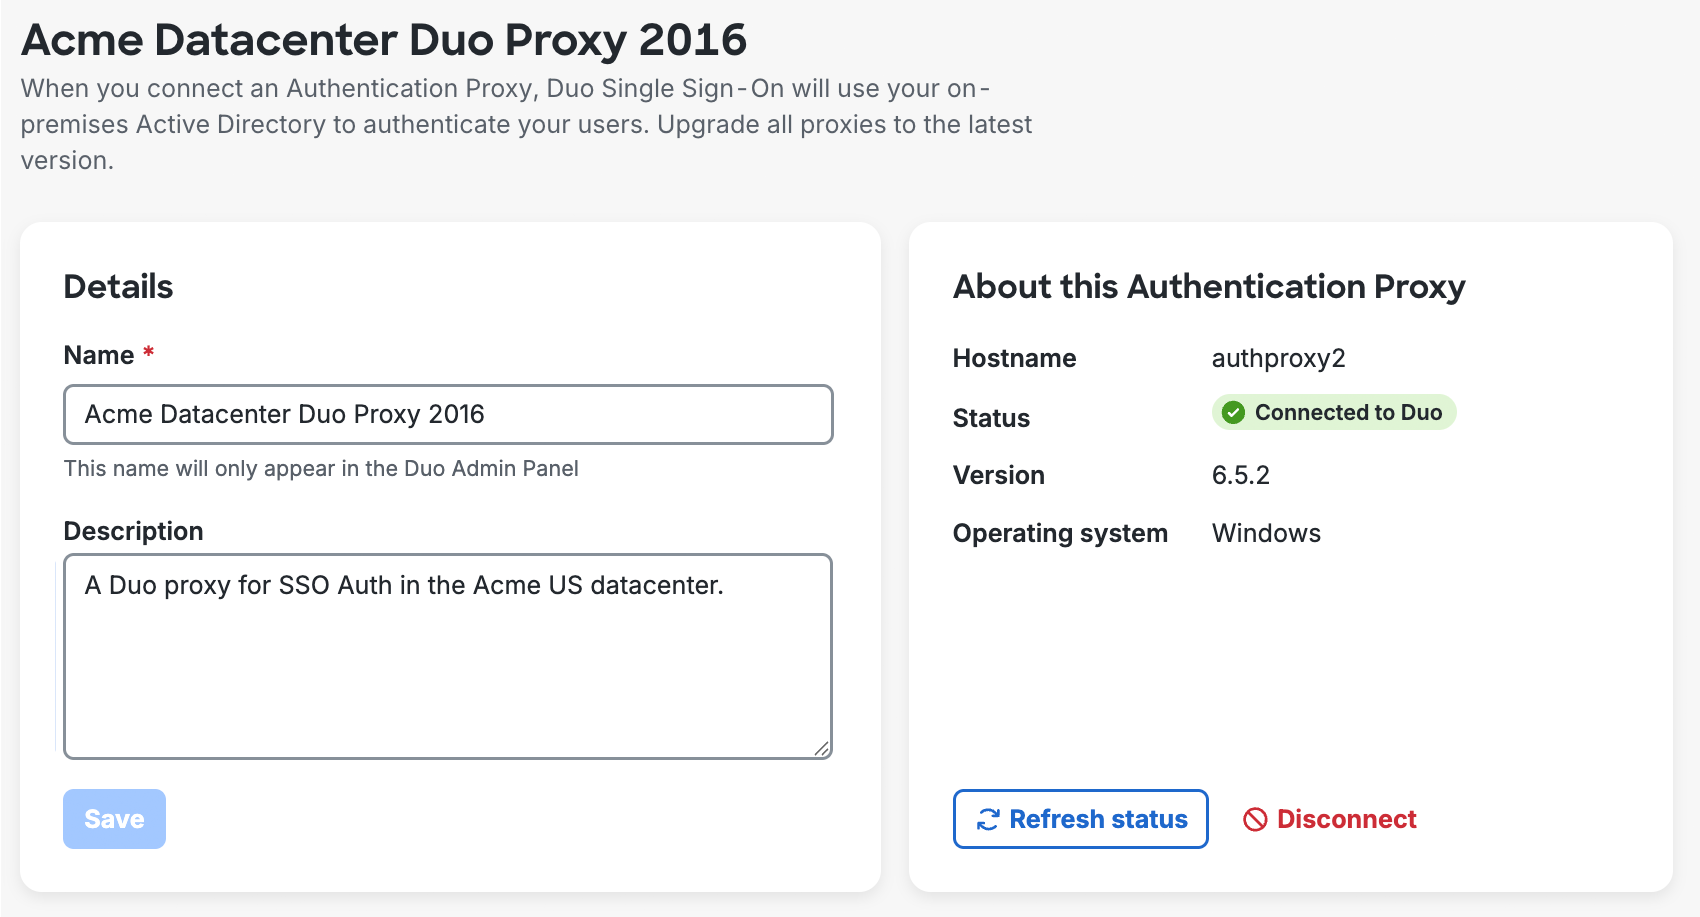
You can view information about your Authentication Proxy in the Authentication Proxy Dashboard.
You can also view information from the Active Directory Authentication Source page, by clicking on the "Proxy name" value for any of your connected Authentication Proxy servers.
The "Details" Section shows the following information:
| Name | Description |
|---|---|
| Name | The name you set for this proxy in the Admin Panel. |
| Description | The description for this proxy in the Admin Panel. |
| Hostname | The host name of the server as reported by the running Duo Authentication Proxy service on that server. |
| Status | Whether the Authentication Proxy service is currently connected to Duo or not. Click the icon to refresh status. |
| Version | The installed Duo Authentication Proxy software version. |
| Operating System | The operating system on which the Duo Authentication Proxy is running (Windows, Linux or Unknown). |
Unassigned Authentication Proxies
On the Active Directory configuration page, under "1. Install the Authentication Proxy", you may see a second section appear called "Unassigned Authentication Proxies"; these are proxy servers that were never configured or connected to an Active Directory.
You can remove Authentication Proxy server(s) from this list by doing one of the following:
-
Connect the Authentication Proxy to an Active Directory
- Click on the name of the Authentication Proxy to be taken to its configuration page.
- Follow the steps starting with Step 2 in Connect Authentication Proxy to Duo Single Sign-On.
-
Deleting the Authentication Proxy
- Click on the name of the Authentication Proxy to be taken to its configuration page.
- Click Disconnect Authentication Proxy in the upper right-hand corner of the page.
- Reading the information on the pop-up and then clicking Yes, disconnect this proxy.
Configure Active Directory
-
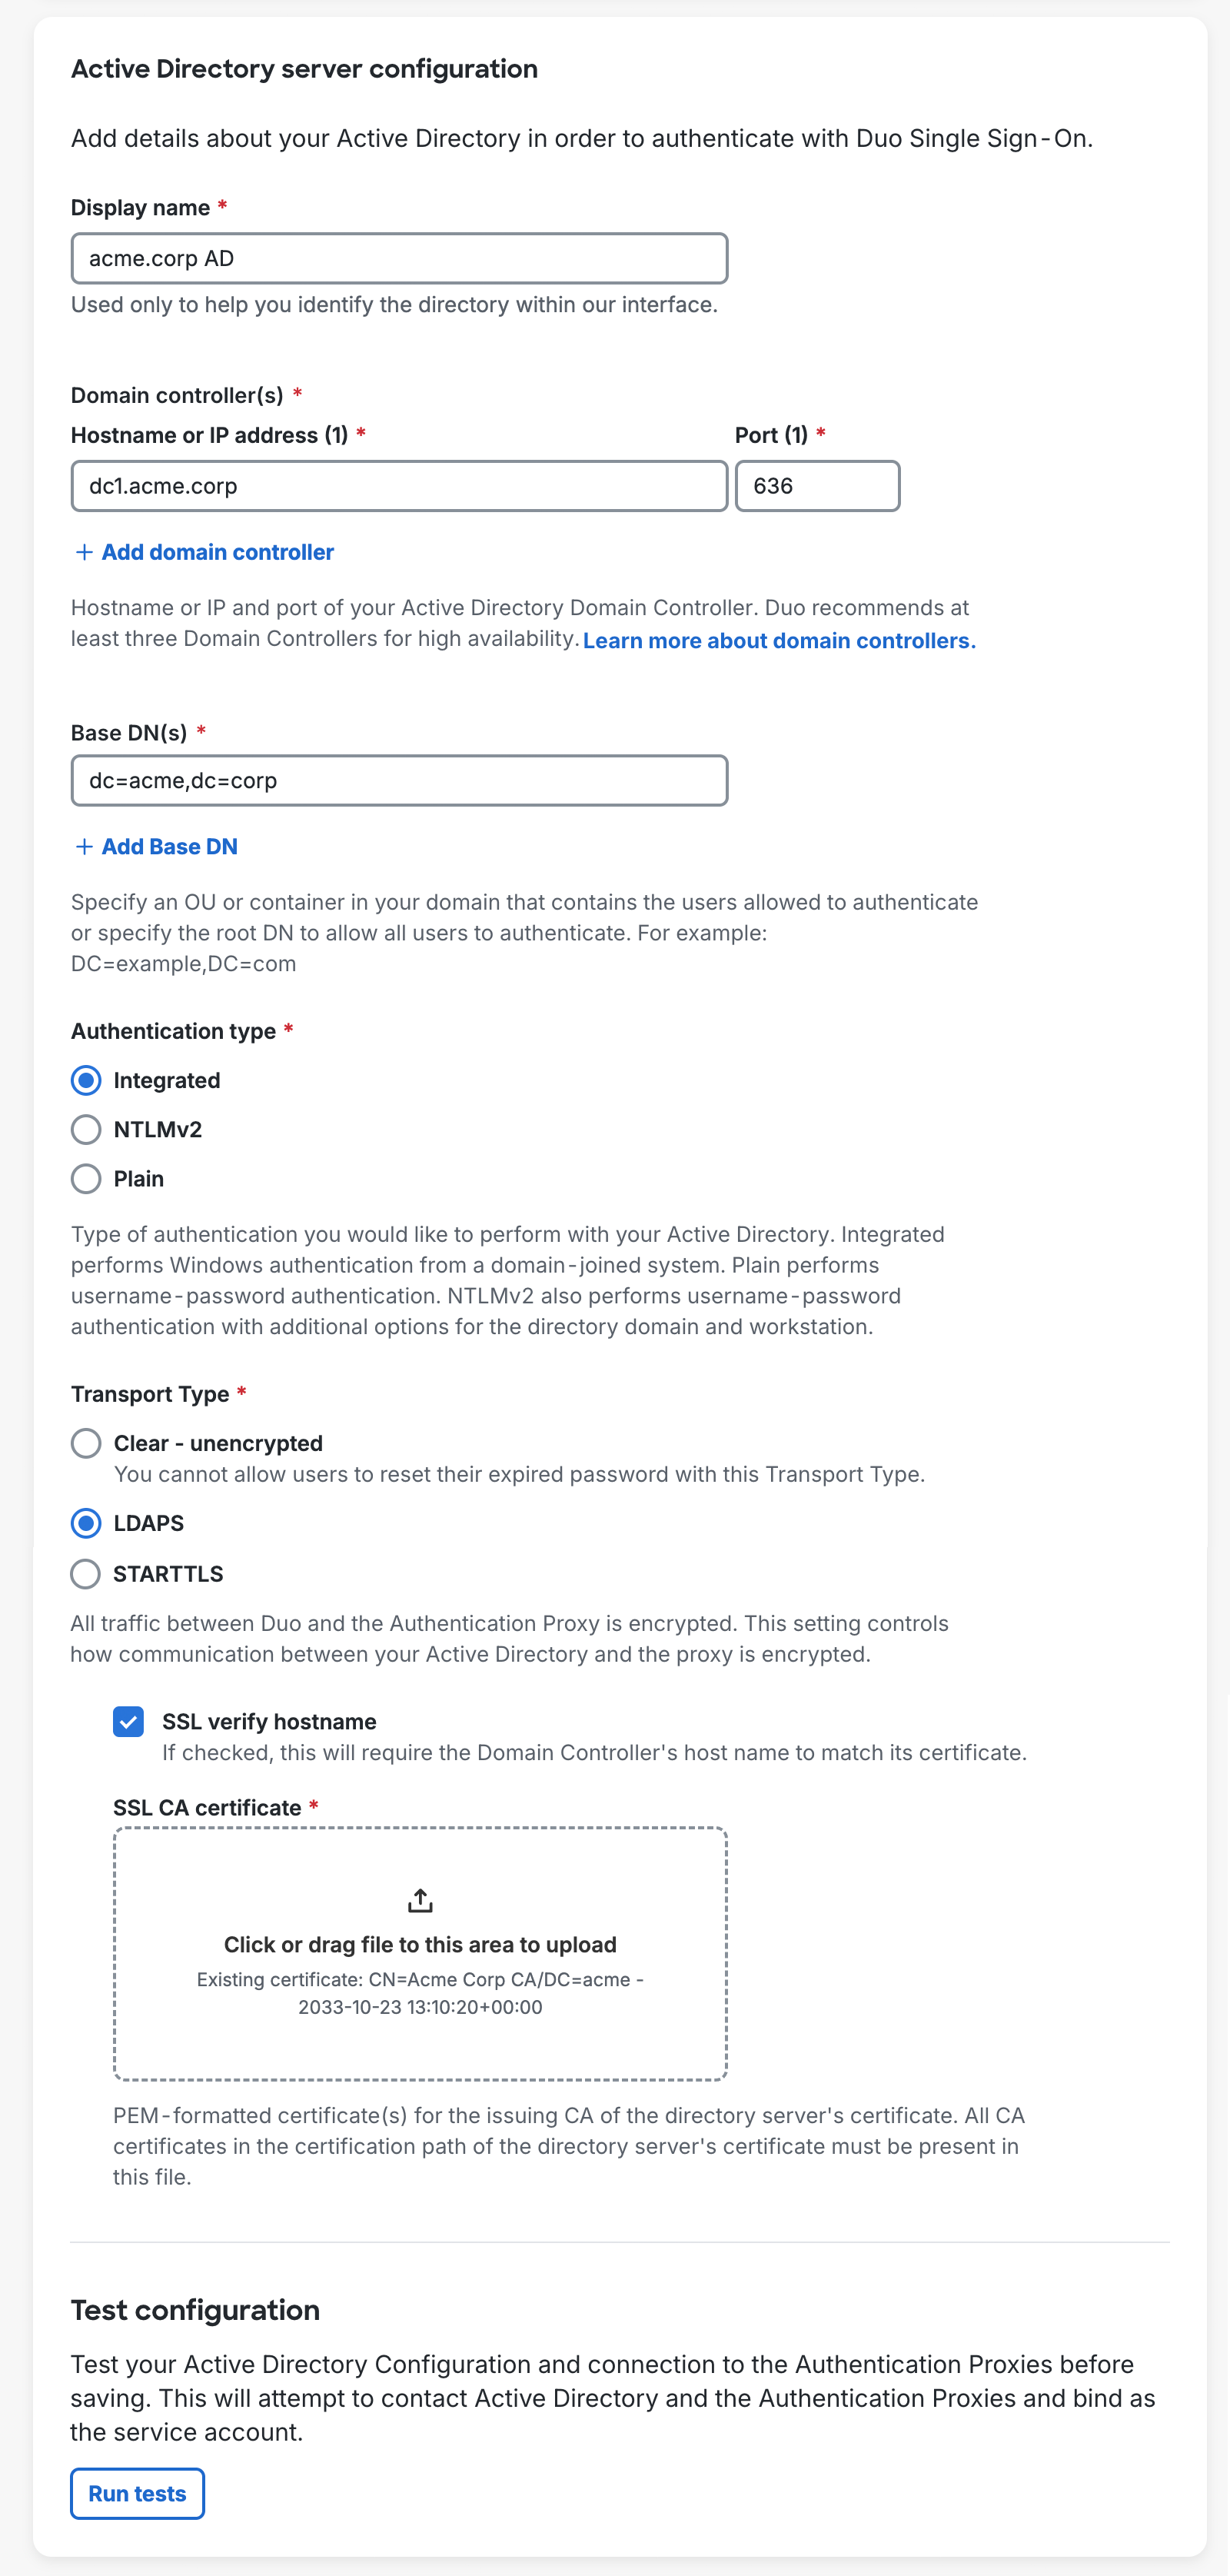
On the Active Directory authentication source page scroll down to "Active Directory Server Configuration" and fill out the form using the information below. Note that all information is required unless otherwise noted.
Name Description Display Name Enter a name to help you identify your Active Directory authentication source.
Domain Controller(s) Enter the IP address or RFC-1034-compliant hostname of your AD domain controller (DC), followed by the port the Authentication Proxy server should use to contact the domain controller.
Every host you add here must be reachable for LDAP connections by every Authentication Proxy server added.
The default port for LDAP lookups against a single domain using unsecured LDAP or STARTTLS is 389, and the default LDAPS port is 636.
The default port for LDAP lookups against all domains in a forest using global catalog with unsecured LDAP or STARTTLS is 3268, and the default LDAPS port is 3269.
Click Add Domain Controller to add additional hosts. We recommend at least three domain controllers for high availability. When performing authentication, the order of the domain controllers will be randomized. If the first server in the list doesn't respond the next server is used as a fallback. If you decommission any of your domain controllers be sure to return to Duo and remove it from the list.
Base DN(s) Enter a DN that corresponds to a container or OU in your directory structure containing the user accounts for SSO. You can add additional DNs by clicking Add Base DN.
Example DNs:
ou=Employees,ou=US,dc=acme,dc=corpsearches within an organizational unit hierarchy;dc=amer,dc=acme,dc=corpsearches a single domain in a multi-domain forest, anddc=acme,dc=corpsearches the entire forest.Authentication type Select the type of authentication the Authentication Proxy will use to connect to your AD domain controller. One of:
- Integrated - Performs SSPI authentication. This option requires no additional configuration here, but the Duo Authentication Proxy server must be a Windows machine joined to the domain that contains your users.
- NTLMv2 - Performs Windows NTLMv2 authentication. If you select this option you'll need to enter the NTLM domain and NTLM workstation names, and also ensure you have specified the username and password used to connect to your AD domain in the
authproxy.cfgwhen you configured your Duo Authentication Proxy server. - Plain - Performs basic authentication. This option provides the widest compatibility. Ensure you have specified the username and password used to connect to your AD domain in the
authproxy.cfgwhen you configured your Duo Authentication Proxy server. We recommend using secure LDAPS or STARTTLS transport to protect sensitive credentials if you select this option.
Default: Integrated.
Transport type The transport type selected determines how the connection between the Duo Authentication Proxy software and the AD domain server is encrypted, if at all. Connectivity between the Duo Authentication Proxy software and the Duo Security cloud services is always HTTPS secured with SSL and is not affected by this setting.
Authentication Proxy 6.4.0 and later require that all certificates used for LDAPS or STARTTLS use SHA256 or greater and have a public key length of 2048 or greater.
One of:
- Clear - Unencrypted - LDAP communication between your DC and the Authentication Proxy will not be encrypted. If you selected **Plain** authentication for this directory, please avoid CLEAR and switch to a secure transport type to protect your AD domain lookup credentials.
- LDAPS - Encrypts LDAP communication using SSL over a dedicated secure port distinct from the port used for unsecured transport.
- STARTTLS - Opens an unencrypted connection on the unsecured LDAP port then secures the connection with TLS.
Selecting LDAPS or STARTTLS exposes additional settings:
- SSL verify hostname - Requires that the AD domain controller's SSL certificate subject "common name" or "issued to" and the server hostname you entered when setting up your directory need to match.
- SSL CA certificate - In order to secure LDAP connections to your AD domain server using LDAPS or STARTTLS protocols, you'll need the UTF-8 PEM-formatted certificate from the certificate authority (CA) that issued your AD domain controller's SSL certificate.
To obtain the PEM-formatted version of the AD domain controller certificate's issuing CA certificate, view the "Certification Path" tab of the DC's certificate properties and double-click the issuing certificate to view it. Export the issuing CA certificate as a Base-64 encoded X.509 (CER) format and upload it here.
You may need to export all the certs (such as root CA and intermediate CA) in the certification path, open each in a text editor, copy the file contents (including the BEGIN and END wrapper), and paste them all into one certificate bundle file to upload here.
If you do use a self-signed certificate to secure LDAPS communications to your domain controller, the certificate's key usage must include "Certificate Signing".
Default: Clear - Unencrypted.
Click Run tests to test connections between Duo Single Sign-On, your Authentication Proxy server(s), and your Active Directory. It will only report the status of an individual connection if there is an error. If you encounter an error, make the appropriate changes and click Run tests again.
-
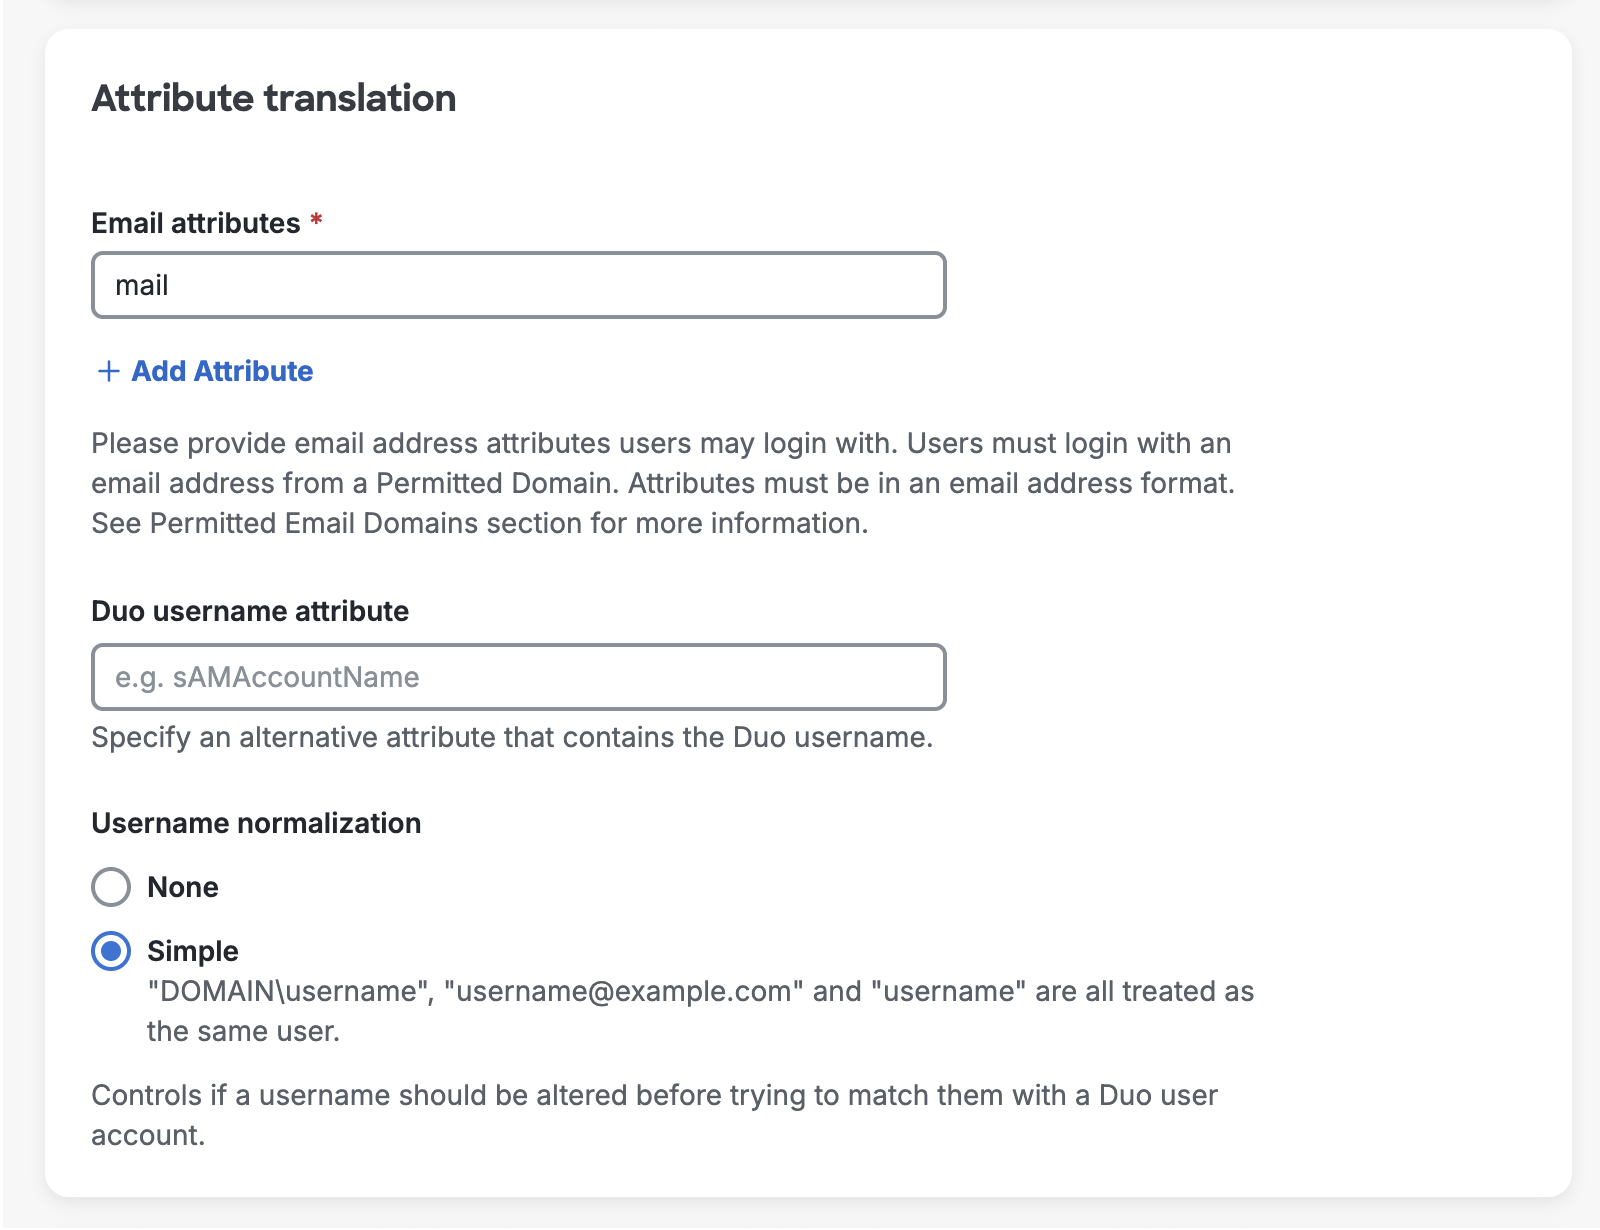
Continue the configuration in the "Attribute translation" section.
Email attributes All AD attributes that could contain a user's email address. The values for the attribute(s) you specify here must be in SMTP address format (
user@example.com). You can add additional attributes by clicking Add attribute.This email will also be the username sent to Duo for 2FA unless you specify an alternate Duo username attribute.
Default:
mail.Duo username attribute Optional The email address that users type in during SSO login will be matched to the user in Duo. If your Duo usernames do not match the email address value(s) for your specified Username attributes, type in the name of an Active Directory attribute under Duo username attribute that does contain the values that match your Duo usernames.
Example: Your users have email addresses in AD with the format
norben.arroway@example.com, but your Duo usernames are thesAMAccountNamevalues with the formatnarroway. AddsAMAccountNameas a Duo username attribute.Default: No alternate username attribute; send email address as Duo username.
Username normalization Controls whether or not usernames entered for primary authentication should be altered before trying to match them to a Duo user account. When set to None, the usernames
narroway,EXAMPLE\narroway, andnarroway@example.comwould be three separate users in Duo. When set to Simple, any domain information is stripped from the username sent to Duo, sonarroway,EXAMPLE\narroway, andnarroway@example.comwould all resolve to a single "narroway" Duo user.Default: Simple.
-
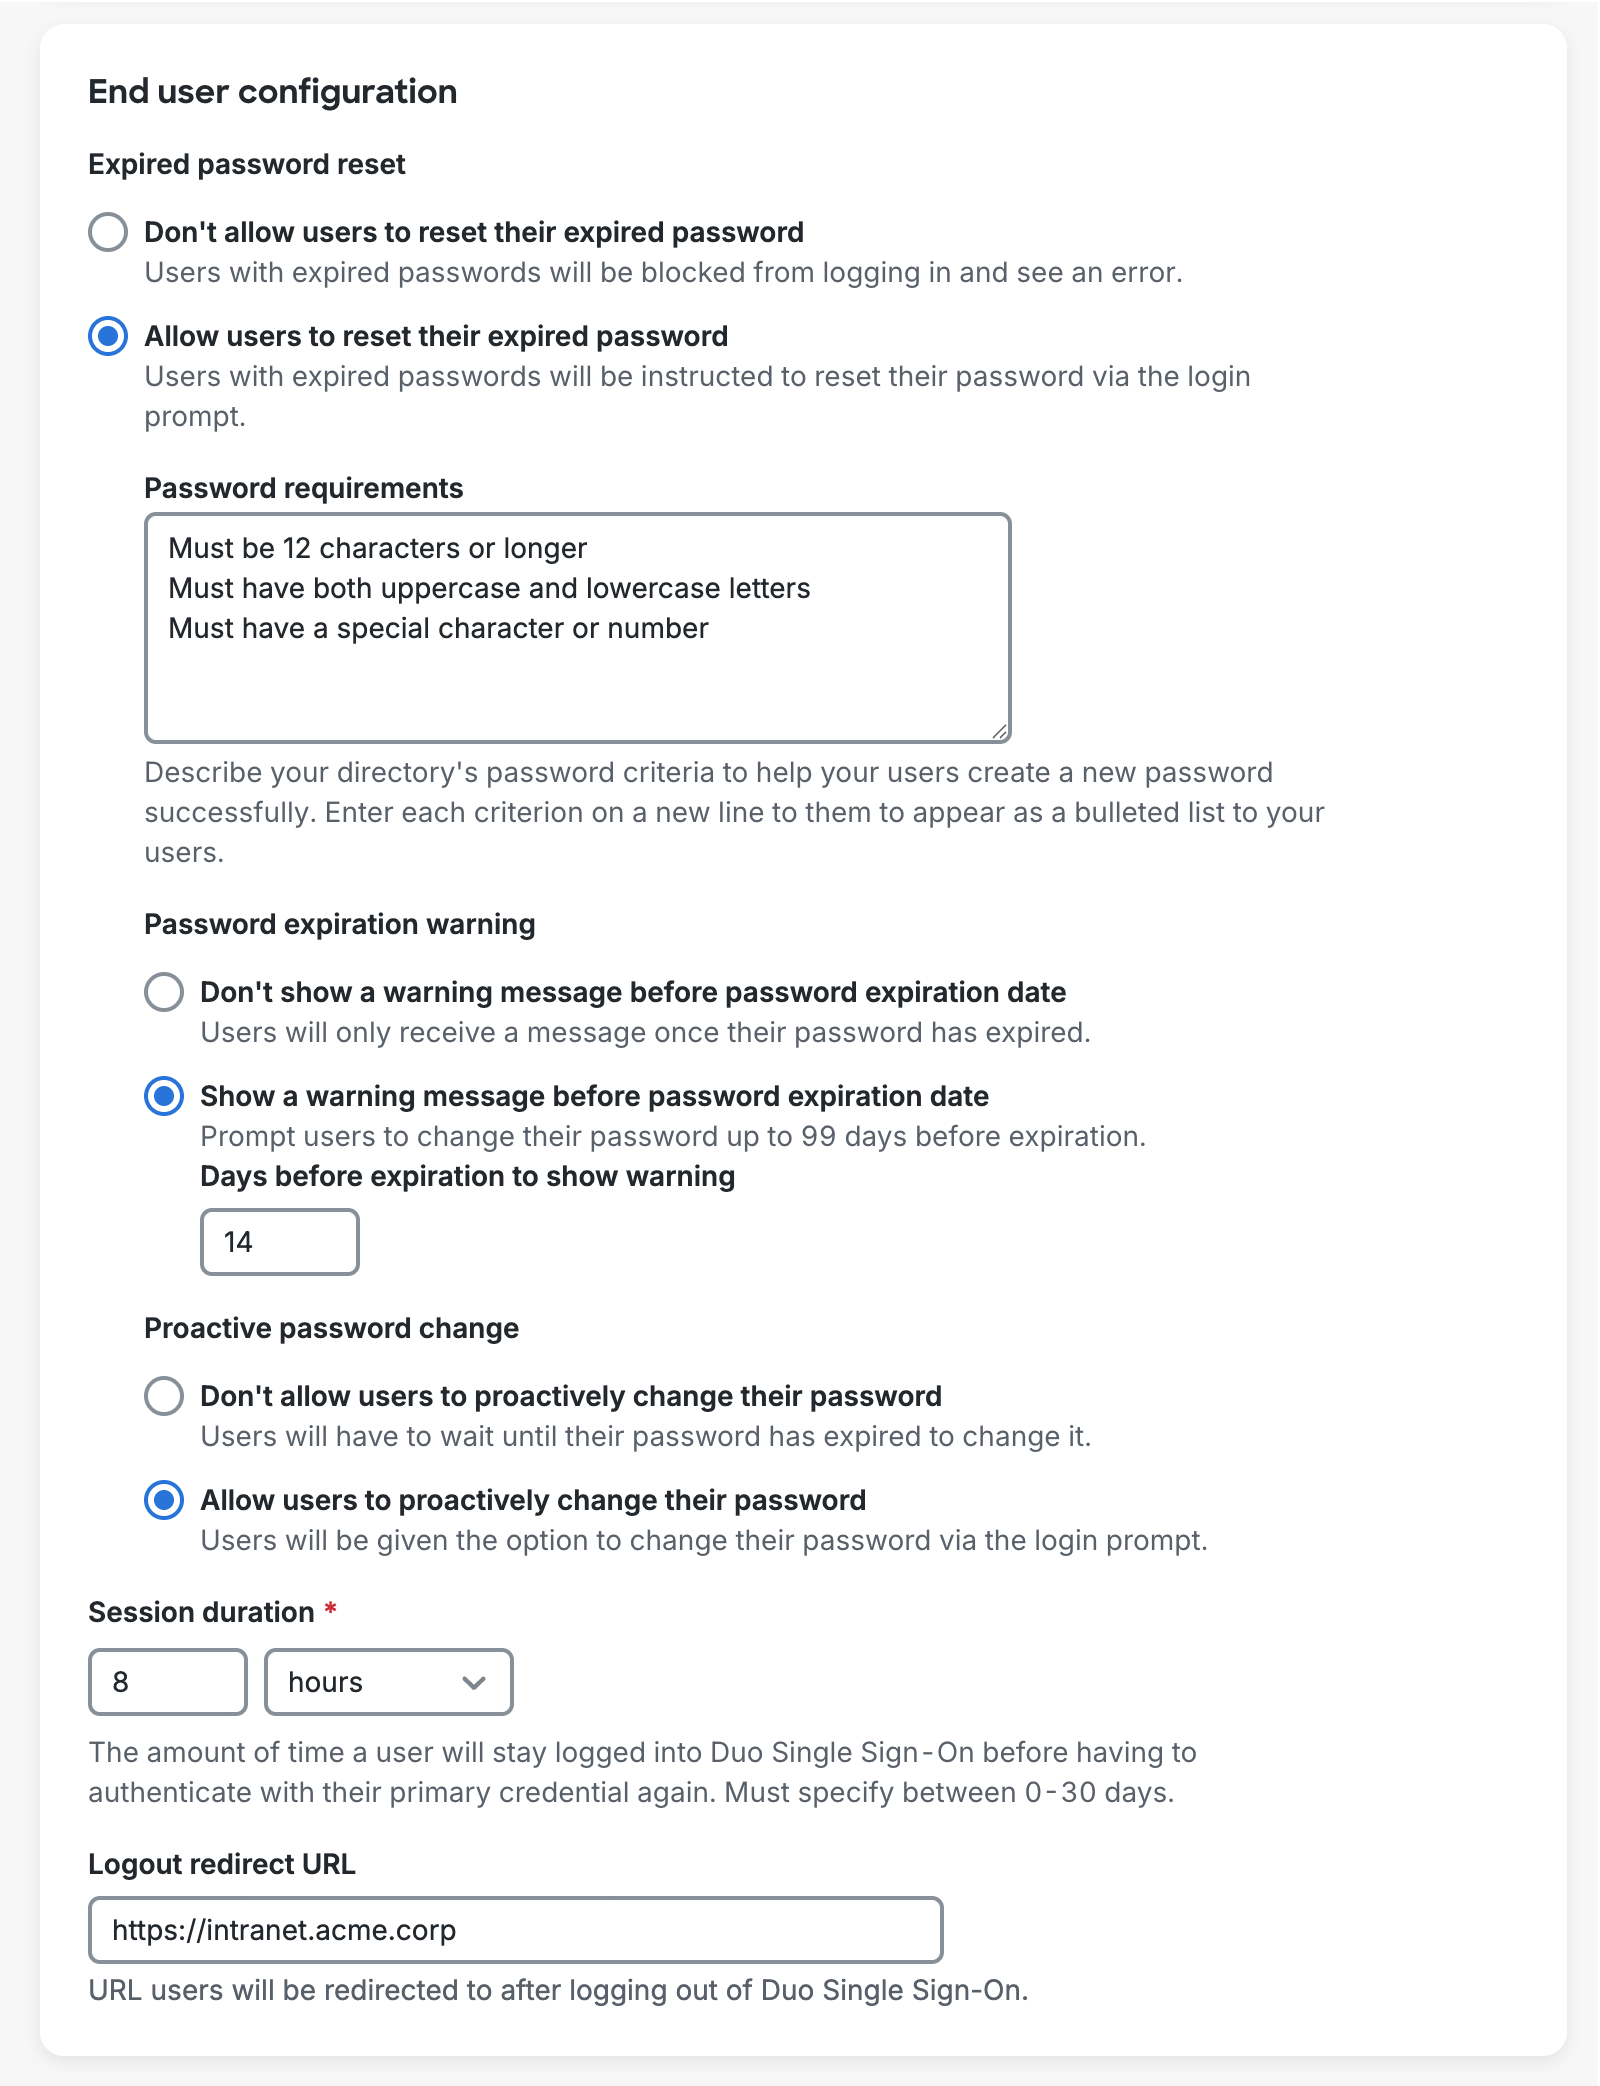
Continue Active Directory configuration by completing the "End user configuration" section.
Expired password reset Controls whether users can reset their expired Active Directory passwords during login after successfully completing MFA. When set to Don't allow users to reset their expired password, users with expired passwords will fail Active Directory authentication. We recommend Duo Authentication Proxy version 6.5.2 or later if you enable this.
When set to Allow users to reset their expired password, users will be required to reset their expired Active Directory passwords during login after successfully completing MFA before continuing on to their application. When this setting is enabled the Password requirements text box will appear requiring you to type in your Active Directory password requirements. Each requirement should be on a separate line which will be shown to users as a bulleted list. Duo SSO is unable to check the Active Directory password policy so it is important this information is accurate so users will understand the requirements.
Enabling password resets has the following requirements:
- Transport type must be set to LDAPS or STARTTLS
- All Duo Authentication Proxy server(s) must be version 5.5.0 or higher
- Must not be using the Global Catalog port to communicate with the domain controllers
The user experience is as follows:
- User initiates log in to an application protected by Duo SSO.
- The application redirects the user to the Duo SSO login page for email address and password.
- Active Directory verifies the submitted password and informs Duo SSO the user's password has expired.
- Duo SSO informs the user that they must change their expired password after completing two-factor authentication.
- User completes Duo authentication and returns to Duo SSO for the password change.
- The Duo SSO password reset page shows the user the password requirements you entered during AD authentication source configuration. The user enters their current, expired password, and then can enter and confirm their new password.
- If the password change succeeds, the user gets prompted to continue to the application without needing to reauthenticate. If the password change fails, the user may try to reset their password again until they succeed or leave the Duo SSO page without accessing the application.
Note: If you have users with bypass status or have applied policies that allow unenrolled users to login without MFA, they'll be able to reset their Active Directory passwords from Duo SSO without performing two-factor authentication.
See the expired password reset experience for users in the Duo End User Guide.
Default: Don't allow users to reset their expired password.
Password expiration warning If expired password resets have been enabled then you can also enable a prompt shown to users at login a configurable number of days before their passwords expire. After providing their current password in the login process, Duo SSO warns them of their upcoming password expiration and how many days left until it expires. A user can opt to reset their password ahead of the expiration date, which sends then to Duo MFA before the password change screen, or skip the password change and proceed to the application. If the user declines to reset their password they continue seeing the warning the next time they log in to Duo SSO with their expiring password until they either reset it or the password expires.
The user experience is similar to the experience described for expired password reset except that the user can decline to change their password from the warning message.
This setting does not appear if expired password reset isn't enabled.
See the password warning and reset experience for users in the Duo End User Guide.
Default: Show a warning message before password expiration date and show the warning 14 days before expiration.
Proactive password change If expired password resets have been enabled then you can also allow users to change their passwords from Duo SSO at any time. Before entering their username on the Duo SSO login page they can click a help link that will let them access password reset. After providing their current password and completing Duo two-factor authentication to verify their identity, they can enter a new password and then continue to the application. If a user has an existing SSO session (as defined in the Session Duration setting) they won't encounter the proactive warning again until their next log in with a password after the session expires.
This setting does not appear if expired password reset isn't enabled.
See the proactive password reset experience for users in the Duo End User Guide.
Default: Don't allow users to proactively change their password.
Session Duration Controls how long user will stay logged into Duo SSO before having to authenticate with their primary credential again. You can set the duration length in minutes, hours, and days, up to 30 days. Changing this value will affect existing Duo SSO sessions by forcing any logged-in users to authenticate again if they were logged in longer than the new set duration. Duo SSO session expiration does not affect the session established independent of Duo between the end-user's client and the application.
Default: 8 hours.
Logout Redirect URL This field is optional. When this field is populated, after logging a user out of Duo Single Sign-On they will be redirected to the URL in this field.
-
Click Save changes or Save and enable when done. If necessary, you can visit the user attributes to add custom attributes or mappings. Otherwise, proceed to configure your permitted email domains.
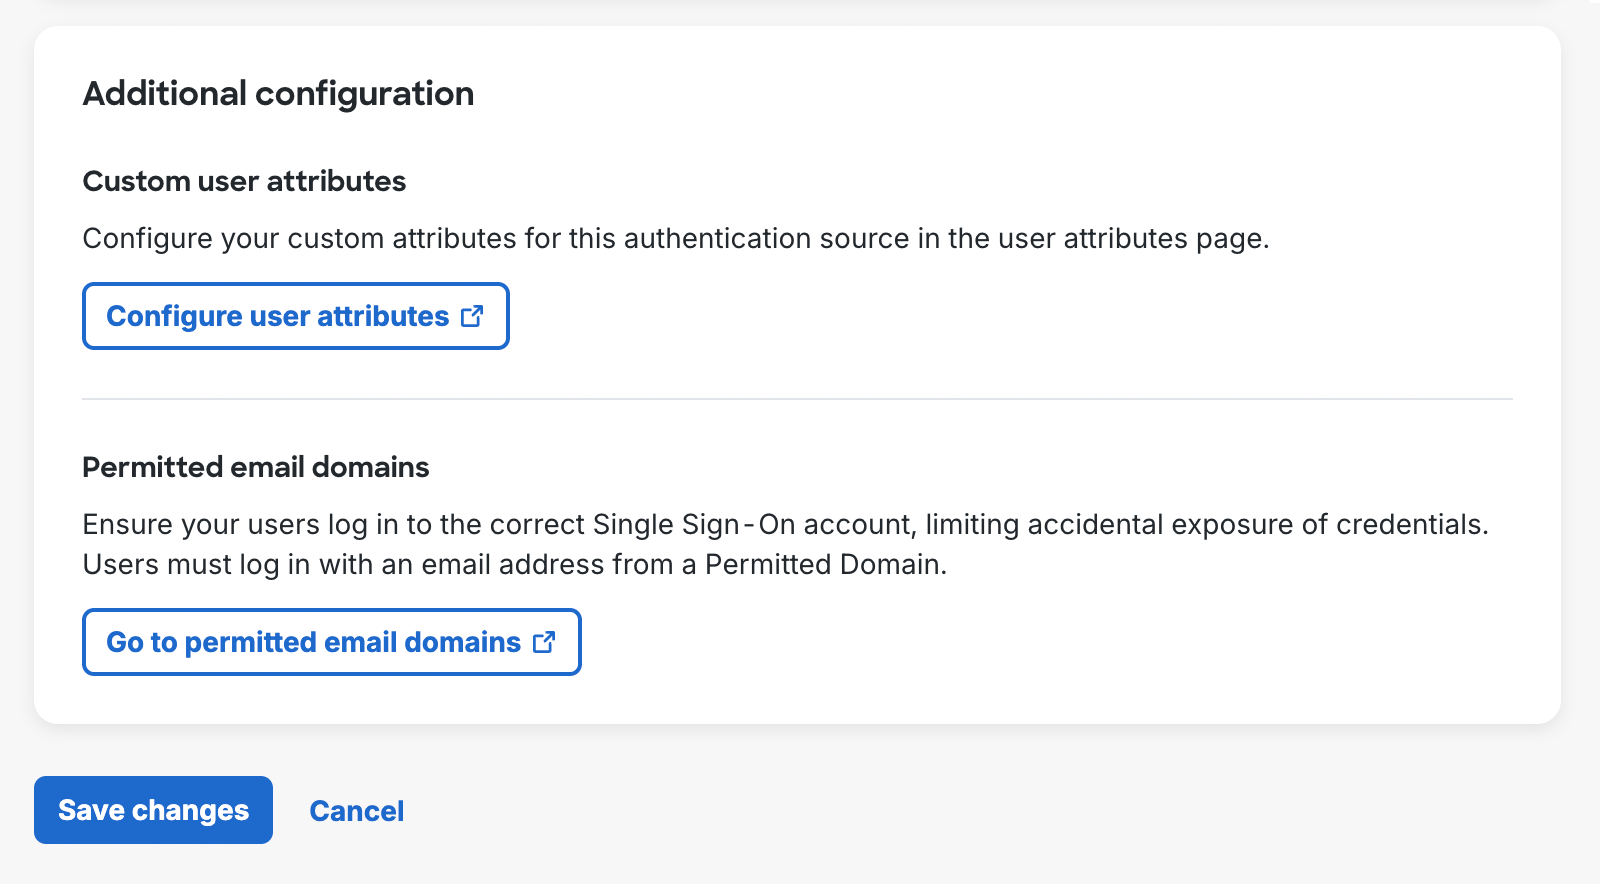
Configure Permitted Email Domains
Duo Single Sign-On requires that you verify control of the email domains users will be logging in with by adding a DNS TXT record to the email domain's public (external) DNS.
When a user attempts to log in with an email address that has not been verified by their organization, the authentication will be rejected and the user's credentials will not be sent to the Authentication Proxy for verification. This prevents your users from accidentally exposing their credentials to a Duo Single Sign-On not owned by your organization.
-
Once you've added an Active Directory authentication source, go to the SSO settings page and scroll down on the "Settings" tab to "Permitted Domains"**". Click Add Email Domain.
-
Type in the domain name of an email address that users from your organization will use to log in on the "Add Email Domain" pop-up. Example: If your email address is username@example.com type example.com and click Add.
-
A "DNS Records" table appears, showing the domain name you just added, along with additional information about the DNS TXT record that needs to be created.
-
Log into your DNS provider and create a DNS TXT record for the domain you just added in Record Name (eg. example.com) with the value in the corresponding DNS Text Record Value column.
You will be creating a DNS TXT record for your domain. Many domain registrars allow you to signify this by using the @ symbol.
See below about adding DNS records for popular domain registrars:
-
Once your DNS record has been created, return to the Duo Admin Panel and click the Verify button under the "Status" column. Duo's service queries your public DNS for the expected new TXT record.
It can take some time for DNS changes to propagate so if the verification attempt fails, you may need to wait and try again later. If email domain verification continues to fail, double-check that the DNS TXT record was created correctly.
-
Once the record has been verified the "Status" column will change to "Verified". Users using the verified domain will now be able to log into Duo Single Sign-On.
-
Repeat steps 1 through 6 for all email domains that need to be verified. Subdomains must be individually verified.
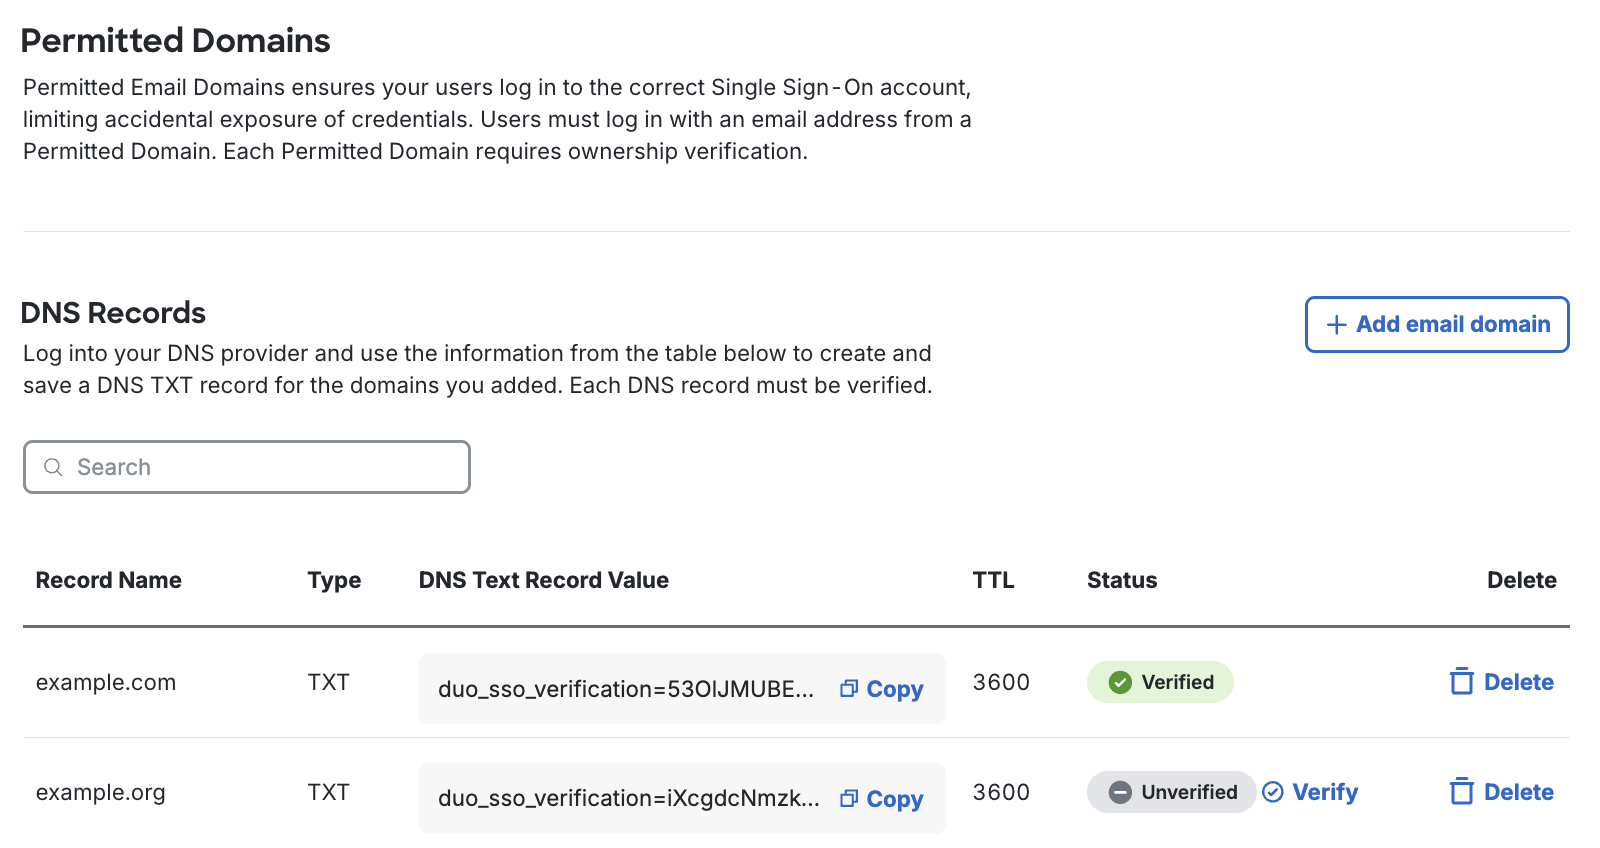
You may delete the DNS TXT record after Duo verifies the domain. Don't remove it before your domain shows "Verified" status.
You are now ready to start protecting applications with Duo Single Sign-On.
Add Another Active Directory Authentication Source
Once you've completed setting up an Active Directory authentication source you can add additional Active Directory authentication sources and Authentication Proxy server(s) by:
- Adding a new authentication source.
- Following the steps to add new Authentication Proxy servers and configure the additional Active Directory.
When you have more than one Active Directory authentication source, your Authentication Proxy server configuration pages include a drop-down selector which lets you choose which of your Active Directory sources that Authentication proxy server should connect to.
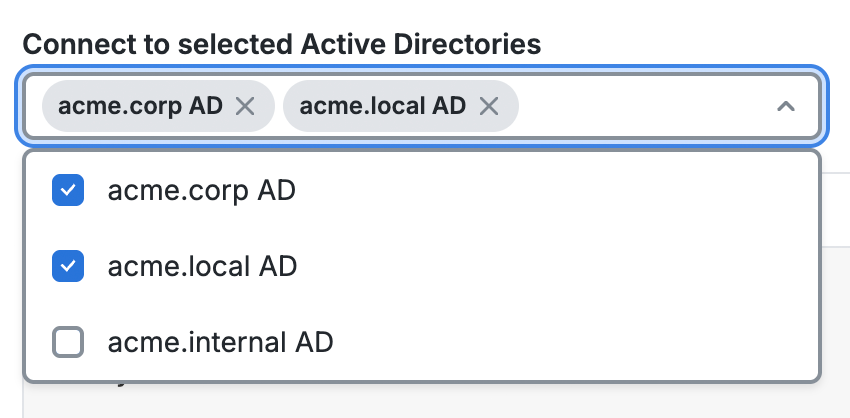
If you choose more than one Active Directory for that Authentication proxy server to connect to, the authproxy.cfg configuration updates with multiple [sso] sections (with a number appended) as necessary to include one section for each Active Directory you selected in the connection drop-down.
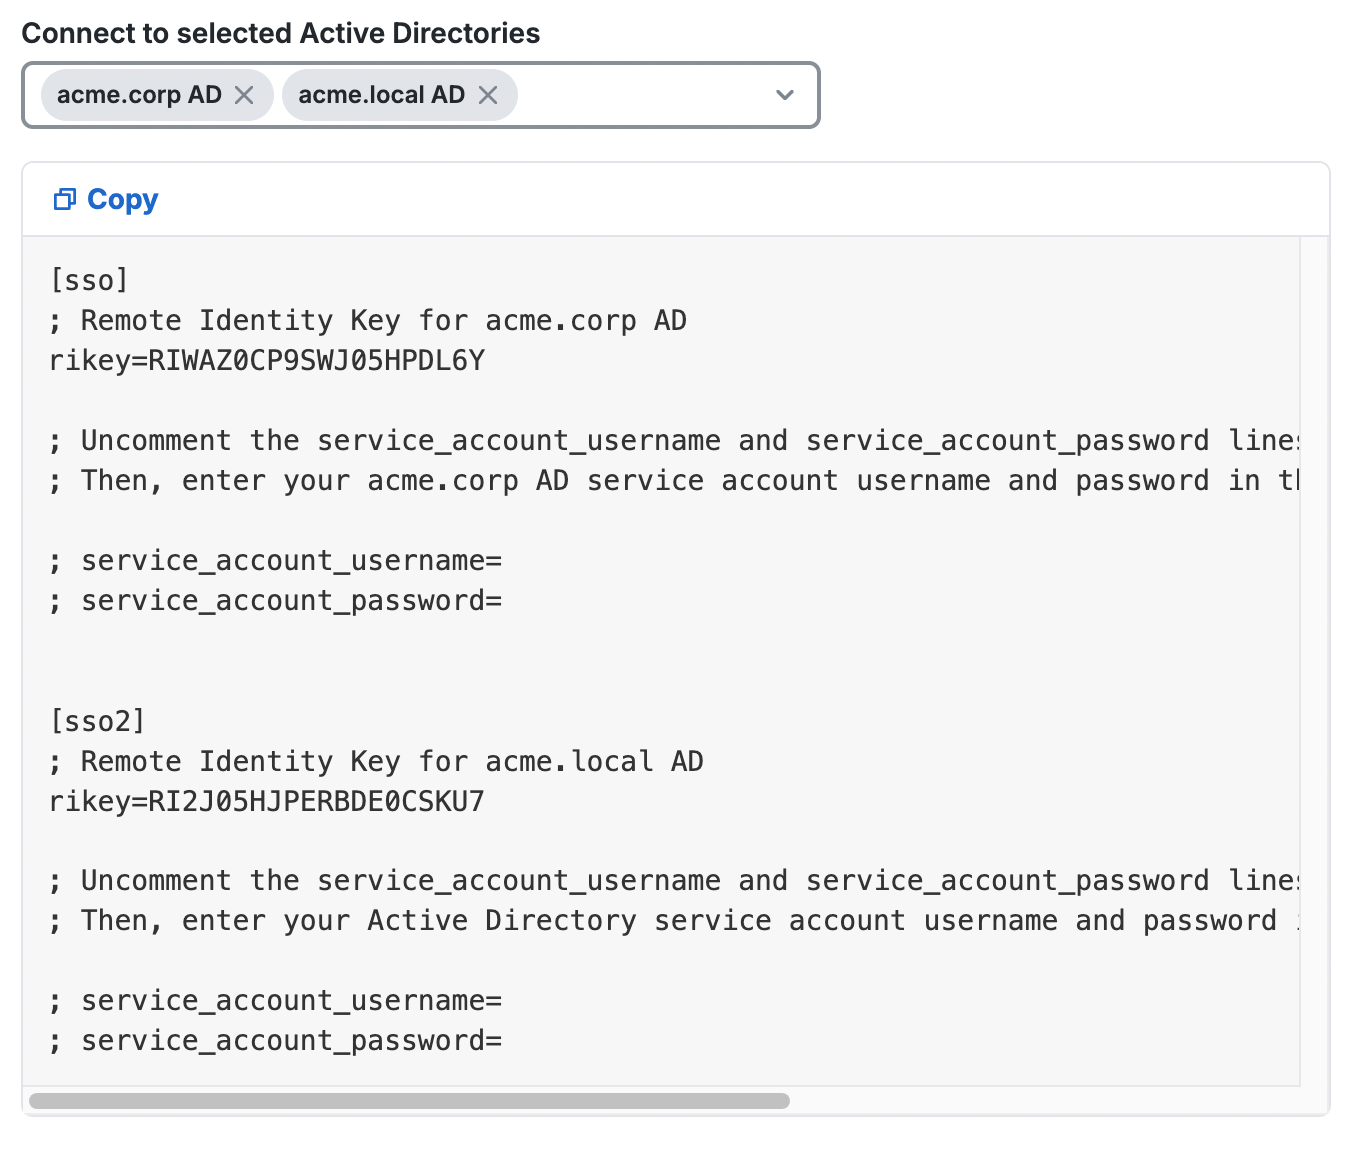
A given Authentication Proxy server can connect to multiple Active Directory authentication sources, but only within a single SSO deployment and Duo customer account.
SAML
Follow the steps below to configure Duo Single Sign-On as a service provider inside of your SAML identity provider and configure Duo Single Sign-On to use your SAML identity provider for authentication. Keep the Duo Admin Panel open in your browser while you access your SAML IdP's administrative console in a new window or tab. You'll need to return to the Duo Single Sign-On page to complete the configuration steps.
Note: If you use Entra ID (Azure AD) as your SAML IdP for Duo Single Sign-On you cannot also protect Office 365 with Duo Single Sign-On.
Configure the Duo Single Sign-On app in Entra ID
-
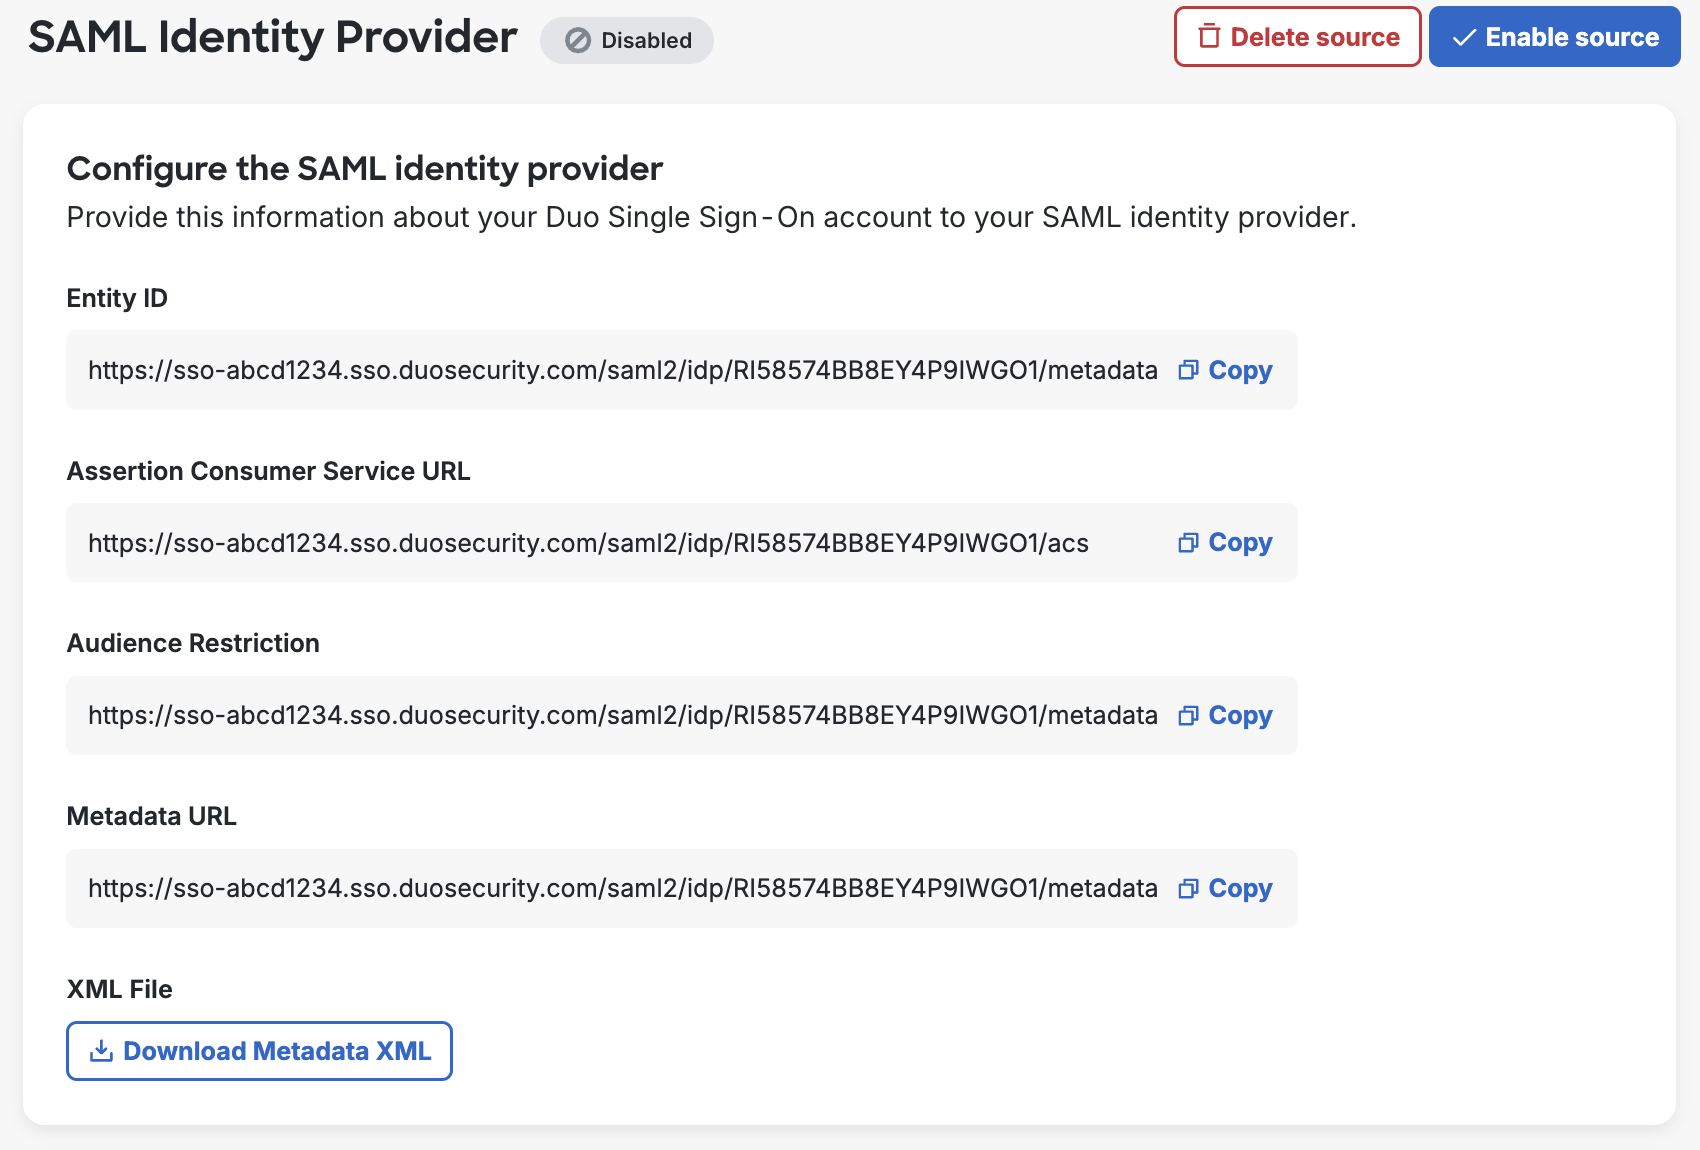
On the "Single Sign-On Configuration" page scroll down to 1. Configure your SAML Identity Provider. This is the Duo Single Sign-On metadata information you'll need to provide to your SAML identity provider to configure Duo Single Sign-On as a service provider.
-
Log into your Microsoft Entra admin center.
-
Click on the menu icon in the upper left-hand side of the page. Click on Entra ID.
-
On the left-hand navigation bar click Enterprise Apps. Click + New application at the top of the screen.
-
Click + Create your own application at the top of the gallery page.
-
On the "Create your own application" page type "Duo SSO" or any descriptive name you wish into the Input name field under "What's the name of your app?". Select the "non-gallery" option Integrate any other application you don't find in the gallery and then click Create.
-
On the application "Overview" page under "Getting Started" click Assign users and groups.
-
Click + Add user/group and select the users and groups that should have access to log in with Entra ID credentials to Duo Single Sign-On. After selecting the users and groups click Assign at the bottom of the page.
You may not be able to see or select distribution groups created in the Microsoft 365 Admin Center from the Entra portal. If you do not see the group you want to choose and that group is a distribution-only group created in the M365 Admin Center, you will need to select a different group or recreate the group as either the "Microsoft 365" or "Security" group type with the same membership in Entra ID.
-
On the left-hand navigation under "Manage" click Single sign-on. Select SAML on the "Select a single sign-on method" page.
-
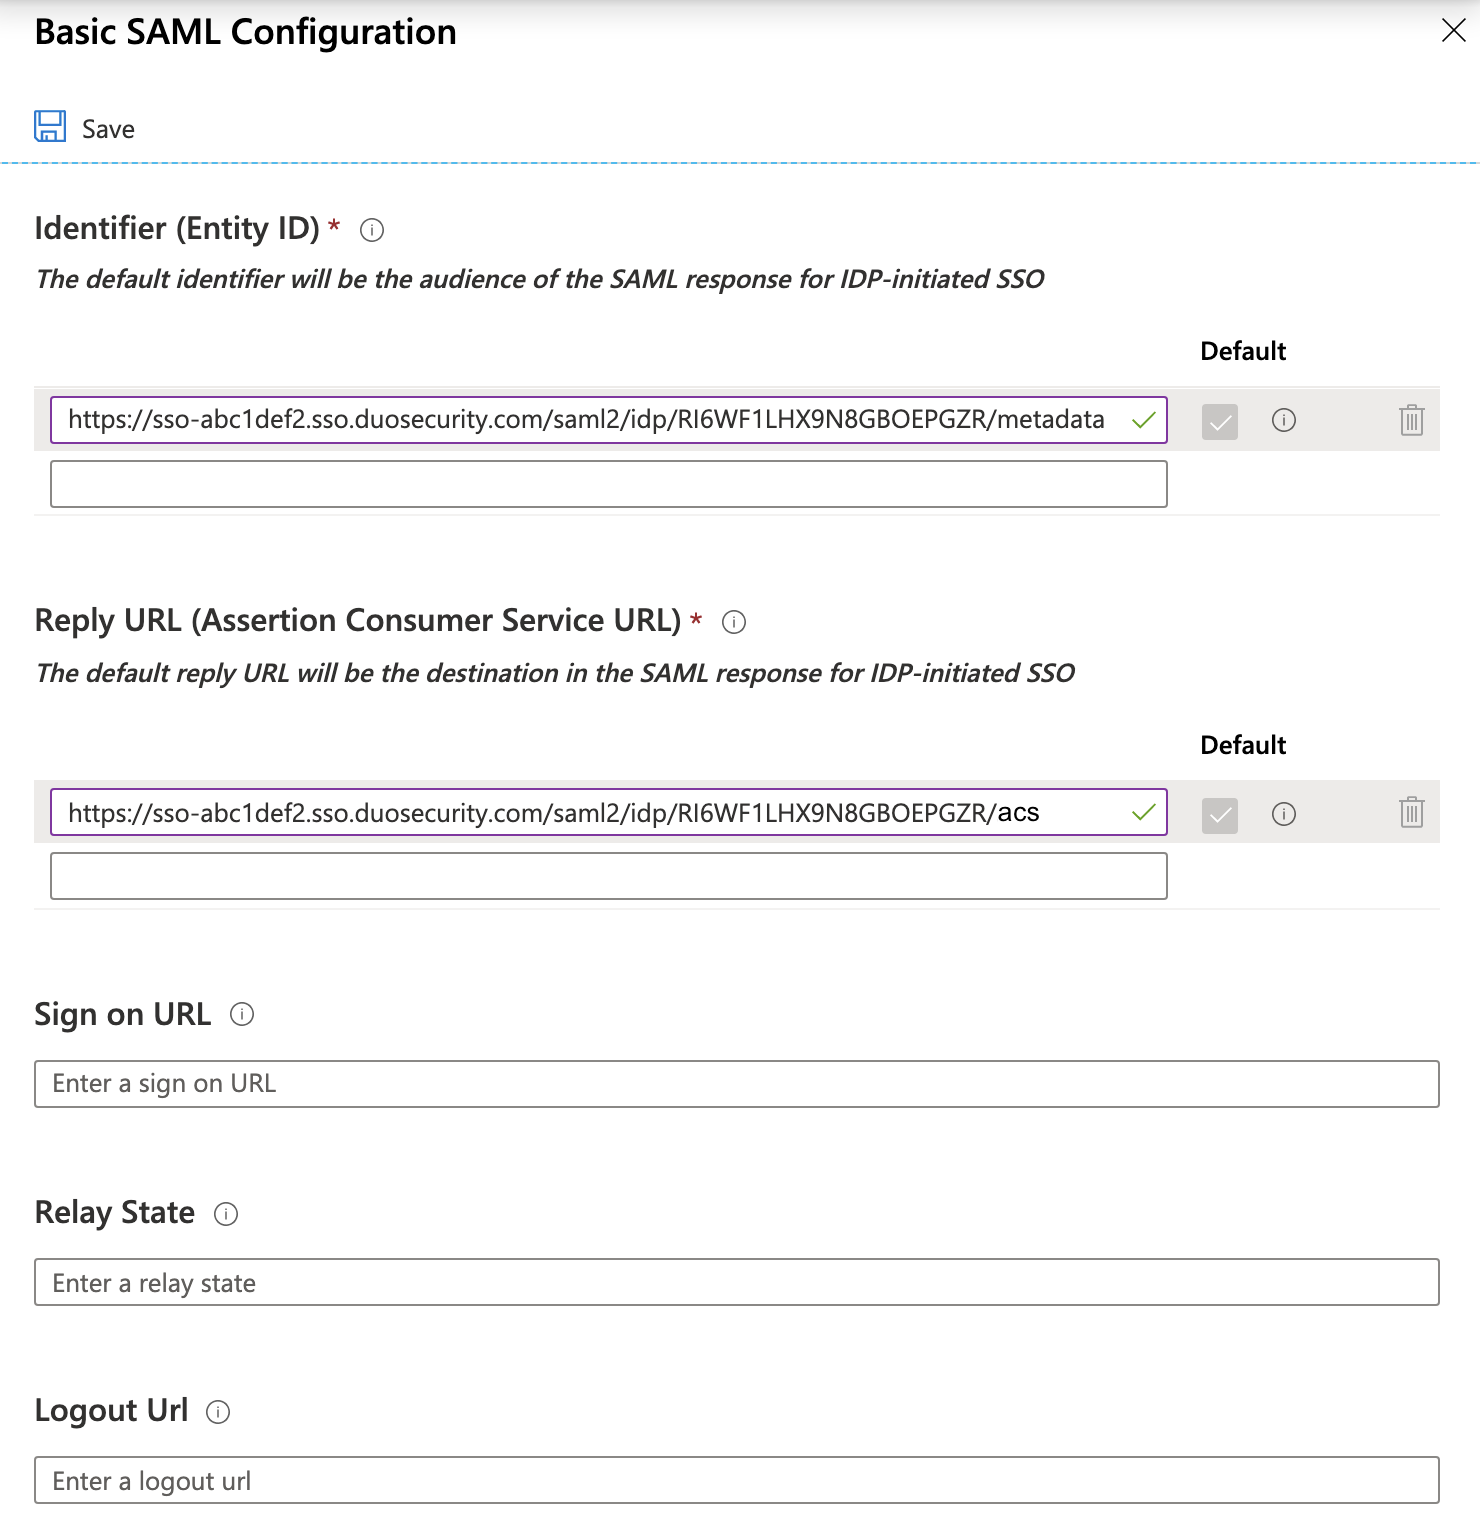
On the "Set up Single Sign-On with SAML" page under "Basic SAML Configuration" click the Edit icon (a pencil).
-
While on the "Basic SAML Configuration" page copy the Entity ID from the Duo Admin Panel. In the Entra ID admin center click Add identifier under "Identifier (Entity ID)" and paste the URL you copied from Duo in the field that appears.
Example: https://sso-abc1def2.sso.duosecurity.com/saml2/idp/RI6WF1LHX9N8GBOEPGZR/metadata
-
Return to the Duo Admin Panel's "Basic SAML Configuration" page and copy the Assertion Consumer Service URL. In Entra ID click Add reply URL under "Reply URL (Assertion Consumer Service URL)" and paste the URL you copied from Duo in the field that appears.
Example: https://sso-abc1def2.sso.duosecurity.com/saml2/idp/RI6WF1LHX9N8GBOEPGZR/acs
-
Leave all other fields empty.
-
Click Save and close the "Basic SAML Configuration" editor.
-
Click the pencil icon next to "Attributes & Claims".
-
Under "Additional Claims" click ... then Delete and confirm the action next to each row and delete the four default claims.
-
Click + Add new claim at the top of the page. Use the information in the table below to add a total of five additional claims.
Name Namespace Source Source attribute Email Leave Empty Attribute user.mail Username Leave Empty Attribute user.userprincipalname FirstName Leave Empty Attribute user.givenname LastName Leave Empty Attribute user.surname DisplayName Leave Empty Attribute user.displayname 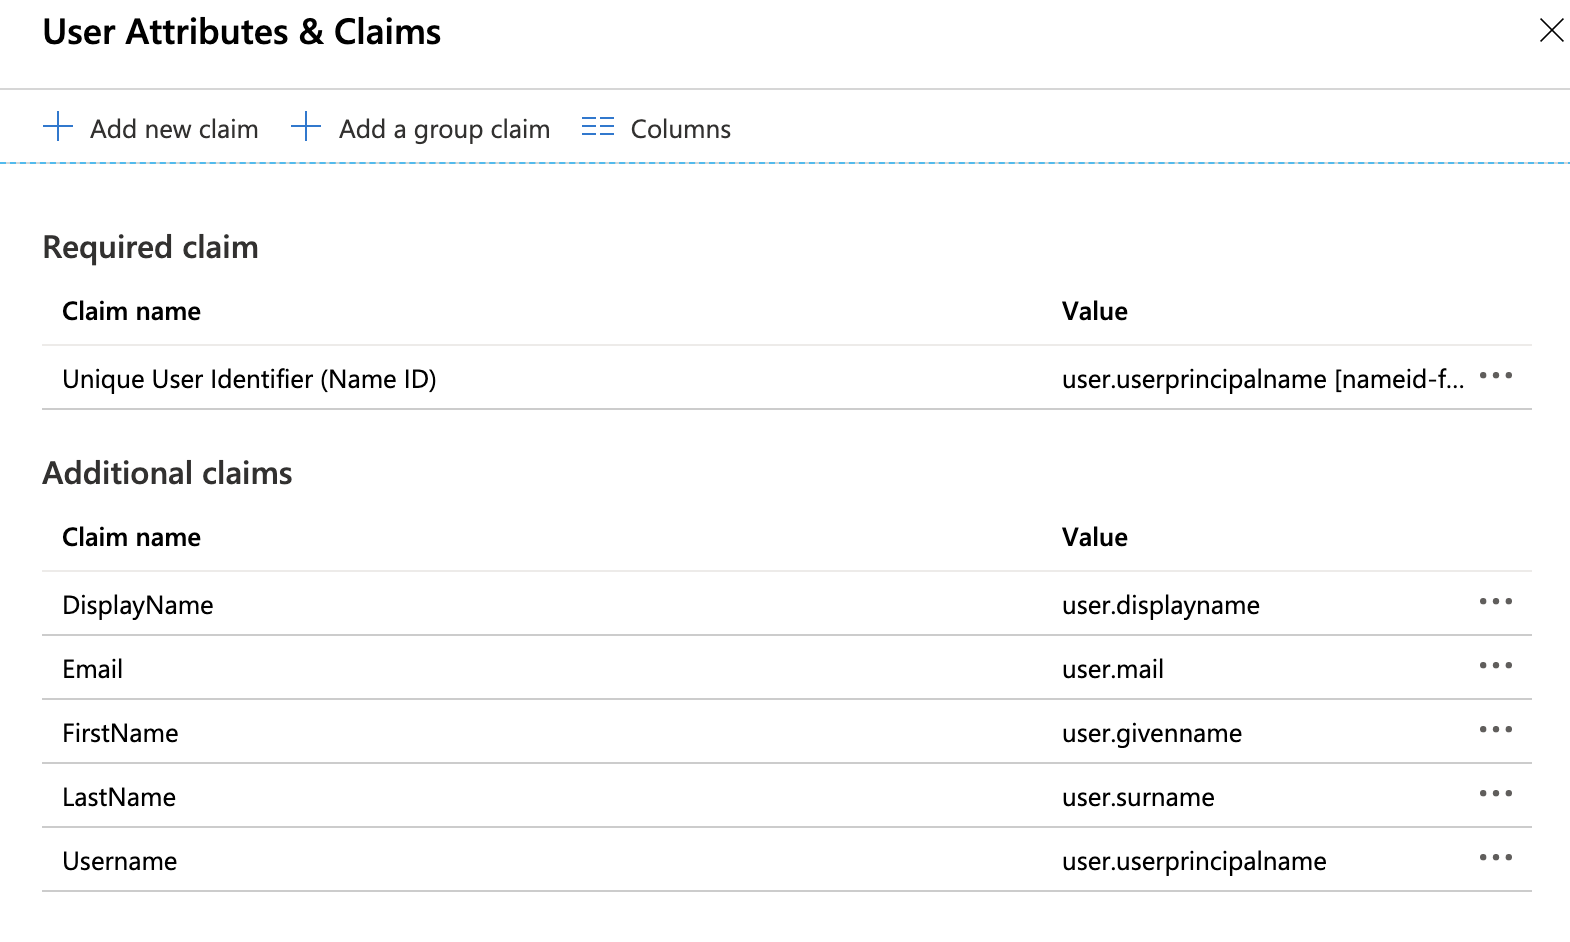
-
After adding all five claims click the X icon at the top right-hand side to close the view.
-
Duo Single Sign-On does not support an identity provider sending it a request. Do not click "Test" under step 5 to test your setup as it will fail.
Configure Duo Single Sign-On to use Entra ID
-
In the "SAML Certificates" section of the properties page of your Entra SAML application, click Download next to Certificate (Base64). You will need this certificate file later.
-
Under "Set up Duo SSO" (or whatever you named the new application) you will find metadata information to provide to Duo Single Sign-On.
-
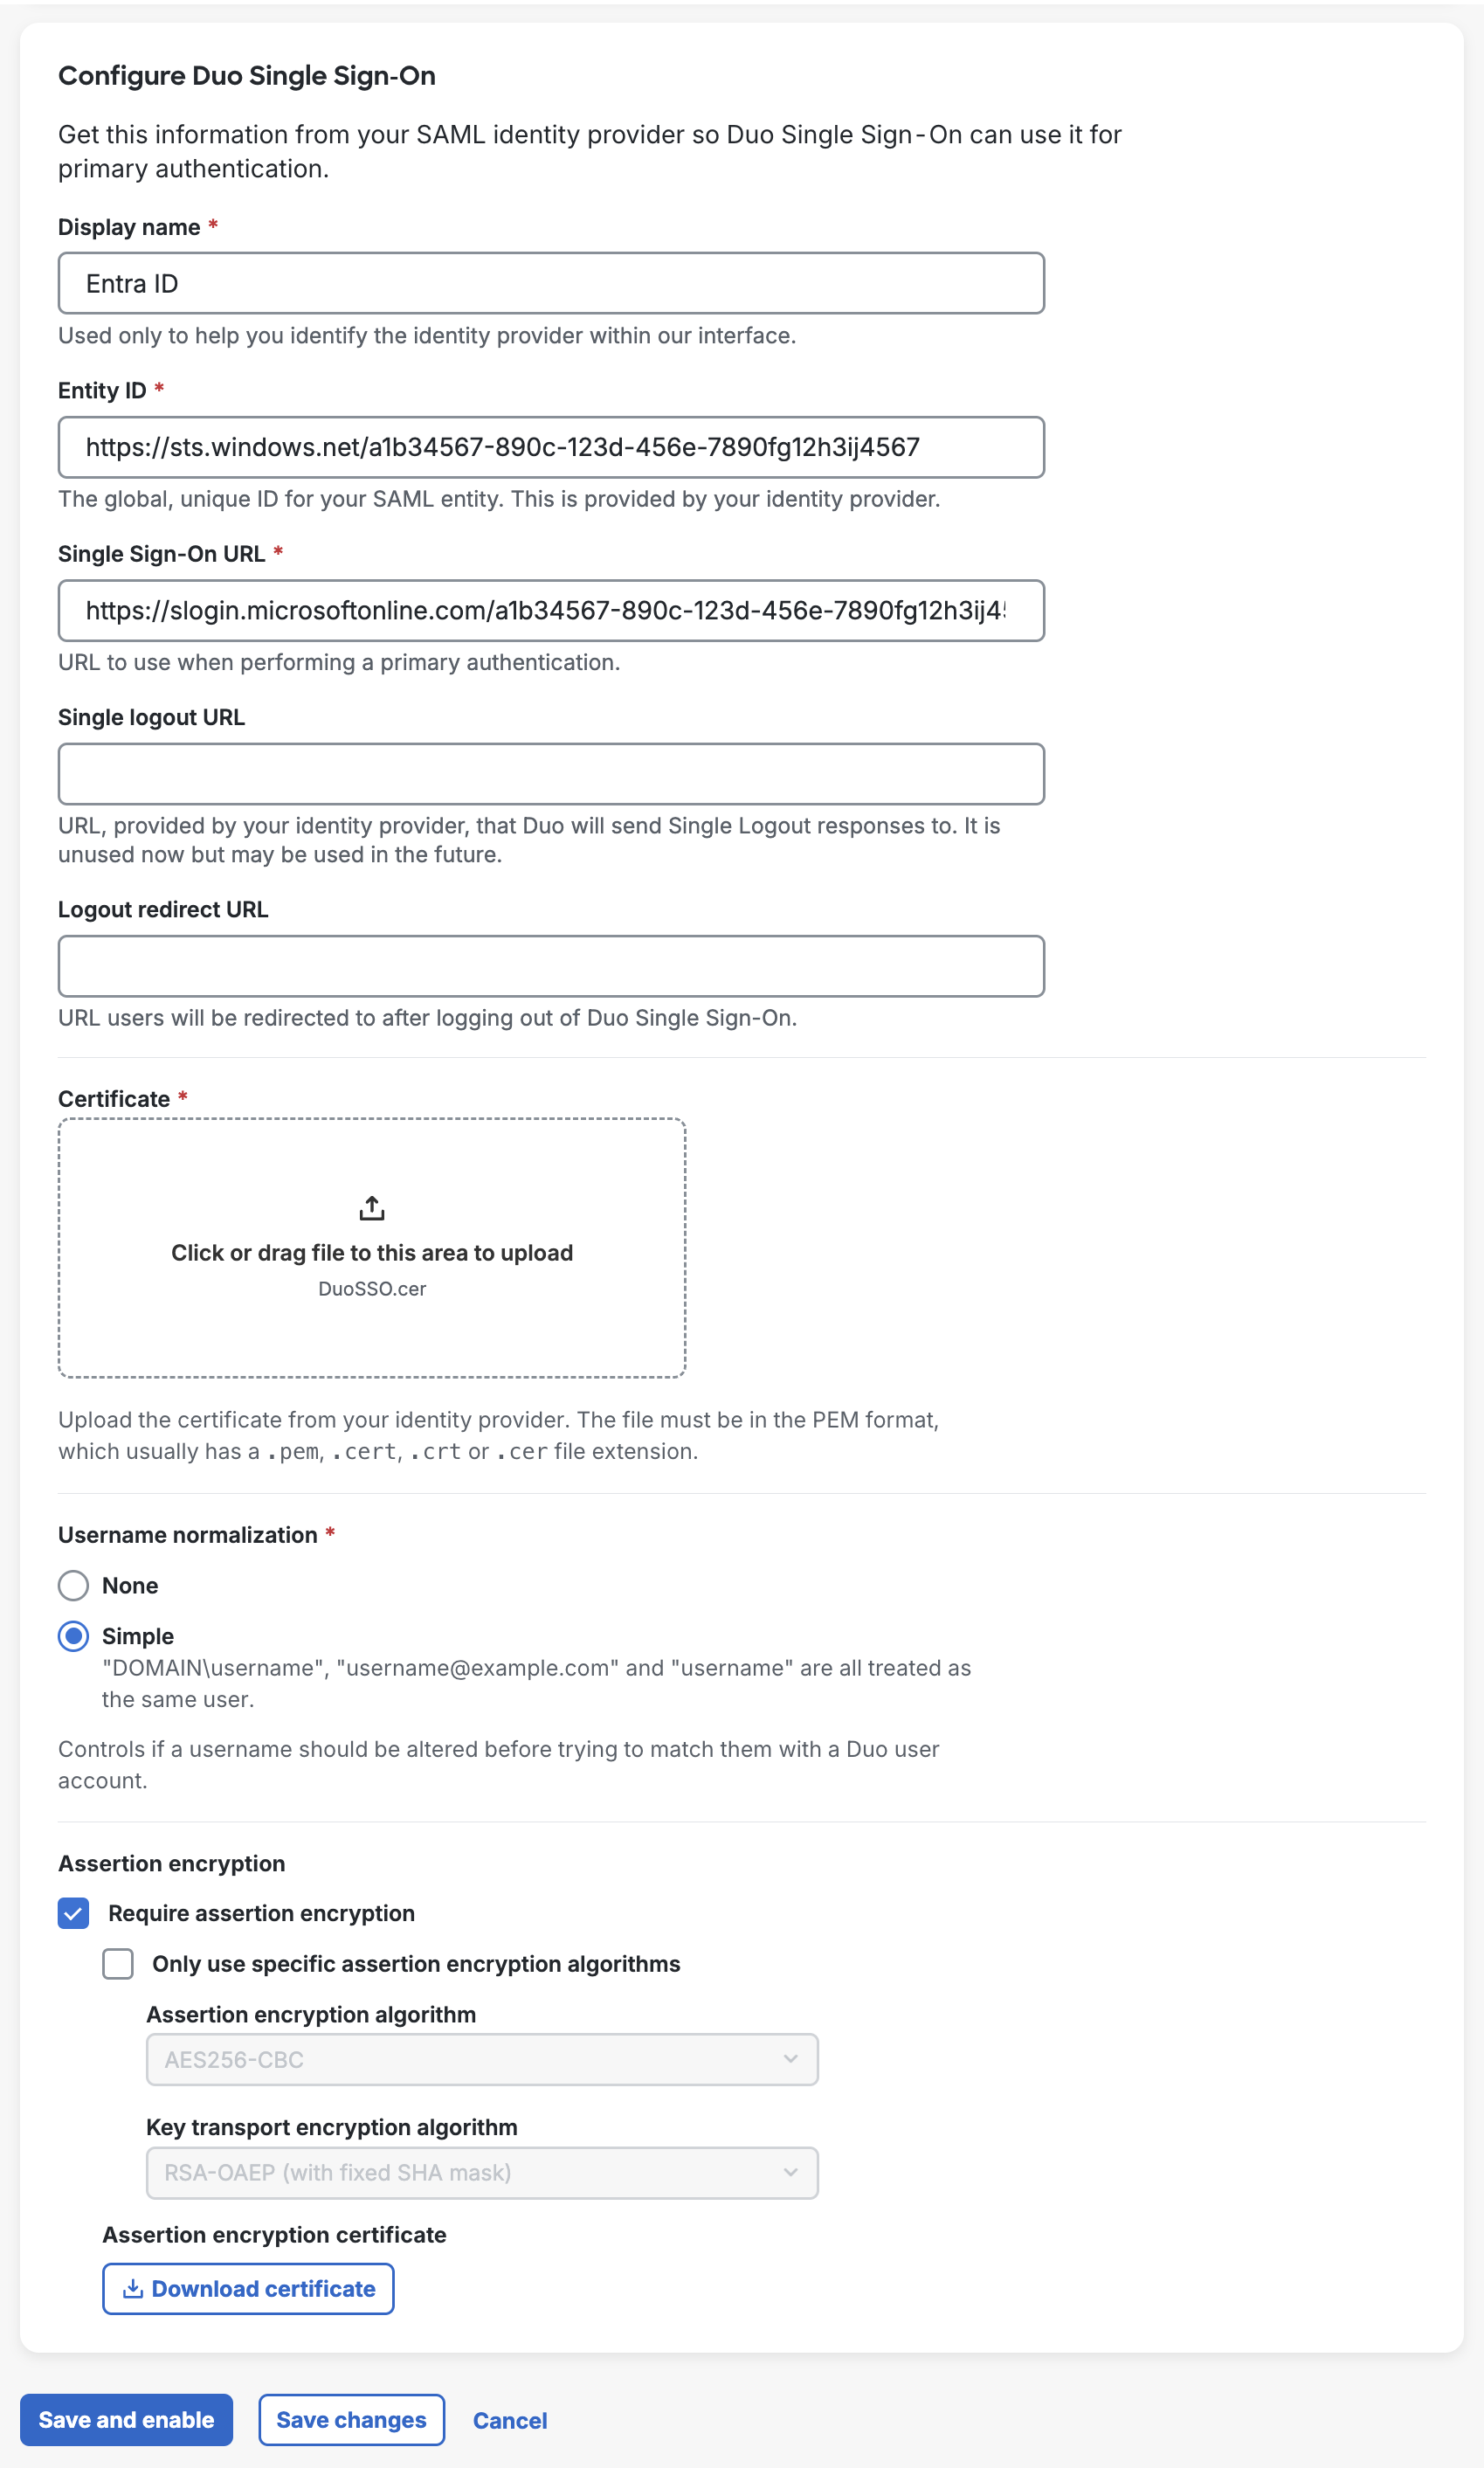
Return to the Duo Admin Panel and scroll down to 3. Configure Duo Single Sign-On. In the Display Name field type a name that will let you easily identify the provider.
-
Copy the Login URL value from Entra ID and paste it into the Single Sign-On URL field in the Duo Admin Panel.
Example: https://login.microsoftonline.com/a1b34567-890c-123d-456e-7890fg12h345/saml2
-
Copy the Microsoft Entra Identifier value from Entra ID and paste it into the Entity ID field in the Duo Admin Panel.
Example: https://sts.windows.net/a1b34567-890c-123d-456e-7890fg12h345/
-
Leave Single Logout URL and Logout Redirect URL empty in the Duo Admin Panel.
-
Upload the certificate to the Certificate section in the Duo Admin Panel.
-
Username Normalization controls whether or not usernames entered for primary authentication should be altered before trying to match them to a Duo user account. When set to None, the usernames
narroway,EXAMPLE\narroway, andnarroway@example.comwould be three separate users in Duo. When set to Simple, any domain information is stripped from the username sent to Duo, sonarroway,EXAMPLE\narroway, andnarroway@example.comwould all resolve to a single "narroway" Duo user.
Default: Simple. -
If you want to use encrypted assertions with Entra ID, enable Require encrypted assertion. This is optional.
Check the box next to Allow use of any algorithm that is supported by SAML Identity Provider configuration to allow all supported algorithms. Otherwise, uncheck the box and set the Assertion encryption algorithm to AES256-CBC and the Key transport encryption algorithm to RSA-OAEP (with fixed SHA mask). Click Download Certificate to obtain the
SAML Identity Provider.crtcertificate file. You will need to upload this certificate to Entra ID after saving your SAML identity provider in Duo. -
Click Save. If you did not enable encrypted assertions, skip to step 14.
-
Return to the Duo SSO application in the Entra ID admin console. On the left-hand navigation bar under "Security" click Token encryption.
-
Locate the
SAML Identity Provider.crtcertificate you downloaded from Duo on your computer. Change the file extension on that file from.crtto.cer, so the file is now namedSAML Identity Provider.cerThen, click Import Certificate at the top of the Entra ID page and select the
SAML Identity Provider.cercertificate file from your computer. The certificate imports with "Inactive" status. -
Click the three dots at the end of the row for your imported Duo certificate and select Activate token encryption certificate. Click Yes in the warning that pops up. The certificate's status changes to "Active".
-
You are now ready to start protecting applications with Duo Single Sign-On.
Note: If you use Google Workspace (formerly known as G Suite) as your SAML IdP for Duo Single Sign-On you cannot also protect Google Workspace with Duo Single Sign-On. Additionally, Google Workspace does not support use of encrypted assertions.
Configure Duo Single Sign-On to use Google Workspace
-
Log into your Google Workspace Admin page.
-
While in the Admin Console click on Apps and then click on Web and mobile apps.
-
At the top of the "Apps" table click the Add App drop-down and select Add custom SAML app. You'll be taken to a new page.
-
On the "Apps details" page type a name that will let you easily identify the provider. Click CONTINUE.
-
The "Google Identity Provider details" page contains the information needed to configure Duo Single Sign-On.
-
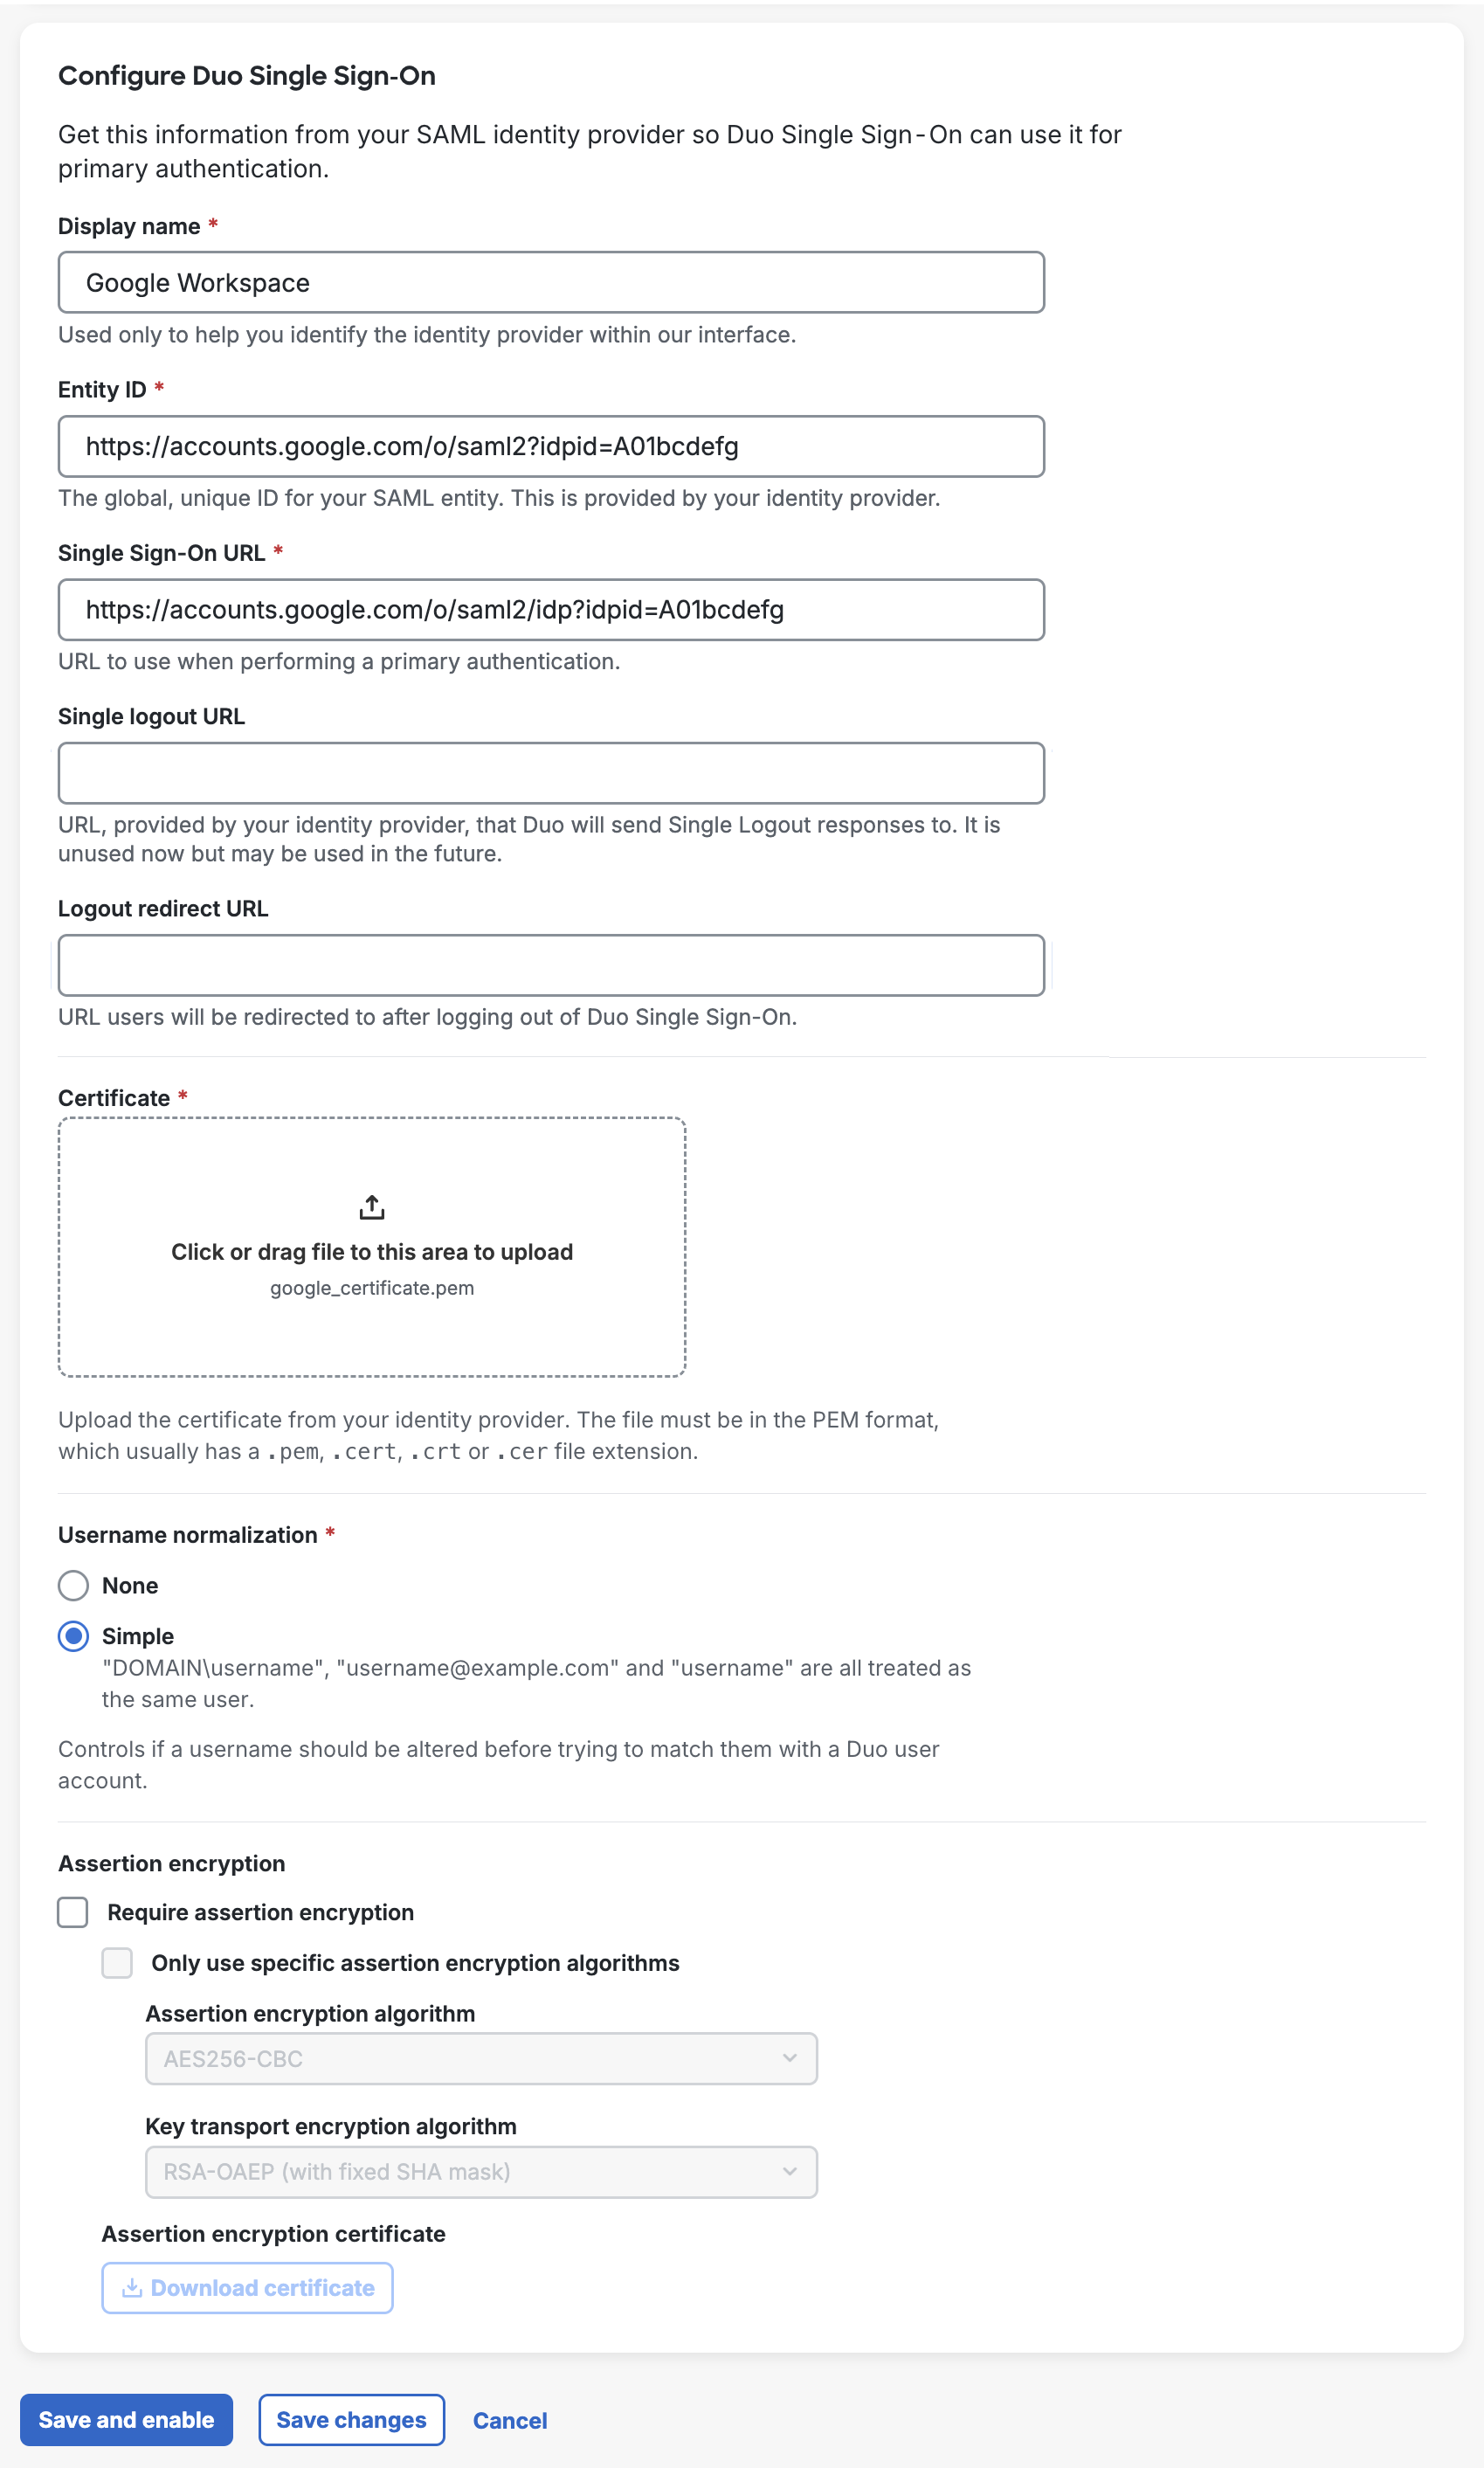
In another tab return to the Duo Admin Panel and scroll down to 3. Configure Duo Single Sign-On.
-
In the Name field type a name that will let you easily identify the provider.
-
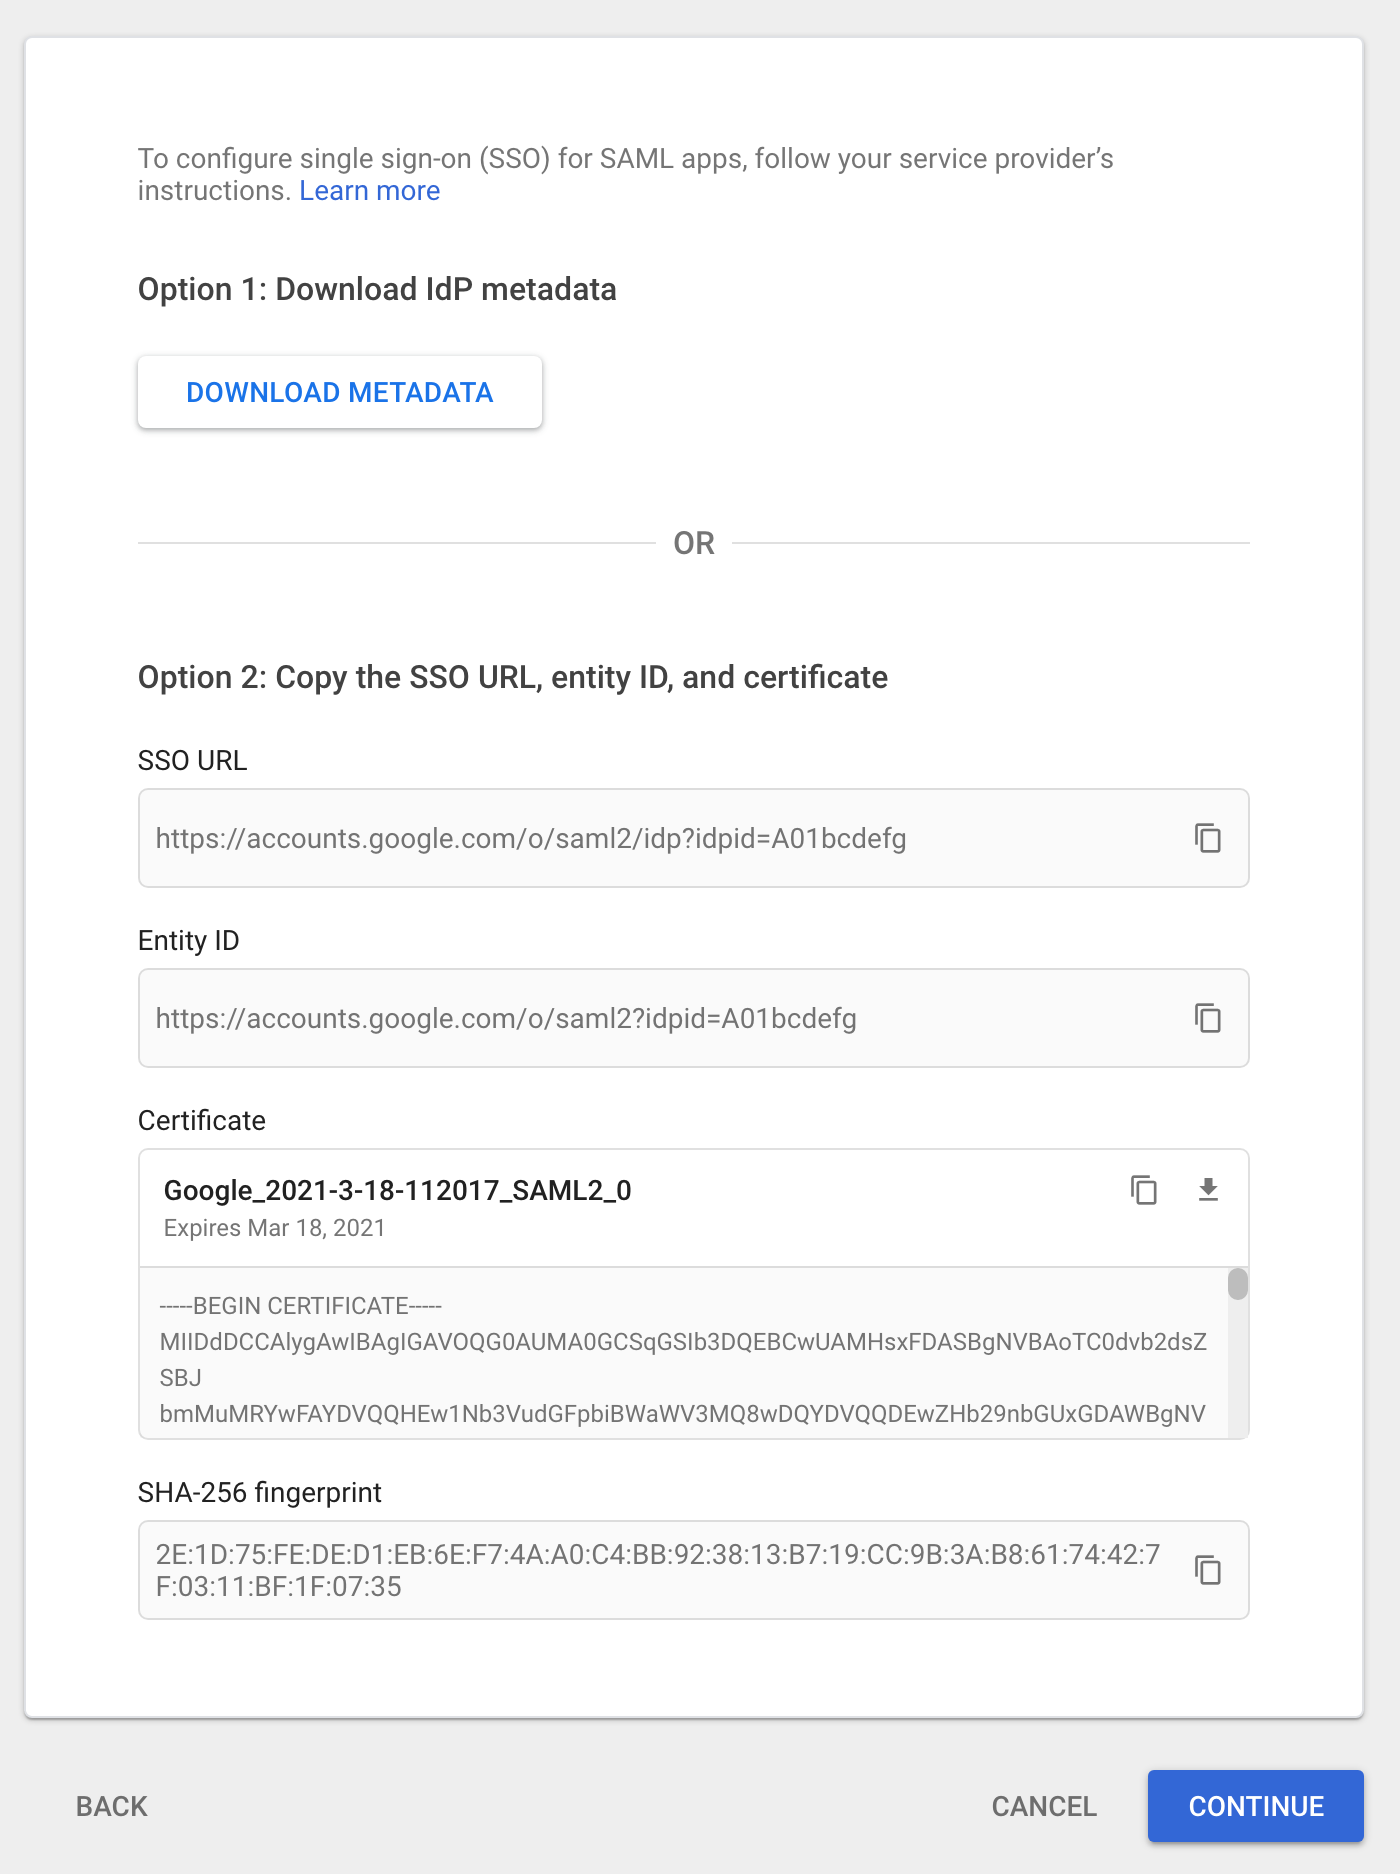
Copy the Entity ID value from Google and paste it into the Entity ID field in the Duo Admin Panel.
Example: https://accounts.google.com/o/saml2?idpid=A01bcdefg
-
Copy the SSO URL value from Google and paste it into the Single Sign-On URL field in the Duo Admin Panel.
Example: https://accounts.google.com/o/saml2/idp?idpid=A01bcdefg
-
Leave Single Logout URL and Logout Redirect URL empty in the Duo Admin Panel.
-
Click the download icon button under the "Certificate" section on Google. Upload the certificate to the Certificate section in the Duo Admin Panel.
-
Username Normalization controls whether or not usernames entered for primary authentication should be altered before trying to match them to a Duo user account. When set to None, the usernames
narroway,EXAMPLE\narroway, andnarroway@example.comwould be three separate users in Duo. When set to Simple, any domain information is stripped from the username sent to Duo, sonarroway,EXAMPLE\narroway, andnarroway@example.comwould all resolve to a single "narroway" Duo user.
Default: Simple. -
Do not enable Assertion encryption as Google does not support it.
-
Click Save.
Configure Google Workspace app for Duo Single Sign-On
-
On the Duo Admin Panel scroll up to 1. Configure your SAML Identity Provider. This is the Duo Single Sign-On metadata information you'll need to provide to your SAML identity provider to configure Duo Single Sign-On as a service provider.
-
Return to Google and on the "Google Identity Provider details" page click CONTINUE.
-
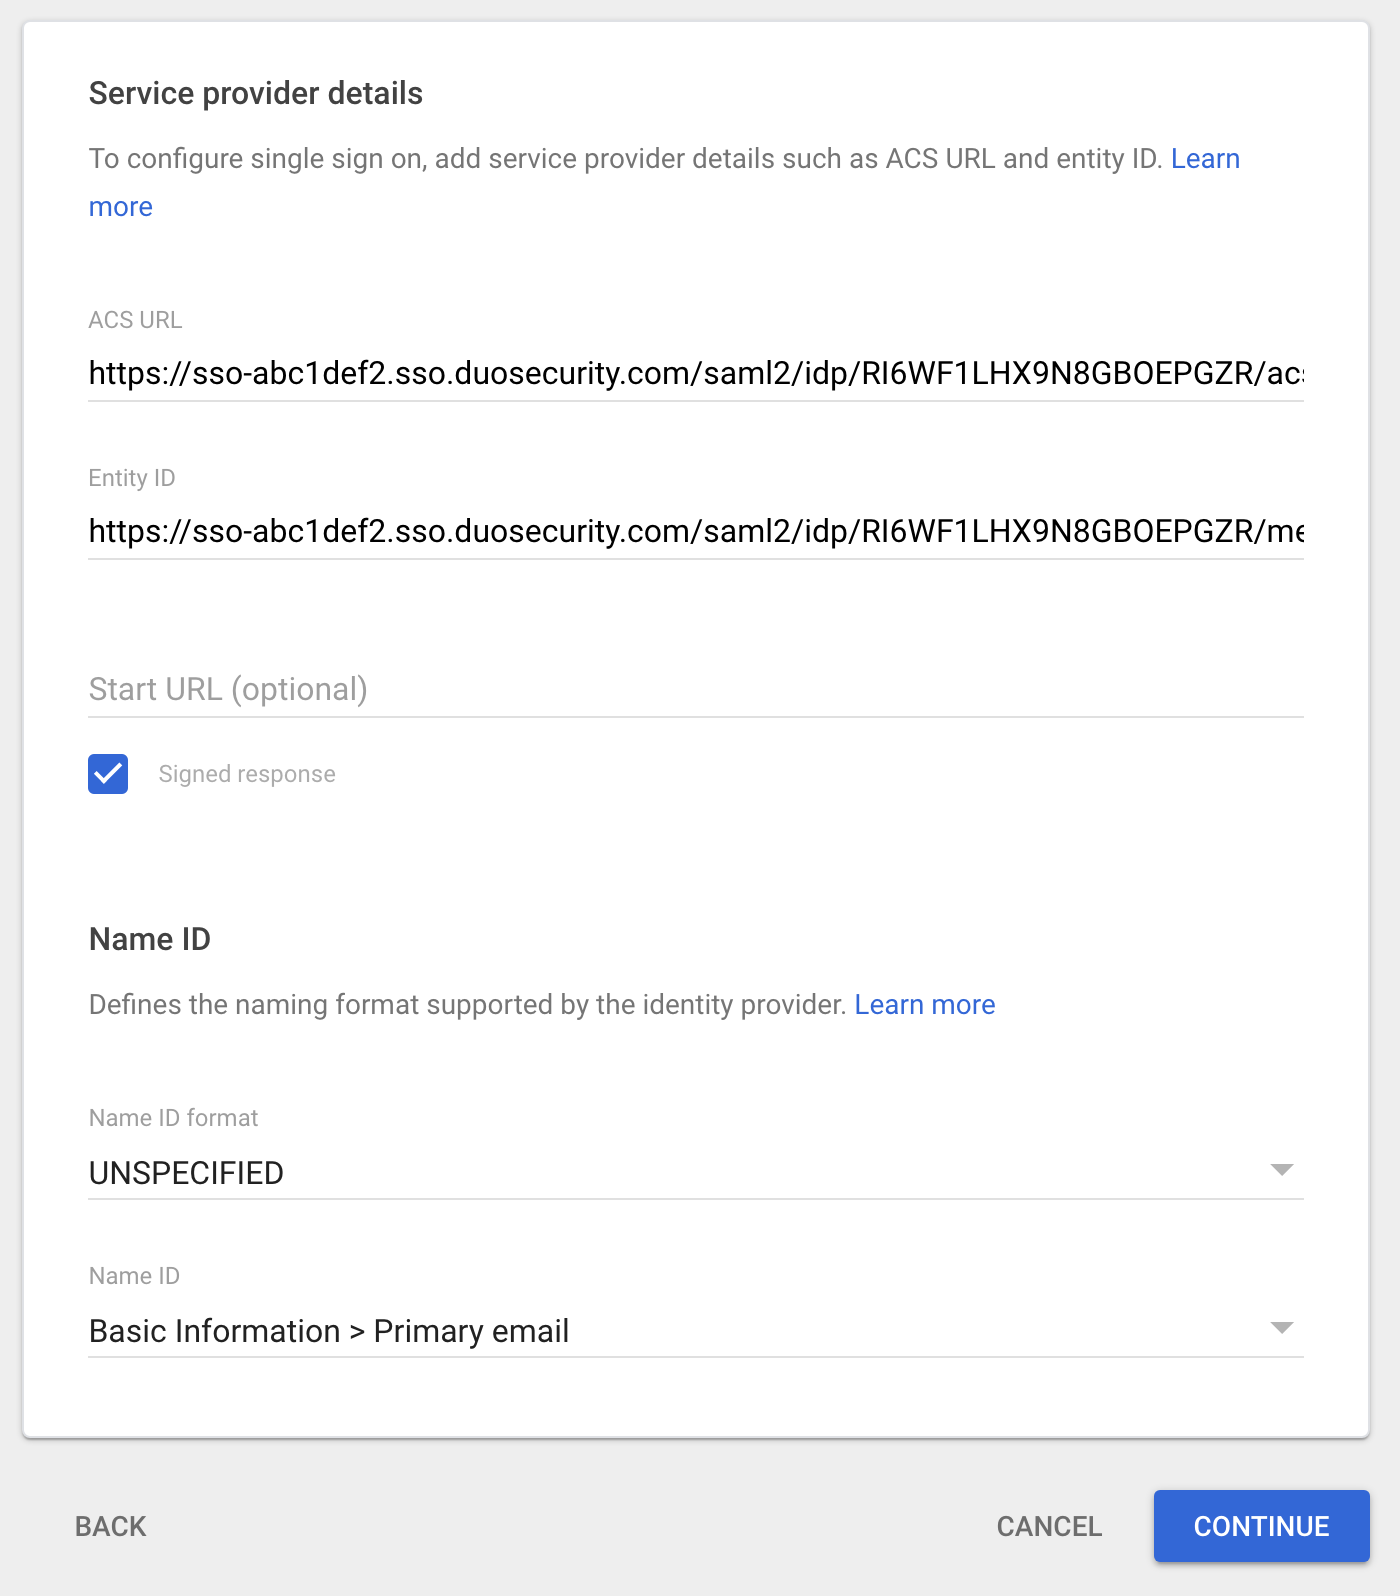
On the "Service Provider Details" page copy the Assertion Consumer Service URL from the Duo Admin Panel and paste it into the ACS URL field.
Example: https://sso-abc1def2.sso.duosecurity.com/saml2/idp/RI6WF1LHX9N8GBOEPGZR/acs.
-
Copy the Entity ID from the Duo Admin Panel and paste it into the Entity ID field.
Example: https://sso-abc1def2.sso.duosecurity.com/saml2/idp/RI6WF1LHX9N8GBOEPGZR/metadata.
-
Leave Start URL empty.
-
Check the box next to Signed response
-
Set Name ID Format to UNSPECIFIED and click CONTINUE.
-
Set Name ID to an attribute in Google that matches your Duo usernames.
-
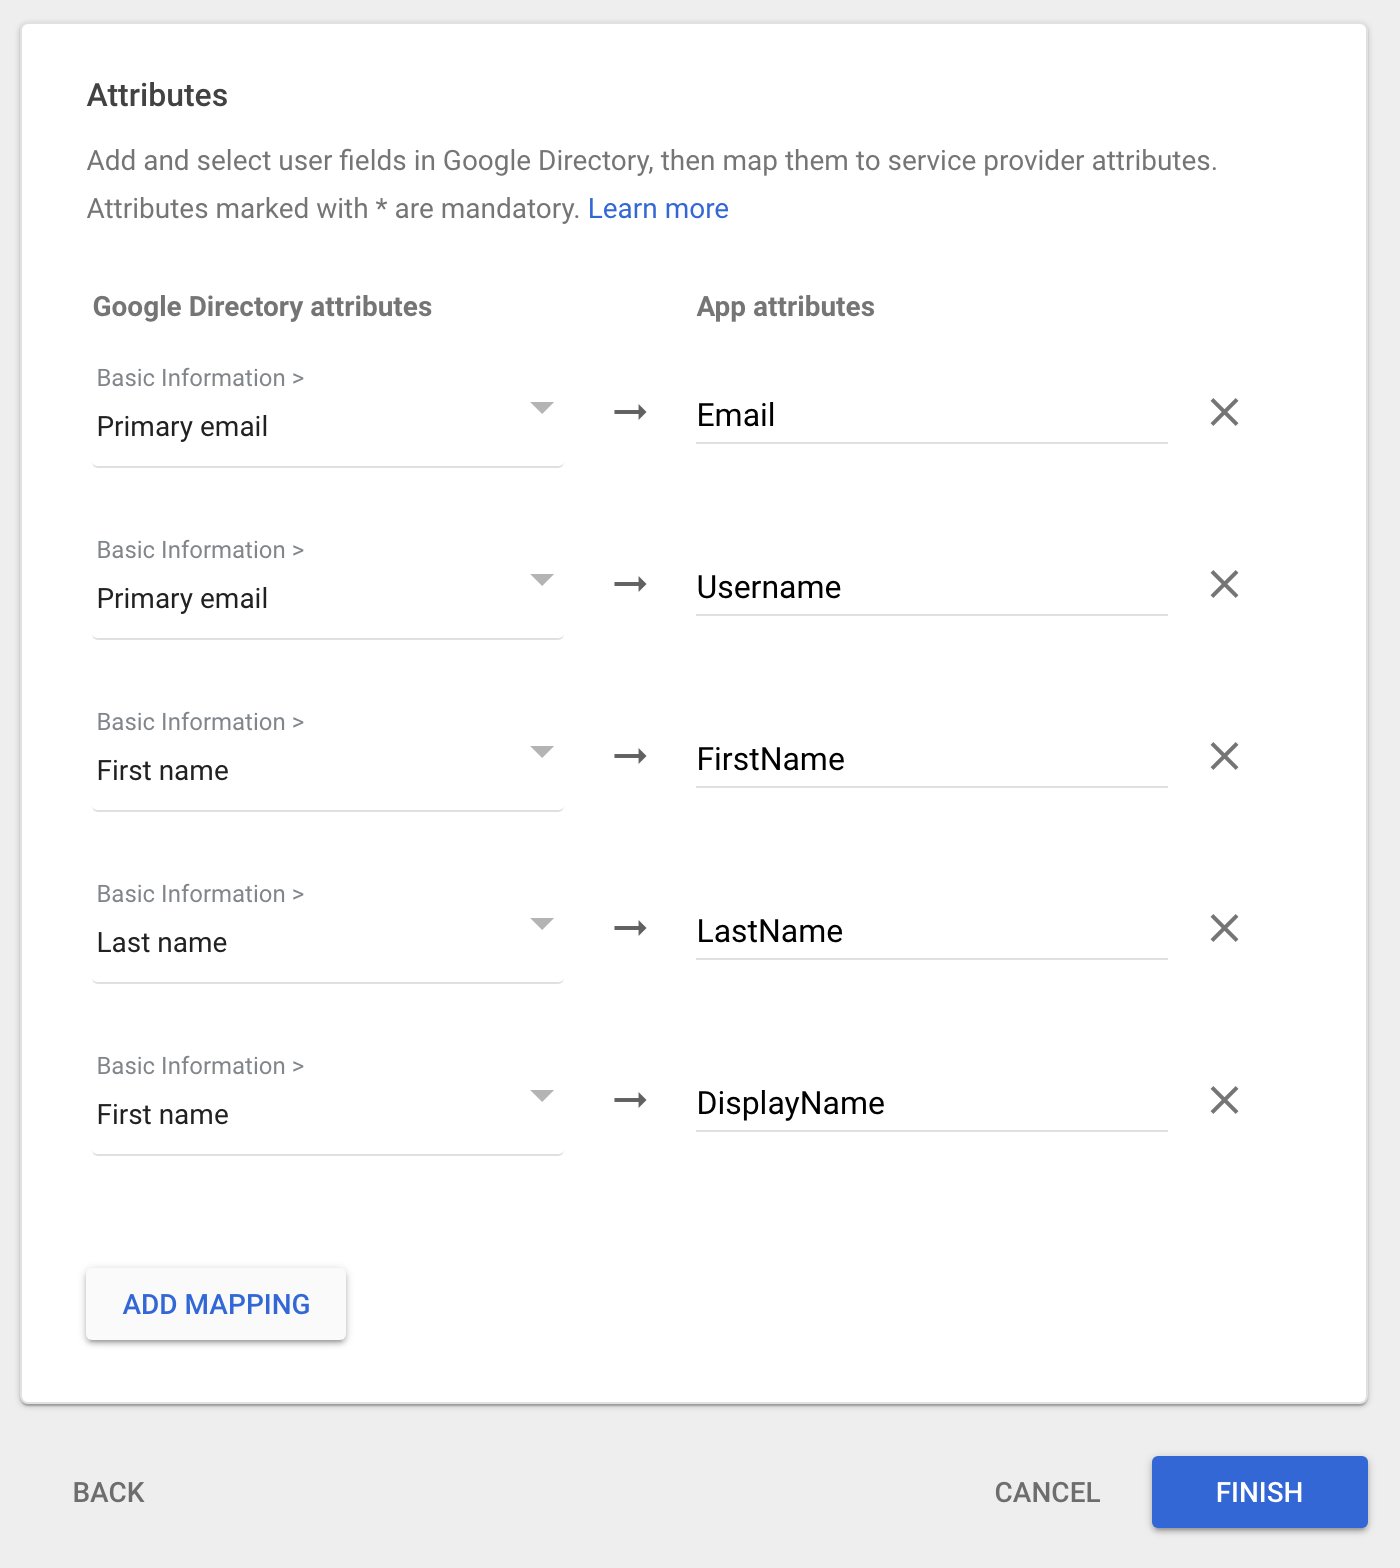
On the "Attribute Mapping" click ADD MAPPING five times. New rows will appear on the page.
-
Use the table below to add mappings onto the Google page from left to right for each row.
Google Directory attributes App attributes Primary email Email Primary email Username First Name FirstName Last Name LastName First Name DisplayName -
Click FINISH. You'll be taken to the application's page in "Web and mobile apps".
-
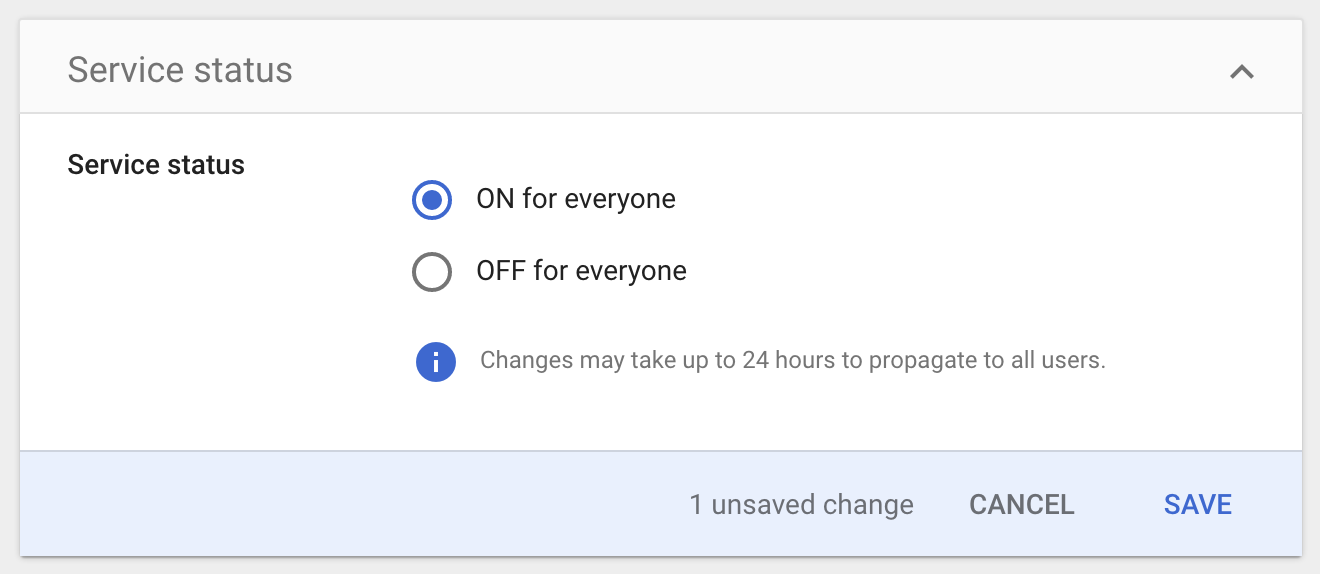
On the application page click the down arrow in the upper-right corner of "User access". You'll be taken to a new page.
-
Under "Service status" click ON for everyone and click SAVE.
-
You are now ready to start protecting applications with Duo Single Sign-On.
Configure your SAML Identity Provider
-
On the "Single Sign-On Configuration" page scroll down to 1. Configure your SAML Identity Provider. This is the Duo Single Sign-On metadata information you'll need to provide to your SAML identity provider to configure Duo Single Sign-On as a service provider.
-
Configure your SAML identity provider to:
-
Send a NameIDFormat of urn:oasis:names:tc:SAML:1.1:nameid-format:unspecified.
-
Send a NameID attribute that matches your users' Duo usernames.
-
-
On the "Single Sign-On Configuration" page scroll down to 2. Configure SAML Identity Provider's Attributes. Configure your SAML identity provider to send the following required attribute values. Attribute names must be sent to Duo Single Sign-On corresponding to the "Attribute Name Sent" column below:
SAML IdP Attribute Attribute Name Sent Email Address Email Username Username First Name FirstName Last Name LastName Full Name DisplayName You may configure additional attributes to send in addition to the required attributes
-
Continue to the next section once you've configured Duo Single Sign-On as a service provider within your SAML identity provider.
Configure Duo Single Sign-On Authentication Source
-
On the Duo Admin Panel "Single Sign-On Configuration" page scroll down to 3. Configure Duo Single Sign-On.
-
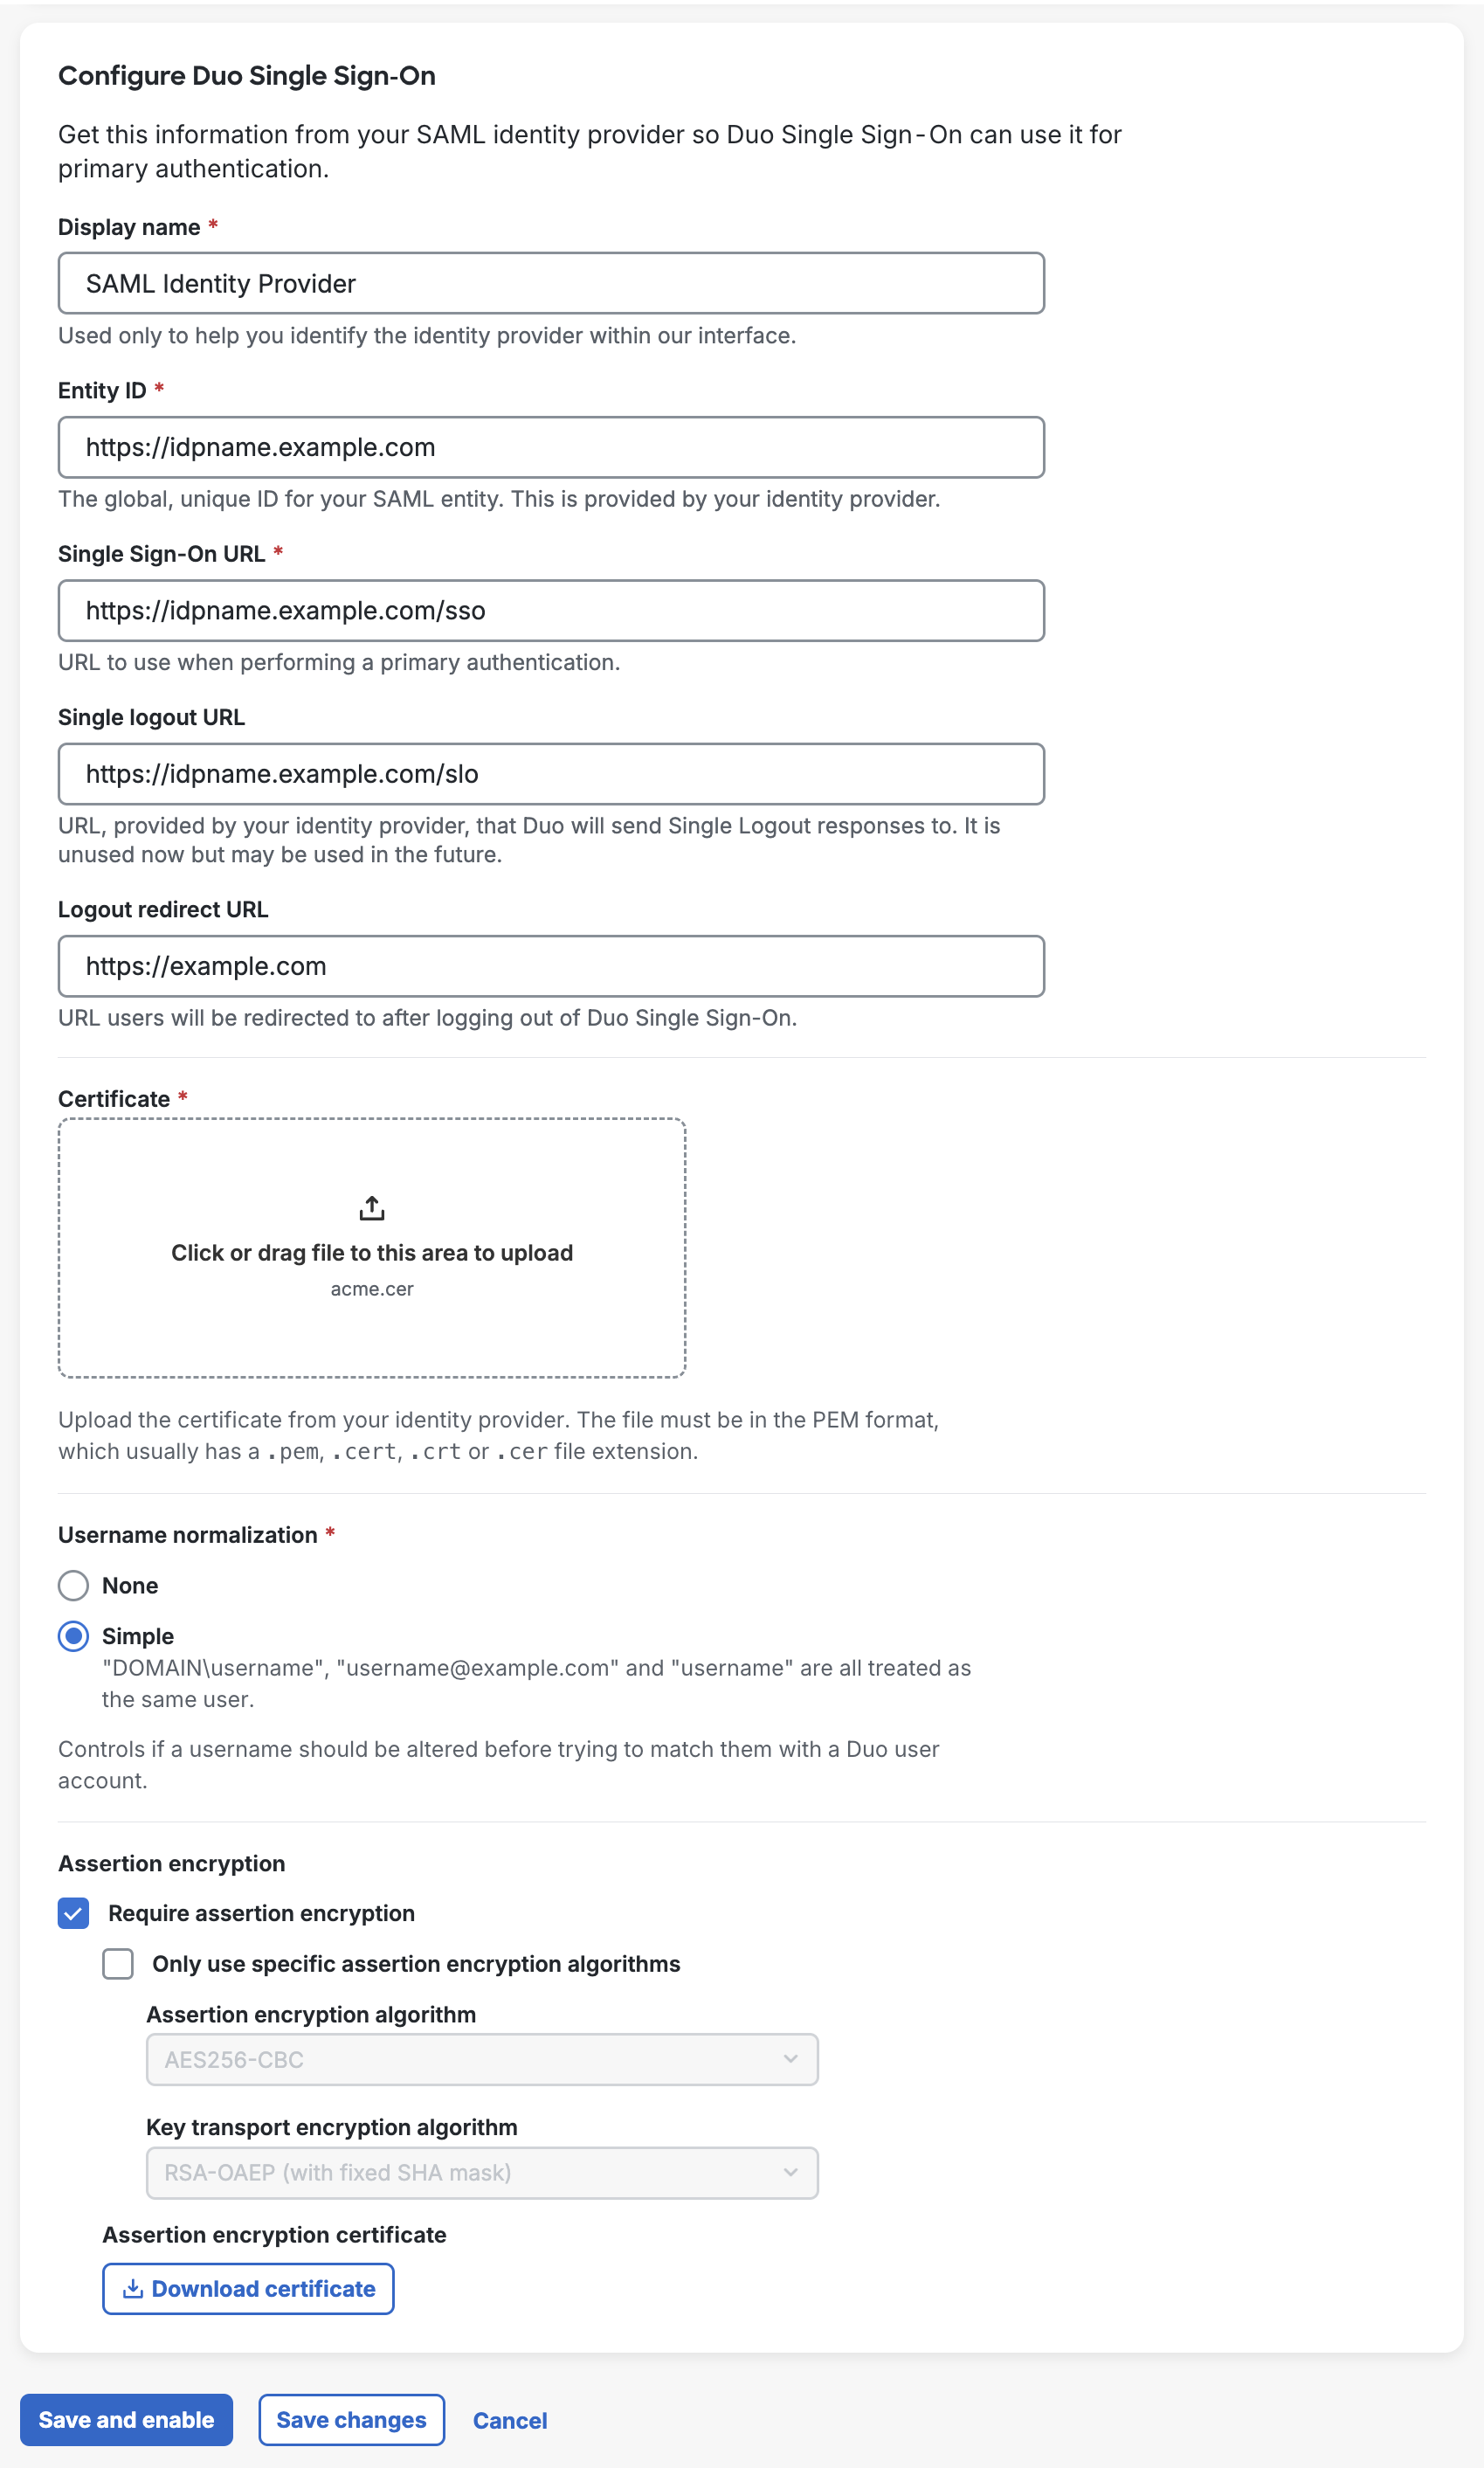
Fill out the fields listed below using information from your SAML identity provider:
Name Description Display Name A name so that you can easily identify the provider. Entity ID The global, unique name for your SAML identity provider. This is provided by your SAML identity provider and is sometimes referred to as "Issuer". Single Sign-On URL The authentication URL for your identity provider. This is sometimes referred to as "SSO URL" or "Login URL". Single Logout URL This field is optional and currently unused by Duo Single Sign-On. This field my be used in the future. The logout URL for your identity provider. This is sometimes referred to as "SLO URL" or "Logout Endpoint". Logout Redirect URL This field is optional. When this field is populated, after logging a user out of Duo Single Sign-On they will be redirected to the URL in this field. Certificate Download the signing certificate for your identity provider, and then click the Browse button to select the downloaded certificate. Username normalization Controls whether or not usernames entered for primary authentication should be altered before trying to match them to a Duo user account. When set to None, the usernames narroway,EXAMPLE\narroway, andnarroway@example.comwould be three separate users in Duo. When set to Simple, any domain information is stripped from the username sent to Duo, sonarroway,EXAMPLE\narroway, andnarroway@example.comwould all resolve to a single "narroway" Duo user.
Default: Simple.Assertion encryption Enable Require encrypted assertion if your SAML IdP supports it and you want to encrypt your assertions. Select the Assertion encryption algorithm and Key transport encryption algorithm compatible with your SAML identity provider using the drop-down, and then click Download Certificate to obtain the Duo encryption certificate. Upload the Duo certificate to your SAML IdP where you configured Duo SSO. Consult your identity provider's documentation for encrypted assertion support details and certificate requirements. -
Once all the required information is filled out click Save. You are now ready to start protecting applications with Duo Single Sign-On.
View External Authentication Sources
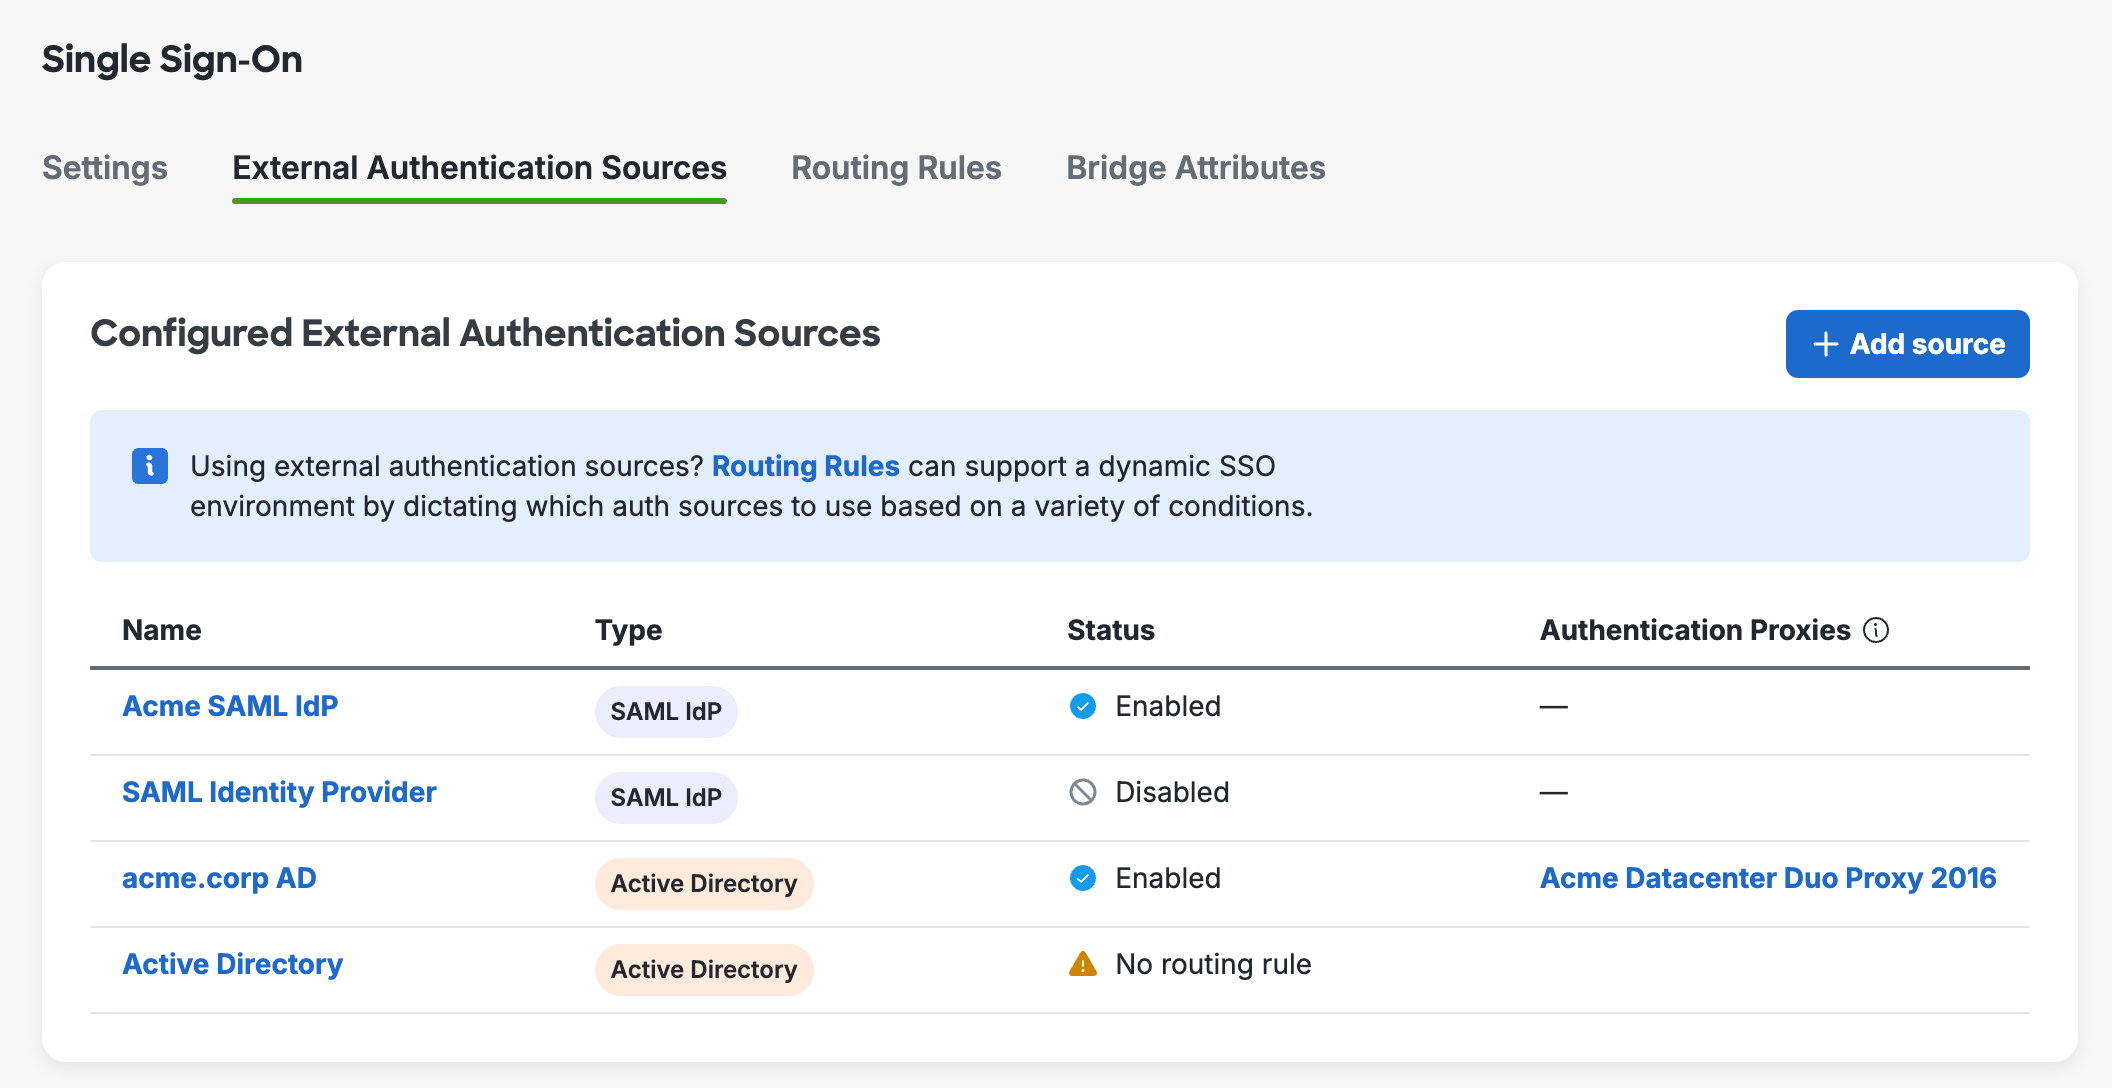
View external authentication sources you've added on the "External Authentication Sources" tab on the Single Sign-On page in the Duo Admin Panel.
The list of configured external authentication sources shows the following information:
| Column Name | Information | ||||||
|---|---|---|---|---|---|---|---|
| Name | The name of the authentication source. | ||||||
| Type | Either "Active Directory" or "SAML IDP". | ||||||
| Status | One of:
|
||||||
| Authentication Proxies | The Authentication Proxy server(s) associated with an AD authentication source. No value shown for SAML sources. |
Add Additional Authentication Sources
You can create additional external authentication sources after your first one. You can have up to 10 Active Directory and 10 SAML Identity Provider authentication sources.
-
While on the Single Sign-On page, go to the "External Authentication Sources" tab and click Add source.
-
The page will redirect to the Add External Authentication Source page. You can choose between using Active Directory or a SAML Identity Provider as your authentication source. Click the Add button at the bottom of the option to be taken to the configuration page for the new authentication source.
Additional authentication sources added will start out disabled. See how to modify authentication sources to enable it.
Modify Authentication Sources
While on the Single Sign-On page's "External Authentication Sources" tab, click on the name of the authentication source you'd like to modify to open its configuration page. Click Save changes or Save and enable when done.
At the top of each page, the status ("Enabled", "Inactive (No associated routing rule)", or "Disabled") of the authentication source displays next to the source name.
Click the Edit button next to "Status" to enable a disabled authentication source. Click Disable Source to disable an active authentication source. Only authentication sources not referenced by routing rules can be disabled.
To remove a disabled authentication source, click Delete Source at the top of the page.

The "Inactive (No associated routing rule)" warning on an active source indicates that users cannot be routed to that source for authentication. To resolve this, create or enable a routing rule that references the source.
Routing Rules
Duo Single Sign-On Routing Rules direct users to the correct authentication source when you have multiple authentication sources configured for Duo SSO, such as Duo-hosted directory plus an external Active Directory (AD) or SAML authentication source. This creates a seamless, flexible sign-in experience for your users and eliminates authentication issues for users from different identity stores. With routing rules, the system doesn't indiscriminately search all directories. Instead, it directs users to the appropriate environment, easing the load on authentication systems and offering tailored accuracy.
You can apply routing rules to specific Duo user groups, applications, domain names, and IP address ranges, up to a limit of 30 rules. When signing in to applications via Duo SSO, users will always encounter the Duo SSO login page for email input, which enables domain-based routing conditions.
A default routing rule applies when you have no custom rules defined, or when a user does not match any of your defined custom rules. The default routing rule for a new Duo account uses Duo's user directory as the authentication source. Adding external authentication sources does not automatically change the source used by the default rule or create new rules.
If you add external AD or SAML authentication sources, you can then create routing rules that specify when these authentication sources will be used for authentication, selecting the source to use by name. Configuring multiple Active Directory external authentication sources also adds an All Active Directories option for routing rules. Unlike Active Directory, when you have multiple enabled SAML authentication sources there is no option in the default routing rule to use all of them. Your default rule may only use one of your SAML authentication sources, and you must create custom routing rules if you want to direct logins to different SAML providers.
When you have a single SAML authentication source and just the default routing rule, then Duo SSO automatically redirects users to that SAML identity provider to sign in. If you have custom rules or multiple enabled SAML authentication sources, users will enter an email address on the Duo SSO login page and then be redirected to the matching external identity provider.
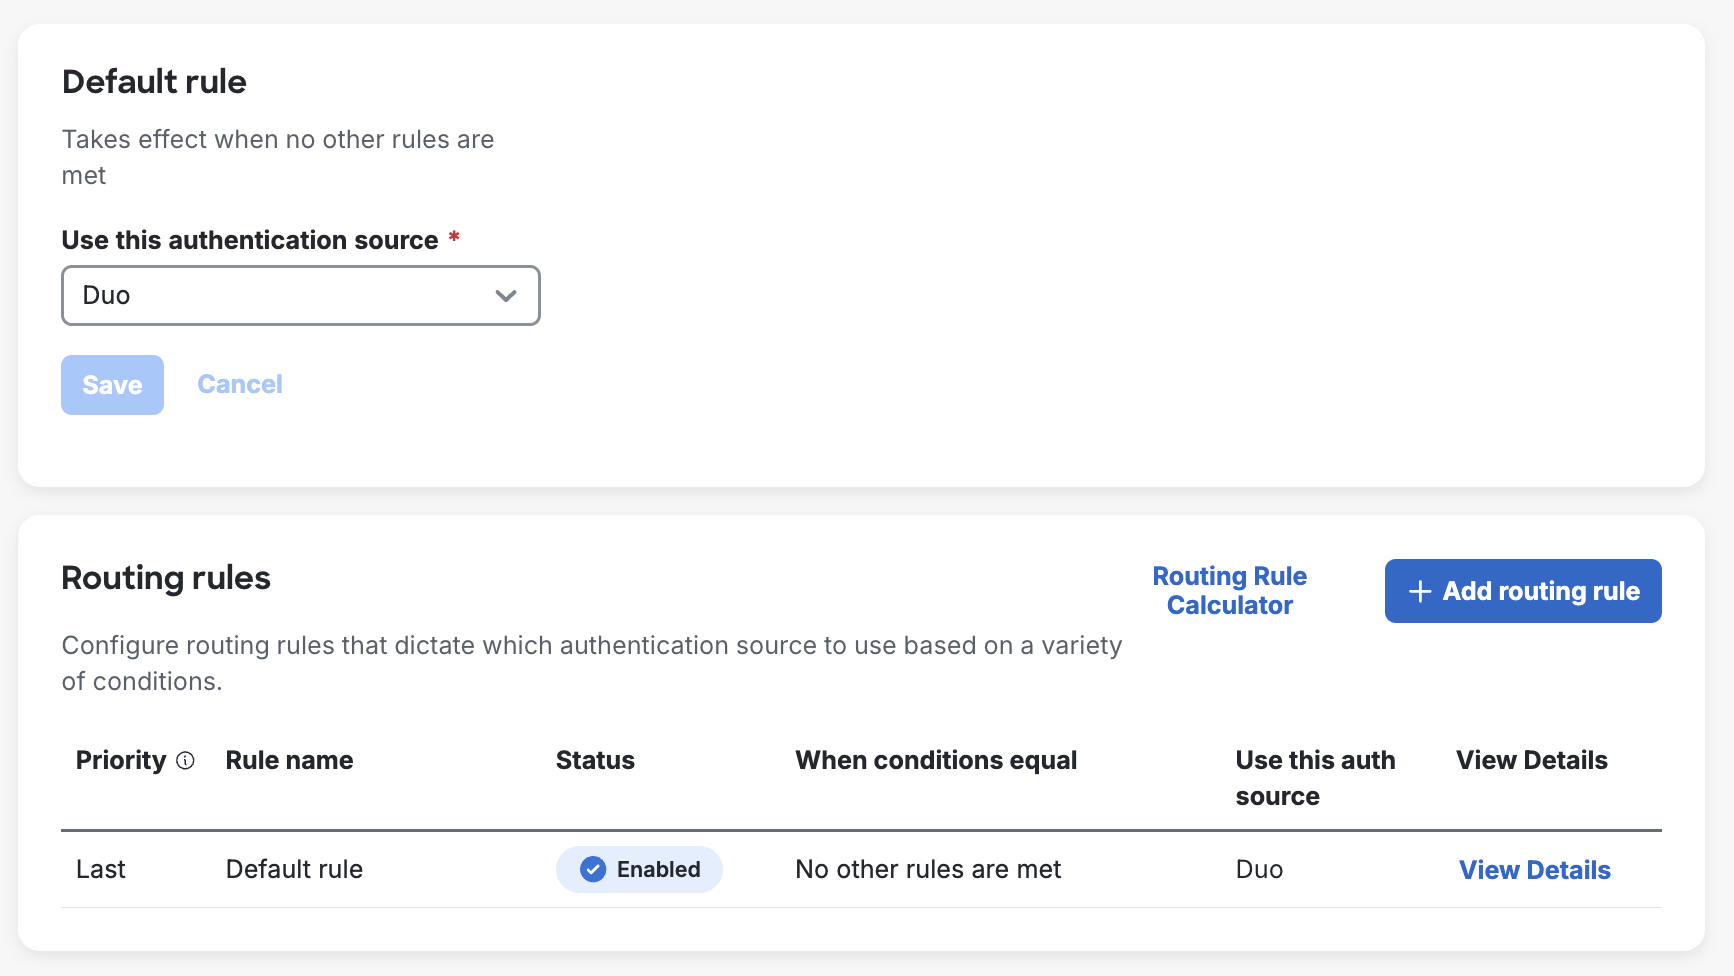
Create a New Routing Rule
To create a routing rule:
-
Navigate to Applications → SSO Settings and go to the "Routing Rules" tab. You'll see your current default rule at the top of the page.
-
Click + Add routing rule.
-
Give your new rule a descriptive name and use the Routing rule status toggle to enable the rule if you want it effective immediately.
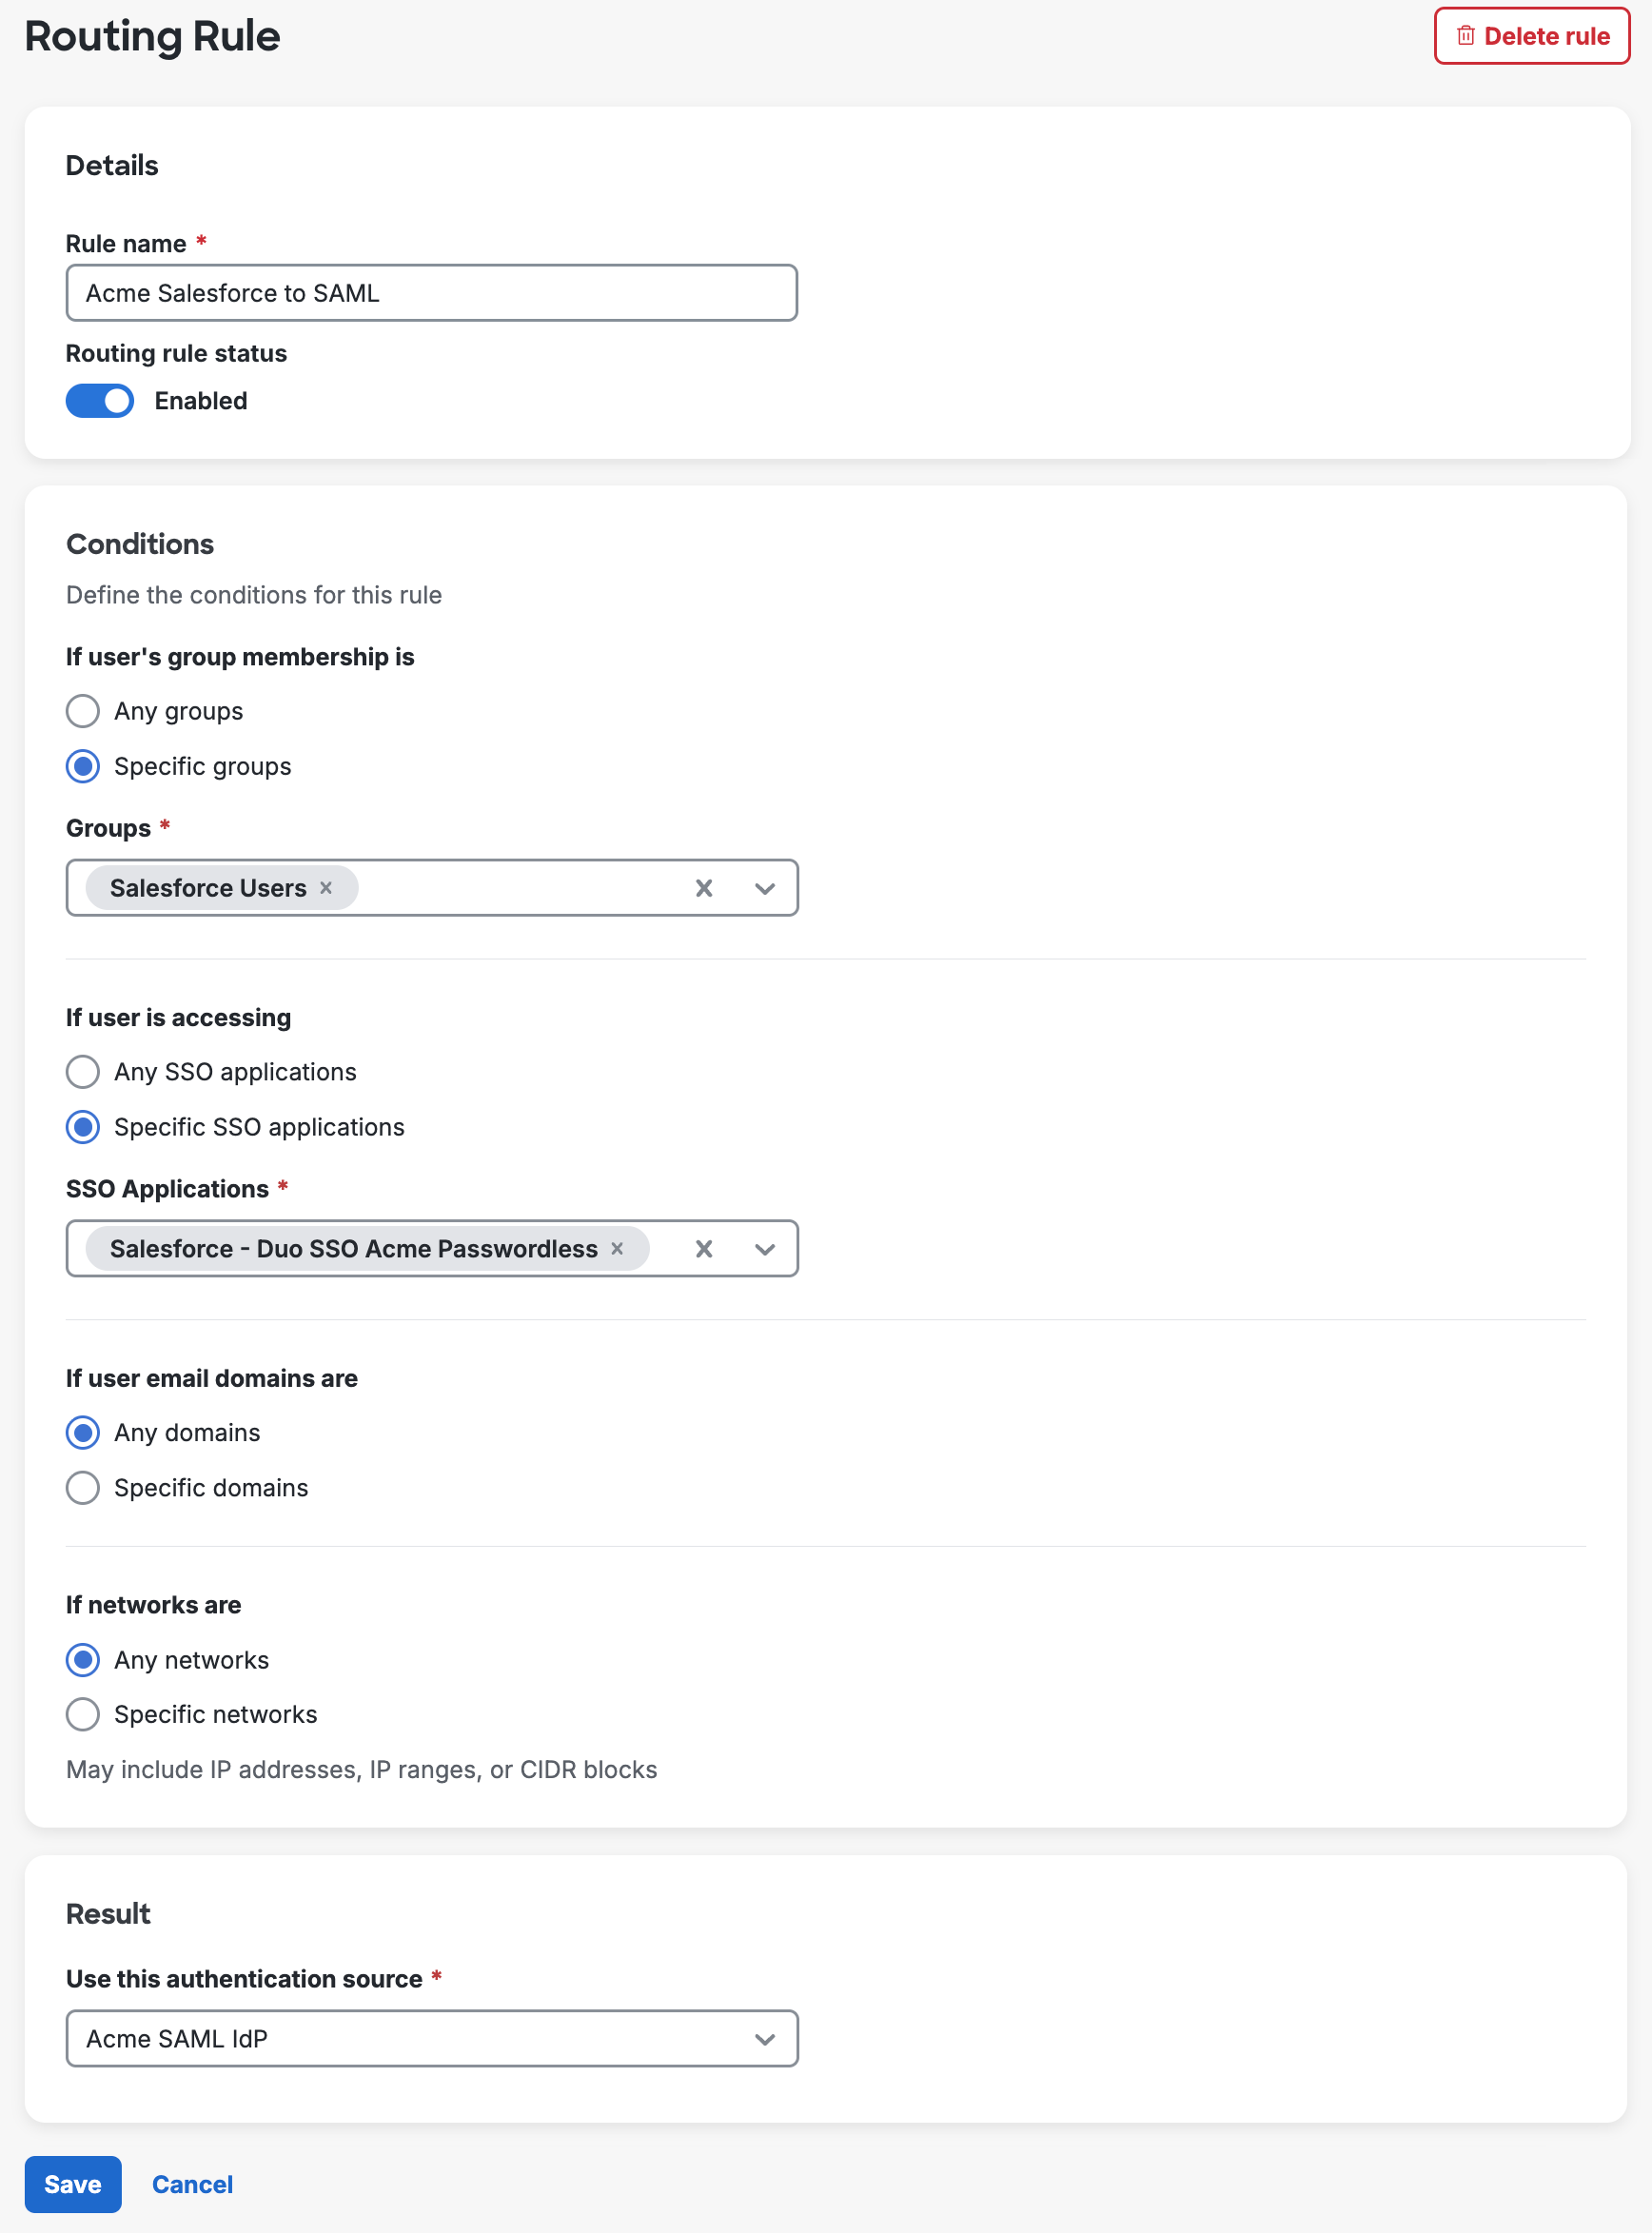
-
Choose which conditions you want to configure in your new routing rule. For each available condition you can create granular definitions:
- Select Specific groups and use the Groups field to pick the Duo groups to which the rule should apply. These groups may be manually maintained or managed by external directory sync.
- Select Specific SSO applications and pick the apps the rule should apply to SSO Applications field.
- Select Specific domains and type the email domain suffix into the Domains field. Do not include the
@symbol when entering your email domains. You can add multiple domains by clicking Add domain after each entry. - Select Specific networks and enter network information by IP address (
10.1.10.1), IP range (10.1.0.0 - 10.1.1.255), or CIDR block (10.1.0.0/16). You can add multiple networks by clicking Add network after each entry.
If you don't modify these conditions then the rule will apply to all users of any SSO application, email domain, or network.
-
Determine the rule's outcome in the "Result" section by selecting the enabled authentication source you want to use when your defined conditions are met.
-
Click Save, which returns you to the "Routing Rules" page with your new rule enabled if you toggled that option on before saving.
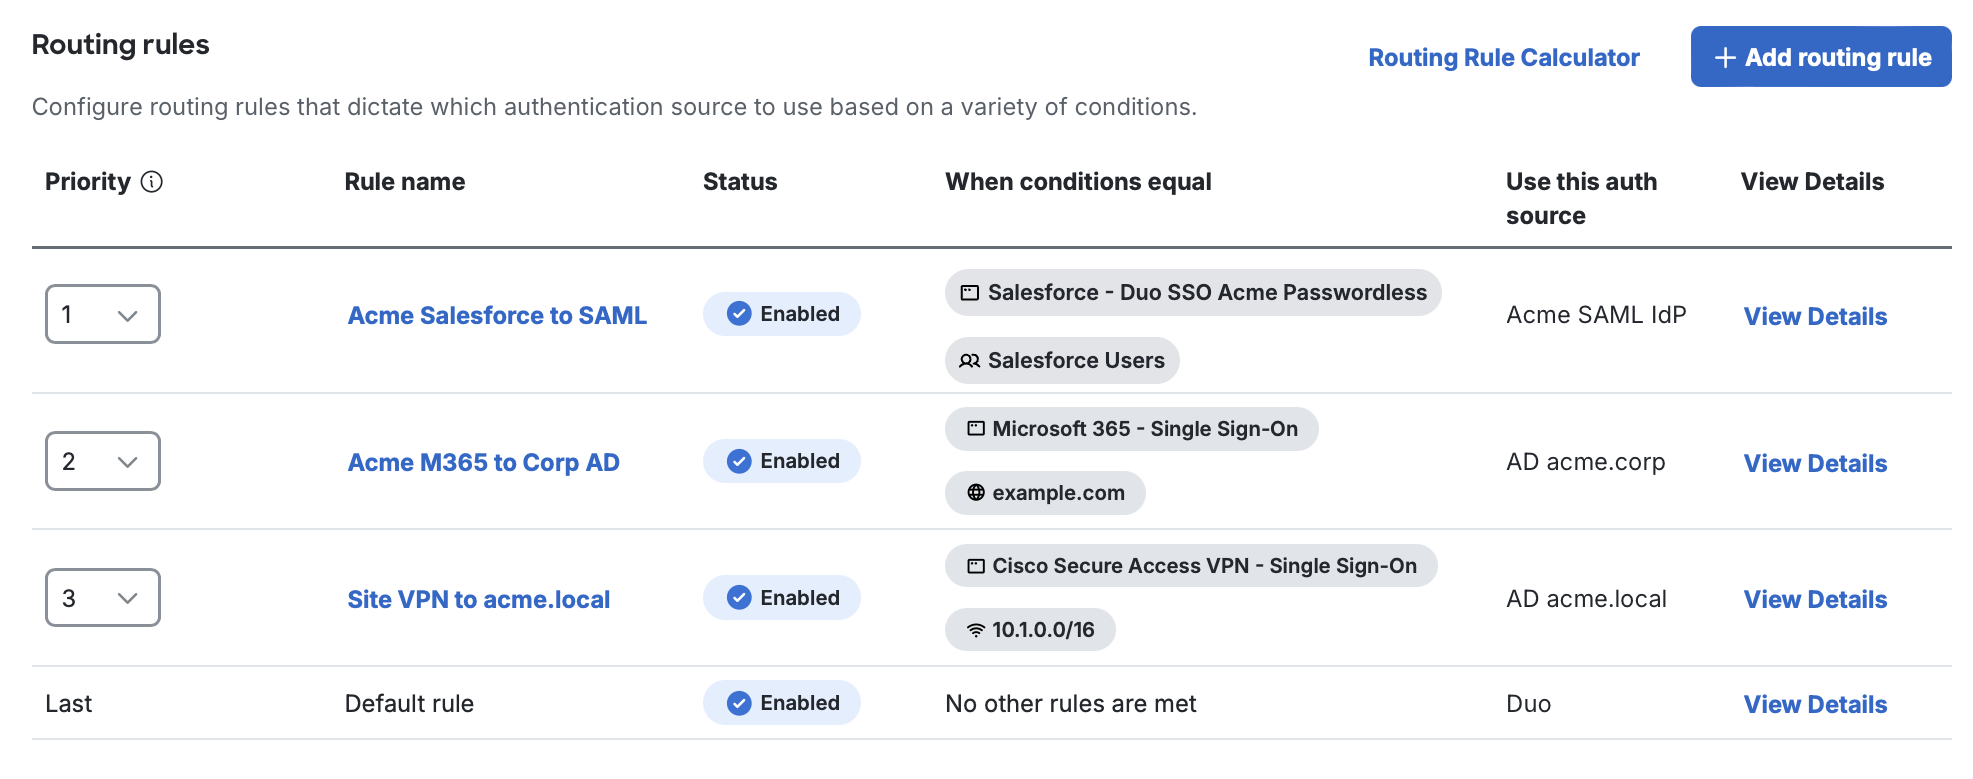
Routing Rule Priority
A routing rule's priority determines the order in which your rules are evaluated. When you have multiple routing rules enabled, incoming SSO authentication attempts are checked against your rules in descending priority order to find one with matching conditions. If a user matches multiple rules, the highest priority rule takes effect. If no routing rules match, the default rule applies.
Reorder your routing rules by making a selection using the Priority drop-down. Changing the priority selection for one rule automatically updates the priority for the rules that now follow it.
Enable or Disable Routing Rules
Routing rules are disabled upon creation by default, unless you choose to enable it before the first save. You can enable a disabled routing rule by clicking the rule's name to open the editor, toggling enabled status on, and saving.
Similarly, you can edit a rule to change the status to disabled. When you disable a routing rule, user logins that match the rule will no longer be evaluated by that rule. If another routing rule's conditions apply, then that rule will be used instead. If no rule conditions apply, the logins that would have been subject to the now-disabled routing rule will fallback to the default rule.
View, Modify, or Delete Routing Rules
The "Routing Rules" page shows information about your rules in the table. Click View Details in any row to view details about a routing rule's conditions. Click a rule's name to open the editor, where you can change the rule's name or conditions, update the rule's status, or delete the rule.
When you delete a rule the priority of all rules ordered after it shift upwards. If you delete or disable all your routing rules the default rule applies to all SSO authentications. You may wish to first disable a rule to test SSO authentication outcomes before you delete it, as deleted rules can't be restored.
Routing Rule Calculator
Use the Routing Rule Calculator to verify the routing rule that will be applied to a given user and application.
-
Click Routing Rule Calculator at the top of your routing rules table.
-
Enter the email address of one of your users as the Email address.
-
Select one of your SSO applications from the Application drop-down list.
-
Optionally enter an IP address if you want to test a network addressing condition you added to your routing rules.
-
Click Calculate. The "Result" section shows the effective routing rule for the user, application, and IP address you provided. The "Evaluation Trace" information shows each step of the calculation.
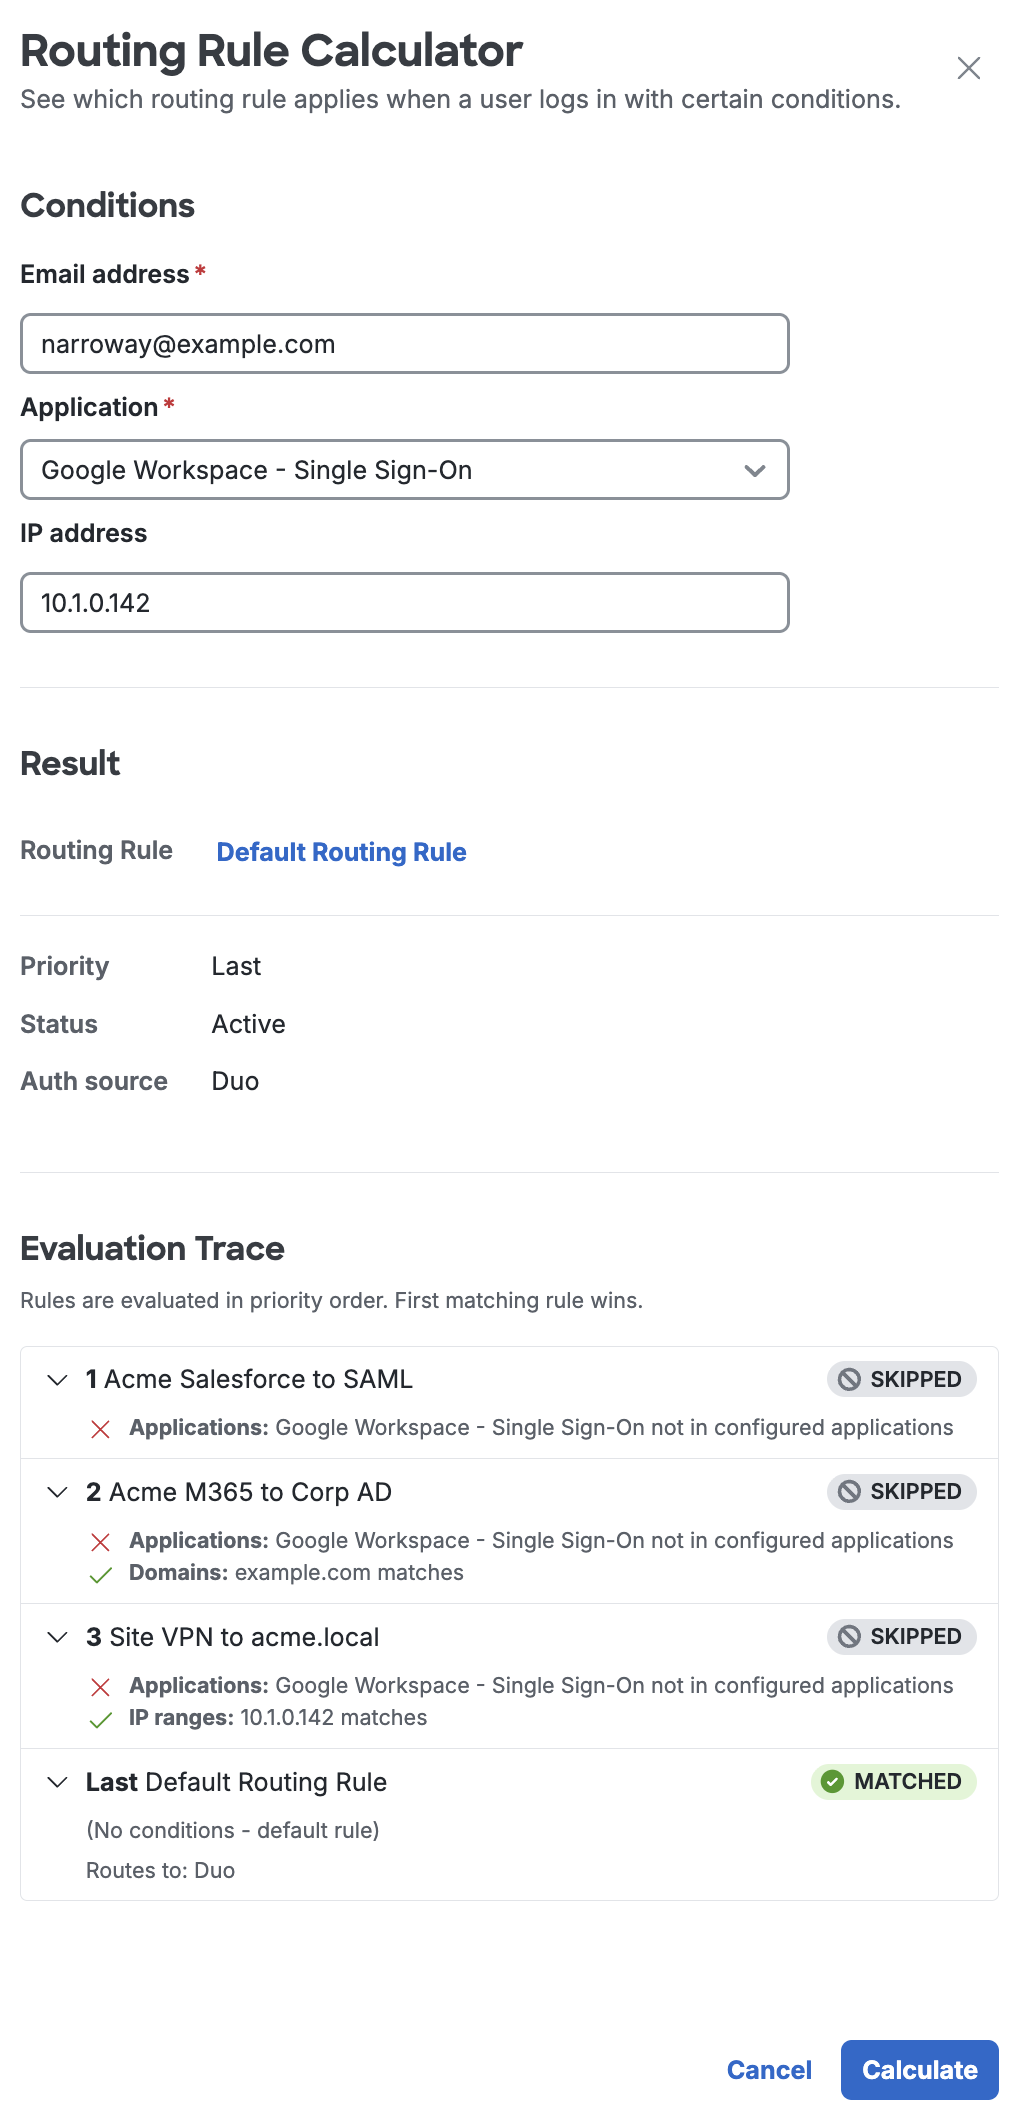
You can view details like priority, status, and authentication source. Click the routing rule's name to view conditions. If you want to make adjustments to that rule, you can click the Edit Rule button in the calculator to modify that rule without needing to return to the list of all routing rules.
Additional Settings
Attributes
When configuring an application to be protected with Duo Single Sign-On you'll need to send attributes from Duo Single Sign-On to the application. Duo Directory and Active Directory will work with no additional setup, but if you used a SAML identity provider as your authentication source please verify that you configured it to send the correct SAML attributes.
These are the default attributes that automatically map certain attributes from your authentication source. These required attributes may not be edited.
| Default Attribute | Active Directory | SAML IdP |
|---|---|---|
<Username> |
sAMAccountName | Username |
<Email Address> |
||
<Display Name> |
displayName | DisplayName |
<First Name> |
givenName | FirstName |
<Last Name> |
sn | LastName |
<Entra Federated User ID> |
mS-DS-ConsistencyGuid | EntraImmutableID |
Create Custom Attributes
You can create custom user attributes if you have multiple identity providers with different names for the same attribute.
Bridge attributes were a legacy implementation of custom user attributes for Duo Single Sign-On applications. Bridge attributes have been replaced by user attributes.
See the User Attributes documentation to learn more.
Customize the SSO Login Label
You may change the text shown above the username field on the Duo SSO login page in the Custom Branding options on the global "Settings" page. Login label customization not available to Duo trials.
Create a Cloud Application in Duo
Role required: Owner, Administrator, or Application Manager
Generic SSO Applications
You can use Duo Single Sign-On with any SAML 2.0 service provider or OIDC relying party by configuring them with one of our generic connectors:
Duo Single Sign-On can also act as an OAuth authorization server supporting the client credentials grant type allowing secure machine to machine interactions by generating an access token with scoped permissions for one machine which can be sent and then validated by another machine. Refer to the instructions for:
We provide pre-configured OIDC and SAML SSO apps for many cloud applications, with support for outbound automated provisioning when applicable.
Named SSO Applications
Refer to the instructions for your named application:
Fortinet Fortigate Administrators
HPE Juniper Security Director Cloud
ManageEngine Access Manager Plus
ManageEngine ADSelfService Plus
ManageEngine Application Control Plus
ManageEngine Applications Manager
ManageEngine Password Manager Pro
ManageEngine Patch Manager Plus
ManageEngine Patch Manager Plus Cloud
ManageEngine Remote Access Plus
ManageEngine Remote Access Plus Cloud
ManageEngine SupportCenter Plus
SolarWinds Application Management
SolarWinds Database Performance Analyzer
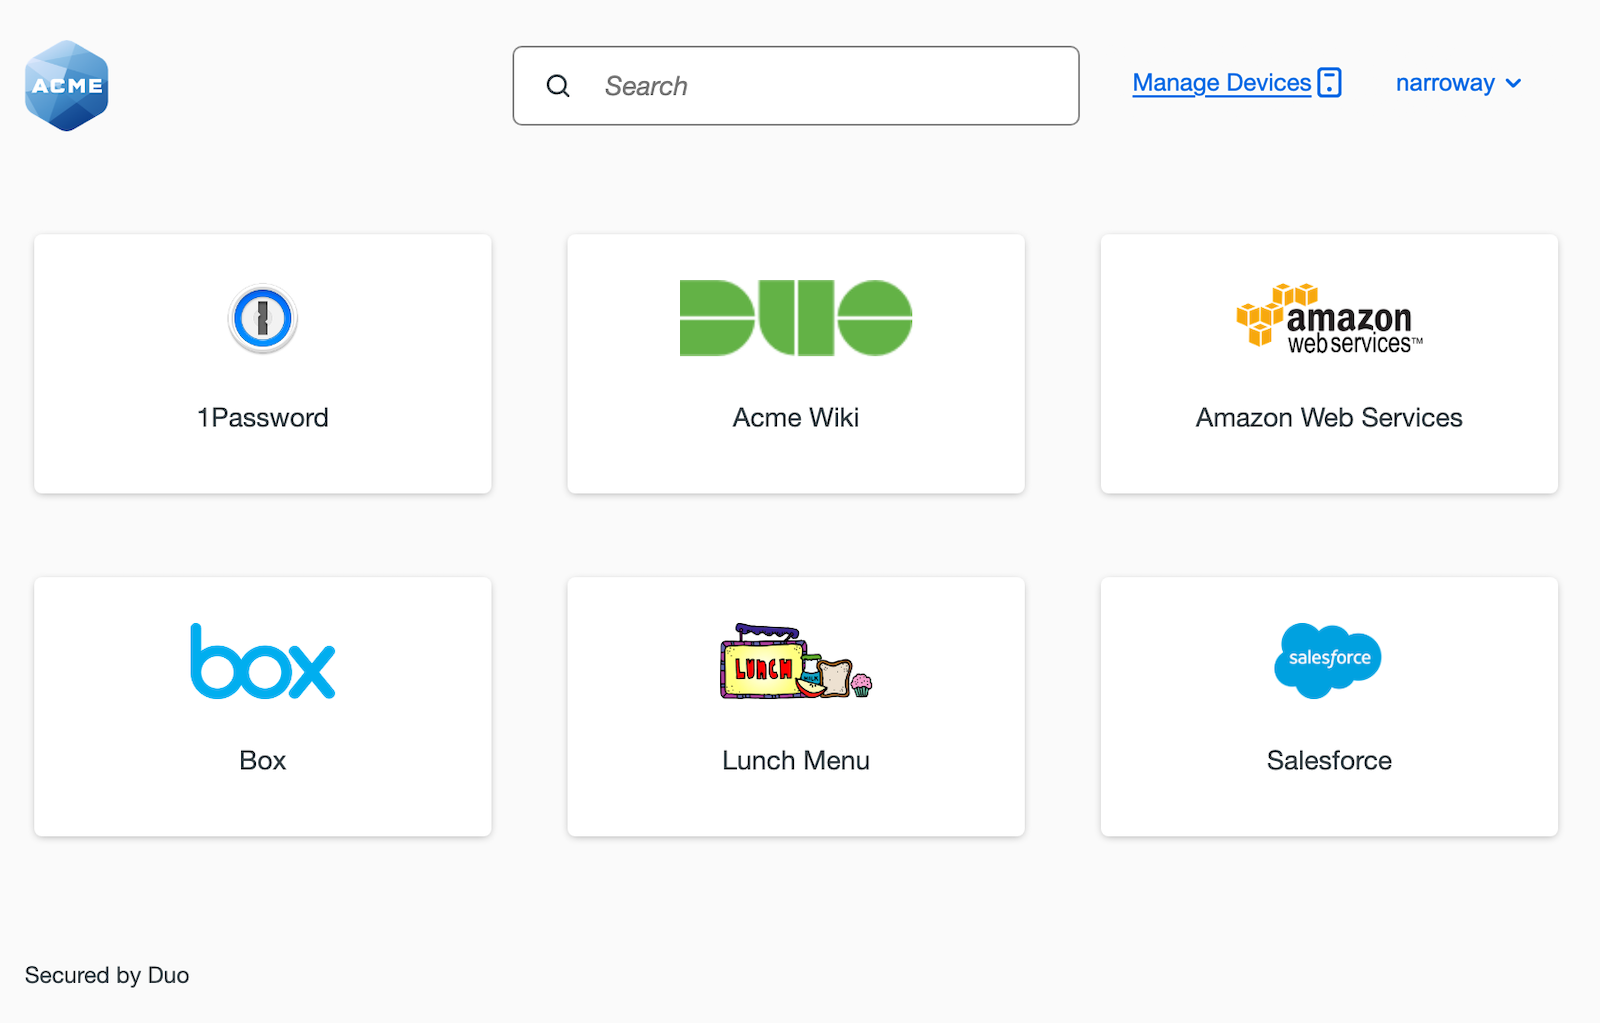
Duo Central
Once you've configured Duo Single Sign-On, you can access Duo Central, a single location for your users to get access to your organization's applications and helpful links and manage their authentication devices. Get started with Duo Central.
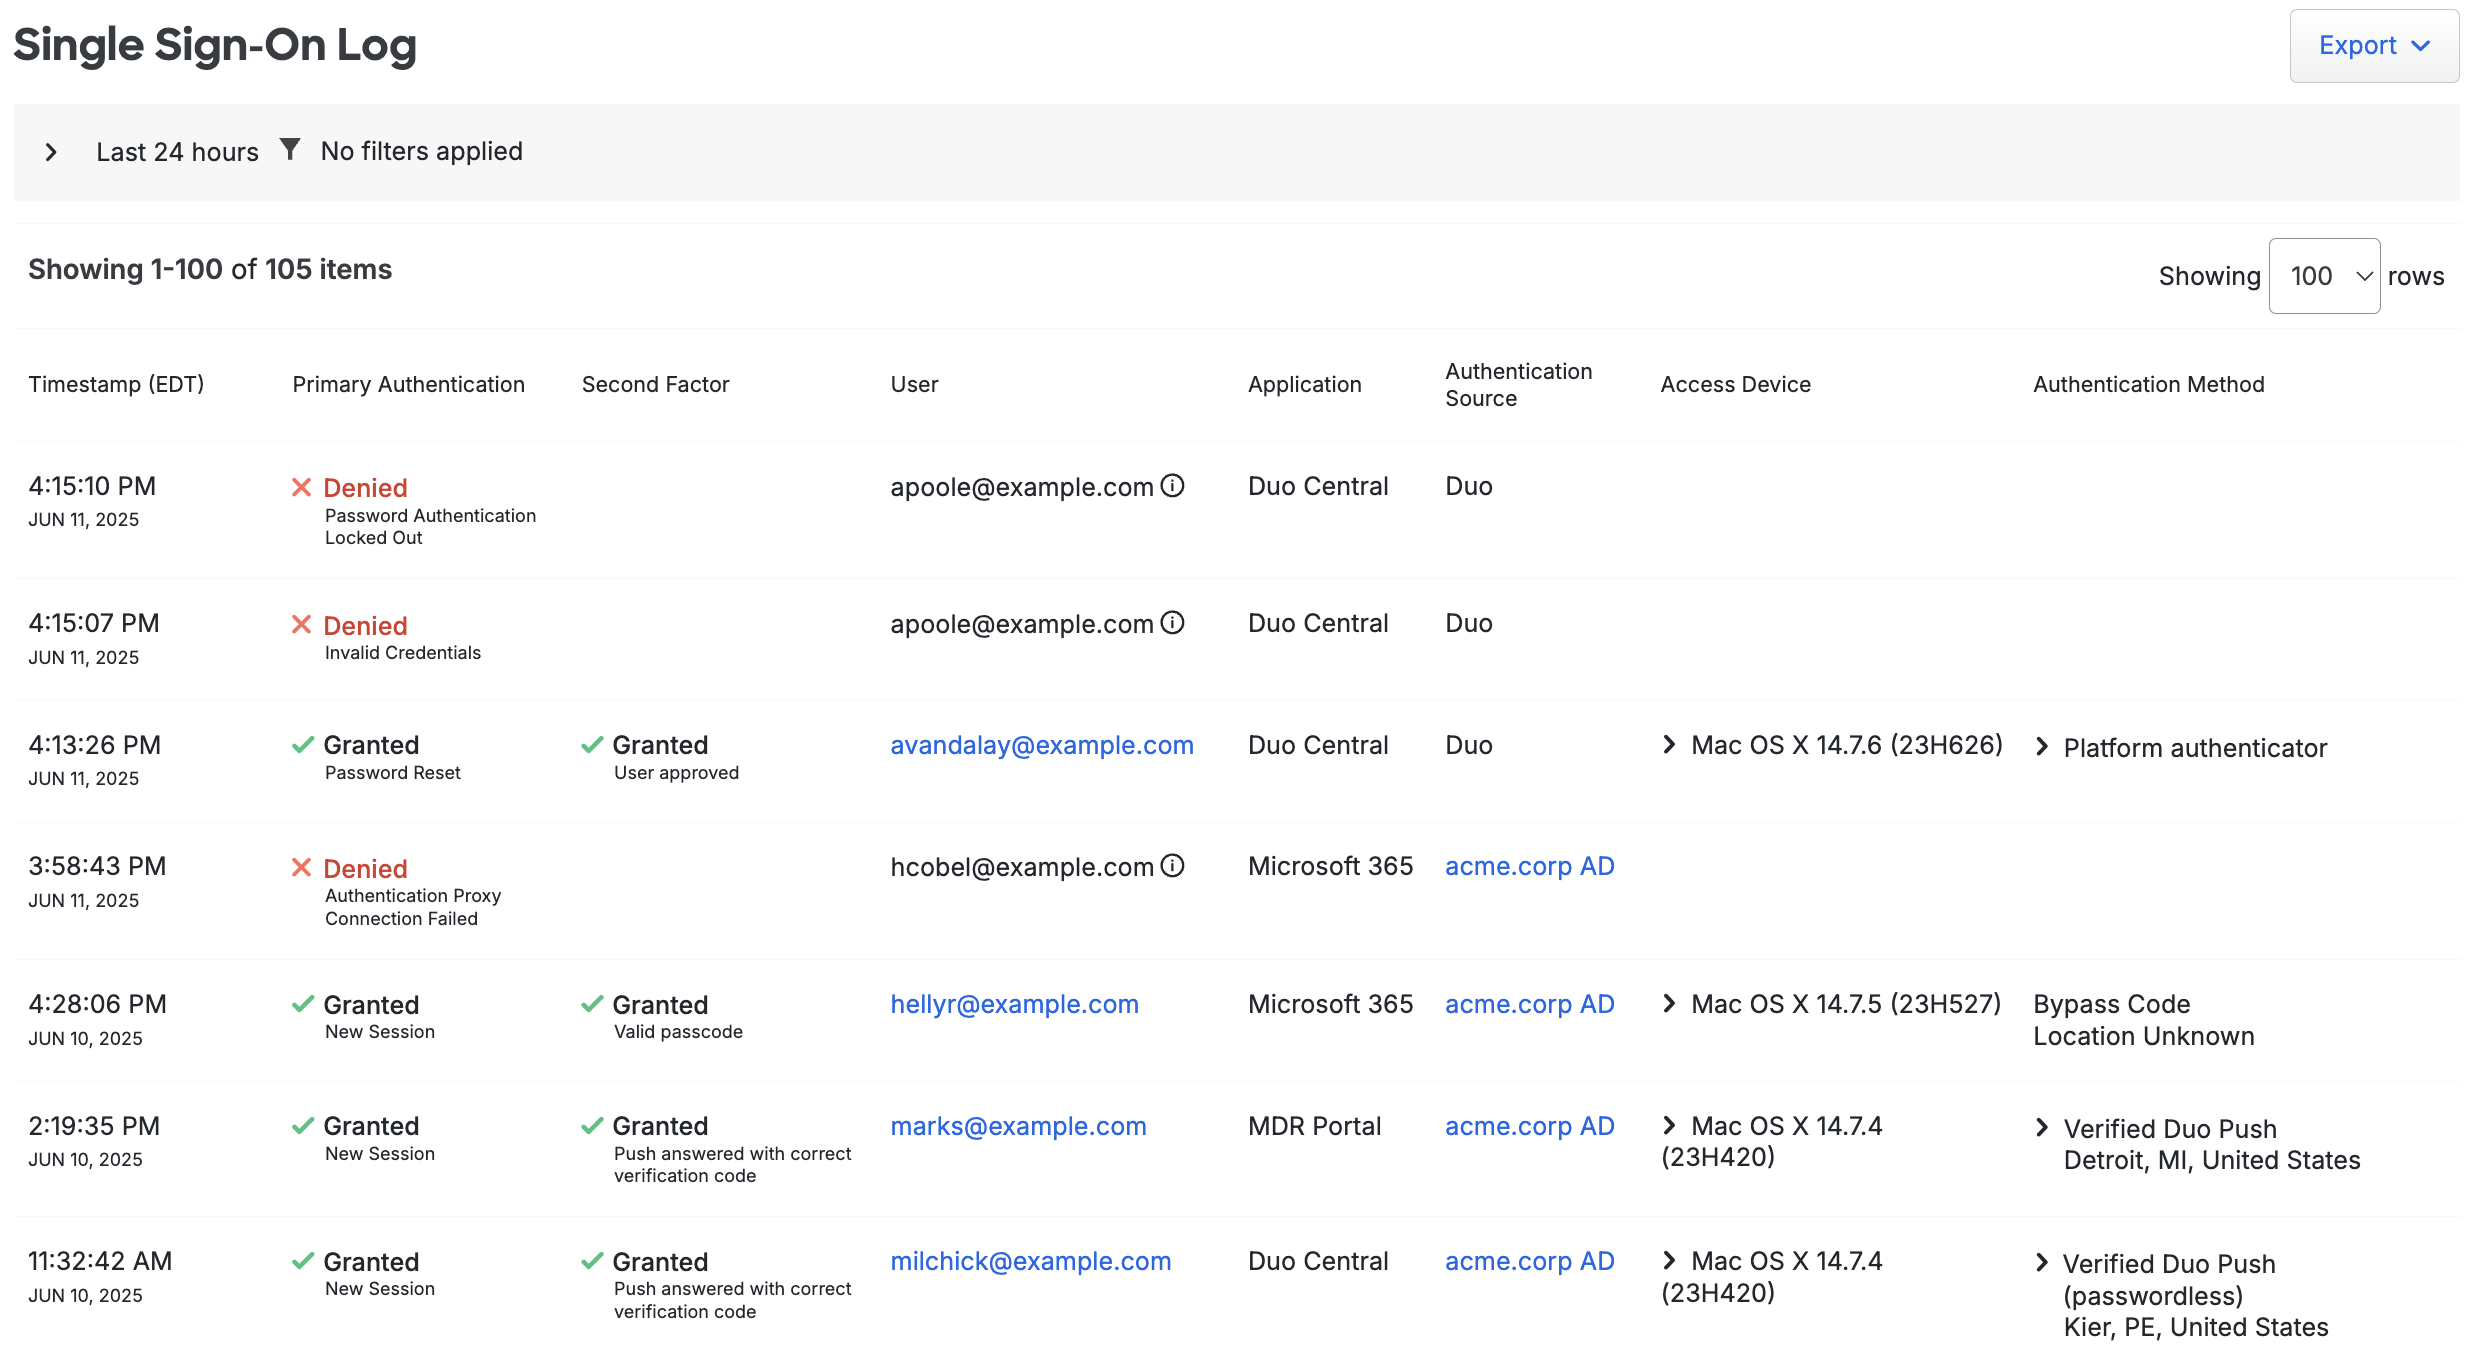
Duo Single Sign-On Log
View Duo SSO authentication and access events in the Admin Panel at Reports → Single Sign-On Log. The Single Sign-On Log shows password and passwordless authentication attempts against any authentication source, password changes, and SSO login failures.
Troubleshooting
Need some help? Try searching our Knowledge Base articles or Community discussions. For further assistance, contact Support.
Network Diagrams
SAML 2.0
Duo Directory
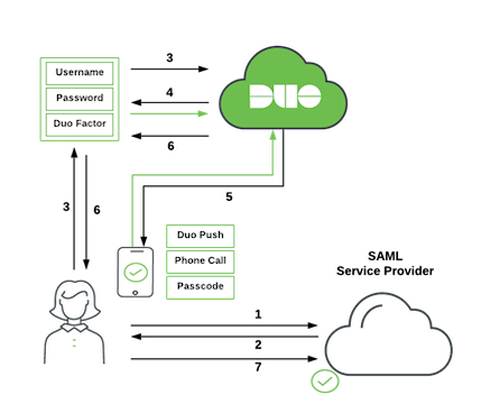
-
User initiates SAML service provider login.
-
SAML service provider redirects user's browser to Duo Single Sign-On with a SAML request message.
-
User logs in with primary credentials.
-
Duo verifies the user's credentials.
-
Duo Single Sign-On requires the user to complete two-factor authentication.
-
User completes Duo two-factor authentication.
-
Duo Single Sign-On redirects user's browser to the SAML service provider with response message.
Active Directory
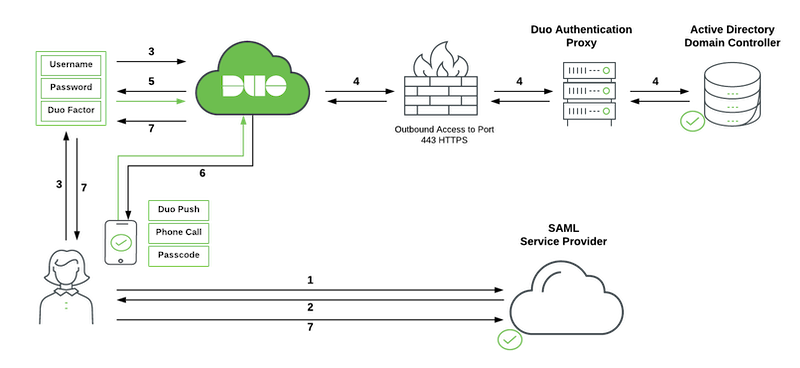
-
User initiates SAML service provider login.
-
SAML service provider redirects user's browser to Duo Single Sign-On with a SAML request message.
-
User logs in with primary credentials.
-
Duo Single Sign-On sends the credentials to the Duo Authentication Proxy in the customer's network. The Authentication Proxy forwards this to Active Directory which returns a response back to Duo Single Sign-On.
-
Duo Single Sign-On requires the user to complete two-factor authentication.
-
User completes Duo two-factor authentication.
-
Duo Single Sign-On redirects user's browser to the SAML service provider with response message.
SAML Identity Provider
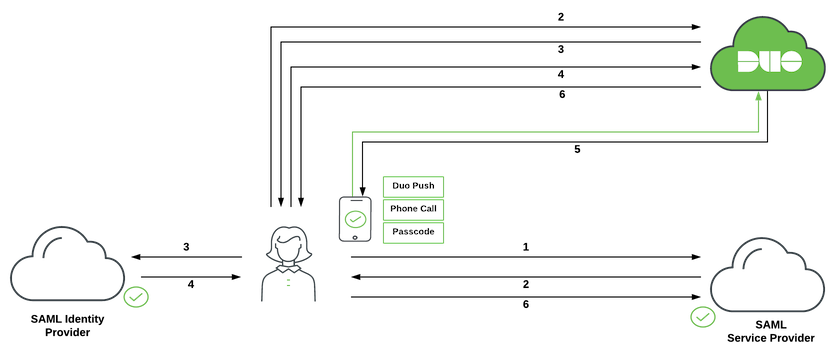
-
User initiates SAML service provider login.
-
SAML service provider redirects user's browser to Duo Single Sign-On with a SAML request message.
-
Duo Single Sign-On redirects user's browser to the SAML identity provider with a SAML request message.
-
User logs in with primary credentials.
-
SAML identity provider redirects user's browser to Duo Single Sign-On with response message.
-
Duo Single Sign-On requires the user to complete two-factor authentication. User completes Duo two-factor authentication.
-
Duo Single Sign-On redirects user's browser to the SAML service provider with response message.
OIDC
Duo Directory
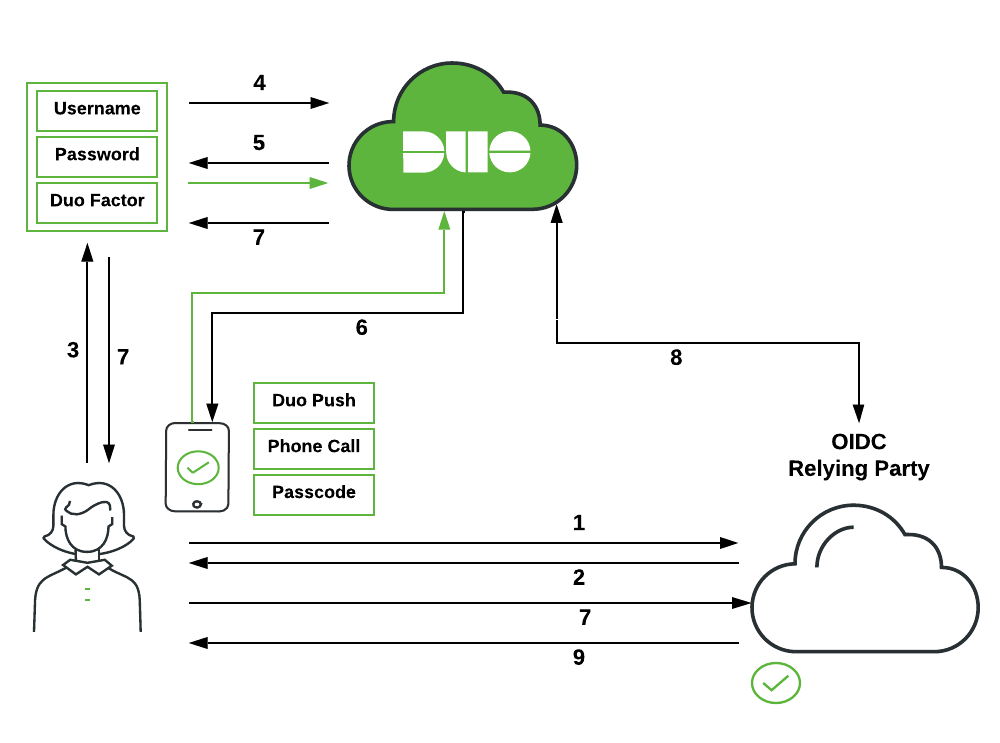
-
User initiates OIDC relying party login.
-
OIDC relying party redirects user's browser to Duo Single Sign-On with an OIDC request message.
-
User logs in with primary credentials.
-
Duo verifies the user's credentials.
-
Duo Single Sign-On requires the user to complete two-factor authentication.
-
User completes Duo two-factor authentication.
-
Duo Single Sign-On redirects user's browser to the OIDC relying party with response message.
-
OIDC relying party makes a direct call to Duo Single Sign-On using its client secret and information from response message and receives back ID and access tokens.
-
OIDC relying party lets user in based off information in tokens.
Active Directory
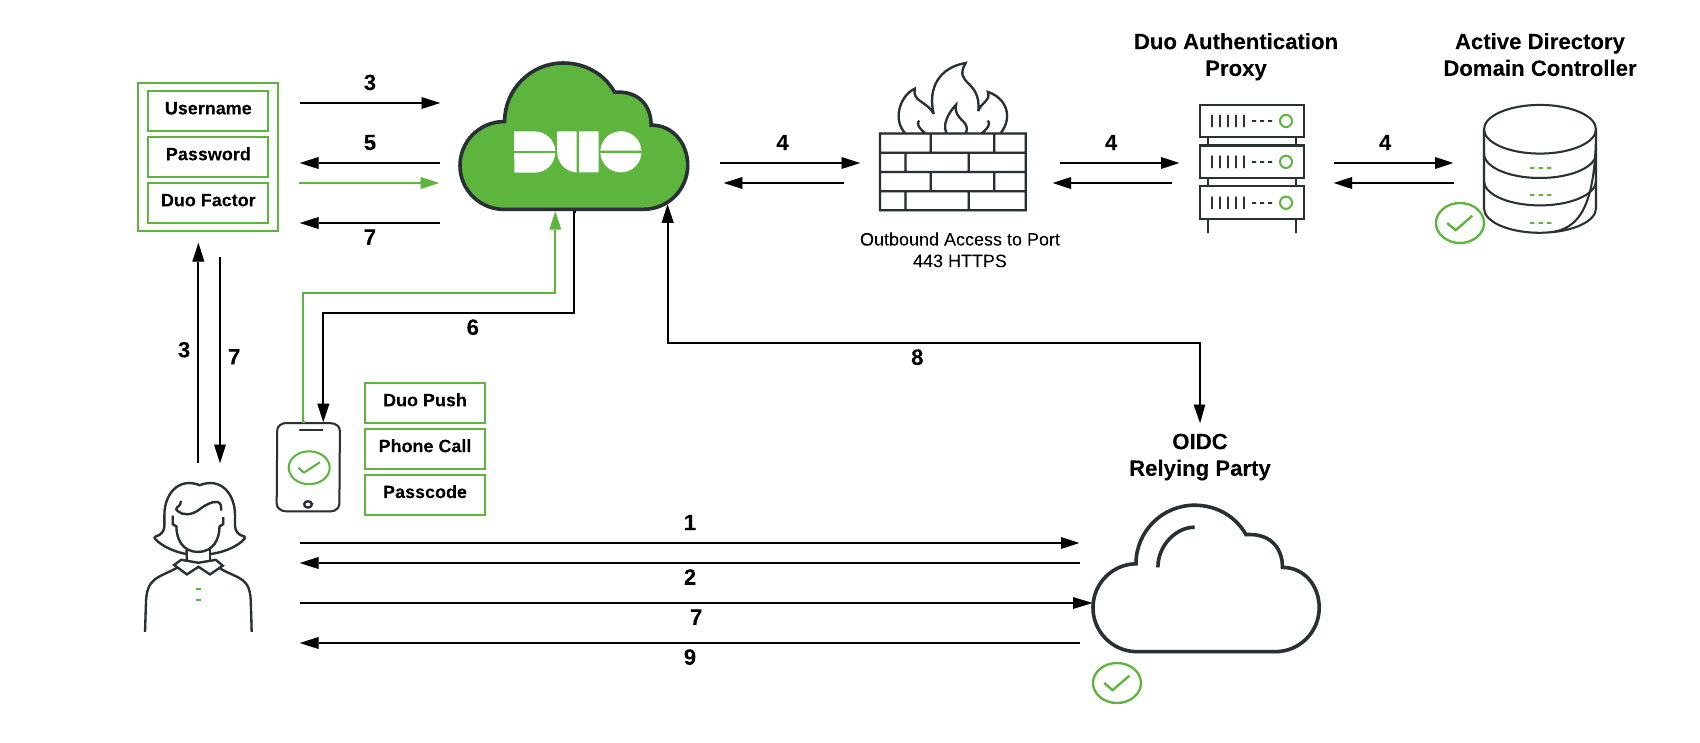
-
User initiates OIDC relying party login.
-
OIDC relying party redirects user's browser to Duo Single Sign-On with an OIDC request message.
-
User logs in with primary credentials.
-
Duo Single Sign-On sends the credentials to the Duo Authentication Proxy in the customer's network. The Authentication Proxy forwards this to Active Directory which returns a response back to Duo Single Sign-On.
-
Duo Single Sign-On requires the user to complete two-factor authentication.
-
User completes Duo two-factor authentication.
-
Duo Single Sign-On redirects user's browser to the OIDC relying party with response message.
-
OIDC relying party makes a direct call to Duo Single Sign-On using its client secret and information from response message and receives back ID and access tokens.
-
OIDC relying party lets user in based off information in tokens.
SAML Identity Provider
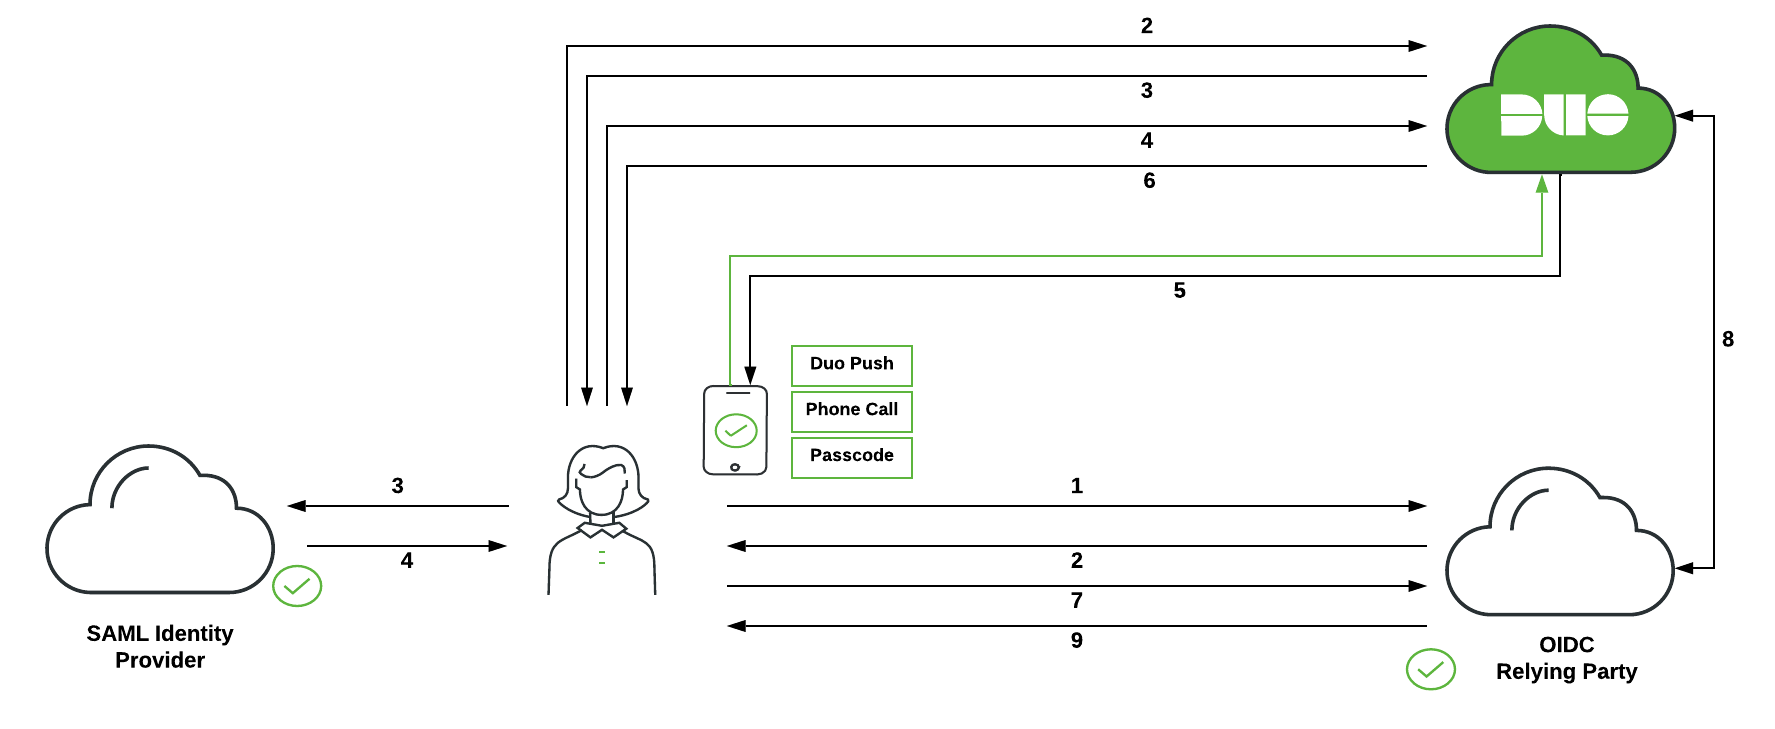
-
User initiates OIDC relying party login.
-
OIDC relying party redirects user's browser to Duo Single Sign-On with an OIDC request message.
-
Duo Single Sign-On redirects user's browser to the SAML identity provider with a SAML request message.
-
User logs in with primary credentials.
-
SAML identity provider redirects user's browser to Duo Single Sign-On with response message.
-
Duo Single Sign-On requires the user to complete two-factor authentication. User completes Duo two-factor authentication.
-
Duo Single Sign-On redirects user's browser to the OIDC relying party with response message.
-
OIDC relying party makes a direct call to Duo Single Sign-On using its client secret and information from response message and recieves back ID and access tokens.
-
OIDC relying party lets user in based off information in tokens.
OAuth 2.0 Client Credentials
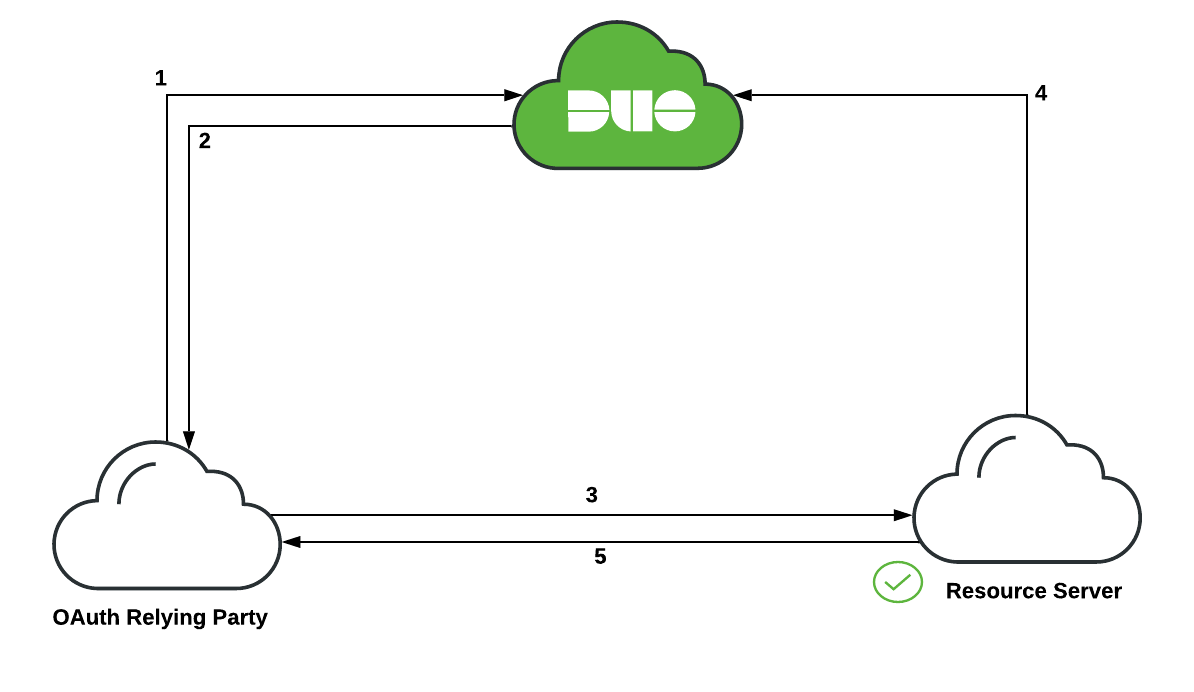
-
OAuth relying party makes a call to Duo Single Sign-On with its client secret requesting access with specific scopes.
-
Duo Single Sign-On validates the OAuth relying party is allowed to use requested scopes and then generates an access token and returns it to OAuth relying party.
-
OAuth relying party makes a request to Resource Server and includes the access token.
-
Resource Server makes a call to Duo Single Sign-On with its client secret and the access token to validate the token.
-
Once the access token has been validated the Resource Server responds letting the OAuth relying party do actions based off the scopes specified in the access token.