Duo Administration - User Enrollment & Account Management
Last updated:
Overview
Duo Premier, Duo Advantage, and Duo Essentials plans customers gain granular control of end-users' enrollment and self-service portal experiences with enrollment policies.
Previously, the same set of policies used for access and authentication controlled all aspects of Duo's enrollment and self-service experiences. To reduce confusion and challenges for customers who may want to define these experiences separately, the User Enrollment and Management page allows you to create and manage enrollment policies, which lets you manage certain aspects of the end-user enrollment and self-service portal (SSP) experiences.
Customers who signed up for Duo prior to June 2025 may opt-in to centrally-managed enrollment policies. Newer customers already have enrollment policy enabled by default, and may not turn them off.
How Does it Work?
Enrollment policies define behavior for users once they have entered Duo’s enrollment or self-service portals:
- For unenrolled users:
- Enrollment policies define certain aspects of unenrolled users’ enrollment experience.
- Enrollment policies determine the password requirements for Duo Directory user passwords.
- Enrollment policies do not define the decision for a user to enter enrollment or not. This remains handled by the effective authentication policy for that method of enrollment.
- Email link enrollment always prompts users to enroll.
- Inline self-enrollment remains subject to the effective authentication policy for the users accessing that inline application.
- For standalone Device Management Portal (DMP) application enrollment, this decision is controlled by the effective authentication policy of the user for the DMP application in use.
- For enrolled users:
- Enrollment policies define certain aspects of enrolled users’ self-service portal (SSP) experience once they have gained access to the SSP.
- Enrollment policies determine the password requirements for Duo Directory user passwords.
- Enrollment policies do not define the requirements for access into the SSP. The effective policy for access into the SSP is determined by:
- When using SSP inline with an application or via Duo Central:
- With an SSP policy enabled, the effective SSP policy applies for that user.
- With an SSP policy disabled, the effective policy for the inline application accessed applies.
- When using SSP with a DMP application:
- If using a DMP, the effective policy for the user accessing that DMP application applies.
- When using SSP inline with an application or via Duo Central:
Prerequisites and Limitations
- Enrollment policies are available only for Duo’s web-based Universal Prompt enrollment and self-service portals including:
- Email enrollment
- Enroll Portal Enrollment (both enrollment code and enrollment via external IDP)
- Standalone Device Management Portal (DMP) application enrollment application enrollment
- Self-Service Portal (SSP)
- Duo Central Device Management (via the Duo Central launcher or the dedicated URL)
- Enrollment policies do not affect enrollment actions for the traditional Duo Prompt, Admin Panel, Auth API applications, or any Duo-protected application which does not show the Universal Prompt in a browser.
- You must configure identity verification with Persona before enabling identity verification in enrollment policies.
- Identity verification requires a separate Persona Essential, Growth, or Enterprise plan.
Configure Enrollment Policies
Role required: Owner or Administrator
Create and manage your enrollment policies from Policies → User Enrollment and Account Management in the Duo Admin Panel.
Since a variety of applications allow access to the enrollment and self-service portals, enrollment policies apply across all applications or by assigning a policy to groups.
- Global: This is the organization’s default policy when no superseding policy applies.
- If there are multiple configurable sections in the policy, the user’s effective enrollment policy may be a combination of an item specified at the global or group level.
- If a user is not subject to any user group enrollment policy, then they are subject only to the global enrollment policy.
- User Group: Items specified in this enrollment policy apply to all users who are members of any group(s) assigned this enrollment policy. This applies across all applications. If users are members of multiple group policies, the effective policy determination is the order in which the group policies are applied. Users cannot have more than one user group policy apply at one time.
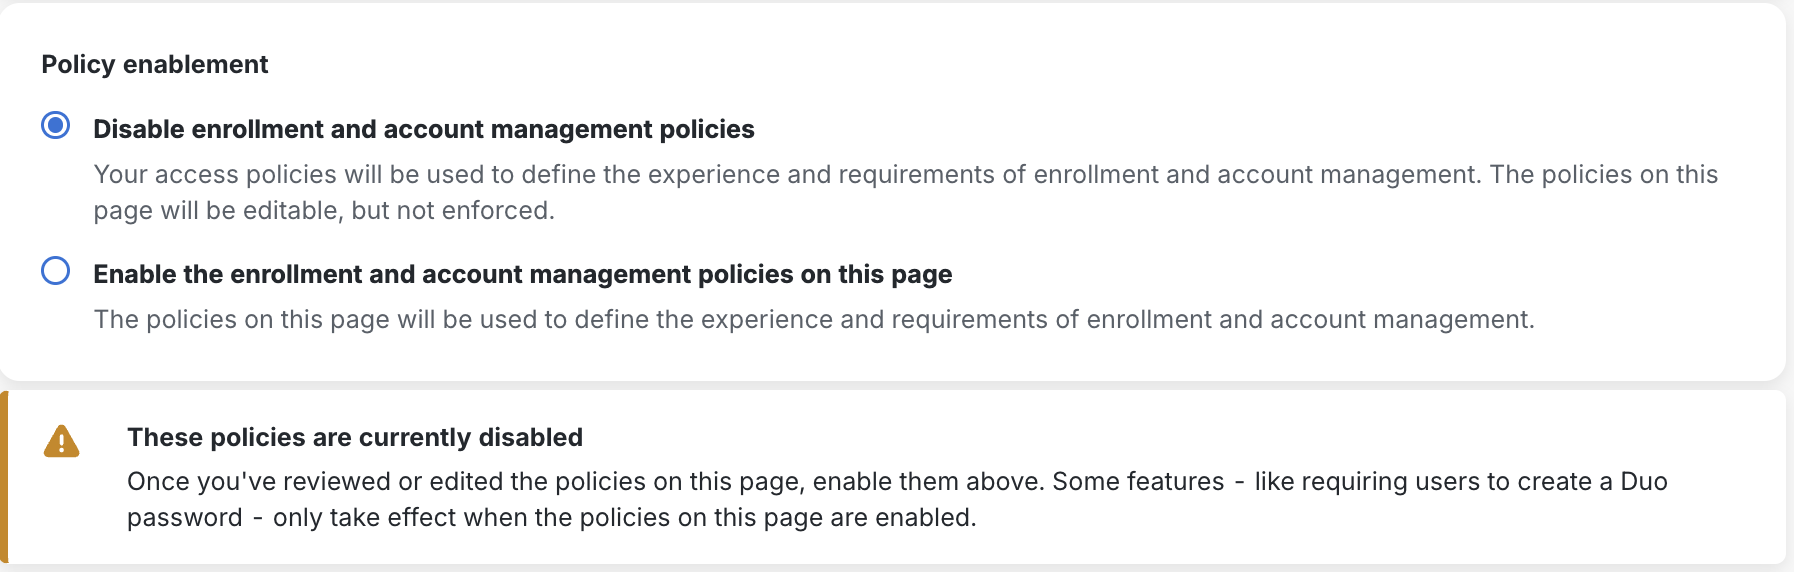
Policy Enablement
This setting defines, for overlapping controls, whether Global or application policies or enrollment policies defined on this page will take effect for enrollment and self-service portals. If you were a Duo customer before June 2025 and you did not already enable enrollment and account management policies, you must do so for your new policies to take effect.
Policy enablement is set to Disable enrollment and account management policies by default for customers who signed up for Duo before June 2025. Duo customer accounts created in June 2025 and after already have enrollment and account management policies enabled, and do not have the option to disable them.
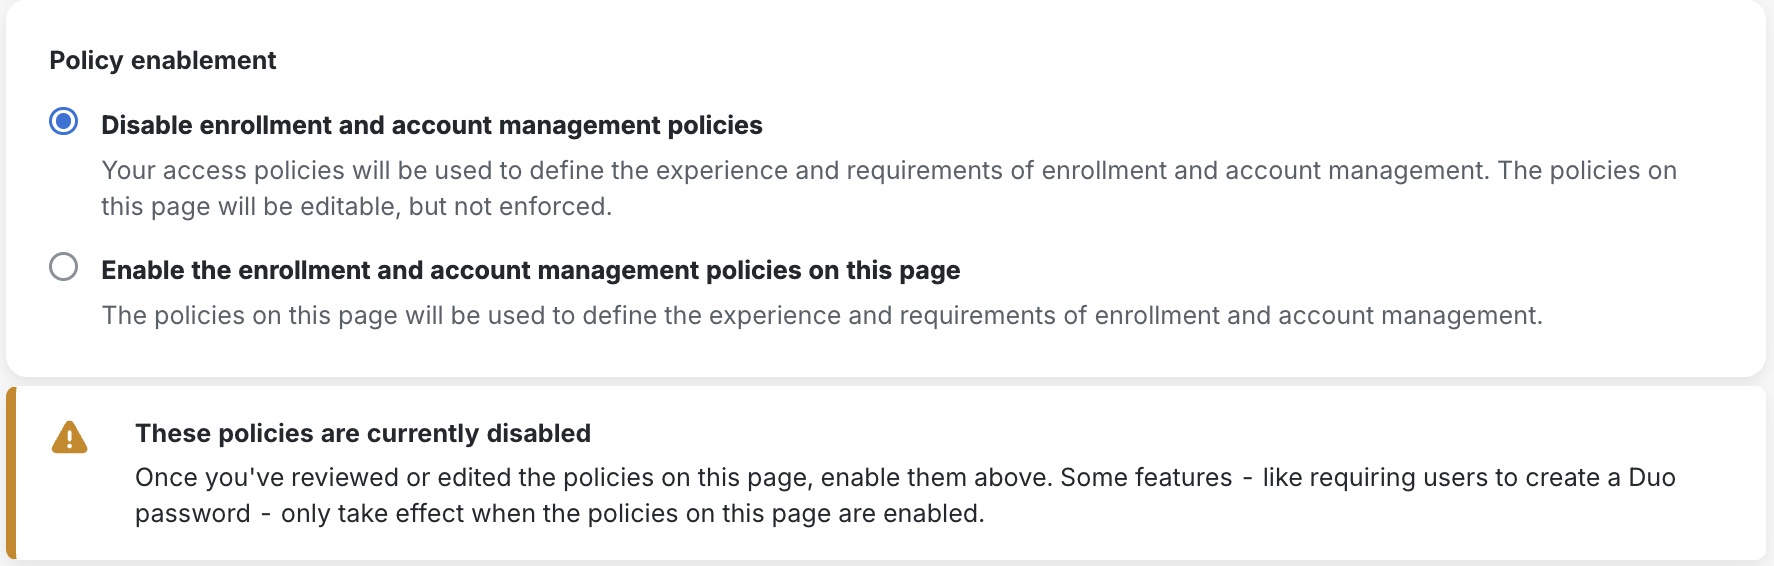
Click on the Enable the enrollment and account management policies on this page button to use the policies on this page to define the experience and requirements of enrollment and account management.
Enrollment Policy Options
Use the enrollment policy editor to configure enrollment policy options in your global or custom enrollment policies.
Duo Directory Password
The "Duo Directory password" options determine whether your Duo users must create a password stored in Duo.
-
Require password: Disabled by default. When selected, unenrolled users must create a Duo password during enrollment from an emailed enrollment link or at the hosted enrollment portal. Existing users may first authenticate with a temporary password provided by an administrator and then set a new password.
You may customize the Duo Directory password complexity, minimum and maximum length, history (preventing reuse), and expiration options. The password policy default imposes a minimum length of 12 characters, a maximum length of 256 characters, and prevents reuse of the last 24 passwords.
When you enable password expiration, you can set the maximum password age and choose whether to show a warning at login before the password expires. See the expired password reset experience for users in the Duo End User Guide.
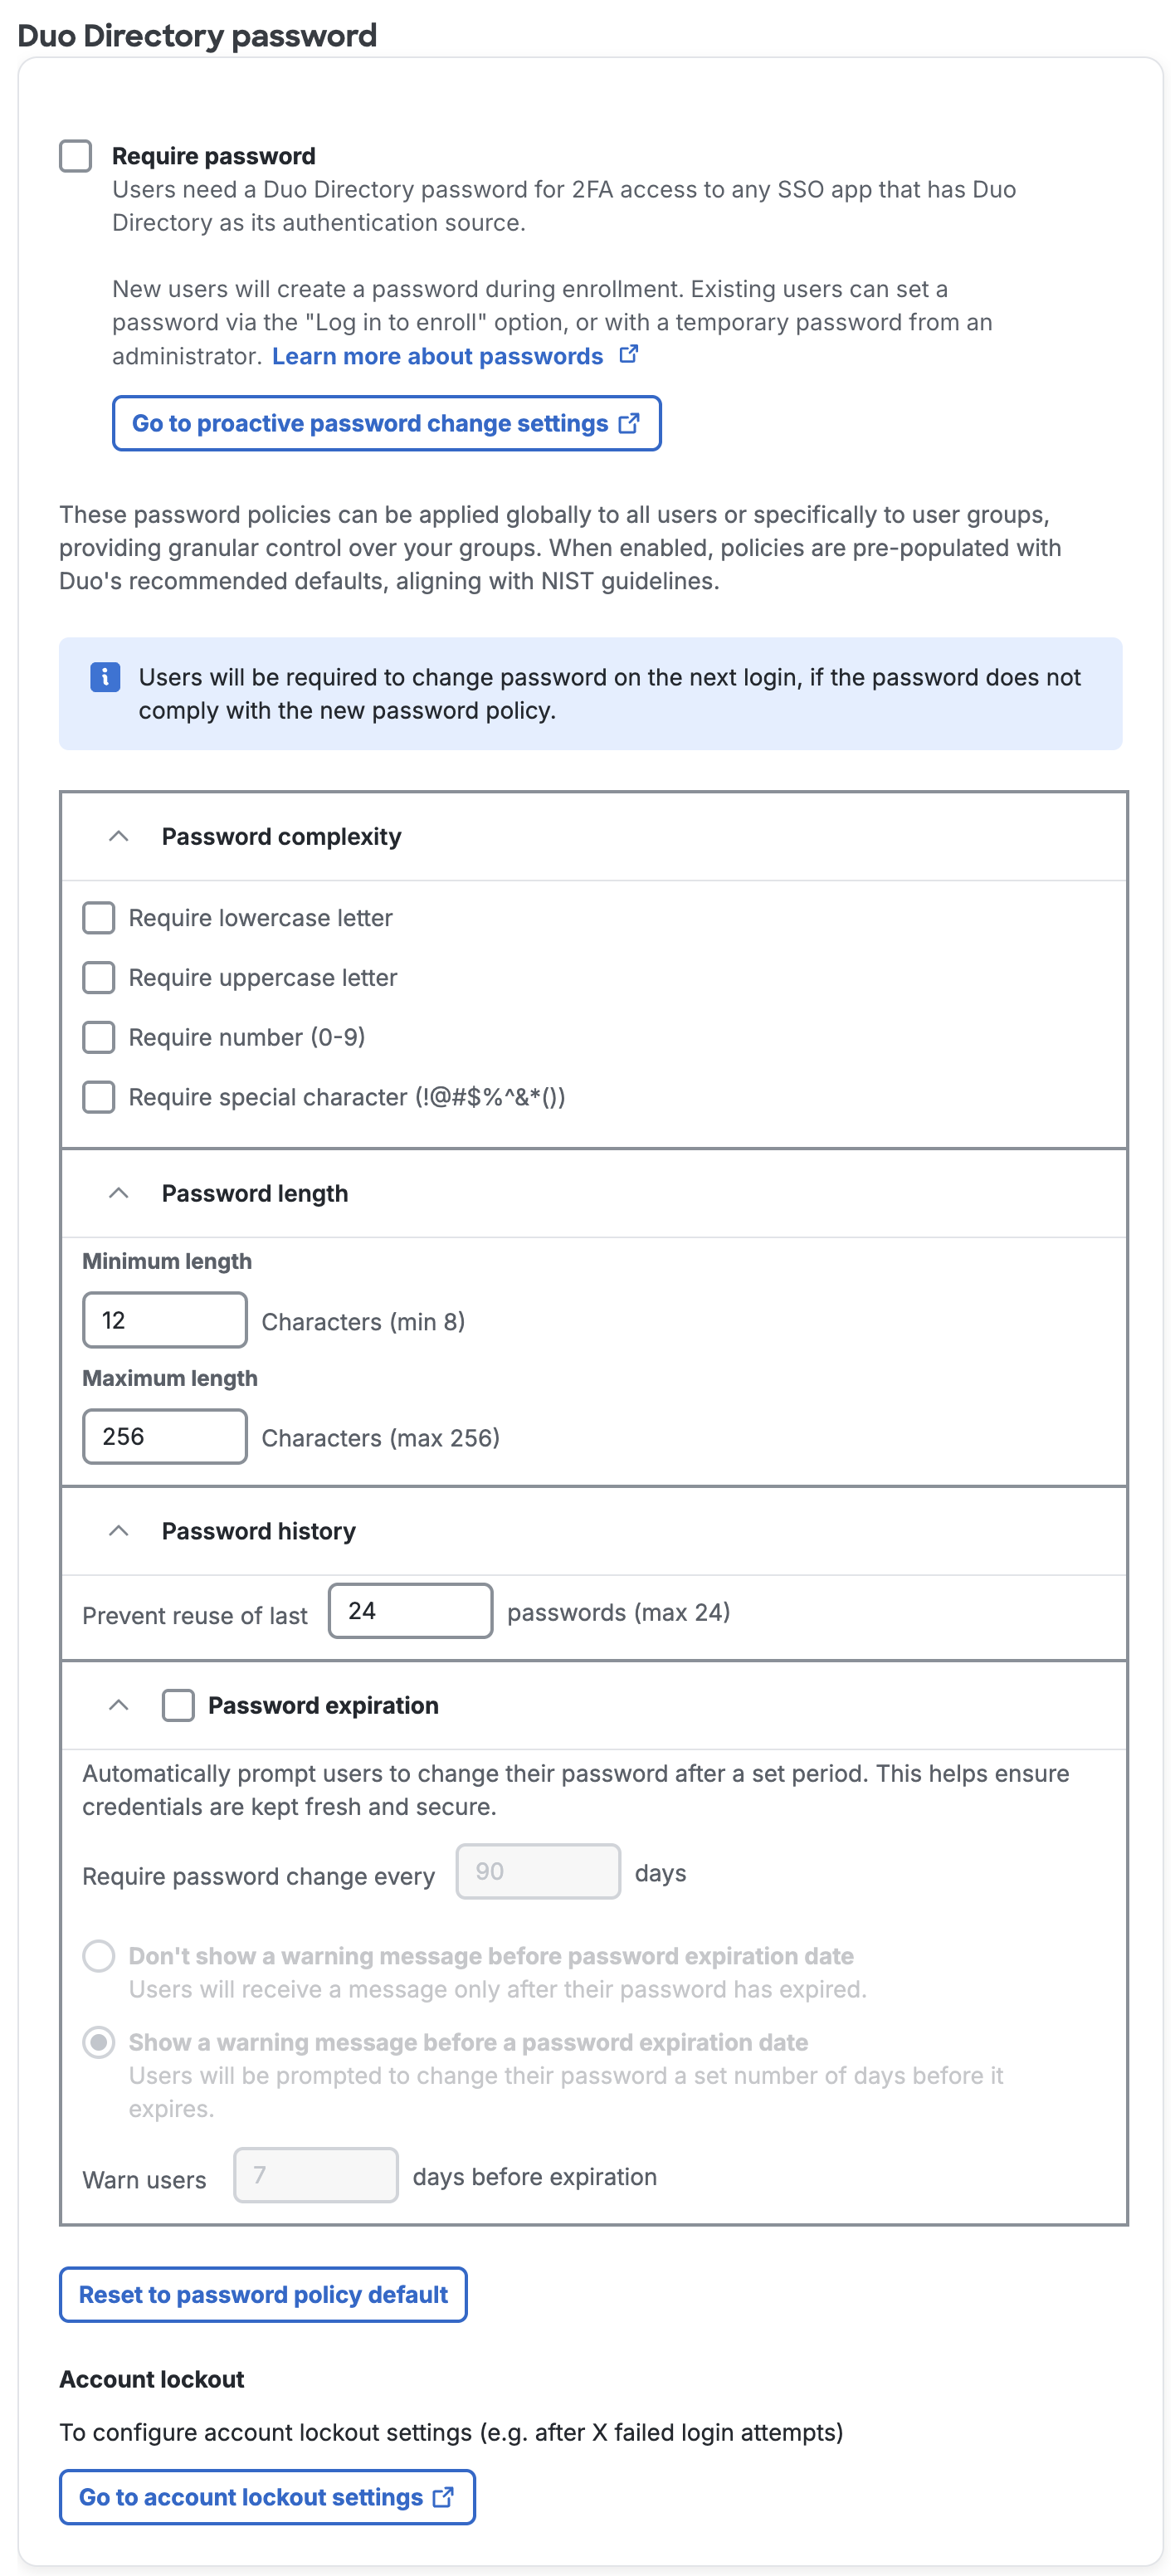
If a user's current password does not satisfy your updated Duo Directory password complexity and expiration options in the effective enrollment policy, the user must set a new password at their next login.
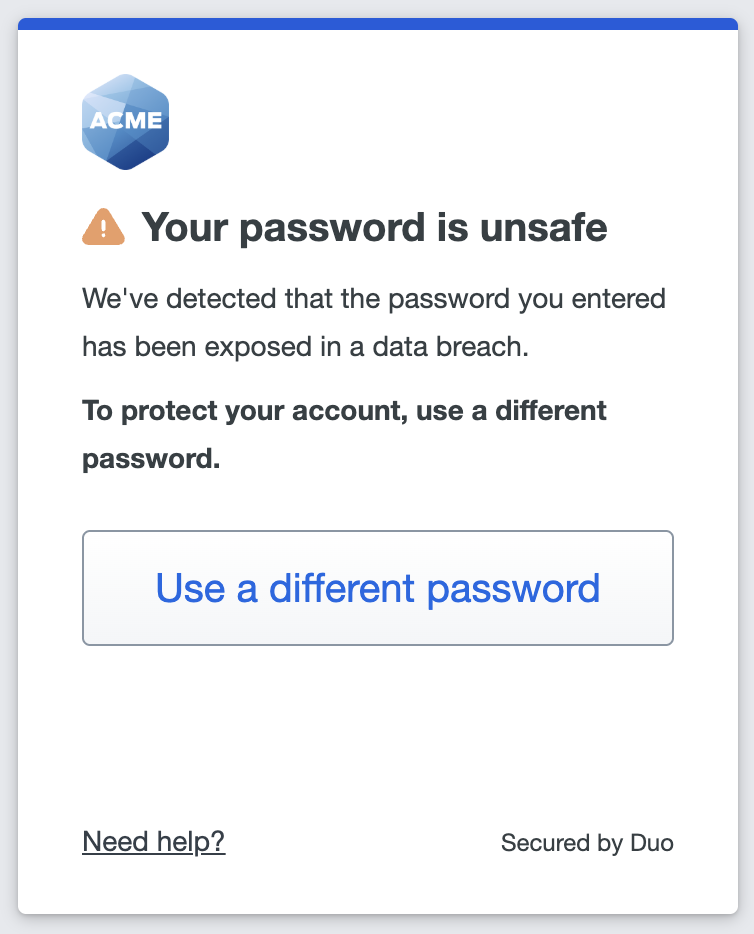
When users enter a Duo password — whether during login or while setting a new one — we check the password against a regularly-updated database of breached passwords. Users may not set a new password found in the breached password database. If we find a user's current password value among the compromised password lists, then the user must set a new, safe password before continuing to the application.
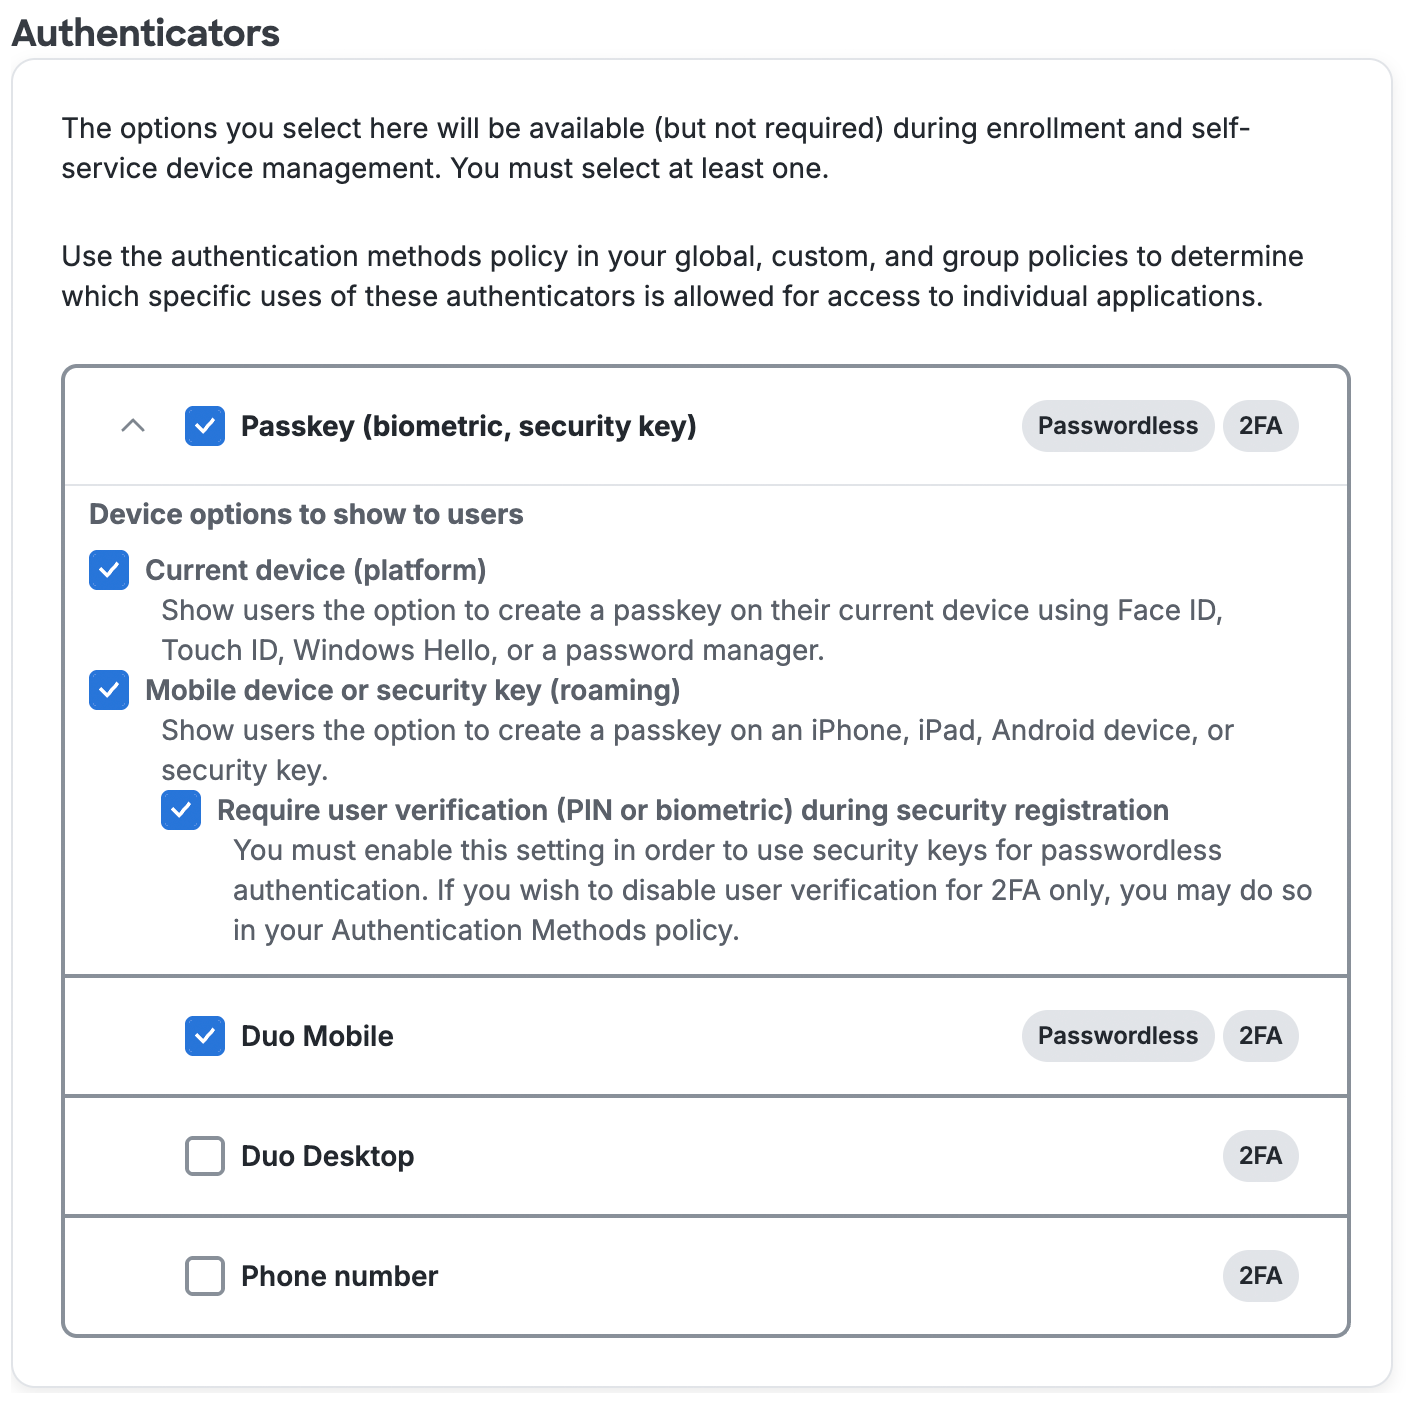
Authenticators
The "Authenticators" options specify which Duo authentication methods will be available (but not required) during enrollment and self-service device management.
-
Passkey (biometric, security key) - Enabled by default.
Allow users to enroll platform WebAuthn authenticators integrated into their current device hardware and operating system, like the Touch ID fingerprint reader on a Mac, or a roaming FIDO2-compliant USB, Bluetooth, or NFC WebAuthn security key.
Uncheck the user verification option if you do not want security key users enrolling devices for passwordless authentication.
-
Duo Mobile - Enabled by default.
Duo's service sends an authentication request to the Duo Mobile iOS or Android app for the user to approve or deny. Duo Mobile authentication supports passwordless or 2FA authentication.
-
Duo Desktop - Disabled by default.
This option makes Duo Desktop available for enrollment as a 2FA authenticator if the user already has Duo Desktop installed. Enabling this does not offer or require Duo Desktop installation during first-time enrollment. Configure your Global Policy to require the Duo Desktop app if you want to prompt your users to install Duo Desktop during enrollment. Duo Desktop may not be used for passwordless authentication.
-
Phone number - Disabled by default.
Users enroll a phone number to receive calls or SMS messages during authentication. The phone call method will not work for passwordless authentication.
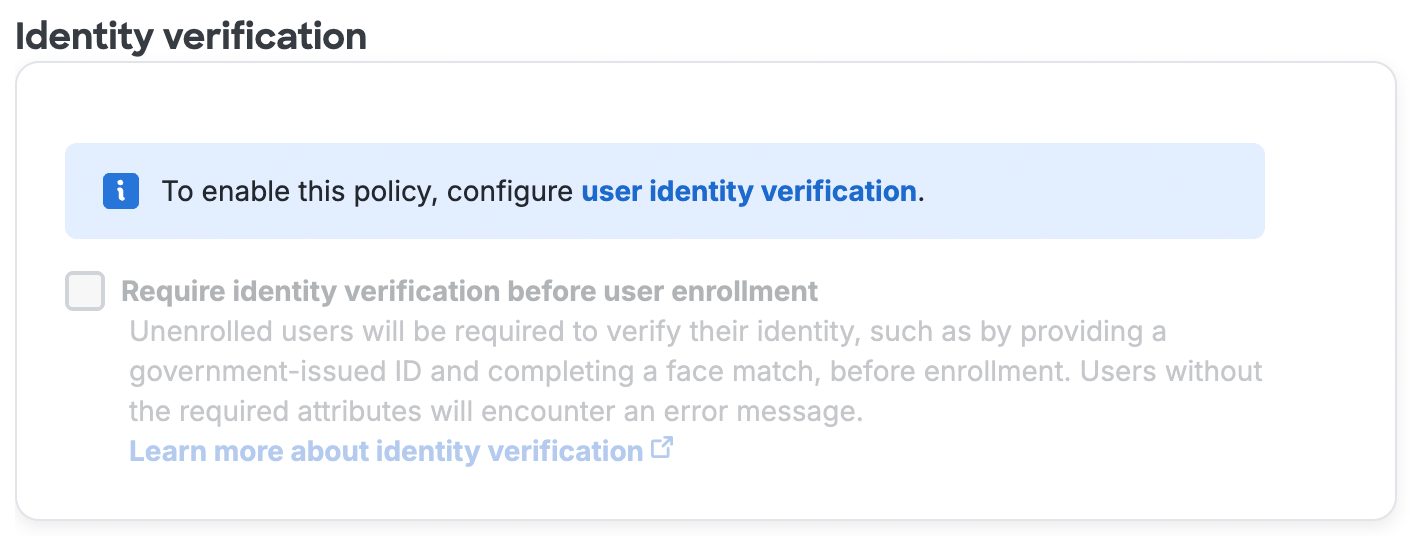
Identity Verification
Disabled by default. Enable Require identity verification before user enrollment to enforce external verification of users' government IDs during enrollment through an integration with Persona. You must first complete identity verification setup to make this option selectable.
Phone Ownership Verification
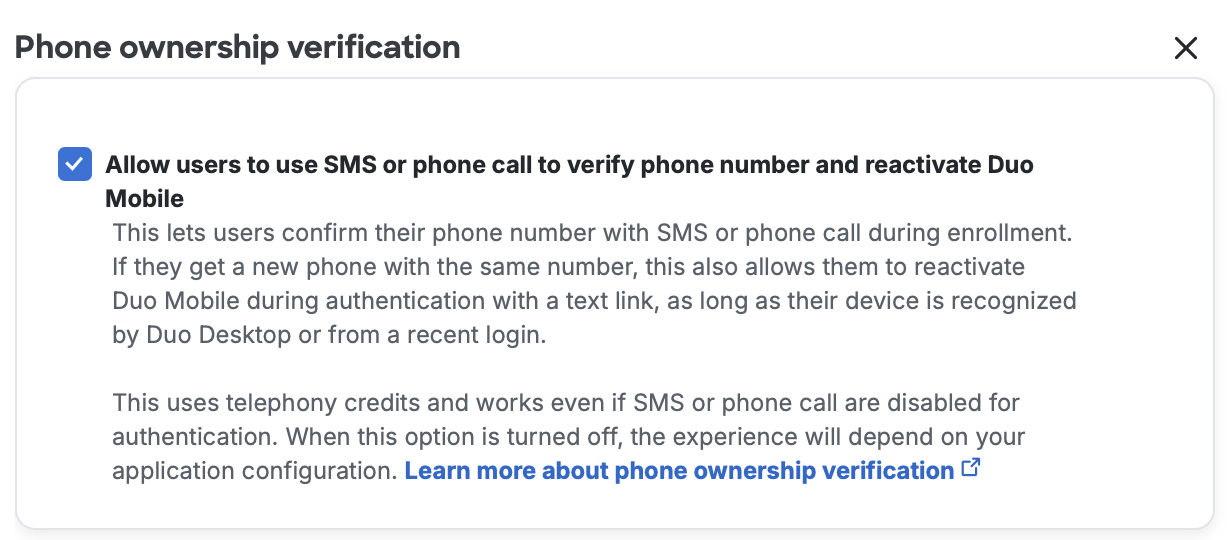
This option allows users to use SMS passcodes or phone call to verify phone ownership without enabling those methods for two-factor authentication (2FA) in authentication methods policies. When you enable this option, users also no longer need to use the Self-Service Portal for same-number reactivations during authentication. Users can reactivate Duo Mobile during authentication with a text link if they get a new phone with the same number, as long as their device is recognized by Duo Desktop or from a recent login.
Enabled by default. Enable Allow users to use SMS or phone call to verify phone number and reactivate Duo Mobile to allow users to confirm their phone number with SMS or a phone call during enrollment.
Note: While you must enable enrollment policies for your entire Duo account, you can apply different enrollment policies to specific groups of users. By default, ownership verification control is enabled in your global enrollment policy, so if you wish to try this with a subset of users first, you’ll need to disable it in your global enrollment policy and re-enable it in a user-group enrollment policy.
To set up phone ownership verification:
-
Navigate to Policies → User Enrollment and Account Management.
-
Confirm that the phone ownership verification option is enabled in all policies you wish and disable it in the policies that you don’t.
-
If you are using a user-group enrollment policy, ensure that the policy is applied to the correct group and that your users are members of the applied group.
Note: If you have multiple competing user-group enrollment policies, make sure this policy sits visually at the top in the policy hierarchy so it takes priority where conflicts may exist.
-
Confirm that the Policy enablement section at the top of the enrollment policies page is set to Enable the enrollment and account management policies on this page. If you do not have a Policy enablement section, enrollment policies are already enabled on your account.
-
Edit authentication methods policies to disable phone call and SMS if you no longer want them used for 2FA. (Optional)
Duo recognizes endpoints that have either a browser cookie that indicates the user successfully authenticated from this endpoint in the past 30 days; or, a valid Duo Desktop registration for this user and organization.
If the endpoint is not recognized, these reactivation options will not appear.
Devices are not reactivated until the activation link is used successfully in Duo Mobile.
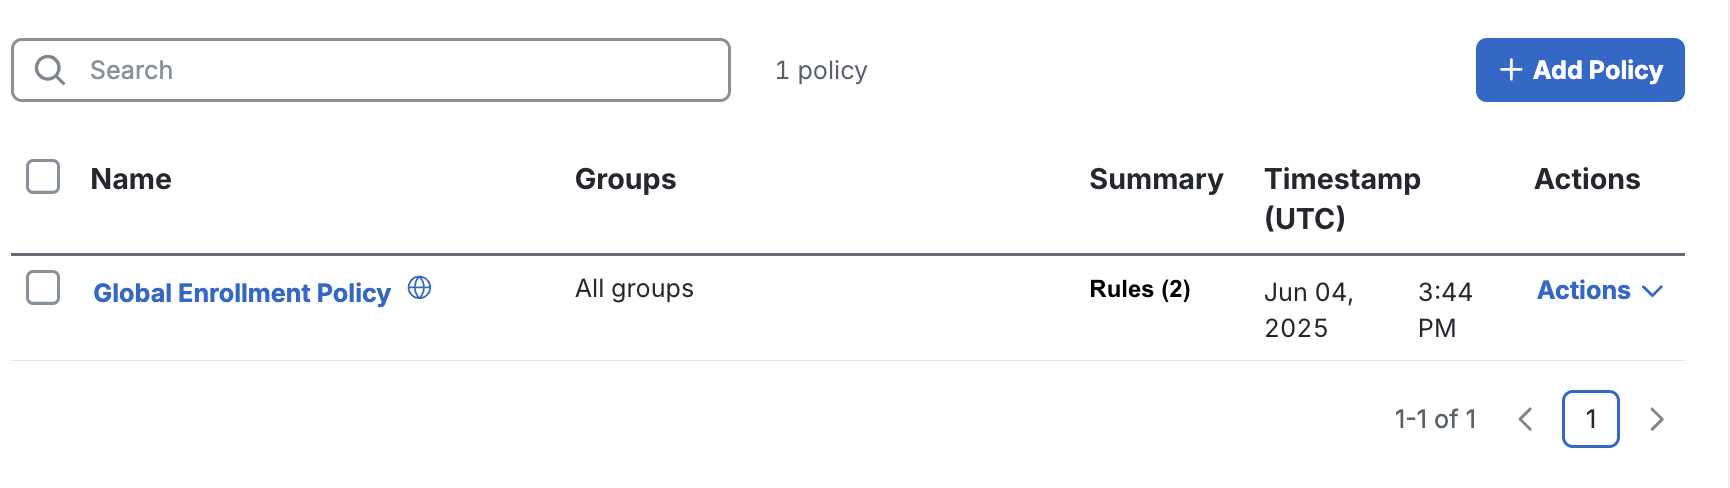
Global Enrollment Policy
The built-in Global Enrollment Policy cannot be deleted. If you selected to Enable the enrollment and account management policies on this page in the "Policy enablement" section, the Global Enrollment Policy always applies to all applications. Edit this policy if there are settings you'd like to control for all users and all applications. You can view and edit your current Global Enrollment Policy settings on the Policies → User Enrollment and Account Management page.
Edit the Global Enrollment Policy
Role required: Owner or Administrator
To edit the Global Enrollment Policy:
-
Navigate to the Policies → User Enrollment and Account Management page.
-
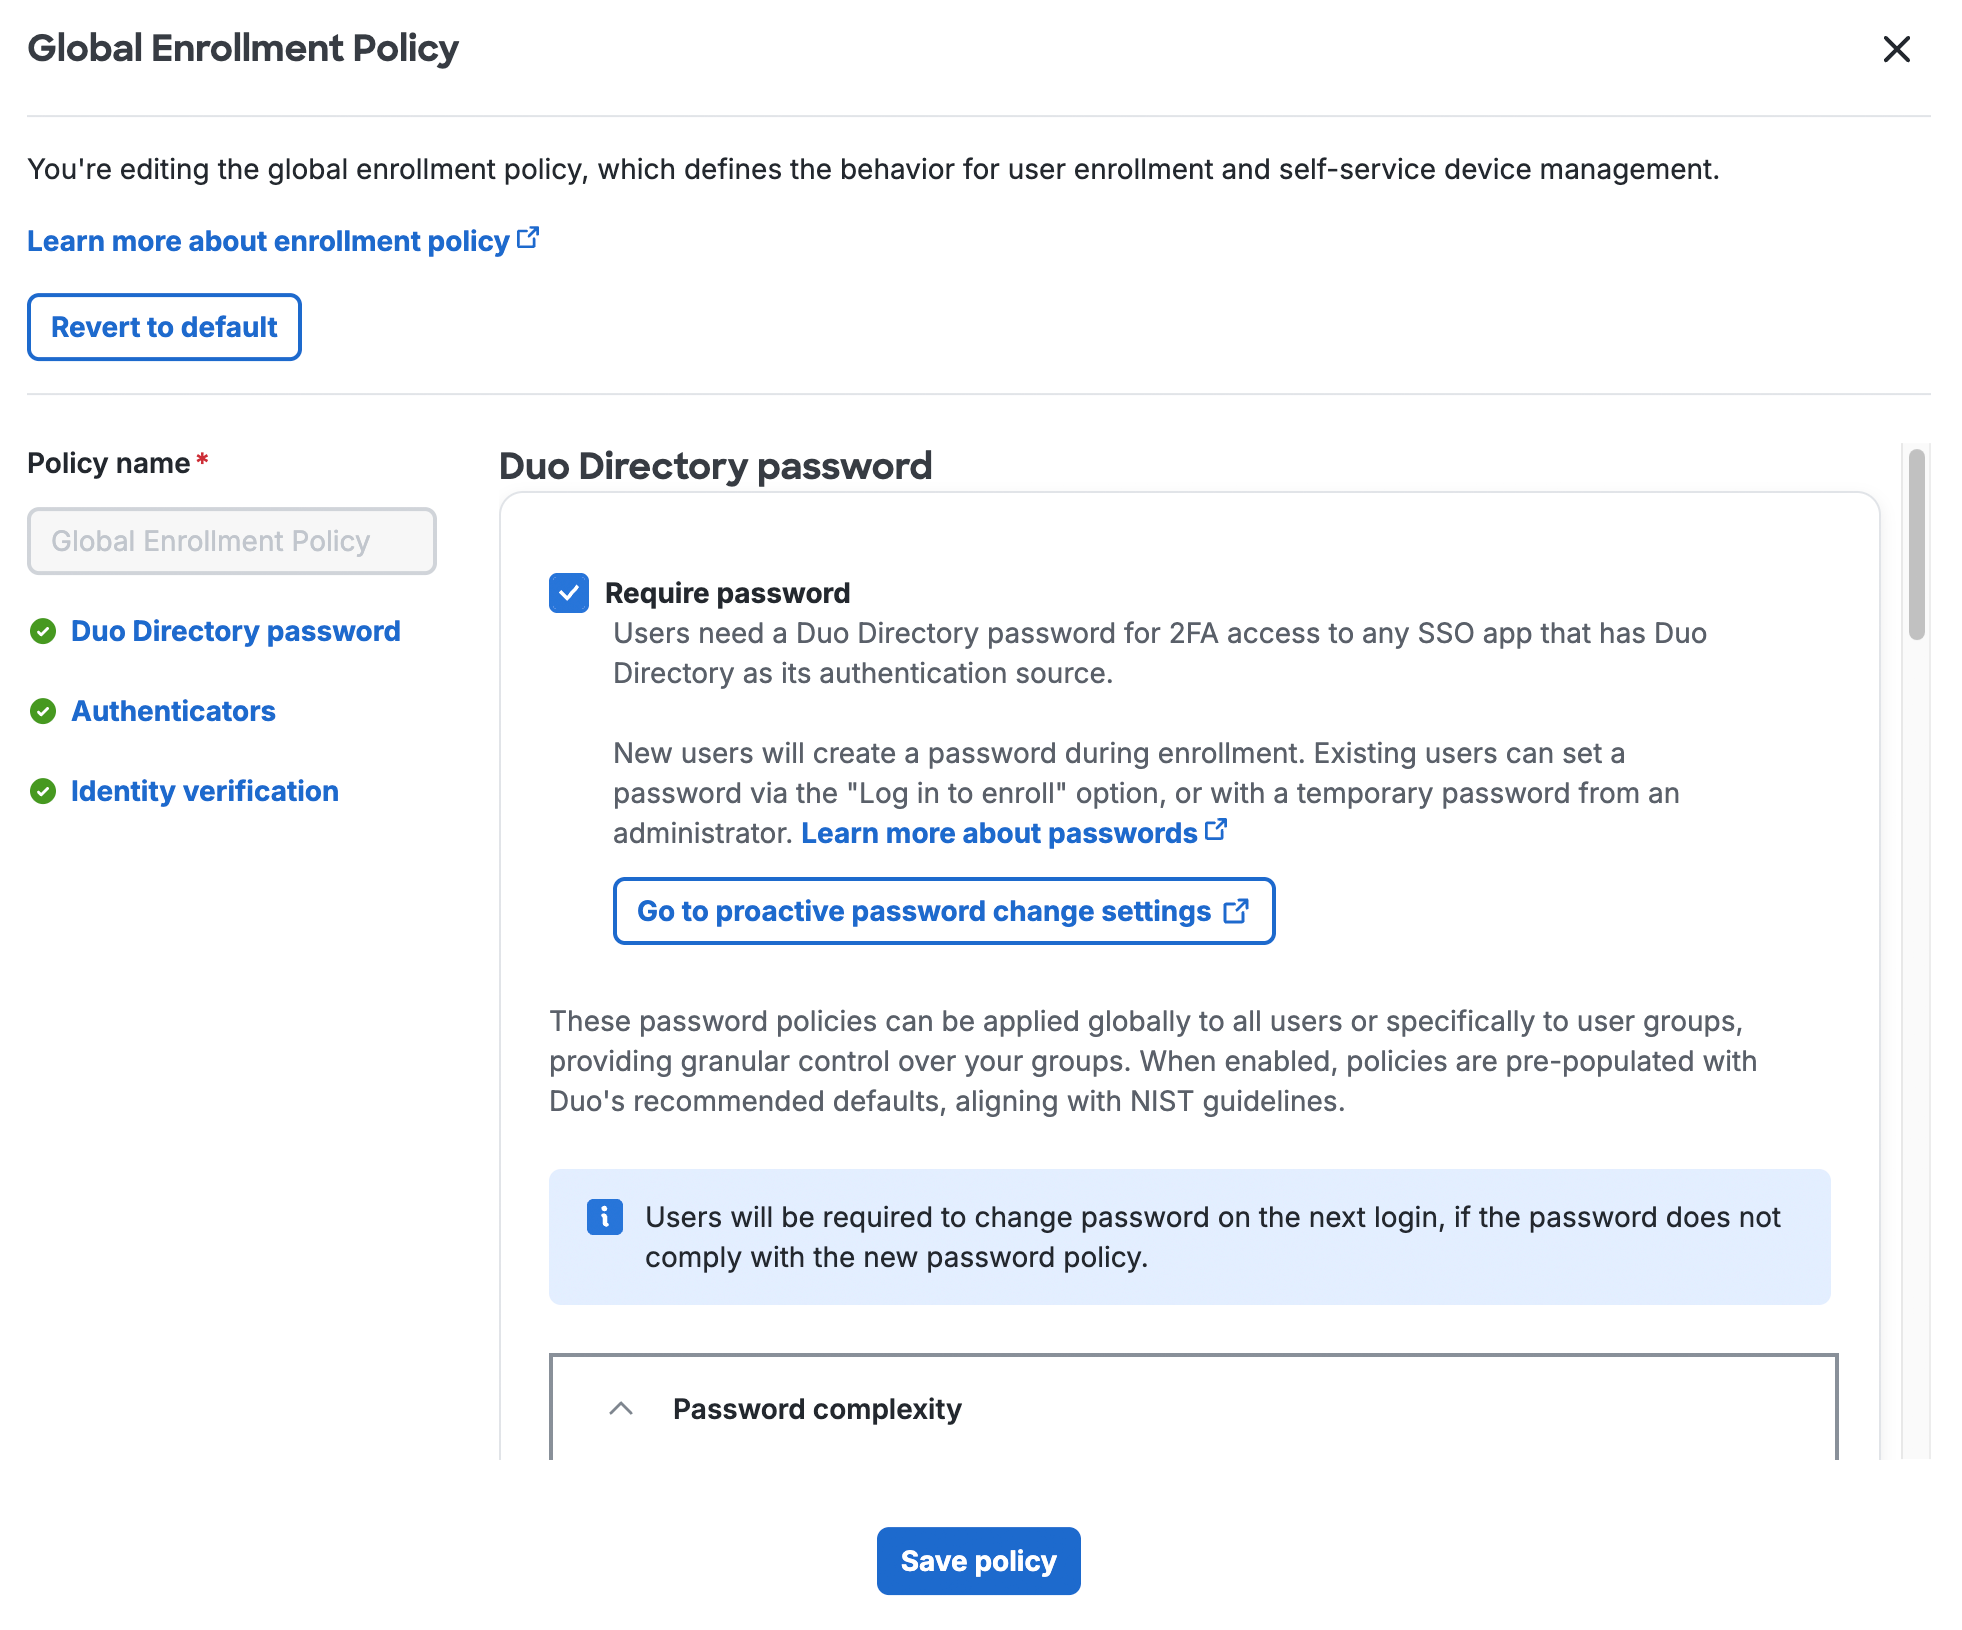
Click Global Enrollment Policy under "Name" or click on the checkbox to select the Global Enrollment Policy and use the "Actions" menu to select Edit to open the "Global Enrollment Policy" editor.
-
Once in the "Global Enrollment Policy" editor, update the enrollment policy options on the right side of the editor.
-
Click Save Policy when your edits to the Global Enrollment Policy are complete.
If you'd like to restore the original Global Enrollment Policy settings, open the Global Enrollment Policy editor again and click the Revert to default button at the top of the "Global Enrollment Policy" window. Click Save Policy to apply the Global Enrollment Policy defaults.
The Global Enrollment Policy cannot be assigned, unassigned, or deleted.
Custom Enrollment Policies
Create and assign enrollment policies to create custom enrollment experiences.
Create a Custom Enrollment Policy
Role required: Owner or Administrator
To create a new enrollment policy:
-
Scroll down to the enrollment policies list.
-
Click the + Add Policy button.
-
In the "Create Enrollment Policy" editor, enter a descriptive Policy Name at the top of the left column, and then click on a rule on the left to configure the enrollment policy options in your new group enrollment policy.

-
When you finish adding and configuring policy settings, click Create Policy to save the settings.
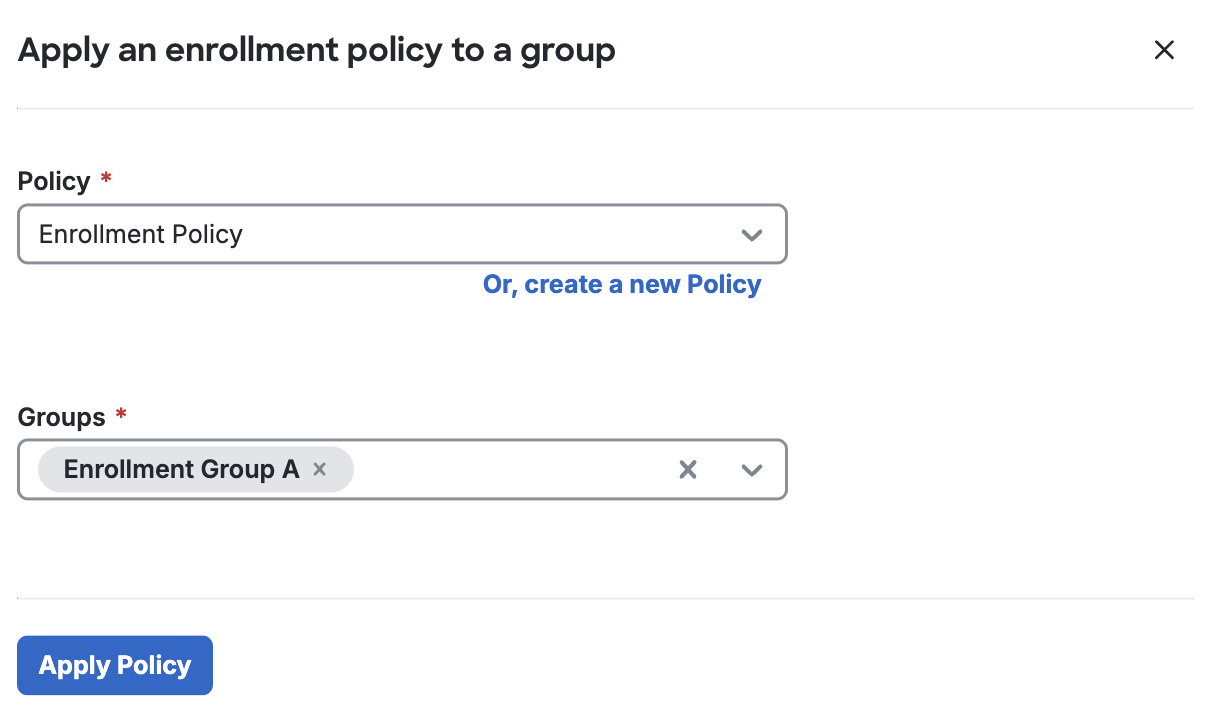
Apply an Enrollment Policy to a Group
You can apply an enrollment policy to a specific group or groups. For example, you can apply an enrollment policy to specify a certain group of users with privileged access that you only want to enroll in phishing-resistant authentication methods.
To apply an enrollment policy to a group:
-
Under the "User Group Enrollment Policy" section, click Apply user group policy.
-
In the Apply an enrollment policy to a group editor, under "Policies", select the policy you want to apply to specific groups.
-
Under "Groups", add the groups you want to assign this policy.
-
Click Apply Policy.
-
You should now see the table of enrollment policies reflecting the changes you made. Additionally, you will see more detailed information and a visual hierarchy of the policies in the summary table.
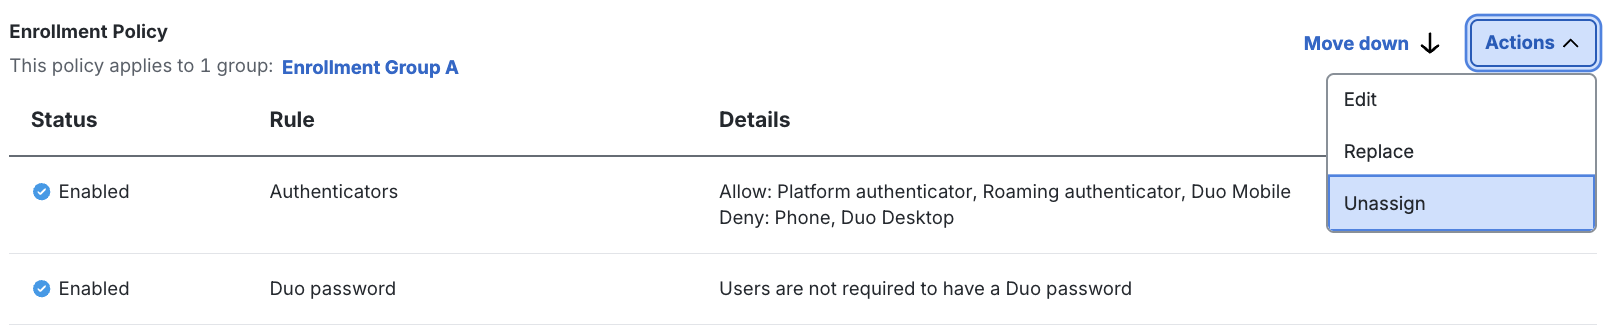
Unassign User Group Enrollment Policies
To unassign a user group enrollment policy:
-
From the "User Group Enrollment Policy" section, locate the enrollment policy that you want to unassign and use the "Actions" menu to select Unassign.
-
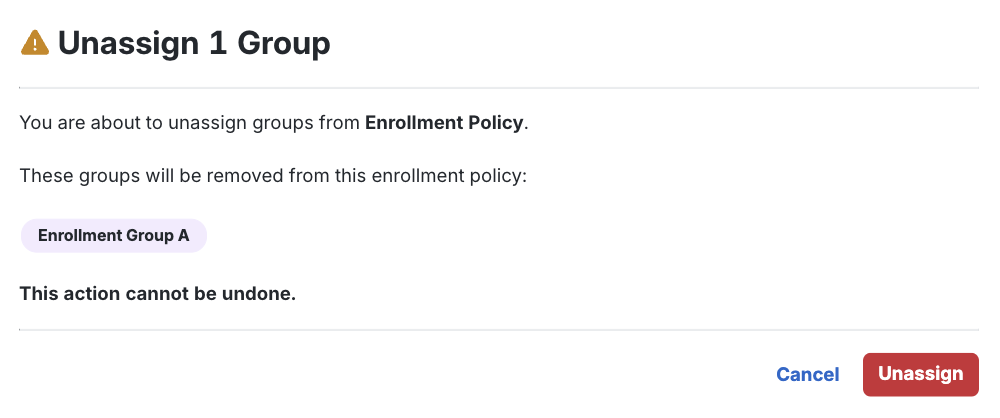
Confirm that you want to unassign the enrollment policy by clicking Unassign.
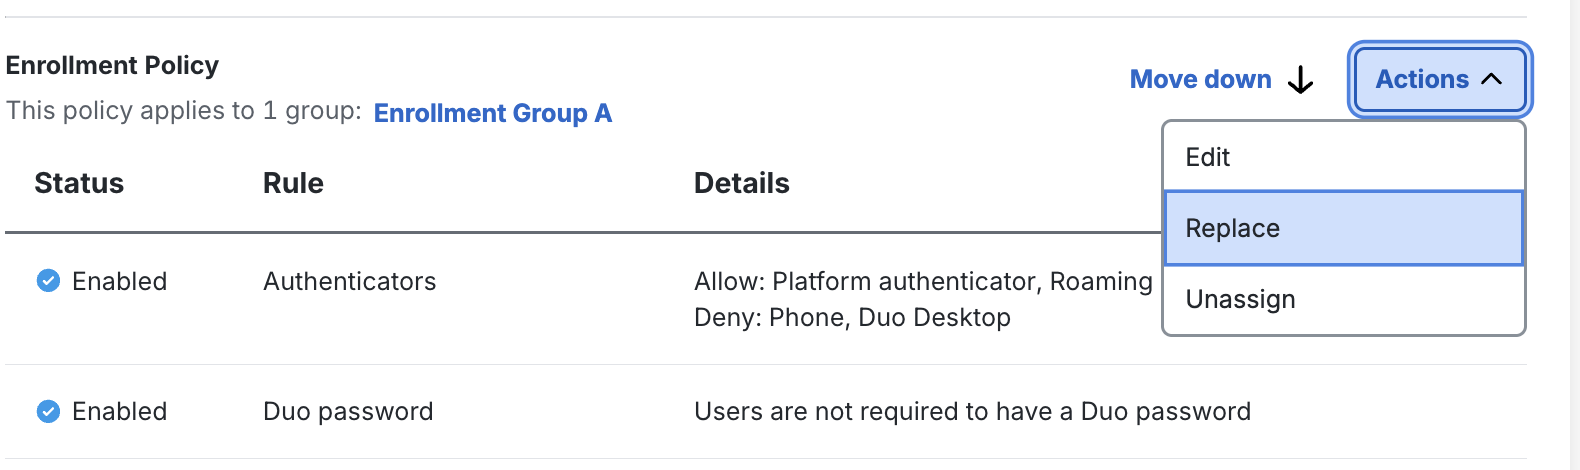
Replace User Group Enrollment Policies
You can replace assigned enrollment policies instead of unassigning and then reassigning group enrollment policies.
To replace user group enrollment policies:
-
From the "User Group Enrollment Policy" section, locate the enrollment policy that you want to replace and use the "Actions" menu to select Replace.
-
In the "Replace an enrollment policy" window, under "Policies", select the policy you want to apply to these groups instead.
-
Under "Groups", review, add, or remove any groups to specify which groups you want to replace.
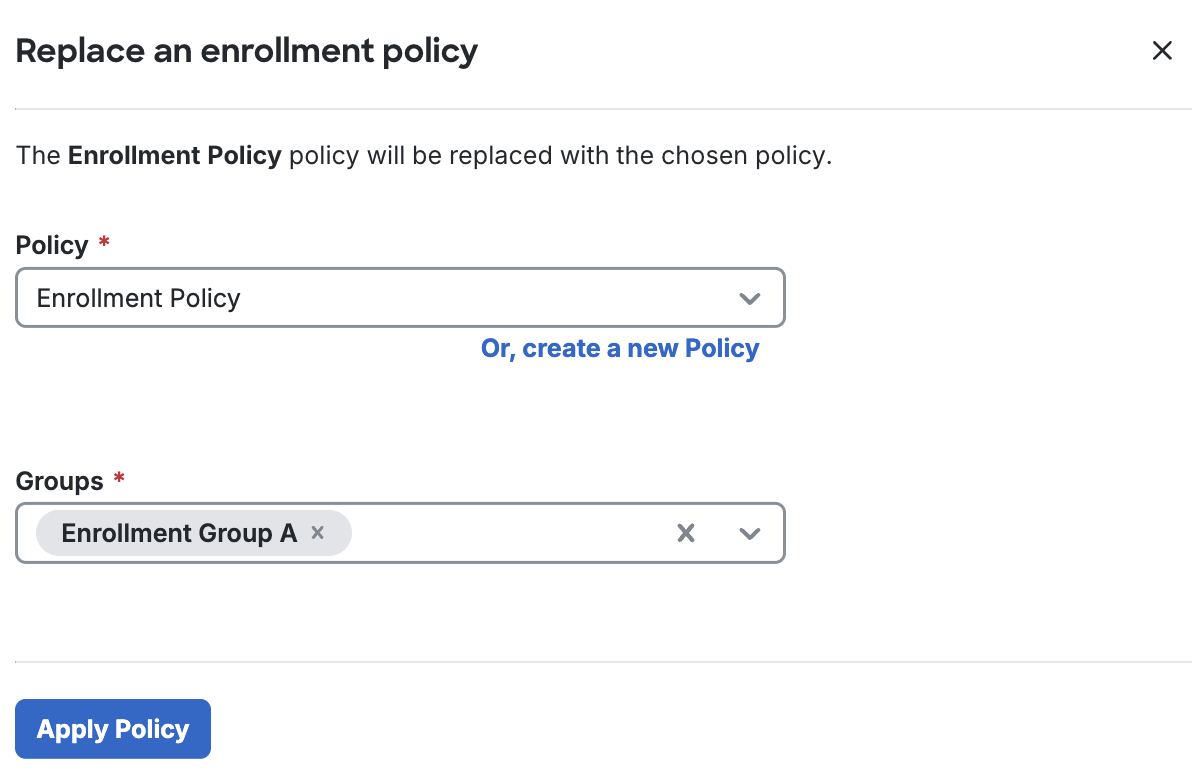
-
Click Apply Policy.
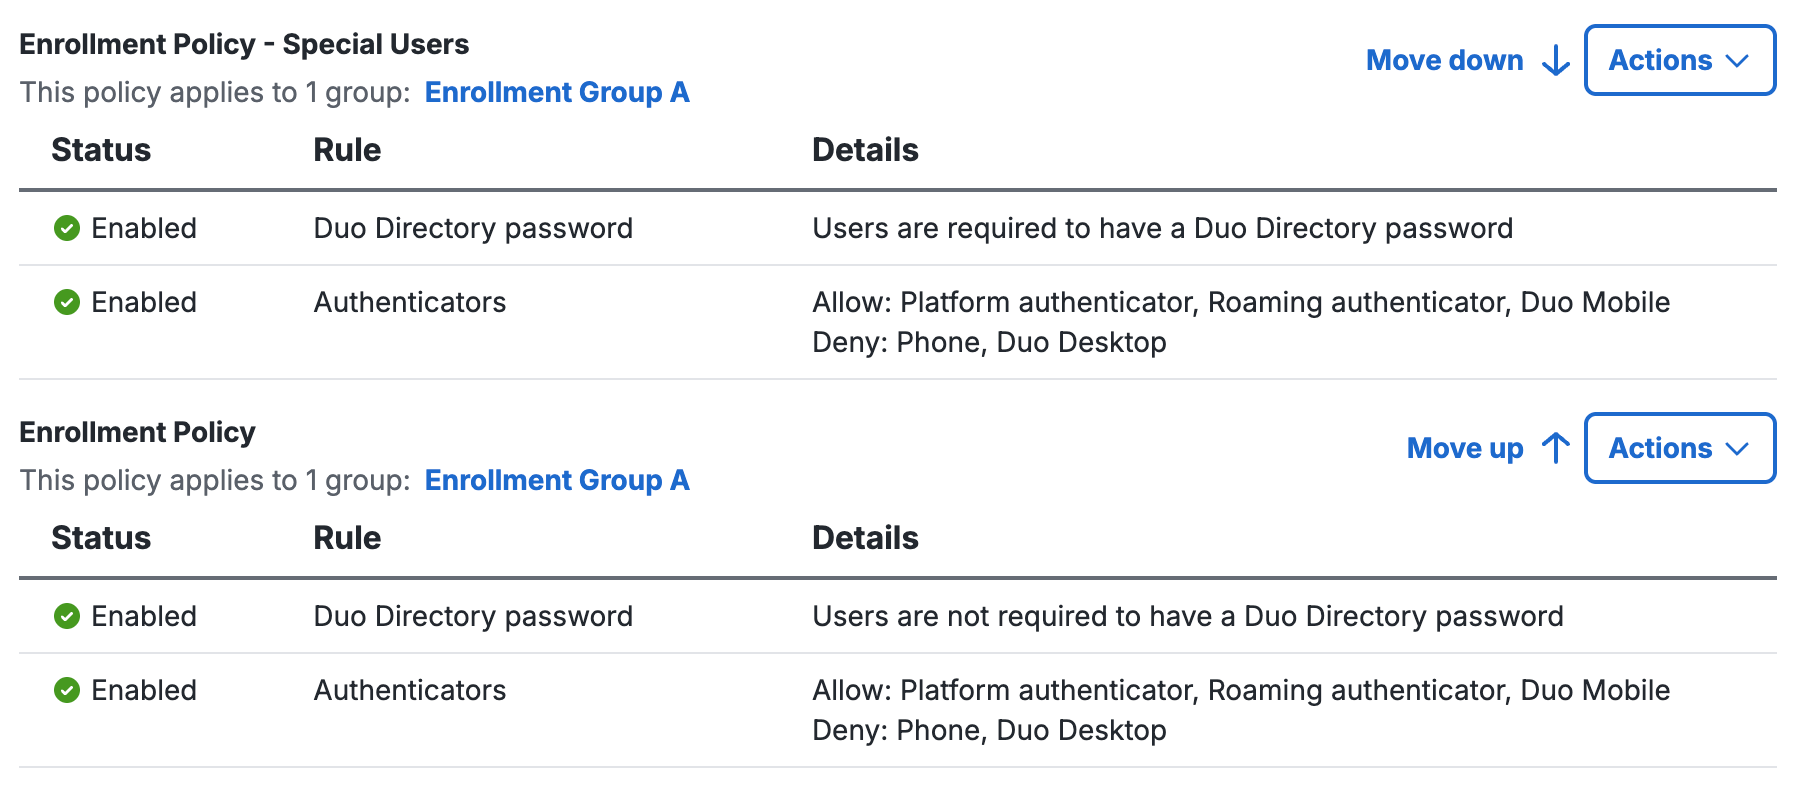
Reorder Policies
When multiple policies apply, the effective policy is the first in order. If you have multiple group enrollment policies and want to change the order of the policies that take effect, click on the Move Up and Move Down buttons for each applied policy in the User Group Enrollment Policy section.
Duplicate Enrollment Policies
-
From the enrollment policy list, click on the checkbox to select the enrollment policy you want to duplicate and click Duplicate, or use the "Actions" menu and select Duplicate.
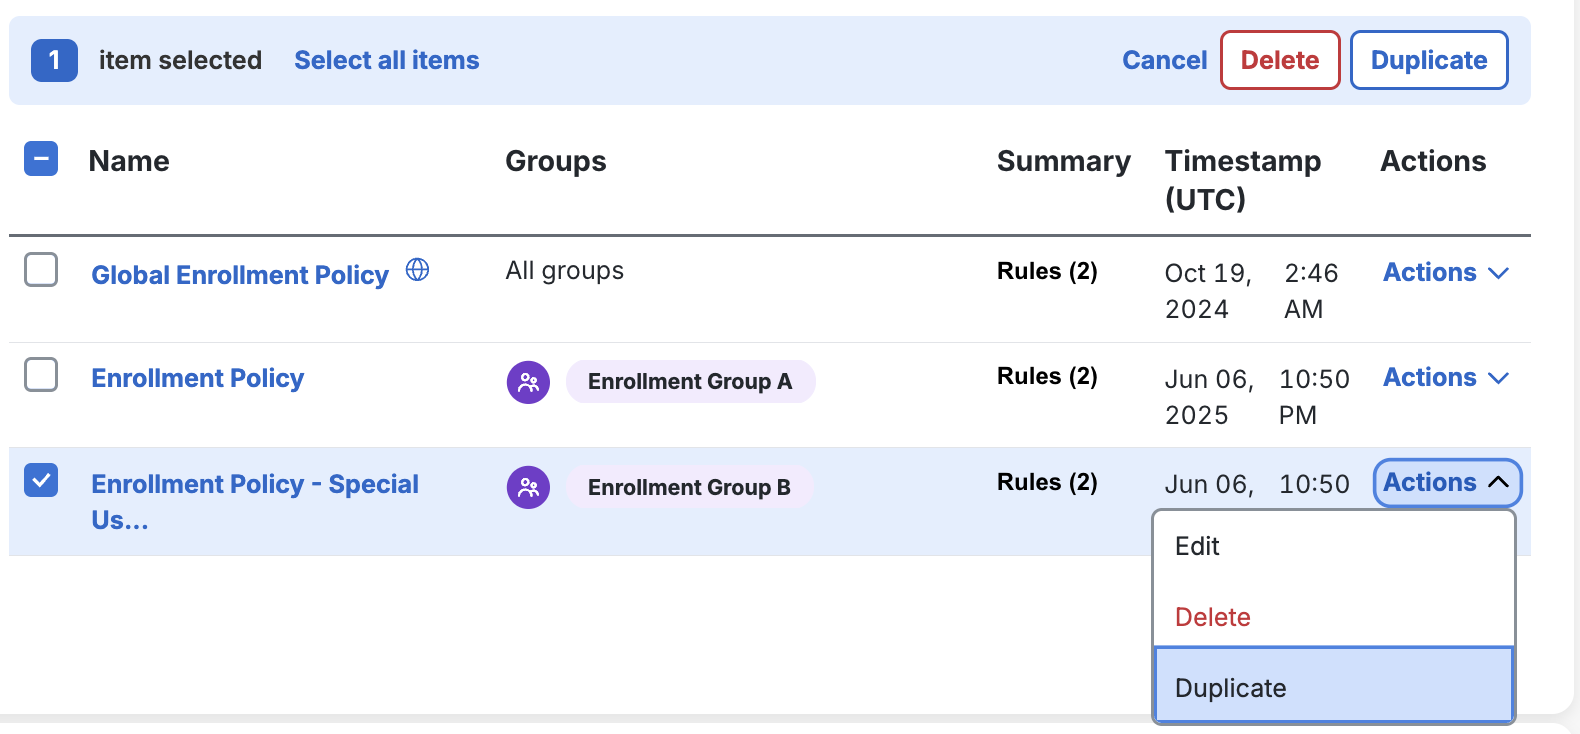
-
The new enrollment policy created has the same name, but with “copy” appended to the end.
-
When duplicated, this new policy has no group assignments. You can assign it to a group to use it.
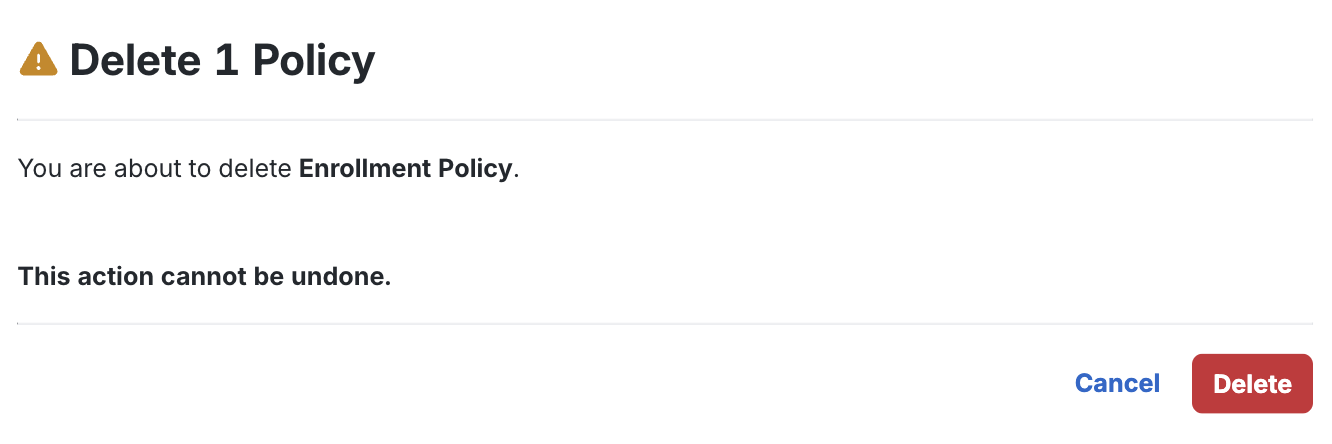
Delete Group Enrollment Policies
-
From the enrollment policy list, click on the checkbox to select the enrollment policy you want to delete and click Delete, or use the "Actions" menu and select Delete.

-
Confirm that you want to delete the enrollment policy by selecting Delete.
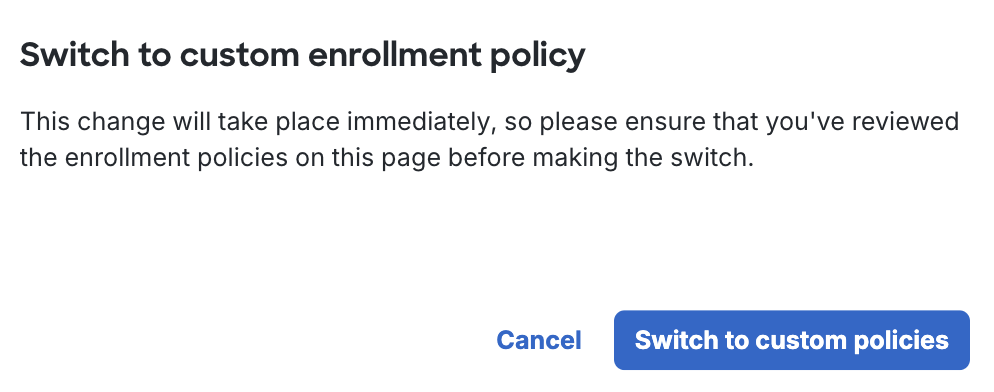
Enable Enrollment Policies
-
Once you have fully configured your policies, return to the "Policies" section.
-
Under Policy enablement, select Enable the enrollment and account management policies on this page.
-
Confirm the change by selecting Switch to custom policies.
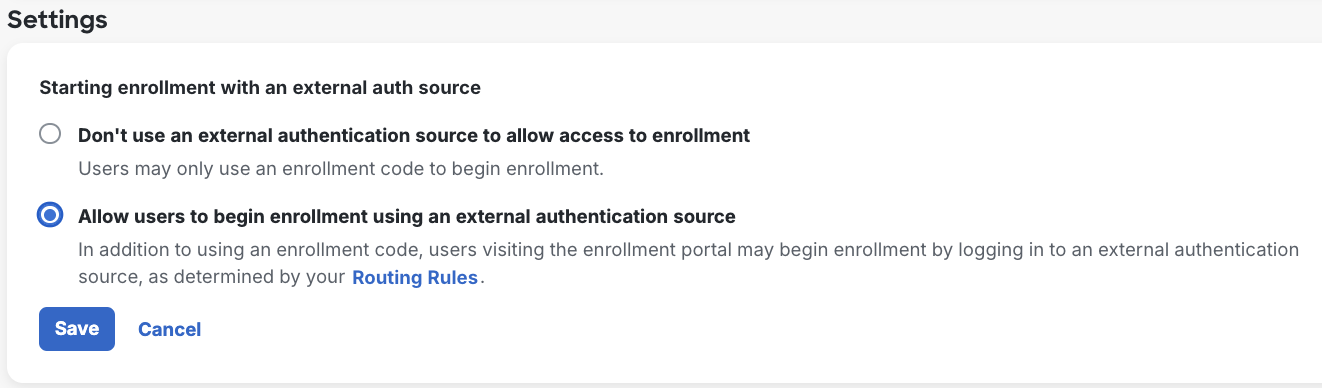
Start Enrollment With an External Auth Source
You can ease your migration from other external authentication sources to Duo-hosted users by allowing your existing users from these authentication sources to begin enrollment after verifying credentials from an external directory. The enrollment policy default is Don't use an external authentication source to allow access to enrollment.
To specify if you want to start enrollment with an external authentication source:
-
Under the "Settings" section, click the Allow users to begin enrollment using an external authentication source button.
-
Click Save.
Troubleshooting
Need some help? Try searching our Knowledge Base articles or Community discussions. For further assistance, contact Support.