Duo Two-Factor Authentication for Microsoft Entra ID (formerly Azure Active Directory)
Last updated:
Duo for Microsoft Entra ID External MFA provides an improved authentication experience, streamlined configuration, and fewer Microsoft feature limitations over the legacy custom control for Entra Conditional Access.
Microsoft will prevent creation of new custom controls in September 2026 as part of the custom controls deprecation process. Therefore, you may not create or edit new "Microsoft Azure Active Directory" applications in Duo after September 30, 2026.
New Entra ID MFA deployments should use the Duo "Microsoft Entra ID: External MFA" application rather than the CA custom controls approach described on this page. Existing users of the Duo CA custom control should migrate to Duo External MFA before the Microsoft custom controls retirement date.
Overview
Duo integrates with Microsoft Entra ID (formerly Azure Active Directory) Conditional Access policies to add two-factor authentication to Entra ID logons, offering inline user enrollment, self-service device management, and support for a variety of authentication methods — such as passkeys and security keys, Duo Push, or Verified Duo Push — in the Universal Prompt.
About Entra ID Conditional Access
Microsoft Entra ID (formerly Azure Active Directory or Azure AD) Conditional Access (CA) allows you to set policies that evaluate Entra ID user access attempts to applications and grant access only when the access request satisfies specified requirements e.g. user group membership, geolocation of the access device, or successful multifactor authentication.
Duo's custom control for Microsoft Entra ID Conditional Access provides strong secondary authentication to Entra ID logons. Additionally, Duo's granular access policies and controls complement and extend the access controls in Entra ID.
Please review Microsoft's Conditional Access documentation before configuring Duo authentication in your Entra ID tenant.
Entra ID Custom Control Limitations
MFA Requirement Excludes Custom Controls
Microsoft does not evaluate authentication with a custom control as part of a Conditional Access multifactor authentication claim requirement. Custom controls, like the Duo custom control, cannot satisfy a CA rule that requires "multifactor". Learn more about this Microsoft limitation for custom controls in the Entra ID documentation.
Duo MFA can satisfy CA multifactor requirements when you federate Entra ID/Microsoft 365 with Duo Single Sign-On or when you federate Entra ID with Microsoft AD FS, install Duo for AD FS, and configure AD FS to pass an Authentication Method References claim for MFA back to Entra ID.
External Guest Accounts
The Duo custom control doesn't support external guest user logins.
Azure Government Exclusion
Duo Federal plans include access to the "Microsoft Azure Active Directory" custom control application, which can be used with Microsoft's commercial tenants. Microsoft’s Government Cloud added support for custom controls for Entra ID conditional access, but the Duo custom control remains unavailable in Entra ID GCC.
Be sure to review Azure Government's additional variations to Entra ID Premium features.
Client Application Compatibility
Note that Entra ID Conditional Access protects cloud applications only when the user access originates from the following client applications:
- Web browsers.
- Mobile and Desktop clients that support Microsoft's modern authentication (such as Office 2016 and 2019 applications).
Conditional Access cannot add third-party MFA for Office clients that do not support modern authentication, such as Office 2010. Microsoft relies upon modern authentication workflows to invoke Conditional Access policies, which in turn apply Duo's MFA custom control. You can use Conditional Access to block authentication from legacy Office clients that cannot support modern authentication. Please refer to Block legacy authentication with Microsoft Entra Conditional Access to learn how to control access from these client applications.
Prerequisites
-
An active Entra ID P1 or P2 subscription including Conditional Access, with the P1/P2 licenses assigned to each user that will log in using Duo MFA. Microsoft 365 E3, E5, and F3 plans, Enterprise Mobility + Security E3 and E5 plans, and Microsoft Business Premium include Entra ID Premium.
-
A designated Entra ID admin service account to use for authorizing the Duo application access. This account needs the Entra ID Global Administrator role during Duo setup, but you can reduce the service account's role privileges later. This service account may or may not require Entra ID MFA for admins at login (learn more about the baseline MFA policy for Entra ID admins).
Create the Duo Entra ID Application
Before starting these steps, you should either not be logged in to the Microsoft Entra admin center at all, or be logged in as the designated service account with global administrator privileges for Duo you created as a prerequisite.
-
Sign up for a Duo account if you do not already have one.
-
Log in to the Duo Admin Panel and navigate to Applications → Application Catalog.
-
Locate the entry for Microsoft Azure Active Directory with the "2FA" label in the catalog. Click the + Add button to create the application. See Protecting Applications for more information about protecting applications with Duo and additional application options.
-
Before you can proceed, Duo needs read access to your Entra ID tenant. Click the Authorize button, which takes you to the Microsoft portal.
-
Sign in with the designated Entra ID service administrator account that has the global administrator role for this Entra ID. If required, complete Entra ID MFA for that service account admin user.
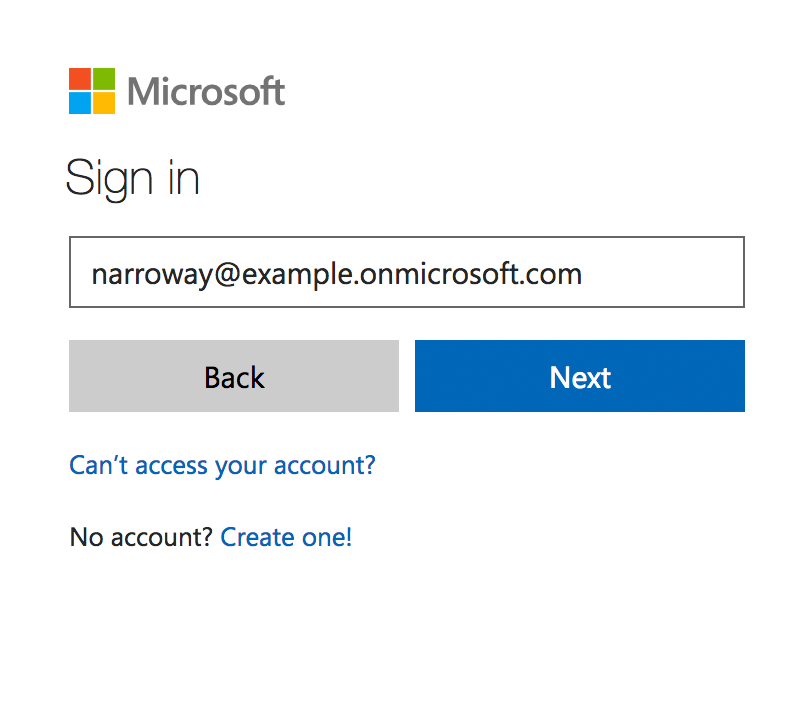
Duo does not see or store your Entra ID administrator credentials.
-
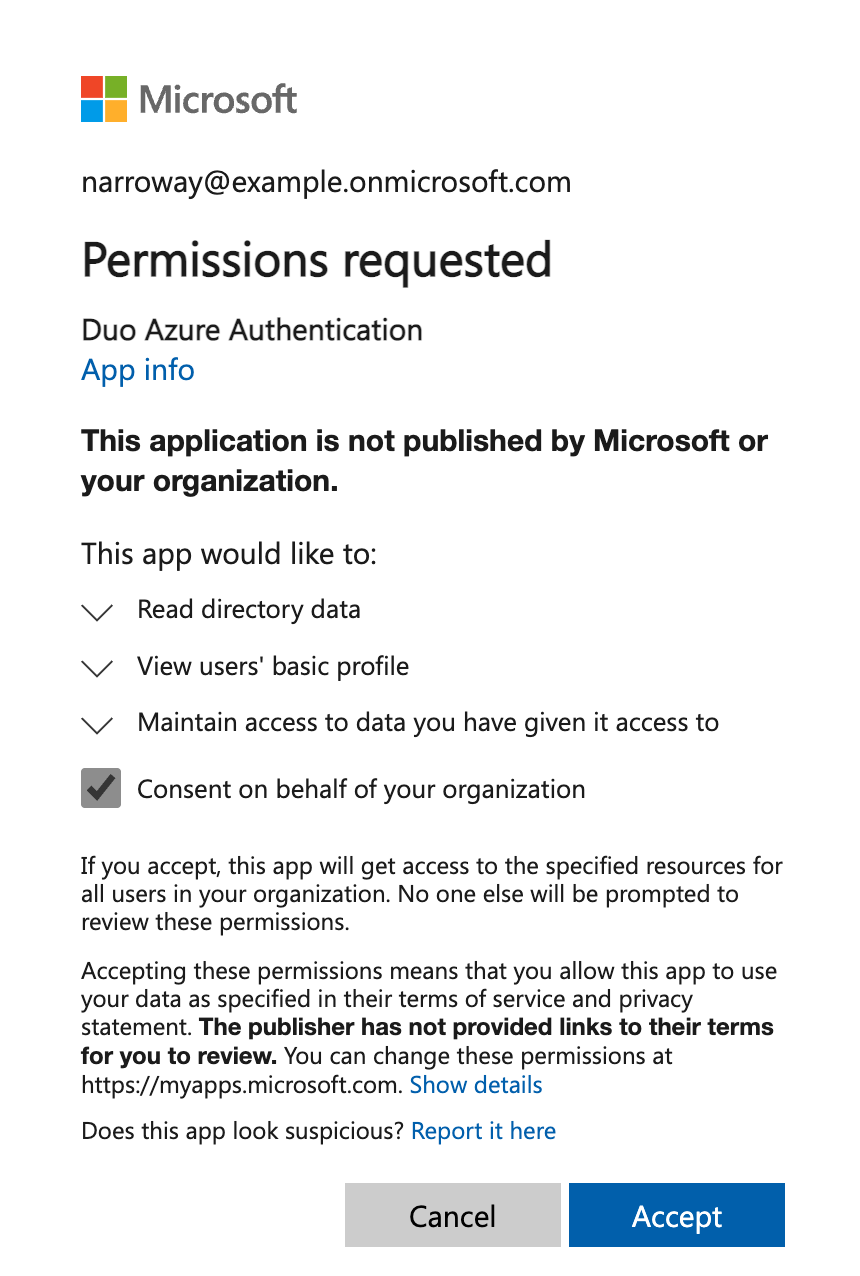
Once you've signed in to Entra ID, you must check the box next to Consent on behalf of your organization and then click Accept to grant Duo the read rights needed to access and read from your Entra ID tenant.
-
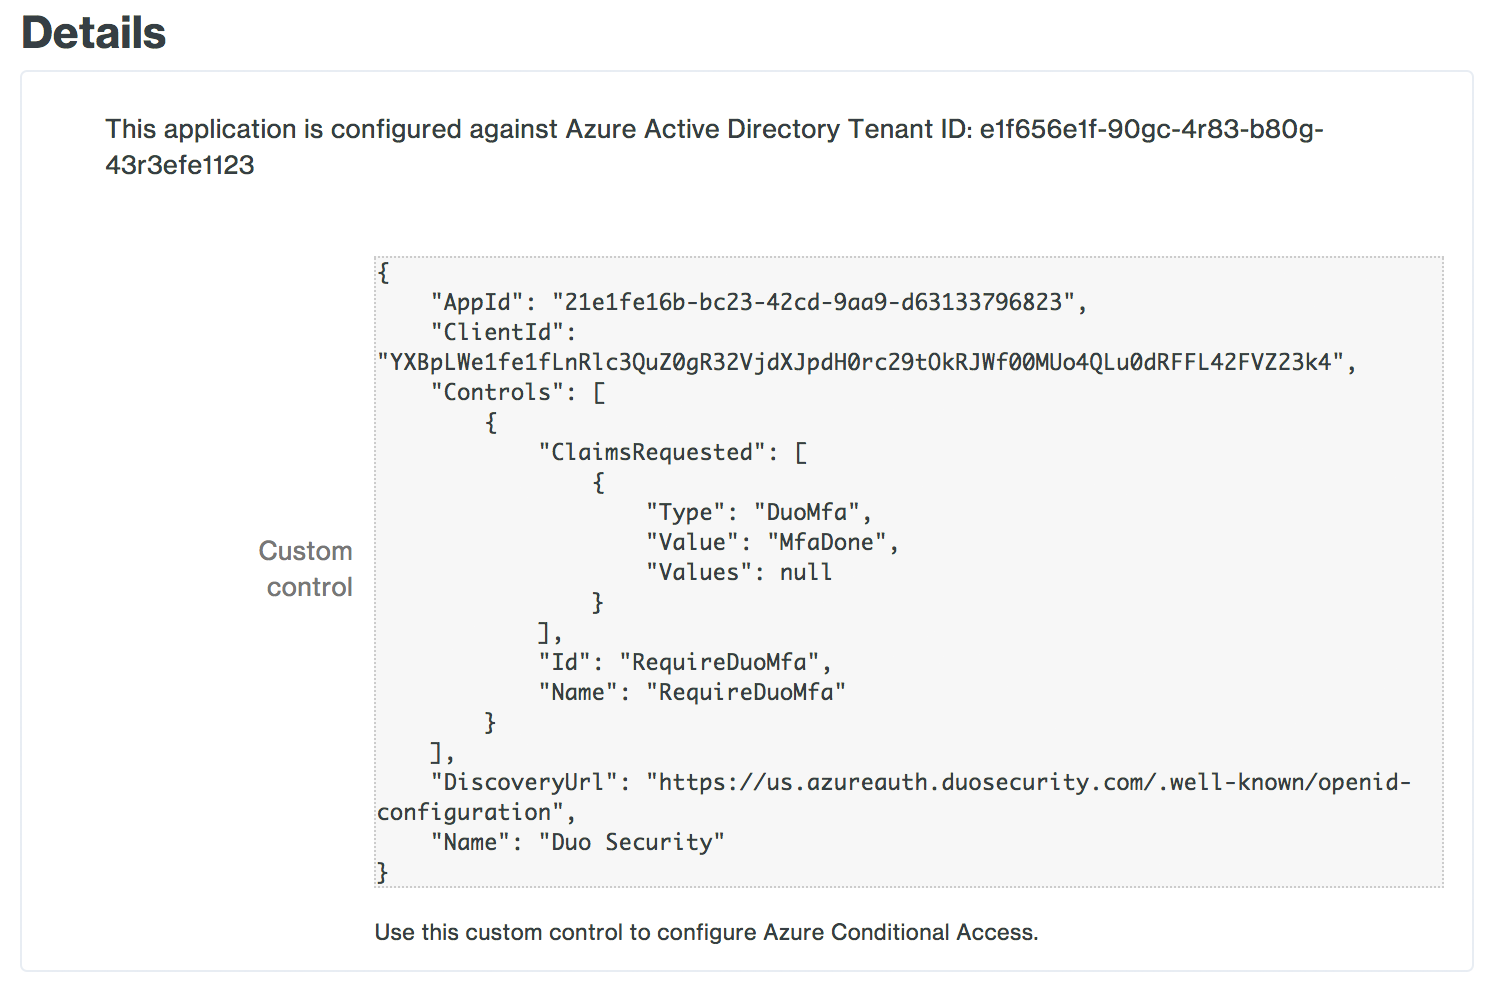
Accepting the Duo Entra ID Authentication application's permissions request redirects you back to the Microsoft Azure Active Directory application page in the Duo Admin Panel.
Note the Custom control JSON text in the "Details" section of the page. You'll need to provide this information to Entra ID to complete Duo authentication setup.
-
No active Duo users can log in to new applications until you grant access. Update the User access setting to grant access to this application to users in selected Duo groups, or to all users. Learn more about user access to applications. If you do not change this setting now, be sure to update it so that your test user has access before you test your setup.
This setting only applies to users who exist in Duo with "Active" status. This does not affect application access for existing users with "Bypass" status, existing users for whom the effective Authentication Policy for the application specifies "Bypass 2FA" or "Skip MFA", or users who do not exist in Duo when the effective New User Policy for the application allows access to users unknown to Duo without MFA. -
You can adjust additional settings for your new Azure Active Directory Duo application at this time — like changing the application's name from the default value, enabling self-service, or assigning a group policy — or come back and change the application's policies and settings after you finish Entra ID setup (note that the "Hostname Whitelisting" settings have no effect on this application). If you do update any settings, click the Save button when done.
-
Keep the Duo Admin Panel open so you can copy the custom control JSON text into the Entra ID admin center in the next steps.
Duo Universal Prompt
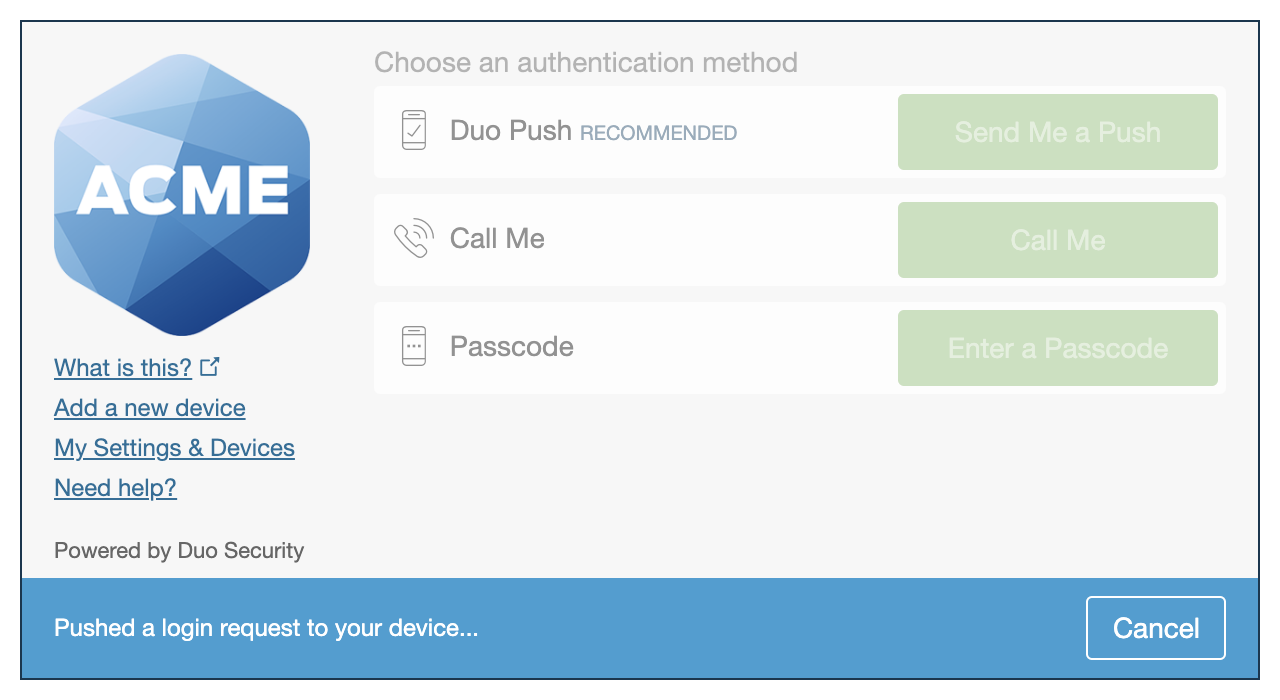
The Duo Universal Prompt provides a simplified and accessible Duo login experience for web-based applications, offering a redesigned visual interface with security and usability enhancements.
| Universal Prompt | Traditional Prompt |
 |
 |
We've already updated the Duo Microsoft Azure Active Directory application hosted in Duo's service to support the Universal Prompt, so there's no action required on your part to update the application itself. If you created your Microsoft Azure Active Directory application before March 2024, you can activate the Universal Prompt experience for users from the Duo Admin Panel. Microsoft Azure Active Directory applications created after March 2024 have the Universal Prompt activated by default.
If you created your Microsoft Azure Active Directory application before March 2024, it's a good idea to read the Universal Prompt Update Guide for more information, about the update process and the new login experience for users, before you activate the Universal Prompt for your application.
Activate Universal Prompt
Activation of the Universal Prompt is a per-application change. Activating it for one application does not change the login experience for your other Duo applications.
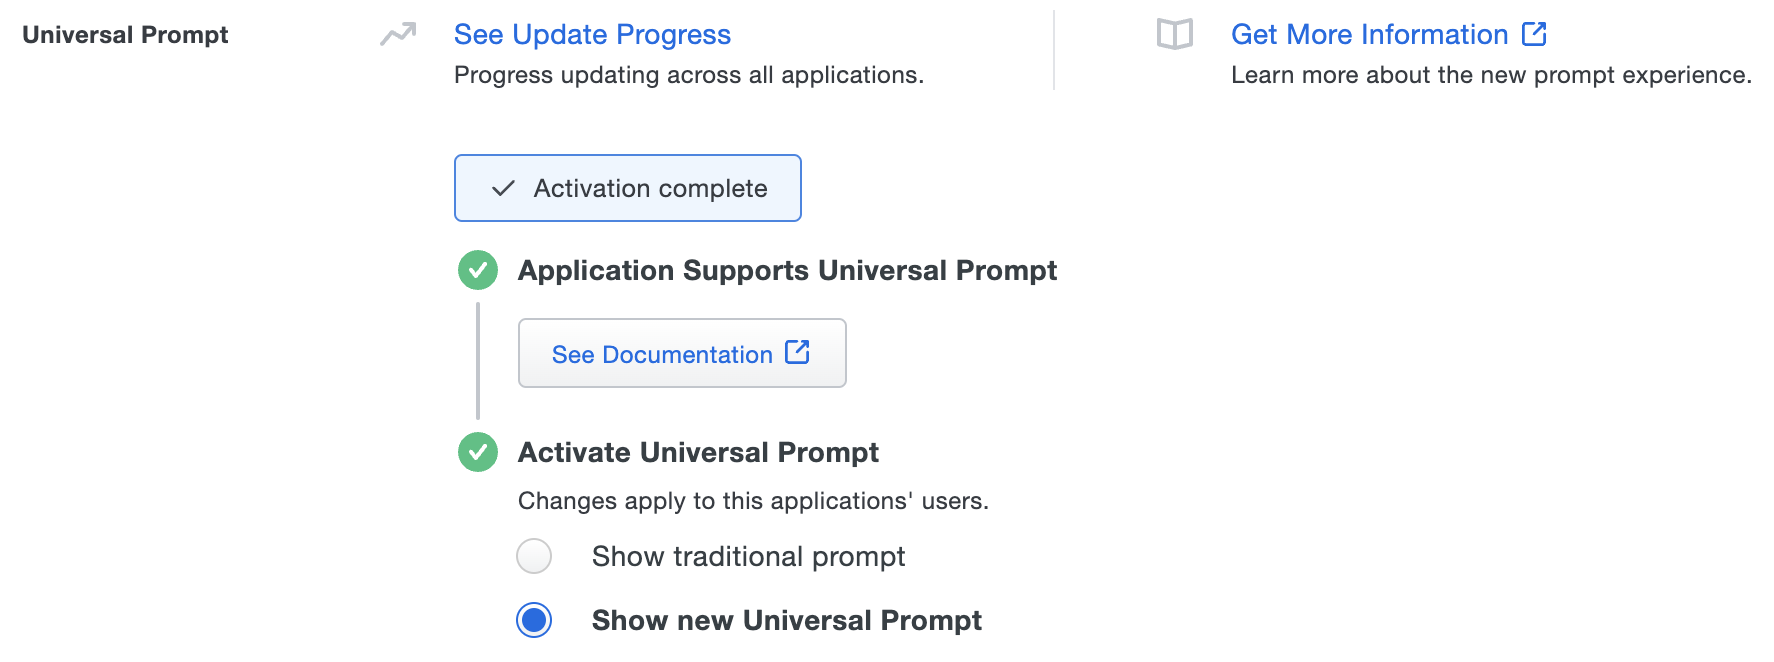
The "Universal Prompt" area of the application details page shows that this application is "Ready to activate", with these activation control options:
- Show traditional prompt: Your users experience Duo's traditional prompt via redirect when logging in to this application.
- Show new Universal Prompt: (Default) Your users experience the Universal Prompt via redirect when logging in to this application.
The application's Universal Prompt status shows "Activation complete" here and on the Universal Prompt Update Progress report.
Should you ever want to roll back to the traditional prompt, you can return to this setting and change it back to Show traditional prompt. However, this will still deliver the Duo prompt via redirect, not in an iframe. Keep in mind that support for the traditional Duo prompt ended for the majority of applications in March 2024.
Universal Update Progress
Click the See Update Progress link to view the Universal Prompt Update Progress report. This report shows the update availability and migration progress for all your Duo applications. You can also activate the new prompt experience for multiple supported applications from the report page instead of visiting the individual details pages for each application.
Configure Entra ID
Create the Duo MFA Custom Control
-
Log in to your Entra ID tenant in the Microsoft Entra admin center at https://entra.microsoft.com as a global administrator (if you aren't already logged in).
If you try to perform these configuration steps from the Azure portal (https://portal.azure.com) the navigation is slightly different.
-
In the Entra Admin Center, go to Conditional Access.
If you logged into the Azure portal instead of the Entra Admin Center, first click Microsoft Entra ID then go to Security → Conditional Access.
-
Click Custom controls (Preview) on the left, and then click New custom control.
-
Remove the example custom controls JSON text and paste in the "Custom control" JSON text you copied from the Duo Admin Panel's Microsoft Azure Active Directory application page earlier.
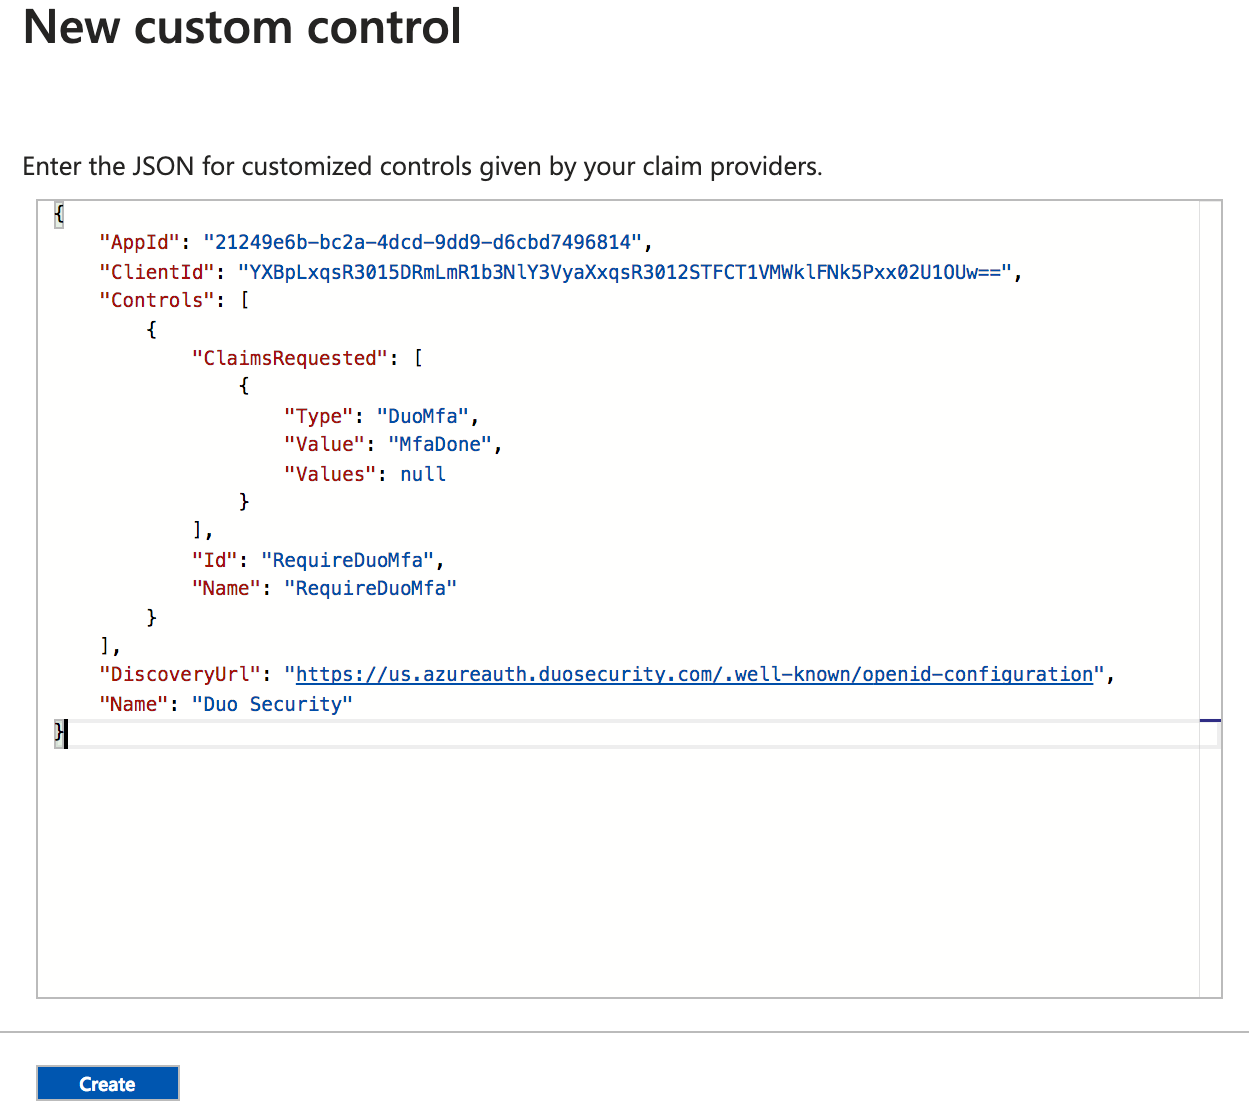
Click the Create button after entering the Duo JSON text. Entra ID creates the new custom control "RequireDuoMFA".
Create and Apply a Duo Conditional Access Policy
-
While still in the Microsoft Entra admin center "Conditional Access" configuration area, click Policies on the left and then click New Policy.
-
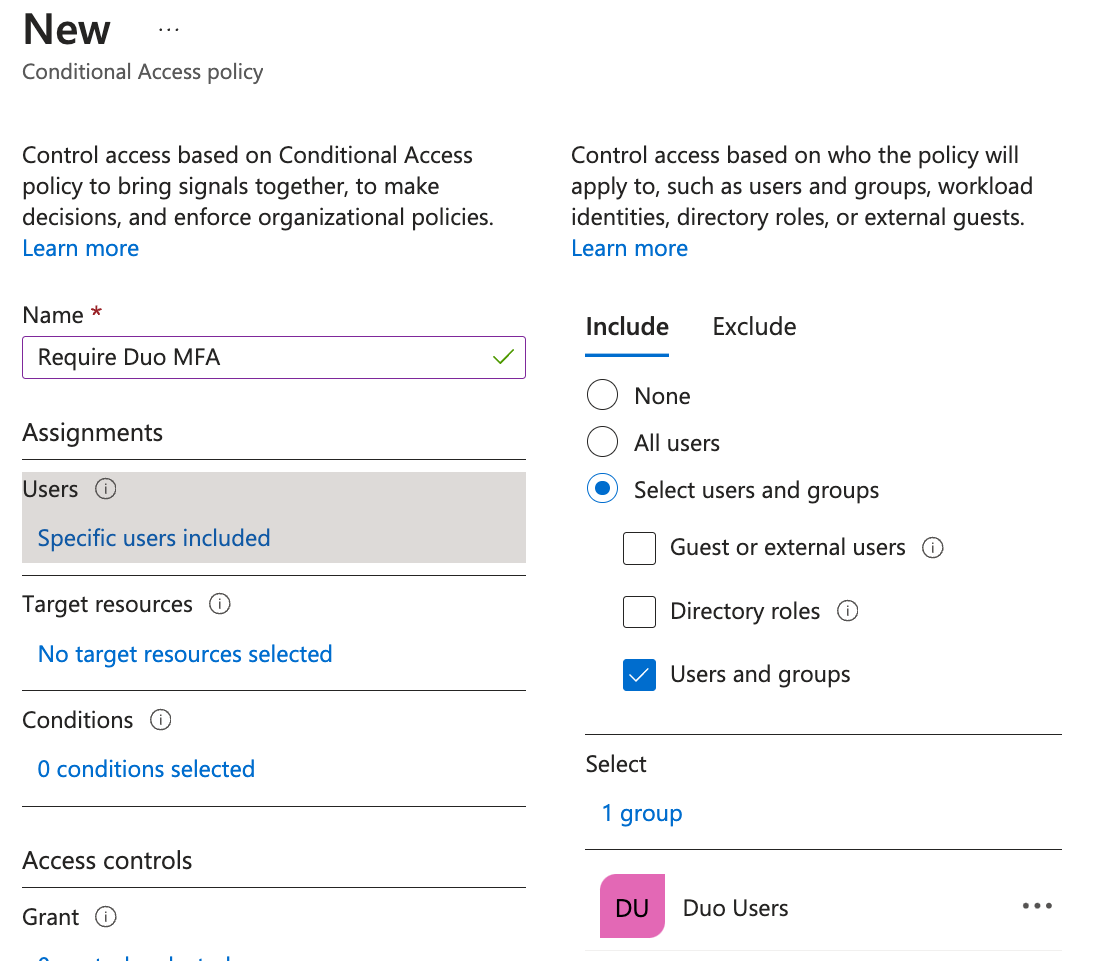
Enter a descriptive name for the new policy, like "Require Duo MFA".
-
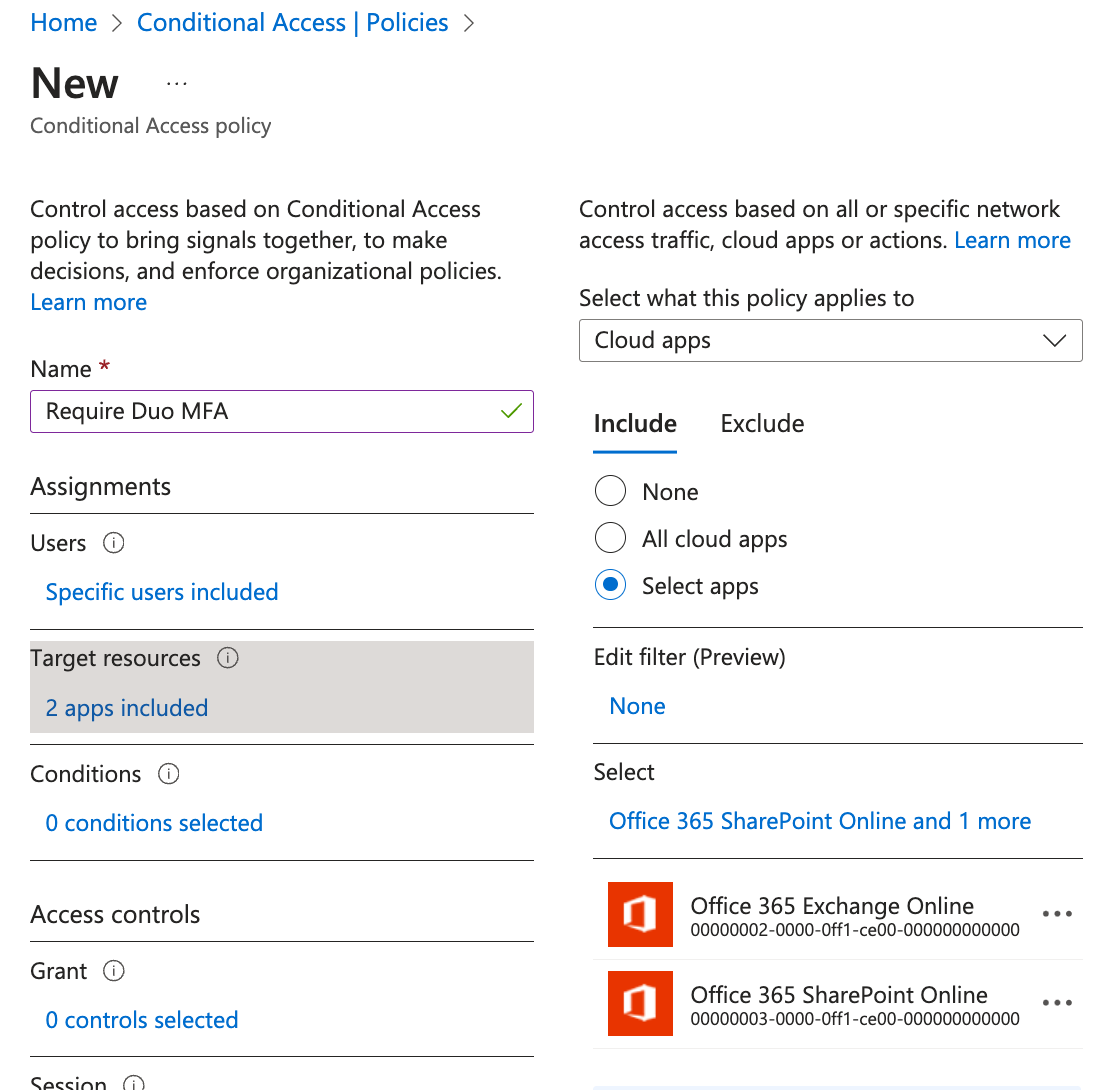
Make your desired policy assignments. You can assign this new policy to selected users or Entra ID security groups, to specific Entra ID cloud apps, or to any of the other Entra ID conditions like client platform or network.
-
As an example, click on Users and groups under "Assignments", click Select on the "Users and groups" blade, and locate the users or Entra ID security groups you want to authenticate with Duo. Click on a user or security group to select it, then click the Select button on the "Select" blade, followed by clicking the Done button on the "Users and groups" blade.
In this example the new Duo policy assignment includes the Entra ID group "Duo Users", so members of that group will require Duo two-factor when logging in to Entra ID.
-
Next, click on Target resources. On the "Include" tab, click Select apps and choose the Entra ID applications where you want Duo authentication before access.
In this example the Duo cloud apps assignment applies to "Office 365 Exchange Online" and "Office 365 Sharepoint Online". This means that the policy (and the Duo custom control in it) gets applied when the users assigned that policy access the Exchange and SharePoint applications only. Other Entra ID and Office applications not specified by the policy assignment, including the Office 365 portal itself, will not exercise the Conditional Access control at login and therefore will not require Duo MFA. If you want your users logging into the Office 365 portal using Duo MFA, then select the All cloud apps option.
Click Done to save the cloud apps assignment and close that blade.
Note: We don't recommend assigning the Duo policy to all users (including tenant administrators) or to all cloud apps at first to avoid the risk of inadvertently blocking administrator access to the Entra ID portal. Verify that your Duo policy and custom control work properly before assigning the policy to your tenant administrators or to all cloud apps. You should create a fail-safe Entra ID tenant administrator account that is excluded from Duo MFA policies to ensure uninterrupted admin access. Apply a secure password and a different access condition, like one based on a trusted network, to secure this admin account.
Additionally, the Duo custom control doesn't support external guest Entra ID logins. Do not apply a Conditional Access policy requiring Duo MFA to these accounts.
-
-
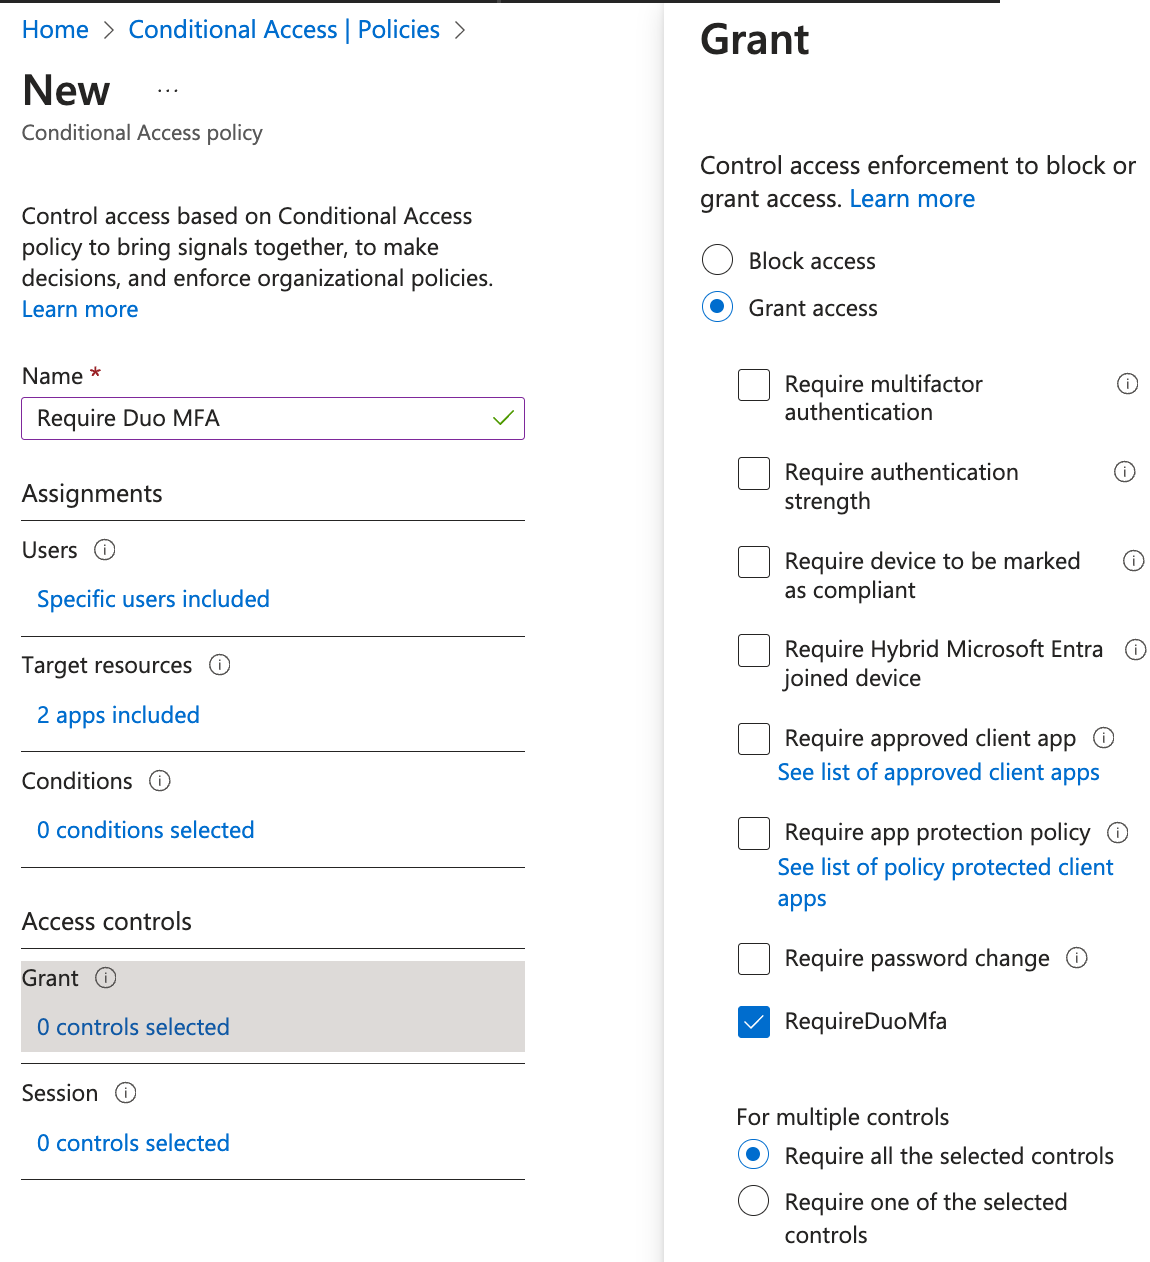
Click Grant under "Access controls". To allow users access with Duo authentication, click on Grant access and check the box next to the RequireDuoMFA custom control you created in the previous steps. While you may choose to combine or require satisfying multiple controls before granting user access, this example simply adds the Duo authentication requirement to the new policy. Click Select when done.
-
The final step to creating the new Duo policy is to enable it. Click the On toggle switch underneath "Enable policy", and then click Create. Entra ID creates and enables the new "Require Duo MFA" policy.
You may want to prevent Entra ID from offering your users the option to set up the Microsoft Authenticator app for sign-in if you will want them to use Duo instead.
-
In the Entra ID admin center go to Protection → Authentication methods → Registration campaign.
-
Click Edit and change the State to Disabled. Click Save. You could also leave the registration campaign on and exclude any groups of users to which you applied the Duo MFA conditional access policy instead.
-
Go to Protection → Authentication methods → Settings → System preferred multifactor authentication.
-
Click Edit and change the State to Disabled. Click Save.
-
Go to Protection → Policies. Click Microsoft Authenticator.
-
On the “Enable and Target” tab, click the Enable toggle to turn Microsoft Authenticator Off. Click Save.
Test Your Setup
Log in to Entra ID (or, per the example cloud app assignment, Exchange Online) as a user assigned the Duo MFA policy.
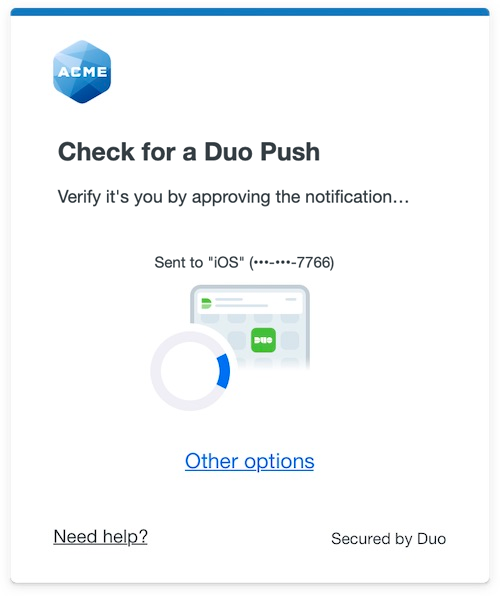
If you chose to apply the Duo Conditional Access policy to "All cloud apps", then when you log into the Office portal and submit your primary Entra ID credentials, you'll be redirected to the Duo Prompt or Duo user enrollment. Completing Duo authentication returns you to Entra ID to complete your login.
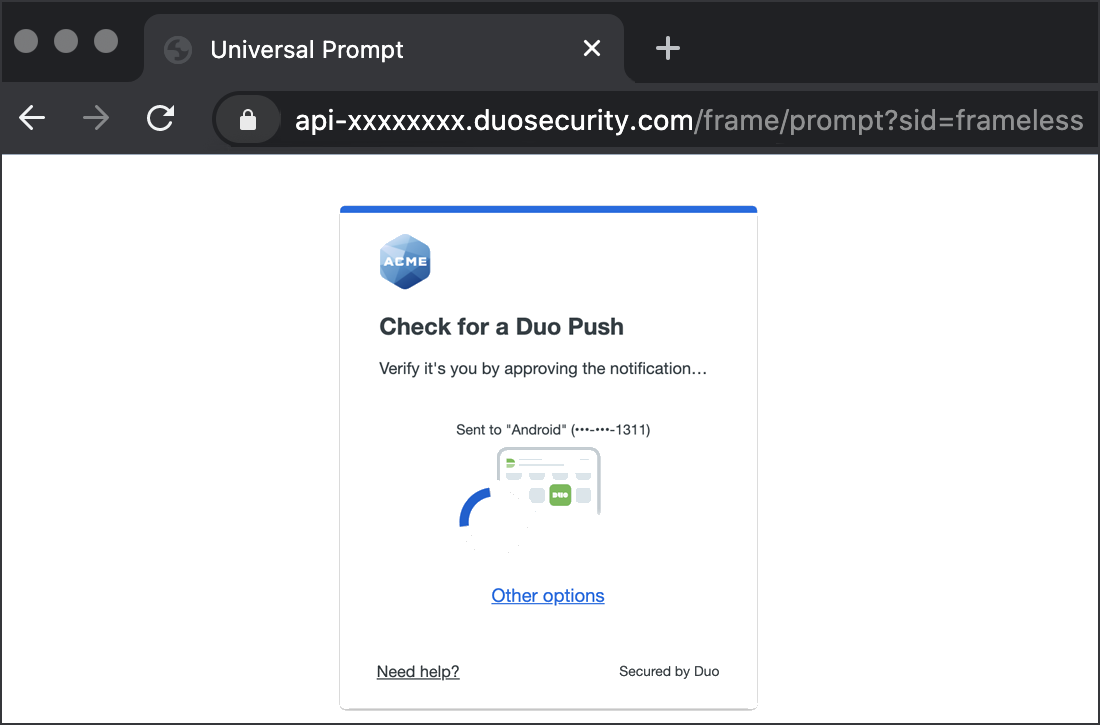
*Universal Prompt experience shown.
If you applied the Duo Conditional Access policy to specific applications, then the initial Office portal login won't prompt for Duo MFA, but accessing the protected application from within the Office portal after logging in or accessing the protected application directly (bypassing the Office portal) will prompt for Duo MFA.
Add Ownership and Risk Information
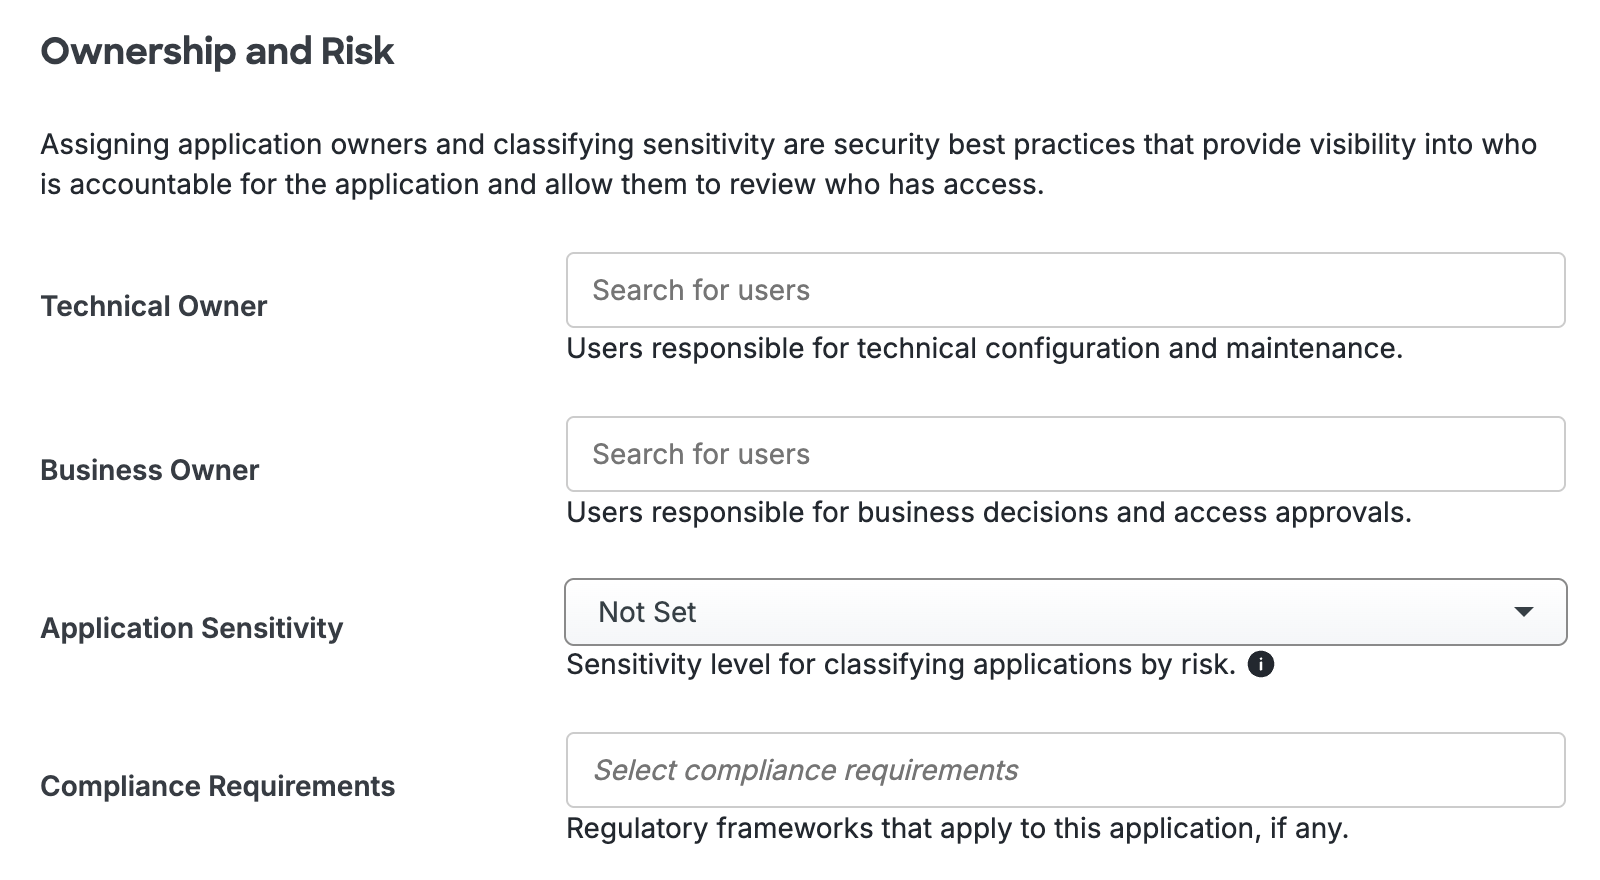
Go to the "Ownership and Risk" section of the application's page in the Duo Admin Panel to assign application owners and classify the application's risk level. Cisco Identity Intelligence automatically imports this information to populate relevant fields for Duo Advantage and Premier customers. Duo Essentials and Duo Federal plans exclude Cisco Identity Intelligence features.
You may set any of the following:
- Technical Owner: Search for and assign Duo users responsible for technical configuration and maintenance of this application.
- Business Owner: Search for and assign Duo users responsible for business decisions and access approvals related to this application.
- Application Sensitivity: Select this application's risk level from the drop-down list. Default: Not Set.
- Compliance Requirements: Select any applicable regulatory frameworks for this application (SOX (Sarbanes-Oxley), HIPAA, PCI-DSS, etc.) from the list.
Scroll to the bottom of the page and click Save to apply your changes.
Grant Access to Users
If you did not already grant user access to the Duo users you want to use this application be sure to do that before inviting or requiring them to log in with Duo.
Remembered Devices and Entra ID CA
Each Entra ID CA custom control is a single application in Duo, even though you may opt to apply that single control to multiple Entra ID or Office applications. If you enable Remembered Devices on the Microsoft Azure Active Directory Duo application, then if a user signs into one application that has that control applied and chooses to remember that device when performing Duo authentication, then other Entra ID and Office applications with that same Duo control applied won't require the user to perform Duo MFA again.
If you want the Entra ID and Office applications you protect with Duo to have distinct Remembered Devices settings, or any other combination of Duo settings, you can create multiple Duo custom controls with different settings.
Configuring Multiple Duo CA Policies
You may wish to create multiple Duo Conditional Access policies with unique Duo policy settings to apply to different Entra ID applications or users. The process of creating additional Duo custom controls in Entra ID is slightly different than creating the first one. You'll need to edit the custom control JSON text provided by Duo with some unique values before saving the new control.
-
Log in to your Duo Admin Panel and create another Microsoft Azure Active Directory as you did earlier, and copy the custom control JSON text.
-
In the Entra ID admin center, create a new Conditional Access custom control as before, pasting in the JSON from the Duo Admin Panel.
-
Locate the following attributes in the "Controls" section of the Duo JSON text and give them unique values:
Id:Append text to RequireDuoMfa, for exampleRequireDuoMfa-ALT.Name:Append text to RequireDuoMfa, for exampleRequireDuoMfa-ALT. -
Locate the second
Name:attribute after the "DiscoveryURL" attribute. Append text toDuo Security, for exampleDuo Security-2.Full example of Duo JSON updated with the unique values highlighted:
{ "AppId": "XXXXX", "ClientId": "XXXXX", "Controls": [ { "ClaimsRequested": [ { "Type": "DuoMfa", "Value": "MfaDone", "Values": null } ], "Id": "RequireDuoMfa-ALT", "Name": "RequireDuoMfa-ALT" } ], "DiscoveryUrl": "https://us.azureauth.duosecurity.com/.well-known/openid-configuration"", "Name": "Duo Security-2" } -
Click Create to create the additional Duo custom control.
-
Apply the additional Duo control to users or applications via Entra ID Conditional Access.
You can repeat this process as many times as you wish to create multiple Duo controls for use with Conditional Access policies.
Troubleshooting
Need some help? Take a look at our Microsoft Azure Active Directory or Entra ID Knowledge Base articles or Community discussions. For further assistance, contact Support.
Network Diagram
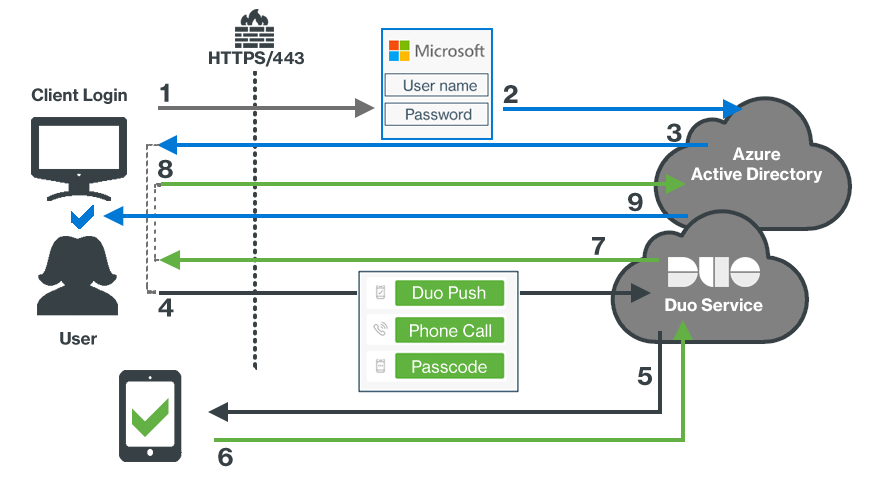
- User accesses Microsoft Online or other services using Entra ID authentication.
- User submits primary Entra ID credentials.
- An Entra ID Conditional Access policy redirects the client browser to Duo.
- User received the Duo Prompt and submits factor selection.
- User receives Duo Push authentication request on device.
- Authentication approval returned to Duo service.
- Secondary authentication approval returned to client.
- Client sends Duo approval back to Entra ID.
- Entra ID grants application or service access once the Duo Conditional Access policy is satisfied.