Duo Network Gateway
Last updated:
Support for the traditional Duo Prompt experience and Duo Prompt delivery via iframe ended on March 30, 2024.
See the update instructions for Duo Network Gateway to update an existing deployment of the iframe-based Duo Network Gateway software to the latest release. Authenticating once with the updated Duo software is a required step before you can enable the Duo Universal Prompt for your existing Duo Network Gateway application.
Please visit the Duo Universal Prompt Update Guide for more information about the traditional Duo Prompt end of support.
Overview
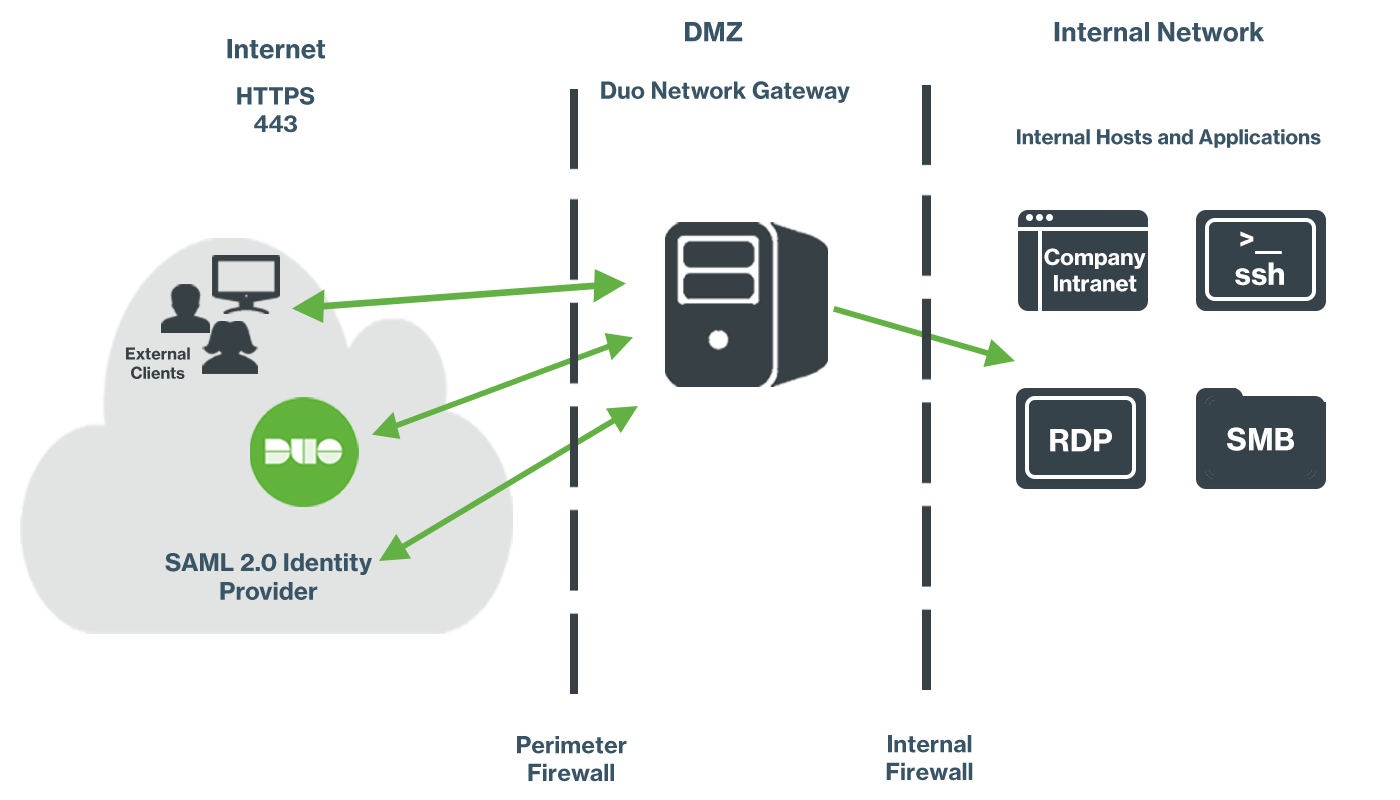
With Duo Network Gateway your users can securely access your internal web applications from any device, using any browser, from anywhere in the world, without having to install or configure remote access software on their device. After installing the DuoConnect connectivity tool, users can also remotely access any application or server that communicates via a TCP port/protocol, such as RDP and SSH, providing server access through Duo Network Gateway without a full VPN deployment.
Users first authenticate to Duo Network Gateway and approve a two-factor authentication request before they may access your different protected services. Session awareness minimizes repeated MFA prompts as users access additional services and hosts via your gateway.
Duo Network Gateway gives you granular access control per web application, set of internal servers, and user groups. You can specify different policies to make sure only trusted users and endpoints are able to access your internal services. For example, you can require that SSH users complete two-factor authentication at every login, but once every seven days when accessing a web application. Duo checks the user, device, and network against an application's policy before allowing access to the application.
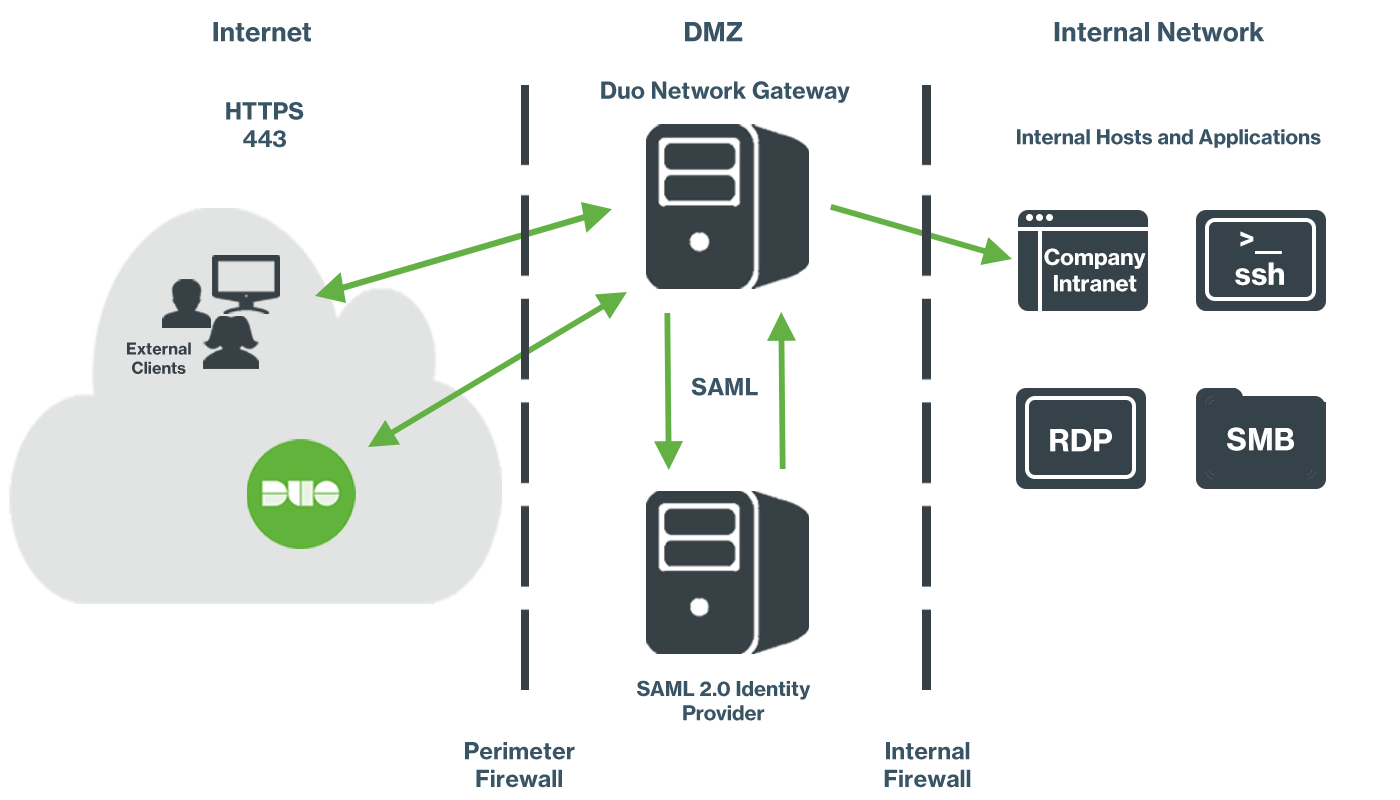
Your users may authenticate against SAML 2.0 cloud identity providers (IdPs) (like Duo Single Sign-On) or on-premises.
Cloud-hosted IdP
On-premises IdP
Duo Network Gateway is part of the Duo Premier plan.
Requirements
- A Duo Premier plan subscription or an active Duo Premier plan trial.
- Access to the Duo Admin Panel as an administrator with the Owner, Administrator, or Application Manager administrative roles.
Prerequisites
Before you deploy the Duo Network Gateway, make sure to complete these steps.
Determine DNG Features to Deploy
Decide whether you want use Duo Network Gateway to protect access to web applications, SSH hosts, RDP/SMB hosts, other client applications, or a combination of these services.
We provide two installation options: one that installs DNG for web and SSH access, and one that installs DNG for web, SSH access, and RDP/SMB/custom relay application access. Most of the prerequisites are the same, with some extra steps needed for RDP/SMB/custom relay access deployments.
Be sure to download the Docker YML file that matches your desired deployment when you get to the download step in these instructions.
The Windows 11 24H2 feature update prevents DuoConnect from connecting to RDP, SMP, or custom DNG application relay apps. If your organization's Windows 11 clients have updated to 24H2, please also update those clients to use DuoConnect 2.0.6 or later.
Deploy a SAML IdP
Duo Network Gateway requires a SAML 2.0 Identity Provider (IdP) to use as its primary authentication source. You can use Duo Single Sign-On as your SAML IdP, or a third-party SAML provider such as AD FS, OneLogin, or Okta.
Deploy a DMZ Server
- Deploy a physical or virtual modern 64-bit Linux server in your perimeter network (or DMZ).
The size of your Duo Network Gateway server for web applications should relate to the requests per second or RPS of traffic that you expect to use with the Duo Network Gateway.
Learn more about how the Duo Network Gateway was performance tested by reading the How much traffic can the Duo Network Gateway handle? knowledge base article.
| Requests per second | Processor Cores | Memory | Disk Storage |
|---|---|---|---|
| 1500 RPS | 1 core | 2 GB | 20 GB |
| 3800 RPS | 2 cores | 4 GB | 20 GB |
| 3800 RPS | 4 cores | 16 GB | 20 GB |
| 5000 RPS | 8 cores | 32 GB | 20 GB |
| 8000 RPS | 16 cores | 32 GB | 20 GB |
Sizing recommendations based on SSH connections and megabyte per second throughput for the Duo Network Gateway can be found below:
| Maximum SSH Connections | Throughput | Processor Cores | Memory | Disk Storage |
|---|---|---|---|---|
| 8000 | 35 MB/s | 1 core | 2 GB | 20 GB |
| 8000 | 55 MB/s | 2 cores | 4 GB | 20 GB |
| Additional hardware does not increase connections or throughput |
We recommend that you store your Docker volumes on encrypted drives for additional security.
- Open ports 80 and 443 in the perimeter firewall for HTTP and HTTPS external TCP traffic to and from the server. If you plan to protect access to Remote Desktop servers or protect access to SMB/file servers, then open port 53 for UDP and TCP as well.
- Port 8443 will be used for administrative purposes. Restrict traffic to this port to only authorized networks.
- Allow the Duo Network Gateway server to communicate with your internal web applications via HTTP or HTTPS using the same ports as your internal application.
- Allow the Duo Network Gateway server to communicate with your SSH servers over the SSH port on which they listen.
- Create an Internet resolvable fully qualified DNS entry for external access (e.g. yourserver.example.com).
- Purchase an SSL certificate for your server from a commercial certificate authority (CA), using the fully qualified DNS name of your Duo Network Gateway server as the common name (e.g. yourserver.example.com). You may also use a wildcard SSL certificate. If you don't want to purchase a certificate you'll have the opportunity to generate a free, automatically renewing certificate from Let's Encrypt later during Network Gateway setup.
Install Docker
Docker is a tool that allows Duo Network Gateway to run inside its own self-contained environment, called a “container”, on top of your host operating system.
Click one of the tabs below to view Docker installation instructions for your Linux platform.
CentOS 7, CentOS Stream 8 or 9
These directions will walk you through installing the free Docker Community Edition for CentOS.
- Log into your Duo Network Gateway server locally or through SSH with a user that has sudo permissions. Any time you use the
sudocommand you may be prompted to enter your password. - Docker requires a 64-bit operating system. Please verify your installation of CentOS is 64-bit by typing:
The output should contain x86_64 if the operating system is 64-bit. The output would be similar to:uname -r3.10.0-327.el7.x86_64 - Install yum-utils on your server. Type:
sudo yum install -y yum-utils - Add the Docker repository to your yum repository by typing:
The output should be similar to:sudo yum-config-manager --add-repo https://download.docker.com/linux/centos/docker-ce.repoAdding repo from https://download.docker.com/linux/centos/docker-ce.repo - Make sure your existing packages are up to date. This may take a few minutes. Type:
When packages are finished updating you should see output similar to:sudo yum makecacheMetadata Cache Created! - If wget is not installed on your system, install it by typing:
When wget is finished installing you should see output similar to:sudo yum install -y wgetRunning transaction Installing : wget-1.14-13.el7.x86_64 1/1 Verifying : wget-1.14-13.el7.x86_64 1/1 Installed: wget.x86_64 0:1.14-13.el7 Complete! - Install Docker by typing:
When Docker is finished installing you should see output similar to:sudo yum install -y docker-ce docker-ce-cli containerd.io docker-buildx-plugin docker-compose-pluginComplete! - Enable the Docker service by typing:
You should see output similar to:sudo systemctl enable docker.serviceCreated symlink from /etc/systemd/system/multi-user.target.wants/docker.service to /usr/lib/systemd/system/docker.service. - Start the Docker daemon by typing:
sudo systemctl start docker - Check that Docker has installed properly by typing:
You should see output similar to:sudo docker psCONTAINER ID IMAGE COMMAND CREATED STATUS PORTS NAMES - Add your user to the Docker group so Docker commands don't require sudo. Type:
sudo usermod -aG docker $(whoami) - Log out of your Duo Network Gateway box and back in for the group changes to take effect.
- Check that Docker is functioning without using sudo by typing:
You should see output similar to:docker psCONTAINER ID IMAGE COMMAND CREATED STATUS PORTS NAMES
Fedora 41 and Later
These directions will walk you through installing the free Docker Community Edition for Fedora.
- Log into your Duo Network Gateway server locally or through SSH with a user that has sudo permissions. Any time you use the
sudocommand you may be prompted to enter your password. - Docker requires a 64-bit operating system. Please verify your installation of Fedora is 64-bit by typing:
The output should beuname -mx86_64. - Install dnf-plugins-core on your server. Type:
sudo dnf -y install dnf-plugins-core - Add the Docker repository to your dnf repository by typing:
The output should be similar to:sudo dnf config-manager addrepo --from-repofile=https://download.docker.com/linux/fedora/docker-ce.repoAdding repo from: https://download.docker.com/linux/fedora/docker-ce.repo - Update your package database by typing:
You should see output similar to:sudo dnf makecacheMetadata Cache Created! - Install Docker by typing:
When Docker is finished installing you should see output similar to:sudo dnf install -y docker-ce docker-ce-cli containerd.io docker-buildx-plugin docker-compose-pluginComplete! - Enable and start the Docker service by typing:
You should see output similar to:sudo systemctl enable --now docker.serviceCreated symlink from /etc/systemd/system/multi-user.target.wants/docker.service to /usr/lib/systemd/system/docker.service. - Check that Docker has installed properly by typing:
You should see output similar to:sudo docker psCONTAINER ID IMAGE COMMAND CREATED STATUS PORTS NAMES - Add your user to the docker group so Docker commands don't require sudo. Type:
sudo usermod -aG docker $(whoami) - Log out of your Duo Network Gateway box and back in for the group changes to take effect or run this command to add the docker group to the user's groupset:
newgrp docker - Check that Docker is functioning without using sudo by typing:
You should see output similar to:docker psCONTAINER ID IMAGE COMMAND CREATED STATUS PORTS NAMES
Fedora 35-40
These directions will walk you through installing the free Docker Community Edition for Fedora.
- Log into your Duo Network Gateway server locally or through SSH with a user that has sudo permissions. Any time you use the
sudocommand you may be prompted to enter your password. - Docker requires a 64-bit operating system. Please verify your installation of Fedora is 64-bit by typing:
The output should beuname -mx86_64. - Install dnf-plugins-core on your server. Type:
sudo dnf -y install dnf-plugins-core - Add the Docker repository to your dnf repository by typing:
The output should be similar to:sudo dnf config-manager --add-repo https://download.docker.com/linux/fedora/docker-ce.repoAdding repo from: https://download.docker.com/linux/fedora/docker-ce.repo - Update your package database by typing:
You should see output similar to:sudo dnf makecacheMetadata Cache Created! - Install Docker by typing:
When Docker is finished installing you should see output similar to:sudo dnf install -y docker-ce docker-ce-cli containerd.io docker-buildx-plugin docker-compose-pluginComplete! - Enable and start the Docker service by typing:
You should see output similar to:sudo systemctl enable --now docker.serviceCreated symlink from /etc/systemd/system/multi-user.target.wants/docker.service to /usr/lib/systemd/system/docker.service. - Check that Docker has installed properly by typing:
You should see output similar to:sudo docker psCONTAINER ID IMAGE COMMAND CREATED STATUS PORTS NAMES - Add your user to the docker group so Docker commands don't require sudo. Type:
sudo usermod -aG docker $(whoami) - Log out of your Duo Network Gateway box and back in for the group changes to take effect or run this command to add the docker group to the user's groupset:
newgrp docker - Check that Docker is functioning without using sudo by typing:
You should see output similar to:docker psCONTAINER ID IMAGE COMMAND CREATED STATUS PORTS NAMES
Older Fedora Releases
These directions will walk you through installing the free Docker Community Edition for Fedora.
- Log into your Duo Network Gateway server locally or through SSH with a user that has sudo permissions. Any time you use the
sudocommand you may be prompted to enter your password. - Docker requires a 64-bit operating system. Please verify your installation of Fedora is 64-bit by typing:
The output should contain x86_64 if the operating system is 64-bit. The output would be similar to:uname -r4.8.16-300.fc25.x86_64 - Install dnf-plugins-core on your server. Type:
sudo dnf -y install dnf-plugins-core - Add the Docker repository to your dnf repository by typing:
The output should be similar to:sudo dnf config-manager --add-repo https://download.docker.com/linux/fedora/docker-ce.repoAdding repo from: https://download.docker.com/linux/fedora/docker-ce.repo - Make sure your existing packages are up to date. This may take a few minutes. Type:
When packages are finished updating you should see output similar to:sudo dnf makecache fastMetadata Cache Created! - Install wget by typing:
When wget is finished installing you should see output similar to:sudo dnf install -y wgetRunning transaction Installing : wget-1.14-13.el7.x86_64 1/1 Verifying : wget-1.14-13.el7.x86_64 1/1 Installed: wget.x86_64 0:1.14-13.el7 Complete! - Install Docker by typing:
When Docker is finished installing you should see output similar to:sudo dnf install -y docker-ce docker-ce-cli containerd.io docker-buildx-plugin docker-compose-pluginComplete! - Enable the Docker service by typing:
You should see output similar to:sudo systemctl enable docker.serviceCreated symlink from /etc/systemd/system/multi-user.target.wants/docker.service to /usr/lib/systemd/system/docker.service. - Start the Docker daemon by typing:
sudo systemctl start docker - Check that Docker has installed properly by typing:
You should see output similar to:sudo docker psCONTAINER ID IMAGE COMMAND CREATED STATUS PORTS NAMES - Add your user to the Docker group so Docker commands don't require sudo. Type:
sudo usermod -aG docker $(whoami) - Log out of your Duo Network Gateway box and back in for the group changes to take effect.
- Check that Docker is functioning without using sudo by typing:
You should see output similar to:docker psCONTAINER ID IMAGE COMMAND CREATED STATUS PORTS NAMES
Ubuntu 18.04 and later
These directions will walk you through installing the free Docker Community Edition for Ubuntu.
- Log into your Duo Network Gateway server locally or through SSH with a user that has sudo permissions. Any time you use the
sudocommand you may be prompted to enter your password. - Update the apt package index by typing:
You should see output similar to:sudo apt-get updateHit:1 http://us-west-1.ec2.archive.ubuntu.com/ubuntu focal InRelease Get:2 http://us-west-1.ec2.archive.ubuntu.com/ubuntu focal-updates InRelease [114 kB] Get:40 http://security.ubuntu.com/ubuntu focal-security/multiverse Translation-en [5488 B] Get:41 http://security.ubuntu.com/ubuntu focal-security/multiverse amd64 c-n-f Metadata [528 B] Fetched 26.0 MB in 5s (5050 kB/s) Reading package lists... Done - Install packages to allow apt to use a repository over HTTPS by typing:
You should see output similar to:sudo apt-get install -y ca-certificates curl gnupg lsb-releaselsb-release set to manually installed. ca-certificates set to manually installed. Processing triggers for libc-bin (2.31-0ubuntu9.9) ... - Add Docker's official GPG key by typing:
sudo mkdir -m 0755 -p /etc/apt/keyrings curl -fsSL https://download.docker.com/linux/ubuntu/gpg | sudo gpg --dearmor -o /etc/apt/keyrings/docker.gpg - Use the following command to set up the repository:
echo \ "deb [arch=$(dpkg --print-architecture) signed-by=/etc/apt/keyrings/docker.gpg] https://download.docker.com/linux/ubuntu \ $(lsb_release -cs) stable" | sudo tee /etc/apt/sources.list.d/docker.list > /dev/null - Update the apt package index by typing:
You should see output similar to:sudo apt-get updateFetched 442 kB in 1s (584 kB/s) Reading package lists... Done -
Install Docker Engine, containerd, and Docker Compose by typing:
You should see output similar to:sudo apt-get install -y docker-ce docker-ce-cli containerd.io docker-buildx-plugin docker-compose-pluginThe following NEW packages will be installed: containerd.io docker-buildx-plugin docker-ce docker-ce-cli docker-ce-rootless-extras docker-compose-plugin docker-scan-plugin pigz slirp4netns 0 upgraded, 9 newly installed, 0 to remove and 31 not upgraded. Processing triggers for systemd (245.4-4ubuntu3.19) ... - Add your user to the Docker group so Docker commands don't require sudo. Type:
sudo usermod -aG docker $(whoami) - Log out of your Duo Network Gateway box and back in for the group changes to take effect.
- Check that Docker is functioning without using sudo by typing:
You should see output similar to:docker psCONTAINER ID IMAGE COMMAND CREATED STATUS PORTS NAMES
Debian 11 and Later
These directions will walk you through installing the free Docker Community Edition for Debian.
- Log into your Duo Network Gateway server locally or through SSH with a user that has sudo permissions. sudo is not installed by default on Debian and may require installation. Any time you use the
sudocommand you may be prompted to enter your password. - Docker requires a 64-bit operating system. Please verify your installation of Debian is 64-bit by typing:
The output should beuname -mx86_64. - Install apt requirements for HTTPS on the server. Type:
sudo apt-get update sudo apt-get install \ ca-certificates \ curl \ gnupg \ lsb-release - Download Docker’s official GPG key and add it to your keyring by typing:
curl -fsSL https://download.docker.com/linux/debian/gpg | sudo gpg --dearmor -o /usr/share/keyrings/docker-archive-keyring.gpg - Add the Docker repository to your APT sources by typing:
echo \ "deb [arch=$(dpkg --print-architecture) signed-by=/usr/share/keyrings/docker-archive-keyring.gpg] https://download.docker.com/linux/debian \ $(lsb_release -cs) stable" | sudo tee /etc/apt/sources.list.d/docker.list > /dev/null - Update your package database by typing:
You should see output similar to:sudo apt-get updateReading package lists... Done - Install Docker by typing:
When the install is finished, you should see output similar to:sudo apt-get install -y docker-ce docker-ce-cli containerd.io docker-buildx-plugin docker-compose-pluginProcessing triggers for systemd (215-17+deb8u6) ... Processing triggers for initramfs-tools (0.120+deb8u2) ... update-initramfs: Generating /boot/initrd.img-3.16.0-4-amd64 Processing triggers for dbus (1.8.22-0+deb8u1) ... - Enable and start the Docker service by typing:
You should see output similar to:sudo systemctl enable --now docker.serviceCreated symlink from /etc/systemd/system/multi-user.target.wants/docker.service to /usr/lib/systemd/system/docker.service. - Check that Docker has installed properly by typing:
You should see output similar to:sudo docker psCONTAINER ID IMAGE COMMAND CREATED STATUS PORTS NAMES - Add your user to the Docker group so Docker commands don't require sudo. Type:
sudo usermod -aG docker $(whoami) - Log out of your Duo Network Gateway box and back in for the group changes to take effect or run this command to add the docker group to the user's groupset:
newgrp docker - Check that Docker is functioning without using sudo by typing:
You should see output similar to:docker psCONTAINER ID IMAGE COMMAND CREATED STATUS PORTS NAMES
Older Debian Releases
These directions will walk you through installing the free Docker Community Edition for Debian.
- Log into your Duo Network Gateway server locally or through SSH with a user that has sudo permissions. Any time you use the
sudocommand you may be prompted to enter your password. - Update your package database by typing:
You should see output similar to:sudo apt-get updateReading package lists... Done - Ensure that APT works with HTTPS and that CA certificates are installed. Type:
You should see output similar to:sudo apt-get install -y apt-transport-https ca-certificates gnupg2 software-properties-commonProcessing triggers for libc-bin (2.19-18+deb8u7) ... Processing triggers for systemd (215-17+deb8u6) ... Processing triggers for dbus (1.8.22-0+deb8u1) ... - Add the official Docker repository GPG keys to your server by typing:
You should see output similar to:wget -O- "https://download.docker.com/linux/ubuntu/gpg" | sudo apt-key add -Resolving download.docker.com (download.docker.com)... 54.192.192.196, 54.192.192.15, 54.192.192.26, ... Connecting to download.docker.com (download.docker.com)|54.192.192.196|:443... connected. HTTP request sent, awaiting response... 200 OK Length: 3817 (3.7K) [binary/octet-stream] Saving to: ‘STDOUT’ - 100%[===========================================================================================================================================>] 3.73K --.-KB/s in 0s 2017-05-19 12:07:50 (374 MB/s) - written to stdout [3817/3817] OK - Add the Docker repository to to your APT sources by typing:
sudo add-apt-repository "deb [arch=amd64] https://download.docker.com/linux/debian $(lsb_release -cs) stable" - Update your package database again by typing:
You should see output similar to:sudo apt-get updateReading package lists... Done - Install Docker by typing:
When the install is finished, you should see output similar to:sudo apt-get install -y docker-ce docker-ce-cli containerd.io docker-buildx-plugin docker-compose-pluginProcessing triggers for systemd (215-17+deb8u6) ... Processing triggers for initramfs-tools (0.120+deb8u2) ... update-initramfs: Generating /boot/initrd.img-3.16.0-4-amd64 Processing triggers for dbus (1.8.22-0+deb8u1) ... - Check that Docker has installed properly by typing:
You should see output similar to:sudo docker psCONTAINER ID IMAGE COMMAND CREATED STATUS PORTS NAMES - Add your user to the Docker group so Docker commands don't require sudo. Type:
sudo usermod -aG docker $(whoami) - Log out of your Duo Network Gateway box and back in for the group changes to take effect.
- Check that Docker is functioning without using sudo by typing:
You should see output similar to:docker psCONTAINER ID IMAGE COMMAND CREATED STATUS PORTS NAMES
Red Hat Enterprise Linux
SUSE Enterprise Linux 15 and later
- Log into your Duo Network Gateway server locally or through SSH with a user that has sudo permissions. sudo is not installed by default on SUSE Enterprise Linux and may require installation. Any time you use the
sudocommand you may be prompted to enter your password. - Docker requires a 64-bit operating system. Please verify your installation of SUSE Enterprise Linux is 64-bit by typing:
The output should beuname -mx86_64. - Install curl by typing:
sudo zypper install -y curl - Add the required repository to your server by typing:
The output should be similar to:sudo SUSEConnect -p sle-module-containers/15.3/x86_64 -r ''Registering system to SUSE Customer Center Updating system details on https://scc.suse.com ... Activating sle-module-containers 15.3 x86_64 ... -> Adding service to system ... -> Installing release package ... Successfully registered system - Install Docker and Docker Compose by typing:
sudo zypper install -y docker docker-compose docker-compose-switch - Enable and start the Docker service by typing:
Output should be similar to:sudo systemctl enable --now docker.serviceCreated symlink from /etc/systemd/system/multi-user.target.wants/docker.service to /usr/lib/systemd/system/docker.service. - Check that Docker has installed properly by typing:
Output should be similar to:sudo docker psCONTAINER ID IMAGE COMMAND CREATED STATUS PORTS NAMES - Add your user to the Docker group so Docker commands don't require sudo. Type:
sudo usermod -aG docker $(whoami) - Log out of your Duo Network Gateway box and back in for the group changes to take effect or run this command to add the docker group to the user's groupset:
newgrp docker - Check that Docker is functioning without using sudo by typing:
You should see output similar to:docker psCONTAINER ID IMAGE COMMAND CREATED STATUS PORTS NAMES
Install Duo Network Gateway
This application communicates with Duo's service on SSL TCP port 443 using TLS 1.2 or later.
Firewall configurations that restrict outbound access to Duo's service with rules using destination IP addresses or IP address ranges aren't recommended, since these may change over time to maintain our service's high availability. If your organization requires IP-based rules, please review Duo Knowledge Base article 1337.
See Duo Knowledge Base article 2152 for additional TLS version and SSL cipher support details.
Web and SSH Deployment
This installation supports web application and SSH server access through Duo Network Gateway. When done, you will have three running Docker containers.
-
Download the Duo Network Gateway YML file and save it to your Duo Network Gateway server. Download the YML file for web and SSH deployment by typing:
curl -JO https://dl.duosecurity.com/network-gateway-latest.ymlYou should see output similar to:
  % Total    % Received % Xferd  Average Speed   Time    Time     Time  Current
                                 Dload  Upload   Total   Spent    Left  Speed
100  1358  100  1358    0     0   2547      0 --:--:-- --:--:-- --:--:--  2543
curl: Saved to filename 'network-gateway-3.4.0.yml'
Make note of the actual file name that was saved, you'll need this in future steps. View checksums for Duo Network Gateway downloads on the Checksums and Downloads page.
Save this YML file in a persistent directory location for future use; it will be required for later use when deploying, updating, or interacting with your Duo Network Gateway server.
Note: If you do not have curl installed but have wget, use this command:
wget --content-disposition https://dl.duosecurity.com/network-gateway-latest.yml -
The following command instructs Docker Compose to download the Duo Network Gateway images and start containers using them. Specify the YML file downloaded in the last step in the command. Note that your YML file name may reflect a different version than the example command shown. Replace the file name in the example with your downloaded YML file's actual name.
Type:
docker compose -p network-gateway -f network-gateway-3.4.0.yml up -dThis may take a few minutes. Once completed the text output will be similar to:
Creating network-gateway-redis Creating network-gateway-admin Creating network-gateway-portal -
You can verify that your Duo Network Gateway containers are running by typing:
docker psYou should see output showing all three containers with a status of "up" similar to:
CONTAINER ID        IMAGE                                                                                                 COMMAND                  CREATED             STATUS              PORTS                                      NAMES
3aea70b8e1a8        duosecurity/network-gateway@sha256:36b1e3a4198c9a386830599e64c99b181095f70cdb6e42e216031377a1c83155   "bash -c /bin/run-con"   4 minutes ago       Up 4 minutes        0.0.0.0:80->80/tcp, 0.0.0.0:443->443/tcp   network-gateway-portal
8c63f6a2aa2a        duosecurity/network-gateway@sha256:9277bf641f0d74cbd26914bda8257fc14fb9c7ec10b026a1cb1bc49326578375   "bash -c /bin/run-con"   4 minutes ago       Up 4 minutes        0.0.0.0:8443->443/tcp                      network-gateway-admin
f04e00161738        duosecurity/network-gateway@sha256:f8d671839cd408dd0e97cae7333054074c80a5eaf23afdefd10f00e666a4928f   "docker-entrypoint.sh"   4 minutes ago       Up 4 minutes        6379/tcp                                   network-gateway-redis
Web, SSH, and Application Relay Deployment
This installation supports web application, SSH server access, and application host access through Duo Network Gateway. When done, you will have four running Docker containers.
-
Download the Duo Network Gateway - AppRelay YML file and save it to your Duo Network Gateway server. Download the YML file for Web, SSH, and Application Relay deployment by typing:
curl -JO https://dl.duosecurity.com/network-gateway-app-relay-latest.ymlYou should see output similar to:
  % Total    % Received % Xferd  Average Speed   Time    Time     Time  Current
                                 Dload  Upload   Total   Spent    Left  Speed
100  1834  100  1834    0     0   3346      0 --:--:-- --:--:-- --:--:--  3346
curl: Saved to filename 'network-gateway-3.4.0-app-relay.yml'
Make note of the actual file name that was saved as you'll need this in future steps. View checksums for Duo Network Gateway downloads on the Checksums and Downloads page.
Save this YML file in a persistent directory location for future use; it will be required for later use when deploying, updating, or interacting with your Duo Network Gateway server.
Note: If you do not have curl installed but have wget, use this command:
wget --content-disposition https://dl.duosecurity.com/network-gateway-app-relay-latest.yml -
The following command instructs Docker Compose to download the Duo Network Gateway images (including the additional DNS container for application host access like RDP or SMB) and start containers using them. Specify the YML files downloaded in the last step in the command. Note that your YML file names may reflect a different version than the example command shown. Replace the file names in the example with your downloaded YML file's actual names.
Type:
docker compose -p network-gateway -f network-gateway-3.4.0-app-relay.yml up -dThis may take a few minutes. Once completed the text output will be similar to:
Creating network-gateway-redis Creating network-gateway-admin Creating network-gateway-portal Creating network-gateway-dns ... done -
You can verify that your Duo Network Gateway containers are running by typing:
docker psYou should see output showing all four containers with a status of "up" similar to:
CONTAINER ID   IMAGE                                        COMMAND                  CREATED         STATUS         PORTS                                                                          NAMES
dbbea7724709   duosecurity/network-gateway                  "/usr/local/bin/supe…"   2 minutes ago   Up 2 minutes   192.168.4.36:53->53/tcp, 192.168.4.36:53->53/udp                               network-gateway-dns
05651ed4f1cc   duosecurity/network-gateway                  "bash -c /bin/run-co…"   2 minutes ago   Up 2 minutes   127.0.0.1:80->80/tcp, 127.0.0.1:443->443/tcp                                   network-gateway-portal
2f774f5722d7   duosecurity/network-gateway                  "bash -c /bin/run-co…"   2 minutes ago   Up 2 minutes   0.0.0.0:8443->443/tcp, :::8443->443/tcp                                        network-gateway-admin
b0377023bb14   duosecurity/network-gateway                  "docker-entrypoint.s…"   2 minutes ago   Up 2 minutes   6379/tcp                                                                       network-gateway-redis
If the
network-gateway-dnscontainer isn’t started successfully, please refer to this KB article about issues binding to port 53.
Configure Duo Network Gateway
Duo Network Gateway can be configured using the Admin UI by following the directions below or by using scripted configuration which allows you to configure Duo Network Gateway with a configuration file.
Initial Duo Network Gateway Configuration
-
In a browser navigate to https://<URL-OR-IP-OF-NETWORK-GATEWAY>:8443 from an internal network to log into the Duo Network Gateway admin console. Your browser will warn you about an untrusted certificate the first time you access the page. Dismiss the warning and continue onto the page. If you would like to verify the certificate displayed by your browser is the same one loaded by the Duo Network Gateway please see this knowledge base article.
-
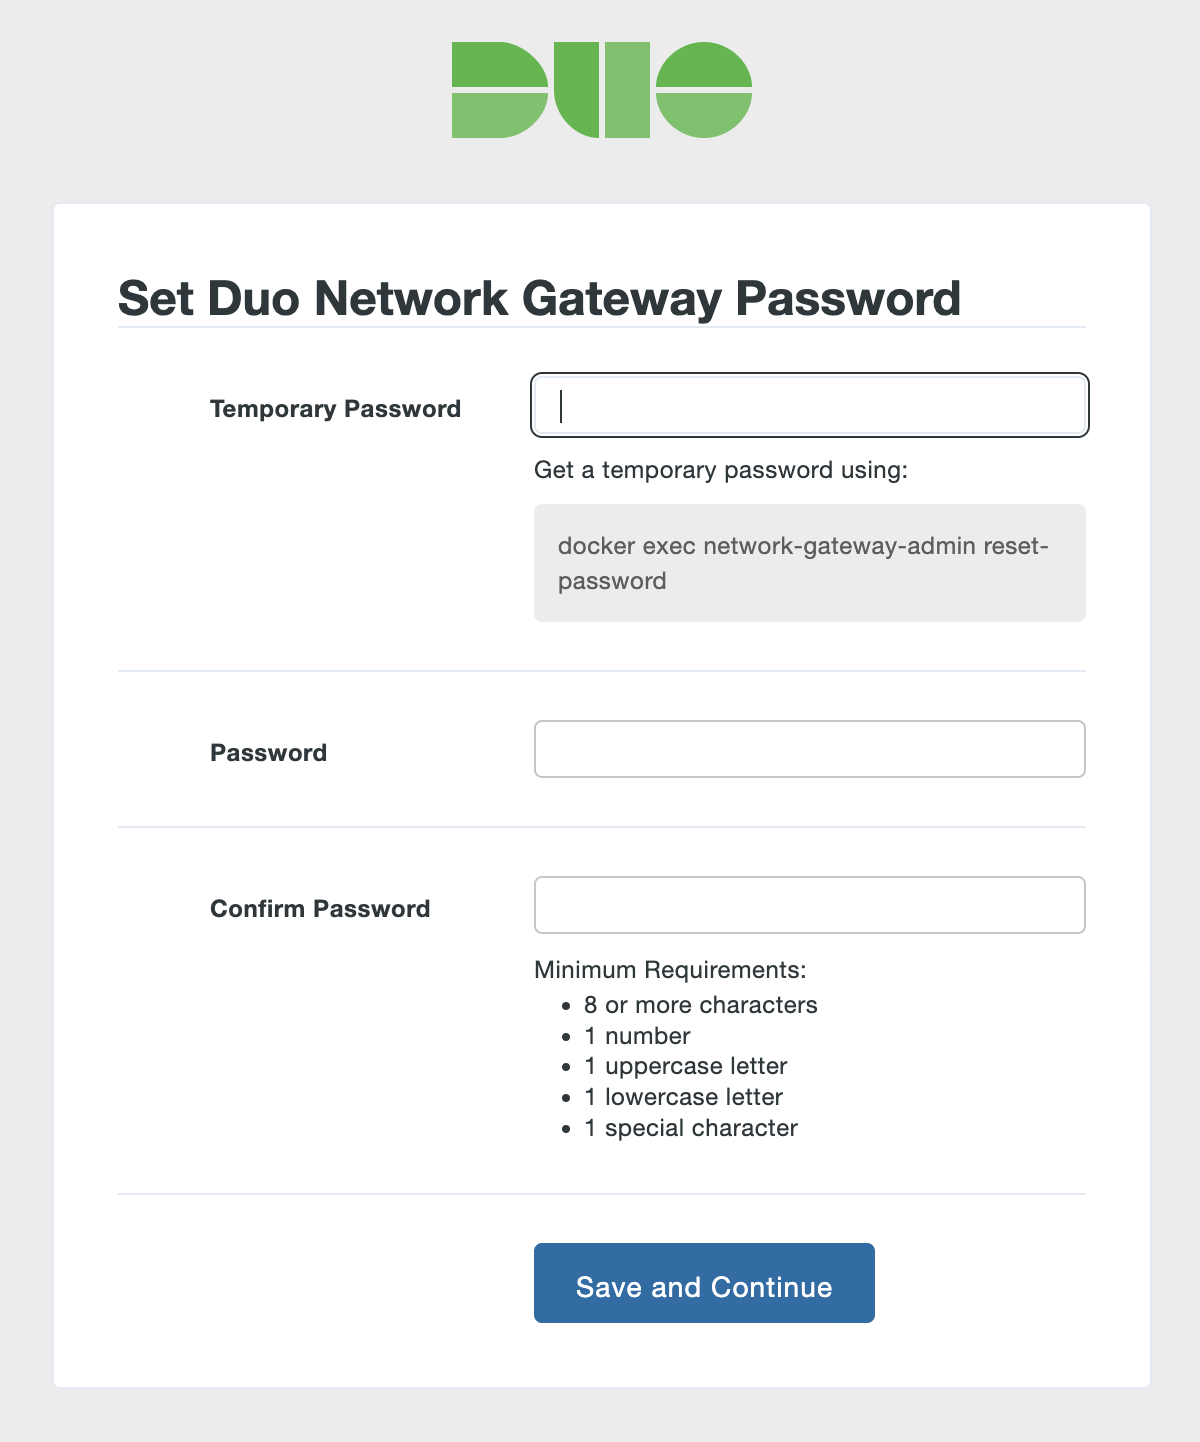
The first page of the Duo Network Gateway setup screen will ask you to choose a password for the Duo Network Gateway admin console. You must first obtain a temporary password by executing the displayed command on the Duo Network Gateway host. This command can be used to reset the admin password at any time.
docker exec network-gateway-admin reset-passwordThe output should be similar to:
A6PfSoMnjd75lsejAak8 -
Once you've entered the temporary password that meets the requirements, click Save and Continue.
-
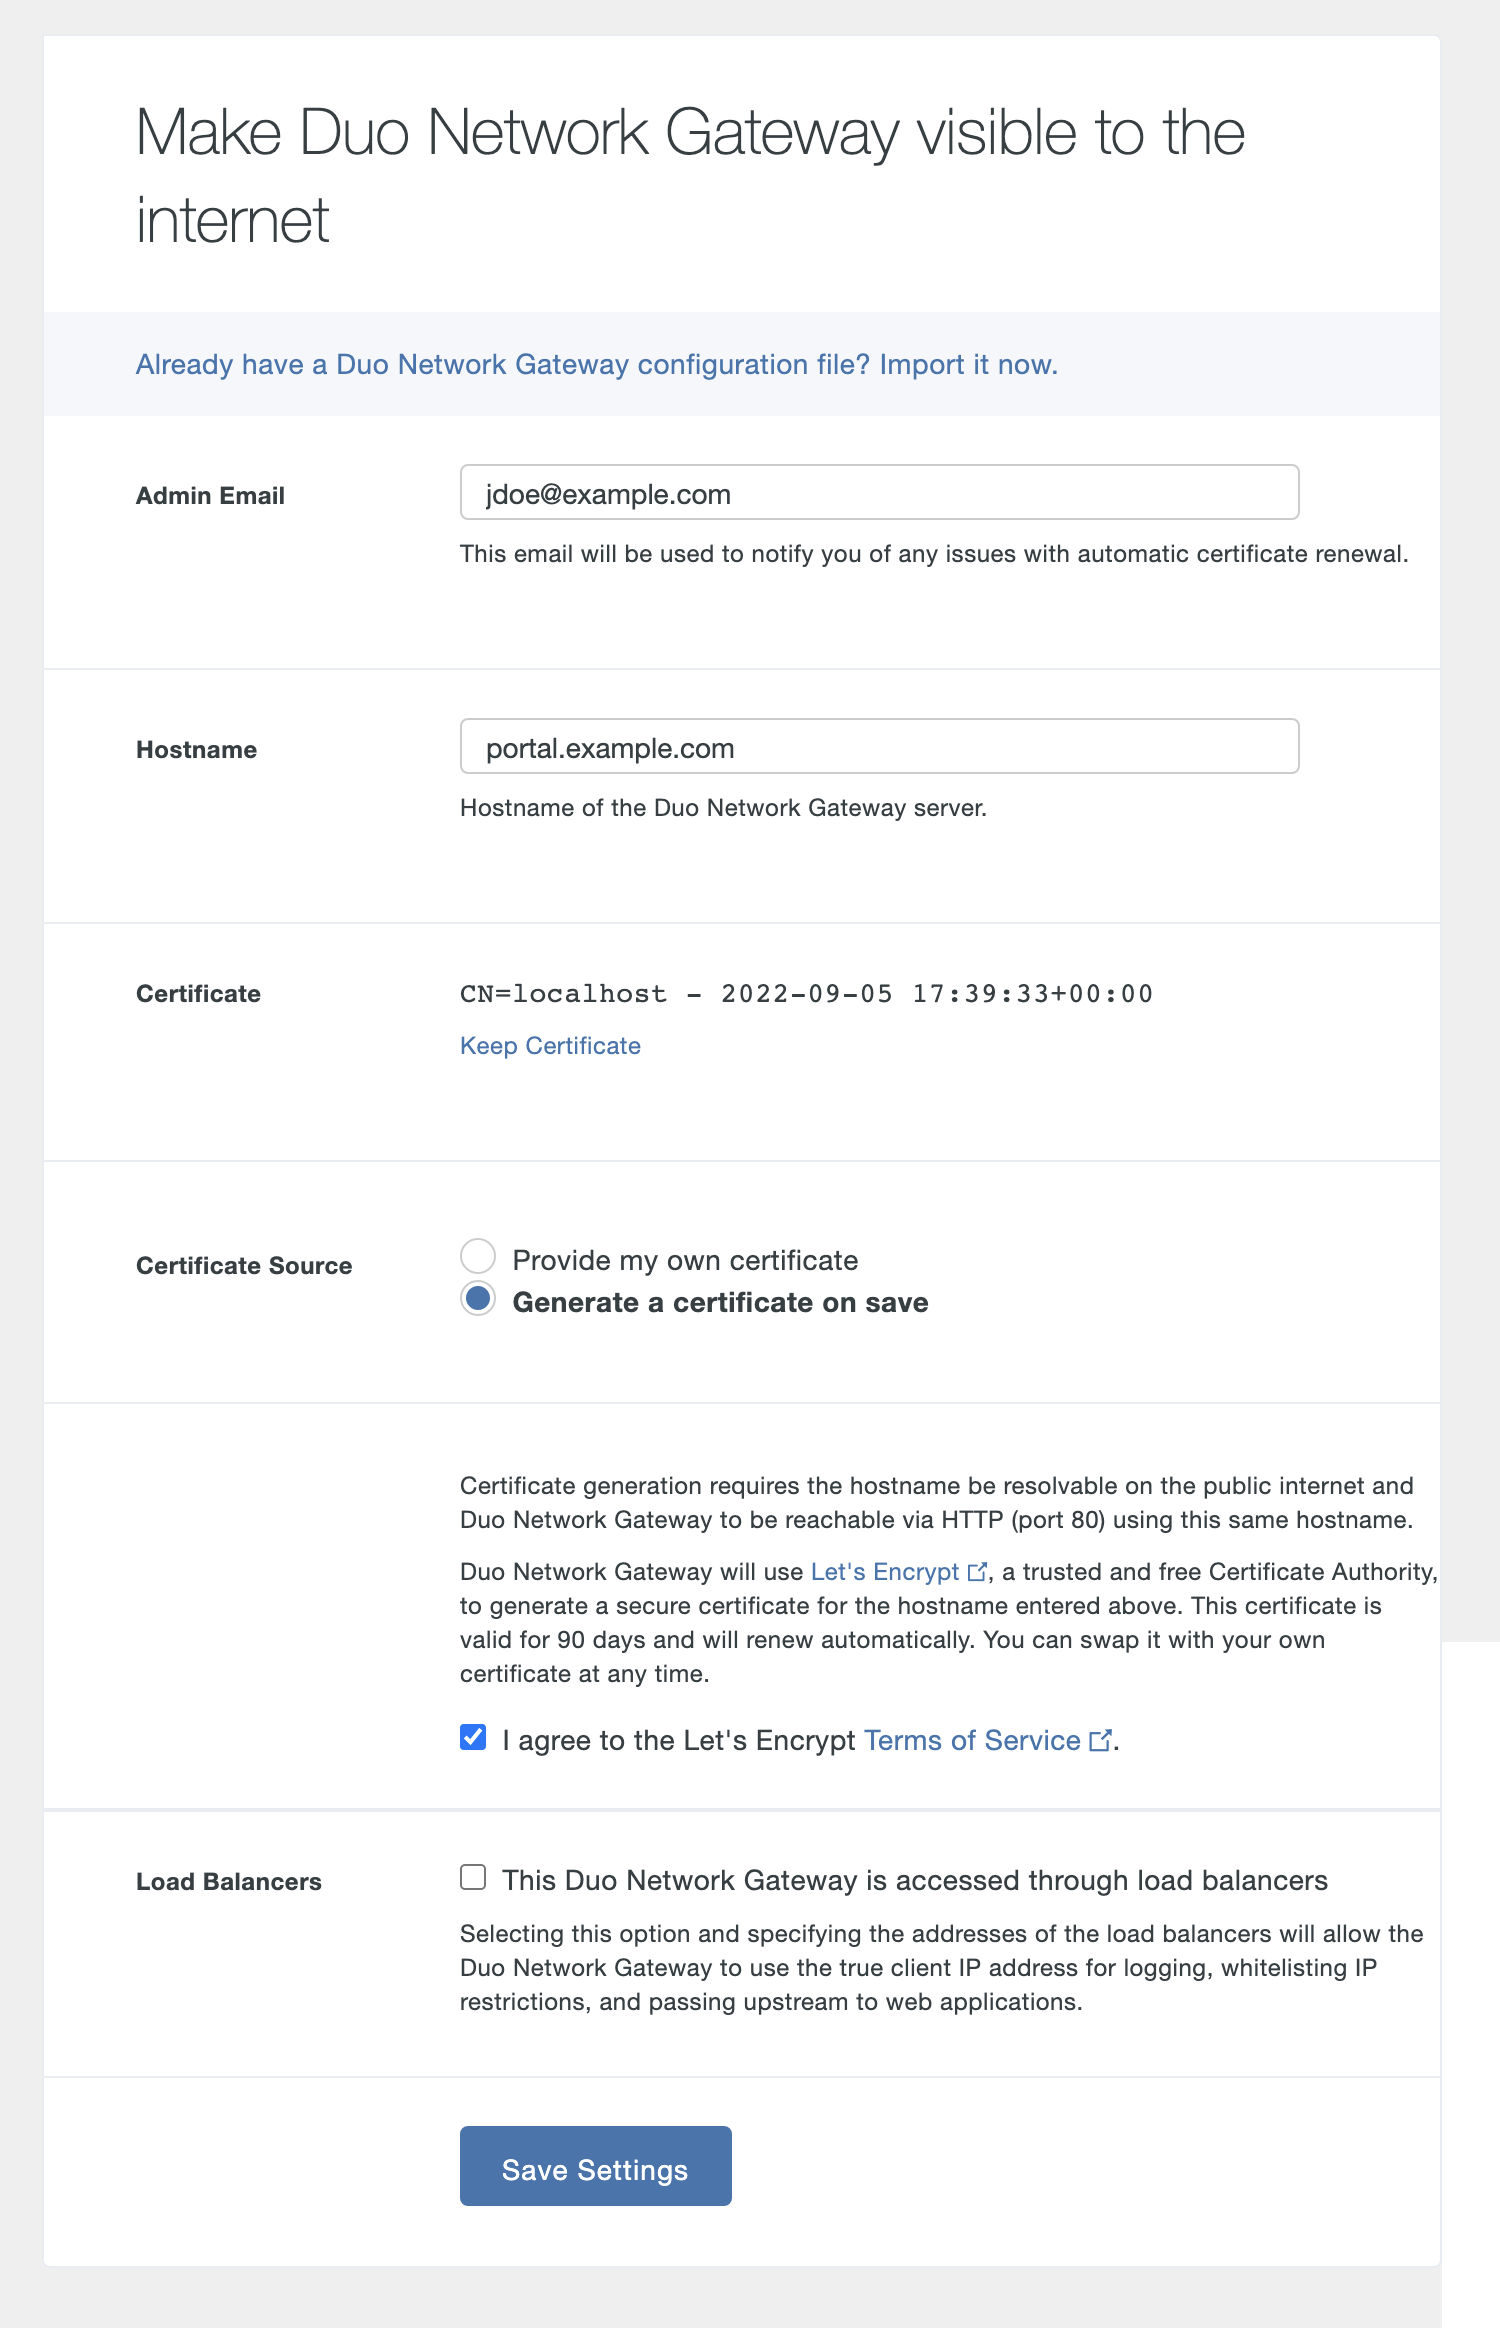
On the "Make Duo Network Gateway visible to the internet" page fill in the following fields. You can also click the "Already have a Duo Network Gateway configuration file? Import it now." link to restore settings from a backup.
Option Description Admin Email Enter the e-mail address of an administrator who can be contacted if there is an issue. Currently this e-mail address will only be contacted if there are issues renewing the automatically generated certificates. Hostname Enter the fully-qualified external domain name (FQDN) of the server. This should be FQDN addressable to the Internet (eg. portal.example.com), using an RFC-1034-compliant hostname (not an IP address). -
If you will be supplying your own SSL certificate click Change Certificate to select Provide my own certificate. Configure the certificate using the table below and skip step 6. If you would like to automatically generate certificates with Let's Encrypt, skip this step and proceed to step 6.
DuoConnect will fail to connect to SSH & RDP servers if the certificate provided to the DNG does not include a DNS Subject Alternative Name (SAN) extension with the same value as the Common Name (CN) extension of the certificate. Certificates generated by Duo Network Gateway using Let's Encrypt or obtained from a commercial certificate vendor satisfy this requirement.
Option Description Certificate Upload the certificate file you purchased earlier for the Duo Network Gateway server. The certificate should be Base64-encoded X.509 (pem, cer, or crt) and include the entire certificate bundle. The certificates should be ordered from top to bottom: certificate, issuing or intermediate certificates, and root certificate. Private Key Upload the private key file related to the certificate you purchased earlier for the Duo Network Gateway server. Private keys should formatted as Base64-encoded X.509 (pem, cer, or crt). 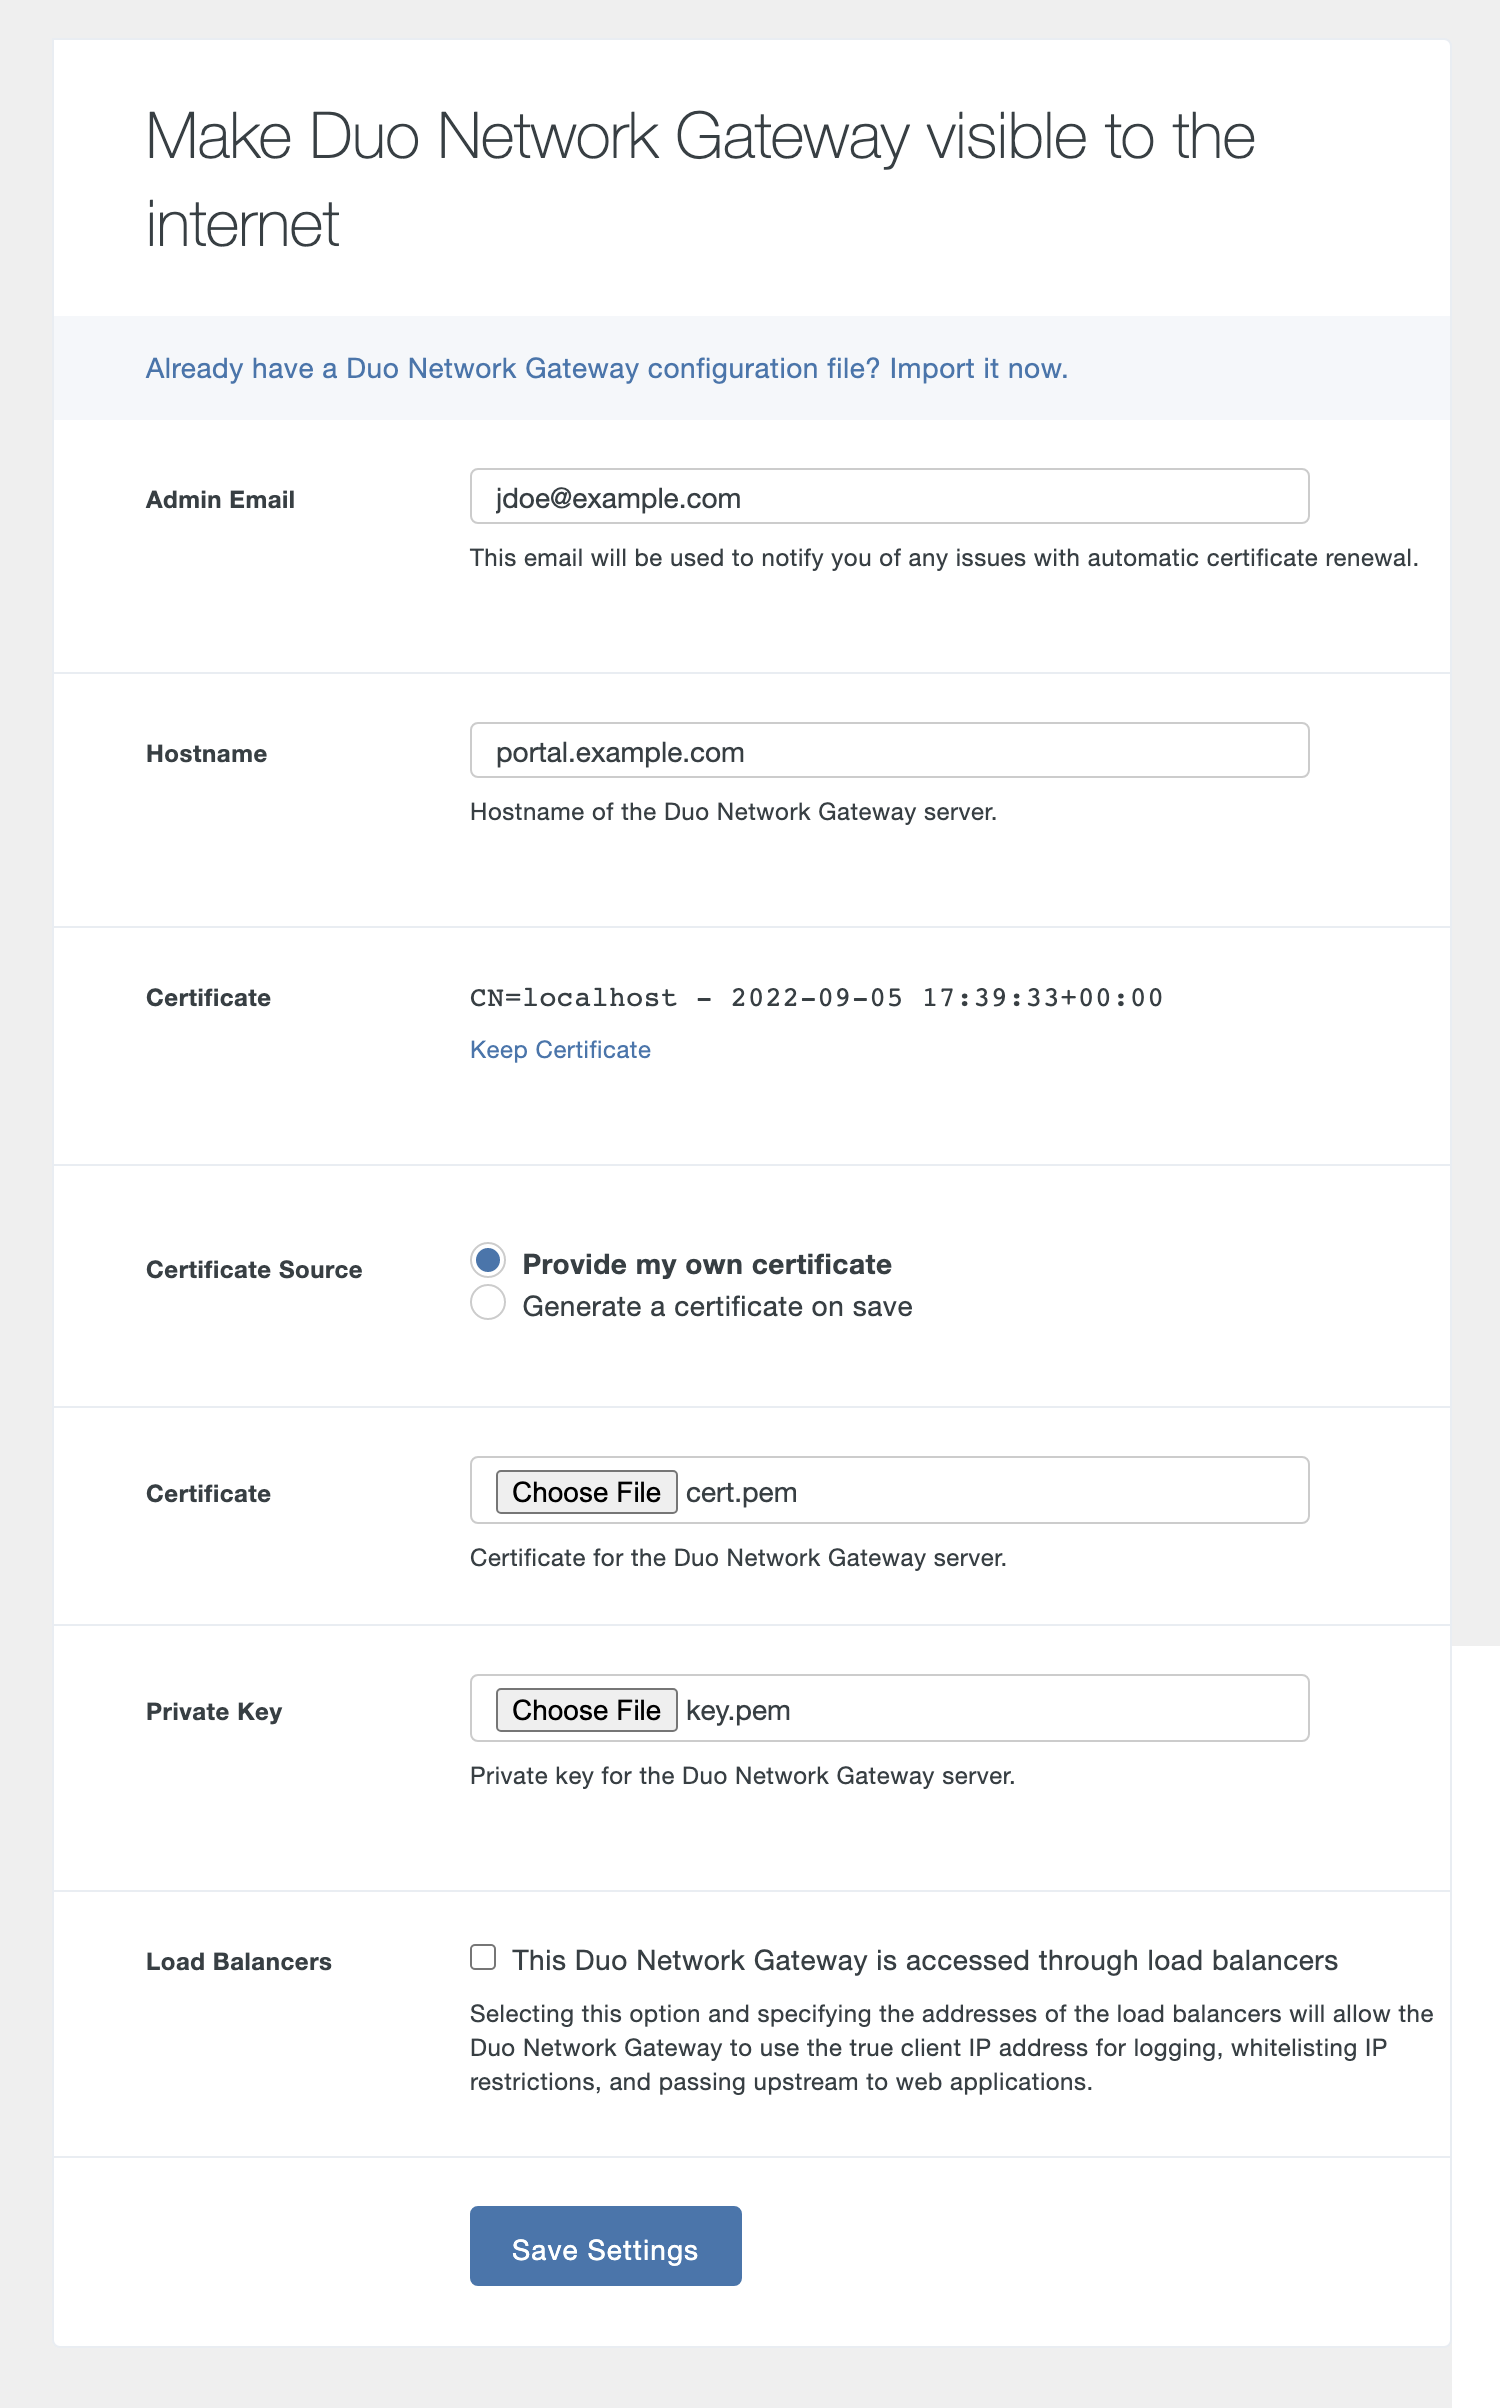
If all information isn't entered completely and correctly or this initial configuration fails to save you'll need to re-enter the information again before proceeding, including selection of the certificate and key.
-
If you'd like the Duo Network Gateway to automatically generate and renew a free SSL certificate using Let's Encrypt click Change Certificate and select Generate a certificate on save. Review the Let's Encrypt Terms of Service. If you accept, check the box next to I agree to the Let's Encrypt Terms of Service.
If all information isn't entered completely and correctly or this initial configuration fails to save you'll need to re-enter the information again before proceeding.
-
If the Duo Network Gateway is behind a load balancer check the box next to This Duo Network Gateway is accessed through load balancers.
In the Load Balancer IP addresses field you can specify the IP addresses of your load balancer in a variety of different ways:
- single IP address (192.168.99.105)
- a block (10.1.2.0/24)
- a range of IP addresses (10.0.2.4-10.0.2.10).
Entries can be separated by spaces or new lines.
If the Duo Network Gateway is behind a load balancer and this setting is not configured the load balancer IP addresses will be used when logging, applying allowed IP restrictions, and passing IP addresses to protected applications.
-
Click Save and Continue. Saving your configuration redirects you to the Duo Network Gateway admin console.
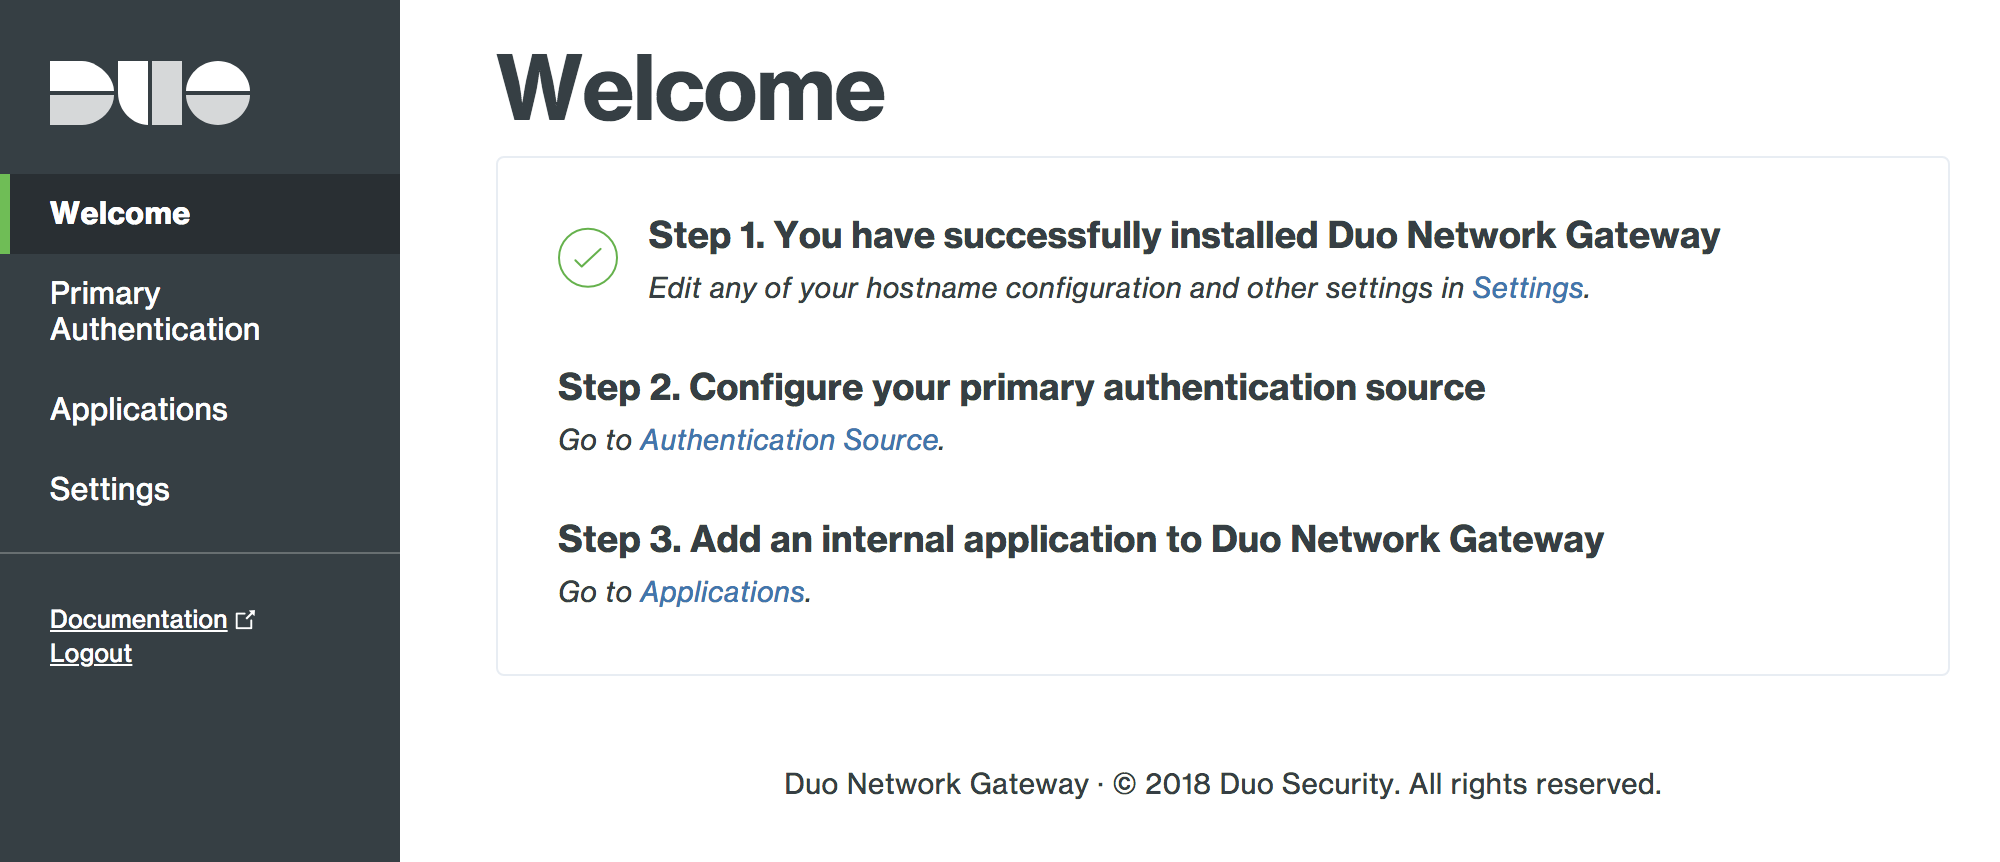
Configure the Duo Network Gateway Authentication Source
Duo Network Gateway uses SAML as its primary authentication source. You may use any identity provider you'd like, such as Duo Single Sign-On, Okta, OneLogin, AD FS, or another identity provider that supports SAML 2.0 service providers.
Configure Single Sign-On
- Before configuring Duo Network Gateway you'll first need to configure Duo Single Sign-On with a working authentication source.
Configure the Duo Network Gateway Application in Duo
-
Log in to the Duo Admin Panel and navigate to Applications → Application Catalog.
-
Locate the entry for Duo Network Gateway with the "SSO" label in the catalog. Click the + Add button to start configuring Duo Network Gateway. See Protecting Applications for more information about protecting applications with Duo and additional application options. You'll need the information on the Duo Network Gateway page later to complete your setup.
-
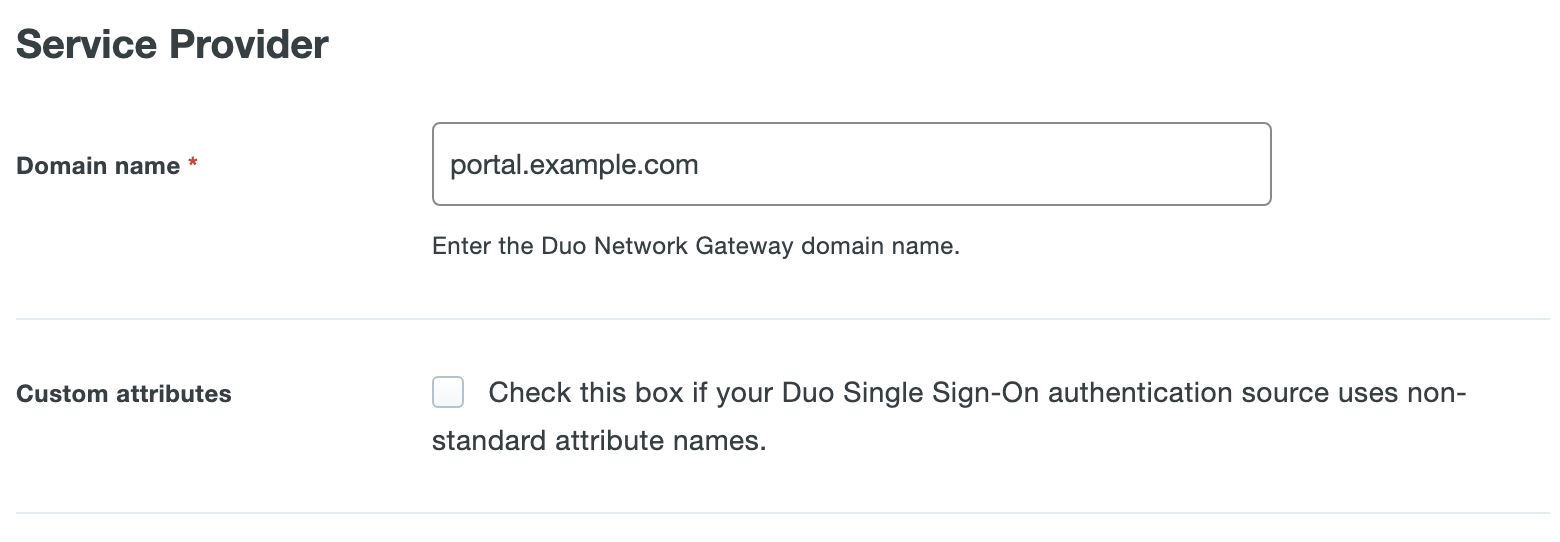
The Domain name is the fully qualified external DNS of your Duo Network Gateway server. For example, if your Duo Network Gateway URL is https://portal.example.com then you would type in portal.example.com in the field.
-
Duo Network Gateway uses the Username attribute when authenticating. We've mapped the <Username> attribute to external authentication source attributes as follows:
Default Attribute Active Directory SAML IdP <Username> sAMAccountName Username If you are using a non-standard username attribute for your authentication source, check the Custom attributes box and enter the name of the attribute you wish to use instead.
-
You can adjust additional settings for your new SAML application at this time — like changing the application's name from the default value.
-
Scroll to the bottom of the page and click the Save button.
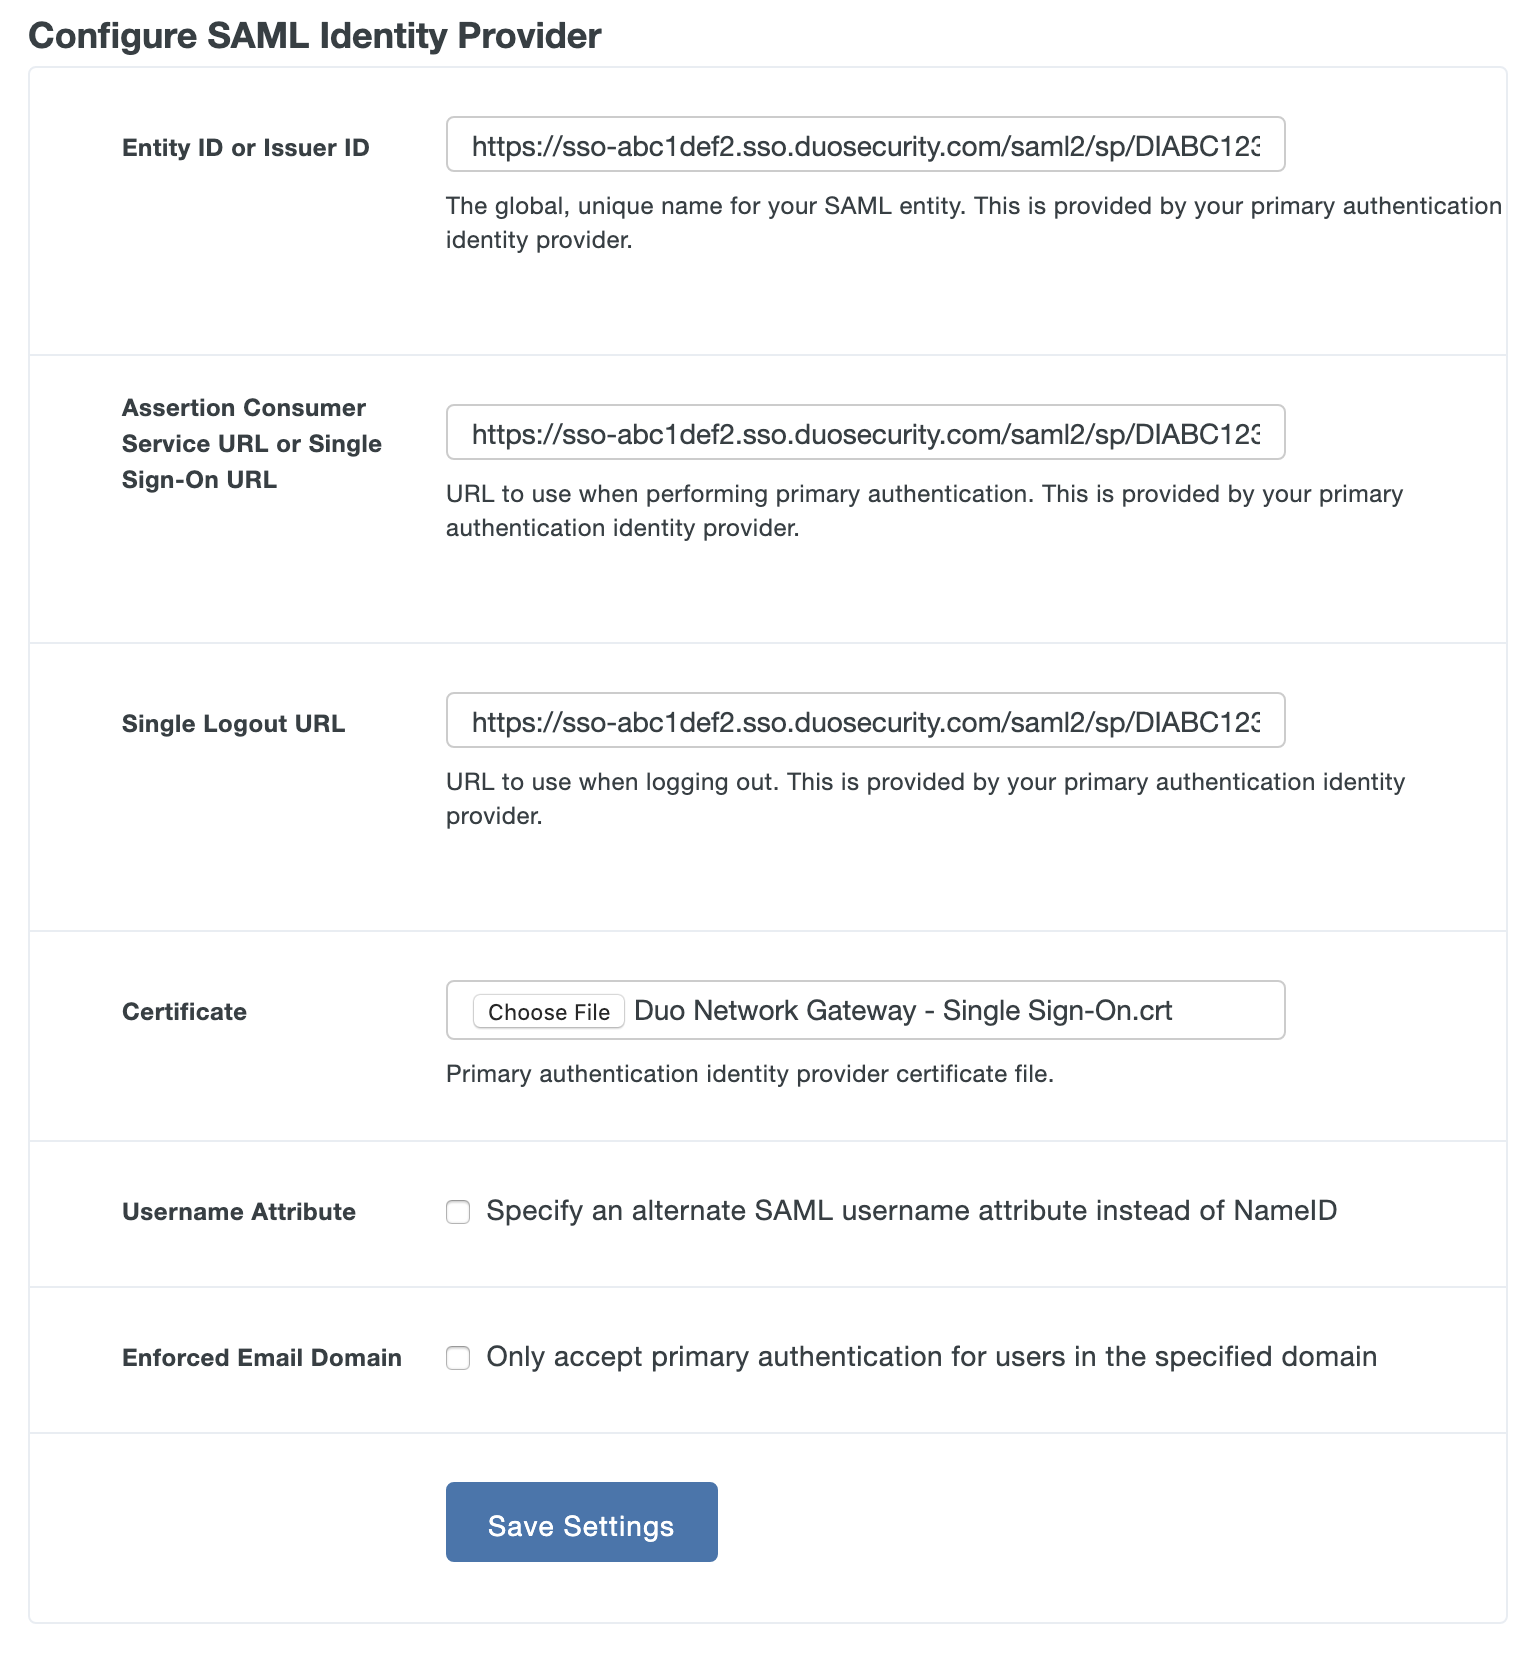
Configure Duo Network Gateway IdP
-
On the Duo Network Gateway admin console home page click the Authentication Source link under Step 2.
-
Scroll down to the Configure SAML Identity Provider section of the page.
-
Copy the Entity ID from the Duo Admin Panel Metadata section and paste it into the Duo Network Gateway Entity ID or Issuer ID field.
Example: https://sso-abc1def2.sso.duosecurity.com/saml2/sp/DIABC123678901234567/metadata
-
Copy the Single Sign-On URL from the Duo Admin Panel Metadata section and paste into the Duo Network Gateway Assertion Consumer Service URL or Single Sign-On URL field.
Example: https://sso-abc1def2.sso.duosecurity.com/saml2/sp/DIABC123678901234567/sso
-
Copy the Single Logout URL from the Duo Admin Panel Metadata section and paste into the Duo Network Gateway Single Logout URL field.
Example: https://sso-abc1def2.sso.duosecurity.com/saml2/sp/DIABC123678901234567/slo
-
Click Download certificate next to "Certificate" under Downloads on the details page for your Duo Network Gateway application in the Duo Admin Panel to download the Duo Single Sign-On signing certificate. Click the Choose File button next to "Certificate" and select the certificate.
-
Leave Username Attribute unchecked.
-
Enforced Email Domain is an optional setting. Enabling this will allow you to enforce that only e-mail addresses within a certain domain are allowed to log into Duo Network Gateway if the username attribute you are using is an e-mail address.
-
After you've entered all the required information click the Save Settings button.
-
Now that you've configured Duo Network Gateway and the primary authentication source we are ready to protect a server with Duo Network Gateway. Duo Network Gateway supports protecting both web applications and SSH servers.
Using AD FS as your IdP requires Duo Network Gateway 1.2.4 or later.
Copy Metadata from the Duo Network Gateway
-
On the Duo Network Gateway admin console home page click the Authentication Source link under Step 2.
-
Under the Metadata section copy the URL next to Entity ID or Issuer ID URL. You'll need this later in the setup.
Add the Duo Network Gateway Relying Party in AD FS
-
Log into your AD FS server as a Domain Admin or member of the server's local Administrators group and open the AD FS Management console.
-
Click the arrow icon next to Trust Relationships on the left-hand side of the page to expand its options. Skip this step if you are using AD FS 4.
-
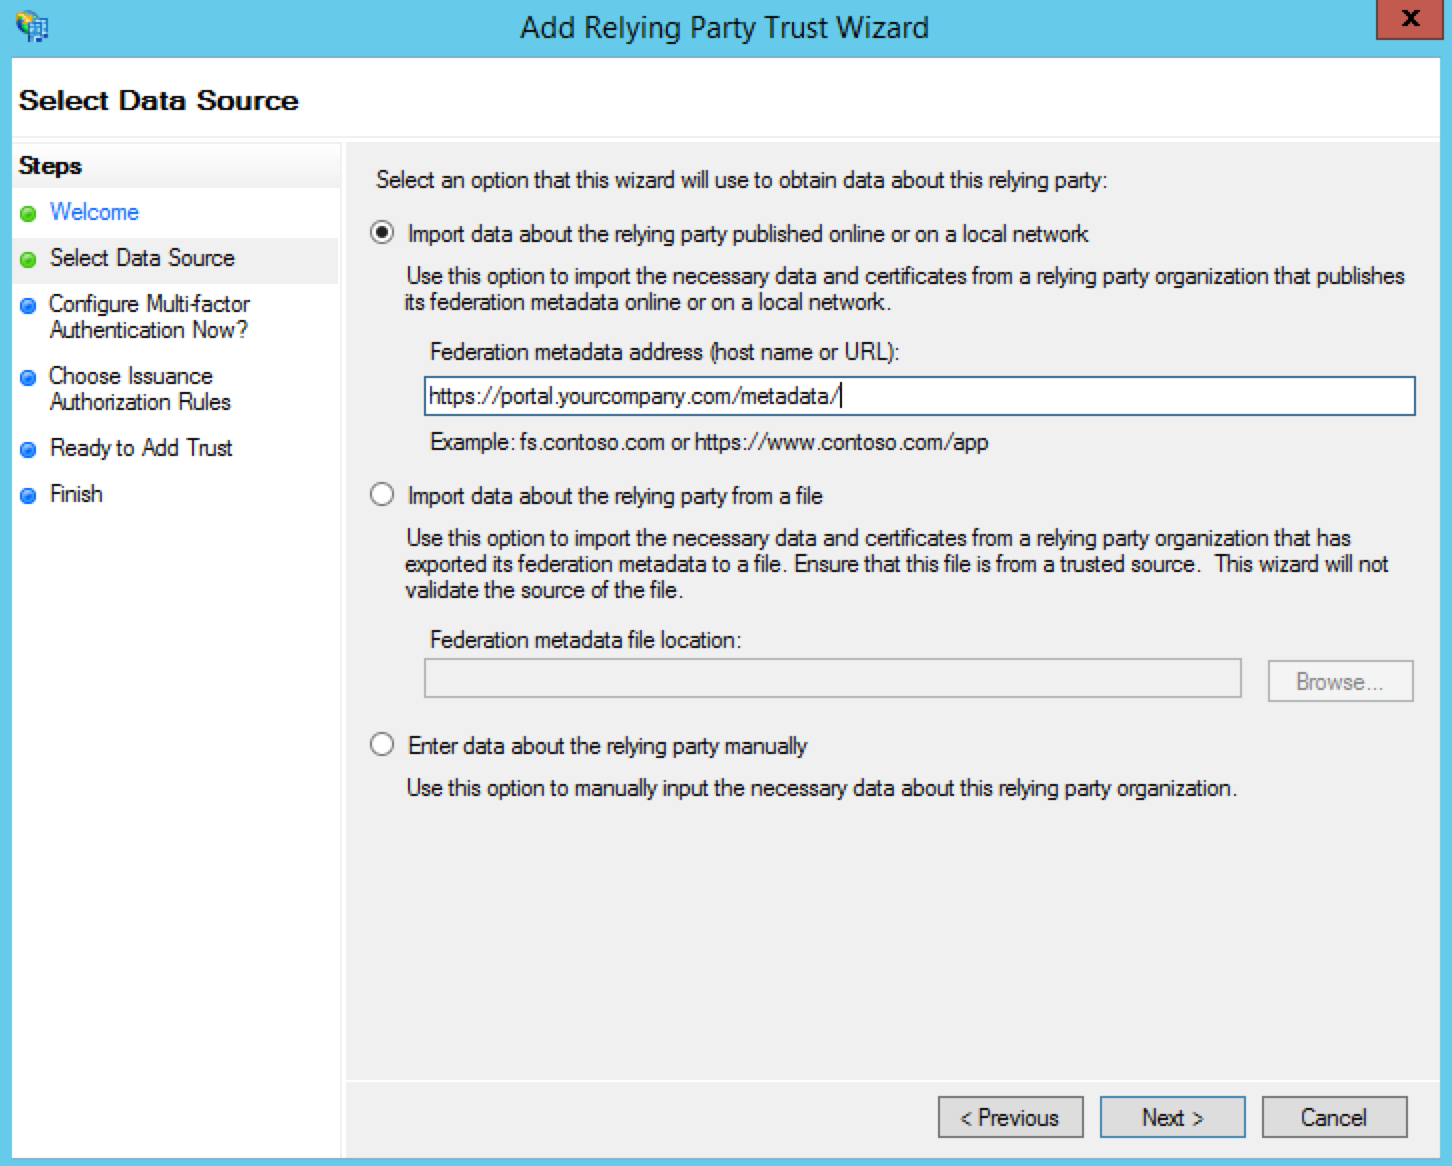
Right click Relying Party Trusts and select Add Relying Party Trust... from the drop-down. A new window will appear.
-
Review the information on the Welcome page and then click Start. In AD FS 4 leave the default choice of "Claims aware" selected and click Start.
-
Select Import data about the relying party published online or on a local network on the Select Data Source Page. Copy the Entity ID or Issuer ID value from earlier and paste it into the text field. Click Next.
Example: https://portal.example.com/metadata/
-
On the Specify Display Name page type a name that will help you identify this relying party easily later into the Display name field and click Next.
-
On the Configure Multi-factor Authentication Now? page select I do not want to configure multi-factor authentication settings for this relying party trust at this time. and click Next. In AD FS 4 this page is called "Choose Access Control Policy". Select the access control policy for this application from the list. The simplest option is to choose the default "Permit everyone" policy, or if you want to restrict Duo Network Gateway access select the built-in or custom access control policy that meets your needs. After selecting an access control policy click Next.
-
Click Next on the Ready to Add Trust page.
-
Leave the "Open the Edit claim Rules dialog for this relying party trust when the wizard closes" checked and click Close. This setting is called "Configure claims issuance policy for this application." in AD FS 4. A new window will appear.
Configure the Duo Network Gateway Relying Party in AD FS
-
On the Edit Claim Rules for ... page click Add Rule.... A new window will appear.
-
On the Select Rule Template page select Send LDAP Attributes as Claims from the drop-down and click Next.
-
On the Configure Rule page type NameID into the Claim rule name field.
-
Select Active Directory from the Attribute store drop-down.
-
Click the drop-down menu under LDAP Attribute and select SAM-Account-Name.
-
Click the drop-down menu under Outgoing Claim Type and select Name ID.
-
Click Finish. You'll return "Edit Claims Rules for ..." page.
-
Click Apply and click OK. The page will close and you'll return to the AD FS Management console.

Export AD FS Signing Certificate
-
On the AD FS Management console click the arrow icon next to Service on the left-hand side of the page to expand its options. Click on Certificates.
-
In the middle of the screen right-click the certificate under Token-signing and select View Certificate.... A new window will appear.
-
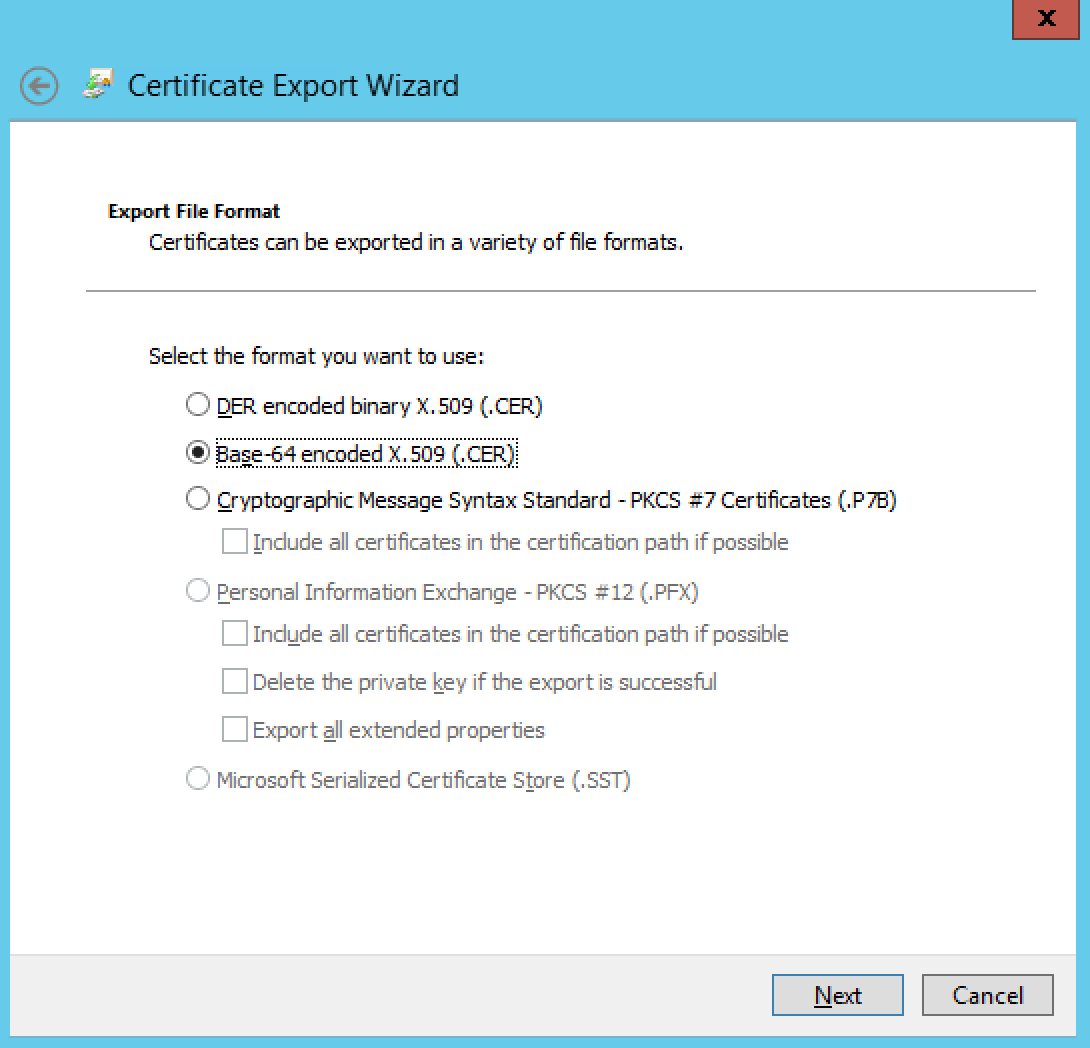
On the Certificate window select the Details tab. Click the button Copy to File.... A new window will appear.
-
Click Next on the Welcome page.
-
On the Export Private Key page select No, do not export the private key and then click Next.
-
Select Base-64 encoded X.509 (.CER) on the Export File Format page. Click Next.
-
On the File to Export page click Browse.... Name the file adfs and select a location to save it. You will need to use this certificate later. Click Finish.
Gather AD FS Metadata
-
Open up a web browser and go to https://AD-FS-URL/FederationMetadata/2007-06/FederationMetadata.xml. This will download an XML file onto your computer.
-
Open up the FederationMetadata.xml file using a text editor like NotePad or WordPad. You will need information from this file later.
Configure Duo Network Gateway IdP
-
On the Duo Network Gateway admin console home page click the Authentication Source link under Step 2.
-
Scroll down to the Configure SAML Identity Provider section of the page.
-
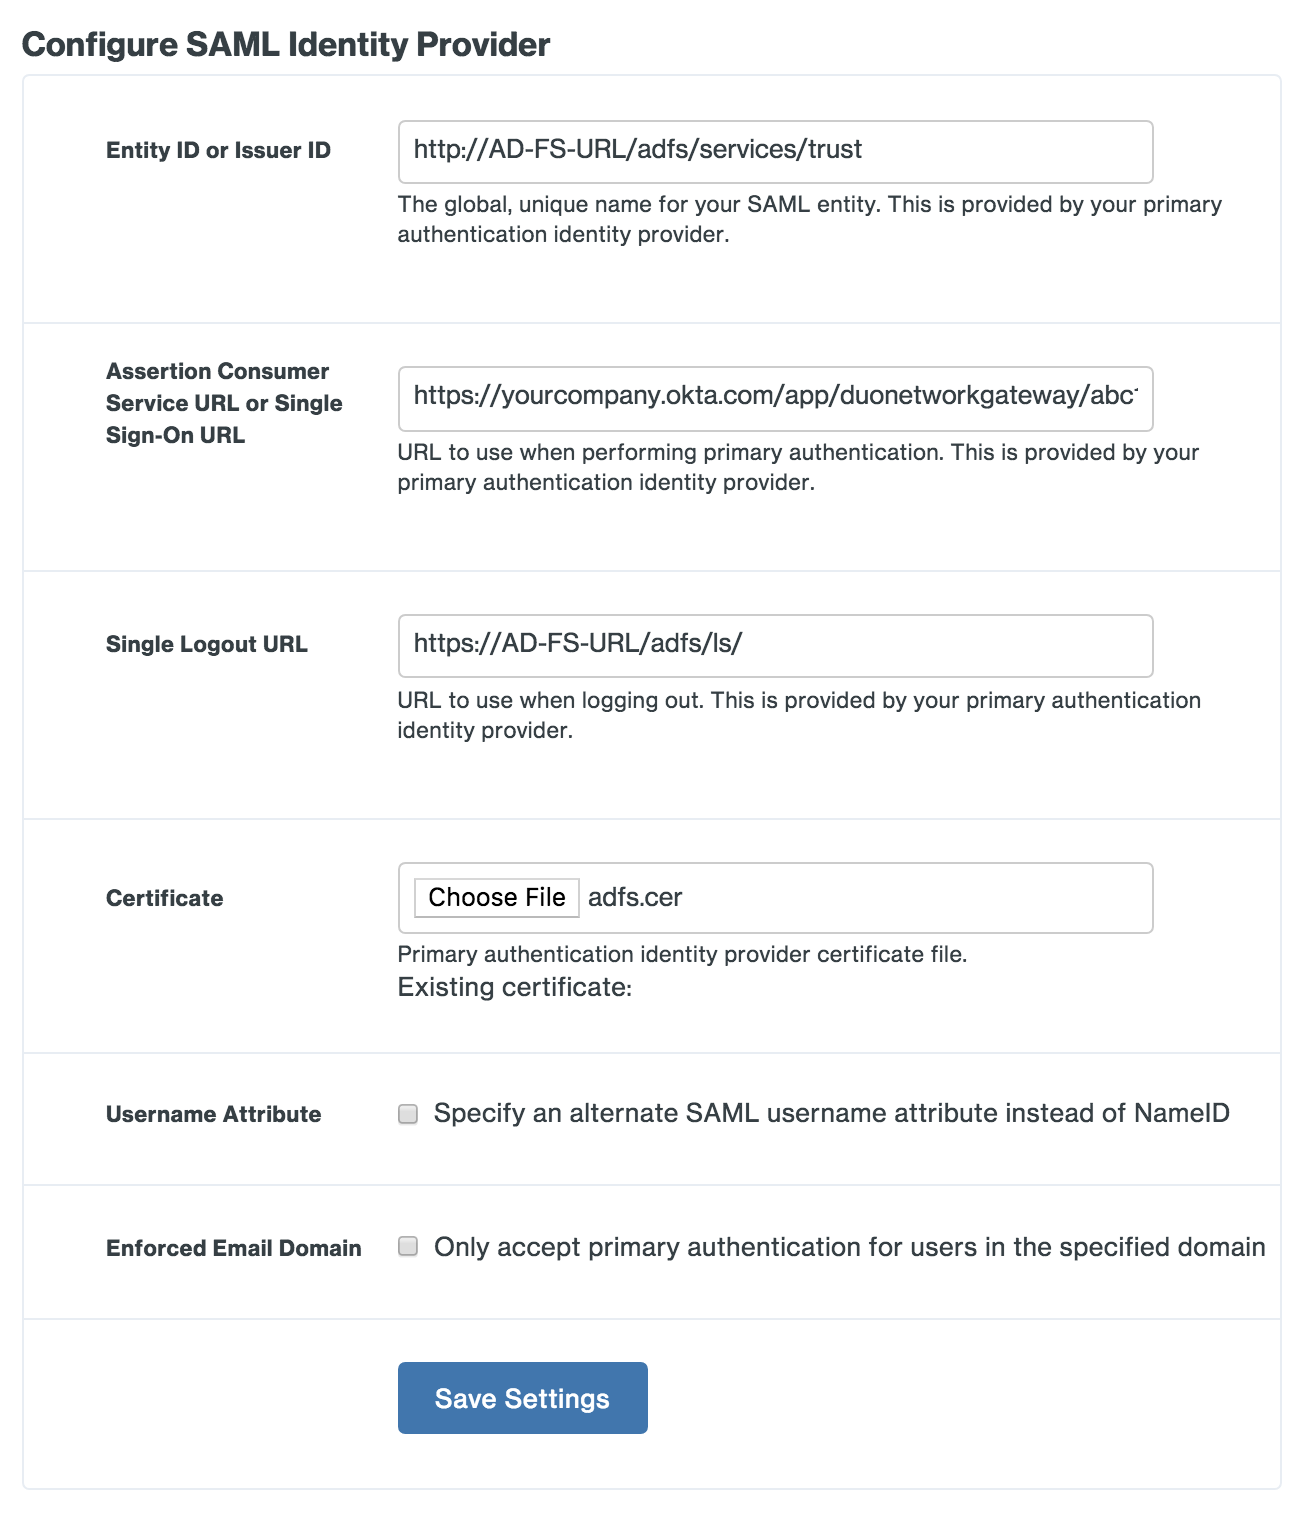
Copy the entityID value from the AD FS XML file and paste it into the Duo Network Gateway Entity ID or Issuer ID field.
Example: http://AD-FS-URL/adfs/services/trust
-
Copy the AssertionConsumerService value from the AD FS XML file and paste it into the Duo Network Gateway Assertion Consumer Service URL or Single Sign-On URL field.
Example: https://AD-FS-URL/adfs/ls/
-
The "Certificate" is the AD FS token-signing certificate file you downloaded earlier. Click the Choose File button to select the adfs.cer file. Upload the certificate.
-
Username Attribute is an optional setting. By default Duo Network Gateway will use the NameID field to populate the username. If AD FS sends a different attribute that you'd like to use as your username attribute, you can select the check box and specify the name of the attribute you'd like to use instead.
-
Enforced Email Domain is an optional setting. Enabling this will allow you to enforce that only e-mail addresses or userPrincipalNames within a certain domain are allowed to log into Duo Network Gateway if you are using one of those attributes.
-
After you've entered all the required information click the Save Settings button.
-
Now that you've configured Duo Network Gateway and the primary authentication source you are ready to protect a server with Duo Network Gateway. Duo Network Gateway supports protecting both web applications and SSH servers.
Configure the Duo Network Gateway app in Okta
-
Log into Okta as an administrative user. Click on the Admin button in the top right hand corner of the screen. This opens the Admin Console.
-
Navigate to Applications → Applications.
-
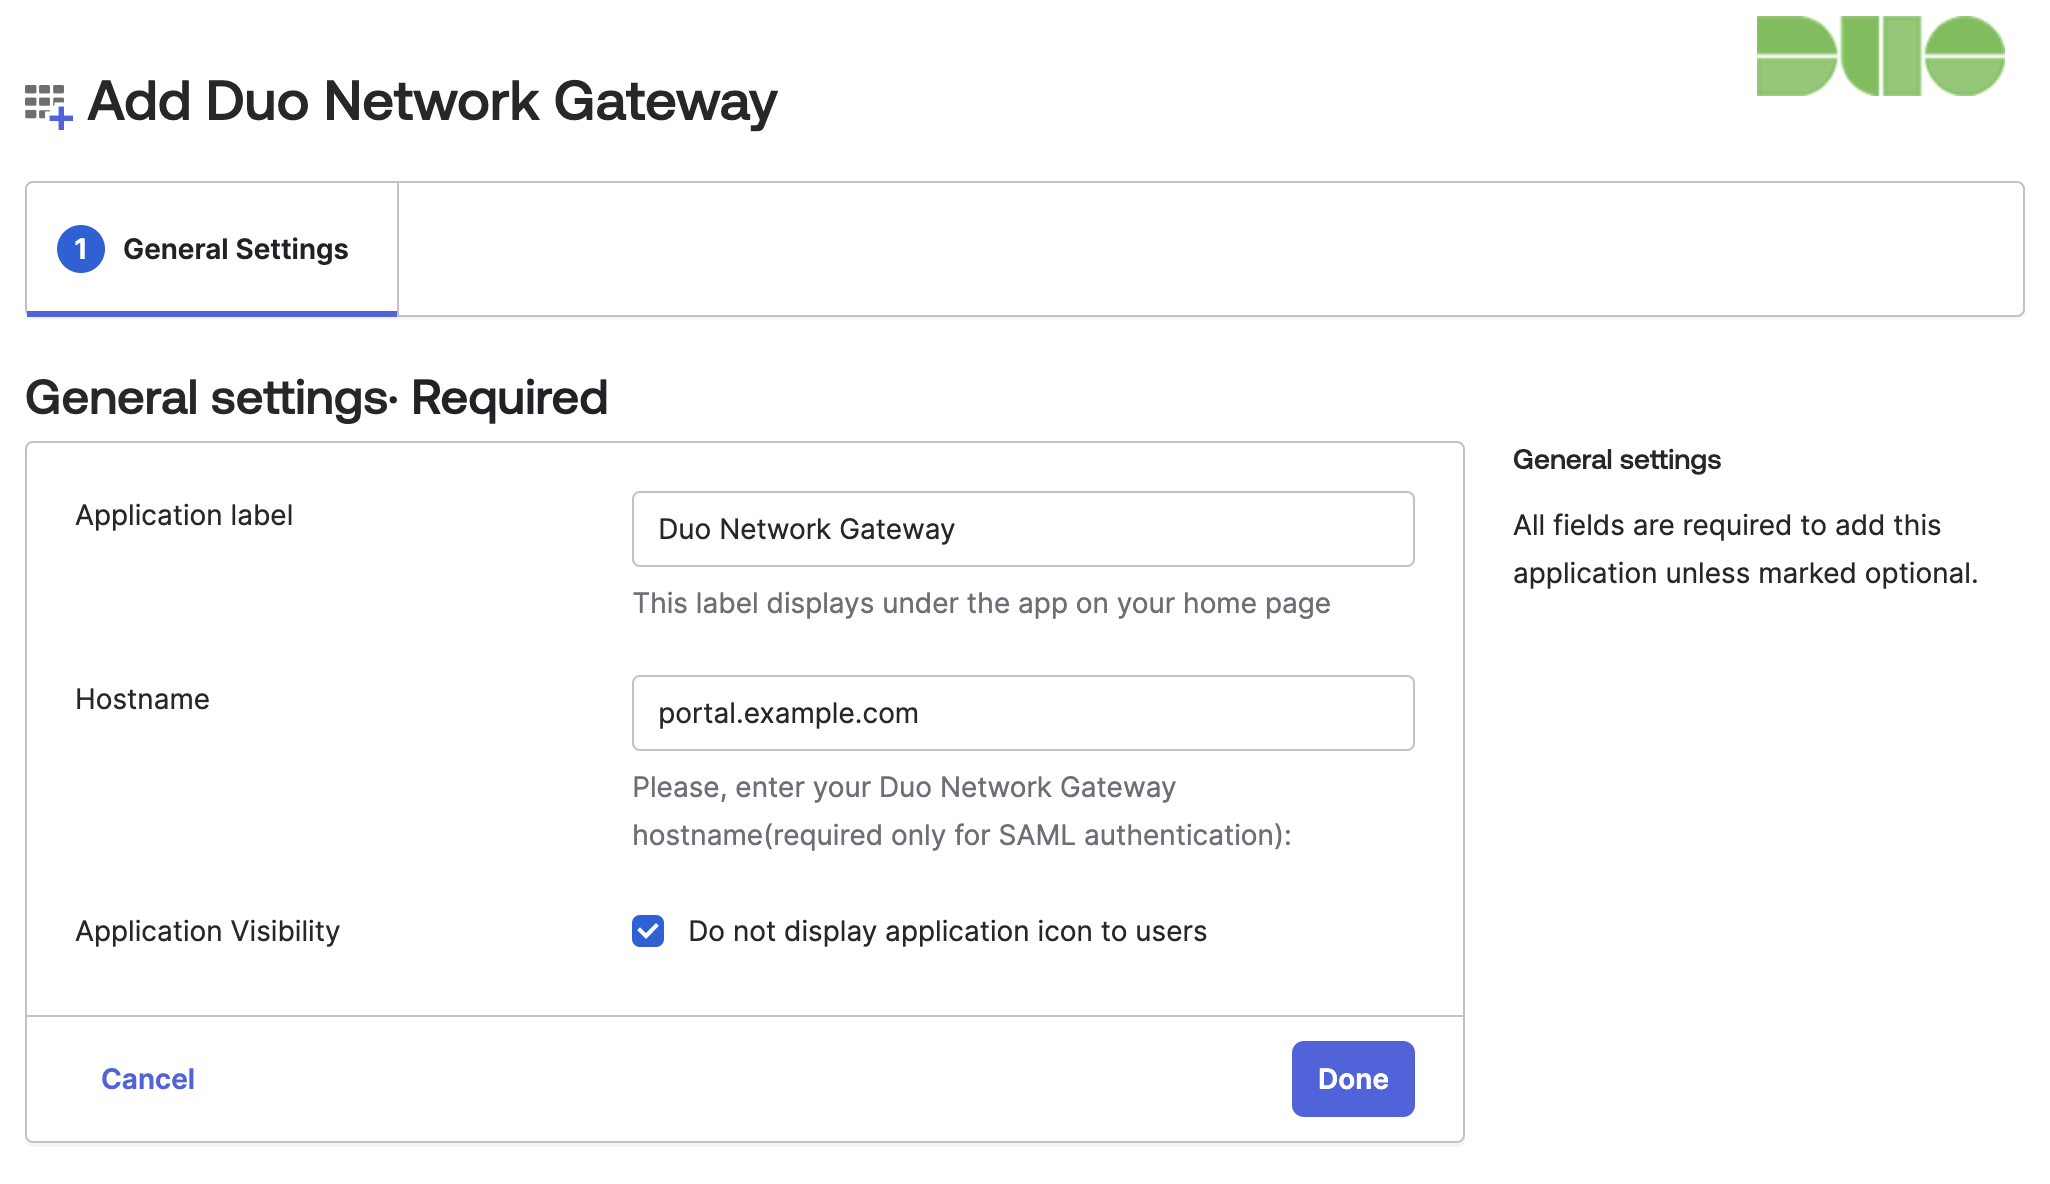
On the "Application" page click Browse App Catalog. Search for and select Duo Network Gateway. Click Add Integration on this application to create it.
-
On the "General Settings" page you can change the name of the application by modifying the text in the Application label field.
-
In the Hostname field enter in the fully-qualified domain name of your Duo Network Gateway server.
Example: If your Duo Network Gateway URL is https://portal.example.com you would type portal.example.com.
-
Check the Do not display application icon to users box next to "Application Visibility".
-
Click Done at the bottom of the screen. The page will reload.
-
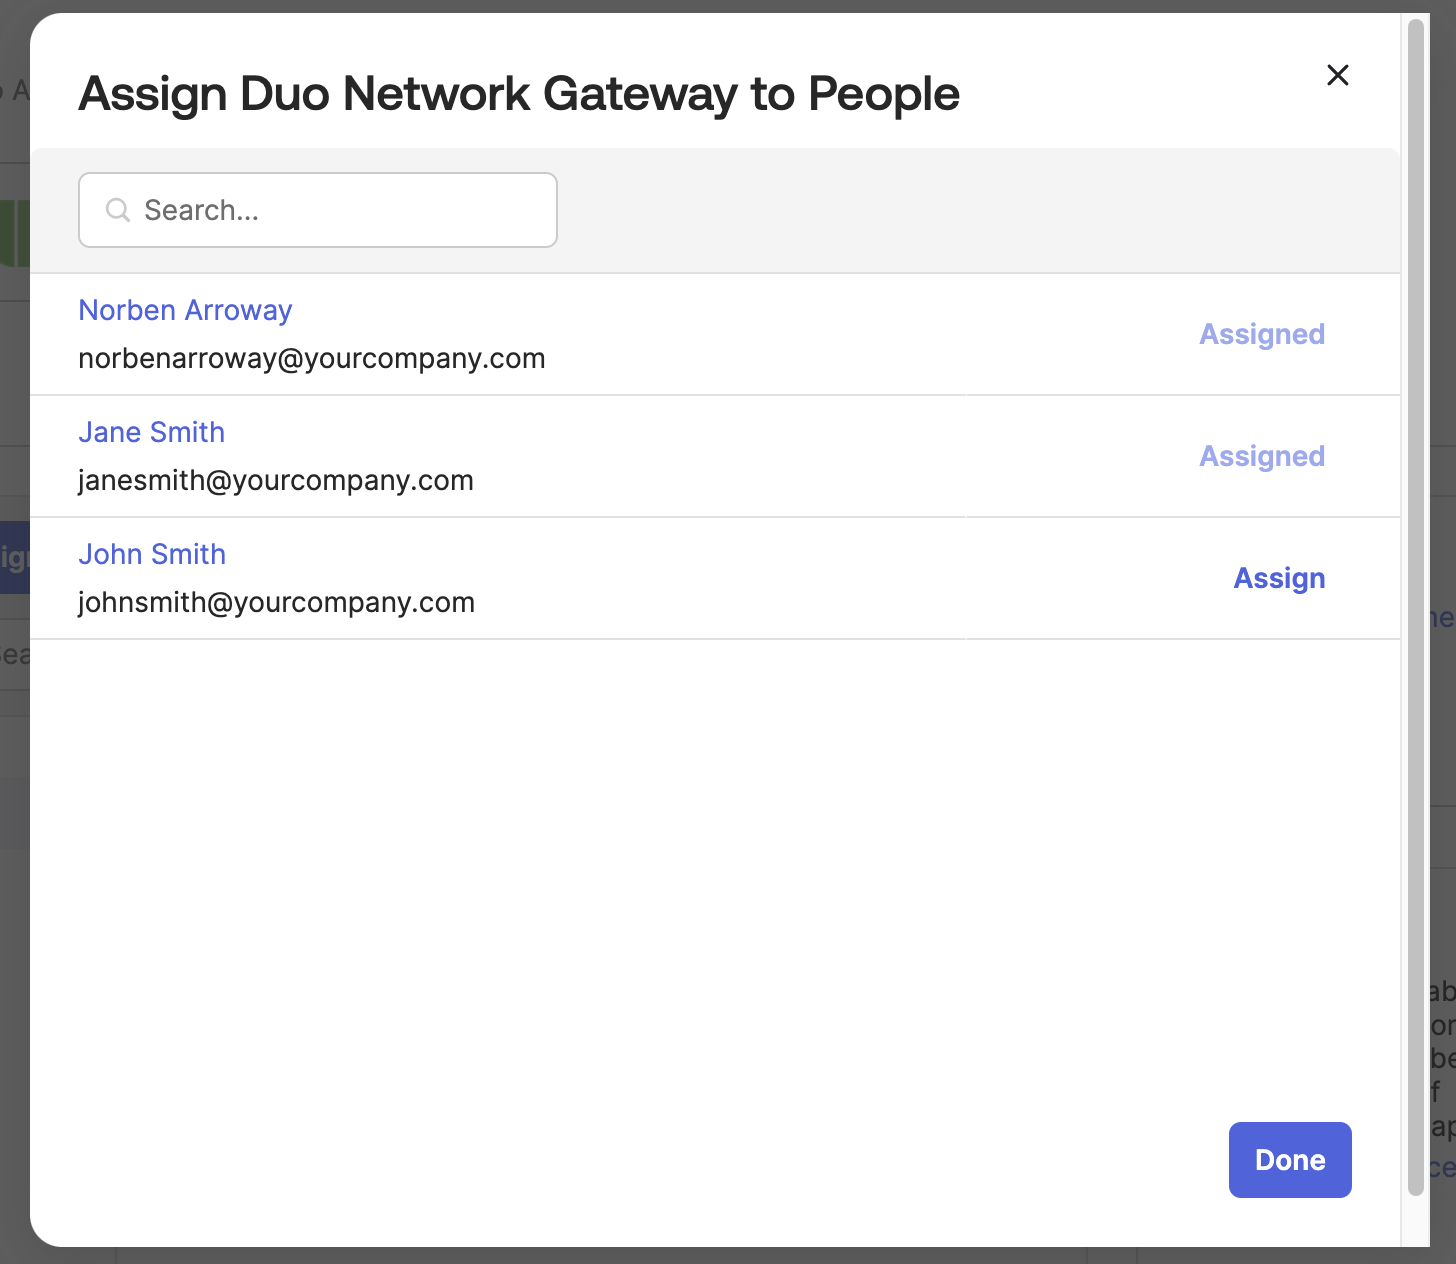
In the "Assignments" tab click on Assign → Assign to People.
-
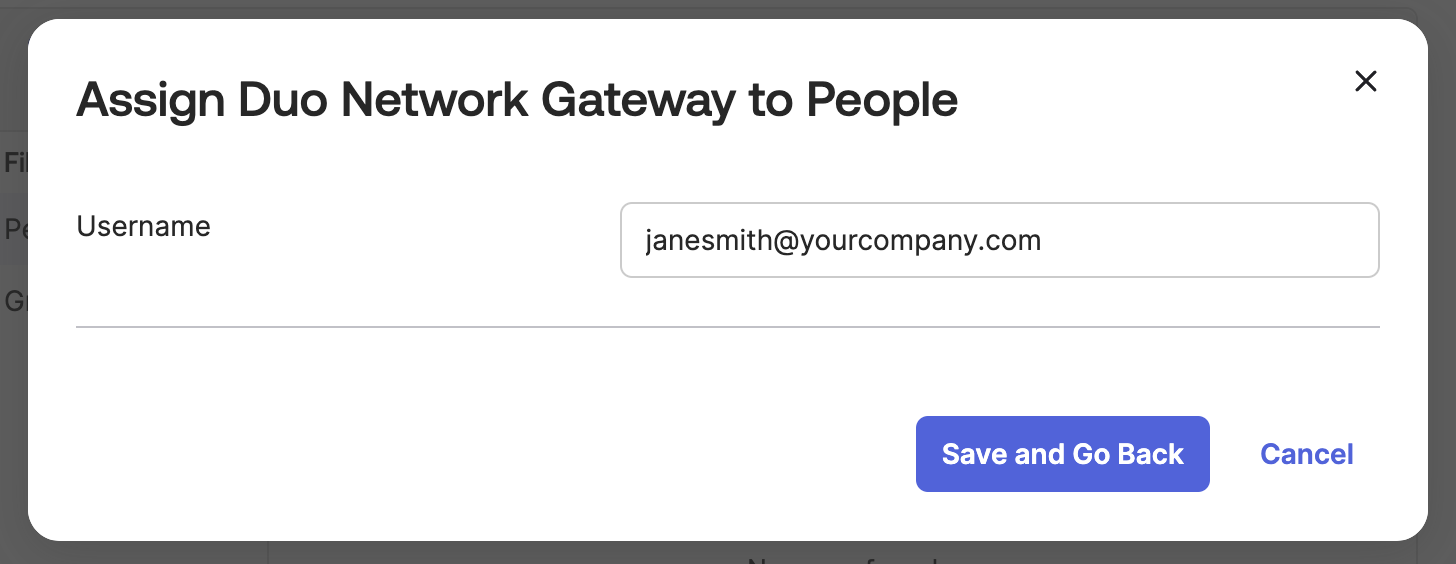
Click Assign next to the user you want to to access the Duo Network Gateway application. The next page will ask you to validate the username field. The username will be checked against Duo when completing two-factor authentication. Modify any usernames as needed and click Save and Go Back. Repeat these steps for each user.
-
Click Done.
-
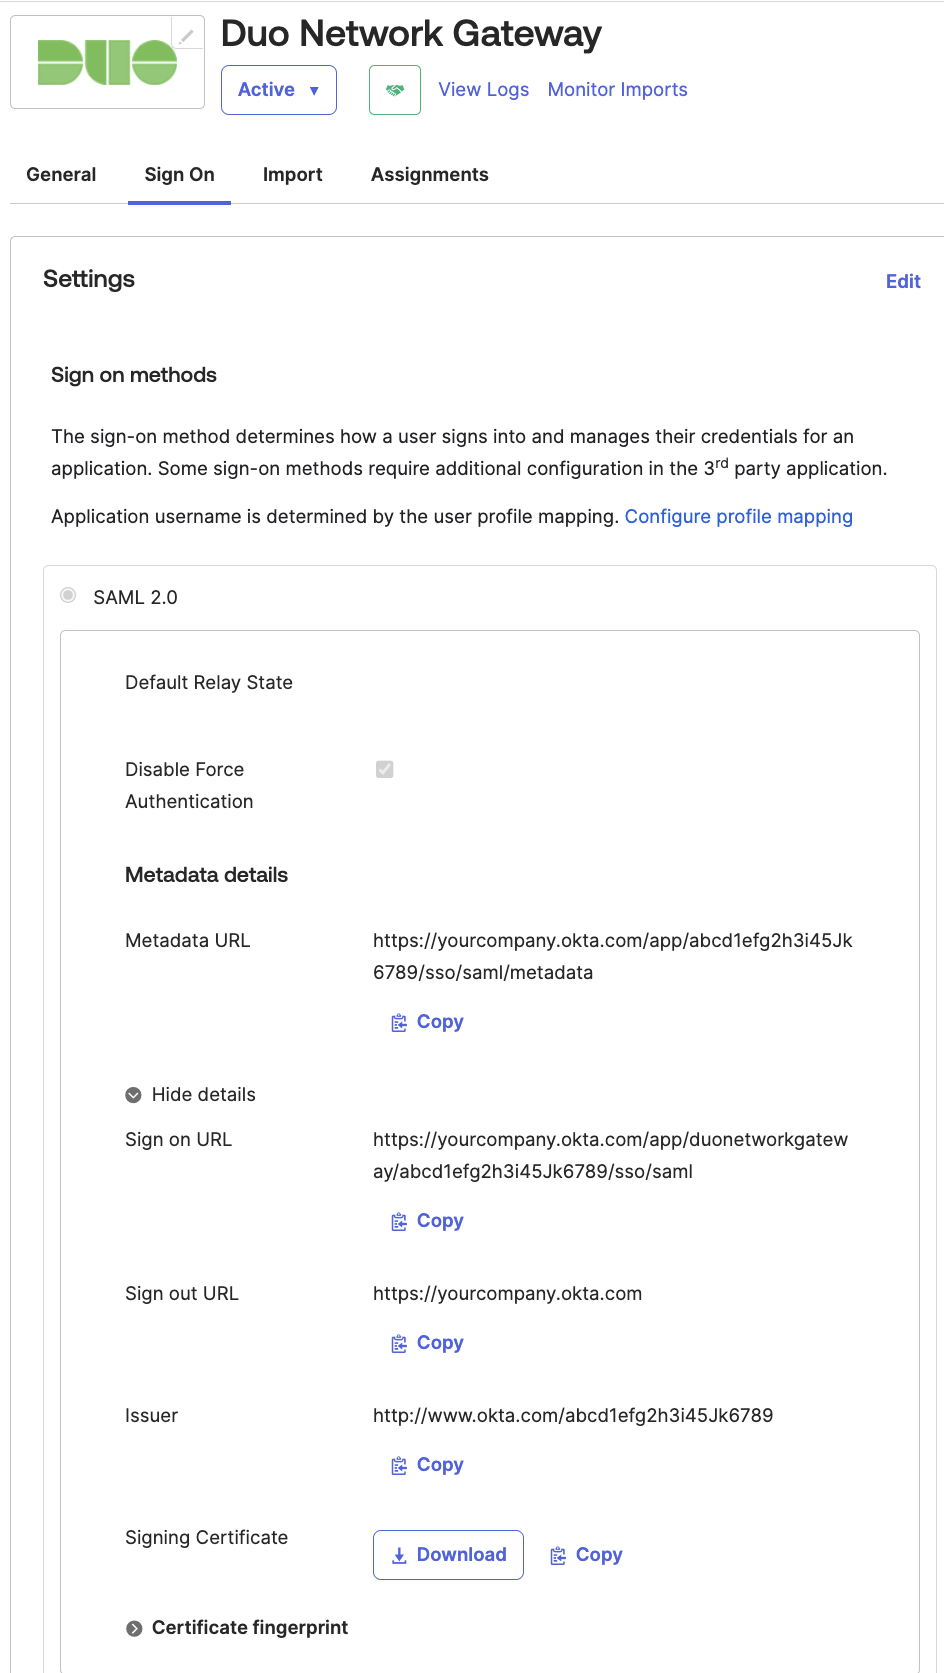
On the "Duo Network Gateway" page click the Sign On tab. Click More details to reveal additional information. You'll need to provide this information to the Duo Network Gateway in the next section.
Configure Duo Network Gateway IdP
-
On the Duo Network Gateway admin console home page click the Authentication Source link under Step 2.
-
Scroll down to the Configure SAML Identity Provider section of the page.
-
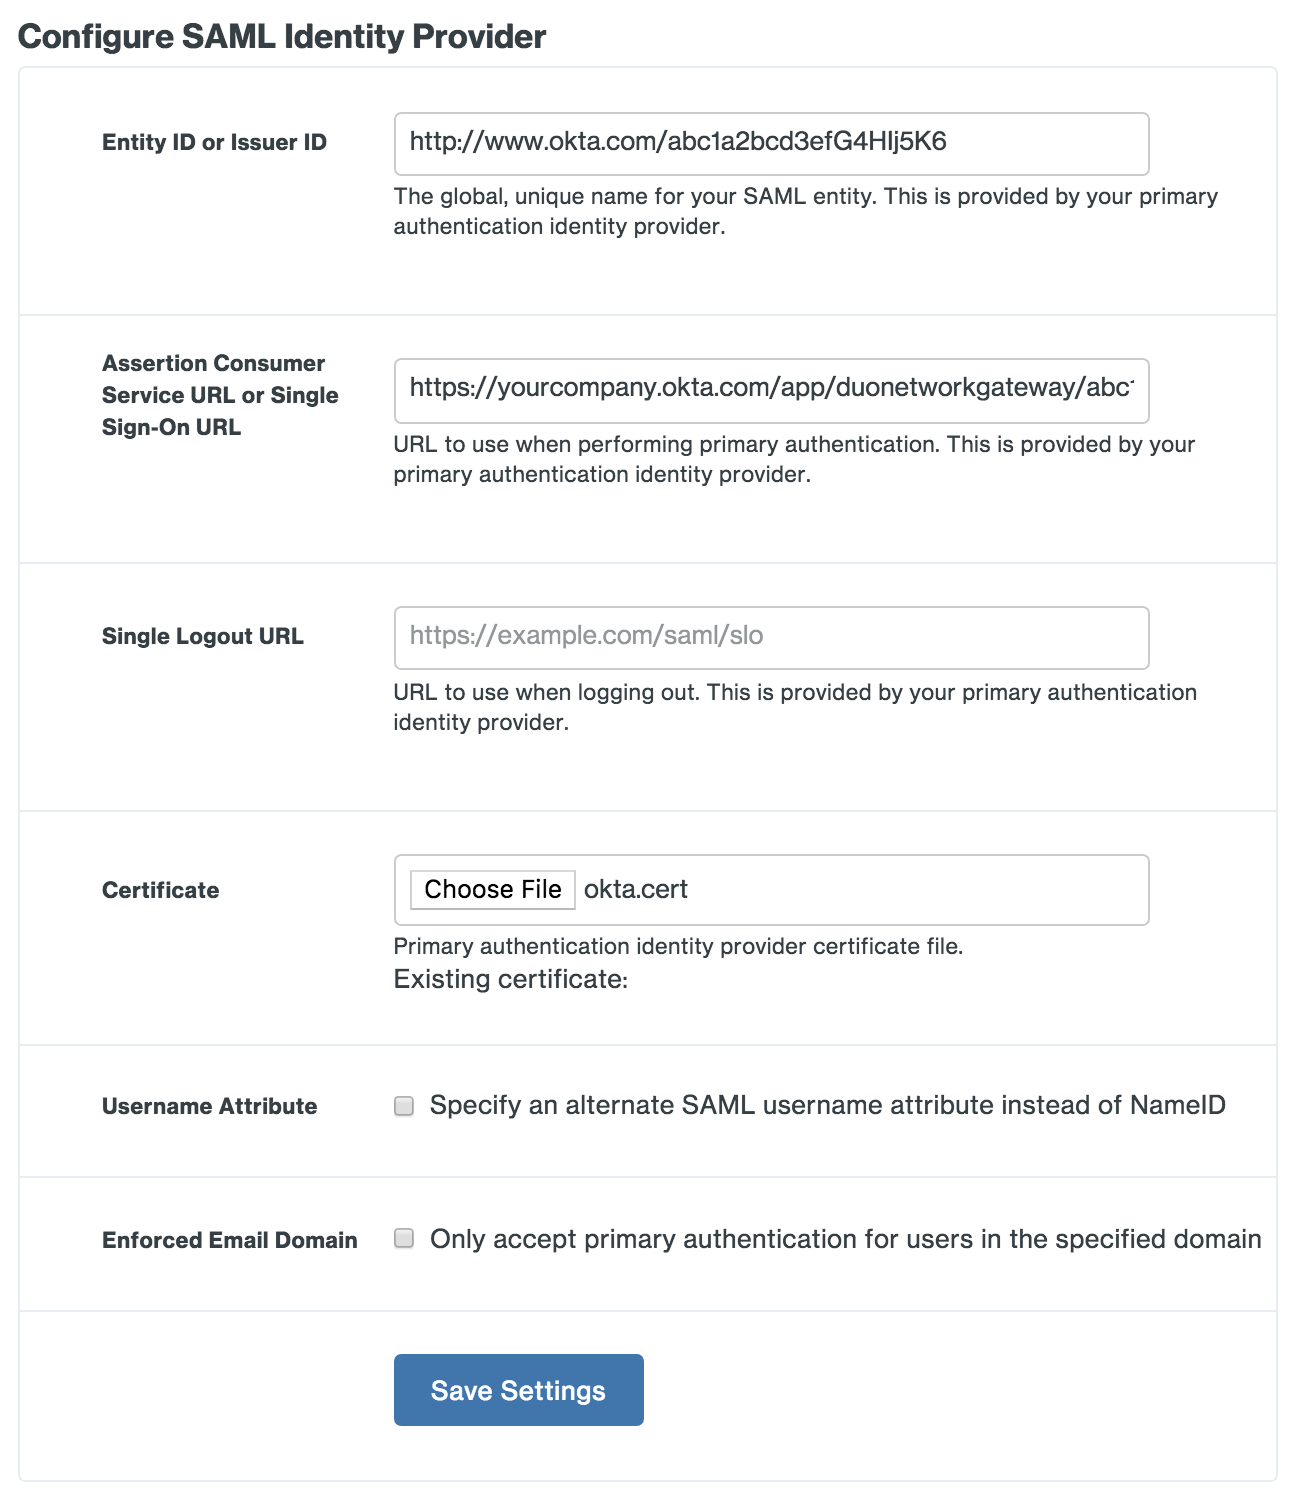
Copy the Issuer value from the Okta SSO page and paste it into the Duo Network Gateway Entity ID or Issuer ID field.
Example: http://www.okta.com/abc1a2bcd3efG4HIj5K6
-
Copy the Sign On URL value from the Okta SSO page and paste it into the Duo Network Gateway Assertion Consumer Service URL or Single Sign-On URL field.
Example: https://example.okta.com/app/duonetworkgateway/abc1a2bcd3efG4HIj5K6/sso/saml
-
Leave the Single Logout URL field blank.
-
Click the Download button next to "Signing Certificate" on the Okta SSO page to download the okta.cert file. Upload the certificate in the Duo Network Gateway Certificate section.
-
Username Attribute is an optional setting. By default Duo Network Gateway will use the NameID field to populate the username. If your SAML IdP sends a different attribute that you'd like to use as your username attribute, you can select the check box and specify the name of the attribute you'd like to use instead.
-
Enforced Email Domain is an optional setting. Enabling this will allow you to enforce that only e-mail addresses within a certain domain are allowed to log into Duo Network Gateway if the username attribute you are using is an e-mail address.
-
After you've entered all the required information click the Save Settings button.
-
Now that you've configured Duo Network Gateway and the primary authentication source you are ready to protect a server with Duo Network Gateway. Duo Network Gateway supports protecting both web applications and SSH servers.
Configure the Duo Network Gateway app in OneLogin
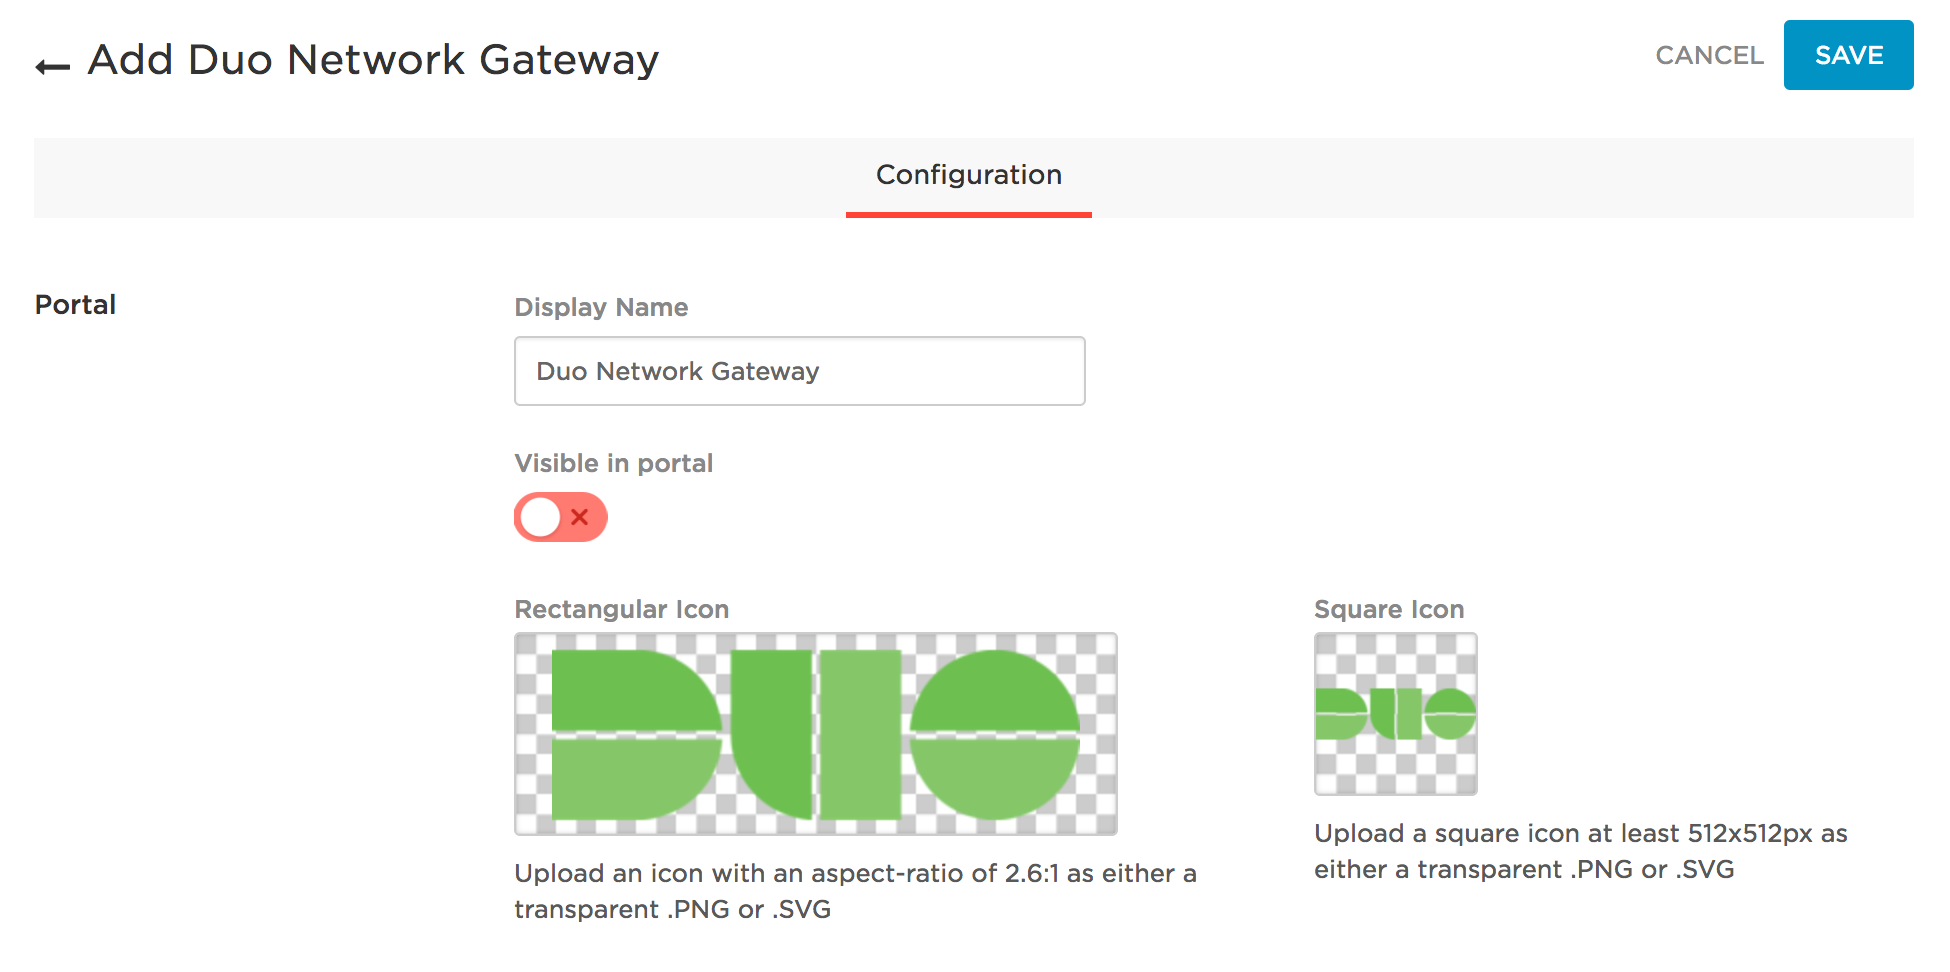
-
Log into OneLogin as an administrative user. Move your mouse over the APPS button at the top of the screen. A drop-down will appear, click Add Apps. You will be taken to a new page.
-
On the "Find Applications" page type Duo Network Gateway into the search field. It should return only one result called "Duo Network Gateway". Click on this application to create it. You'll be taken to a new page.
-
On the "Configuration" page click on the Visible in portal switch to toggle it to off.
-
Click Save at the top of the screen. You'll be taken to a new page.
-
Once you're on the Duo Network Gateway app page click the Configuration tab at the top of the screen. In the Hostname field enter in the fully-qualified domain name of your Duo Network Gateway server.
Example: If your Duo Network Gateway URL is https://portal.example.com you would type portal.example.com.
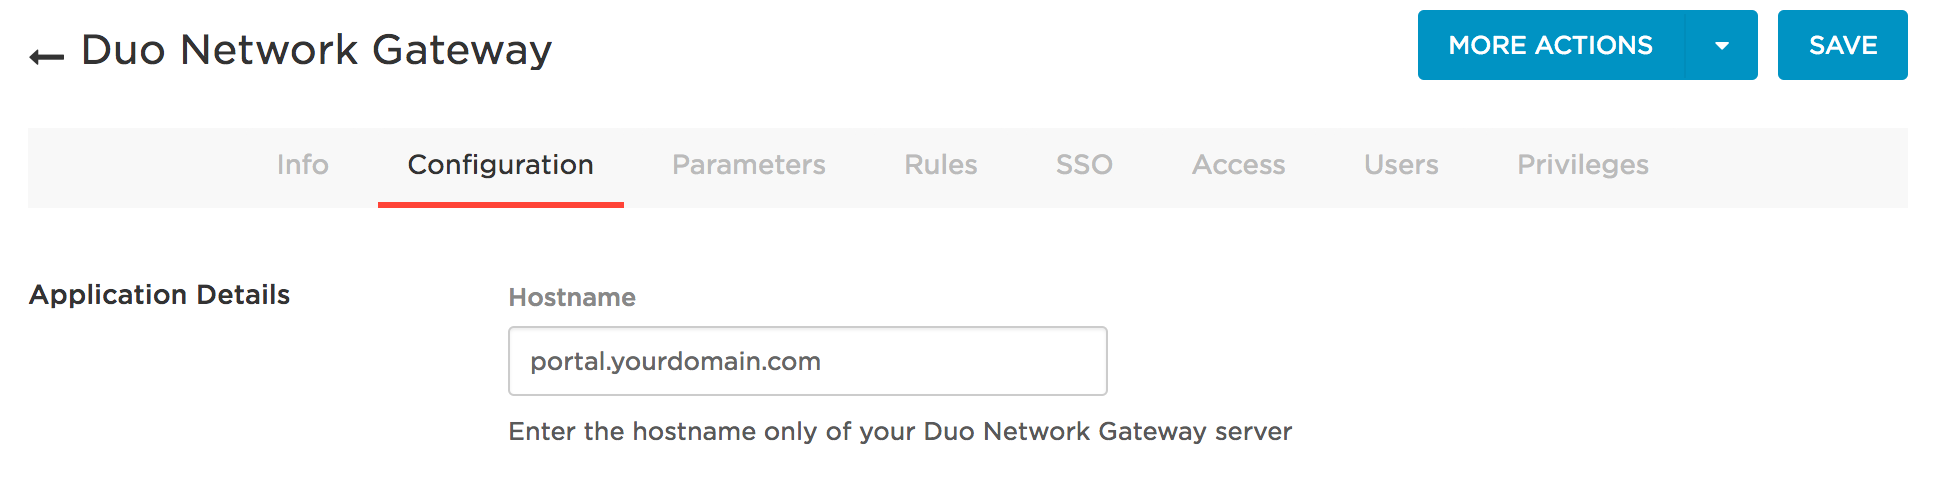
-
Click the Save button.
-
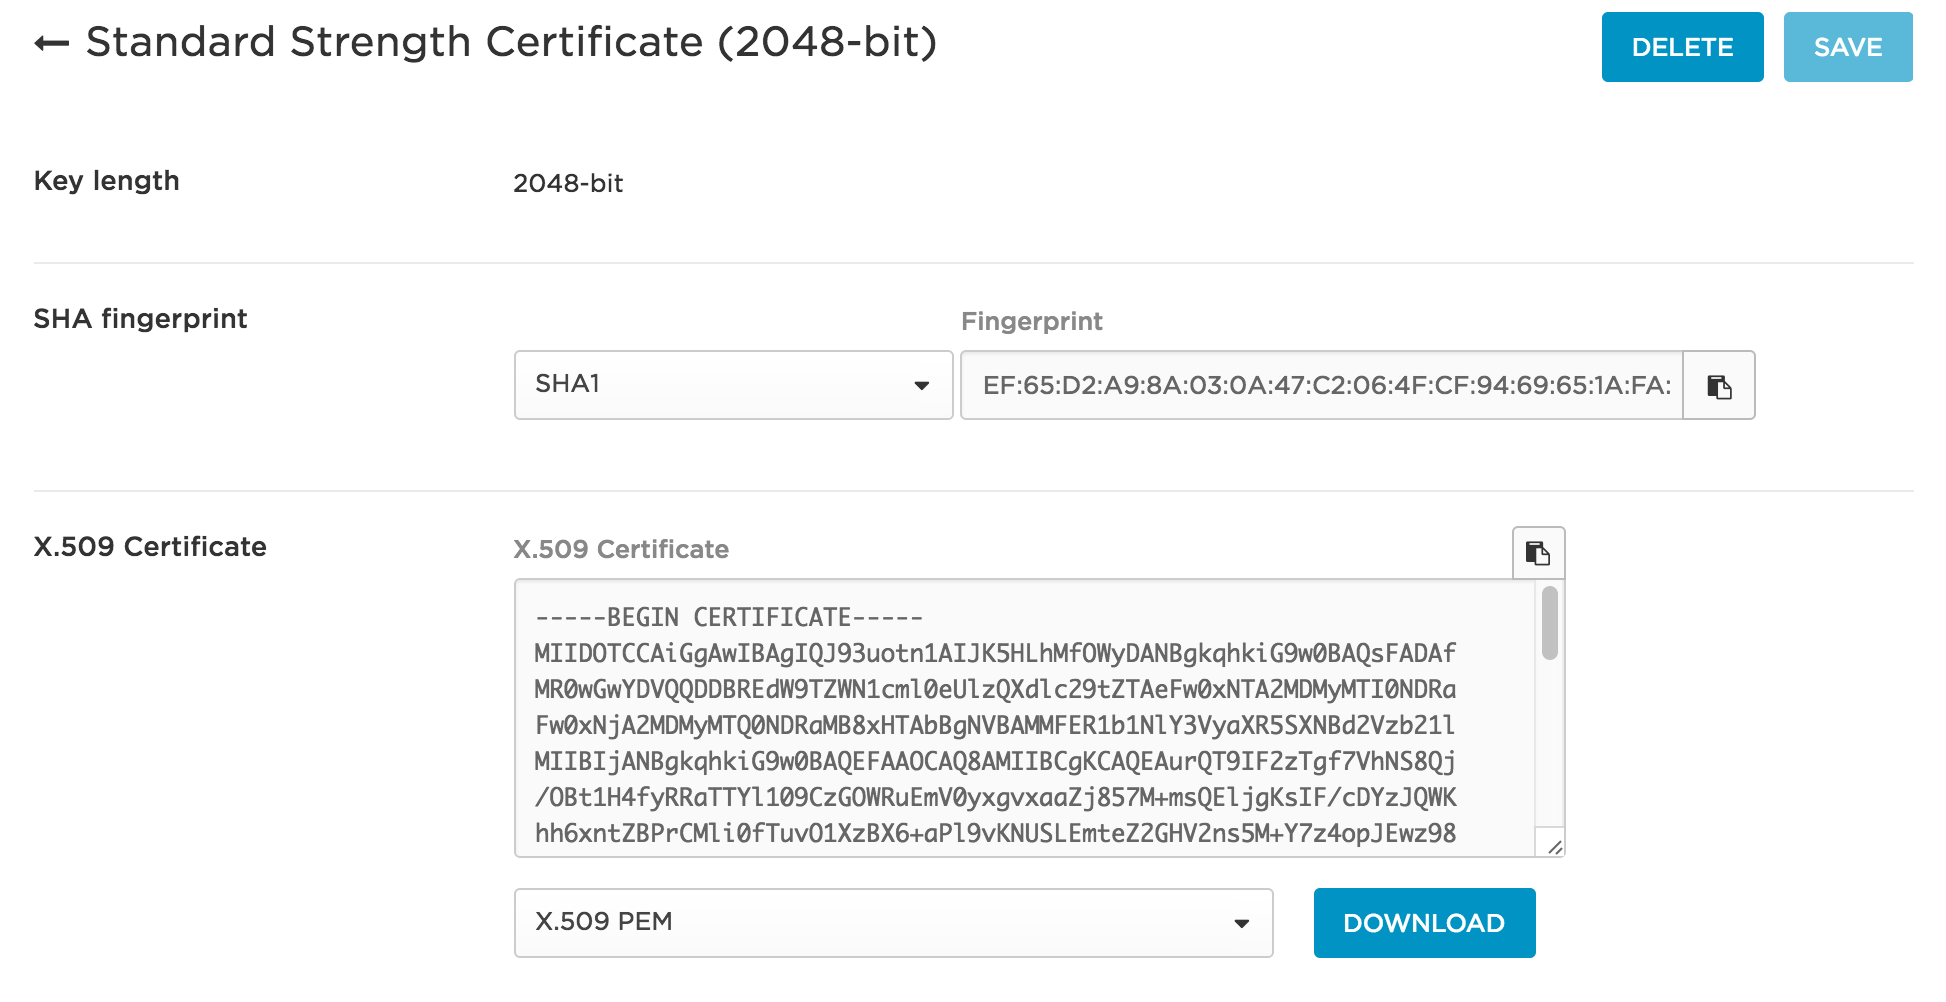
Click the SSO tab at the top of the screen. Under the "X.509 Certificate" click View Details, you'll be taken to a new page.
-
On the "Standard Strength Certificate (2048-bit)" page under "X.509 Certificate" select X.509 PEM from the drop-down and click DOWNLOAD. This will download a onelogin.pem file that you'll need when configuring the Duo Network Gateway.
-
Return to the OneLogin SSO page. You'll need to provide information from the "SSO" page for configuring the Duo Network Gateway.
-
You can now assign users in OneLogin to have access to the Duo Network Gateway app.
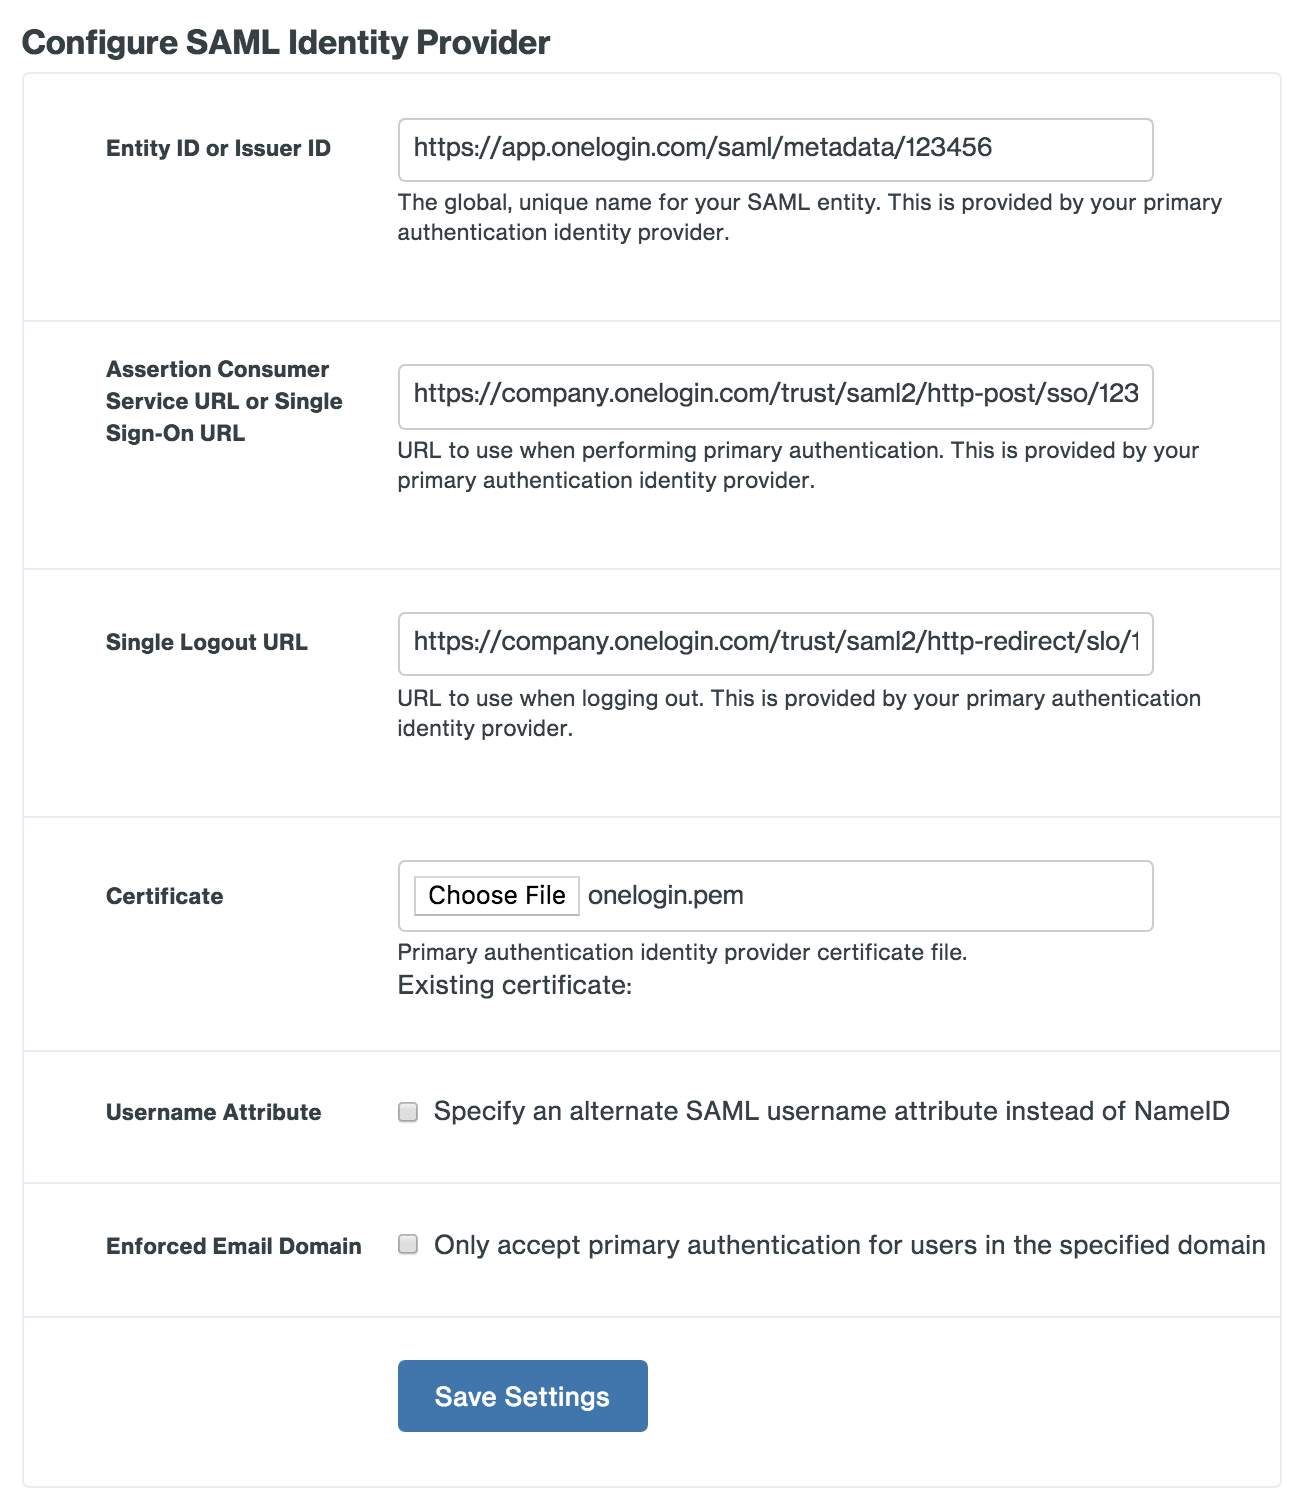
Configure Duo Network Gateway IdP
-
On the Duo Network Gateway admin console home page click the Authentication Source link under Step 2.
-
Scroll down to the Configure SAML Identity Provider section of the page.
-
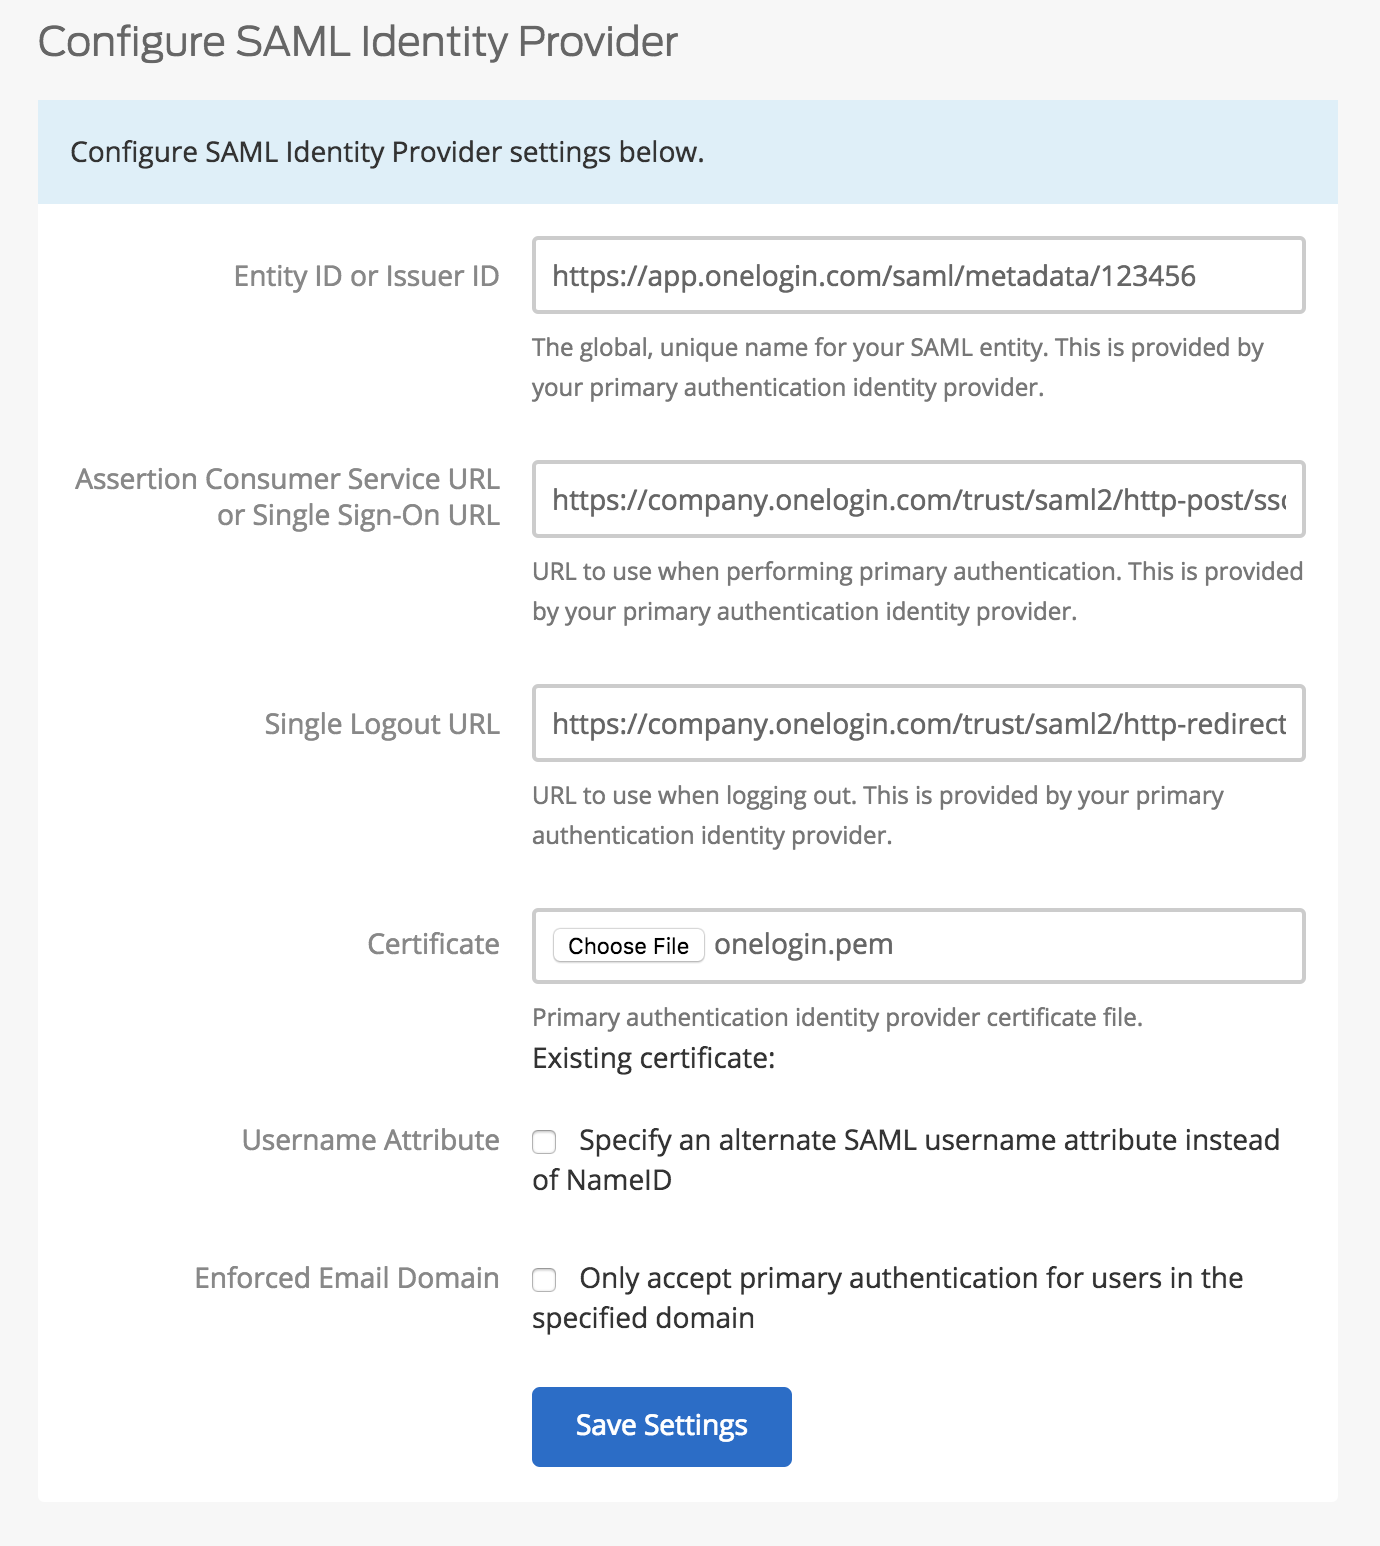
Copy the Issuer URL from the OneLogin SSO page and paste it into the Duo Network Gateway Entity ID or Issuer ID field.
Example: https://app.onelogin.com/saml/metadata/123456
-
Copy the SAML 2.0 Endpoint (HTTP) from the OneLogin SSO page and paste it into the Duo Network Gateway Assertion Consumer Service URL or Single Sign-On URL field.
Example: https://company.onelogin.com/trust/saml2/http-post/sso/123456
-
Copy the SLO Endpoint (HTTP) from the OneLogin SSO page and paste it into the Duo Network Gateway Single Logout URL field.
Example: https://company.onelogin.com/trust/saml2/http-redirect/slo/123456
-
The "Certificate" is the OneLogin certificate you downloaded earlier. Click the Choose File button to select the onelogin.pem file. Upload the certificate.
-
Username Attribute is an optional setting. By default Duo Network Gateway will use the NameID field to populate the username. If your SAML IdP sends a different attribute that you'd like to use as your username attribute, you can select the check box and specify the name of the attribute you'd like to use instead.
-
Enforced Email Domain is an optional setting. Enabling this will allow you to enforce that only e-mail addresses within a certain domain are allowed to log into Duo Network Gateway if the username attribute you are using is an e-mail address.
-
After you've entered all the required information click the Save Settings button.
-
Now that you've configured Duo Network Gateway and the primary authentication source you are ready to protect a server with Duo Network Gateway. Duo Network Gateway supports protecting both web applications and SSH servers.
Other SAML Providers
-
On the Duo Network Gateway admin console home page click the Authentication Source link under Step 2.
-
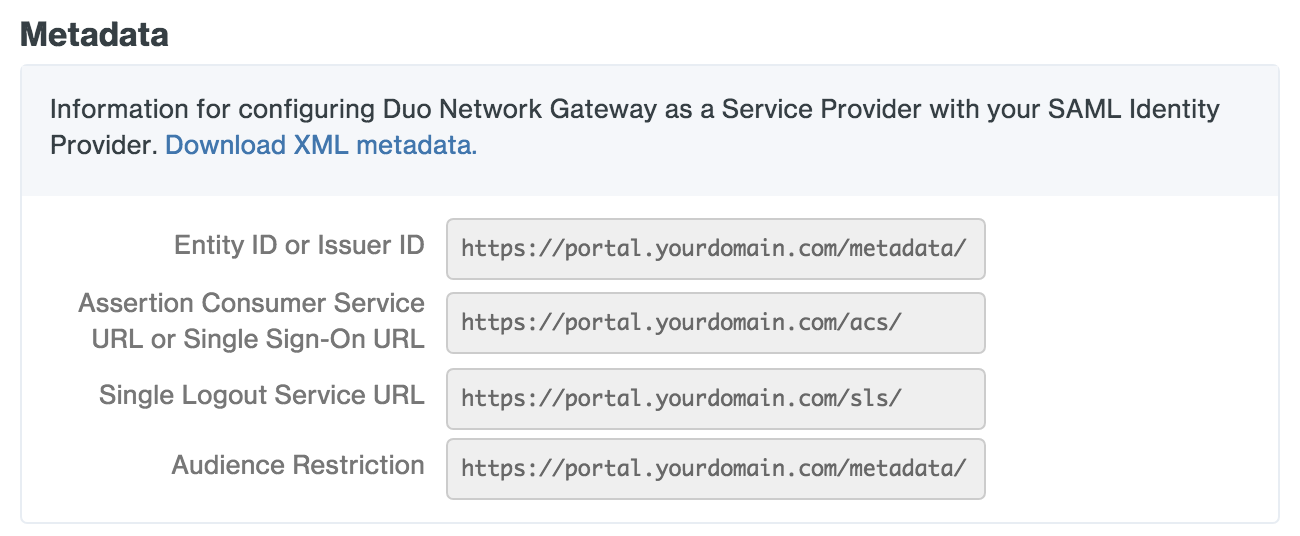
On the "Primary Authentication" page scroll down to Metadata. You will need to provide this information about Duo Network Gateway to your primary authentication source.
-
Add Duo Network Gateway as a SAML Service Provider or Relying Party to the SAML Identity Provider (IdP) of your choice.
- Use the metadata to fill out information related to the Duo Network Gateway server during the setup.
- Configure your SAML IdP to send the NameIDFormat as
urn:oasis:names:tc:SAML:1.1:nameid-format:unspecifiedwith the NameID value containing the Duo username. - Save the certificate generated by your SAML IdP, you will need this later.
-
Once you've configured Duo Network Gateway as a SAML Service Provider on your SAML IdP you will need to configure the Duo Network Gateway server to use your IdP. Use the table below and fill in the follow fields:
Option Description Entity ID or Issuer ID The global, unique name for your SAML entity. Obtain this from your SAML authentication identity provider. Assertion Consumer Service URL or Single Sign-On URL URL to use when performing primary authentication. This is provided by your primary authentication identity provider. Single logout URL Optional: URL to use when logging out. This is provided by your primary authentication identity provider. Certificate The Base64-encoded X.509 certificate provided by your SAML IdP. Username Attribute Optional: By default Duo Network Gateway will use the NameID field to populate the username. If your SAML IdP sends a different attribute that you'd like to use as your username attribute, you can select the check box and specify the name of the attribute you'd like to use instead. Enforced Email Domain Optional: Enabling this will allow you to enforce that only e-mail addresses within a certain domain are allowed to log into Duo Network Gateway. 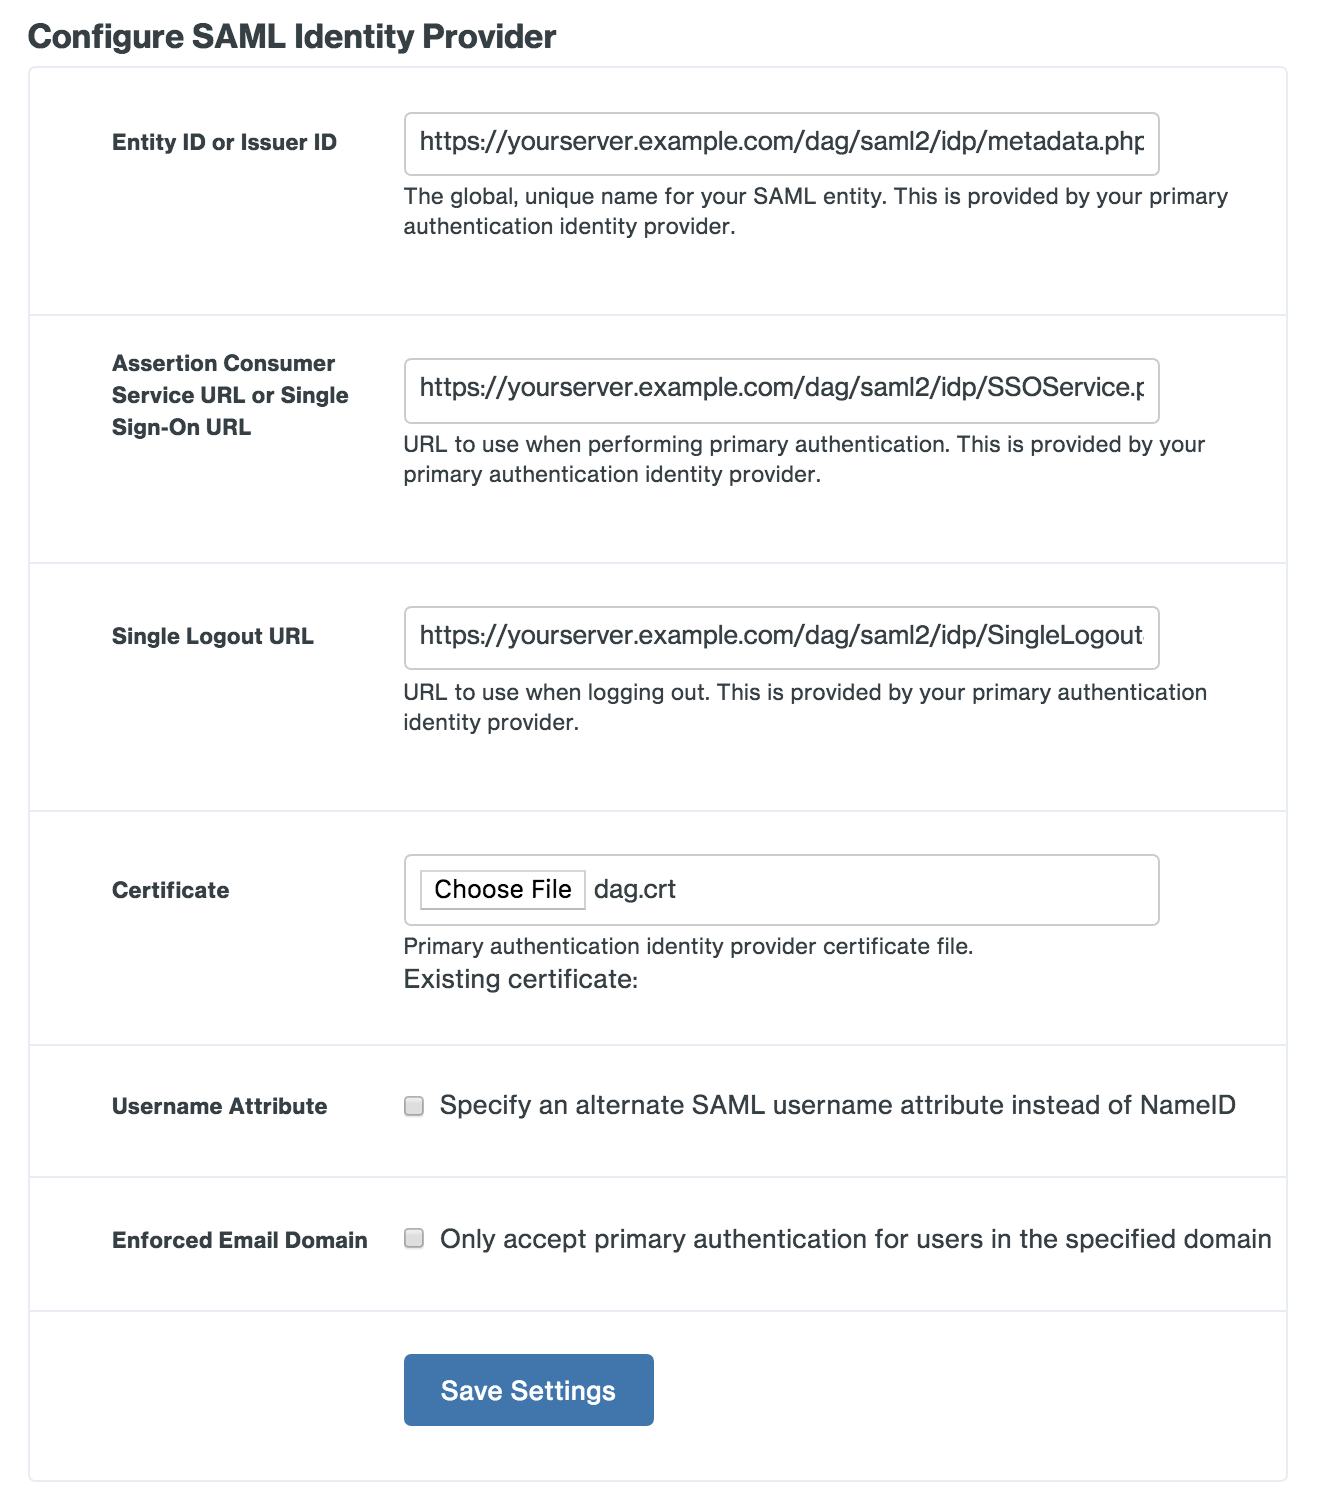
-
Once you've filled in all the required fields, click Save Settings.
-
Now that you've configured Duo Network Gateway and the primary authentication source you are ready to protect a server with Duo Network Gateway. Duo Network Gateway supports protecting web applications and SSH servers, and as of version 1.6.0 can protect Remote Desktop Protocol (RDP) connections as well.
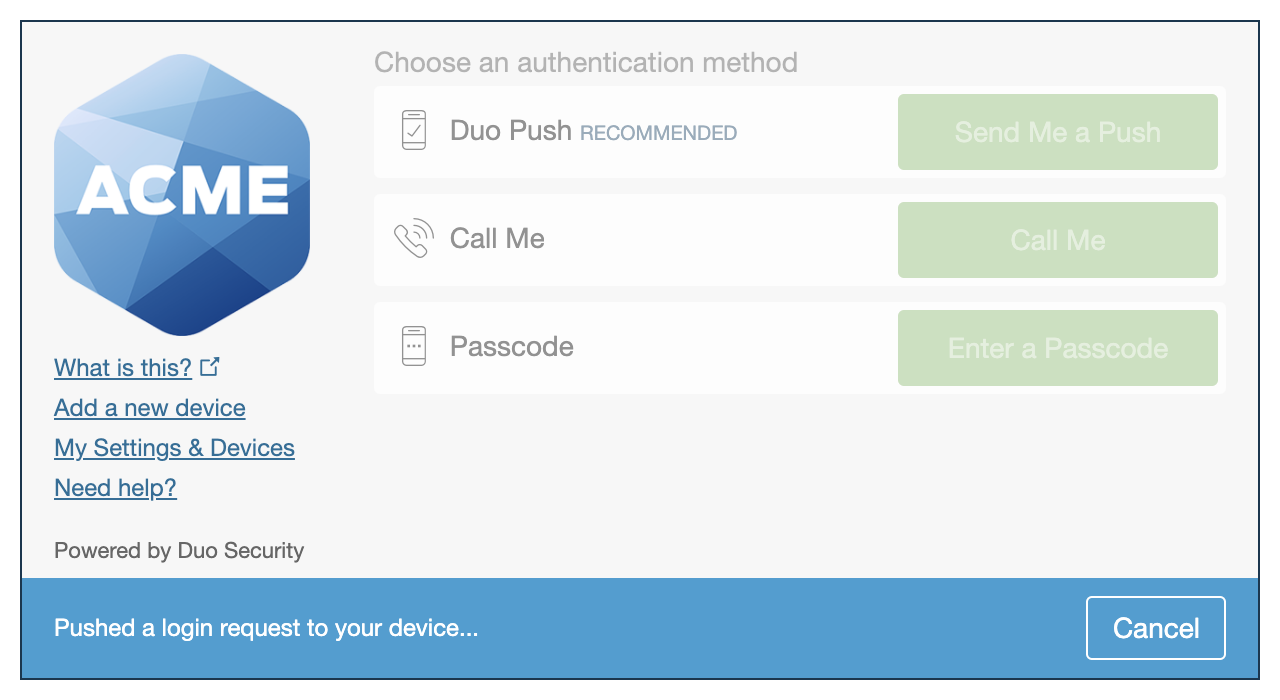
Duo Universal Prompt
The Duo Universal Prompt provides a simplified and accessible Duo login experience for web-based applications, offering a redesigned visual interface with security and usability enhancements.
| Universal Prompt | Traditional Prompt |
 |
 |
For Duo Network Gateway applications created before March 2024, migration to Universal Prompt is a three-step process:
- Install an update for the Duo Network Gateway application, which implements a redirect to Duo during authentication to support the Universal Prompt.
- Authenticate with Duo 2FA using the updated application so that Duo makes the Universal Prompt activation setting available in the Admin Panel. This first authentication after updating shows the traditional Duo prompt in a redirect instead of an iframe.
- From the Duo Admin Panel, activate the Universal Prompt experience for users of that Duo Duo Network Gateway application if the traditional prompt is still selected. Once activated, all users of the application see the Duo Universal Prompt in a redirect.
If you created your Duo Network Gateway application before March 2024, it's a good idea to read the Universal Prompt Update Guide for more information, about the update process and the new login experience for users, before you activate the Universal Prompt for your application.
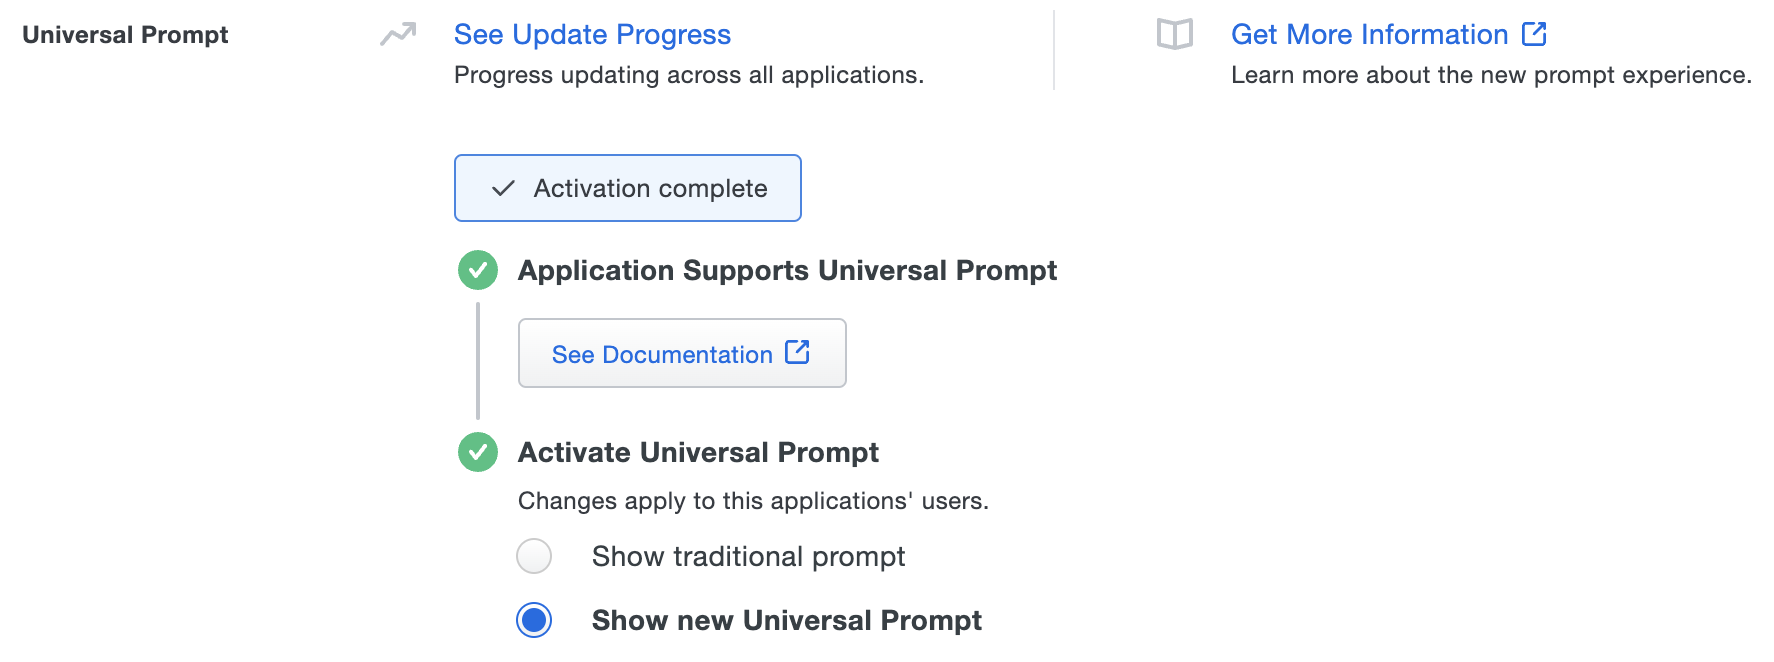
New Duo Network Gateway Applications
When you install the latest version of Duo Network Gateway you're ready to use the Universal Prompt. Duo Network Gateway applications created after March 2024 have the Universal Prompt activated by default. If you're configuring Duo Network Gateway now, proceed with the installation instructions in this document.
The "Universal Prompt" area of the application details page shows that this application is "Activation complete", with these activation control options:
- Show traditional prompt: Your users experience Duo's traditional prompt via redirect when logging in to this application.
- Show new Universal Prompt: (Default) Your users experience the Universal Prompt via redirect when logging in to this application.
Existing Duo Network Gateway Applications
Duo Network Gateway needs a software update installed to support the Universal Prompt. The "Universal Prompt" section of your existing Duo Network Gateway application reflects this status as "Update required". To update Duo Network Gateway application to a newer version, follow the update directions below.
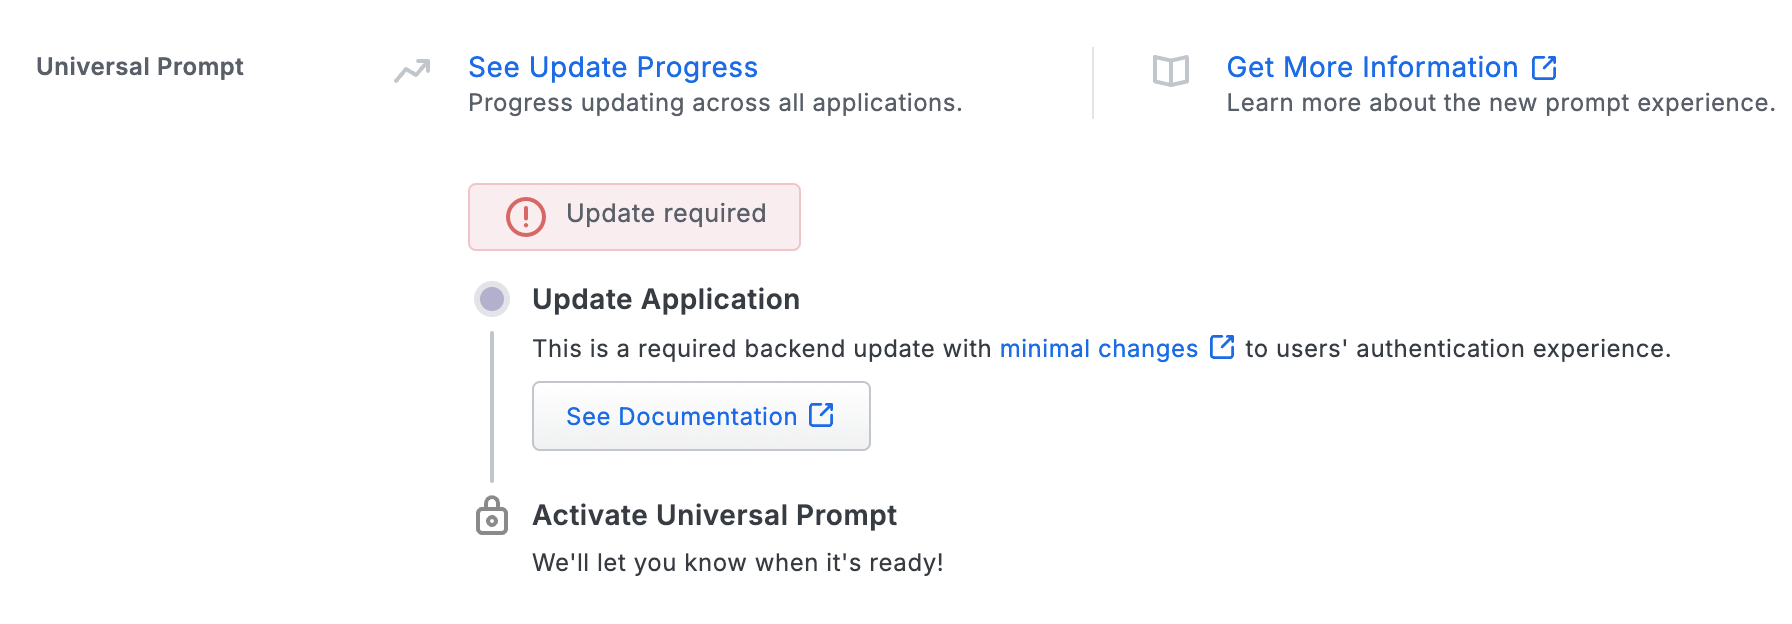
Once a user authenticates to Duo Network Gateway via the updated Duo plugin, the "Universal Prompt" section of the Duo Network Gateway application page reflects this status as "Ready to activate", with these activation control options:
- Show traditional prompt: (Default) Your users experience Duo's traditional prompt via redirect when logging in to this application.
- Show new Universal Prompt: Your users experience the Universal Prompt via redirect when logging in to this application.

In addition, the "Integration key" and "Secret key" property labels for the application update to "Client ID" and "Client secret" respectively. The values for these properties remain the same.
Activate Universal Prompt
Activation of the Universal Prompt is a per-application change. Activating it for one application does not change the login experience for your other Duo applications.
Enable the Universal Prompt experience by selecting Show new Universal Prompt, and then scrolling to the bottom of the page to click Save.
Once you activate the Universal Prompt, the application's Universal Prompt status shows "Activation Complete" here and on the Universal Prompt Update Progress report.
Should you ever want to roll back to the traditional prompt, you can return to this setting and change it back to Show traditional prompt. However, this will still deliver the Duo prompt via redirect, not in an iframe. Keep in mind that support for the traditional Duo prompt ended for the majority of applications in March 2024.
Universal Update Progress
Click the See Update Progress link to view the Universal Prompt Update Progress report. This report shows the update availability and migration progress for all your Duo applications. You can also activate the new prompt experience for multiple supported applications from the report page instead of visiting the individual details pages for each application.
Protect a Web Application with Duo Network Gateway
Duo Network Gateway allows your users to access internal web applications without having to join a VPN. Users will be able to access the internal web application after verifying their identity with a first factor and Duo MFA.
Web Application Prerequisites
- Identify the web application you'd like to protect with Duo Network Gateway and verify that Duo Network Gateway is able to communicate locally with the application.
- Create or update the public DNS record of your application to point to the Duo Network Gateway server.
Example: If you have an internal wiki you're protecting you could create a public CNAME DNS record of "wiki.example.com" and point it at the Duo Network Gateway record. - Obtain an SSL certificate for your application from a commercial certificate authority (CA) using the fully qualified external DNS name of your application as the common name (e.g. yourinternalapp.example.com). This secures the connection between your external users and the Duo Network Gateway server. You can also generate a free, automatically renewing certificate from Let's Encrypt during setup.
- If the application you'll be protecting is already communicating over HTTPS you will also need to obtain the Base64-encoded X.509 (pem, cer, or crt) formatted version of the application's certificate bundle including the issuing certificates and the root certificate. You may also use a wildcard SSL certificate.
Create a Duo Network Gateway Web Application in Duo
-
Log in to the Duo Admin Panel and navigate to Applications → Application Catalog.
-
Locate the entry for Duo Network Gateway - Web Application with the "2FA" label in the catalog. Click the + Add button to create the application and get your Client ID, Client secret, and API hostname. You'll need this information to complete your setup. See Protecting Applications for more information about protecting applications with Duo and additional application options.
Previously, the Client ID was called the "Integration key" and the Client secret was called the "Secret key".
-
No active Duo users can log in to new applications until you grant access. Update the User access setting to grant access to this application to users in selected Duo groups, or to all users. Learn more about user access to applications. If you do not change this setting now, be sure to update it so that your test user has access before you test your setup.
This setting only applies to users who exist in Duo with "Active" status. This does not affect application access for existing users with "Bypass" status, existing users for whom the effective Authentication Policy for the application specifies "Bypass 2FA" or "Skip MFA", or users who do not exist in Duo when the effective New User Policy for the application allows access to users unknown to Duo without MFA. -
You can adjust additional settings for your new Duo Network Gateway application at this time — like changing the application's name from the default value, enabling self-service, or assigning a group policy — or come back and change the application's policies and settings after you finish setup. If you do update any settings, click the Save button at the bottom of the page when done.
Configure a Web Application in Duo Network Gateway
-
Return to the Duo Network Gateway admin console and click the Applications link on the left-hand side of the screen.
-
On the "Applications" page click Add New... and select Web App from the drop-down options. You will be taken to a new page.
-
Under "Configure Duo 2FA" enter the information from the application you created earlier from the Duo Admin Panel.
Option Description Duo Integration key Copy and paste in the Client ID from the Duo Network Gateway application you created earlier in the Duo Admin Panel. Duo Secret key Copy and paste in the Client secret from the Duo Network Gateway application you created earlier in the Duo Admin Panel. Duo API hostname Copy and paste in the API hostname from the Duo Network Gateway application you created earlier in the Duo Admin Panel. Enable Frameless Turns on frameless support for Duo Universal Prompt in Duo Network Gateway versions 1.5.10 to 3.1.0. DNG 3.2.0 enables frameless authentication by default for all applications, so this configuration option has been removed. 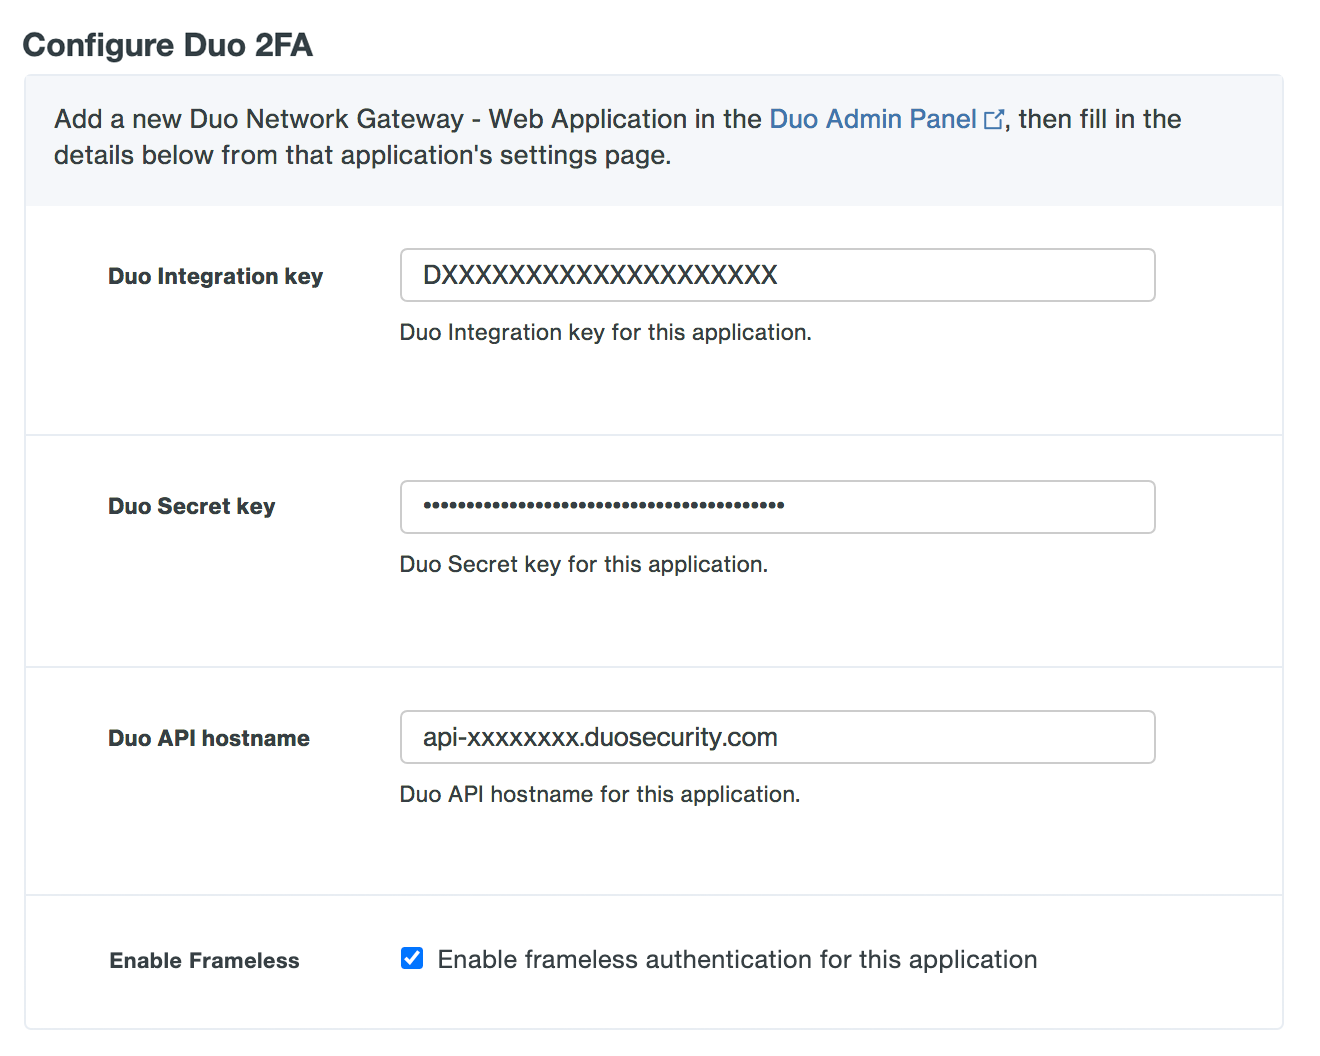
-
Scroll down to the "External Website Settings" section. In the External URL field enter the public facing URL of the web application Duo Network Gateway is protecting (eg. https://wiki.example.com). This URL can be the same as the internal application URL but is not required to match. Ensure that this hostname resolves to the external IP address of your Duo Network Gateway server.
A wildcard external URL such as https://*.example.com can also be used, which will automatically route all subdomains of example.com to this application that are not already defined as a separate application in Duo Network Gateway. When using a wildcard URL the internal application must be able to distinguish between the various hostnames.
If you do reuse the same URL for internal and external, ensure that there is also an internal DNS record in place for this hostname that resolves to the application server's internal IP address.
-
If you will be supplying your own SSL certificate select Provide my own certificate next to Certificate Source. Configure the certificate using the table below and skip step 7. If you would like to automatically generate certificates, skip this step and proceed to step 7.
Option Description External SSL certificate Base64-encoded X.509 (pem, cer, or crt) public certificate to present for the external URL of the application. We recommend including the entire certificate chain in the certificate file. The certificates should be ordered from top to bottom: certificate, issuing certificates, and root certificate. External SSL certificate key Base64-encoded X.509 (pem, cer, or crt) private key for the application's external URL certificate. 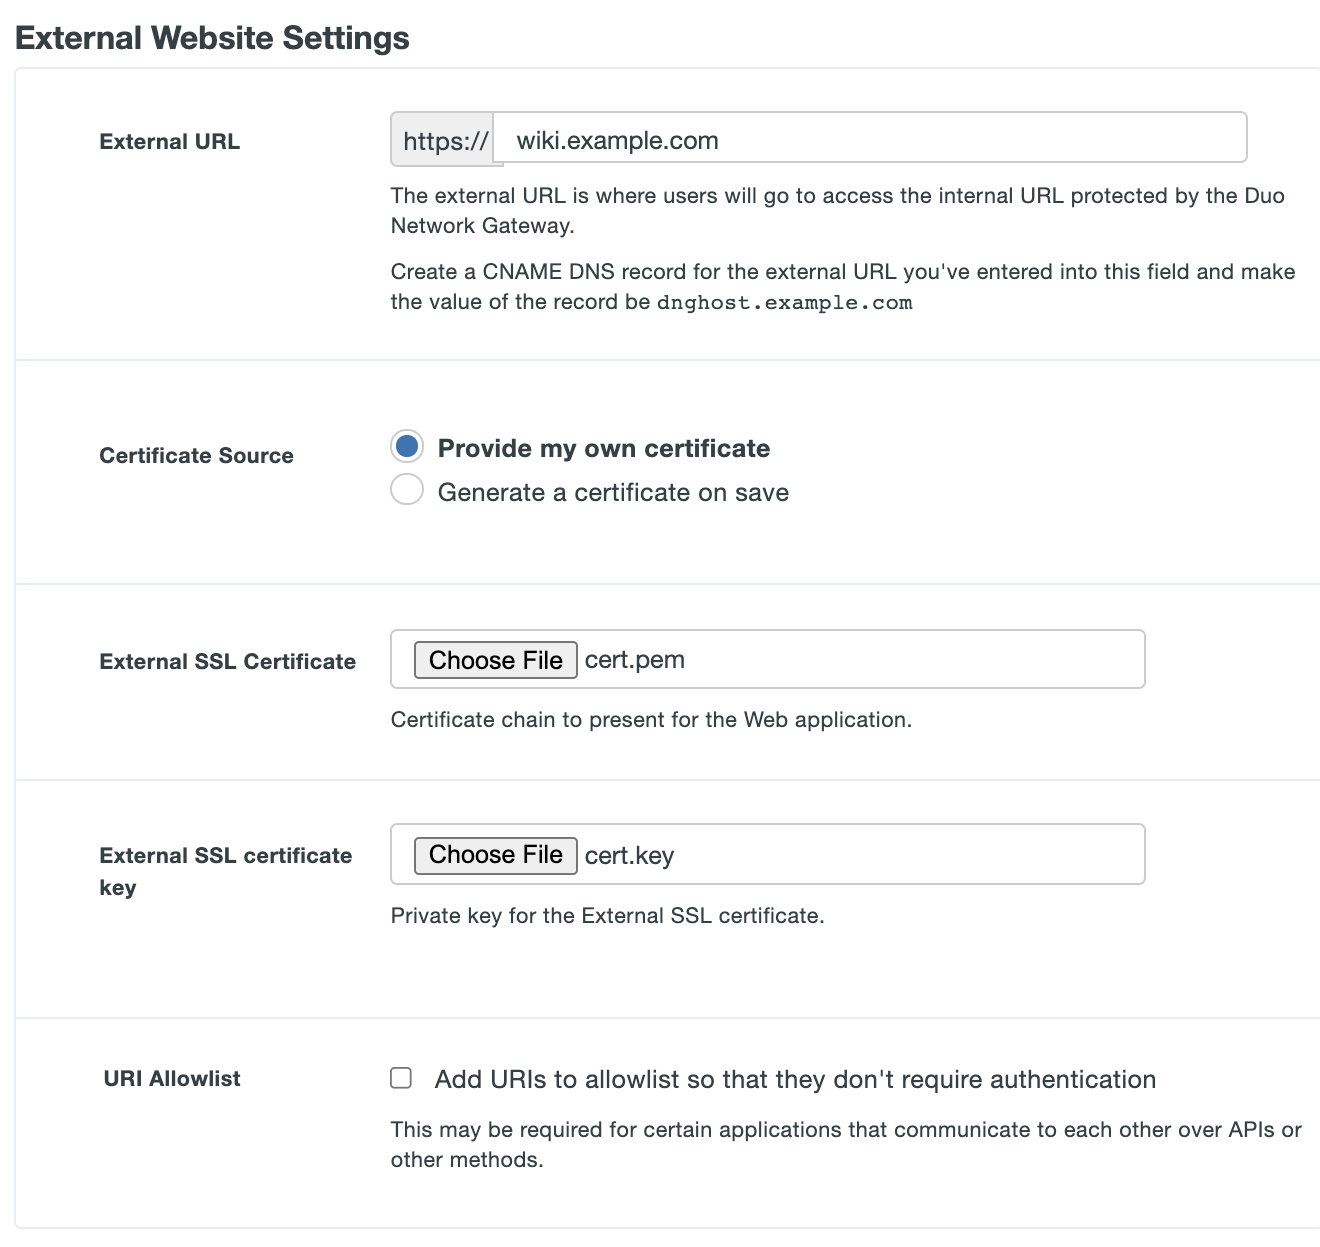
-
If you'd like the Duo Network Gateway to automatically generate and renew a free SSL certificate using Let's Encrypt select Generate a certificate on save next to Certificate Source. Review the Let's Encrypt Terms of Service. If you accept, check the box next to I agree to the Let's Encrypt Terms of Service.
Note: Let's Encrypt does not work with wildcard external URLs. You must provide your own wildcard SSL certificate when using wildcard external URLs.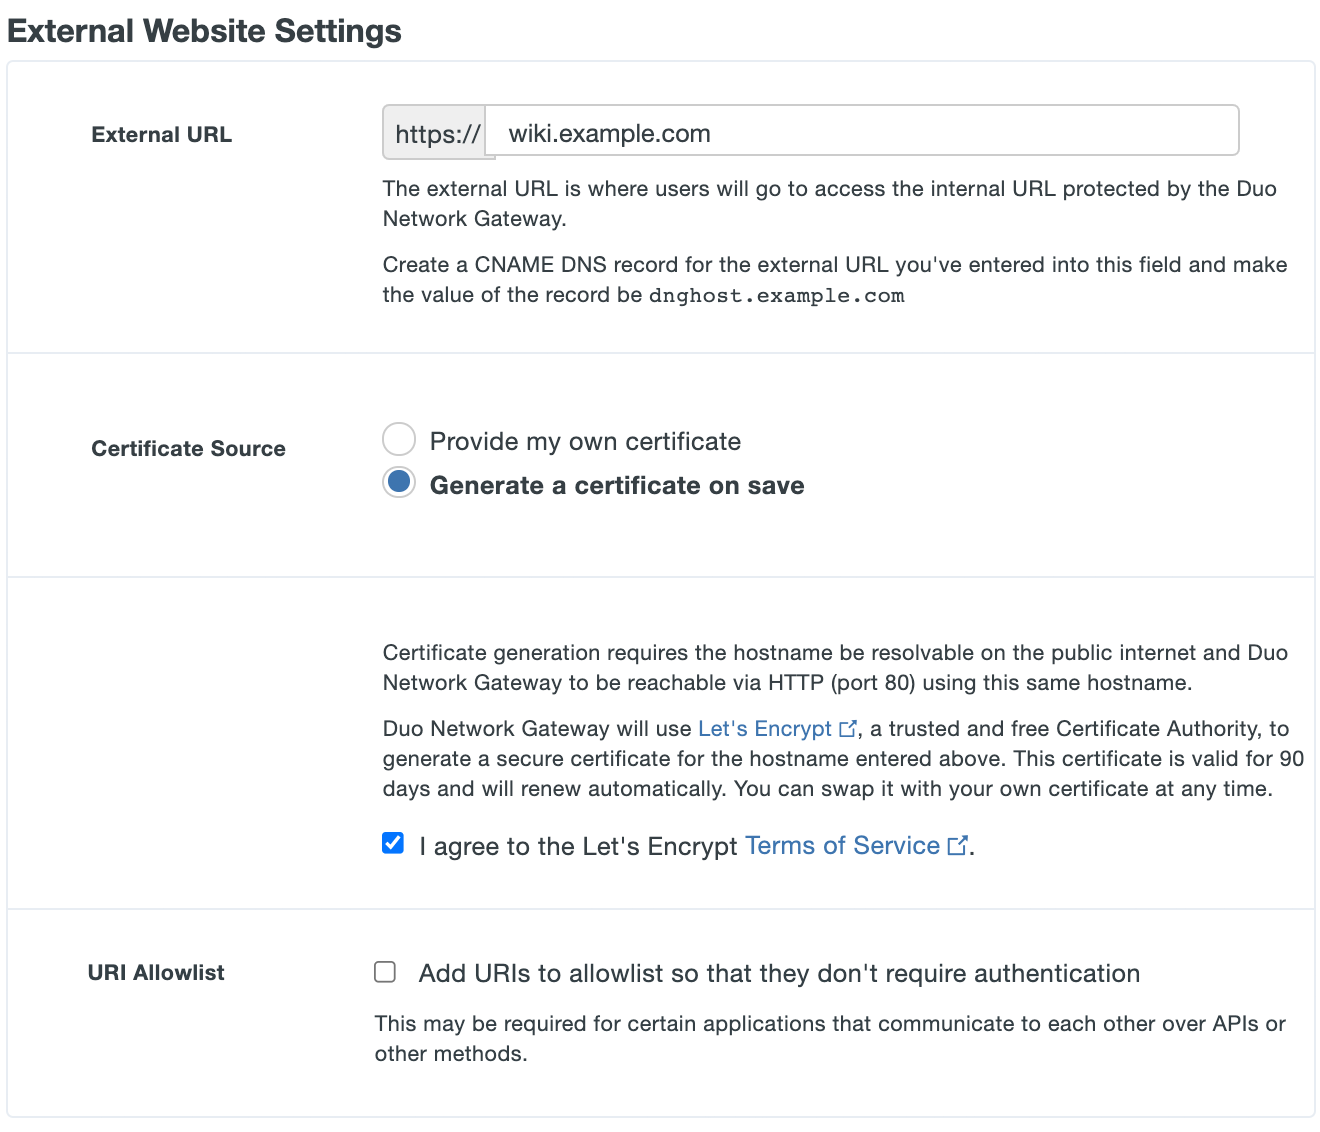
-
URI Allowlist is an optional feature. Select the "Add URIs to allowlist so that they don't require authentication" option to display additional settings. Allowing URI prefixes or suffixes here means that they don't require authentication through the Duo Network Gateway. You will still need to complete any authentication the internal application may have before accessing the resource. This may be required for certain applications that communicate to each other over APIs or other methods. Separate multiple values with spaces. You may also restrict this allow list to specific IP addresses or IP ranges during configuration.
-
Scroll down to the "Internal website settings" section. Configure the settings related to your internal application using the table below:
Option Description Internal URL Enter the internal URL or IP address of the web application Duo Network Gateway is protecting (eg. https://wiki.local or https://10.1.10.123). If the internal application is communicating on a port other than 80 or 443 please specify the port using a colon (eg. https://wiki.local:8090). Your internal application can communicate over HTTP or HTTPS.
If you used the same URL for the application's internal and external URLs, ensure that an internal DNS record for this hostname exists and points to the internal application server IP.Internal HTTP Host header name The drop-down options include the internal and external URLs you entered on this page. Select one that will be sent in HTTP Host header when communicating with the internal application. Certificate Authority This will only appear if your internal URL uses HTTPS. Duo Network Gateway will automatically check your internal application's certificate against a list of trusted public certificate authorities. If you use a private certificate authority or still get an error when trying to access your application, please check this option next to I use a private Certificate Authority and upload an Internal SSL certificate. Internal SSL certificate Only required if the internal application is communicating over HTTPS and you've checked the box next to I use a private Certificate Authority. Provide a Base64-encoded X.509 (pem, cer, or crt) version of the Root CA's certificate that is at the top of the chain for the internal application certificate. Internal SSL validation name The drop-down options include the internal and external URLs you entered on this page. Select the one that matches the subject host name of your certificate used by the internal application. Session duration This field allows you to specify the maximum user session duration for a specific application in minutes. Users must reauthenticate to the Duo Network Gateway when the limit is reached. The default value is 480. Proxy Headers When Add an X-Forwarded-Host header to proxied requests is checked the Duo Network Gateway will send an X-Forwarded-Host header with the Host header value from the incoming request to the protected application. This is required by some applications that generate absolute URLs to internal resources instead of using relative URLs. Note that some applications will break if more than one proxy adds this header.
When Add an X-Forwarded-Proto header to proxied requests is checked the Duo Network Gateway will send an X-Forwarded-Proto header to the protected application. Some applications generate absolute URLs using the wrong protocol if this option is not selected. Note that some applications will break if more than one proxy adds this header.Upstream response timeout This field allows you to specify the amount of time in seconds an upstream server is permitted to respond to a request. The default value is 180. Maximum client body size This field allows you to specify the maximum client to server upload size in megabytes. The default value is 128MB. If you are receiving "413 Request Entity Too Large" errors, then set this value to the largest upload size the upstream server is expected to handle. Requires Duo Network Gateway version 1.5.12 or later. Maximum header size This field allows you to specify the maximum header size. The default value is 8KB. Requires Duo Network Gateway version 2.3.0 or later. Proxy buffer size This field allows you to specify the proxy buffer size. The default value is 64KB. We recommend keeping the default value, unless the protected application utilizes websockets and the DNG is hitting memory capacity limits. Refer to Duo KB article 8819 for more information about tuning. Requires Duo Network Gateway version 3.1.0 or later. 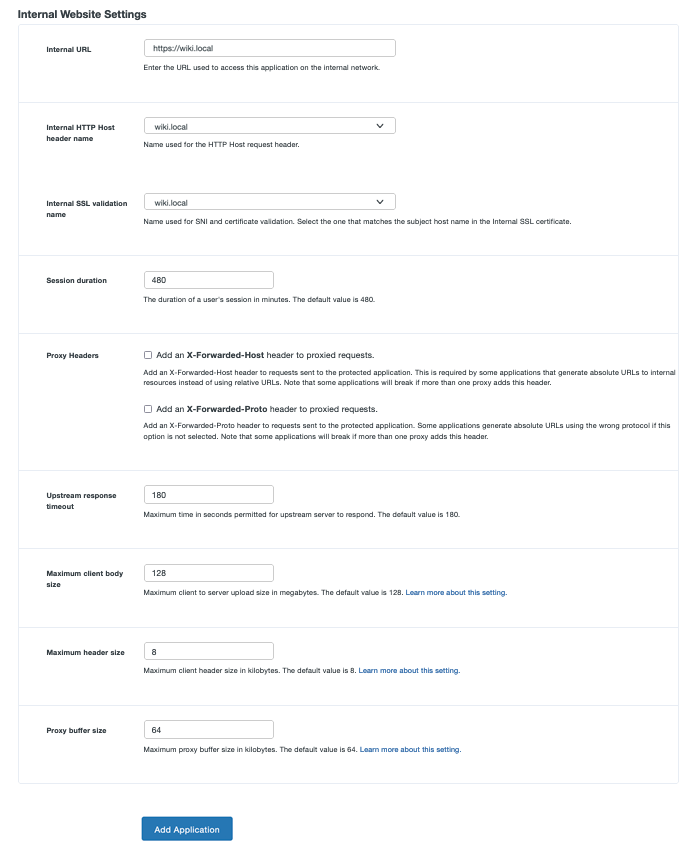
-
Once you've filled in all the required fields, click Add Application.
If all information isn't entered completely and correctly or this new application configuration fails to save you'll need to re-enter the Duo application secret key and select the certificate and key files again for upload.
Test Duo Network Gateway with Web Applications
-
Navigate to the external URL of the application that you just configured in Duo Network Gateway (eg. https://wiki.example.com).
-
You'll be redirected to the SAML IdP you configured for use with Duo Network Gateway. The Duo authentication prompt appears after successful primary authentication. Completing secondary authentication with Duo grants access to your internal web application.
-
The Duo Network Gateway doesn't pass any primary login credential information to the internal application, so you'll need to provide your username and password to the internal application separately.
Congratulations! You have successfully published your internal application with Duo Network Gateway. You can now remove any external firewall rules providing direct access to your internal application and allow all authorized users to access the application through Duo Network Gateway.
Protect SSH Servers with Duo Network Gateway
Duo Network Gateway allows you to remotely access your SSH servers by tunneling the connection through it using HTTPS. You can group access to a set of servers, after you've authenticated you'll be able to connect all servers in that group. You might decide to group servers by level of security or by departments within your organization. Each group of servers can have its own policies in the Duo Admin Panel.
SSH Installation Video Overview
This video demonstrates the process of configuring Duo Network Gateway for protected external access of an internal SSH server.
SSH Prerequisites
- Identify the SSH servers you'd like to protect with Duo Network Gateway and make sure that Duo Network Gateway is able to communicate locally with each server over the SSH ports they are configured to use.
- Create a public DNS record related to your set of SSH servers and point it to the Duo Network Gateway server. This DNS record must be different from your individual SSH servers' records and from the Duo Network Gateway's DNS record, even if your SSH servers have a public DNS record already.
- Example: If the group of servers you're protecting is for your engineering team you could create a public CNAME DNS record of "engineering-ssh.example.com" and point it to the Duo Network Gateway.
- Obtain an SSL certificate for your external URL from a commercial certificate authority (CA) using the fully qualified external DNS name of your external URL as the common name (e.g. engineering-ssh.example.com). This secures the connection between your external users and the Duo Network Gateway server. You can also generate a free, automatically renewing certificate from Let's Encrypt during setup.
Create a Duo Network Gateway - SSH Relay Application in Duo
-
Log in to the Duo Admin Panel and navigate to Applications → Application Catalog.
-
Locate the entry for Duo Network Gateway - SSH Relay with the "2FA" label in the catalog. Click the + Add button to create the application and get your Client ID, Client secret, and API hostname. You'll need this information to complete your setup. See Protecting Applications for more information about protecting applications with Duo and additional application options.
Previously, the Client ID was called the "Integration key" and the Client secret was called the "Secret key".
-
No active Duo users can log in to new applications until you grant access. Update the User access setting to grant access to this application to users in selected Duo groups, or to all users. Learn more about user access to applications. If you do not change this setting now, be sure to update it so that your test user has access before you test your setup.
This setting only applies to users who exist in Duo with "Active" status. This does not affect application access for existing users with "Bypass" status, existing users for whom the effective Authentication Policy for the application specifies "Bypass 2FA" or "Skip MFA", or users who do not exist in Duo when the effective New User Policy for the application allows access to users unknown to Duo without MFA. -
You can adjust additional settings for your new Duo Network Gateway application at this time — like changing the application's name from the default value, enabling self-service, or assigning a group policy — or come back and change the application's policies and settings after you finish setup. If you do update any settings, click the Save button at the bottom of the page when done.
Protect SSH Relays in Duo Network Gateway
-
Navigate to the Duo Network Gateway admin console and click the Applications link on the left-hand side of the screen.
-
On the "Applications" page click Add New... and select SSH Relay from the drop-down options. You will be taken to a new page.
-
Under "Configure Duo 2FA" enter the information from the application you created earlier from the Duo Admin Panel.
Option Description Duo Integration key Copy and paste in the Client ID from the "Duo Network Gateway - SSH Relay" application you created earlier in the Duo Admin Panel. Duo Secret key Copy and paste in the Client secret from the "Duo Network Gateway - SSH Relay" application you created earlier in the Duo Admin Panel. Duo API hostname Copy and paste in the API hostname from the "Duo Network Gateway - SSH Relay" application you created earlier in the Duo Admin Panel. Enable Frameless Turns on frameless support for Duo Universal Prompt in Duo Network Gateway versions 1.5.10 to 3.1.0. DNG 3.2.0 enables frameless authentication by default for all applications, so this configuration option has been removed. 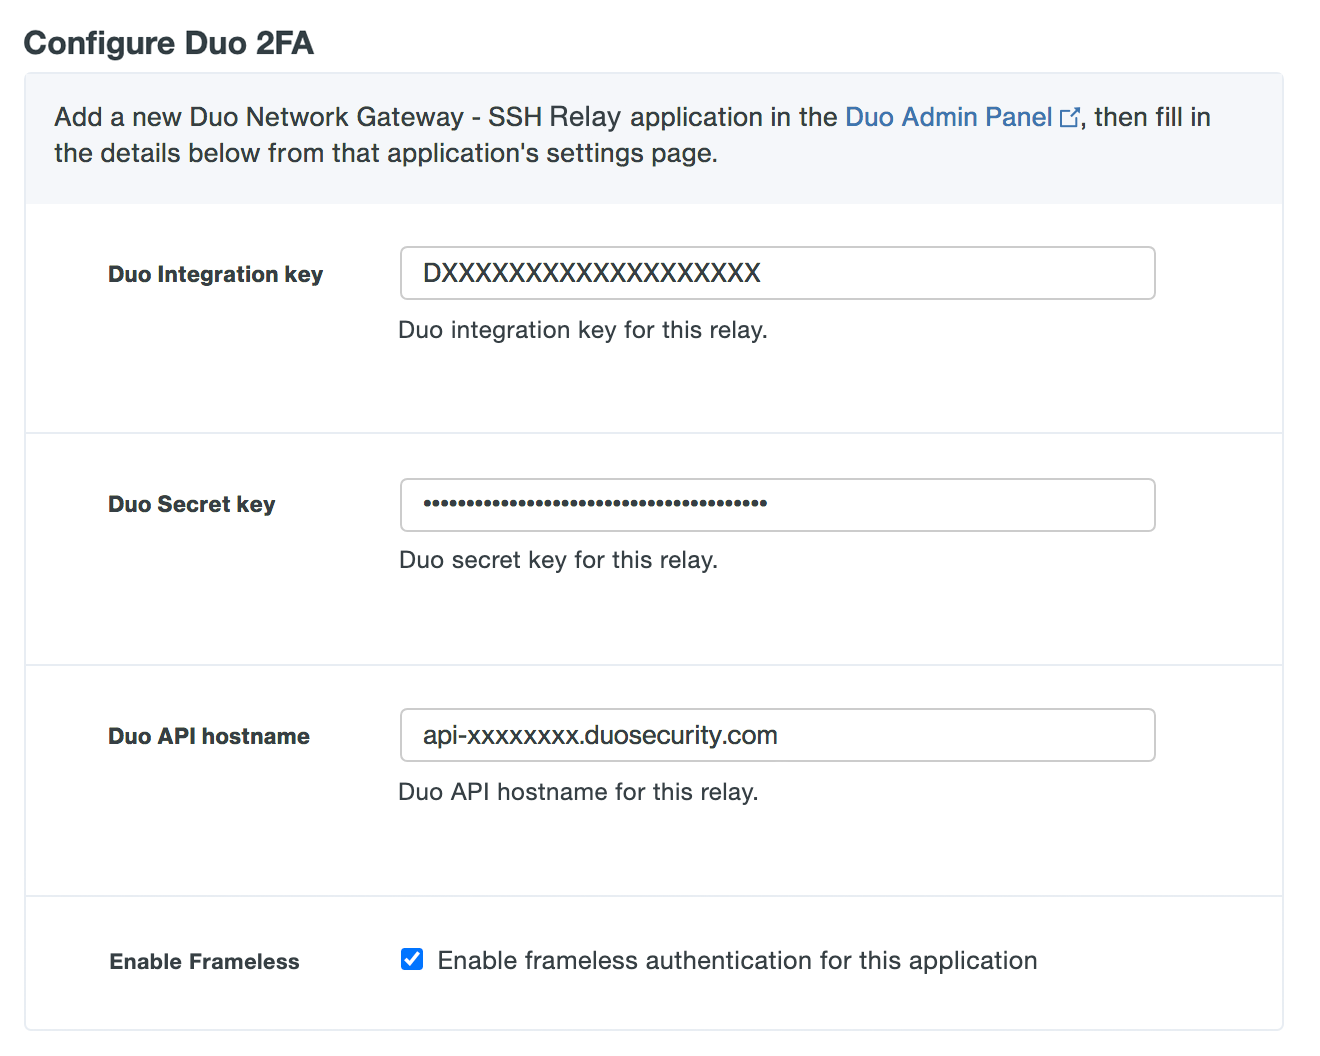
-
Scroll down to the "External URL Settings" section. In the External URL field enter hostname of the external URL DNS record you created as part of the prerequisites. The external URL is where users' computers will communicate with the Duo Network Gateway. A group of SSH servers can be protected behind an external URL. An example of a external URL for SSH servers used by the engineering team might be "engineering-ssh.example.com".
-
If you will be supplying your own SSL certificate select Provide my own certificate next to Certificate Source. Configure the certificate using the table below and skip step 6. If you would like to automatically generate certificates with Let's Encrypt, skip this step and proceed to step 6.
DuoConnect will fail to connect to SSH & RDP servers if the certificate provided to the DNG does not include a DNS Subject Alternative Name (SAN) extension with the same value as the Common Name (CN) extension of the certificate. Certificates generated by Duo Network Gateway using Let's Encrypt or obtained from a commercial certificate vendor satisfy this requirement.
Option Description SSL certificate Base64-encoded X.509 (pem, cer, or crt) public certificate to present for the "external URL" URL. We recommend including the entire certificate chain in the certificate file. The certificates should be ordered from top to bottom: certificate, issuing certificates, and root certificate. SSL certificate key Base64-encoded X.509 (pem, cer, or crt) private key for the "external URL" URL certificate. 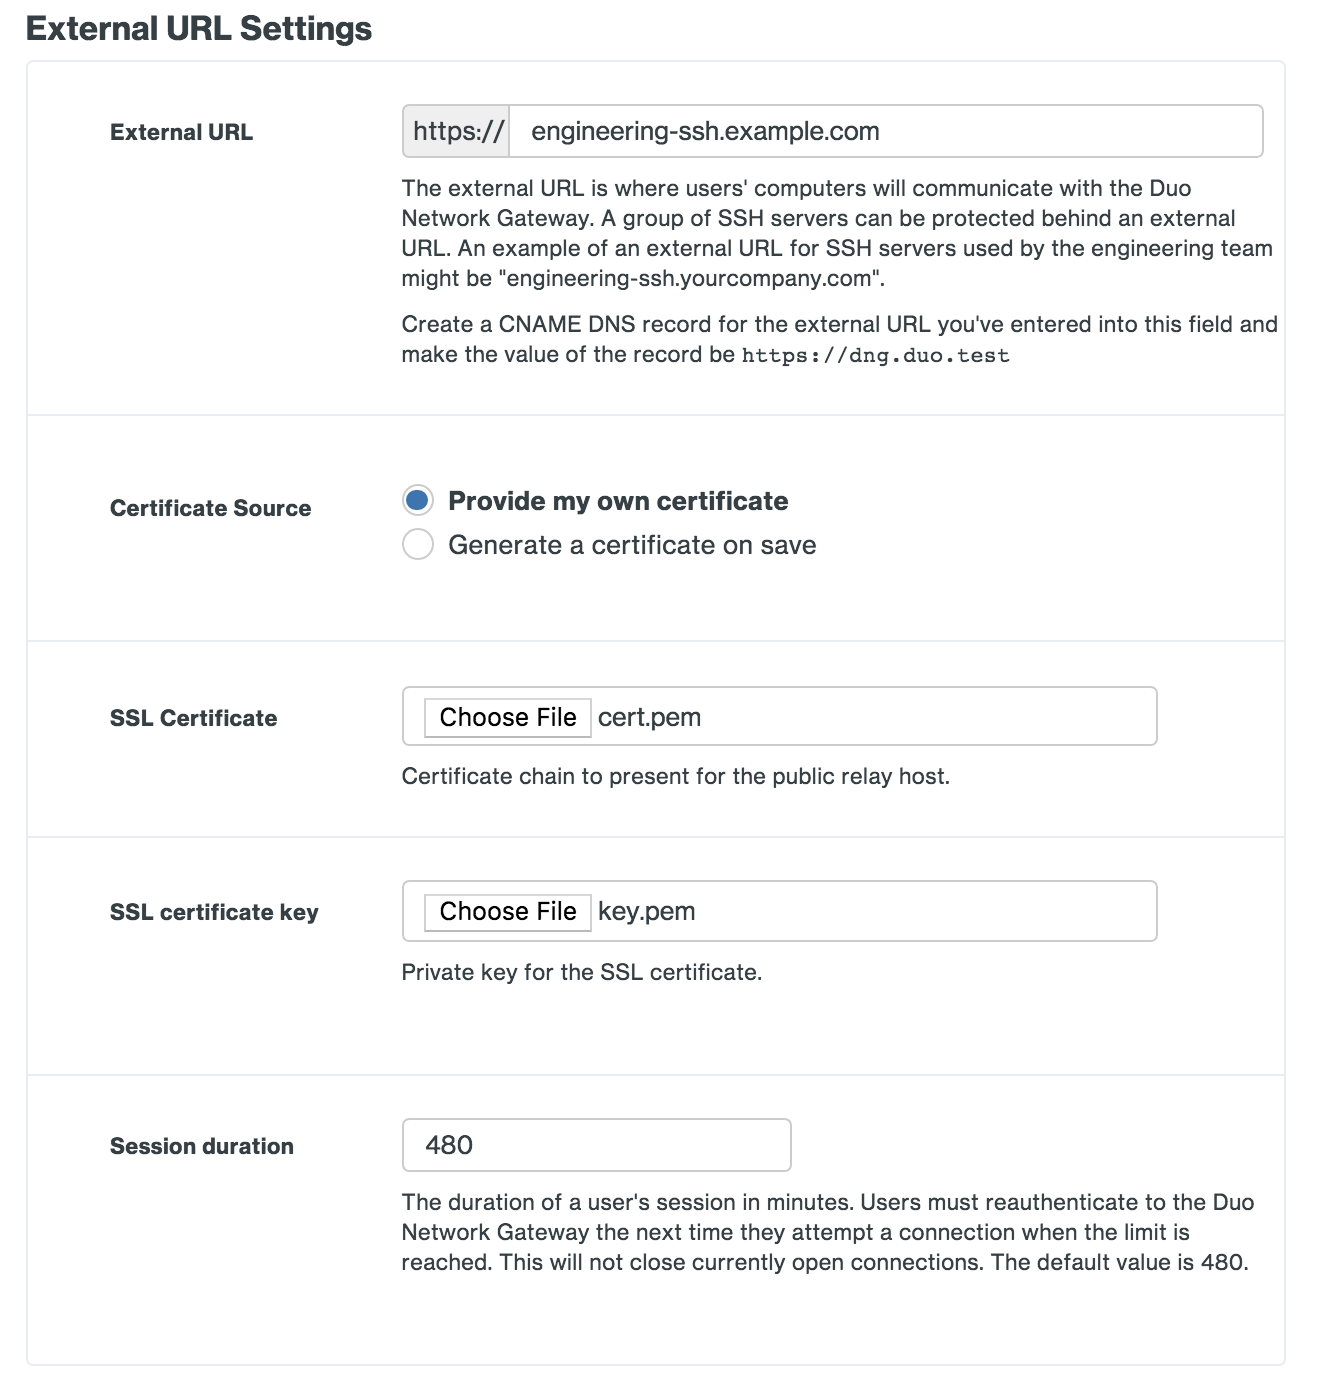
-
If you'd like the Duo Network Gateway to automatically generate and renew a free SSL certificate using Let's Encrypt select Generate a certificate on save next to Certificate Source. Review the Let's Encrypt Terms of Service. If you accept, check the box next to I agree to the Let's Encrypt Terms of Service.
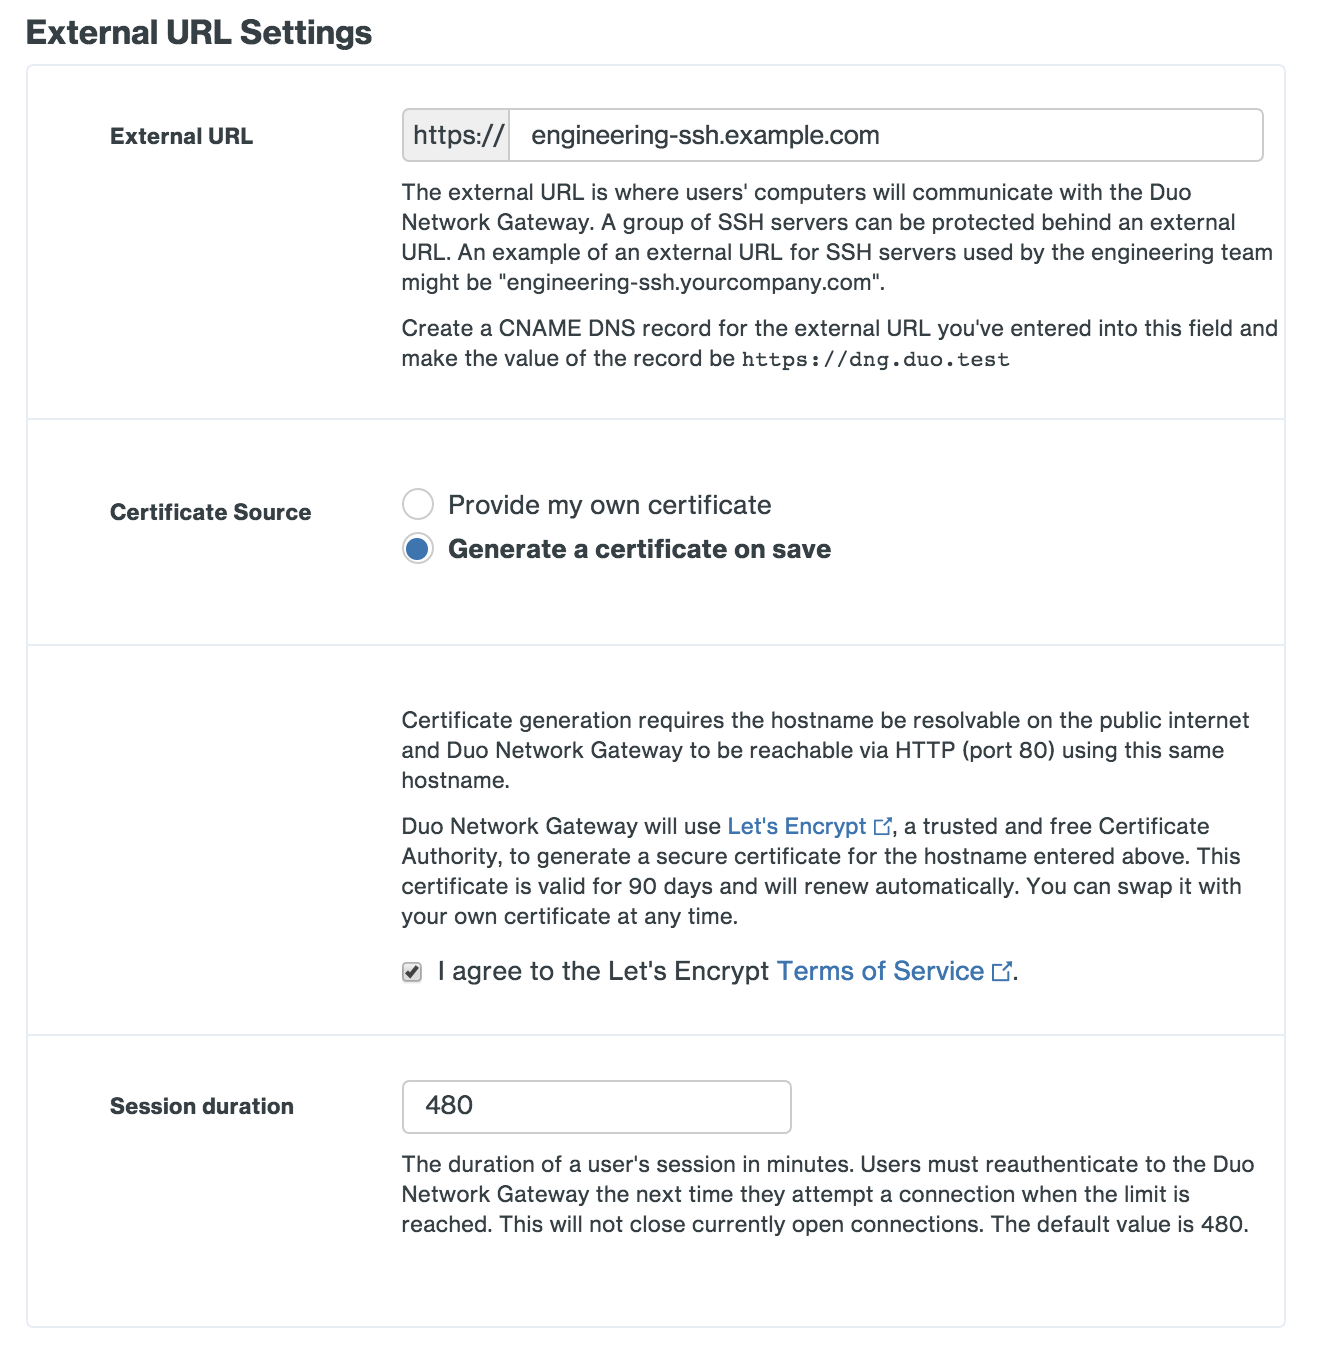
-
Session duration allows you to specify the maximum user session duration for a external URL in minutes. Users must reauthenticate to the Duo Network Gateway the next time they attempt a connection when the limit is reached. This will not close currently open connections. The default value is 480.
-
Scroll down to the "SSH Servers" section. Multiple SSH servers can be protected behind a external URL. Once a user authenticates through the external URL they can access any of the SSH servers behind the external URL without having to authenticate again. Users will need to reauthenticate on the next login attempt after their session has expired based on the Session Duration setting above. Users will still need to locally authenticate to the SSH servers.
-
Configure the settings related to your internal SSH servers using the table below:
Option Description Internal hosts Enter a hostname, a hostname with wildcards, an IP address, a range of IP addresses, or a CIDR block related to the internal SSH servers you want to protect. If a hostname is used, then it must be resolvable by the DNG server. Wildcards will not match sub-domains (e.g. ".example.com" will match "server.example.com" but not "server.internal.example.com"). Wildcards will be used to match domain names, not IP addresses. For example, the pattern 192.168.1. will match the domain name 192.168.1.com but will not match the IP address 192.168.1.1 Ports Enter the port(s) that the servers are listening on for SSH connections. You may enter a single port or a range of ports. You can also specify multiple ports or multiple ranges of ports by separating them with commas. -
Additional text fields will appear under Internal hosts. Repeat step 9 to protect additional SSH servers behind this external URL.
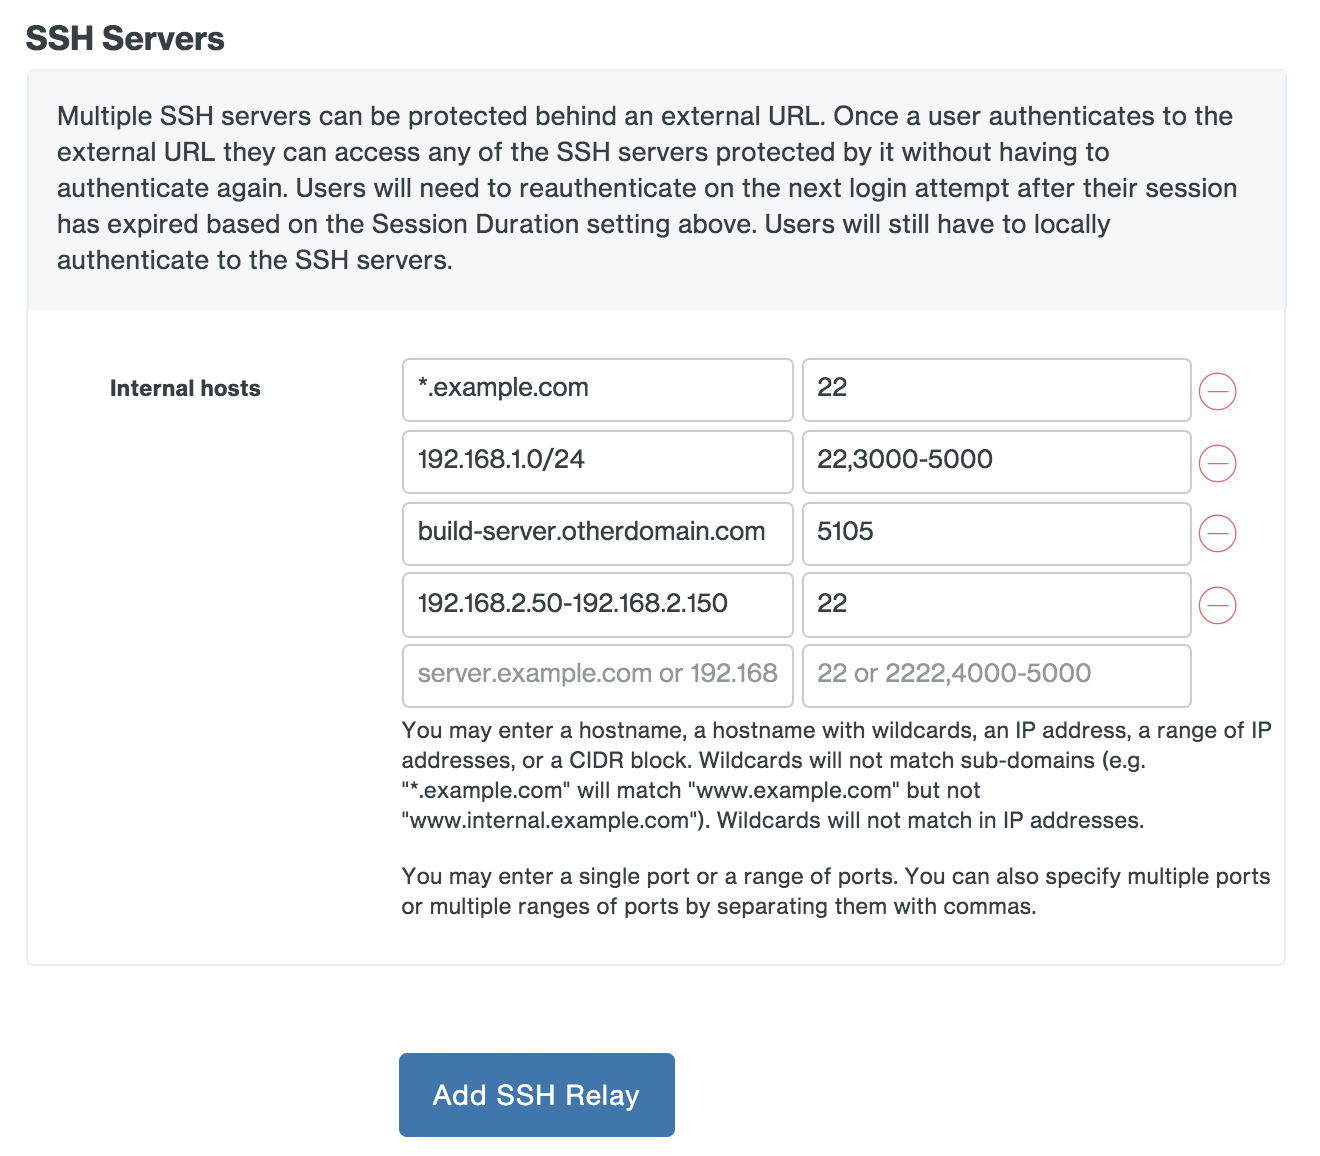
-
Once you've filled in all the required fields, click Add SSH Servers.
If all information isn't entered completely and correctly or this new external URL fails to save, you'll need to re-enter the Duo application secret key and select the certificate and key files again for upload.
-
Once the page reloads you'll see a new section at the top of the page called SSH Client Configuration with SSH client configuration to provide to your users that they'll need after they configure DuoConnect.
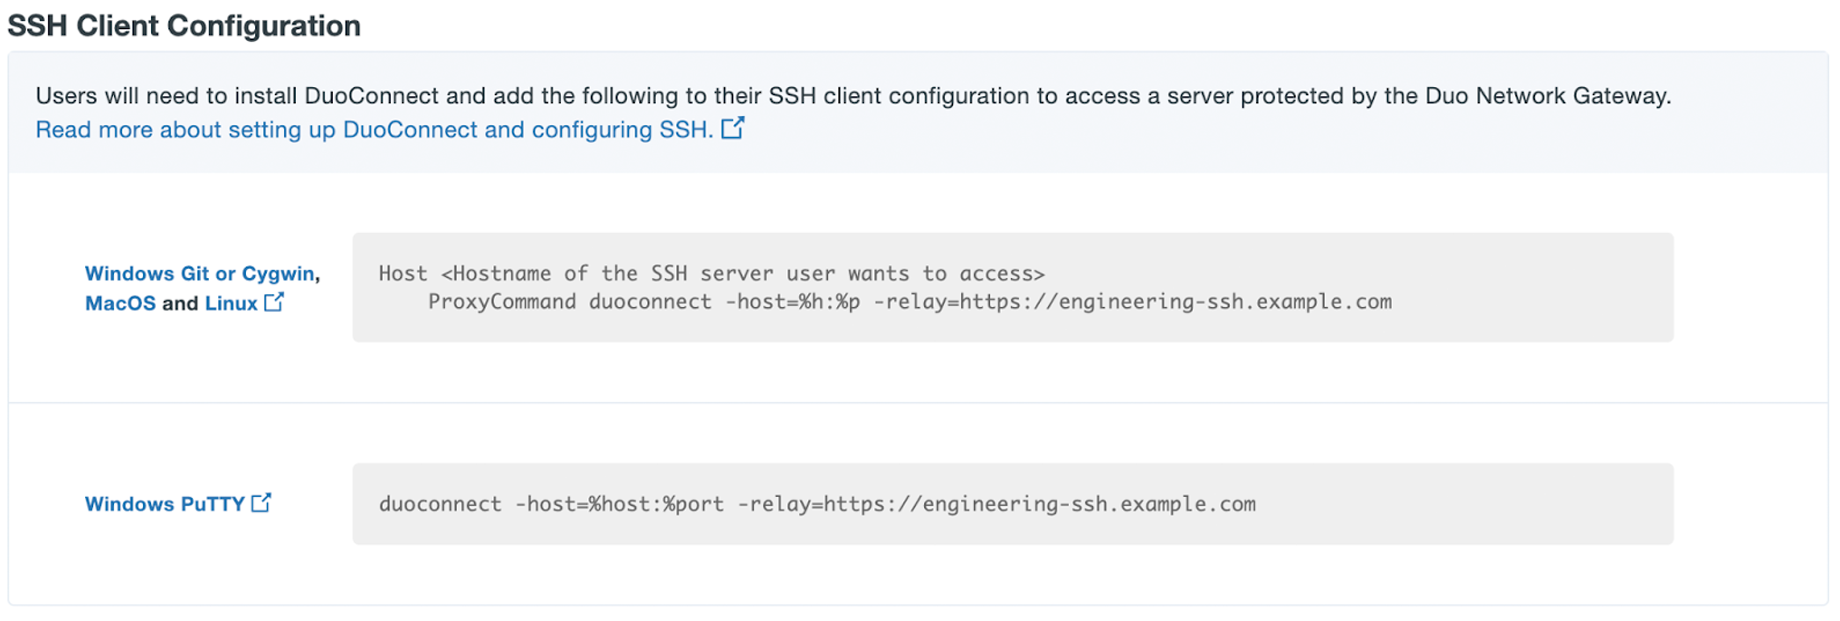
Install & Configure DuoConnect Client
Using the Duo Network Gateway to protect SSH servers requires a small software install on the user's computer. We support 64-bit operating systems for the following platforms: Windows (64-bit only), macOS 10.11 and later, and most Linux distributions.
You and your users can learn how to install and configure DuoConnect at the DuoConnect User's Guide using the information provided in step 12 of Protect SSH Servers in Duo Network Gateway.
Newer versions of DuoConnect will be released with new features, bug fixes, and security patches. When newer versions of DuoConnect are released there will be two different types of updates:
- Optional updates will notify users there is a pending update but allow users to proceed past the message and continue their connection to the SSH server.
- Required updates will notify users that there is a pending update and users will not be able to continue until they update DuoConnect.
The DNG server checks for available DuoConnect updates by making an outbound HTTPS/443 connection to dl.duosecurity.com.
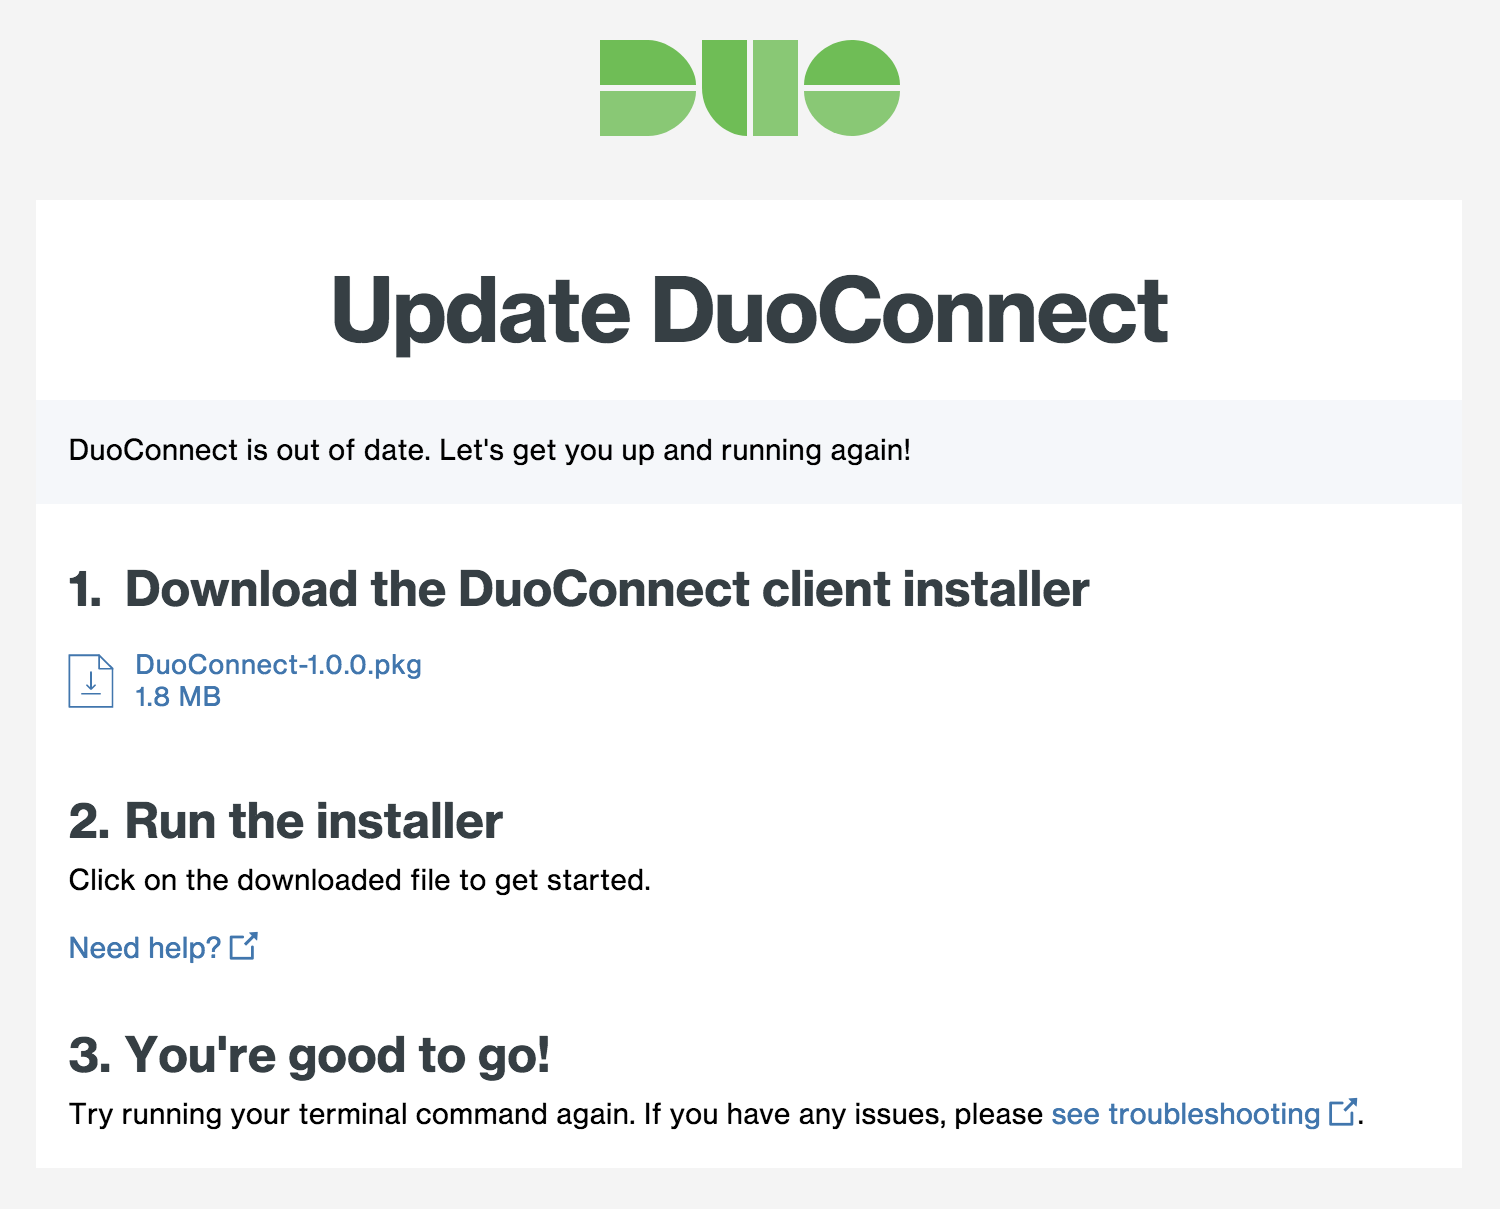
Protect Application Servers with Duo Network Gateway
Duo Network Gateway allows you to remotely access your application servers by tunneling the connection through it using HTTPS. You can group access to a set of servers in one application relay; after you've authenticated you'll be able to connect all servers in that group. You might decide to group servers by level of security or by departments within your organization. Each group of application servers can have its own policies in the Duo Admin Panel.
Application Relays and Subdomains
Two new components Duo Network Gateway uses to make RDP and SMB/file server connections work are Application Relays and Subdomains.
Similar to SSH Relays, Application Relays serve as a point to relay traffic from the external network to the internal network, and as a point of authentication. You can protect multiple application servers behind one Application relay, and the relay would have its own hostname (i.e. rdp-relay.example.com). We support the following protocols: RDP and SMB (file sharing) through the use of our application-specific relays (i.e. RDP relay and SMB relay).
Due to the absence of a "proxy" configuration, we rely on subdomain delegation to the Duo Network Gateway. You configure the Duo Network Gateway with an external/internal pair of subdomains, where the external subdomain is delegated by your main domain to the Duo Network Gateway, and the internal subdomain is one that is resolvable within the corporate network.
For instance, if the company owns the public domain "example.com", the domain administrator can delegate "external.example.com" to the Duo Network Gateway (via public DNS) to relay RDP traffic, and configure the Duo Network Gateway Subdomains configuration to make "external.example.com" correspond to the internal domain "internal.example.com".
When the user attempts to connect to "user1-desktop.external.example.com" using an RDP client, Duo Network Gateway will receive the request, correlate it with the existing relay and subdomains configurations, and assign a random temporary IP address to the name "user1-desktop.external.example.com" and send it back to the RDP client.
After receiving the temporary IP assignment, the connection is internally routed to the DuoConnect app installed on the user client system. Upon receiving the connection, DuoConnect contacts the Duo Network Gateway to start the authentication process and tunnel the connection through the RDP Relay at "rdp-relay.example.com".
Ultimately, your DNS configuration for protecting RDP servers through RDP relays would look similar to the following:
| Type | Name | Value | TTL(sec) | Purpose |
|---|---|---|---|---|
| A | portal | 111.211.222.42 | 300 | Base DNG record |
| CNAME | rdp-relay | portal.example.com | 300 | RDP Relay for authentication |
| NS | external | portal.example.com | 300 | Subdomain delegation |
The corresponding Subdomains configuration would be
| External Subdomain | Internal Subdomain |
|---|---|
| external.example.com | internal.example.com |
Users accessing "userX-desktop.internal.example.com" (which is protected by the relay "rdp-relay.example.com") would use the address "userX-desktop.external.example.com" in their RDP client, without needing to know the relay URL beforehand.
Application Relay Prerequisites
To protect RDP, SMB, and other application relay protocols with Duo Network Gateway, you’ll need to have or perform the following:
-
A working Duo Network Gateway set up with an authentication source. Ideally you will have already verified a full end-to-end deployment protecting a web application or SSH relay.
- The Duo Network Gateway deployment must be running version 2.0.0 or greater for RDP support, or version 2.2.0 or greater for SMB/file sharing/custom relay support. Upgrade your working Duo Network Gateway to the latest release before continuing.
-
Open port 53 on your external firewall for TCP/UDP external traffic to and from the DNS container, in addition to the ports you already opened when you first set up Duo Network Gateway (80 and 443).
-
Identify the RDP and SMB/file servers or internal client/server apps you’d like to protect with Duo Network Gateway and make sure that Duo Network Gateway is able to communicate locally with each server over the application ports they are configured to use.
- RDP defaults to port 3389
- SMB/File sharing defaults to ports 445
- Custom supports all TCP ports
-
Create a public DNS record related to your set of application servers and point it to the Duo Network Gateway server. This DNS record must be different from your individual application servers' records and from the Duo Network Gateway's DNS record, even if your application servers have a public DNS record already.
- Example: If the group of servers you're protecting is for your engineering team are RDP servers you could create a public CNAME DNS record of "engineering-rdp.example.com" and point it to the Duo Network Gateway.
-
Obtain an SSL certificate for your external URL from a commercial certificate authority (CA) using the fully qualified external DNS name of your external URL as the common name (e.g. engineering-rdp.example.com). This secures the connection between your external users and the Duo Network Gateway server. You can also generate a free, automatically renewing certificate from Let's Encrypt during setup.
-
If you did not originally deploy Duo Network Gateway with application relay support (i.e. RDP, SMB, and custom app relay support), then enable the application relay features on your Duo Network Gateway by following the steps in the Enable Application Relay Features section.
Enable Application Relay Features
RDP and SMB/file sharing through Duo Network Gateway requires an additional container for DNS. If you did not already deploy Duo Network Gateway with Application Relay support you can add this container to an existing DNG deployment with these steps.
-
Download the Duo Network Gateway - AppRelay YML file and save it to your Duo Network Gateway server in the same location that you saved the
network-gateway-3.4.0.ymlYML from when you first set up your Duo Network Gateway server or upgraded it to 3.4.0. Download the YML file for the additional DNS container by typing:wget --content-disposition https://dl.duosecurity.com/network-gateway-app-relay-latest.ymlYou should see output similar to:
--2022-04-04 09:48:11--  https://dl.duosecurity.com/network-gateway-app-relay-latest.yml
Resolving dl.duosecurity.com... 54.192.58.68, 54.192.58.97, 54.192.58.16, ...
Connecting to dl.duosecurity.com|54.192.58.68|:443... connected.
HTTP request sent, awaiting response... 200 OK
Length: 500 [application/octet-stream]
Saving to: 'network-gateway-3.4.0-app-relay.yml'

network-gateway-3.4.0-app-relay.yml 100%[==============================================================>]     500  --.-KB/s   in 0s

2021-11-18 09:48:11 (68.1 MB/s) - 'network-gateway-3.4.0-app-relay.yml' saved [500/500]
Make note of the actual file name that was saved as you'll need this in future steps. View checksums for Duo Network Gateway downloads on the Checksums and Downloads page.
Save this YML file in a persistent directory location for future use; it will be required for later use when deploying, updating, or interacting with your Duo Network Gateway server.
-
The following command instructs Docker Compose to download Duo Network Gateway (including the new DNS container for RDP) and install it. Specify the YML files downloaded in the last step in the command. Note that your YML file names may reflect a different version than the example command shown. Replace the file names in the example with your downloaded YML file's actual names.
Type:
docker compose -p network-gateway -f network-gateway-3.4.0-app-relay.yml up -dThis may take a few minutes. Once completed the text output will be similar to:
network-gateway-redis is up-to-date network-gateway-admin is up-to-date network-gateway-portal is up-to-date Creating network-gateway-dns ... done -
You can verify that your Duo Network Gateway containers are running by typing:
docker psYou should see output showing all 4 containers with a status of "up" similar to:
CONTAINER ID   IMAGE                                        COMMAND                  CREATED         STATUS         PORTS                                                                          NAMES
dbbea7724709   duosecurity/network-gateway                  "/usr/local/bin/supe…"   2 minutes ago   Up 2 minutes   192.168.4.36:53->53/tcp, 192.168.4.36:53->53/udp                               network-gateway-dns
05651ed4f1cc   duosecurity/network-gateway                  "bash -c /bin/run-co…"   2 minutes ago   Up 2 minutes   127.0.0.1:80->80/tcp, 127.0.0.1:443->443/tcp                                   network-gateway-portal
2f774f5722d7   duosecurity/network-gateway                  "bash -c /bin/run-co…"   2 minutes ago   Up 2 minutes   0.0.0.0:8443->443/tcp, :::8443->443/tcp                                        network-gateway-admin
b0377023bb14   duosecurity/network-gateway                  "docker-entrypoint.s…"   2 minutes ago   Up 2 minutes   6379/tcp                                                                       network-gateway-redis
If the
network-gateway-dnscontainer isn’t started successfully, please refer to this KB article about issues binding to port 53. -
You have enabled the necessary features to make Remote Desktop, SMB/file server connections, and other relayed applications available though Duo Network Gateway.
Install & Configure Duo Client Applications for Application Relay Access
Using the Duo Network Gateway to protect RDP, SMB, and application relays requires two small software installations on the user's computer: DuoConnect and Duo Desktop.
When the minimum versions of both applications are combined, the effective supported operating systems for remote application or server access are Windows 10 and later and macOS 11 and later.
The Windows 11 24H2 feature update prevents DuoConnect 2.0.4 or earlier from connecting to RDP, SMP, or custom DNG application relay apps. If your organization's Windows 11 clients have updated to 24H2, please also update those clients to use DuoConnect 2.0.6 or later.
DuoConnect
DuoConnect must be installed on any client computer used to access remote protected RDP servers, SMB file shares, or other relayed applications through Duo Network Gateway. DuoConnect supports remote access on 64-bit operating systems for the following platforms: Windows 10 and later and macOS 11 and later.
You and your users can learn how to install and configure DuoConnect for RDP at the DuoConnect User's Guide.
Newer versions of DuoConnect will be released with new features, bug fixes, and security patches. When newer versions of DuoConnect are released there will be two different types of updates:
- Optional updates will notify users there is a pending update but allow users to proceed past the message and continue their connection to the SSH server.
- Required updates will notify users that there is a pending update and users will not be able to continue until they update DuoConnect.
The DNG server checks for available DuoConnect updates by making an outbound HTTPS/443 connection to dl.duosecurity.com.
Duo Desktop
Remote access through Duo Network Gateway also requires installation of Duo Desktop or Duo Device Health 2.24 or later on client computers. Duo Desktop supports accessing remote protected RDP servers, SMB file shares, or other relayed applications on 64-bit operating systems for the following platforms: Windows 10 and later and macOS 11 and later.
Duo Desktop must be present for remote system, share, or application access even if you do not apply any Duo Desktop policies to your endpoints.
Once Duo Desktop is installed, users need to update Duo Desktop's settings with information about your DNG server.
-
Click on the Duo Desktop menu bar icon to open the Duo Desktop application.
-
Click the menu icon (three stacked horizontal lines) in the upper-left.
-
Click on the DuoConnect menu item to open the "Welcome to DuoConnect" page. Click Get Started.
-
On the "DuoConnect" app screen, enter the hostname of your Duo Network Gateway (such as "portal.example.com") as the Server hostname and then click Add Hostname. This sets your Duo Network Gateway hostname as the configured DuoConnect hostname.
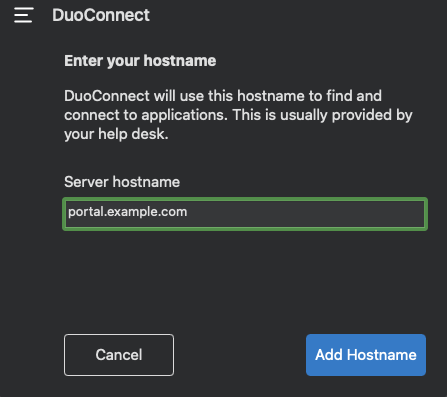
-
Click anywhere else on the macOS desktop to minimize Duo Desktop's window back to the menu bar.
If you need to change the configured Duo Network Gateway hostname, return to the DuoConnect menu item in Duo Desktop to view the configured hostname, and click the trash can icon to the right of the hostname to delete it and enter a new one.
-
Click on the Duo Desktop icon in the system tray to open the Duo Desktop application.
-
Click the menu icon (three stacked horizontal lines) in the upper-left.
-
Click on the DuoConnect menu item to open the "Welcome to DuoConnect" page. Click Get Started.
-
On the "DuoConnect" app screen, enter the hostname of your Duo Network Gateway (such as "portal.example.com") as the Server hostname and then click Add Hostname. This adds your Duo Network Gateway hostname to the list of configured DuoConnect hostnames.

-
Click anywhere else on the Windows desktop to minimize Duo Desktop's window back to the menu bar.
If you need to change the configured Duo Network Gateway hostname, return to the DuoConnect menu item in Duo Desktop to view the list of configured hostnames, and click the X icon to the right of the hostname to delete it and enter a new one.
-
Now that the client has the necessary Duo client application installs, proceed to creating an RDP Relay application, SMB Relay application, or Custom Relay application.
Create a Duo Network Gateway - RDP Relay Application in Duo
-
Log in to the Duo Admin Panel and navigate to Applications → Application Catalog.
-
Locate the entry for Duo Network Gateway - RDP Relay with the "2FA" label in the catalog. Click the + Add button to create the application and get your Client ID, Client secret, and API hostname. You'll need this information to complete your setup. See Protecting Applications for more information about protecting applications with Duo and additional application options.
Previously, the Client ID was called the "Integration key" and the Client secret was called the "Secret key".
-
No active Duo users can log in to new applications until you grant access. Update the User access setting to grant access to this application to users in selected Duo groups, or to all users. Learn more about user access to applications. If you do not change this setting now, be sure to update it so that your test user has access before you test your setup.
This setting only applies to users who exist in Duo with "Active" status. This does not affect application access for existing users with "Bypass" status, existing users for whom the effective Authentication Policy for the application specifies "Bypass 2FA" or "Skip MFA", or users who do not exist in Duo when the effective New User Policy for the application allows access to users unknown to Duo without MFA. -
You can adjust additional settings for your new Duo Network Gateway application at this time — like changing the application's name from the default value, enabling self-service, or assigning a group policy — or come back and change the application's policies and settings after you finish setup. If you do update any settings, click the Save button when done.
Protect RDP Servers in Duo Network Gateway
-
Navigate to the Duo Network Gateway admin console and click the Applications link on the left-hand side of the screen.
-
On the "Applications" page click Add New... and select RDP Relay from the drop-down options. You will be taken to a new page.
-
Under "Configure Duo 2FA" enter the information from the application you created earlier from the Duo Admin Panel.
Option Description Duo Integration key Copy and paste in the Client ID from the "Duo Network Gateway - RDP Relay" application you created earlier in the Duo Admin Panel. Duo Secret key Copy and paste in the Client secret from the "Duo Network Gateway - RDP Relay" application you created earlier in the Duo Admin Panel. Duo API hostname Copy and paste in the API hostname from the "Duo Network Gateway - RDP Relay" application you created earlier in the Duo Admin Panel. Enable Frameless Turns on frameless support for Duo Universal Prompt in Duo Network Gateway versions 1.5.10 to 3.1.0. DNG 3.2.0 enables frameless authentication by default for all applications, so this configuration option has been removed. 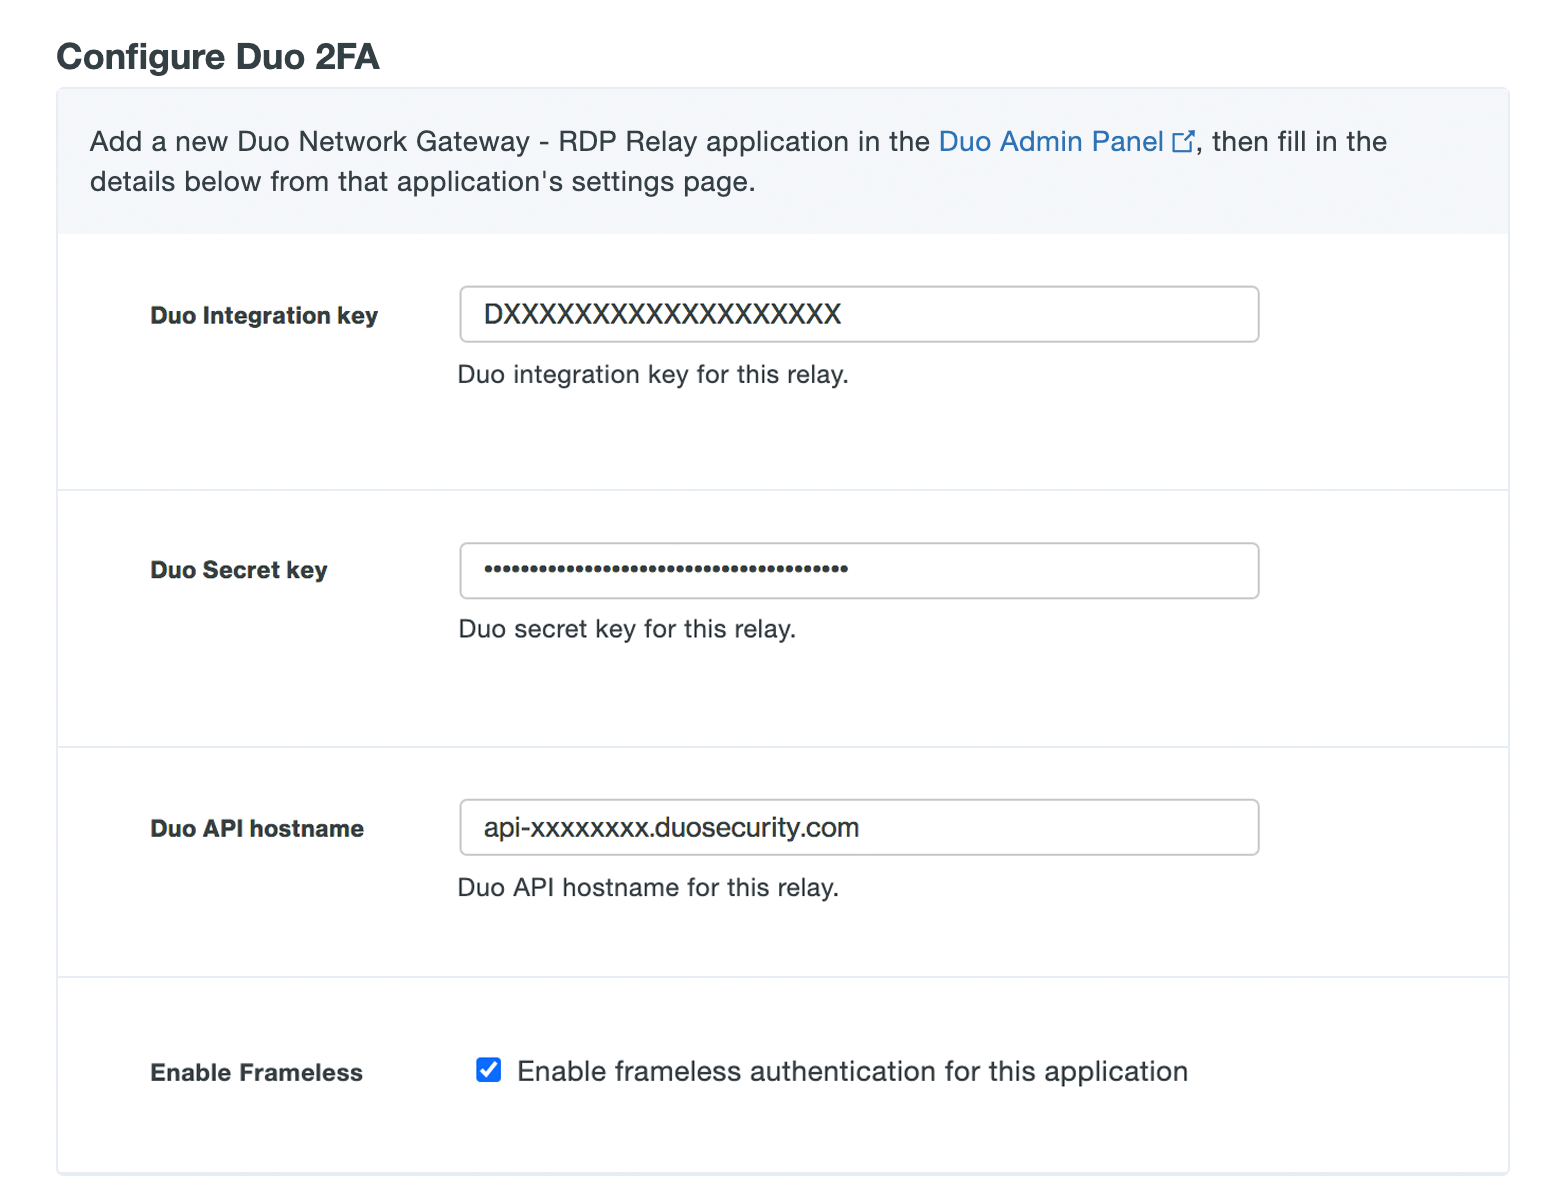
-
Scroll down to the "External URL Settings" section. In the External URL field enter the hostname of the external URL DNS record you created as part of the prerequisites. The external URL is where users' computers will communicate for authentication with the Duo Network Gateway. A group of RDP servers can be protected behind an external URL. Using the DNS example above, you would enter "rdp-relay.example.com". An example of an external URL for RDP servers used by the engineering team might be "engineering-rdp.example.com".
-
If you will be supplying your own SSL certificate select Provide my own certificate next to Certificate Source. Configure the certificate using the table below and skip step 6. If you would like to automatically generate certificates with Let's Encrypt, skip this step and proceed to step 6.
DuoConnect will fail to connect to SSH & Application Relays if the certificate provided to the DNG does not include a DNS Subject Alternative Name (SAN) extension with the same value as the Common Name (CN) extension of the certificate. Certificates generated by Duo Network Gateway using Let's Encrypt or obtained from a commercial certificate vendor satisfy this requirement.
Option Description SSL certificate Base64-encoded X.509 (pem, cer, or crt) public certificate to present for the "external URL" URL. We recommend including the entire certificate chain in the certificate file. The certificates should be ordered from top to bottom: certificate, issuing certificates, and root certificate. SSL certificate key Base64-encoded X.509 (pem, cer, or crt) private key for the "external URL" URL certificate. 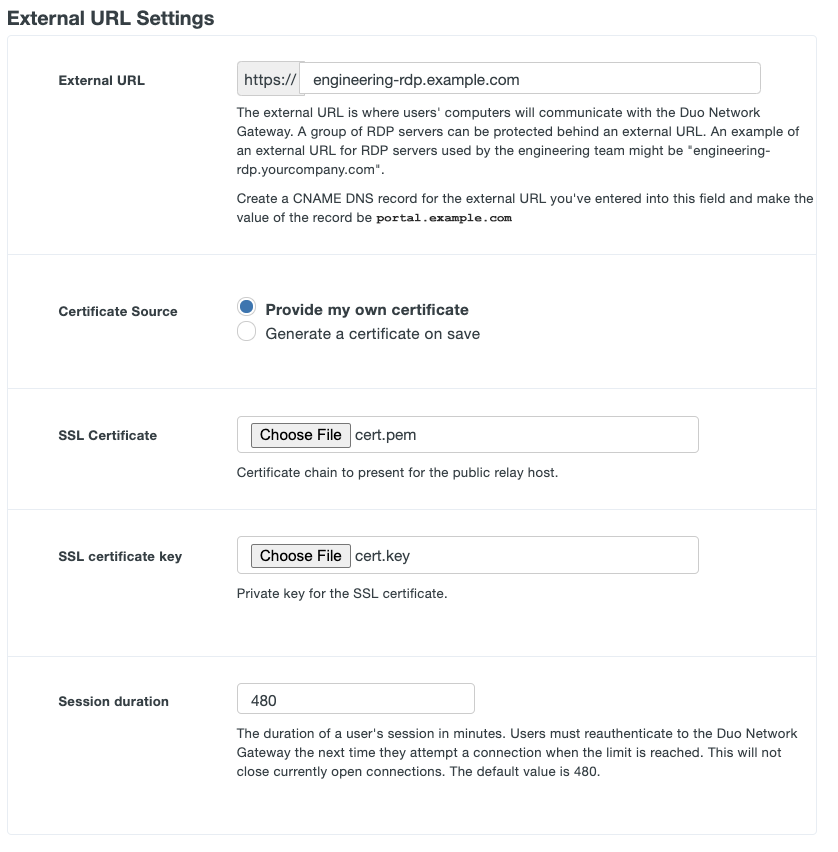
-
If you'd like the Duo Network Gateway to automatically generate and renew a free SSL certificate using Let's Encrypt select Generate a certificate on save next to Certificate Source. Review the Let's Encrypt Terms of Service. If you accept, check the box next to I agree to the Let's Encrypt Terms of Service.
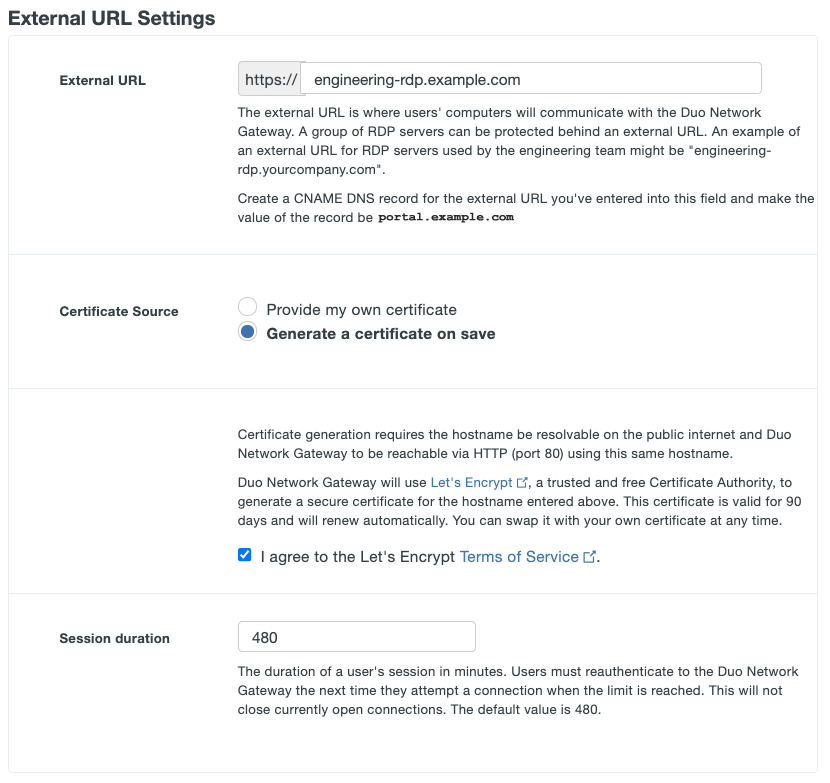
-
Session duration allows you to specify the maximum user session duration for a external URL in minutes. Users must reauthenticate to the Duo Network Gateway the next time they attempt a connection when the limit is reached. This will not close currently open connections. The default value is 480.
-
Scroll down to the "RDP Servers" section. Multiple RDP servers can be protected behind a external URL. Once a user authenticates through the external URL they can access any of the RDP servers behind the external URL without having to authenticate again. Users will need to reauthenticate on the next login attempt after their session has expired based on the Session Duration setting above. Users will still need to locally authenticate to the individual RDP servers.
-
Configure the settings related to your internal RDP servers that will be using the application relay using the table below:
Option Description Application type Pre-populates the Ports parameter if that parameter is not defined, for RDP, port 3389 is auto-populated. Internal hosts Enter a hostname or a hostname with wildcards related to the internal RDP servers you want to protect. Wildcards will not match sub-domains (e.g. "*.example.com" will match "server.example.com" but not "server.internal.example.com").
Use of hostnames instead of IP addresses for your RDP servers is required. If your network configuration does not support this, please refer to this KB article for a suggested workaroundPorts Enter the port(s) that the servers are listening on for RDP connections. You may enter a single port or a range of ports. You can also specify multiple ports or multiple ranges of ports by separating them with commas. If no value specified then the port used is determined by the selected Application type (3389 for RDP). -
Additional text fields will appear under Internal hosts. Repeat step 9 to protect additional RDP servers behind this external URL (example shows two RDP hosts).

-
Once you've filled in all the required fields, click Add RDP Relay.
If all information isn't entered completely and correctly or this new RDP relay fails to save, you'll need to re-enter the Duo application client secret/secret key and select the certificate and key files again for upload.
-
Click the Subdomains link on the left-hand side of the Duo Network Gateway admin console.
-
On the "Subdomains" page you will add external to internal DNS subdomain mapping to help DNG understand which delegated DNS Zone(s) correspond to which internal DNS zone(s).
In this example, the RDP servers are in the "internal.example.com" DNS zone. Add a subdomain mapping from the external zone "external.example.com to the internal zone "internal.example.com". When you enter the subdomain information, the page will show you how user connections will be mapped from external to internal host DNS names.
The external or internal subdomains could be top level domains instead of actual subdomains. For example, if your internal RDP server's hostname is "rdp1.someinternaldomain.com", you could map the external subdomain "external.example.com" to the internal domain "someinternaldomain.com" on this page, and your users will connect through "rdp1.external.example.com" to reach the server "rdp1.someinternaldomain.com".
-
For each external subdomain you add, you must create a DNS nameserver NS record with the Duo Network Gateway hostname (specified during initial Network Gateway configuration) as the value.
For the above example configuration, if the Duo Network Gateway hostname was set to "portal.example.com", then you will need to create an NS record for the external subdomain "external.example.com" with the value "portal.example.com". This will delegate name resolution to the Duo Network Gateway for any "*.external.example.com" names used by the RDP relay. Depending on your provider, the record may look like "external → portal.example.com" or "external → portal".
Connect to a Protected Remote Desktop Server
Once the DuoConnect and Duo Desktop client applications have been installed and configured you can test making a remote desktop connection to a protected RDP server.
If you encounter any issues establishing the remote desktop connection to the internal Windows host, review our collection of DuoConnect and Duo Desktop client knowledge base articles.
macOS
-
Open the Microsoft Remote Desktop Connection app and click the + to expand the Add menu. Click Add PC.
-
Enter the external hostname equivalent for your internal RDP server. Continuing the previous example setup, to connect to an internal server "rdp1.internal.example.com" with the "external.example.com" to "internal.example.com" subdomains configuration, you'd enter rdp1.external.example.com as the "PC name".
-
Set any other options you want for this PC host connection, and then click Add to save it.
If you choose to have the Remote Desktop app "ask when required" for the Windows credentials, then you will need to enter the username and password for the remote system after establishing the RDP connection though Duo Network Gateway. If you select or add a user account instead, the Remote Desktop Connection app will pass those credentials to the remote Windows system.
-
Double-click your newly added RDP PC name to launch the connection.
You can expect to complete primary authentication at the Duo Network Gateway's configured authentication source in a browser, followed by Duo two-factor authentication. After that, you'll complete login at the remote Windows system, either by entering your username and password or having the Remote Desktop app pass in your saved user account information (depending on how you configured the PC connection for this host).
Windows
-
Open the Start Menu with Windows key ⊞ key or click the Windows logo on the far left of the taskbar, or click the search icon in the task bar.
-
Type Remote Desktop and click the application search result.
-
Enter the external hostname equivalent for your internal RDP server. Continuing the previous example setup, to connect to an internal server "rdp1.internal.example.com" with the "external.example.com" to "internal.example.com" subdomains configuration, you'd enter rdp1.external.example.com as the "Computer" name.
-
Set any other options you want for this remote computer connection by clicking Show Options to expose the settings tabs. If you enable the "Allow me to save credentials" for the Windows credentials, then you'll be able to save your password for the remote system for future connections, instead of entering your login information every time.
-
Click Connect to launch the connection.
You can expect to complete primary authentication at the Duo Network Gateway's configured authentication source in a browser, followed by Duo two-factor authentication. After that, you'll complete login at the remote Windows system by entering your username and password (optionally saving them for future connections if you enabled that option in the Remote Desktop Connection client).
Create a Duo Network Gateway - Custom Relay Application in Duo
-
Log in to the Duo Admin Panel and navigate to Applications → Application Catalog.
-
Locate the entry for Duo Network Gateway - Custom Relay with the "2FA" label in the catalog. Click the + Add button to create the application and get your Client ID, Client secret, and API hostname. You'll need this information to complete your setup. See Protecting Applications for more information about protecting applications with Duo and additional application options.
Previously, the Client ID was called the "Integration key" and the Client secret was called the "Secret key".
-
No active Duo users can log in to new applications until you grant access. Update the User access setting to grant access to this application to users in selected Duo groups, or to all users. Learn more about user access to applications. If you do not change this setting now, be sure to update it so that your test user has access before you test your setup.
This setting only applies to users who exist in Duo with "Active" status. This does not affect application access for existing users with "Bypass" status, existing users for whom the effective Authentication Policy for the application specifies "Bypass 2FA" or "Skip MFA", or users who do not exist in Duo when the effective New User Policy for the application allows access to users unknown to Duo without MFA. -
You can adjust additional settings for your new Duo Network Gateway application at this time — like changing the application's name from the default value, enabling self-service, or assigning a group policy — or come back and change the application's policies and settings after you finish setup. If you do update any settings, click the Save button when done.
Protect Custom Servers in Duo Network Gateway
-
Navigate to the Duo Network Gateway admin console and click the Applications link on the left-hand side of the screen.
-
On the "Applications" page click Add New... and select Custom Relay from the drop-down options. You will be taken to a new page.
-
Under "Configure Duo 2FA" enter the information from the application you created earlier from the Duo Admin Panel.
Option Description Duo Integration key Copy and paste in the Client ID from the "Duo Network Gateway - Custom Relay" application you created earlier in the Duo Admin Panel. Duo Secret key Copy and paste in the Client secret from the "Duo Network Gateway - Custom Relay" application you created earlier in the Duo Admin Panel. Duo API hostname Copy and paste in the API hostname from the "Duo Network Gateway - Custom Relay" application you created earlier in the Duo Admin Panel. Enable Frameless Turns on frameless support for Duo Universal Prompt in Duo Network Gateway versions 1.5.10 to 3.1.0. DNG 3.2.0 enables frameless authentication by default for all applications, so this configuration option has been removed. 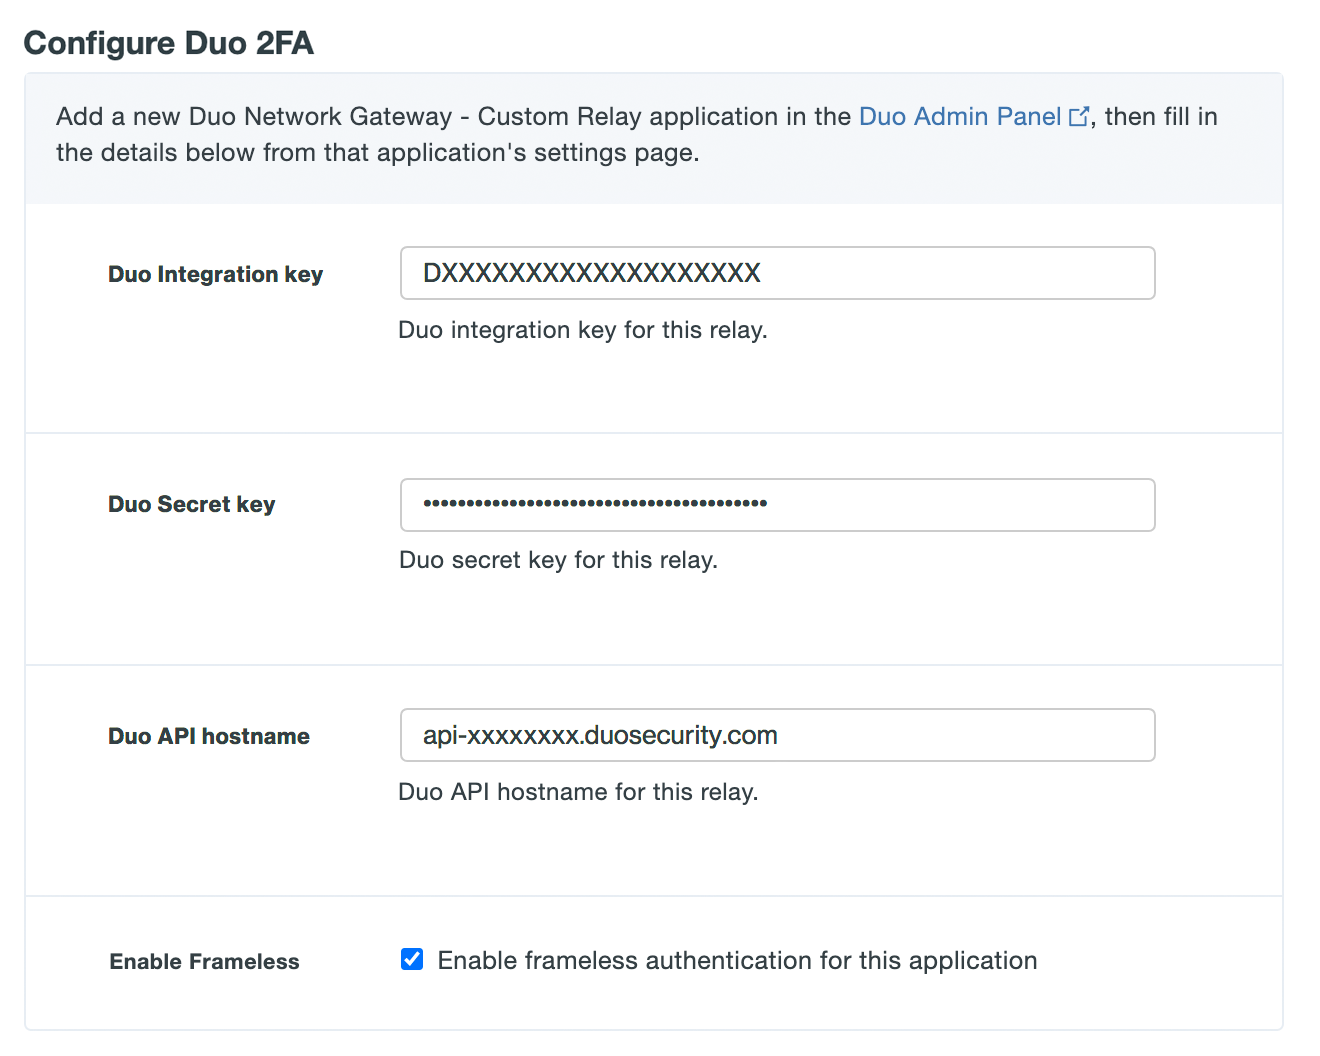
-
Scroll down to the "External URL Settings" section. In the External URL field enter hostname of the external URL DNS record you created as part of the prerequisites. The external URL is where users' computers will communicate for authentication with the Duo Network Gateway. A group of Custom servers can be protected behind an external URL. An example of a custom URL for Custom servers used by the engineering team might be "engineering-custom.example.com".
-
If you will be supplying your own SSL certificate select Provide my own certificate next to Certificate Source. Configure the certificate using the table below and skip step 6. If you would like to automatically generate certificates with Let's Encrypt, skip this step and proceed to step 6.
DuoConnect will fail to connect to SSH & Application Relays if the certificate provided to the DNG does not include a DNS Subject Alternative Name (SAN) extension with the same value as the Common Name (CN) extension of the certificate. Certificates generated by Duo Network Gateway using Let's Encrypt or obtained from a commercial certificate vendor satisfy this requirement.
Option Description SSL certificate Base64-encoded X.509 (pem, cer, or crt) public certificate to present for the "external URL" URL. We recommend including the entire certificate chain in the certificate file. The certificates should be ordered from top to bottom: certificate, issuing certificates, and root certificate. SSL certificate key Base64-encoded X.509 (pem, cer, or crt) private key for the "external URL" URL certificate. 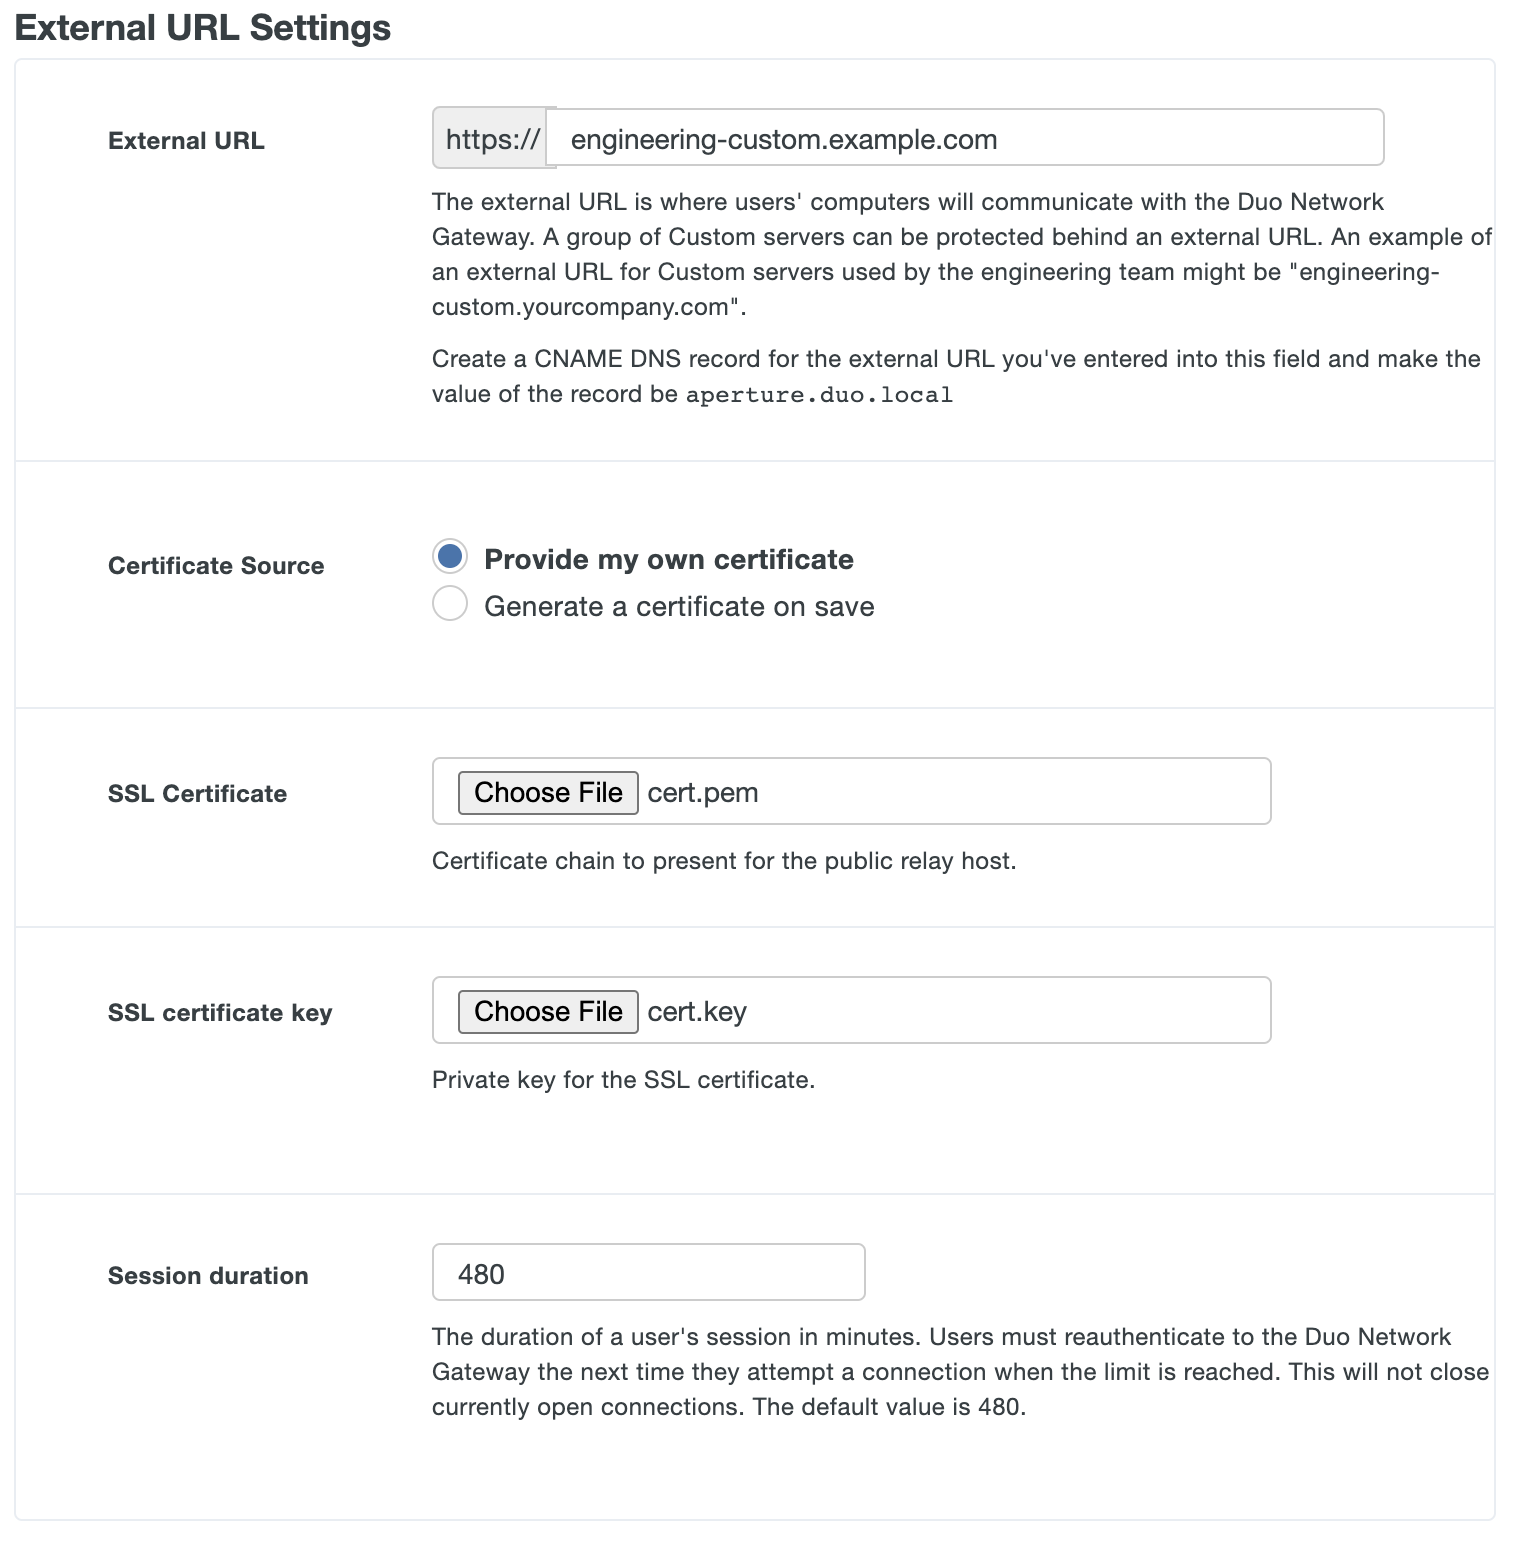
-
If you'd like the Duo Network Gateway to automatically generate and renew a free SSL certificate using Let's Encrypt select Generate a certificate on save next to Certificate Source. Review the Let's Encrypt Terms of Service. If you accept, check the box next to I agree to the Let's Encrypt Terms of Service.
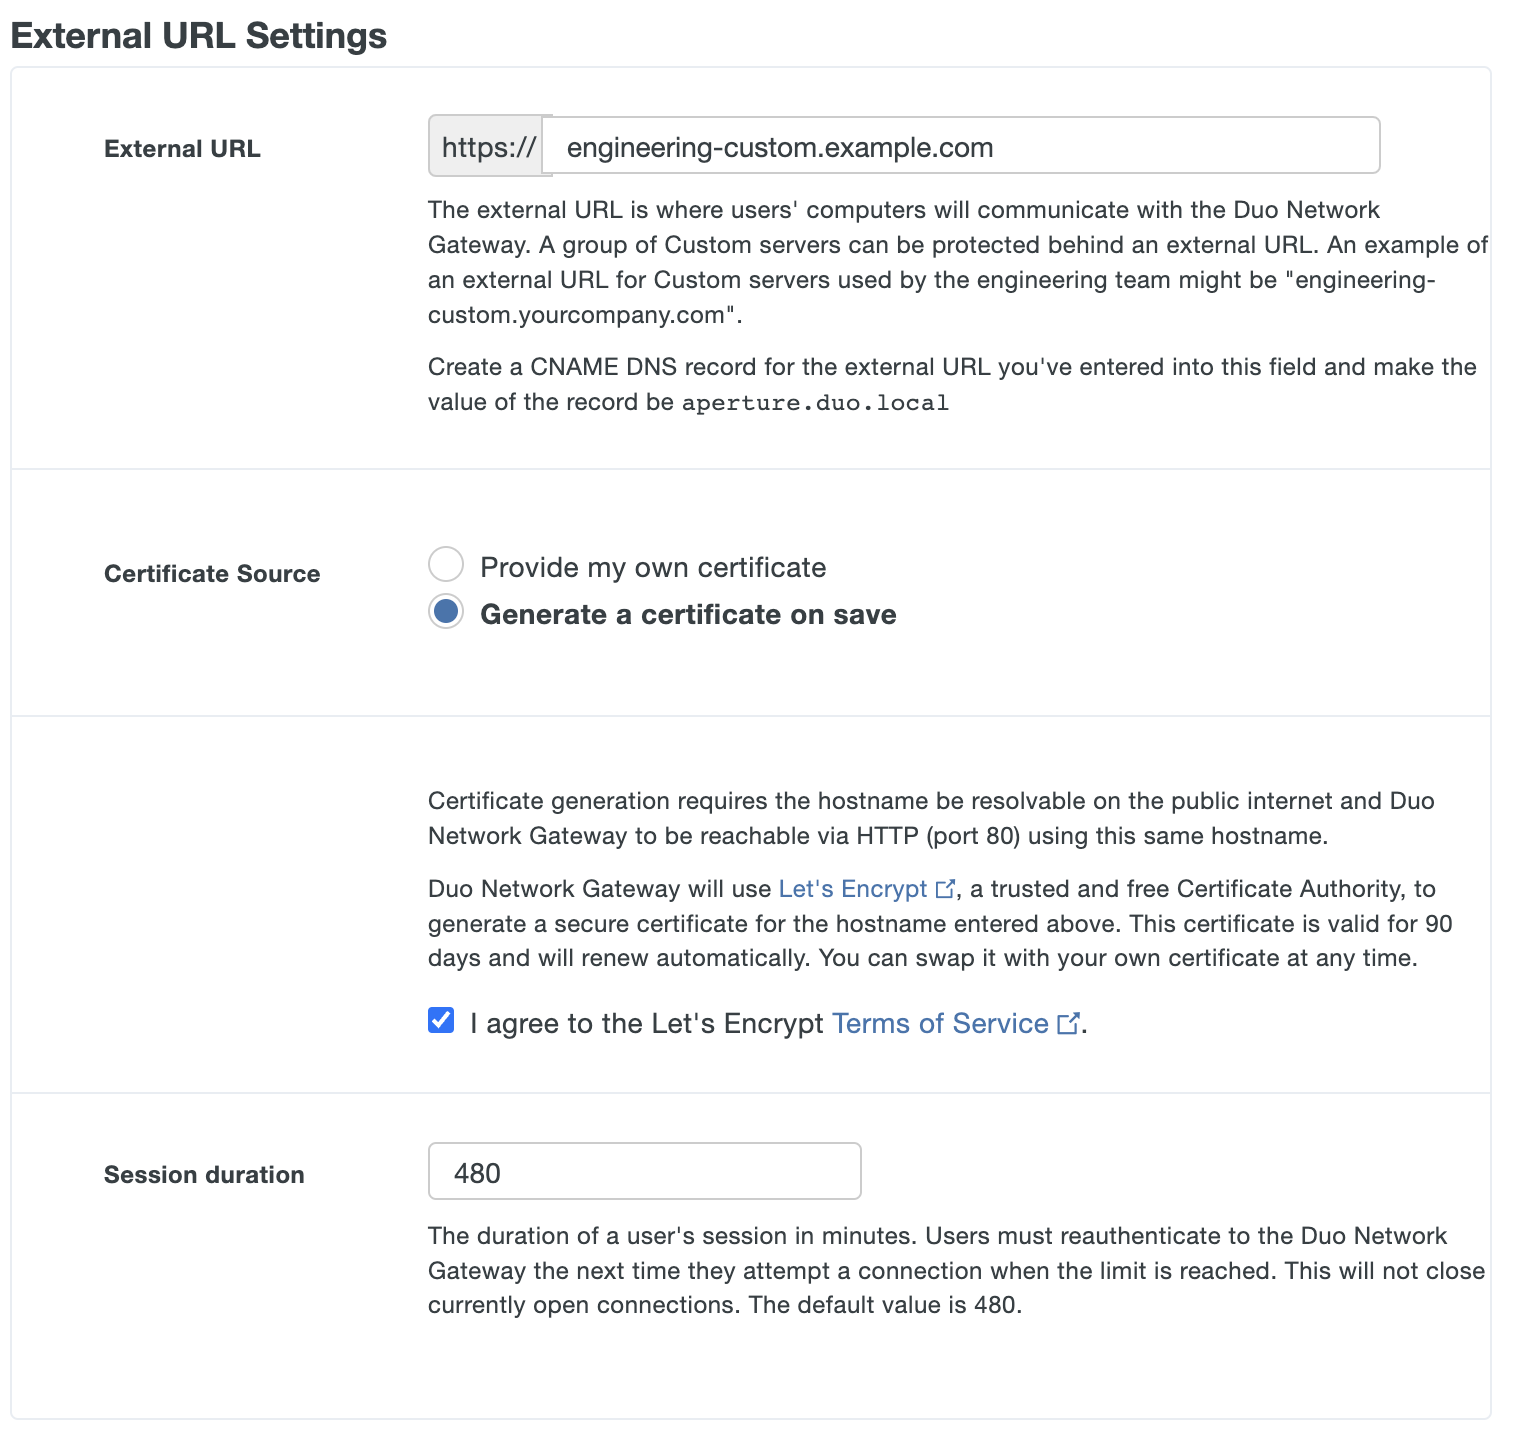
-
Session duration allows you to specify the maximum user session duration for a external URL in minutes. Users must reauthenticate to the Duo Network Gateway the next time they attempt a connection when the limit is reached. This will not close currently open connections. The default value is 480.
-
Scroll down to the "Custom Servers" section. Multiple Custom servers can be protected behind a external URL. Once a user authenticates through the external URL they can access any of the Custom servers behind the external URL without having to authenticate again. Users will need to reauthenticate on the next login attempt after their session has expired based on the Session Duration setting above. Users will still need to locally authenticate to the individual Custom servers.
-
Configure the settings related to your internal Custom servers that will be using the application relay using the table below:
Option Description Application type Pre-populated with application type. Internal hosts Enter a hostname or a hostname with wildcards related to the internal application servers you want to protect (a Telnet server in this example). Wildcards will not match sub-domains (e.g. "*.example.com" will match "server.example.com" but not "server.internal.example.com").
Use of hostnames instead of IP addresses for your RDP servers is required. If your network configuration does not support this, please refer to this KB article for a suggested workaroundPorts Enter the port(s) that the servers are listening on for custom connections. You may enter a single port or a range of ports (this example uses the Telnet default port 23). You can also specify multiple ports or multiple ranges of ports by separating them with commas. -
Additional text fields will appear under Internal hosts. Repeat step 9 to protect additional custom applications behind this external URL (example shows two custom hosts).
-
Once you've filled in all the required fields, click Add Custom Relay.
If all information isn't entered completely and correctly or this new Custom relay fails to save, you'll need to re-enter the Duo application client secret/secret key and select the certificate and key files again for upload.
-
Click the Subdomains link on the left-hand side of the Duo Network Gateway admin console.
-
On the "Subdomains" page you will add external to internal DNS subdomain mapping to help DNG understand which delegated DNS Zone(s) correspond to which internal DNS zone(s).
In this example, the Custom servers are in the "internal.example.com" DNS zone. Add a subdomain mapping from the external zone "external.example.com to the internal zone "internal.example.com". When you enter the subdomain information, the page will show you how user connections will be mapped from external to internal host DNS names.
The external or internal subdomains could be top level domains instead of actual subdomains. For example, if your internal Custom server's hostname is "telnet1.someinternaldomain.com", you could map the external subdomain "external.example.com" to the internal domain "someinternaldomain.com" on this page, and your users will connect through "telnet1.external.example.com" to reach the server "telnet1.someinternaldomain.com".
-
For each external subdomain you add, you must create a DNS nameserver NS record with the Duo Network Gateway hostname (specified during initial Network Gateway configuration) as the value.
For the above example configuration, if the Duo Network Gateway hostname was set to "portal.example.com", then you will need to create an NS record for the external subdomain "external.example.com" with the value "portal.example.com". This will delegate name resolution to the Duo Network Gateway for any "*.external.example.com" names used by the Custom relay. Depending on your provider, the record may look like "external → portal.example.com" or "external → portal".
Connect to a Protected Custom Server
Once the DuoConnect and Duo Desktop client applications have been installed and configured you can test making a remote connection to a protected Telnet server.
macOS
-
Click the Launchpad icon in the Dock, type Terminal in the search field, then click Terminal.
-
Use the external hostname equivalent for your internal Telnet server to connect using the Telnet client. Continuing the previous example setup, to connect to the Telnet server hosted by the internal server "telnet1.internal.example.com" with the "external.example.com" to "internal.example.com" subdomains configuration, you'd enter telnet telnet1.external.example.com at the Terminal command line prompt.
-
Press Enter to launch the connection.
You can expect to complete primary authentication at the Duo Network Gateway's configured authentication source in a browser, followed by Duo two-factor authentication. After that, you'll complete login for the Telnet server.
Windows
-
Open the Start Menu with Windows key ⊞ key or click the Windows logo on the far left of the taskbar, or click the search icon in the task bar.
-
Type Command Prompt and click the application search result.
-
Use the external hostname equivalent for your internal Telnet server to connect using the Telnet client. Continuing the previous example setup, to connect to the Telnet server hosted by the internal server "telnet1.internal.example.com" with the "external.example.com" to "internal.example.com" subdomains configuration, you'd enter telnet telnet1.external.example.com at the Command Prompt.
-
Press Enter to launch the connection.
You can expect to complete primary authentication at the Duo Network Gateway's configured authentication source in a browser, followed by Duo two-factor authentication. After that, you'll complete login for the Telnet server.
Create a Duo Network Gateway - SMB Relay Application in Duo
-
Log in to the Duo Admin Panel and navigate to Applications → Application Catalog.
-
Locate the entry for Duo Network Gateway - SMB Relay with the "2FA" label in the catalog. Click the + Add button to create the application and get your Client ID, Client secret, and API hostname. You'll need this information to complete your setup. See Protecting Applications for more information about protecting applications with Duo and additional application options.
Previously, the Client ID was called the "Integration key" and the Client secret was called the "Secret key".
-
No active Duo users can log in to new applications until you grant access. Update the User access setting to grant access to this application to users in selected Duo groups, or to all users. Learn more about user access to applications. If you do not change this setting now, be sure to update it so that your test user has access before you test your setup.
This setting only applies to users who exist in Duo with "Active" status. This does not affect application access for existing users with "Bypass" status, existing users for whom the effective Authentication Policy for the application specifies "Bypass 2FA" or "Skip MFA", or users who do not exist in Duo when the effective New User Policy for the application allows access to users unknown to Duo without MFA. -
You can adjust additional settings for your new Duo Network Gateway application at this time — like changing the application's name from the default value, enabling self-service, or assigning a group policy — or come back and change the application's policies and settings after you finish setup. If you do update any settings, click the Save button when done.
Protect SMB/File Servers in Duo Network Gateway
We recommend securing your SMB file shares using SMB encryption (encrypts data in transit), which is supported on SMB 3 or later. Please see SMB security enhancements for more information.
-
Navigate to the Duo Network Gateway admin console and click the Applications link on the left-hand side of the screen.
-
On the "Applications" page click Add New... and select SMB Relay from the drop-down options. You will be taken to a new page.
-
Under "Configure Duo 2FA" enter the information from the application you created earlier from the Duo Admin Panel.
Option Description Duo Integration key Copy and paste in the Client ID from the "Duo Network Gateway - SMB Relay" application you created earlier in the Duo Admin Panel. Duo Secret key Copy and paste in the Client secret from the "Duo Network Gateway - SMB Relay" application you created earlier in the Duo Admin Panel. Duo API hostname Copy and paste in the API hostname from the "Duo Network Gateway - SMB Relay" application you created earlier in the Duo Admin Panel. Enable Frameless Turns on frameless support for Duo Universal Prompt in Duo Network Gateway versions 1.5.10 to 3.1.0. DNG 3.2.0 enables frameless authentication by default for all applications, so this configuration option has been removed. 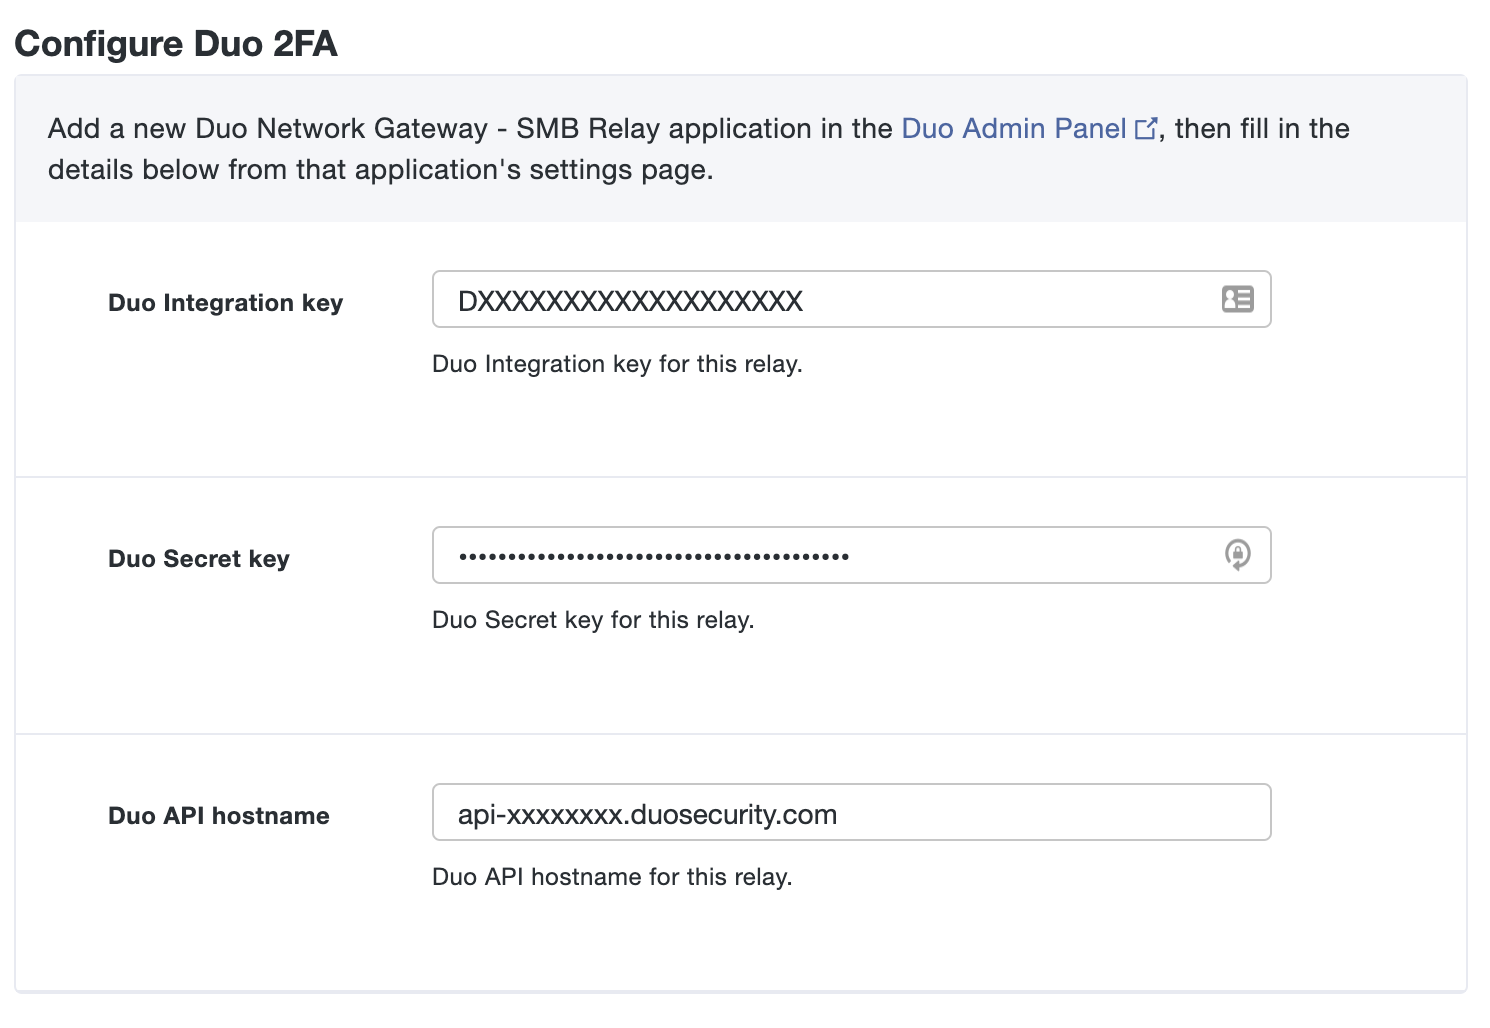
-
Scroll down to the "External URL Settings" section. In the External URL field enter hostname of the external URL DNS record you created as part of the prerequisites. The external URL is where users' computers will communicate for authentication with the Duo Network Gateway. A group of SMB servers can be protected behind an external URL. An example of a external URL for SMB servers used by the engineering team might be "engineering-smb.example.com".
-
If you will be supplying your own SSL certificate select Provide my own certificate next to Certificate Source. Configure the certificate using the table below and skip step 6. If you would like to automatically generate certificates with Let's Encrypt, skip this step and proceed to step 6.
DuoConnect will fail to connect to SSH & Application Relays if the certificate provided to the DNG does not include a DNS Subject Alternative Name (SAN) extension with the same value as the Common Name (CN) extension of the certificate. Certificates generated by Duo Network Gateway using Let's Encrypt or obtained from a commercial certificate vendor satisfy this requirement.
Option Description SSL certificate Base64-encoded X.509 (pem, cer, or crt) public certificate to present for the "external URL" URL. We recommend including the entire certificate chain in the certificate file. The certificates should be ordered from top to bottom: certificate, issuing certificates, and root certificate. SSL certificate key Base64-encoded X.509 (pem, cer, or crt) private key for the "external URL" URL certificate. 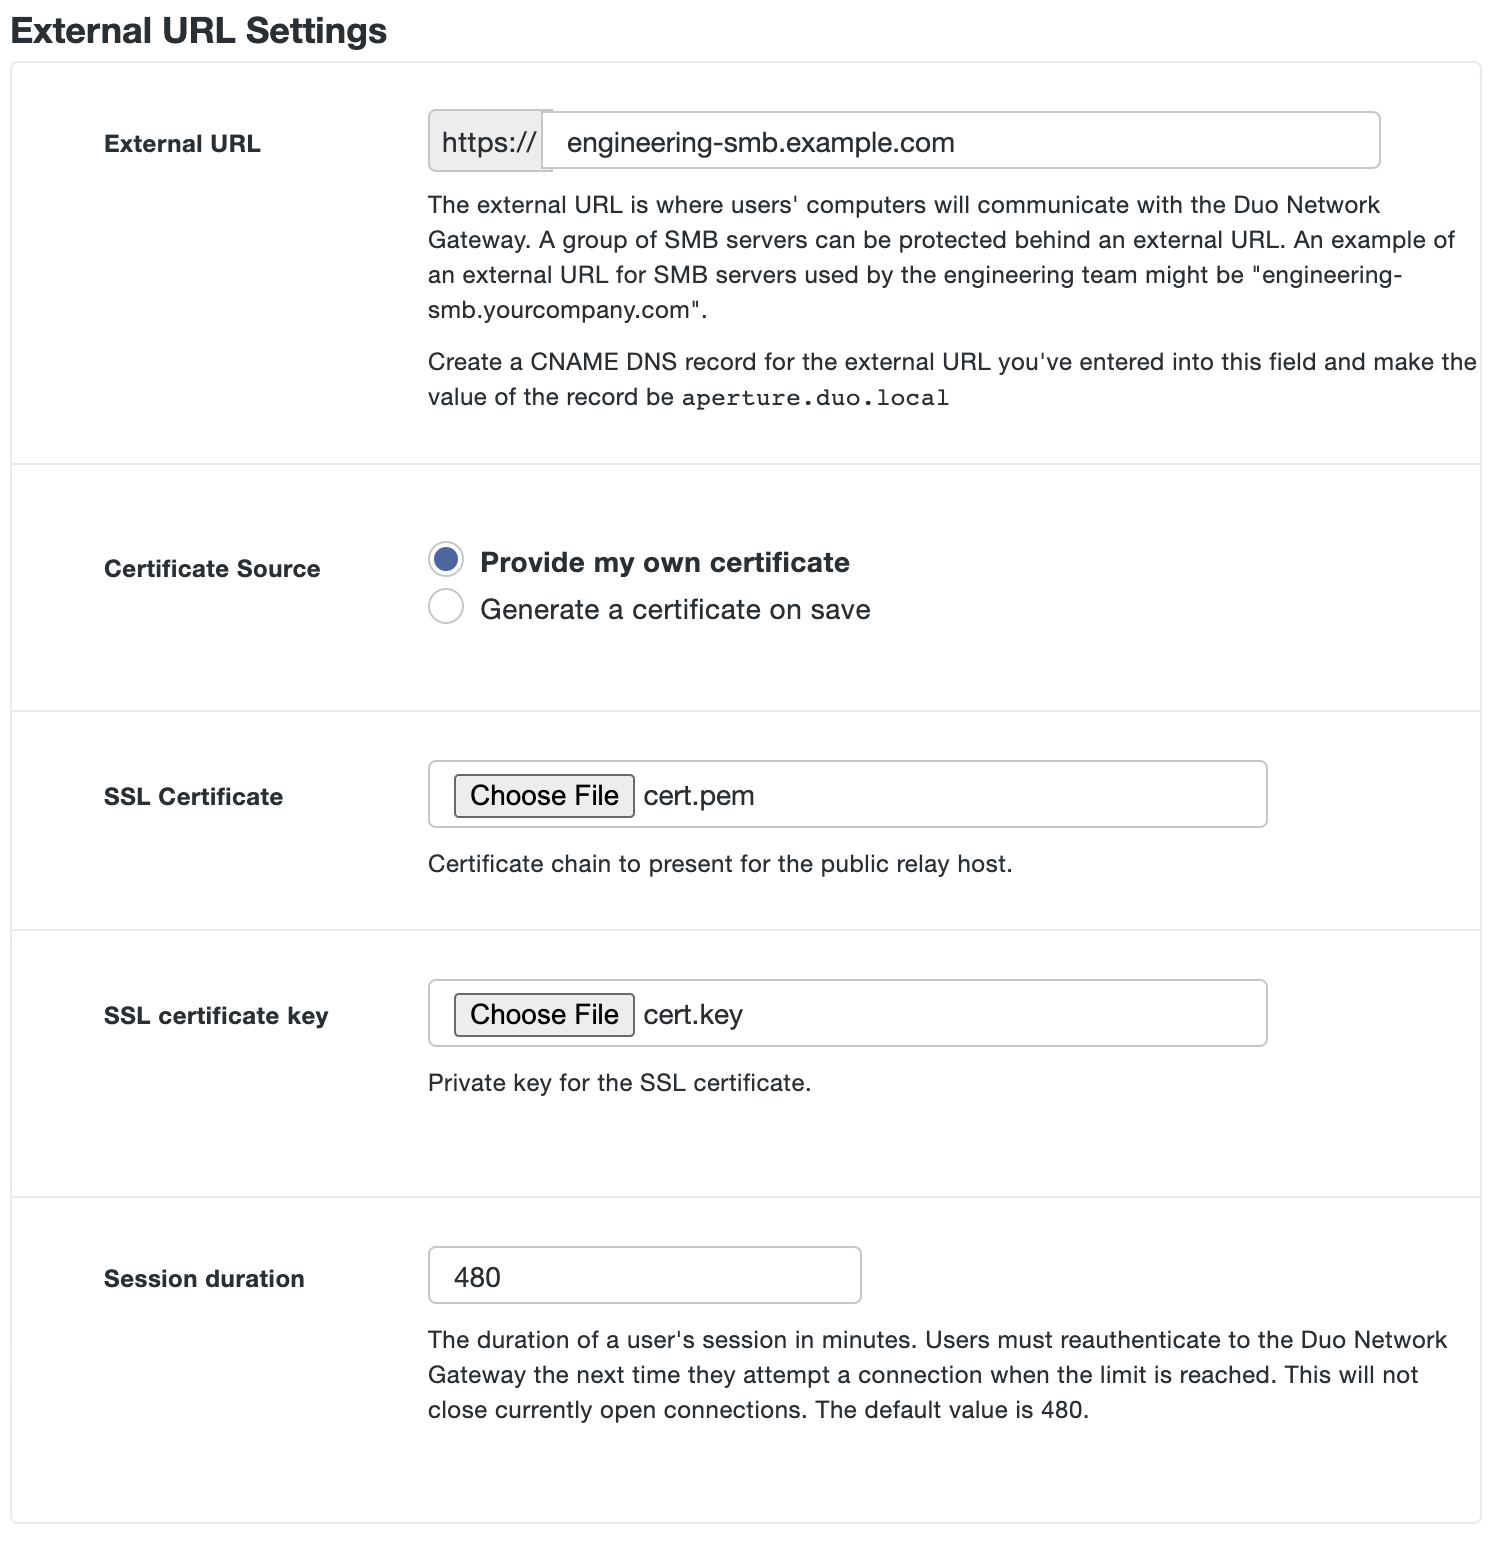
-
If you'd like the Duo Network Gateway to automatically generate and renew a free SSL certificate using Let's Encrypt select Generate a certificate on save next to Certificate Source. Review the Let's Encrypt Terms of Service. If you accept, check the box next to I agree to the Let's Encrypt Terms of Service.
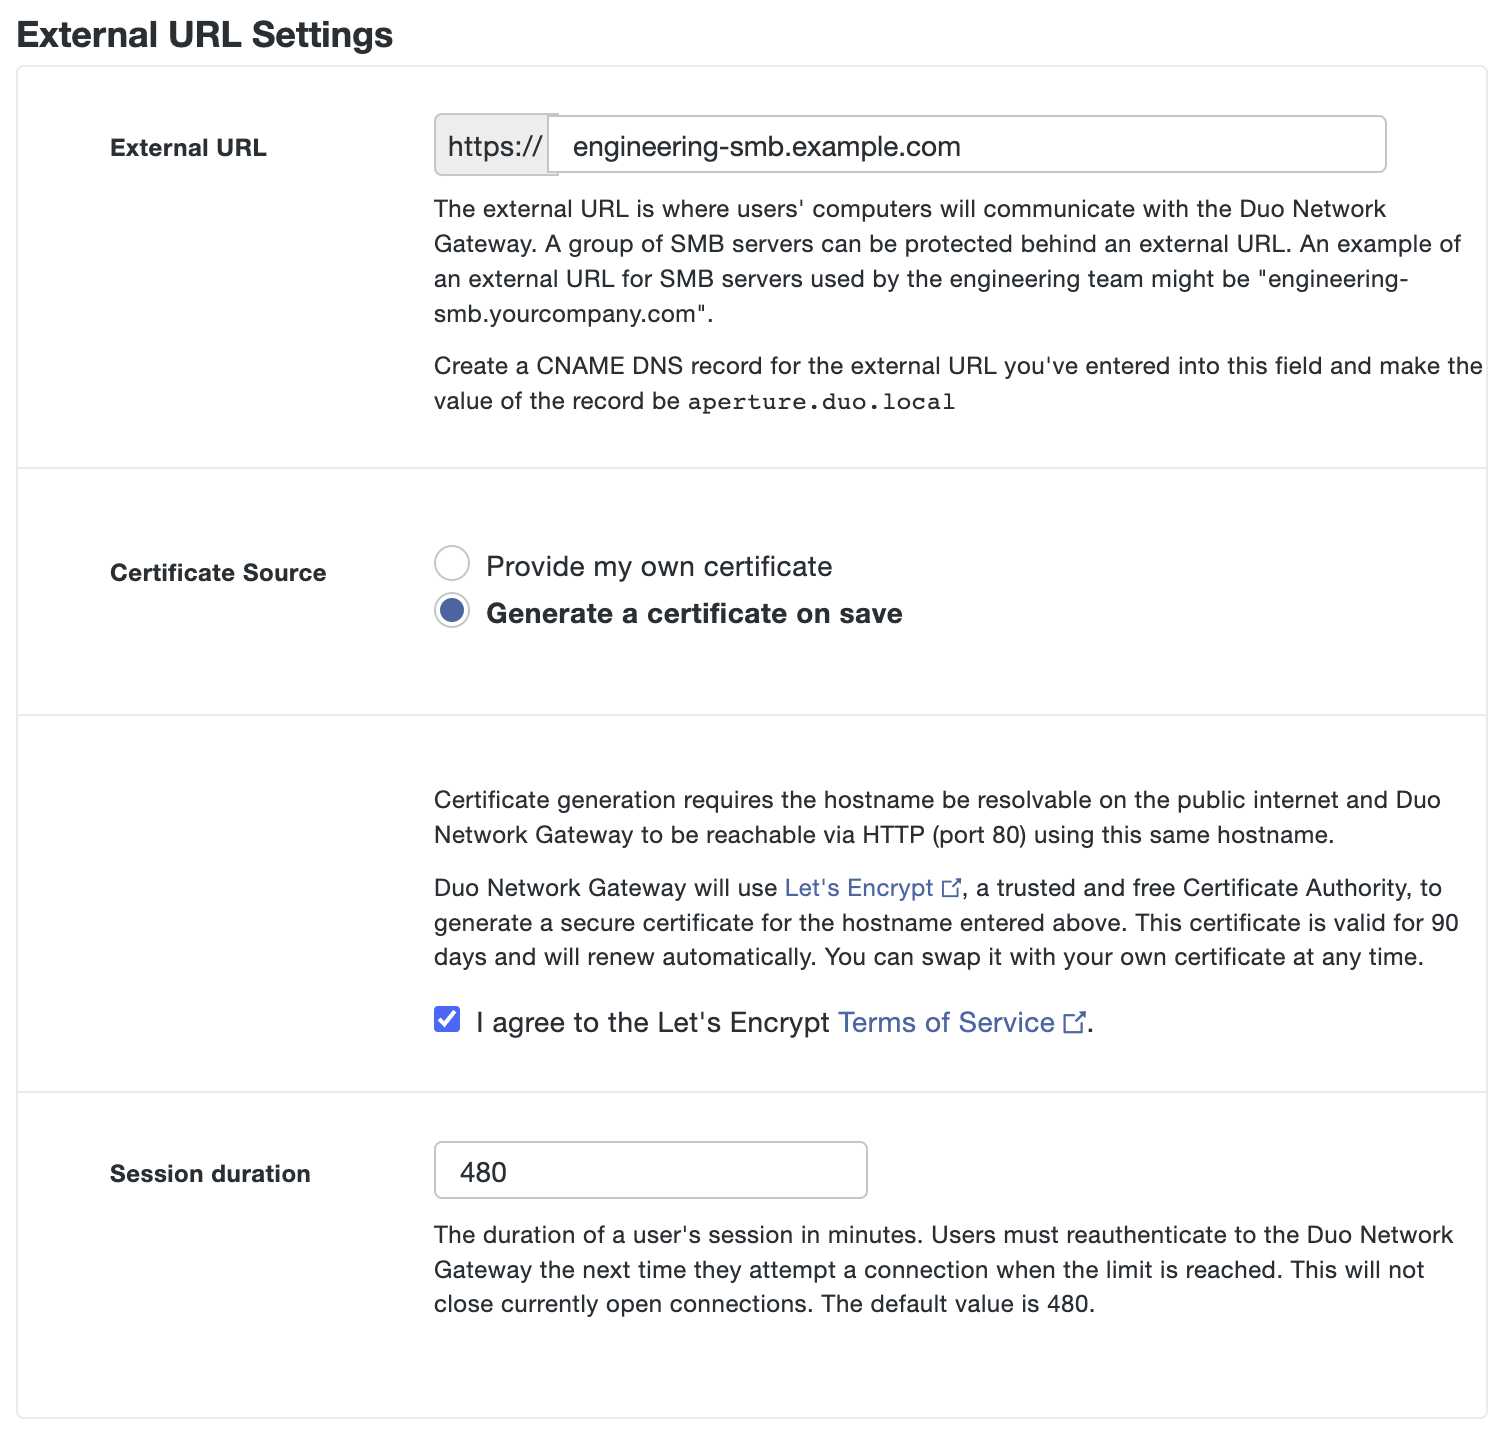
-
Session duration allows you to specify the maximum user session duration for a external URL in minutes. Users must reauthenticate to the Duo Network Gateway the next time they attempt a connection when the limit is reached. This will not close currently open connections. The default value is 480.
-
Scroll down to the "SMB Servers" section. Multiple SMB servers can be protected behind a external URL. Once a user authenticates through the external URL they can access any of the SMB servers behind the external URL without having to authenticate again. Users will need to reauthenticate on the next login attempt after their session has expired based on the Session Duration setting above. Users will still need to locally authenticate to the individual SMB servers.
-
Configure the settings related to your internal SMB servers that will be using the application relay using the table below:
Option Description Application type Pre-populates the Ports parameter if that parameter is not defined, for SMB, port 445 is auto-populated. Internal hosts Enter a hostname or a hostname with wildcards related to the internal SMB servers you want to protect. Wildcards will not match sub-domains (e.g. "*.example.com" will match "server.example.com" but not "server.internal.example.com").
Use of hostnames instead of IP addresses for your SMB servers is required. If your network configuration does not support this, please refer to this KB article for a suggested workaroundPorts Enter the port(s) that the servers are listening on for SMB connections. You may enter a single port or a range of ports. You can also specify multiple ports or multiple ranges of ports by separating them with commas. If no value specified then the port used is determined by the selected Application type (445 for SMB). -
Additional text fields will appear under Internal hosts. Repeat step 9 to protect additional SMB servers behind this external URL (example shows two SMB hosts).
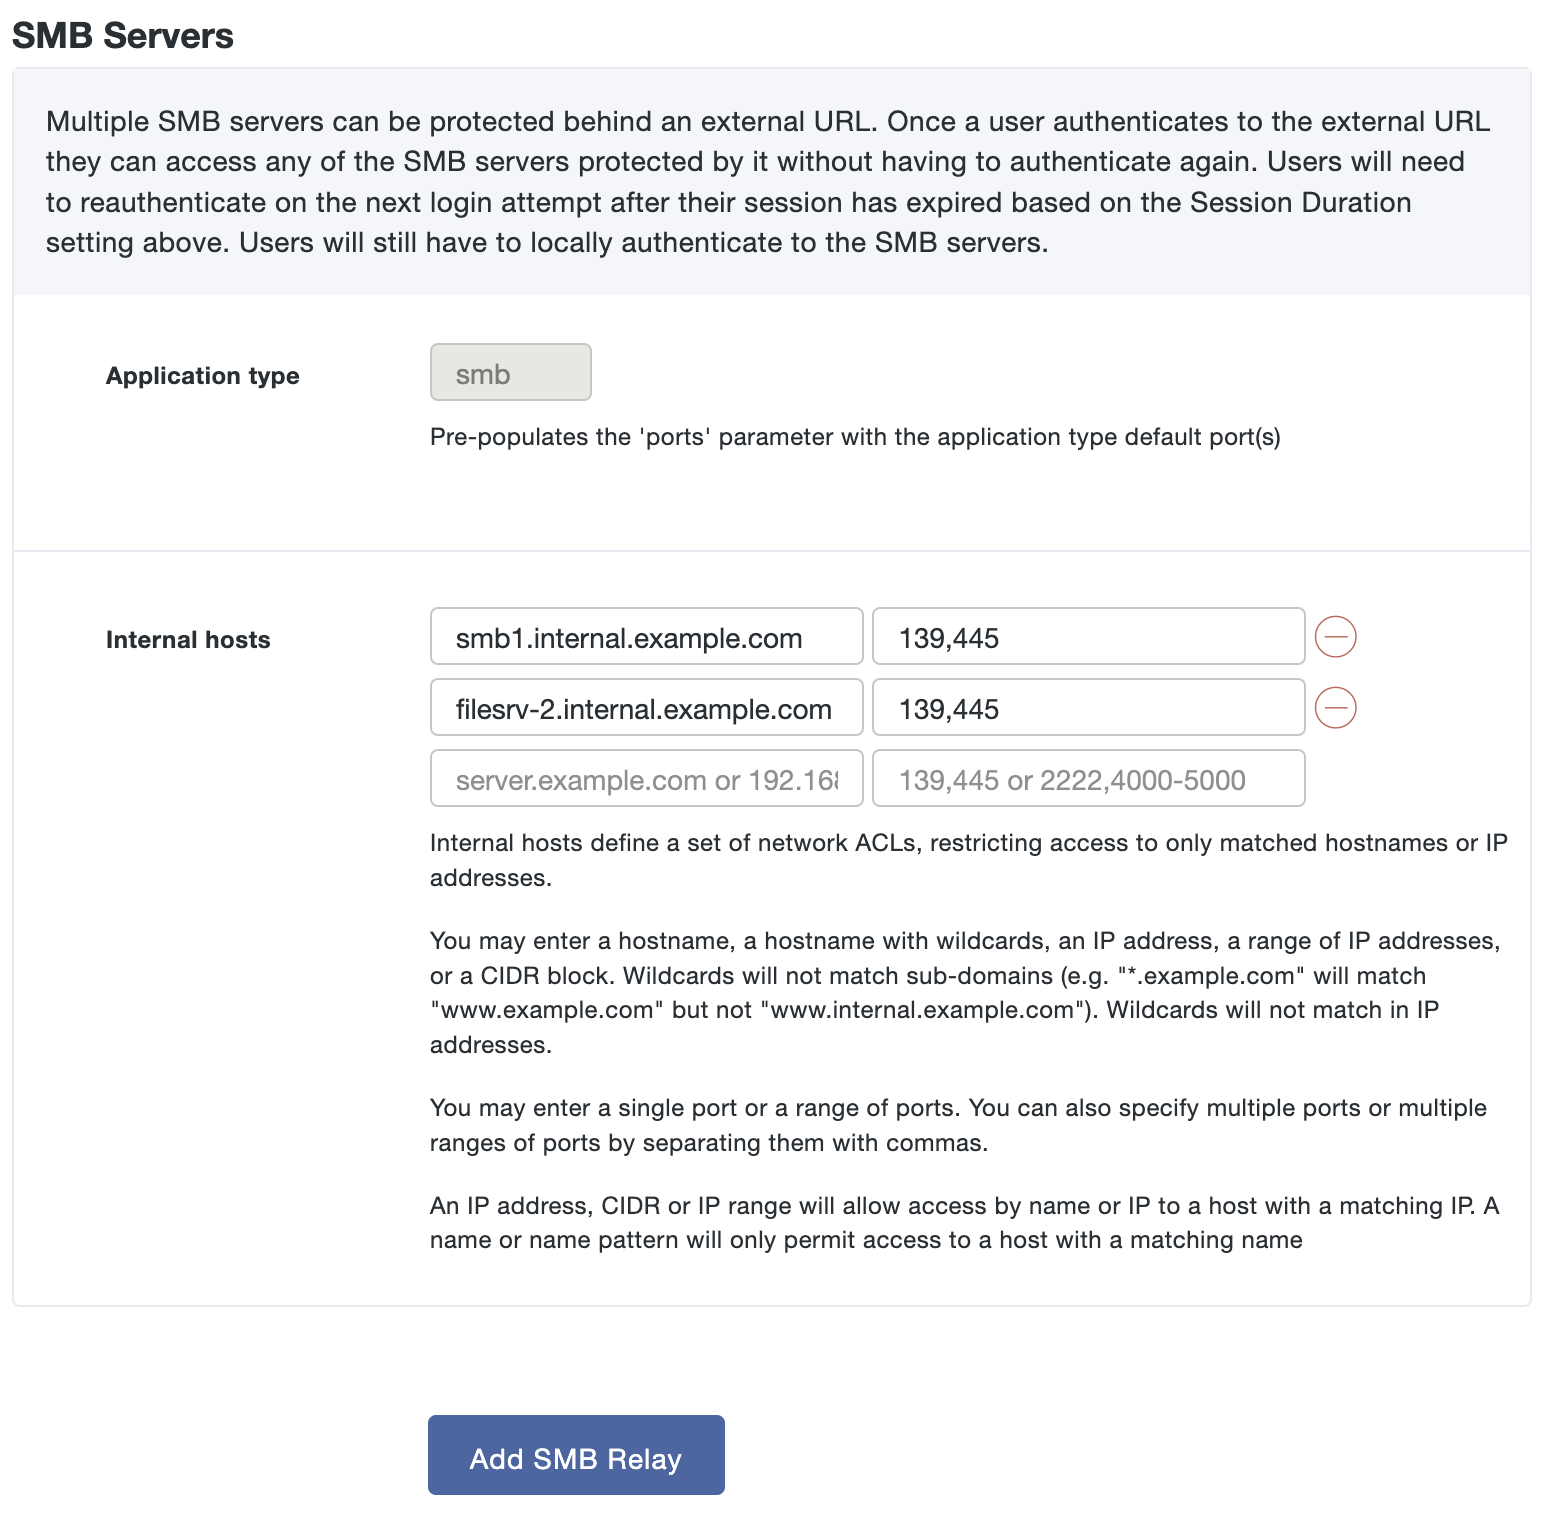
-
Once you've filled in all the required fields, click Add SMB Relay.
If all information isn't entered completely and correctly or this new SMB relay fails to save, you'll need to re-enter the Duo application client secret/secret key and select the certificate and key files again for upload.
-
Click the Subdomains link on the left-hand side of the Duo Network Gateway admin console.
-
On the "Subdomains" page you will add external to internal DNS subdomain mapping to help DNG understand which delegated DNS Zone(s) correspond to which internal DNS zone(s).
In this example, the SMB servers are in the "internal.example.com" DNS zone. Add a subdomain mapping from the external zone "external.example.com to the internal zone "internal.example.com". When you enter the subdomain information, the page will show you how user connections will be mapped from external to internal host DNS names.
The external or internal subdomains could be top level domains instead of actual subdomains. For example, if your internal SMB server's hostname is "smb1.someinternaldomain.com", you could map the external subdomain "external.example.com" to the internal domain "someinternaldomain.com" on this page, and your users will connect through "smb1.external.example.com" to reach the server "smb1.someinternaldomain.com".
-
For each external subdomain you add, you must create a DNS nameserver NS record with the Duo Network Gateway hostname (specified during initial Network Gateway configuration) as the value.
For the above example configuration, if the Duo Network Gateway hostname was set to "portal.example.com", then you will need to create an NS record for the external subdomain "external.example.com" with the value "portal.example.com". This will delegate name resolution to the Duo Network Gateway for any "*.external.example.com" names used by the SMB relay. Depending on your provider, the record may look like "external → portal.example.com" or "external → portal".
Connect to a Protected SMB/File Server
Once the DuoConnect and Duo Desktop client applications have been installed and configured you can test making an SMB connection to a protected SMB/file share.
If you encounter any issues establishing the SMB connection to the internal SMB, Windows file share, and/or SAMBA host, review our collection of DuoConnect and Duo Desktop client knowledge base articles.
macOS
For more information on connecting to SMB/file shares with your mac, please see the following Apple help guide: Connect to a Windows computer from macOS.
-
Open the Finder app and in the App menu within the top menu bar, click Go, then click Connect to Server... (or you can use the shortcut ⌘K).
-
Enter the external hostname equivalent for your internal SMB/file server. Continuing the previous example setup, to connect to file share called "finance-file-share" hosted by the internal server "file-server.internal.example.com" with the "external.example.com" to "internal.example.com" subdomains configuration, you'd enter smb://file-server.external.example.com/finance-file-share as the full file server and file share connection name.
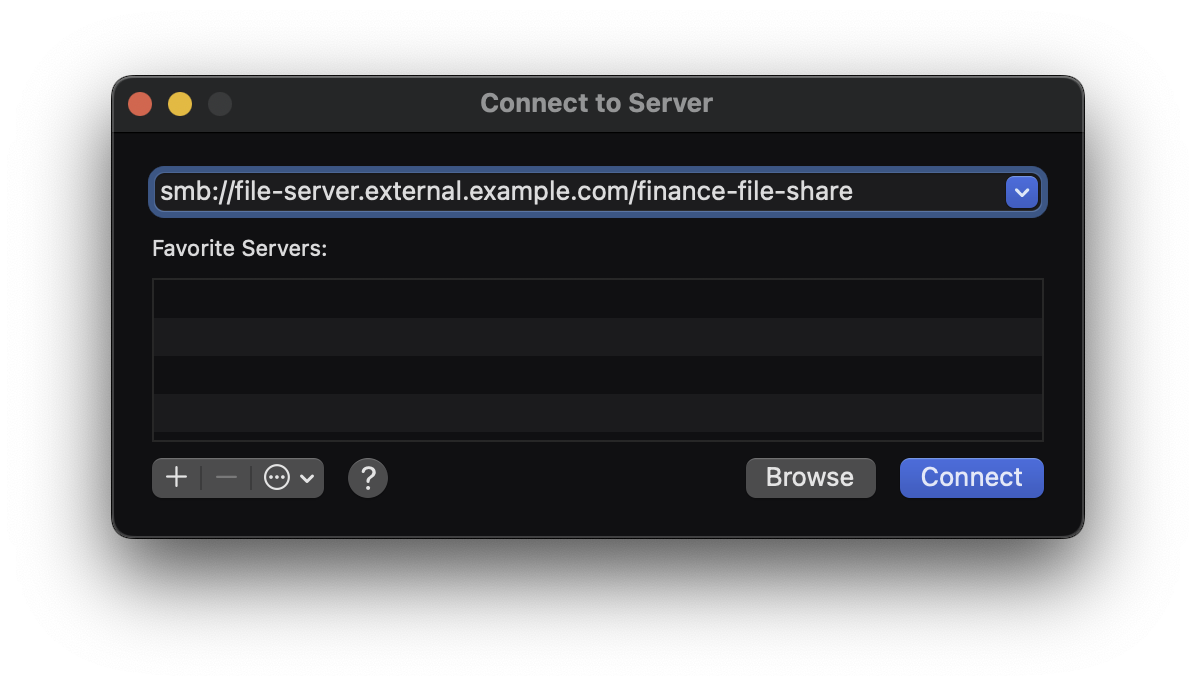
-
Click the Connect button to launch the connection.
You can expect to complete primary authentication at the Duo Network Gateway's configured authentication source in a browser, followed by Duo two-factor authentication. After that, you'll complete login for the file share with the remote file server, either by entering your username and password or having the Finder app remember your password (depending on if when previously connecting, Remember this password in my keychain was selected).
Windows
-
Open the Start Menu with Windows key ⊞ key or click the Windows logo on the far left of the taskbar, or click the search icon in the task bar, and type File Explorer and click the application search result (or use the shortcut Windows key ⊞ + e).
-
Right click This PC and then select click Map network drive....
-
Enter the external hostname equivalent for your internal SMB/file server. Continuing the previous example setup, to connect to file share called "finance-file-share" hosted by the internal server "file-server.internal.example.com" with the "external.example.com" to "internal.example.com" subdomains configuration, you'd enter \\file-server.external.example.com\finance-file-share as the full file server and file share connection name.
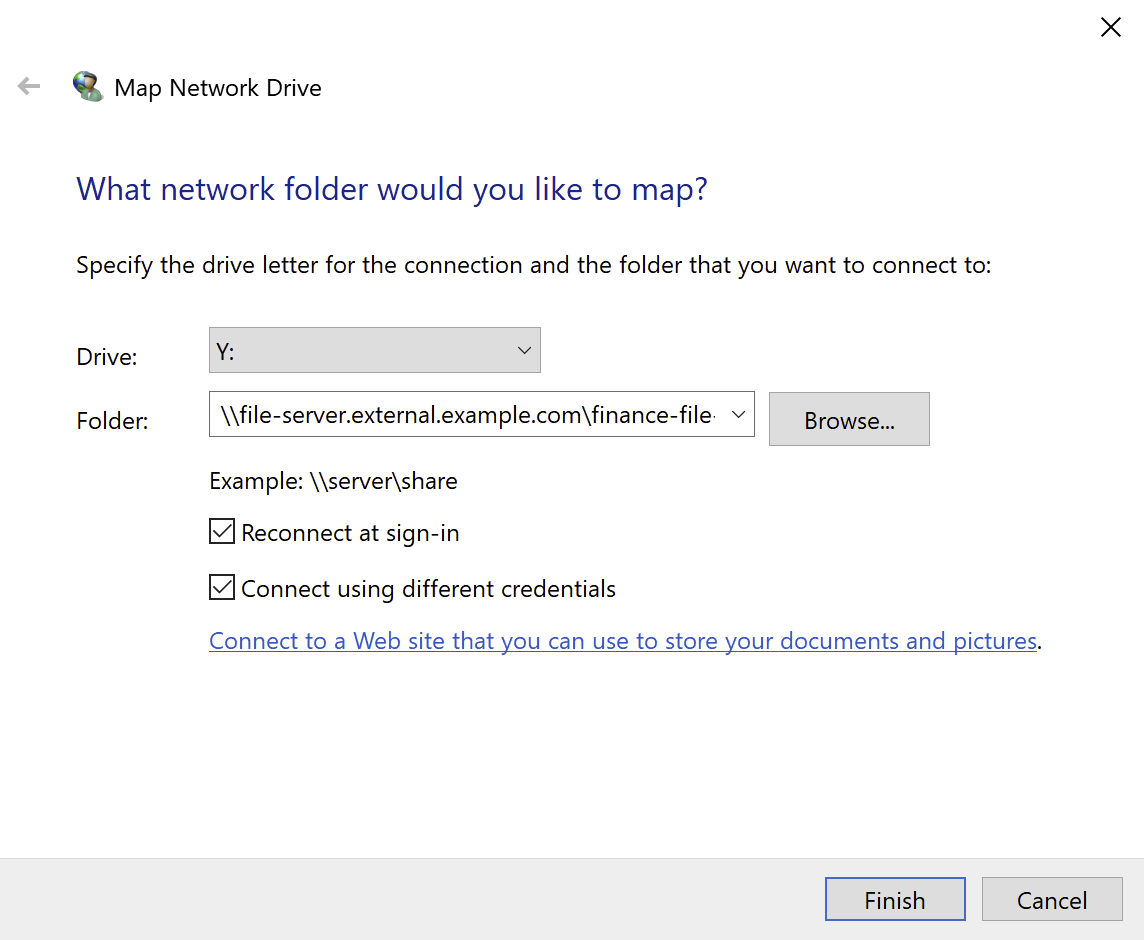
-
Set any other options you want for this remote smb/file share connection, for example, the Drive letter, whether you want to file share to automatically connect at sign-in, and whether to use different credentials to connect. You can save the alternative credentials when prompted.
-
Click Finish to launch the connection.
You can expect to complete primary authentication at the Duo Network Gateway's configured authentication source in a browser, followed by Duo two-factor authentication. After that, you'll complete login for the file share with the remote file server, either by entering your username and password or having Windows use your current signed-in user credentials or remember your password option (depending on if when previously connecting, Remember my credentials was selected).
Additional Settings
You can change settings related to the Duo Network Gateway server by clicking the Settings link on the left-hand side navigation menu and clicking tabs at the top of the page.
Server Settings
This section allows you to change the Duo Network Gateway server settings that were set during Initial Duo Network Gateway Configuration. These values are the admin e-mail, hostname, and certificate that are used for the Duo Network Gateway website. This is the site that users are directed to when they are authenticating through Duo Network Gateway.
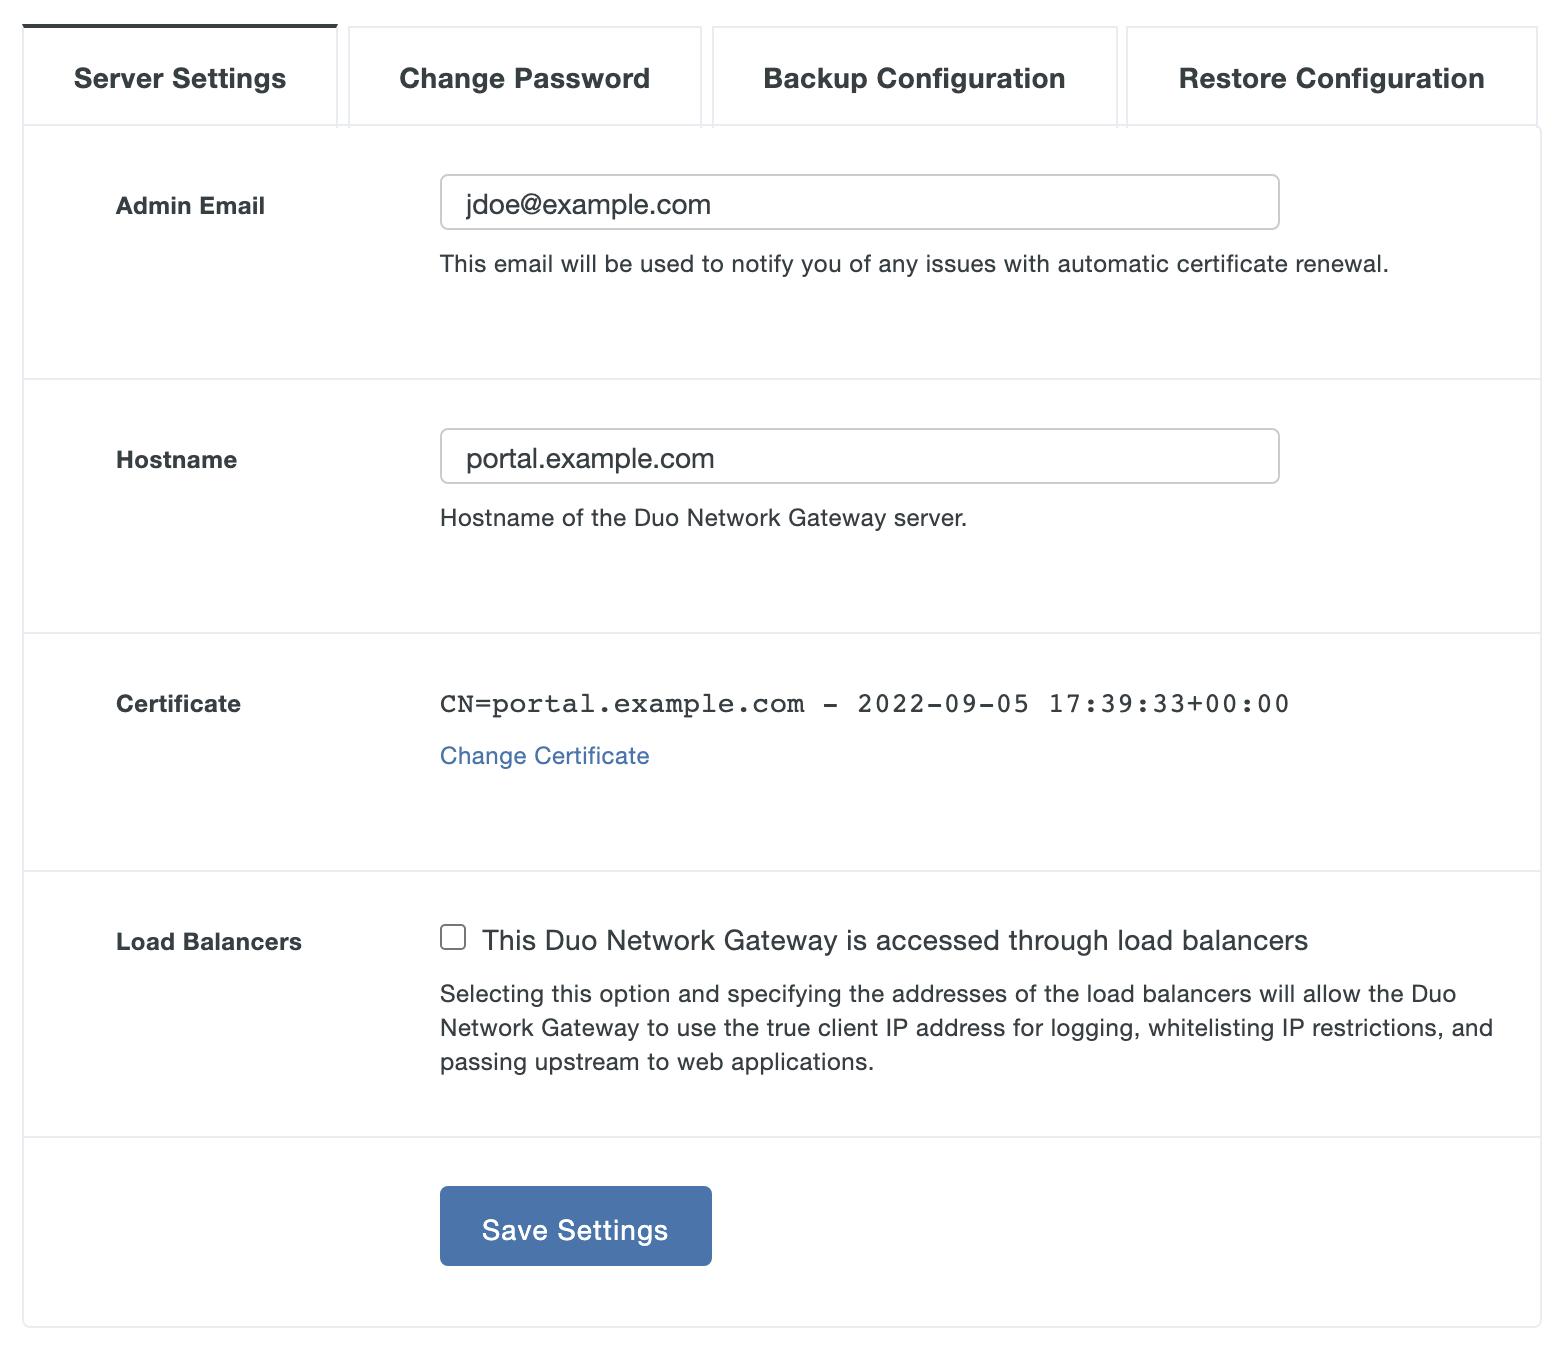
Change Password
Set a new administrator password. We require a strong password that uses a mix of uppercase and lowercase letters, numbers, and special characters.
Backup and Restore
Duo Network Gateway allows you to backup your current configuration and restore it at a later date or import on a different server for high-availability or migration. You can do this through the admin console using the directions below or you can also backup and restore from the command-line by using scripted backup and restore.
Backing up your configuration
-
While logged into the Duo Network Gateway admin console click Settings on the left-hand side of the screen.
-
On the "Settings" page click the Backup Configuration tab.
-
Type your current admin password into the Current Admin Password field.
-
Type a passphrase that will be used to encrypt your backup file into the File Encryption Passphrase and confirm the passphrase in the Confirm Encryption Passphrase field. This encrypts private information such as private keys and passwords within the backup file. See the Duo article How is Duo Network Gateway Backup and Restore data encrypted? for more details about encryption of DNG backup files.
Important: Secure this file as you would any other sensitive or password information. If you lose your passphrase you will not be able to restore the backup file. -
Click Backup Configuration. A backup CFG file will be downloaded to your computer. Store this file in a secure location.
Restoring from the Settings page
-
While logged into the Duo Network Gateway admin console click Settings on the left-hand side of the screen.
-
On the "Settings" page click the Restore Configuration tab.
-
Type your current admin password into the Current Admin Password field.
-
Select the backup CFG file you'd like to restore from and upload it in Saved Configuration File.
-
Type the passphrase you chose when you created the backup in the Encryption Passphrase for Selected File field.
-
Click Restore Configuration. The page will refresh and all previous configurations will be restored.
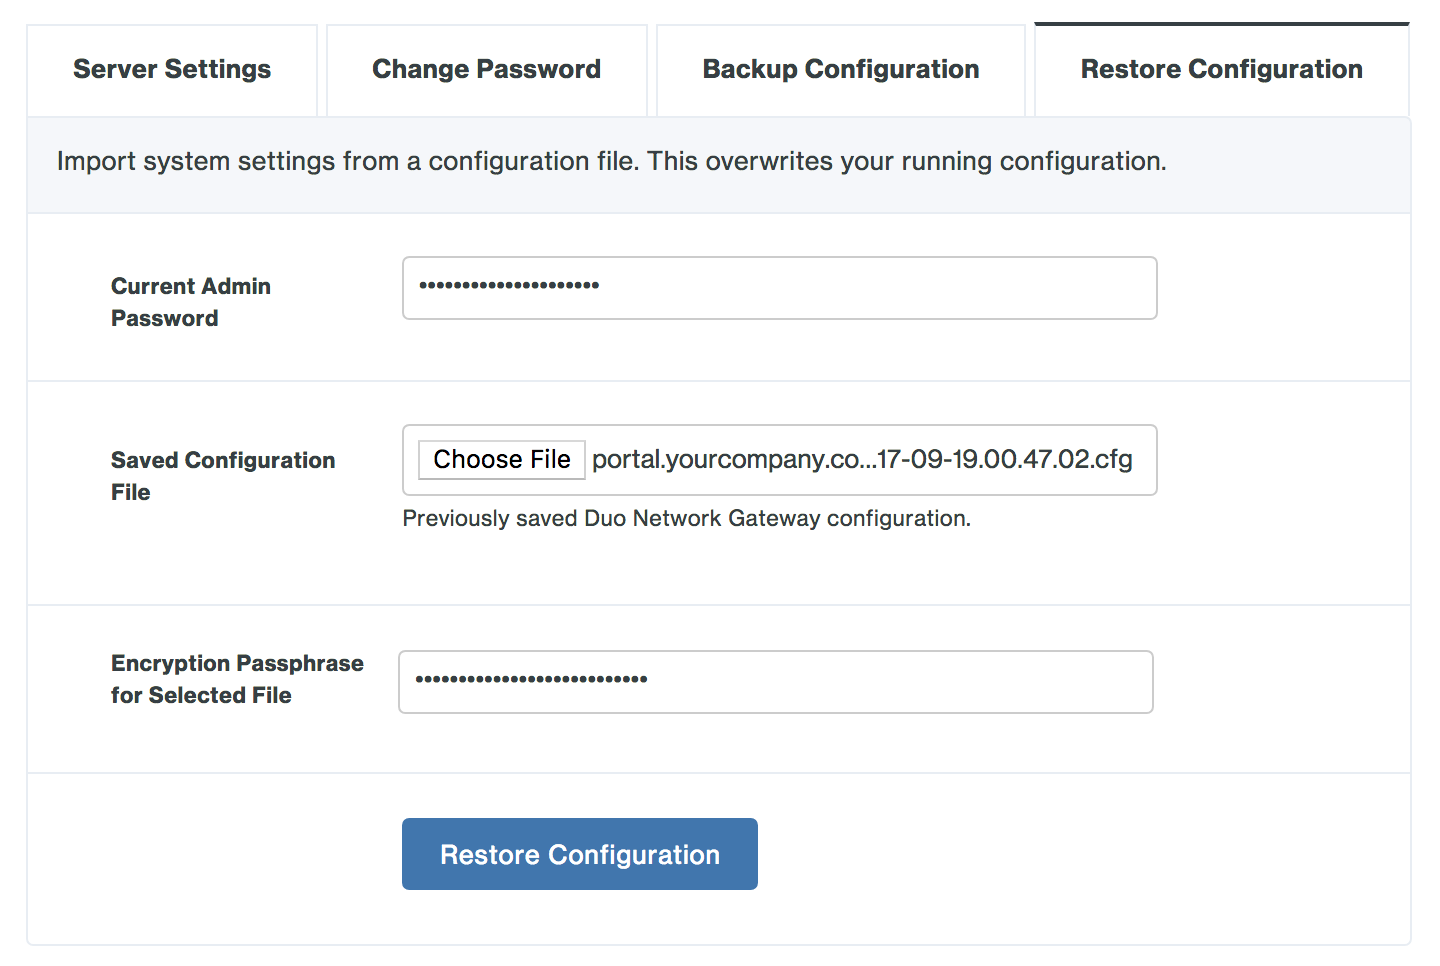
Restoring from the Initial config page
-
While configuring a new Duo Network Gateway on the "Make Duo Network Gateway visible to the internet" page click the Already have a Duo Network Gateway configuration file? Import it now. link.
-
Select the backup CFG file you'd like to restore from and upload it in Saved Configuration File.
-
Type the passphrase you chose when you created the backup in the Encryption Passphrase for Selected File field.
-
Click Import Configuration. The page will refresh and all previous configurations will be restored.
-
You'll be taken to the homepage of the Duo Network Gateway admin console.
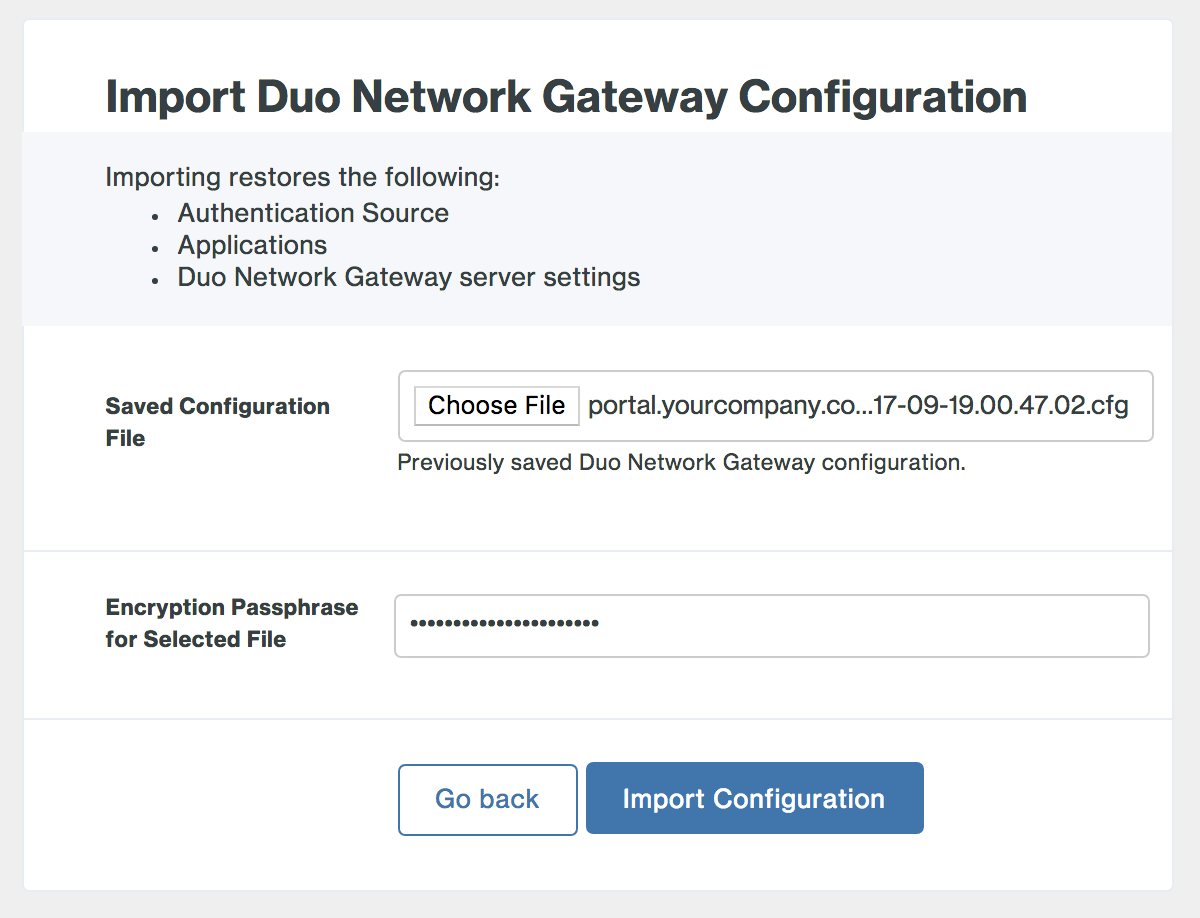
Feature Flags
View Feature Flags
To view the current feature flags and their status, use the following command:
docker exec network-gateway-admin features.py --getSet Feature Flags
To enable a feature flag, first get the name using the view command, then enable with:
docker exec admin features.py --enable --feature <feature name>>To disable a feature flag, use the following command:
docker exec admin features.py --disable --feature <feature name>Expose Non-Standard Ports for Web Apps
By default, Duo Network Gateway accepts connections for your web applications only on the standard HTTPS port (443). If you need to expose web applications on other ports, create an additional Docker YML file with the required port specifications.
For example, if you have added two web applications to the DNG with external URLs that use non-standard ports (such as https://app1.example.com:1500 and https://app2.example.com:1501), you need to expose ports 1500 and 1501 in addition to the default 443.
To expose those example ports, create a file called network-gateway-ports.yml with the following contents:
services:
    portal:
      ports:
          - 1500:1500
          - 1501:1501
Add one line for each non-standard port that needs to be exposed.
When starting the DNG, specify the YML file you created with the additional ports on the command line:
docker compose -p network-gateway -f network-gateway-3.4.0.yml -f network-gateway-ports.yml up -dNote that your network-gateway-n.n.n YML file name may reflect a different version than the example command shown. Replace the file name in the example with your current YML file's actual name.
Other Docker commands (such as down and pull) do not require the additional ports file specification.
Logging
To view Duo Network Gateway's system logs, log into the Duo Network Gateway server and run the following command using your current Duo Network Gateway YML file:
docker compose -p network-gateway -f network-gateway-3.4.0.yml logs -fNote that your YML file name may reflect a different version than the example command shown. Replace the file name in the example with your current YML file's actual name.
The logs will output as a continuous stream. To exit viewing the logs use the keyboard combination CTRL + Z.
Syslog Integration
Syslog has been integrated into the DNG to enhance logging capabilities. Below are the details on how to use and configure Syslog.
Enabling Syslog
-
To enable Syslog, use the following command:
COMPOSE_PROFILES=syslog docker compose –p network-gateway -f network-gateway-3.4.0.yml up -d -
To ensure Syslog is consistently enabled, define the profile in a
.envfile.- Create a
.envfile in the same directory as yourdocker-compose.yml, by adding:
COMPOSE_PROFILES=syslog- Start DNG with Syslog enabled:
docker compose -p network-gateway -f network-gateway-3.4.0.yml up –dDocker Compose will automatically pick up the
COMPOSE_PROFILES=syslogsetting from the.envfile. - Create a
Log Rotation
- Syslog is configured with log rotation functionality. It performs log rotation every 24 hours and compresses the log files.
Log Output Location
-
By default, Syslog outputs logs to the current directory where the Docker compose files are located. The logs follow this directory structure:
syslog/<serviceName>/<serviceName>.log
Customizing Log Output Location
-
You can define a custom location for logs. To customize the log output location, use the following variable when starting services:
SYSLOG_LOG_PATH=docker compose –p network-gateway -f network-gateway-3.2.2.yml up -d -
To define a custom location for logs, add the
SYSLOG_LOG_PATHvariable to the.envfile:-
Update
.envfile with the following:COMPOSE_PROFILES=syslog SYSLOG_LOG_PATH=/custom/log/directory -
Start DNG with the custom log path by running the following command:
docker compose -p network-gateway -f network-gateway-3.4.0.yml up -d
Since
SYSLOG_LOG_PATHis defined in the.envfile, Docker Compose will automatically apply the custom log location. -
Integration with Splunk’s Universal Forwarder
- Install Splunk Universal Forwarder on the machine running the services and configure it to stream logs to Splunk. For more information, refer to Splunk’s Universal Forwarder documentation.
User Sessions
A session’s duration in the Duo Network Gateway is the amount of time after which a user would have to reauthenticate with Duo 2FA. This is determined by the Session Duration configured for that application. If all sessions belonging to a user have expired, they will be redirected to authenticate with the configured primary authentication provider.
Any connections through SSH or application relays (i.e. RDP, SMB, etc.) are allowed to stay connected past the specified session duration, but users will be required to reauthenticate to establish any new connections.
Active user sessions can be viewed and terminated from the Duo Network Gateway admin console on the Sessions page. The table displays a list of the current active sessions and SSH or application relay (RDP, SMB, etc.) connections in the Duo Network Gateway server.
End a User Session
To end a user's session:
-
Navigate to the Duo Network Gateway admin console and click the Sessions link on the left-hand side of the screen.
-
On the "Sessions" page use the search bar in the top right to filter sessions based on username. Sort the list alphabetically by clicking the name title.
-
Click the End All Sessions button next to the desired username.
-
Click End on the confirmation dialog to terminate that user's sessions and disconnect any SSH or application relay (RDP, SMB, etc.) connections. The user will need to reauthenticate to DNG.
Upgrade Duo Network Gateway
Upgrading Duo Network Gateway preserves all your server settings and application configurations.
Web and SSH Deployments
To perform an upgrade:
-
Before upgrading back up your configuration.
-
Clean up older unused Duo Network Gateway Docker images by typing:
docker rmi $(docker images --format "{{.Repository}} {{.ID}}" | grep duosecurity | cut -f 2 -d ' ')Ignore any
error responsemessages you see. You should see output similar to:Untagged: duosecurity/network-gateway@sha256:16d5e71a3280c11766996de561b48b283b866ec93613f1bb65490def6ff29c64 Deleted: sha256:6893259e27b3311895279cde328012879f4e92c9823245d05adf9926fed3c0b4 Deleted: sha256:82dcf49fa7f5fe50b3193a60663e562e2980692e56cf50aed1e168807cc9ea96 Deleted: sha256:0c9d75ad7dbad398c8382638effbfde7edc20c546c7dec392074716e80535897 Error response from daemon: conflict: unable to delete 3f33419032e4 (cannot be forced) - image is being used by running container f596fdca3aad Error response from daemon: conflict: unable to delete 421ce10839ab (cannot be forced) - image is being used by running container f29e373adc26 Error response from daemon: conflict: unable to delete 3627aad0d196 (cannot be forced) - image is being used by running container 2acb91f391a7 -
Download the latest version of the Duo Network Gateway YML file by typing:
wget --content-disposition https://dl.duosecurity.com/network-gateway-latest.ymlYou should see output similar to:
--2016-12-21 14:15:16--  https://dl.duosecurity.com/network-gateway-latest.yml
 Resolving dl.duosecurity.com (dl.duosecurity.com)... 52.84.66.79, 52.84.66.236, 52.84.66.146, ...
 Connecting to dl.duosecurity.com (dl.duosecurity.com)|52.84.66.79|:443... connected.
 HTTP request sent, awaiting response... 200 OK
 Length: 1194 (1.2K) [application/octet-stream]
 Saving to: ‘network-gateway-3.4.0.yml’
 network-gateway-3.4.0.yml                   100%[======================================================================>]   1.17K  --.-KB/s    in 0s
 2016-12-21 14:15:16 (124 MB/s) - ‘network-gateway-3.4.0.yml’ saved [1194/1194]
Note the saved file name; you'll need this in future steps. View checksums for Duo downloads here.
-
Pull down the new Duo Network Gateway image files using the YML file downloaded in the previous step.
Type:
docker compose -f network-gateway-3.4.0.yml pullNote that your YML file name may reflect a different version than the example command shown. Replace the file name in the example with your downloaded YML file's actual name.
-
Type the following command to upgrade your existing Duo Network Gateway to the new version from the YML file you downloaded:
docker compose -p network-gateway -f network-gateway-3.4.0.yml up -dNote that the new YML file names may reflect different versions than the example command shown. Replace the file name in the example with your newly downloaded YML file's actual name.
-
The Duo Network Gateway server shuts down and starts up with the newer version; preserving your existing settings. The upgrade process is complete with no further action required. The output will look similar to:
Recreating network "network-gateway_default" with the default driver
 Recreating network-gateway-redis
 Recreating network-gateway-portal
 Recreating network-gateway-admin
If you've upgraded to Duo Network Gateway version 1.5.10 to 3.1.0 and now want to enable Universal Prompt support for your applications:
-
Log in to the Network Gateway admin console, click Applications, and click on an application in the list.
-
In the "Configure MFA" section of the page, check the Enable Frameless setting box to enable it and save the change.
-
Repeat for the rest of your web and SSH applications.
DNG 3.2.0 enables frameless authentication by default for all applications, so this configuration option has been removed. You may still need to log into the Duo Admin Panel and activate Universal Prompt for your DNG applications if you still see the traditional Duo Prompt during authentication.
Web, SSH, and Application Server Deployments
To perform an upgrade:
-
Before upgrading back up your configuration.
-
Clean up older unused Duo Network Gateway Docker images by typing:
docker rmi $(docker images --format "{{.Repository}} {{.ID}}" | grep duosecurity | cut -f 2 -d ' ')Ignore any
error responsemessages you see. You should see output similar to:Untagged: duosecurity/network-gateway@sha256:16d5e71a3280c11766996de561b48b283b866ec93613f1bb65490def6ff29c64 Deleted: sha256:6893259e27b3311895279cde328012879f4e92c9823245d05adf9926fed3c0b4 Deleted: sha256:82dcf49fa7f5fe50b3193a60663e562e2980692e56cf50aed1e168807cc9ea96 Deleted: sha256:0c9d75ad7dbad398c8382638effbfde7edc20c546c7dec392074716e80535897 Deleted: sha256:0c893gbjs9374d398c8382638effbfde7edc20c546c7dec392074716e80535897 Error response from daemon: conflict: unable to delete 3f33419032e4 (cannot be forced) - image is being used by running container f596fdca3aad Error response from daemon: conflict: unable to delete 421ce10839ab (cannot be forced) - image is being used by running container f29e373adc26 Error response from daemon: conflict: unable to delete 3627aad0d196 (cannot be forced) - image is being used by running container 2acb91f391a7 Error response from daemon: conflict: unable to delete dbbea7724709 (cannot be forced) - image is being used by running container dbbea7724709 -
Download the latest version of the Duo Network Gateway AppRelay for RDP, SMB, etc. YML file by typing:
wget --content-disposition https://dl.duosecurity.com/network-gateway-app-relay-latest.ymlYou should see output similar to:
--2022-04-04 09:48:11--  https://dl.duosecurity.com/network-gateway-app-relay-latest.yml
 Resolving dl.duosecurity.com... 54.192.58.68, 54.192.58.97, 54.192.58.16, ...
 Connecting to dl.duosecurity.com|54.192.58.68|:443... connected.
 HTTP request sent, awaiting response... 200 OK
 Length: 500 [application/octet-stream]
 Saving to: 'network-gateway-3.4.0-app-relay.yml'

 network-gateway-3.4.0-app-relay.yml 100%[==============================================================>]     500  --.-KB/s   in 0s

 2021-11-18 09:48:11 (68.1 MB/s) - 'network-gateway-3.4.0-app-relay.yml' saved [500/500]
Note the saved file name; you'll need this in future steps. View checksums for Duo downloads here.
-
Pull down the new Duo Network Gateway image files using the YML file downloaded in the previous step.
Type:
docker compose -f network-gateway-3.4.0-app-relay.yml pullNote that your YML file name may reflect a different version than the example command shown. Replace the file name in the example with your downloaded YML file's actual name.
-
Type the following command to upgrade your existing Duo Network Gateway to the new version from the YML file you downloaded:
docker compose -p network-gateway -f network-gateway-3.4.0-app-relay.yml up -dNote that the new YML file names may reflect different versions than the example command shown. Replace the file name in the example with your newly downloaded YML file's actual name.
-
The Duo Network Gateway server shuts down and starts up with the newer version; preserving your existing settings. The upgrade process is complete with no further action required. The output will look similar to:
Recreating network "network-gateway_default" with the default driver
 Recreating network-gateway-redis
 Recreating network-gateway-portal
 Recreating network-gateway-admin
 Recreating network-gateway-dns
Enable Frameless Authentication
If you've upgraded to Duo Network Gateway version 1.5.10 to 3.1.0 and now want to enable Universal Prompt support for your web and SSH applications:
-
Log in to the Network Gateway admin console, click Applications, and click on an application in the list.
-
In the "Configure MFA" section of the page, check the Enable Frameless setting box to enable it and save the change.
-
Repeat for the rest of your DNG applications.
-
Log in to each of your DNG applications once to experience the traditional Duo Prompt via redirect.
-
Visit the Duo Admin Panel and update the properties for each of your DNG applications to activate the Universal Prompt.
DNG 3.2.0 enables frameless authentication by default for all applications, so this configuration option has been removed. You may still need to log into the Duo Admin Panel and activate Universal Prompt for your DNG applications if you still see the traditional Duo Prompt during authentication.
API Configuration
Duo Network Gateway 2.2.0 and later may be configured and administered via the Duo Network Gateway API. Learn more about using the DNG API.
Scripted Configuration
Duo Network Gateway can be configured by using the admin console or by creating a configuration file and sending it to the Duo Network Gateway.
Using a configuration file will give you the option to manage your Duo Network Gateway configuration offline with source control and give you the ability to automatically deploy, configure, and update the Duo Network Gateway using automation without having to access the Admin console.
Scripted Backup and Restore
Scripted backup and restore requires Duo Network Gateway 1.3.2 or greater.
Duo Network Gateway offers a way to use the command-line to backup and restore Duo Network Gateway configuration. This allows you to use scripts or tools to automatically backup or restore Duo Network Gateway configuration without needing to log into the admin console.
Scripted Backup
The command for backing up your configuration is called backup-config. It accepts a password on its standard input, and provides the backup configuration on its standard output. This allows you to use scripts or tools to backup Duo Network Gateway configuration.
-
While logged into the Duo Network Gateway server through the command-line with Duo Network Gateway running, create an environment variable called
BACKUP_PASSWORD. The value of this variable should be the password you'd like to use to encrypt and decrypt the Duo Network Gateway backup file.We recommend setting this environment variable using a script or another tool so that the password is not stored in command-line history. This environment variable can usually be set with a command similar to:
BACKUP_PASSWORD="The_Actual_Password"This environment variable will only persist until the command-line session is closed.
-
Running the following command will backup the Duo Network Gateway to a file called
dng.cfgthat will be saved into your current directory:echo "$BACKUP_PASSWORD" | docker exec -i network-gateway-admin backup-config >dng.cfgYou can change the file name that the backup is saved as by modifying the name at the end of the command.
-
Upon successful run of the command you'll see the following output:
Password: Backup completed. -
You can now move the
dng.cfgfile from your current directory to a backup location.
Scripted Restore
The command for restoring configuration is called restore-config. It accepts a password as the first line of its standard input, followed by the configuration file name you'd like to restore. This allows you to use scripts or tools to restore the Duo Network Gateway configuration.
-
While logged into the Duo Network Gateway server through the command-line with Duo Network Gateway running, set the same
BACKUP_PASSWORDenvironment variable and value you used in Scripted Backup. -
Running the following command will restore the Duo Network Gateway:
(echo "$BACKUP_PASSWORD" && cat dng.cfg) | docker exec -i network-gateway-admin restore-configIf you have changed the name of the backup file or it is located in a different directory you may need to modify the command.
-
Upon successful run of the command you'll see the following output:
Password: Configuration restored. -
Duo Network Gateway configuration has now been restored.
High Availability
We recommend some level of high availability in all Duo Network Gateway deployments. We support two configurations:
- Active / Active: multiple servers can be used concurrently.
- Active / Passive: a spare Duo Network Gateway server you can fail over to in the event that your active server goes down.
Active / Active
The Duo Network Gateway can be configured in an active / active deployment in Amazon Web Services (AWS) where multiple Duo Network Gateway servers can be used simultaneously.
Important: Active / Active deployment is only supported in Amazon Web Services. This configuration assumes previous experience building highly available services using AWS.
Architecture Overview
The Duo Network Gateway is traditionally deployed on a single server running Docker. Inside of Docker there are either three or four separate containers running:
- Portal: The worker container that serves requests from users and proxies the connection to internal services. Ports 80 and 443 are publicly exposed to this container.
- Admin: The container where you modify your Duo Network Gateway configuration and administrative tasks take place. Port 8443 is sent to this container and should not be publicly exposed.
- DNS: The container that serves DNS requests from users for use in DuoConnect Application Relay (for RDP, SMB, etc.) proxying. Port 53 for TCP and UDP are publicly exposed to this container. This container only exists in DNG for web, SSH, and Application Relay deployments.
- Redis: The database container where all configuration is stored. This container has no ports exposed to the internet.
In this active / active deployment we will have portal, DNS, and admin containers running on separate servers and use AWS Elasticache for Redis. This allows running portal containers or DNS containers on multiple servers. The architecture layout looks similar to this:
- Portal container servers: A number of dedicated portal servers that can serve requests to users.
- DNS container servers: A number of dedicated DNS servers that can serve DNS to users.
- Admin container server: A single admin server that will handle administrative tasks.
- AWS ElastiCache Redis Cluster: A redis cluster that will hold configuration for the Duo Network Gateway.
- AWS Application Load Balancer: A load balancer that will distribute connections between the Portal servers.
- AWS Network Load Balancer: A load balancer that will distribute connections between the DNS servers.
Create AWS Security Groups
We recommend that you create the following AWS Security Groups in the VPC where your Network Gateway resources will be hosted.
-
Redis Security Group: Security group that allows inbound connection to the redis traffic port (default is 6379). The Network Gateway Admin and Portal servers will need access to resources in this security group.
-
Network Gateway Portal Group: Security group that allows inbound traffic over TCP ports 80 and 443. Load Balancers should have access to this security group.
-
Network Gateway DNS Group: Security group that allows inbound traffic over UDP and TCP port 53. This security group will be open to the internet as the Network load balancer will preserve the source IP for UDP/TCP configurations.
-
Internal Servers Group: Security group that allows inbound traffic over TCP ports where internal web and SSH servers you want to protect behind the Duo Network Gateway are hosted. The Network Gateway Portal servers will need access to resources in this security group.
-
Load Balancer Group: Security group that allows inbound traffic over ports 80 and 443. Public internet will need access to resources in this security group.
Create AWS ElastiCache Redis Cluster
-
Create an AWS ElastiCache with cluster engine Redis.
-
Redis engine version compatibility should be set to 6.2.
-
Use Multi-AZ with Auto-Failover. Select a VPC where your Network Gateway Admin and Portal servers will be as the Subnet group.
-
Use the Redis Security Group you made above.
-
Use features Encryption at-rest, Encryption in-transit, Redis AUTH.
-
Type at least a 16 character password into the Redis AUTH Token field. This will be used later.
-
Finish configuring the other ElastiCache settings.
Create Network Gateway Admin server
-
Configure a Linux server with a minimum of 1 CPU, 1 GB of memory, and 20GB of storage. Administrators will need to be able to access the administrative console over port 8443.
-
Set the following environment variables on the server. These will be needed every time you start the Network Gateway Admin server. You'll use these same values later when configuring the Portal servers.
Environment Variable Value REDIS_HOST Hostname of your ElastiCache cluster (e.g. dngcluster.abc1.0001.usw2.cache.amazonaws.com). REDIS_PORT Redis traffic port. This can be excluded if the default port 6379 is used. REDIS_AUTH Redis AUTH Token that you created earlier. -
Follow the instructions for Installing Docker and Docker Compose.
-
Download the Duo Network Gateway Admin HA YML file and save it to your Duo Network Gateway Admin server. Download the YML file by typing:
wget --content-disposition https://dl.duosecurity.com/network-gateway-latest-ha.admin.ymlYou should see output similar to:
--2016-12-21 14:15:16--  https://dl.duosecurity.com/network-gateway-latest-ha.admin.yml
Resolving dl.duosecurity.com (dl.duosecurity.com)... 52.84.66.79, 52.84.66.236, 52.84.66.146, ...
Connecting to dl.duosecurity.com (dl.duosecurity.com)|52.84.66.79|:443... connected.
HTTP request sent, awaiting response... 200 OK
Length: 1194 (1.2K) [application/octet-stream]
Saving to: ‘network-gateway-3.4.0-ha.admin.yml’
network-gateway-3.4.0-ha.admin.yml                   100%[======================================================================>]   1.17K  --.-KB/s    in 0s
2016-12-21 14:15:16 (124 MB/s) - ‘network-gateway-3.4.0-ha.admin.yml’ saved [1194/1194]
Make note of the actual file name that was saved; you'll need this in future steps.
Save this YML file in a persistent directory location for future use; it will be required for later use when deploying, updating, or interacting with your Duo Network Gateway server.
-
The following command instructs Docker Compose to download Duo Network Gateway Admin and install it. Specify the YML file downloaded in the last step in the command. Note that your YML file name may reflect a different version than the example command shown. Replace the file name in the example with your downloaded YML file's actual name.
Type:
docker compose -p network-gateway -f network-gateway-3.4.0-ha.admin.yml up -dThis may take a few minutes. Once completed the text output will be similar to:
Creating network-gateway-admin -
You can verify that your Duo Network Gateway containers are running by typing:
docker psYou should see output showing the container with a status of "up" similar to:
CONTAINER ID        IMAGE                                                                                                 COMMAND                  CREATED             STATUS              PORTS                                      NAMES
8c63f6a2aa2a        duosecurity/network-gateway@sha256:9277bf641f0d74cbd26914bda8257fc14fb9c7ec10b026a1cb1bc49326578375   "bash -c /bin/run-con"   4 minutes ago       Up 4 minutes        0.0.0.0:8443->443/tcp                      network-gateway-admin
Create Network Gateway Portal servers
Duo Network Gateway Portal servers will process all the requests that users make when accessing internal services.
-
Configure Linux servers. See the Duo Network Gateway Sizing Chart to determine the system resources needed on each Network Gateway Portal server. Load balancers will need to be able to access these servers over ports 80 and 443.
-
Set the following environment variables on the servers. These will be needed every time you start the Network Gateway Portal servers. These are the same values you set earlier on your Admin server.
Environment Variable Value REDIS_HOST Hostname of your ElastiCache cluster (e.g. dngcluster.abc1.0001.usw2.cache.amazonaws.com). REDIS_PORT Redis traffic port. This can be excluded if the default port 6379 is used. REDIS_AUTH Redis AUTH Token that you created earlier. REDIS_CA_CERTS Optional: if you're using a self signed certificate, or one signed by a private CA, you can use this variable to provide the certificate text necessary to validate connections to redis. -
Follow the instructions for Installing Docker and Docker Compose.
-
Download the Duo Network Gateway Portal HA YML file and save it to your Duo Network Gateway Portal servers. Download the YML file by typing:
wget --content-disposition https://dl.duosecurity.com/network-gateway-latest-ha.ymlYou should see output similar to:
--2016-12-21 14:15:16--  https://dl.duosecurity.com/network-gateway-latest-ha.yml
Resolving dl.duosecurity.com (dl.duosecurity.com)... 52.84.66.79, 52.84.66.236, 52.84.66.146, ...
Connecting to dl.duosecurity.com (dl.duosecurity.com)|52.84.66.79|:443... connected.
HTTP request sent, awaiting response... 200 OK
Length: 1194 (1.2K) [application/octet-stream]
Saving to: ‘network-gateway-3.4.0-ha.yml’
network-gateway-3.4.0-ha.yml                   100%[======================================================================>]   1.17K  --.-KB/s    in 0s
2016-12-21 14:15:16 (124 MB/s) - ‘network-gateway-3.4.0-ha.yml’ saved [1194/1194]
Make note of the actual file name that was saved; you'll need this in future steps.
Save this YML file in a persistent directory location for future use; it will be required for later use when deploying, updating, or interacting with your Duo Network Gateway server.
-
The following command instructs Docker Compose to download Duo Network Gateway Portal and install it. Specify the YML file downloaded in the last step in the command. Note that your YML file name may reflect a different version than the example command shown. Replace the file name in the example with your downloaded YML file's actual name.
Type:
docker compose -p network-gateway -f network-gateway-3.4.0-ha.yml up -dThis may take a few minutes. Once completed the text output will be similar to:
Creating network-gateway-portal -
You can verify that your Duo Network Gateway containers are running by typing:
docker psYou should see output showing the container with a status of "up" similar to:
CONTAINER ID IMAGE COMMAND CREATED STATUS PORTS NAMES 3aea70b8e1a8 duosecurity/network-gateway@sha256:36b1e3a4198c9a386830599e64c99b181095f70cdb6e42e216031377a1c83155 "bash -c /bin/run-con" 4 minutes ago Up 4 minutes 0.0.0.0:80->80/tcp, 0.0.0.0:443->443/tcp network-gateway-portal -
Repeat these steps on each Network Gateway Portal server.
Create Network Gateway DNS servers
Duo Network Gateway DNS servers will process all the DNS requests that users make when accessing internal RDP or file share services. You do not need to create DNS servers if you do not plan to configure Application Relay (RDP, SMB, etc.) access.
-
Configure Linux servers. Load balancers will need to be able to access these servers over TCP and UDP on port 53.
-
Set the following environment variables on the servers. These will be needed every time you start the Network Gateway DNS servers. These are the same values you set earlier on your Admin server.
Environment Variable Value REDIS_HOST Hostname of your ElastiCache cluster (e.g. dngcluster.abc1.0001.usw2.cache.amazonaws.com). REDIS_PORT Redis traffic port. This can be excluded if the default port 6379 is used. REDIS_AUTH Redis AUTH Token that you created earlier. REDIS_CA_CERTS Optional: if you're using a self signed certificate, or one signed by a private CA, you can use this variable to provide the certificate text necessary to validate connections to redis. -
Follow the instructions for Installing Docker and Docker Compose.
-
Download the Duo Network Gateway DNS HA YML file and save it to your Duo Network Gateway DNS servers. Download the YML file by typing:
wget --content-disposition https://dl.duosecurity.com/network-gateway-latest-ha.dngdns.ymlYou should see output similar to:
--2016-12-21 14:15:16--  https://dl.duosecurity.com/network-gateway-latest-ha.dngdns.yml
Resolving dl.duosecurity.com (dl.duosecurity.com)... 52.84.66.79, 52.84.66.236, 52.84.66.146, ...
Connecting to dl.duosecurity.com (dl.duosecurity.com)|52.84.66.79|:443... connected.
HTTP request sent, awaiting response... 200 OK
Length: 1194 (1.2K) [application/octet-stream]
Saving to: ‘network-gateway-3.4.0-ha.dngdns.yml’
network-gateway-3.4.0-ha.dngdns.yml                 100%[======================================================================>]   1.17K  --.-KB/s    in 0s
2016-12-21 14:15:16 (124 MB/s) - ‘network-gateway-3.4.0-ha.dngdns.yml’ saved [1194/1194]
Make note of the actual file name that was saved; you'll need this in future steps.
Save this YML file in a persistent directory location for future use; it will be required for later use when deploying, updating, or interacting with your Duo Network Gateway server.
-
The following command instructs Docker Compose to download Duo Network Gateway DNS and install it. Specify the YML file downloaded in the last step in the command. Note that your YML file name may reflect a different version than the example command shown. Replace the file name in the example with your downloaded YML file's actual name.
Type:
docker compose -p network-gateway -f network-gateway-3.4.0-ha.dngdns.yml up -dThis may take a few minutes. Once completed the text output will be similar to:
Creating network-gateway-dns -
You can verify that your Duo Network Gateway containers are running by typing:
docker psYou should see output showing the container with a status of "up" similar to:
CONTAINER ID IMAGE COMMAND CREATED STATUS PORTS NAMES 3aea70b8e1a8 duosecurity/network-gateway@sha256:36b1e3a4198c9a386830599e64c99b181095f70cdb6e42e216031377a1c83155 "bash -c /bin/run-con" 4 minutes ago Up 4 minutes 0.0.0.0:80->80/tcp, 0.0.0.0:443->443/tcp network-gateway-dns -
Repeat these steps on each Network Gateway DNS server.
Configure a Load Balancer
Duo Network Gateway configured for high availability was tested with the AWS Application Load Balancer but may work with other load balancers.
- Configure the load balancer to accept HTTP and HTTPS traffic.
- Put all Network Gateway portal servers behind the load balancer.
- Perform health checks against Network Gateway Portal servers at /health-check on port 443.
- Enable sticky sessions.
- Point the external DNS records for the Duo Network Gateway hostname and all protected applications at the load balancer's CNAME.
- Provision public SSL certificates on the load balancer for the Duo Network Gateway hostname and all protected applications.
Configure a Network Load Balancer
Duo Network Gateway configured for high availability DNS was tested with the AWS Network Load Balancer but may work with other load balancers. This network load balancer is not needed if you chose not to deploy any DNS servers for RDP.
- Configure the load balancer to accept TCP and UDP traffic on port 53.
- Put all Network Gateway DNS servers behind the load balancer.
- Perform health checks against Network Gateway DNS servers on TCP port 53.
- Point the external DNS records for the Duo Network Gateway DNS hostname and delegate external subdomains to - the load balancer’s CNAME.
Configure Duo Network Gateway
Now that the Duo Network Gateway infrastructure has been successfully deployed you can configure the Duo Network Gateway.
-
In a browser navigate to https://URL-OF-NETWORK-GATEWAY-ADMIN:8443 from an internal network to log into the Duo Network Gateway admin console. Your browser may warn you about an untrusted certificate when you access the page. Dismiss the warning and continue onto the page.
-
Continue the documentation from Initial Duo Network Gateway Configuration starting at step 2.
Important: Let's Encrypt certificates are not supported when Duo Network Gateway is configured for high availability. This setting has been replaced with Present a self-signed certificate to incoming connections which will create a self-signed certificate.
Migrating from Standalone
If you've already configured a standalone Duo Network Gateway and would like to migrate to active / active high availability follow the instructions below.
-
Create a backup of your current Duo Network Gateway configuration.
-
Follow the instructions above to create your active / active high availability environment.
-
Restore your standalone backup into your new high availability Duo Network Gateway.
-
Load public SSL certificates used from your previous setup into your load balancer.
Important: Let's Encrypt certificates are not supported when Duo Network Gateway is configured for high availability. This setting has been replaced with Present a self-signed certificate to incoming connections which will create a self-signed certificate.
-
Modify your DNS entries to point from your standalone Duo Network Gateway to your load balancer.
Upgrading Duo Network Gateway configured for Active / Active
When upgrading Duo Network Gateway configured for active / active high availability you need upgrade all portal servers before upgrading the admin server.
-
Before upgrading back up your configuration.
-
Connect to one of your portal servers through a terminal.
-
Clean up older unused Duo Network Gateway Docker images by typing:
docker rmi $(docker images --format "{{.Repository}} {{.ID}}" | grep duosecurity | cut -f 2 -d ' ')Ignore any
error responsemessages you see. You should see output similar to:Untagged: duosecurity/network-gateway@sha256:16d5e71a3280c11766996de561b48b283b866ec93613f1bb65490def6ff29c64 Deleted: sha256:6893259e27b3311895279cde328012879f4e92c9823245d05adf9926fed3c0b4 Error response from daemon: conflict: unable to delete 3627aad0d196 (cannot be forced) - image is being used by running container 2acb91f391a7 -
Download the latest version of the Duo Network Gateway Portal HA YML file by typing:
wget --content-disposition https://dl.duosecurity.com/network-gateway-latest-ha.ymlYou should see output similar to:
--2016-12-21 14:15:16-- https://dl.duosecurity.com/network-gateway-latest-ha.yml
 Resolving dl.duosecurity.com (dl.duosecurity.com)... 52.84.66.79, 52.84.66.236, 52.84.66.146, ...
 Connecting to dl.duosecurity.com (dl.duosecurity.com)|52.84.66.79|:443... connected.
 HTTP request sent, awaiting response... 200 OK
 Length: 1194 (1.2K) [application/octet-stream]
 Saving to: ‘network-gateway-3.4.0-ha.yml’
 network-gateway-3.4.0-ha.yml                   100%[======================================================================>]   1.17K  --.-KB/s    in 0s
 2016-12-21 14:15:16 (124 MB/s) - ‘network-gateway-3.4.0-ha.yml’ saved [1194/1194]
Make note of the actual file name that was saved; you'll need this in future steps.
Save this YML file in a persistent directory location for future use; it will be required for later use when deploying, updating, or interacting with your Duo Network Gateway server.
-
Pull down the new Duo Network Gateway Portal HA image files using the YML file downloaded in the previous step.
Type:
docker compose -f network-gateway-3.4.0-ha.yml pullNote that your YML file name may reflect a different version than the example command shown. Replace the file name in the example with your downloaded YML file's actual name.
-
Type the following command to upgrade your existing Duo Network Gateway Portal server to the new version from the YML file you downloaded:
docker compose -p network-gateway -f network-gateway-3.4.0-ha.yml up -dNote that the new YML file names may reflect different versions than the example command shown. Replace the file name in the example with your newly downloaded YML file's actual name.
-
The Duo Network Gateway Portal server shuts down and starts up with the newer version. The output will look similar to:
Recreating network "network-gateway_default" with the default driver Recreating network-gateway-portal -
Repeat the above steps for every portal server.
-
Once all portal servers are upgraded we will upgrade the admin server. Connect to your admin server through a terminal.
-
Clean up older unused Duo Network Gateway Docker images by typing:
docker rmi $(docker images --format "{{.Repository}} {{.ID}}" | grep duosecurity | cut -f 2 -d ' ')Ignore any
error responsemessages you see. You should see output similar to:Untagged: duosecurity/network-gateway@sha256:16d5e71a3280c11766996de561b48b283b866ec93613f1bb65490def6ff29c64 Deleted: sha256:6893259e27b3311895279cde328012879f4e92c9823245d05adf9926fed3c0b4 Error response from daemon: conflict: unable to delete 3627aad0d196 (cannot be forced) - image is being used by running container 2acb91f391a7 -
Download the latest version of the Duo Network Gateway Admin HA YML file by typing:
wget --content-disposition https://dl.duosecurity.com/network-gateway-latest-ha.admin.ymlYou should see output similar to:
--2016-12-21 14:15:16--  https://dl.duosecurity.com/network-gateway-latest-ha.admin.yml
Resolving dl.duosecurity.com (dl.duosecurity.com)... 52.84.66.79, 52.84.66.236, 52.84.66.146, ...
Connecting to dl.duosecurity.com (dl.duosecurity.com)|52.84.66.79|:443... connected.
HTTP request sent, awaiting response... 200 OK
Length: 1194 (1.2K) [application/octet-stream]
Saving to: ‘network-gateway-3.4.0-ha.admin.yml’
network-gateway-3.4.0-ha.admin.yml                   100%[======================================================================>]   1.17K  --.-KB/s    in 0s
2016-12-21 14:15:16 (124 MB/s) - ‘network-gateway-3.4.0-ha.admin.yml’ saved [1194/1194]
Make note of the actual file name that was saved; you'll need this in future steps.
Save this YML file in a persistent directory location for future use; it will be required for later use when deploying, updating, or interacting with your Duo Network Gateway server.
-
Pull down the new Duo Network Gateway Admin HA image files using the YML file downloaded in the previous step.
Type:
docker compose -f network-gateway-3.4.0-ha.admin.yml pullNote that your YML file name may reflect a different version than the example command shown. Replace the file name in the example with your downloaded YML file's actual name.
-
Type the following command to upgrade your existing Duo Network Gateway Admin server to the new version from the YML file you downloaded:
docker compose -p network-gateway -f network-gateway-3.4.0-ha.admin.yml up -dNote that the new YML file names may reflect different versions than the example command shown. Replace the file name in the example with your newly downloaded YML file's actual name.
-
The Duo Network Gateway admin server shuts down and starts up with the newer version. The output will look similar to:
Recreating network "network-gateway_default" with the default driver
Recreating network-gateway-admin
If you've upgraded to Duo Network Gateway version 1.5.10 to 3.1.0 and now want to enable Universal Prompt support for your web and SSH applications:
-
Log in to the Network Gateway admin console, click Applications, and click on an application in the list.
-
In the "Configure MFA" section of the page, check the Enable Frameless setting box to enable it and save the change.
-
Repeat for the rest of your web and SSH applications.
Duo Network Gateway version 3.2.0 and later enables frameless authentication by default for all applications. There is no longer a configurable Enable Frameless option. You may still need to log into the Duo Admin Panel and activate Universal Prompt for your DNG applications if you still see the traditional Duo Prompt during authentication.
Active / Passive
You can quickly create a backup of your current Duo Network Gateway and restore it to a new system by following the Scripted Backup and Restore command-line instructions. You can also do these actions in the admin console by following the Backup and Restore instructions.
You can configure a load balancer in front of two identically configured Duo Network Gateway servers for active / passive high availability. Consult your load balancer documentation for guidance.
Add Ownership and Risk Information
Go to the "Ownership and Risk" section of the application's page in the Duo Admin Panel to assign application owners and classify the application's risk level. Cisco Identity Intelligence automatically imports this information to populate relevant fields for Duo Advantage and Premier customers. Duo Essentials and Duo Federal plans exclude Cisco Identity Intelligence features.
You may set any of the following:
- Technical Owner: Search for and assign Duo users responsible for technical configuration and maintenance of this application.
- Business Owner: Search for and assign Duo users responsible for business decisions and access approvals related to this application.
- Application Sensitivity: Select this application's risk level from the drop-down list. Default: Not Set.
- Compliance Requirements: Select any applicable regulatory frameworks for this application (SOX (Sarbanes-Oxley), HIPAA, PCI-DSS, etc.) from the list.
Scroll to the bottom of the page and click Save to apply your changes.
Grant Access to Users
If you did not already grant user access to the Duo users you want to use this application be sure to do that before inviting or requiring them to log in with Duo.
Troubleshooting
Need some help? Take a look at our Duo Network Gateway Knowledge Base articles or Community discussions. For further assistance, contact Support.
Installation Overview Video
This video demonstrates the process of deploying Duo Network Gateway and using it to publish an internal web site for protected external access.
Network Diagram
Web Application Diagram
- Client HTTPS connection to Duo Network Gateway
- Primary authentication to SAML identity provider
- Duo Network Gateway connection established to Duo Security over TCP port 443
- Secondary authentication via Duo Security’s service
- Duo Network Gateway receives authentication response
- Duo Network Gateway session authenticated
- External SSL access to published internal web application via Duo Network Gateway reverse proxy
SSH Servers Diagram
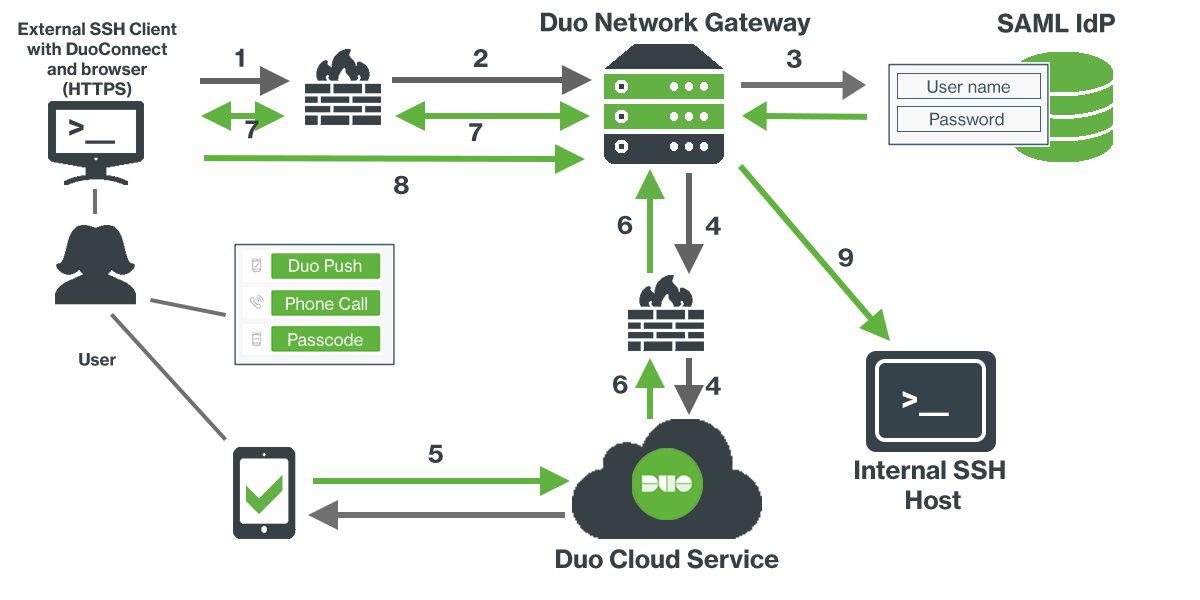
- User starts SSH session and DuoConnect software on user’s computer opens a browser window
- DuoConnect sends information over the user’s browser to Duo Network Gateway over TCP port 443
- Primary authentication to SAML identity provider
- Duo Network Gateway connection established to Duo Security over TCP port 443
- Secondary authentication via Duo Security’s service
- Duo Network Gateway receives authentication response
- Duo Network Gateway checks if DuoConnect is up to date and prompts if update is available
- DuoConnect connects user’s SSH session through Duo Network Gateway to the SSH server
- User completes regular SSH authentication steps
RDP Servers Diagram
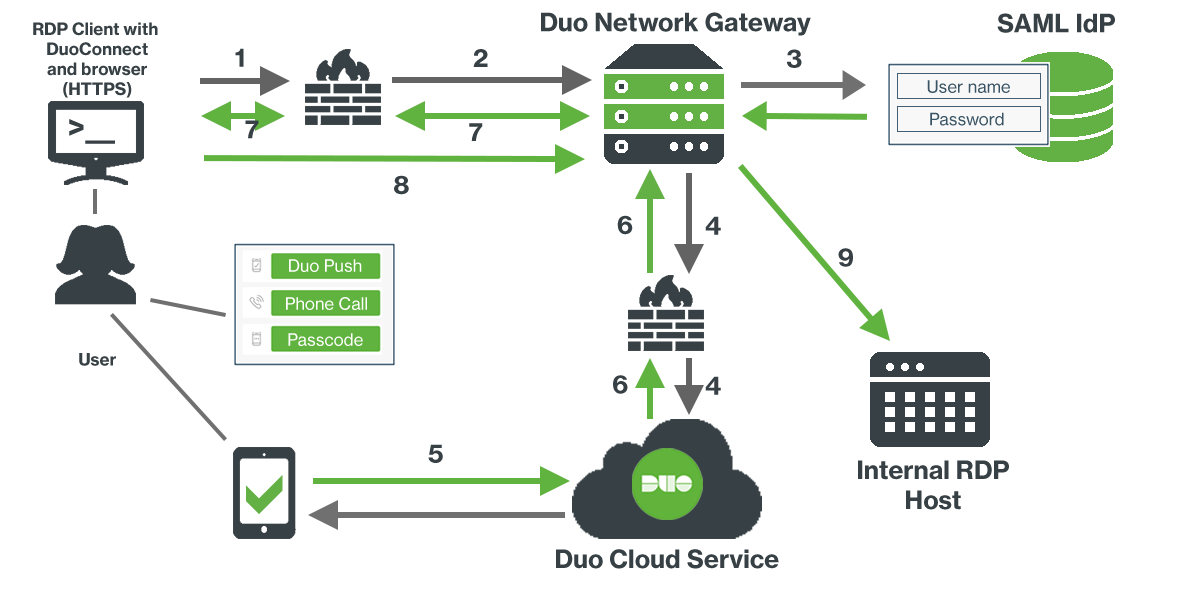
- User starts RDP client session and DuoConnect software on user’s computer opens a browser window
- DuoConnect sends information over the user’s browser to Duo Network Gateway over TCP port 443
- Primary authentication to SAML identity provider
- Duo Network Gateway connection established to Duo Security over TCP port 443
- Secondary authentication via Duo Security’s service
- Duo Network Gateway receives authentication response
- Duo Network Gateway checks if DuoConnect is up to date and prompts if update is available
- DuoConnect connects user’s RDP session through Duo Network Gateway to the remote server
- User completes regular RDP login steps
SMB/File Share Diagram
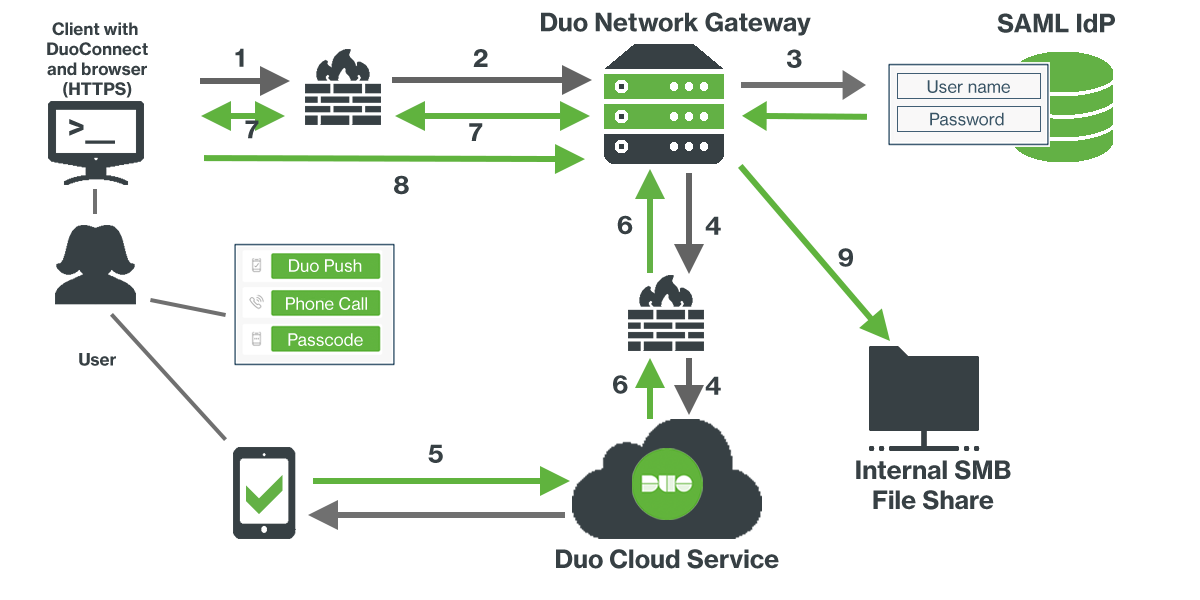
- User initiates remote file share connection and DuoConnect software on user’s computer opens a browser window
- DuoConnect sends information over the user’s browser to Duo Network Gateway over TCP port 443
- Primary authentication to SAML identity provider
- Duo Network Gateway connection established to Duo Security over TCP port 443
- Secondary authentication via Duo Security’s service
- Duo Network Gateway receives authentication response
- Duo Network Gateway checks if DuoConnect is up to date and prompts if update is available
- DuoConnect connects user's client through Duo Network Gateway to the remote share
- User authenticates to remote SMB share