
Duo Agentic Identity for Envoy AI Gateway
Last updated:
Overview
AI agents connected to tools via the Model Context Protocol (MCP) are part of enterprise workflows, executing complex tasks autonomously on behalf of users. This creates a critical security gap: how do you control what an AI agent can do and on whose behalf?
Envoy AI Gateway provides a managed gateway layer for MCP servers, and Duo serves as the identity and authorization engine. The Duo Authorization Connector intercepts every inbound request to Envoy AI Gateway. On each tool invocation, it extracts the Duo-issued access token from the authenticated request and evaluates the request against centrally managed authorization policies. Based on the allow-or-deny decision, the connector enforces fine-grained authorization before any MCP tool call reaches the back-end server.
Key capabilities:
- MCP server onboarding and tool discovery.
- User authentication via Duo OAuth 2.1/OIDC with Dynamic Client Registration (DCR) or Client ID Metadata Documents (CIMD).
- User identity extraction and Duo group membership lookup.
- Fine-grained tool-level authorization policies mapped to Duo user groups.
- Audit trail of all agent-to-tool invocations.
Duo Agentic Identity for Envoy AI Gateway requires a Duo Premier plan subscription.
Prerequisites
Before you begin, make sure you have the following:
- A Duo Premier plan subscription or an active Duo Premier trial.
- Access to the Duo Admin Panel as an administrator with the Owner or Administrator administrative role or equivalent custom role.
- A DMZ Linux VM or server where you will install Docker.
- At least one MCP server deployed and accessible from the Envoy AI Gateway host.
- An Internet-resolvable fully qualified domain name (FQDN) for the Envoy AI Gateway endpoint.
- A valid SSL certificate for the FQDN from a public certificate authority. Self-signed certificates or certificates from an internal CA will cause connection failures to the MCP gateway from Duo.
- (Optional) Users and groups provisioned or synced to the Duo Directory. You may also manually create users and groups to target with your MCP tool access policies.
Create the MCP Application in Duo
This application handles inbound user authentication to Envoy AI Gateway using Duo Single Sign-On with Dynamic Client Registration (DCR) or Client ID Metadata Documents (CIMD).
-
Log in to the Duo Admin Panel and navigate to Applications → Application Catalog.
-
Locate the entry for Model Context Protocol (MCP) - Single Sign-On with the "SSO" label in the catalog. Click the + Add button to start configuring Model Context Protocol (MCP) - Single Sign-On. See Protecting Applications for more information about protecting applications with Duo and additional application options. You'll need the information on the Model Context Protocol (MCP) - Single Sign-On page later to complete your setup.
-
No active Duo users can log in to new applications until you grant access. Update the User access setting to grant access to this application to users in selected Duo groups, or to all users. Learn more about user access to applications. If you do not change this setting now, be sure to update it so that your test user has access before you test your setup.
This setting only applies to users who exist in Duo with "Active" status. This does not affect application access for existing users with "Bypass" status, existing users for whom the effective Authentication Policy for the application specifies "Bypass 2FA" or "Skip MFA", or users who do not exist in Duo when the effective New User Policy for the application allows access to users unknown to Duo without MFA. -
On the General tab, configure the following settings:
Setting Value Grant Type Select Authorization Codefor user AI agents. SelectClient Credentialsfor Duo to pull the tools list.Access Token Lifetime (Optional) Adjust the access token lifetime as needed. Minimum: 5 minutes. Sign-In Redirect URLs https://sso.duosecurity.com/oidc/default/callbackResource URL Your Envoy AI Gateway public URL, which typically ends with /mcp.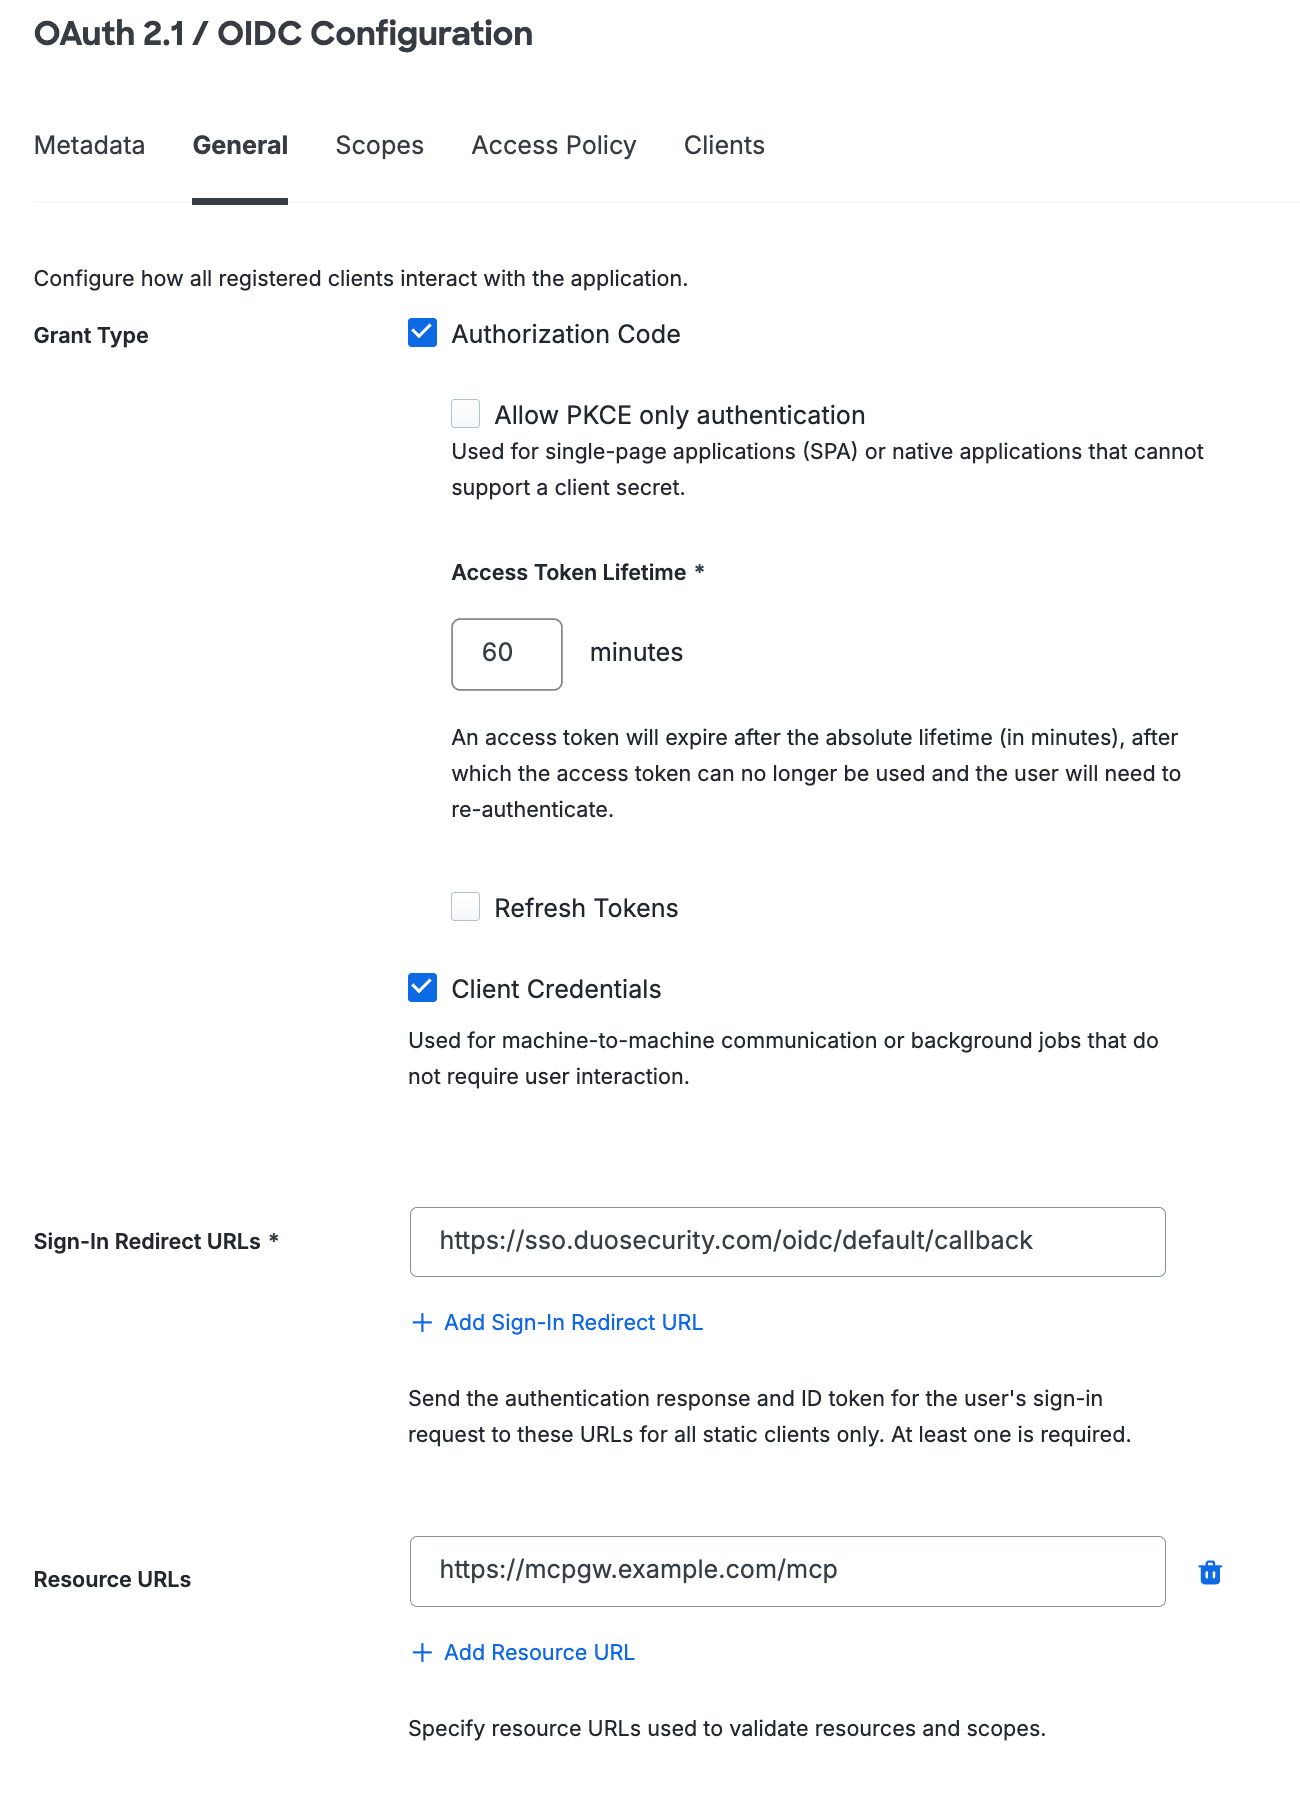
-
On the Scopes tab, optionally update the attribute mapping of the default scopes, add custom scopes, or configure claim transformations if needed.
-
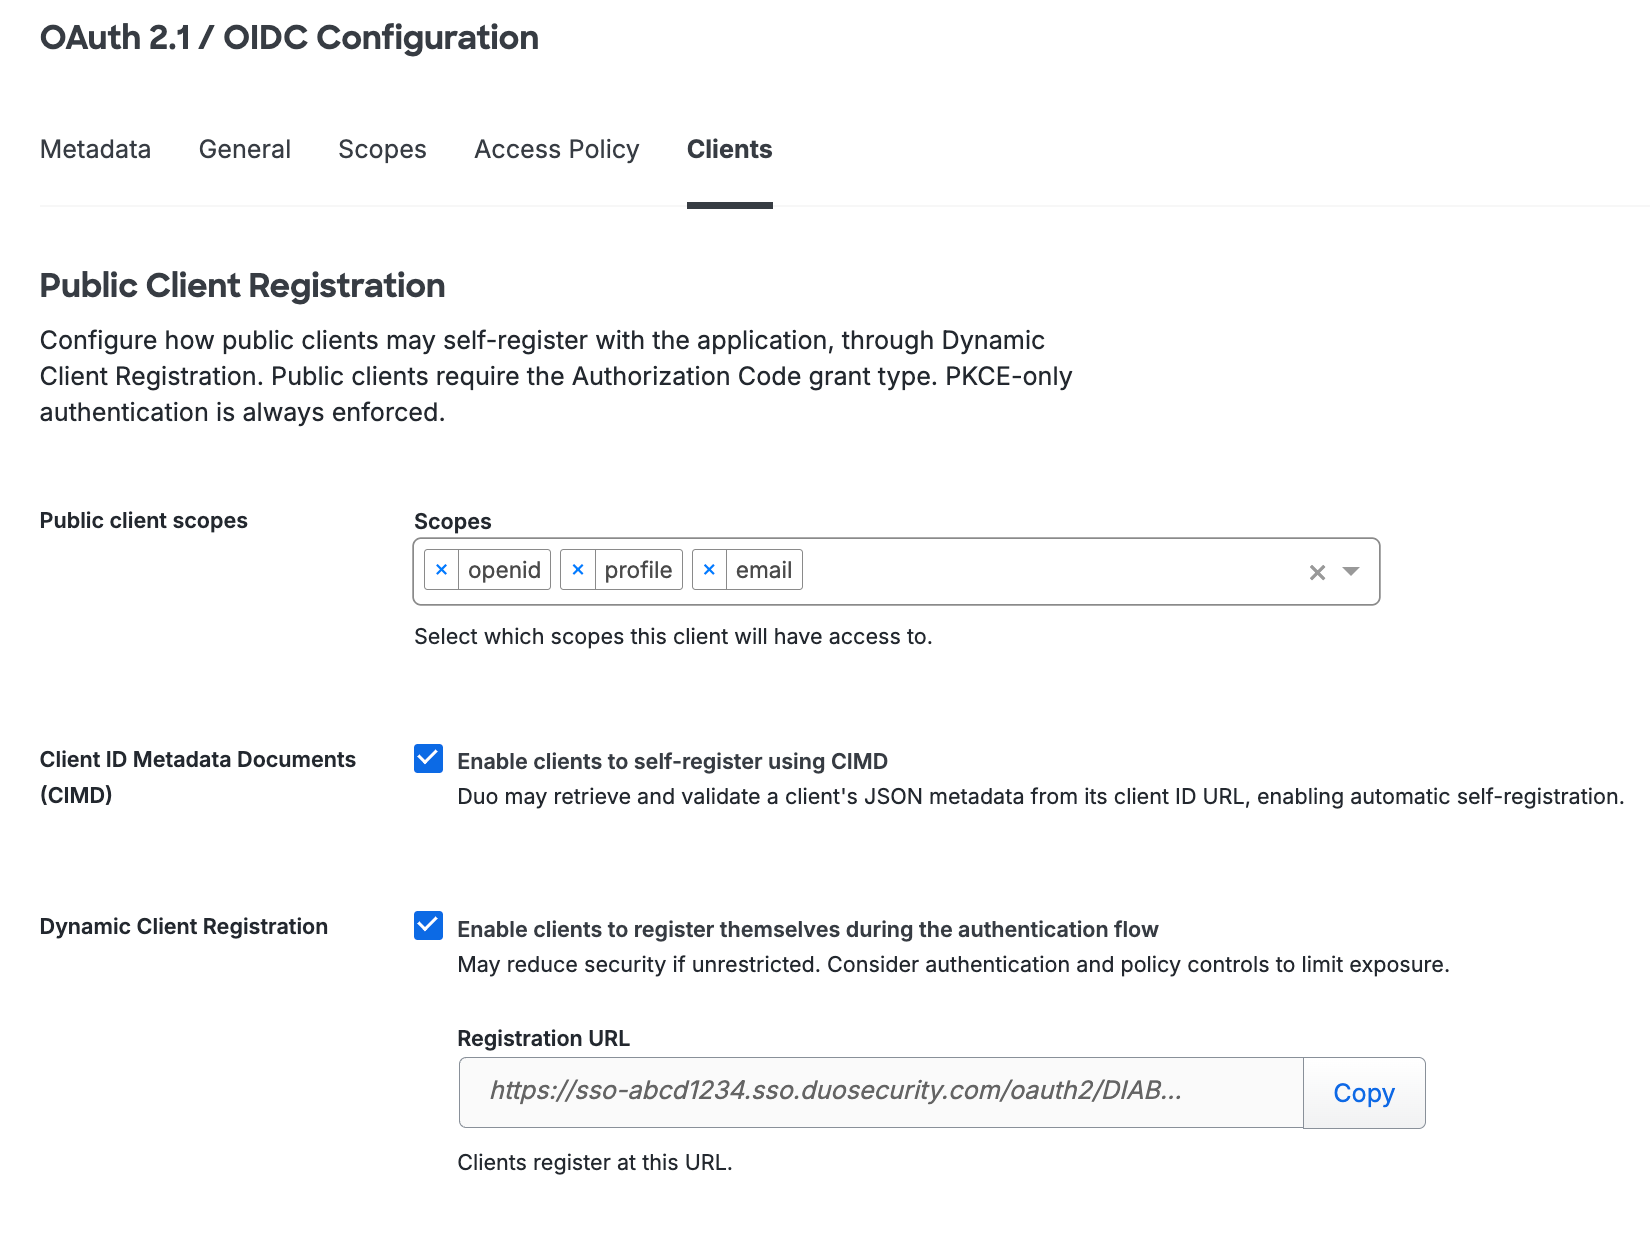
On the Clients tab, make these changes in the "Public Client Registration" section:
- Under "Public Client Registration", click in the Scopes field to add the
openid,profile, andemailscopes. - Enable one or both of the following registration options: Enable clients to self-register using CIMD and Enable clients to register themselves during the authentication flow.
Verify that your clients support CIMD registration before enabling that option.
- Under "Public Client Registration", click in the Scopes field to add the
-
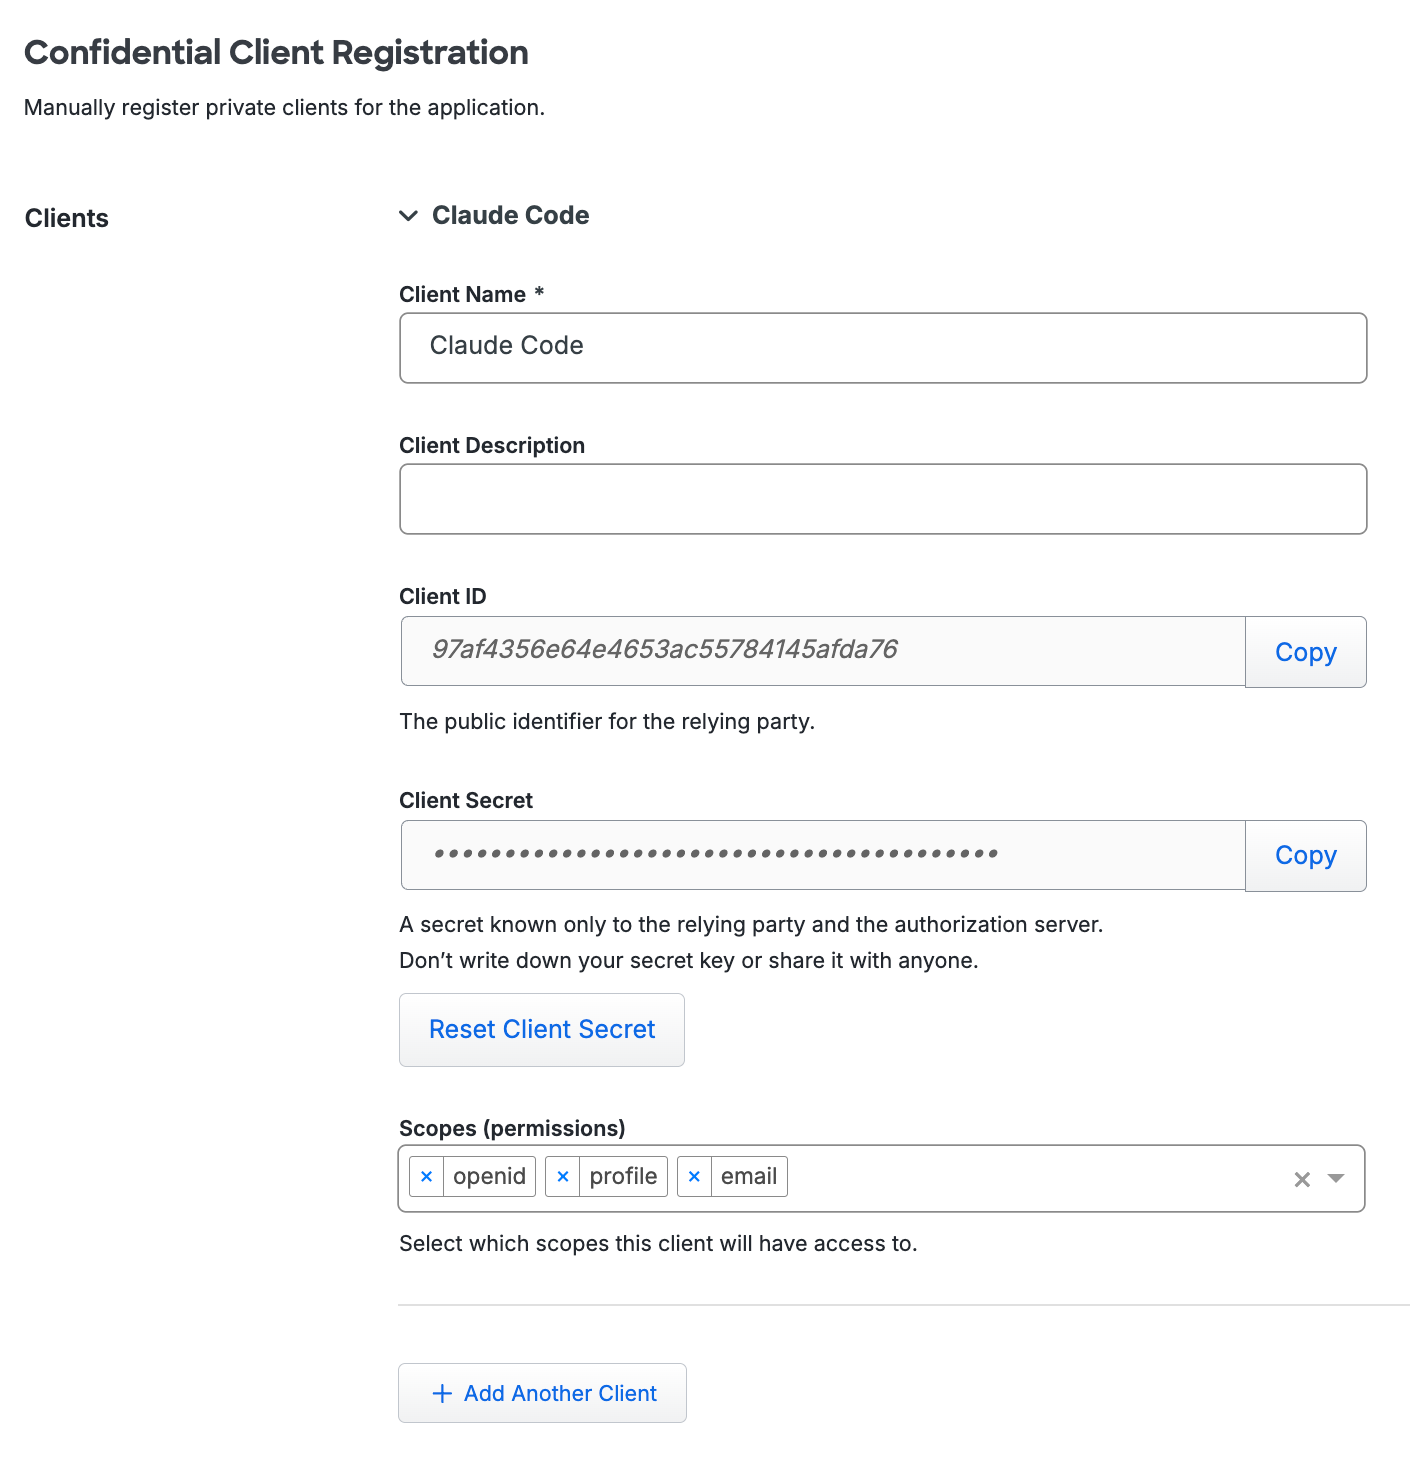
Scroll down to the "Confidential Client Registration" section to add the clients that will use this MCP through Envoy AI Gateway. For each client, enter a meaningful Client Name, an optional description, and then add the required scopes. This example adds Claude Code as a client.
-
Adjust additional settings for your new MCP application at this time — like changing the application's name from the default value or assigning policies or administrative units.
-
Click Save.
Add Ownership and Risk Information
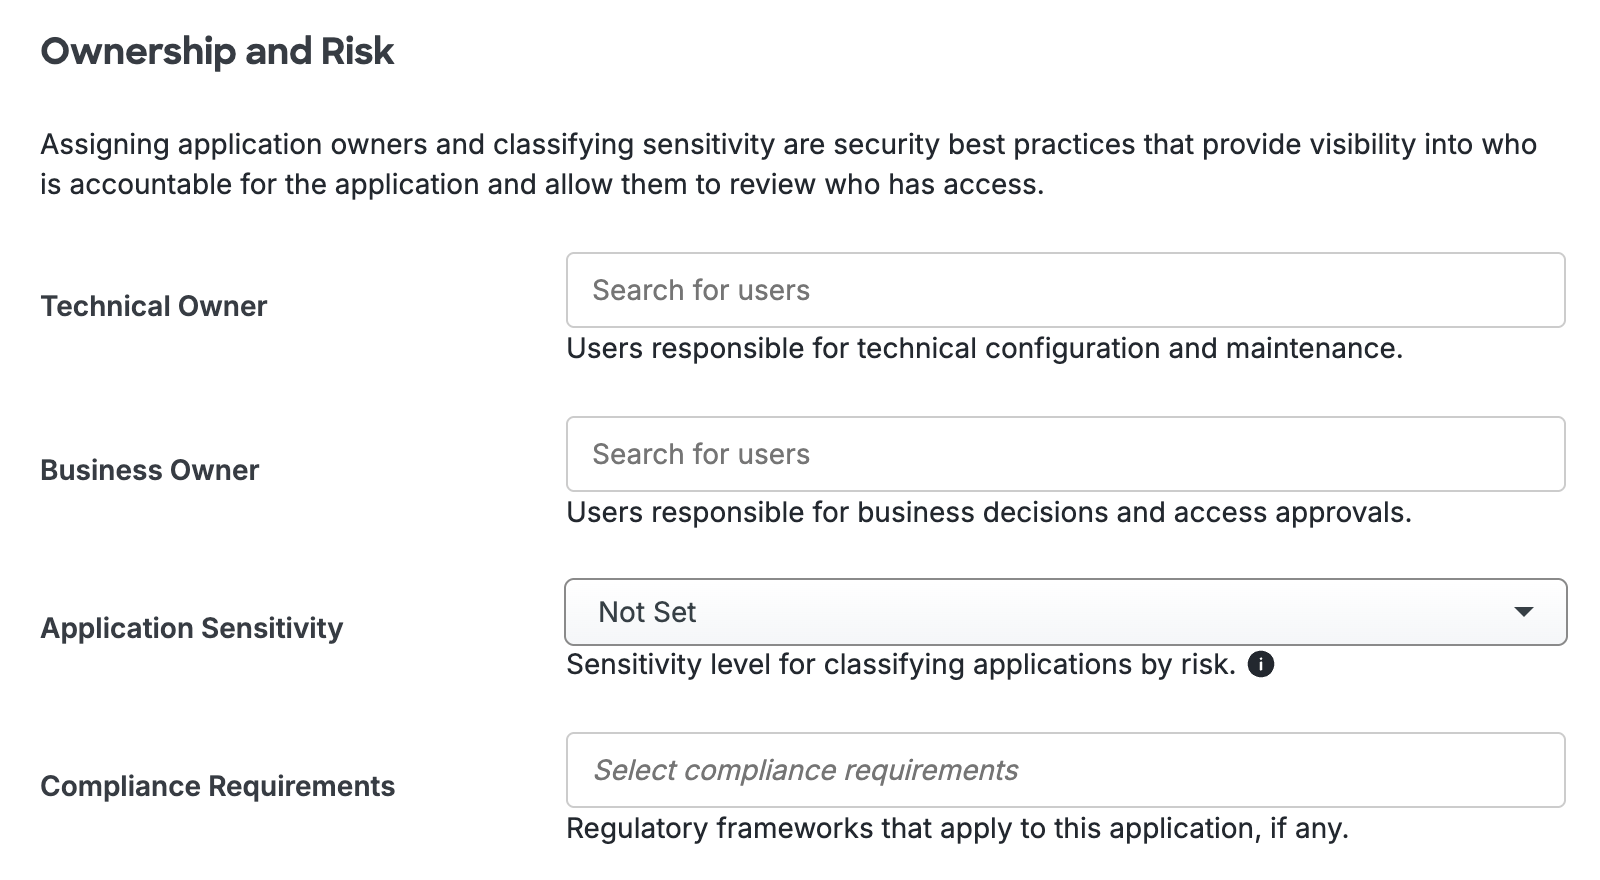
Go to the "Ownership and Risk" section of the application's page in the Duo Admin Panel to assign application owners and classify the application's risk level. Cisco Identity Intelligence automatically imports this information to populate relevant fields.
You may set any of the following:
- Technical Owner: Search for and assign Duo users responsible for technical configuration and maintenance of this application.
- Business Owner: Search for and assign Duo users responsible for business decisions and access approvals related to this application.
- Application Sensitivity: Select this application's risk level from the drop-down list. Default: Not Set.
- Compliance Requirements: Select any applicable regulatory frameworks for this application (SOX (Sarbanes-Oxley), HIPAA, PCI-DSS, etc.) from the list.
Scroll to the bottom of the page and click Save to apply your changes.
For detailed information about configuring the MCP application, refer to Duo Single Sign-On for Model Context Protocol (MCP).
Create the Envoy AI Gateway Application in Duo
This application provides the API credentials that the Duo Authorization Connector uses for tool-level authorization decisions.
-
Log in to the Duo Admin Panel and navigate to Applications → Application Catalog.
-
Locate the entry for Envoy AI Gateway in the catalog. Click the + Add button to create the application, and get your integration key, secret key, and API hostname. You'll need this information to complete your setup. See Protecting Applications for more information about protecting applications with Duo and additional application options.
-
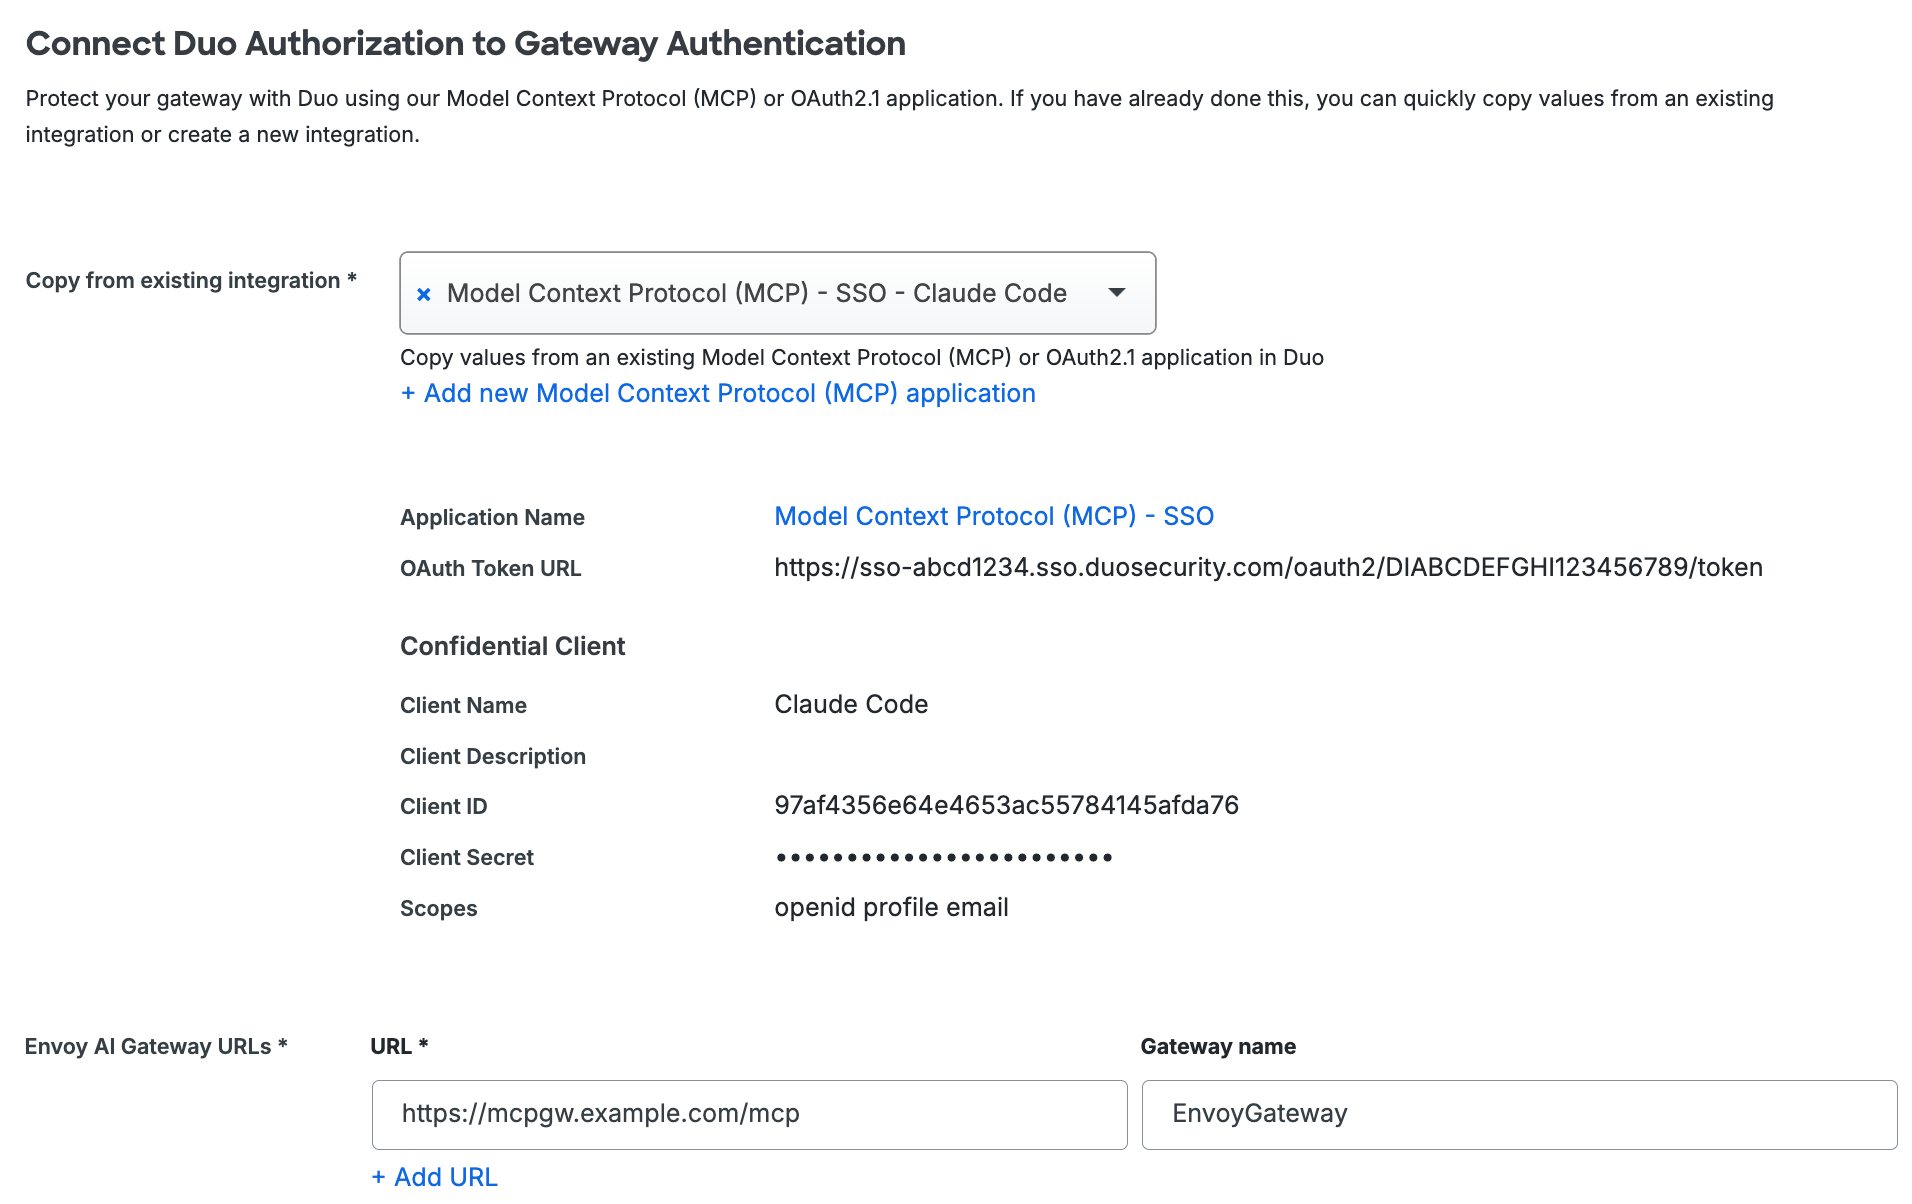
In the "Connect Duo Authorization to Gateway Authentication" section, use the Copy from existing integration drop-down to select the MCP integration you created earlier. The OAuth details auto-populate. In the example, selecting the MCP application that had Claude Code added as a client shows that information in the details.
-
Populate the Envoy AI Gateway URLs information with your Envoy AI Gateway URL in the URL field and provide a friendly name as the Gateway name.
-
Adjust additional settings for your new Envoy AI Gateway application at this time — like changing the application's name from the default value or assigning an administrative unit.
-
Click Save.
Add Ownership and Risk Information
Go to the "Ownership and Risk" section of the application's page in the Duo Admin Panel to assign application owners and classify the application's risk level. Cisco Identity Intelligence automatically imports this information to populate relevant fields.
You may set any of the following:
- Technical Owner: Search for and assign Duo users responsible for technical configuration and maintenance of this application.
- Business Owner: Search for and assign Duo users responsible for business decisions and access approvals related to this application.
- Application Sensitivity: Select this application's risk level from the drop-down list. Default: Not Set.
- Compliance Requirements: Select any applicable regulatory frameworks for this application (SOX (Sarbanes-Oxley), HIPAA, PCI-DSS, etc.) from the list.
Scroll to the bottom of the page and click Save to apply your changes.
Deploy the Duo Authorization Connector
The Duo Authorization Connector is a Docker container that enforces Duo authorization policies on every MCP tool invocation. The quickstart deployment uses Docker Compose to create the environment.
Install Docker
Docker is a tool that allows Duo Authorization Connector to run inside its own self-contained environment, called a “container”, on top of your host operating system.
Click one of the tabs below to view Docker installation instructions for your Linux platform.
CentOS 7, CentOS Stream 8 or 9
These directions will walk you through installing the free Docker Community Edition for CentOS.
- Log in to your Duo Authorization Connector server locally or through SSH with a user that has sudo permissions. Any time you use the
sudocommand, you may be prompted to enter your password. - Docker requires a 64-bit operating system. Please verify your installation of CentOS is 64-bit by typing:
The output should contain x86_64 if the operating system is 64-bit. The output would be similar to:uname -r3.10.0-327.el7.x86_64 - Install yum-utils on your server. Type:
sudo yum install -y yum-utils - Add the Docker repository to your yum repository by typing:
The output should be similar to:sudo yum-config-manager --add-repo https://download.docker.com/linux/centos/docker-ce.repoAdding repo from https://download.docker.com/linux/centos/docker-ce.repo - Make sure your existing packages are up to date. This may take a few minutes. Type:
When packages are finished updating, you should see output similar to:sudo yum makecacheMetadata Cache Created! - If wget is not installed on your system, install it by typing:
When wget is finished installing, you should see output similar to:sudo yum install -y wgetRunning transaction Installing : wget-1.14-13.el7.x86_64 1/1 Verifying : wget-1.14-13.el7.x86_64 1/1 Installed: wget.x86_64 0:1.14-13.el7 Complete! - Install Docker by typing:
When Docker is finished installing, you should see output similar to:sudo yum install -y docker-ce docker-ce-cli containerd.io docker-buildx-plugin docker-compose-pluginComplete! - Enable the Docker service by typing:
You should see output similar to:sudo systemctl enable docker.serviceCreated symlink from /etc/systemd/system/multi-user.target.wants/docker.service to /usr/lib/systemd/system/docker.service. - Start the Docker daemon by typing:
sudo systemctl start docker - Check that Docker has installed properly by typing:
You should see output similar to:sudo docker psCONTAINER ID IMAGE COMMAND CREATED STATUS PORTS NAMES - Add your user to the Docker group so Docker commands don't require sudo. Type:
sudo usermod -aG docker $(whoami) - Log out of your Duo Authorization Connector box and back in for the group changes to take effect.
- Check that Docker is functioning without using sudo by typing:
You should see output similar to:docker psCONTAINER ID IMAGE COMMAND CREATED STATUS PORTS NAMES
Fedora 41 and Later
These directions will walk you through installing the free Docker Community Edition for Fedora.
- Log in to your Duo Authorization Connector server locally or through SSH with a user that has sudo permissions. Any time you use the
sudocommand, you may be prompted to enter your password. - Docker requires a 64-bit operating system. Please verify your installation of Fedora is 64-bit by typing:
The output should beuname -mx86_64. - Install dnf-plugins-core on your server. Type:
sudo dnf -y install dnf-plugins-core - Add the Docker repository to your dnf repository by typing:
The output should be similar to:sudo dnf config-manager addrepo --from-repofile=https://download.docker.com/linux/fedora/docker-ce.repoAdding repo from: https://download.docker.com/linux/fedora/docker-ce.repo - Update your package database by typing:
You should see output similar to:sudo dnf makecacheMetadata Cache Created! - Install Docker by typing:
When Docker is finished installing, you should see output similar to:sudo dnf install -y docker-ce docker-ce-cli containerd.io docker-buildx-plugin docker-compose-pluginComplete! - Enable and start the Docker service by typing:
You should see output similar to:sudo systemctl enable --now docker.serviceCreated symlink from /etc/systemd/system/multi-user.target.wants/docker.service to /usr/lib/systemd/system/docker.service. - Check that Docker has installed properly by typing:
You should see output similar to:sudo docker psCONTAINER ID IMAGE COMMAND CREATED STATUS PORTS NAMES - Add your user to the docker group so Docker commands don't require sudo. Type:
sudo usermod -aG docker $(whoami) - Log out of your Duo Authorization Connector box and back in for the group changes to take effect or run this command to add the docker group to the user's groupset:
newgrp docker - Check that Docker is functioning without using sudo by typing:
You should see output similar to:docker psCONTAINER ID IMAGE COMMAND CREATED STATUS PORTS NAMES
Fedora 35-40
These directions will walk you through installing the free Docker Community Edition for Fedora.
- Log in to your Duo Authorization Connector server locally or through SSH with a user that has sudo permissions. Any time you use the
sudocommand, you may be prompted to enter your password. - Docker requires a 64-bit operating system. Please verify your installation of Fedora is 64-bit by typing:
The output should beuname -mx86_64. - Install dnf-plugins-core on your server. Type:
sudo dnf -y install dnf-plugins-core - Add the Docker repository to your dnf repository by typing:
The output should be similar to:sudo dnf config-manager --add-repo https://download.docker.com/linux/fedora/docker-ce.repoAdding repo from: https://download.docker.com/linux/fedora/docker-ce.repo - Update your package database by typing:
You should see output similar to:sudo dnf makecacheMetadata Cache Created! - Install Docker by typing:
When Docker is finished installing, you should see output similar to:sudo dnf install -y docker-ce docker-ce-cli containerd.io docker-buildx-plugin docker-compose-pluginComplete! - Enable and start the Docker service by typing:
You should see output similar to:sudo systemctl enable --now docker.serviceCreated symlink from /etc/systemd/system/multi-user.target.wants/docker.service to /usr/lib/systemd/system/docker.service. - Check that Docker has installed properly by typing:
You should see output similar to:sudo docker psCONTAINER ID IMAGE COMMAND CREATED STATUS PORTS NAMES - Add your user to the docker group so Docker commands don't require sudo. Type:
sudo usermod -aG docker $(whoami) - Log out of your Duo Authorization Connector box and back in for the group changes to take effect or run this command to add the docker group to the user's groupset:
newgrp docker - Check that Docker is functioning without using sudo by typing:
You should see output similar to:docker psCONTAINER ID IMAGE COMMAND CREATED STATUS PORTS NAMES
Older Fedora Releases
These directions will walk you through installing the free Docker Community Edition for Fedora.
- Log in to your Duo Authorization Connector server locally or through SSH with a user that has sudo permissions. Any time you use the
sudocommand, you may be prompted to enter your password. - Docker requires a 64-bit operating system. Please verify your installation of Fedora is 64-bit by typing:
The output should contain x86_64 if the operating system is 64-bit. The output would be similar to:uname -r4.8.16-300.fc25.x86_64 - Install dnf-plugins-core on your server. Type:
sudo dnf -y install dnf-plugins-core - Add the Docker repository to your dnf repository by typing:
The output should be similar to:sudo dnf config-manager --add-repo https://download.docker.com/linux/fedora/docker-ce.repoAdding repo from: https://download.docker.com/linux/fedora/docker-ce.repo - Make sure your existing packages are up to date. This may take a few minutes. Type:
When packages are finished updating, you should see output similar to:sudo dnf makecache fastMetadata Cache Created! - Install wget by typing:
When wget is finished installing, you should see output similar to:sudo dnf install -y wgetRunning transaction Installing : wget-1.14-13.el7.x86_64 1/1 Verifying : wget-1.14-13.el7.x86_64 1/1 Installed: wget.x86_64 0:1.14-13.el7 Complete! - Install Docker by typing:
When Docker is finished installing, you should see output similar to:sudo dnf install -y docker-ce docker-ce-cli containerd.io docker-buildx-plugin docker-compose-pluginComplete! - Enable the Docker service by typing:
You should see output similar to:sudo systemctl enable docker.serviceCreated symlink from /etc/systemd/system/multi-user.target.wants/docker.service to /usr/lib/systemd/system/docker.service. - Start the Docker daemon by typing:
sudo systemctl start docker - Check that Docker has installed properly by typing:
You should see output similar to:sudo docker psCONTAINER ID IMAGE COMMAND CREATED STATUS PORTS NAMES - Add your user to the Docker group so Docker commands don't require sudo. Type:
sudo usermod -aG docker $(whoami) - Log out of your Duo Authorization Connector box and back in for the group changes to take effect.
- Check that Docker is functioning without using sudo by typing:
You should see output similar to:docker psCONTAINER ID IMAGE COMMAND CREATED STATUS PORTS NAMES
Ubuntu 18.04 and later
These directions will walk you through installing the free Docker Community Edition for Ubuntu.
- Log in to your Duo Authorization Connector server locally or through SSH with a user that has sudo permissions. Any time you use the
sudocommand, you may be prompted to enter your password. - Update the apt package index by typing:
You should see output similar to:sudo apt-get updateHit:1 http://us-west-1.ec2.archive.ubuntu.com/ubuntu focal InRelease Get:2 http://us-west-1.ec2.archive.ubuntu.com/ubuntu focal-updates InRelease [114 kB] Get:40 http://security.ubuntu.com/ubuntu focal-security/multiverse Translation-en [5488 B] Get:41 http://security.ubuntu.com/ubuntu focal-security/multiverse amd64 c-n-f Metadata [528 B] Fetched 26.0 MB in 5s (5050 kB/s) Reading package lists... Done - Install packages to allow apt to use a repository over HTTPS by typing:
You should see output similar to:sudo apt-get install -y ca-certificates curl gnupg lsb-releaselsb-release set to manually installed. ca-certificates set to manually installed. Processing triggers for libc-bin (2.31-0ubuntu9.9) ... - Add Docker's official GPG key by typing:
sudo mkdir -m 0755 -p /etc/apt/keyrings curl -fsSL https://download.docker.com/linux/ubuntu/gpg | sudo gpg --dearmor -o /etc/apt/keyrings/docker.gpg - Use the following command to set up the repository:
echo \ "deb [arch=$(dpkg --print-architecture) signed-by=/etc/apt/keyrings/docker.gpg] https://download.docker.com/linux/ubuntu \ $(lsb_release -cs) stable" | sudo tee /etc/apt/sources.list.d/docker.list > /dev/null - Update the apt package index by typing:
You should see output similar to:sudo apt-get updateFetched 442 kB in 1s (584 kB/s) Reading package lists... Done -
Install Docker Engine, containerd, and Docker Compose by typing:
You should see output similar to:sudo apt-get install -y docker-ce docker-ce-cli containerd.io docker-buildx-plugin docker-compose-pluginThe following NEW packages will be installed: containerd.io docker-buildx-plugin docker-ce docker-ce-cli docker-ce-rootless-extras docker-compose-plugin docker-scan-plugin pigz slirp4netns 0 upgraded, 9 newly installed, 0 to remove and 31 not upgraded. Processing triggers for systemd (245.4-4ubuntu3.19) ... - Add your user to the Docker group so Docker commands don't require sudo. Type:
sudo usermod -aG docker $(whoami) - Log out of your Duo Authorization Connector box and back in for the group changes to take effect.
- Check that Docker is functioning without using sudo by typing:
You should see output similar to:docker psCONTAINER ID IMAGE COMMAND CREATED STATUS PORTS NAMES
Debian 11 and Later
These directions will walk you through installing the free Docker Community Edition for Debian.
- Log in to your Duo Authorization Connector server locally or through SSH with a user that has sudo permissions. sudo is not installed by default on Debian and may require installation. Any time you use the
sudocommand, you may be prompted to enter your password. - Docker requires a 64-bit operating system. Please verify your installation of Debian is 64-bit by typing:
The output should beuname -mx86_64. - Install apt requirements for HTTPS on the server. Type:
sudo apt-get update sudo apt-get install \ ca-certificates \ curl \ gnupg \ lsb-release - Download Docker’s official GPG key and add it to your keyring by typing:
curl -fsSL https://download.docker.com/linux/debian/gpg | sudo gpg --dearmor -o /usr/share/keyrings/docker-archive-keyring.gpg - Add the Docker repository to your APT sources by typing:
echo \ "deb [arch=$(dpkg --print-architecture) signed-by=/usr/share/keyrings/docker-archive-keyring.gpg] https://download.docker.com/linux/debian \ $(lsb_release -cs) stable" | sudo tee /etc/apt/sources.list.d/docker.list > /dev/null - Update your package database by typing:
You should see output similar to:sudo apt-get updateReading package lists... Done - Install Docker by typing:
When the install is finished, you should see output similar to:sudo apt-get install -y docker-ce docker-ce-cli containerd.io docker-buildx-plugin docker-compose-pluginProcessing triggers for systemd (215-17+deb8u6) ... Processing triggers for initramfs-tools (0.120+deb8u2) ... update-initramfs: Generating /boot/initrd.img-3.16.0-4-amd64 Processing triggers for dbus (1.8.22-0+deb8u1) ... - Enable and start the Docker service by typing:
You should see output similar to:sudo systemctl enable --now docker.serviceCreated symlink from /etc/systemd/system/multi-user.target.wants/docker.service to /usr/lib/systemd/system/docker.service. - Check that Docker has installed properly by typing:
You should see output similar to:sudo docker psCONTAINER ID IMAGE COMMAND CREATED STATUS PORTS NAMES - Add your user to the Docker group so Docker commands don't require sudo. Type:
sudo usermod -aG docker $(whoami) - Log out of your Duo Authorization Connector box and back in for the group changes to take effect or run this command to add the docker group to the user's groupset:
newgrp docker - Check that Docker is functioning without using sudo by typing:
You should see output similar to:docker psCONTAINER ID IMAGE COMMAND CREATED STATUS PORTS NAMES
Older Debian Releases
These directions will walk you through installing the free Docker Community Edition for Debian.
- Log in to your Duo Authorization Connector server locally or through SSH with a user that has sudo permissions. Any time you use the
sudocommand, you may be prompted to enter your password. - Update your package database by typing:
You should see output similar to:sudo apt-get updateReading package lists... Done - Ensure that APT works with HTTPS and that CA certificates are installed. Type:
You should see output similar to:sudo apt-get install -y apt-transport-https ca-certificates gnupg2 software-properties-commonProcessing triggers for libc-bin (2.19-18+deb8u7) ... Processing triggers for systemd (215-17+deb8u6) ... Processing triggers for dbus (1.8.22-0+deb8u1) ... - Add the official Docker repository GPG keys to your server by typing:
You should see output similar to:wget -O- "https://download.docker.com/linux/ubuntu/gpg" | sudo apt-key add -Resolving download.docker.com (download.docker.com)... 54.192.192.196, 54.192.192.15, 54.192.192.26, ... Connecting to download.docker.com (download.docker.com)|54.192.192.196|:443... connected. HTTP request sent, awaiting response... 200 OK Length: 3817 (3.7K) [binary/octet-stream] Saving to: ‘STDOUT’ - 100%[===========================================================================================================================================>] 3.73K --.-KB/s in 0s 2017-05-19 12:07:50 (374 MB/s) - written to stdout [3817/3817] OK - Add the Docker repository to to your APT sources by typing:
sudo add-apt-repository "deb [arch=amd64] https://download.docker.com/linux/debian $(lsb_release -cs) stable" - Update your package database again by typing:
You should see output similar to:sudo apt-get updateReading package lists... Done - Install Docker by typing:
When the install is finished, you should see output similar to:sudo apt-get install -y docker-ce docker-ce-cli containerd.io docker-buildx-plugin docker-compose-pluginProcessing triggers for systemd (215-17+deb8u6) ... Processing triggers for initramfs-tools (0.120+deb8u2) ... update-initramfs: Generating /boot/initrd.img-3.16.0-4-amd64 Processing triggers for dbus (1.8.22-0+deb8u1) ... - Check that Docker has installed properly by typing:
You should see output similar to:sudo docker psCONTAINER ID IMAGE COMMAND CREATED STATUS PORTS NAMES - Add your user to the Docker group so Docker commands don't require sudo. Type:
sudo usermod -aG docker $(whoami) - Log out of your Duo Authorization Connector box and back in for the group changes to take effect.
- Check that Docker is functioning without using sudo by typing:
You should see output similar to:docker psCONTAINER ID IMAGE COMMAND CREATED STATUS PORTS NAMES
Red Hat Enterprise Linux
SUSE Enterprise Linux 15 and later
- Log in to your Duo Authorization Connector server locally or through SSH with a user that has sudo permissions. sudo is not installed by default on SUSE Enterprise Linux and may require installation. Any time you use the
sudocommand, you may be prompted to enter your password. - Docker requires a 64-bit operating system. Please verify your installation of SUSE Enterprise Linux is 64-bit by typing:
The output should beuname -mx86_64. - Install curl by typing:
sudo zypper install -y curl - Add the required repository to your server by typing:
The output should be similar to:sudo SUSEConnect -p sle-module-containers/15.3/x86_64 -r ''Registering system to SUSE Customer Center Updating system details on https://scc.suse.com ... Activating sle-module-containers 15.3 x86_64 ... -> Adding service to system ... -> Installing release package ... Successfully registered system - Install Docker and Docker Compose by typing:
sudo zypper install -y docker docker-compose docker-compose-switch - Enable and start the Docker service by typing:
Output should be similar to:sudo systemctl enable --now docker.serviceCreated symlink from /etc/systemd/system/multi-user.target.wants/docker.service to /usr/lib/systemd/system/docker.service. - Check that Docker has installed properly by typing:
Output should be similar to:sudo docker psCONTAINER ID IMAGE COMMAND CREATED STATUS PORTS NAMES - Add your user to the Docker group so Docker commands don't require sudo. Type:
sudo usermod -aG docker $(whoami) - Log out of your Duo Authorization Connector box and back in for the group changes to take effect or run this command to add the docker group to the user's groupset:
newgrp docker - Check that Docker is functioning without using sudo by typing:
You should see output similar to:docker psCONTAINER ID IMAGE COMMAND CREATED STATUS PORTS NAMES
Download the Quickstart YAML
Download the Docker Compose quickstart YAML file by typing:
curl -JO https://dl.duosecurity.com/duo-authorization-connector-beta-latest-quickstart.yamlYou should see output similar to:
  % Total    % Received % Xferd  Average Speed   Time    Time     Time  Current
                                 Dload  Upload   Total   Spent    Left  Speed
100  4069  100  4069    0     0   7844      0 --:--:-- --:--:-- --:--:--  7855
curl: Saved to filename 'duo-authorization-connector-beta-v1.0.0-quickstart.yaml'
Make note of the saved file's actual file name; you'll need this in future steps. View checksums for Duo Authorization Connector downloads on the Checksums and Downloads page.
Note: If you do not have curl installed but have wget, use this command:
wget --content-disposition https://dl.duosecurity.com/duo-authorization-connector-beta-latest-quickstart.yamlDownload the Configuration File
Download the example configuration file by typing:
curl -JO https://dl.duosecurity.com/duo-authorization-connector-quickstart.example.confYou should see output similar to:
  % Total    % Received % Xferd  Average Speed   Time    Time     Time  Current
                                 Dload  Upload   Total   Spent    Left  Speed
100  4009  100  4009    0     0  15810      0 --:--:-- --:--:-- --:--:-- 15845
The downloaded file is quickstart.example.conf. View checksums for Duo Authorization Connector downloads on the Checksums and Downloads page.
Note: If you do not have curl installed but have wget, use this command:
wget https://dl.duosecurity.com/duo-authorization-connector-quickstart.example.confConfigure the Duo Authorization Connector
Copy the example configuration file to a new file and then create the secrets directory:
cp quickstart.example.conf quickstart.conf
mkdir secrets
Open quickstart.conf in a text editor and update the following sections:
Gateway Section
| Setting | Value |
|---|---|
url |
Internal URL where Envoy AI Gateway listens (e.g., http://envoy:8080/mcp). If you use a load balancer, you should not need to change this value, as the load balancer forwards traffic to the virtual machine on port 8080. |
external_url |
Public FQDN that MCP clients use to reach Envoy AI Gateway (e.g., https://mcpgw.example.com/mcp). |
gateway:
  url: "http://envoy:8080/mcp"
  external_url: "https://api.example.com/mcp"
Gateway TLS Section (Optional)
If Envoy AI Gateway uses TLS internally instead of a TLS-terminating load balancer, copy your certificate file and key to the virtual machine, uncomment the tls options, and configure the TLS settings with the paths to your certificate files:
| Setting | Value |
|---|---|
enabled |
true |
cert_path |
Path to the TLS certificate file. |
key_path |
Path to the TLS private key file. |
tls:
    # cert_file: "./certs/gateway.crt"
    # key_file: "./secrets/gateway_key"
Upstreams Section
Add your upstream MCP server information to the upstreams section:
| Setting | Value |
|---|---|
name |
The name of the MCP |
url |
The URL of the MCP server. Ensure that the authorization gateway can resolve and communicate with the URL hostnames, IPs, and ports you specify. |
upstreams:
  - name: everything
    url: "http://everything-mcp:8080/mcp"

  - name: github
    url: "http://github-mcp:8080/mcp"

  - name: slack
    url: "http://slack-mcp:3000/mcp"
OAuth Section
The oauth section requires these values from the Envoy AI Gateway application's details page in the Duo Admin Panel:
| Setting | Value |
|---|---|
issuer |
The OAuth Token URL value shown on the Duo Envoy AI Gateway application (copied from your Duo MCP application). Remove /token from the end of the URL when you paste it into the file. |
admin_panel_client_id |
The Client ID value shown on the Duo Envoy AI Gateway application (copied from your Duo MCP application). |
oauth:
  issuer: "https://sso-abcd1234.sso.duosecurity.com/oauth2/DIABCDEFGHI12345678"
  admin_panel_client_id: "97af4356e64e4653ac55784145afda76"
Duo Section
The duo section requires these values from the Envoy AI Gateway application's details page in the Duo Admin Panel:
| Setting | Value |
|---|---|
host |
The API hostname value from your Duo Envoy AI Gateway application. |
integration_key |
The Integration key value from your Duo Envoy AI Gateway application. |
secret_key_file |
The path to a duo_skey file you will create in the secrets directory you created earlier. |
duo:
  host: "api-XXXXXXXX.duosecurity.com"
  integration_key: "DIXXXXXXXXXXXXXXXXXX"
  secret_key_file: "./secrets/duo_skey"
Create the Duo secret key file:
echo "YOUR_DUO_SECRET_KEY" > ./secrets/duo_skey
chmod 600 ./secrets/duo_skey
Replace YOUR_DUO_SECRET_KEY with the Secret key value from your Duo Envoy AI Gateway application.
Create the Gateway .env File
Create a .env text file with the MCP gateway information:
| Setting | Value |
|---|---|
COMPOSE_PROFILES |
Which gateway to run (envoy). |
GATEWAY_PORT |
Defaults to port 8080 if not set. If the MCP gateway hosts a TLS listener, then set this to 443. |
# =============================================================================
  # Gateway Profile
  # =============================================================================
  # Choose which gateway to run: agentgateway (default) or envoy
  # Override at runtime: COMPOSE_PROFILES=envoy docker compose up
  COMPOSE_PROFILES=envoy

  # =============================================================================
  # Gateway Port
  # =============================================================================
  # Port published on the host for the client-facing MCP endpoint (default: 8080).
  # Set to 443 when using the TLS overlay (docker-compose.tls.yaml).
  # GATEWAY_PORT=443
Your directory should now contain:
duo-authorization-connector-beta-v1.0.0-quickstart.yaml
quickstart.conf
.env
secrets/
  duo_skey
TLS Configuration (Optional)
If you want to enable TLS for the Envoy AI Gateway endpoint, download the TLS configuration overlay by typing:
curl -JO https://dl.duosecurity.com/duo-authorization-connector.tls.yamlView checksums for Duo Authorization Connector downloads on the Checksums and Downloads page.
Place your TLS certificate and private key files in the working directory, then add the TLS overlay to your docker compose command in the next step.
Run the Duo Authorization Connector
Start the connector and Envoy AI Gateway:
docker compose -f duo-authorization-connector-beta-v1.0.0-quickstart.yaml up -dIf using TLS, add the TLS overlay file:
docker compose -f duo-authorization-connector-beta-v1.0.0-quickstart.yaml \
  -f duo-authorization-connector.tls.yaml up -d
Expected output:
[+] Running 3/3
 ✔ Network duo-authz-connector_default        Created
 ✔ Container authz-connector                  Started
 ✔ Container envoy                            Started
Verify the containers are running:
docker psExpected output:
CONTAINER ID   IMAGE                                        COMMAND                  CREATED          STATUS          PORTS                    NAMES
a1b2c3d4e5f6   duosecurity/authorization-connector:v1.0.0   "/app/authz-connector"   10 seconds ago   Up 8 seconds    0.0.0.0:9090->9090/tcp   authz-connector
b2c3d4e5f6a7   envoyproxy/envoy-ai-gateway:latest           "/app/envoy"             10 seconds ago   Up 8 seconds    0.0.0.0:8080->8080/tcp   envoy
Configure Authorization Policy
Define which Duo user groups can invoke which MCP tools through Envoy AI Gateway. The MCP gateway allows no tool use without configured rules or policy.
Create User Groups
You may use Duo user groups managed via directory sync or inbound SCIM in your authorization policy. Assign users to the target groups in the external directory and sync the changes into Duo.
If you need to create authorization groups manually:
-
Log in to the Duo Admin Panel and navigate to Users → Groups.
-
Create groups that correspond to the tool-level access you want to enforce. For example:
Group Description Engineering Access to code generation and repository tools Finance Access to financial reporting and analytics tools Admin Access to all available tools -
Assign users to the appropriate groups.
For more information about creating and managing Duo groups, refer to Using Groups.
Set Up Tool-Level Authorization
-
In the Duo Admin Panel, navigate to Applications → MCP Gateways and Servers.
-
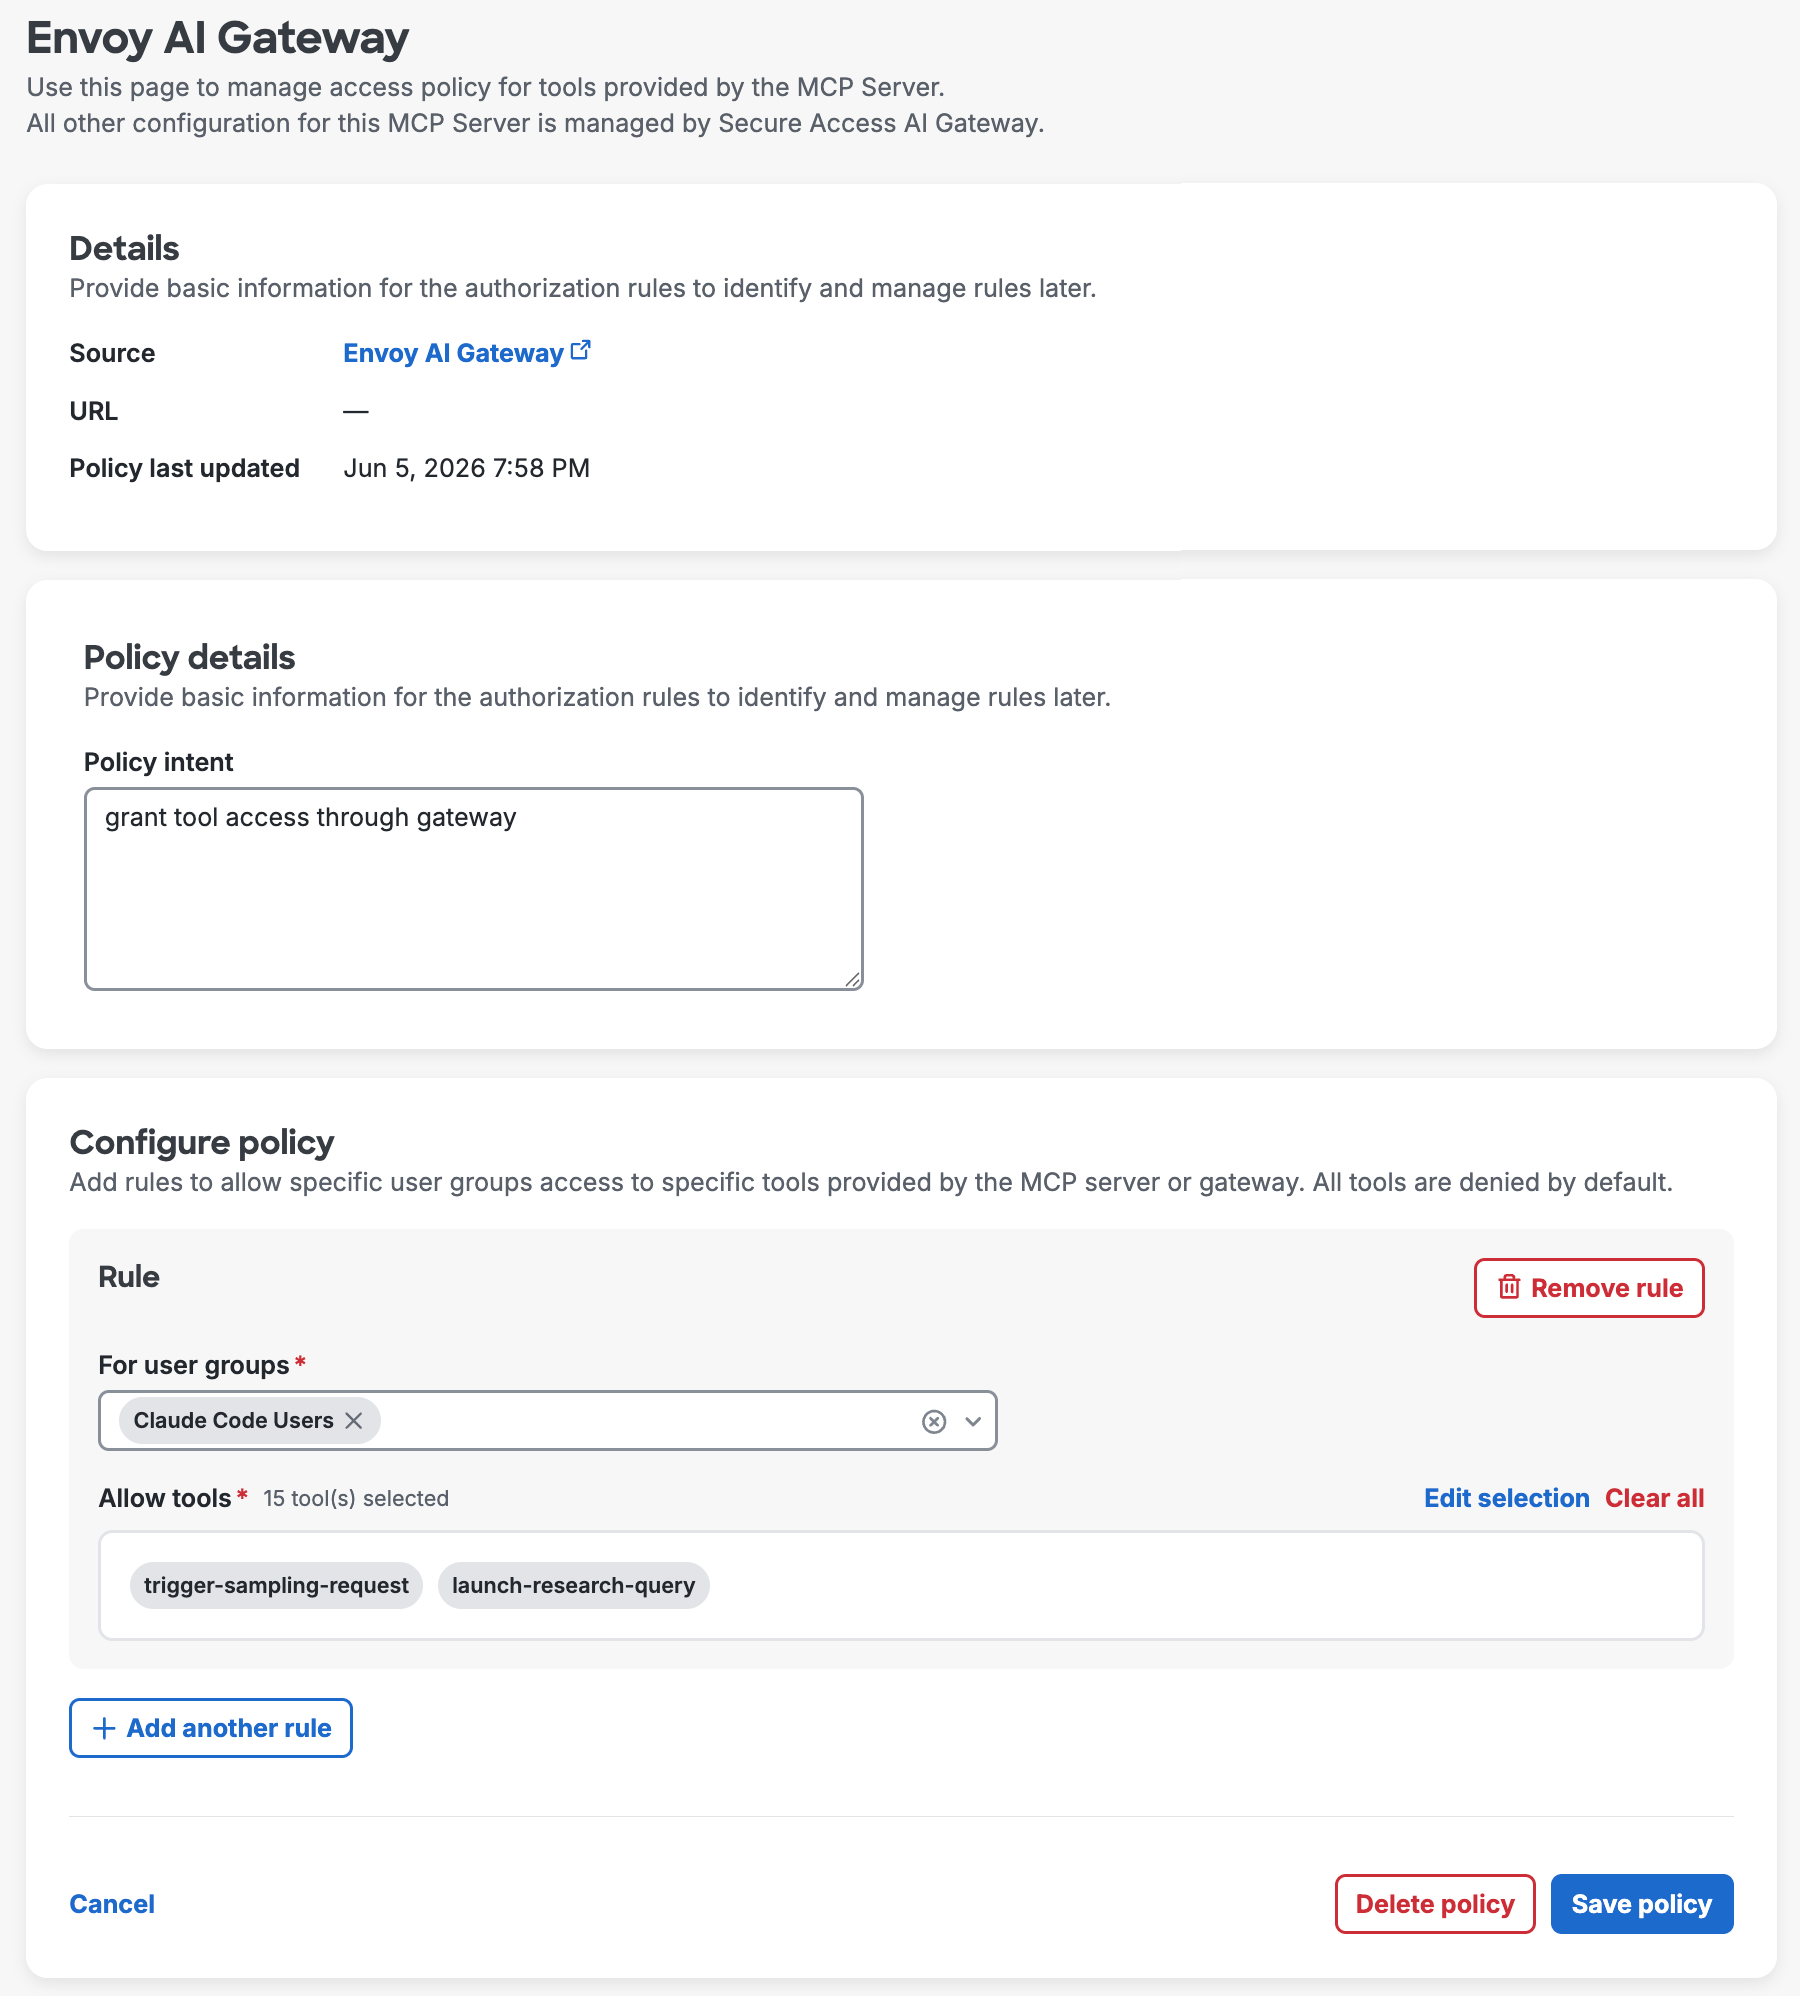
On the "MCP Gateways and Servers" page, locate the Envoy AI Gateway server you created, and click Configure policy.
-
Enter the policy details describing the intent of the new policy.
-
In the "Configure Policy" section, click + Add another rule.
-
Use the For user groups drop-down to select one or more Duo groups. Users in any of the selected groups receive the specified access.
-
Click Select tools in the "Allow tools" box to choose which tools members of the selected groups can invoke. Make your selections from the available tools list on the right to add them to the rule. Click Close on the "All Tools" list when you complete your tool selections.
-
Verify your group and tool selections in the new rule.
-
-
Click + Add another rule to create additional rules as needed for other group and tool combinations or Remove rule to delete a rule from the policy.
-
Click Save policy after creating your tool rules.
The Gateway denies access to all MCP tools for users who are not members of any group with tool permissions.
Test Your Setup
After completing the deployment and configuration steps, you will have:
- The Duo Authorization Connector connected to Duo's Authorization API.
- An MCP server configured with Envoy AI Gateway.
- A Duo Authorization policy configured for the MCP Server.
Verify the authorization flow with an MCP client.
Configure an MCP Client
This example uses the Claude Code CLI as the MCP client. You can substitute any MCP-compatible client.
-
Add Envoy AI Gateway as an MCP server:
claude mcp add envoyaigateway -t http https://mcpgw.example.com/mcpReplace
mcpgw.example.comwith your actual Envoy AI Gateway FQDN. -
Launch Claude Code:
claude -
Type
/mcpto view the list of configured MCP servers. -
Select the envoyaigateway entry and press Enter to confirm.
-
Select Authenticate and press Enter to authenticate via Duo Single Sign-On.
-
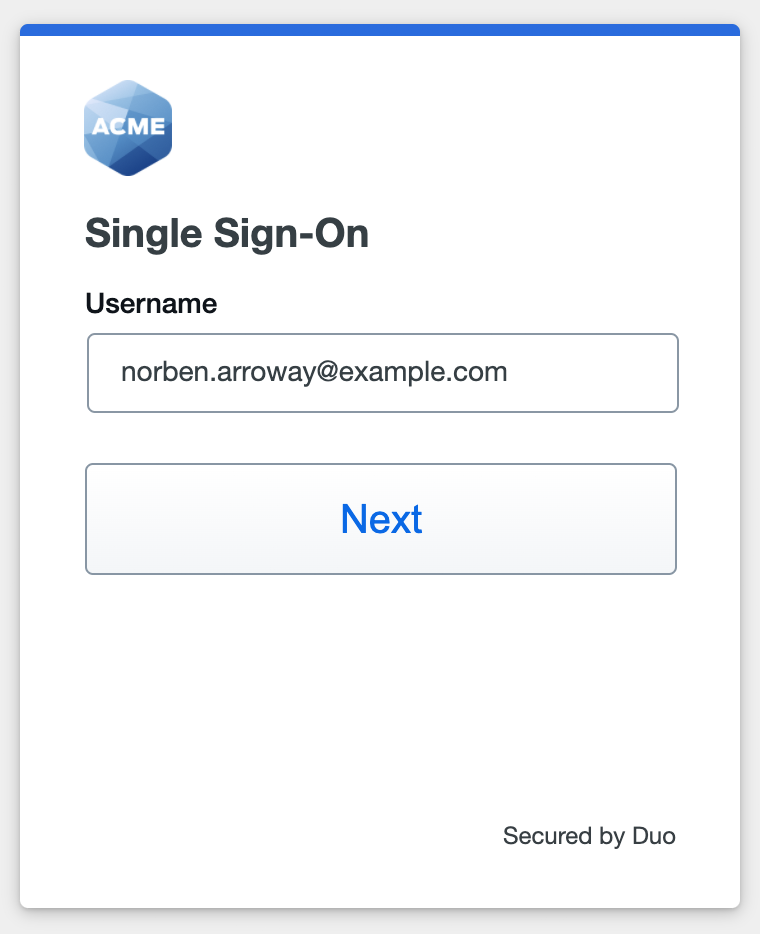
Claude Code launches your default web browser with the Duo SSO authentication URL. If your browser doesn't launch automatically, copy the URL provided in the text output and paste it into a new browser tab.
-
Log in to Duo SSO and complete additional authentication when prompted.
Verify Tool-Level Authorization
-
After authentication, use
/mcpto view available MCP tools. Confirm the list matches your group permissions. -
Invoke a tool that your group has access to. The request succeeds and returns results.
-
If you have access to a second user account that is not authorized for certain tools, authenticate as that user and confirm that unauthorized tools do not appear in the tools list.
Troubleshooting
Need some help? Take a look at our Envoy AI Gateway Knowledge Base articles or Community discussions. For further assistance, contact Support.
View Container Logs
View logs for the Duo Authorization Connector:
docker logs authz-connectorView logs for Envoy AI Gateway:
docker logs envoyCommon Issues
| Symptom | Possible Cause | Resolution |
|---|---|---|
| 401 Unauthorized | Token validation failure | Verify the OAuth issuer URL in quickstart.conf matches the OAuth Token URL from the Duo MCP application (without /token). |
| 403 Forbidden for an authorized user | Group membership not found or policy misconfiguration | Check the user's group membership in the Duo Admin Panel under Users → Groups and verify the authorization policy. |
| Tools not discovered | MCP server not responding | Verify the MCP server URLs in the upstreams section of quickstart.conf are correct and reachable from the connector container. |
| Container fails to start | Configuration file error | Review Docker logs for syntax errors in quickstart.conf. |
| Checksum verification failed | Corrupted download | Re-download the file. |
| "Invalid client" error | DCR or CIMD misconfiguration | Verify client registration settings on the MCP application Clients tab. |
| TLS certificate errors | Certificate not trusted by MCP client | Ensure the certificate is signed by a CA trusted by the MCP client, or add the CA certificate to the client's trust store. |