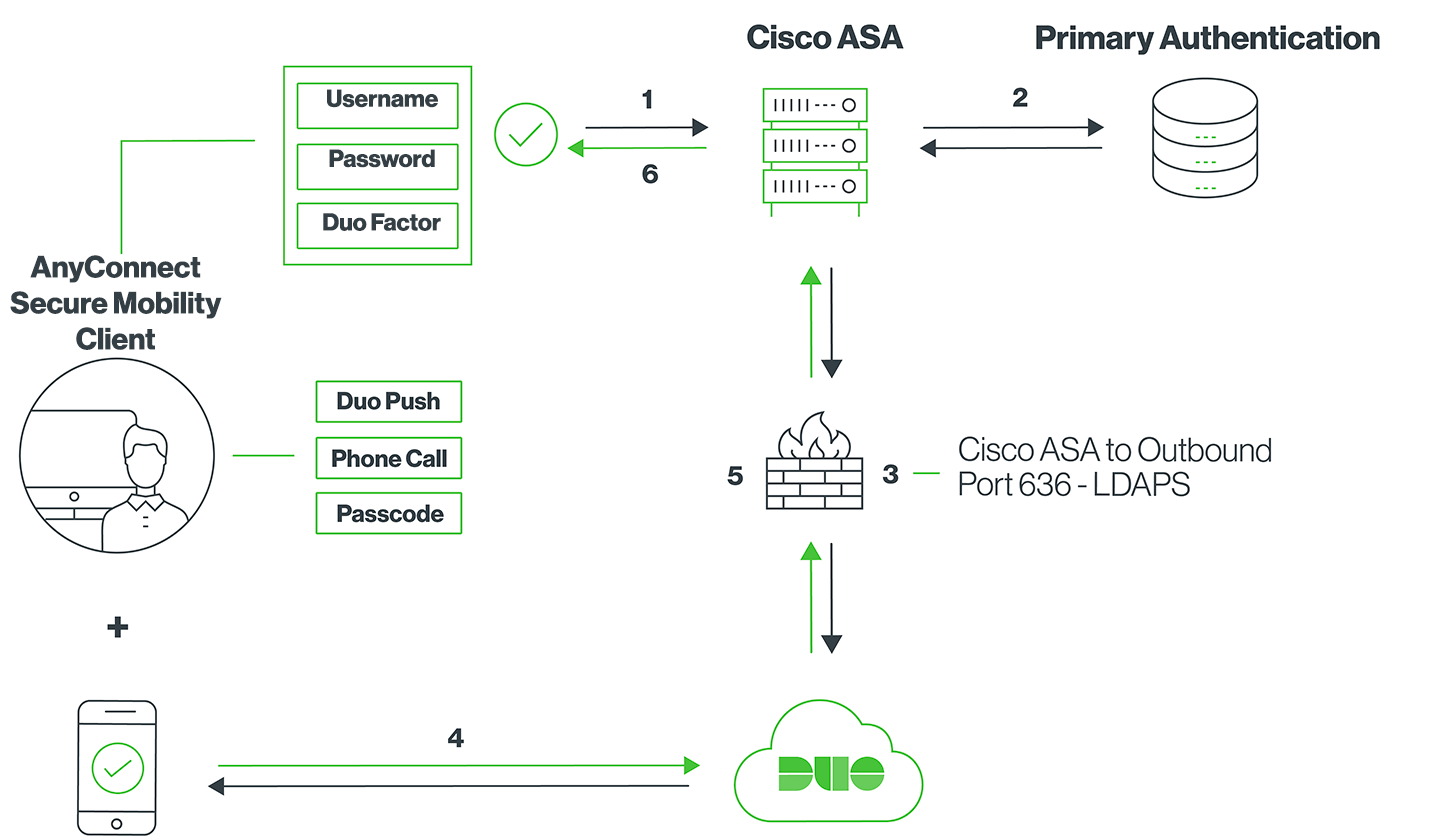
Duo integrates with your Cisco ASA VPN to add two-factor authentication to any VPN login.
Direct LDAP connectivity to Duo for Cisco ASA will reach end of life on March 30, 2024. Customers may not create new Cisco ASA SSL VPN applications after September 7, 2023.
We recommend you deploy Duo Single Sign-On for Cisco ASA with AnyConnect to protect Cisco ASA with Duo Single Sign-On, our cloud-hosted identity provider featuring Duo Central and the Duo Universal Prompt.
Another alternative to direct LDAPS connections is adding Duo authentication to Cisco ASA using RADIUS and the Duo Authentication Proxy, for example, RADIUS with Automatic Push for Cisco ASA. See the "Related" links to the left to explore more RADIUS configurations.
Please visit the article Guide to end of life for the Duo LDAP cloud service (LDAPS) used to provide 2FA for Cisco ASA, Juniper Networks Secure Access, and Pulse Secure Connect Secure SSL VPN for further details, and review the Duo End of Sale, Last Date of Support, and End of Life Policy.
These instructions remain available for reconfiguring your existing application.
This Duo ASA SSL VPN configuration supports inline self-service enrollment and the Duo Prompt for web-based VPN logins, and push, phone call, or passcode authentication for AnyConnect desktop and mobile client connections that use SSL encryption.
Your ASA device makes a direct connection to Duo's cloud service using LDAPS. LDAPS authentications do not report a client IP address when the AnyConnect client is used. There is no configurable fail mode for LDAPS connections, so if your device cannot contact Duo's service your users won't be able to log in with Duo.
This integration expressly supports Cisco ASA VPN and is not guaranteed to work with any other VPN solution.
The AnyConnect RADIUS configuration does not feature the interactive Duo Prompt for web-based logins, but that configuration does capture client IP information for use with Duo policies, such as geolocation and authorized networks, and offers configurable fail mode.
The SAML VPN deployment features inline enrollment and authentication in the Duo Universal Prompt for both web-based VPN logins and AnyConnect 4.6+ client logins. This deployment option features Duo Single Sign-On, our cloud-hosted SAML 2.0 identity provider. Primary and Duo secondary authentication occur at the identity provider, not at the ASA itself.
Please refer to the Duo for Cisco AnyConnect VPN with ASA or Firepower overview to learn more about the different options for protecting ASA logins with Duo MFA.
If you need to protect connections that use Cisco's desktop VPN client (IKE encryption), use our Cisco IPSec instructions.
Before starting, make sure that Duo is compatible with your Cisco ASA device. Log on to your Cisco ASDM interface and verify that your Cisco ASA firmware is version 8.3 or later.
This application communicates with Duo's service on SSL TCP port 636.
Firewall configurations that restrict outbound access to Duo's service with rules using destination IP addresses or IP address ranges aren't recommended, since these may change over time to maintain our service's high availability. If your organization requires IP-based rules, please review Duo Knowledge Base article 1337.
Effective June 30, 2023, Duo no longer supports TLS 1.0 or 1.1 connections or insecure TLS/SSL cipher suites. See Duo Knowledge Base article 7546 for additional guidance.
Before moving on to the deployment steps, it's a good idea to familiarize yourself with Duo administration concepts and features like options for applications, available methods for enrolling Duo users, and Duo policy settings and how to apply them. See all Duo Administrator documentation.
You should already have a working primary authentication configuration for your SSL VPN users before you begin to deploy Duo, e.g. LDAP authentication to Active Directory.
Then you'll need to:
The security of your Duo application is tied to the security of your secret key (skey). Secure it as you would any sensitive credential. Don't share it with unauthorized individuals or email it to anyone under any circumstances!
ASA software versions 9.13(1) and later perform certificate validation for secure LDAP connections, which requires that you upload the certificate chains used for the connection to Duo to your device. If you plan to update to 9.13(1) or later after configuring Duo, it's a good idea to install the CA certificates for Duo connectivity now.
Duo's cloud service currently secures SSL traffic with certificates issued by DigiCert. If your device is running 9.13(1) you'll need to install the DigiCert CA certificates on your ASA so that it can establish the secure LDAP connection to Duo.
To install the DigiCert CA certificates used by Duo's service on your ASA:
If you did not already do so, download the DigiCert High Assurance EV Root CA and DigiCert Global Root CA certificates from the DigiCert site for installation on your ASA.
Log on to your Cisco ASA administrator web interface (ASDM).
Click the Configuration tab and then click Device Management in the left menu.
Navigate to Certificate Management → CA Certificates.
Click the Add button.
In the "Install Certificate" window, select the Install from a file option and then click the Browse... button.
Select the DigiCert High Assurance EV Root CA file you downloaded from DigiCert (DigiCertHighAssuranceEVRootCA.crt
) and click Install.
Click the Install Certificate button and then click Send on the "Preview CLI Commands" prompt. The DigiCert Root is installed.
Repeat steps 4-8 to install the DigiCert Global Root CA certificate (DigiCertGlobalRootCA.crt
).
Verify that both DigiCert CA certificates are listed.
With all necessary CA certificates uploaded to your device, proceed to the next section.
To add the Duo customization to your Cisco sign-in page:
While still logged in to your Cisco ASA administrator web interface (ASDM), click the Configuration tab and then click Remote Access VPN in the left menu.
Navigate to Clientless SSL VPN Access → Portal → Web Contents. Then click Import.
In the Source section, select Local computer, click Browse Local Files..., and find the Duo-Cisco-vX.js file extracted from the Duo-Cisco-vX-accountid.zip file downloaded earlier from the Duo admin console where vX will reflect the actual version of the Duo Cisco package and accountid is your organization's Duo Account ID (visible on the Settings tab of the Duo Admin Panel) i.e. Duo-Cisco-v5-1234-5678-90.zip. You must use the .js file from the Duo package customized for your account. Uploading the file customized for the wrong account can cause authentication failures.
After the file is selected, Duo-Cisco-vX.js
will appear in the Web Content Path box.
In the Destination section, select No in response to "Require authentication to access its content?"
Click Import Now then click Apply
Navigate to Clientless SSL VPN Access → Portal → Customization, select the Customization Object you want to modify, and then click Edit.
In the outline on the left, click Title Panel (under Logon Page).
Then type <script src="/+CSCOU+/Duo-Cisco-vX.js"></script>
(replacing vX with the file version actually downloaded)
in the Text: box. Click OK.
Click Apply
Navigate to AAA/Local Users → AAA Server Groups, click Add, and fill out the form:
Server Group | Duo-LDAP |
Protocol | LDAP |
In the Servers in the Selected Group section, click Add and fill out the form:
Interface Name | Choose your external, internet-facing interface (it may be called "outside") |
Server Name or IP Address |
Your API hostname (i.e. api-XXXXXXXX.duosecurity.com )
|
Timeout | 60 seconds |
Check Enable LDAP over SSL and fill out the form (replacing INTEGRATION_KEY and SECRET_KEY with your application-specific keys):
Server Port | 636 |
Server Type | -- Detect Automatically/Use Generic Type -- |
Base DN | dc=INTEGRATION_KEY,dc=duosecurity,dc=com |
Scope | One level beneath the Base DN |
Naming Attribute(s) | cn |
Login DN | dc=INTEGRATION_KEY,dc=duosecurity,dc=com |
Login Password | SECRET_KEY |
Click Save to write all changes to the ASA device memory.
If any of your users will be logging in through desktop or mobile AnyConnect clients (click here to learn more about Duo and AnyConnect), you'll need to increase the AnyConnect Authentication Timeout so that users have enough time to use Duo Push or phone callback. Here's how:
You now have an increased authentication timeout. This timeout will take effect after each client successfully logs into the VPN after applying the new profile.
If you find that AnyConnect client connections disconnect after about 12 seconds please see the following FAQ: Why is the AnyConnect client connection attempt disconnecting after 12 seconds when I have increased the timeout?
Visit your Cisco ASA SSL VPN Service URL (it usually ends in /+CSCOE+/logon.html
). After you complete primary authentication, the Duo enrollment/login prompt appears.
If you plan to permit use of WebAuthn authentication methods (security keys, U2F tokens, or Touch ID) in the traditional Duo Prompt, Duo recommends configuring allowed hostnames for this application and any others that show the inline Duo Prompt before onboarding your end-users.
The Duo Universal Prompt has built-in protection from unauthorized domains so this setting does not apply.
Users see a "Second Password" field when using the AnyConnect client, which cannot be left blank.
Enter the primary username and password, and a Duo factor option as the second password. Choose from:
push |
Perform Duo Push authentication You can use Duo Push if you've installed and activated Duo Mobile on your device. |
phone | Perform phone callback authentication. |
sms |
Send a new batch of SMS passcodes. Your authentication attempt will be denied. You can then authenticate with one of the newly-delivered passcodes. |
A numeric passcode | Log in using a passcode, either generated with Duo Mobile, sent via SMS, generated by your hardware token, or provided by an administrator. Examples: "123456" or "2345678" |
You can also specify a number after the factor name if you have more than one device enrolled (as the automatic push or phone call goes to the first capable device attached to a user). So you can enter push2 or phone2 if you have two phones enrolled and you want the authentication request to go to the second phone.
Need some help? Take a look at the Cisco Frequently Asked Questions (FAQ) page or try searching our Cisco Knowledge Base articles or Community discussions. For further assistance, contact Support.
You can configure Duo on your ASA using the Cisco command line.
The CA certificates downloaded from DigiCert are in binary format. You need to convert them to base-64 PEM format in order to add them to the ASA from the CLI. You can do this with OpenSSL.
Open a terminal prompt and change directory (cd
) to the location where you saved the DigiCert CA .crt files you downloaded earlier.
Enter the following to convert the DigiCert High Assurance EV Root CA file to PEM:
openssl x509 -inform DER -outform PEM -in DigiCertHighAssuranceEVRootCA.crt -out DigiCertHighAssuranceEVRootCA.pem
Enter the following to convert the DigiCert Global Root CA file to PEM:
openssl x509 -inform DER -outform PEM -in DigiCertGlobalRootCA.crt -out DigiCertGlobalRootCA.pem
SSH into your ASA again if no longer connected and access the config terminal.
login as: asaadmin
asaadmin@ciscoasa's password:
Type help or '?' for a list of available commands.
ciscoasa> enable
Password: ********
ciscoasa# config terminal
ciscoasa(config)#
Enter the following to begin uploading the DigiCert High Assurance EV Root CA (the example trustpoint name is ASDM_TrustPoint1):
ciscoasa(config)#crypto ca trustpoint ASDM_TrustPoint1
ciscoasa(config-ca-trustpoint)# revocation-check none
ciscoasa(config-ca-trustpoint)# no id-usage
ciscoasa(config-ca-trustpoint)# enrollment terminal
Open the DigiCertHighAssuranceEVRootCA.pem
file in a text editor (like Notepad), and copy the entire contents of the file (including the -----BEGIN CERTIFICATE-----
and -----END CERTIFICATE-----
lines). Paste the certificate text into your terminal when prompted, followed by a carriage return and quit.
ciscoasa(config-ca-trustpoint)# crypto ca authenticate ASDM_TrustPoint1
Enter the base 64 encoded CA certificate. End with the word "quit" on a line by itself
-----BEGIN CERTIFICATE-----
MIIDxTCCAq2gAwIBAgIQAqxcJmoLQJuPC3nyrkYldzANBgkqhkiG9w0BAQUFADBs
MQswCQYDVQQGEwJVUzEVMBMGA1UEChMMRGlnaUNlcnQgSW5jMRkwFwYDVQQLExB3
d3cuZGlnaWNlcnQuY29tMSswKQYDVQQDEyJEaWdpQ2VydCBIaWdoIEFzc3VyYW5j
ZSBFViBSb290IENBMB4XDTA2MTExMDAwMDAwMFoXDTMxMTExMDAwMDAwMFowbDEL
MAkGA1UEBhMCVVMxFTATBgNVBAoTDERpZ2lDZXJ0IEluYzEZMBcGA1UECxMQd3d3
LmRpZ2ljZXJ0LmNvbTErMCkGA1UEAxMiRGlnaUNlcnQgSGlnaCBBc3N1cmFuY2Ug
RVYgUm9vdCBDQTCCASIwDQYJKoZIhvcNAQEBBQADggEPADCCAQoCggEBAMbM5XPm
+9S75S0tMqbf5YE/yc0lSbZxKsPVlDRnogocsF9ppkCxxLeyj9CYpKlBWTrT3JTW
PNt0OKRKzE0lgvdKpVMSOO7zSW1xkX5jtqumX8OkhPhPYlG++MXs2ziS4wblCJEM
xChBVfvLWokVfnHoNb9Ncgk9vjo4UFt3MRuNs8ckRZqnrG0AFFoEt7oT61EKmEFB
Ik5lYYeBQVCmeVyJ3hlKV9Uu5l0cUyx+mM0aBhakaHPQNAQTXKFx01p8VdteZOE3
hzBWBOURtCmAEvF5OYiiAhF8J2a3iLd48soKqDirCmTCv2ZdlYTBoSUeh10aUAsg
EsxBu24LUTi4S8sCAwEAAaNjMGEwDgYDVR0PAQH/BAQDAgGGMA8GA1UdEwEB/wQF
MAMBAf8wHQYDVR0OBBYEFLE+w2kD+L9HAdSYJhoIAu9jZCvDMB8GA1UdIwQYMBaA
FLE+w2kD+L9HAdSYJhoIAu9jZCvDMA0GCSqGSIb3DQEBBQUAA4IBAQAcGgaX3Nec
nzyIZgYIVyHbIUf4KmeqvxgydkAQV8GK83rZEWWONfqe/EW1ntlMMUu4kehDLI6z
eM7b41N5cdblIZQB2lWHmiRk9opmzN6cN82oNLFpmyPInngiK3BD41VHMWEZ71jF
hS9OMPagMRYjyOfiZRYzy78aG6A9+MpeizGLYAiJLQwGXFK3xPkKmNEVX58Svnw2
Yzi9RKR/5CYrCsSXaQ3pjOLAEFe4yHYSkVXySGnYvCoCWw9E1CAx2/S6cCZdkGCe
vEsXCS+0yx5DaMkHJ8HSXPfqIbloEpw8nL+e/IBcm2PN7EeqJSdnoDfzAIJ9VNep
+OkuE6N36B9K
-----END CERTIFICATE-----
quit
Accept the certificate when prompted by typing yes.
INFO: Certificate has the following attributes:
Fingerprint: d474de57 5c39b2d3 9c8583c5 c065498a
Do you accept this certificate? [yes/no]: yes
Trustpoint CA certificate accepted.
% Certificate successfully imported
ciscoasa(config)#
Repeat steps 5-7 to import the DigiCertGlobalRootCA.pem
certificate, using a different trustpoint name than the one you used earlier.
Verify that the DigiCert CA certificates are present.
ciscoasa-9x(config)# show crypto ca trustpoints
Trustpoint ASDM_TrustPoint0:
Configured for self-signed certificate generation.
Trustpoint ASDM_TrustPoint1:
Subject Name:
cn=DigiCert High Assurance EV Root CA
ou=www.digicert.com
o=DigiCert Inc
c=US
Serial Number: 02ac5c266a0b409b8f0b79f2ae462577
Certificate configured.
Trustpoint ASDM_TrustPoint2:
Subject Name:
cn=DigiCert Global Root CA
ou=www.digicert.com
o=DigiCert Inc
c=US
Serial Number: 083be056904246b1a1756ac95991c74a
Certificate configured.
SSH into your ASA again if no longer connected and access the config terminal.
login as: asaadmin
asaadmin@ciscoasa's password:
Type help or '?' for a list of available commands.
ciscoasa> enable
Password: ********
ciscoasa# config
ciscoasa# config terminal
ciscoasa(config)#
Enable scopy if not already permitted.
ciscoasa(config)# ssh scopy enable
Use scopy (scp or pscp) to upload the Duo sign-in page customizations (downloaded from your Cisco SSL VPN application's properties page in the Duo Admin Panel page back in step 3 of "First Steps") to your ASA.
c:\>pscp.exe c:\Duo-Cisco-v5.js asaadmin@ciscoasa:Duo-Cisco.v5.js
asaadmin@ciscoasa's password: ********
Duo-Cisco-v5.js | 71 kB | 35.9 kB/s | ETA: 00:00:00 | 100%
Then import the new web content package.
ciscoasa(config)# import webvpn webcontent /+CSCOU+/Duo-Cisco-v5.js disk0:Duo-Cisco-v5.js
* Web resource `+CSCOU+/Duo-Cisco-v5.js' was successfully initialized
Export a web customization object for modification. The default customization object is named "DfltCustomization".
ciscoasa(config)# export webvpn customization DfltCustomization disk0:/DfltCustomization
%INFO: Customization object 'DfltCustomization' was exported to disk0:/DfltCustomization
Then download the exported customization object from the ASA.
c:\>pscp.exe asaadmin@ciscoasa:disk0:/DfltCustomization DfltCustomization
asaadmin@ciscoasa's password:
DfltCustomization | 9 kB | 9.6 kB/s | ETA: 00:00:00 | 100%
Open the downloaded web customization object in an XML editor. Edit the "title-panel" section of the page to add the path to the Duo-Cisco-v5.js file you just uploaded to the ASA. The edit should be as follows:
<text l10n="yes"><![CDATA[<script src="/+CSCOU+/Duo-Cisco-v5.js"></script>]]></text>
Save the modified DfltCustomization file and upload it back to the ASA.
c:\>pscp.exe DfltCustomization asaadmin@ciscoasa:disk0:/DfltCustomization
asaadmin@ciscoasa's password:
DfltCustomization | 9 kB | 9.6 kB/s | ETA: 00:00:00 | 100%
Then import the modified customization object from the ASA command line.
ciscoasa(config)# import webvpn customization DfltCustomization disk0:/DfltCustomization
%INFO: customization object 'DfltCustomization' was successfully imported
SSH into your ASA again if no longer connected and access the config terminal.
login as: asaadmin
asaadmin@ciscoasa's password:
Type help or '?' for a list of available commands.
ciscoasa> enable
Password: ********
ciscoasa# config
ciscoasa# config terminal
ciscoasa(config)#
Create the LDAP AAA Server Group.
ciscoasa(config-aaa-server-group)# aaa-server Duo-LDAP protocol ldap
Then, add the Duo LDAP server, using your external, internet-facing interface and the following information:
Host |
Your API hostname (i.e. api-XXXXXXXX.duosecurity.com )
|
Server Port | 636 |
Timeout | 60 |
Base DN | dc=INTEGRATION_KEY,dc=duosecurity,dc=com |
Login DN | dc=INTEGRATION_KEY,dc=duosecurity,dc=com |
Login Password | SECRET_KEY |
Naming Attribute(s) | cn |
LDAP over SSL | enable |
ciscoasa(config-aaa-server-group)# aaa-server Duo-LDAP (outside) host api-xxxxxxxx.duosecurity.com
ciscoasa(config-aaa-server-host)# server-port 636
ciscoasa(config-aaa-server-host)# timeout 60
ciscoasa(config-aaa-server-host)# ldap-base-dn dc=DIXXXXXXXXXXXXXXXXXX,dc=duosecurity,dc=com
ciscoasa(config-aaa-server-host)# ldap-login-dn dc=DIXXXXXXXXXXXXXXXXXX,dc=duosecurity,dc=com
ciscoasa(config-aaa-server-host)# ldap-login-password ************
ciscoasa(config-aaa-server-host)# ldap-naming-attribute cn
ciscoasa(config-aaa-server-host)# ldap-over-ssl enable
ciscoasa(config-aaa-server-host)# exit
Edit the SSL VPN Connection Profile so that the Duo-LDAP server is used for secondary authentication. (In the example below the connection profile is called "VPNConnectionProfile").
ciscoasa(config)# tunnel-group VPNConnectionProfile general-attributes
ciscoasa(config-tunnel-general)# secondary-authentication-server-group Duo-LDAP use-primary-username
INFO: This command applies only to SSL VPN - Clientless and AnyConnect.
ciscoasa(config-tunnel-general)# exit
It's a good idea to write your changes to memory when done.
ciscoasa-9x(config)# write mem
Building configuration...
Cryptochecksum: a131c143 0de517bc 23861c2b b1c71cc8
52064 bytes copied in 1.520 secs (52064 bytes/sec)
[OK]
If your users log in with the AnyConnect desktop or mobile clients increase the authentication timeout in the AnyConnect profile. This will give users enough time to approve the Duo authentication request.
Download the AnyConnect Client Profile XM file (normally called "DefaultProfile.xml").
c:\>pscp.exe asaadmin@ciscoasa:disk0:DefaultProfile.xml .\DefaultProfile.xml
asaadmin@ciscoasa's password:
DefaultProfile.xml | 2 kB | 2.0 kB/s | ETA: 00:00:00 | 100%
Edit the downloaded XML file add change the AuthenticationTimeout to 60 seconds. The edit should be as follows:
<AuthenticationTimeout>60</AuthenticationTimeout>
Save the modified AnyConnect XML connection profile file and upload it back to the ASA.
c:\>pscp.exe DefaultProfile.xml asaadmin@ciscoasa:disk0:/DefaultProfile.xml
asaadmin@ciscoasa's password:
DefaultProfile.xml | 2 kB | 2.0 kB/s | ETA: 00:00:00 | 100%