Duo Unix - Two-Factor Authentication for SSH (login_duo)
Last updated:
Action Required: April 15, 2026 Duo CA Bundle Expiration
Duo products that use certificate pinning require a software update for uninterrupted use. Legacy clients could stop working at any time after April 15, 2026.
Check your Duo Unix installations and upgrade them if they are not running version 2.1.0 or later.
Please visit Duo Knowledge Base article 9451 for more information and guidance.
Duo Network Gateway provides SSH access to internal hosts without a VPN or jump host with trusted endpoint detection and session awareness. Learn more.
Overview
Duo can be enabled on any Unix system with the addition of a simple login_duo utility.
We recommend deploying our pam_duo module with Pluggable Authentication Modules (PAM) support instead of login_duo in most scenarios for the most secure and customizable experience, especially if port forwarding and tunneling is used in your environment.
This application communicates with Duo's service on SSL TCP port 443.
Firewall configurations that restrict outbound access to Duo's service with rules using destination IP addresses or IP address ranges aren't recommended, since these may change over time to maintain our service's high availability. If your organization requires IP-based rules, please review Duo Knowledge Base article 1337.
Effective June 30, 2023, Duo no longer supports TLS 1.0 or 1.1 connections or insecure TLS/SSL cipher suites. See Duo Knowledge Base article 7546 for additional guidance.
FIPS Support
Duo Unix is FIPS-compliant as of version 1.10.4 when run on any machine that has an operating system-wide FIPS mode (like CentOS/RedHat 7, Ubuntu 16.04, etc.). No additional flags or options are required.
Duo Factor Support
Duo Unix supports these Duo authentication methods for MFA:
- Duo Push
- Verified Duo Push (as of v2.2.0; verification codes only)
- Duo Mobile Passcodes
- SMS Passcodes
- Hardware Token OTP passcodes (including Yubikey OTP)
- Phone Call
- Bypass Codes
First Steps
Before moving on to the deployment steps, it's a good idea to familiarize yourself with Duo administration concepts and features like options for applications, available methods for enrolling Duo users, and Duo policy settings and how to apply them. See all Duo Administrator documentation.
Then you'll need to:
- Sign up for a Duo account.
- Log in to the Duo Admin Panel and navigate to Applications → Application Catalog.
- Locate the entry for UNIX Application with the "2FA" label in the catalog. Click the Add button to create the application and get your integration key, secret key, and API hostname. You'll need this information to complete your setup. See Protecting Applications for more information about protecting applications with Duo and additional application options.
- If you plan to build Duo Unix from source, download the latest version of the
duo_unixtarball (view checksum). From the command line you can usecurlorwgetto download the file, like$ wget --content-disposition https://dl.duosecurity.com/duo_unix-latest.tar.gz.
The security of your Duo application is tied to the security of your secret key (skey). Secure it as you would any sensitive credential. Don't share it with unauthorized individuals or email it to anyone under any circumstances!
Verified Duo Push for Duo Unix
Available in: Duo Essentials, Duo Advantage, and Duo Premier
Duo Unix version 2.2.0 and later supports Verified Duo Push with a numeric code. Verified Duo Push requires Duo Mobile 4.16.0 or later on Android 8+ or Duo Mobile 4.17.0 or later on iOS 16+, activated for Duo Push.
Applying an Authentication Methods policy enabling Verified Duo Push with a verification code to a Duo Unix application will require users to enter the verification code into the Duo Mobile app when performing a Duo Push to authenticate.
Do not apply a policy to your Duo Unix application enabling either of the following authentication methods:
These methods do not work with Duo Unix and can block your users from authenticating.
To enable Verified Duo Push for Duo Unix:
-
Set
verified_push=yesin your local Duo configurationlogin_duo.conffile (andautopush=noif currently enabled). -
Create a new custom policy or update an existing policy which enables both the Require Verified Duo Push and Require users to enter a verification code options in the Authentication Methods policy settings. Click Save Policy when done.
-
Apply the custom policy to your Duo Unix application. If you made the change in your global policy then the setting applies to all your Duo Unix applications.
The policy setting takes immediate effect — there is no need to reinstall Duo Unix as long as clients have already installed v2.2.0 or later. Systems with older versions of Duo Unix will continue offering the standard Duo Push experience and must upgrade to a supported release to use Verified Duo Push.
With this policy setting applied, users must enter the verification code shown in the Duo Unix text prompt into the Duo Mobile authentication request.
Build and Install from Source
Install login_duo Prerequisites
OpenSSL development headers and libraries are required for login_duo. When compiling on SUSE/SLES, the zlib package is also necessary.
| Dependency | Platform | Installation |
|---|---|---|
| OpenSSL | FreeBSD, NetBSD | Installed by default |
| Debian, Ubuntu | apt-get install libssl-dev |
|
| Red Hat, Fedora, CentOS, Amazon Linux | yum install openssl-devel |
|
| SUSE/SLES | zypper install libopenssl-devel |
|
| Solaris | pkg install openssl |
|
| AIX | 3rd party packages or source build | |
| zlib | SUSE/SLES | zypper install zlib-devel |
You also need a compiler like gcc installed on your system to build Duo Unix.
Install login_duo
Once the required dependencies are built and installed, build and install duo_unix.
-
Extract the downloaded tarball for
duo_unixand change to the extracted directory (note your actual extracted directory name reflects the actual version downloaded; the example syntax below references version 2.2.3). View checksums for Duo downloads here.$ tar zxf duo_unix-latest.tar.gz $ cd duo_unix-2.2.3 -
Build and install
duo_unix.$ ./configure --prefix=/usr && make && sudo make installFor advanced build options, see the
READMEfile in the source tarball. -
Once installed, proceed to Duo configuration.
Install from Linux Packages
To more easily install and maintain Duo Unix deployments, we've built Linux packages for some popular Linux distributions. Duo tests these packages against the specific listed versions of their respective distributions.
Please test all packages thoroughly prior to deploying them into your environment to ensure a great experience. Note that we exclusively provide Duo Unix install packages at pkg.duosecurity.com and cannot guarantee packages obtained from other sources.
When installing Duo Unix from packages, there is no need to also install the build-from-source prerequisites on the target systems.
To download the packages, you'll need Duo's GPG key. The GPG key verifies the Duo Unix package for currently supported OS distributions and versions.
We updated the Duo GPG key for packages on supported distros on May 18, 2020. If you installed Duo Unix from packages before May 2020, be sure to update your previously imported GPG key using command for your distro the before the next time you install or upgrade Duo Unix.
The current Duo GPG key expires in May 2030.
OS distributions identified as no longer supported in the distro-specific packages sections use a previous GPG key. We won't replace or update the GPG key on these EOL versions when it expires, and urge you to update to a supported OS.
CentOS Stream
Tested against 9 and 10 64-bit
IMPORTANT:
- CentOS Stream 8 reached end of life on May 31, 2024. Duo Unix 2.0.3 was the last release with CentOS Stream 8 package support.
Create /etc/yum.repos.d/duosecurity.repo with the following contents:
[duosecurity]
name=Duo Security Repository
baseurl=https://pkg.duosecurity.com/CentOSStream/$releasever/$basearch
enabled=1
gpgcheck=1
Execute the following shell commands for CentOS Stream 8 and later:
# rpm --import https://duo.com/DUO-GPG-PUBLIC-KEY.asc
# yum install duo_unix
CentOS Linux
Consider migrating to CentOS Stream.
IMPORTANT:
-
CentOS 5 reached end of life on March 31, 2017. Duo Unix 1.10.5 was the last release with CentOS 5 package support.
-
CentOS 6 reached end of life on November 30, 2020. Duo Unix 1.11.4 was the last release with CentOS 6 package support.
-
CentOS 7 reached end of life on June 30, 2024. Duo Unix 2.0.3 was the last release with CentOS 7 package support.
-
CentOS 8 reached end of life on December 31, 2021. Duo Unix 1.12.0 was the last release with CentOS 8 package support.
Please review the Duo End of Sale, Last Date of Support, and End of Life Policy.
Create /etc/yum.repos.d/duosecurity.repo with the following contents:
[duosecurity]
name=Duo Security Repository
baseurl=https://pkg.duosecurity.com/CentOS/$releasever/$basearch
enabled=1
gpgcheck=1
Execute the following shell commands for CentOS 7 and later:
# rpm --import https://duo.com/DUO-GPG-PUBLIC-KEY.asc
# yum install duo_unix
Fedora
Tested against Fedora 41, 42, and 43 64-bit
IMPORTANT:
-
Fedora 34 reached end of life on June 7, 2022. Duo Unix 2.0.2 was the last release with Fedora 34 package support.
-
Fedora 37 reached end of life on November 14, 2023. Duo Unix 2.0.2 was the last release with Fedora 37 package support.
-
Fedora 38 reached end of life on May 31, 2024. Duo Unix 2.0.3 was the last release with Fedora 38 package support.
-
Fedora 39 reached end of life on November 26, 2024. Duo Unix 2.1.0 was the last release with Fedora 39 package support.
-
Fedora 40 reached end of life on May 13, 2025. Duo Unix 2.1.0 was the last release with Fedora 40 package support.
Please review the Duo End of Sale, Last Date of Support, and End of Life Policy.
Create /etc/yum.repos.d/duosecurity.repo with the following contents:
[duosecurity]
name=Duo Security Repository
baseurl=https://pkg.duosecurity.com/Fedora/$releasever/$basearch
enabled=1
gpgcheck=1
Execute the following shell commands for Fedora 34 and later:
# rpm --import https://duo.com/DUO-GPG-PUBLIC-KEY.asc
# yum install duo_unix
Ubuntu
Tested against 24.04 noble 64-bit and 22.04 jammy 64-bit
IMPORTANT:
-
Ubuntu 12.04 reached end of life in April 2017. Duo Unix 1.11.3 was the last release with Ubuntu 12.04 package support.
-
Ubuntu 14.04 reached end of life in April 2019. Duo Unix 1.12.0 was the last release with Ubuntu 14.04 package support.
-
Ubuntu 16.04 reached end of life in April 2021. Duo Unix 1.12.0 was the last release with Ubuntu 16.04 package support.
-
Ubuntu 18.04 reached end of life in May 2023. Duo Unix 2.0.1 was the last release with Ubuntu 18.04 package support.
-
Ubuntu 20.04 reached end of life in May 2025. Duo Unix 2.1.0 was the last release with Ubuntu 20.04 package support.
Please review the Duo End of Sale, Last Date of Support, and End of Life Policy.
Create /etc/apt/sources.list.d/duosecurity.list with the following contents:
For 22.04 jammy:
deb [arch=amd64] https://pkg.duosecurity.com/Ubuntu jammy mainor
For 24.04 noble:
deb [arch=amd64] https://pkg.duosecurity.com/Ubuntu noble mainExecute the following shell commands for Ubuntu 18.04 and 20.04:
# curl -s https://duo.com/DUO-GPG-PUBLIC-KEY.asc | sudo apt-key add -
# apt-get update && apt-get install duo-unix
Execute the following shell commands for Ubuntu 22.04 and later:
# curl -s https://duo.com/DUO-GPG-PUBLIC-KEY.asc | sudo gpg --dearmor -o  /etc/apt/trusted.gpg.d/duo.gpg
# apt-get update && apt-get install duo-unix
Upgrading from 20.04 to 22.04 with do-release-upgrade requires use of the --allow-third-party flag. Without this flag do-release-upgrade disables third-party libraries, including those used by Duo Unix. This could prevent logins after upgrading.
Please see the Duo Knowledge Base article How do I upgrade Ubuntu from version 20.04 to 22.04 with Duo Unix installed? for more information, including recovery steps if you have already performed the upgrade without allowing third-party libraries.
Red Hat Enterprise Linux
Tested against 10.0 64-bit and 8.0 64-bit.
IMPORTANT:
-
Red Hat 5 reached full end of life on November 30, 2020. Duo Unix 1.10.5 was the last release with Red Hat 5 package support.
-
Red Hat 6 reached the end of maintenance support on November 30, 2020. Duo Unix 1.11.4 was the last release with Red Hat 6 package support.
-
Red Hat 7 reached the end of maintenance support on June 30, 2024. Duo Unix 2.0.3 was the last regular release with Red Hat 7 package support.
February 4, 2026: One-off 2.2.3 package release for RHEL 7 to upgrade impacted systems before the March 31, 2026 Duo CA bundle expiration hard cutoff. This does not reinstate ongoing package support for RHEL 7 in future versions.
Please review the Duo End of Sale, Last Date of Support, and End of Life Policy.
Create /etc/yum.repos.d/duosecurity.repo with the following contents:
[duosecurity]
name=Duo Security Repository
baseurl=https://pkg.duosecurity.com/RedHat/$releasever/$basearch
enabled=1
gpgcheck=1
Execute the following shell commands for Red Hat 6 and later:
# rpm --import https://duo.com/DUO-GPG-PUBLIC-KEY.asc
# yum install duo_unix
Debian
Tested against 13.0 64-bit, 12.0 32/64-bit, and 11.0 32/64-bit.
IMPORTANT:
-
Debian 6 reached end of life on May 31, 2015. Duo Unix 1.9.18 was the last release with Debian 6 package support.
-
Debian 7 reached end of life on April 26, 2016. Duo Unix 1.11.1 was the last release with Debian 7 package support.
-
Debian 8 reached end of life on June 30, 2020. Duo Unix 1.11.4 was the last release with Debian 8 package support.
-
Debian 9 reached end of life on June 30, 2022. Duo Unix 2.0.1 was the last release with Debian 9 package support.
-
Debian 10 reached end of life on June 30, 2024. Duo Unix 2.0.3 was the last release with Debian 10 package support.
Please review the Duo End of Sale, Last Date of Support, and End of Life Policy.
Create /etc/apt/sources.list.d/duosecurity.list with the following contents:
deb https://pkg.duosecurity.com/Debian stretch mainor
deb https://pkg.duosecurity.com/Debian buster mainor
deb https://pkg.duosecurity.com/Debian bullseye mainor
deb https://pkg.duosecurity.com/Debian bookworm mainExecute the following shell commands for Debian 9 and later:
# curl -s https://duo.com/DUO-GPG-PUBLIC-KEY.asc | sudo apt-key add -
# apt-get update && apt-get install duo-unix
Amazon Linux
Tested against Amazon Linux 2023.
Create /etc/yum.repos.d/duosecurity.repo with the following contents:
[duosecurity]
name=Duo Security Repository
baseurl=https://pkg.duosecurity.com/AmazonLinux/$releasever/$basearch
enabled=1
gpgcheck=1
Execute the following shell commands for Amazon Linux:
# rpm --import https://duo.com/DUO-GPG-PUBLIC-KEY.asc
# yum install duo_unix
Once the Duo Unix package is installed, proceed to Duo configuration.
Duo Configuration
The login_duo.conf configuration file uses the INI format.
Once duo_unix is installed, edit login_duo.conf
(in /etc/duo or /etc/security) to add the integration key, secret key, and API hostname from your Duo Unix application.
You may also add optional Duo configuration options to login_duo.conf. See the table below for all available settings.
[duo]
; Duo integration key
ikey = INTEGRATION_KEY
; Duo secret key
skey = SECRET_KEY
; Duo API hostname
host = API_HOSTNAME
Duo Configuration Options
| Key | Required? | Description | ||||||||
|---|---|---|---|---|---|---|---|---|---|---|
ikey
|
Required | Your integration key | ||||||||
skey
|
Required | Your secret key | ||||||||
host
|
Required |
Your API hostname i.e. api-XXXXXXXX.duosecurity.com
|
||||||||
groups
|
Optional |
If specified, Duo authentication is required only for users whose primary group or supplementary group list matches one of the space-separated pattern lists. A pattern consists of zero or more non-whitespace characters, " A pattern-list is a comma-separated list of patterns. Patterns within pattern-lists may be negated by preceding them with an exclamation mark ("
Important: Negation is a filter, not a rule on its own. A pattern-list made up entirely of negated patterns (for example, |
||||||||
failmode
|
Optional |
On service or configuration errors that prevent Duo authentication, fail "safe" (allow access) or "secure" (deny access). The default is "safe". |
||||||||
pushinfo
|
Optional |
Include information such as the command to be executed in the Duo Push message. Either "yes" or "no". The default is "no". |
||||||||
http_proxy
|
Optional |
Use the specified HTTP proxy, same format as the |
||||||||
autopush
|
Optional |
Either "yes" or "no". Default is "no". If "no", the user will be prompted to choose an authentication method. If "yes", Duo Unix will automatically send a push login request to the user's phone, falling back to a phone call if push is unavailable. Note that this effectively disables SMS, hardware token, or Duo Mobile passcode authentication as there is no opportunity for the user to enter a passcode. If you enable autopush and a user has not enrolled a device capable of automatic push or phone call, or if the effective policy prevents use of Duo Push or phone call authentication, the login attempt will fail with an error. When configured with Mutually exclusive with |
||||||||
verified_push
|
Optional |
Either "yes" or "no". Default is "no". If "no", a Duo Push request will not prompt the user to enter a verification code from the Duo Unix prompt. If "yes", the Duo Unix prompt will include a verification code the user must enter into a Duo Push request to complete login approval if the effective authentication methods policy requires Verified Duo Push with a static code. See Verified Duo Push for Duo Unix above for more information. Mutually exclusive with |
||||||||
motd
|
Optional |
Print the contents of This option is only available for |
||||||||
prompts
|
Optional |
If a user fails to authenticate with a second factor, Duo Unix will prompt the user to authenticate again. This option sets the maximum number of prompts that Duo Unix will display before denying access. Must be 1, 2, or 3. Default is 3. For example, when When configured with |
||||||||
accept_env_factor
|
Optional |
Look for factor selection or passcode in the The SSH client will need Example:
You can also add a number to the end of these factor names if you have more than one device registered. For example, push2 will send a login request to your second phone, phone3 will call your third phone, etc. Default is This option is only available for |
||||||||
fallback_local_ip
|
Optional |
Duo Unix reports the IP address of the authorizing user, for the purposes of authorization and network allow/deny. If Duo Unix cannot detect the IP address of the client, setting If you are using Authorized Networks, enabling this option could cause unauthorized logins if the local IP is listed in the allow list. |
||||||||
https_timeout
|
Optional |
Set to the number of seconds to wait for HTTPS responses from Duo Security. If Duo Security takes longer than the configured number of seconds to respond to the preauth API call, the configured failmode is triggered. Other network operations such as DNS resolution, TCP connection establishment, and the SSL handshake have their own independent timeout and retry logic. Default is 0, which disables the HTTPS timeout. |
||||||||
send_gecos
|
Optional |
Sends the entire GECOS field as the Duo username. Default is If you specify Warning: The GECOS field is not a trusted attribute. On most systems |
||||||||
gecos_username_pos
|
Optional |
Specify this option to select what position from the GECOS field will be used as the username. Positions are separated by whatever you specify in For example, if the
Then setting If not configured, the GECOS field is not parsed for the username. Overrides Warning: The GECOS field is not a trusted attribute. On most systems |
||||||||
gecos_delim
|
Optional |
Specify this option to change the default value of the GECOS delimiter from a comma to another character. The new delimiter specified must be exactly one character, and must a valid punctuation character other than a colon ( For example, if the
Then setting If not configured, the default comma ( |
Example configuration file with additional options:
[duo]
ikey=DIXXXXXXXXXXXXXXXXXX
skey=X1hXztPX1rb1X71x1wXkpnmXXvqXXXqqj1XoXbbXu
host=api-xxxxxxxx.duosecurity.com
pushinfo=yes
autopush=yes
For more information, see the man page for login_duo.
Test Your Setup
Verify that Duo Unix works properly, and then enable it for logins.
Test login_duo
As a regular user, test login_duo manually by running
$ /usr/sbin/login_duoOn some systems, you may instead have to run /usr/local/sbin/login_duo.
If everything is set up correctly, and your username doesn't already exist in Duo, you'll be given an enrollment link:
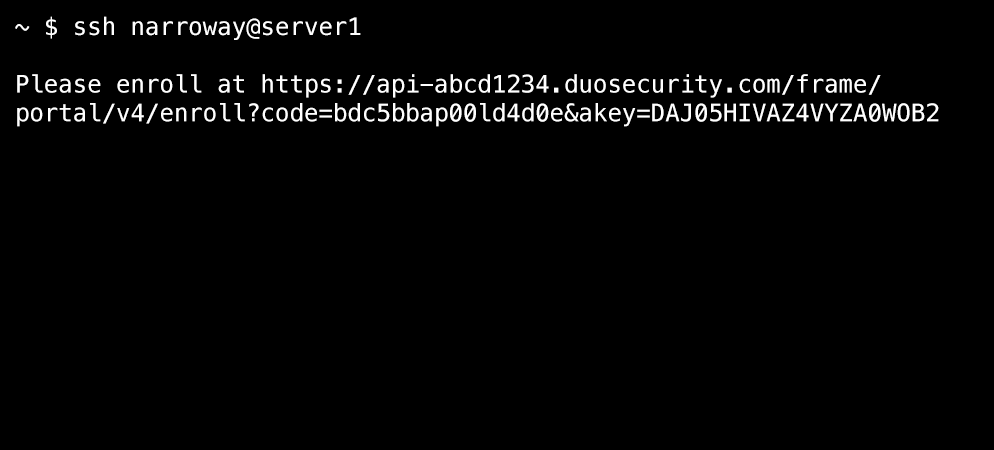
Copy the enrollment link and paste it into a web browser to complete Duo's enrollment process.
After enrolling your authentication device with Duo (or if your test user was already enrolled in Duo), try login_duo again, this time adding a command to run after authentication is complete:
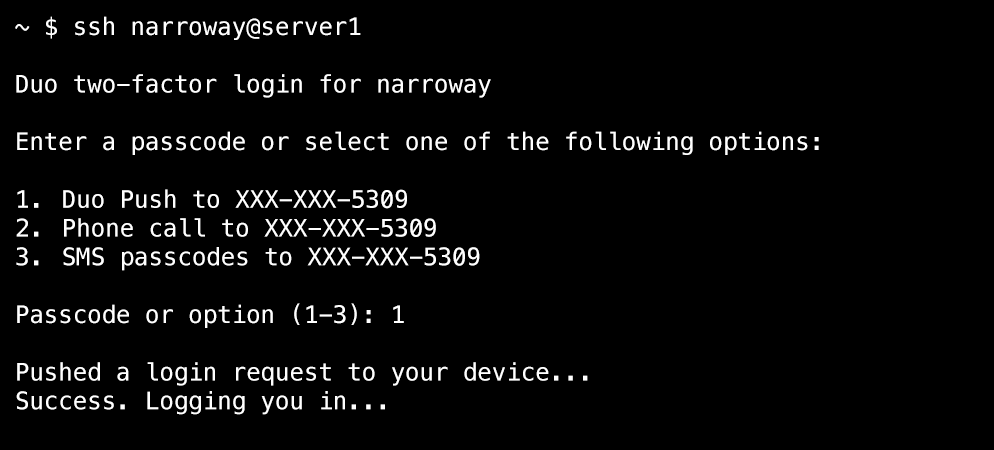
$ /usr/sbin/login_duo echo 'YOU ROCK!'You'll receive the prompt for additional verification. Choose your authentication method and approve the request using your phone or other device.
In this example, Duo Push was selected and the effective authentication methods policy did not require Verified Duo Push. Login access was granted after approving the Duo Push request from the selected device.
In the following example, Duo Push was selected and the effective authentication methods policy required Verified Duo Push with a verification code. Login access was granted after entering the verification code shown into Duo Mobile on the selected device in response to the Duo Push request.
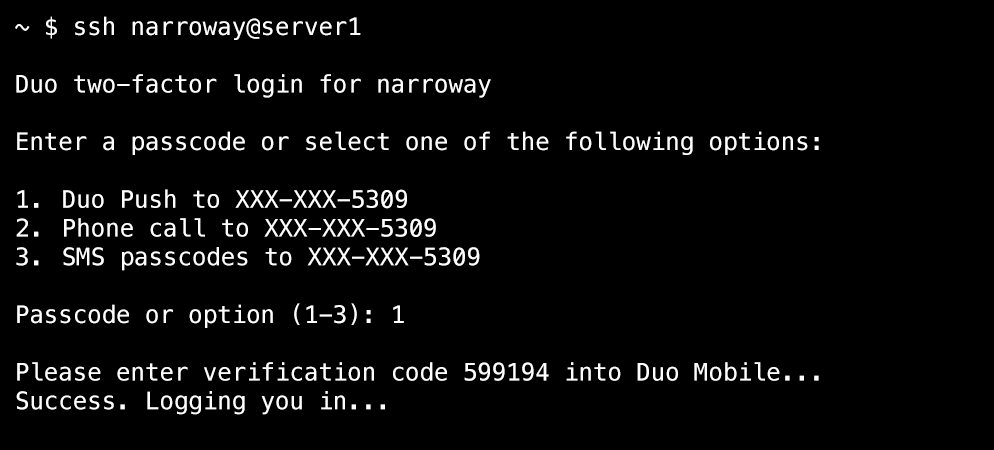
Learn more about completing Verified Duo Push authentication on Android or iOS/iPadOS.
If you are having trouble with these steps, or if you aren't getting a Duo login prompt, try running login_duo with the -d flag to enable debug output.
Enable login_duo
To protect remote access via SSH, use login_duo.
To enable two-factor authentication for any SSH login method (password, pubkey, etc.) for any user, edit your sshd_config (usually
in /etc or /etc/ssh) to add the following line:
ForceCommand /usr/sbin/login_duoThis ForceCommand directive instructs sshd to run login_duo (to perform two-factor authentication) before any other requested commands. However, according to the sshd documentation: "The command is invoked by using the user's login shell with the -c option." This means that shell rc files (e.g. .bashrc, .cshrc, etc.) execute before login_duo; if users can edit these files, they may be able to disable Duo authentication for their own accounts. Keep in mind that ForceCommand also disables command=. Mitigate these issues by deploying pam_duo instead of login_duo.
We strongly recommend that you disable PermitTunnel and AllowTcpForwarding in your sshd_config when using login_duo to protect SSH logins. Since OpenSSH sets up port forwarding and tunneling before Duo's two-factor challenge, an attacker may be able to access internal services via port forwarding before completing secondary authentication. Adding the following lines to your sshd_config will prevent this scenario:
PermitTunnel no
AllowTcpForwarding no
You can also optionally limit two-factor authentication to a subset of users whose primary or supplementary group is specified in
login_duo.conf. For example:
group = wheelIf you'd like to enable Duo only for specific accounts using SSH pubkeys, use the command option in those users' authorized_keys instead. For example, to verify each admin authorized to log into a shared root account, your ~/.ssh/authorized_keys might look something like this:
command="/usr/sbin/login_duo -f user1" ssh-dss FRP...FD== user1@company
command="/usr/sbin/login_duo -f user2" ssh-dss YUX...IO== user2@company
Now restart the SSH service.
This also works for user-local installations (e.g. in $HOME/bin) without root access — just specify the location of login_duo.conf with the -c flag.
Troubleshooting
Need some help? Take a look at the Duo UNIX Frequently Asked Questions (FAQ) page or try searching our Duo UNIX Knowledge Base articles or Community discussions. For further assistance, contact Support.
If you open a support case with Duo, be sure to use the Duo Unix Support Tool to create a tarball you can send to the support engineer to aid with troubleshooting.
Network Diagram
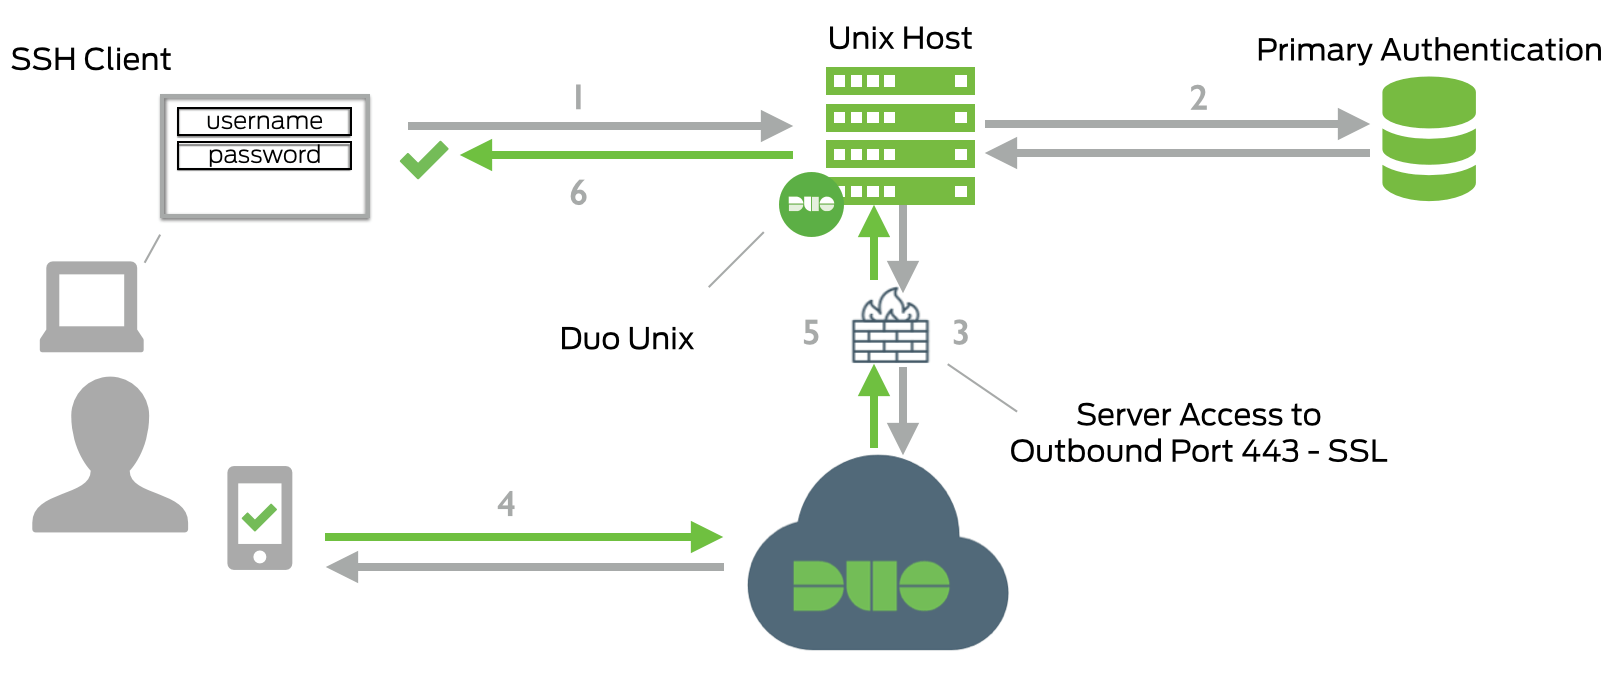
- SSH connection initiated
- Primary authentication
- Duo Unix connection established to Duo Security over TCP port 443
- Secondary authentication via Duo Security’s service
- Duo Unix receives authentication response
- SSH session logged in