Skip navigation
Documentation

Duo Two-Factor Authentication with LDAPS for Pulse Connect Secure Access SSL VPN

Last Updated: February 1st, 2024

Direct LDAP connectivity to Duo for Pulse Connect Secure SSL VPN will reach end of support on March 30, 2024. Customers may not create new Juniper SSL VPN (used with Pulse VPN) applications after September 2023.

We recommend you deploy Duo Single Sign-On for Ivanti Connect Secure to protect Pulse Connect Secure SSL VPN with Duo Single Sign-On, our cloud-hosted identity provider featuring Duo Central and the Duo Universal Prompt.

Another alternative to direct LDAPS connections is adding Duo authentication to Pulse Connect Secure SSL VPN using RADIUS and the Duo Authentication Proxy, for example, RADIUS with Automatic Push for Pulse Connect Secure SSL VPN. See the "Related" links to the left to explore more RADIUS configurations.

Please visit the article Guide to end of support for the Duo LDAP cloud service (LDAPS) used to provide 2FA for Cisco ASA, Juniper Networks Secure Access, and Pulse Secure Connect Secure SSL VPN for further details, and review the Duo End of Sale, Last Date of Support, and End of Life Policy.

These instructions remain available for reconfiguring your existing application. Duo Support will no longer provide troubleshooting assistance for LDAPS configurations after March 30, 2024.

Overview

This Pulse Connect Secure SSL VPN configuration supports inline self-service enrollment and the Duo Prompt for web-based VPN logins, and push, phone call, or passcode authentication for Pulse desktop and mobile client connections that use SSL encryption.

Your device makes a direct connection to Duo's cloud service using LDAPS. LDAPS authentications do not report a client IP address when the Pulse VPN client is used. There is no configurable fail mode for LDAPS connections, so if your device cannot contact Duo's service your users won't be able to log in with Duo.

This integration expressly supports Juniper/Pulse SSL VPN and is not guaranteed to work with any other VPN solution (including Ivanti-branded Pulse system software).

The Pulse/Ivanti Connect Secure RADIUS configuration does not feature the interactive Duo Prompt for web-based logins, but that configuration does capture client IP information for use with Duo policies, such as geolocation and authorized networks, and offers configurable fail mode. This also supports integrating Duo into a single Pulse sign-in URL with multiple authentication realms.

If you are still running Juniper v8.2 or lower firmware, please see the Juniper SSL VPN instructions.

Connectivity Requirements

This application communicates with Duo's service on SSL TCP port 636.

Firewall configurations that restrict outbound access to Duo's service with rules using destination IP addresses or IP address ranges aren't recommended, since these may change over time to maintain our service's high availability. If your organization requires IP-based rules, please review Duo Knowledge Base article 1337.

Effective June 30, 2023, Duo no longer supports TLS 1.0 or 1.1 connections or insecure TLS/SSL cipher suites. See Duo Knowledge Base article 7546 for additional guidance.

First Steps

Before moving on to the deployment steps, it's a good idea to familiarize yourself with Duo administration concepts and features like options for applications, available methods for enrolling Duo users, and Duo policy settings and how to apply them. See all Duo Administrator documentation.

Make sure that Duo is compatible with your Pulse Secure Access SSL VPN. Log on to your Pulse administrator interface and verify that your firmware is version 8.3, 9.0, or later.

You should also have a working primary authentication configuration for your SSL VPN users, e.g. LDAP authentication to Active Directory.

Then you'll need to:

  1. Sign up for a Duo account.
  2. Log in to the Duo Admin Panel and navigate to Applications.
  3. Find your existing Juniper SSL VPN application and click to view the application details. Note that as of September 7, 2023, you cannot create new applications of this type.
  4. Download the Duo Juniper 8.x package zip file for your device's firmware version from the Duo Admin Panel (even for Pulse v9.x devices). This file is customized for your account and has your Duo account ID appended to the file name (after the version). You will need to upload this to your Pulse SSL VPN.
  5. Download the DigiCert SHA2 High Assurance Server CA and DigiCert TLS RSA SHA256 2020 CA1 certificates from the DigiCert site for installation on your device.

Treat your secret key like a password

The security of your Duo application is tied to the security of your secret key (skey). Secure it as you would any sensitive credential. Don't share it with unauthorized individuals or email it to anyone under any circumstances!

Modify the Sign-In Page

  1. Log on to your Pulse Connect Secure SSL VPN administrator web interface.

  2. Navigate to Authentication → Signing In → Sign-in Pages, click Upload Custom Pages..., and fill in the form:

    Field Value
    Name Duo
    Page type Access
    Templates file Upload the Duo Juniper package zip file downloaded from the Duo Admin Panel earlier. Your file name will differ from the example image below, reflecting the actual version of the Duo Juniper/Pulse package and your organization's Duo Account ID (visible on the Settings tab of the Duo Admin Panel) as the accountid i.e. Duo-Juniper-8.x-v5-1234-5678-90.zip.You must use the Duo package customized for your account. Uploading the Duo package for the wrong account can cause authentication failures.
  3. Do not select the "Use Custom Page for Pulse Desktop Client Logon" or "Prompt the secondary credentials on the second page" options, if present.

  4. Check the Skip validation checks during upload box. If you don't you'll see some warnings after uploading the file, which you can ignore.

    Upload Custom Pages
  5. Click Upload Custom Pages. You may ignore any warnings.

Install CA Certificates

Install the DigiCert CA Certificates

Duo's cloud service currently secures SSL traffic with certificates issued by DigiCert. You'll need to install the DigiCert CA certificates on your SSL VPN so that it can establish the secure LDAP connection to Duo using certificate validation.

To install the DigiCert intermediate CA certificates used by Duo's service:

  1. If you did not already do so, download the DigiCert SHA2 High Assurance Server CA and DigiCert TLS RSA SHA256 2020 CA1 certificates from the DigiCert site for installation on your SSL VPN device.

  2. Navigate to SystemConfigurationCertificatesTrusted Server CAs in the Pulse Secure SSL VPN administrative interface.

  3. Click Import Trusted Server CA... then click the Browse button on the "Import Trusted Server CA" page.

  4. Select the DigiCert SHA2 High Assurance Server CA file you downloaded from DigiCert (DigiCertSHA2HighAssuranceServerCA.crt) and click Import Certificate.

    DigiCert CA UploadDigiCert CA Upload
  5. After successful import of the DigiCert CA certificate, click Done.

    DigiCert CA Upload Success
  6. Repeat steps 3 through 5 for the DigiCert TLS RSA SHA256 2020 CA1 (DigiCertTLSRSASHA2562020CA1-1.crt) certificate.

With all necessary CA certificates uploaded to your device, proceed to adding the Duo LDAP server.

Add the Duo LDAP Server

  1. Navigate to AuthenticationAuth. Servers.

    Select LDAP Server from the Auth Server Type list, click New Server, and fill out the form:

    Field Value
    Name Duo-LDAP
    LDAP Server Your API hostname (i.e. api-XXXXXXXX.duosecurity.com)
    LDAP Port 636
    LDAP Server Type Generic
    Connection LDAPS
    Validate Server Certificate Check this box
    New LDAP Server Configuration
  2. In the "Authentication required?" section, check the Authentication required to search LDAP box and fill in the form (replacing INTEGRATION_KEY and SECRET_KEY with your application-specific keys).

    Field Value
    Admin DN dc=INTEGRATION_KEY,dc=duosecurity,dc=com
    Password SECRET_KEY
  3. In the "Finding user entries" section:

    Field Value
    Base DN dc=INTEGRATION_KEY,dc=duosecurity,dc=com
    Filter cn=<USER>
    Authentication User Entries
  4. Click Save Changes. (After you click Save you might receive a message indicating that the LDAP server is unreachable. You can disregard this message.)

Configure a User Realm

To configure a user realm for the Duo LDAP server, you can do one or more of the following:

  • Create a new realm for testing
  • Create a realm to gradually migrate users to the new system (for instance, by duplicating an existing realm)
  • Use the default Users realm

If you create a new realm as part of deploying Duo, be sure to create role mapping rules to add users to the new realm.

To add 2FA to a user realm:

  1. Navigate to Users → User Realms and click the link for the user realm to which you want to add secondary authentication (in our example we're using a realm named "Duo-Users").

  2. While on the user realm's "General" tab, expand the "Additional Authentication Server" section, select the Enable additional authentication server check box, and fill out the form:

    Field Value
    Authentication #2 Duo-LDAP
    Username is predefined as <USERNAME>
    Password is specified by user on sign-in page
  3. Check the End session if authentication against this server fails box.

    User Realm Config
  4. Click Save Changes.

  5. Click the Authentication Policy tab at the top of the page and then click Password.

  6. In the "Options for additional authentication server" section, select Allow all users.

    Password Limit
  7. Click Save Changes.

Configure the Sign-In Policy for Secondary Authentication

To finish setting up your integration, configure a sign-in policy for secondary authentication. In this example we'll use the default */ URL policy, but you can set up a new sign-in policy at a custom URL (like */Duo-testing/) for testing.

  1. Navigate to Authentication → Signing In → Sign-in Policies tab.

  2. Click the link for the sign-in policy that you want to modify.

  3. Select the Duo from the Sign-in page list.

    Authentication Realm Config
  4. In the "Authentication realm" section, choose User picks from a list of authentication realms....

  5. Choose the user realm you configured earlier, and click Add to move it to the Selected realms box on the right. Make sure this is the only selected realm for this sign-in page.

    Authentication Realm Config
  6. Click Save Changes.

Test Your Setup

To test your Pulse Connect Secure two-factor authentication setup, go to the URL that you defined for your sign-in policy. After you complete primary authentication, the Duo enrollment/login prompt appears.

Pulse Connect SSL VPN Authentication Prompt

If you're using the Pulse VPN client, you’ll see a "Secondary Password" field when using the Pulse Connect client.

Pulse Client Secondary Authentication Prompt

Enter a Duo factor option as the second password. Choose from:

push Perform Duo Push authentication
You can use Duo Push if you've installed and activated Duo Mobile on your device.
phone Perform phone callback authentication.
sms Send a new batch of SMS passcodes.
Your authentication attempt will be denied. You can then authenticate with one of the newly-delivered passcodes.
A numeric passcode Log in using a passcode, either generated with Duo Mobile, sent via SMS, generated by your hardware token, or provided by an administrator. Examples: "123456" or "2345678"

Configure Allowed Hostnames

If you plan to permit use of WebAuthn authentication methods (security keys, U2F tokens, or Touch ID) in the traditional Duo Prompt, Duo recommends configuring allowed hostnames for this application and any others that show the inline Duo Prompt before onboarding your end-users.

The Duo Universal Prompt has built-in protection from unauthorized domains so this setting does not apply.

Troubleshooting

Need some help? Take a look at the Pulse Connect Secure Frequently Asked Questions (FAQ) page or try searching our Pulse Connect Secure Knowledge Base articles or Community discussions. For further assistance, contact Support.

Network Diagram
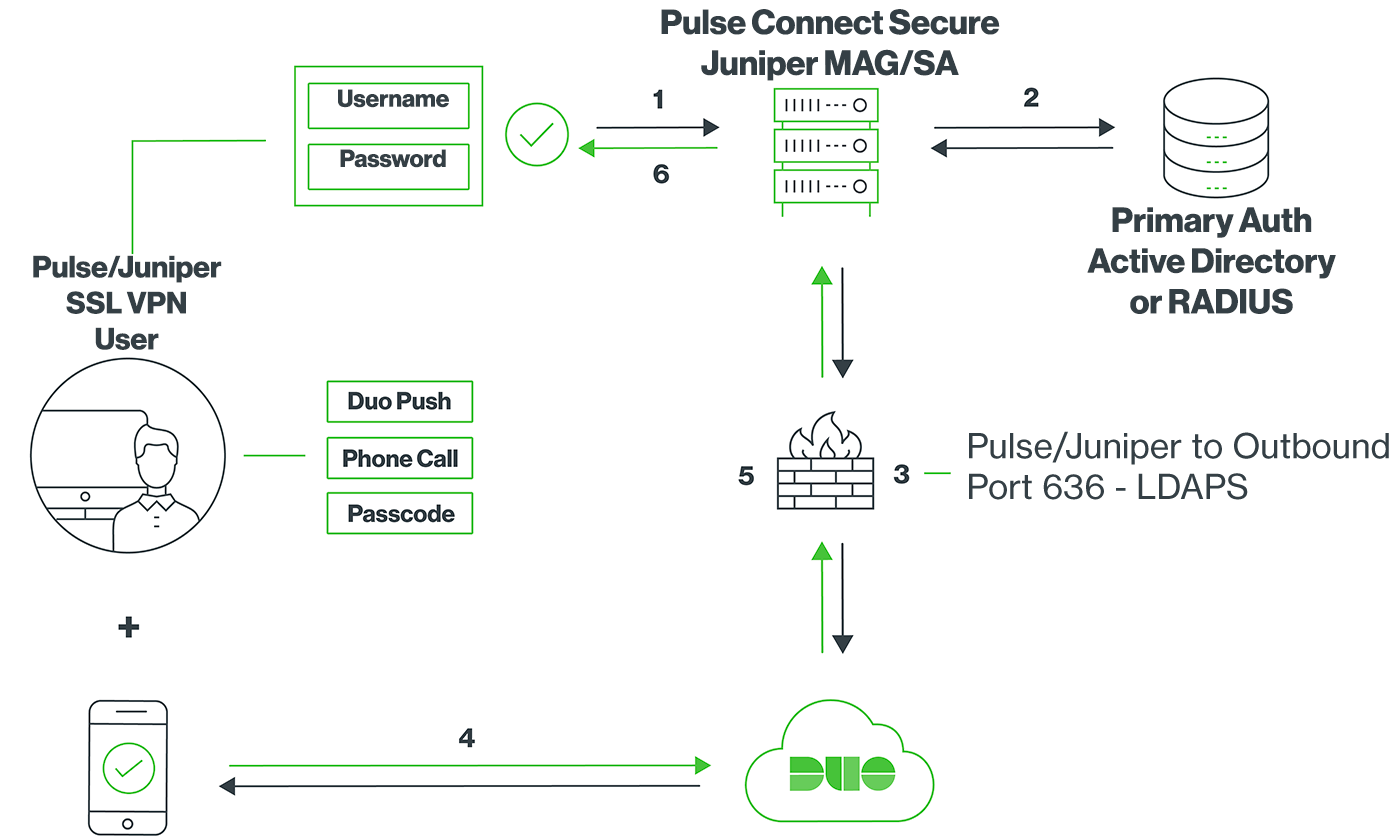
Duo and Pulse Connect Secure Authentication Network Diagram
  1. SSL VPN connection initiated
  2. Primary authentication
  3. Pulse Connect Secure connection established to Duo Security over TCP port 636
  4. User completes Duo two-factor authentication via the interactive web prompt served from Duo's service or text response to PCS and their selected authentication factor.
  5. Pulse Connect Secure receives authentication response
  6. SSL VPN connection established