Duo Desktop
Last updated:
Overview
Duo Desktop, formerly known as Duo Device Health, gives organizations more control over which laptop and desktop devices can access corporate applications based on the security posture of the device or presence of Duo Desktop installed on the endpoint.
There are three key components:
-
Duo access policies that enforce application access based on device health.
-
A native client application for supported Linux, macOS, and Windows clients that checks the security posture of the device when a user authenticates to an application protected by Duo's browser-based prompt with an applied Duo Desktop policy.
-
Additional endpoint information provided in the Duo Admin Panel.
The first time users log in to an application protected by the web-based Duo Universal Prompt or traditional Duo Prompt with the Duo Desktop policy set to require the app, Duo prompts them to download and install Duo Desktop. After installing Duo Desktop, Duo blocks access to applications through the Duo browser-based authentication prompt (when displayed in a browser or in a supported thick client's embedded browser) if the device is unhealthy based on the Duo policy definition and informs the user of the reason for denying the authentication.
When a user's device doesn't meet the security requirements of the Duo Desktop policy, Duo Desktop provides the user with steps they can take to remediate their security posture to align with the Duo Desktop policy on the application.
Note: While Duo Desktop transmits collected information securely, this information is not uniquely identified. This means that a bad actor could intercept the Duo authentication prompt and create their own response to Duo's request for device health information and send that response up to Duo servers. Every authentication is uniquely identified, so a user cannot reasonably impersonate another user’s device information. You can limit this risk by enabling device registration.
Requirements
Ensure you have the following:
- A Duo Essentials, Duo Advantage or Duo Premier plan subscription.
- Access to the Duo Admin Panel as an administrator with the Owner, Administrator, or Application Manager administrative roles.
- Linux, macOS, or Windows user endpoints with direct access or HTTP relay proxy connection to Duo Security's service on port 443. Proxy connections that perform HTTPS inspection or filtering from endpoints are not supported.
- Access devices should support Trusted Platform Module (TPM) 2.0 (Windows and Linux) or Secure Enclave (Mac) if you will require device registration.
Supported endpoint operating systems include:
- Linux distributions which support Debian or Red Hat packages
- macOS 11 and later
- macOS virtual machines
- Windows 10 build 1803 and later
- Windows 11
- Windows Server 2016 and later
- Windows virtual machines
See Supported Operating Systems for detailed version and distribution information.
Duo Desktop does not support earlier versions of Windows desktop or Server (like Windows 7, Windows 8.1, or Windows Server 2012) or macOS beta versions.
Understanding the Duo Desktop & Device Health Policy Options
The Duo Desktop & device health policy can apply to Linux endpoints, macOS endpoints, Windows endpoints, or Chrome OS endpoints — in distinct policies or all platforms in a single policy.
Some device health check options do not require Duo Desktop installed on the device. The check instead uses information reported by an external device data source, such as Chrome Enterprise browser. Any device health check options which require health information provided by Duo Desktop are noted. Duo Desktop is not available for Chrome OS. Device health checks for Chrome OS require the Chrome Enterprise browser data source.
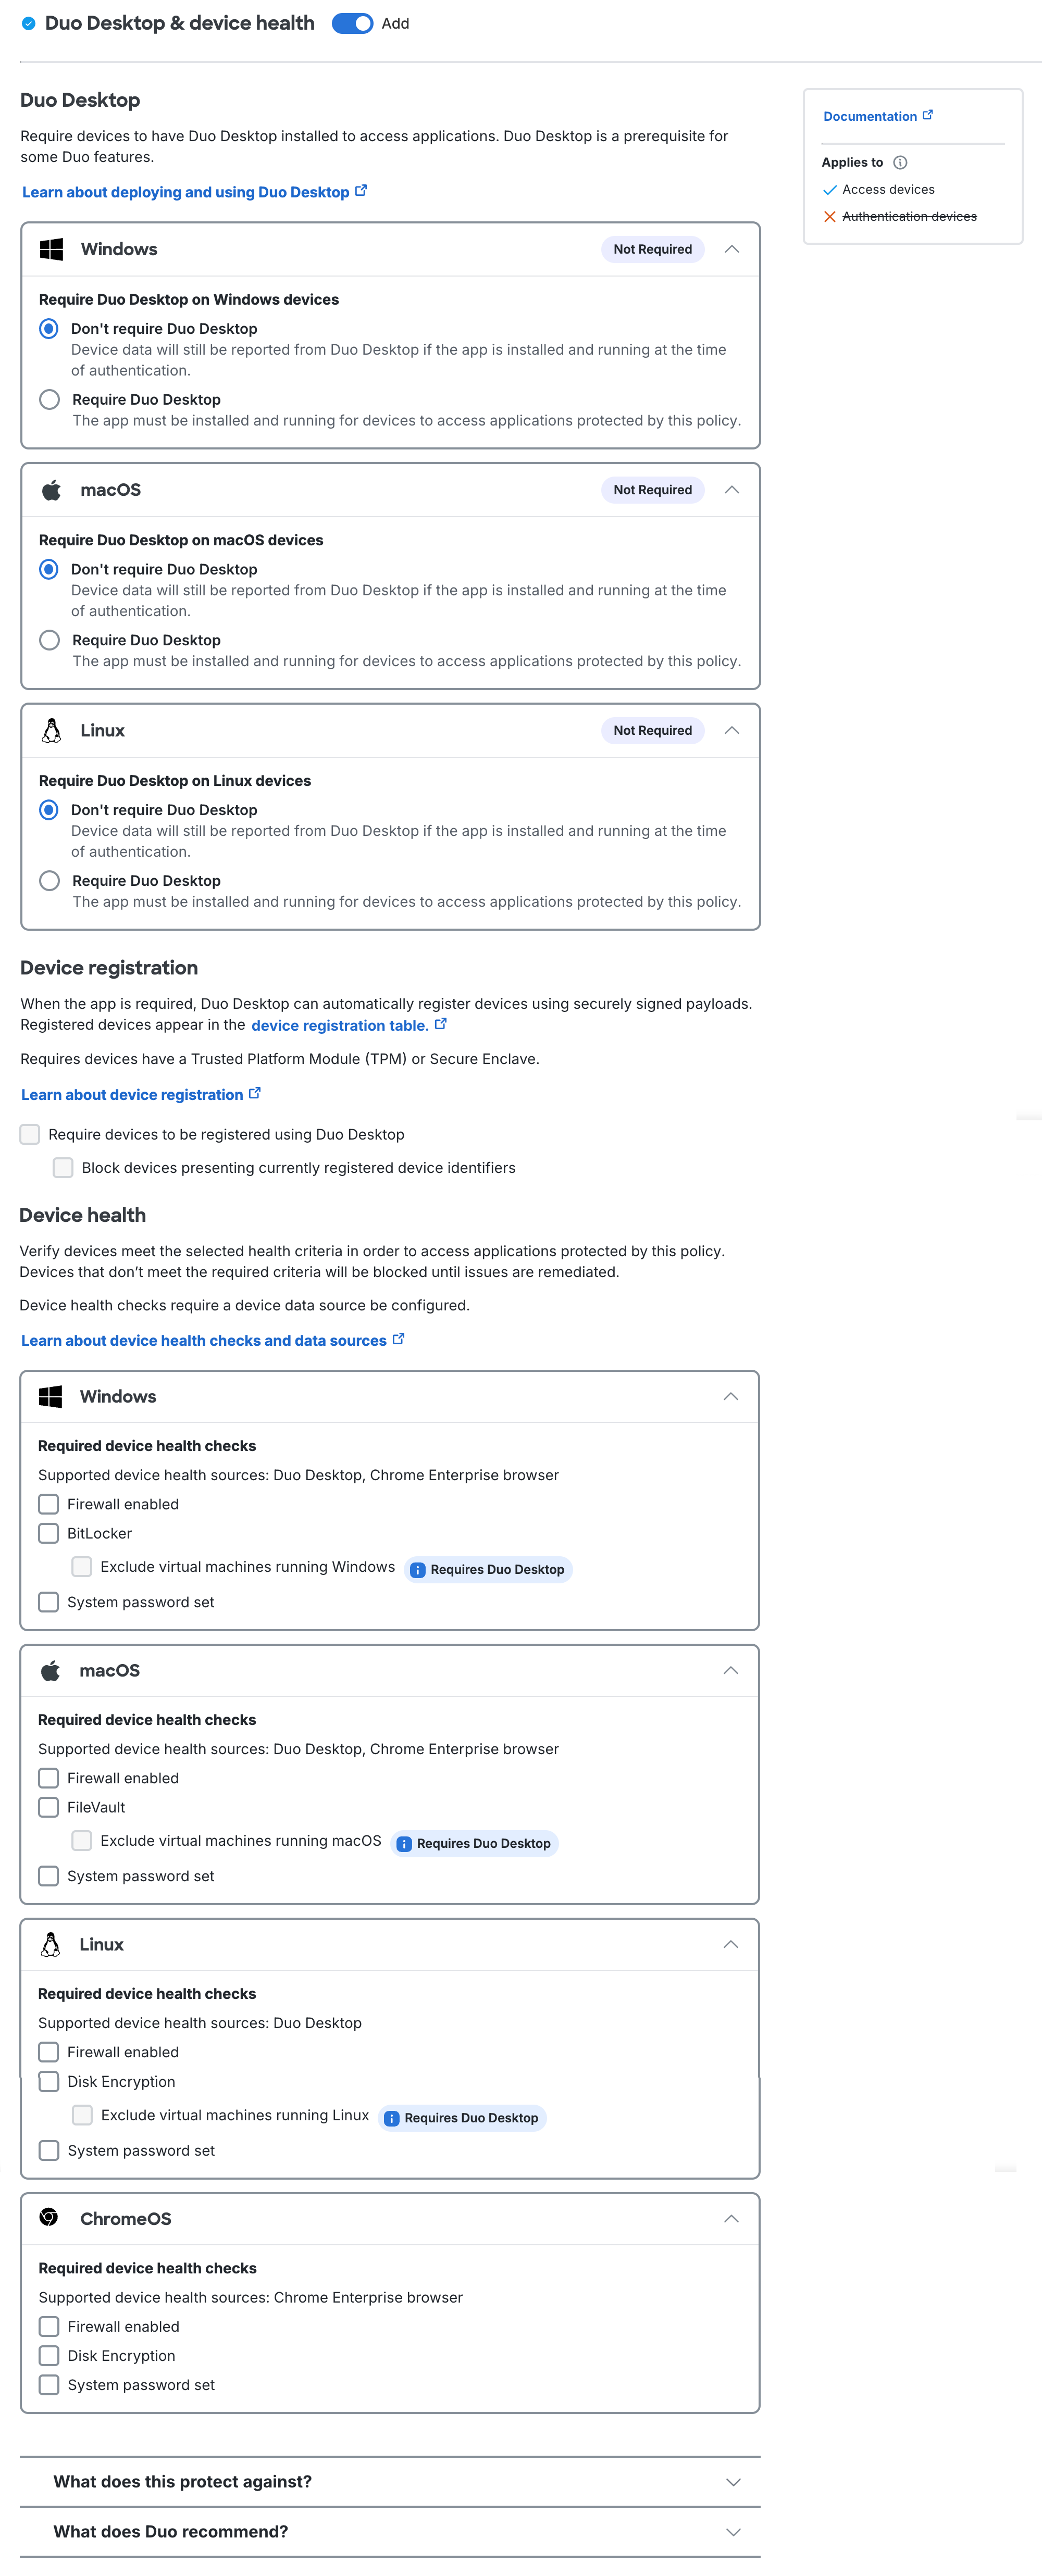
Duo Desktop & device health policy options in Duo Advantage
Duo Essentials policy options include requiring the Duo Desktop app and device registration, but no device health check options.
Duo Desktop policy options in Duo Essentials
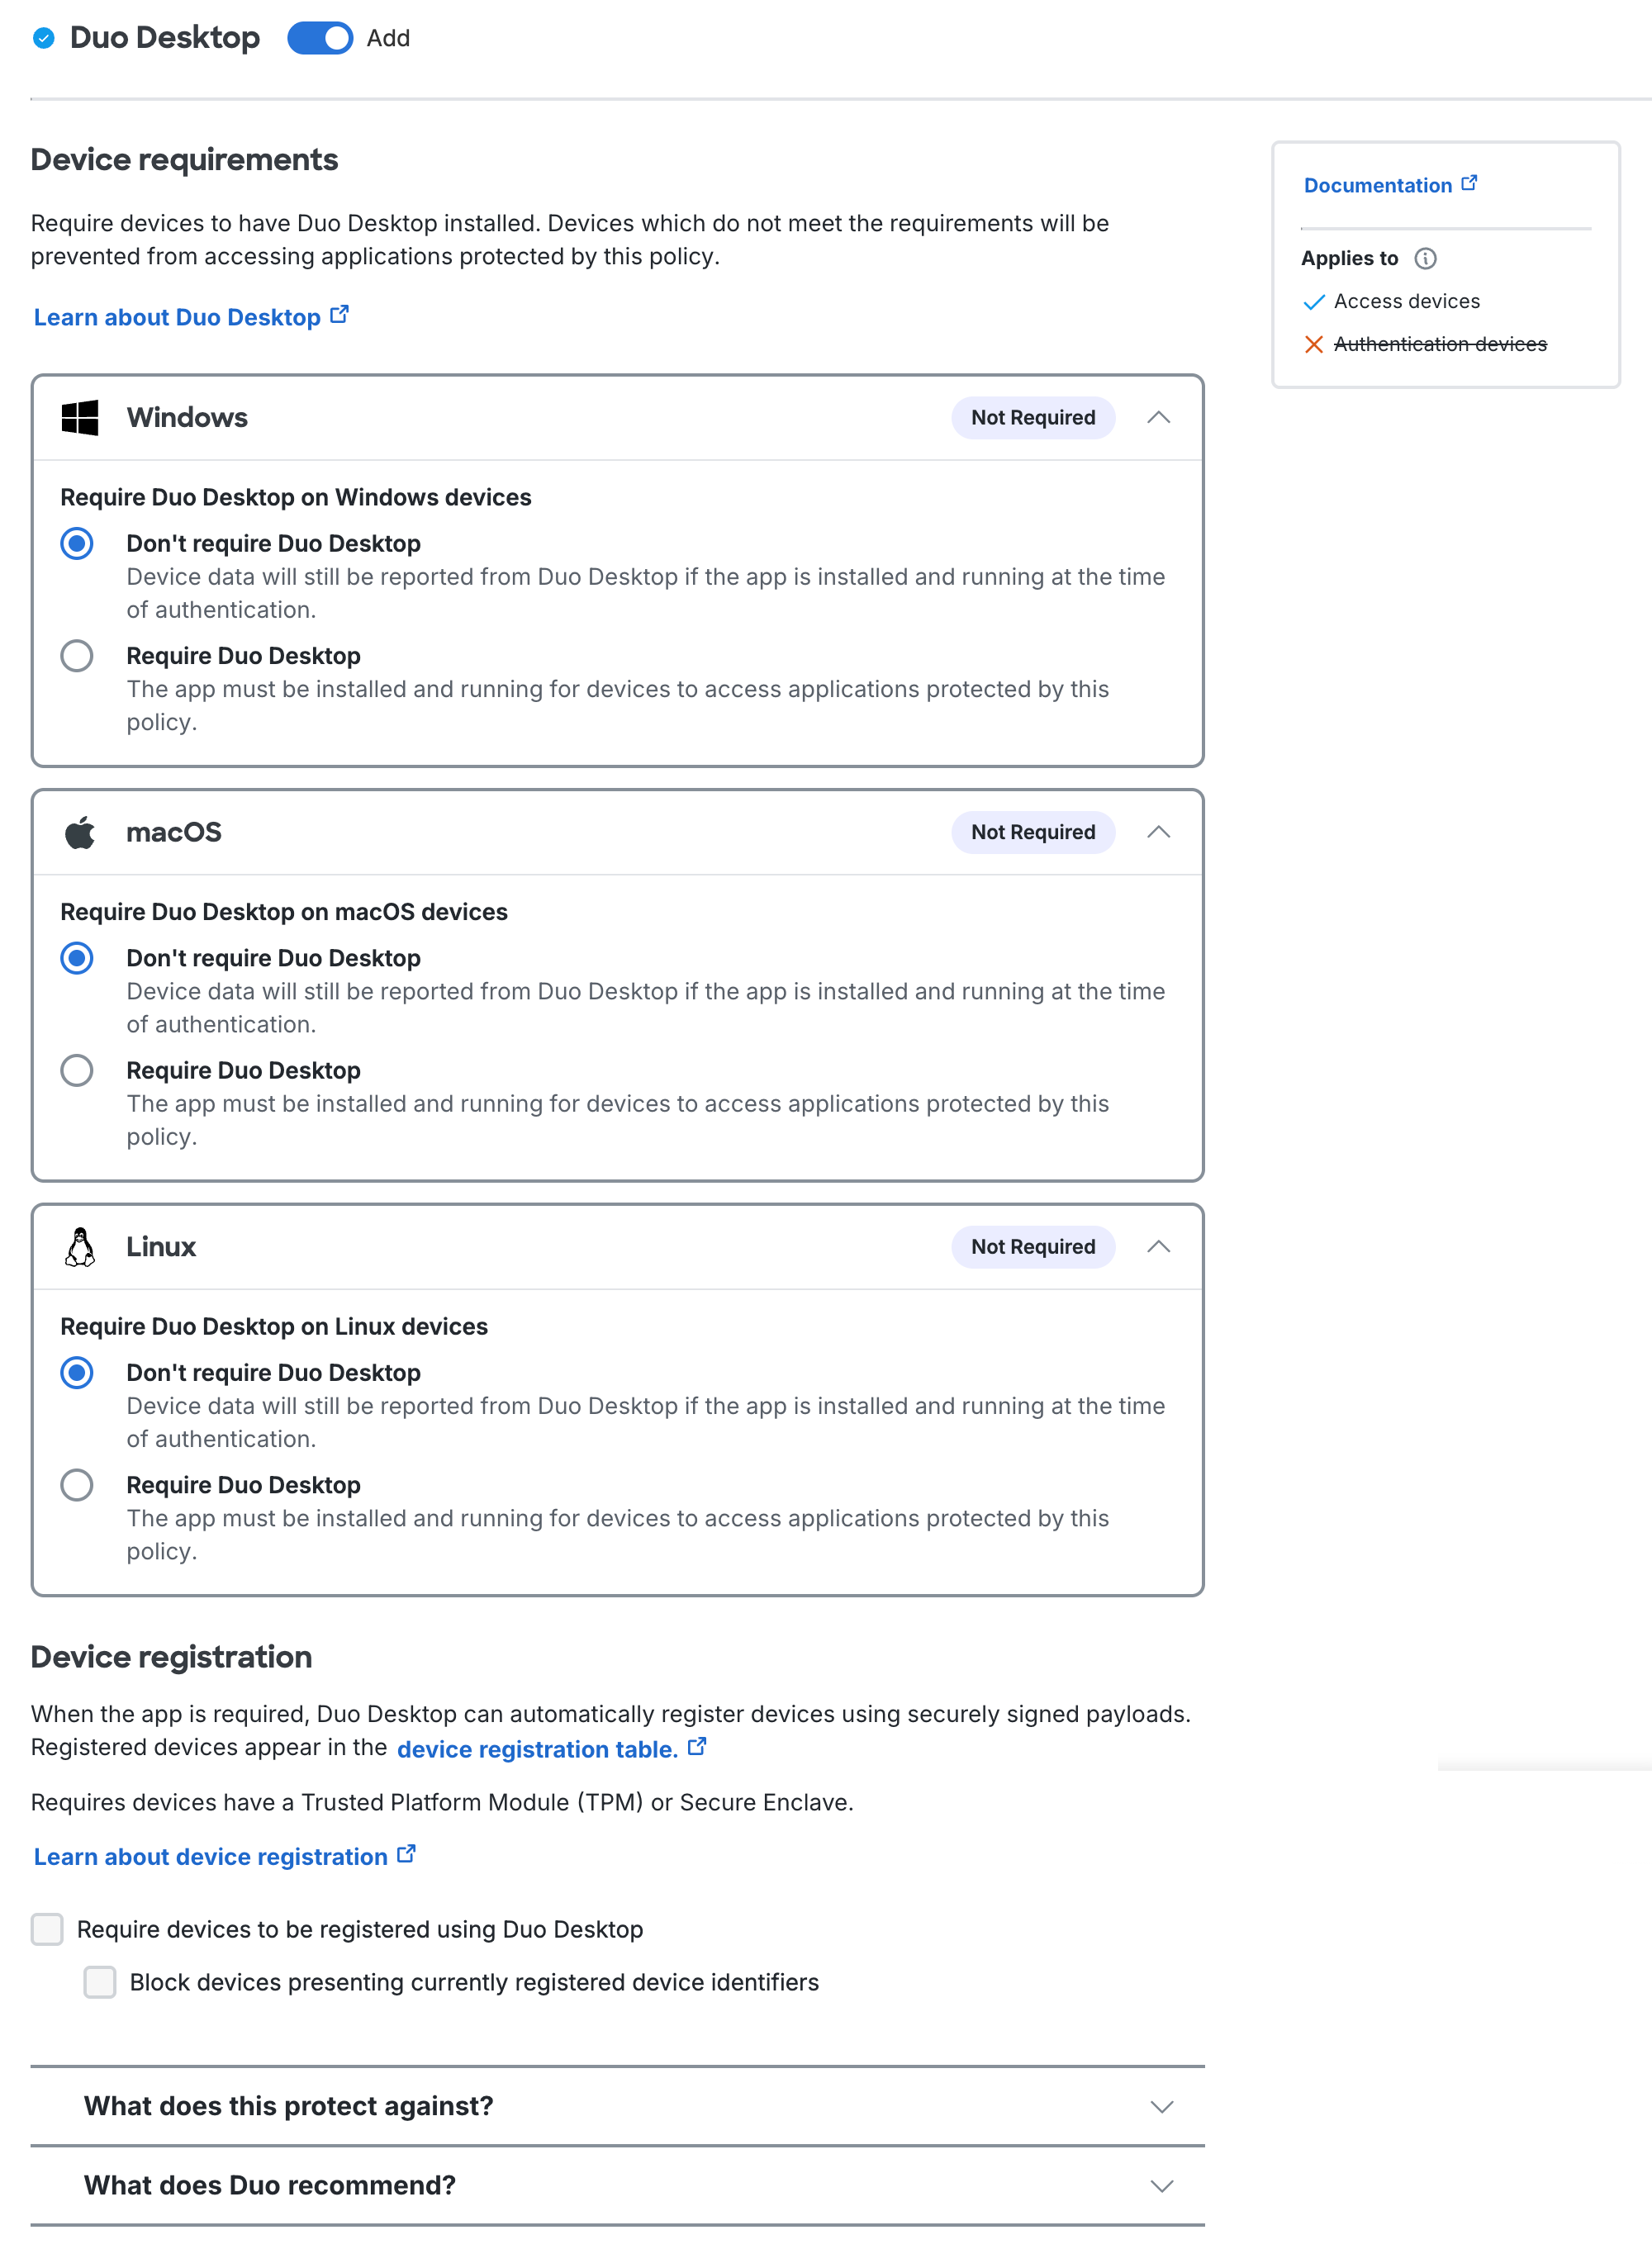
Within the Duo Desktop policy section you can configure whether to require Duo Desktop for application access, to require device registration using Duo Desktop from devices that meet hardware requirements, and which device health checks you want to enforce on your organization's endpoints.
Duo Desktop & device health
Available in: Duo Essentials, Duo Advantage, and Duo Premier
These settings determine which operating systems require Duo Desktop installed for Duo-protected application access. For each operating system listed, make one of the following selections:
-
Don’t require Duo Desktop (Default for Duo Essentials):
With this option selected, the policy is not in effect and has no impact on end user access. End users are not prompted to install Duo Desktop when accessing a Duo-protected application. Data will be collected from Duo Desktop if present and running on the machine.
-
Require Duo Desktop:
With this option selected, but none of the device health checks options in the policy, having Duo Desktop installed and reporting information to Duo is required for access.
End users running devices that can install the app (Linux, macOS 11+, Windows 10 build 1803+, and Windows Server 2016+) see a link to download the app from the Duo authentication prompt when attempting to access a Duo-protected application associated with the policy if they do not already have the application installed. Devices that are capable of running the app but do not have it installed and running will be blocked from access.
The app will collect health information from the device, but Duo will not block the user from getting access if it does not pass the specific firewall, encryption, and password health checks. This means that the device will be able to access the application even if the device would not pass each health check.
Devices that cannot run the app, including older versions of Windows and macOS, mobile platforms, etc., will not be prompted to install the app and are effectively allowed to bypass the Duo Desktop policy.
Device Registration
Use the "Device registration" options in the Duo Desktop policy settings to register devices using signed payloads with Duo Desktop. Information collected during the registration process from a device with Trusted Platform Module (TPM) 2.0 or Secure Enclave is formatted and displayed with Endpoints information.
Device registration requires the following:
- Active two-factor authentication through browser-based applications using the Universal Prompt.
- Device registration does not occur if the user bypasses two-factor authentication for any reason, such as access from a network permitted by the authorized networks policy setting, if the user has an existing remembered devices session, or bypass status set at the individual or group level.
- Windows and Linux access devices with Trusted Platform Module (TPM) 2.0 or Mac access devices with Secure Enclave.
- Duo Desktop 6.0.0/6.0.0.0 or later installed on Windows and macOS clients and Duo Desktop 3.0.0 or later installed on Linux clients.
Chrome OS does not support Duo Desktop device registration.
Note: To enable device registration using Duo Desktop, first select Require Duo Desktop in the Require Duo Desktop options for macOS, Windows, and/or Linux.
The primary device registration policy options are:
-
Require devices to be registered using Duo Desktop - Select this option to have payloads sent from Duo Desktop and evaluated against the policy controls to determine the device’s trust status. Devices that do not have TPM 2.0/Secure Enclave cannot complete registration and will be blocked.
The first time Duo Desktop sends a payload for a given device, it will be unsigned, and the device is sent through the automatic Duo Desktop registration.
-
Block devices presenting already registered device identifiers - Select this option to block devices that attempt to register but the device does not match the policy controls. For example, the device will be blocked:
-
If there is an existing Duo Desktop registration for the device.
-
If the payload is signed, and the stored signature does not match the one sent in the payload.
-
If the payload is signed, and the stored signature matches the one sent in the payload, but it is not the oldest known registration for that device.
When a device does not meet the security requirements of the device registration policies, the Admin Panel provides more information about why the user’s device was blocked.
To view and manage your registered devices, navigate to Devices → Duo Desktop Device Registration in the Admin Panel.
-
Device Health Checks
Available to Advantage and Premier plans. Device health checks can be performed with data collected by Duo Desktop or reported by an external device data source, such as Chrome Enterprise browser.
Configuring any of the device health check options that note they require Duo Desktop for an operating system needs the Require Duo Desktop option set to "Require Duo Desktop" for the corresponding operating system.
With device health checks configured, users must either have Duo Desktop installed, running, and reporting information to Duo or be enrolled in the relevant external device data source, and the device must satisfy the specified health requirements for access.
End users running devices that can install the app (Linux, macOS 11+, Windows 10 build 1803+, and Windows Server 2016+) see a link to download the app from the Duo prompt when attempting to access a Duo-protected application associated with the policy if they do not already have the application installed. Devices that are capable of running the app but do not have it installed and running will be blocked from access if the policy requires the app.
Duo will allow or block access to the protected application based on the device health checks options selected.
The collapsed device health check view reflects the effective configuration:
- Don't require device health checks: No device health checks are configured for the operating system.
- Require device health checks: One or more device health checks are required for the operating system. Block access when devices don't comply with your selected options.
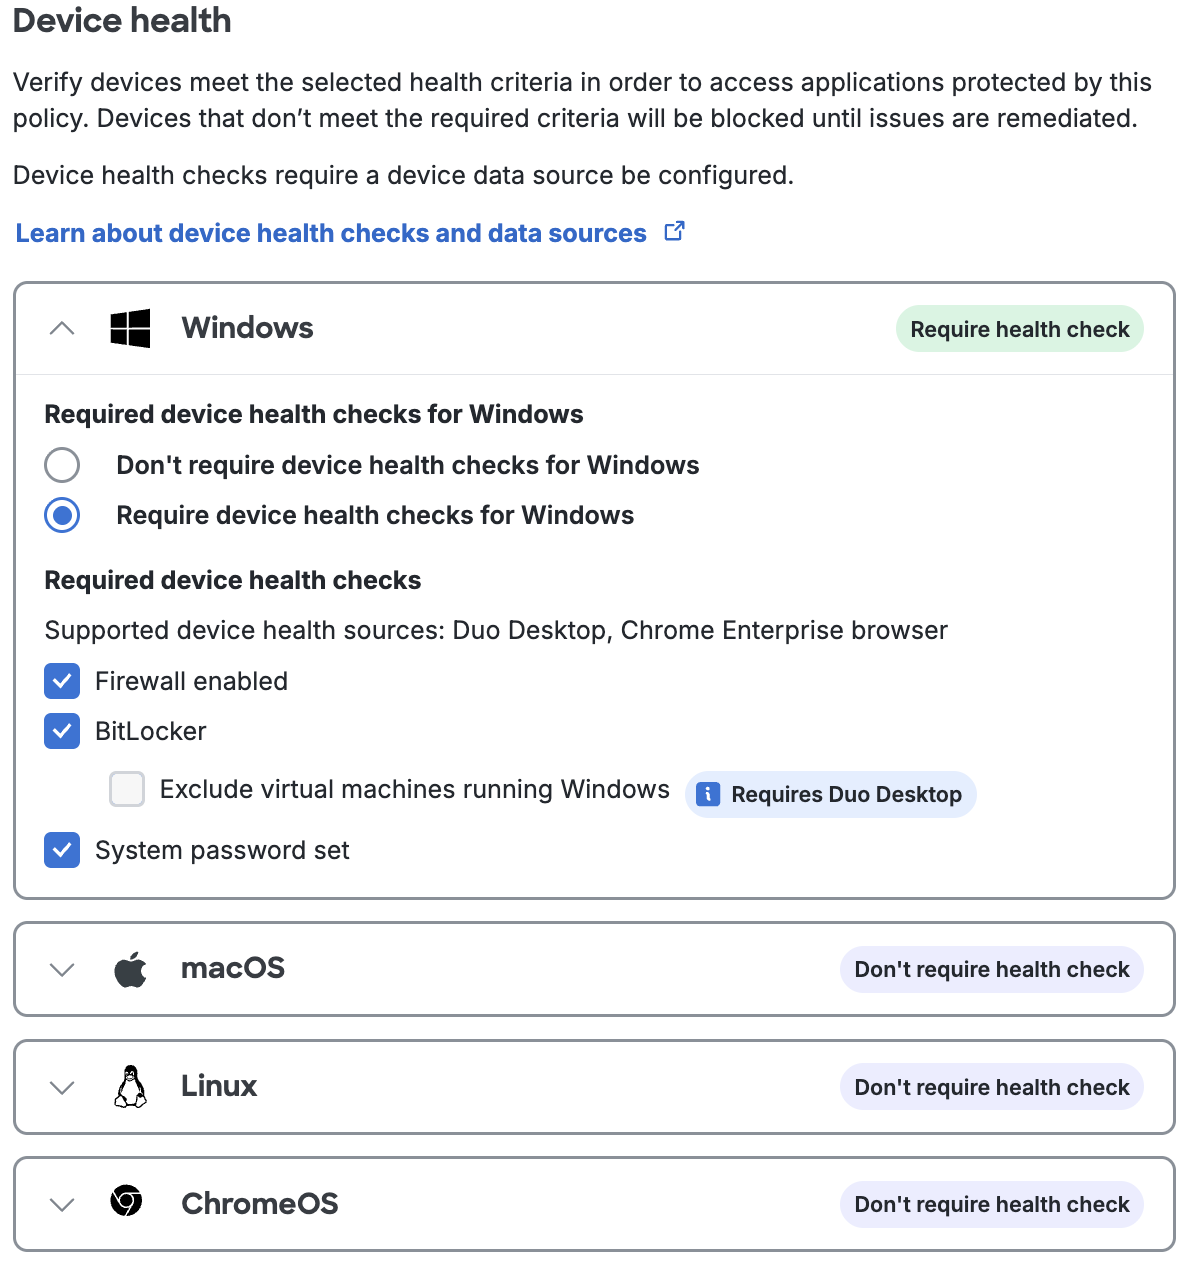
Note that the default "fail-open" Duo Desktop policy configuration allows you to enforce health checks for supported devices, while not blocking users who need to access an application using a non-supported device. You can optionally use Duo's Operating Systems policy to restrict other device types from accessing the application.
Device Health Check Options
Available in: Duo Advantage and Duo Premier
Block access to Duo-protected applications if devices don't comply with your selected device health check options. The checks can use any device data source, except as noted.
You can enforce the following health requirements for each OS:
- Firewall enabled: Blocks access if the firewall is disabled on the endpoint
- Linux requires Duo Desktop. Chrome OS requires Chrome Enterprise browser.
- Disk encryption: Only for Linux endpoints. Blocks access if disk encryption is disabled on the Linux endpoint. Requires Duo Desktop.
- Exclude virtual machines running Linux: If Duo Desktop detects that it's running on a Linux virtual machine, disk encryption enforcement is skipped.
- FileVault: Only for macOS endpoints. Blocks access if FileVault is disabled on the macOS endpoint.
- Exclude virtual machines running macOS: If Duo Desktop detects that it's running on a macOS virtual machine, FileVault enforcement is skipped. Requires Duo Desktop.
- BitLocker: Only for Windows endpoints. Blocks access if BitLocker is disabled on the Windows endpoint.
- Exclude virtual machines running Windows: If Duo Desktop detects that it's running on a Windows virtual machine, BitLocker enforcement is skipped. Requires Duo Desktop.
- System password set: Blocks access if the system password is not set on the endpoint.
- Linux requires Duo Desktop. Chrome OS requires Chrome Enterprise browser.
- Security agent installed and running: Only available for Duo Premier plan customers. See Security Agent Verification to learn more.
Duo Desktop & device health policy options in Duo Premier

Security Agent Verification
Duo Premier plan customers can use Duo Desktop's antivirus/anti-malware agent device health checks to verify that endpoints have one of these supported security solutions listed below in place before accessing an application:
- BitDefender Endpoint Security
- Cisco Secure Endpoint (previously known as Cisco AMP for Endpoints)
- CrowdStrike Falcon Sensor
- CylancePROTECT
- Forcepoint One (only shown in the list for Windows and macOS)
- Microsoft Defender for Endpoint (only shown in the list for macOS)
- Trellix Endpoint Security (formerly known as McAfee Endpoint Security)
- Palo Alto Cortex XDR
- Qualys Cloud Agent
- SentinelOne
- Sophos AV (only shown in the list for Windows and macOS)
- Sophos Home (only shown in the list for Windows and macOS)
- Symantec Endpoint Protection
- Trend Micro Apex One (only shown in the list for Windows and macOS)
- VMWare Carbon Black Cloud
- Windows Defender (only shown in the list for Windows)
All security agent checks for Windows, macOS, and Linux require Duo Desktop, with the Require Duo Desktop option selected to activate the Security agent installed and running control.
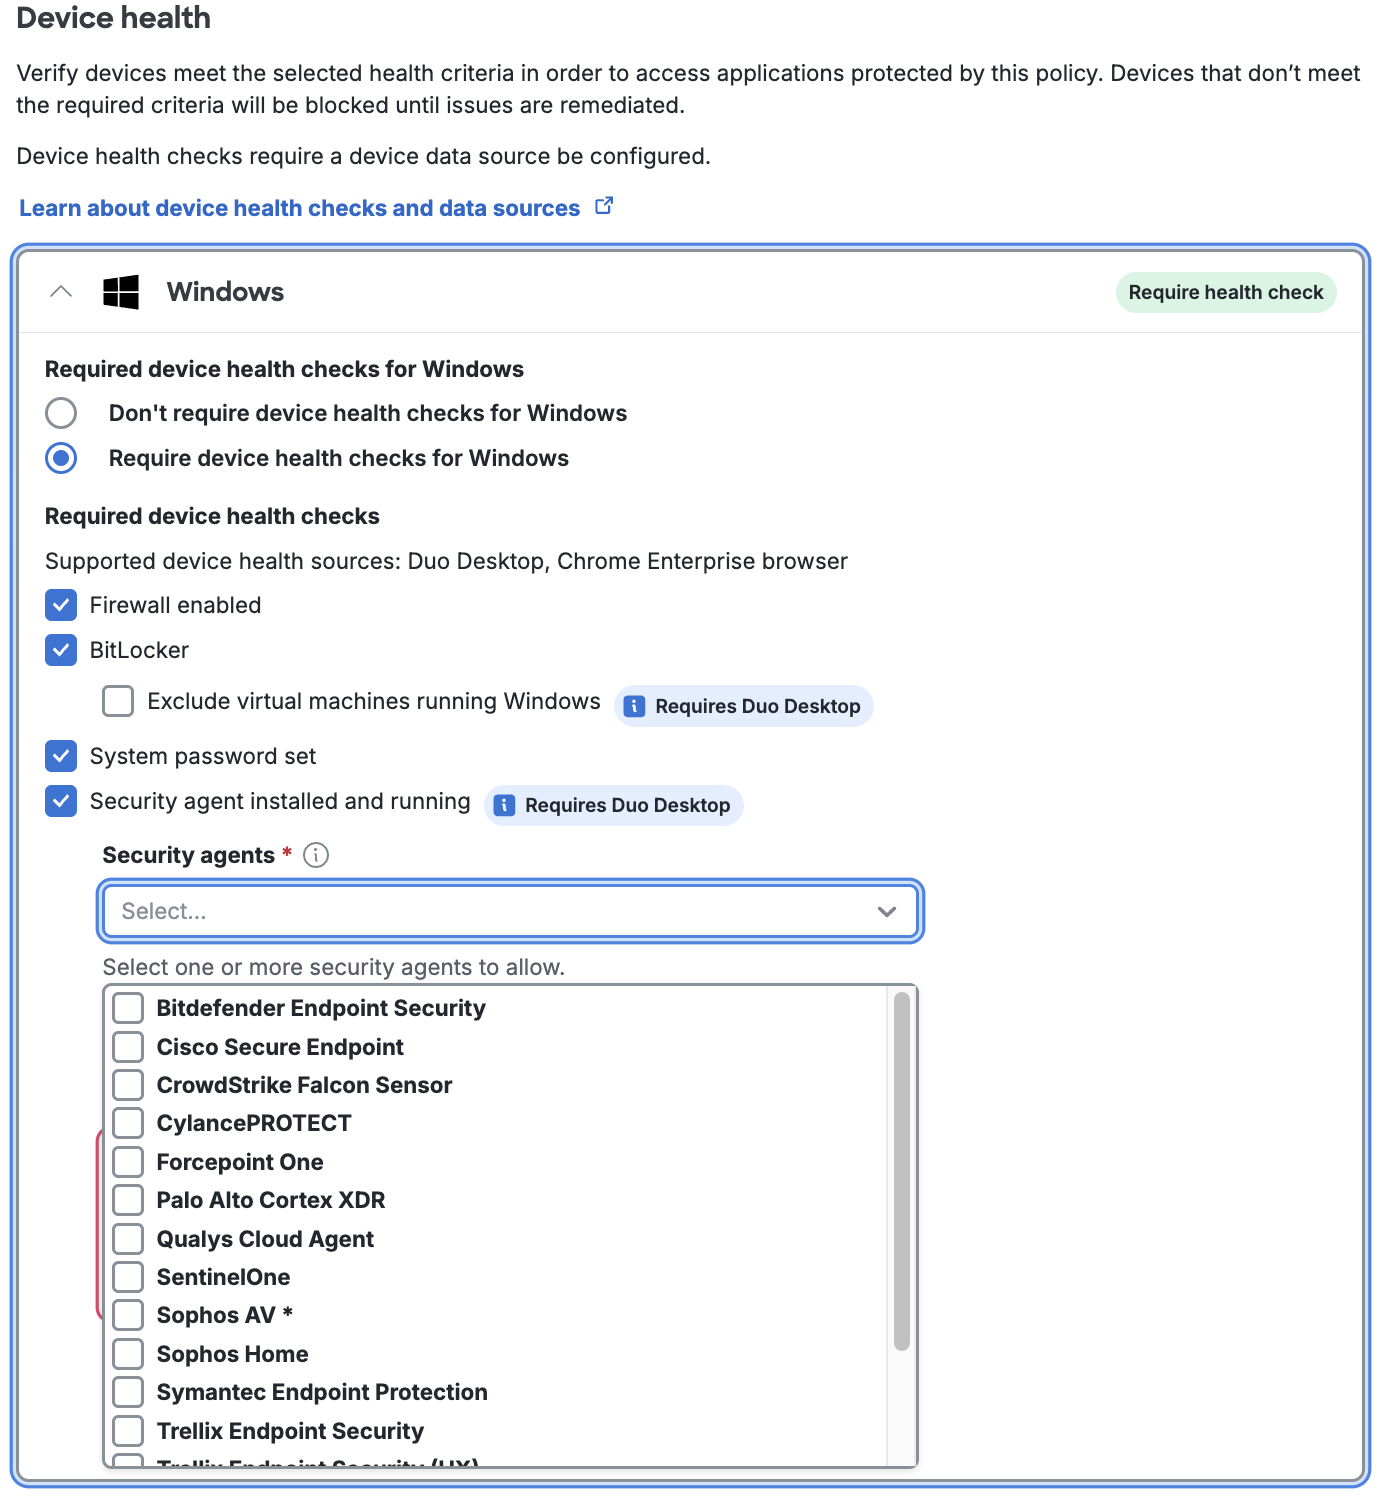
Security agent verification is unavailable for Chrome OS.
Duo Desktop Authentication Method
Duo Desktop prompts users to approve or deny an authentication request. It works for authenticating into web-based applications that show the Duo Universal Prompt from a desktop or laptop. It does not require another device; 2FA can be done from the same device.
This authentication method can be enabled in the Authentication methods policy section:
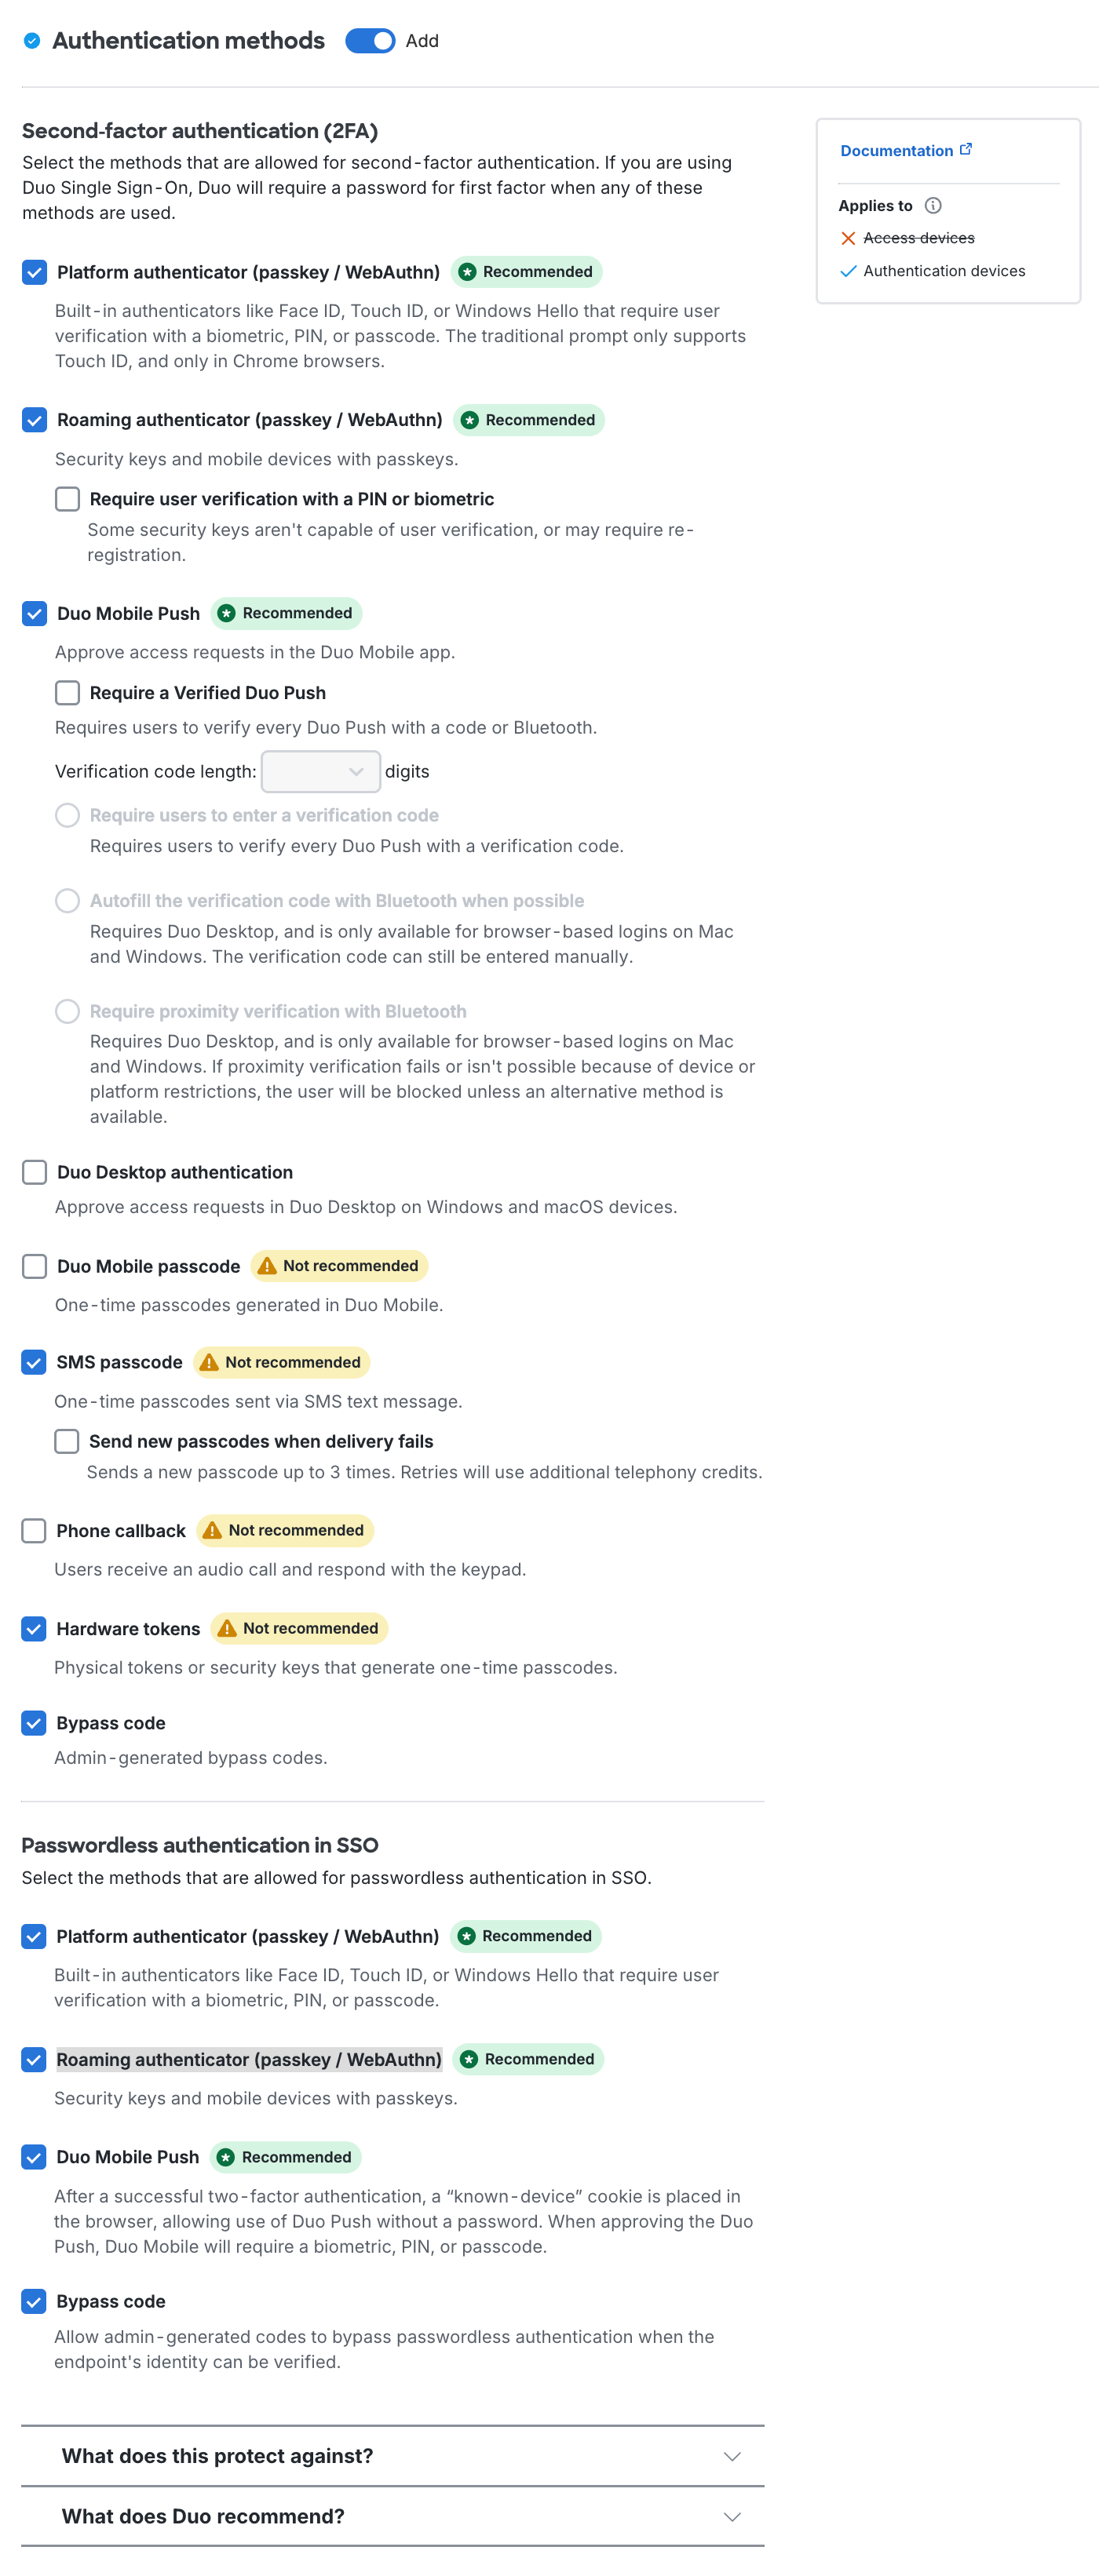
See Duo Desktop as an authentication method for more information.
Enable the Duo Desktop & Device Health Policy
Duo automatically collects information from devices when Duo Desktop is installed and running with no need for you to configure a policy to do so. Start your rollout of the app by deploying Duo Desktop to managed devices, or inviting your end users to install the app by emailing them installation links and instructions. Once the application is installed and running, Duo collects device health information every time a user encounters the Duo prompt. You can monitor your authentication logs in Duo to see how enforcing Duo Desktop & device health policy settings would affect your organization.
When you're ready to begin requiring the presence of Duo Desktop during authentication, create a new policy targeting a test group of users and a pilot application to start, with the Duo Desktop policy configured to require installation of Duo Desktop but not to block access based on security posture. This continues collecting information about access devices to see how deployment of both the application and policy affects a sample population of your overall user base, while requiring that the targeted users accessing Duo-protected applications install Duo Desktop if they have not already done so.
After deployment, you can review the states of devices accessing Duo-protected applications in the Admin Panel and then make assessments to identify the policy that will protect all your users.
-
Log into the Duo Admin Panel as an administrator with the Owner or Administrator admin role.
-
Navigate to Policies → Policies and click + Add Policy. The policy editor launches with an empty policy.
-
Enter a descriptive Policy Name on the "Name & details" tab, and then click the Duo Desktop & device health policy item on the left.
-
Click Add for Duo Desktop & device health.
-
In the "Duo Desktop" section of the Duo Desktop options, change the selected option for Windows, macOS, or Linux (or all three) to Require Duo Desktop to require that the app is installed and running before permitting authentication for those configured operating systems.
-
In the "Device registration" section of the Duo Desktop options, enable the Require devices to be registered using Duo Desktop option if you chose to require the app for macOS or Windows and your computers meet the hardware requirements for registration.
-
To prevent authentication based on an endpoint's security posture, select any or all of the "Device health" options for an operating system in the policy editor.
Duo Premier customers see additional options for Windows, macOS, and Linux endpoints in the policy editor. To prevent authentication using the agent verification check, select the Don't require device health checks for Windows, Don't require device health checks for macOS, Don't require device health checks for Linux, or Don't require device health checks for ChromeOS option(s) and select the supported source(s) from the list. If you select multiple sources, a device will pass the policy if it has any one of the required selected sources installed.
After you select which security sources to allow, you can enter the remediation instructions that end users will see in Duo Desktop if they attempt to authenticate without the required security source.
-
Click the Save button to save the settings and create the new policy.
-
Navigate to Applications → Applications or use the search bar at the top of the Admin Panel to find the application to which you want to apply your new Duo Desktop & device health policy. Open the details page for that application.
-
Scroll down on the application's details page to the "Application-Group policies" section and click Apply a policy to groups of users to assign the new Duo Desktop & device health policy to a test group.
-
Select the Duo Desktop & device health policy you just created from the Policy drop-down list.
-
Start typing in the pilot group's name in the Groups field and select it from the suggested names.
-
Click the Apply Policy button. The application page shows the new application-group policy assignment.
For more information about creating and applying group policies, see the Policy documentation.
Policy Interactions
You can combine a Duo Desktop policy in combination with most other existing Duo policies including Browsers, Plugins and Operating Systems policies.
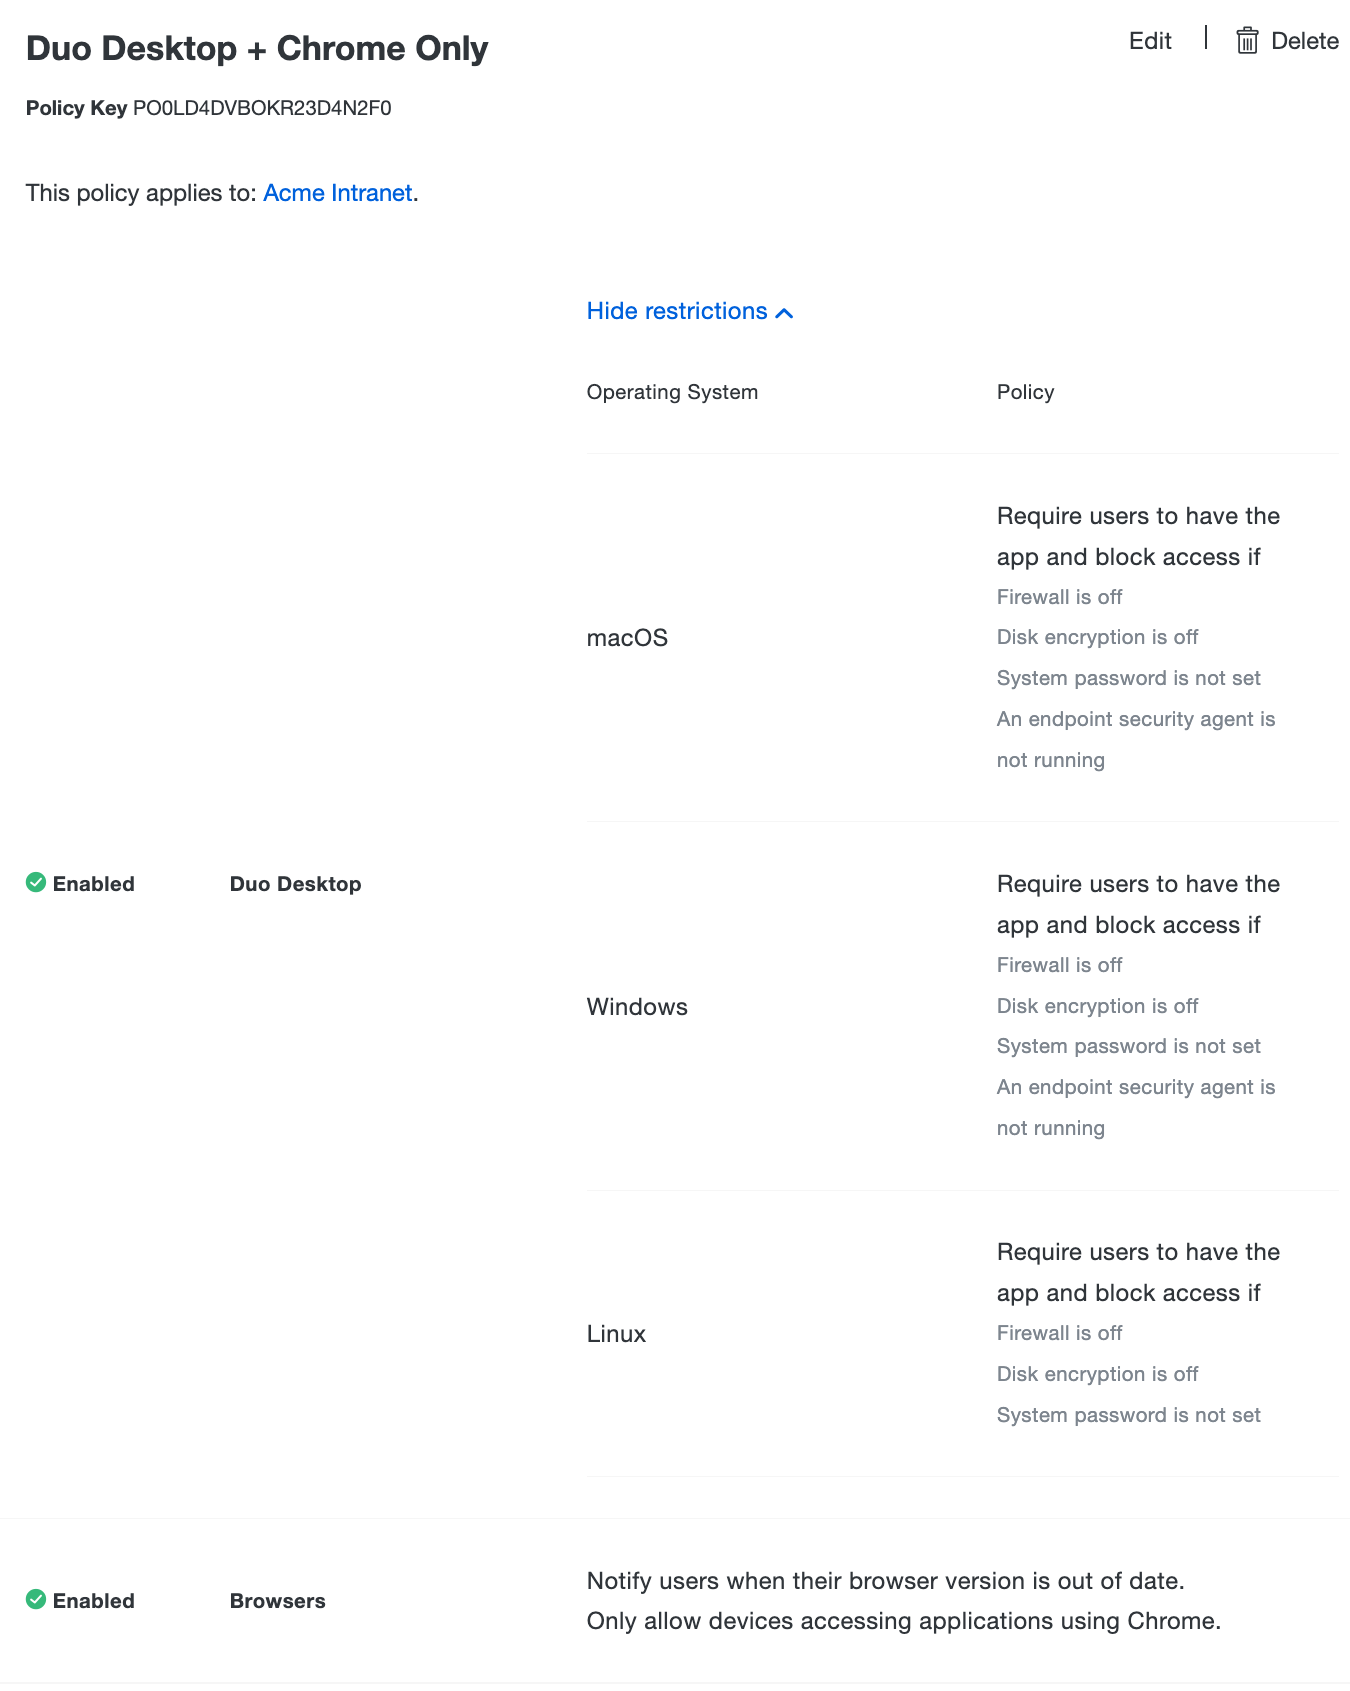
For example, you can create a custom policy that only allows access if the device:
- Has an encrypted drive (using LUKS for Linux, FileVault for macOS, or BitLocker for Windows 10+)
- Has the host firewall enabled (using specific firewall configurations for Linux, Application Firewall for macOS, or Windows Defender Firewall for Windows 10+)
- Is protected by a password
- Is accessing the application using a Chrome browser
In that case, enforce the first three conditions with the Duo Desktop policy's "Block access if system password is not set.", "Block access if disk encryption is off.", and "Block access if firewall is off." options. Enforce the fourth condition in the same custom policy by checking all browsers except Chrome in the Browser policy's "Block browsers" option.
Note: Duo does not use information gathered by Duo Desktop to enforce browser policy.
Operating System Granular Policy
In order to enforce access based on operating system (OS) version, you can use the existing OS policy for macOS or Windows in combination with the Duo Desktop policy. Duo Desktop will be the preferred source of information about an endpoint when evaluating OS policy. This means that we will trust information provided by Duo Desktop more than the browser user agent provided by the web requests to Duo.
Linux
Granular operating system policy options are not available for Linux.
macOS 11 and Later
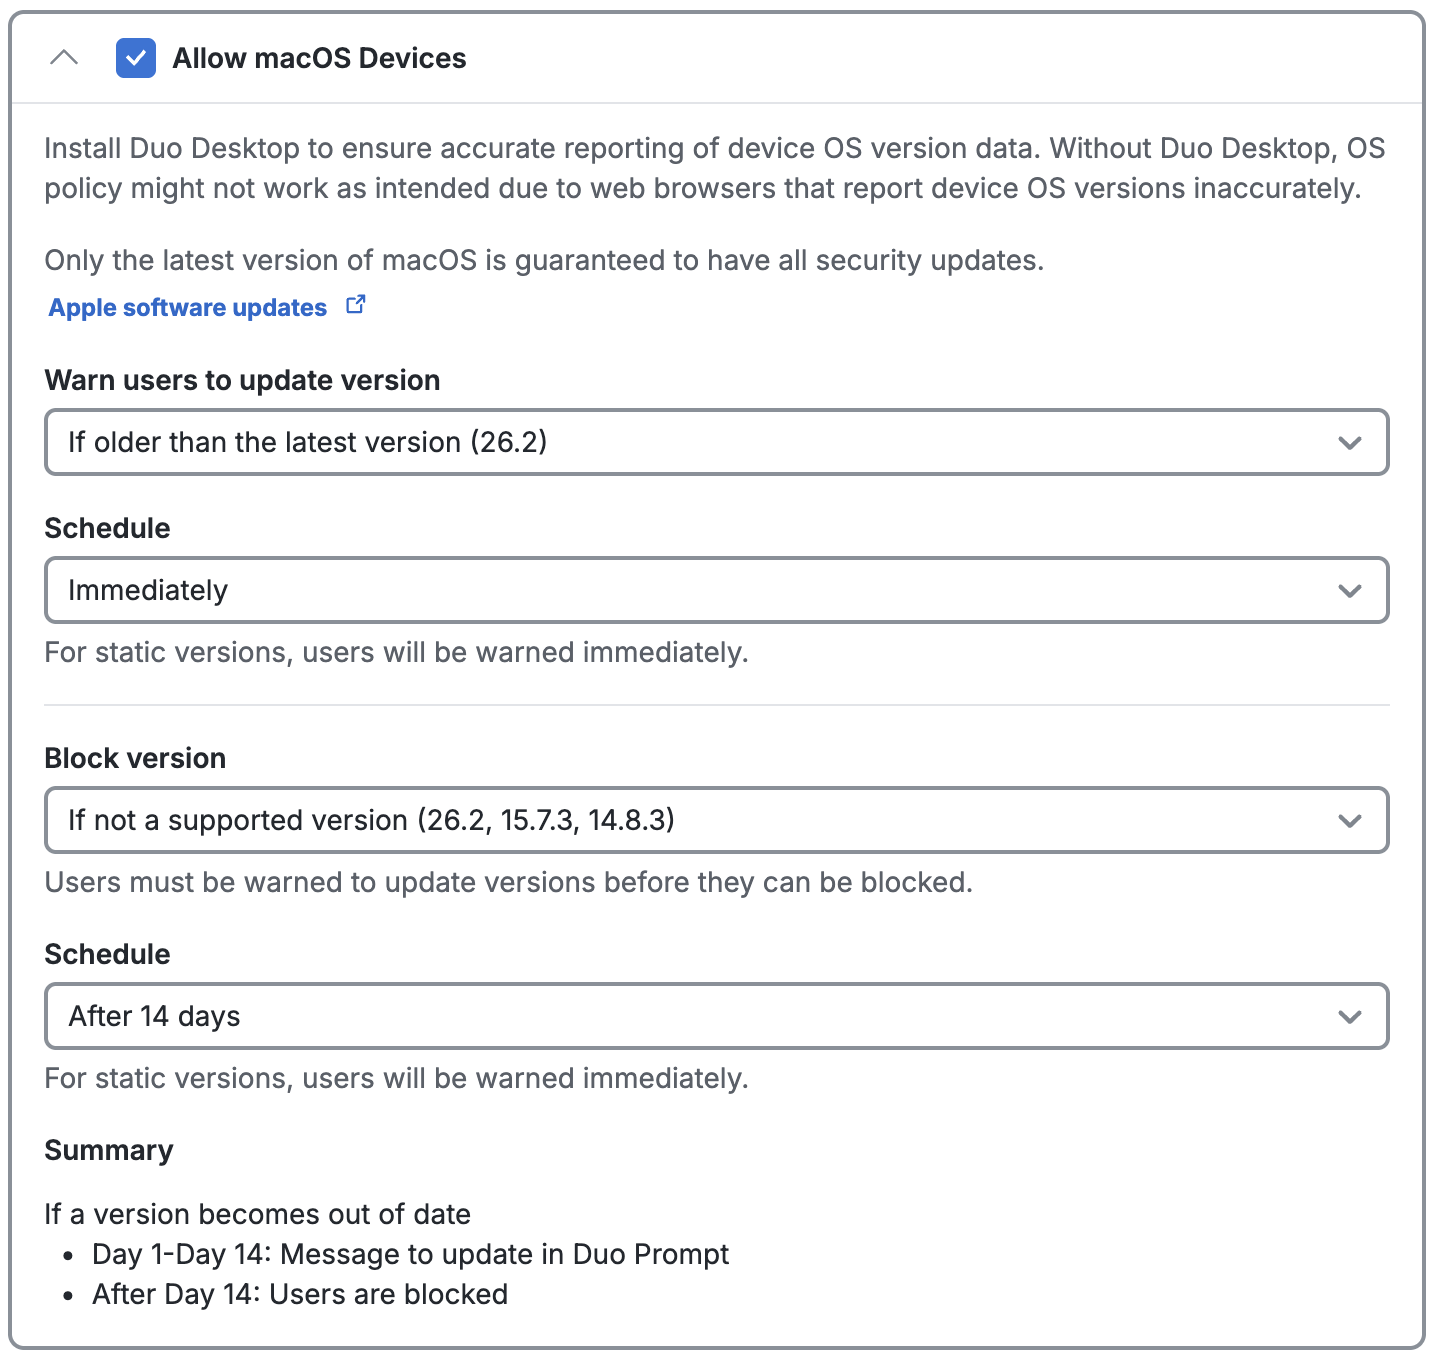
The Operating Systems policy settings for macOS remain the same as when the Duo Desktop policy is not enabled, and continue to look for a macOS version similar to "10.14.6". Duo Desktop provides information that is more trustworthy than the user agent reported by a browser or embedded web view.
As of macOS 11, up-to-date versions of major browsers (Safari, Chrome, Firefox, and Edge) have frozen the OS version reported via the browser user agent string as 10.15.6, 10.15.7, or 10.16, impacting the ability to detect whether macOS is truly up to date when relying only on information reported to Duo by the browser.
Duo Desktop detects and reports the actual macOS version, enabling reliable OS version verification during Duo authentication. Duo recommends using Duo Desktop on macOS 11 or newer clients to enable accurate checking and reporting, especially if you choose to apply a Duo operating systems policy with the "If older than the latest version" option selected, or pick a static version of 11.0 or greater.
Windows 10 and Later
Windows OS has some additional changes in the Operating Systems policy when Duo Desktop is present. A browser user agent provides a limited amount of information about the Windows version. Duo Desktop is able to retrieve the Windows build version and the security patch version for a device. This allows you to make policy decisions on specific Windows versions to keep users up to date.
You’ll notice these changes under the Operating Systems policy section under the "Allow Windows devices" header. Open the drop-down under the "Warn users to update version" or "Block version" label and you’ll see new Windows version options.
When you select these options, additional information appears on the right side of the policy screen containing the details of activating an Operating Systems policy with this setting.
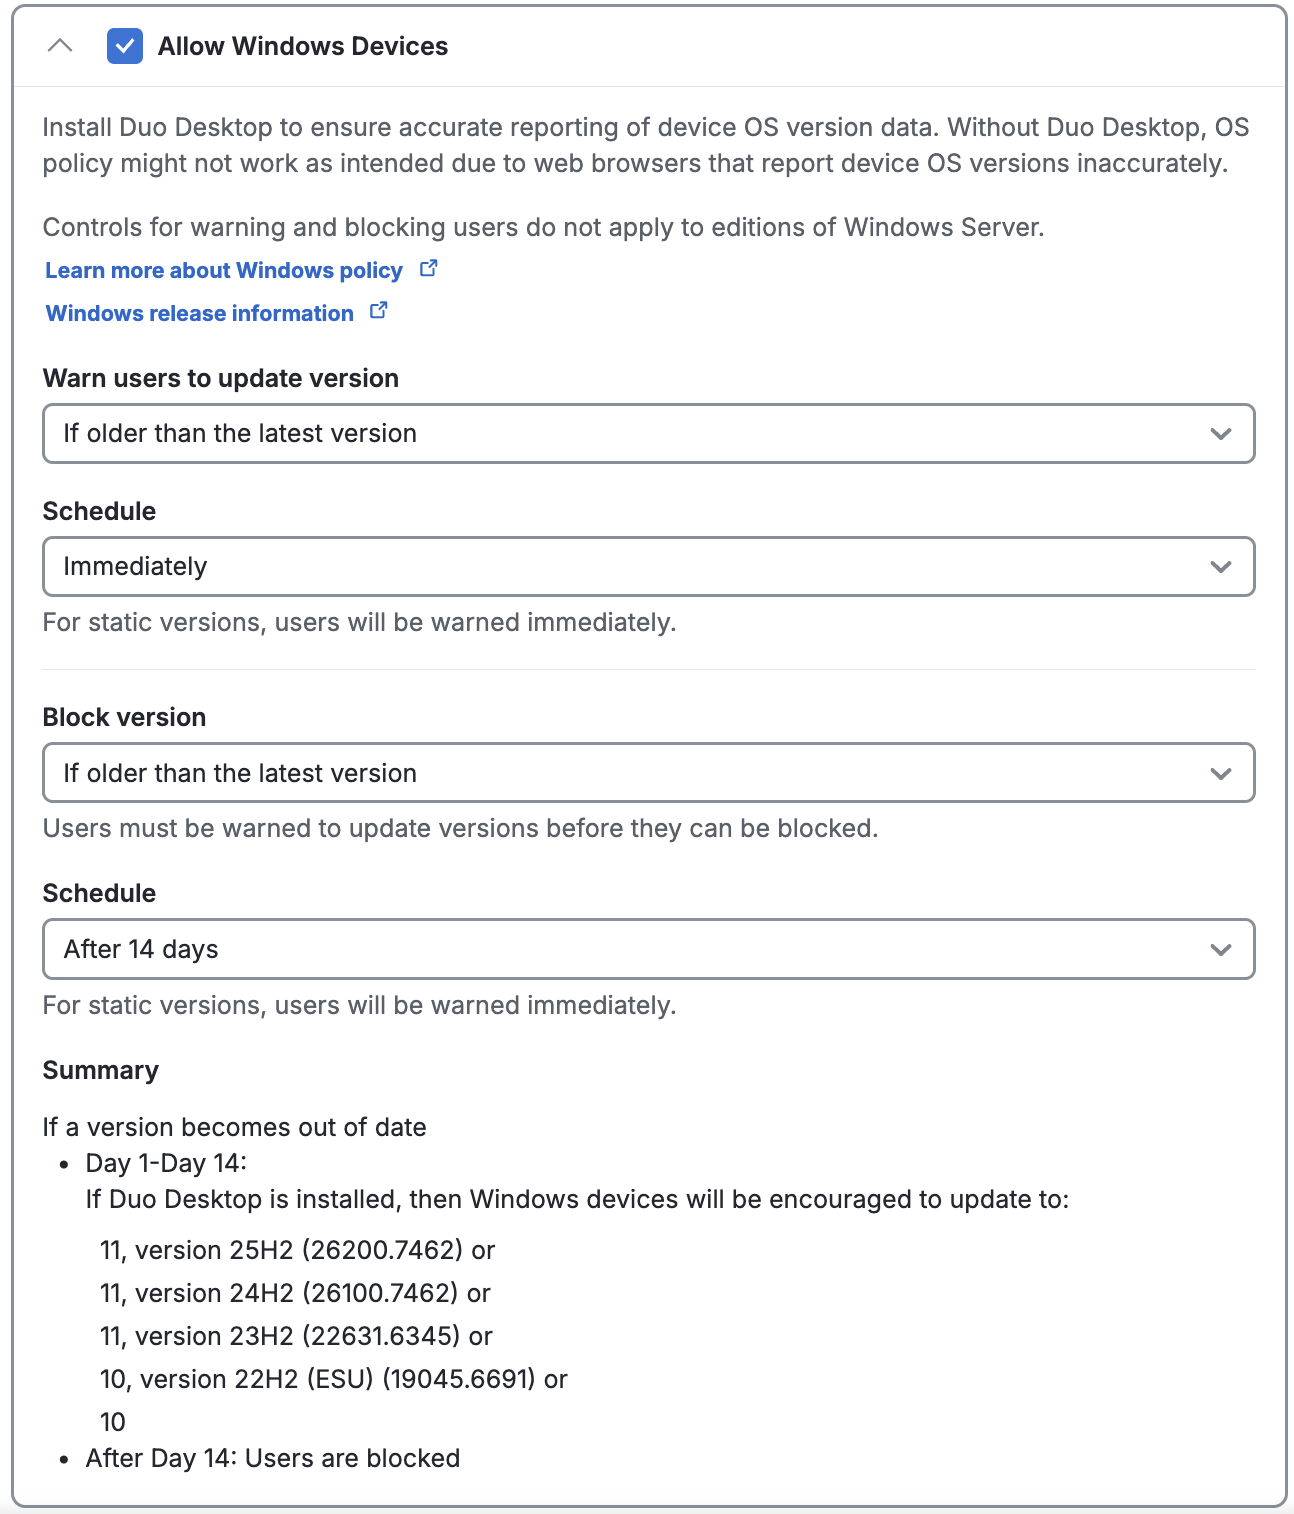
If Duo Desktop is not enabled, then the policy engine will fallback to simply "Windows 10" when assessing the windows version of the device accessing a Duo protected application.
Major browsers will not accurately report the OS version in the browser user agent string on Windows 11, so the detection of and policy enforcement against Windows 11 will require Duo Desktop.
The "Warn users to update version" and "Block version" policy options do not apply to Windows Server, as it has its own versioning system. If Duo Desktop detects that it's running on a Windows Server, OS version policy enforcement is skipped.
System Language
On macOS and Windows, Duo Desktop user interfaces show the user's preferred system language: English, French, Japanese, Spanish (Latin America), Spanish (Spain), Indonesian, Portuguese, Chinese, Italian, Polish, Korean, Thai, Hindi, Turkish, and Vietnamese. Note that the Duo Desktop MSI installer for Windows is not fully localized to Spanish (Latin America), Hindi, Indonesian, and Vietnamese.
If the system language is not one of the listed options, Duo Desktop defaults to English.
The help desk custom message does not use the system language and will always show the first listed Help Desk custom message in the global settings.
Help Desk Text
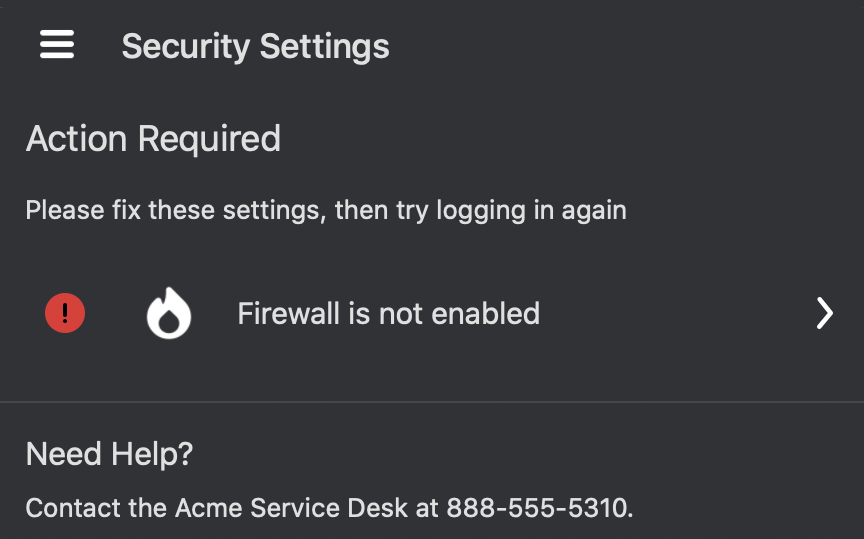
Duo Desktop for macOS and Windows displays the same help message text configured in the first listed Help Desk custom message in global Settings.
The application shows this information in the "Need Help?" area whenever the Action Required dialog is displayed to help the user remediate authentication issues.
Duo Desktop Reporting
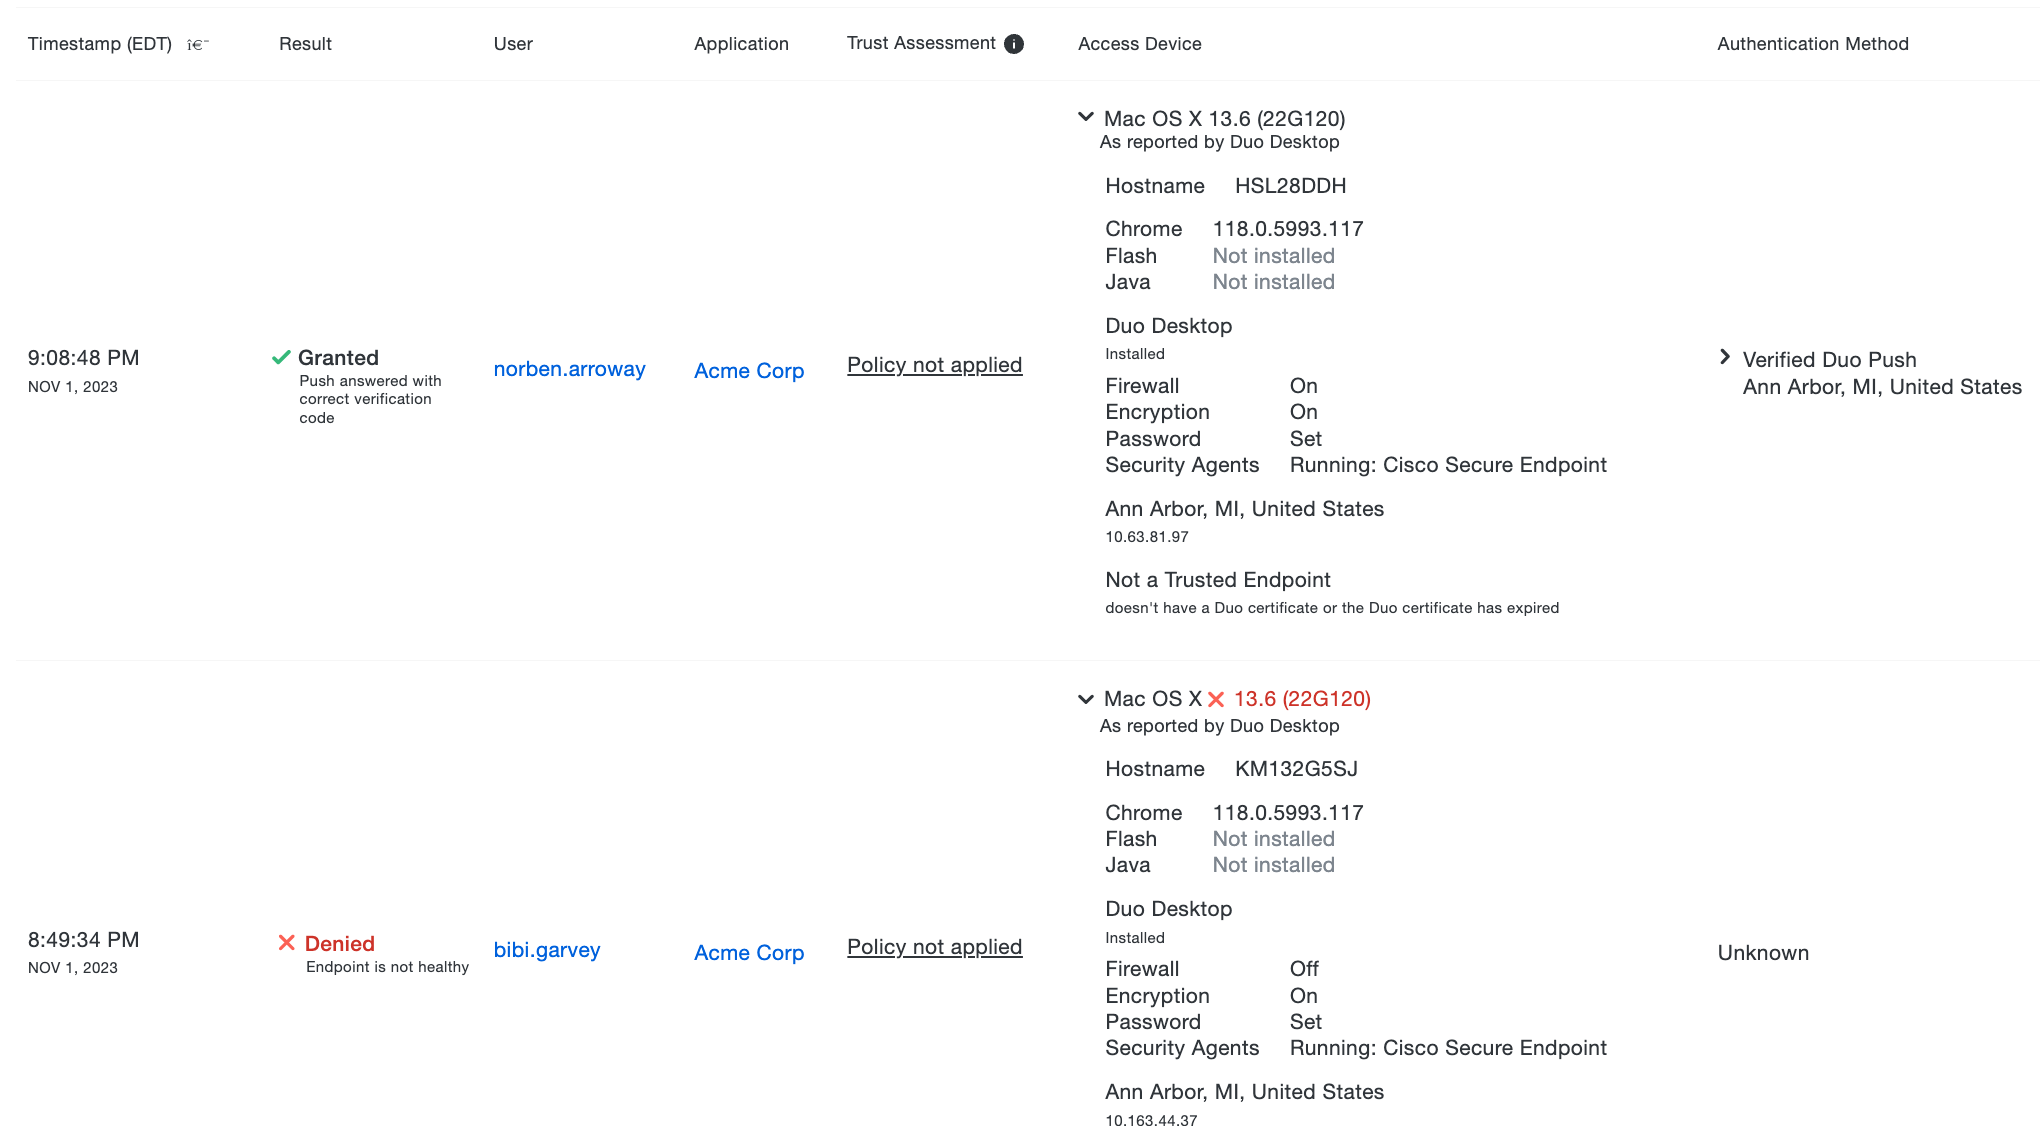
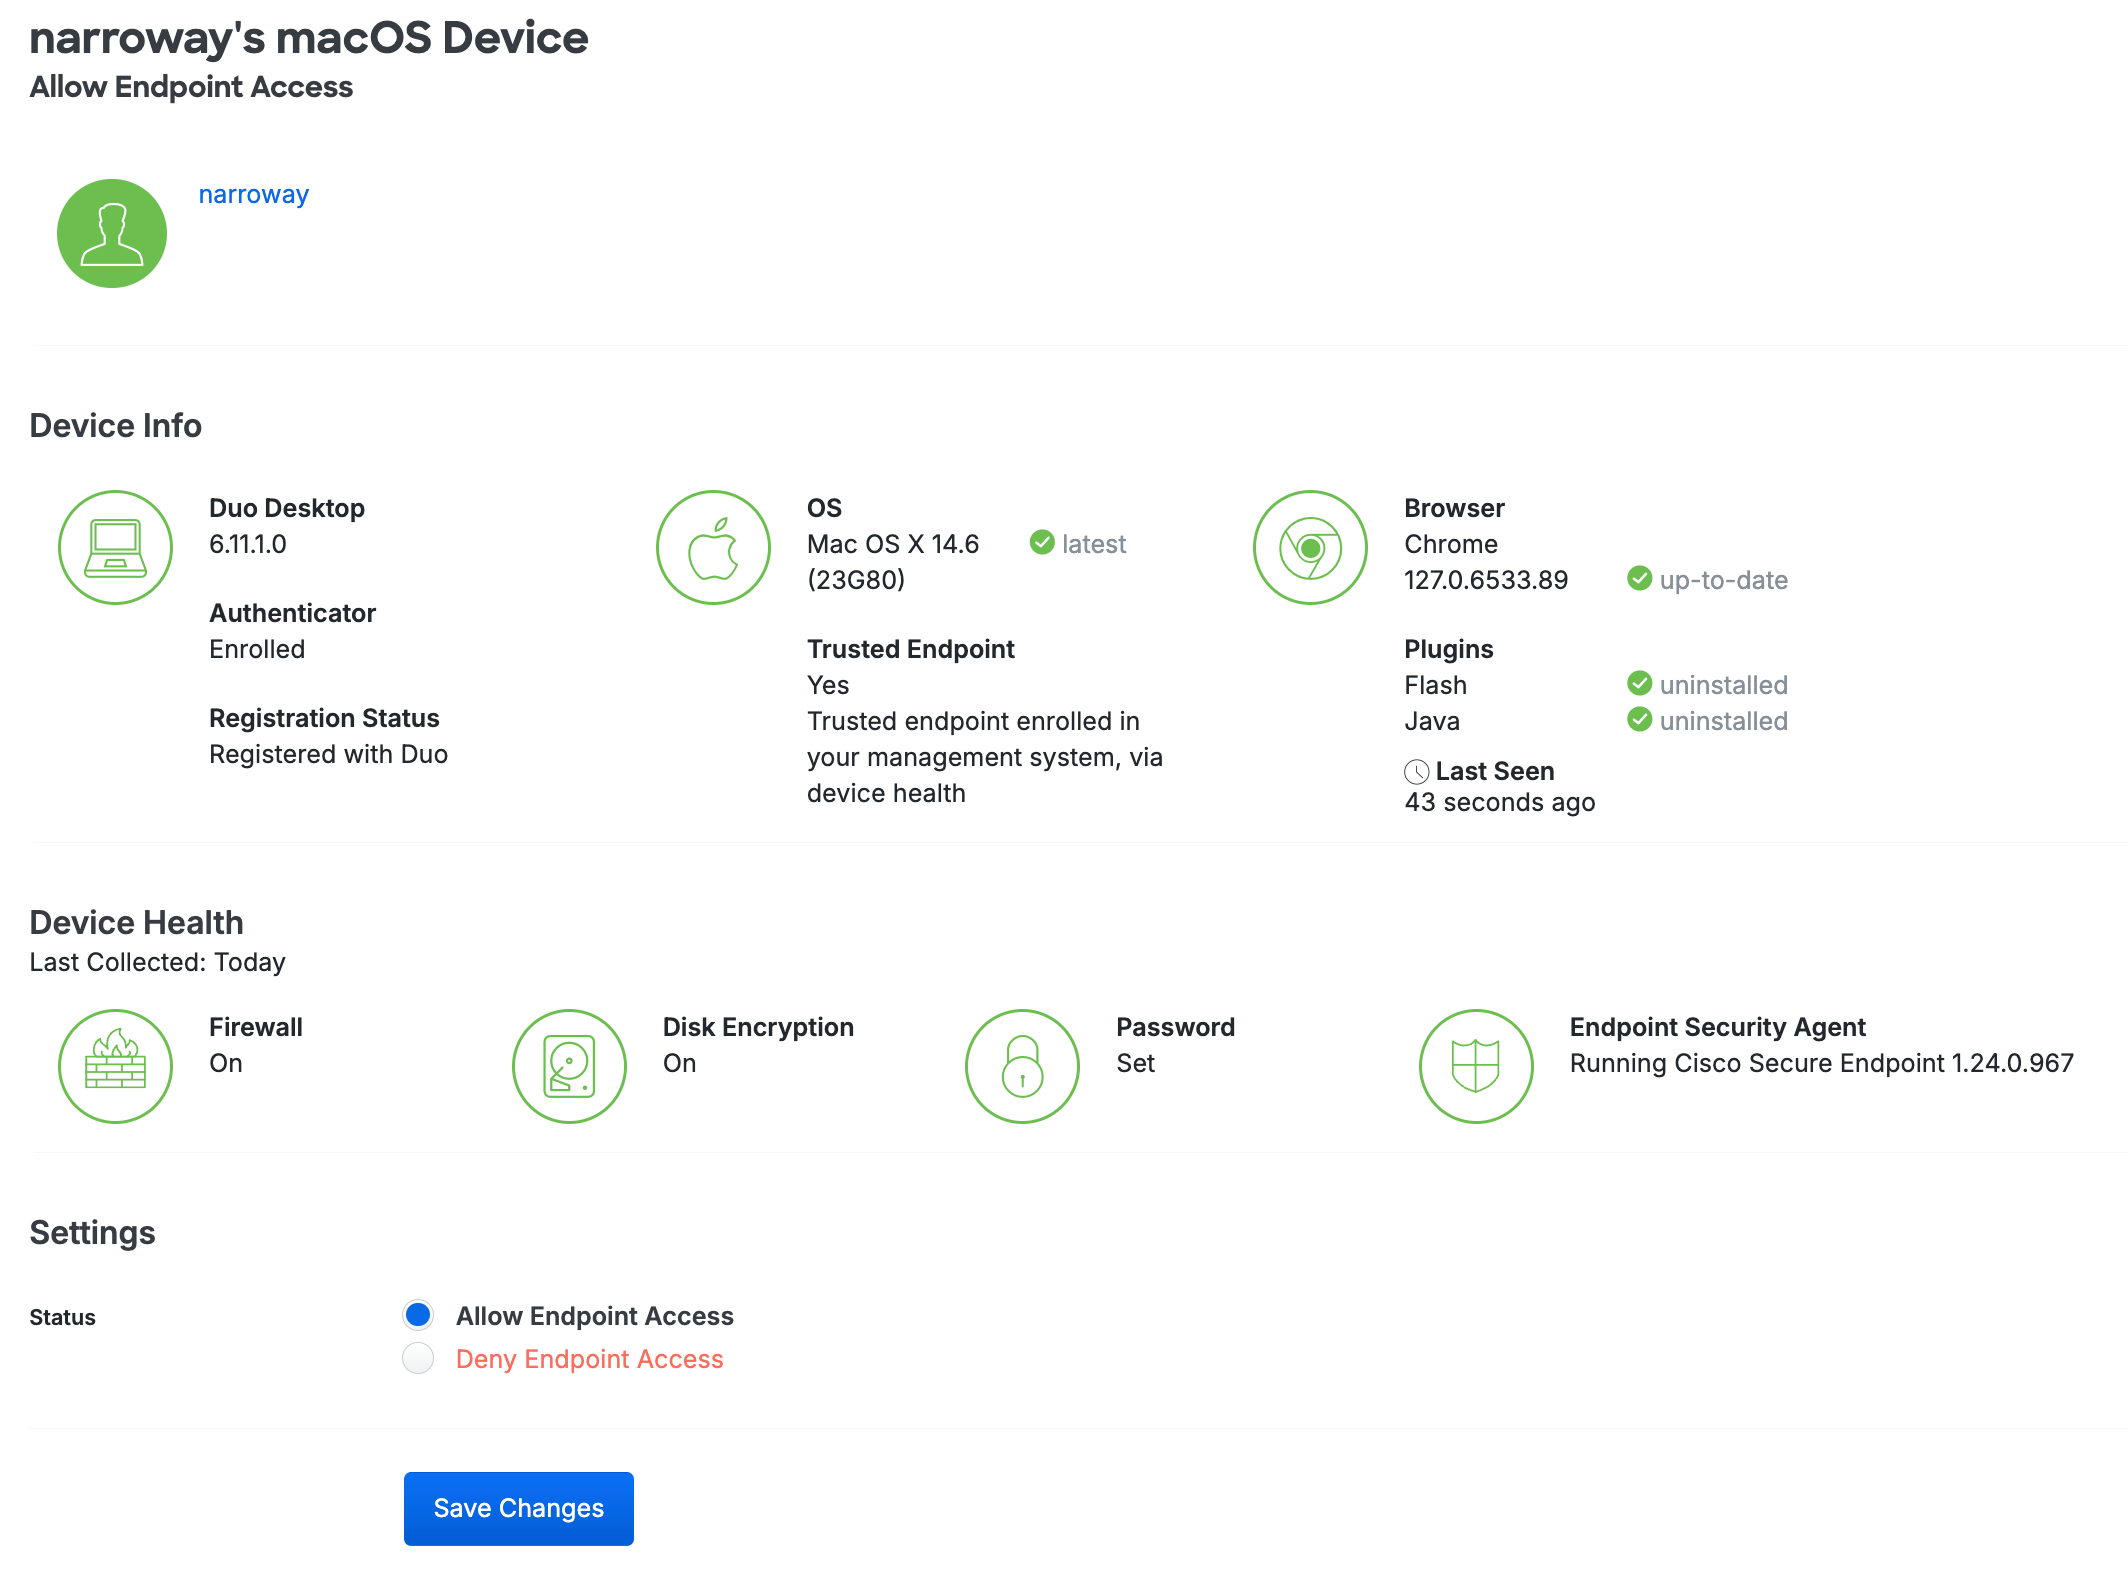
Information reported from Duo Desktop is shown in the Admin Panel along with existing Endpoint information. The Authentication Log report, Endpoints page list and endpoint details, and endpoint information shown for Users will be augmented with details from Duo Desktop.
Application Log
With Duo Desktop installed, authentication log events show checks related to Duo Desktop in the "Access Device" information. Operating system version information includes the build version for macOS, the build and revision versions for Windows, or the distribution name and version for Linux.
Endpoint Details
An endpoint's details page shows information about and from Duo Desktop.
Duo Desktop as an Authentication Method
If your organization wants to use 2FA but your end users don't have access to a secondary device, Duo Desktop can be used as an authentication method. For instance, users may not have a secondary authentication device such as a smartphone, they may be hesitant to install work-related software on their personal devices, or they are restricted from using smartphones, such as in a secure area.
We recommend enabling Duo Desktop for authentication only when no other authentication methods are available. A secondary authentication device, like a security key, is more secure.
Duo Desktop prompts users to approve or deny an authentication request. It works for authenticating into web-based applications that show the Duo Universal Prompt from a desktop or laptop. It does not require another device; 2FA can be done from the same device.
Only available for Duo end users; administrators cannot log into the Duo Admin Panel with Duo Desktop. When Duo Desktop authentication is enabled in your application's effective authentication methods policy, end users can self-enroll Duo Desktop for authentication via the enrollment prompt. When Duo Desktop authentication is enabled in both the authentication methods policy and the enrollment policy, end users can self-enroll Duo Desktop for authentication via the self-service portal. When Duo Desktop authentication is enabled in the enrollment policy, users will be able to select and enroll Duo Desktop as an authentication method during their first-time Duo enrollment. End users cannot log into the self-service portal using Duo Desktop, even if the authentication method is enabled in the effective policy.
If you want to simplify repetitive Duo Desktop authentication enrollment for users without individual workstations, see Shared Device Authentication for more information.
If a user logs into a different device than the one where Duo Desktop authentication was first set up and Duo Desktop is the only authentication method, they will be blocked from authenticating and see "Device not allowed". To avoid this, either enroll other authentication methods for the user or enable Shared Device Authentication.
Prerequisites
- Windows access devices must support Trusted Platform Module (TPM) 2.0.
- MacOS access devices must support Secure Enclave.
If you need to use Duo Desktop authentication on a device that does not have TPM or Secure Enclave, contact Duo Support for options.
Requirements
- A Duo Premier, Duo Advantage, or Duo Essentials plan.
- An administrator with the Owner, Administrator, or Application admin role.
- Access devices running macOS 11+ or Windows 10 build 1803+.
- Duo Desktop 6.12.0/6.12.0.0 or later installed on Windows and macOS clients.
- Supported Duo applications which feature the Duo Universal Prompt:
- Make sure your enrollment experience is set to Show new Universal Prompt.
- Edit your global policy or apply a application-group or application policy with these policy settings:
- Duo Desktop: Set to Require Duo Desktop on Windows devices or Require Duo Desktop on macOS devices.
- Authentication methods: Enable Duo Desktop authentication.
- Note: Duo Desktop authentication doesn’t require configuring device registration. If your existing policies already require device registration, you do not need to change these policies.
Duo Desktop authentication cannot be used as a factor for remembered devices. Even if a remembered devices policy is applied, Duo Desktop authentication will not start a remembered devices session, and users will need to authenticate with Duo Desktop each time.
- Duo Desktop authentication will not work with Duo Passport.
Enable Duo Desktop for Authentication
-
Duo Desktop must be installed on any supported macOS or Windows machine where you wish to use Duo Desktop for authentication. Please follow the steps for your chosen deployment method in the Duo Desktop installation instructions.
-
Log in to the Duo Admin Panel and navigate to Policies → Policies.
-
Either edit your global policy or apply a application group or application policy with these policy settings:
- Duo Desktop: Set to Require Duo Desktop on Windows devices, or Require Duo Desktop on macOS devices.
- Authentication methods: Enable Duo Desktop authentication.
-
Click Save Policy.
For more information about creating and applying group policies, see the Policy documentation.
Verify Duo Desktop for Authentication
Test enrolling in Duo Desktop for authentication from a supported Windows or macOS device:
-
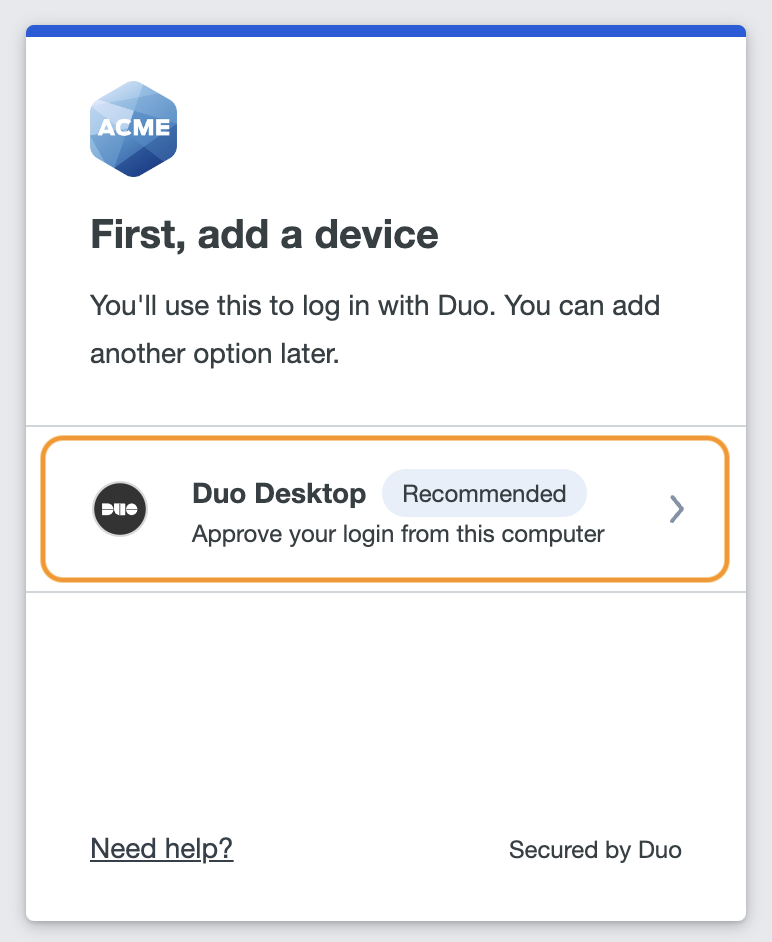
Access some Duo-protected web application which shows the Duo Universal Prompt using a browser as a new user. The application's effective policy should have "Duo Desktop authentication" enabled as an authentication method and Duo Desktop must be installed on the device.
-
Enroll in Duo Desktop for authentication by selecting Duo Desktop in the list of devices.
-
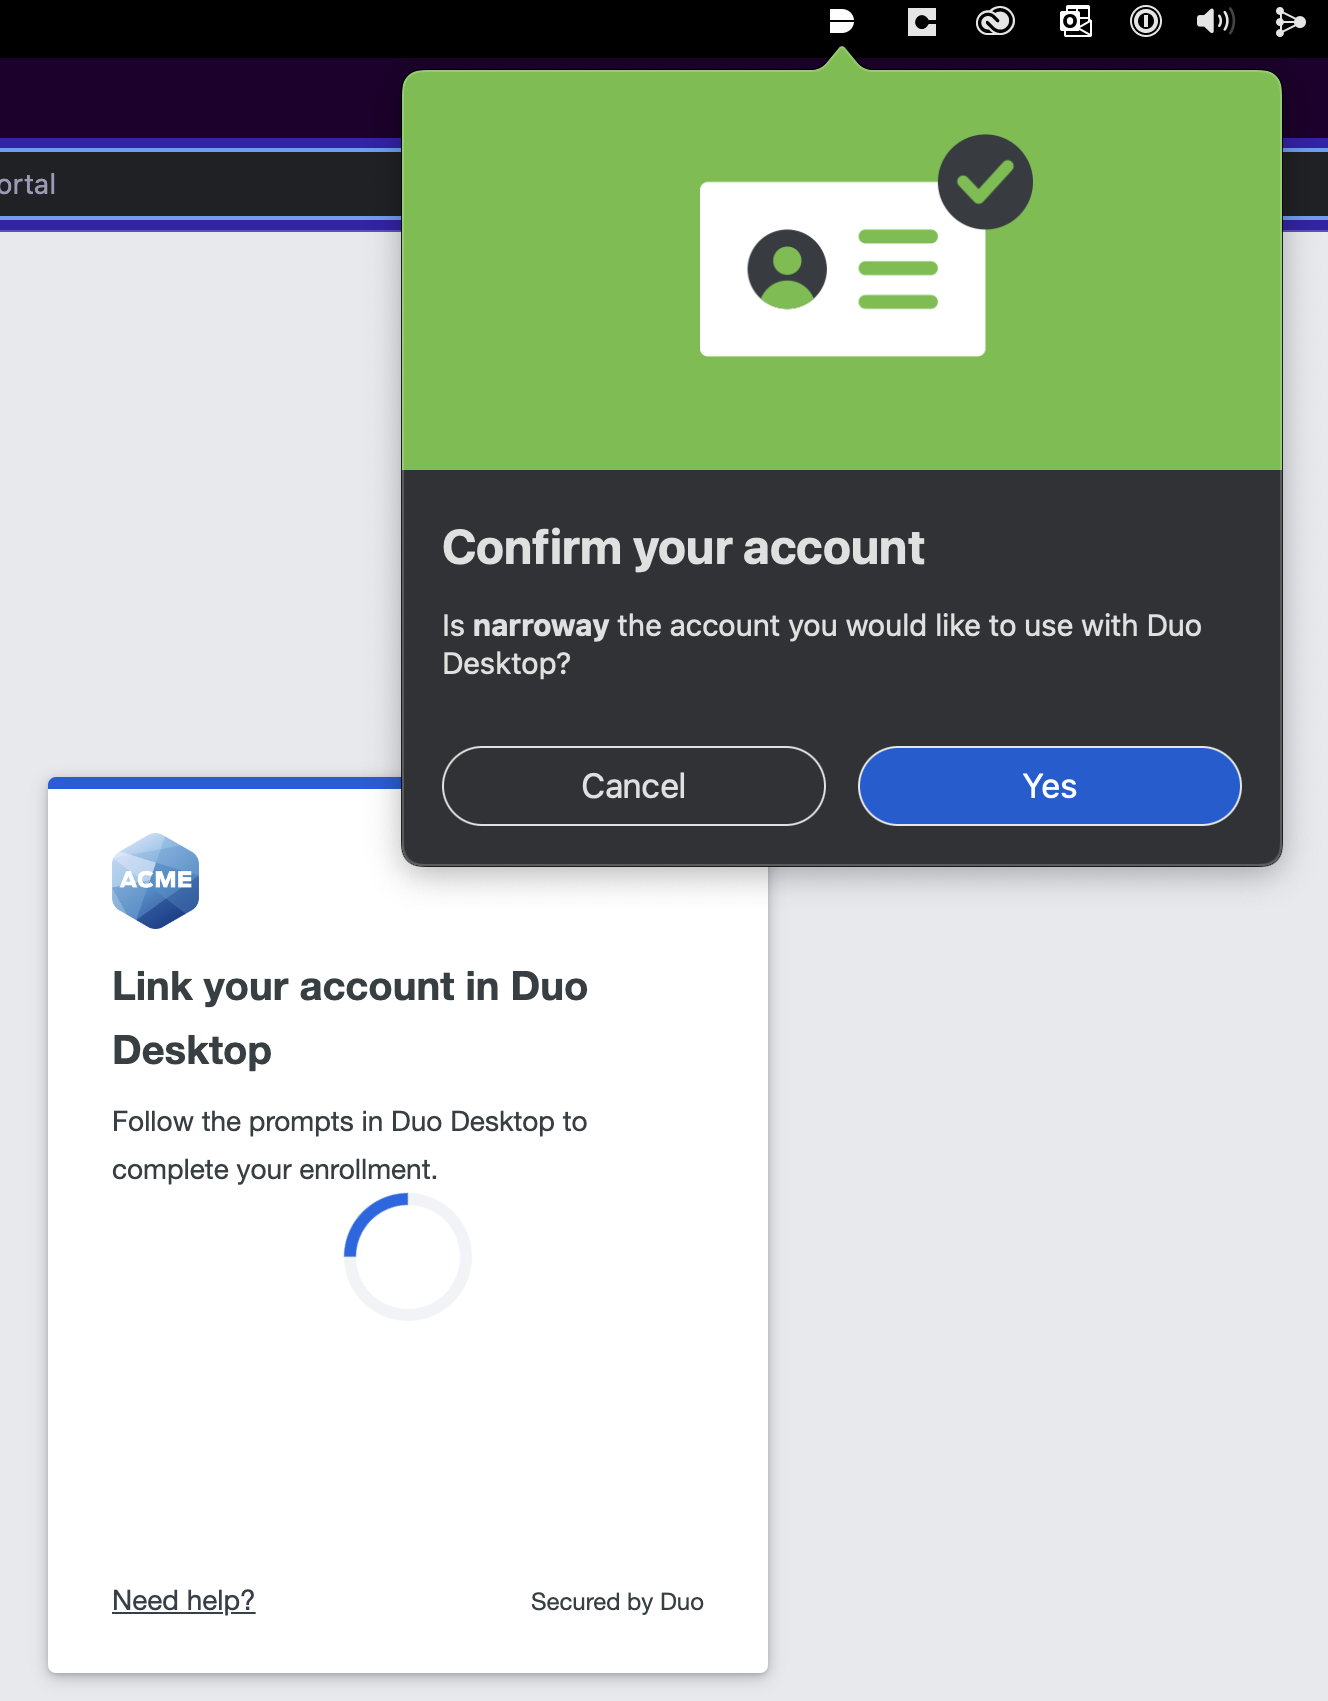
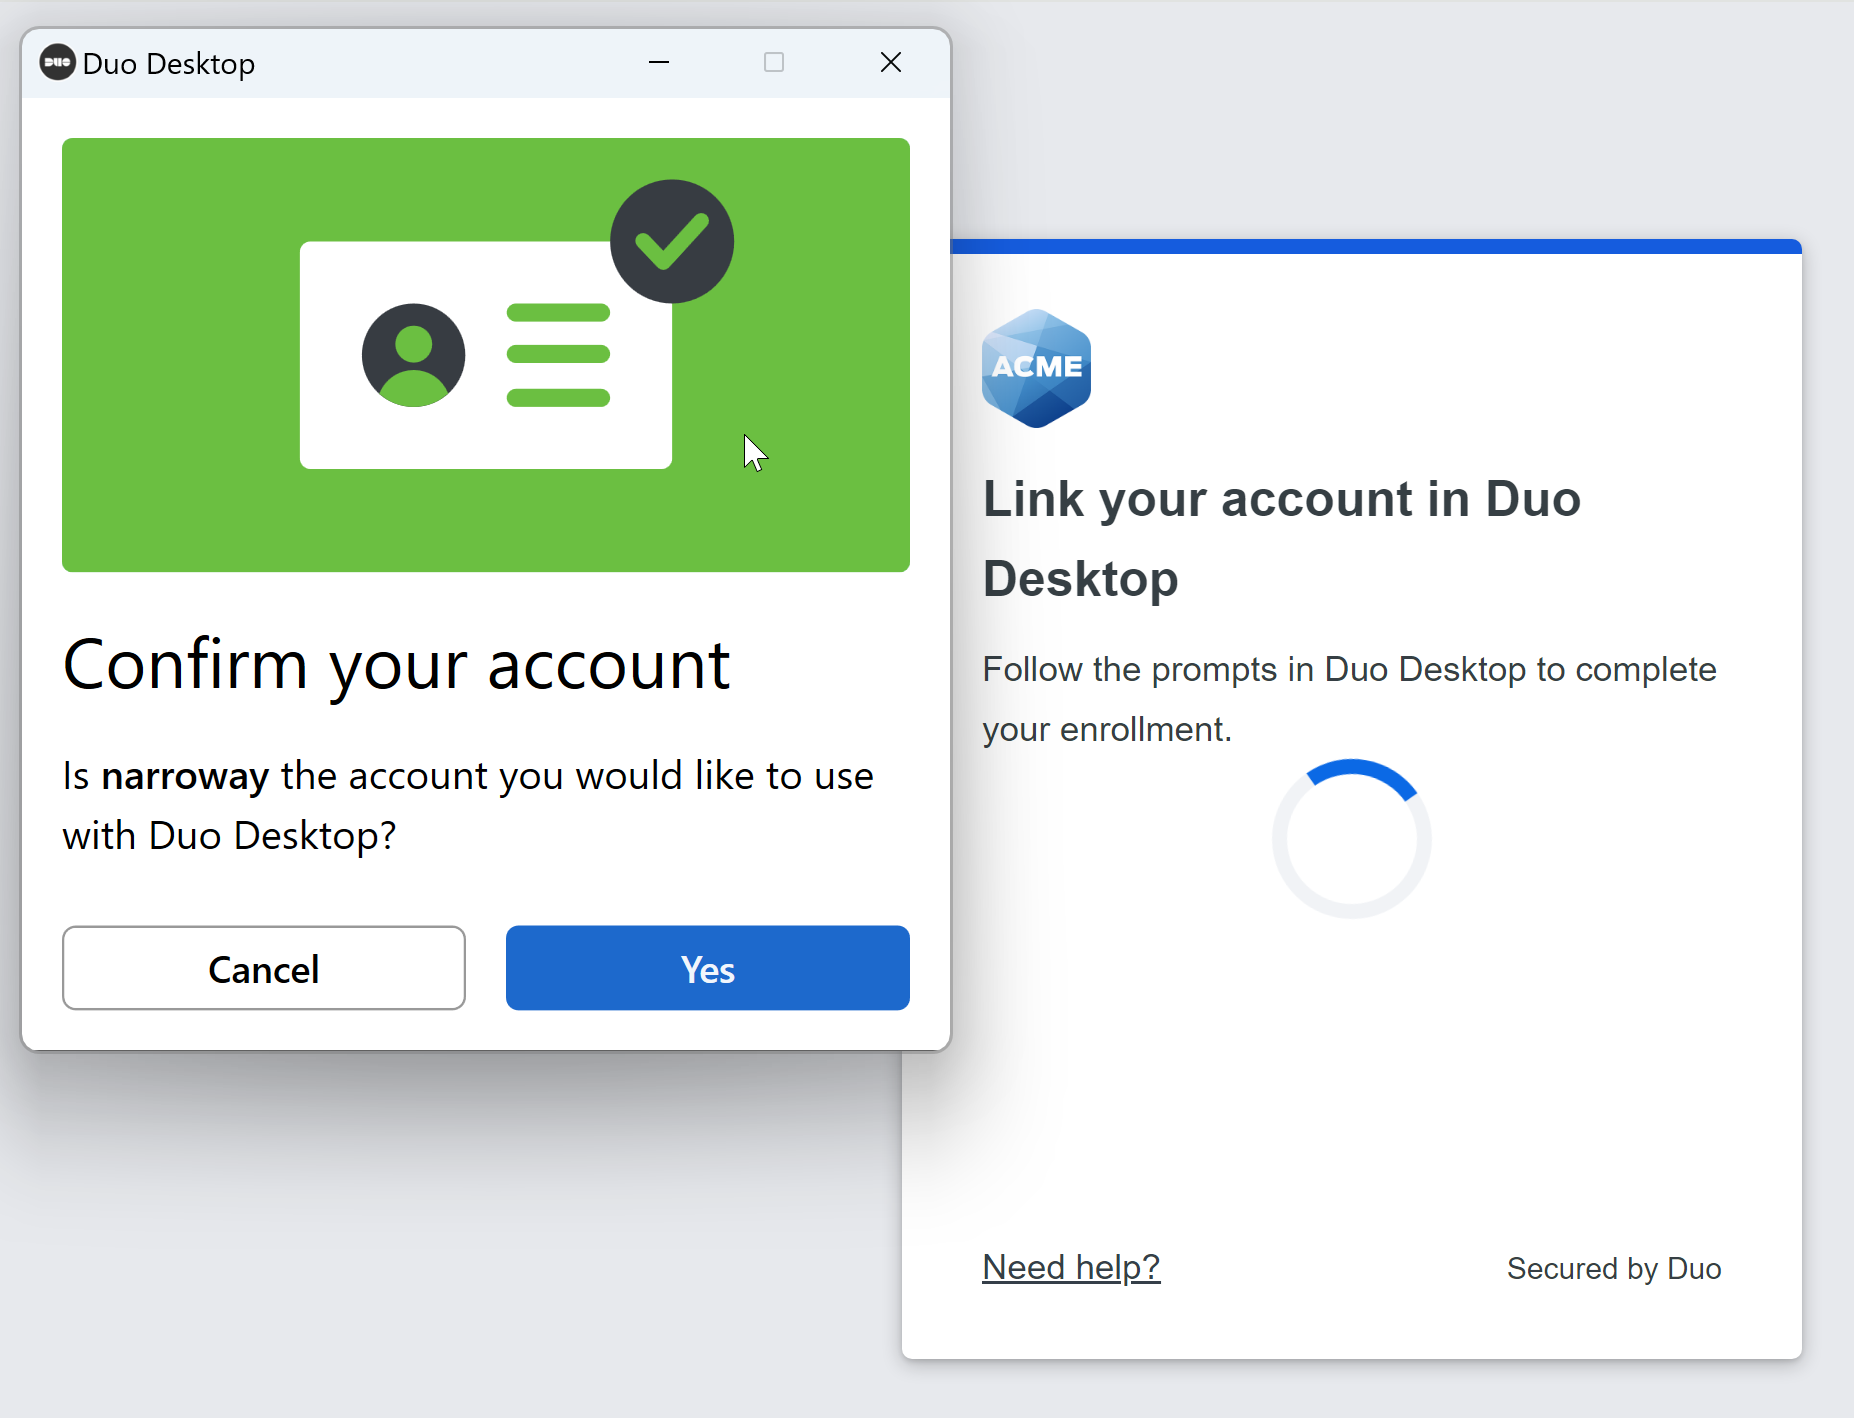
Duo Desktop will pop up a confirmation window. Click Yes to link your account.
On macOS:
On Windows:
-
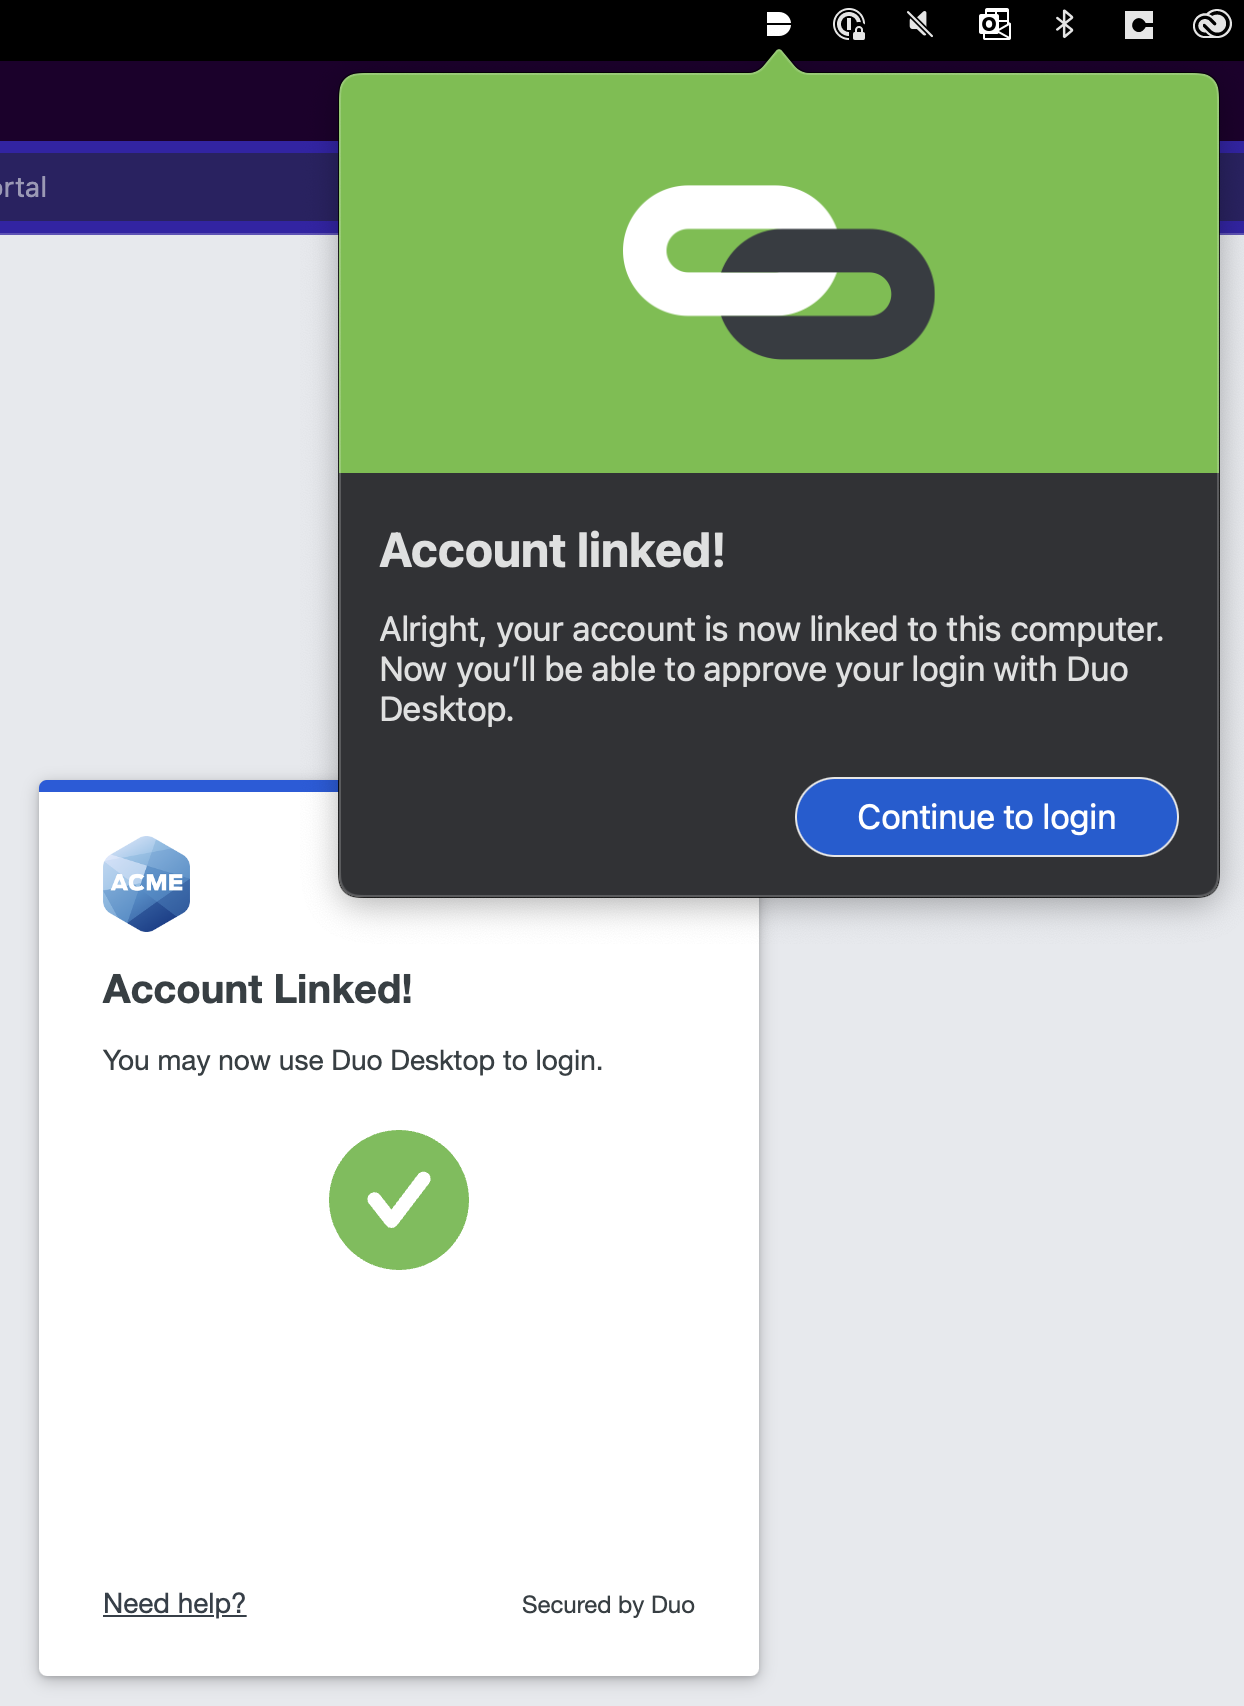
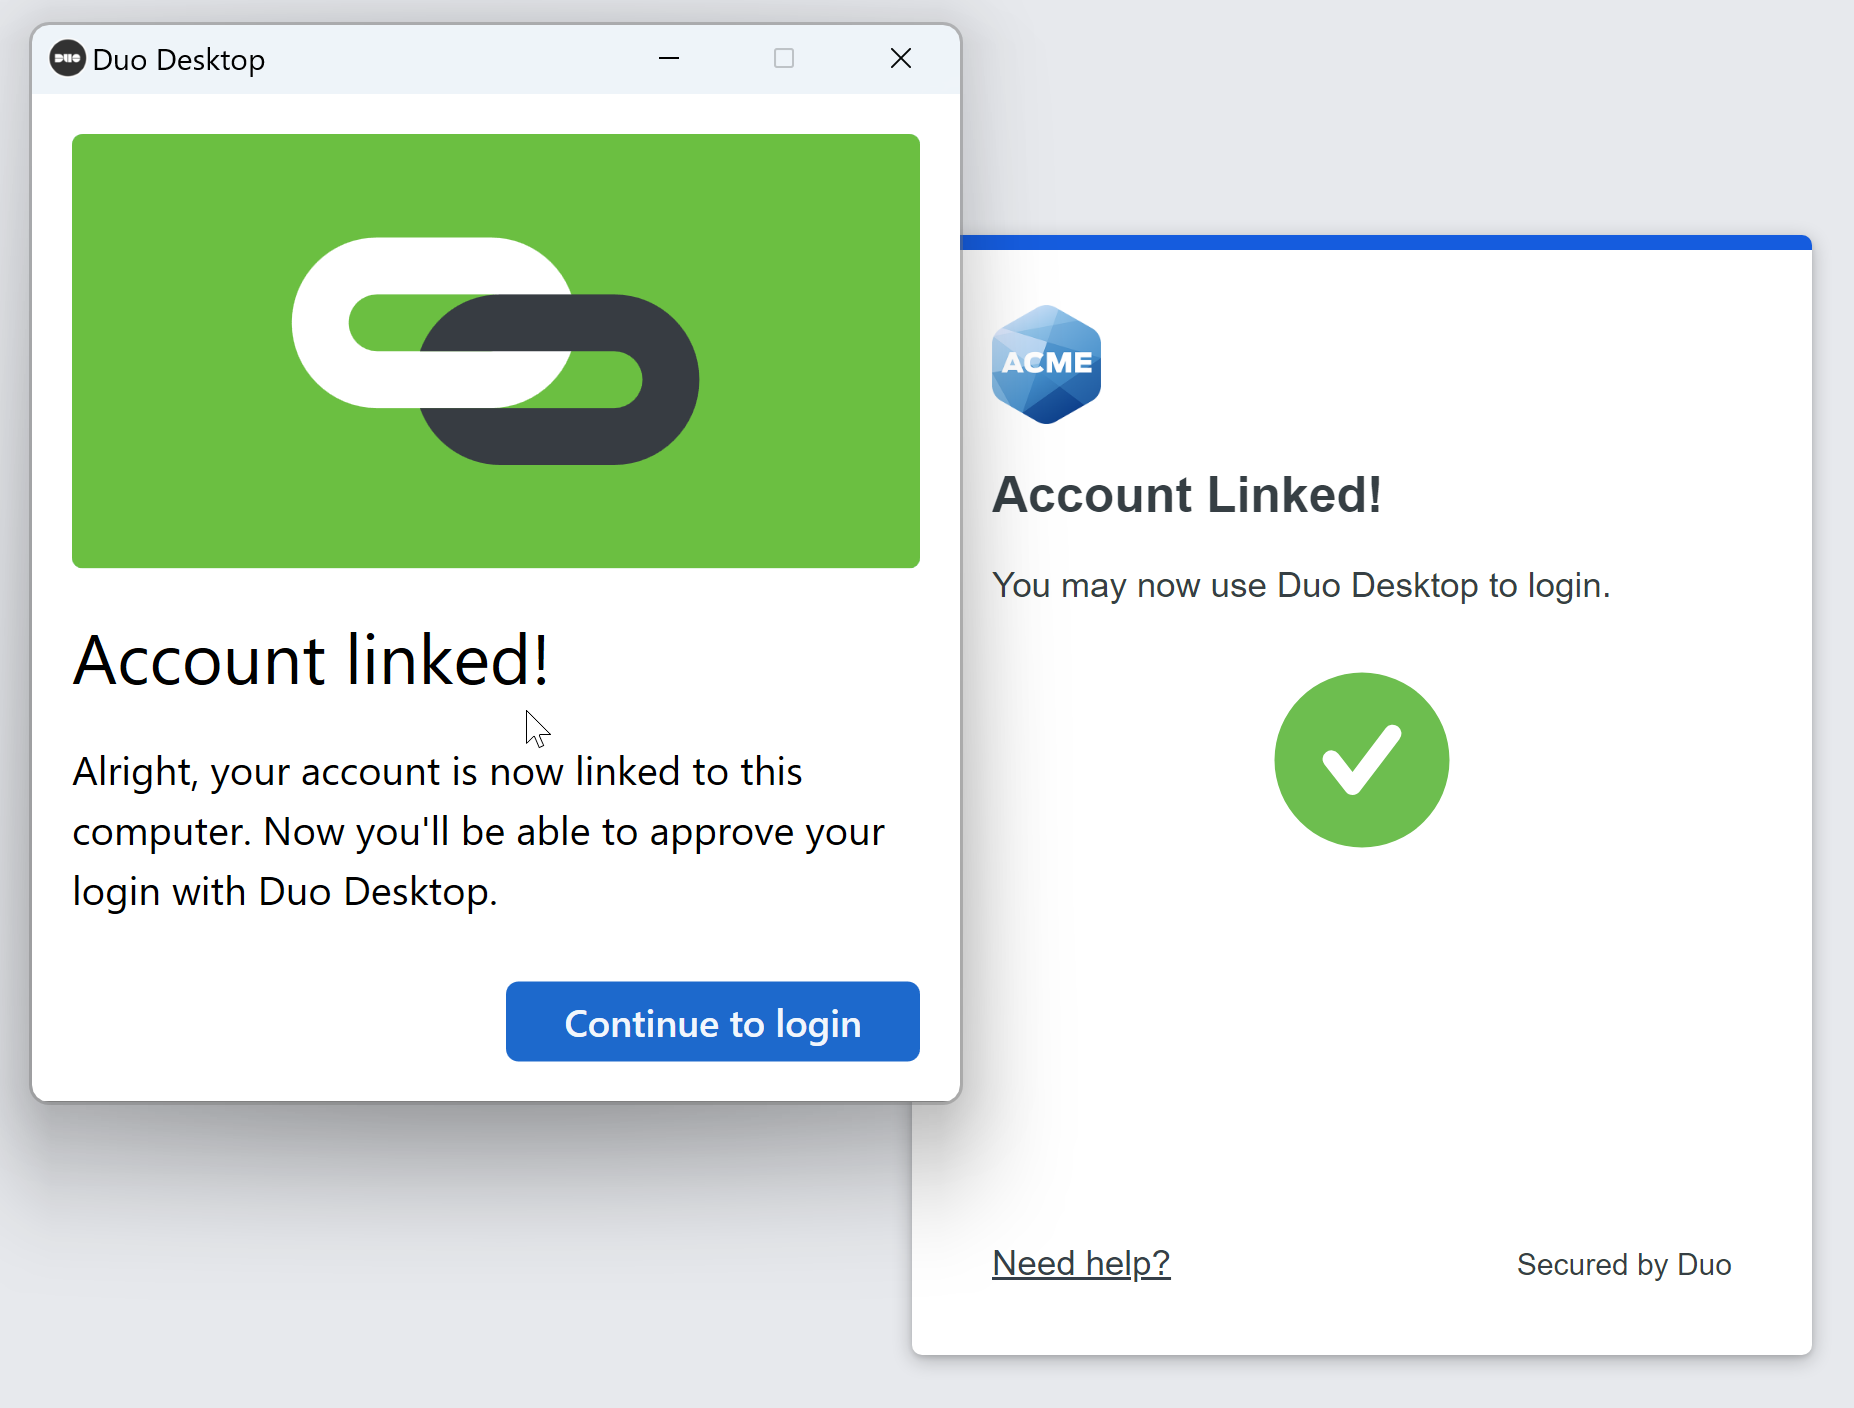
Click Continue to login.
On macOS:
On Windows:
-
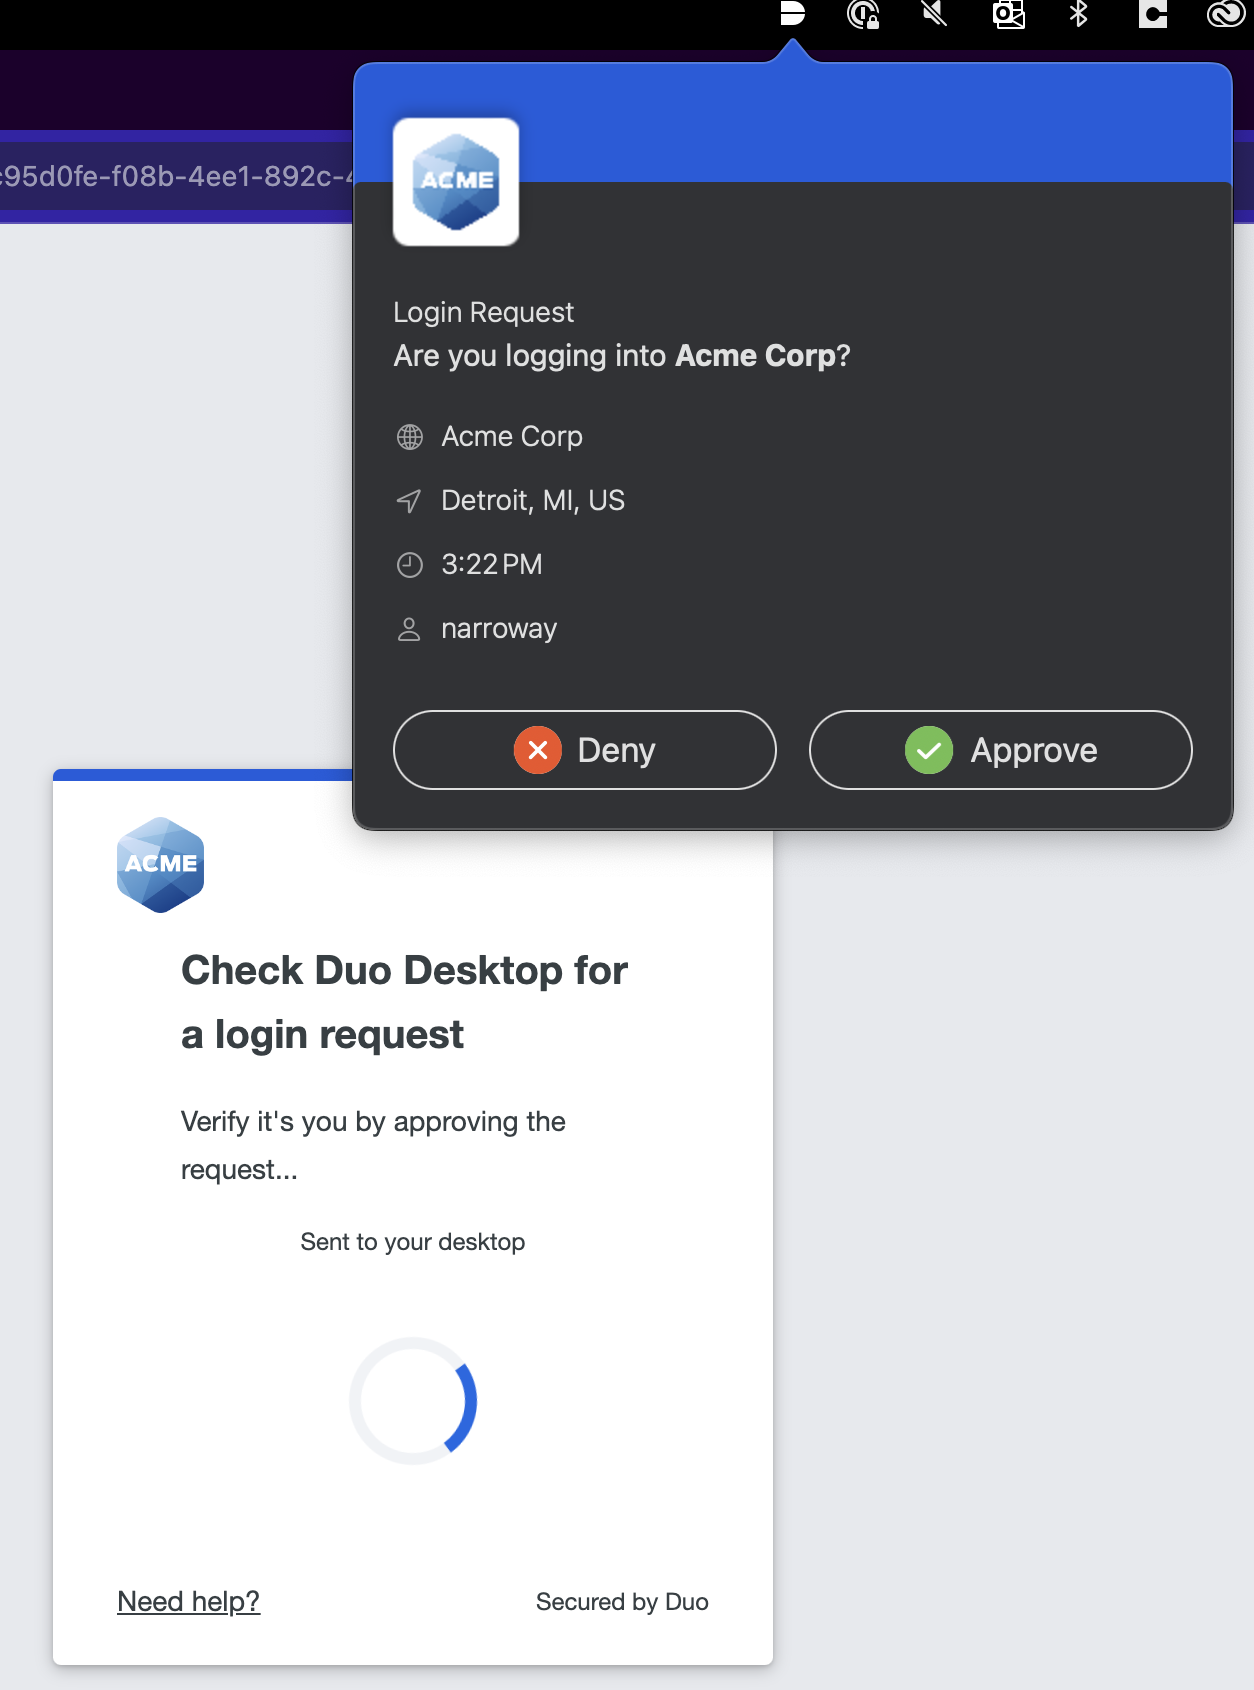
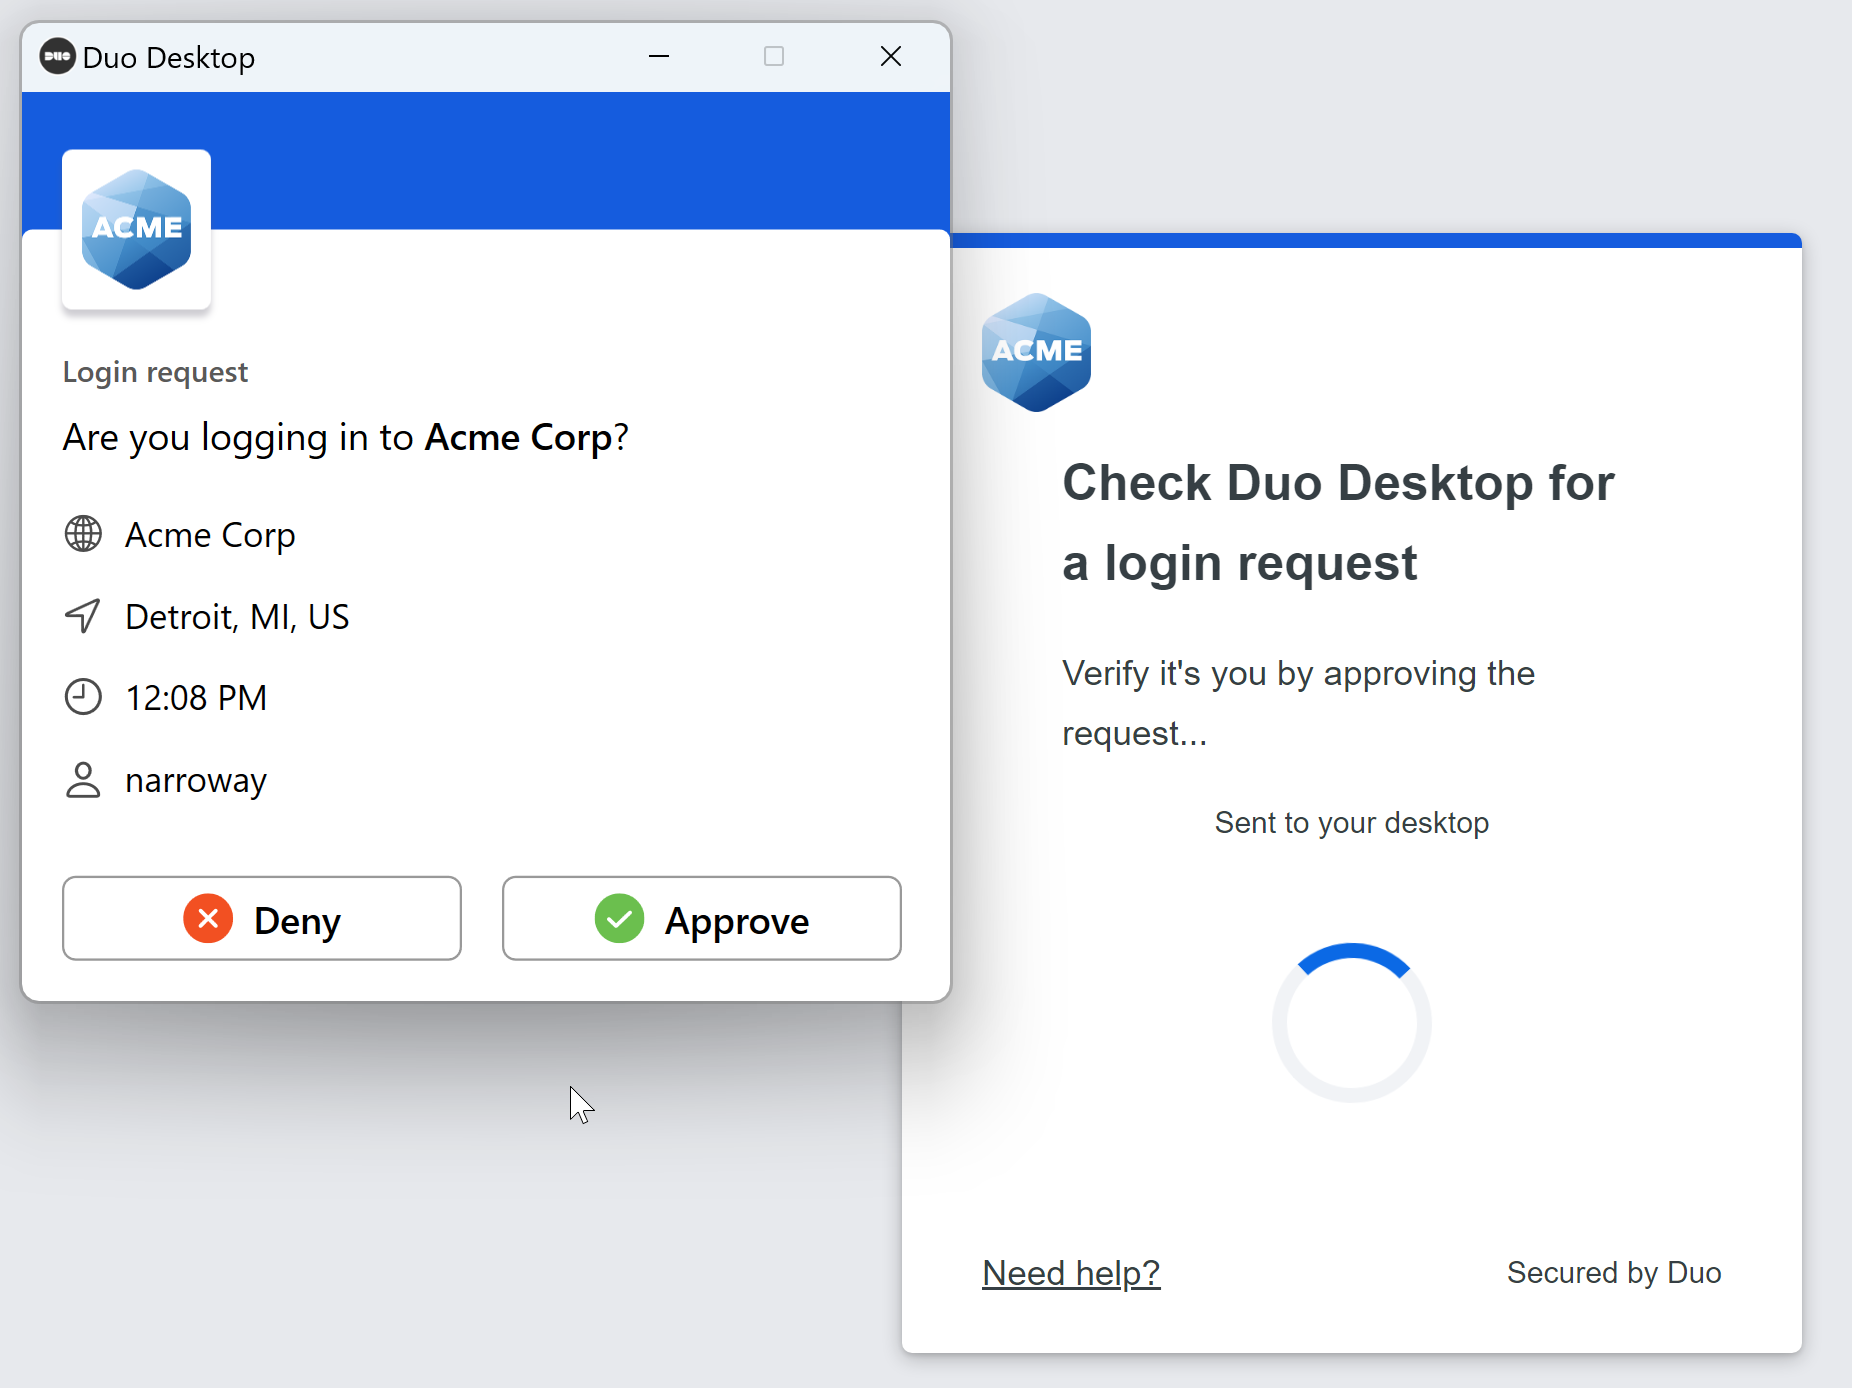
Duo Desktop will ask you to approve or deny the authentication attempt. Click Approve to log into the application.
On macOS:
On Windows:
Once you have enrolled in Duo Desktop for authentication on a device, that device will show Duo Desktop as an authentication method as long as "Duo Desktop authentication" is enabled in policy.
By default, end users will need to enroll in Duo Desktop authentication on each computer they use to access Duo-protected applications. To allow end users to use Duo Desktop as an authentication method on multiple devices without having to enroll each time, see Shared Device Authentication.
List Duo Desktop Authenticators
-
Log in to the Duo Admin Panel and navigate to Devices → Duo Desktop Authenticators. A list of Duo Desktop Authenticators are shown, along with the attached end user.
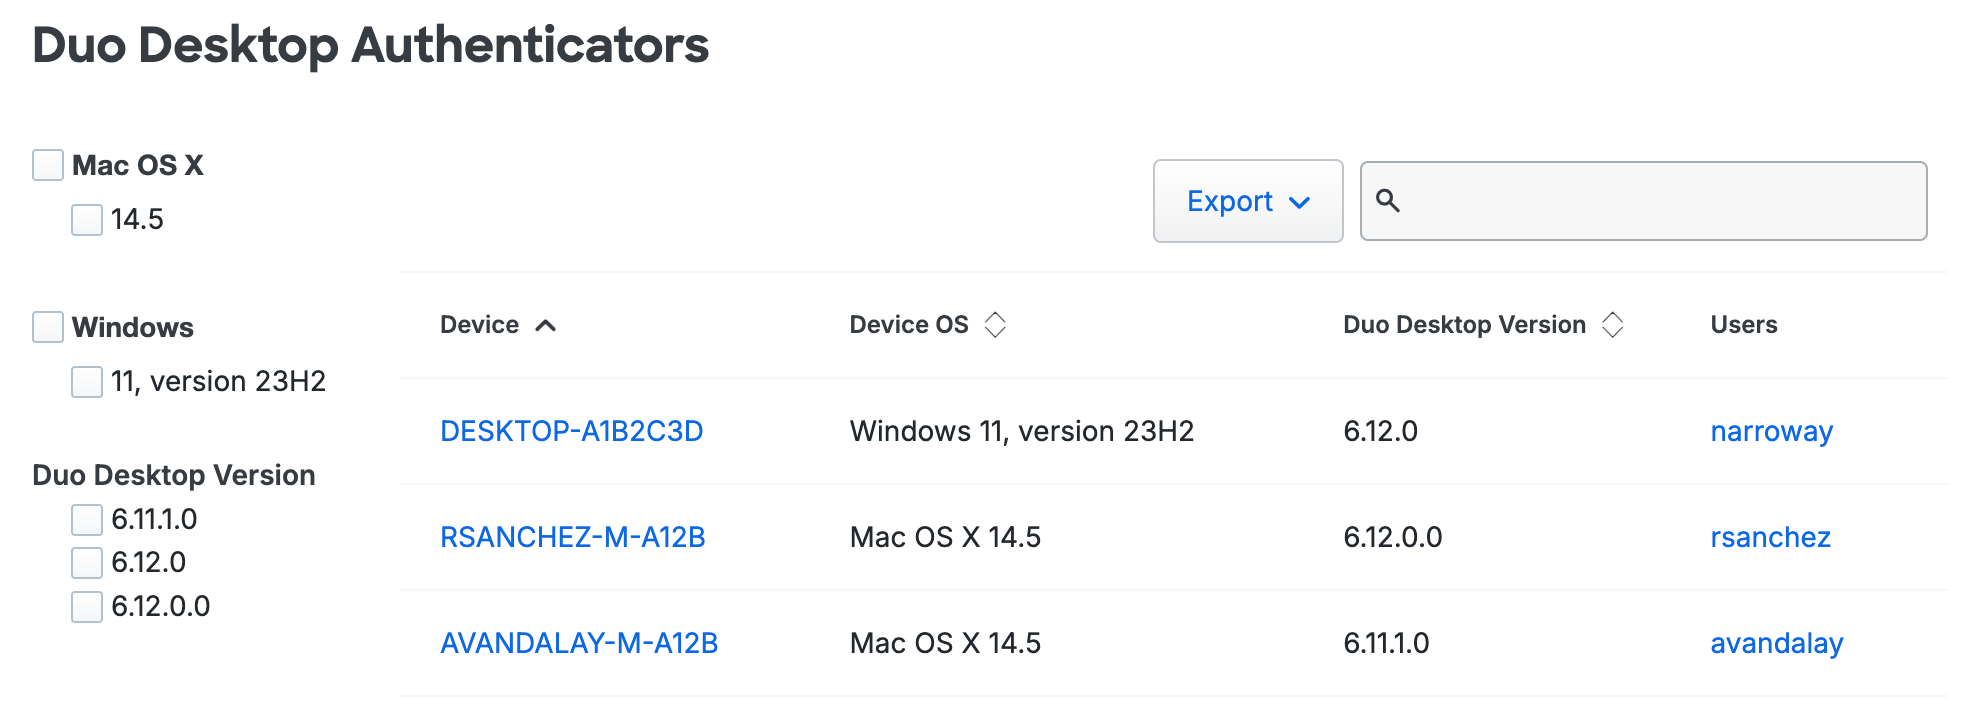
Click the Export button in the upper right side of the desktops list and select from the available export options, which may include CSV or JSON, to download a copy of the desktops list.
-
Select an authenticator by clicking the identifier in the "Device" column. This loads the endpoint's details page for that computer. You can view which users have authenticated to Duo using that endpoint, as well as the operating system, browser, plugin, trusted endpoint, device health, and Duo Desktop authentication information. This page is not available for Essentials customers.

Delete a Duo Desktop Authenticator For a User
Duo Desktop authenticators can be deleted from the user's properties page:
-
Log in to the Duo Admin Panel and navigate to Users → Users in the left sidebar.
-
Select a user by clicking their username. Scroll down to the Desktop Authenticators table and click the trash icon to remove a device.

-
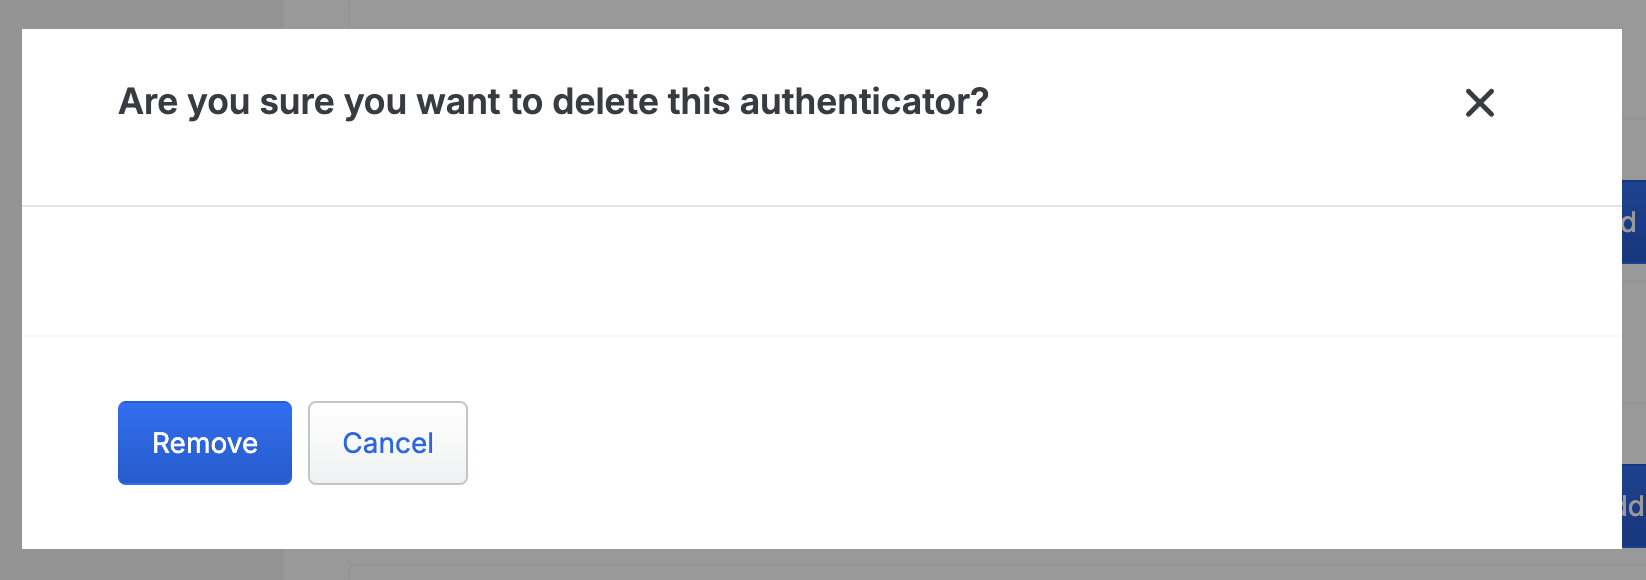
Confirm deletion of the Duo Desktop authenticator. This will remove the computer from the "Duo Desktop Authenticators" page; the "Endpoints" details will still be available.
Note: You can't add a desktop for Duo Desktop authentication for a user.
Shared Device Authentication
Enable shared device authentication to simplify Duo Desktop authentication enrollment for users who regularly move between desktops. This allows groups of users using devices in certain Trusted Endpoints integrations to only have to enroll in Duo Desktop for authentication on one computer. Subsequent enrollments on additional computers happen silently.
You can add multiple shared device authentication configurations of user groups and Trusted Endpoints integrations. Each configuration limits shared device authentication to the selected users and devices.
Prerequisites
- The same prerequisites as Duo Desktop authentication.
Requirements
- In addition to the requirements needed for Duo Desktop authentication:
- One or more user groups that contain the users who switch desktops.
- Note: You cannot update the members of a group managed by directory sync. Consider syncing a new group containing only the target users for shared device authentication.
- One or more Trusted Endpoints integrations that use Duo Desktop for device verification.
- Note: Shared device authentication doesn’t require a trusted endpoints policy to be set to "Require endpoints to be trusted". If your existing policies already require endpoints to be trusted, you do not need to change these policies.
- One or more user groups that contain the users who switch desktops.
Enable Shared Device Authentication
-
Duo Desktop must be installed on any supported macOS or Windows machine that you wish to use Duo Desktop for authentication. Please follow the steps for your chosen deployment method in the Duo Desktop installation instructions.
-
Log in to the Duo Admin Panel and navigate to Policies → Policies in the left sidebar.
-
Either edit your global policy or apply a custom group or application policy with these policy settings:
- Duo Desktop: Set to Require Duo Desktop.
- Authentication methods: Enable Duo Desktop authentication.
-
Click Save Policy.
For more information about creating and applying group policies, see the Policy documentation.
-
Navigate to Devices → Duo Desktop Shared Device Authentication.
-
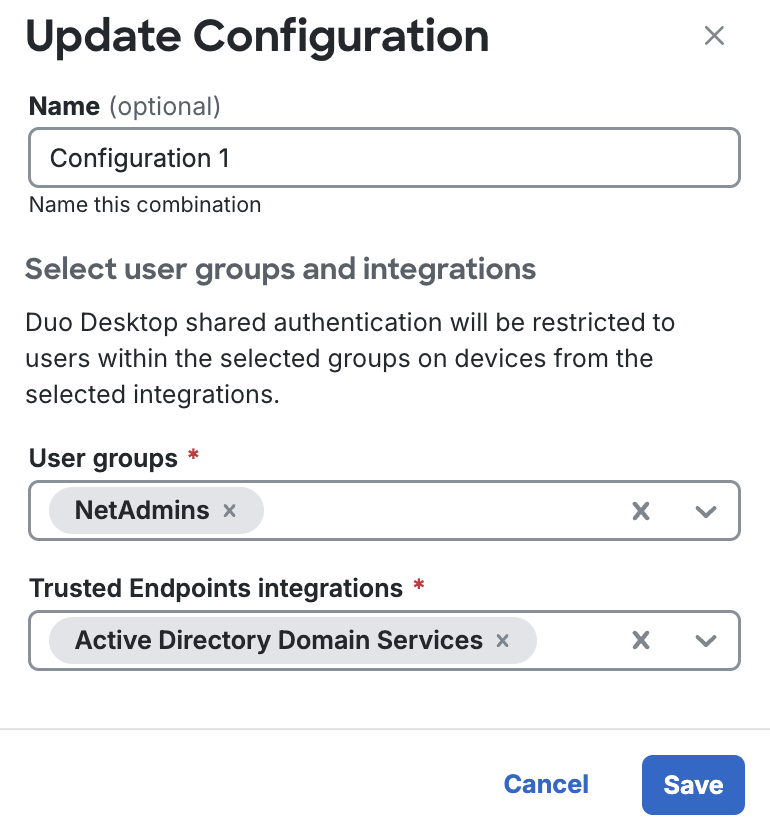
Click + Add configuration.
-
Optionally, you can enter a name for this shared device authentication configuration in the Name field.
-
Select one or more groups that contain users of shared desktops from the User groups drop-down. See Using Groups for more information about creating user groups.
You cannot update the members of a group managed by directory sync. Consider syncing a new group containing only the target users for shared device authentication.
-
Select one or more Trusted Endpoints integrations from the Trusted Endpoints integrations drop-down. The selected integrations must use Duo Desktop for device verification. See Trusted Endpoints for more information about creating a Trusted Endpoints integration.
-
Click Save.
-
Repeat steps 6-10 for any additional configurations.
Verify Shared Device Authentication
-
Follow the steps to enroll and verify Duo Desktop authentication. Test with a device trusted by a Trusted Endpoints integration and a user from a user group you selected earlier.
-
Access a different device that is part of the same Trusted Endpoints integration with the same user.
-
You should automatically be prompted to approve or deny the authentication from Duo Desktop. The new device will be enrolled for that user without seeing the enrollment flow.
Manage Shared Device Authentication Configurations
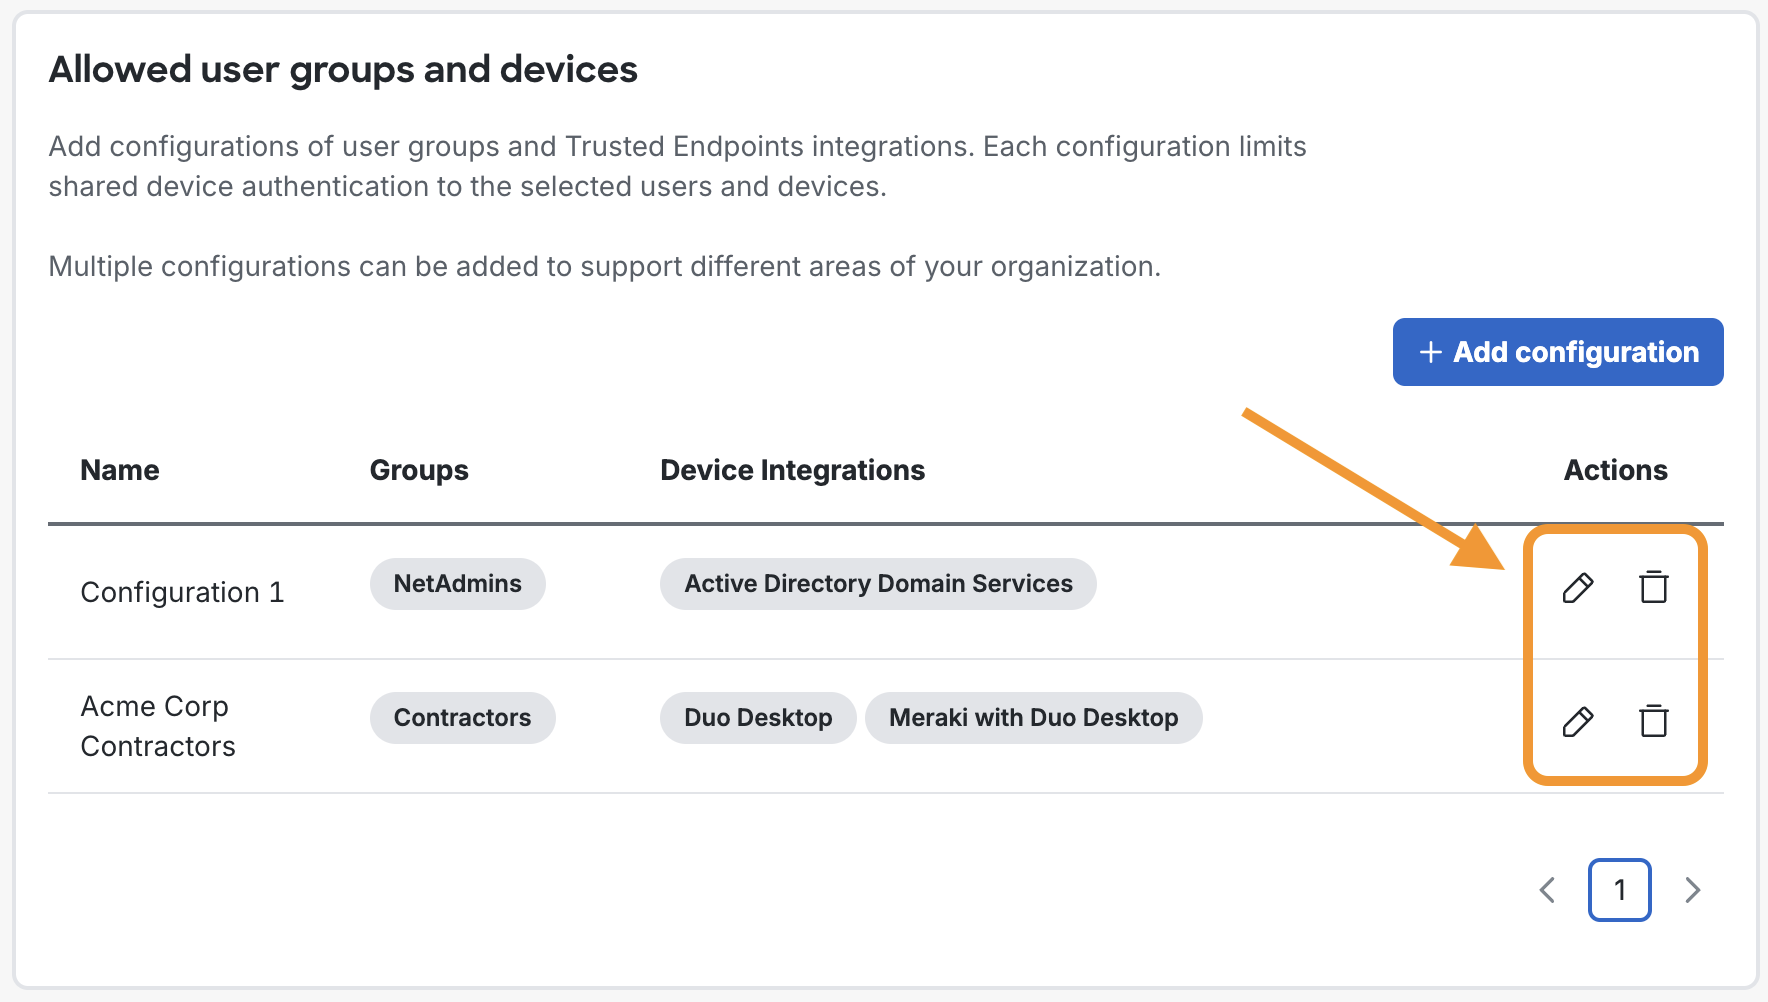
You can manage your shared device authentication configurations in the Duo Admin Panel. Navigate to Devices → Duo Desktop Shared Device Authentication to see a list of your configurations.
Under the "Action" column, you can click on the edit or delete icons to update your current shared device authentication configurations.
Manage Shared Devices
Every device enrolled in Duo Desktop authentication will show up in the "Desktop Authenticators" table on the user's details page. Information about the devices can also be seen on the Duo Desktop Authenticators page and desktop authenticators can be deleted for individual users.
Duo Desktop Client Application
Duo Desktop analyzes a device to assess the status of its security posture and reports the results of this scan to Duo. During authentication, Duo applies and enforces access policies using the device security posture information. When access is denied by Duo due to the state of security posture on the device, Duo Desktop receives the results of the policy check and presents guidance for the user to remediate the issue and successfully login the next time.
Supported Operating Systems
Linux Endpoints
- Debian: 11, 12
- Ubuntu: 24.04 LTS, 23.04, 22.04 LTS, 20.04 LTS
- CentOS Stream: 8, 9
- Red Hat Enterprise Linux: 8, 9
ARM architectures for Linux are not supported.
Disk encryption verification for Linux supports LUKS disk encryption only, and the following criteria must be met:
- The entire home directory (
/home) must be encrypted. - The entire root (
/) partition must be encrypted.
Firewall verification supports any one of these firewall options running on the endpoint:
ufw(uncomplicated firewall) with enabled status.firewalldwith enabled status.iptableswith a defaultINPUT DROPrule.
The following features either function differently or aren't present in Duo Desktop for Linux:
- Duo Desktop does not offer guided remediation. The Duo authentication prompt lists posture issues if an endpoint is blocked by policy.
- Your operating system's package manager handles automated app updates. Installing Duo Desktop registers it with the appropriate package manager (
aptoryum) for the endpoint's Linux distribution. - Duo Desktop does not present a Duo icon in the taskbar on Linux systems as it operates as a background service.
- The app has no standalone health check (home screen).
- Operating system updates policies that check for out-of-date software versions aren't supported.
macOS Endpoints
Duo Desktop supports the following macOS versions on physical and virtual machines:
- macOS 26 (Tahoe)
- macOS 15 (Sequoia)
- macOS 14 (Sonoma)
- macOS 13 (Ventura)
- macOS 12 (Monterey)
- macOS 11 (Big Sur)
Both Intel and Apple silicon chipsets (M processors) run the app natively. Duo Desktop does not support macOS beta versions.
Windows Endpoints
Duo Desktop supports the following Windows versions on physical and virtual machines:
- Windows 10 build 1803 and later
- Windows 11
- Windows Server 2016 and later
Supports Intel and ARM processors.
Duo Desktop is compatible with Windows Enterprise, Pro, and Home client editions (and the "Education" variants of these editions). Additionally, Duo Desktop is compatible with Windows Server Standard, Datacenter, and Datacenter: Azure editions.
Duo Desktop relies on the Windows Security Center present in client versions of the OS, so it does not support earlier desktop versions of Windows (like Windows 7 or Windows 8.1) as they lack this feature. If Duo Desktop detects that it's running on a Windows Server, the check for Windows Security Center is skipped.
Duo Desktop for Windows also requires .NET Framework 4.7.2 or later.
Standalone Health Check
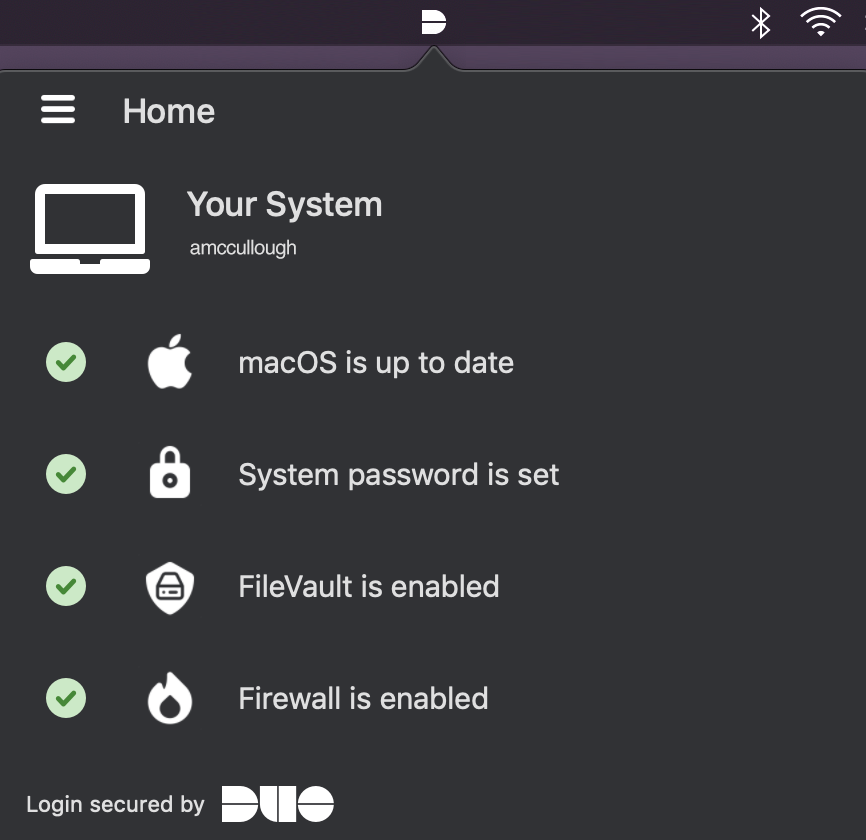
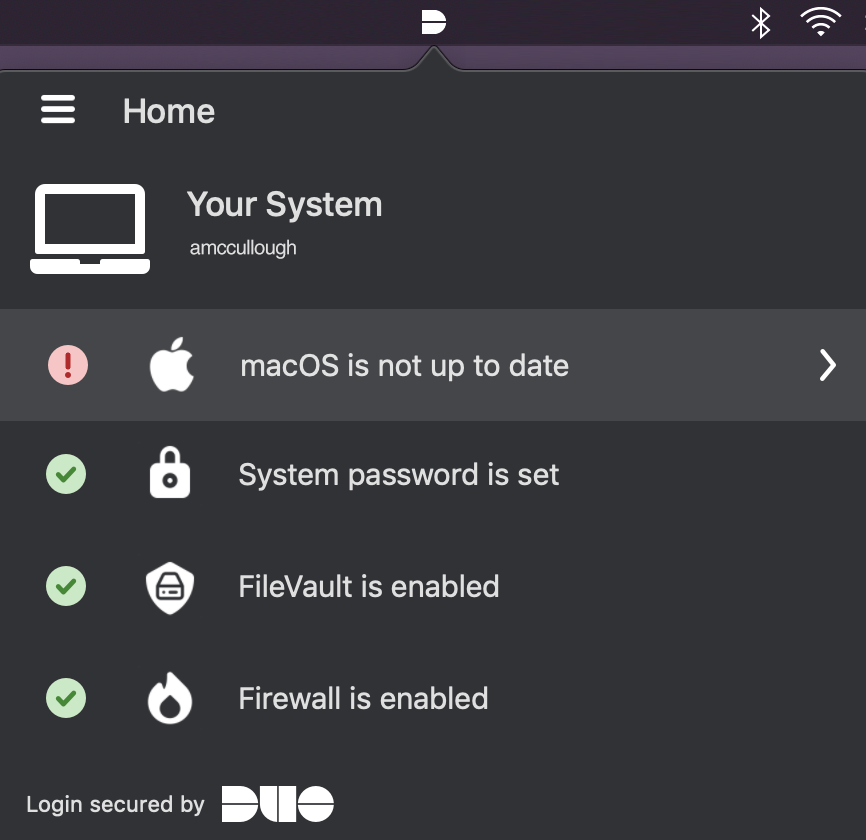
The home screen of Duo Desktop performs a health check on macOS and Windows systems and reports information to the user about the state of the device. This information is Duo’s basis of a secure device and does not apply directly to the evaluation of policy or authentication to an application protected by Duo. While the status of a local security agent (collected if you've configured agent verification) isn't shown on Duo Desktop's home screen, the app will raise an "Action Required" screen with the agent status if access gets blocked for that reason.
The health check will be performed anytime the application is opened from the menu bar (macOS) or the system tray (Windows).
Linux does not support a standalone health check.
macOS Example App Icon and Health Check
Windows Example App Icon in System Tray
Windows Example Health Check
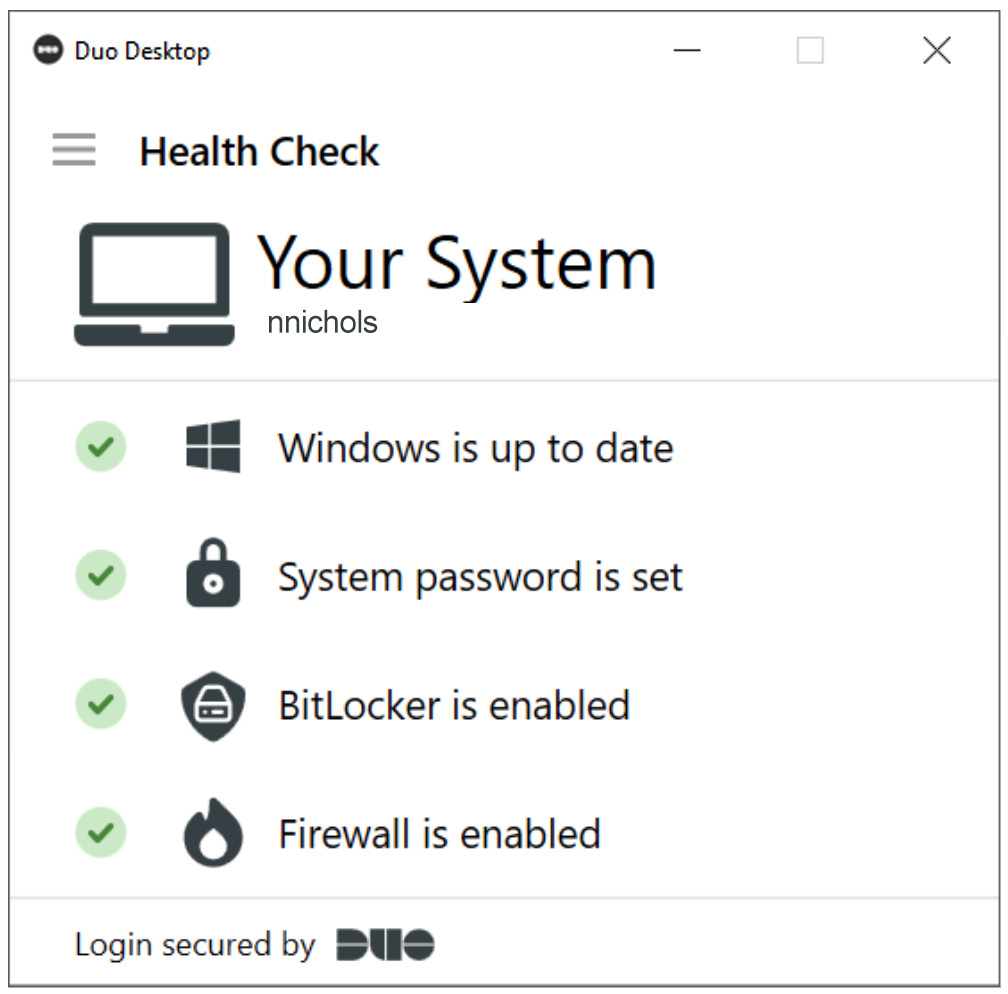
This health check provides your preferred Duo device security posture. By keeping all of these health checks green, Duo helps users keep a secure system and alleviates issues that may arise before an authentication is required. If this check reports an issue, such as the firewall turned off or OS out of date, users have the opportunity to perform remediation before attempting to authenticate.
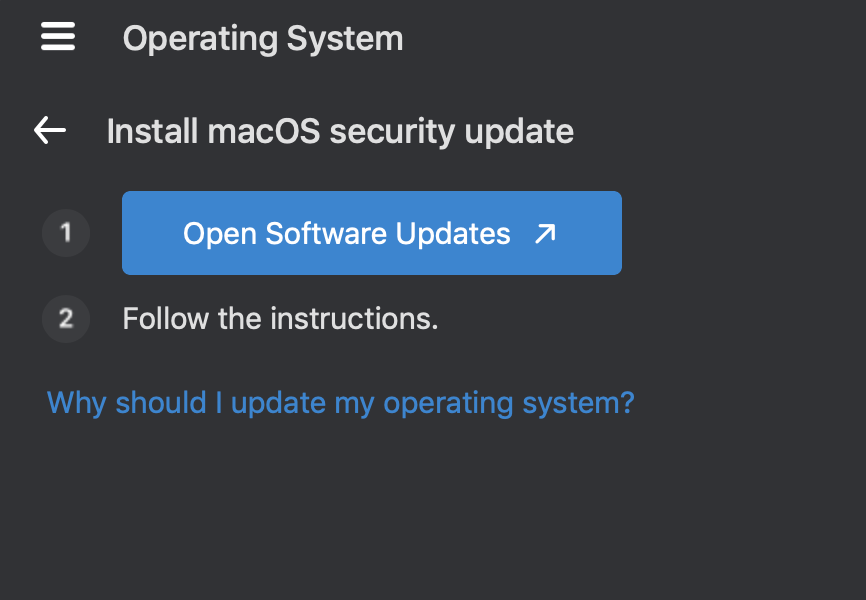
macOS Example Health Check Alert with Remediation Guidance
Require Duo Desktop During Duo Prompt Authentication
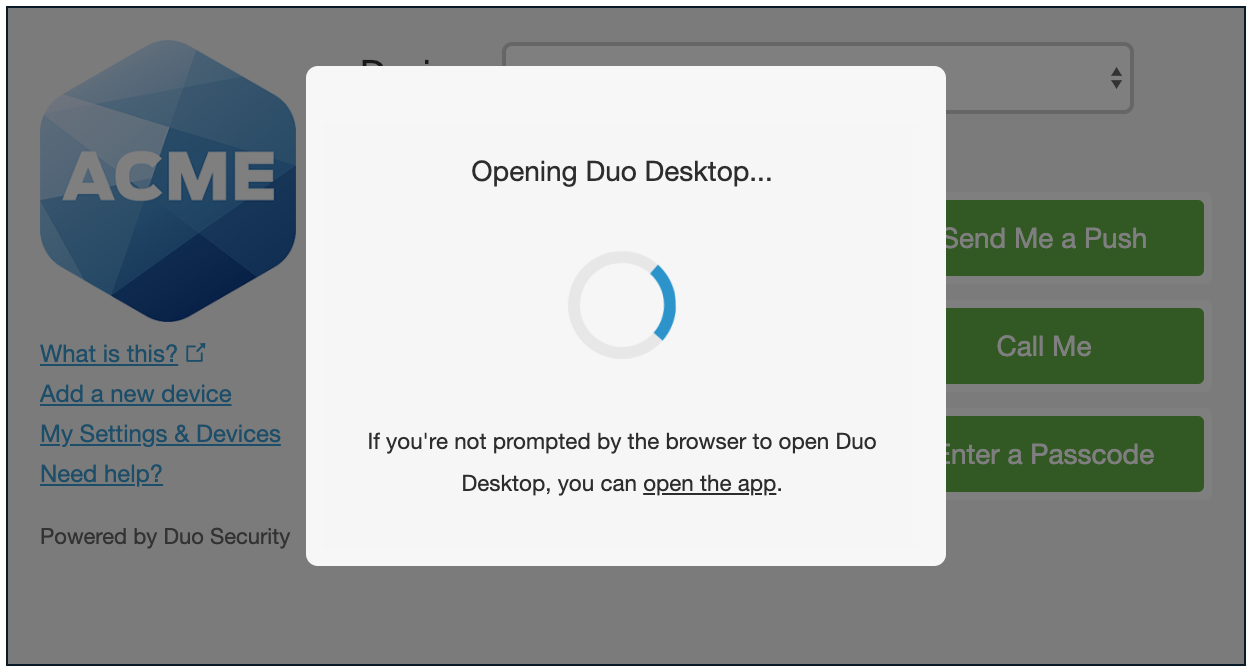
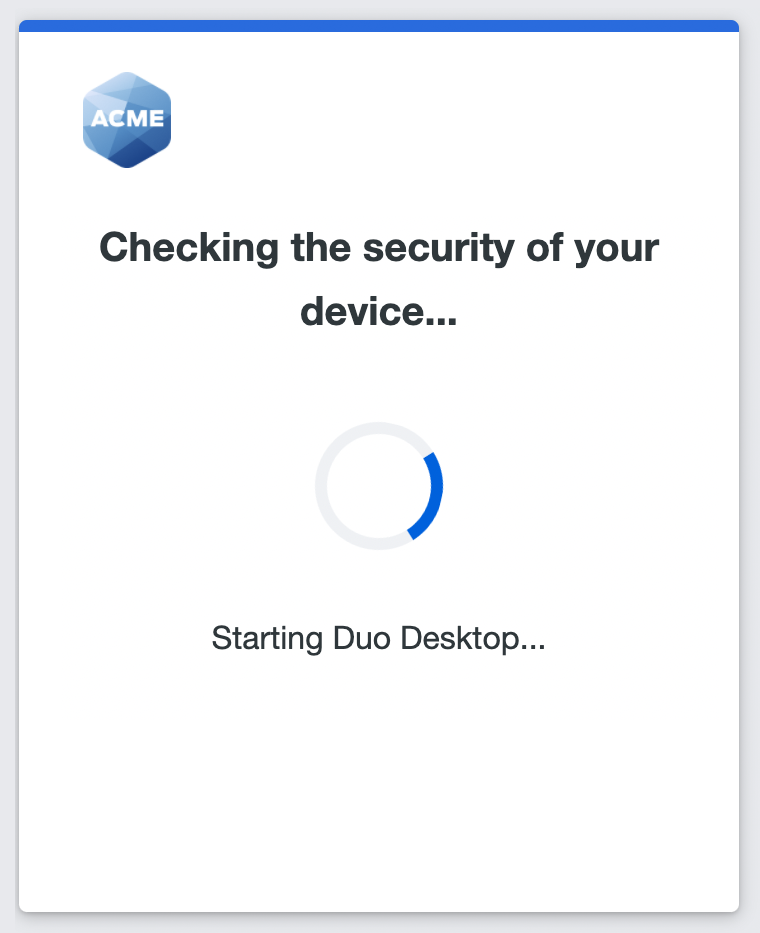
When a user first lands at a Duo Prompt that requires Duo Desktop, a loading spinner appears while Duo performs the health check. If Duo Desktop is already installed and running, this spinner should only appear for a few seconds and the user will continue with authentication. In the event of a failed authentication, the user will be directed to remediate these issues.
When Duo Desktop is not already installed and running users see a notice indicating that the Duo Prompt is attempting to launch Duo Desktop.
Traditional Duo Prompt
Duo Universal Prompt
If the application was already installed and the browser has been told to remember it, the application launches and the health check will be performed without any need for interaction.
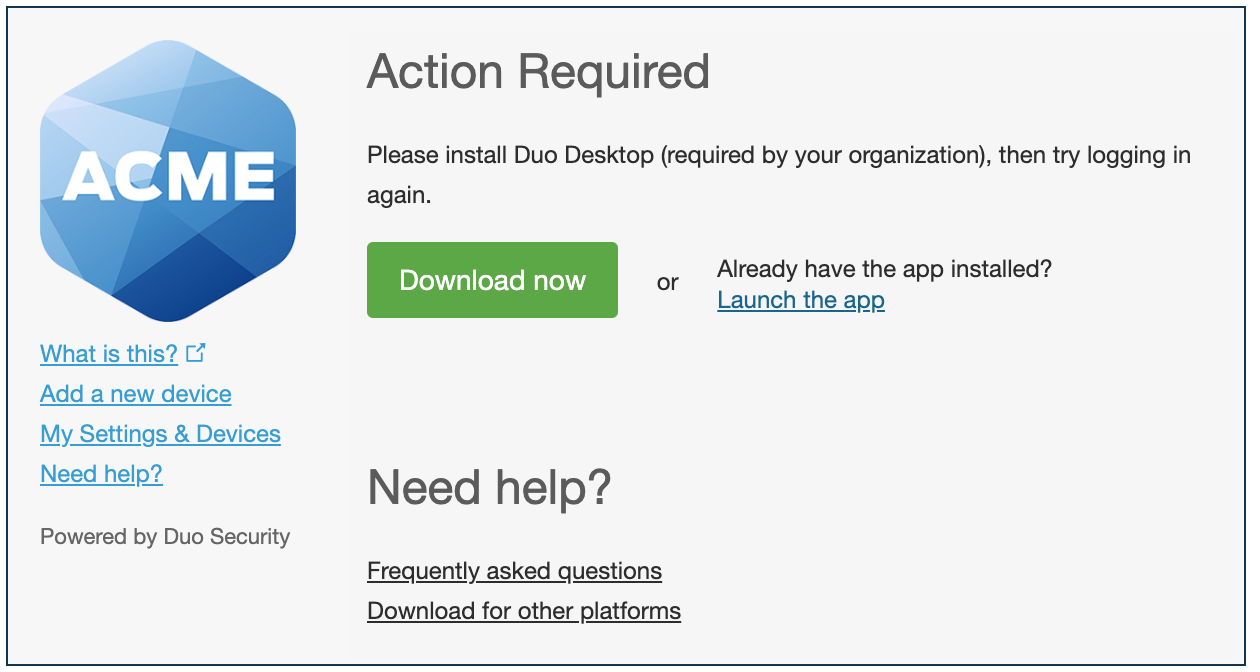
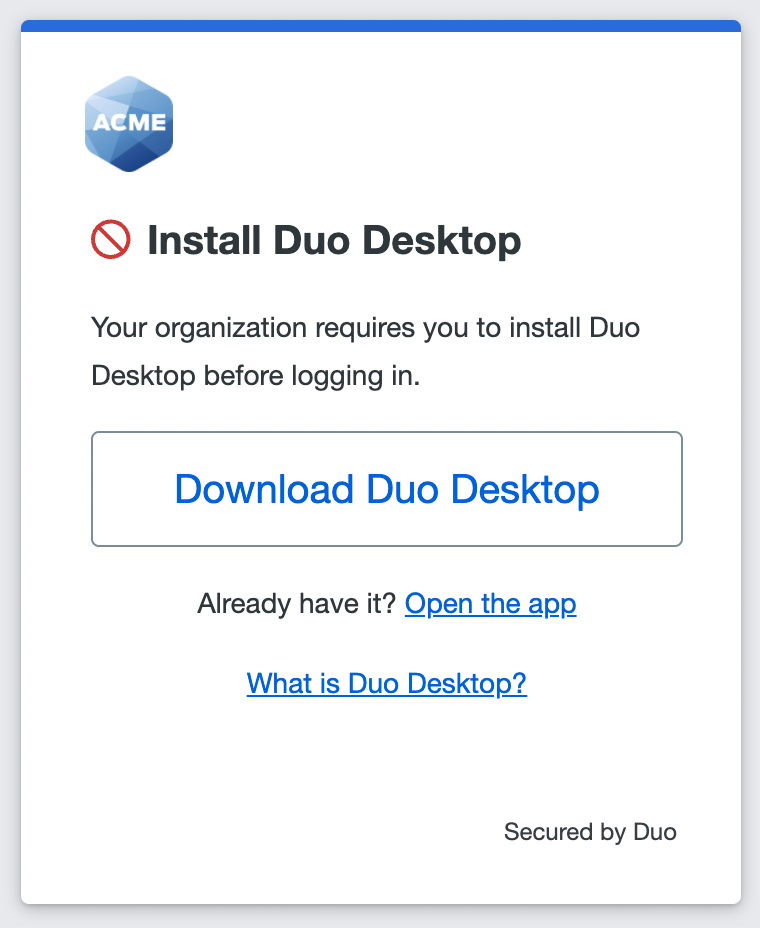
Otherwise, the user will be asked to download and install the application if it isn't currently installed.
Traditional Duo Prompt
Duo Universal Prompt
Duo Prompt, Duo Desktop, and Thick Clients
When accessing Duo-protected applications with rich client applications that display the Duo prompt in an embedded browser (i.e. thick clients such as Cisco AnyConnect, Outlook, and others), the endpoint health checks function only when Duo Desktop is already running during a Duo authentication. Thick client embedded browsers cannot launch Duo Desktop from the Duo prompt, unlike standalone browsers, which can launch Duo Desktop in the background during authentication.
If Duo Desktop isn't running it can be started manually; see Start Duo Desktop.
Install Duo Desktop from the Duo Prompt
To install Duo Desktop:
-
Download the installer from the Duo prompt. Mac and Windows users see a Download Now or Download the app button. Linux users must first select DEB or RPM as required by their Linux distribution and then click the download button.
Note that if your users find that the download button isn't functional, they may be authenticating from a non-browser client application (like Outlook), or the page displaying the Duo prompt prevents the download. If this is the case, suggest the users try a different Duo-protected application without those limitations, or distribute the app directly to your users via emailed download links or managed deployment.
-
Linux users: Double-click the DEB or RPM file and follow the instructions from the installer.
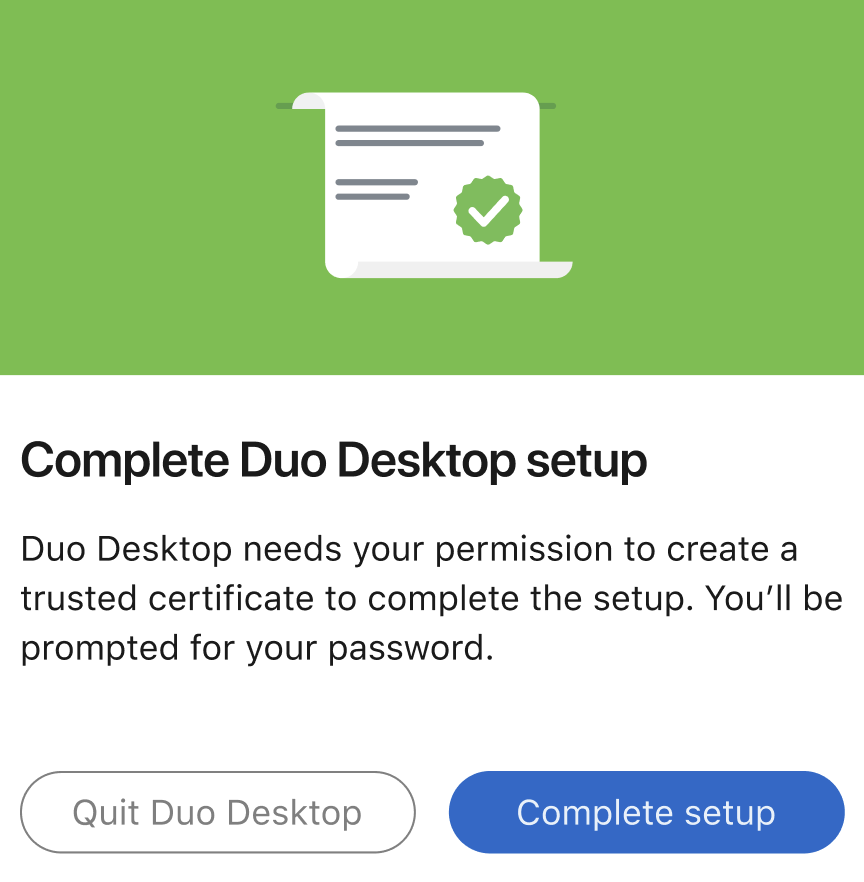
macOS users: Double-click the PKG file and follow the installer prompts. After Duo Desktop is installed, a pop-up will appear asking for permission to create a trusted certificate. Click Complete setup and enter in your system password.
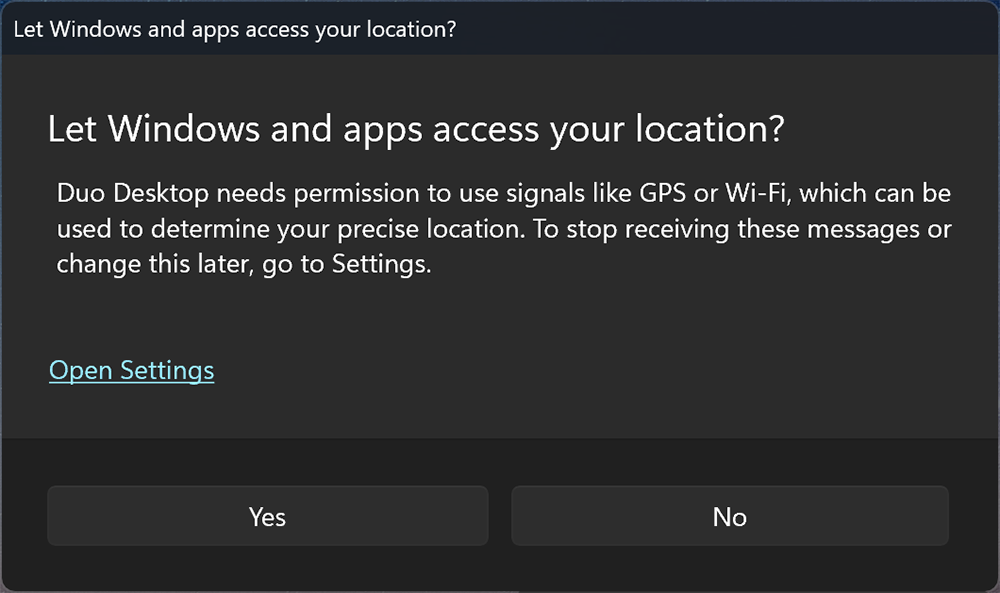
Windows users: Double-click the MSI file and follow the installer prompts. Windows 11 users may need to provide consent for location access to Duo Desktop, and should click Yes to allow it.
Note that installation requires administrator privileges on Linux, macOS, and Windows. During installation if the user doesn't have admin rights they'll get prompted to provide credentials of an account that is able to install software on the client.
The user may be prompted to launch the application if it is already installed and just not running. For some browsers, this prompt may include a "Remember my choice" option (actual dialog format varies by browser and operating system). Having the application already running or checking the "Remember my choice"/"Always open these types of links" checkbox skips this prompt for future health checks.
If Duo Desktop was uninstalled after selecting the "Remember my choice" checkbox, the operating system may still try to handle the request. On macOS this results in a "Search the App Store" dialog and on Windows this results in a "Look for an app in the Store" dialog.
On macOS click Cancel to close the dialog, and on Windows click OK to close it. After a short timeout the Duo Prompt in the browser loads the download prompt for Duo Desktop.
When Duo Desktop is running it analyzes the user’s system and report the state of the device to Duo. Policy will then be applied to the information received from the device, and if there is a problem with the health posture it will be reported back to the user. If the health posture is acceptable under the policy, no further interaction is required from the user and Duo Desktop.
Device Remediation
When an issue is reported by Duo Desktop on macOS or Windows, a red exclamation point will be shown next to the item that has an issue. This can happen as part of the standalone health check or as a report from an authentication failure due to the device's health.
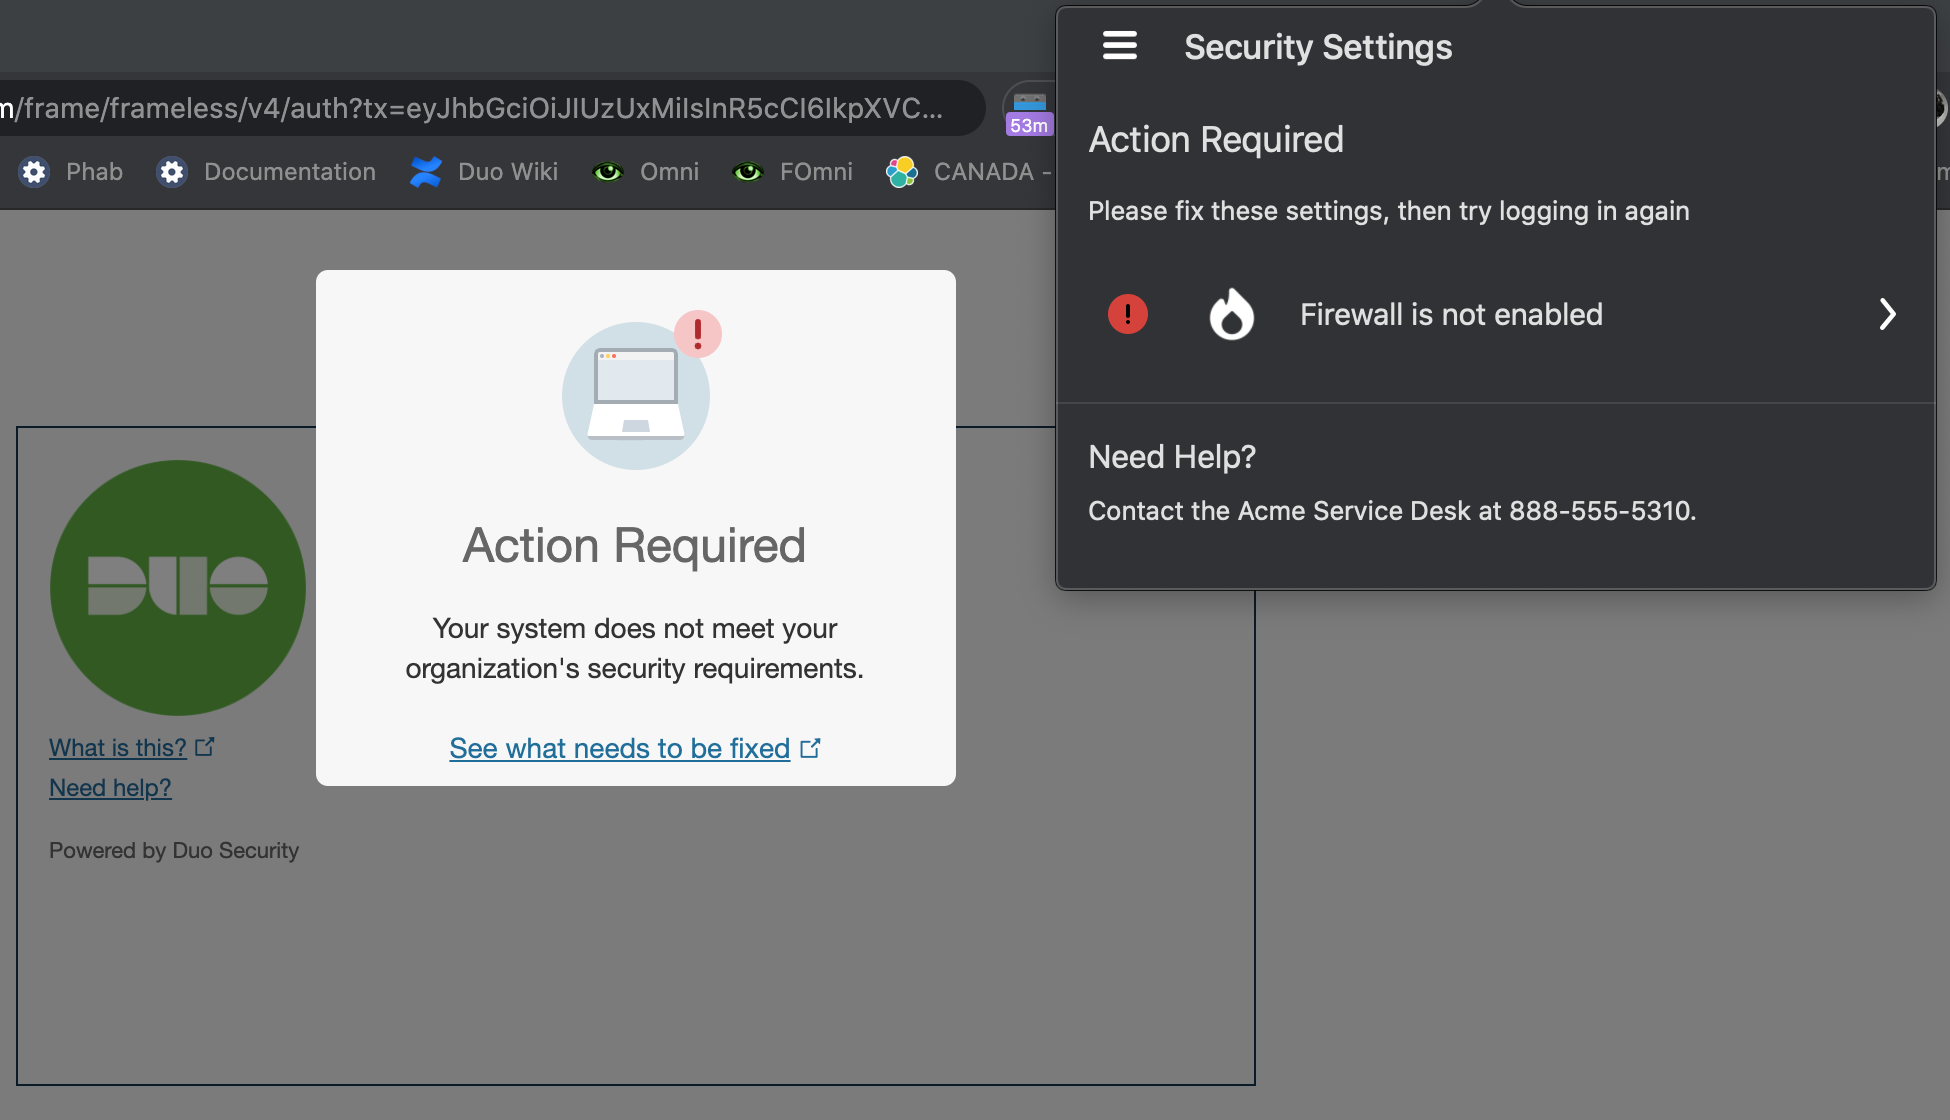
If a user is attempting to access an application with a Duo Desktop blocking policy, and their endpoint's security posture does not comply with the policy requirements, then the Duo Prompt notifies the user that they must take action before they can access the application and Duo Desktop automatically opens with with information about why the authentication was denied.
Traditional Duo Prompt
Duo Universal Prompt
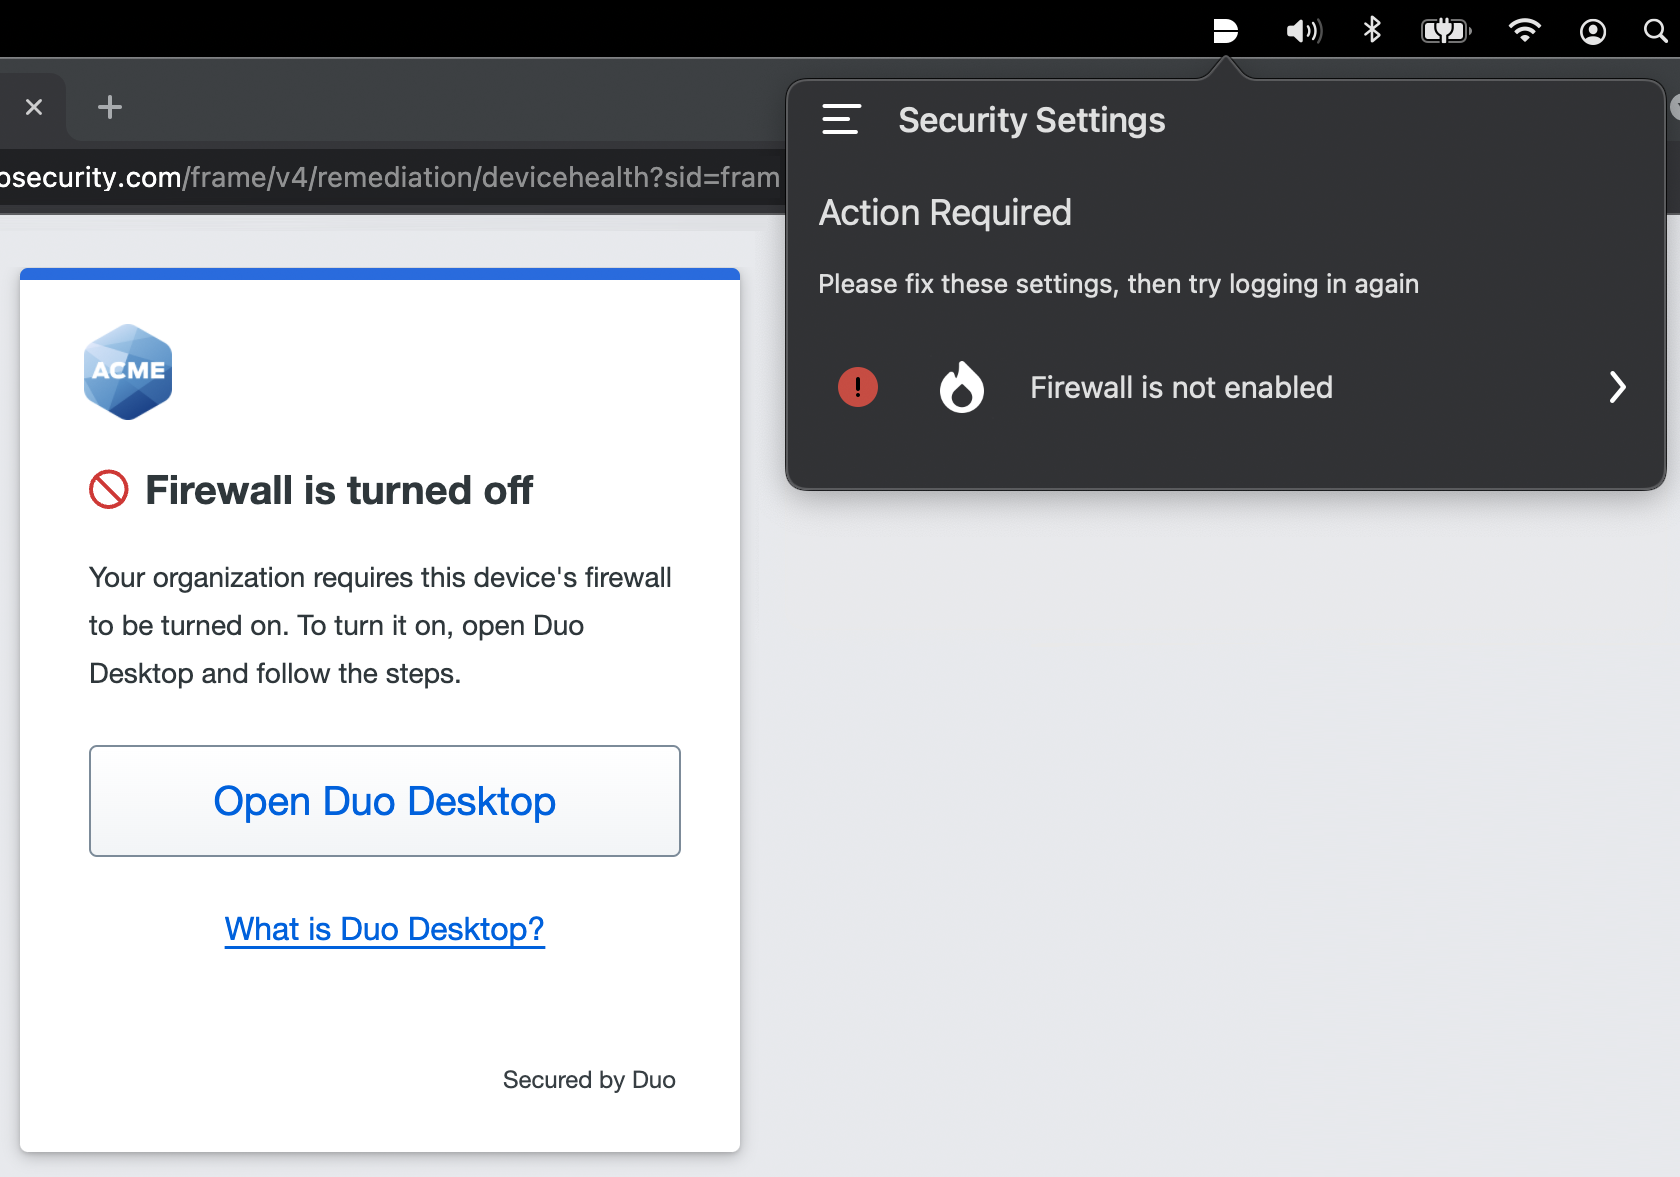
Each non-compliant setting shown is a clickable item, that directs the user to instructions on how to fix the problem. Additionally, there is a link at the bottom that will take the user to a page in the application that briefly explains why keeping the device healthy is important.
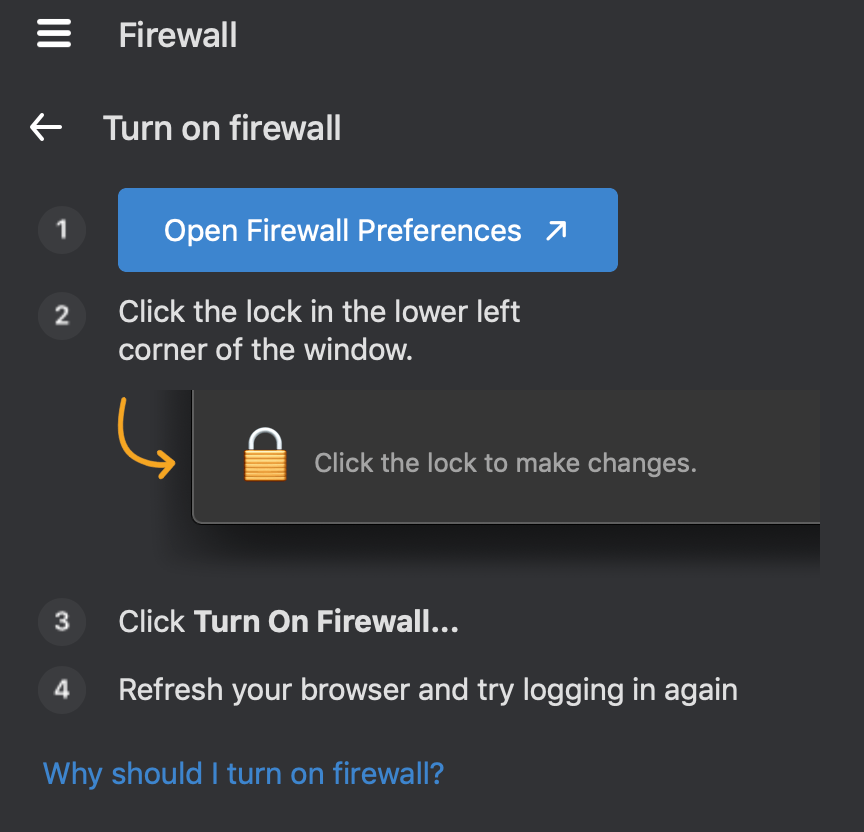
While Duo Desktop for Linux does not offer in-app remediation guidance, users can use the information presented in the Duo authentication prompt to determine which properties of their endpoint do not comply with the configured policy and take appropriate action.
Install Duo Desktop
The easiest way to distribute Duo Desktop is to apply a Duo Desktop policy to a web-based application that features Duo's inline authentication prompt, and then let users self-install the client when prompted during Duo authentication or enrollment.
Note that installation requires administrator privileges on Linux, macOS, and Windows.
User Self-install During Authentication
When the effective Duo Desktop policy is set to "Require users to have the app" enabled, then existing Duo users must download and install Duo Desktop to continue to Duo two-factor authentication and access the destination application.
Traditional Duo Prompt

Duo Universal Prompt

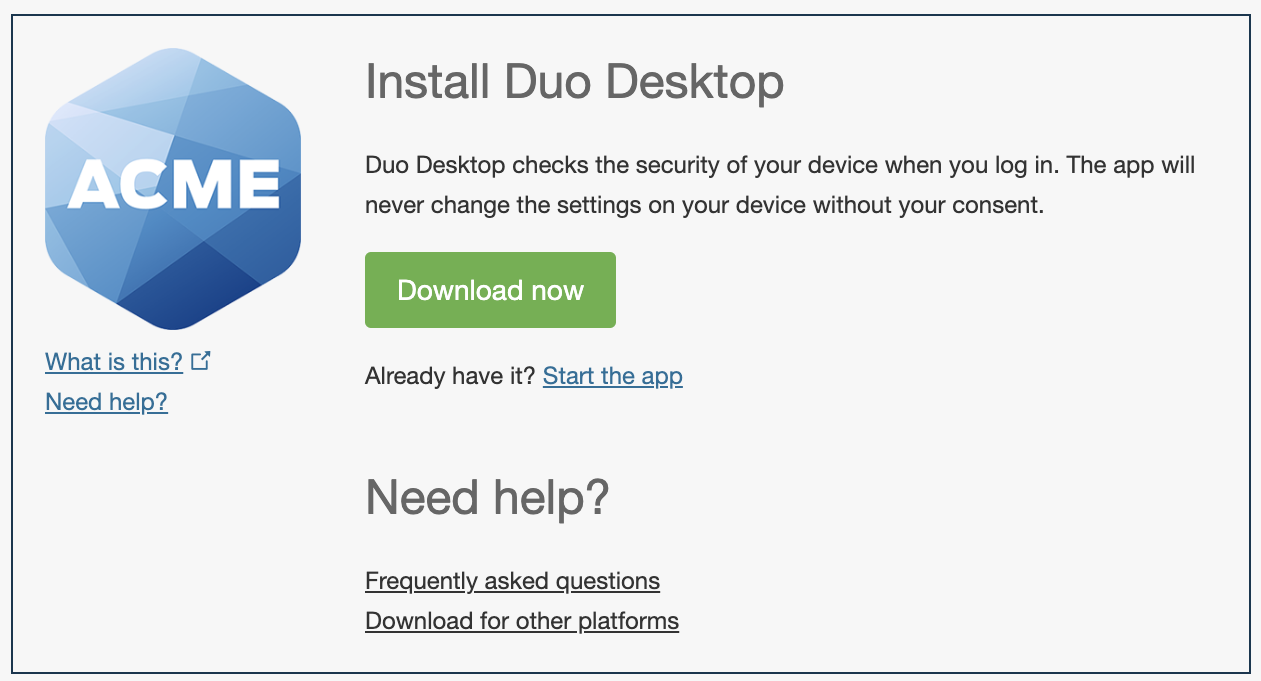
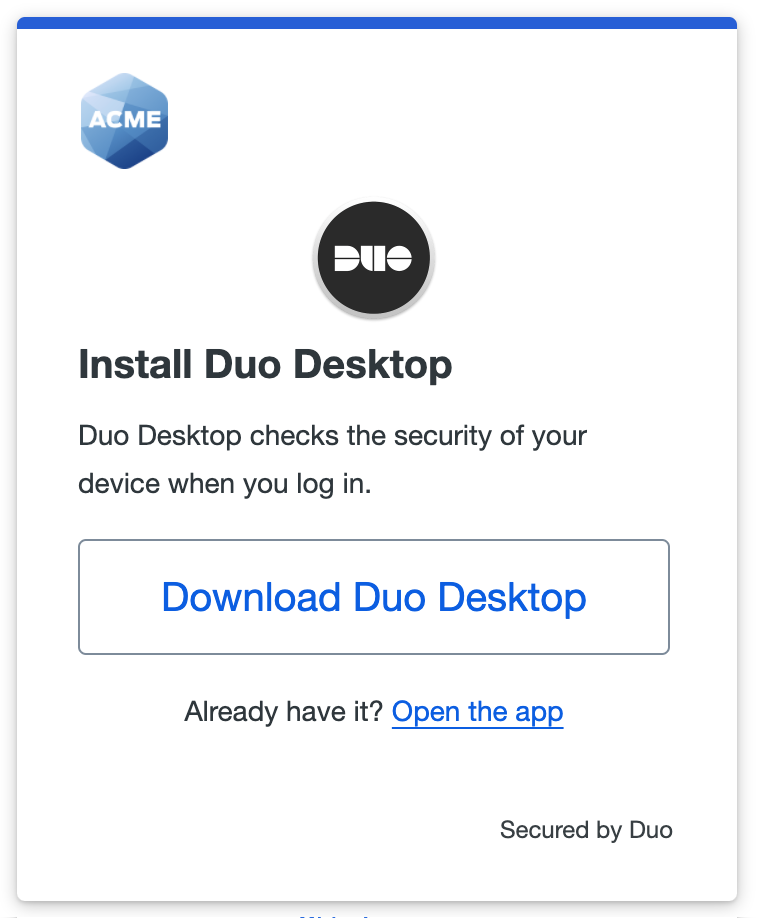
A new user to Duo will also download and install Duo Desktop as part of the inline enrollment process.
Traditional Duo Prompt
Duo Universal Prompt
After Duo Desktop is installed on macOS, a pop-up will ask for the user's permission to create a trusted certificate. Users need to click Complete setup and enter their system password to finish setup.
Users may receive a location access prompt for Duo Desktop on Windows 11 24H2 and later systems. They should click Yes to grant the necessary permission to Duo Desktop.
Send Download Links to Users
If you'd like to notify your users of the new Duo Desktop requirement and give them the chance to install the application ahead of time, you can send these client download links to your users:
Linux (.deb) https://desktop.pkg.duosecurity.com/duo-desktop-latest.amd64.deb
Linux (.rpm) https://desktop.pkg.duosecurity.com/duo-desktop-latest.x86_64.rpm
macOS: https://dl.duosecurity.com/DuoDesktop-latest.pkg
Windows: https://dl.duosecurity.com/DuoDesktop-latest.msi
View checksums for Duo downloads here.
Note that installation requires administrator privileges on Linux, macOS, and Windows. During installation if the user doesn't have admin rights they'll get prompted to provide credentials of an account that is able to install software on the client.
Scripted or Managed Deployment
If you'd like to deploy Duo Desktop via a scripted install or an endpoint management tool, download the installers using the links above, and use the following information to automate installation:
Linux (DEB-based):
Run the following command with root privileges. Replace the example DEB file name with your actual DEB filename.
dpkg -i /path/to/duo-desktop-latest.amd64.debAfter the initial installation, Duo Desktop will check your device health at the time of authentication.
Linux (RPM-based):
Run the following command with root privileges. Replace the example RPM file name with your actual RPM filename.
rpm -i /path/to/duo-desktop-latest.x86_64.rpmAfter the initial installation, Duo Desktop will check your device health at the time of authentication.
macOS 11 and Later:
MDM silent deployments on macOS as of version 11 require installation of a trusted certificate in the user's keychain, with full access to the private key, before installing the application. The steps to a managed deployment of Duo Desktop to macOS 11+ clients are:
-
Download the Duo_Device_Health_App_Identity_Generation_Script.sh script.
-
Run the script, choosing to create a .mobileconfig profile or a PFX certificate.
Choose to create a PFX certificate if you want more control over the deployment process and your MDM has an option to set the private key access level. Run the script without any options to create a .PFX file. Note the PFX password output by the script, as you'll need it when configuring your MDM to distribute the PFX certificate.
sh Duo_Device_Health_App_Identity_Generation_Script.shOtherwise, choose to create a .mobileconfig profile with the
-moption.sh Duo_Device_Health_App_Identity_Generation_Script.sh -mThis creates both a .mobileconfig and a .PFX file, but you can delete the .PFX as it's not needed for your .mobileconfig deployment.
-
Distribute an empty file named
DisableMacOS11CertManagementin the directory/Library/Application Support/Duo/Duo Device Health/to your managed endpoints via MDM (so the full path to the file is/Library/Application Support/Duo/Duo Device Health/DisableMacOS11CertManagement). -
Distribute the certificate to your managed endpoints via MDM. If you opted to use a .PFX, ensure that the private key is set to allow access from all applications. Duo Desktop will not function properly if the private key is not set to allow access from all applications. If distributing via a .mobileconfig profile, the private key access configuration will be set for you automatically.
-
Distribute Duo Desktop to your managed endpoints via MDM.
Refer to the Guide to Duo Desktop certificate deployment for macOS 11+ users for more details about deploying the Duo Desktop certificate.
Use this syntax to install the application from the downloaded .pkg installer (after adding the required certificate to your users' keychains):
sudo installer -pkg /path/to/installer/DuoDesktop-6.0.0.0.pkg -target /Windows:
Replace the example MSI file name with your actual MSI filename.
msiexec /i /path/to/installer DuoDesktop-6.0.0.msiAfter the initial installation, Duo Desktop will check your device health at the time of authentication. You can verify installation by looking for Duo Desktop icon in the menu bar. When you click on the app icon, you will be able to view device health status.
Installation Stalled on macOS
Duo Desktop install should complete quickly, with the progress bar step taking a matter of seconds for most users. However, it's possible the installation process could stall for several minutes due to macOS prioritizing another process on the system. In that case, our installation will pause until the other process completes. Large, slow-installing applications, such as XCode, are most likely to trigger this behavior.
If the installation or upgrade process appears to have hung and is not completing, we recommend canceling it and resuming later when other processes have completed.
Start Duo Desktop
Duo Desktop starts automatically after an interactive installation to enable users pass the health check as quickly and easily as possible. If it is not running when a user lands on the Duo Prompt in a browser, the prompt attempts to launch the application.
Duo Desktop may also be started manually. This could be necessary when you've installed Duo Desktop silently via endpoint management tools or scripted install, or when authenticating with a thick client application and Duo Desktop is not already running.
Linux Users:
Duo Desktop is automatically registered as a systemd service and requires no user interaction. Manage the service as follows:
-
Start the service:
sudo systemctl start duo-desktop -
Stop the service:
sudo systemctl stop duo-desktop -
Check the service status:
systemctl status duo-desktop
macOS Users:
-
Open Spotlight with Command key ⌘ + Space bar.
-
Type Duo Desktop and click the application search result.
Windows Users:
-
Open the Start Menu with Windows key ⊞ key or click the Windows logo on the far left of the taskbar, or click the search icon in the task bar.
-
Type Duo Desktop and click the application search result.
Suppress Automatic Launch of Duo Desktop
In some circumstances you may wish to perform an installation (e.g. mass rollouts to managed devices) without automatically launching the application immediately after installation completes. You can prevent automatic launch of Duo Desktop until you're ready to use it across your organization.
Linux:
Enter this command as root:
systemctl disable duo-desktopmacOS:
The macOS installer is unable to utilize custom arguments or environment variables, so indicating you wish to suppress the autolaunch must be done via the filesystem.
Create the folder /Library/Application Support/Duo/Duo Device Health and then create a file in that folder called NoAutoLaunchAfterInstall before installing Duo Desktop. The existence of this file prevents automatic launch of the application by the installer. Then run the installer, and remove the NoAutoLaunchAfterInstall file when done.
If you do not remove the NoAutoLaunchAfterInstall file after installation, future installs and upgrades will skip auto-launching the application as well. This may be the desired behavior if you will always roll out upgrades to your users in a managed environment. However, if your users may upgrade the application themselves, we recommend removing the file to preserve the default behavior.
The following set of example commands creates the /Library/Application Support/Duo/Duo Device Health folder and the NoAutoLaunchAfterInstall file, runs the Duo Desktop .pkg installer that you downloaded from Duo, and removes the NoAutoLaunchAfterInstall file when done:
sudo mkdir -p "/Library/Application Support/Duo/Duo Device Health"
sudo touch "/Library/Application Support/Duo/Duo Device Health/NoAutoLaunchAfterInstall"
sudo /usr/sbin/installer -pkg /path/to/installer/DuoDesktop-6.0.0.0.pkg -target /
sudo rm "/Library/Application Support/Duo/Duo Device Health/NoAutoLaunchAfterInstall"
Here are the same commands, but in a single line:
sudo mkdir -p "/Library/Application Support/Duo/Duo Device Health" && sudo touch "/Library/Application Support/Duo/Duo Device Health/NoAutoLaunchAfterInstall" && sudo /usr/sbin/installer -pkg /path/to/installer/DuoDesktop-6.0.0.0.pkg -target / && sudo rm "/Library/Application Support/Duo/Duo Device Health/NoAutoLaunchAfterInstall"Windows:
When installing the Windows application from the command line include the LAUNCH parameter set to False:
msiexec /i /path/to/installer DuoDesktop-6.0.0.msi LAUNCH=FalseDuo Desktop Silent Updates
Duo Desktop offers the option of silent app updates as of version 3.0.0 for macOS and Windows. This means that after the initial installation of Duo Desktop with administrator privileges, the app will silently self-update to future releases without user action or requiring the end-user to have elevated rights on their workstation.
An updater service runs in the background, checking for new versions of Duo Desktop every four hours. If a new version of Duo Desktop is available, the updater service downloads and installs it without interrupting the user to request approval.
If the new release contains significant changes, a pop-up notification appears after installation inviting the user to learn more by reading the release notes. The release notes are also linked from Duo Desktop's "Preferences" menu item.
If you manage your Duo Desktop client installations and do not want silent updates enabled when your user endpoints update from Duo Device Health v2.x to a later version of Duo Desktop, then we recommend performing the steps to disable automatic updates in the next section before installing the newer version.
Note that if silent updates are turned off, then the only way to update Duo Desktop is to download a new version and install it.
Your Linux operating system's package manager handles automated app updates to Duo Desktop for Linux; the app does not include its own updater service.
Disable Automatic Updates
Users with administrator privileges on their system can disable silent automatic updates by opening Duo Desktop's preferences and toggling the Automatically download and install updates option. Disabling this option from the app stops the updater service from running. This setting may not be changed by users without administrator rights.
Administrators can also disable automatic updates across multiple systems by pushing a configuration option to workstations before installing Duo Desktop. Choosing to disable automatic updates means that you will need to manually push updates to your users' endpoints in the future.
In rare situations running an out-of-date version of Duo Desktop could cause users to get blocked if a new blocking policy is added that is not supported on a user's machine. We recommend that you push Duo Desktop updates frequently if you will not permit automatic silent updates.
macOS
Disable automatic updates on macOS systems by creating a plist entry with the following command prior to Duo Desktop installation:
sudo /usr/libexec/PlistBuddy -c "add :DisabledByAdministrator bool true" /Library/Application\ Support/Duo/Duo\ Device\ Health/Config.plistTo enable automatic updates after using this method, follow this process:
-
Use this command to delete the previously created "DisabledByAdministrator" plist entry:
sudo /usr/libexec/PlistBuddy -c "delete :DisabledByAdministrator" /Library/Application\ Support/Duo/Duo\ Device\ Health/Config.plist -
Reinstall Duo Desktop over the existing installation, which defaults to enabling automatic updates.
Windows
Disable automatic updates on Windows systems by creating the string registry value HKLM\Software\Duo\Duo Device Health\AutoUpdater\DisabledByAdministrator set to 1 prior to Duo Desktop installation. Example reg command to create this value:
reg add "HKEY_LOCAL_MACHINE\Software\Duo\Duo Device Health\AutoUpdater" /v DisabledByAdministrator /d 1 /fTo enable automatic updates after using this method, follow this process:
-
Uninstall Duo Desktop from the Windows systems.
-
Delete the previously created
DisabledByAdministratorregistry value. Exampleregcommand to delete this value:reg delete "HKEY_LOCAL_MACHINE\Software\Duo\Duo Device Health\AutoUpdater" /v DisabledByAdministrator /f -
Reinstall Duo Desktop, which defaults to enabling automatic updates.
Duo Desktop Data Reporting
Duo collects error and usage data from Duo Desktop to improve the stability and usability of the app. This data is only used by Duo and never shared.
Duo Desktop 7.13.2 and later adds a configurable preference for error and usage data reporting. Users may opt out of data collection after installation of 7.13.2 or later. Duo Desktop displays an opt-out notification offering the option to turn off data collection and reporting to the user upon first launch after installation.
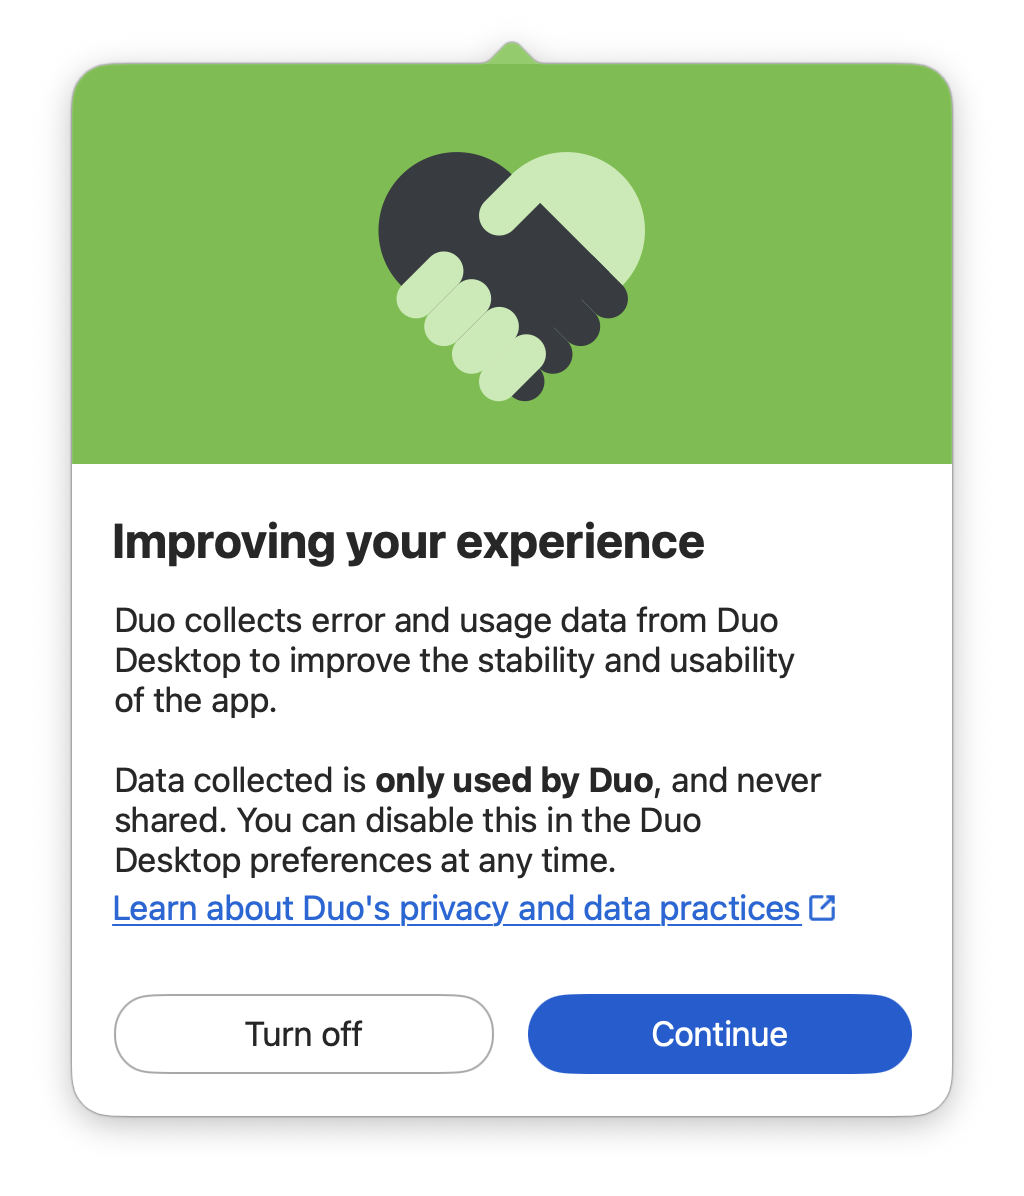
Users may change their usage and error reporting setting at any time after their initial selection by opening Duo Desktop's preferences and toggling the Send error reports and usage data to Duo option.
Disable Configurable Data Reporting Preference
Administrators can set a system-wide preference on managed devices which will both suppress the opt-out user prompt and hide the "Send error reports and usage data to Duo" option from Duo Desktop's preferences in the user interface.
macOS
To enable error reporting system-wide:
sudo /usr/libexec/PlistBuddy -c "add :DisableErrorReporting bool false" /Library/Application\ Support/Duo/Duo\ Device\ Health/Config.plistTo disable error reporting system-wide:
sudo /usr/libexec/PlistBuddy -c "add :DisableErrorReporting bool true" /Library/Application\ Support/Duo/Duo\ Device\ Health/Config.plistWindows
To enable error reporting system-wide, run this command with administrator privileges:
reg add "HKEY_LOCAL_MACHINE\Software\Duo\Duo Device Health" /v DisableErrorReporting /d 0 /fTo disable error reporting system-wide:
reg add "HKEY_LOCAL_MACHINE\Software\Duo\Duo Device Health" /v DisableErrorReporting /d 1 /fUninstall Duo Desktop
DEB users: Run this command with root privileges:
apt remove -y duo-desktopRPM users: Run this command with root privileges:
dnf remove -y duo-desktopmacOS Users (10.14.4 or later):
-
Click on the Duo Desktop menu bar icon to open Duo Desktop.
-
Click the menu icon (three stacked horizontal lines) in the upper-left.
-
Click Preferences.
-
Click the Uninstall button under "Uninstall Duo Desktop".
macOS Users (10.14.3 or earlier):
-
Press Command + space bar and type in Terminal to open a command line shell session.
-
Enter the following command in the Terminal window:
sudo /Applications/Duo\ Desktop.app/Contents/Library/LaunchServices/com.duosecurity.UninstallDuoDeviceHealth -
Enter your macOS password when prompted to allow the uninstaller to run with elevated privileges.
Windows users:
-
Go to Start → Settings.
-
Click Apps & Features.
-
From the list, select the "Duo Desktop" application and click Uninstall.
Troubleshooting
Need some help? Take a look at the Duo Desktop Frequently Asked Questions (FAQ) page or try searching our Duo Desktop Knowledge Base articles or Community discussions. For further assistance, contact Support.
