Entra ID Sync for Duo Users and Admins
Last updated:
Overview
Import Duo end-users or administrators directly from your Entra ID cloud service into Duo with Duo Security's Directory Sync feature.
Duo Directory Sync is a one-way operation. No information from Duo is imported into your user directory.
Scheduled user synchronization of your full directory runs twice a day, and runs every 30 minutes for administrators. Run either type of full sync on-demand from the Duo Admin Panel. You can also run an individual user or administrator syncs on-demand from the Admin Panel or programmatically via Admin API.
The Directory Sync feature is part of the Duo Premier, Duo Advantage, and Duo Essentials plans.
Prerequisites
Before setting up Entra ID sync, ensure you have the following:
- A supported Entra ID or Office 365 subscription. Duo supports importing users into Duo from Entra ID commercial and government tenants, but not from Azure GCC High tenants.
- A designated Entra ID admin service account to use for authorizing the sync. This account needs the Entra ID Global Administrator role during Duo setup, but you can reduce the service account's role privileges later. This service account may or may not require Azure MFA for admins at login (learn more about the baseline MFA policy for Azure admins).
- Entra ID groups populated with users to sync.
- You must have the Owner, Administrator, or User Manager admin role to set up and manage directory sync of users into Duo. Duo Admin directory sync setup and management requires the Owner admin role.
- An application where users sign in with an Entra ID UPN as their username.
Role required: Owner, Administrator, or User Manager.
Directory Sync Updates Existing Users
Before executing any directory synchronization with Duo, understand the effect that synchronization can have on accounts with the duplicate Duo usernames. Suppose that you already have some active Duo users, and one or more of these users have the same username in Entra ID. Performing a synchronization will cause the existing Duo users' information to be merged with, and in some cases overwritten by the Entra ID information, such as email addresses present in Duo changing to match the value stored in the synced directory.
If you synchronize multiple directories and there are non-unique usernames among those directories, the net result is that there will be only one Duo user created with that username, and the sync that creates the user will continue to own and manage the user.
Set Up User Sync
Create or Choose a Connection for User Sync
To start setting up a user directory sync:
-
Log in to the Duo Admin Panel.
-
Navigate to Users → External Directories or click the External Directories link on the "Users" page.
-
Click the Add External Directory button and select Microsoft Entra ID from the list.
-
If this is the first Entra ID sync you've created for users or admins then you must first create a new connection to use for this sync. With Add new connection selected, click Continue to proceed to the next step.
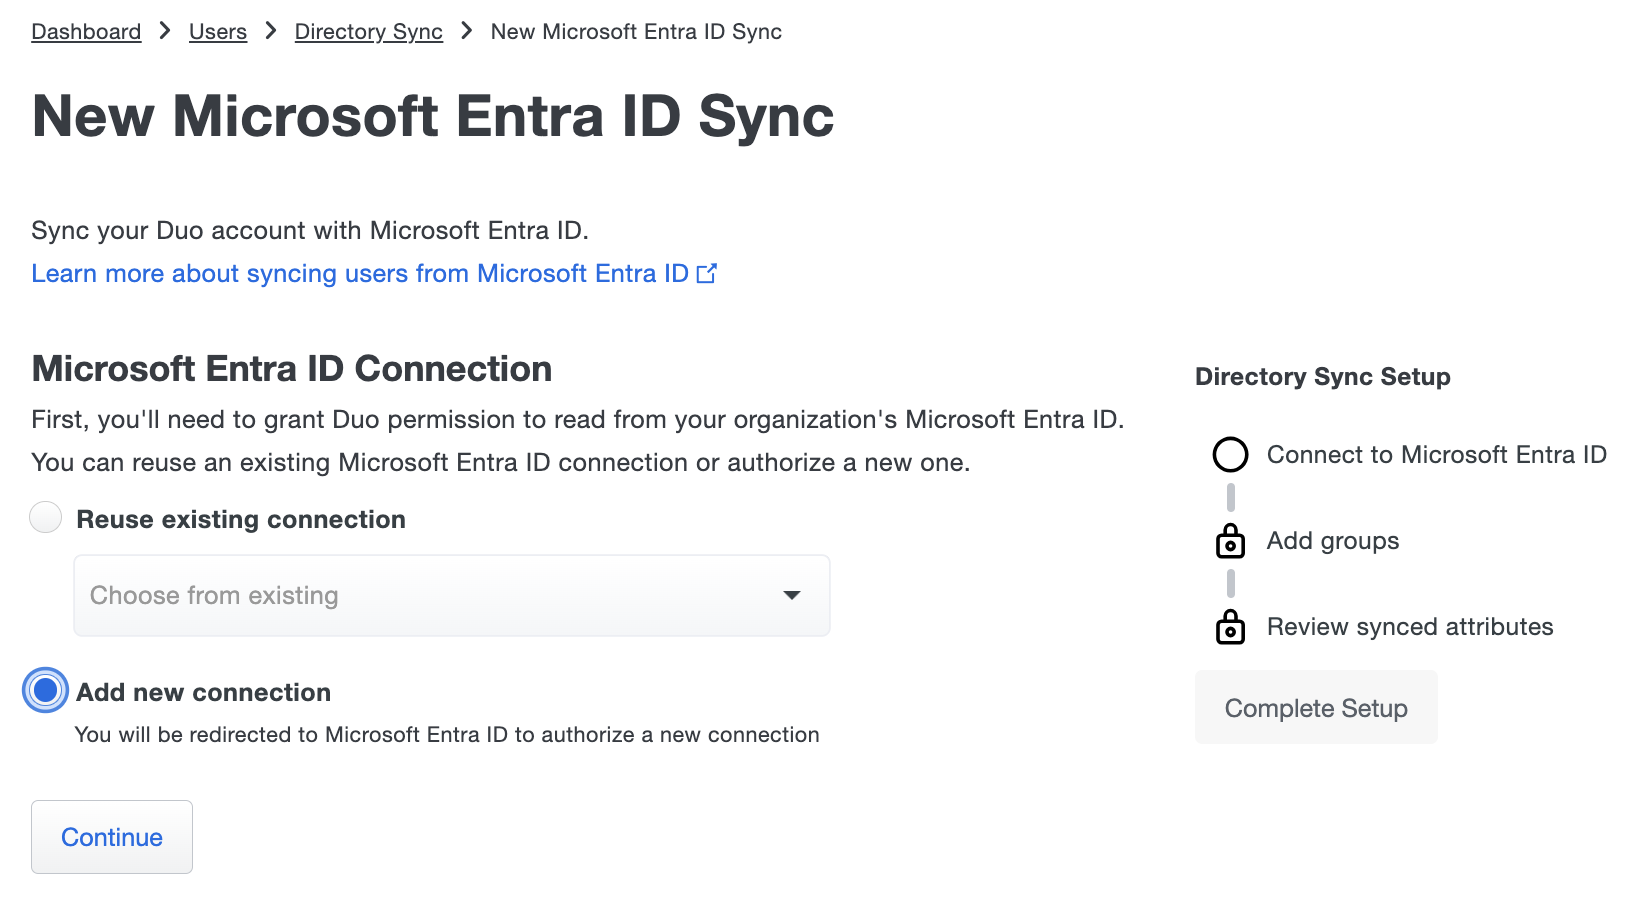
If you have previously created an Entra ID sync for users or administrators you can either create another new connection or reuse an existing connection to that directory for this new sync. User syncs and admin syncs can share connections to the same source directory.
If you want to use an existing connection choose Reuse existing connection and use the drop-down to select one from the list, then click Continue.
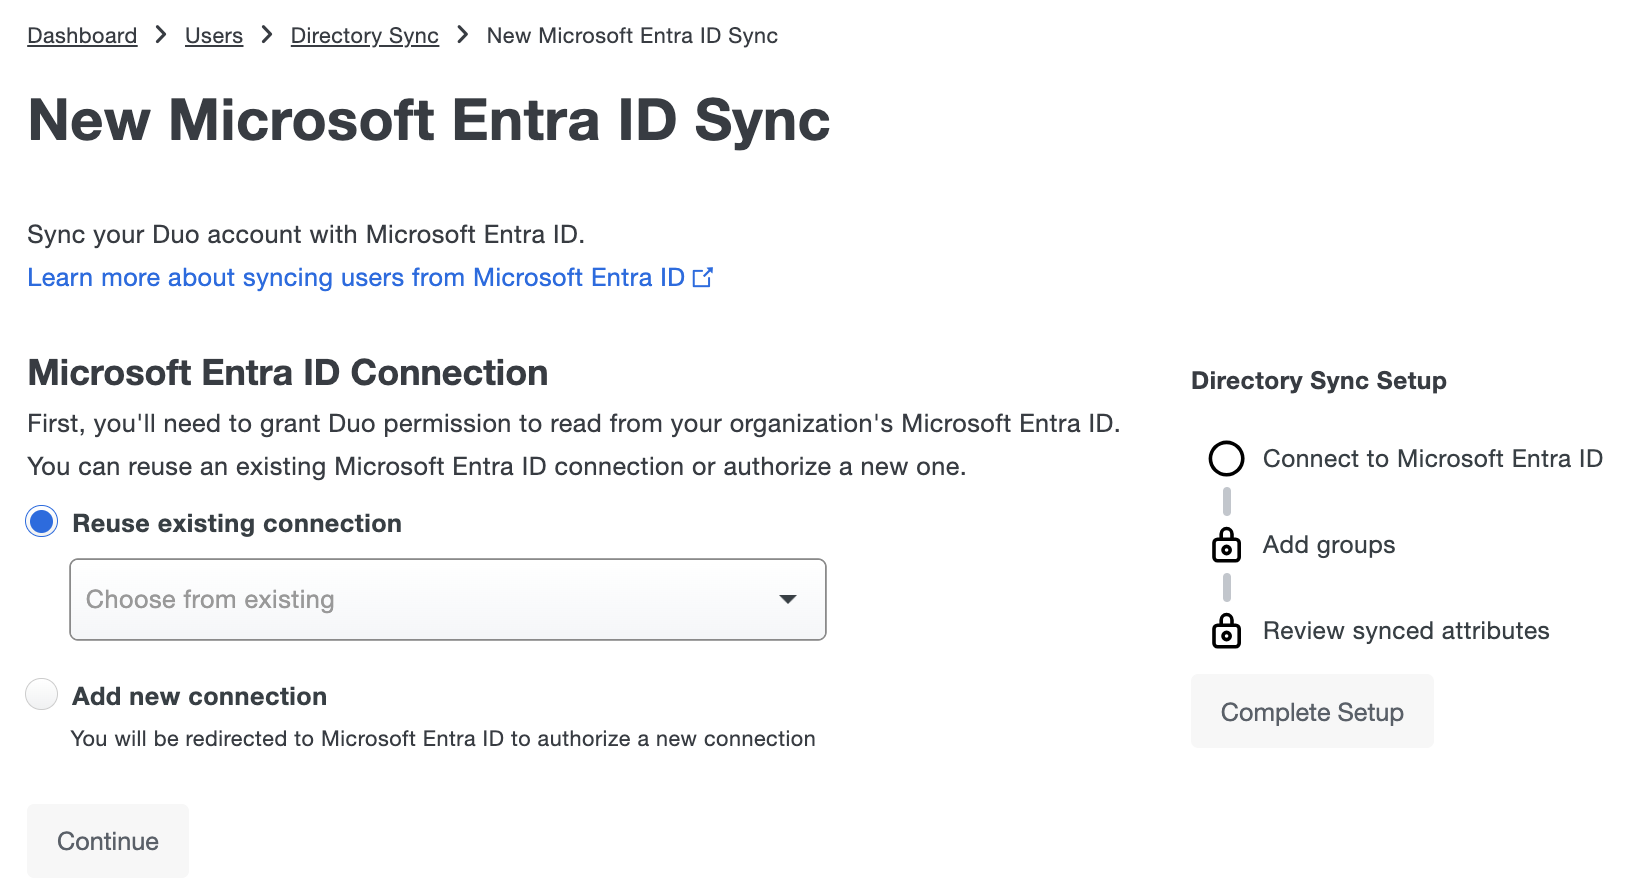
You will not be asked to perform the Entra ID app authorization steps again. Instead, you'll proceed directly to the new sync's properties page, where you'll select groups to sync and configure the synced attributes.
-
If you chose to add a new connection for this Entra ID user sync then after clicking Continue you'll be redirected to the Entra ID portal to authorize use of Duo Entra ID Sync in your tenant. Sign in with the designated Entra ID service administrator account that has the global administrator role for this Entra ID. If required, complete Azure MFA for that service account admin user.

Duo does not see or store your Entra ID administrator credentials.
If you are already signed into the Entra ID portal as the Duo service account, you may not be prompted to log in again here.
-
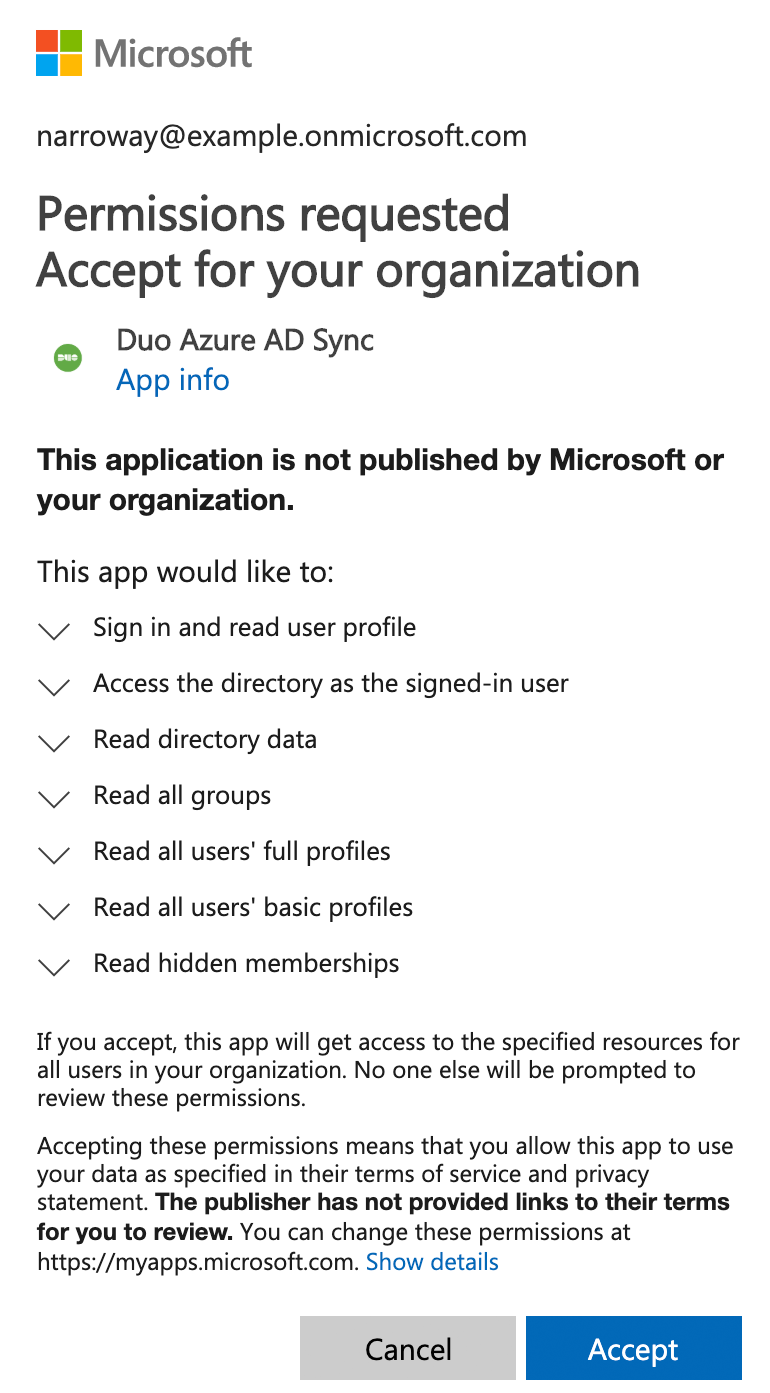
Once you've signed in to Entra ID, you must click Accept to grant Duo the read rights needed to import users from your Entra ID domain.
-
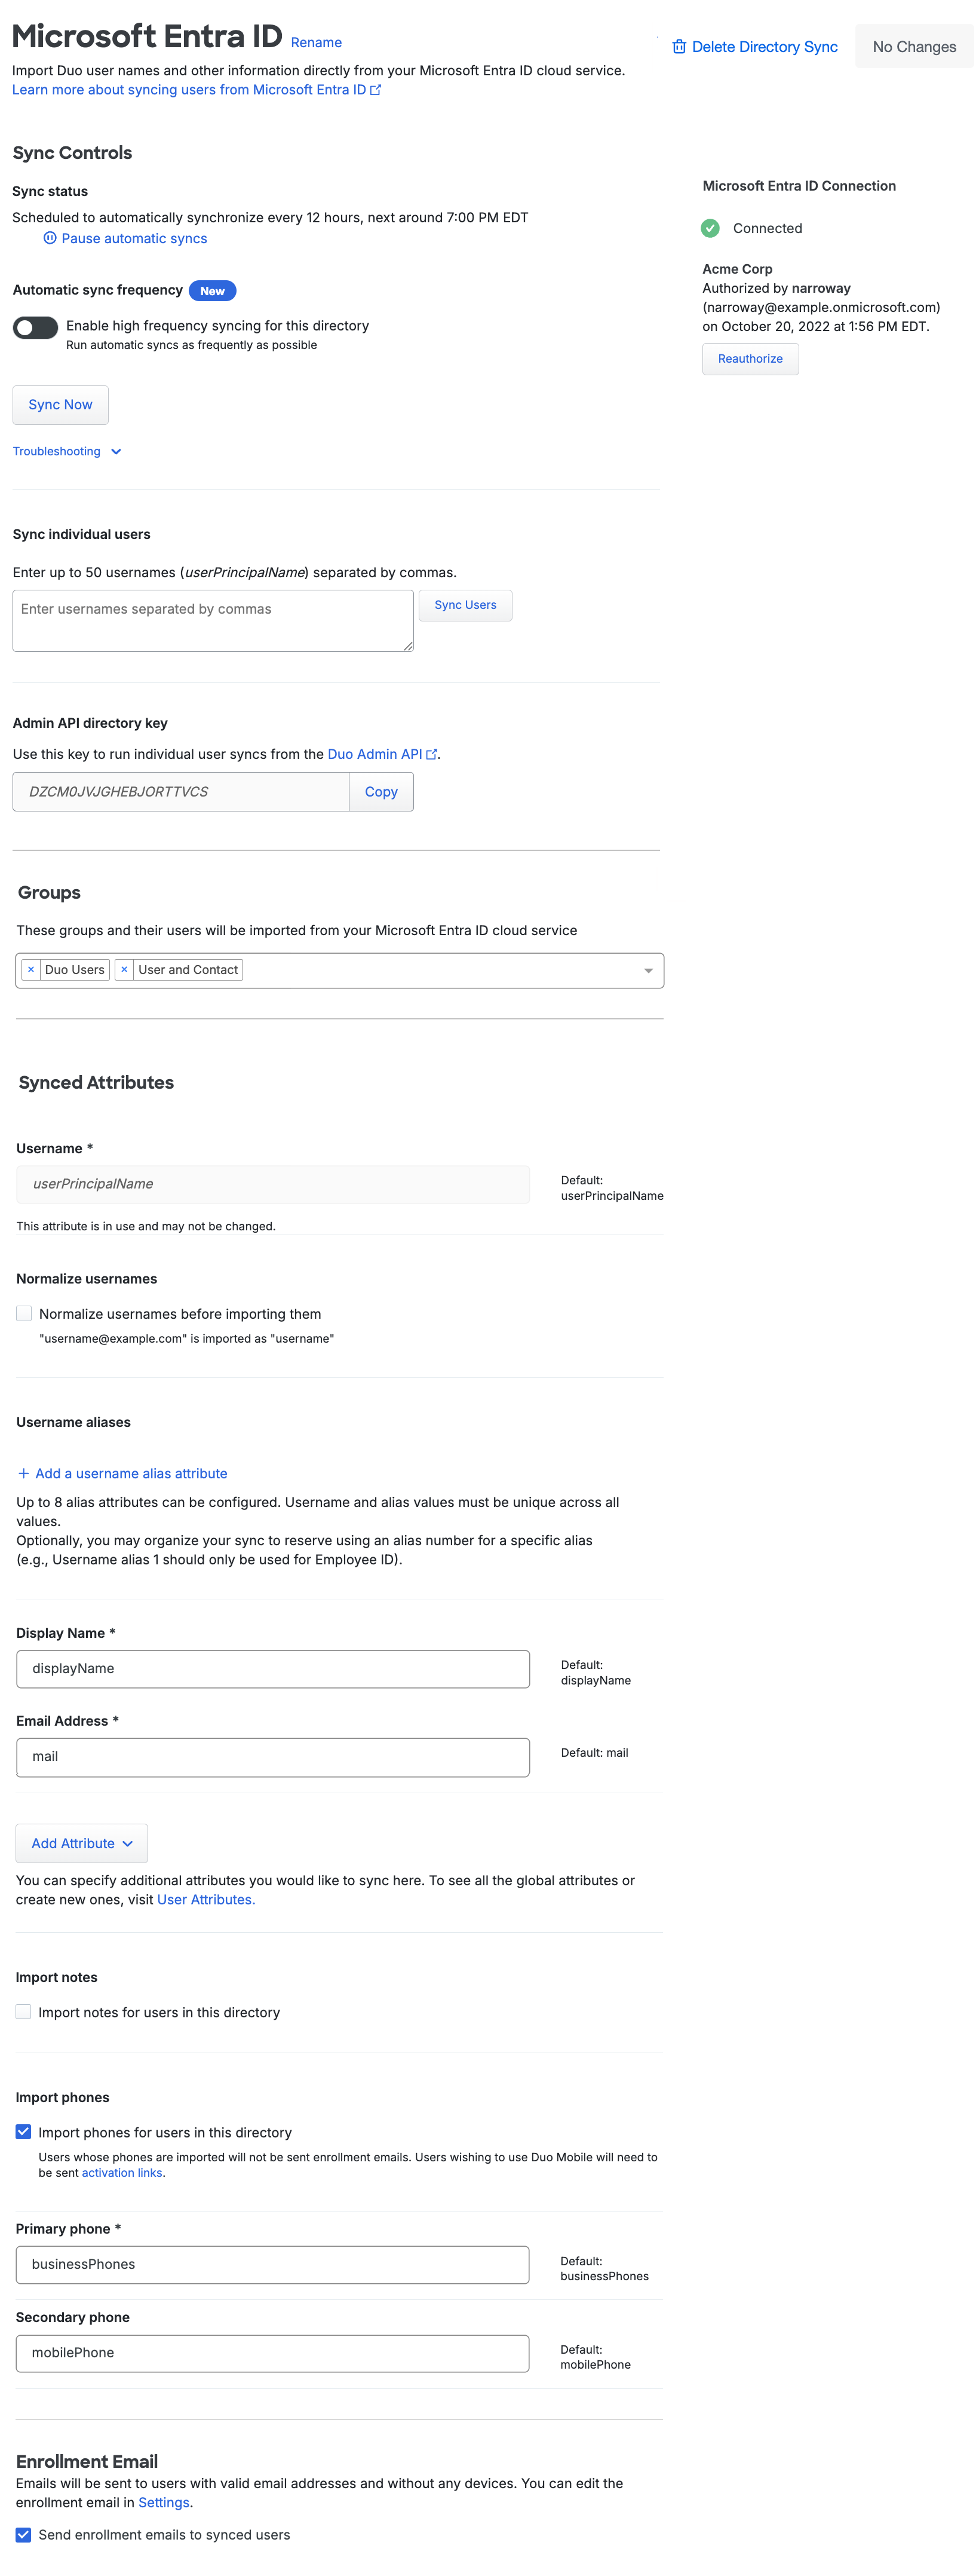
Authorizing the Entra ID application redirects you back to the details page for your new Entra ID user directory sync in the Duo Admin Panel. The new directory's name defaults to your Entra ID's organization name. Click the Rename link if you'd like to change the directory sync's name to something different, clicking Save to apply the new name.
-
The "Microsoft Entra ID Connection" should show as Connected. If the page lists the wrong Entra ID domain and you need to authorize the connection with a user from a different Entra ID tenant, click the Reauthorize button to begin again.
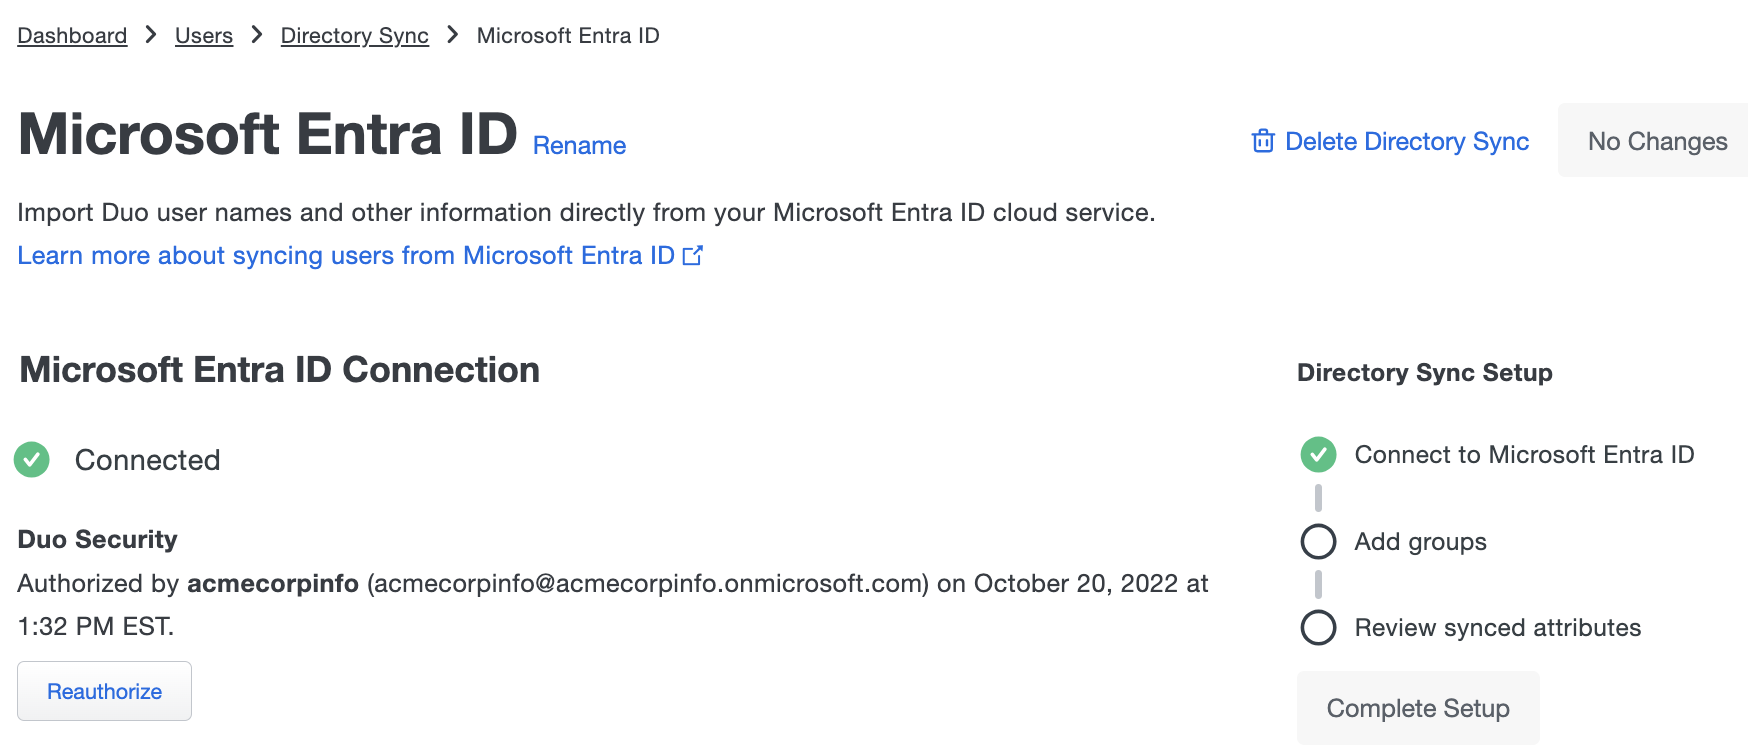
If the sync shows as "Connected" and the domain authorization information is correct, finish configuring the directory sync on this page with your selected Groups and Synced Attributes information.
Groups
Do not configure the same selected groups from your source directory in multiple Duo directory syncs. If you create more than one directory sync with the same source directory, and configure them to sync the same group from that directory, then when you save the sync configuration it will "take over" management of that group and remove it from the other sync config. This may have unexpected effects on your configured custom application group policies, user access restrictions, or administrative unit assignments. We do not recommend this.
Click in the Groups box and start typing an Entra ID group name; the list of available groups to sync returned will match the filter. If you have a very large number of groups in your Entra ID directory, Duo limits the search results to 100 groups, so you may need to type in most of your desired sync group's name to locate it.
If you don't see any of your groups listed, review the previous setup steps and correct your configuration.
Once you see your intended group (or a list of groups), click to select the desired group to sync. Repeat this until you've added all the groups you want to import. You can select up to 400 groups to sync from the source directory. Members of the groups you choose here will be synced as users into Duo.
Nested groups are supported; Duo sync imports users from groups nested within your sync group, but creates only the top level group in Duo (the group explicitly selected for directory sync), with all nested group members as direct members of that Duo group.
If you delete and recreate any of the Entra ID groups saved in the sync properties (even if you reused the same group name and members), then you'll need to return to the directory sync property page for your Entra ID domain on the Duo Admin Panel and delete the recreated group from your sync configuration, then re-add the group, and save the directory.
If you save the sync without selecting any groups, or if you remove all the groups selected from the sync config in the future, Duo pauses your scheduled sync upon detecting the missing information and updates the sync status to alert you that no groups have been selected. Correct the issue by selecting one or more groups to sync from the source directory and resuming scheduled synchronization.
Synced Attributes
Make changes here if you want to customize which Entra ID attribute values get imported to Duo. The Duo attributes that have default Entra ID attributes defined indicate those defaults as helper text. You can change these default attributes to custom attributes of your choice. Some Entra ID attributes have a different property name in Microsoft Graph that you may need to specify instead to use that attribute; see a list of Microsoft Graph property name differences here. Return to using the default attributes by clicking Revert all attributes to default.
Note that Duo does not import passwords from external directories.
You may customize the Entra ID source attributes for these Duo user properties:
| Username |
Required. The source attribute for the Duo username. The attribute selected should match the primary authentication login name your users submit to Duo. This attribute cannot be customized after the first directory synchronization occurs. Default: Limitation: The |
| Normalize usernames |
When creating a new user from Entra ID, Duo defaults to using the entire Entra ID If you enable this option after performing your first sync, the next sync updates all managed users to remove the UPN suffix from their usernames. Specifying a different source attribute for Username removes the normalization option. Note that you still need to specify the user's full UPN Entra ID username to perform a sync of individual users from the Admin Panel. The Duo username remains normalized. |
| Username Aliases |
Specify up to eight directory attributes to import as additional usernames for each Duo user by clicking Add a username alias attribute, choosing which alias number to define, and entering the desired source attribute from your directory. For example, if the Username source attribute is Be sure to choose directory attributes that have unique values (email address, employee ID, etc.). If any of the username or username alias attribute values is the same for two or more users, those users will be skipped by the sync process. Unlike the Username, the attributes used for username aliases may be changed after the first directory synchronization. Default: No aliases imported. Aliases may be defined manually from the Admin Panel or programmatically via Admin API on a per-user basis. |
| Display Name |
Required. The user's name. Default: |
| Email Address |
Required. The user's email address. This is used as the destination address for enrollment emails from Duo. Default: |
| Add Attribute |
Click the Add Attribute button to select any additional attributes you want to import from the external directory. When you select an additional attribute to sync, it will appear above the add button with a text field for you to specify the source external directory attribute. Some attributes you add may have suggested source attributes, which you can change by typing in a different attribute name. See the user attributes documentation to learn how to create your own custom user attributes. |
| Notes |
Additional information about the users. Default: No notes imported. Notes information may be defined manually from the Admin Panel or programmatically via Admin API on a per-user basis. |
| Import Phones |
Enable this option if you want Directory Sync to create phones in Duo using your Entra ID users' Office Phone and Mobile Phone property values. Imported devices default to the "Generic Smartphone" platform. Directory sync does not send SMS activation messages to imported phones; see User Enrollment and Activation for activation steps. If you enable both the Enrollment email and Import Phones options, enrollment links are only sent to users with email addresses who do not have phone information populated in Entra ID. Default: Import no phone information from Entra ID. |
| Primary Phone |
Required. Create a phone in Duo with the attribute value as the phone number, attached to the imported user as a generic smartphone 2FA device. Non-US numbers must be stored in Entra ID using the format To import a landline with an extension, append Only configurable if Import Phones is selected. Default: |
| Secondary Phone |
Create a phone in Duo with the attribute value as the phone number, attached to the imported user as an additional generic smartphone 2FA device. Non-US numbers must be stored in Entra ID using the format To import a landline with an extension, append Only configurable if Import Phones is selected. Default: |
Enrollment Email
Select the Enrollment Email option if you want imported users to automatically receive an enrollment link email when the sync process completes. Only users imported with active status, a valid email address, and who do not already have any enrolled authentication devices in Duo receive an emailed link. The email address is populated by Entra ID sync.
Default: Do not send enrollment emails to imported users.
The enrollment link sent when the sync first imports a user is valid for 30 days. Duo sends an emailed enrollment reminder if the user hasn't yet completed enrollment after two days, and then a second reminder if the user remains unenrolled eight days after the first reminder.
If the user does not complete the enrollment process after 30 days has elapsed, the original enrollment link expires and a new enrollment link is generated at the next sync and sent to the user. This entire 30 day cycle repeats until the user completes Duo enrollment.
The contents of the enrollment email subject and body can be changed on the global Settings page. The enrollment email body should contain the placeholder text "<enrollment-link>", which will be replaced by the link to the enrollment form when the email is sent. The sent message will have a non-editable header added, informing the user it's an automated message sent by Duo and to contact their organization's Duo admins or IT support group with any questions.
If your organization uses e-mail filtering, be sure to allow the sender no-reply@duosecurity.com.
Duo Premier and Duo Advantage Plan Users: Global Policy settings affect access to the enrollment portal. Do not apply any global restrictions that could prevent user enrollment. For example, if you configure the User Location policy setting to deny access to a country, then the policy will also block any of your users who attempt to enroll in Duo from that country via an emailed enrollment link. The New User Policy setting for the enrollment portal is always "Require Enrollment".
Finish User Sync Setup
Click Complete Setup to finish creating the new Entra ID sync in Duo.
The directory page shows the status as "Connected to Duo" and the "Sync status" indicates when the next scheduled sync will run now that all directory configuration steps have been completed successfully. If you wish you can click the Sync Now button to perform the first import of users from your directory into Duo.
Note that once you import users from Entra ID into Duo you may not change the Entra ID username source attribute, but you can enable or disable username normalization. See the FAQ for more information.
Adjust Sync Frequency
The default scheduled user sync frequency is 12 hours. If you want user sync to run more often, toggle on the Enable high frequency syncing for this directory option in the "Automatic sync frequency" section of your Entra ID sync's details page.
With high-frequency sync enabled, Duo will automatically start another user sync about 30 minutes after a sync finishes. Disable the high frequency sync option to return to the default 12-hour schedule.
Reduce Privileges for the Service Account
When setup is complete you may edit the Duo service account in Entra ID that you used to authorize the Duo application to drop the account's role privileges to any role with lesser privileges. Once you've authorized the sync the account no longer requires the Global Administrator role.
User Enrollment and Activation
After importing users from your directory into Duo, your next step is to have them activate their devices for Duo authentication (if you chose not to send enrollment emails to synced users when creating your directory in Duo). On the Users page you'll see a notification bar indicating that users have not yet activated the Duo Mobile smartphone app. Click the link in the notification bar to begin the process of sending these users activation links via SMS message or email.

For more information on user activation, see Activating Duo Mobile After Enrollment.
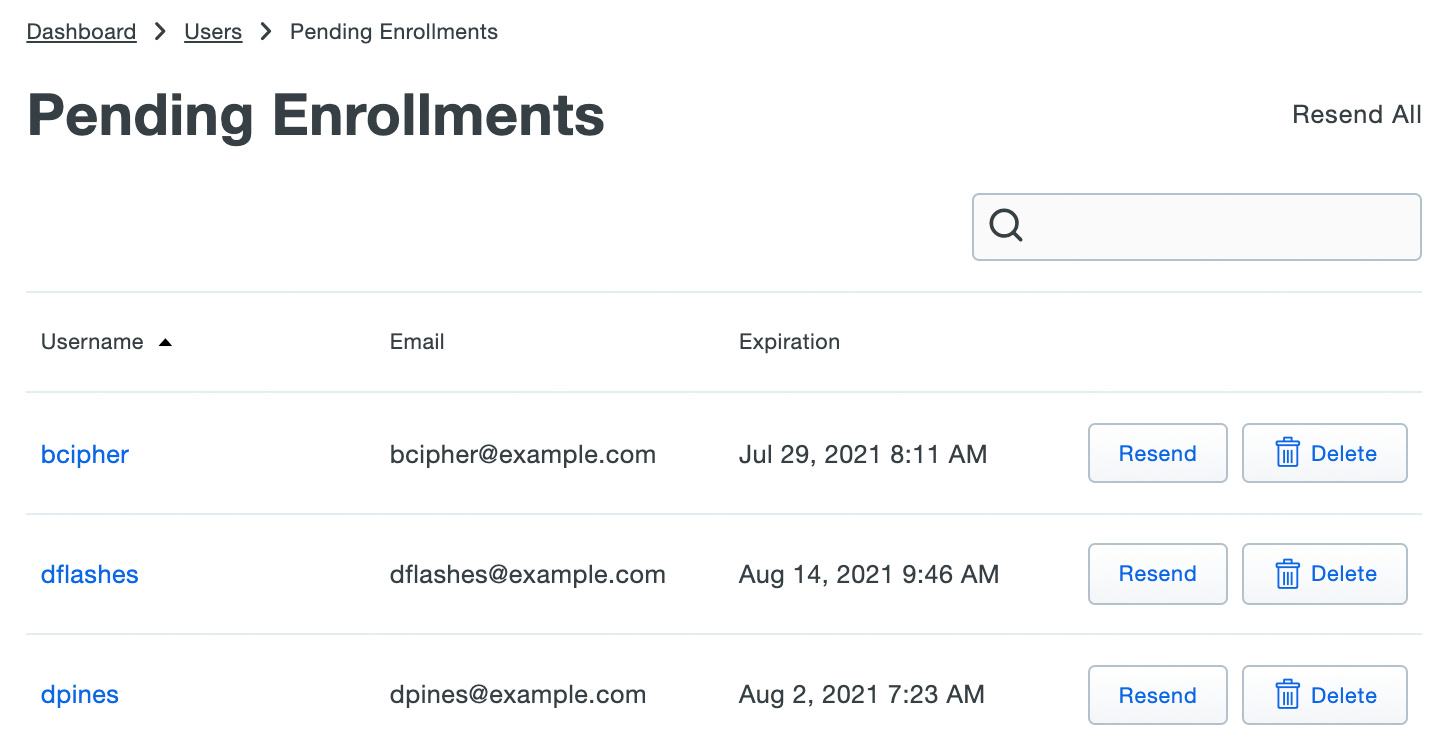
If you did choose to send enrollment emails to synced users automatically, the Pending Enrollments table shows which users created by directory sync (or bulk enrollment) have not yet completed enrolling their 2FA devices in Duo, along with the user's email address and the expiration date for the enrollment link previously sent.
If you need to send a user another copy of the enrollment link email, click the Resend button on the right of that user's information, or click Resend All to send the email again to all users with outstanding enrollment links. Resending the email does not change the current enrollment link's expiration date and uses the same email address that was used when the original enrollment was sent.
Click Delete to remove a pending enrollment. Deleting a pending enrollment immediately invalidates any unexpired enrollment link previously sent to that user. The next time directory sync runs, a new enrollment link will be emailed to that user, as long as they remain a member of a synced group and the sync configuration still has the "Enrollment Email" option enabled.
Manage User Sync
Role required: Owner, Administrator, or User Manager except where noted in the sections below.
Once configured, you can run manual syncs, update the sync settings, and perform other sync management operations.
To access your configured sync:
-
Log in to the Duo Admin Panel. Navigate to Users → External Directories or click the External Directories link on the "Users" page.
-
The "Directory Sync" tab lists all your configured syncs and shows their type, scheduled sync status, and the time a full sync was last run. Select the sync you want to manage by clicking on its name in the list.
-
Perform your management actions from the sync's properties page.
Perform a Full Sync
A full user directory sync runs automatically twice a day (at a set 12-hour interval chosen at random). If you enabled high-frequency syncs, user syncs start automatically about 30 minutes after a prior sync finishes.
Perform a manual full sync of the users in your directory to Duo at any time by clicking Sync Now in the "Sync Controls" section. This immediately imports all members of your selected Entra ID groups into Duo, creating and updating users and groups as necessary.
When the full sync completes, you'll see a count of users and groups synced into Duo.
Cancel a Full Sync
If you need to cancel a full sync in progress then click the Cancel sync action that appears while the sync is running. This will stop the sync, but any user and group updates already applied by the sync before you canceled it remain in place.
We recommend running another full sync at the earliest opportunity to address any user or group inconsistencies from the canceled sync.
Sync Individual Users from the Duo Admin Panel
Role required: Owner, Administrator, User Manager, Security Analyst, or Help Desk.
When you just need to import information for a few users from Entra ID you can interactively sync selected users instead of syncing the entire directory. For example, you may have some new employee accounts in Entra ID who need a corresponding Duo account, or you might have just disabled an Entra ID user and need that status carried over to Duo. Syncing these individual user accounts updates Duo immediately.
To sync individual users:
-
Type up to 50 Entra ID user names as a comma-separated list into the Sync individual users text box found in the "Sync Controls" section on the directory's properties page. If you used
userPrincipalNameas the Duo username source attribute (the default), then you must enter each username in full UPN format, such as "narroway@example.onmicrosoft.com", even if you enabled username normalization in the sync configuration. If you used a different source attribute for the Duo username, you must type each username exactly as it is shown (or will be shown) in Duo i.e. if you opted to usemailas the username attribute, you must enter the values of themailattribute as the usernames to sync.Additionally, individually synced users must be members of a group specified in your directory's sync configuration. If you try to sync an individual user who is not a member of a selected group then no update of that user occurs.
-
Click the Sync Users button to import information about the specified user or users.
When initiated, the individual user sync verifies that each specified user is a member of a group currently synced with Duo and then imports information for that user into Duo. If a specified user doesn't already exist in Duo, the sync creates them using the information imported from the source directory. If you enabled the option to send enrollment emails and the new user has the email address attribute populated, then a new user created by the individual user sync receives an emailed enrollment link.
Individual user sync updates an existing specified user with information from the source directory. The sync can change attribute values (except the username), modify group memberships, or disable the user in Duo if they are disabled in the source directory.
If you include a specified user that is no longer a member of any group synced into Duo, then the sync marks the user for deletion.
In addition to syncing individual users by username from the directory's details page, you can also perform an individual sync on an existing Duo user by visiting that user's properties page in the Duo Admin Panel and clicking the Sync This User link at the top-right. If you enabled the "Normalize usernames" option when configuring the Entra ID sync in Duo, (so that the usernames don't include the Entra ID domain information) then user pages won't show the option to sync, and you'll need to visit the directory sync page to perform the individual sync as previously described.

Individual User Sync using Admin API
Use the AdminAPI directory key from the "Directory Sync" section of the page to perform a sync operation on an individual user using Duo's Admin API.
Pause Directory Sync
Should you want to put your directory sync on hold to prevent it from making changes to your imported users, you can do so without removing your Entra ID configured sync from Duo. Use the pause functionality to stop scheduled syncs from running until you want to resume them.
To pause or resume synchronization of a directory:
-
From the Directory Sync page click on the directory for which you want to pause or resume scheduled syncs to view its configuration page.
-
Click the Pause automatic syncs or Resume automatic syncs action in the "Sync Status" section to perform the stated action. The sync status updates to reflect the effective state of the scheduled sync.
You can perform manual full and individual syncs at any time from the Admin Panel or via Admin API while the scheduled sync remains paused.
If your Entra ID sync has no selected groups in the configuration then we'll pause scheduled syncs right away and the sync's status will show an alert for no groups selected. Select a group or groups and save the change to resume the sync.
Sync Failure Notifications
Duo tracks failures of your scheduled directory synchronizations. We'll send a notification email to all Duo administrators with the Owner, Administrator, or User Manager roles after three (3) days of consecutive sync failures. If the failure persists, we'll send additional notification emails after seven (7) and 14 days. Duo will send a final email notification after 30 days of consecutive sync failures and pause the scheduled sync automatically.
Visit your Entra ID sync's page in the Admin Panel to correct the issues preventing sync success, or delete the directory sync if you no longer wish to use it.
To resume the paused sync after correcting any issues, click the Resume automatic syncs action in the "Sync status" section.
Update Sync Connection
To view or modify the connection used by a given Entra ID directory sync, view its properties in the Duo Admin Panel and click the Reauthorize button shown on the right side of an admin sync's properties page, in the "Microsoft Entra ID Connection" information. Use a different Entra ID authorization user to change the connection.
Reauthorizing the Sync
If the Duo Sync application's authorization in Entra ID expires then scheduled syncs stop running. We'll automatically pause the scheduled sync and send an "Action required" email to all the Duo administrators with the "Owner" role to let them know.
When you visit your Entra ID directory sync configuration page in the Duo Admin Panel, the Microsoft Entra ID Connection information on the right shows you the state of your directory connection.
If the status says "Could not connect to Entra ID: Reauthorization required", then click the Reauthorize button to repeat the authorization step you performed when you originally configured the sync. If the Entra ID account you'll use to reauthorize the sync had its privileges reduced after the first authorization, temporarily apply the Global Administrator role again before clicking Reauthorize.
You will need to manually resume scheduled syncs after completing reauthorization of the Duo Entra ID Sync application.
Delete Synced Directories
Deleting a directory sync from Duo doesn't delete or disable any of the previously imported objects. When you delete a synced directory from Duo, then the users, phones, and groups formerly managed by that sync remain available and get converted to unmanaged Duo objects that can be manually updated or deleted.
-
Users previously synced remain available and retain the status previously assigned, whether applied to the synced group or to the individual user. Any authentication devices associated with the user remain available. The users retain their former group memberships.
-
Groups previously synced remain available and retain the same members and status assigned when they were managed by the sync. The group name changes from Group name from type of sync "name of sync" to Group name (formerly from "name of sync").
-
Phones previously synced remain in Duo attached to the same users. Activation status remains unchanged.
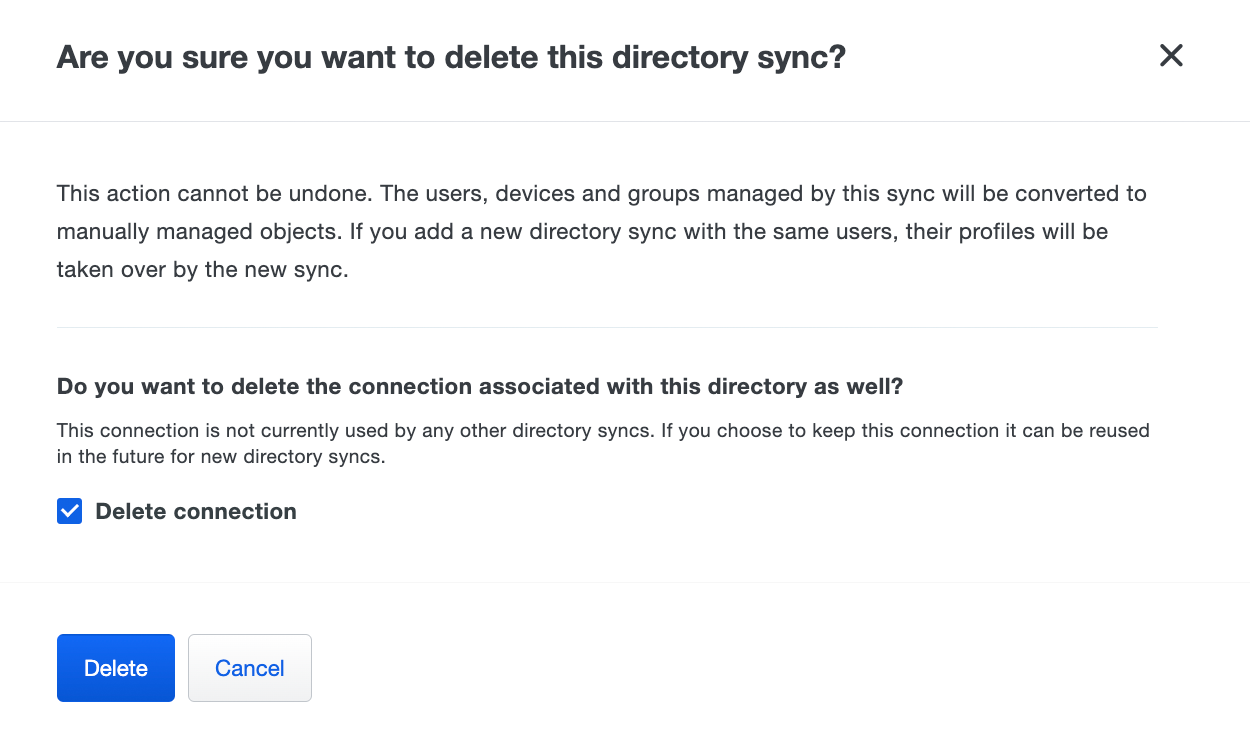
When you delete a directory sync and the connection used by that sync is not used by any other sync you can optionally delete the connection at the same time.
To delete a synced directory, click the Delete Directory Sync link at the top-right of that sync's details page and confirm that you want to delete that directory. If this is the last or only directory sync using the associated connection and you don't want to delete that connection, be sure to uncheck the Delete connection box before clicking the Delete button (option not shown if the connection is used by another sync).
Manage Synced Users and Groups
Sync Multiple Directories in Duo
You can configure multiple syncs with different source directories of any type and import all those users and groups into Duo. If you do this, ensure that the users you select for import have unique names.
If the same username exists in two different sync directory sources, the first sync you create will create or manage the user. Subsequent syncs with the same username get a sync error preventing the sync from affecting those users with the message "Cannot sync a user belonging to another directory sync unless that sync is paused". You can view the error in the Administrator Actions report for that sync's "completed" event. This error only affects the user in question; it doesn’t halt the sync.
If you want a different sync to be allowed to manage those users (for example to migrate users from one sync to another), you will need to pause the automatic scheduled syncs on the directory sync which currently manages those users. You could also delete the user from a synced group managed by the first sync, run that sync so the user is moved into the trash, make sure the user is in a group managed by the second sync, and then run the second sync to take over management of that user and restore them from the trash.
Update Synced User Information
User attributes synced from an external directory cannot be edited in Duo via the Admin Panel, Admin API, or CSV import. This always applies to the required attributes username, display name, email address, plus phone numbers (if you chose to import phones), and group memberships. Changes to these user attributes should be made in the external directory and then synced over to Duo.
You may edit Duo user properties that aren't synced from Entra ID via the Admin Panel, Admin API, or CSV import, including those that correspond with optional Entra ID sync attributes you chose not to import. However, if you update your Entra ID sync to begin importing values for a previously unconfigured optional attribute, the sync will overwrite any previously configured values with the information imported from Entra ID.
Examples:
-
You do not specify a source attribute for Notes when you create your Entra ID directory sync. The sync imports the username, email address, and name from Entra ID, but imports no notes information. You can edit the "Notes" field for synced Duo users. but you may not edit the "Username", "Display Name", or "Email Address" properties for synced users.
-
You specify a source attribute for Username Alias 1 but not for the remaining aliases. The sync imports values for "Username Alias 1" from Entra ID, and no other aliases. You can't edit "Username Alias 1" for a synced user, but you can edit additional aliases beyond the first.
-
You do not specify a source attribute for Username Alias 1. The sync creates users with no aliases, and you manually add values for "Username Alias 1" to some Duo users from the Admin Panel. You update your configured Entra ID sync to add a source attribute for Username Alias 1. The next sync updates the "Username Alias 1" value for all synced users to match the value in Entra ID, overwriting the aliases you added manually.
Bypass Status for Synced Users
Users synced from an external directory may have bypass status assigned individually or at the group level. See the Using Groups and User Status Administration documentation for more information.
Disabled Status for Synced Users
Admins can't disable individual Duo users managed by directory sync from the Duo Admin Panel, Admin API, or CSV import. Directory sync checks the user account status in the source directory and uses that information to determine whether the corresponding Duo account should remain enabled.
If a synced user account is disabled in the source directory, on the next sync Duo updates the user's status to "Disabled" but does not send that user to the Trash, and retains the user's group memberships. The user remains read-only, and cannot be manually enabled. Disabling a user invalidates existing remembered device sessions.
You can restore the disabled Duo account to active status by enabling the account in the source directory and running a sync.
You may disable a group of synced users by changing the status of that group to Disabled. This prevents any user who is a member of that group from logging in with Duo, regardless of that individual user's status. See the Using Groups and Group Status Administration documentation for more information.
Delete Synced Users
You may not delete a synced user from Duo as long as directory sync is actively managing that user. If a synced directory user is removed from all external directory groups that sync to Duo (or if the user account is deleted from the source directory), the user is sent to the Trash and marked as "Pending Deletion" at the next full directory sync or individual sync for that user, and the user can no longer authenticate to Duo. The user's properties are read-only and you are no longer billed for that user.
Locate users pending deletion in the Trash view, accessed by clicking the Trash count shown at the top of the Users page.
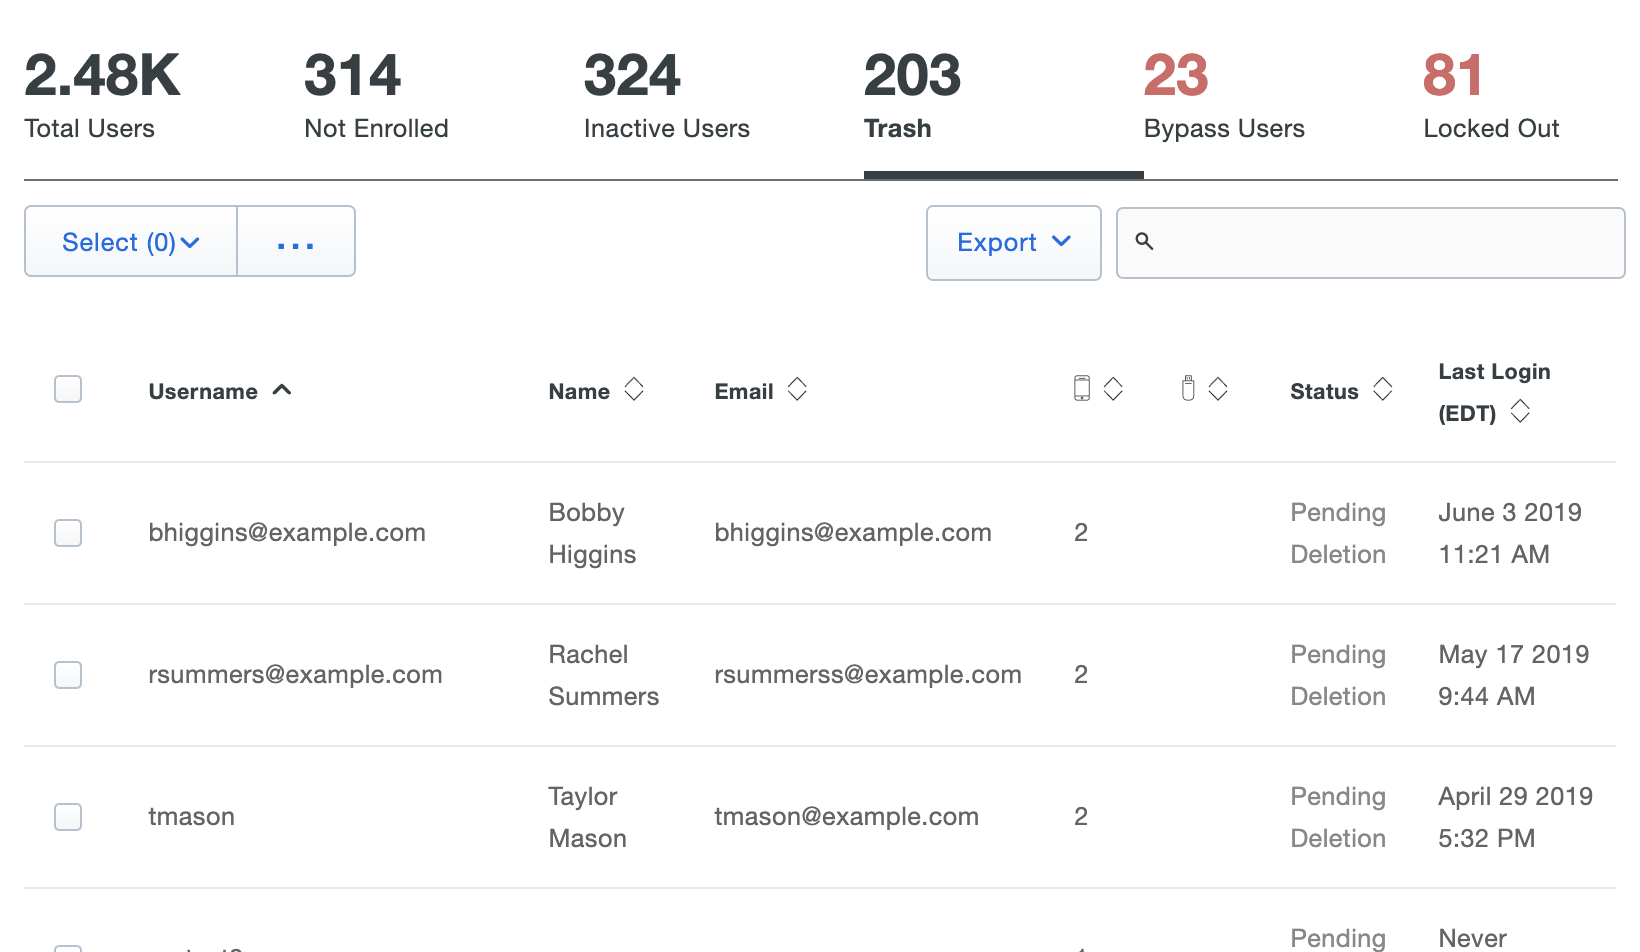
If the user marked for deletion is not reconnected to an external directory account via the sync within seven days the user is automatically deleted from Duo. The user's properties show the target date for deletion. A Duo admin can manually delete a synced user from the Trash via the Permanently Delete link at any time during those seven days.
Manage Synced Groups
Duo groups created by directory sync may only be managed by the sync. You can't change the group's members interactively from the Admin Panel interface, via CSV import, or programmatically with the Admin API.
To update the members of a sync-managed group, make the necessary changes in the source directory and import them into Duo by running a full or single-user sync.
Groups managed by Entra ID sync are identified as such in the Admin Panel and Admin API output. When viewing groups in the Admin Panel, you'll see from Entra ID Sync "name of sync" appended to the group's name or as the group's description. In Admin API output the sync information is appended to the group's name.
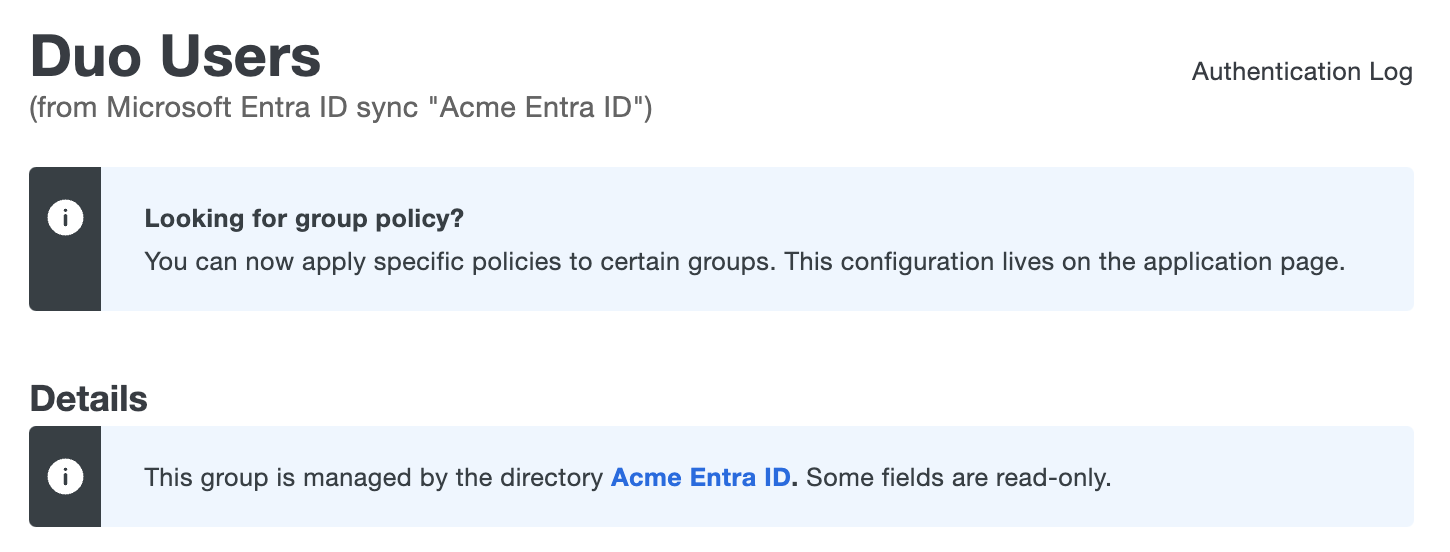
You can have multiple syncs managing groups with the same name (such as a "Duo Users" group managed by AD sync and also a "Duo Users" group managed by Entra ID sync), or even a manually created "Duo Users" group not managed by any sync. Each sync-managed group only contains Duo user members managed by the same directory sync, and an unmanaged group can only contain users also not managed by any directory sync.
Removing a group from the directory's configuration in Duo marks any members of that group for deletion if they are not members of another synchronized group, and converts the group to unmanaged so it can be modified or deleted from the Duo Admin Panel or Admin API. Duo updates the group's name to indicate it was once managed by directory sync, changing from Group name from Entra ID Sync "name of sync" to Group name (formerly from "name of sync").
Frequently Asked Questions
Be sure to review frequently asked questions and answers before using Duo's Entra ID synchronization.
Troubleshooting
Need some help? Take a look at the Entra ID Sync Frequently Asked Questions (FAQ) page or try searching our Azure Directory Sync Knowledge Base articles or Community discussions. For further assistance, contact Support.
On the details page of your Entra ID sync there is a Troubleshooting section under the "Sync Now" button. Here you'll find tips to help your sync run as intended. If you are still having issues and need to open a support case with Duo, you can click Sync Full Directory with Diagnostics to provide Duo Support with more information about your sync.
Additionally, a sync reference code is now provided on every sync. This will be included on every Entra ID sync event captured in the Administrator Actions Log, as well as within any emails Duo sends you about sync errors. Duo Support will request this code to locate logs associated with your sync.
Set Up Admin Sync
Role required: Owner.
Review the Prerequisites information before setting up Admin Directory Sync.
Directory Sync Updates Existing Admins
Before executing any Entra ID synchronization with Duo, understand the effect that synchronization can have on accounts with Duo admin duplicate email addresses. If you have some active Duo administrators, and one or more of these admins have the same email address attribute values in your Entra ID tenant, then performing a synchronization will cause the existing Duo admins' information to be merged with, and in some cases overwritten by the Entra ID information, such as names present in Duo changing to match the value stored in the synced directory.
If you synchronize multiple directories and there are non-unique email addresses among those directories, the net result is that there will be only one Duo admin created with that email address username. Only the sync that created the admin will be able to modify that admin, while additional syncs ignore it.
Create or Choose a Connection for Admin Sync
To start setting up an admin directory sync:
-
Log in to the Duo Admin Panel.
-
Navigate to Users in the left side bar and then click Administrators → Admin Directory Sync on the submenu.
-
Click the Add External Directory button and select Microsoft Entra ID from the list.
-
If this is the first Entra ID sync you've created for users or admins then you must first create a new connection to use for this sync. With Add new connection selected, click Continue to proceed to the next step.
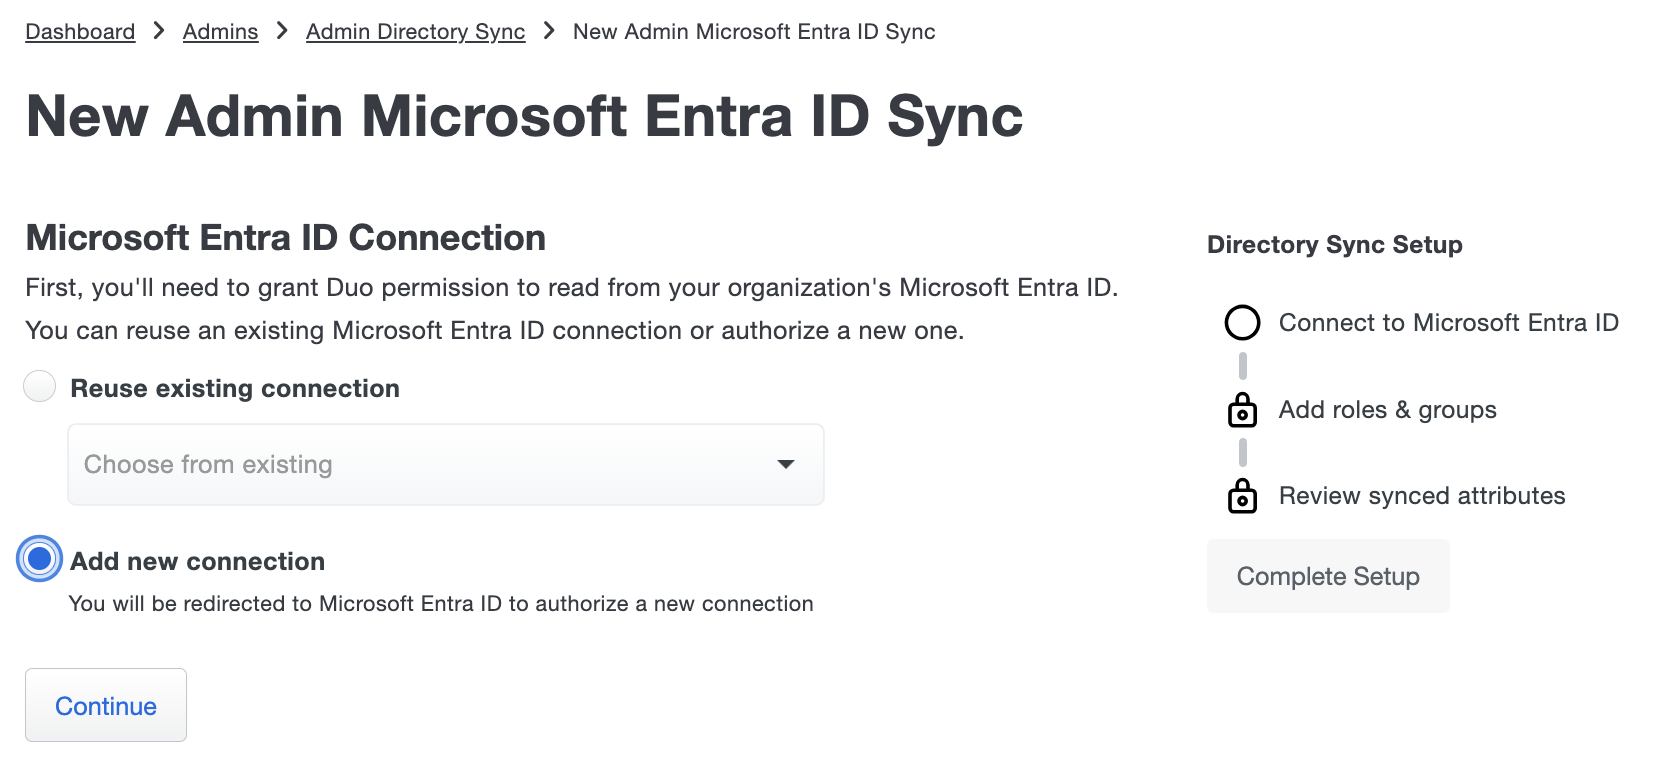
If you have previously created an Entra ID sync for users or administrators you can either create another new connection or reuse an existing connection to that directory for this new sync. User syncs and admin syncs can share connections to the same source directory.
If you want to use an existing connection choose Reuse existing connection and use the drop-down to select one from the list, then click Continue.
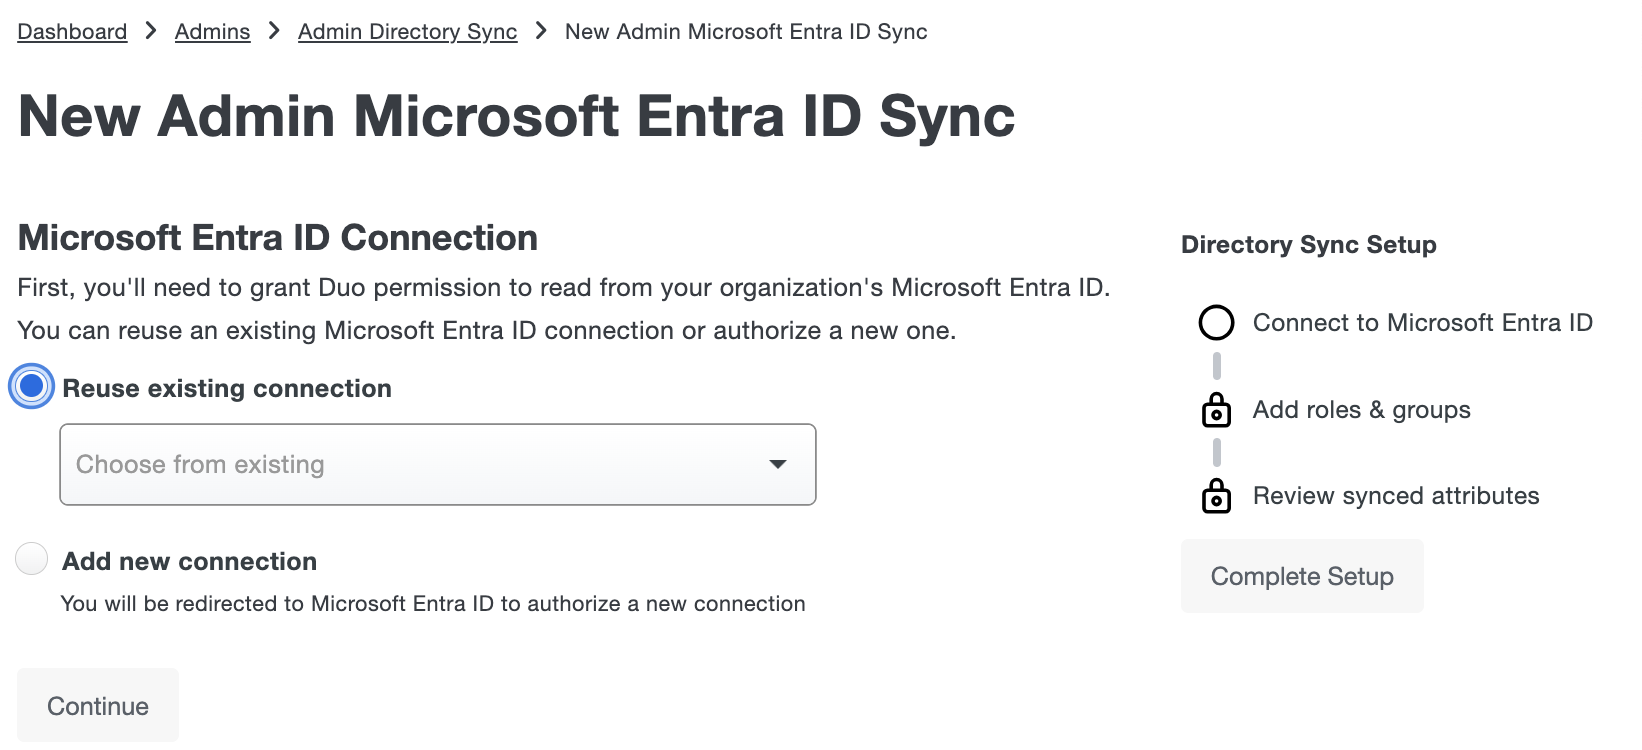
You will not be asked to perform the Entra ID app authorization steps again. Instead, you'll proceed directly to the new sync's properties page, where you'll perform role mapping and configure the synced attributes.
-
If you chose to add a new connection for this Entra ID admin sync then after clicking Continue you'll be redirected to the Entra ID portal to authorize use of Duo Entra ID Sync in your tenant. Sign in with the designated Entra ID service administrator account that has the global administrator role for this Entra ID. If required, complete Azure MFA for that service account admin user.
Duo does not see or store your Entra ID administrator credentials.
If you are already signed into the Entra ID portal as the Duo service account, you may not be prompted to log in again here.
-
Once you've signed in to Entra ID, you must click Accept to grant Duo the read rights needed to import admin users from your Entra ID domain.
-
Authorizing the Entra ID application redirects you back to the details page for your new Entra ID admin directory sync in the Duo Admin Panel. The new directory's name defaults to your Entra ID's organization name. Click the Rename link if you'd like to change the directory sync's name to something different, clicking Save to apply the new name.
-
The "Microsoft Entra ID Connection" should show as Connected. If the page lists the wrong Entra ID domain and you need to authorize the connection with a user from a different Entra ID tenant, click the Reauthorize button to begin again.
If the sync shows as "Connected" and the domain authorization information is correct, remain on the directory sync page to perform role mapping and configure the synced attributes.
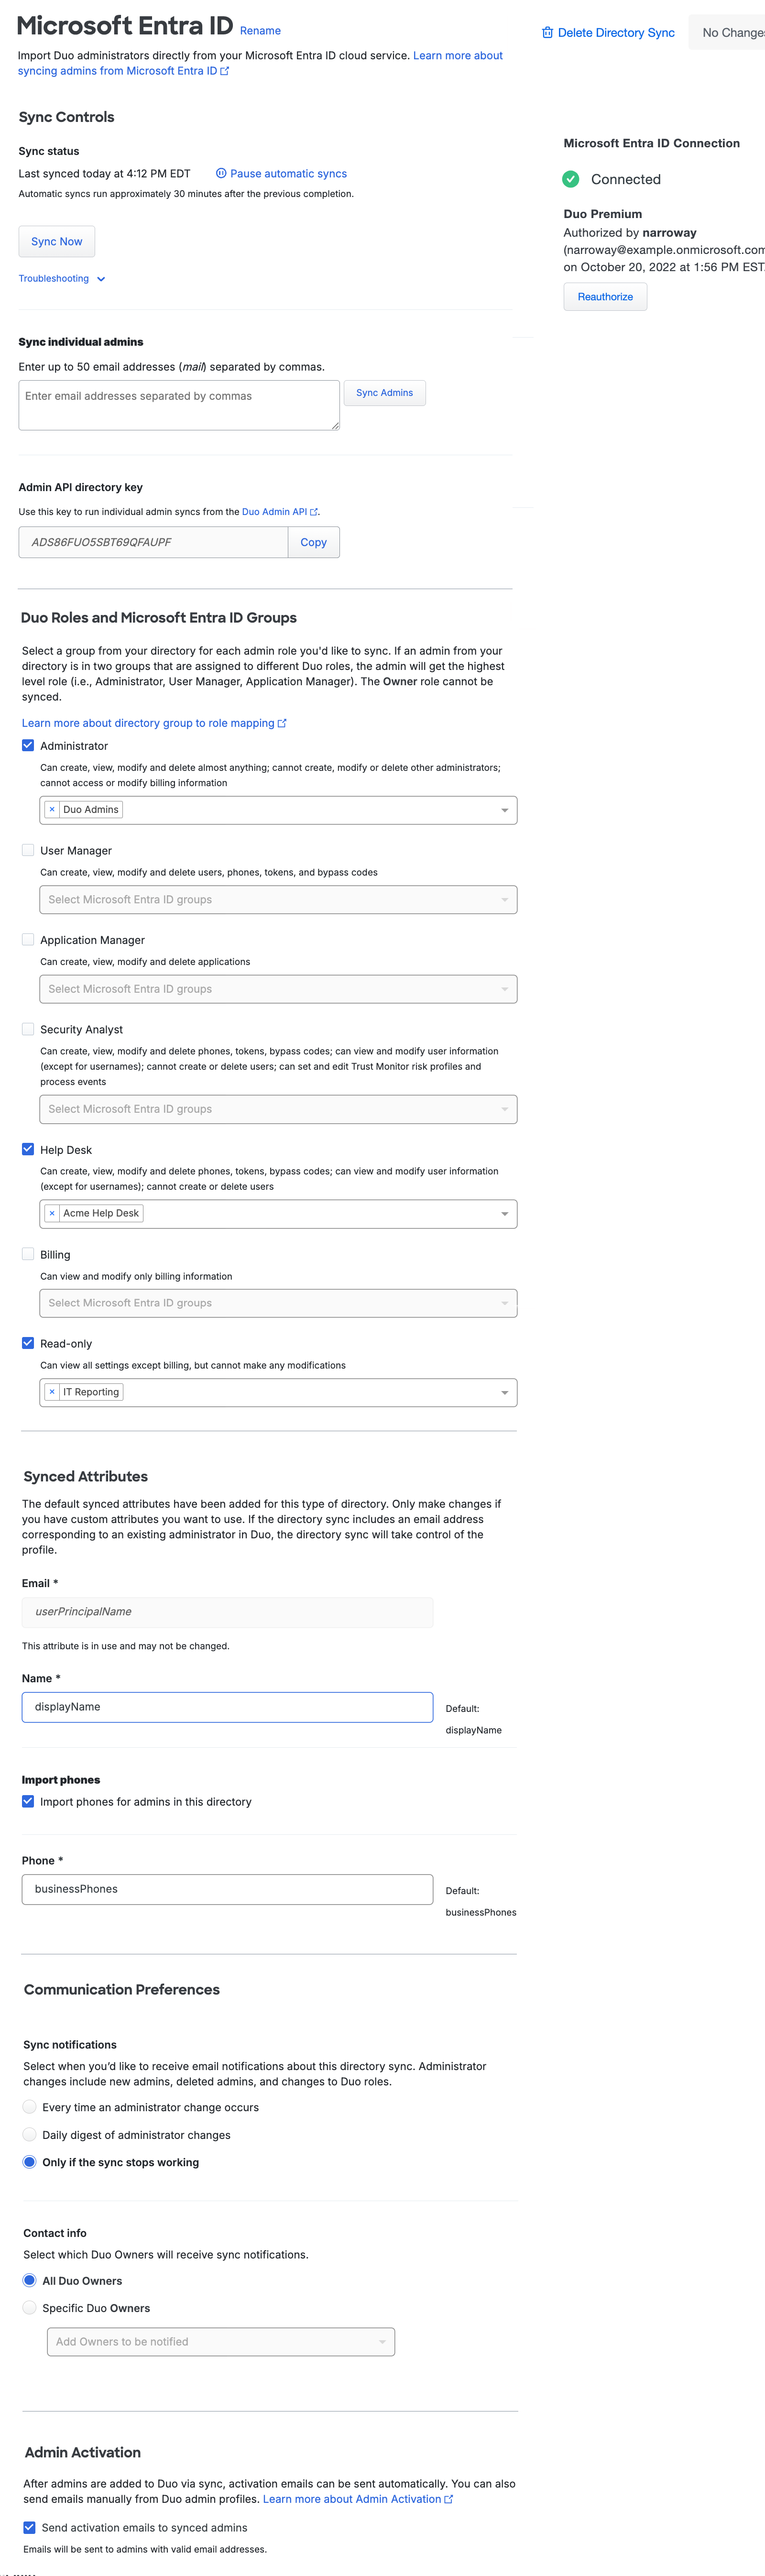
Duo Roles and Entra ID Groups
Admin directory sync imports admins and assigns Duo admin roles to your imported Duo admins based on their membership in the groups you define for each admin role in your admin sync's properties.
Check the box next to each role you would like to assign via sync. For each selected role, click in the Select Microsoft Entra ID groups field and start typing a group name; the list of available groups to sync returned will match the filter. If you have a very large number of groups in your directory, Duo limits the search results to 100 groups, so you may need to type in most of your desired sync group's name or enter a complete DN for the group (like CN=Duo-Admins,OU=Groups,DC=domain,DC=local) to locate it.
If you don't see any of your groups listed, review the previous setup steps and correct your configuration.
Once you see a list of groups, click to select the desired group or groups to sync. Members of the groups you choose here will be synced into Duo as administrators, with their assigned admin role corresponding to the selected mapping. You can sync multiple groups to the same role, and admins who are members of subgroups of the selected groups will also be synced.
If an existing administrator has the same email address as an administrator in your selected groups, that administrator will be taken over by sync.
If an admin is a member of multiple synced groups that are mapped to multiple roles, the admin will receive the higher level role, for example, a user who is a member of both a group you select for the Administrator role and a group you select for the Help Desk role receives the Administrator role.
The available roles are listed in descending order of role precedence from Administrator to Read-only on the admin sync page. Admin directory sync cannot create new admins with the Owner role, nor can it update existing Duo admins with the Owner role.
Nested groups are supported; Duo sync imports users from groups nested within your sync group, but creates only the top level group in Duo (the group explicitly selected for directory sync), with all nested group members as direct members of that Duo group.
If you delete and recreate any of the Entra ID groups saved in the sync properties (even if you reused the same group name and members), then you'll need to return to the admin directory sync property page for your AD domain in the Duo Admin Panel and delete the recreated group from your sync's role-mapping selections, then re-add the group and save the directory.
If you save the sync without selecting any groups, or if you remove all the groups selected from the sync config in the future, Duo pauses your automatic syncs upon detecting the missing information and updates the sync status to alert you that no groups have been selected. Correct the issue by selecting one or more groups to sync from the source directory and resuming scheduled synchronization.
Admin Synced Attributes
Make changes here if you want to customize which Entra ID attribute values get imported to Duo. The Duo attributes that have default AD attributes defined indicate those defaults as helper text. You can change these default attributes to custom attributes of your choice. Return to using the default attributes by clicking Revert all attributes to default.
Note that Duo does not import passwords from external directories.
You may customize the AD source attributes for these Duo admin properties:
| Email Address |
Required. The admin's email address. The attribute selected should match the primary authentication login name your admins use to log in to the Duo Admin Panel. This attribute cannot be customized after the first directory synchronization occurs. Default: |
| Display Name |
Required. The admin's name. Default: |
| Import Phones |
Enable this option if you want Directory Sync to import a phone for your admins. Imported devices default to the "Generic Smartphone" platform, capable of phone call and SMS messaging. Directory sync does not send SMS activation messages to imported admins; see Admin Activation for details. If you enable both the Admin Activation and Import Phones options, activation emails are only sent to admins with email addresses who do not have phone information populated in AD. Default: Import no phone information from AD. |
| Phone |
Required. Create a phone in Duo with the attribute value as the phone number, attached to the imported admin as a generic smartphone 2FA device. Directory sync will only add a phone number if the admin being synced does not already have one. Non-US numbers must be stored in AD using the format To import a landline with an extension, append Only configurable if Import Phones is selected. Default: |
Communication Preferences
Use the "Communications Preferences" to determine what sync information is emailed to Duo Owner admins.
Choose one of these options in the Sync notifications section:
-
Every time an administrator change occurs: receive separate, immediate notifications whenever a sync creates, deletes, or updates an administrator.
-
Only if the sync stops working: receive an email only when a sync fails to run (default).
The Contact info setting lets you select certain Duo administrators with the Owner role to receive notifications. By default, Directory Sync sends notifications to all active admins with the Owner role.
Admin Activation
Select the Send activation emails to synced admins option in the "Admin Activation" section if you want imported admins to automatically receive an admin activation email with a link to set up a password and 2FA device. Emails are sent to the email address associated with the newly created admin.
The setup links contained in these emails are valid for seven (7) days. If the admin does not complete the setup process after seven days have elapsed, the original setup link expires and a new email is generated at the next sync and sent to the admin.
The pending admin setup link is displayed on an administrator’s page and can be directly provided to new admins. Admin activation emails can also be resent or pending admin activation links invalidated and recreated from the administrator’s details page.
Default: Send activation emails to imported admins.
If your organization uses e-mail filtering, be sure to allow the sender no-reply@duosecurity.com.
Finish Admin Sync Setup
Click Complete Setup to finish creating the new Entra ID admin sync in Duo.
The directory page shows the status as "Connected to Duo" and the "Sync status" indicates when the next automatic sync will run once all directory configuration steps have been completed successfully.
If you wish you can click the Sync Now button to perform the first import of admins from your directory into Duo. Whether you run your first sync immediately after setup or not, admin directory sync runs automatically around every 30 minutes. You can always return to the Duo Admin Panel to initiate a manual sync.
Note that once you import admins from Entra ID into Duo you may not change the Email Address source attribute.
Manage Admin Sync
Role required: Owner.
Once configured, you can run manual admin syncs, update the sync settings, and perform other sync management operations.
To access your configured admin sync:
-
Log in to the Duo Admin Panel.
-
Navigate to Users in the left side bar and then click Administrators → Admin Directory Sync on the submenu.
-
The "Directory Syncs" tab lists all your configured admin syncs and shows their type, automatic sync status, and the time a full sync was last run. Select the sync you want to manage by clicking on its name in the list.
-
Perform your management actions from the admin sync's properties page.
Perform a Full Admin Sync
A full admin directory sync runs automatically every 30 minutes.
Perform a manual full sync of the admins in mapped admin groups in your directory to Duo by clicking Sync Now in the "Sync Controls" section. This immediately imports all members of your selected Entra ID groups into Duo, creating and updating admins as necessary.
When the full sync completes, you'll see a count of admins and groups synced into Duo. Note that the groups synced by an admin sync are only used for admin role mapping, and do not show up on the Groups page in the Duo Admin Panel.
Cancel a Full Admin Sync
If you need to cancel a full admin sync in progress then click the Cancel sync action that appears while the sync is running. This will stop the sync, but any admin updates already applied by the sync before you canceled it remain in place.
We recommend running another full sync at the earliest opportunity to address any inconsistencies from the canceled sync.
Sync Individual Admins from the Duo Admin Panel
When you just need to import information for a few admins from Entra ID you can interactively sync selected admins instead of syncing the entire directory. For example, you may have some new employee accounts in Entra ID who need a corresponding Duo admin account, or you might have just disabled an Entra ID user and need that status carried over to their administrator account in Duo. Syncing these individual admin accounts updates Duo immediately.
To sync individual admins:
-
Type up to 50 email addresses as a comma-separated list into the Sync individual admins text box found in the "Sync Controls" section on the directory's properties page.
Additionally, individually synced admins must be members of a group specified as a role group in the "Duo Roles and Entra ID Groups" section of your directory sync's configuration. If you try to sync an individual admin who is not a member of a synced group then no update of that admin occurs.
-
Click the Sync Admins button to import information about the specified admin or admins.
When initiated, the individual admin sync verifies that each specified admin is a member of a group currently synced with Duo and then imports information for that admin into Duo. If a specified admin doesn't already exist in Duo, the sync creates them using the information imported from the source directory.
If you enabled the option to send activation emails then a new admin created by the individual admin sync receives an emailed activation link.
Individual admin sync updates an existing specified admin with information from the source directory. The sync can change attribute values, modify the assigned Duo admin role, or disable the admin in Duo if they are disabled in the source directory.
If you include a specified admin that is no longer a member of any group synced into Duo, then the sync marks the admin for deletion](#delete-synced-admins). Admins pending deletion will be deleted in seven (7) days. In that time, if the admin is re-added to a synced group, the admin will be restored.
In addition to syncing individual admins by email address from the directory's details page, you can also perform an individual sync on an existing Duo admin by visiting that admin's properties page in the Duo Admin Panel and clicking the Sync This Admin link at the top-right.
Individual Admin Sync using Admin API
Use the AdminAPI directory key from the "Sync Controls" section of the page to perform a sync operation on an individual admin using Duo's Admin API.
Pause Admin Sync
Should you want to put your directory sync on hold to prevent it from making changes to your imported admins, you can do so without removing your Entra ID configured sync from Duo. Use the pause functionality to stop scheduled syncs from running until you want to resume them.
To pause or resume synchronization of a directory:
-
From the Admin Directory Sync page click on the directory for which you want to pause or resume scheduled syncs to view its configuration page.
-
Click the Pause automatic syncs or Resume automatic syncs action in the Directory Sync "Status" section to perform the stated action. The sync status updates to reflect the effective state of the scheduled sync.
You can perform manual full and individual syncs at any time from the Admin Panel or via Admin API while the scheduled sync remains paused.
If your admin sync has no mapped role groups in the configuration then we'll pause scheduled syncs right away and the admin sync's status will show an alert for no groups selected. Select a group or groups and save the change to resume the sync.
Sync Failure Notifications
Duo tracks failures of your automatic admin directory synchronizations. We'll send a notification email to the Duo Owners specified in the sync's Communication Preferences after one (1) day of consecutive sync failures. If the failure persists, we'll send additional notification emails after three (3). Duo will send a final email notification after seven (7) days of consecutive admin sync failures and pause the sync automatically.
Visit your admin sync's page in the Admin Panel to correct the issues preventing sync success, or delete the admin directory sync if you no longer wish to use it.
To resume the paused sync after correcting any issues, click the Resume automatic syncs action in the "Sync status" section.
Update Sync Connection
To view or modify the connection used by a given Entra ID admin directory sync, view its properties in the Duo Admin Panel and click the Reauthorize button shown on the right side of an admin sync's properties page, in the "Microsoft Entra ID Connection" information. Use a different Entra ID authorization user to change the connection.
Reauthorizing the Sync
If the Duo Sync application's authorization in Entra ID expires then scheduled syncs stop running. We'll automatically pause the scheduled sync and send an "Action required" email to all the Duo administrators with the "Owner" role to let them know.
When you visit your Entra ID directory sync configuration page in the Duo Admin Panel, the Microsoft Entra ID Connection information on the right shows you the state of your directory connection.
If the status says "Could not connect to Entra ID: Reauthorization required", then click the Reauthorize button to repeat the authorization step you performed when you originally configured the sync. If the Entra ID account you'll use to reauthorize the sync had its privileges reduced after the first authorization, temporarily apply the Global Administrator role again before clicking Reauthorize.
You will need to manually resume scheduled syncs after completing reauthorization of the Duo Entra ID Sync application.
Delete Admin Syncs
Deleting a directory sync from Duo doesn't delete or disable any of the previously imported objects. When you delete a an admin sync from Duo, then the admins formerly managed by that sync remain available and get converted to unmanaged Duo admins that can be manually updated or deleted.
-
Admins previously synced remain available and retain the status and role previously assigned.
-
Any 2FA methods associated with the admin remain available.
When you delete an admin directory sync and the connection used by that sync is not used by any other sync you can optionally delete the connection at the same time.
To delete an admin sync, click the Delete Directory Sync link at the top-right of that sync's details page and confirm that you want to delete that directory. If this is the last or only directory sync using the associated connection and you don't want to delete that connection, be sure to uncheck the Delete connection box before clicking the Delete button (option not shown if the connection is used by another sync).
Manage Synced Admins
Update Synced Admin Information
Admin attributes synced from an external directory generally cannot be edited in Duo via the Admin Panel or Admin API. This applies to the attributes email address, display name, role, and status. Changes to these attributes should be made in the external directory and then synced over to Duo.
You may edit Administrative units and 2FA devices, including phone numbers, for synced admins. Synced administrators may update their own password and 2FA devices from the "Edit Profile" page in the Duo Admin Panel.
Change a Synced Admin's Role
To update an admin’s assigned role, either update the admin’s group membership in your source directory to add the admin to a group which has been mapped to the desired role in the admin sync config, or modify the role-to-group mapping on the admin sync's details page to include the desired group.
To update a synced admin’s role to the Owner role, go to the properties page for that administrator and check the Upgrade to Owner checkbox in the "Role" section, and then click Save. This converts the synced admin to an unmanaged admin with the Owner role. Admins with the Owner role assigned in this manner cannot be managed or modified by Directory Sync, regardless of group membership.
Disabled Status for Synced Admins
Duo Owner admins can't disable individual Duo admins managed by directory sync from the Duo Admin Panel or Admin API. Directory sync checks the admin's user account status in the source directory and uses that information to determine whether the corresponding Duo admin should remain enabled.
If a synced admin is disabled in the Entra ID source, on the next sync Duo updates the user's status to "Disabled" but does not delete the admin. The Duo admin account remains read-only, and cannot be manually enabled.
You can restore the disabled Duo admin account to active status by enabling the account in the source directory and running a sync.
Delete Synced Admins
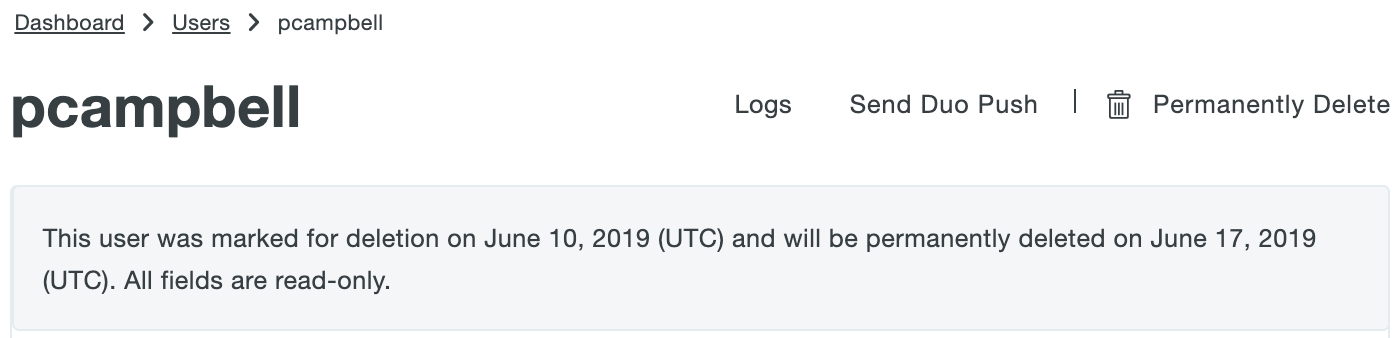
You may not delete a synced admin from Duo as long as directory sync is actively managing that admin. If a synced directory admin is removed from all external directory groups that sync to Duo (or if the admin's user account is deleted from the source directory), the admin is marked as "Pending Deletion" at the next sync, and the admin can no longer log in to the Duo Admin Panel.
View a list of admins pending deletion by navigating to the Administrators page in the Admin Panel and applying the "Pending Deletion" filter.
If the admin marked for deletion is not reconnected to an external directory account via the sync within seven (7) days, the admin is automatically deleted from Duo. The admin's properties show the target date for deletion. A Duo admin with the Owner role can manually delete a synced pending deletion admin via the Permanently Delete button at any time during those seven days. Synced Duo admins pending deletion can also be restored using the Restore Admin button, but will no longer be synced unless an account with the same email address is added back to a synced admin group in the source directory.
Frequently Asked Questions
Be sure to review frequently asked questions and answers before using Duo's Entra ID synchronization for users or admins.
Troubleshooting
Need some help? Take a look at the Entra ID Sync Frequently Asked Questions (FAQ) page or try searching our Azure AD Sync Knowledge Base articles or Community discussions. For further assistance, contact Support.
On the details page of your directory sync there is a Troubleshooting section under the "Sync Now" button. Here you'll find tips to help your sync run as intended. If you are still having issues and need to open a support case with Duo, you can click Sync Directory with Diagnostics to provide Duo Support with more information about your sync.
Additionally, a sync reference code is now provided on every sync. This will be included on every directory sync event captured in the Administrator Actions Log, as well as within any emails Duo sends you about sync errors. Duo Support will request this code to locate logs associated with your sync.
Network Diagram
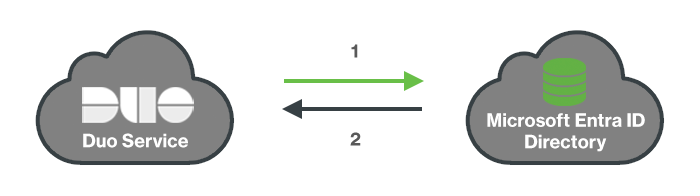
- Duo requests directory information from Entra ID.
- Users and groups imported to Duo's service.