Active Directory Sync for Duo Users and Admins
Last updated:
Action Required: April 15, 2026 Duo CA Bundle Expiration
Duo products that use certificate pinning, such as the Duo Authentication Proxy, require a software update for uninterrupted use. Legacy clients could stop working at any time after April 15, 2026.
Check your Duo Authentication Proxy installations used for Active Directory sync and upgrade them if they are not running version 6.5.1 or later.
Please visit Duo Knowledge Base article 9451 for more information and guidance.
Overview
Import Duo end-users or administrators directly from your on-premises Active Directory (AD) forest or domain or Active Directory Lightweight Directory Service (AD LDS) instance into Duo with Duo Security's Directory Sync feature.
Duo Directory Sync is a one-way operation. No information from Duo is imported into your user directory.
Scheduled user synchronization of your full directory runs twice a day, and runs every 30 minutes for administrators. Run either type of full sync on-demand from the Duo Admin Panel. You can also run an individual user or administrator syncs on-demand from the Admin Panel or programmatically via Admin API.
The Directory Sync feature is part of the Duo Premier, Duo Advantage, and Duo Essentials plans.
Prerequisites
Prerequisites necessary for Active Directory synchronization are as follows:
- Know your Active Directory domain controller hostname or IP address, the LDAP or LDAPS port for communicating with that server, the authentication type you plan to use, and the directory search base DN.
- Hostnames must be RFC-1034-compliant and only contain letters, digits, or hyphens (
-) in the host or domain name.
- Hostnames must be RFC-1034-compliant and only contain letters, digits, or hyphens (
- Authentication Proxy 6.4.0 and later require that all certificates used for LDAPS or STARTTLS use SHA256 or greater and have a public key length of 2048 or greater.
- A Windows 2016 or later, or modern Linux system (CentOS, Ubuntu, Red Hat), for running the Duo Authentication Proxy software.
- Duo Authentication Proxy installed on the target server. You will complete this installation as part of the setup steps described below.
- You must have the Owner, Administrator, or User Manager admin role to set up and manage directory sync of users into Duo. Custom roles must include the "External directory configuration" permission set to "All" and the "Run user directory syncs" permission set to "Individual users" (to run directory sync for specific users) or "All user syncs" (to run full directory syncs and syncs for specific users) accordingly. Duo Admin directory sync setup and management requires the Owner admin role.
This application communicates with Duo's service on SSL TCP port 443.
Firewall configurations that restrict outbound access to Duo's service with rules using destination IP addresses or IP address ranges aren't recommended, since these may change over time to maintain our service's high availability. If your organization requires IP-based rules, please review Duo Knowledge Base article 1337.
Effective June 30, 2023, Duo no longer supports TLS 1.0 or 1.1 connections or insecure TLS/SSL cipher suites. See Duo Knowledge Base article 7546 for additional guidance.
Set Up User Sync
Role required: Owner, Administrator, or User Manager. Custom roles must include the "External directory configuration" permission set to "All" and the "Run user directory syncs" permission set to "Individual users" (to run directory sync for specific users) or "All user syncs" (to run full directory syncs and syncs for specific users) accordingly.
Directory Sync Updates Existing Users
Before executing any Active Directory synchronization with Duo, understand the effect that synchronization can have on accounts with the same name. Suppose that you already have some Duo users, and one or more of these users have the same username on your Active Directory server. Performing a synchronization will cause the existing Duo users' information to be merged with, and in some cases overwritten by the Active Directory information, such as email addresses in Duo changing to match the value stored in the synced directory.
If you synchronize multiple directories and there are non-unique usernames among those directories, the net result is that there will be only one Duo user created with that username, and the sync that creates the user will continue to own and manage the user.
Please note that this video shows user sync configuration prior to the October 2022 D252 Duo release. Some concepts still apply.
Create or Choose a Connection for User Sync
To start setting up a user directory sync:
-
Log in to the Duo Admin Panel.
-
Navigate to Users → External Directories or click the External Directories link on the "Users" page.
-
Click the Add External Directory button and select Active Directory from the list.
-
If this is the first Active Directory sync you've created for users or admins, you must first create a new connection to use for this sync. With Add new connection selected, click Continue to proceed to the next step.
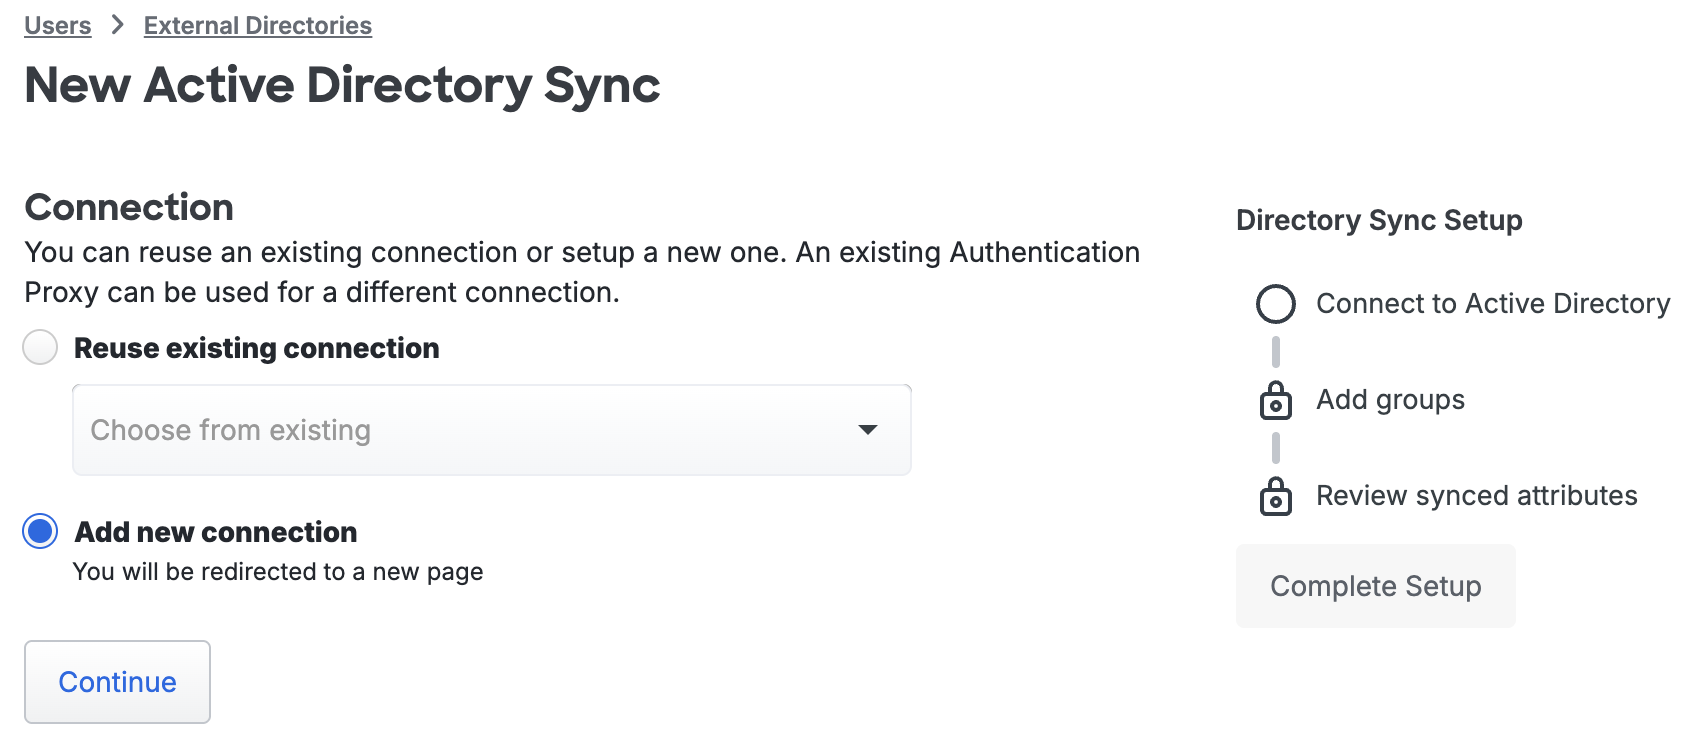
If you have previously created an Active Directory sync for users or administrators, you can either create another new connection or reuse an existing connection to that directory for this new sync. User syncs and admin syncs can share connections to the same source directory.
If you want to use an existing connection, choose Reuse existing connection and use the drop-down to select one from the list, then click Continue.
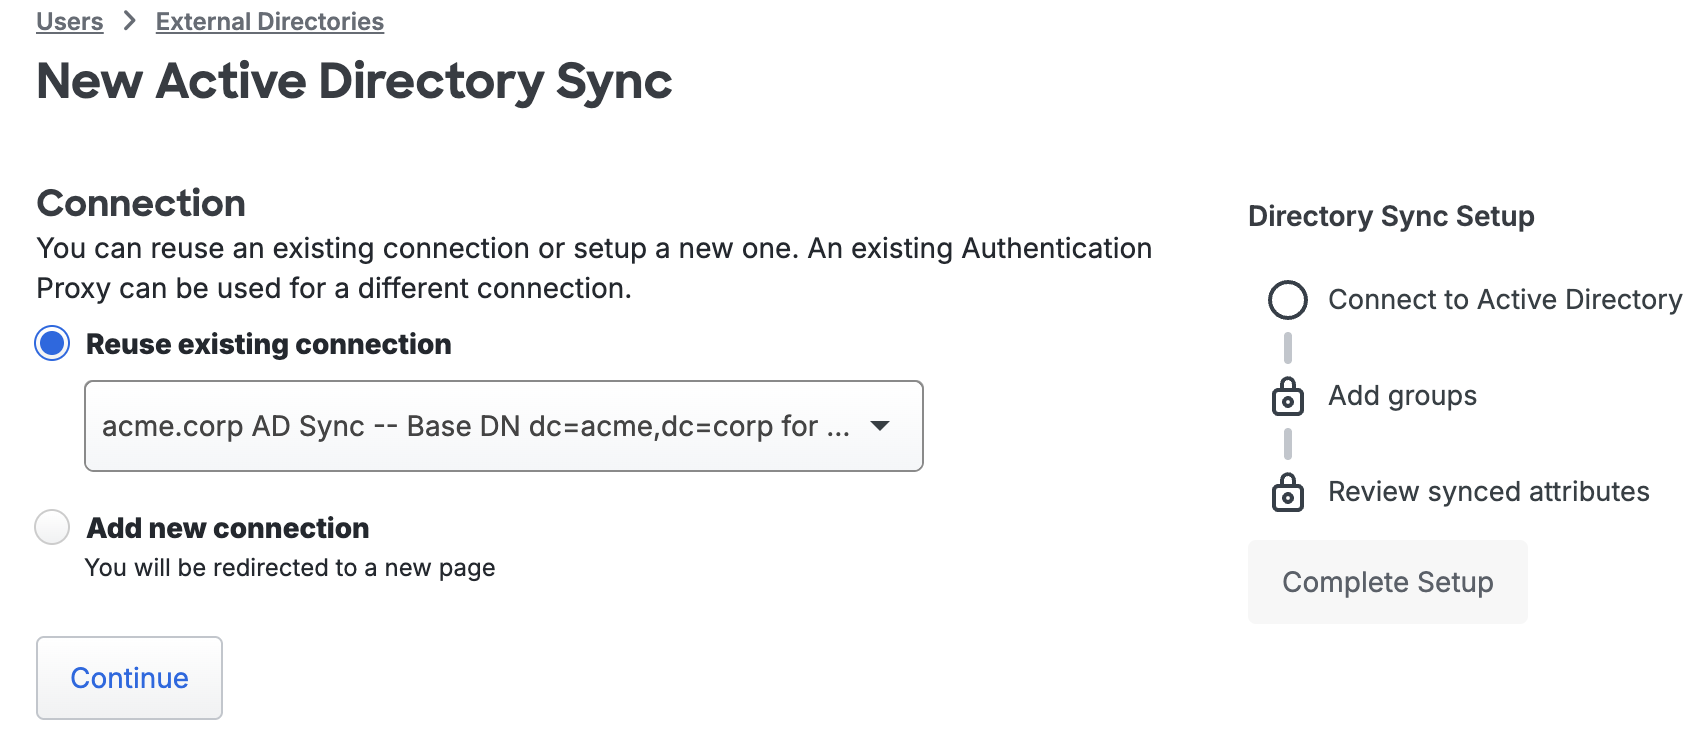
You'll proceed directly to the new sync's properties page, where you'll select groups to sync and configure the synced attributes.
Install Duo Authentication Proxy
If you chose to create a new connection then your next step is to install the Duo Authentication Proxy software on a machine that can connect to both Duo's cloud service and to your AD domain controller. Before proceeding, you should locate (or set up) a system in your environment on which you will install the Duo Authentication Proxy. This host needs LDAP connectivity to your AD domain controller (ports 389/636 or whichever ports accept Active Directory binds), as well as HTTPS/443 connectivity to Duo.
If you are already running an Authentication Proxy server in your environment, you can also use that host for directory synchronization. If your existing Authentication Proxy server is version 5.2.0 or later, and it's already running a directory sync, you can use the same proxy connection to run additional syncs as long as they are all for the same Duo customer account (identical api_host values).
Locate (or set up) a system on which you will install the Duo Authentication Proxy. We recommend the following 64-bit operating systems for the system hosting the Duo Authentication Proxy:
- Windows Server 2016 or later
- CentOS 7
- CentOS Stream 8 or later
- Fedora 37 or later
- Red Hat Enterprise Linux 7 or later
- Ubuntu 20.04 LTS or later
- Debian 11 or later
If you opt for Integrated authentication, the Authentication Proxy server must be a domain-joined Windows 2016 or later server.
The Duo End of Sale, Last Date of Support, and End of Life Policy states that Duo does not offer support for integrations running on operating system versions beyond the vendor’s stated Last Date of Support date.
If you will reuse an existing Duo Authentication Proxy server for this new application, you can skip the install steps and go to Configure the Proxy.
The Duo Authentication Proxy can be installed on a physical or virtual host. We recommend a system with at least 1 CPU, 200 MB disk space, and 4 GB RAM (although 1 GB RAM is usually sufficient). See additional Authentication Proxy performance recommendations in the Duo Authentication Proxy Reference.
We do not recommend installing the Duo Authentication Proxy on the same Windows server that acts as your Active Directory domain controller or one with the Network Policy Server (NPS) role. If you must co-locate the Duo Authentication Proxy with these services, be prepared to resolve potential LDAP or RADIUS port conflicts between the Duo service and your pre-existing services.
- Download the most recent Authentication Proxy for Windows from https://dl.duosecurity.com/duoauthproxy-latest.exe. Note that the actual filename will reflect the version e.g. duoauthproxy-6.8.0.exe. View checksums for Duo downloads here.
- Launch the Authentication Proxy installer on the target Windows server as a user with administrator rights and follow the on-screen prompts.
When installing, you can choose whether or not you want to install the Proxy Manager. The Proxy Manager is a Windows utility that helps you edit the Duo Authentication Proxy configuration, determine the proxy's status, and start or stop the proxy service. Learn more about using the Proxy Manager. Installing the Proxy Manager adds about 100 MB to the installed size.
If you do not want to install the Proxy Manager, you may deselect it on the "Choose Components" installer screen before clicking Install.
To perform a silent install on Windows, issue the following from an elevated command prompt after downloading the installer (replacing version with the actual version you downloaded):
duoauthproxy-version.exe /SAppend /exclude-auth-proxy-manager to install silently without the Proxy Manager:
duoauthproxy-version.exe /S /exclude-auth-proxy-managerEnsure you have compiler toolchain packages installed. On most recent RPM-based distributions — like Fedora, Red Hat Enterprise, and CentOS — you can install these by running (as root):
$ yum install gcc make libffi-devel zlib-devel diffutilsOn Debian-derived systems, install these dependencies by running (as root):
$ apt-get install build-essential libffi-dev zlib1g-devIf SELinux is present on your system and you want the Authentication Proxy installer to build and install its SELinux module, include
selinux-policy-develandchkconfigin the dependencies:$ yum install gcc make libffi-devel zlib-devel diffutils selinux-policy-devel chkconfig$ apt-get install build-essential libffi-dev zlib1g-dev selinux-policy-devel chkconfig-
Download the most recent Authentication Proxy for Unix from https://dl.duosecurity.com/duoauthproxy-latest-src.tgz. From the command line you can use
curlorwgetto download the file, like$ wget --content-disposition https://dl.duosecurity.com/duoauthproxy-latest-src.tgz. Depending on your download method, the actual filename may reflect the version e.g. duoauthproxy-6.8.0-src.tgz. View checksums for Duo downloads here. Extract the Authentication Proxy files and build it as follows:
$ tar xzf duoauthproxy-6.8.0-src.tgz $ cd duoauthproxy-version-src $ make-
Install the authentication proxy (as root):
$ cd duoauthproxy-build
$ ./install
Follow the prompts to complete the installation. The installer creates a user to run the proxy service and a group to own the log directory and files. You can accept the default user and group names or enter your own.
If SELinux is present on the target server, the Duo installer will ask you if you want to install the Authentication Proxy SELinux module. Your selection affects whether systemd can start the Authentication Proxy after installation.
SELinux Mode Default Response Result Enforcing Yes Choose 'yes' to install the Authentication Proxy's SELinux module. This permits start of the Authentication Proxy service by systemd. If you choose 'no' then the SELinux module is not installed, and systemd cannot start the Authentication Proxy service. Permissive No Choose 'no' to decline install of the Authentication Proxy's SELinux module. The Authentication Proxy service can be started by systemd. However, if you change SELinux from permissive to enforcing mode after installing the Duo proxy, systemd can no longer start the Authentication Proxy service. If you plan to enable SELinux enforcing mode later, you should choose 'yes' to install the Authentication Proxy SELinux module now. If you choose to install the Authentication Proxy SELinux module and the dependencies
selinux-policy-develandchkconfigare not present, then the installer fails to build the module.
To install the Duo proxy silently with the default options, use the following command:
sudo ./duoauthproxy-build/install --install-dir /opt/duoauthproxy --service-user duo_authproxy_svc --log-group duo_authproxy_grp --create-init-script yesAppend --enable-selinux=yes|no to the install command to choose whether to install the Authentication Proxy SELinux module.
Configure the Proxy
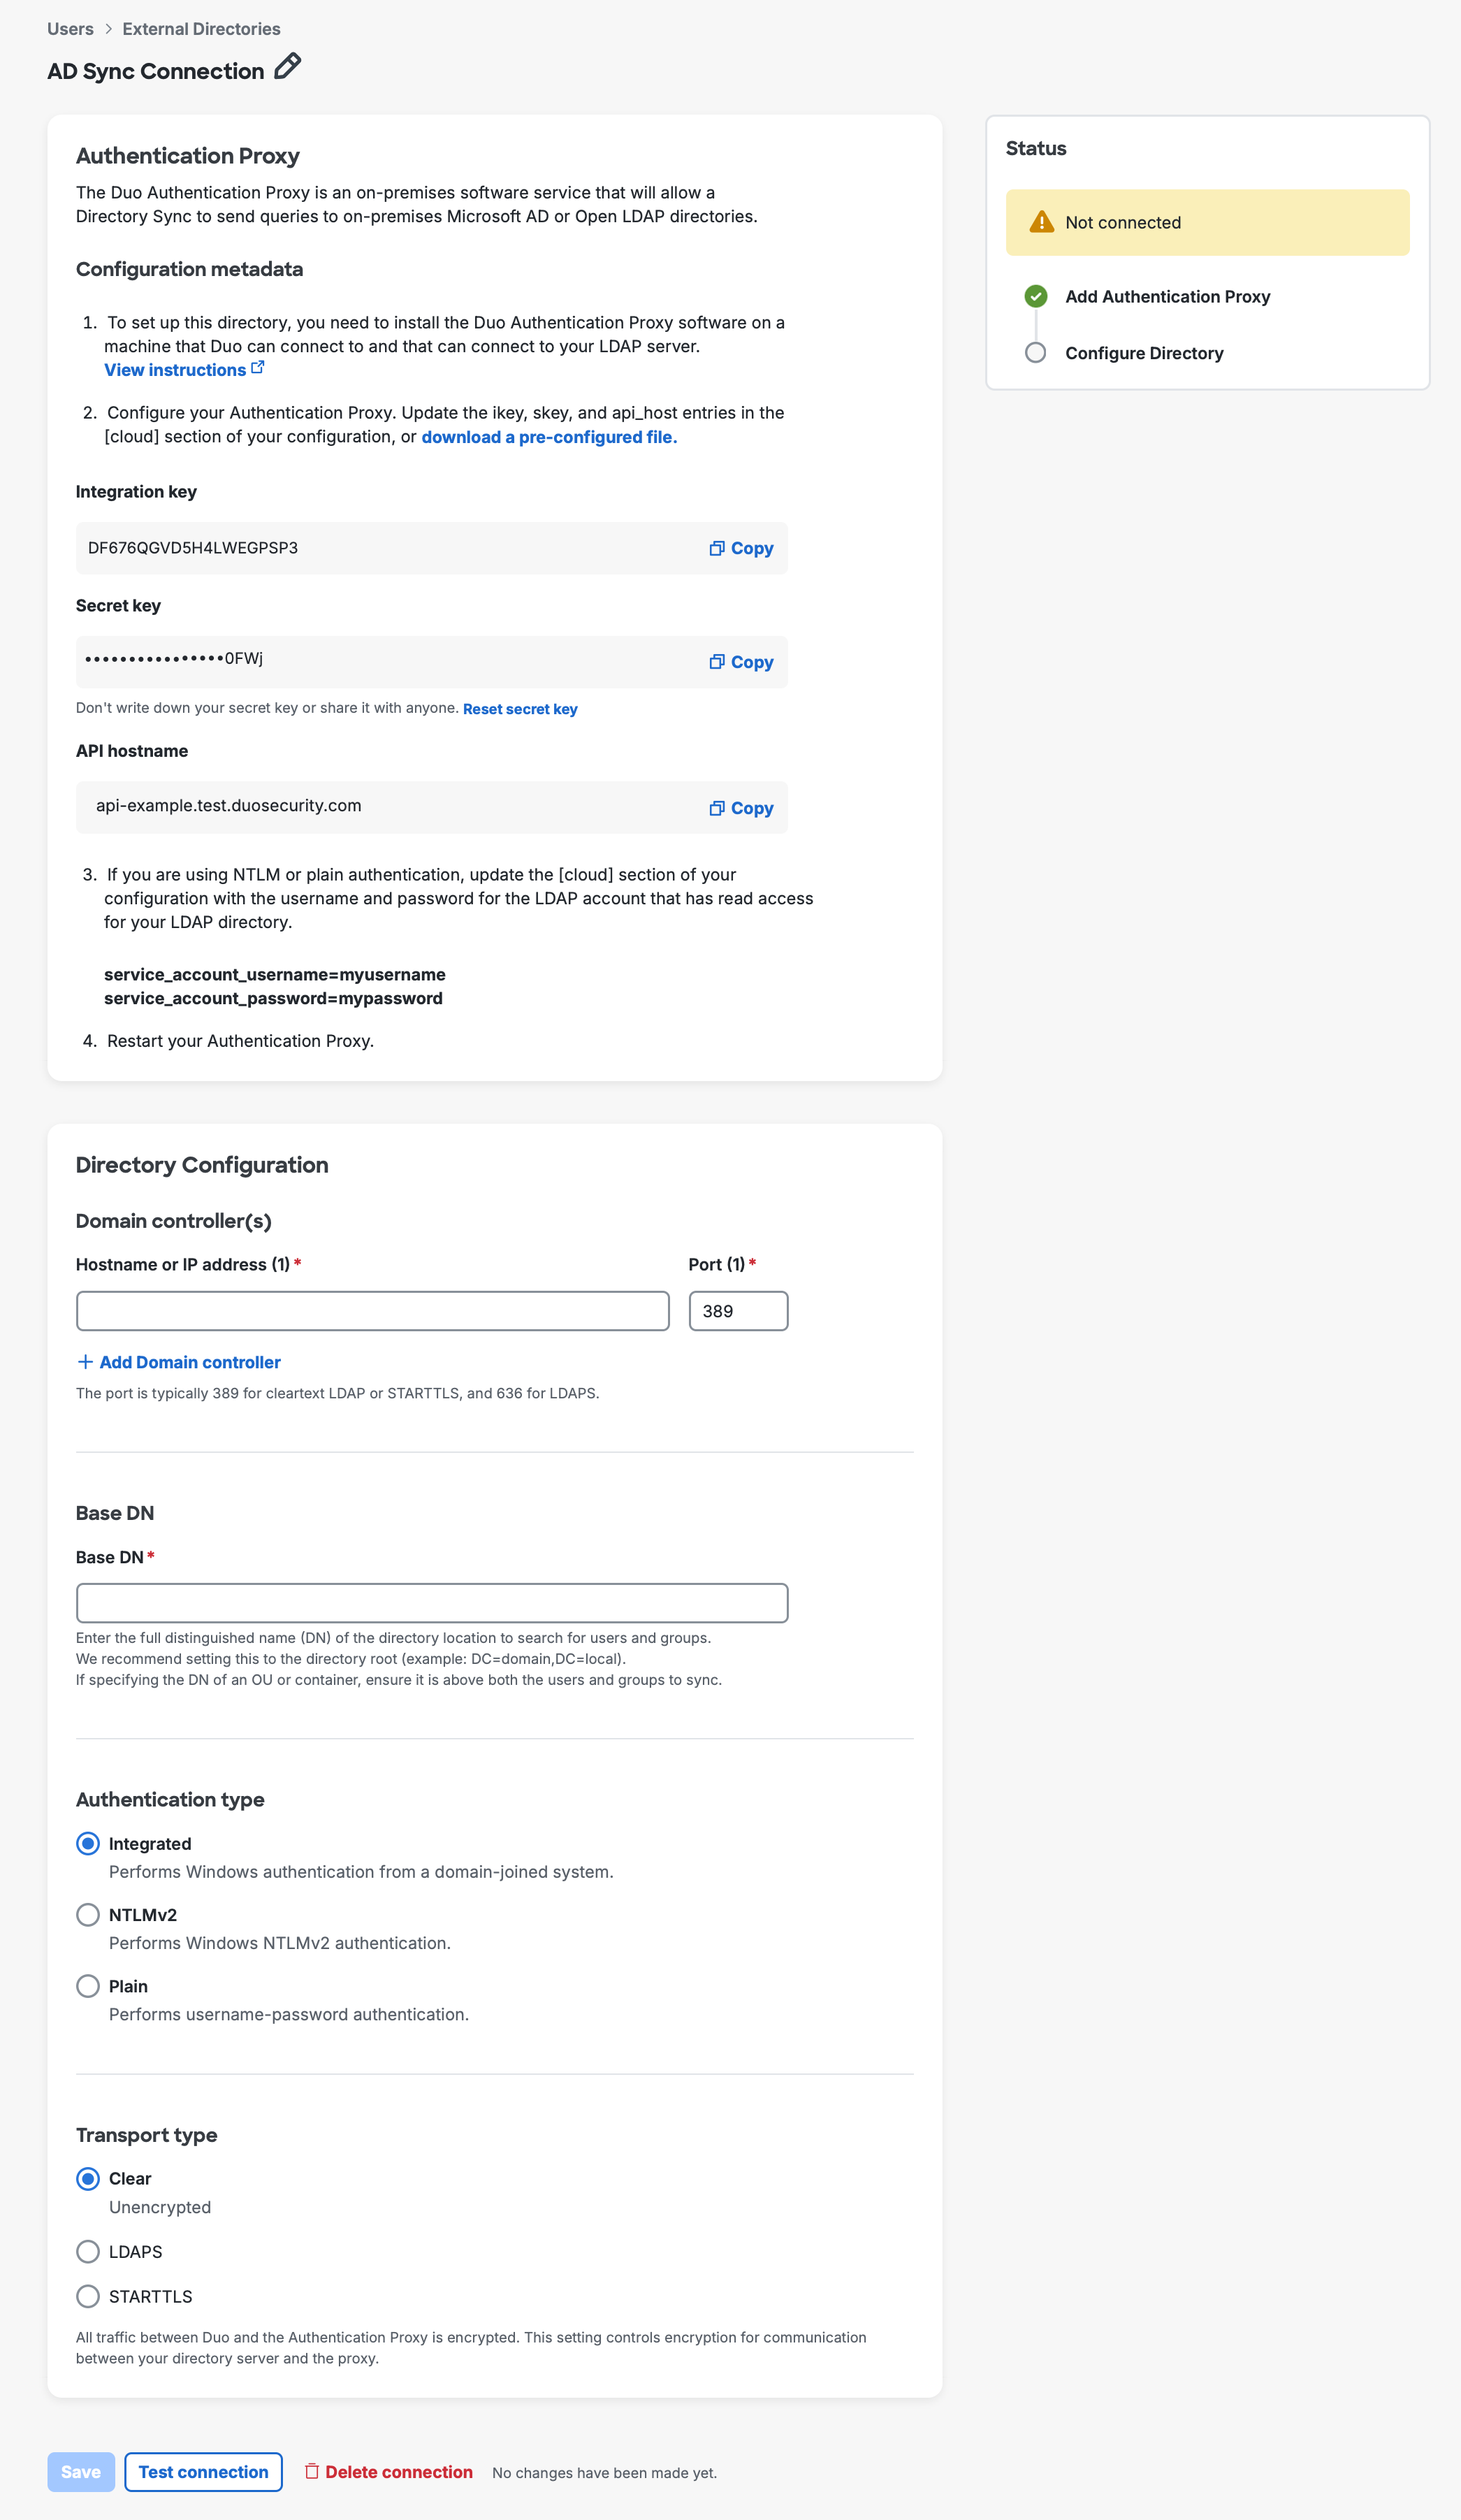
After the installation completes, you will need to configure the proxy with your connection information. Note that as of v4.0.0, the default file access for the conf directory is restricted to the built-in "Administrators" group during installation on Windows systems.
The Duo Authentication Proxy configuration file is named authproxy.cfg, and located in the conf subdirectory of the proxy installation.
| Operating System | Authentication Proxy Version |
Path |
|---|---|---|
| Windows | v5.0.0 and later | C:\Program Files\Duo Security Authentication Proxy\conf |
| Windows | v4.0.2 and earlier | C:\Program Files (x86)\Duo Security Authentication Proxy\conf |
| Linux | All | /opt/duoauthproxy/conf |
Download the Authentication Proxy authproxy.cfg file for your AD domain sync by clicking the download a pre-configured file link in step 2 of the Duo Authentication Proxy section of the directory properties page. This file contains the values needed to set up the connection. You could also copy the values directly from the Admin Panel to paste into your server's config file.
The configuration file is formatted as a simple INI file. Section headings appear as:
[section]
Individual properties beneath a section appear as:
name=value
A first time Authentication Proxy install may include an existing authproxy.cfg with some example content. If this is the first time you're configuring this Authentication Proxy server, you should delete the existing sample content.
Duo Authentication Proxy Manager
The Duo Authentication Proxy Manager is a Windows utility for managing the Authentication Proxy installation on the Windows server where you install the Authentication Proxy. The Proxy Manager comes with Duo Authentication Proxy for Windows version 5.6.0 and later.
The Proxy Manager cannot manage remote Duo Authentication Proxy servers, nor can you install the Proxy Manager as a stand-alone application. There is no Proxy Manager available for Linux. The Proxy Manager only functions as part of a local Duo Authentication Proxy installation on Windows servers.
Learn more about using the Proxy Manager in the Duo Authentication Proxy Reference.
To launch the Proxy Manager utility:
- Open the Start Menu and go to Duo Security.
- Click the Duo Authentication Proxy Manager icon to launch the application. You must have administrative privileges on the Windows server and accept the prompt for elevation.
- The Proxy Manager launches and automatically opens the
%ProgramFiles%\Duo Security Authentication Proxy\conf\authproxy.cfgfile for editing.
Use the Proxy Manager editor on the left to make the authproxy.cfg changes in these instructions. As you type into the editor, the Proxy Manager will automatically suggest configuration options. Accepting these suggestions helps make sure you use the correct option syntax.
As you follow the instructions on this page to edit the Authentication Proxy configuration, you can click Validate to verify your changes (output shown on the right).
When you complete the Authentication Proxy configuration steps in this document, you can use the Save button to write your updates to authproxy.cfg, and then use the authproxy.cfg button to start the Authentication Proxy service before continuing on to the next configuration steps.
If you do not use the Proxy Manager to edit your configuration then we recommend using WordPad or another text editor instead of Notepad when editing the config file on Windows.
To add your new connection information to the Authentication Proxy:
-
Open the
authproxy.cfgin your Authentication Proxy installation'sconfdirectory in a text editor, or in the Proxy Manager utility if present on your Windows proxy server. -
Download the Authentication Proxy
authproxy.cfgfile for your Active Directory sync by clicking the download a pre-configured file link in step 2 of the Duo Authentication Proxy section of the connection properties page. -
Open the downloaded file in a text editor to copy its contents, and then paste the information from that
authproxy.cfgfile you downloaded into the installed Authentication Proxy'sauthproxy.cfgfile (which you opened in a text editor or in the Proxy Manager on Windows).
The authproxy.cfg file for Active Directory sync contains a [cloud] section with the following properties:
Integrated authentication
| Field | Value |
|---|---|
| ikey | your integration key |
| skey | your secret key |
| api_host | your API hostname (i.e., api-XXXXXXXX.duosecurity.com) |
If service account credentials are specified in Authentication Proxy v3.2.0 and later when the corresponding Active Directory sync config in the Duo Admin Panel uses "Integrated" authentication, then the proxy negotiates NTLM over SSPI authentication using the credentials instead of the machine account.
NTLMv2 or Plain authentication
| Field | Value |
|---|---|
| ikey | Your integration key. |
| skey | Your secret key. |
| api_host | Your API hostname (i.e., api-XXXXXXXX.duosecurity.com). |
| service_account_username | The account used to bind to Active Directory. This account needs read-only access to your directory. |
| service_account_password | The directory password for the service_account_username user. |
Add your service account information (if necessary, depending on the authentication type you chose) to the information you downloaded and copied to your Authentication Proxy server's authproxy.cfg configuration file. Make sure to save your configuration file when done, or validate and then save in the Proxy Manager utility.
To configure an existing Authentication Proxy server for directory sync, append the [cloud] section of the config file downloaded from the Duo Admin Panel directory properties page to the current authproxy.cfg file located in the Duo Security Authentication Proxy conf folder. If you already have a [cloud] section present (and you are running proxy version 5.2.0 or later), increment the next section you're adding as [cloud2].
Save the configuration file then restart the Duo Authentication Proxy service for the change to take effect.
Here's a sample authproxy.cfg file for Plain authentication:
[cloud]
ikey=DIXXXXXXXXXXXXXXXXXX
skey=2v3O7uCJmdhFK6hsKS82HGyNUR5L1XGCRx44DjCQ
api_host=api-XXXXXXXX.duosecurity.com
service_account_username=duosync
service_account_password=Pass12345
Here's an example for multiple directory syncs using Integrated (SSPI) authentication. Notice the integration key differs but the API host is the same in both sections; this reflects the requirement that the multiple syncs must be for a single Duo customer account:
[cloud]
ikey=DIABCDEFGHIJKLMNOPQR
skey=2v3O7uCJmdhFK6hsKS82HGyNUR5L1XGCRx44DjCQ
api_host=api-12345678.duosecurity.com

[cloud2]
ikey=DISTUVWXYZABCDEFGHIJ
skey=2HGyNUR5L1XGCRx44DjCQ2v3O7uCJmdhFK6hsKS8
api_host=api-12345678.duosecurity.com
Encrypting Passwords
When running the Authentication Proxy on Windows, you may encrypt the directory user password for NTLMv2/Plain authentication stored in the [cloud] section if you do not want to store them as plain text. Use the authproxy_passwd.exe program, which can be found in the bin directory of your Authentication Proxy installation.
"C:\Program Files\Duo Security Authentication Proxy\bin\authproxy_passwd.exe"If you run the tool without any arguments, it prompts you to enter and confirm the password or secret you want to encrypt, and then outputs the encrypted value. For example:
c:\>"C:\Program Files\Duo Security Authentication Proxy\bin\authproxy_passwd.exe"
Password:
Re-enter password:
AQAAANCMnd8BFdERjHoAwE/Cl+sBAAAA5hII/4JlnEeB5xMBzB5D/wQAAAAeAAAAdwBpAG4AMwAyAGMAcgB5AHAAd
ABvAC4AcAB5AAAAA2YAAMAAAAAQAAAA5AHAAdABvAC4AcAB5AAAAA2YAAMAAAAAQAAAASApm6tif+wDKj+Rt0UtQ9
QAAAAAEgAlnEeB5xMBzB5D/wQAAAAeAAAAdwBpAG4AMwAyAGMAcgB5AHAAdABvQ8M7voQmwOOxqv91QmJs9QAAAAA
EgAAAoAAAABAAAACxWVslLxrlFOunUUeq+kg1CAAAAPFj+oygch2RFAAAAD9HgbRonCsy/GNx4M9FxSq/KJCqThe encrypted password is specific to the server where it was generated, and will not work if copied to a different machine. If you have multiple Authentication Proxy servers with the same service account specified, be sure to run authproxy_passwd.exe separately on each one.
Copy and paste the output into your configuration file as and remove any line breaks. You may find it easier to redirect the command output to a file and then open the file in Notepad.
When using encrypted passwords or secrets, use the "protected" version of the parameter:
| Instead of... | Use... |
|---|---|
service_account_password
|
service_account_password_protected
|
skey
|
skey_protected
|
Here's a sample authproxy.cfg file for Plain authentication with an encrypted secret key and service account password:
[cloud]
ikey=DIXXXXXXXXXXXXXXXXXX
skey_protected=AQAAANCMnd8BFdERjHoAwE/Cl+sBAAAAEK80Kg76BUKI63ApctGZ/wQAAAAeAAAAdwBpAG4AMwAyAGMAcgB5AHAAdABvAC4AcAB5AAAAA2YAAMAAAAAQAAAAMlqARKe+pLNcFwVWWzLfrwAAAAAEgAAAoAAAABAAAAAe+ADzHx0OmowXFu+95w4ACAAAAC+9Hae0HWbNFAAAAA/94/UTD1iB2vnlGcVvDaqKtdcu
api_host=api-XXXXXXXX.duosecurity.com
service_account_username=duosync
service_account_password_protected=QAAANCMnd8BFdERjHoAwE/Cl+sBAAAA5hII/4JlnEeB5xMBzB5D/wQAAAAeAAAAdwBpAG4AMwAyAGMAcgB5AHAAdABvAC4AcAB5AAAAA2YAAMAAAAAQAAAA5AHAAdABvAC4AcAB5AAAAA2YAAMAAAAAQAAAASApm6tif+wDKj+Rt0UtQ9QAAAAAEgAlnEeB5xMBzB5D/wQAAAAeAAAAdwBpAG4AMwAyAGMAcgB5AHAAdABvQ8M7voQmwOOxqv91QmJs9QAAAAAEgAAAoAAAABAAAACxWVslLxrlFOunUUeq+kg1CAAAAPFj+oygch2RFAAAAD9HgbRonCsy/GNx4M9FxSq/KJCq
See additional password/secret encryption options in the Authentication Proxy Reference.
Start the Proxy
If you installed the Duo Authentication Proxy Manager utility (available with 5.6.0 and later), click the Start Service button at the top of the Proxy Manager window to start the service.
To start the service from the command line, open an Administrator command prompt and run:
net start DuoAuthProxyAlternatively, open the Windows Services console (services.msc), locate "Duo Security Authentication Proxy Service" in the list of services, and click the Start Service button.
Authentication Proxy v5.1.0 and later includes the authproxyctl executable, which shows the connectivity tool output when starting the service. The installer adds the Authentication Proxy C:\Program Files\Duo Security Authentication Proxy\bin to your system path automatically, so you should not need to specify the full path to authproxyctl to run it.
From an administrator command prompt run:
authproxyctl startIf the service starts successfully, Authentication Proxy service output is written to the authproxy.log file, which can be found in the log subdirectory.
If you see an error saying that the "service could not be started", open the Application Event Viewer and look for an Error from the source "DuoAuthProxy". The traceback may include a "ConfigError" that can help you find the source of the issue.
Stop and restart the Authentication Proxy service by either clicking the Restart Service button in the Duo Authentication Proxy Manager or the Windows Services console or issuing these commands from an Administrator command prompt:
net stop DuoAuthProxy & net start DuoAuthProxyTo stop and restart the Authentication Proxy using authproxyctl, from an administrator command prompt run:
authproxyctl restartOpen a root shell and run:
# /opt/duoauthproxy/bin/authproxyctl startTo ensure the proxy started successfully, run:
# /opt/duoauthproxy/bin/authproxyctl statusAuthentication Proxy service output is written to the authproxy.log file, which can be found in the log subdirectory.
To stop and restart the Authentication Proxy, open a root shell and run:
# /opt/duoauthproxy/bin/authproxyctl restartView video guides for proxy deployment at the Authentication Proxy Overview or see the Authentication Proxy Reference for additional configuration options.
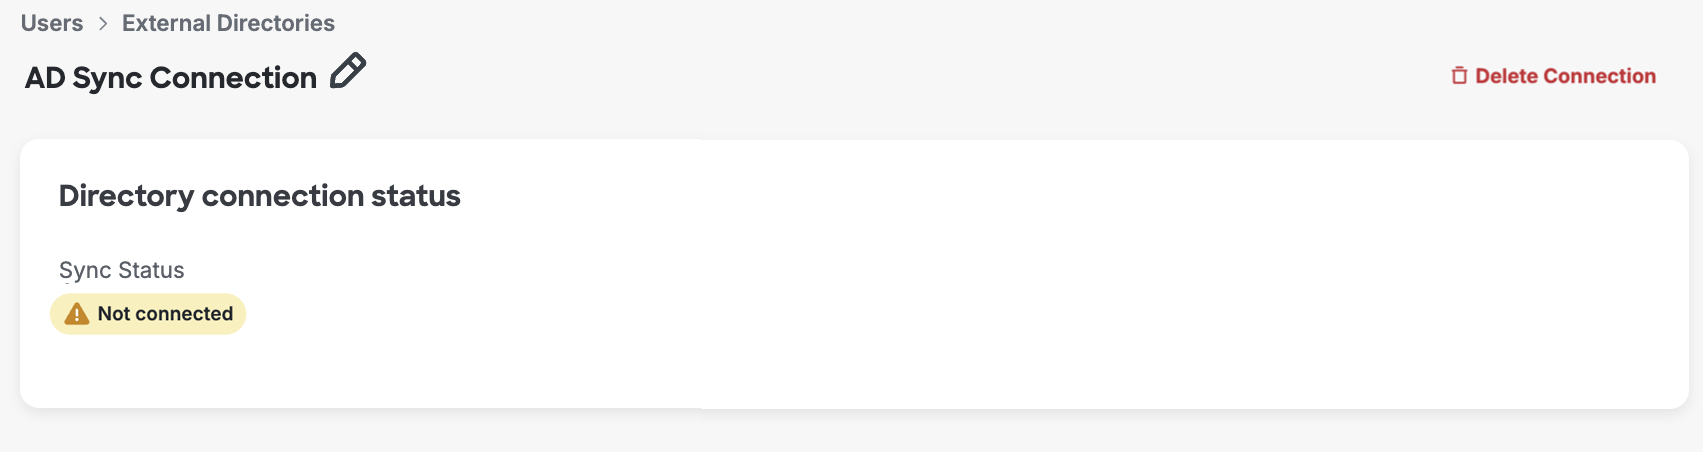
Once you've started the Authentication Proxy service, return to the AD Sync Connection page in the Duo Admin Panel and click Test Connection at the bottom of the page. The connection's status still says "Not connected", but the "Add Authentication Proxy" step should now show as checked. You're ready to move on to the next setup step, Directory Configuration.
If the "Add Authentication Proxy" status information doesn't update when you test the connection, double-check the information in your authproxy.cfg and make sure the proxy service is running, then test the connection again.
You can view information about your Authentication Proxy in the Authentication Proxy Dashboard.
To delete a sync connection, click Delete connection at the bottom of the page and confirm the deletion (the option appears after you delete the associated sync).
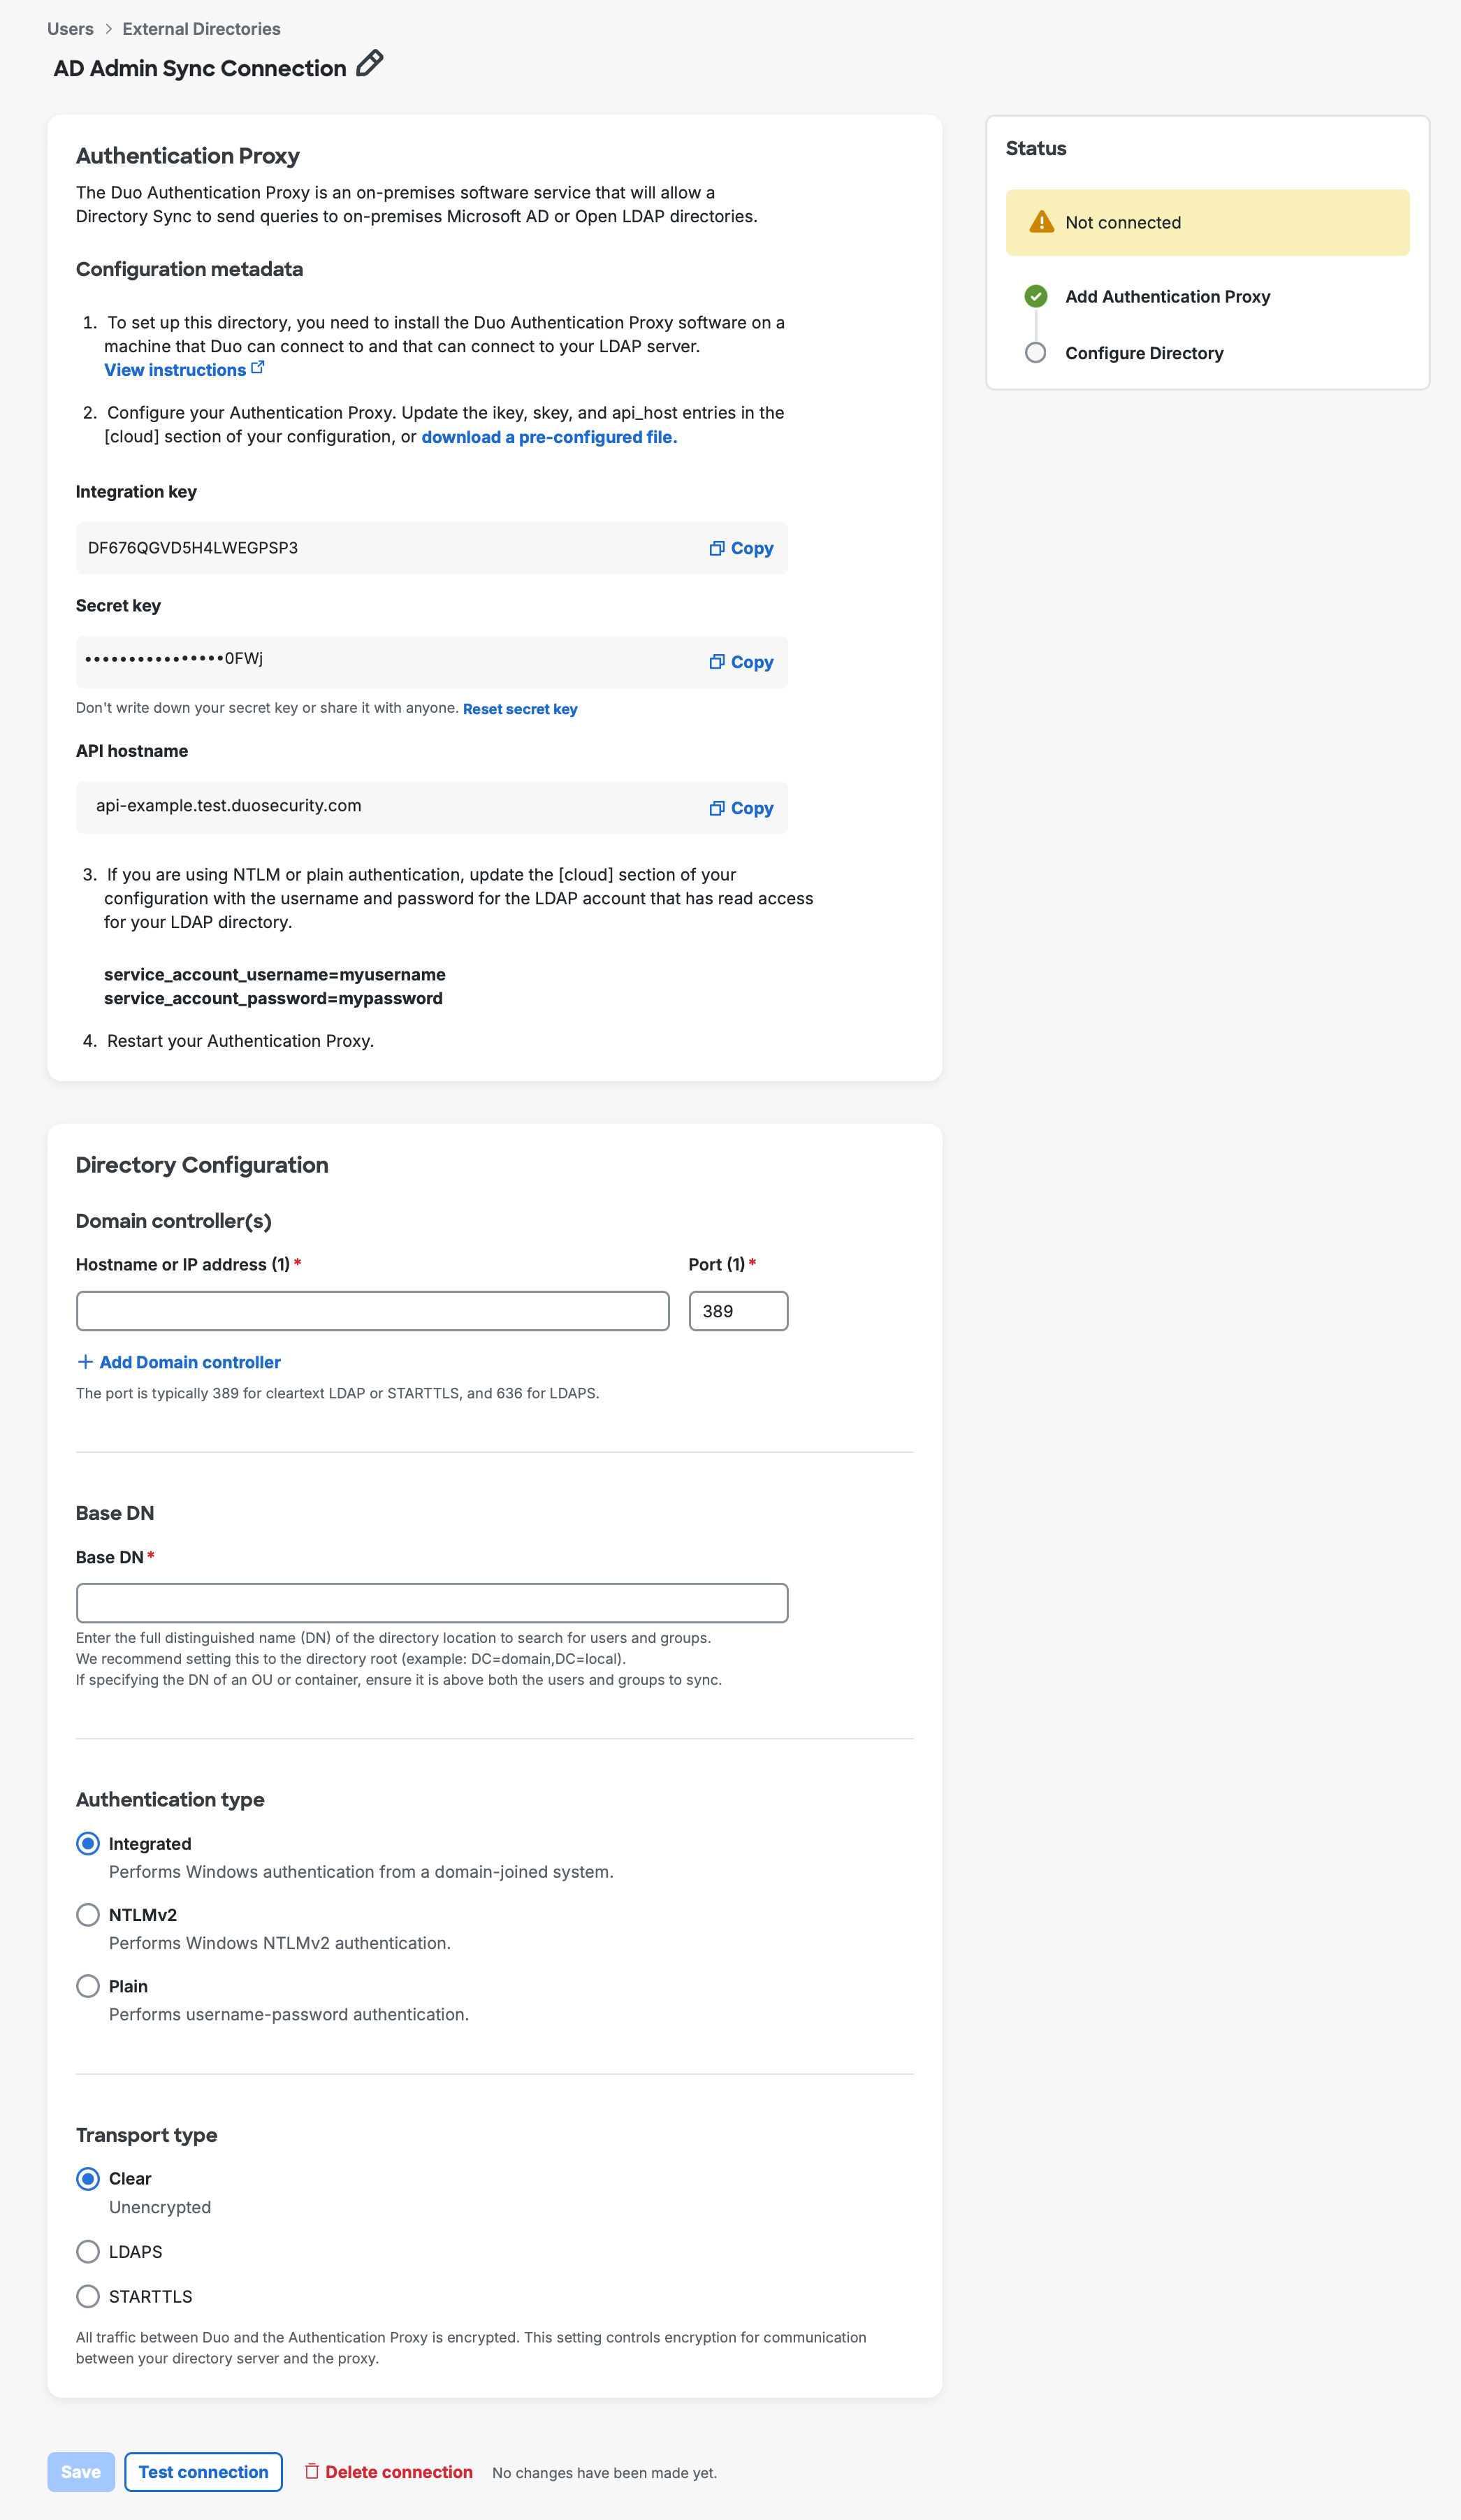
Directory Configuration
Enter the required directory connection information:
| Domain Controller(s) |
Enter the IP address or RFC-1034-compliant hostname of your AD domain controller (DC), followed by the port the Authentication Proxy server should use to contact the domain controller. The typical port for unsecured LDAP or STARTTLS is 389, and LDAPS is usually 636.
Click Add Domain Controller to add up to four additional hosts. If the first server in the list doesn't respond when performing a sync, the next server is used as a fallback. If you decommission any of your domain controllers be sure to return to Duo and remove it from the list. |
| Base DN |
The base DN should be a level in your directory structure above both the users and groups you plan to synchronize. Example: |
| Authentication Type |
Select the type of authentication the Authentication Proxy will use to connect to your AD domain controller. One of:
|
| Transport Type | The transport type selected determines how the connection between the Duo Authentication Proxy software and the AD domain server is encrypted, if at all. Connectivity between the Duo Authentication Proxy software and the Duo Security cloud services is always HTTPS secured with SSL and is not affected by this setting. Starting with Authentication Proxy version 6.0.0, the certificate issued to the domain controller(s) must use SHA256 or greater. One of:
Selecting LDAPS or STARTTLS exposes additional settings:
|
Click Save at the bottom of the page after entering the Directory Configuration information. If the Duo Authentication Proxy was able to contact the specified directory server and perform a search for groups using the given Base DN, then the status will show as Connected.
Your connection is ready to use. Click the link for your sync under "Connected User syncs" to return to the properties page of your new AD Sync. You will finish configuring the directory sync there with your selected Groups and Synced Attributes information.
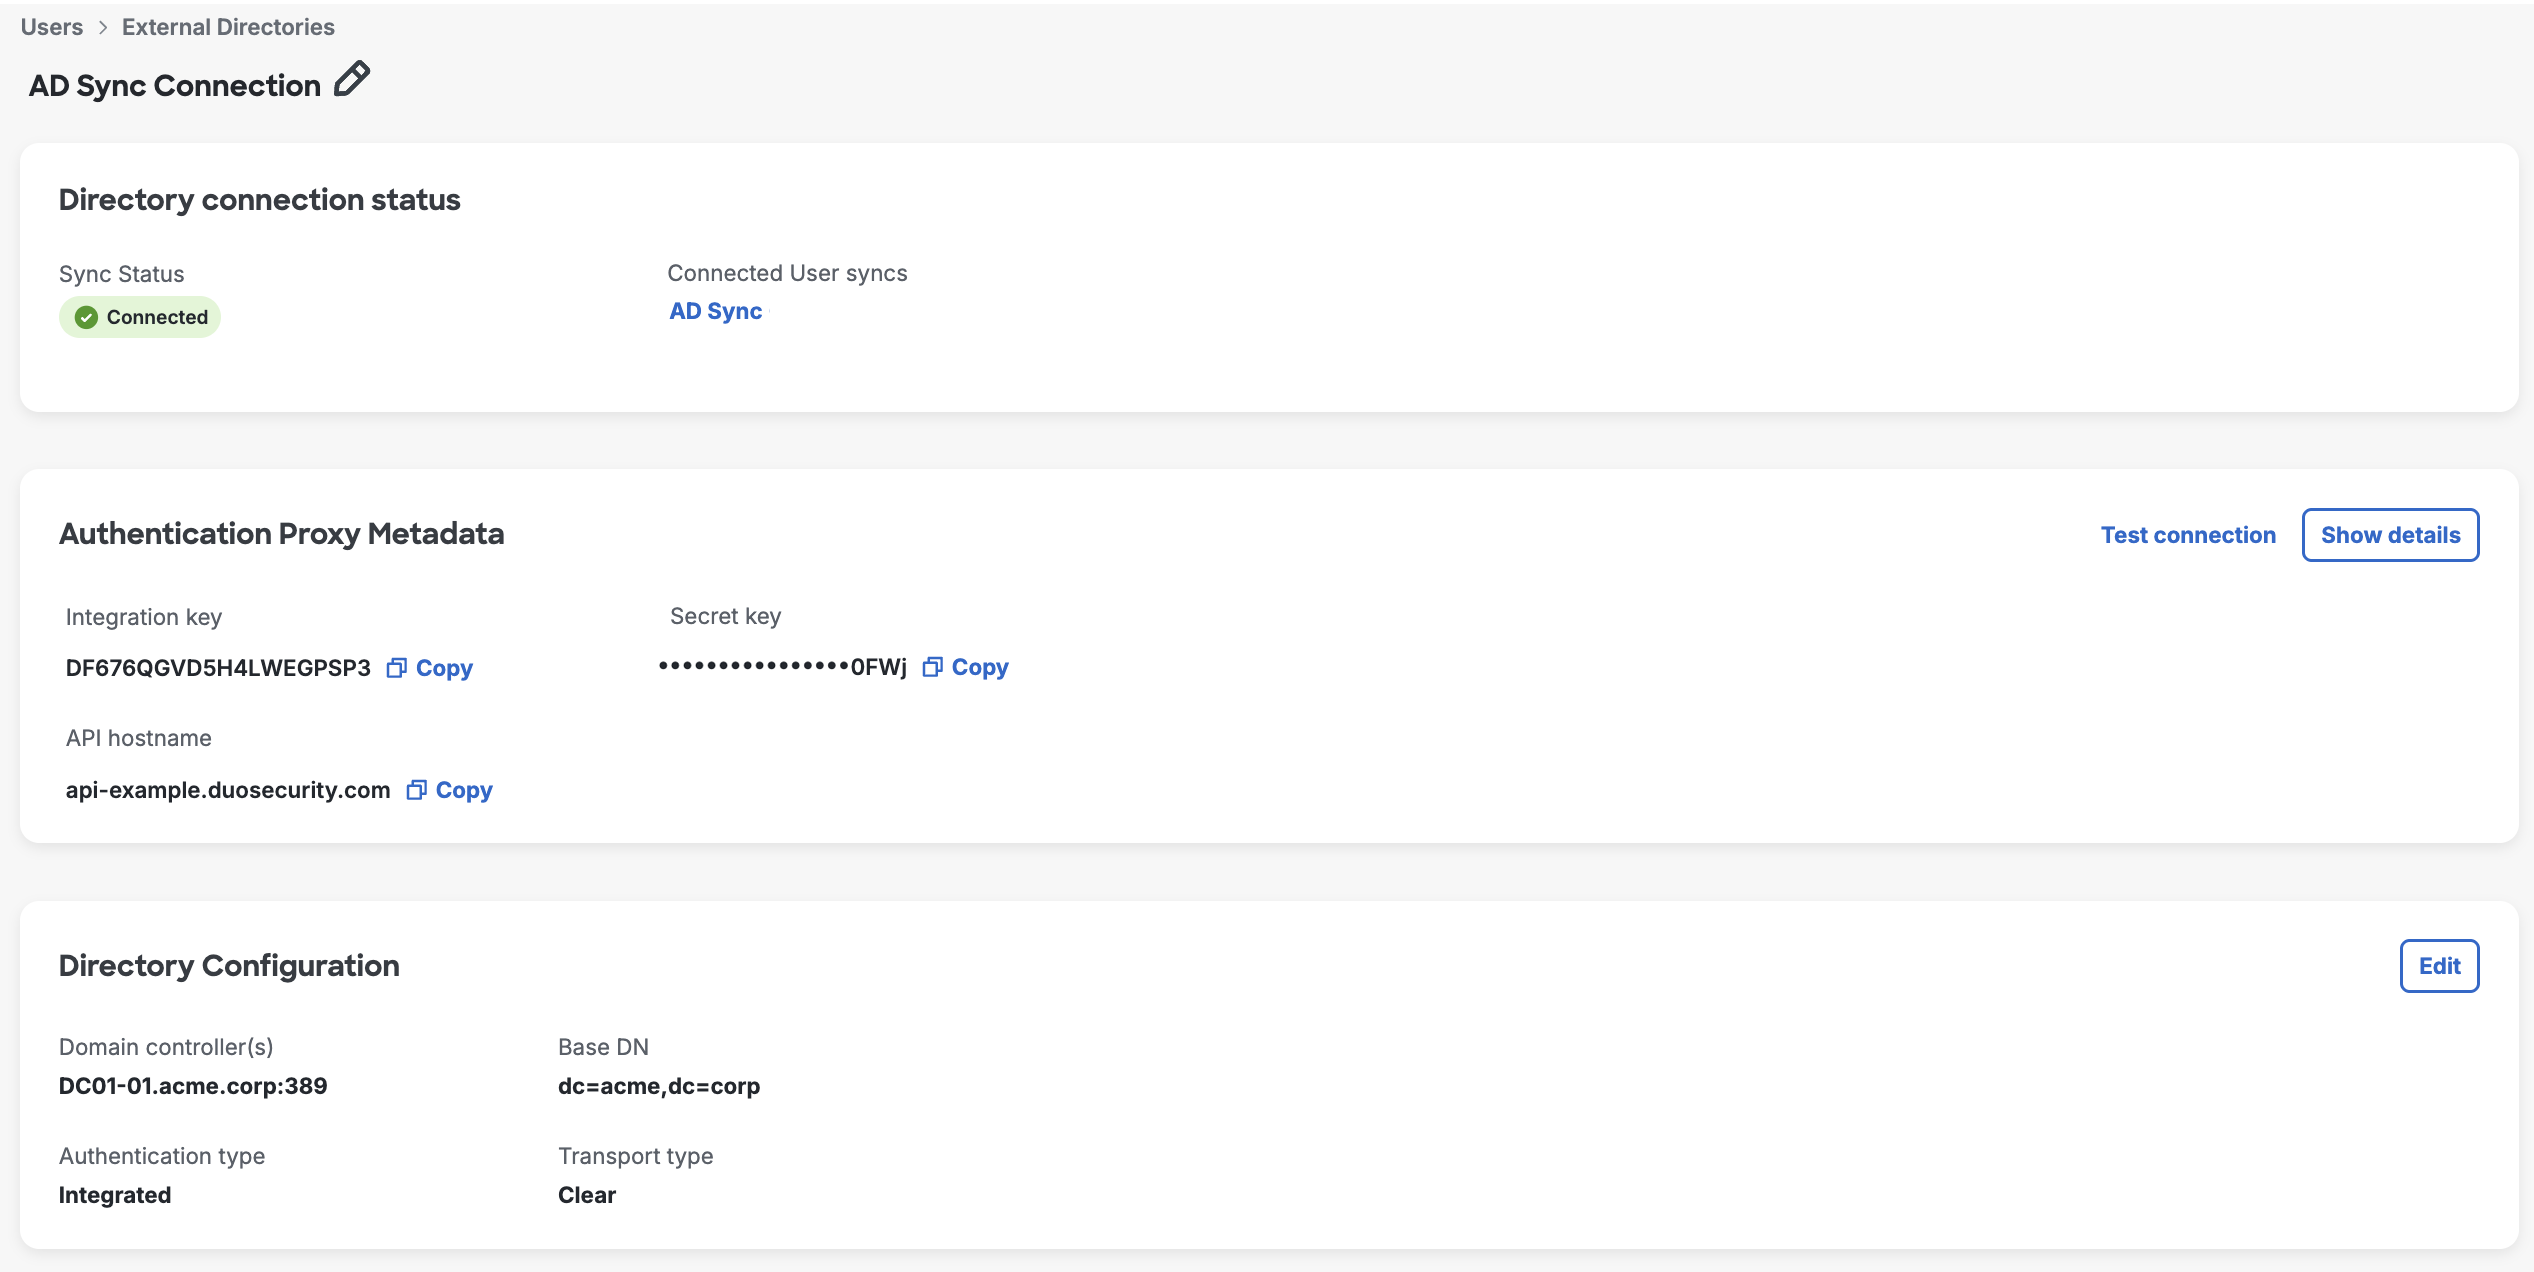
To manage the user sync connection:
-
To rename the sync connection, click the pencil icon to the right of the current name. Enter your new name and then click Save. You can always return to the sync connection properties page later to rename the sync or make other changes.
-
To view more information about Authentication Proxy data, click Show details on the right.
-
To edit the directory configuration, click Edit on the right, make the necessary changes, and click Save.
-
To delete the sync connection, click Delete Connection in the top-right corner and confirm the deletion (the option appears only if no syncs use the connection).
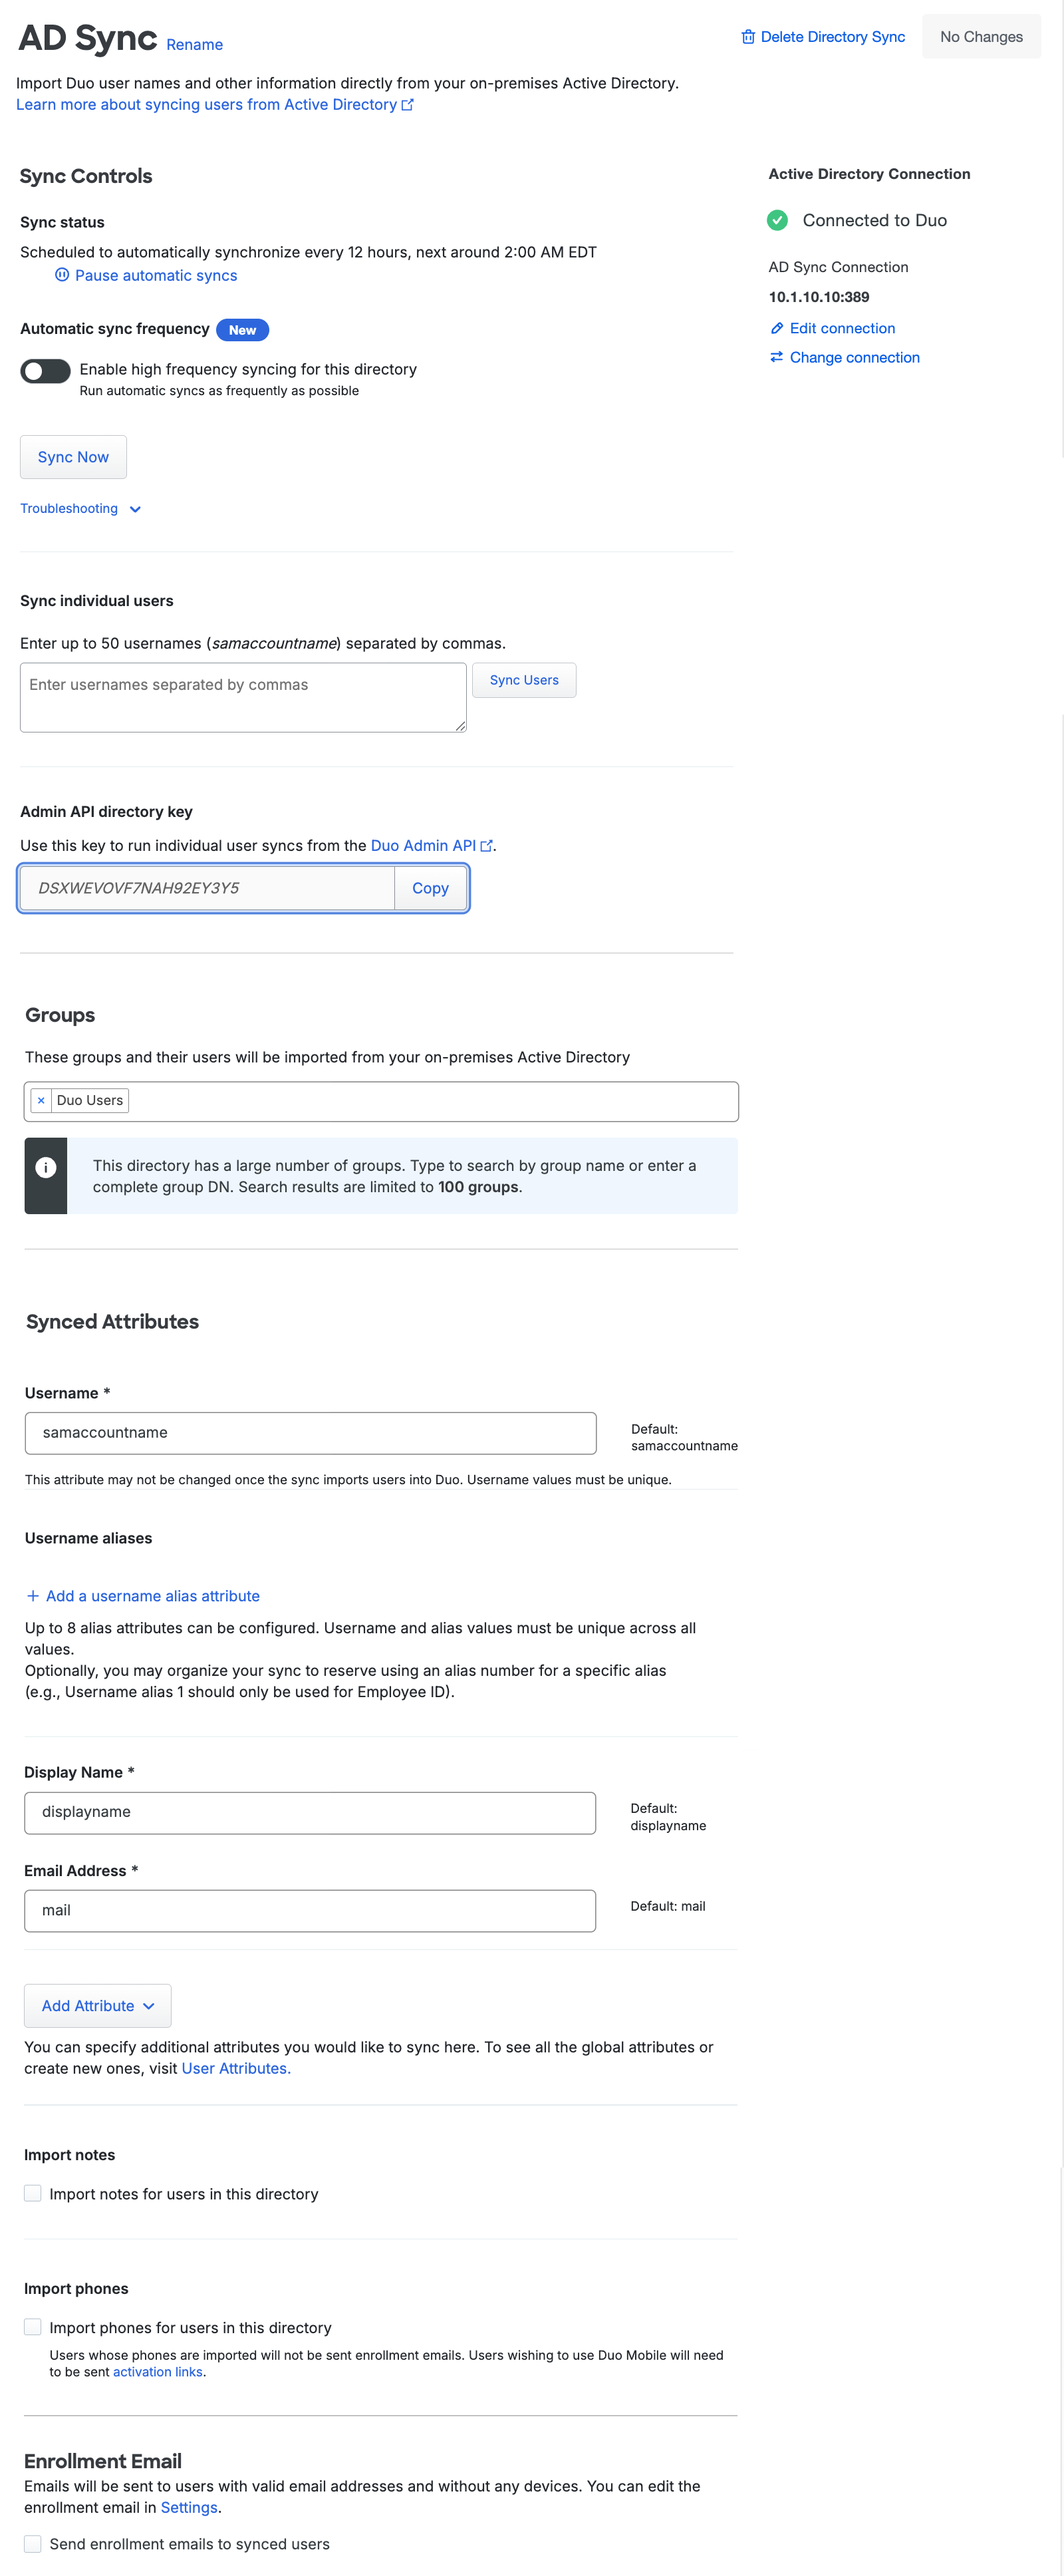
Groups
Once you've returned to the new AD Sync page the next step is selecting groups from your source directory to sync into Duo.
Do not configure the same selected groups from your source directory in multiple Duo directory syncs. If you create more than one directory sync with the same source directory, and configure them to sync the same group from that directory, then when you save the sync configuration it will "take over" management of that group and remove it from the other sync config. This may have unexpected effects on your configured custom application group policies, user access restrictions, or administrative unit assignments. We do not recommend this.
Click in the Groups box and start typing an AD group name; the list of available groups to sync returned will match the filter. If you have a very large number of groups in your directory, Duo limits the search results to 100 groups, so you may need to type in most of your desired sync group's name or enter a complete DN for the group (like CN=Duo-Users,OU=Groups,DC=domain,DC=local) to locate it.
If you don't see any of your groups listed, review the previous setup steps and correct your connection.
Once you see your intended group (or a list of groups), click to select the desired group to sync. Repeat this until you've added all the groups you want to import. You can select up to 400 groups to sync from the source directory. Members of the groups you choose here will be synced as users into Duo.
Nested groups are supported; Duo sync imports users from groups nested within your sync group, but creates only the top level group in Duo (the group explicitly selected for directory sync), with all nested group members as direct members of that Duo group.
If you delete and recreate any of the AD groups saved in the sync properties (even if you reused the same group name and members), then you'll need to return to the directory sync property page for your AD domain on the Duo Admin Panel and delete the recreated group from your sync configuration, then re-add the group and save the directory.
If you save the sync without selecting any groups, or if you remove all the groups selected from the sync config in the future, Duo pauses your scheduled sync upon detecting the missing information and updates the sync status to alert you that no groups have been selected. Correct the issue by selecting one or more groups to sync from the source directory and resuming scheduled synchronization.
Synced Attributes
Make changes here if you want to customize which AD attribute values get imported to Duo. The Duo attributes that have default AD attributes defined indicate those defaults as helper text. You can change these default attributes to custom attributes of your choice. Return to using the default attributes by clicking Revert all attributes to default.
Note that Duo does not import passwords from external directories.
You may customize the AD source attributes for these Duo user properties:
| Username |
Required. The source attribute for the Duo username. The attribute selected should match the primary authentication login name your users submit to Duo. This attribute cannot be customized after the first directory synchronization occurs. Default: |
| Username Aliases |
Specify up to eight directory attributes to import as additional usernames for each Duo user by clicking Add a username alias attribute, choosing which alias number to define, and entering the desired source attribute from your directory. For example, if the Username source attribute is Be sure to choose directory attributes that have unique values (email address, employee ID, etc.). If any of the username or username alias attribute values is the same for two or more users, those users will be skipped by the sync process. Unlike the Username, the attributes used for username aliases may be changed after the first directory synchronization. Default: No aliases imported. Aliases may be defined manually from the Admin Panel or programmatically via Admin API on a per-user basis. |
| Display Name |
Required. The user's name. Default: |
| Email Address |
Required. The user's email address. This is used as the destination address for enrollment emails from Duo. Default: |
| Add Attribute |
Click the Add Attribute button to select any additional attributes you want to import from the external directory. When you select an additional attribute to sync, it will appear above the add button with a text field for you to specify the source external directory attribute. Some attributes you add may have suggested source attributes, which you can change by typing in a different attribute name. See the user attributes documentation to learn how to create your own custom user attributes. If you plan to use Duo identity verification you may want to import the required additional attributes First Name, Last Name, and Date of Birth if they have values in your directory. |
| Import Notes |
Enable this option if you want Directory Sync to import notes information for your users. Default: No notes imported. |
| Notes |
Populate the "Notes" field for a Duo user with information from Active Directory. Only configurable if Import notes is selected. Default: |
| Import Phones |
Enable this option if you want Directory Sync to create phones for your users. Imported devices default to the "Generic Smartphone" platform, capable of phone call and SMS messaging. Directory sync does not send SMS activation messages to imported phones; see User Enrollment and Activation for activation steps. If you enable both the Enrollment email and Import Phones options, enrollment links are only sent to users with email addresses who do not have phone information populated in AD. Default: Import no phone information from AD. |
| Primary Phone |
Required. Create a phone in Duo with the attribute value as the phone number, attached to the imported user as a generic smartphone 2FA device. Non-US numbers must be stored in AD using the format To import a landline with an extension, append Only configurable if Import Phones is selected. Default: |
| Secondary Phone |
Create a phone in Duo with the attribute value as the phone number, attached to the imported user as an additional generic smartphone 2FA device. Non-US numbers must be stored in AD using the format To import a landline with an extension, append Only configurable if Import Phones is selected. Default: |
Enrollment Email
Select the Enrollment Email option if you want imported users to automatically receive an enrollment link email when the sync process completes. Only users imported with active status, a valid email address, and who do not already have any enrolled authentication devices in Duo receive an emailed link. The email address is populated by AD sync.
Default: Do not send enrollment emails to imported users.
The enrollment link sent when the sync first imports a user is valid for 30 days. Duo sends an emailed enrollment reminder if the user hasn't yet completed enrollment after two days, and then a second reminder if the user remains unenrolled eight days after the first reminder.
If the user does not complete the enrollment process after 30 days has elapsed, the original enrollment link expires and a new enrollment link is generated at the next sync and sent to the user. This entire 30 day cycle repeats until the user completes Duo enrollment.
The contents of the enrollment email subject and body can be changed on the global Settings page. The enrollment email body should contain the placeholder text "<enrollment-link>", which will be replaced by the link to the enrollment form when the email is sent. The sent message will have a non-editable header added, informing the user it's an automated message sent by Duo and to contact their organization's Duo admins or IT support group with any questions.
If your organization uses e-mail filtering, be sure to allow the sender no-reply@duosecurity.com.
Duo Premier and Duo Advantage Plan Users: Global Policy settings affect access to the enrollment portal. Do not apply any global restrictions that could prevent user enrollment. For example, if you configure the User Location policy setting to deny access to a country, then the policy will also block any of your users who attempt to enroll in Duo from that country via an emailed enrollment link. The New User Policy setting for the enrollment portal is always "Require Enrollment".
Finish User Sync Setup
Click Complete Setup to finish creating the new Active Directory sync in Duo.
The directory page shows the status as "Connected to Duo" and the "Sync status" indicates when the next scheduled sync will run now that all directory configuration steps have been completed successfully. If you wish you can click the Sync Now button to perform the first import of users from your directory into Duo.
Note that once you import users from Active Directory into Duo you may not change the AD username source attribute, but you can enable or disable username normalization. See the FAQ for more information.
Adjust Sync Frequency
The default scheduled user sync frequency is 12 hours. If you want user sync to run more often, toggle on the Enable high frequency syncing for this directory option in the "Automatic sync frequency" section of your Active Directory sync's details page.
With high-frequency sync enabled, Duo will automatically start another user sync about 30 minutes after a sync finishes. Disable the high frequency sync option to return to the default 12-hour schedule.
User Enrollment and Activation
After adding new users to Duo through Active Directory synchronization, your next step is to have them activate their Duo access (if you chose not to send enrollment emails to synced users when creating your directory in Duo). Because a phone created by directory sync defaults to the "Generic Smartphone" platform, on the Users page you'll see a notification bar indicating that users have not yet activated the Duo Mobile smartphone app. This bar provides a link to click to send these users activation links via SMS message or email.

For more information on user activation, see Activating Duo Mobile After Enrollment.
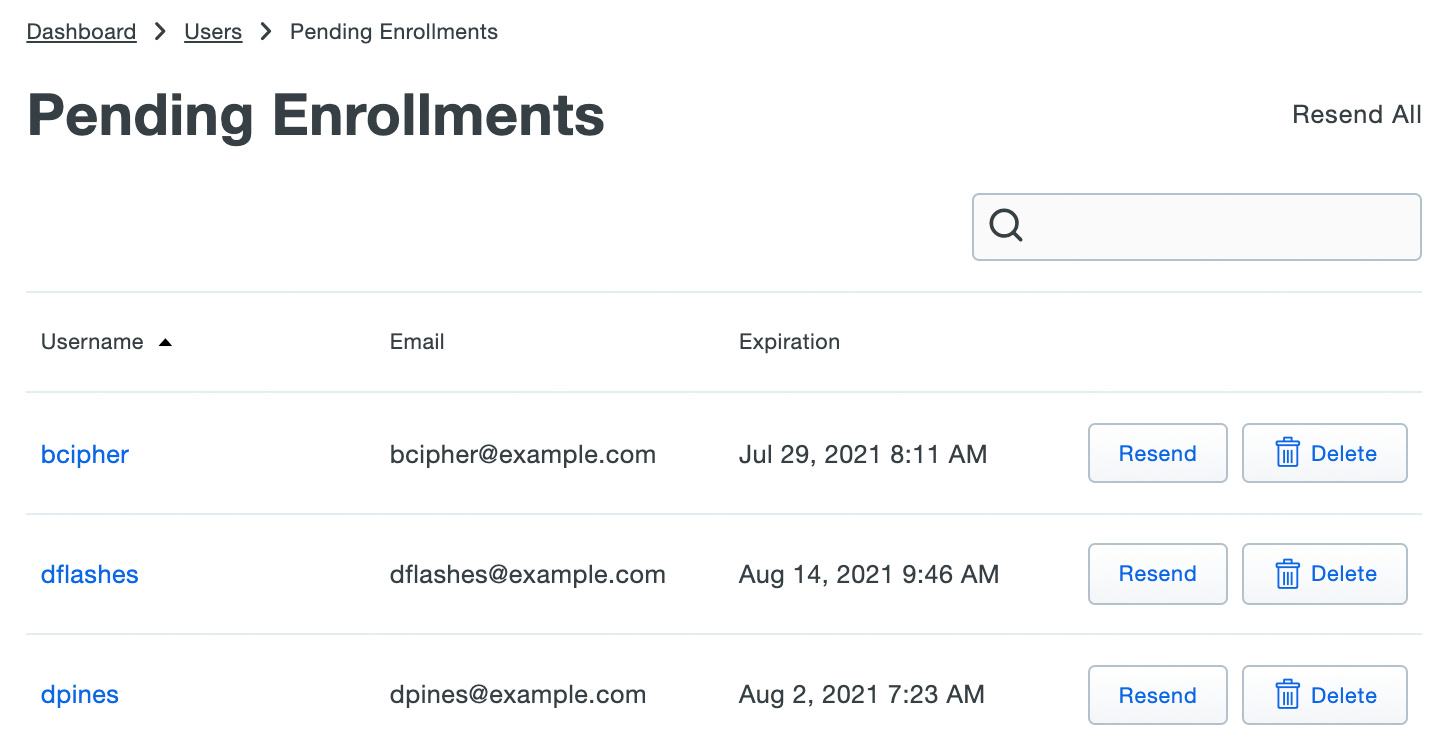
If you did choose to send enrollment emails to synced users automatically, the Pending Enrollments table shows which users created by directory sync (or bulk enrollment) have not yet completed enrolling their 2FA devices in Duo, along with the user's email address and the expiration date for the enrollment link previously sent.
If you need to send a user another copy of the enrollment link email, click the Resend button on the right of that user's information, or click Resend All to send the email again to all users with outstanding enrollment links. Resending the email does not change the current enrollment link's expiration date and uses the same email address that was used when the original enrollment was sent.
Click Delete to remove a pending enrollment. Deleting a pending enrollment immediately invalidates any unexpired enrollment link previously sent to that user. The next time directory sync runs, a new enrollment link will be emailed to that user, as long as they remain a member of a synced group and the sync configuration still has the "Enrollment Email" option enabled.
Manage User Sync
Role required: Owner, Administrator, or User Manager except where noted in the sections below. Custom roles must include the "External directory configuration" permission set to "All".
Once configured, you can run manual syncs, update the sync settings, and perform other sync management operations.
To access your configured sync:
-
Log in to the Duo Admin Panel. Navigate to Users → External Directories or click the External Directories link on the "Users" page.
-
The "Directory Syncs" tab lists all your configured syncs and connections. In the "Directory syncs" section, you can view sync type, scheduled status, and the time a full sync was last run. Select the sync you want to manage by clicking its name in the list.
-
Perform your management actions from the sync's properties page.
Perform a Full Sync
A full user directory sync runs automatically twice a day (at a set 12-hour interval chosen at random). If you enabled high-frequency syncs user syncs start automatically about 30 minutes after a prior sync finishes.
Perform a manual full sync of the users in your directory to Duo at any time by clicking Sync Now in the "Sync Controls" section. This immediately imports all members of your selected AD groups into Duo, creating and updating users and groups as necessary.
When the full sync completes, you'll see a count of users and groups synced into Duo.
Cancel a Full Sync
If you need to cancel a full sync in progress then click the Cancel sync action that appears while the sync is running. This will stop the sync, but any user and group updates already applied by the sync before you canceled it remain in place.
We recommend running another full sync at the earliest opportunity to address any user or group inconsistencies from the canceled sync.
Sync Individual Users from the Duo Admin Panel
Role required: Owner, Administrator, User Manager, Security Analyst, or Help Desk. Custom roles must include the "External directory configuration" permission set to "Read" or "User management" permission set to "Read", and the "Run user directory syncs" permission set to "Individual users".
When you just need to import information for a few users from Active Directory you can interactively sync selected users instead of syncing the entire directory. For example, you may have some new employee accounts in AD who need a corresponding Duo account, or you might have just disabled an AD user and need that status carried over to Duo. Syncing these individual user accounts updates Duo immediately.
To sync individual users:
-
Type up to 50 Active Directory user names as a comma-separated list into the Sync individual users text box found in the "Sync Controls" section on the directory's properties page. If you used a different source attribute than
sAMAccountNamefor the Duo username, you must type each username exactly as it is shown (or will be shown) in Duo i.e. if you opted to usemailas the username attribute, you must enter the values of themailattribute as the usernames to sync.Additionally, individually synced users must be members of a group specified in your directory sync's configuration. If you try to sync an individual user who is not a member of a selected group then no update of that user occurs.
-
Click the Sync Users button to import information about the specified user or users.
When initiated, the individual user sync verifies that each specified user is a member of a group currently synced with Duo and then imports information for that user into Duo. If a specified user doesn't already exist in Duo, the sync creates them using the information imported from the source directory.
If you enabled the option to send enrollment emails and the new user has the email address attribute populated, then a new user created by the individual user sync receives an emailed enrollment link.
Individual user sync updates an existing specified user with information from the source directory. The sync can change attribute values (except the username), modify group memberships, or disable the user in Duo if they are disabled in the source directory.
If you include a specified user that is no longer a member of any group synced into Duo, then the sync marks the user for deletion.
In addition to syncing individual users by username from the directory's details page, you can also perform an individual sync on an existing Duo user by visiting that user's properties page in the Duo Admin Panel and clicking the Sync This User link at the top-right.

Individual User Sync using Admin API
Use the AdminAPI directory key from the "Sync Controls" section of the page to perform a sync operation on an individual user using Duo's Admin API.
Pause Directory Sync
Should you want to put your directory sync on hold to prevent it from making changes to your imported users, you can do so without removing your Active Directory configured sync from Duo. Use the pause functionality to stop scheduled syncs from running until you want to resume them.
To pause or resume synchronization of a directory:
-
From the Directory Sync page click on the directory for which you want to pause or resume scheduled syncs to view its configuration page.
-
Click the Pause automatic syncs or Resume automatic syncs action in the "Sync Status" section to perform the stated action. The sync status updates to reflect the effective state of the scheduled sync.
You can perform manual full and individual syncs at any time from the Admin Panel or via Admin API while the scheduled sync remains paused.
If your AD sync has no selected groups in the configuration then we'll pause scheduled syncs right away and the sync's status will show an alert for no groups selected. Select a group or groups and save the change to resume the sync.
Sync Failure Notifications
Duo tracks failures of your scheduled directory synchronizations. We'll send a notification email to all Duo administrators with the Owner, Administrator, or User Manager roles after three (3) days of consecutive sync failures. If the failure persists, we'll send additional notification emails after seven (7) and 14 days. Duo will send a final email notification after 30 days of consecutive sync failures and pause the scheduled sync automatically.
Visit your Active Directory sync's page in the Admin Panel to correct the issues preventing sync success, or delete the directory sync if you no longer wish to use it.
To resume the paused sync after correcting any issues, click the Resume automatic syncs action in the "Sync status" section.
Update Sync Connection
To view or modify the connection used by a given directory sync, either locate the connection on the "Directory Syncs" tab of the directory sync page in the Admin Panel and click on it, or click the Edit connection link shown on the right side of a sync's properties page, in the "Active Directory Connection" information.
You can change the connection's name, reset the secret key (be sure to update the secret key value in your Authentication Proxy's authproxy.cfg immediately and restart the proxy service to reestablish the connection), or update directory configuration information for your connection at any time.
If you want to switch a sync from one connection to another, click the Change connection link on the right side of the sync's page. You'll see the same options to reuse an existing connection or to create a new connection that you saw when you first created the sync. Make your choice and proceed.
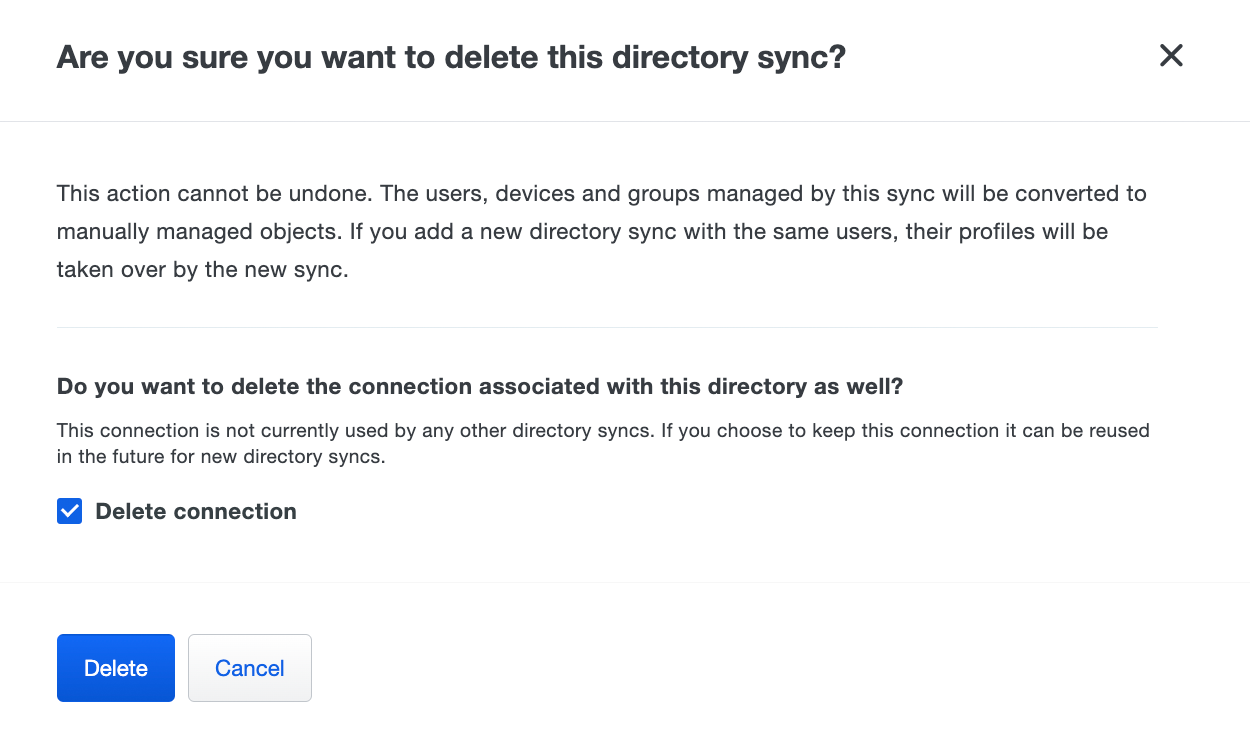
Delete Synced Directories
Deleting a directory sync from Duo doesn't delete or disable any of the previously imported objects. When you delete a synced directory from Duo, then the users, phones, and groups formerly managed by that sync remain available and get converted to unmanaged Duo objects that can be manually updated or deleted.
-
Users previously synced remain available and retain the status previously assigned, whether applied to the synced group or to the individual user. Any authentication devices associated with the user remain available. The users retain their former group memberships. You may manually or programmatically delete the users formerly managed by the sync from Duo.
-
Groups previously synced remain available and retain the same members and status assigned when they were managed by the sync. The group name changes from Group name from type of sync "name of sync" to Group name (formerly from "name of sync"). You may manually or programmatically delete the groups formerly managed by the sync from Duo as long as they are not also used as a Duo Single Sign-On (SSO) routing rule condition.
-
Phones previously synced remain in Duo attached to the same users. Activation status remains unchanged.
When you delete a directory sync and the connection used by that sync is not used by any other sync you can optionally delete the connection at the same time.
To delete a synced directory, click the Delete Directory Sync link at the top-right of that sync's details page and confirm that you want to delete that directory. If this is the last or only directory sync using the associated connection and you don't want to delete that connection, be sure to uncheck the Delete connection box before clicking the Delete button (option not shown if the connection is used by another sync).
Manage Synced Users and Groups
Sync Multiple Directories in Duo
You can configure multiple syncs with different source directories of any type and import all those users and groups into Duo. If you do this, ensure that the users you select for import have unique names.
If the same username exists in two different sync directory sources, the first sync you create will create or manage the user. Subsequent syncs with the same username get a sync error preventing the sync from affecting those users with the message "Cannot sync a user belonging to another directory sync unless that sync is paused". You can view the error in the Administrator Actions report for that sync's "completed" event. This error only affects the user in question; it doesn’t halt the sync.
If you want a different sync to be allowed to manage those users (for example to migrate users from one sync to another), you will need to pause the automatic scheduled syncs on the directory sync which currently manages those users. You could also delete the user from a synced group managed by the first sync, run that sync so the user is moved into the trash, make sure the user is in a group managed by the second sync, and then run the second sync to take over management of that user and restore them from the trash.
Update Synced User Information
User attributes synced from an external directory cannot be edited in Duo via the Admin Panel, Admin API, or CSV import. This always applies to the required attributes username, display name, email address, plus phone numbers (if you chose to import phones), and group memberships. Changes to these user attributes should be made in the external directory and then synced over to Duo.
You may edit Duo user properties that aren't synced from Active Directory via the Admin Panel, Admin API, or CSV import, including those that correspond with optional AD sync attributes you chose not to import. However, if you update your AD sync to begin importing values for a previously unconfigured optional attribute, the sync will overwrite any previously configured values with the information imported from Active Directory.
Examples:
-
You do not enable import of Notes when you create your AD directory sync. The sync imports the username, email address, and name from AD, but imports no notes information. You can edit the "Notes" field for synced Duo users. but you may not edit the "Username", "Display Name", or "Email Address" properties for synced users.
-
You specify a source attribute for Username Alias 1 but not for the remaining aliases. The sync imports values for "Username Alias 1" from AD, and no other aliases. You can't edit "Username Alias 1" for a synced user, but you can edit additional aliases beyond the first.
-
You do not specify a source attribute for Username Alias 1. The sync creates users with no aliases, and you manually add values for "Username Alias 1" to some Duo users from the Admin Panel. You update your configured AD sync to add a source attribute for Username Alias 1. The next sync updates the "Username Alias 1" value for all synced users to match the value in AD, overwriting the aliases you added manually.
Bypass Status for Synced Users
Users synced from an external directory may have bypass status assigned individually or at the group level. See the Using Groups and User Status Administration documentation for more information.
Disabled Status for Synced Users
Admins can't disable individual Duo users managed by directory sync from the Duo Admin Panel, Admin API, or CSV import. Directory sync checks the user account status in the source directory and uses that information to determine whether the corresponding Duo account should remain enabled.
If a user is disabled in the source Active Directory (userAccountControl set to 514), on the next sync Duo updates the user's status to "Disabled" but does not send that user to the trash, and retains the user's group memberships. The user remains read-only, and cannot be manually enabled. Disabling a user invalidates existing remembered device sessions.
You can restore the disabled Duo account to active status by enabling the account in the source directory and running a sync.
You may disable a group of synced users by changing the status of that group to Disabled. This prevents any user who is a member of that group from logging in with Duo, regardless of that individual user's status. See the Using Groups and Group Status Administration documentation for more information.
Delete Synced Users
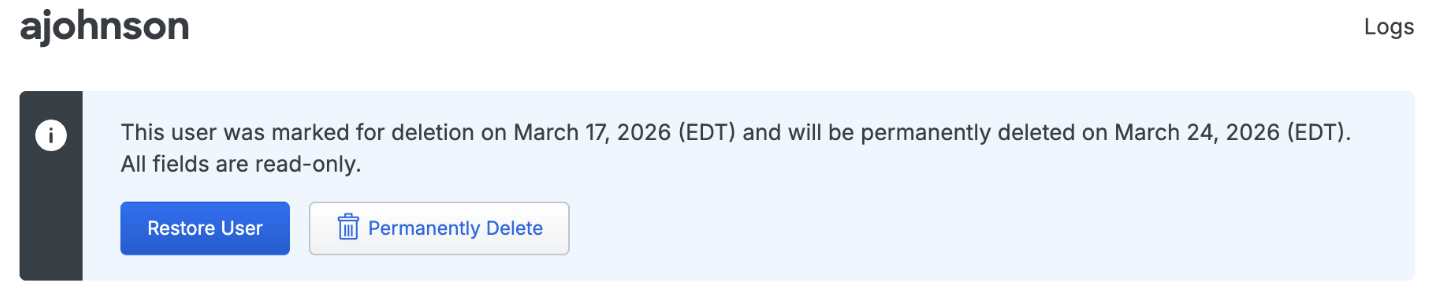
You may not delete a synced user from Duo as long as directory sync is actively managing that user. If a synced directory user is removed from all external directory groups that sync to Duo (or if the user account is deleted from the source directory), the user is sent to the Trash and marked as "Pending Deletion", and the user can no longer authenticate to Duo. The user's properties are read-only and you are no longer billed for that user.
Locate users pending deletion in the Trash view, accessed by clicking the Trash count shown at the top of the Users page.
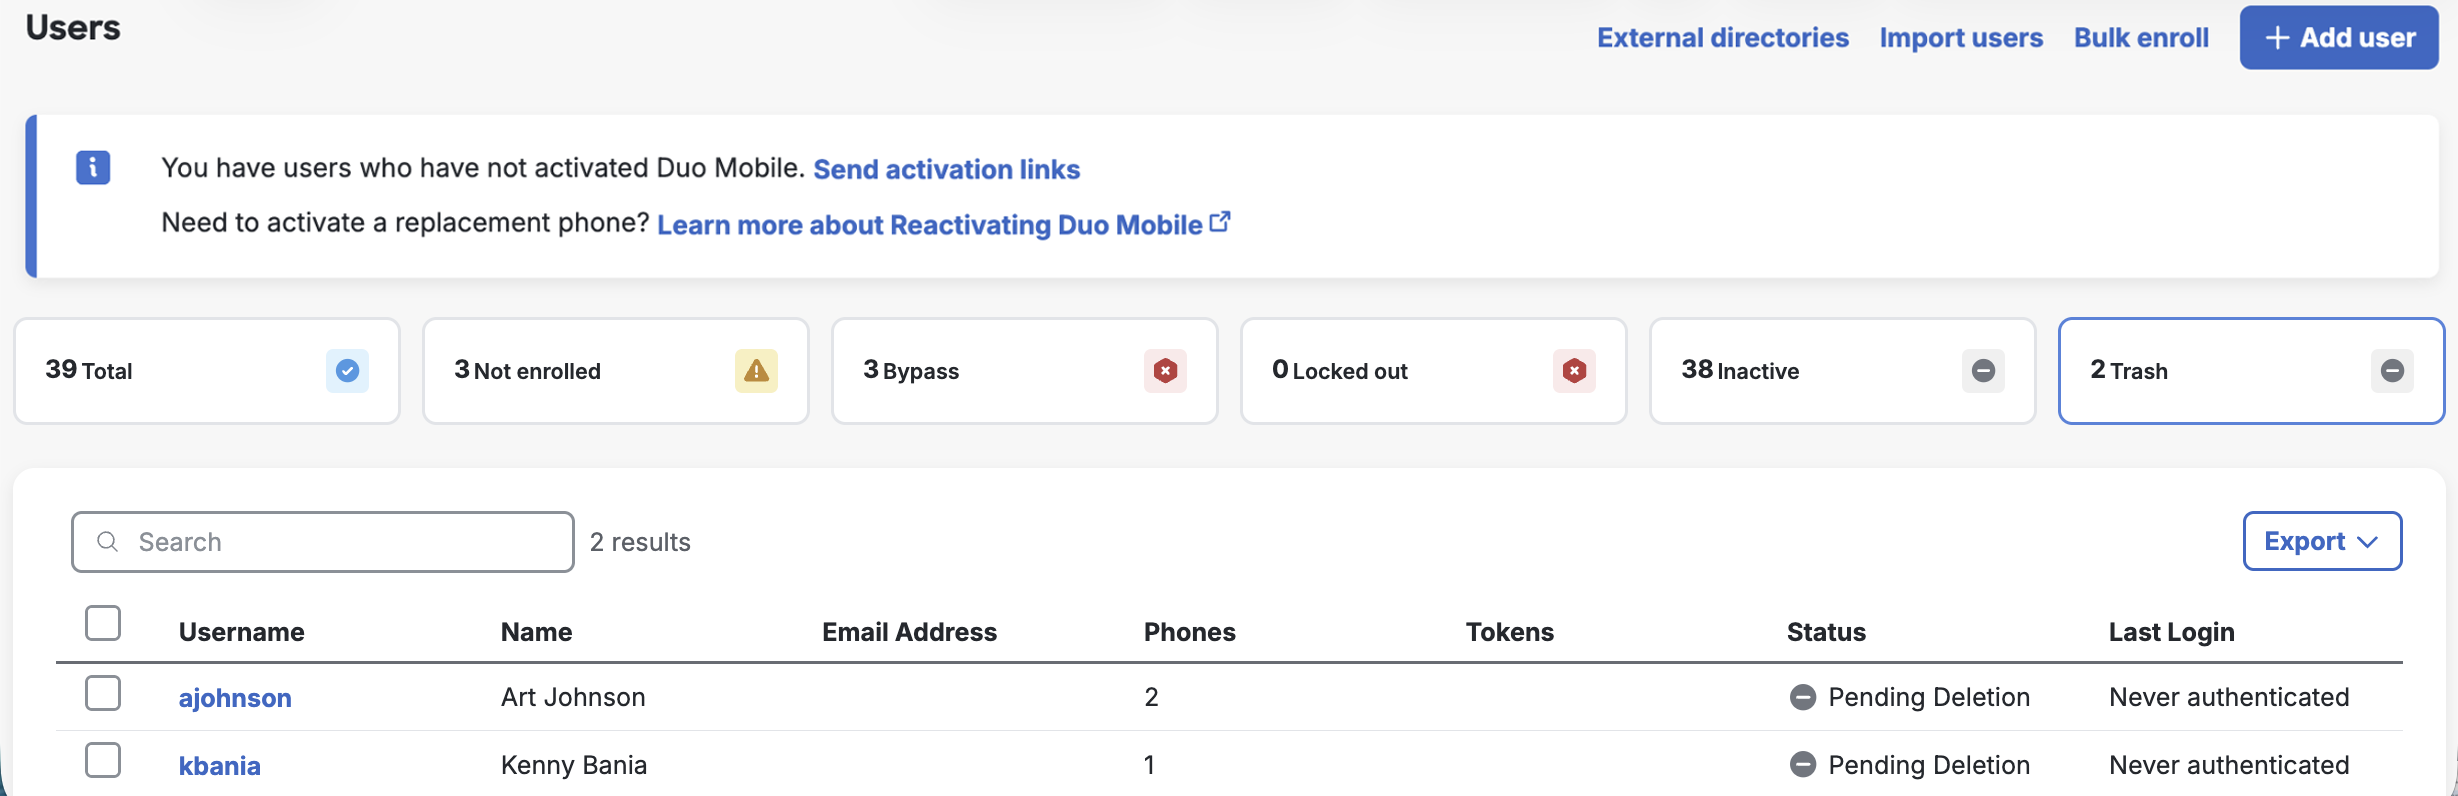
If the user marked for deletion is not reconnected to an external directory account via the sync within seven days the user is automatically deleted from Duo. The user's properties show the target date for deletion. A Duo admin can manually delete a synced user from the Trash via the Permanently Delete link at any time during those seven days.
Manage Synced Groups
Duo groups created by directory sync may only be managed by the sync. You can't change the group's members interactively from the Admin Panel interface, via CSV import, or programmatically with the Admin API.
To update the members of a sync-managed group, make the necessary changes in the source directory and import them into Duo by running a full or single-user sync.
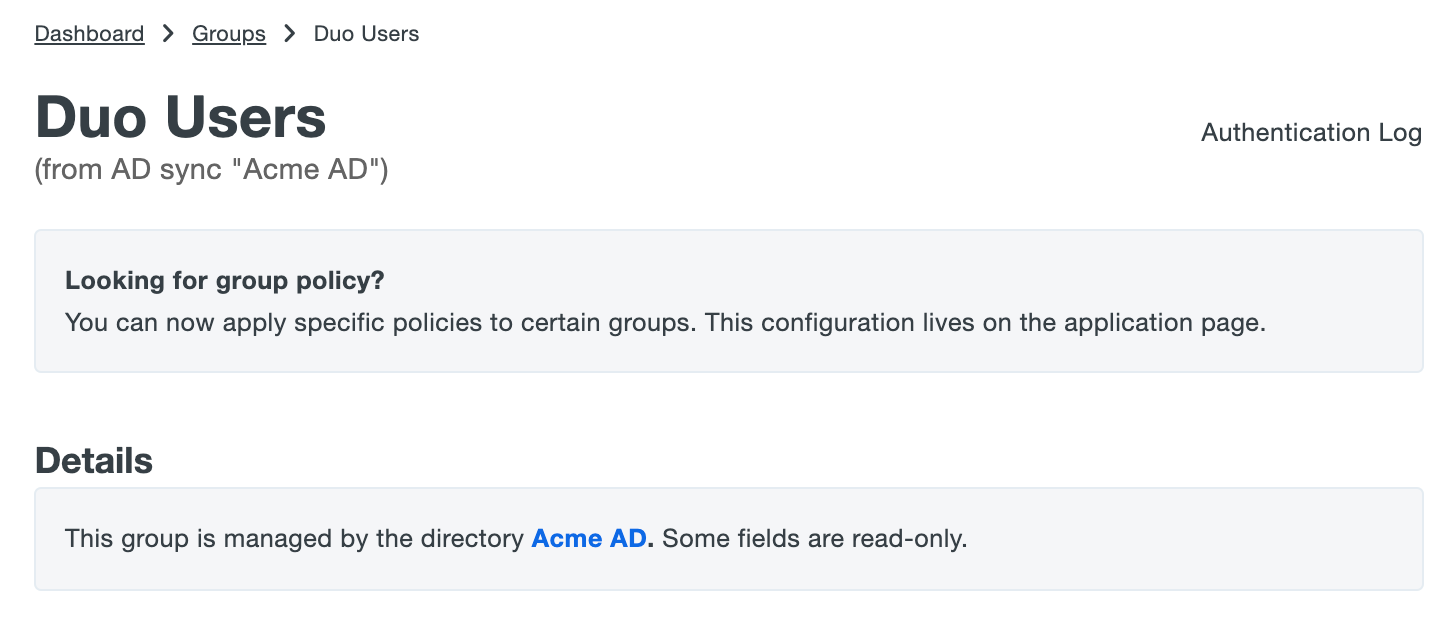
Groups managed by Active Directory sync are identified as such in the Admin Panel and Admin API output. When viewing groups in the Admin Panel, you'll see from AD Sync "name of sync" appended to the group's name or as the group's description. In Admin API output the sync information is appended to the group's name.
You can have multiple syncs managing groups with the same name (such as a "Duo Users" group managed by AD sync and also a "Duo Users" group managed by Entra ID sync), or even a manually created "Duo Users" group not managed by any sync. Each sync-managed group only contains Duo user members managed by the same directory sync, and an unmanaged group can only contain users also not managed by any directory sync.
Removing a group from the directory's configuration in Duo marks any members of that group for deletion if they are not members of another synchronized group, and converts the group to unmanaged so it can be modified or deleted from the Duo Admin Panel or Admin API. Duo updates the group's name to indicate it was once managed by directory sync, changing from Group name from AD Sync "name of sync" to Group name (formerly from "name of sync"). You cannot delete groups formerly managed by the sync from Duo as long as a Duo Single Sign-On (SSO) routing rule condition uses them.
Set Up Admin Sync
Role required: Owner.
Review the Prerequisites information before setting up Admin Directory Sync.
Directory Sync Updates Existing Admins
Before executing any Active Directory synchronization with Duo, understand the effect that synchronization can have on Duo admin accounts with duplicate email addresses. If you have some active Duo administrators, and one or more of these admins have the same email address attribute values on your Active Directory server, then performing a synchronization will cause the existing Duo admins' information to be merged with, and in some cases overwritten by the Active Directory information, such as names present in Duo changing to match the value stored in the synced directory.
If you synchronize multiple directories and there are non-unique email addresses among those directories, the net result is that there will be only one Duo admin created with that email address username. Only the sync that created the admin will be able to modify that admin, while additional syncs ignore it.
Create or Choose a Connection for Admin Sync
To start setting up an admin directory sync:
-
Log in to the Duo Admin Panel.
-
Navigate to Users in the left side bar and then click Administrators → Admin Directory Sync on the submenu.
-
Click the Add External Directory button and select Active Directory from the list.
-
If this is the first Active Directory sync you've created for users or admins, you must first create a new connection to use for this sync. With Add new connection selected, click Continue to proceed to the next step.
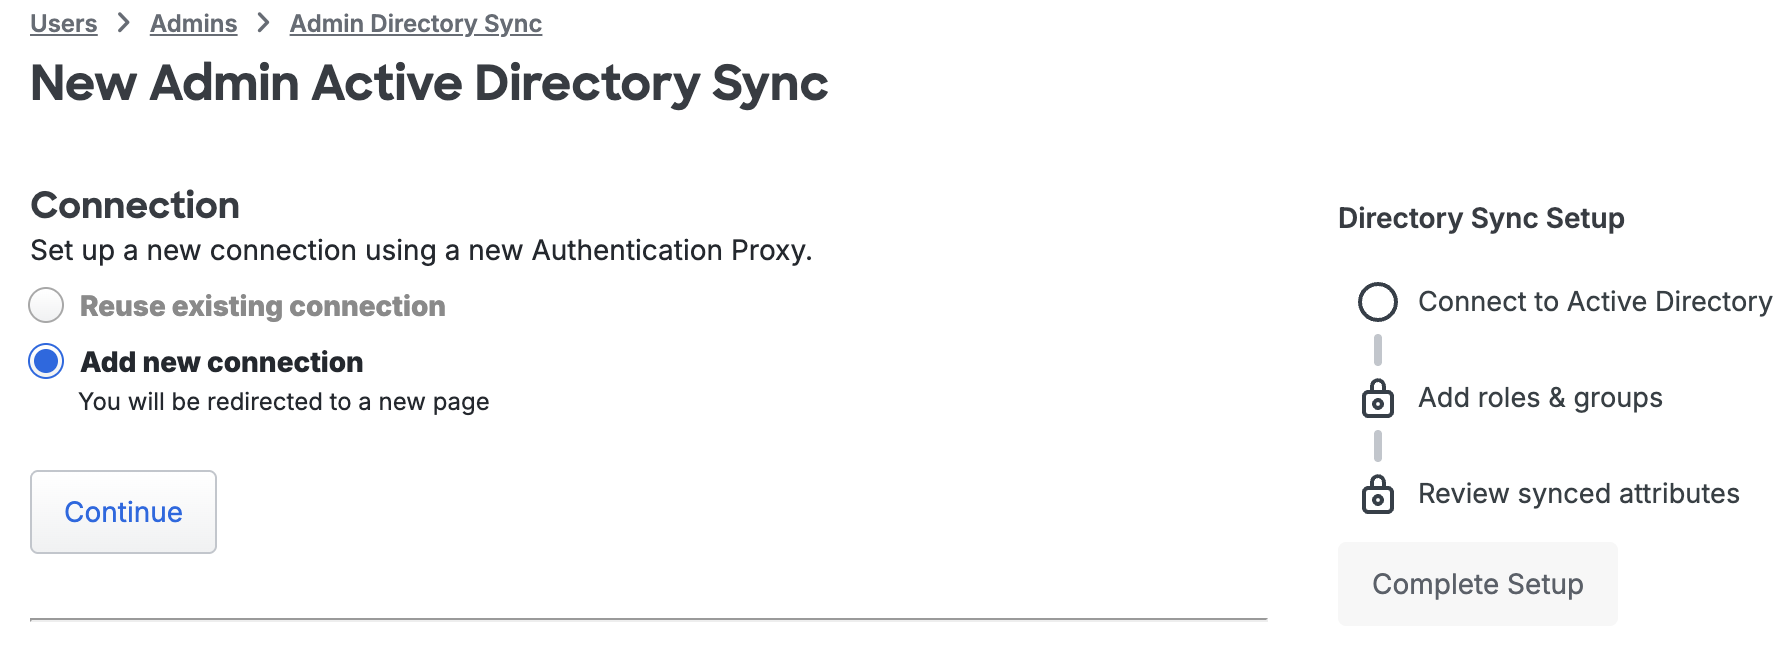
If you have previously created an Active Directory sync for users or administrators, you can either create another new connection or reuse an existing connection to that directory for this new sync. User syncs and admin syncs can share connections to the same source directory.
If you want to use an existing connection, choose Reuse existing connection and use the drop-down to select one from the list, then click Continue.
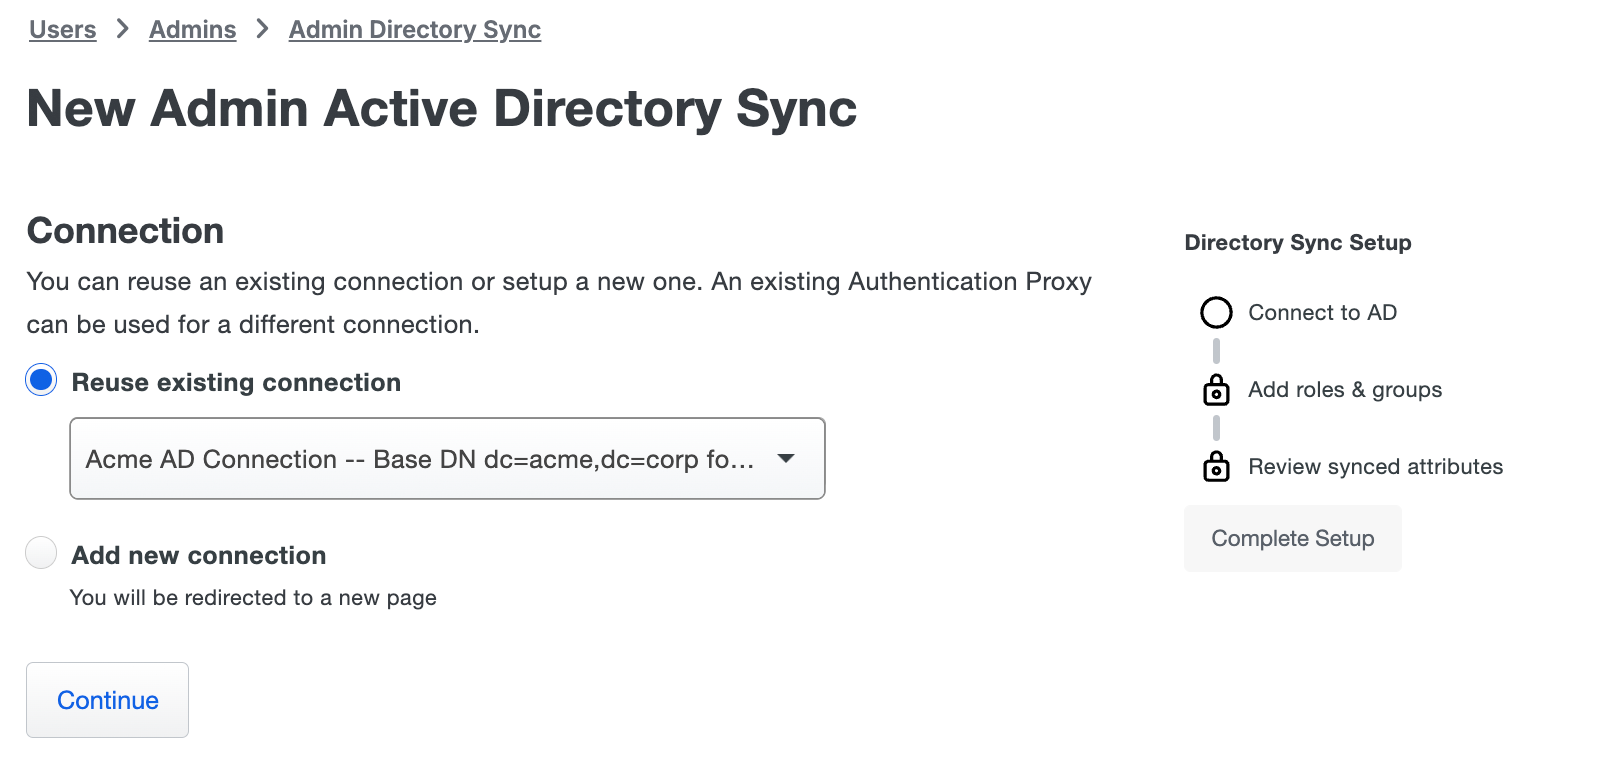
You'll proceed directly to the new sync's properties page, where you'll perform role mapping and configure the synced attributes.
Install Duo Authentication Proxy
If you chose to create a new connection then your next step is to install the Duo Authentication Proxy software on a machine that can connect to both Duo's cloud service and to your AD domain controller. Before proceeding, you should locate (or set up) a system in your environment on which you will install the Duo Authentication Proxy. This host needs LDAP connectivity to your AD domain controller (ports 389/636 or whichever ports accept Active Directory binds), as well as HTTPS/443 connectivity to Duo.
If you are already running an Authentication Proxy server in your environment, you can also use that host for directory synchronization. If your existing Authentication Proxy server is version 5.2.0 or later, and it's already running a directory sync, you can use the same proxy connection to run additional syncs as long as they are all for the same Duo customer account (identical api_host values).
Locate (or set up) a system on which you will install the Duo Authentication Proxy. We recommend the following 64-bit operating systems for the system hosting the Duo Authentication Proxy:
- Windows Server 2016 or later
- CentOS 7
- CentOS Stream 8 or later
- Fedora 37 or later
- Red Hat Enterprise Linux 7 or later
- Ubuntu 20.04 LTS or later
- Debian 11 or later
If you opt for Integrated authentication, the Authentication Proxy server must be a domain-joined Windows 2016 or later server.
The Duo End of Sale, Last Date of Support, and End of Life Policy states that Duo does not offer support for integrations running on operating system versions beyond the vendor’s stated Last Date of Support date.
If you will reuse an existing Duo Authentication Proxy server for this new application, you can skip the install steps and go to Configure the Proxy.
The Duo Authentication Proxy can be installed on a physical or virtual host. We recommend a system with at least 1 CPU, 200 MB disk space, and 4 GB RAM (although 1 GB RAM is usually sufficient). See additional Authentication Proxy performance recommendations in the Duo Authentication Proxy Reference.
We do not recommend installing the Duo Authentication Proxy on the same Windows server that acts as your Active Directory domain controller or one with the Network Policy Server (NPS) role. If you must co-locate the Duo Authentication Proxy with these services, be prepared to resolve potential LDAP or RADIUS port conflicts between the Duo service and your pre-existing services.
- Download the most recent Authentication Proxy for Windows from https://dl.duosecurity.com/duoauthproxy-latest.exe. Note that the actual filename will reflect the version e.g. duoauthproxy-6.8.0.exe. View checksums for Duo downloads here.
- Launch the Authentication Proxy installer on the target Windows server as a user with administrator rights and follow the on-screen prompts.
When installing, you can choose whether or not you want to install the Proxy Manager. The Proxy Manager is a Windows utility that helps you edit the Duo Authentication Proxy configuration, determine the proxy's status, and start or stop the proxy service. Learn more about using the Proxy Manager. Installing the Proxy Manager adds about 100 MB to the installed size.
If you do not want to install the Proxy Manager, you may deselect it on the "Choose Components" installer screen before clicking Install.
To perform a silent install on Windows, issue the following from an elevated command prompt after downloading the installer (replacing version with the actual version you downloaded):
duoauthproxy-version.exe /SAppend /exclude-auth-proxy-manager to install silently without the Proxy Manager:
duoauthproxy-version.exe /S /exclude-auth-proxy-managerEnsure you have compiler toolchain packages installed. On most recent RPM-based distributions — like Fedora, Red Hat Enterprise, and CentOS — you can install these by running (as root):
$ yum install gcc make libffi-devel zlib-devel diffutilsOn Debian-derived systems, install these dependencies by running (as root):
$ apt-get install build-essential libffi-dev zlib1g-devIf SELinux is present on your system and you want the Authentication Proxy installer to build and install its SELinux module, include
selinux-policy-develandchkconfigin the dependencies:$ yum install gcc make libffi-devel zlib-devel diffutils selinux-policy-devel chkconfig$ apt-get install build-essential libffi-dev zlib1g-dev selinux-policy-devel chkconfig-
Download the most recent Authentication Proxy for Unix from https://dl.duosecurity.com/duoauthproxy-latest-src.tgz. From the command line you can use
curlorwgetto download the file, like$ wget --content-disposition https://dl.duosecurity.com/duoauthproxy-latest-src.tgz. Depending on your download method, the actual filename may reflect the version e.g. duoauthproxy-6.8.0-src.tgz. View checksums for Duo downloads here. Extract the Authentication Proxy files and build it as follows:
$ tar xzf duoauthproxy-6.8.0-src.tgz $ cd duoauthproxy-version-src $ make-
Install the authentication proxy (as root):
$ cd duoauthproxy-build
$ ./install
Follow the prompts to complete the installation. The installer creates a user to run the proxy service and a group to own the log directory and files. You can accept the default user and group names or enter your own.
If SELinux is present on the target server, the Duo installer will ask you if you want to install the Authentication Proxy SELinux module. Your selection affects whether systemd can start the Authentication Proxy after installation.
SELinux Mode Default Response Result Enforcing Yes Choose 'yes' to install the Authentication Proxy's SELinux module. This permits start of the Authentication Proxy service by systemd. If you choose 'no' then the SELinux module is not installed, and systemd cannot start the Authentication Proxy service. Permissive No Choose 'no' to decline install of the Authentication Proxy's SELinux module. The Authentication Proxy service can be started by systemd. However, if you change SELinux from permissive to enforcing mode after installing the Duo proxy, systemd can no longer start the Authentication Proxy service. If you plan to enable SELinux enforcing mode later, you should choose 'yes' to install the Authentication Proxy SELinux module now. If you choose to install the Authentication Proxy SELinux module and the dependencies
selinux-policy-develandchkconfigare not present, then the installer fails to build the module.
To install the Duo proxy silently with the default options, use the following command:
sudo ./duoauthproxy-build/install --install-dir /opt/duoauthproxy --service-user duo_authproxy_svc --log-group duo_authproxy_grp --create-init-script yesAppend --enable-selinux=yes|no to the install command to choose whether to install the Authentication Proxy SELinux module.
Configure the Proxy
After the installation completes, you will need to configure the proxy with your connection information. Note that as of v4.0.0, the default file access for the conf directory is restricted to the built-in "Administrators" group during installation on Windows systems.
The Duo Authentication Proxy configuration file is named authproxy.cfg, and located in the conf subdirectory of the proxy installation.
| Operating System | Authentication Proxy Version |
Path |
|---|---|---|
| Windows | v5.0.0 and later | C:\Program Files\Duo Security Authentication Proxy\conf |
| Windows | v4.0.2 and earlier | C:\Program Files (x86)\Duo Security Authentication Proxy\conf |
| Linux | All | /opt/duoauthproxy/conf |
Download the Authentication Proxy authproxy.cfg file for your AD domain sync by clicking the download a pre-configured file link in step 2 of the Duo Authentication Proxy section of the directory properties page. This file contains the values needed to set up the connection. You could also copy the values directly from the Admin Panel to paste into your server's config file.
The configuration file is formatted as a simple INI file. Section headings appear as:
[section]
Individual properties beneath a section appear as:
name=value
A first time Authentication Proxy install may include an existing authproxy.cfg with some example content. If this is the first time you're configuring this Authentication Proxy server, you should delete the existing sample content.
Duo Authentication Proxy Manager
The Duo Authentication Proxy Manager is a Windows utility for managing the Authentication Proxy installation on the Windows server where you install the Authentication Proxy. The Proxy Manager comes with Duo Authentication Proxy for Windows version 5.6.0 and later.
The Proxy Manager cannot manage remote Duo Authentication Proxy servers, nor can you install the Proxy Manager as a stand-alone application. There is no Proxy Manager available for Linux. The Proxy Manager only functions as part of a local Duo Authentication Proxy installation on Windows servers.
Learn more about using the Proxy Manager in the Duo Authentication Proxy Reference.
To launch the Proxy Manager utility:
- Open the Start Menu and go to Duo Security.
- Click the Duo Authentication Proxy Manager icon to launch the application. You must have administrative privileges on the Windows server and accept the prompt for elevation.
- The Proxy Manager launches and automatically opens the
%ProgramFiles%\Duo Security Authentication Proxy\conf\authproxy.cfgfile for editing.
Use the Proxy Manager editor on the left to make the authproxy.cfg changes in these instructions. As you type into the editor, the Proxy Manager will automatically suggest configuration options. Accepting these suggestions helps make sure you use the correct option syntax.
As you follow the instructions on this page to edit the Authentication Proxy configuration, you can click Validate to verify your changes (output shown on the right).
When you complete the Authentication Proxy configuration steps in this document, you can use the Save button to write your updates to authproxy.cfg, and then use the authproxy.cfg button to start the Authentication Proxy service before continuing on to the next configuration steps.
If you do not use the Proxy Manager to edit your configuration then we recommend using WordPad or another text editor instead of Notepad when editing the config file on Windows.
To add your new connection information to the Authentication Proxy:
-
Open the
authproxy.cfgin your Authentication Proxy installation'sconfdirectory in a text editor, or in the Proxy Manager utility if present on your Windows proxy server. -
Download the Authentication Proxy
authproxy.cfgfile for your Active Directory sync by clicking the download a pre-configured file link in step 2 of the Duo Authentication Proxy section of the connection properties page. -
Open the downloaded file in a text editor to copy its contents, and then paste the information from that
authproxy.cfgfile you downloaded into the installed Authentication Proxy'sauthproxy.cfgfile (which you opened in a text editor or in the Proxy Manager on Windows).
The authproxy.cfg file for Active Directory sync contains a [cloud] section with the following properties:
Integrated authentication
| Field | Value |
|---|---|
| ikey | your integration key |
| skey | your secret key |
| api_host | your API hostname (i.e., api-XXXXXXXX.duosecurity.com) |
NTLMv2 or Plain authentication
| Field | Value |
|---|---|
| ikey | Your integration key. |
| skey | Your secret key. |
| api_host | Your API hostname (i.e., api-XXXXXXXX.duosecurity.com). |
| service_account_username | The account used to bind to Active Directory. This account needs read-only access to your directory. |
| service_account_password | The directory password for the service_account_username user. |
Add your service account information (if necessary, depending on the authentication type you chose) to the information you downloaded and copied to your Authentication Proxy server's authproxy.cfg configuration file. Make sure to save your configuration file when done, or validate and then save in the Proxy Manager utility.
To configure an existing Authentication Proxy server for directory sync, simply append the [cloud] section of the config file downloaded from the Duo Admin Panel directory properties page to the current authproxy.cfg file located in the Duo Security Authentication Proxy conf folder. If you already have a [cloud] section present (and you are running proxy version 5.2.0 or later), increment the next section you're adding as [cloud2].
Save the configuration file then restart the Duo Authentication Proxy service for the change to take effect.
Here's a sample authproxy.cfg file for Plain authentication:
[cloud]
ikey=DIXXXXXXXXXXXXXXXXXX
skey=2v3O7uCJmdhFK6hsKS82HGyNUR5L1XGCRx44DjCQ
api_host=api-XXXXXXXX.duosecurity.com
service_account_username=duosync
service_account_password=Pass12345
Here's an example for multiple directory syncs using Integrated (SSPI) authentication. Notice the integration key differs but the API host is the same in both sections; this reflects the requirement that the multiple syncs must be for a single Duo customer account:
[cloud]
ikey=DIABCDEFGHIJKLMNOPQR
skey=skey=2HGyNUR5L1XGCRx44DjCQ2v3O7uCJmdhFK6hsKS8
api_host=api-12345678.duosecurity.com

[cloud2]
ikey=DISTUVWXYZABCDEFGHIJ
skey=2v3O7uCJmdhFK6hsKS82HGyNUR5L1XGCRx44DjCQ
api_host=api-12345678.duosecurity.com
Encrypting Passwords
When running the Authentication Proxy on Windows, you may encrypt the directory user password for NTLMv2/Plain authentication stored in the [cloud] section if you do not want to store them as plain text. Use the authproxy_passwd.exe program, which can be found in the bin directory of your Authentication Proxy installation.
"C:\Program Files\Duo Security Authentication Proxy\bin\authproxy_passwd.exe"If you run the tool without any arguments, it prompts you to enter and confirm the password or secret you want to encrypt, and then outputs the encrypted value. For example:
c:\>"C:\Program Files\Duo Security Authentication Proxy\bin\authproxy_passwd.exe"
Password:
Re-enter password:
AQAAANCMnd8BFdERjHoAwE/Cl+sBAAAA5hII/4JlnEeB5xMBzB5D/wQAAAAeAAAAdwBpAG4AMwAyAGMAcgB5AHAAd
ABvAC4AcAB5AAAAA2YAAMAAAAAQAAAA5AHAAdABvAC4AcAB5AAAAA2YAAMAAAAAQAAAASApm6tif+wDKj+Rt0UtQ9
QAAAAAEgAlnEeB5xMBzB5D/wQAAAAeAAAAdwBpAG4AMwAyAGMAcgB5AHAAdABvQ8M7voQmwOOxqv91QmJs9QAAAAA
EgAAAoAAAABAAAACxWVslLxrlFOunUUeq+kg1CAAAAPFj+oygch2RFAAAAD9HgbRonCsy/GNx4M9FxSq/KJCqThe encrypted password is specific to the server where it was generated, and will not work if copied to a different machine. If you have multiple Authentication Proxy servers with the same service account specified, be sure to run authproxy_passwd.exe separately on each one.
Copy and paste the output into your configuration file as and remove any line breaks. You may find it easier to redirect the command output to a file and then open the file in Notepad.
When using encrypted passwords or secrets, use the "protected" version of the parameter:
| Instead of... | Use... |
|---|---|
service_account_password
|
service_account_password_protected
|
skey
|
skey_protected
|
Here's a sample authproxy.cfg file for Plain authentication with an encrypted secret key and service account password:
[cloud]
ikey=DIXXXXXXXXXXXXXXXXXX
skey_protected=AQAAANCMnd8BFdERjHoAwE/Cl+sBAAAAEK80Kg76BUKI63ApctGZ/wQAAAAeAAAAdwBpAG4AMwAyAGMAcgB5AHAAdABvAC4AcAB5AAAAA2YAAMAAAAAQAAAAMlqARKe+pLNcFwVWWzLfrwAAAAAEgAAAoAAAABAAAAAe+ADzHx0OmowXFu+95w4ACAAAAC+9Hae0HWbNFAAAAA/94/UTD1iB2vnlGcVvDaqKtdcu
api_host=api-XXXXXXXX.duosecurity.com
service_account_username=duosync
service_account_password_protected=QAAANCMnd8BFdERjHoAwE/Cl+sBAAAA5hII/4JlnEeB5xMBzB5D/wQAAAAeAAAAdwBpAG4AMwAyAGMAcgB5AHAAdABvAC4AcAB5AAAAA2YAAMAAAAAQAAAA5AHAAdABvAC4AcAB5AAAAA2YAAMAAAAAQAAAASApm6tif+wDKj+Rt0UtQ9QAAAAAEgAlnEeB5xMBzB5D/wQAAAAeAAAAdwBpAG4AMwAyAGMAcgB5AHAAdABvQ8M7voQmwOOxqv91QmJs9QAAAAAEgAAAoAAAABAAAACxWVslLxrlFOunUUeq+kg1CAAAAPFj+oygch2RFAAAAD9HgbRonCsy/GNx4M9FxSq/KJCq
See additional password/secret encryption options in the Authentication Proxy Reference.
Start the Proxy
If you installed the Duo Authentication Proxy Manager utility (available with 5.6.0 and later), click the Start Service button at the top of the Proxy Manager window to start the service.
To start the service from the command line, open an Administrator command prompt and run:
net start DuoAuthProxyAlternatively, open the Windows Services console (services.msc), locate "Duo Security Authentication Proxy Service" in the list of services, and click the Start Service button.
Authentication Proxy v5.1.0 and later includes the authproxyctl executable, which shows the connectivity tool output when starting the service. The installer adds the Authentication Proxy C:\Program Files\Duo Security Authentication Proxy\bin to your system path automatically, so you should not need to specify the full path to authproxyctl to run it.
From an administrator command prompt run:
authproxyctl startIf the service starts successfully, Authentication Proxy service output is written to the authproxy.log file, which can be found in the log subdirectory.
If you see an error saying that the "service could not be started", open the Application Event Viewer and look for an Error from the source "DuoAuthProxy". The traceback may include a "ConfigError" that can help you find the source of the issue.
Stop and restart the Authentication Proxy service by either clicking the Restart Service button in the Duo Authentication Proxy Manager or the Windows Services console or issuing these commands from an Administrator command prompt:
net stop DuoAuthProxy & net start DuoAuthProxyTo stop and restart the Authentication Proxy using authproxyctl, from an administrator command prompt run:
authproxyctl restartOpen a root shell and run:
# /opt/duoauthproxy/bin/authproxyctl startTo ensure the proxy started successfully, run:
# /opt/duoauthproxy/bin/authproxyctl statusAuthentication Proxy service output is written to the authproxy.log file, which can be found in the log subdirectory.
To stop and restart the Authentication Proxy, open a root shell and run:
# /opt/duoauthproxy/bin/authproxyctl restartView video guides for proxy deployment at the Authentication Proxy Overview or see the Authentication Proxy Reference for additional configuration options.
Once you've started the Authentication Proxy service, return to the AD Admin Sync Connection page in the Duo Admin Panel and click Test Connection at the bottom of the page. The connection's status still says "Not connected", but the "Add Authentication Proxy" step should now show as checked. You're ready to move on to the next setup step, Admin Directory Configuration.
If the "Add Authentication Proxy" status information doesn't update when you test the connection, double-check the information in your authproxy.cfg and make sure the proxy service is running, then test the connection again.
To delete a sync connection, click Delete connection at the bottom of the page and confirm the deletion (the option appears after you delete the associated sync).
Admin Directory Configuration
Enter the required directory connection information:
| Domain Controller(s) |
Enter the IP address or RFC-1034-compliant hostname of your AD domain controller (DC), followed by the port the Authentication Proxy server should use to contact the domain controller. The typical port for unsecured LDAP or STARTTLS is 389, and LDAPS is usually 636.
Click Add Domain Controller to add up to four additional hosts. If the first server in the list doesn't respond when performing a sync, the next server is used as a fallback. If you decommission any of your domain controllers be sure to return to Duo and remove it from the list. |
| Base DN |
The base DN should be a level in your directory structure above both the admin users and role-mapping groups you plan to synchronize. Example: |
| Authentication Type |
Select the type of authentication the Authentication Proxy will use to connect to your AD domain controller. One of:
|
| Transport Type | The transport type selected determines how the connection between the Duo Authentication Proxy software and the AD domain server is encrypted, if at all. Connectivity between the Duo Authentication Proxy software and the Duo Security cloud services is always HTTPS secured with SSL and is not affected by this setting. One of:
Selecting LDAPS or STARTTLS exposes additional settings:
dc1.acme.corp and you entered the IP of that server when setting up the directory in Duo instead of the hostname dc1.acme.corp, and you then enable this option, the connection between your Authentication Proxy and your domain controller fails with the message "The directory server credentials were rejected" because the IP address of the domain controller is not present in the certificate it uses for SSL.
|
Click Save at the bottom of the page after entering the Directory Configuration information. If the Duo Authentication Proxy was able to contact the specified directory server and perform a search for groups using the given Base DN, then the status will show as Connected.
Your connection is ready to use. Click the link for your sync under "Connected Admin syncs" to return to the properties page of your new AD Admin Sync. You will finish configuring the directory sync there with your selected role mapping groups and Synced Attributes information.
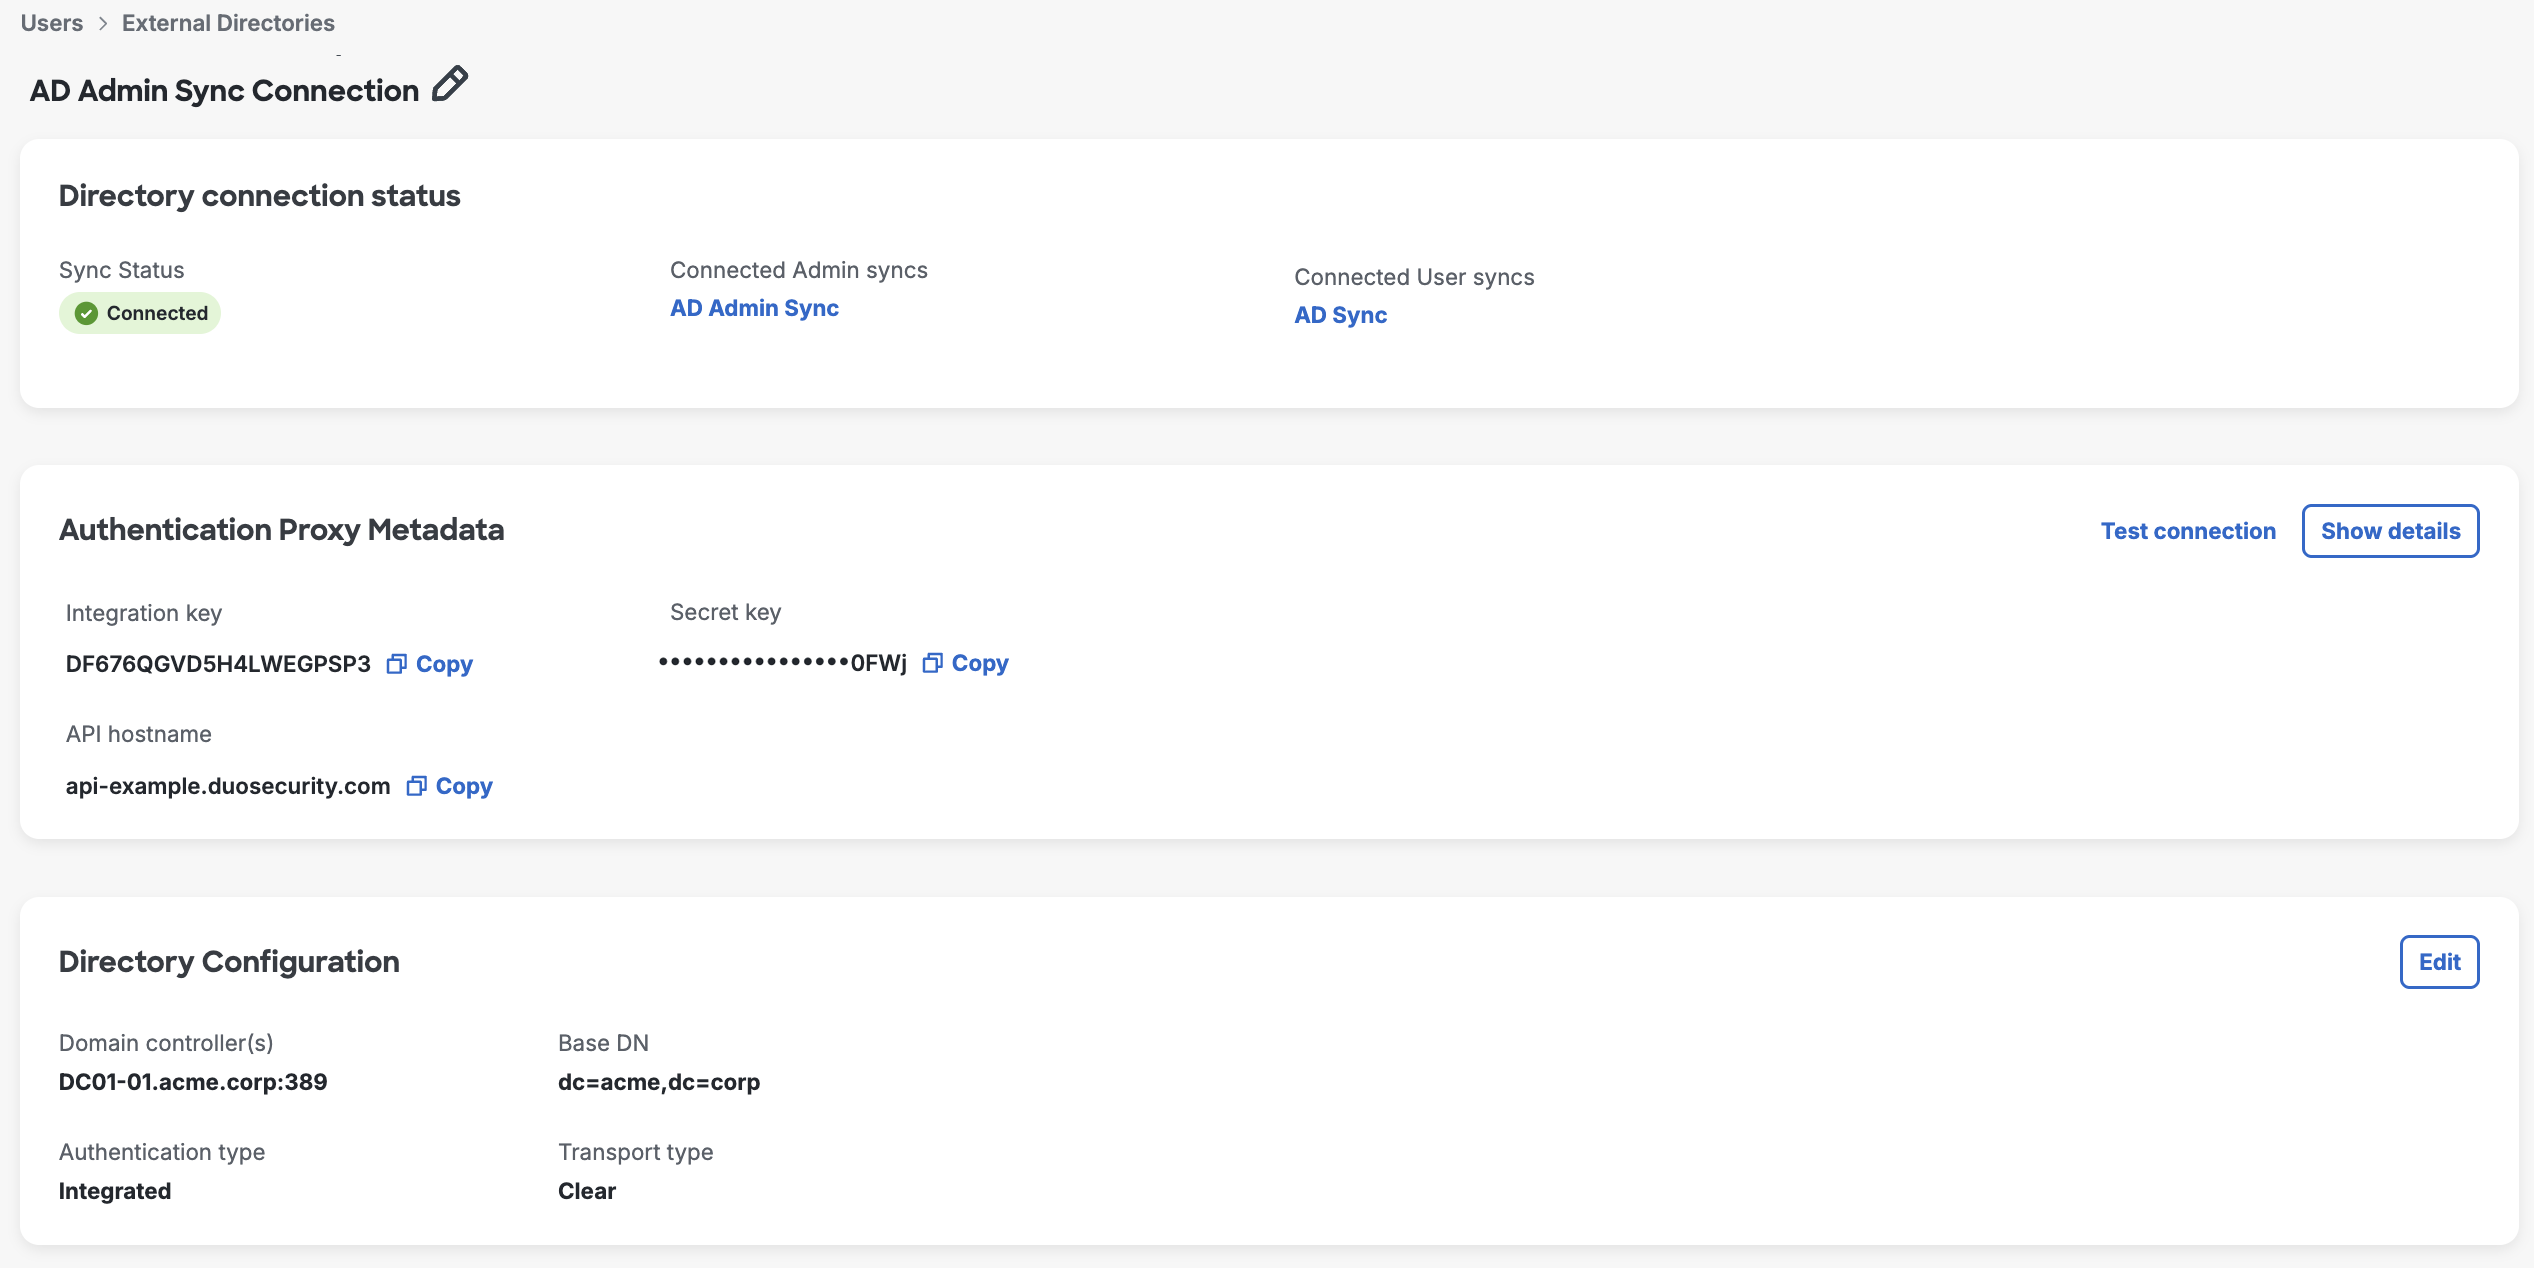
To manage the user sync connection:
-
To change the name of this sync connection to something more descriptive, click the pencil icon to the right of the current name. Enter your new name and then click Save. You can always return to the sync connection properties page later to rename the sync or make other changes.
-
To view more information about Authentication Proxy data, click Show details on the right.
-
To edit the directory configuration, click Edit on the right, make the necessary changes, and click Save.
-
To delete the sync connection, click Delete Connection in the top-right corner and confirm the deletion (the option appears only if no syncs use the connection).
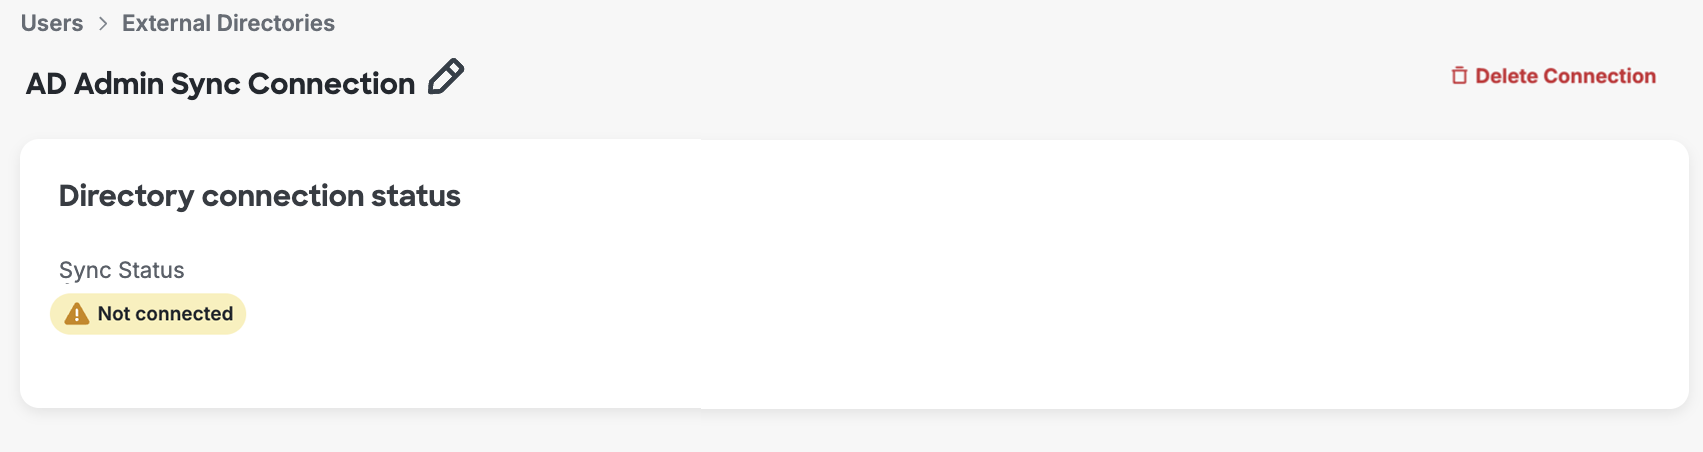
Duo Roles and Active Directory Groups
Admin directory sync imports admins and assigns Duo built-in and custom admin roles to your imported Duo admins based on their membership in the groups you define for each admin role in your admin sync's properties.
Check the box next to each role you would like to assign via sync. Custom admin roles will have a "Custom" badge in the list of available roles to assign. For each selected role, click in the Select AD groups field and start typing a group name; the list of available groups to sync returned will match the filter. If you have a very large number of groups in your directory, Duo limits the search results to 100 groups, so you may need to type in most of your desired sync group's name or enter a complete DN for the group (like CN=Duo-Admins,OU=Groups,DC=domain,DC=local) to locate it.
If you don't see any of your groups listed, review the previous setup steps and correct your configuration.
Once you see a list of groups, click to select the desired group or groups to sync. Members of the groups you choose here will be synced into Duo as administrators, with their assigned admin role corresponding to the selected mapping. You can sync multiple groups to the same role, and admins who are members of subgroups of the selected groups will also be synced.
If an existing administrator has the same email address as an administrator in your selected groups, that administrator will be taken over by sync.
If an admin is a member of multiple synced groups that are mapped to multiple roles, the admin will receive the higher level role, for example, a user who is a member of both a group you select for the Administrator role and a group you select for the Help Desk role receives the Administrator role.
The available roles are listed in descending order of role precedence from Administrator to Read-only on the admin sync page. Admin directory sync cannot create new admins with the Owner role, nor can it update existing Duo admins with the Owner role.
Nested groups are supported; Duo sync imports users from groups nested within your sync group, but creates only the top level group in Duo (the group explicitly selected for directory sync), with all nested group members as direct members of that Duo group.
If you delete and recreate any of the AD groups saved in the sync properties (even if you reused the same group name and members), then you'll need to return to the admin directory sync property page for your AD domain in the Duo Admin Panel and delete the recreated group from your sync's role-mapping selections, then re-add the group and save the directory.
If you assigned administrators a new role whole deleting a custom admin role used by the sync, admin directory sync groups will be reconfigured to sync into the replacement role. The new admin directory sync group configuration (with replacement role) will take effect the next time admin directory sync runs.
If you save the sync without selecting any groups, or if you remove all the groups selected from the sync config in the future, Duo pauses your automatic syncs upon detecting the missing information and updates the sync status to alert you that no groups have been selected. Correct the issue by selecting one or more groups to sync from the source directory and resuming scheduled synchronization.
Admin Synced Attributes
Make changes here if you want to customize which AD attribute values get imported to Duo. The Duo attributes that have default AD attributes defined indicate those defaults as helper text. You can change these default attributes to custom attributes of your choice. Return to using the default attributes by clicking Revert all attributes to default.
Note that Duo does not import passwords from external directories.
You may customize the AD source attributes for these Duo admin properties:
| Email Address |
Required. The admin's email address. The attribute selected should match the primary authentication login name your admins use to log in to the Duo Admin Panel. This attribute cannot be customized after the first directory synchronization occurs. Default: |
| Display Name |
Required. The admin's name. Default: |
| Import Phones |
Enable this option if you want Directory Sync to import a phone for your admins. Imported devices default to the "Generic Smartphone" platform, capable of phone call and SMS messaging. Directory sync does not send SMS activation messages to imported admins; see Admin Activation for details. If you enable both the Admin Activation and Import Phones options, activation emails are only sent to admins with email addresses who do not have phone information populated in AD. Default: Import no phone information from AD. |
| Phone |
Required. Create a phone in Duo with the attribute value as the phone number, attached to the imported admin as a generic smartphone 2FA device. Directory sync will only add a phone number if the admin being synced does not already have one. Non-US numbers must be stored in AD using the format To import a landline with an extension, append Only configurable if Import Phones is selected. Default: |
Communication Preferences
Use the "Communications Preferences" to determine what sync information is emailed to Duo Owner admins.
Choose one of these options in the Sync notifications section:
-
Every time an administrator change occurs: receive separate, immediate notifications whenever a sync creates, deletes, or updates an administrator.
-
Only if the sync stops working: receive an email only when a sync fails to run (default).
The Contact info setting lets you select certain Duo administrators with the Owner role to receive notifications. By default, Directory Sync sends notifications to all active admins with the Owner role.
Admin Activation
Select the Send activation emails to synced admins option in the "Admin Activation" section if you want imported admins to automatically receive an admin activation email with a link to set up a password and 2FA device. Emails are sent to the email address associated with the newly created admin.
The setup links contained in these emails are valid for seven (7) days. If the admin does not complete the setup process after seven days have elapsed, the original setup link expires and a new email is generated at the next sync and sent to the admin.
The pending admin setup link is displayed on an administrator’s page and can be directly provided to new admins. Admin activation emails can also be resent or pending admin activation links invalidated and recreated from the administrator’s details page.
Default: Send activation emails to imported admins.
If your organization uses e-mail filtering, be sure to allow the sender no-reply@duosecurity.com.
Finish Admin Sync Setup
Click Complete Setup to finish creating the new Active Directory admin sync in Duo.
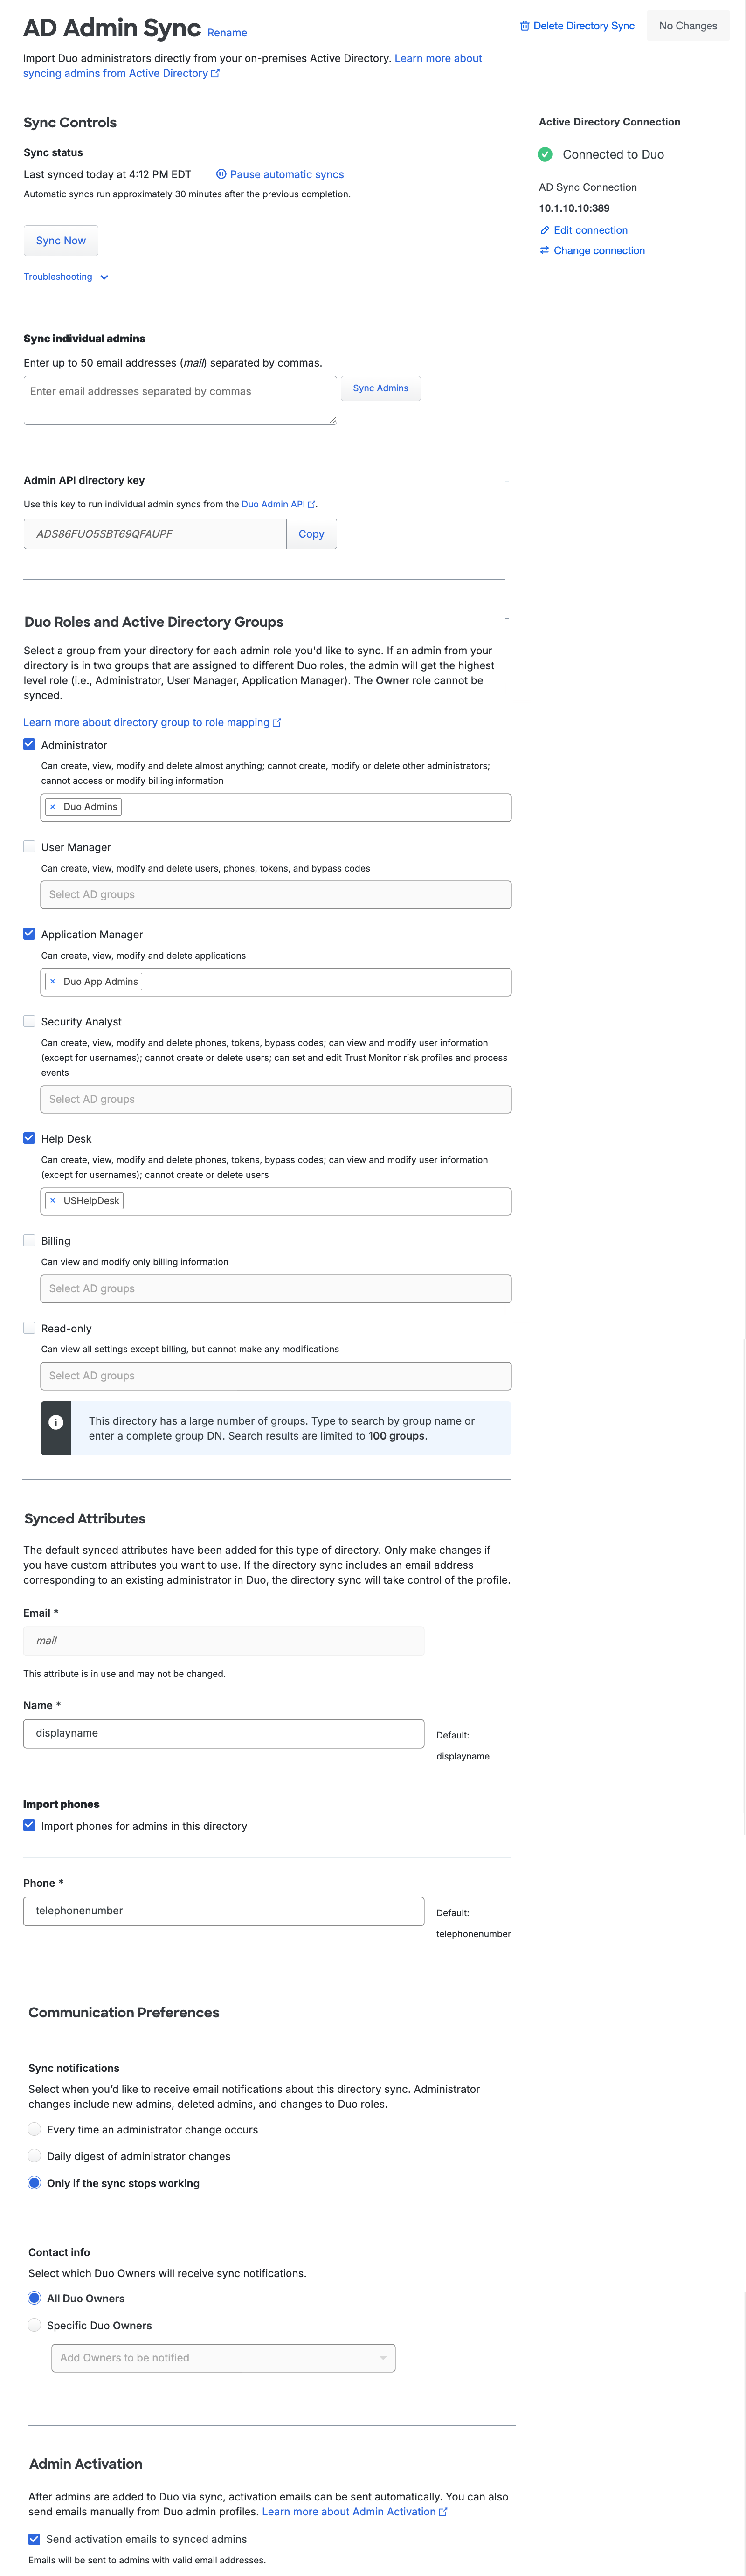
The directory page shows the status as "Connected to Duo" and the "Sync status" indicates when the next automatic sync will run once all directory configuration steps have been completed successfully.
If you wish you can click the Sync Now button to perform the first import of admins from your directory into Duo. Whether you run your first sync immediately after setup or not, admin directory sync runs automatically around every 30 minutes. You can always return to the Duo Admin Panel to initiate a manual sync.
Note that once you import admins from Active Directory into Duo you may not change the Email Address source attribute.
Manage Admin Sync
Role required: Owner.
Once configured, you can run manual admin syncs, update the sync settings, and perform other sync management operations.
To access your configured admin sync:
-
Log in to the Duo Admin Panel.
-
Navigate to Users in the left side bar and then click Administrators → Admin Directory Sync on the submenu.
-
The "Directory Syncs" tab lists all your configured admin syncs and shows their type, automatic sync status, and the time a full sync was last run. Select the sync you want to manage by clicking on its name in the list.
-
Perform your management actions from the admin sync's properties page.
Perform a Full Admin Sync
A full admin directory sync runs automatically every 30 minutes.
Perform a manual full sync of the admins in mapped admin groups in your directory to Duo by clicking Sync Now in the "Sync Controls" section. This immediately imports all members of your selected AD groups into Duo, creating and updating admins as necessary.
When the full sync completes, you'll see a count of admins and groups synced into Duo. Note that the groups synced by an admin sync are only used for admin role mapping, and do not show up on the Groups page in the Duo Admin Panel.
Cancel a Full Admin Sync
If you need to cancel a full admin sync in progress then click the Cancel sync action that appears while the sync is running. This will stop the sync, but any admin updates already applied by the sync before you canceled it remain in place.
We recommend running another full sync at the earliest opportunity to address any inconsistencies from the canceled sync.
Sync Individual Admins from the Duo Admin Panel
When you just need to import information for a few admins from Active Directory you can interactively sync selected admins instead of syncing the entire directory. For example, you may have some new employee accounts in AD who need a corresponding Duo admin account, or you might have just disabled an AD user and need that status carried over to their administrator account in Duo. Syncing these individual admin accounts updates Duo immediately.
To sync individual admins:
-
Type up to 50 email addresses as a comma-separated list into the Sync individual admins text box found in the "Sync Controls" section on the directory's properties page.
Additionally, individually synced admins must be members of a group specified as a role group in the "Duo Roles and Active Directory Groups" section of your directory sync's configuration. If you try to sync an individual admin who is not a member of a synced group then no update of that admin occurs.
-
Click the Sync Admins button to import information about the specified admin or admins.
When initiated, the individual admin sync verifies that each specified admin is a member of a group currently synced with Duo and then imports information for that admin into Duo. If a specified admin doesn't already exist in Duo, the sync creates them using the information imported from the source directory.
If you enabled the option to send activation emails then a new admin created by the individual admin sync receives an emailed activation link.
Individual admin sync updates an existing specified admin with information from the source directory. The sync can change attribute values, modify the assigned Duo admin role, or disable the admin in Duo if they are disabled in the source directory.
If you include a specified admin that is no longer a member of any group synced into Duo, then the sync marks the admin for deletion. Admins pending deletion will be deleted in seven (7) days. In that time, if the admin is re-added to a synced group, the admin will be restored.
In addition to syncing individual admins by email address from the directory's details page, you can also perform an individual sync on an existing Duo admin by visiting that admin's properties page in the Duo Admin Panel and clicking the Sync This Admin link at the top-right.
Individual Admin Sync using Admin API
Use the AdminAPI directory key from the "Sync Controls" section of the page to perform a sync operation on an individual admin using Duo's Admin API.
Pause Admin Sync
Should you want to put your directory sync on hold to prevent it from making changes to your imported admins, you can do so without removing your Active Directory configured sync from Duo. Use the pause functionality to stop scheduled syncs from running until you want to resume them.
To pause or resume synchronization of a directory:
-
From the Admin Directory Sync page click on the directory for which you want to pause or resume scheduled syncs to view its configuration page.
-
Click the Pause automatic syncs or Resume automatic syncs action in the Directory Sync "Status" section to perform the stated action. The sync status updates to reflect the effective state of the scheduled sync.
You can perform manual full and individual syncs at any time from the Admin Panel or via Admin API while the scheduled sync remains paused.
If your admin sync has no mapped role groups in the configuration then we'll pause scheduled syncs right away and the admin sync's status will show an alert for no groups selected. Select a group or groups and save the change to resume the sync.
Sync Failure Notifications
Duo tracks failures of your automatic admin directory synchronizations. We'll send a notification email to the Duo Owners specified in the sync's Communication Preferences after one (1) day of consecutive sync failures. If the failure persists, we'll send additional notification emails after three (3). Duo will send a final email notification after seven (7) days of consecutive admin sync failures and pause the sync automatically.
Visit your admin sync's page in the Admin Panel to correct the issues preventing sync success, or delete the admin directory sync if you no longer wish to use it.
To resume the paused sync after correcting any issues, click the Resume automatic syncs action in the "Sync status" section.
Update Admin Sync Connection
To view or modify the connection used by a given admin directory sync, either locate the connection on the "Connections" tab of the Admin Directory Sync page in the Admin Panel and click on it, or click the Edit connection link shown on the right side of an admin sync's properties page, in the "Active Directory Connection" information.
You can change the connection's name, reset the secret key (be sure to update the secret key value in your Authentication Proxy's authproxy.cfg immediately and restart the proxy service to reestablish the connection), or update directory configuration information for your connection at any time.
If you want to switch a sync from one connection to another, click the Change connection link on the right side of the sync's page. You'll see the same options to reuse an existing connection or to create a new connection that you saw when you first created the sync. Make your choice and proceed.
Delete Admin Syncs
Deleting a directory sync from Duo doesn't delete or disable any of the previously imported objects. When you delete an admin sync from Duo, then the admins formerly managed by that sync remain available and get converted to unmanaged Duo admins that can be manually updated or deleted.
-
Admins previously synced remain available and retain the status and role previously assigned.
-
Any 2FA methods associated with the admin remain available.
When you delete an admin directory sync and the connection used by that sync is not used by any other sync you can optionally delete the connection at the same time.
To delete an admin sync, click the Delete Directory Sync link at the top-right of that sync's details page and confirm that you want to delete that directory. If this is the last or only directory sync using the associated connection and you don't want to delete that connection, be sure to uncheck the Delete connection box before clicking the Delete button (option not shown if the connection is used by another sync).
Manage Synced Admins
Update Synced Admin Information
Admin attributes synced from an external directory generally cannot be edited in Duo via the Admin Panel or Admin API. This applies to the attributes email address, display name, role, and status. Changes to these attributes should be made in the external directory and then synced over to Duo.
You may edit Administrative units and 2FA devices, including phone numbers, for synced admins. Synced administrators may update their own password and 2FA devices from the "Edit Profile" page in the Duo Admin Panel.
Change a Synced Admin's Role
To update an admin’s assigned role, either update the admin’s group membership in your source directory to add the admin to a group which has been mapped to the desired role in the admin sync config, or modify the role-to-group mapping on the admin sync's details page to include the desired group.
To update a synced admin’s role to the Owner role, go to the properties page for that administrator and check the Upgrade to Owner checkbox in the "Role" section, and then click Save. This converts the synced admin to an unmanaged admin with the Owner role. Admins with the Owner role assigned in this manner cannot be managed or modified by Directory Sync, regardless of group membership.
Disabled Status for Synced Admins
Duo Owner admins can't disable individual Duo admins managed by directory sync from the Duo Admin Panel or Admin API. Directory sync checks the admin's user account status in the source directory and uses that information to determine whether the corresponding Duo admin should remain enabled.
If a synced admin is disabled in the source Active Directory (userAccountControl set to 514), on the next sync Duo updates the user's status to "Disabled" but does not delete the admin. The Duo admin account remains read-only, and cannot be manually enabled.
You can restore the disabled Duo admin account to active status by enabling the account in the source directory and running a sync.
Delete Synced Admins
You may not delete a synced admin from Duo as long as directory sync is actively managing that admin. If a synced directory admin is removed from all external directory groups that sync to Duo (or if the admin's user account is deleted from the source directory), the admin is marked as "Pending Deletion" at the next sync, and the admin can no longer log in to the Duo Admin Panel.
View a list of admins pending deletion by navigating to the Administrators page in the Admin Panel and applying the "Pending Deletion" filter.
If the admin marked for deletion is not reconnected to an external directory account via the sync within seven (7) days, the admin is automatically deleted from Duo. The admin's properties show the target date for deletion. A Duo admin with the Owner role can manually delete a synced pending deletion admin via the Permanently Delete button at any time during those seven days. Synced Duo admins pending deletion can also be restored using the Restore Admin button, but will no longer be synced unless an account with the same email address is added back to a synced admin group in the source directory.
Frequently Asked Questions
Be sure to review frequently asked questions and answers before using Duo's Active Directory synchronization for users or admins.
Troubleshooting
Need some help? Take a look at the Active Directory Sync Frequently Asked Questions (FAQ) page or try searching our Active Directory Sync Knowledge Base articles or Community discussions. For further assistance, contact Support.
On the details page of your directory sync there is a Troubleshooting section under the "Sync Now" button. Here you'll find tips to help your sync run as intended. If you are still having issues and need to open a support case with Duo, you can click Sync Directory with Diagnostics to provide Duo Support with more information about your sync.
Additionally, a sync reference code is now provided on every sync. This will be included on every directory sync event captured in the Administrator Actions Log, as well as within any emails Duo sends you about sync errors. Duo Support will request this code to locate logs associated with your sync.
Network Diagram
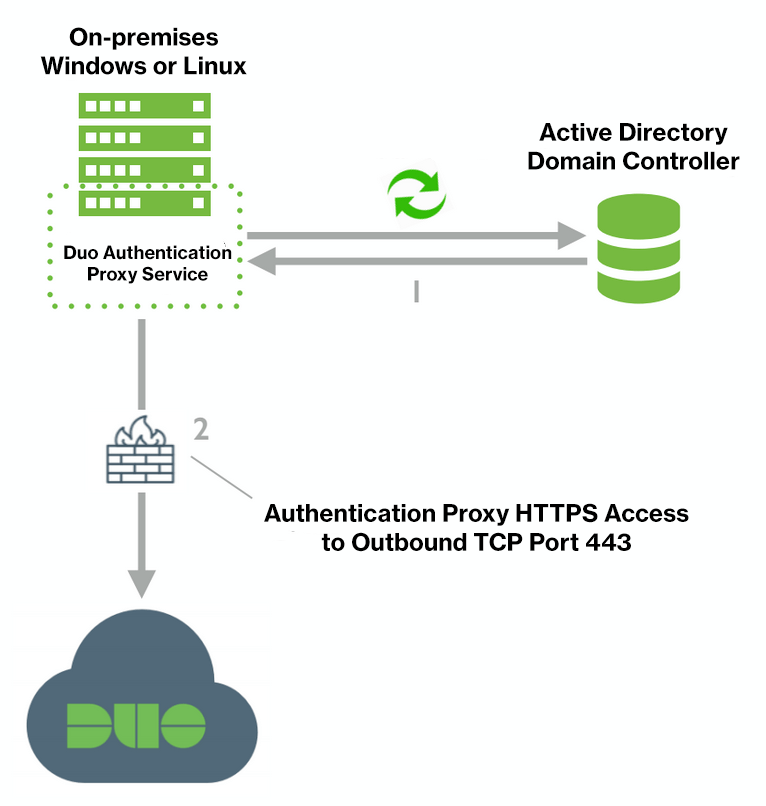
- Duo Authentication Proxy requests information from Active Directory over LDAP, LDAPS, or STARTTLS.
- Duo Authentication Proxy contacts Duo's service over HTTPS/443 to complete user, group, and admin synchronization.