Duo Administration - Manage Administrators
Last updated:
Overview
Create, manage, and delete Duo administrator accounts from the Duo Admin Panel.
Duo administrator accounts are distinct from the Duo user accounts your end users utilize to log in to Duo-protected services and applications with two-factor authentication. Please see Managing Duo Users for more information about administering Duo accounts for your end users.
Other options to create and manage administrators are use of Directory Sync to import administrators from Active Directory, Microsoft Entra ID (formerly known as Azure AD), or OpenLDAP; or use of the Admin API programmatic endpoints for administrators.
New administrators whose accounts were created through Cisco Security Cloud Control (SCC) after May 11, 2026 will have limited access to features/pages in the Admin Panel.
Access the Duo Admin Panel
The browser used to access the Admin Panel must support TLS 1.2, which most modern browsers do by default. If you have issues accessing the site, please update your browser to a recent version of Chrome, Firefox, Edge, Safari, etc. or check your browser’s SSL implementation here: https://www.ssllabs.com.
Duo no longer supports use of Internet Explorer to access the Admin Panel. Microsoft ended Internet Explorer desktop application support on June 15, 2022. Please use one of Duo's supported browsers.
To access the Duo Admin Panel:
-
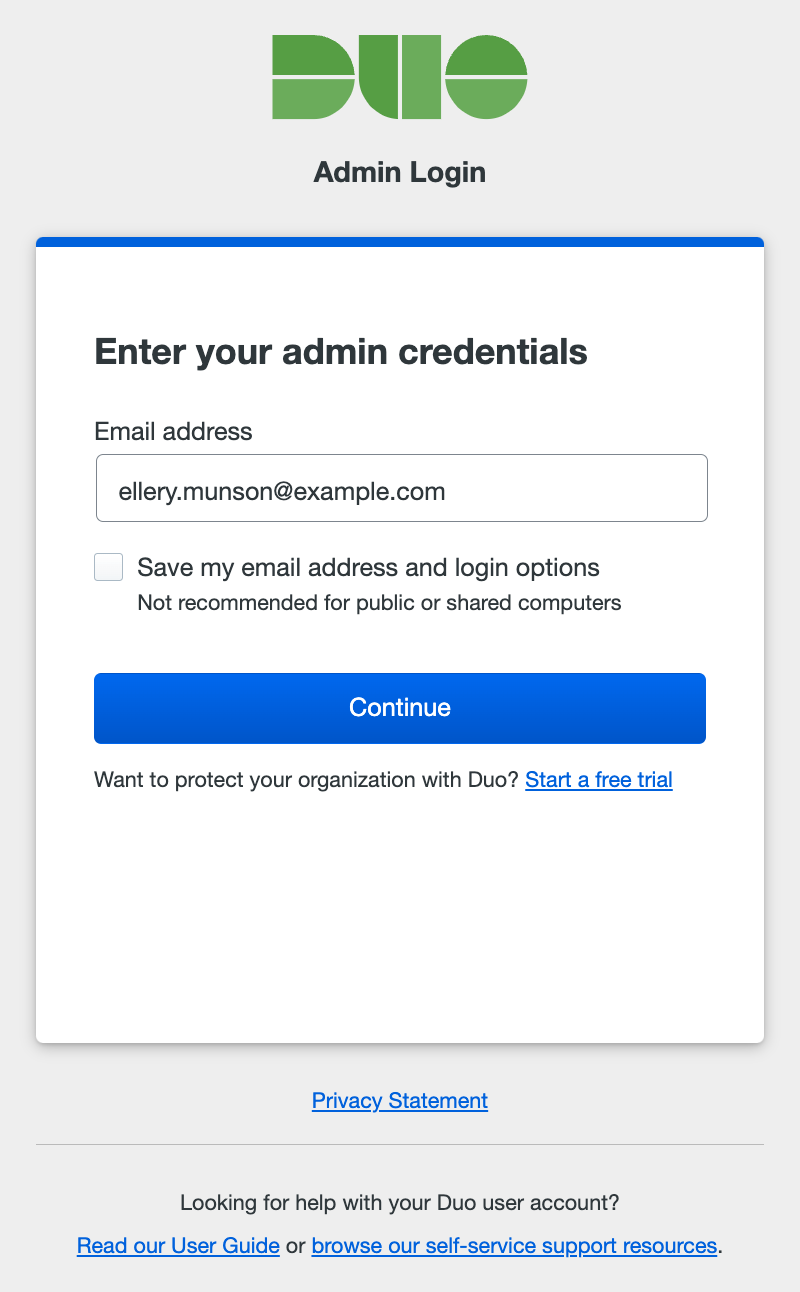
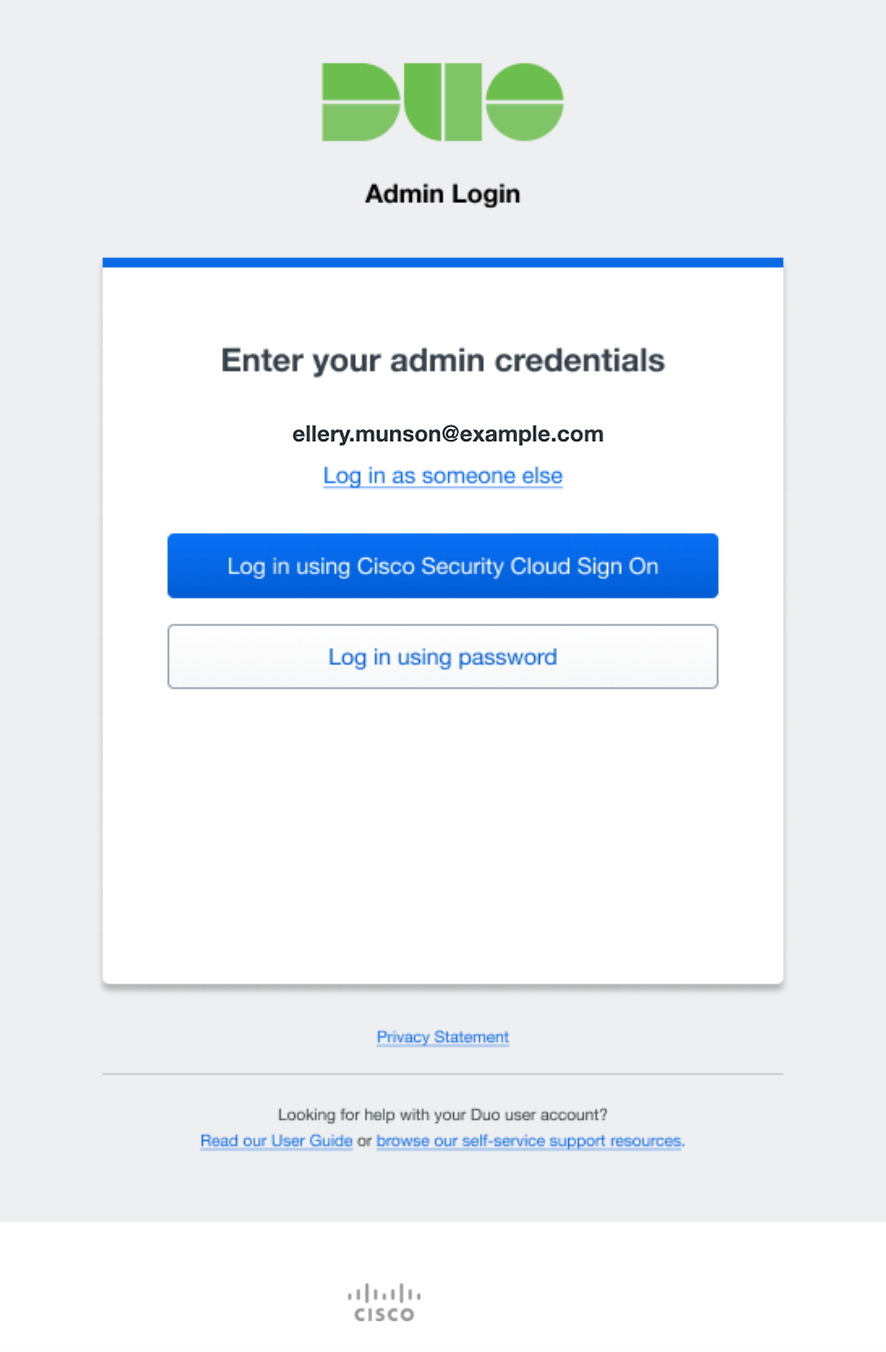
Navigate to the Duo Admin Panel at https://admin.duosecurity.com.
-
Enter your administrator account email address. If you're logging in from a private computer or device, you can check the Save my email address and login options box. Don't do this if you are on a shared kiosk or public computer.
-
The next step depends on whether your organization uses Cisco Security Provisioning and Administration (formerly Security Cloud Control) or has federated Duo administrator logins with an external single sign-on identity provider (IdP), and whether using SSO login is required or optional.
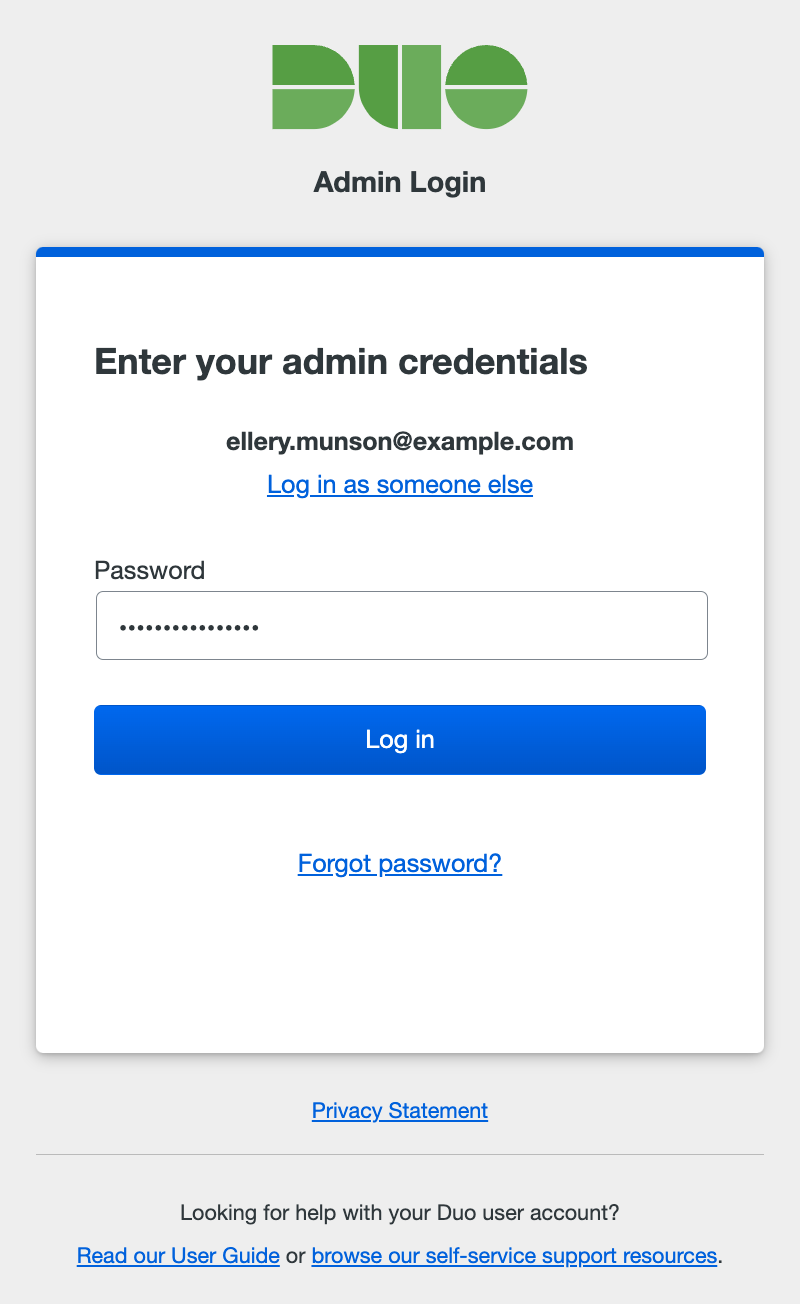
Password Login Only
Your organization has not configured SAML or Cisco Security Cloud login for admins, so no SSO options are presented. Enter your administrator password, and click Log in.
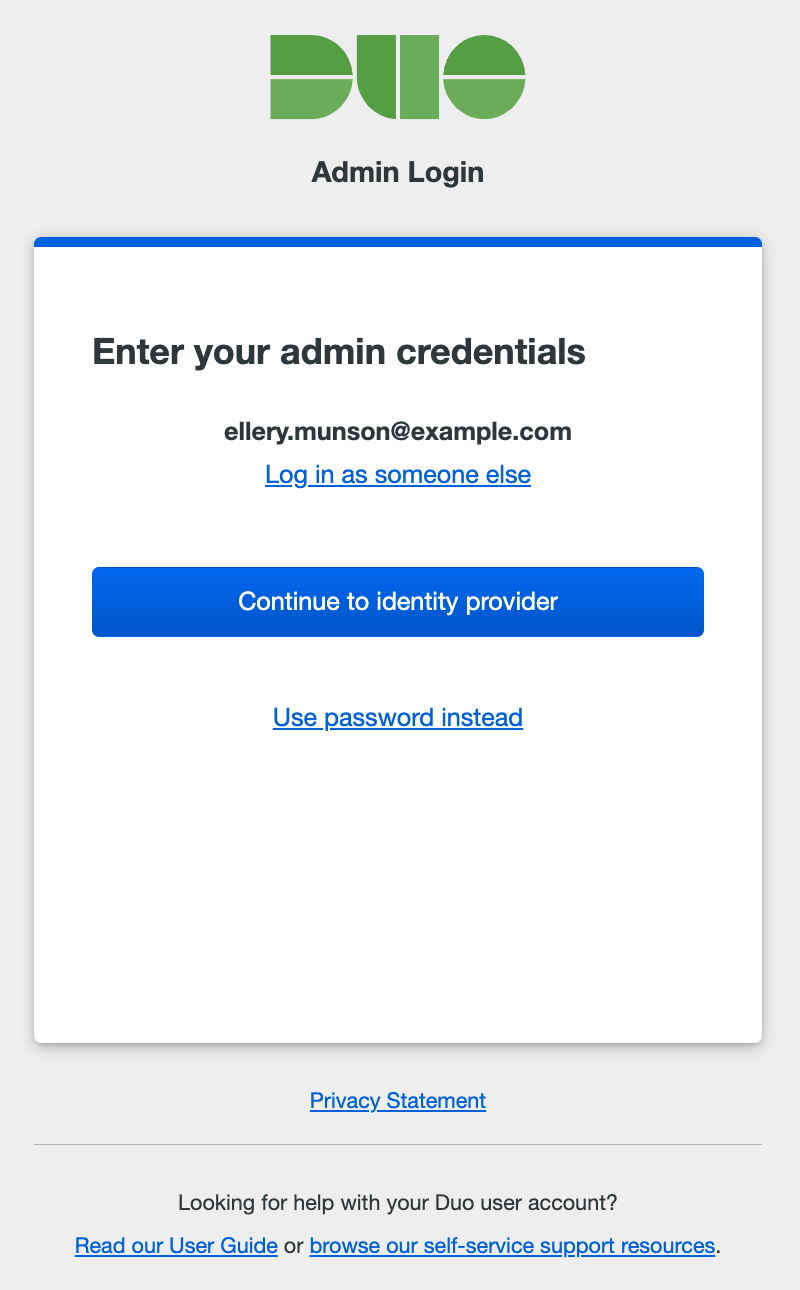
SSO Login Required
Your organization prefers that administrators sign in using a federated SSO IdP. Click the Continue to identity provider button to be taken to your organization's identity provider (IdP) where you'll sign in with your primary user credentials.
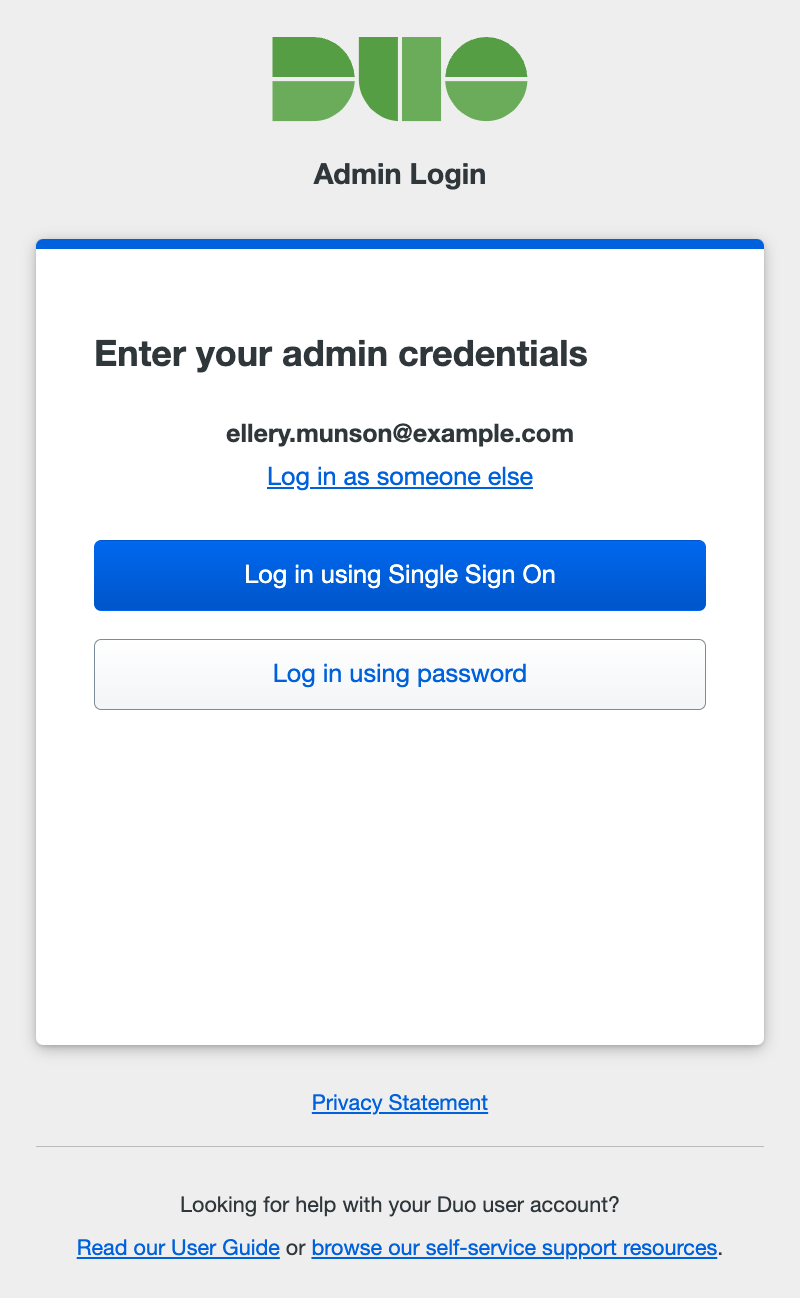
SSO Login Optional
You can choose how to sign-in: via a federated SSO IdP or with a password. Clicking the Log in using Single Sign On button takes you to your organization's IdP to complete primary authentication.
If you created a password for the Duo Admin Panel you may use that instead of SSO. Click Log in using password to show the password entry form. Enter your administrator password, and click Log in.
If you checked the Save my email address and login options box when you entered your Duo administrator username, then we'll also save your SSO login preference and won't ask you to choose between single sign-on or password authentication again.
Cisco Security Cloud Sign On
If your organization is provisioned through Cisco Security Provisioning and Administration (formerly Security Cloud Control), you will see an option to Log in using Security Cloud Sign On (SCSO). This will take you to SCSO or your organization's IdP for primary and secondary authentication depending on how your enterprise admin has configured your setup.

New administrators whose accounts were created through Cisco Security Cloud Control (SCC) after May 11, 2026 should sign on to Cisco’s Security Cloud Control (SCC) to log in to Duo.
-
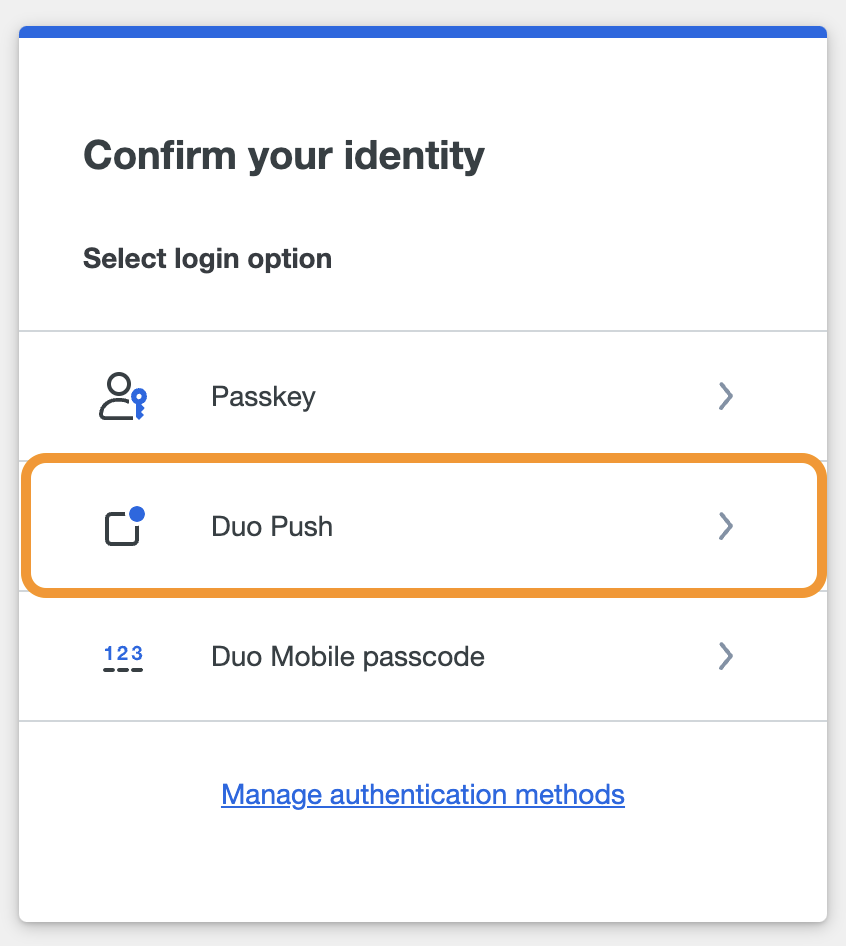
After successful authentication via SSO or by entering the correct Duo admin password, you then must verify your identity using a second factor. Complete login verification by selecting one of the available methods from the list.
-
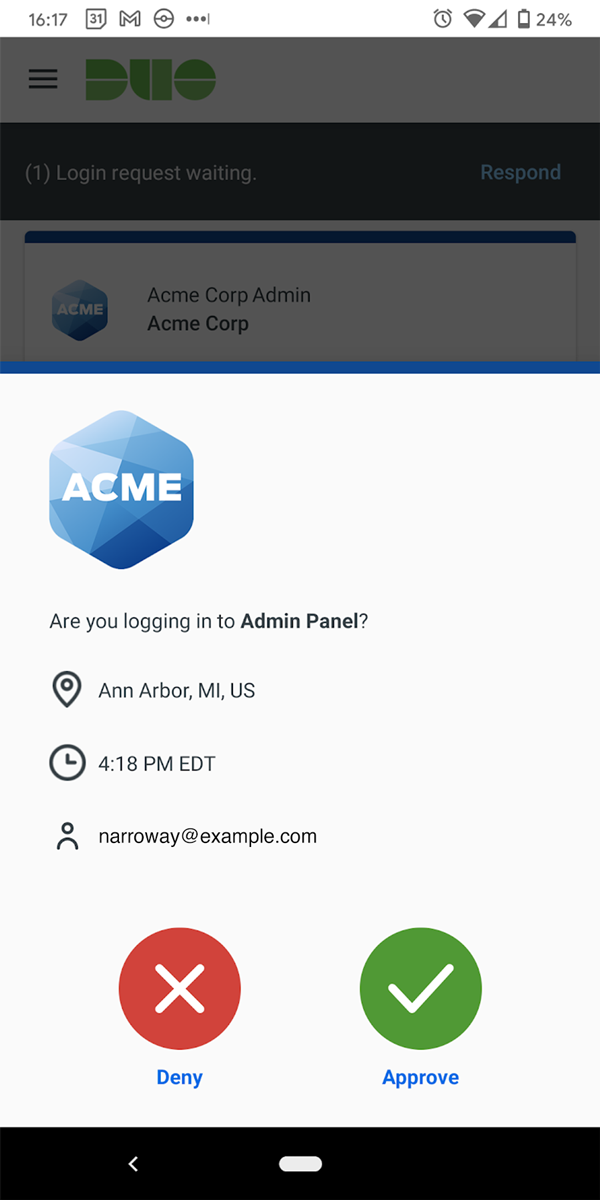
Duo Push: Approve a login verification request sent to your smartphone with the Duo Mobile app. You must activate your administrator account for Duo Mobile separately from your user account to use Duo's push authentication at the Admin Panel. See Use Duo Push for Administrator Authentication for instructions.
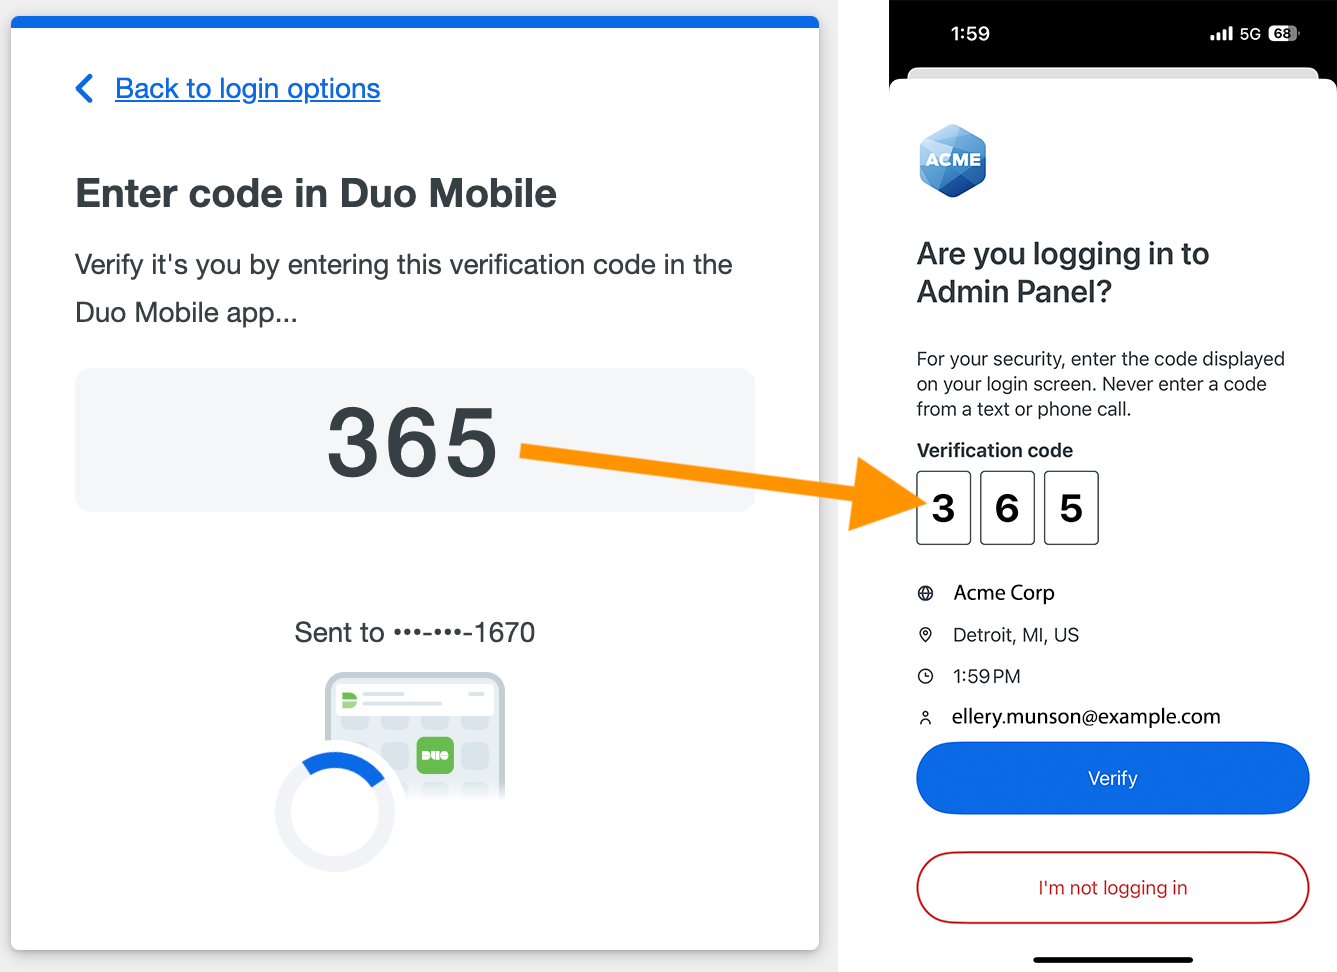
If Verified Duo Push is enabled in Admin Authentication Methods, you must enter a verification code in the Duo Mobile app to approve a login request. See Use Verified Duo Push for Administrator Authentication for instructions.
-
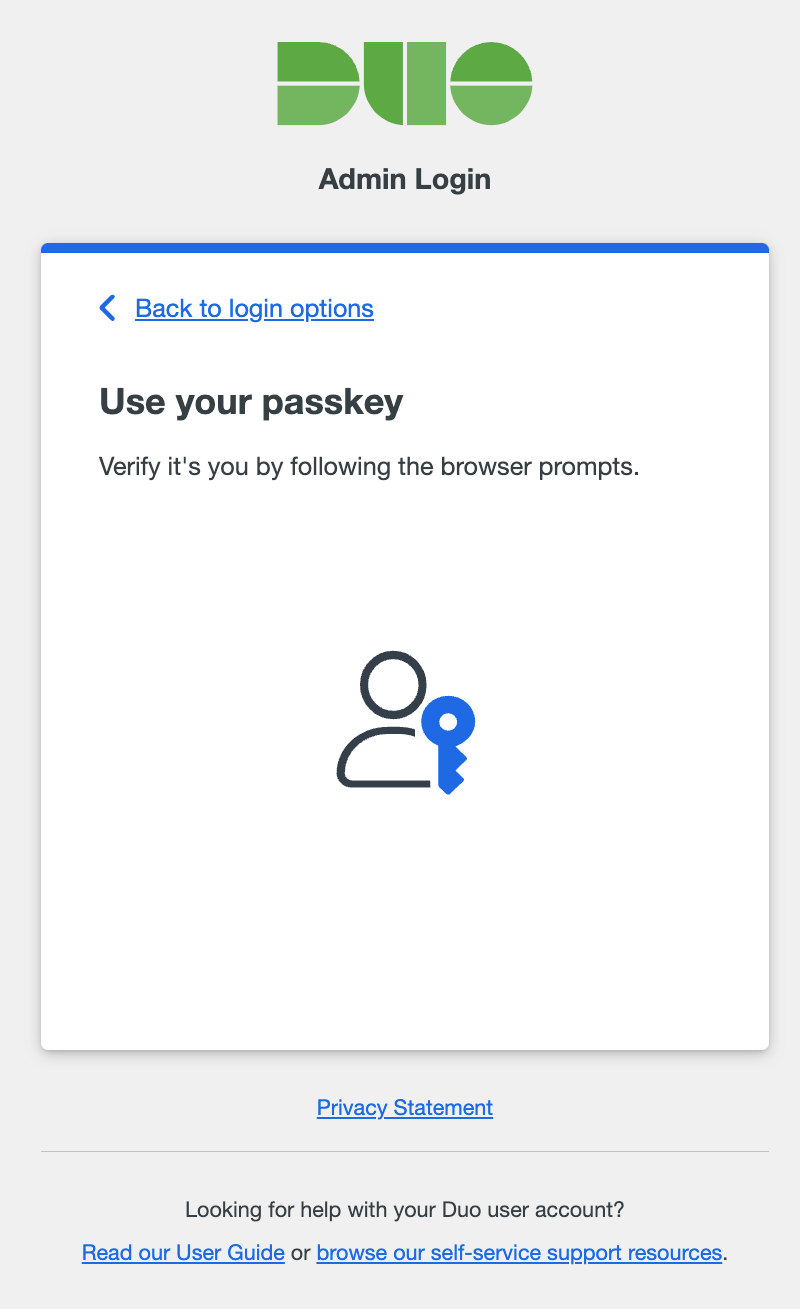
Passkey: Use a passkey including security keys and biometrics. For supported external security key devices, insert it and then touch it. For integrated devices like Touch ID, follow the prompts from your browser that appear to confirm your identity. This method only appears if you have added a passkey to your admin profile.
-
Text Message: Receive an SMS message containing a one-time passcode and enter the passcode in the space provided. This passcode is valid for five minutes.
-
Phone Call: Receive a phone call communicating a one-time passcode and enter the passcode in the space provided. This passcode is valid for five minutes.
-
Duo Mobile passcode: Authenticate with a passcode generated in the Duo Mobile app.
-
Hardware Token: Enter a passcode generated by a physical device issued by your organization.
-
Yubikey passcode: Authenticate with a passcode generated by a Yubikey.
The two-factor authentication methods available may differ depending on your organization's Admin Authentication Methods settings. If, for example, your organization disabled the "Phone Callback" method, you won't see the "Phone call" 2FA option when you log in.
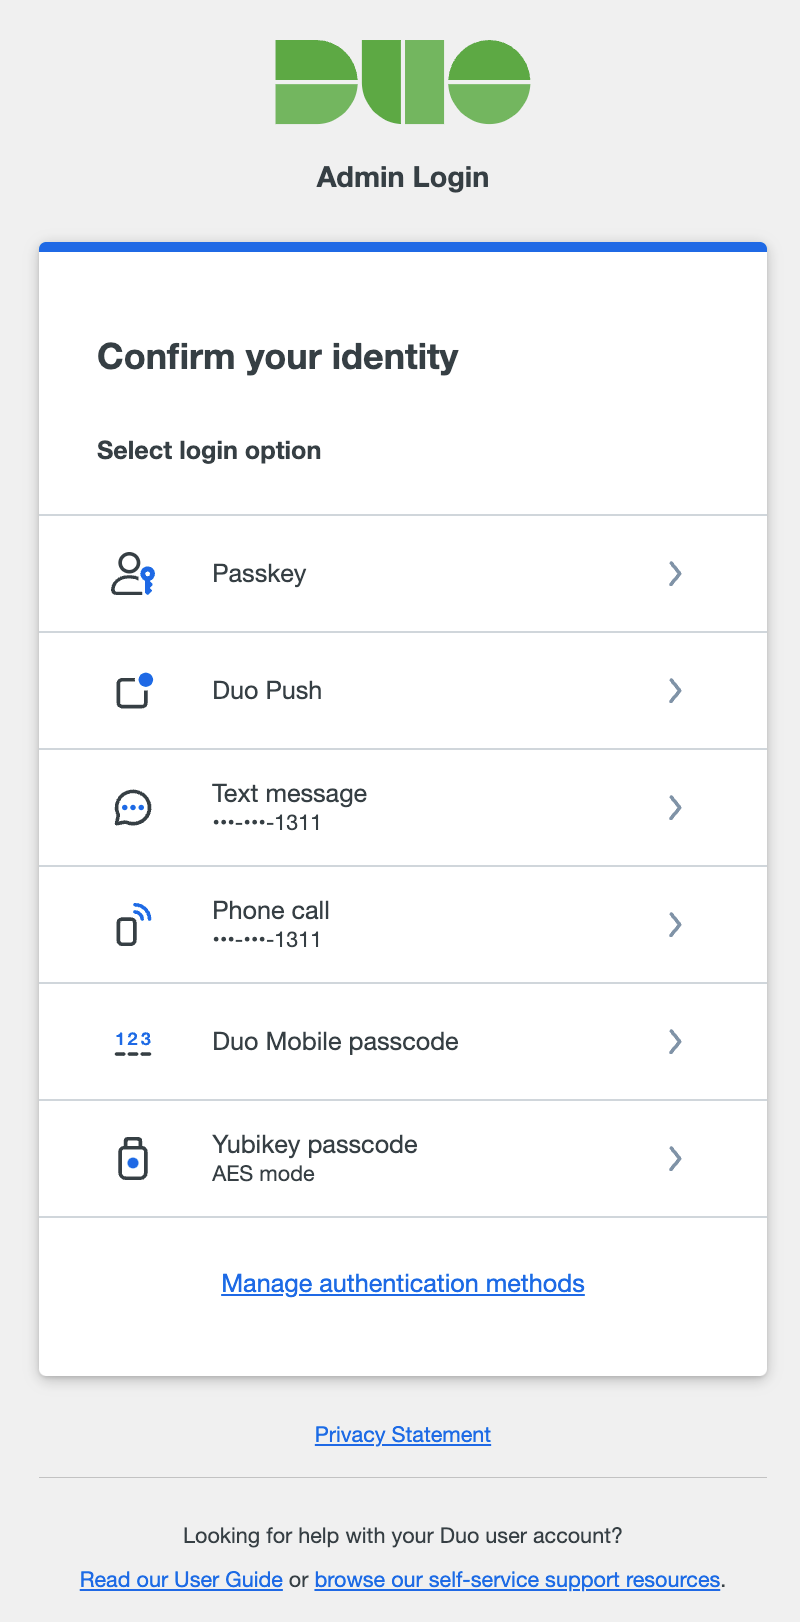
If you want to choose a different way to confirm your identity after your initial choice, click Back to login options to return to the list of all second-factor options and choose again.
If you checked the Save my email address and login options box earlier and also use a passkey or Duo Push as your authentication method, we will save that method as a preference as well and prompt you automatically to use the same verification method the next time you log in. You can always cancel the automatic verification in progress by returning to the list of login options to choose a different method.
-
Forgotten Password
If you've forgotten your password, click the Forgot Password link shown after you enter your email address. Enter the email address that you use to log in to your Duo administrator account and click Submit. Check your email for your password reset link.
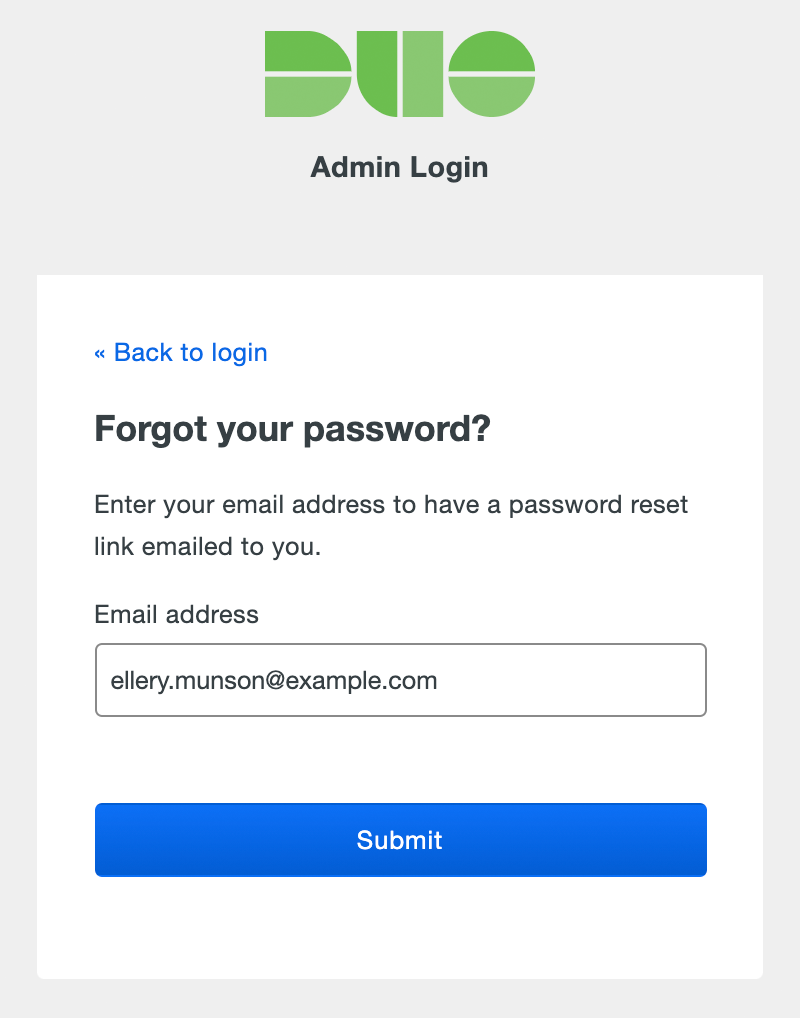
We'll also send you a notification email once you've changed your password. If you receive a password change notification and you didn't initiate this change, contact your organization's Duo owner or Duo Support.
If a Duo Admin forgets their password and doesn't have access to the email address entered, Duo Owner administrators can copy the password reset URL from the Duo Admin Panel. See Reset an Administrator's Forgotten Password for more information.
Account Lockout
Entering the wrong password or passcode for your admin account or letting the push or phone call 2FA approval request time out increments the failed login count. After ten failed login attempts, your admin account will be locked out. Duo will send you an email containing a link you can click to immediately unlock your account. Otherwise, your admin account will automatically unlock after 24 hours.
If you don't have access to email and you can't wait 24 hours for your account to unlock itself, then you can ask another Duo admin at your organization for help. See Unlocking an Administrator for more info about manually unlocking an admin account.
Duo Admin Roles
Only Duo administrators with the Owner role may create and manage other Duo administrator accounts, including assignment of admin roles.
All Duo administrators in Duo Essentials, Duo Advantage, and Duo Premier accounts are assigned one of these standard admin roles (in descending order of privilege):
-
Owner: The Owner role grants full access to all actions, objects, and settings in the Duo Admin Panel. Admins with the Owner role can create, update, or delete other administrators or configure and run admin directory synchronization. Creating and managing the Admin API and Account API applications requires Owner privileges. Only Owners can change the Duo plan edition or cancel a Duo subscription.
-
Administrator: The Administrator has full access to create, update, and delete users, user attributes, devices, settings, policies, and applications (except for the Admin API and Account API application types). Administrators can manage the Duo Single Sign-On (SSO) and Passwordless settings for the account, create and assign enrollment policies, activate Duo Identity Security, set and edit Trust Monitor risk profiles and process events, and configure and run user directory synchronization. An Administrator cannot view or update billing information or make purchases, nor can an Administrator create, view, or modify any other Administrators.
-
User Manager: The User Manager can create, update, and delete users, user attributes, phones, tokens, and bypass codes. The User Manager can also configure and run user directory synchronization. You can restrict User Manager admins' ability to apply bypass status to users in User manager settings. User managers can view the Authentication Log, Telephony Log, Administrator Actions, and Policy Impact reports.
-
Help Desk: Help Desk administrators can create, update, and delete user attribute values, phones, tokens, and bypass codes; use directory sync to create or update a single end-user; send enrollment emails to users; modify full names, email addresses, and notes; change user status from "Locked Out" to "Active"; and can send Duo Mobile activations to users. Help Desk admins cannot manually create or delete users, modify usernames or user aliases; use bulk enrollment; or run a full directory sync. You can restrict Help Desk admins' ability to create bypass codes for users or send enrollment emails in Help desk settings. Help Desk administrators can view and export the Authentication Log, Telephony Log, Administrator Actions, and Policy Impact reports.
-
Security Analyst: Security Analyst administrators can set and edit Trust Monitor risk profiles, process events, lockout users as well as view all logs and reports. Security Analyst administrators can create, update, and delete user attribute values, phones, tokens, and bypass codes; use directory sync to create or update a single end-user; send enrollment emails to users; modify full names, email addresses, and notes; change user status from "Locked Out" to "Active"; and can send Duo Mobile activations to users. Security Analyst admins cannot manually create or delete users, modify usernames or user aliases; use bulk enrollment; or run a full directory sync.
-
Application Manager: The Application Manager role can add protected applications, update and remove applications (except for the Admin API and Account API application types), and manage SSO authentication sources. Application managers may also view limited information about users and devices. Application Managers can assign existing custom policies to applications and groups, but cannot create policies or edit policy settings.
-
Billing: The Billing role can view and update billing information, make hardware tokens and telephony credits purchases, and perform management of sub-accounts. This role may only access the Dashboard and Billing page. This role can not change the Duo plan edition. Note that customers who purchased Duo licenses or telephony credits through Cisco Commerce Workspace (CCW) must log in to CCW to manage billing, download invoices, or purchase additional telephony credits.
-
Read-only: Admins assigned the Read-only role may view (but not modify) basic information about users, groups, phones, tokens, and applications, as well as view Trust Monitor security events and all reports. Read-only administrators may not access the Billing and Directory Sync pages.
-
Account Switcher: Admins assigned the Account Switcher role may view a list of subaccounts using the Accounts drop-down and switch to them. This role may not view users or applications.
-
Custom Admin Role: If you have created a custom admin role, it will appear in the list of admin roles that you can assign to an administrator.
If your organization is using Duo's Administrative Units feature, assigned user and group restrictions may affect those administrators' access to certain reports. Learn more about how administrative unit assignments affects reports access.
Admin Role Privileges
The following table depicts actions that administrators can perform when assigned a standard role.
| Owner Role | Administrator Role | User Manager Role | Help Desk Role | Security Analyst Role | Application Manager Role | Billing Role | Read-only Role | Account Switcher Role | |
|---|---|---|---|---|---|---|---|---|---|
| View reports and download logs | ✅ | ✅ | ✅ | ✅* | ✅ | ✅ | ✅ | ||
| Manage auth devices & bypass codes | ✅ | ✅ | ✅ | ✅ | ✅ | ||||
| Manage users & directory sync | ✅ | ✅ | ✅ | ✅* | ✅* | ||||
| Manage groups | ✅ | ✅ | ✅ | ||||||
| Manage applications | ✅ | ✅ | ✅ | ||||||
| Trust Monitor | ✅ | ✅ | ✅ | ✅* | |||||
| Create and edit policies | ✅ | ✅ | |||||||
| Modify global settings | ✅ | ✅ | |||||||
| View and manage billing | ✅ | ✅ | |||||||
| Manage other admins & admin directory sync | ✅ | ||||||||
| Manage SSO, Passwordless, and enrollment policy settings | ✅ | ✅ | |||||||
| Enable Duo Identity Security | ✅ | ✅ | |||||||
| View list of subaccounts and switch to them | ✅ |
* denotes limited access; see the role description for details.
In Duo Free plans, all administrators are effectively "Owners", with no other role assignments available.
List Administrators
Role required: Owner
-
Log in to the Duo Admin Panel as an Owner and navigate to Users → Administrators → Administrators in the left sidebar. The list shows administrator information like names, email addresses, status, and last login dates. Duo Essentials, Duo Advantage, and Duo Premier plans also include information about admin roles and assigned administrator units.
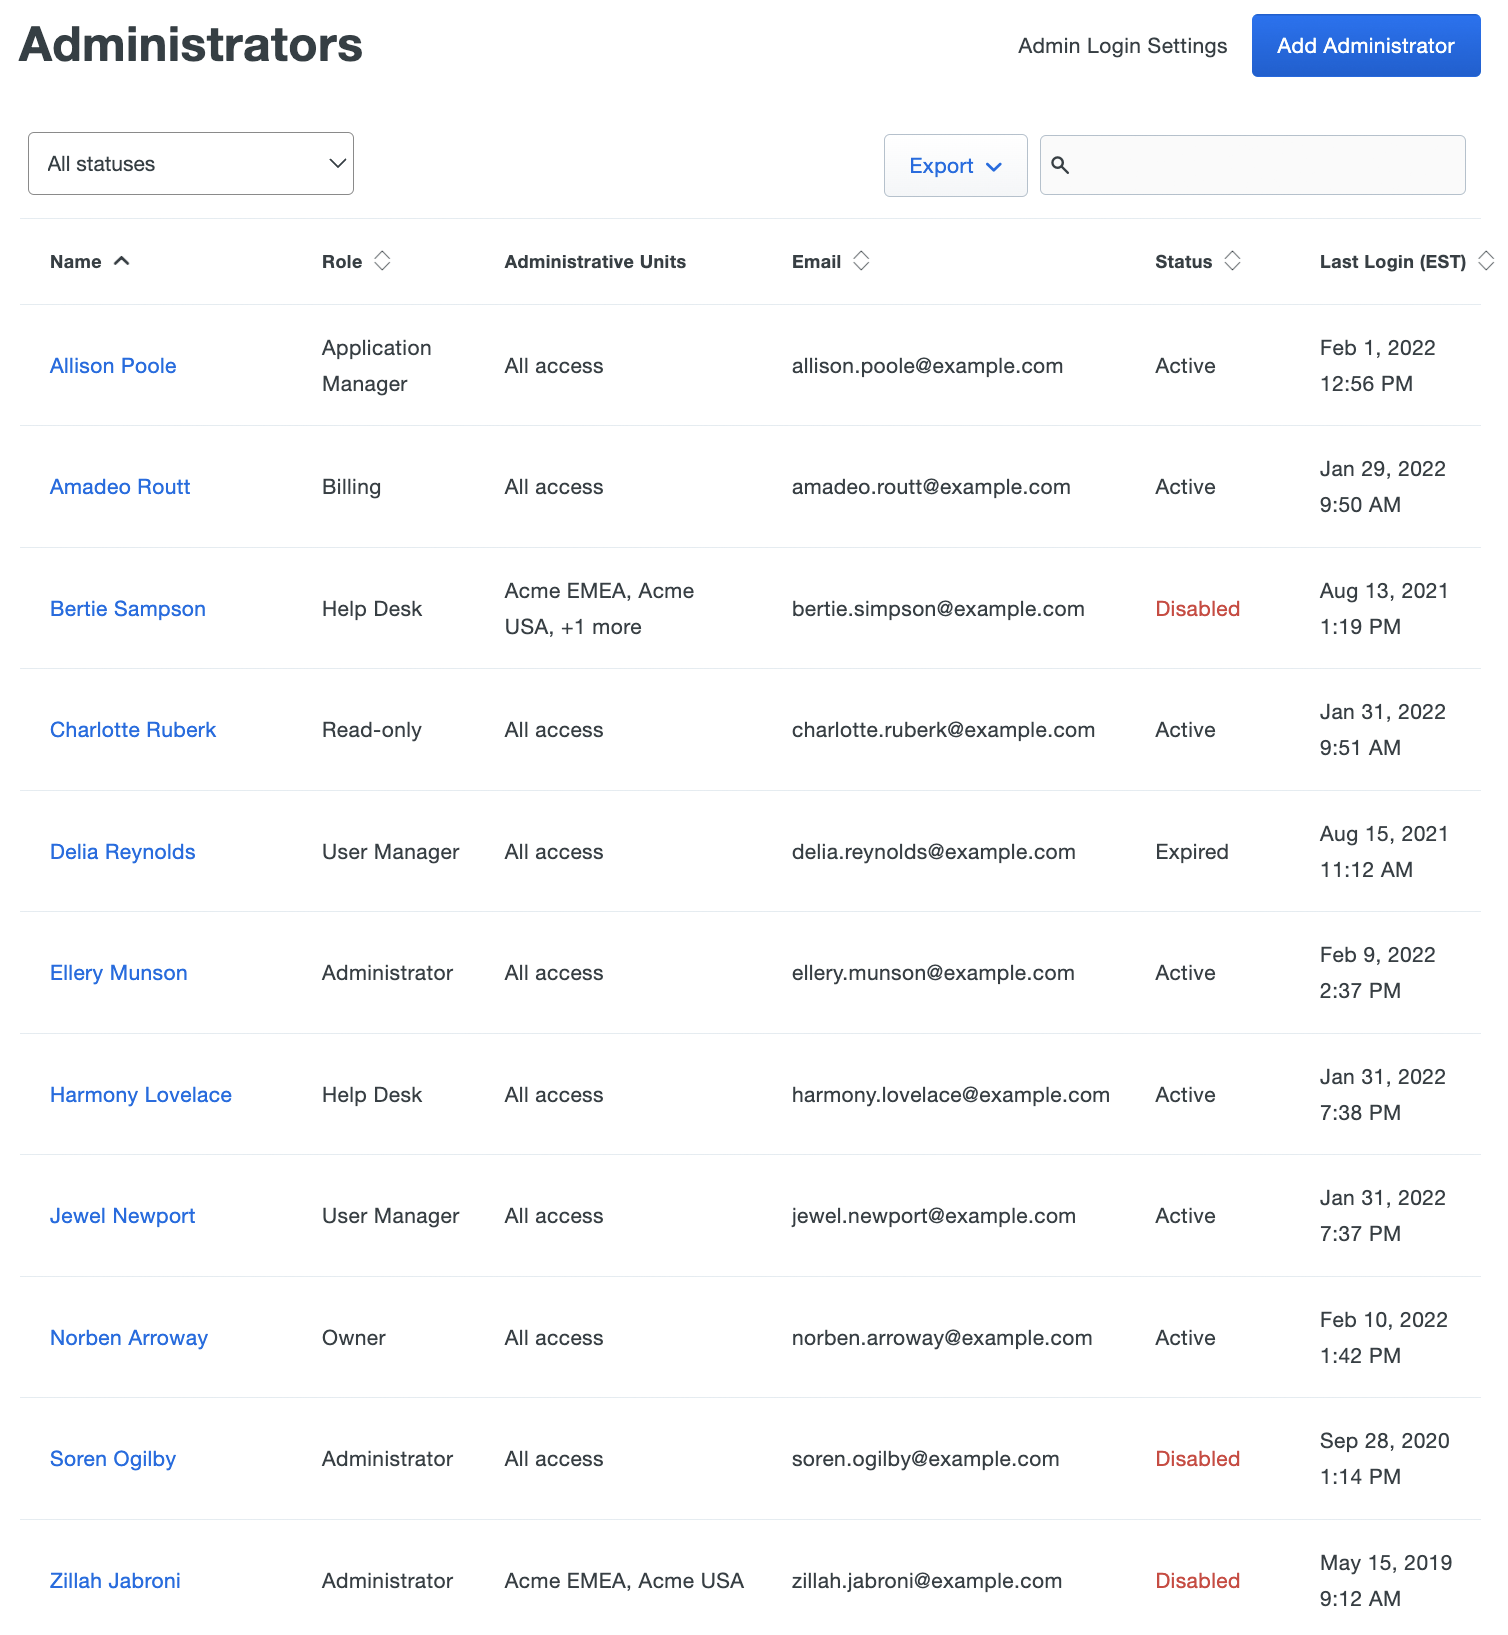
Click on All statuses in the upper left side of the page and select Active, Disabled, Pending Activation, Pending Deletion, or Expired to filter admins by current status.
Click the Export button in the upper right side of the page and select CSV, JSON, or PDF to download a list of administrators. You can also select URL to obtain a direct link to your current administrators view. If you've filtered your current view (like by entering search text in box), the report only includes the filtered results. Administrator statuses will only show Active or Disabled when exported.
-
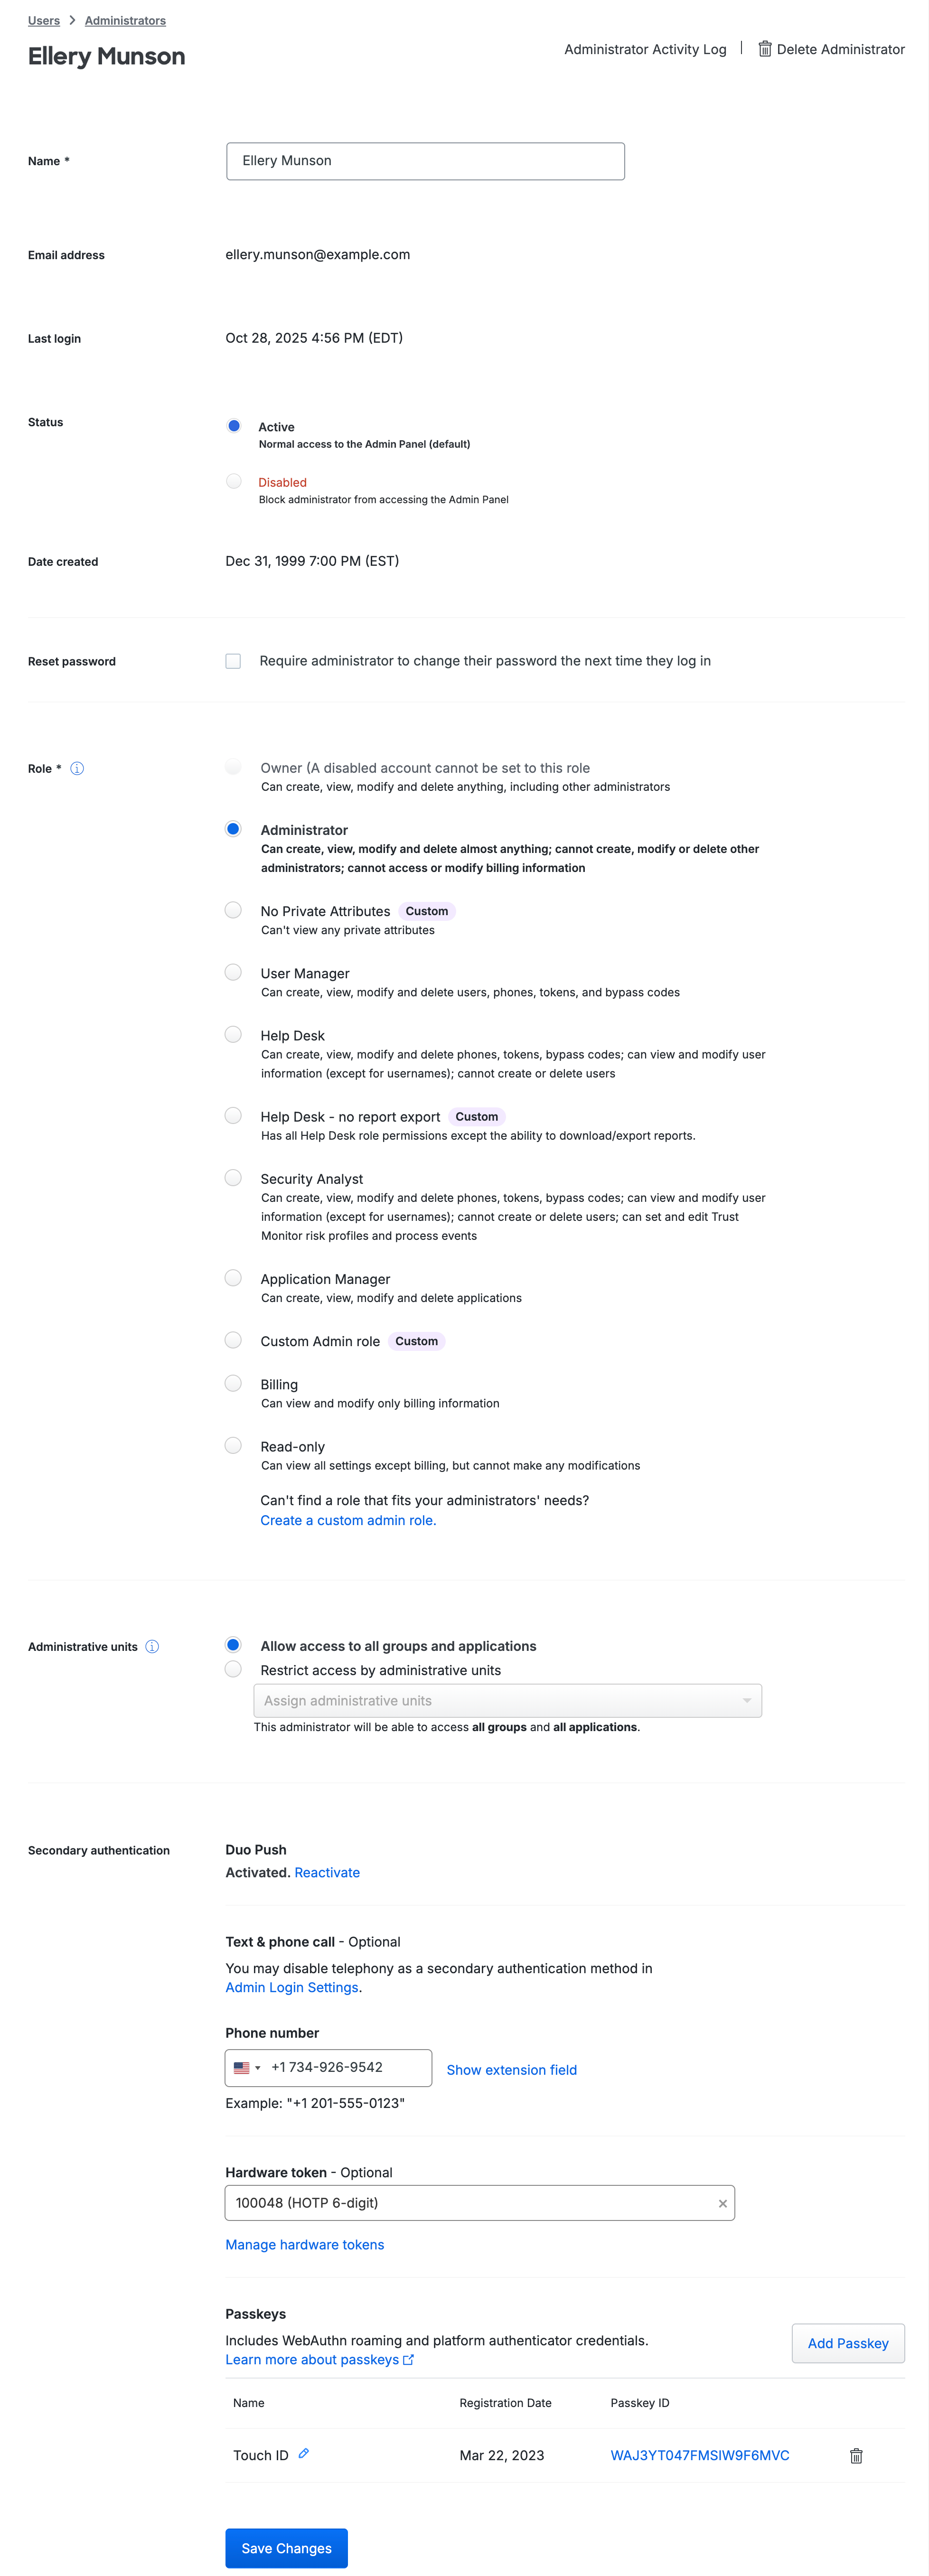
Click on an administrator's name to display details about that admin, like the last login date, creation date (if created after October 2021), role details, secondary authentication devices, and more.
Add an Administrator
Role required: Owner
-
Log in to the Duo Admin Panel as an Owner and navigate to Users → Administrators → Administrators in the left sidebar.
-
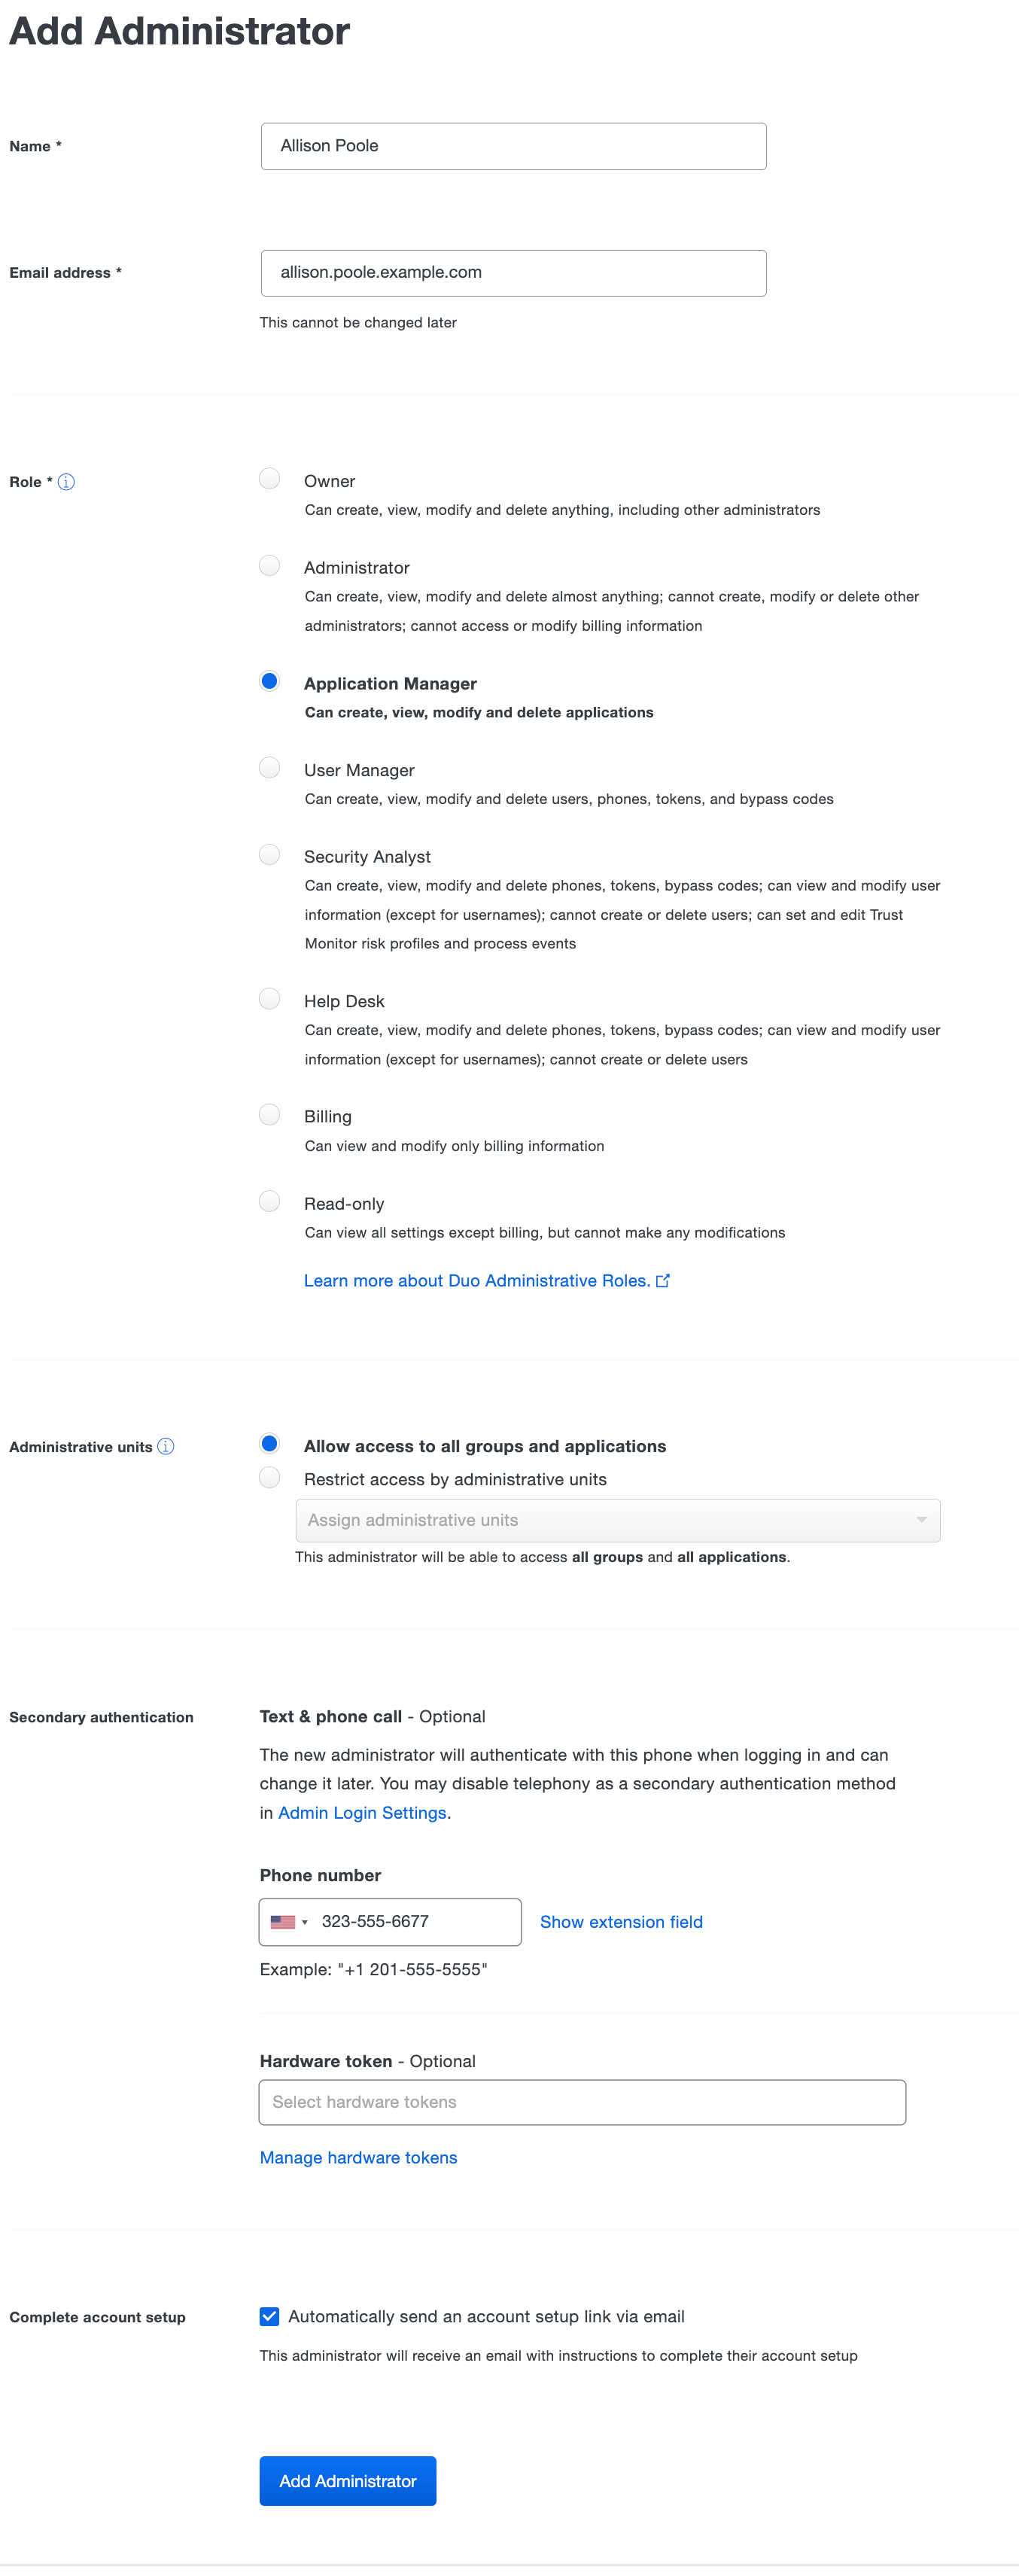
Click the Add Administrator button in the upper right.
-
Enter the new Duo administrator's name and email address. The email address entered here is the new admin's sign-in user name, so it must be unique.
-
Select the desired permissions role for the new administrator, and if you're using the Administrative Units feature you can also assign the new admin's administrative unit assignments now.
-
(Optional) Enter a secondary authentication phone number. This is the number that Duo uses for SMS or phone call two-factor authentication to the Admin Panel. If you do not specify a phone number when creating the new admin, then that new admin will add their own phone information when they complete setting up their admin account.
Optionally assign a hardware token for secondary authentication to the new admin. This must be done from the Admin Panel; the new admin isn't able to assign a hardware token to themself during account setup.
You can't add a passkey to a new admin during initial creation, but you can add a passkey once created or the new admin can add one as they go through account setup.
-
Leaving the Automatically send an account setup link via email option checked means that when you finish this process, your new admin immediately receives an email with a link and instructions for completing account setup. If you don't select this option you'll be able to send the setup email later from the Admin Panel, or you can also copy the setup link from the Admin Panel after creating the admin to send it in your own email or via text message.
-
Click the Add Administrator button to finish.
You can't generate an activation QR code from the admin's details page until the admin completes first-time setup and activation using the setup link. Once generated, a setup link expires in seven days. Setup links don't refresh automatically, you'll need to create and send a new one if the previous one expires.
The new admin's status is shown as "Pending Activation" until that admin completes account setup and activation, and they can't log in to the Duo Admin Panel. Once setup and activation is complete, the admin has "Active" status and can log in to the Duo Admin Panel.
New Administrator Setup Experience
When the new Duo admin receives and clicks the admin setup link, they're prompted to complete the setup process:
-
If your admin's password will be stored in Duo, they'll click Create Password to set their password. Passwords must have at least twelve characters, and may also require a mix of character types depending on your Admin Password Policy settings. New passwords will be checked against common passwords, usernames, and other account information to ensure uniqueness.
If you use single sign-on with your own identity provider (IdP) for Duo Admin Panel logons, the new admin clicks Create account using Single Sign On and signs in at your IdP with primary username and password.
-
After either setting a password or signing in at an external IdP, the new admin must set up a second factor for login verification.
If passkeys are a permitted admin authentication method then the new admin can add a WebAuthn method like Touch ID, Face ID, Windows Hello, an external security key, etc. by following their browser's prompts. If the new admin doesn't have any passkey device available they can skip this step.
After the new admin adds a passkey they're shown a QR code for Duo Push activation as a backup login method if Duo Push is a permitted admin authentication method. If your organization doesn't allow passkeys for admin login or the new admin opted to skip passkey setup then they'll also be offered Duo Push activation. The admin scans the QR code with Duo Mobile or the camera app on their smartphone, or can skip this activation step if they do not have a smartphone.
If you or the new admin entered a phone number for the admin that's already in used by another existing admin, the new admin won't see the Duo Push activation QR code. Phones shared between administrators can't be activated for push by the new administrator during the new admin setup process.
-
If phone callback or SMS passcodes are a permitted admin authentication method and you entered a phone number for the admin during creation, the new admin can confirm that's the right backup phone number for Duo Admin Panel logins, or enter the correct backup phone number. If you did not enter a phone number for the new admin during creation, the new admin can enter their phone number.
If the new admin skipped Duo Push activation, they'll need to verify ownership of the phone number entered by entering a passcode received via text message or phone call.
-
The new admin can log into the Duo Admin Panel with the password just set (or after SSO login), using Duo Push, phone call/SMS, or passkey depending on what authentication methods were set up.
After the new admin logs in they can add additional authentication methods like a passkey or activate their phone for Duo Push if they didn't do it already in their user profile.
Once the admin completes new account setup their administrator account status changes from Pending Activation to Active when you view their profile in the Duo Admin Panel.
Resend the Setup Link
If you chose not to send the new admin a setup link automatically when adding that admin's account, you can return to the Admin Panel to send the link later.
-
Log in to the Duo Admin Panel as an Owner and navigate to Users → Administrators → Administrators in the left sidebar.
-
Click on the administrator's name.
-
Scroll to the "Setup Link" section of the administrator's details and click the Send Email button to email the admin the setup link.
You could also choose to click the Copy button to the right of the admin activation link, and then paste it into your own email message, text message, or direct chat message to communicate the setup link to the new admin.
You can also choose to invalidate the current activation link and generate a new one with the Delete and Invalidate Setup Link option. Once you delete the existing link you can create a new activation link by clicking Create Setup Link, which you can then send by email, text, etc. to the admin.
Change an Administrator's Role
Role required: Owner
Assigned roles can't be changed for admin accounts managed by directory sync, except that an admin with the Owner role can upgrade a synced admin to an Owner, preventing any further management of that admin by directory sync.
To reassign an administrator's role:
-
Log in to the Duo Admin Panel as an Owner and navigate to Users → Administrators → Administrators in the left sidebar.
-
Click on the administrator's name.
-
Select the new role for that administrator from the Roles list and click the Save Changes button.
You can also assign administrators to an admin role from the Admin Roles page by selecting a role and clicking on the Assign administrators button.
Change an Administrator's Status
Role required: Owner
Disable an administrator to prevent them from logging in to the Duo Admin Panel, or change status to "Active" to permit an admin to have access again.
An administrator must have completed their account setup and activation before you can disable them. Duo admins with the "Owner" role may not be disabled.
To change an administrator's status:
-
Log in to the Duo Admin Panel as an Owner and navigate to Users → Administrators → Administrators in the left sidebar.
-
Click on the administrator's name.
-
Select the desired status for that admin, either Active or Disabled.
Clear Inactivity for an Administrator
Role required: Owner
If you configured the Inactive Admins setting so that Duo expires accounts for admins who haven't logged in within a specified number of days (calculated from the "Last Login" information), you can clear that admin's inactivity in the "Status" section, and restore their access to the Admin Panel.
Duo admins with the "Owner" role never expire due to inactivity.
To clear an expired admin's inactivity:
-
Log in to the Duo Admin Panel as an Owner and navigate to Users → Administrators → Administrators in the left sidebar.
-
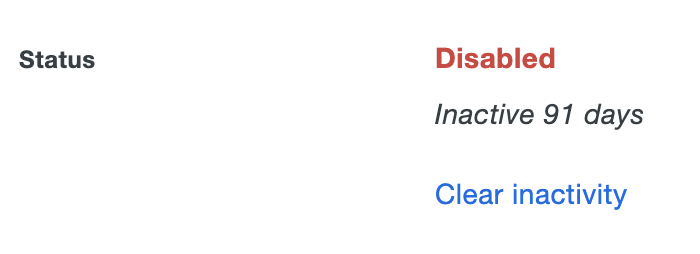
Click on the administrator's name. The "Status" section shows the administrator with effective "Disabled" status and the number of days since that admin last logged into Duo.
-
Click Clear inactivity. The inactive days information disappears and the admin has "Active" status.
If that administrator doesn't log in then the account may become expired due to inactivity again.
Delete an Administrator
Role required: Owner
To remove an administrator:
-
Log in to the Duo Admin Panel as an Owner and navigate to Users → Administrators → Administrators in the left sidebar.
-
Click on the administrator's name.
-
Click the Delete Administrator button to remove that user. You'll be prompted to verify your action. You cannot delete the currently logged in administrator.
Change an Administrator's Password
If a Duo Admin forgets their password, they can perform a self-reset using the Forgot Password link shown on the Duo Admin Panel login page.
Owner admins can force a password change for an admin at their next login:
-
Log in to the Duo Admin Panel as an Owner and navigate to Users → Administrators → Administrators in the left sidebar.
-
Click on the administrator's name to view details.
-
Enable the Require administrator to change their password the next time they log in option.
-
Click the Save Changes button. At their next login, that administrator will be prompted to set a new password, and once they change their password, they'll receive an email confirming the change.
To change your own password from the Admin Panel:
-
Log in to the Duo Admin Panel.
-
Click on your name in the upper right of the page and then click Edit Profile.
-
Enter your current Duo admin password, and then enter and confirm your new password. Passwords must have at least twelve characters, and may also require a mix of character types depending on your Admin Password Policy settings. New passwords will be checked against common passwords, usernames, and other account information to ensure uniqueness.
We'll send you a notification email once you've changed your password. If you receive a password change notification and you didn't update your password, contact your organization's Duo owner or Duo Support.
Reset an Administrator's Forgotten Password
Role required: Owner
If a Duo Admin forgets their password, they can perform a self-reset using the Forgot Password link shown on the Duo Admin Panel login page.
If a Duo Admin doesn't have access to the email address entered on the "Forgot your Password?" screen, Duo Owner administrators can access the password reset URL:
-
Log in to the Duo Admin Panel as an Owner and navigate to Users → Administrators → Administrators in the left sidebar.
-
Click on the administrator's name to view details.
-
Scroll down to the "Forgot password" section and click Copy. This action copies a URL that allows anyone in possession of it to reset the admin's password.

-
Provide the copied URL to the administrator, or use it to reset their password on their behalf.
Please note that the "Forgot password" URL will only be visible for an admin who has initiated the forgot password workflow in the past 24 hours and has not completed the password reset.
Update an Administrator's Secondary Authentication Methods
Role required: Owner
All administrators must use two-factor authentication to access the Duo Admin Panel. A phone number may be provided when creating a Duo administrator, or the admin enters their own phone number during admin account setup. This is the number that Duo uses for SMS or phone call two-factor authentication to the Admin Panel. That phone number (and extension, if necessary) is shown in the "Secondary Authentication → Phone number" field of an administrator's details page. You can update an administrator's phone number at any time.
To update an administrator's phone number:
-
Log in to the Duo Admin Panel as an Owner and navigate to Users → Administrators → Administrators in the left sidebar.
-
Click on the administrator's name to view details.
-
Scroll down to the "Secondary Authentication" section of the details page. Enter the new phone number, then click the Save Changes button.
Assign a Token for Administrator Authentication
Role required: Owner
Duo Owner administrators have the option of assigning a hardware token to other administrators to permit token passcode authentication when logging in to the Duo Admin Panel. Administrators can use hardware tokens purchased from Duo and third-party one-time password (OTP) hardware tokens, such as YubiKey OTP or any other OATH HOTP-compatible tokens. You can continue to use other authentication methods for the Duo Admin Panel like Duo Push and passcodes received via SMS or phone call.
To attach a token to an existing administrator:
-
Log in to the Duo Admin Panel as an Owner and navigate to Users → Administrators → Administrators in the left sidebar.
-
Click on the administrator's name to view details.
-
Click the drop-down menu to see a list of available hardware tokens. You can also search for a token by typing in the serial number.
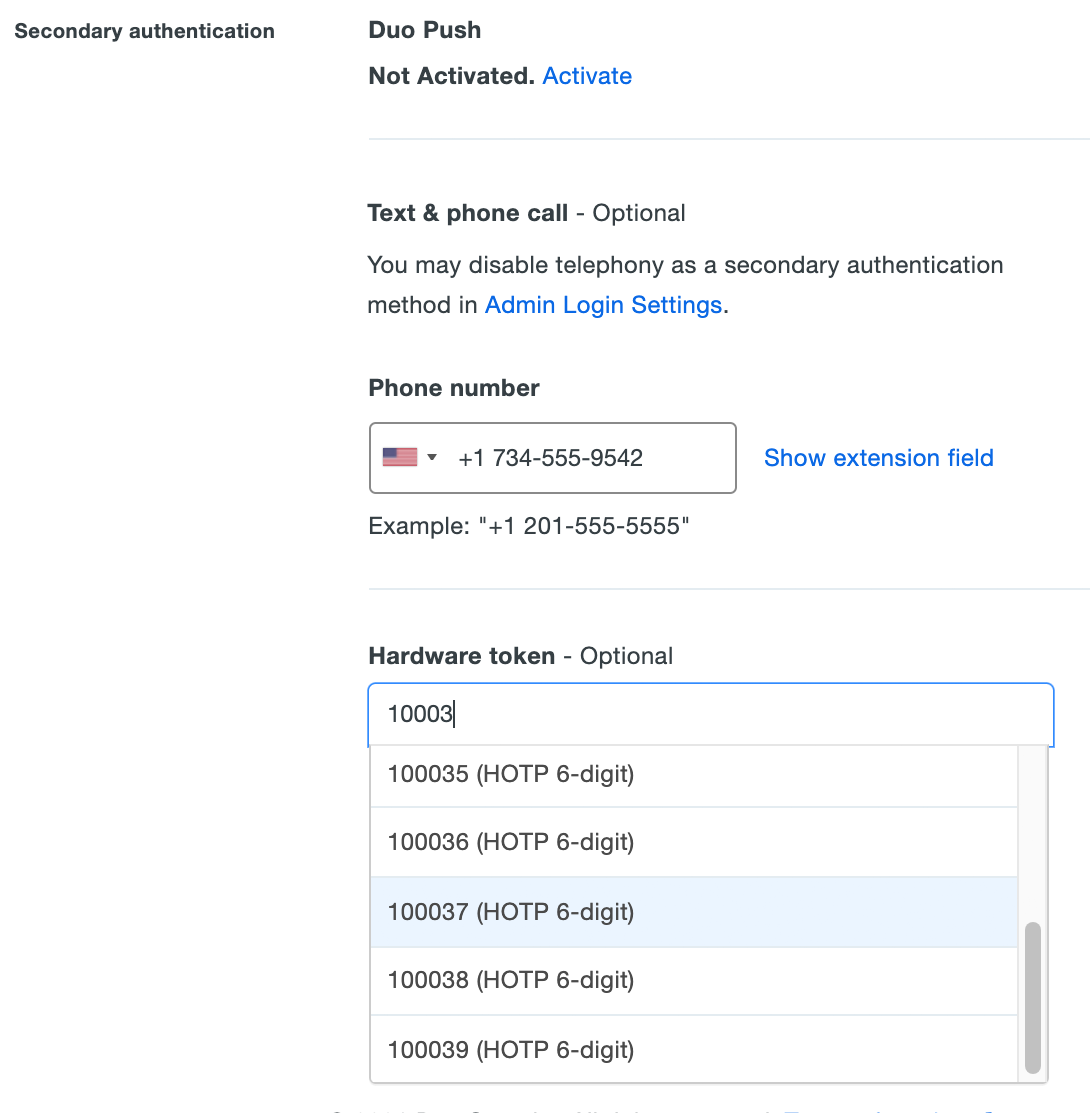
Click a token to select it, and then click Save Changes at the bottom of the page.
-
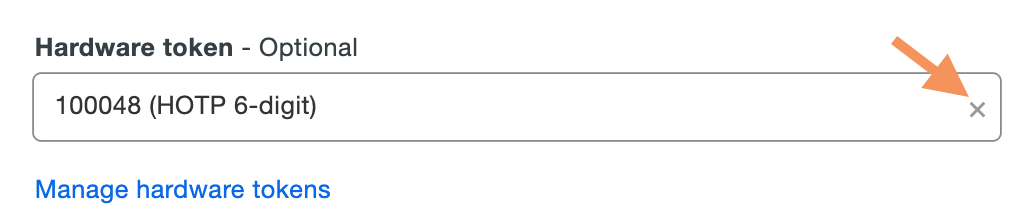
The administrator's properties page shows the newly added token. Click the x in the right side of the token box to clear the selected token information and click Save Changes to remove the hardware token from the administrator's account.
You must remove a hardware token from any attached administrator accounts before deleting the token from Duo.
Use Duo Push for Administrator Authentication
Duo administrators can also use Duo Mobile for secondary authentication via Duo Push. This "one-tap authentication" is both secure and convenient. See Duo Push in action, then download the Duo Mobile app to get started. If you didn't activate Duo Push for your admin account as part of your setup, you can do it once you've logged in to the Admin Panel.
To activate Duo Push for your administrative account:
-
Install Duo Mobile on your mobile device.
-
Log in to the Duo Admin Panel. Click on your name in the upper-right corner to access your administrator account action menu and then click Edit Profile.
-
Scroll down to the Secondary Authentication section and click the Activate link for Duo Push. This activation link will expire in 24 hours.
-
Open Duo Mobile on your device. Tap the plus sign (+) to add a new account, and scan the QR code displayed on your computer screen. If your mobile device doesn't have a camera, click the link below the QR code to email an activation link to your mobile device.
-
Your administrator account is now activated. Log out of the Duo Admin Panel, then submit your username and password and select Duo Push from the list of login options to give it a try.
After clicking Duo Push, the Admin Panel indicates that a login request was sent to your device.
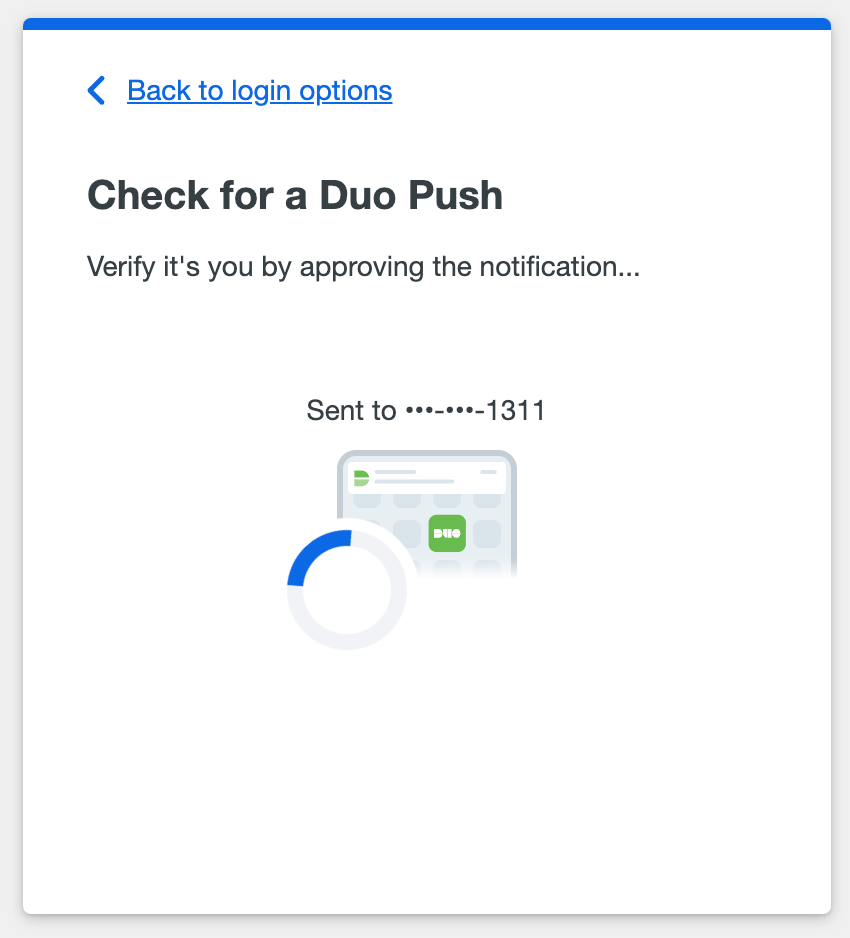
Now approve the Duo Push request when it arrives on your device, and you'll be fully authenticated and logged in.
To send (or resend) Duo Mobile activation to another administrator:
-
Log in to the Duo Admin Panel as an Owner and navigate to Users → Administrators → Administrators in the left sidebar.
-
Click on the administrator's name to view details.
-
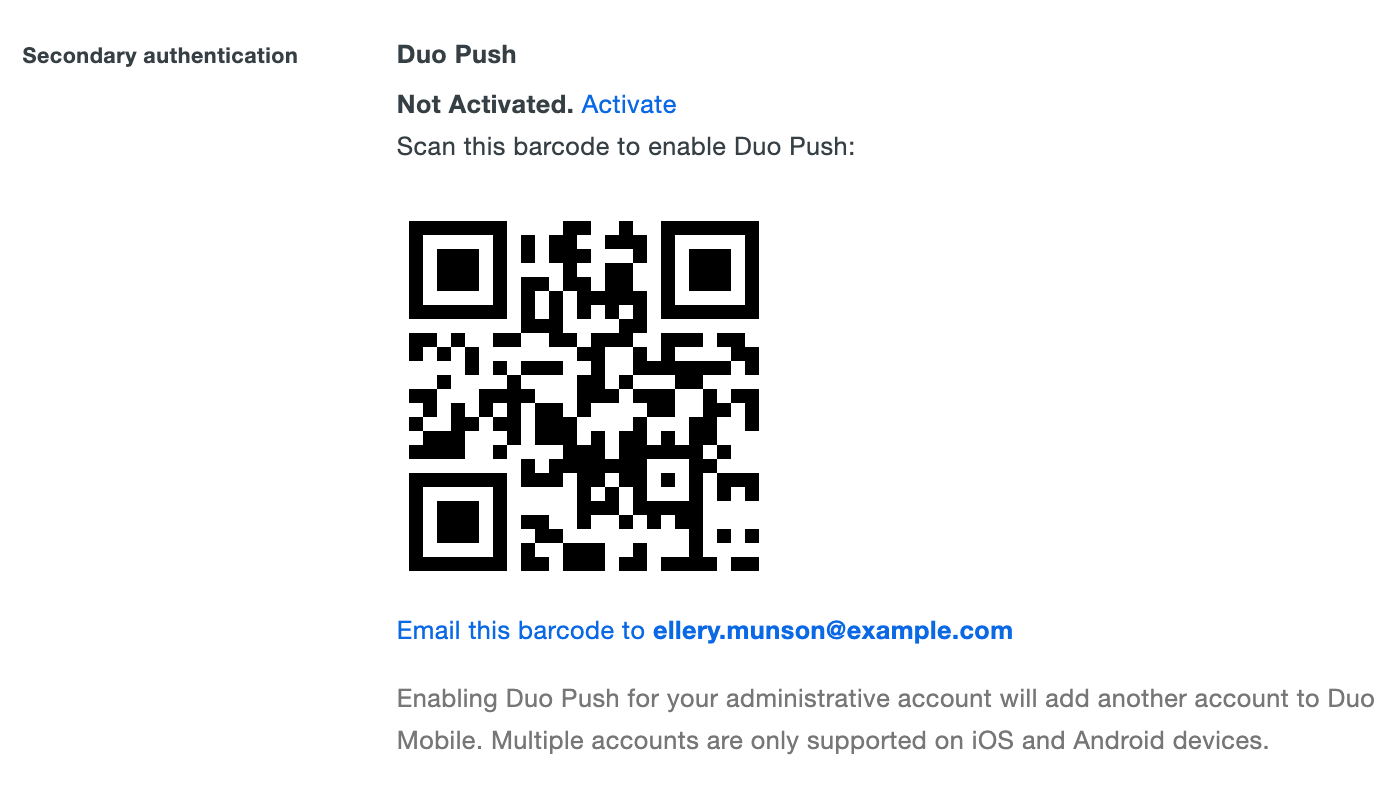
Scroll down to the "Secondary Authentication" section and click the Duo Push Activate or Reactivate link to generate a Duo Mobile activation barcode.
-
Click the Email this barcode to <adminname@example.com> link to send the activation barcode to that administrator's email address. The link and message destination use the same email address as that admin's username.
Use Verified Duo Push for Administrator Authentication
If Verified Duo Push is enabled in Admin Authentication Methods, Duo administrators will need to enter a verification code in the Duo Mobile app to approve a login request.
Log in with Verified Duo Push:
-
After successful authentication via SSO or by entering your admin username and password, select Duo Push from the list of login options.
-
Enter the code shown on your screen into the Duo Push request received on your mobile device. Tap Verify to finish logging in.
Use Passkeys for Administrator Authentication
Duo administrators can also use passkeys for secondary authentication. Passkeys are the most secure method for accessing the Duo Admin Panel. If you didn't add a passkey for your admin account as part of your setup, you can do it once you've logged in to the Admin Panel. Examples of passkeys that you can use to authenticate include:
- Windows Hello on compatible Windows devices.
- Touch ID on compatible macOS devices.
- Face ID or Touch ID on compatible iOS and iPadOS devices, including when stored in iCloud as a passkey.
- Android Biometrics, such as Pixel fingerprint or facial recognition, or Samsung fingerprint or facial recognition.
- WebAuthn FIDO2 security keys with biometric or PIN verification, like those from Yubico or Feitian.
Check the table below for supported browser versions. Running the latest operating system and browser versions available gives the widest passkey compatibility.
| Browser | Platform | Passkeys Supported Version |
|---|---|---|
| Chrome | Android | 95 |
| Chrome | iOS/iPadOS | 95 |
| Chrome | macOS | 70 |
| Chrome | Windows | 731 |
| Edge | iOS/iPadOS | 95 |
| Edge | macOS | 79 |
| Edge | Windows | 791 |
| Firefox | iOS/iPadOS | 38 |
| Firefox | macOS | 662 |
| Firefox | Windows | 66 |
| Safari | iOS/iPadOS | 14.5 |
| Safari | macOS | 14 |
- Windows Hello is not supported in Chrome Incognito or Edge InPrivate browsing sessions.
- Firefox on macOS does not support Touch ID due to missing FIDO2 support.
To add a passkey for your administrative account:
-
Log in to the Duo Admin Panel. Click on your name in the upper-right corner to access your administrator account action menu and then click Edit Profile.
-
Scroll down to the Passkeys section at the bottom of the page and click “Add Passkey”.
-
Your browser will prompt you to register either a platform authenticator (i.e. TouchID, Windows Hello), a security key, or a mobile passkey.
-
Once successfully added, the passkey authenticator appears in your own admin profile and at Devices → Passkeys in the Admin Panel. You can change a passkey's name at any time by clicking the pencil icon next to the name.
Upon next login to the Admin Panel, you will be able to use any registered passkey as a second factor.
Duo Owner administrators can add passkeys for other administrators. An example situation where this might be useful is if you want to pre-register a removable security key as a passkey for a new Duo admin and then give them that security key so they can log in to the Admin Panel from their own computer.
-
Log in to the Duo Admin Panel as an Owner and navigate to Users → Administrators → Administrators in the left sidebar.
-
Click on the administrator's name to view details.
-
Scroll down to the "Secondary Authentication" section and click Add Passkey.
-
Insert or attach the passkey to your computer and complete passkey registration.
-
You'll see the new passkey listed as an authentication device for that administrator.
Delete Administrator Passkeys
Any administrator can delete a passkey from their own profile by visiting the Edit Profile page, scrolling down to the list of passkeys, and clicking the trash can icon next to the passkey they want to remove.
Similarly, an Owner admin can remove a passkey from another administrator's account by viewing that admin's details page in the Admin Panel, scrolling down to the list of passkeys, and clicking the trash can icon next to the passkey they want to remove.
Unlock an Administrator
Role required: Owner
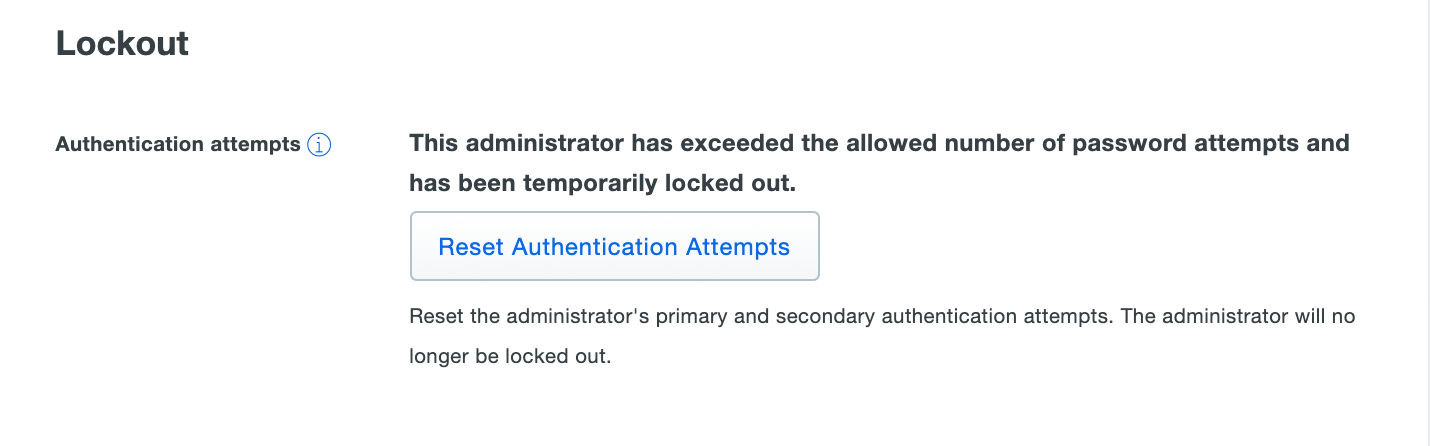
A Duo administrator's account is locked out after ten unsuccessful primary or secondary login attempts. The Duo Admin Panel UI notifies the admin when they reach the maximum number of permitted authentication failures. Duo also sends an email to the locked-out admin containing a link they can use to unlock their account, as well as a notification to all owners on the account.
If the locked-out admin doesn't have access to email, then another administrator at the same organization with the Owner admin role can reset the authentication attempt failure count. Otherwise, the administrator lockout expires 24 hours after the last failure.
To reset the authentication attempt failure count:
-
Log in to the Duo Admin Panel as an Owner and navigate to Users → Administrators → Administrators in the left sidebar.
-
Click on the locked-out administrator's name to view details.
-
Scroll down to the "Lockout" section and click the Reset Authentication Attempts button. The change is applied immediately.
Recover Access to an Administrator Account
If you've already tried to reset your password or unlock your account, and you're unable to log into your Duo Admin Panel account, work with another of your organization's Duo administrators to regain access. Any modification to an administrator account, like resending an activation link or updating an admin's secondary authentication devices, requires the Owner role. We recommend creating at least two administrative users with the Owner role for redundant access to the Admin Panel.
If no other administrators with the Owner role exist at your organization, please contact Duo Support to begin the recovery process.
Administrator Login Settings
Role required: Owner
If you purchased the User Protection Suite, refer to the Cisco Security Cloud Sign On instructions to learn more about the "Cisco Security Cloud Sign On Configuration" login setting.
Admin Authentication Methods
You can restrict or allow the types of authenticators that Duo admins may use on the Administrator Login Settings page.
To change the allowed authentication methods for Duo administrators:
-
Log in to the Duo Admin Panel as an Owner and navigate to Users → Administrators → Admin Login Settings.
-
Scroll to the Admin Authentication Methods section of the page.
-
Use the Only allow administrators to authenticate with setting to select the authentication methods you want Duo administrators to use. When adjusting the allowed methods, ensure that your Duo administrators have at least one of the allowed factors associated with their accounts. We won't let you disable the authentication method you used to log in to the Admin Panel as a safeguard against accidentally denying yourself access. If you want to restrict the method you just used, you'll need to log out and back in using a different 2FA method you plan to leave enabled.
For example, if you disable all methods except hardware tokens and Yubikey AES, then any administrator without an assigned token or Yubikey won't be able to log in to the Duo Admin Panel. You must leave at least one method enabled.
For customers who signed up before April 2024, the default is set to allow all authentication methods. For customers who signed up during or after April 2024, the default is set to allow passkeys, Yubikey AES, Duo Push, and hardware tokens. Verified Duo Push with 3 digits will also be enabled by default for customers who signed up after October 2024.
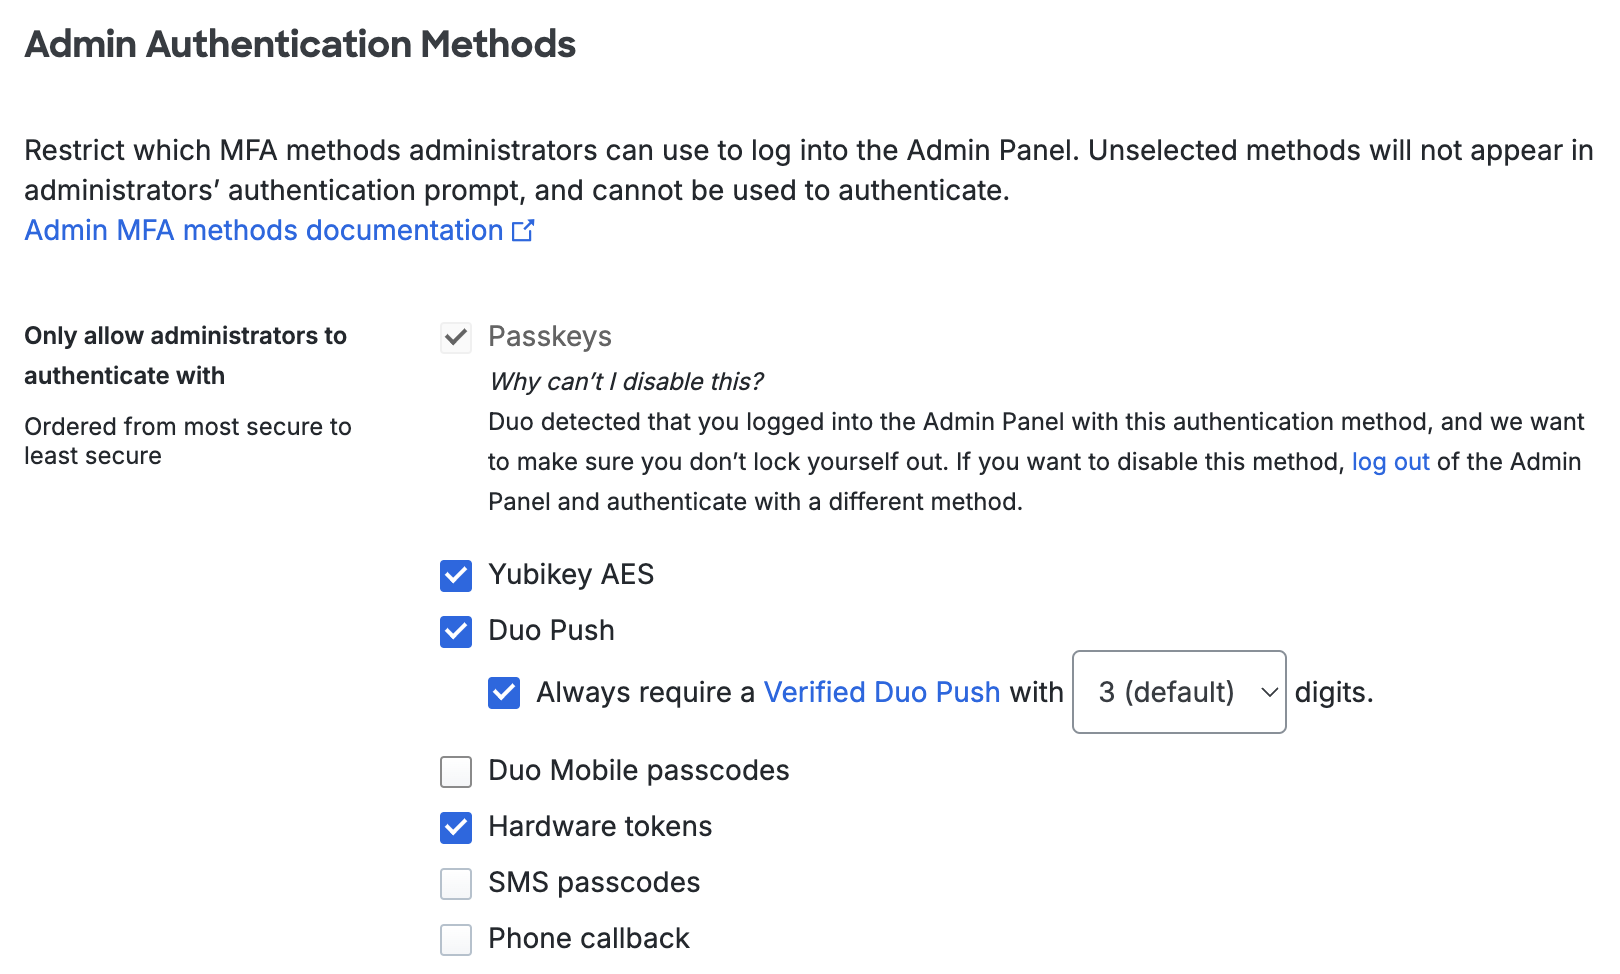
Select one or more of the following:
- Passkeys: Use a passkey including security keys and biometrics. Default setting: enabled.
- Yubikey AES: Authenticate with a passcode generated by a Yubikey. Default setting: enabled.
- Duo Push: Approve a login verification request sent to your smartphone with the Duo Mobile app. Default setting: enabled.
- Verified Duo Push: Always require a verification code in the Duo Mobile app to approve a login request. Set to three digits by default. Default setting: enabled.
- Duo Mobile passcodes: Authenticate with a passcode generated in the Duo Mobile app. Default setting: off.
- Hardware tokens: Enter a passcode generated by a physical device issued by your organization. Default setting: enabled.
- SMS passcodes: Receive an SMS message containing a one-time passcode and enter the passcode in the space provided. Default setting: off.
- Phone callback: Receive a phone call communicating a one-time passcode and enter the passcode in the space provided. Default setting: off.
-
Click the Save button at the top right of the page. You'll need to confirm your selections to apply the change.
Restricted factors no longer appear in the Duo Admin Panel's 2FA prompt. So, if you were to disable SMS passcode and phone callback (leaving Duo Push, Duo Mobile passcodes, hardware tokens, Yubikeys, and passkeys allowed), those disabled options no longer appear in the drop-down list in the Duo Admin Panel's 2FA prompt.
Changing the allowed methods won't automatically log out any administrator who was already logged in with a factor you've now disabled, but the next time they log in to the Duo Admin Panel they'll need to use one of the allowed factors.
Duo Mobile 4.49.0 and later will generate TOTP passcodes with a refresh timer for logging in to the Duo Admin Panel. Older versions of Duo Mobile generate HOTP codes that expire on use. The Duo Admin Panel will accept both HOTP and TOTP codes until "Discontinue HOTP support permanently" is selected in the Passcodes setting. Once HOTP codes are permanently disabled, the Duo Admin Panel will not accept HOTP codes. For customers who signed up after May 2024, the Passcodes setting cannot be changed and the Duo Admin Panel will only accept TOTP passcodes.
Admin Password Policy
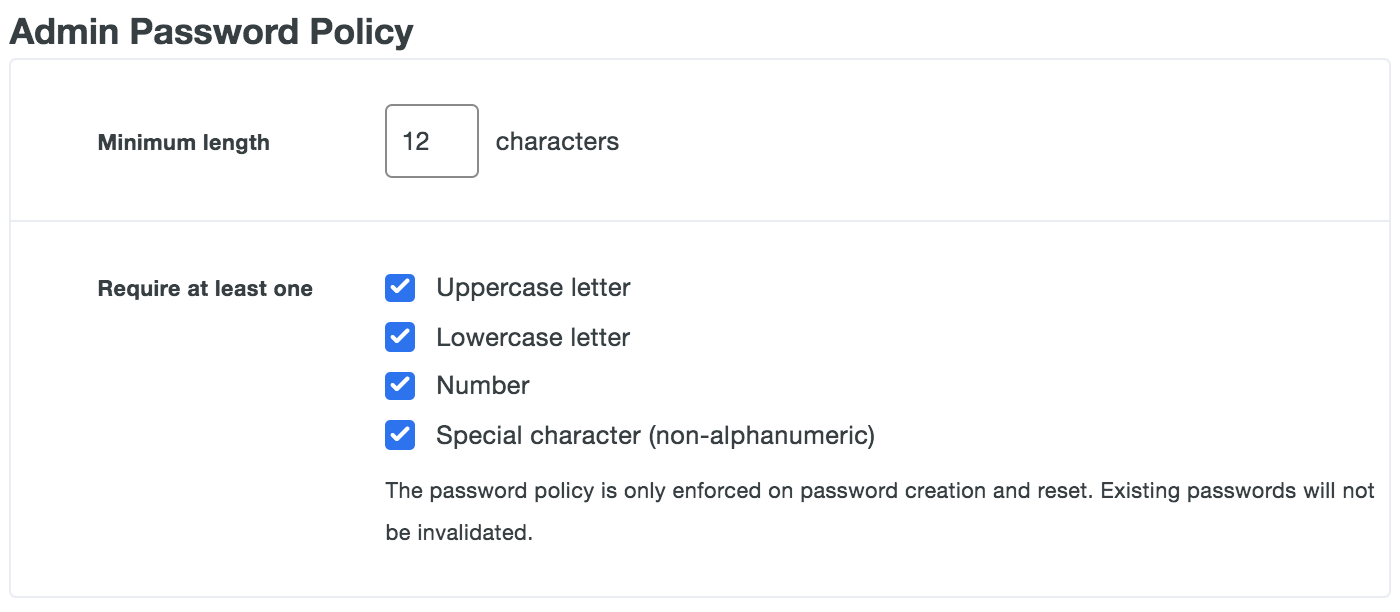
The "Admin Password Policy" settings define the length and strength requirements for Duo administrative user passwords. The default setting for new Duo customers requires administrator passwords with a minimum length of 12 or more characters. Existing Duo customers who currently have the minimum password length set to a value less than 12 may increase this value incrementally, but once increased may not decrease it.
To change the Duo administrator password settings:
-
Log in to the Duo Admin Panel as an Owner and navigate to Users → Administrators → Admin Login Settings in the left sidebar.
-
Scroll to the Admin Password Policy section of the page.
-
To change the minimum password length to a value greater than the default, enter the desired number of characters in the Minimum length box.
-
To enforce password complexity, next to the Require at least one option select any combination of uppercase letter, lowercase letter, number, or special character. We recommend enabling these complexity requirements to ensure administrators choose strong passwords.
-
Click the Save button at the top right of the page.
Admin Access
Available in Duo Premier, Duo Advantage, and Duo Essentials plans. These settings control administrator access to the Duo Admin Panel.

Absolute Session Length
The Absolute session length determines the maximum amount of time a logged-in administrator's Admin Panel session lasts, regardless of activity. When this limit is reached, an administrator will be logged out of the Admin Panel. You may choose to set this value from a minimum of 15 minutes to a maximum of 10 hours. Default: 4 hours.
Idle Timeout Length
The Idle timeout length determines how long administrators may be idle before being logged out of the Duo Admin Panel automatically. Activity refreshes when users click to interact with the Admin Panel. You may set this value from 5 to 60 minutes. Default: 30 minutes.
Inactive Admins
You may wish to block login access for inactive Duo administrators when a certain amount of time elapses between logins. To do this, click the radio button next to Disable admins after a set period of inactivity and enter the maximum number of days you want to pass since an administrator's last login (from 30 to 365 days).
Duo admins who don't log in or have their status changed by another administrator within the specified period have their admin accounts automatically expired as part of a daily process. Admins who already meet the maximum inactivity threshold will be expired at the first opportunity.
This setting has no effect on administrators with the "Owner" role. Owners will never become expired for inactivity. This process also will not act upon administrators who have never logged into the Duo Admin Panel.
Expired administrators are effectively disabled and can't log into the Duo Admin Panel. The "Status" information in the list of administrators shows "Expired" for an admin expired due to inactivity.
A Duo admin with the Owner role may restore access for an admin expired due to inactivity by viewing that administrator's properties in the Duo Admin Panel and clearing the inactive expiration.
Single Sign-On with SAML
Administrator Single Sign-On is available in Duo Premier, Duo Advantage, and Duo Essentials plans.
Single Sign-On with SAML is not available for customers using Security Cloud Sign-On. Instead, Single Sign-On can be configured using Security Provisioning and Administration (formerly Security Cloud Control) including Duo SSO support.
If you have a SAML 2.0 identity provider (IdP) in your environment, you can configure single sign-on (SSO) login for Duo administrators to the Duo Admin Panel. When using SAML for Duo administrator login, you'll be redirected to your IdP's login page to submit your SSO username and password. After successful password verification, you'll then be sent back to the Duo Admin Panel login page to complete two-factor authentication before gaining access.
Duo does not support user provisioning via SAML for administrator accounts. All Duo administrator accounts must be created manually, using Admin Directory synchronization, or via the Admin API regardless of whether they'll login via SSO or not.
When configuring your SSO provider, you'll need to send the Duo administrator's email address as the NameID, and the email address must match the admin's email address in Duo.
SAML login to the Duo Admin Panel supports both SP-initiated authentication and IdP-initiated authentication (if supported by your identity provider).
Duo Federal Edition customers requiring PIV/CAC SmartCard usage for compliance: we recommend enabling Single Sign-on with SAML for the Duo Admin Panel utilizing an external IdP (AD FS, or Entra ID, for example) for the IdP PIV/CAC SmartCard authentication capabilities. Setting “Authentication with SAML” to Required ensures that Duo administrators assigned any role besides “Owner” can't access the Admin Panel without the respective authentication method. Duo administrators with the “Owner” role may choose to sign in with a password, bypassing the external IdP and any PIV/CAC SmartCard authentication enabled therein.
Configure SAML SSO
Role required: Owner
-
Log in to the Duo Admin Panel.
-
Navigate to Users → Administrators → Admin Login Settings.
-
Scroll to the Single Sign-On with SAML Configuration section of the "Administrator Login Settings" page.
-
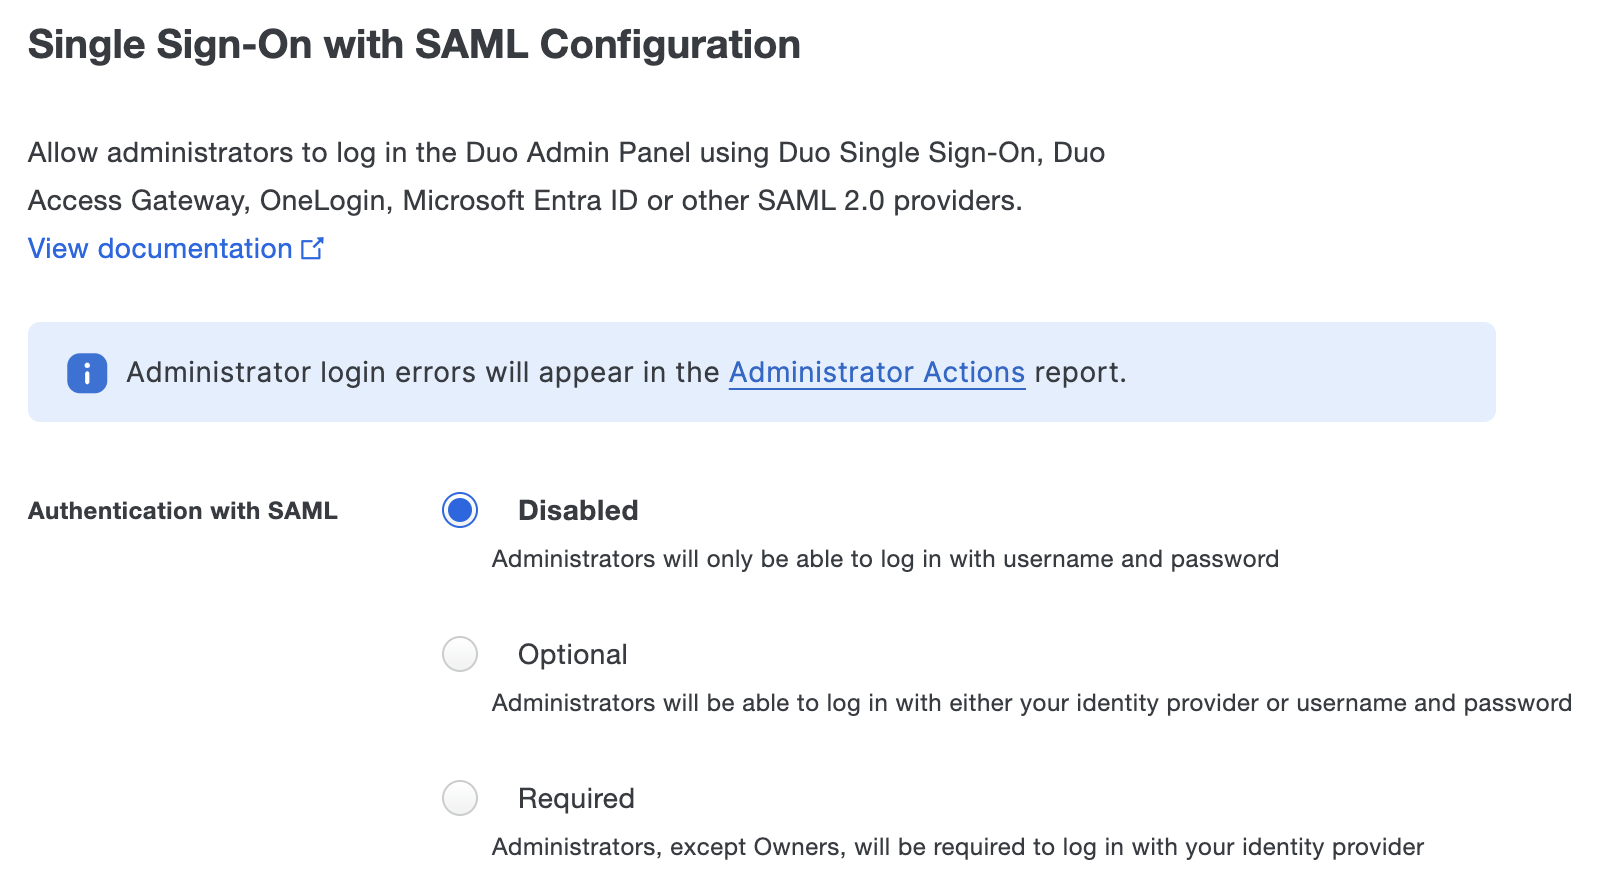
Enable SSO by changing the "Authentication with SAML" setting. The options for this setting are:
- Disabled - SSO login unavailable; all Duo administrators log on with username and password (the default).
- Optional - SSO login available; Duo administrators may choose to log in either via SAML or with username and password.
- Required - SSO login available; Duo administrators with the Owner role may log in either via SAML or with username and password. All other administrator roles must log in via SAML.
Selecting the Optional or Required SAML authentication option exposes the rest of the SSO configuration form. You'll need to enter or upload information about your SAML identity provider in the SAML Identity Provider Settings section, and then provide the metadata information from the Duo Admin Panel to your IdP.
Refer to the instructions for your preferred identity provider, or use the Custom Identity Provider if yours isn't listed.
- Duo Single Sign-On
- Duo Access Gateway
- AD FS
- Entra ID (Azure AD)
- Okta
- OneLogin
- PingOne
- PingFederate
- Shibboleth
- Custom Identity Provider
If you haven't already set-up Duo Single Sign-On you'll need to do that first and configure it with an authentication source before you can set up Admin SSO.
The new Duo Admin Panel application will configure Admin SSO for the Duo account where the application was created.
Configure the Duo Admin Panel Application in Duo
-
Log in to the Duo Admin Panel and navigate to Applications → Application Catalog.
-
Locate the entry for Duo Admin Panel with the "SSO" label in the catalog. Click the + Add button to start configuring Duo Admin Panel. See Protecting Applications for more information about protecting applications with Duo and additional application options.
-
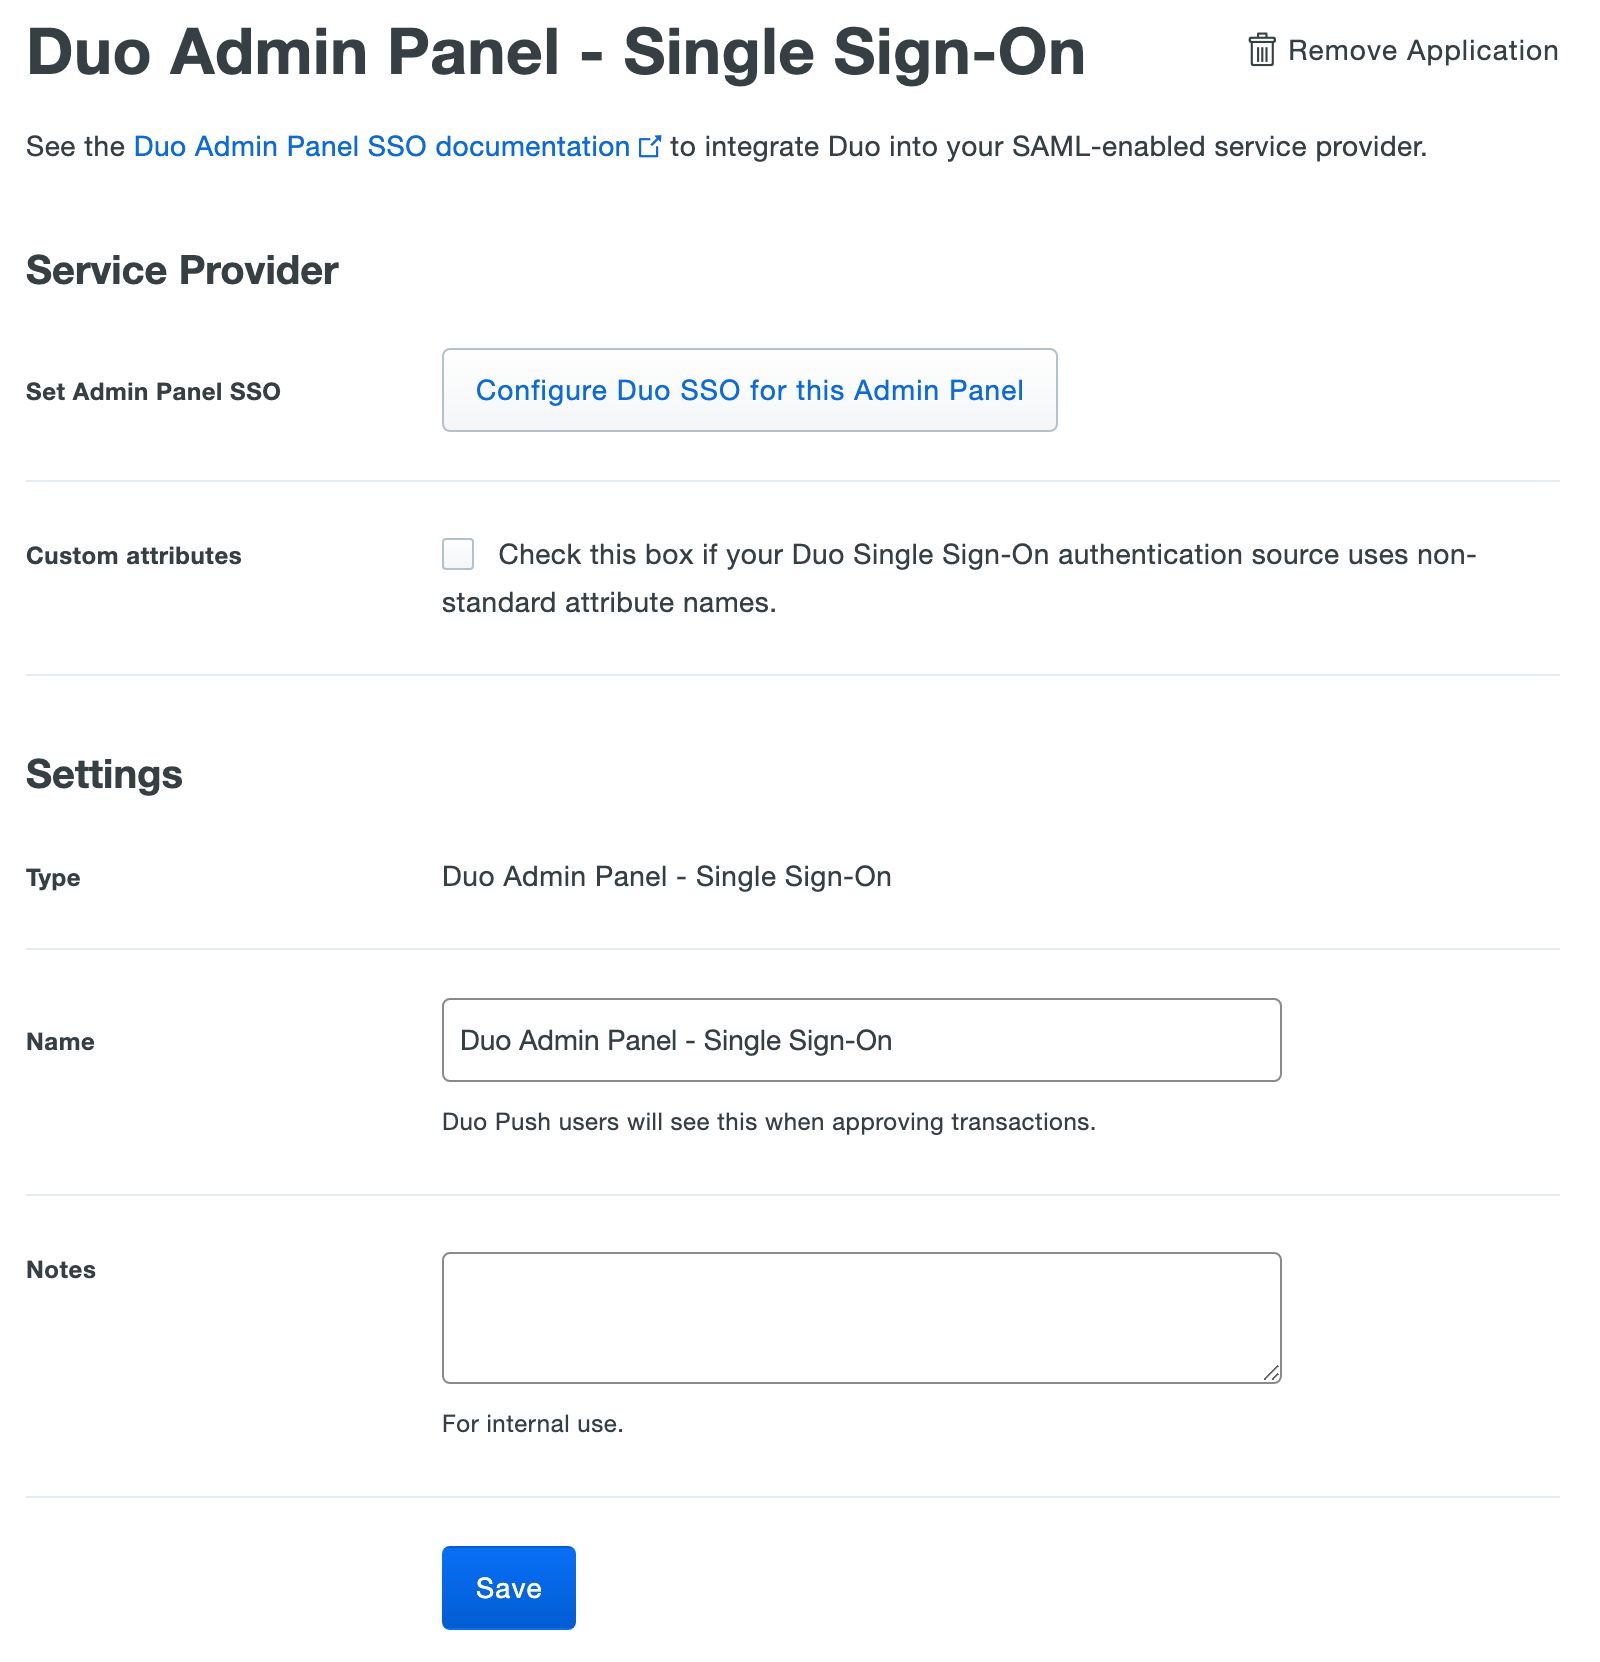
Duo Admin Panel uses the Mail attribute when authenticating. We've mapped the <Email Address> attribute to external authentication source attributes as follows:
Default Attribute Active Directory SAML IdP <Email Address> mail Email If you are using a non-standard email attribute for your authentication source, check the Custom attributes box and enter the name of the attribute you wish to use instead.
-
Click Configure Duo SSO for this Admin Panel next to "Set Admin Panel SSO". A pop-up will appear informing you that continuing will automatically configure and enable Admin Panel SSO with an enforcement of optional in the Duo Admin Panel. Any past configuration will be overridden. Click Confirm. You'll be redirected to the "Admin Login Settings" page.
-
At the top of the "Admin Login Settings" page you should see a banner informing you that Admin Panel SSO was enabled. You're now ready to sign into the Duo Admin Panel using Duo Single Sign-On.
Add Ownership and Risk Information
Go to the "Ownership and Risk" section of the Duo Admin Panel application's page to assign application owners and classify the application's risk level. Cisco Identity Intelligence automatically imports this information to populate relevant fields for Duo Advantage and Premier customers. Duo Essentials plans exclude Cisco Identity Intelligence features.
You may set any of the following:
- Technical Owner: Search for and assign Duo users responsible for technical configuration and maintenance of this application.
- Business Owner: Search for and assign Duo users responsible for business decisions and access approvals related to this application.
- Application Sensitivity: Select this application's risk level from the drop-down list. Default: Not Set.
- Compliance Requirements: Select any applicable regulatory frameworks for this application (SOX (Sarbanes-Oxley), HIPAA, PCI-DSS, etc.) from the list.
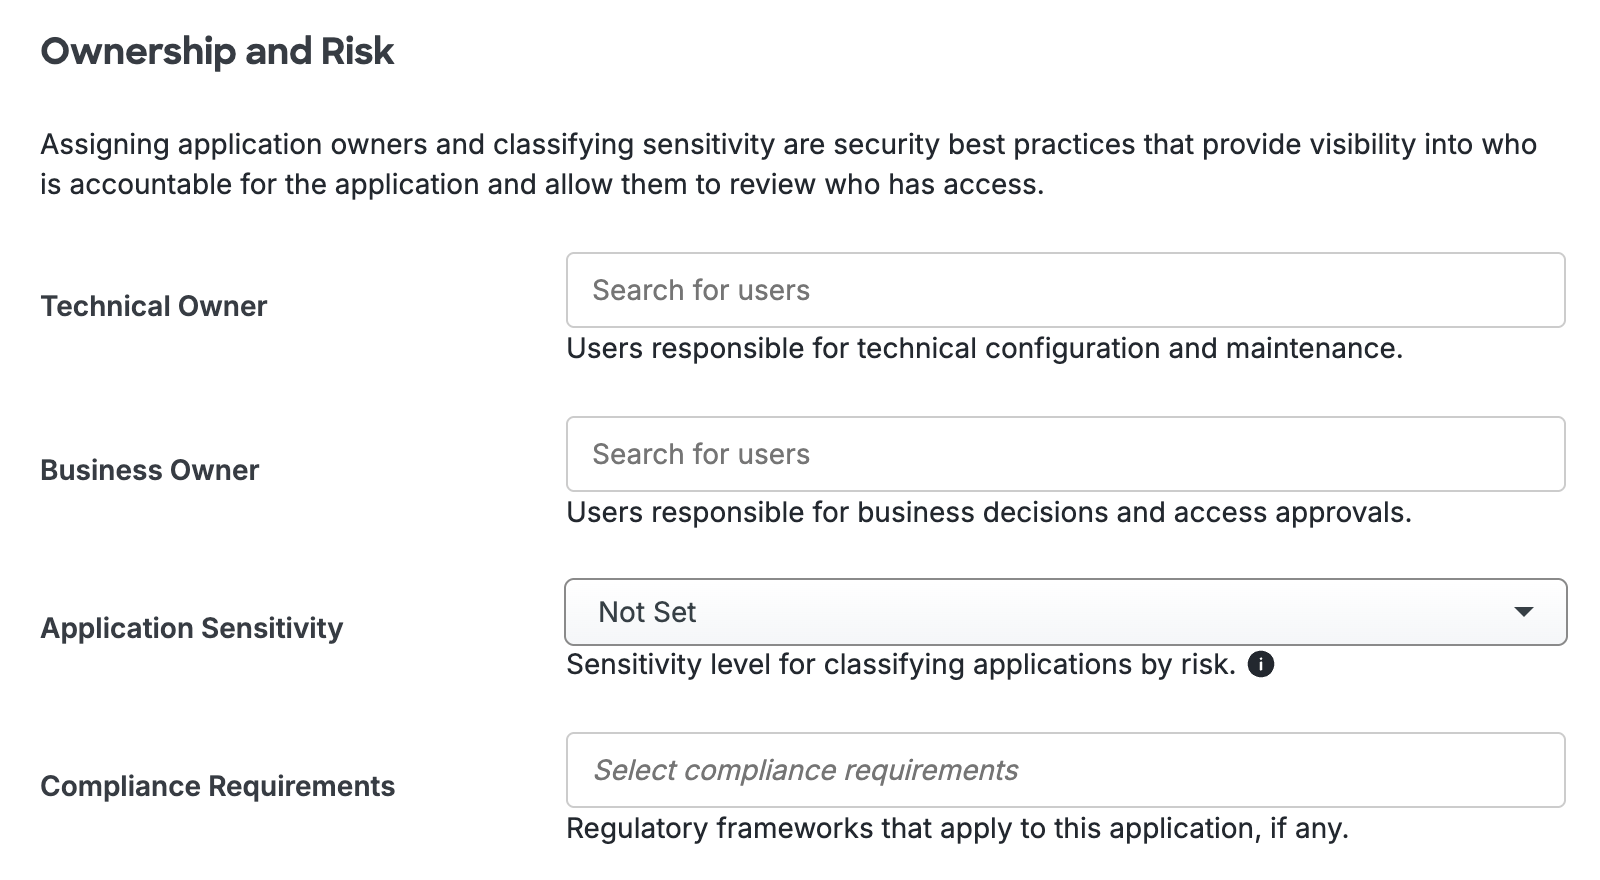
Scroll to the bottom of the page and click Save to apply your changes.
Duo Access Gateway reached Last Day of Support on October 26, 2023 for Duo Essentials, Advantage, and Premier customers. As of that date, Duo Support may only assist with the migration of existing Duo Access Gateway applications to Duo Single Sign-On. Please see the Guide to Duo Access Gateway end of life for more details.
Learn more about Duo Single Sign-On, our cloud-hosted identity provider featuring Duo Central and the Duo Universal Prompt.
Duo Federal customers may still use Duo Access Gateway for SAML applications after October 26, 2023.
Duo Federal customers must first deploy Duo Access Gateway for SSO and configure it with an authentication source before you can set up Admin SSO.
Deploy or Update Duo Access Gateway
-
Install Duo Access Gateway on a server in your DMZ. Follow our instructions for deploying the server, configuring Duo Access Gateway settings, and adding your primary authentication source.
-
Add the attribute from the table below that corresponds to the Duo Mail attribute in the "Attributes" field when configuring your Active Directory or OpenLDAP authentication source in the Duo Access Gateway admin console. For example, if Active Directory is your authentication source, enter mail in the "Attributes" field.
Duo Attribute Active Directory OpenLDAP Mail attribute mail mail If your organization uses another directory attribute than the ones listed here then enter that attribute name instead. If you've already configured the attributes list for another cloud service provider, append the additional attributes not already present to the list, separated by a comma.
-
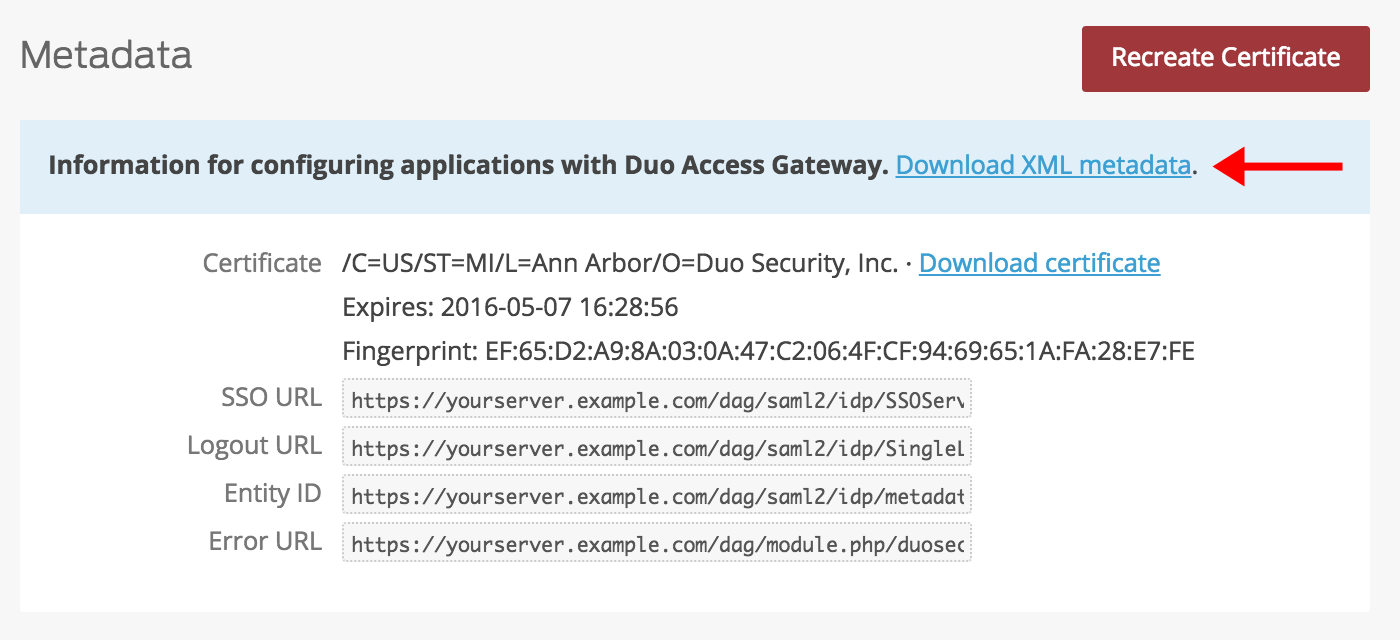
After completing the initial Duo Access Gateway configuration steps, click Applications on the left side of the Duo Access Gateway admin console.
-
Scroll down the Applications page to the Metadata section. This is the information you need to provide to the Duo Admin Panel when configuring SAML authentication for the Duo Admin Panel. Click the Download XML metadata link to obtain the DAG metadata file (the downloaded file is named "dag.xml").
Create the Duo Admin Panel Application in Duo
-
Log on to the Duo Admin Panel from the Duo Access Gateway server console and navigate to Applications.
-
Locate the entry for Duo Admin Panel with the "DAG" label in the catalog. Click the + Add button to start configuring Duo Admin Panel. See Protecting Applications for more information about protecting applications with Duo and additional application options.
-
No admins can log in to the Duo Admin Panel until you grant access to their Duo end-user accounts. Update the User access setting to grant access to this application to groups containing the admin's end-user accounts, or you can enable access for all users (Admin Panel access will still require a valid administrator account). Learn more about user access to applications.
-
The new Duo Admin Panel SAML application assumes you're configuring administrator SSO for the same Duo account where you created this new SAML application.
If you'd like this new Duo Admin Panel SAML application to provide SSO authentication for a different Duo account, enter the SAML URL from the "Metadata for Configuring with Duo Access Gateway" section of the "Single Sign-On with SAML Configuration" option on the "Administrator Login Settings" page in the Duo Admin Panel for that other Duo account, e.g. https://admin-abcd1234.duosecurity.com/saml/D1ABCDEFGH12345678.
-
The Duo Admin Panel uses the Mail attribute when authenticating. We've mapped Mail attribute to Duo Access Gateway supported authentication source attributes as follows:
Duo Attribute Active Directory OpenLDAP SAML IdP Google Entra ID Mail attribute mail mail mail email mail If you are using a non-standard email attribute for your authentication source, check the Custom attributes box and enter the name of the attribute you wish to use instead.
-
Click Save Configuration to generate a downloadable configuration file.
-
You can adjust additional settings for your new Duo Admin Panel SAML application at this time — like changing the application's name from the default value, enabling self-service, or assigning a group policy — or come back and change the application's policies and settings after you finish SSO setup. If you do update any settings, click the Save button when done.
-
Click the Download your configuration file link to obtain the Duo Admin Panel SAML application settings (as a JSON file).
Important: This file contains information that uniquely identifies this application to Duo. Secure this file as you would any other sensitive or password information. Don't share it with unauthorized individuals or email it to anyone under any circumstances!
Add the Duo Admin Panel Application to Duo Access Gateway
-
Return to the Applications page of the Duo Access Gateway admin console session.
-
Click the Choose File button in the "Add Application" section of the page and locate the Duo Admin Panel SAML application JSON file you downloaded from the Duo Admin Panel earlier. Click the Upload button after selecting the JSON configuration file.
-
The Duo Admin Panel SAML application is added.
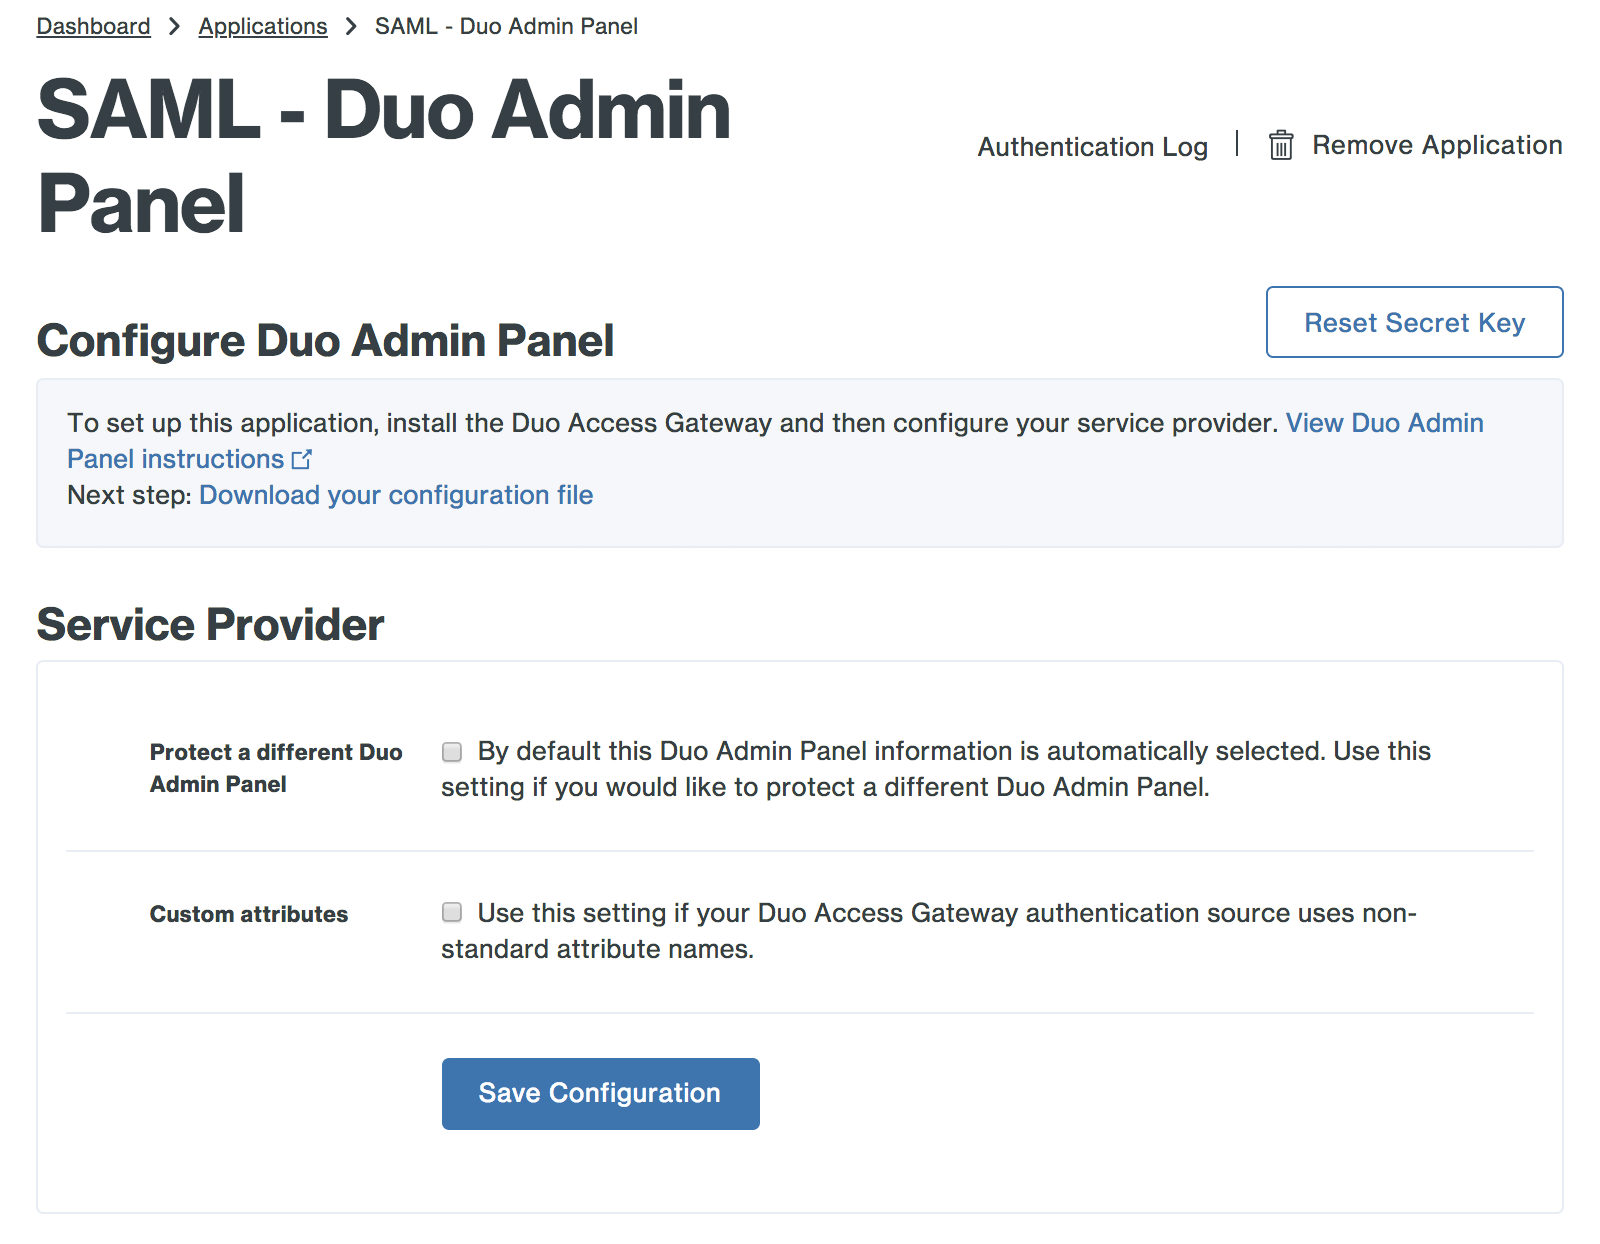
Configure Duo Admin Panel
-
Return to the "Single Sign-On with SAML Configuration" section of the "Administrator Login Settings" page in the Duo Admin Panel.
-
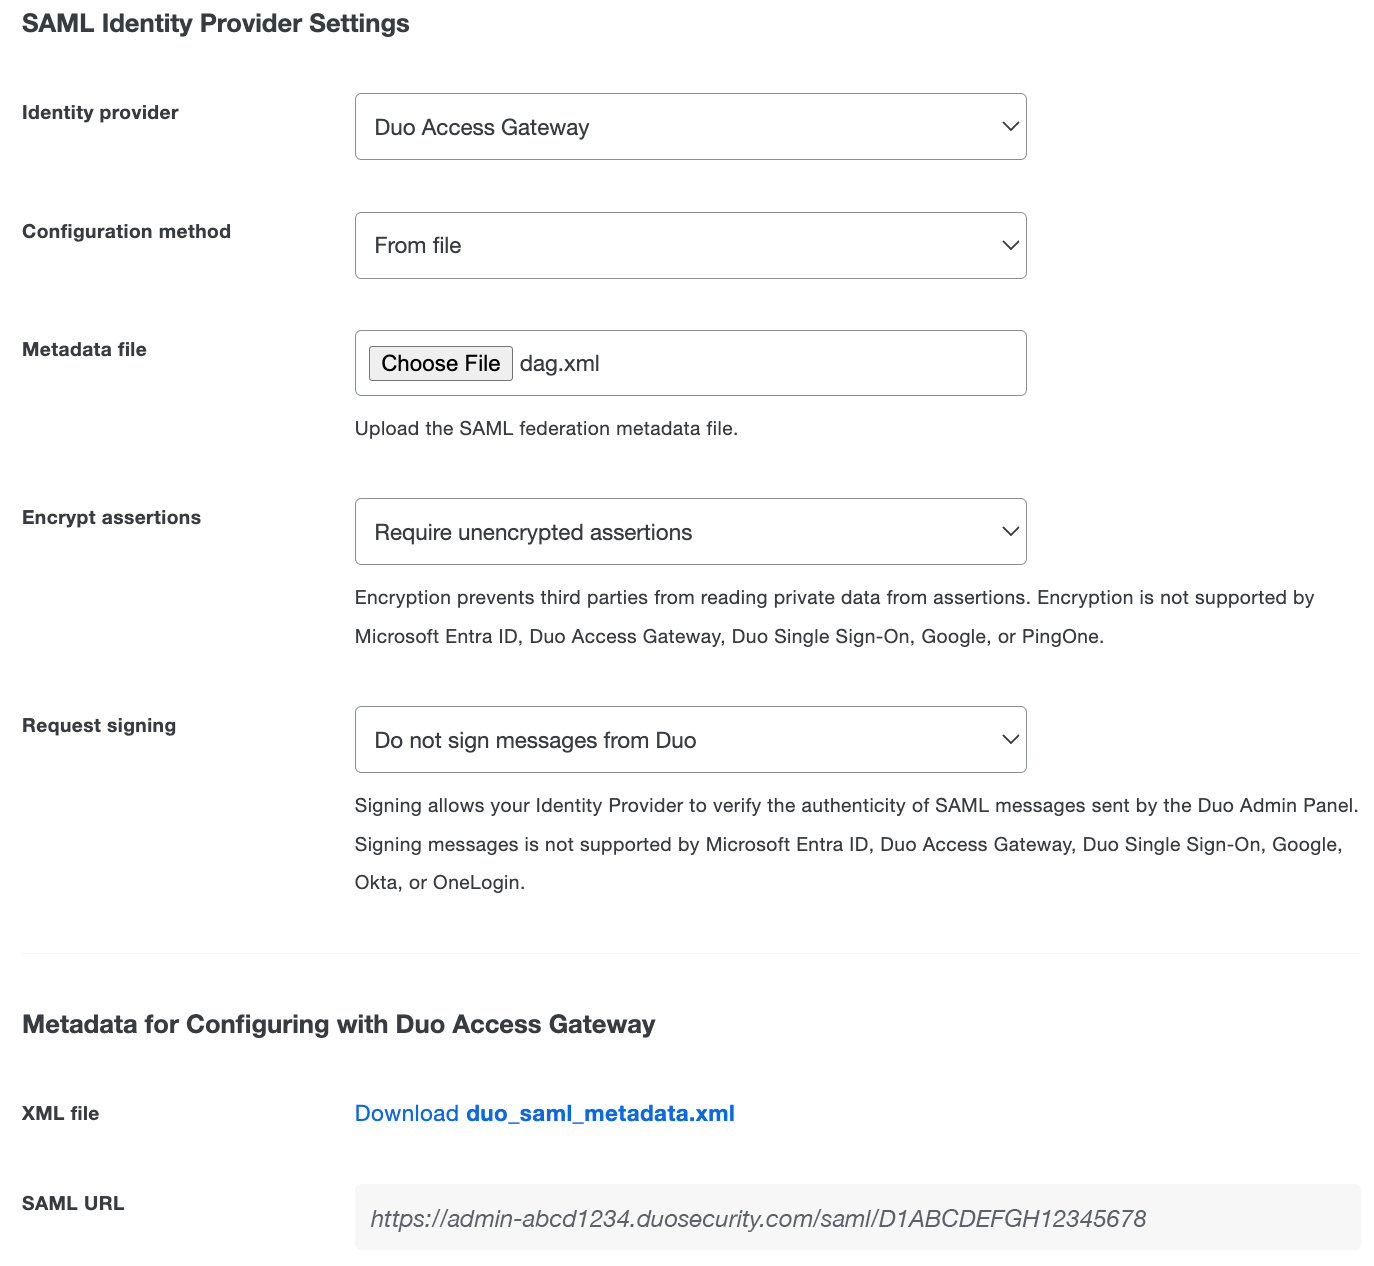
Select either the Optional or Required "Authentication with SAML" option to expose the SAML Identity Provider Settings.
-
Change the "Identity provider" to Duo Access Gateway.
-
Change the "Configuration method" to From file.
-
Click the Choose file button next to "Metadata File" and select the dag.xml metadata file you downloaded from your Duo Access Gateway server earlier.
-
Click the Save button at the top right of the page.
Configuring Duo administrator SSO using AD FS requires entering information from the Duo Admin Panel into AD FS and vice-versa.
Download Metadata from the Duo Admin Panel
-
Navigate to the "Single Sign-On with SAML Configuration" section of the "Administrator Login Settings" page in the Duo Admin Panel.
-
Select either the Optional or Required "Authentication with SAML" option to expose the SAML Identity Provider Settings.
-
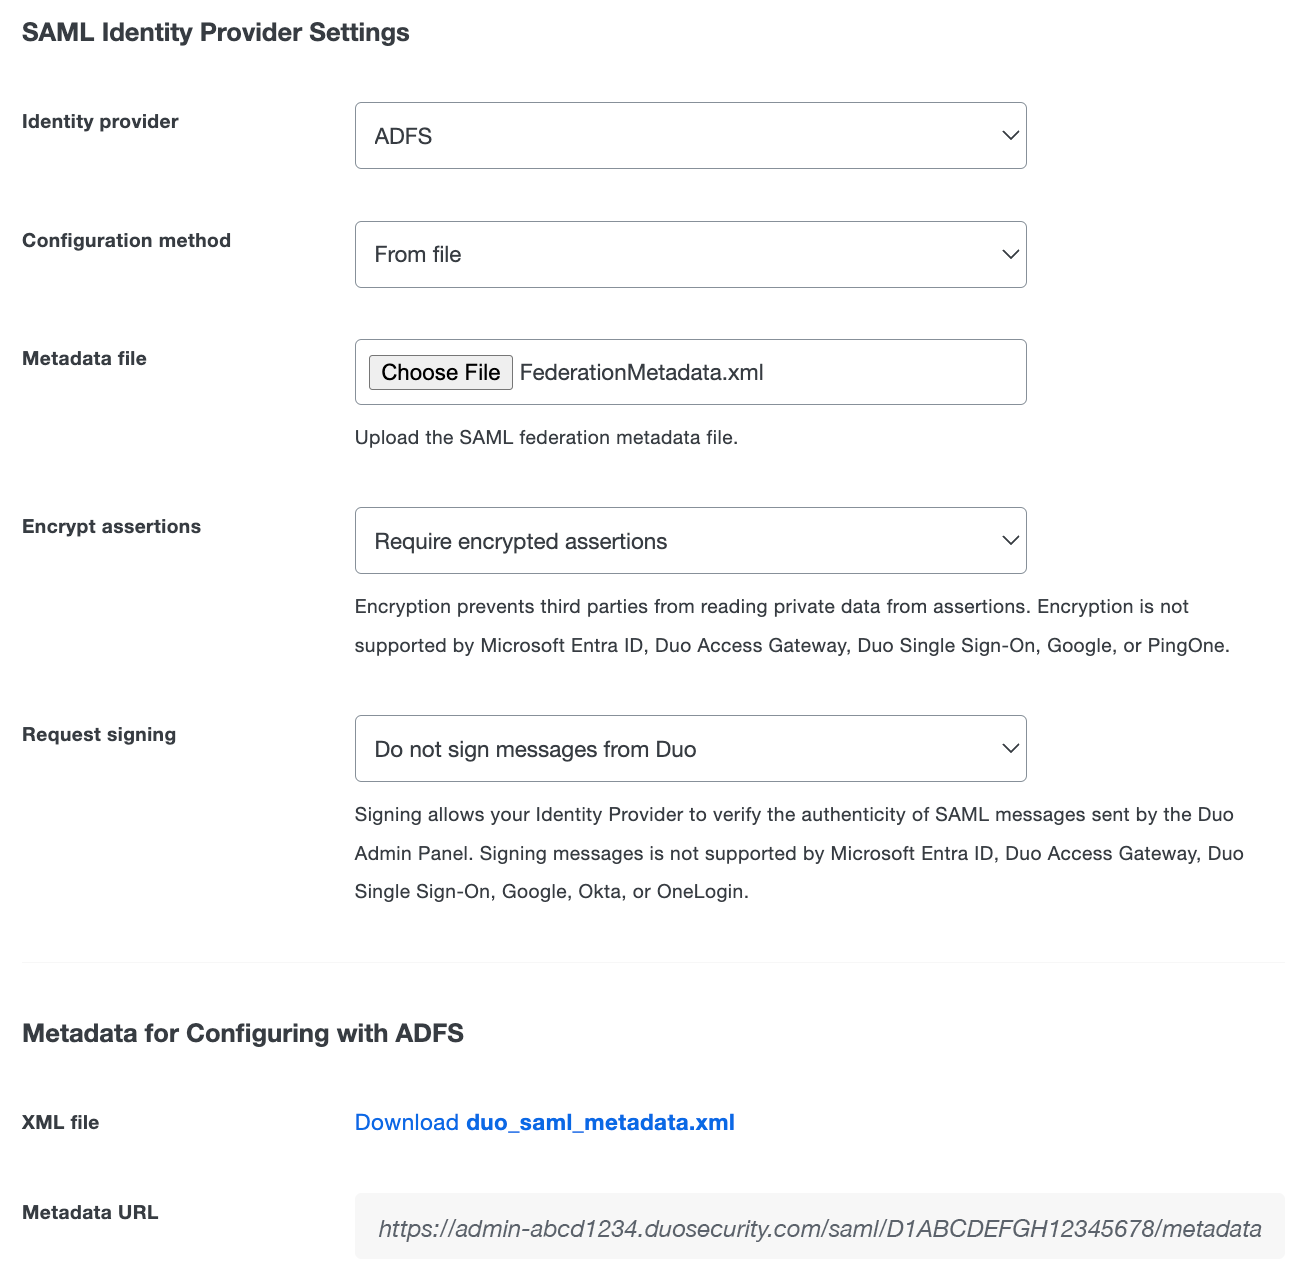
Change the "Identity provider" to ADFS.
-
The default "Encrypt assertions" option is set to Require encrypted assertions. Select Require unencrypted assertions if you do not want to use encryption. If "Require encrypted assertions" is selected, the encryption certificate information will be included in the Duo metadata file you will upload to AD FS later.
-
The default "Request signing" option is set to Do not sign messages from Duo. Select Sign messages from Duo if you want Duo to send signed SAML messages to your identity provider. If "Sign messages from Duo" is selected, the signing certificate information will be included in the Duo metadata file you will upload to AD FS later.
-
Click the Save button at the top right of the page.
-
Scroll to "XML File" in the "Metadata for Configuring with ADFS" section and click the Download duo_saml_metadata.xml link to download a copy of the metadata file. The downloaded file name is duo_saml_metadata.xml. This metadata file is uniquely generated for your Duo customer account and must be used to complete SSO configuration before it expires 30 days from download. Once you use the metadata file to configure SSO, the configuration does not expire.
If you are using encrypted assertions or signed messages it is important to save the single sign-on configuration before downloading the Duo metadata to ensure it includes the certificate information necessary for encryption and/or signing.
Add the Duo Admin Panel Relying Party in AD FS
-
Log into your AD FS server as a Domain Admin or member of the server's local Administrators group and open the AD FS Management console.
-
Click the arrow icon next to Trust Relationships on the left-hand side of the page to expand its options. Skip this step if you are using AD FS 4.
-
Right click Relying Party Trusts and select Add Relying Party Trust... from the drop-down. A new window will appear.
-
Review the information on the "Welcome" page and then click Start. In AD FS 4 leave the default choice of "Claims aware" selected and click Start.
-
Select Import data about the relying party from a file on the "Select Data Source Page". Click the Browse button next to the "Federation metadata file location" field and select the duo_saml_metadata.xml you downloaded from the Duo Admin Panel earlier. Click Next.
-
On the "Specify Display Name" page enter a name like "Duo Admin Panel SSO" to help you identify this relying party easily later into the Display name field and click Next.
-
On the "Configure Multi-factor Authentication Now?" page select I do not want to configure multi-factor authentication settings for this relying party trust at this time. and click Next. In AD FS 4 this page is called "Choose Access Control Policy". Select the access control policy for this application from the list. The simplest option is to choose the default "Permit everyone" policy, or if you want to restrict Duo Admin Panel access select the built-in or custom access control policy that meets your needs. After selecting an access control policy click Next.
-
Click Next on the "Ready to Add Trust" page.
-
Leave the "Open the Edit claim Rules dialog for this relying party trust when the wizard closes" option checked and click Close. This setting is called "Configure claims issuance policy for this application." in AD FS 4. A new window will appear.
Configure the Duo Admin Panel Relying Party in AD FS
-
On the "Edit Claim Rules for ..." page click Add Rule.... A new window will appear.
-
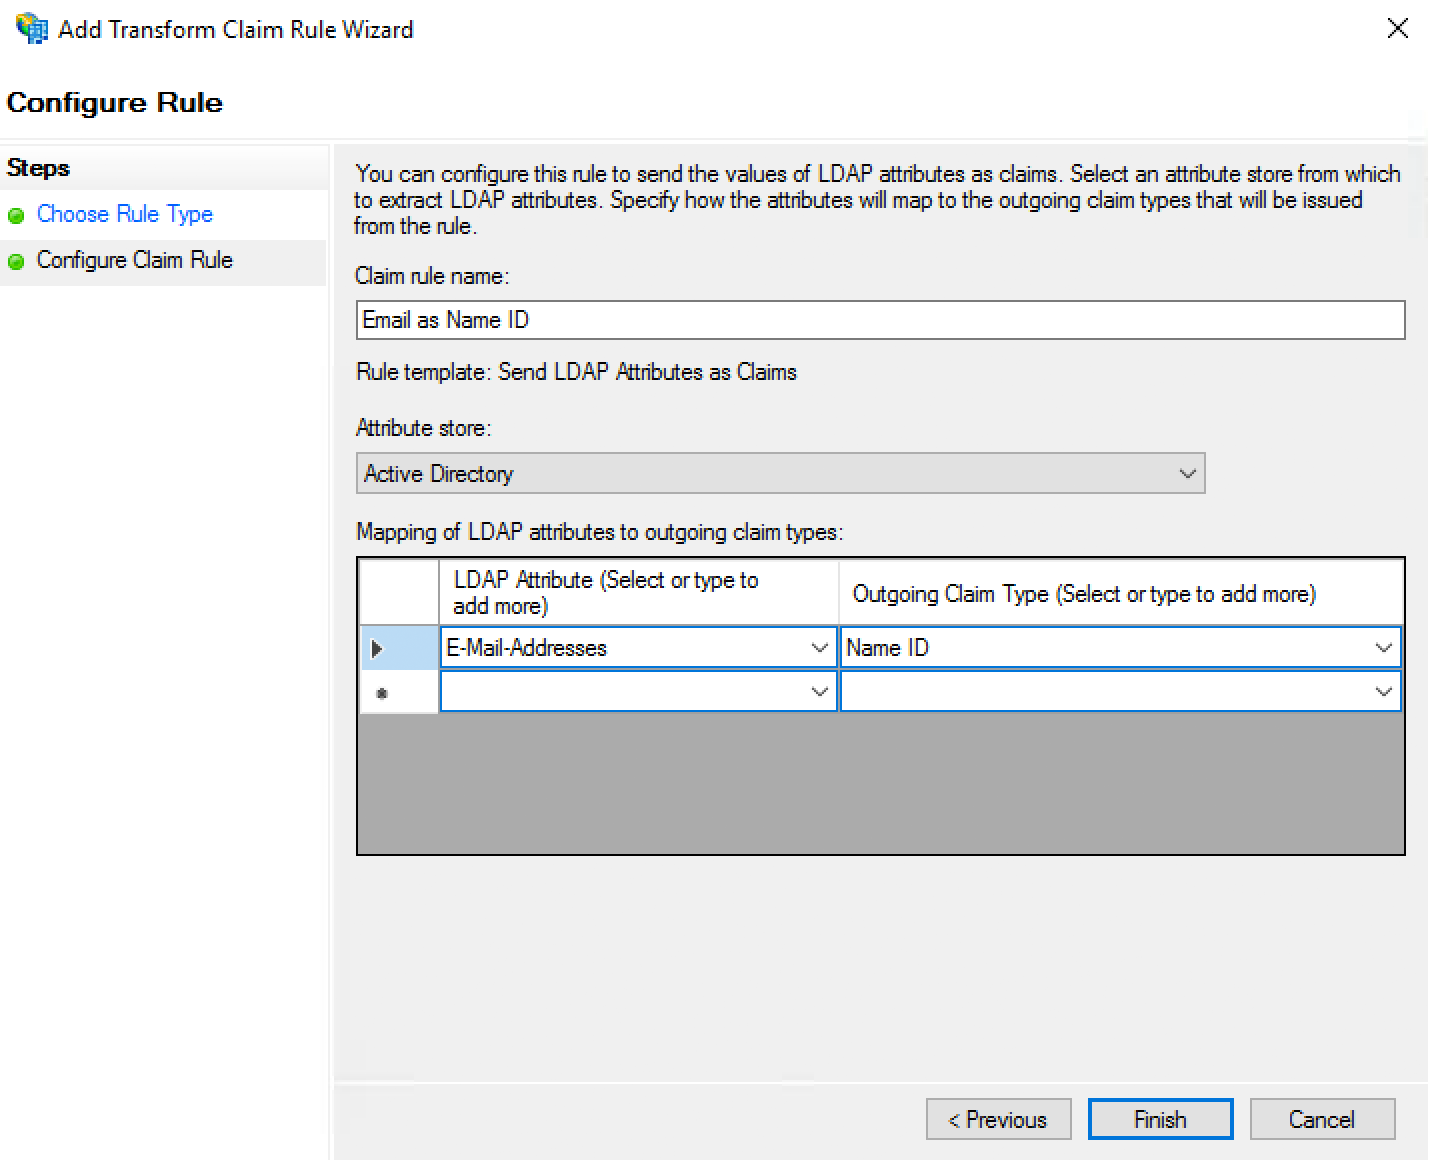
On the "Select Rule Template" page select Send LDAP Attributes as Claims from the drop-down and click Next.
-
On the "Configure Rule" page type Email as Name ID into the Claim rule name field.
-
Select Active Directory from the Attribute store drop-down.
-
Click the drop-down menu under LDAP Attribute and select E-Mail-Addresses.
-
Click the drop-down menu under Outgoing Claim Type and select Name ID.
-
Click Finish. You'll return to the "Edit Claims Rules for ..." page.
-
Click Apply and click OK. The page will close and you'll return to the AD FS Management console.
-
Duo requires that AD FS signs both the SAML assertion and message. AD FS only signs the assertion by default, but you can change this behavior with the
set-adfsrelyingpartytrustPowerShell command.Run PowerShell on the AD FS server as an administrator, and enter the following command:
set-adfsrelyingpartytrust -targetname "The name of your Duo Admin Panel Relying Party" -samlresponsesignature messageandassertion -
Open up a web browser and go to https://Your-AD-FS-Server/FederationMetadata/2007-06/FederationMetadata.xml. This downloads the FederationMetadata.xml metadata file from AD FS to your computer, which you'll upload to the Duo Admin Panel later.
Configure Duo Admin Panel
-
Return to the "Single Sign-On with SAML Configuration" section of the "Administrator Login Settings" page in the Duo Admin Panel.
-
Select either the Optional or Required "Authentication with SAML" option to expose the SAML Identity Provider Settings.
-
Change the "Identity provider" to ADFS.
-
Change the "Configuration method" to From file.
-
Click the Choose file button next to "Metadata File" and select the FederationMetadata.xml metadata file you downloaded from your AD FS server earlier.
-
Click the Save button at the top right of the page.
Configuring Duo administrator SSO using Microsoft Entra ID requires entering information from the Duo Admin Panel into Entra ID (formerly known as Azure AD) and vice-versa. Configuring SSO with a custom SAML app and encrypted assertions requires an Entra ID Premium subscription.
Note: If you opt to configure Entra ID verification certificates for the Duo SAML app, then IdP-initiated sign-on no longer works. This means that you may not launch the Duo Admin Panel SAML app from the Entra/Office apps portal. You will need to use SP-initiated sign-on, which means starting your federated login from the Duo Admin Panel site. Learn more about this limitation in the Microsoft Entra documentation.
Start Duo Admin Panel Configuration
-
Navigate to the "Single Sign-On with SAML Configuration" section of the "Administrator Login Settings" page in the Duo Admin Panel.
-
Select either the Optional or Required "Authentication with SAML" option to expose the SAML Identity Provider Settings.
-
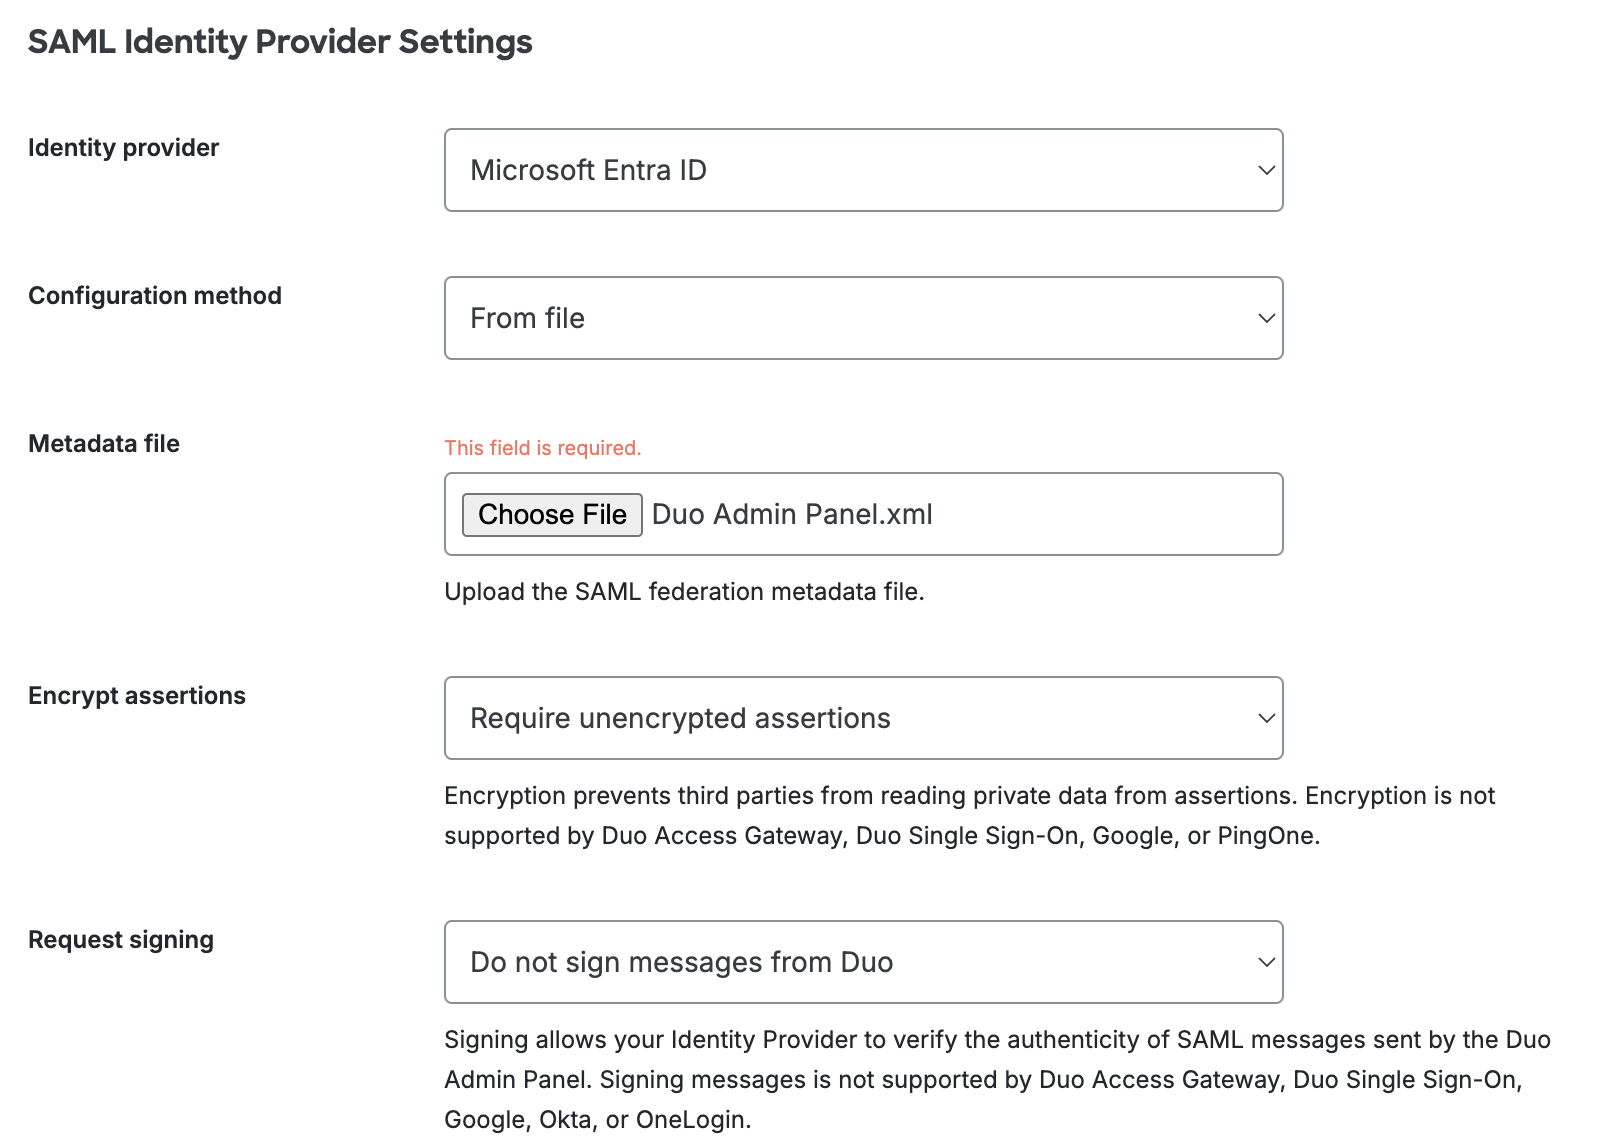
Change the "Identity provider" to Microsoft Entra ID.
-
The default "Encrypt assertions" option is set to Require unencrypted assertions. Select Require encrypted assertions if you want to use encryption.
-
The default "Request signing" option is set to Do not sign messages from Duo. Select Sign messages from Duo if you want Duo to send signed SAML messages to your identity provider. If you require use of IdP-initiated sign-on from Entra to the Duo Admin Panel, do not enable this option.
-
Click the Save button at the top right of the page.
-
Scroll down to the "Metadata for Configuring with Microsoft Entra ID" section of the page and click the Download duo_saml_metadata.xml XML file link. You'll need to upload the duo_saml_metadata.xml file to Microsoft Entra ID in the next set of configuration steps.
-
If you want to use encrypted assertions, scroll down to the "Encryption certificate" and click the link to download the duo_saml_encryption.crt file.
-
If you want to use request signing, scroll down to the "Signing certificate" and click the link to download the duo_saml_signing.crt file. Rename the downloaded signing certificate to duo_saml_signing.cer. If you require use of IdP-initiated sign-on from Entra to the Duo Admin Panel, do not download this certificate for use.
Configure the Duo Admin Panel Application in Entra ID
-
In another browser tab or window, log into the Microsoft Entra admin center as a global administrator. Navigate to Click on Entra ID.
-
On the left-hand navigation bar click Enterprise Apps. Click + New application at the top of the screen.
-
Click + Create your own application at the top of the gallery page.
-
On the "Create your own application" page type "Duo Admin Panel" or any descriptive name you wish into the Input name field under "What's the name of your app?". Select the "non-gallery" option Integrate any other application you don't find in the gallery and then click Create.
The rest of these instructions assume you named the application Duo Admin Panel.
-
Once you're on the "Duo Admin Panel" application overview page in Entra ID, click Single sign-on in the left-hand navigation under "Manage". Select SAML on the "Select a single sign-on method" page.
-
Click Upload metadata file at the top of the page. Browse to and select the duo_saml_metadata.xml file you downloaded from the Duo Admin Panel earlier. Click Add after you select the XML file.
-
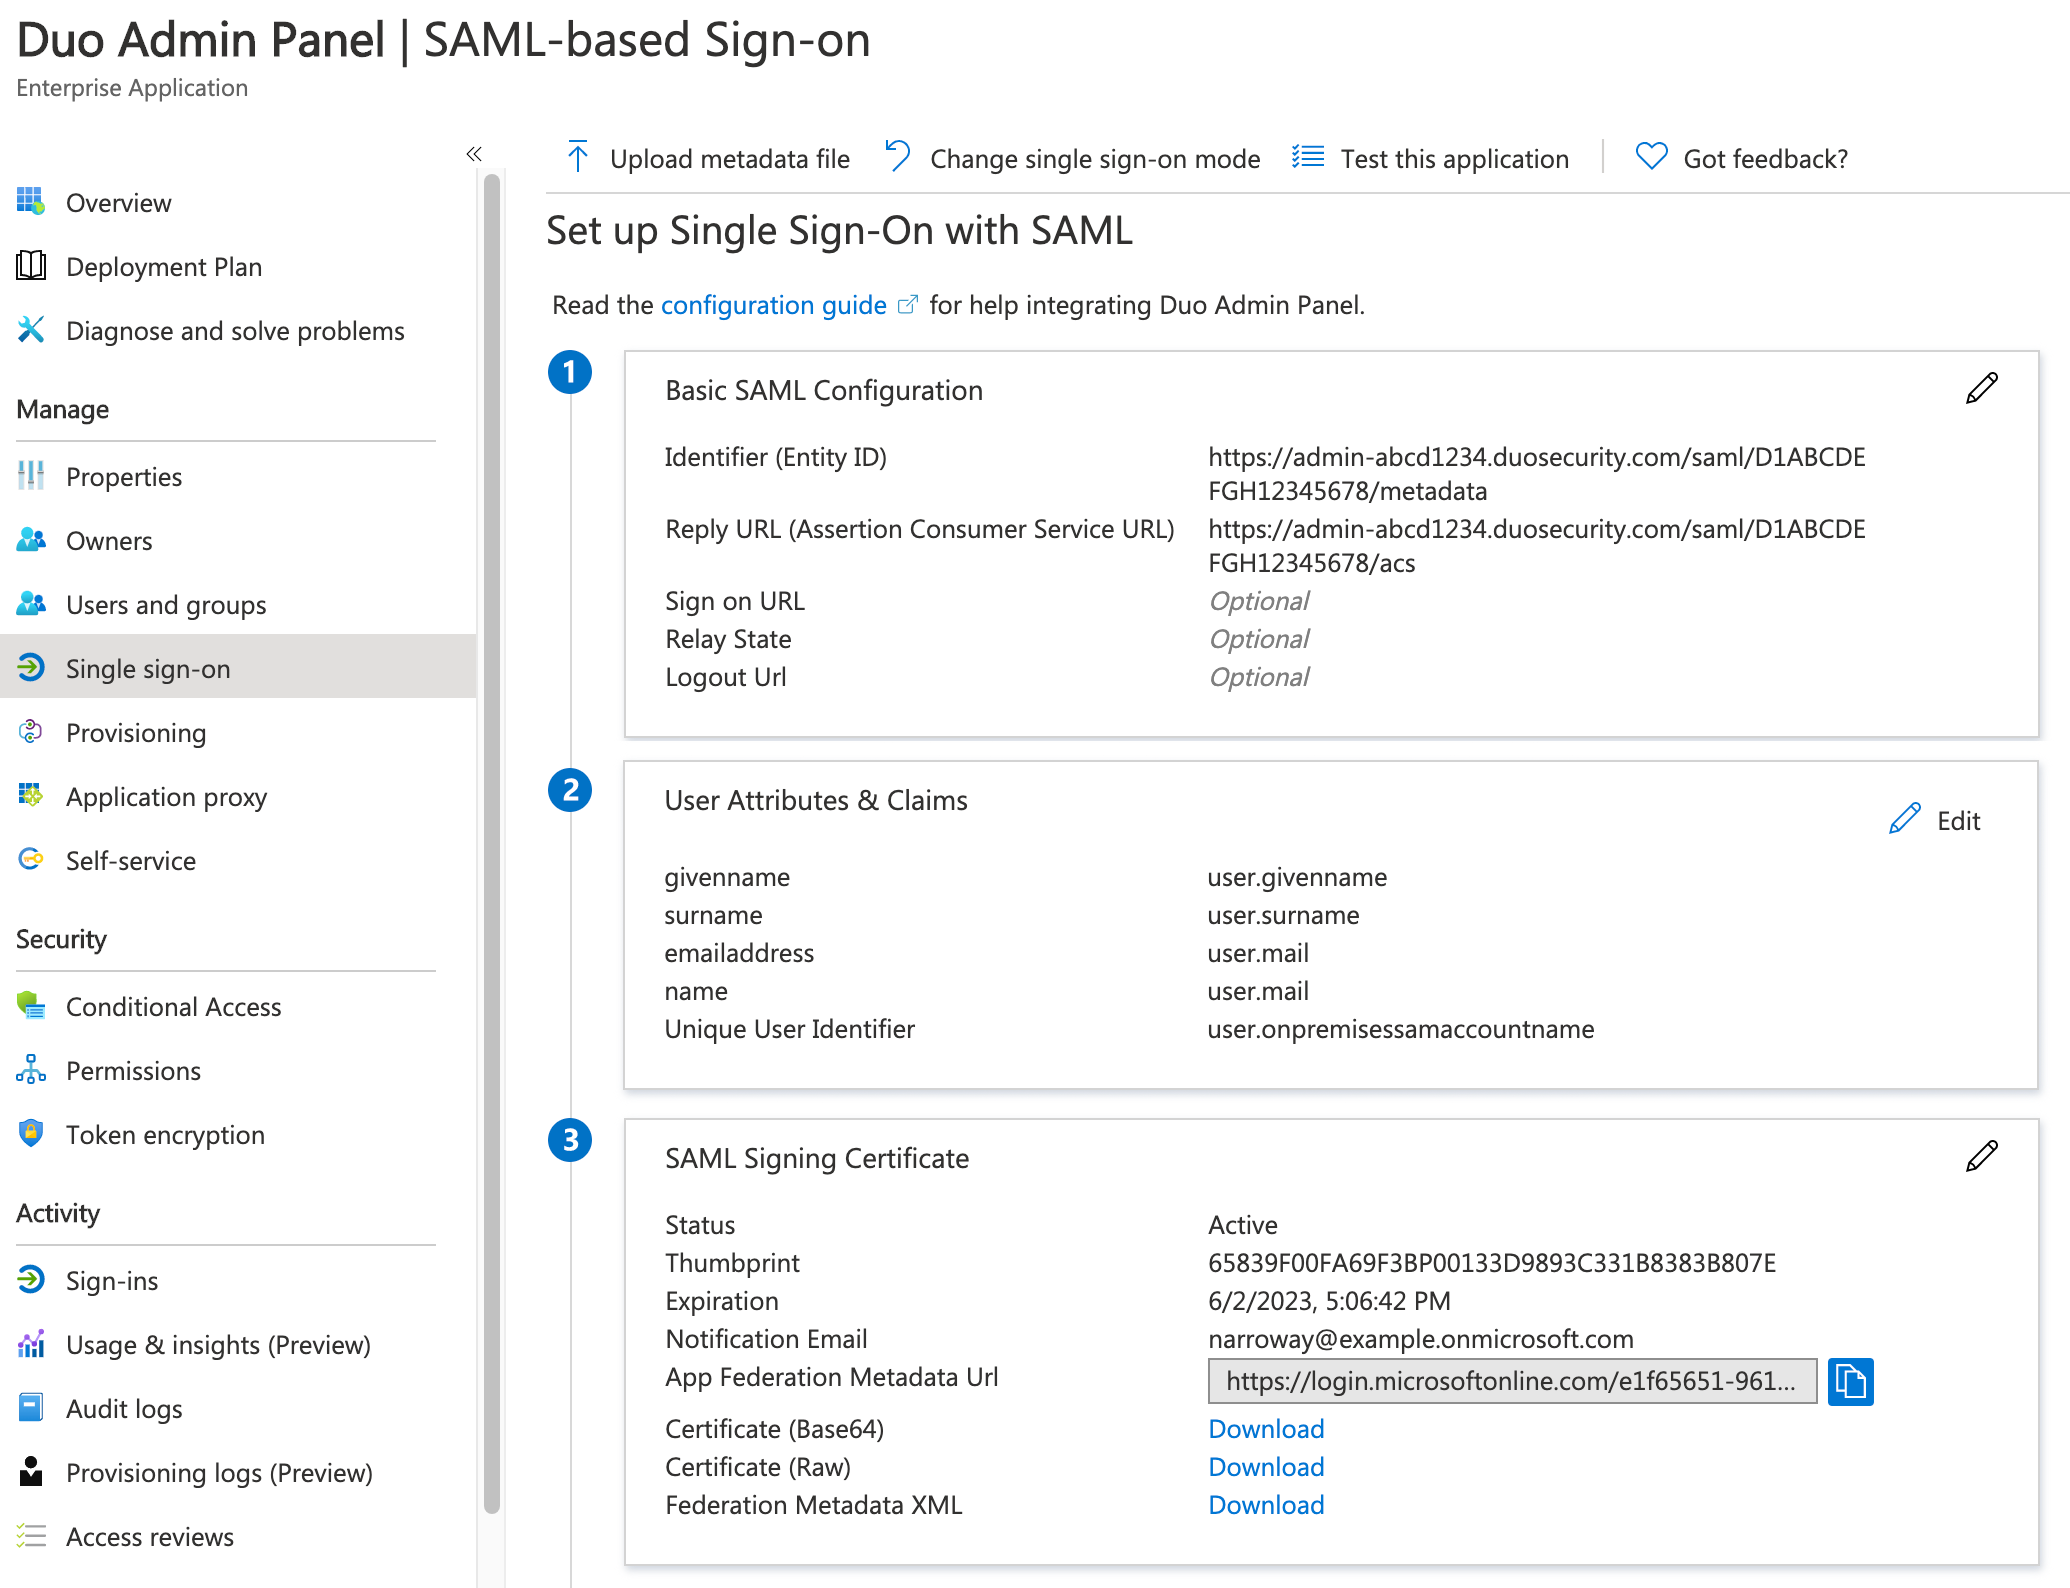
The "Basic SAML Configuration" pane shows the Duo "Identifier" and "Reply URL" values imported from the XML file. Leave all other fields empty, click Save, and close the "Basic SAML Configuration" editor.
-
Click to edit "Attributes & Claims".
-
Click the Unique User Identifier (Name ID) required claim.
-
On the "Manage Claim" page for the "nameidentifier" claim, use the drop-down to change the Source attribute to user.onpremisessamaccountname if your Duo admin users were synced into Entra from an on-premises Active Directory, or choose user.userprincipalname for Entra ID cloud-hosted users, and then click Save.
-
Ensure that an email attribute claim exists with the claim name
http://schemas.xmlsoap.org/ws/2005/05/identity/claims/nameand the valueuser.mail. Click the existinghttp://schemas.xmlsoap.org/ws/2005/05/identity/claims/nameclaim, use the drop-down to change the Source attribute to user.mail on the "Manage Claim" page for that claim, and click Save.If this claim does not exist, click Add new claim, and enter the following information:
Name nameNamespace http://schemas.xmlsoap.org/ws/2005/05/identity/claimsSource Select Attribute Source Attribute user.mailClick Save.
-
Close the "Attributes & Claims" editor.
-
Scroll further down to the "SAML Signing Certificate" section and click Edit.
-
Change the Signing option to Sign SAML response and assertion. Click Save and then close the "SAML Signing Certificate" editor.
-
Click the Download link next to Federation Metadata XML in the SAML Signing Certificate section to download the Entra ID SSO metadata file. The downloaded XML file has the same name as your Entra ID SSO application, such as Duo Admin Panel.xml. It may take a few minutes for Entra ID to create the metadata file after you create the new application.
-
If you enabled the Sign messages from Duo option in the Duo Admin Panel earlier, click to edit Verification certificates (optional) in the "SAML Signing Certificate" section.
-
Enable the Require verification certificates option. Next, click Upload certificate and select the duo_saml_signing.cer file you downloaded from Duo earlier and renamed. Click Save.
If you require use of IdP-initiated sign-on from Entra to the Duo Admin Panel, do not enable the Require verification certificates option or upload a certificate.
-
If you enabled the Require encrypted assertions option in the Duo Admin Panel earlier, click Token Encryption on the left, underneath "Security".
-
Click Import certificate and select the duo_saml_encryption.crt file you downloaded from Duo earlier.
-
Upon upload the encryption certificate has "Inactive" status. Click the three dots at the far right on the imported Duo certificate's row in the table, and then select Activate token encryption certificate. The status changes to "Active".
Do not try to test single sign-on yet!
Complete Duo Admin Panel Configuration
-
Return to the "Single Sign-On with SAML Configuration" section of the "Administrator Login Settings" page in the Duo Admin Panel.
-
Select either the Optional or Required "Authentication with SAML" option to expose the SAML Identity Provider Settings if no longer selected.
-
Change the "Identity provider" to Microsoft Entra ID if no longer selected.
-
Change the "Configuration method" to From file.
-
The "Metadata File" is the SAML XML metadata you downloaded earlier from the Entra admin center. Click the Choose File button to select the Duo Admin Panel.xml file (or whatever you named your Entra ID SSO application).
-
Enable encrypted assertions and request signing if you imported the Duo encryption and signing (verification) certificates into Entra ID. Do not enable these options if you did not import those certificates into Entra ID or did not enable the verification certificates option in Entra ID or activate the Duo encryption certificate in Entra ID. Click the Save button at the top-right of the page.
Test SSO and Assign the Application
-
Return to the Entra ID Duo Admin Panel SAML configuration page. Now you can test single sign-on. If the test succeeds, proceed to the next step. If not, review the previous configuration steps.
-
Click the Users and groups management item on the "Duo Admin Panel" app page and assign this application to those Duo administrators who will sign in to the Duo Admin Panel with SSO.
Configuring Duo administrator SSO using Google requires entering information from the Duo Admin Panel into the Google Admin console and vice-versa.
Start Duo Admin Panel Configuration
-
Navigate to the "Single Sign-On with SAML Configuration" section of the "Administrator Login Settings" page in the Duo Admin Panel.
-
Select either the Optional or Required "Authentication with SAML" option to expose the SAML Identity Provider Settings.
-
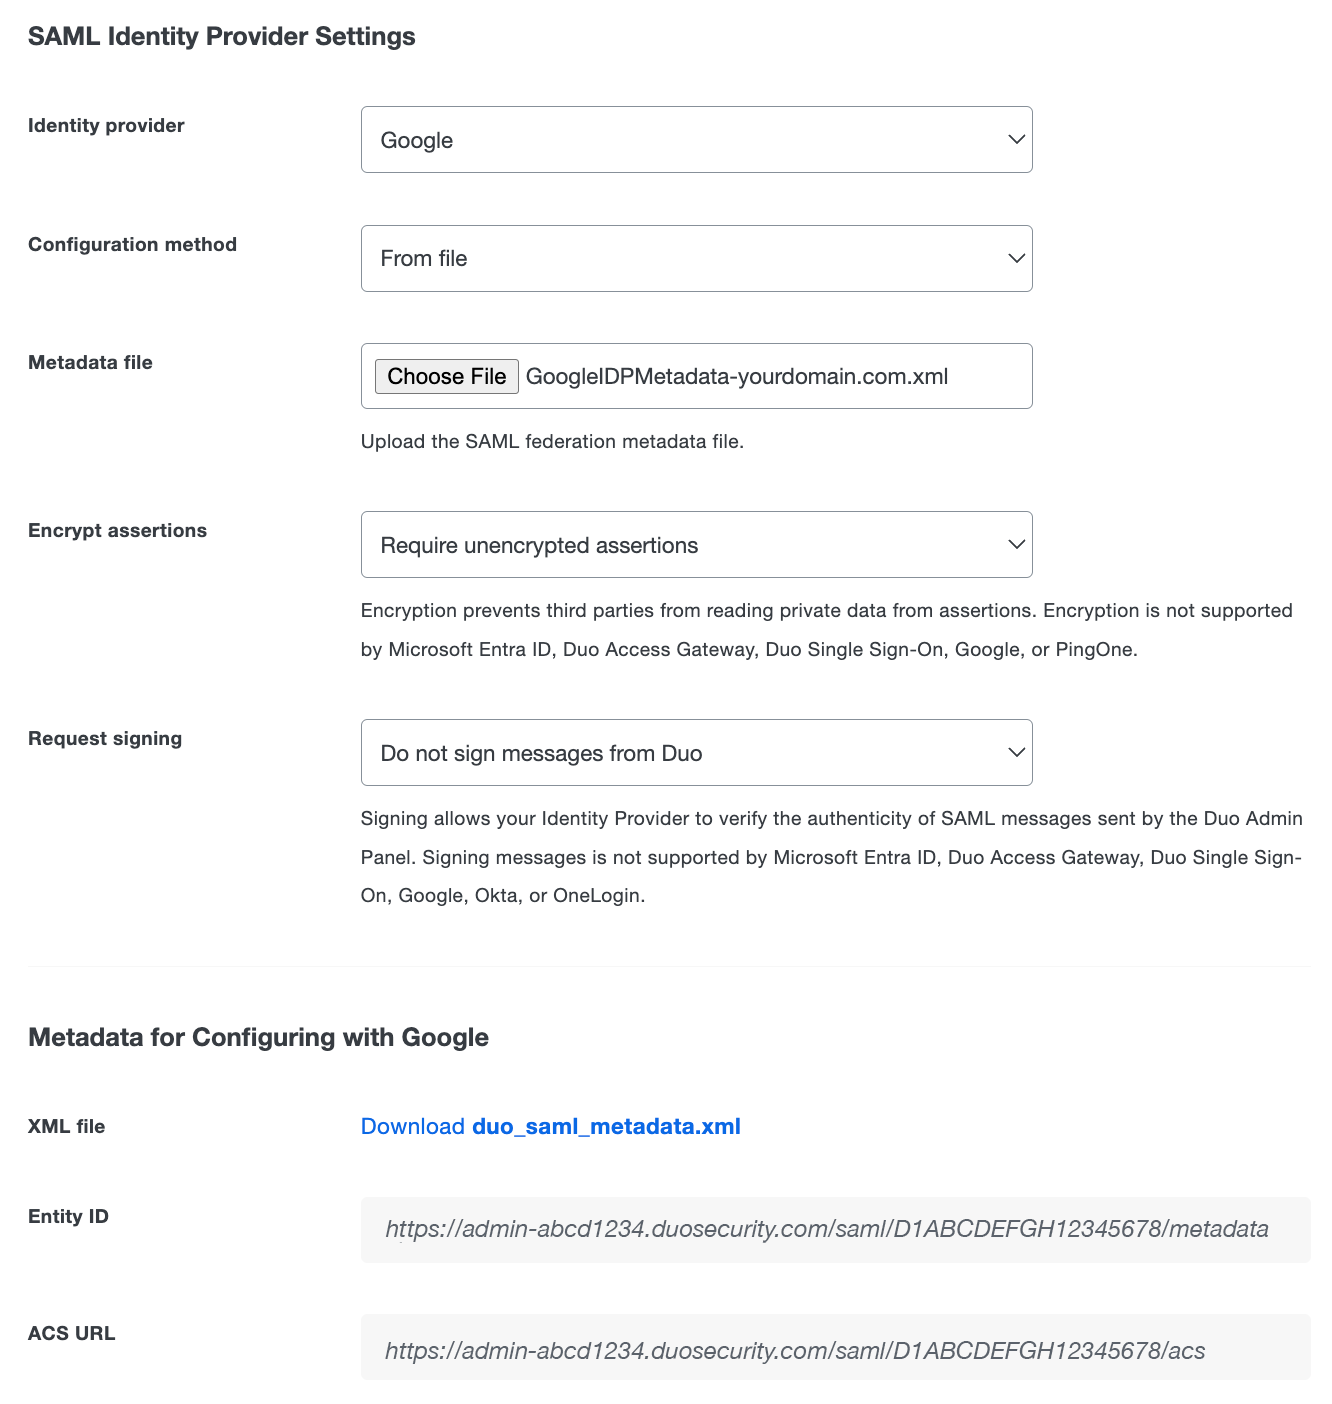
Change the "Identity provider" to Google.
-
Scroll down to the "Metadata for Configuring with Google" section of the page. You'll need to enter the Entity ID and ACS URL into the Google administrator portal in the next set of steps.
Configure the Duo Admin Panel Application in Google
-
In another browser tab or window, log into the Google Admin console as a user with the "Super Admin" role or "Security Settings" privileges. Navigate to Apps → SAML Apps.
-
Once on the "SAML Apps" page, click the yellow plus sign in the bottom right to begin creating a new SAML app.
-
On the step 1 "Enable SSO for SAML Application" page, click the SETUP MY OWN CUSTOM APP at the bottom.
-
On the step 2 "Google IdP Information" page, click the IDP Metadata Download button in the "Option 2" section. Click Next.
-
On the step 3 "Basic information for your Custom App" page, enter a name and description for the new application. The rest of these instructions assume you named the application Duo Admin Panel. Uploading a logo is optional. Click Next.
-
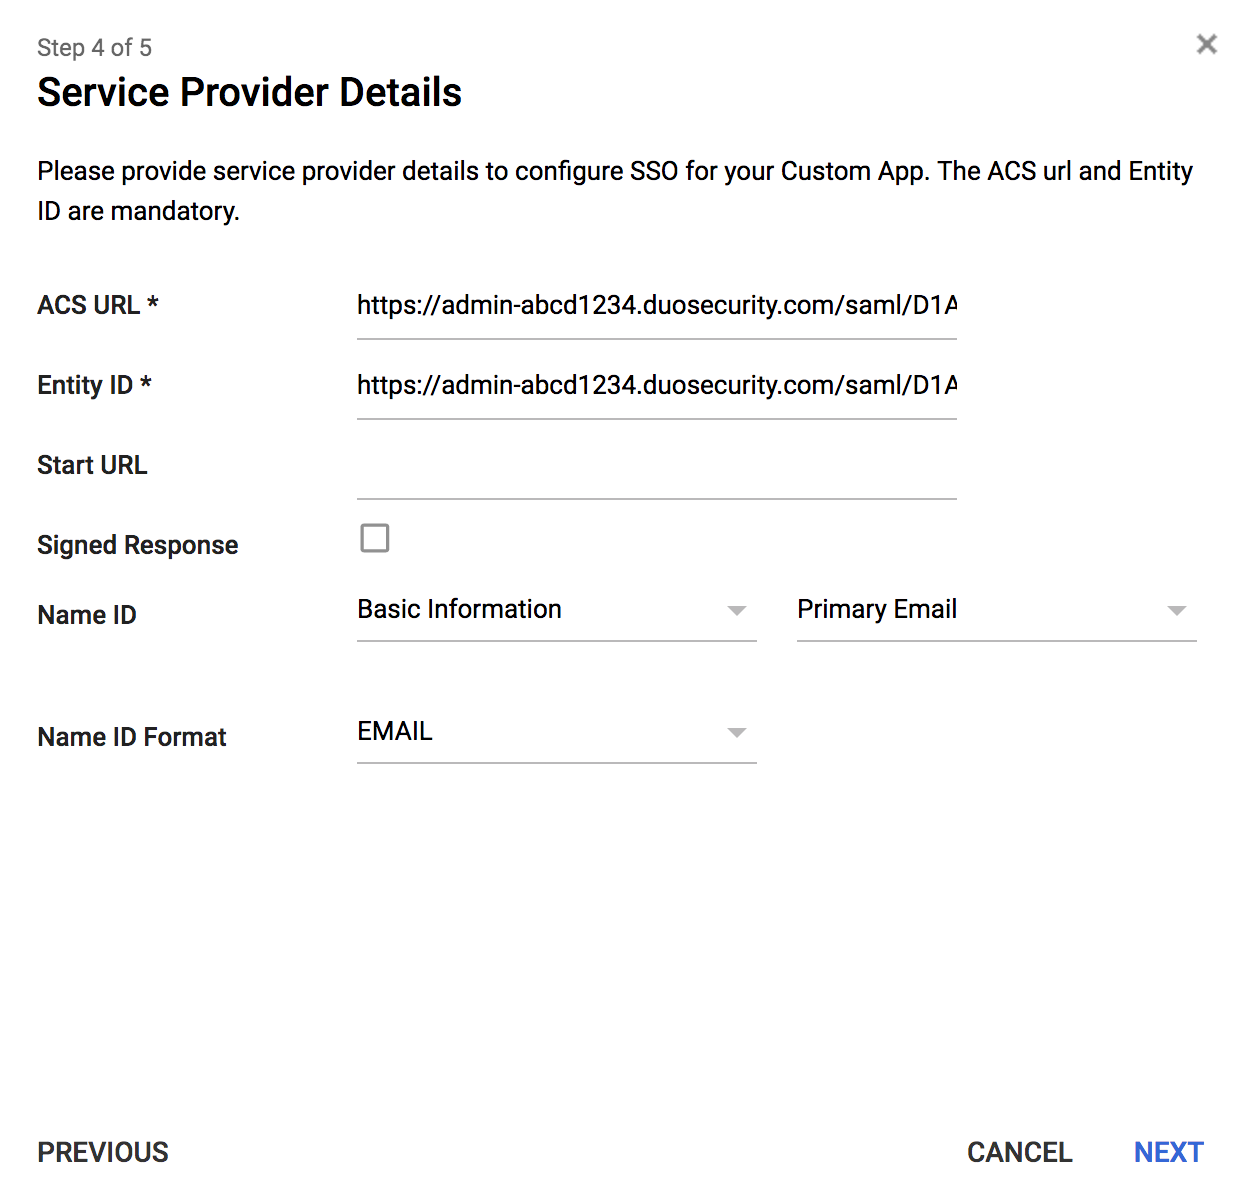
Return to the Duo Admin Panel and copy the Entity ID from the "Metadata for Configuring with Google" section of the "Administrator Login Settings" page. Paste the Entity ID from Duo into the Entity ID field on the step 4 "Service Provider Details" page.
The Duo Admin Panel Entity ID looks like:
https://admin-abcd1234.duosecurity.com/saml/D1ABCDEFGH12345678/metadata. -
Copy the ACS URL from the "Metadata for Configuring with Google" section of the "Administrator Login Settings" page in the Duo Admin Panel. Paste the ACS URL from Duo into the ACS URL field on the step 4 "Service Provider Details" page.
The Duo Admin Panel ACS URL looks like:
https://admin-abcd1234.duosecurity.com/saml/D1ABCDEFGH12345678/acs.Do not check the box next to the "Signed Response" option.
-
Leave the "Name ID" set to "Basic Information" and "Primary Email". Change the Name ID Format to EMAIL. Click Next.
-
Click Finish on the step 5 "Attribute Mapping" page as no mapping is necessary. The Duo Admin Panel SSO app is created but is "OFF for everyone" until you enable it. Click OK on the confirmation dialog.
-
Click the settings icon on the Duo Admin Panel app page and select either to turn it ON for everyone or ON for some organizations and then pick the OUs that contain the Duo administrators who will sign in to the Duo Admin Panel with SSO. Acknowledge the new assignment in the confirmation dialog.
Complete Duo Admin Panel Configuration
-
Return to the "Single Sign-On with SAML Configuration" section of the "Administrator Login Settings" page in the Duo Admin Panel.
-
Select either the Optional or Required "Authentication with SAML" option to expose the SAML Identity Provider Settings if no longer selected.
-
Change the "Identity provider" to Google.
-
Change the "Configuration method" to From file.
-
The "Metadata File" is the SAML XML IDP metadata you downloaded earlier from the Google Admin console. Click the Choose File button to select the GoogleIDPMetadata-yourdomain.com.xml file.
-
Click the Save button at the top right of the page.
Configuring Duo administrator SSO using Okta requires entering information from the Duo Admin Panel into the Okta administrator portal and vice-versa.
Start Duo Admin Panel Configuration
-
Navigate to the "Single Sign-On with SAML Configuration" section of the "Administrator Login Settings" page in the Duo Admin Panel.
-
Select either the Optional or Required "Authentication with SAML" option to expose the SAML Identity Provider Settings.
-
Change the "Identity provider" to Okta.
-
The default "Encrypt assertions" option is set to Require encrypted assertions. Select Require unencrypted assertions if you do not want to use encryption.
-
Click the Save button at the top right of the page.
-
Scroll down to the "Metadata for Configuring with Okta" section of the page. You'll need to enter the SAML URL into the Okta administrator portal in the next set of steps.
Configure the Duo Admin Panel App in Okta
-
Log into Okta as an administrative user. Click on the Admin button in the top right hand corner of the screen.
-
On the "Dashboard" page click the Applications menu item at the top. Once on the "Applications" page click the Add Application button.
-
Enter Duo Admin Panel in the search bar on the "Add Application" page. Select the "Duo Admin Panel" Okta application by clicking the Add button.
-
On the "Add Duo Admin Panel" page, check the boxes next to the Do not display application icon to users and Do not display application icon in the Okta Mobile App options and click the Done button.
-
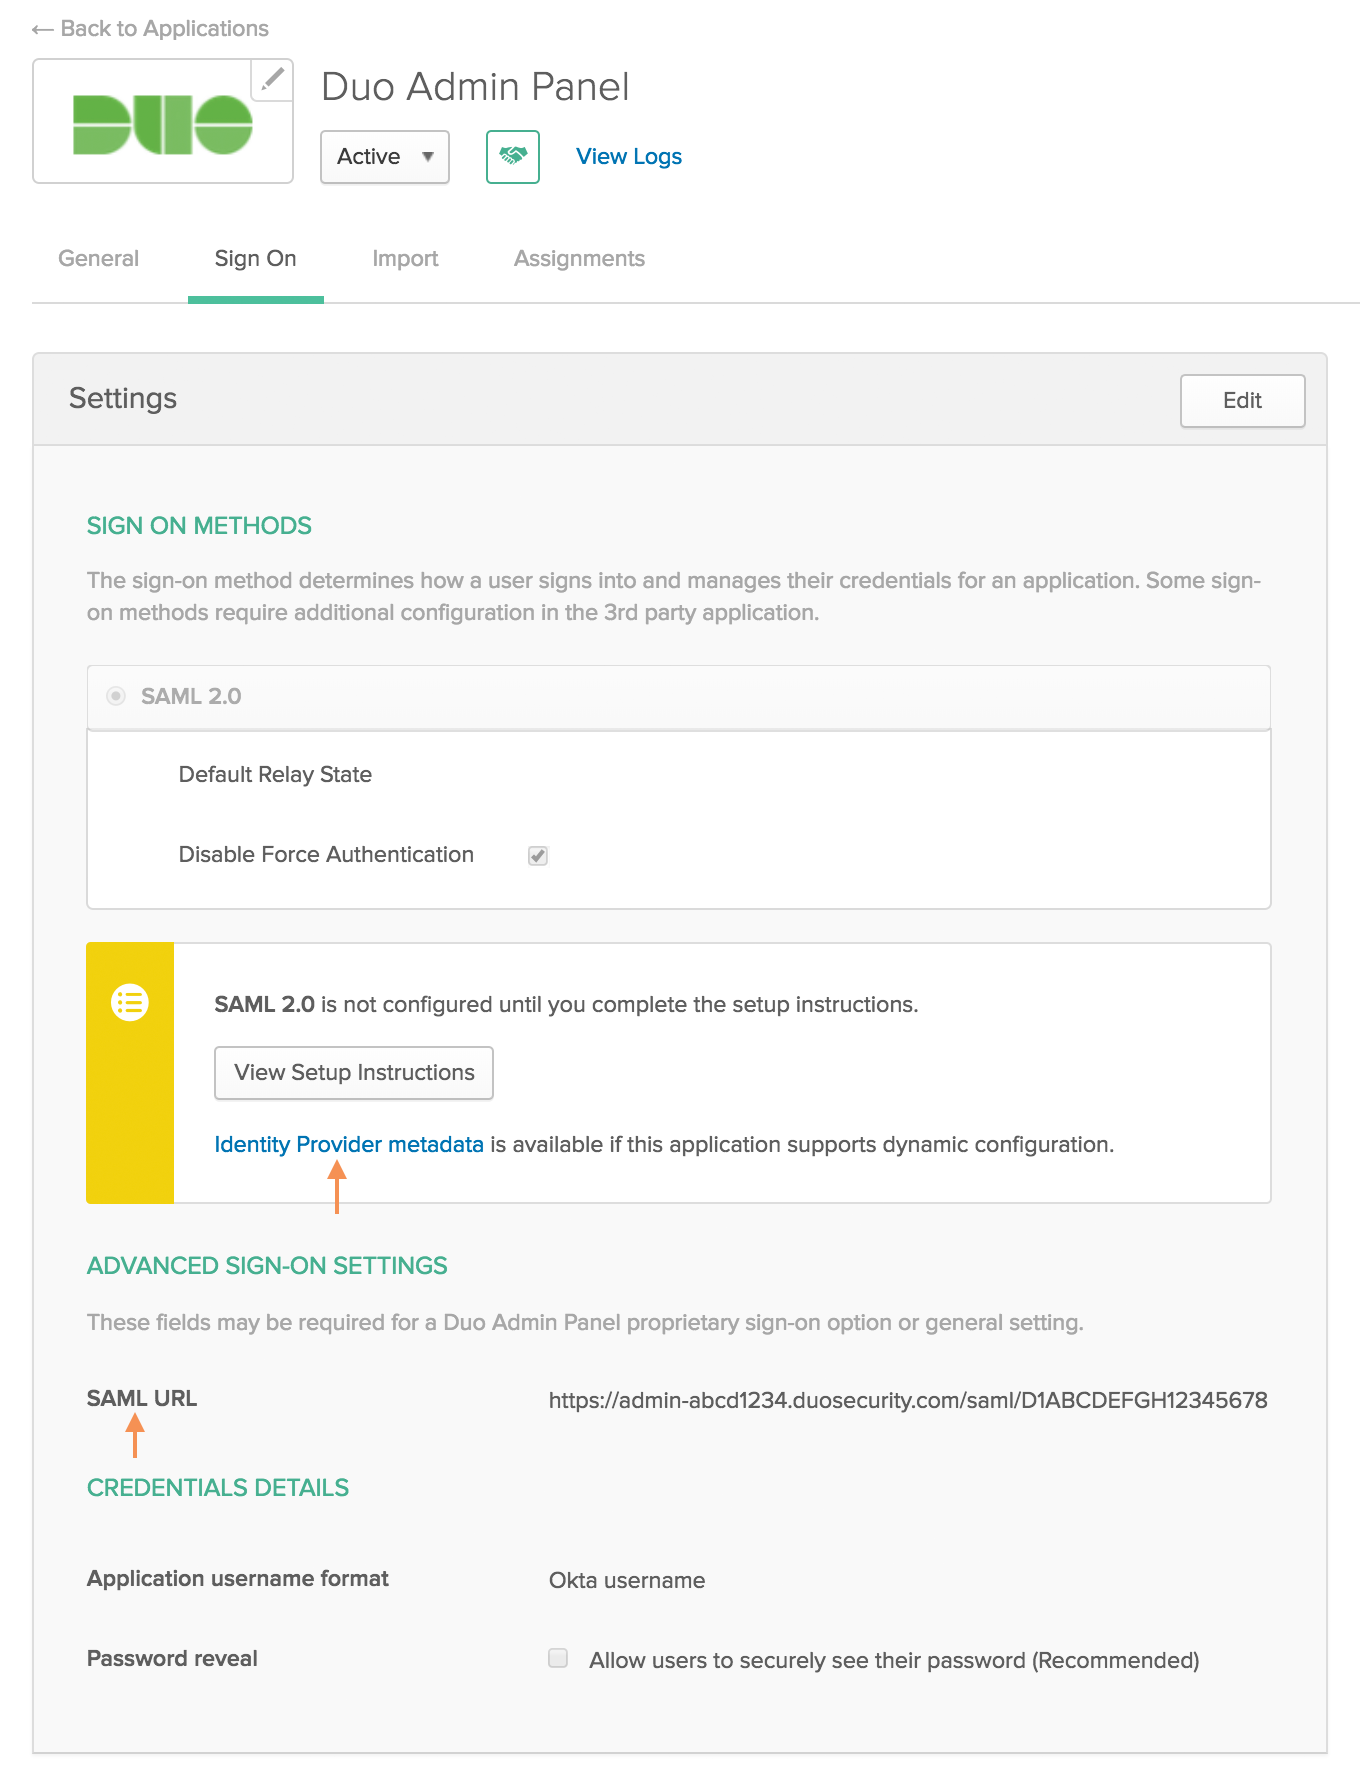
On the "Duo Admin Panel" Okta application page, click the Sign On tab and then click the Edit button.
-
Click the Identity Provider metadata link in the "SIGN ON METHODS" section of the page. This downloads a metadata file. You will need to provide the information from this file to Duo to complete setup.
-
Scroll down to the "ADVANCED SIGN-ON SETTINGS" section of the page. Return to the Duo Admin Panel and copy the SAML URL from the "Metadata for Configuring with Okta" section of the "Administrator Login Settings" page. Paste the SAML URL from Duo into the SAML URL field under "ADVANCED SIGN-ON SETTINGS" for the Duo Admin Panel Okta application.
The Duo Admin Panel SAML URL looks like:
https://admin-abcd1234.duosecurity.com/saml/D1ABCDEFGH12345678. -
Click the Save button.
-
Click the Assignments tab on the "Duo Admin Panel" Okta application page. Assign the Duo Admin Panel application to the Okta users or groups that will use Okta SSO to log on to the Duo Admin Panel. Ensure that the usernames for these users are email addresses that match their Duo admin login username.
Complete Duo Admin Panel Configuration
-
Return to the "Single Sign-On with SAML Configuration" section of the "Administrator Login Settings" page in the Duo Admin Panel.
-
Select either the Optional or Required "Authentication with SAML" option to expose the SAML Identity Provider Settings if no longer selected.
-
Change the "Identity provider" to Okta.
-
Change the "Configuration method" to Paste.
-
Open the metadata file you downloaded from Okta in a text editor. Copy the entire contents of that file and paste it into the Metadata XML field under "SAML Identity Provider Settings".
-
Click the Save button at the top right of the page.
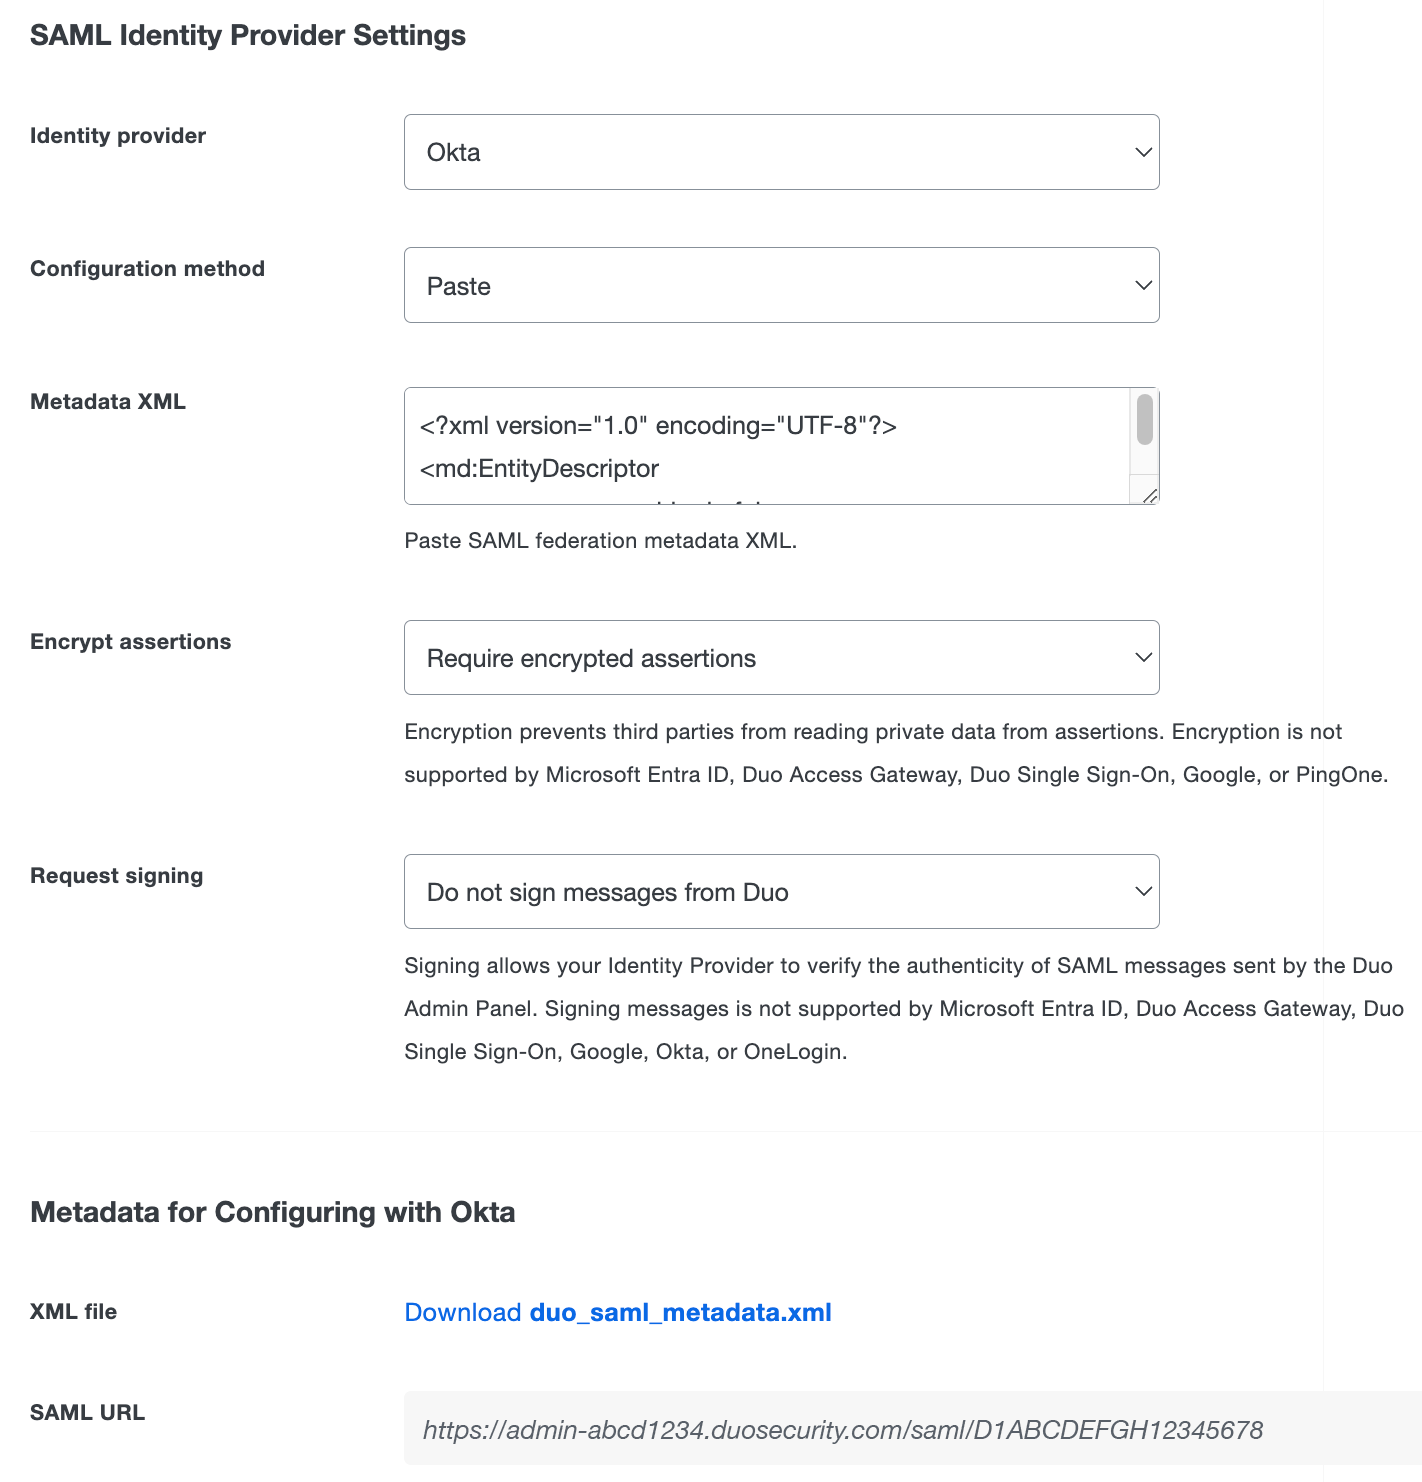
Configuring Duo administrator SSO using OneLogin requires entering information from the Duo Admin Panel into the OneLogin administrator portal and vice-versa.
Start Duo Admin Panel Configuration
-
Navigate to the "Single Sign-On with SAML Configuration" section of the "Administrator Login Settings" page in the Duo Admin Panel.
-
Select either the Optional or Required "Authentication with SAML" option to expose the SAML Identity Provider Settings.
-
Change the "Identity provider" to OneLogin.
-
The default "Encrypt assertions" option is set to Require encrypted assertions. Select Require unencrypted assertions if you do not want to use encryption.
-
Click the Save button at the top right of the page.
-
Scroll down to the "Metadata for Configuring with OneLogin" section of the page. You'll need to enter the SAML URL into the OneLogin administrator portal in the next set of steps.
Configure the Duo Admin Panel Application in OneLogin
-
In another browser tab or window, log into OneLogin as an administrative user and click Administration at the top to access the configuration portal. Navigate to APPS → Add Apps.
-
Type Duo Admin Panel into the search field on the "Find Applications". It should return only one SAML 2.0 app result called "Duo Admin Panel". Click on the Duo Admin Panel application to create it.
-
On the "Configuration" page click on the Visible in portal switch to toggle it off.
-
Click Save at the top of the screen.
-
Once you're on the Duo Admin Panel app page in OneLogin, click the Configuration tab at the top of the screen.
-
Return to the Duo Admin Panel and copy the SAML URL from the "Metadata for Configuring with OneLogin" section of the "Administrator Login Settings" page. Paste the SAML URL from Duo into the Hostname field into the SAML URL field next to "Application Details".
The Duo Admin Panel SAML URL looks like:
https://admin-abcd1234.duosecurity.com/saml/D1ABCDEFGH12345678. -
Click the Save button on the OneLogin application configuration page.
-
Click the SSO tab at the top of the screen.
-
Change the "SAML Signature Algorithm" to SHA-256 and click SAVE.
-
Return to the SSO tab. Click the View Details link under the "X.509 Certificate".
-
On the "Standard Strength Certificate (2048-bit)" page under "X.509 Certificate", select X.509 PEM from the drop-down and click DOWNLOAD. This downloads a onelogin.pem file that you'll upload to the Duo Admin Panel later.
-
Click the back arrow to the left of "Standard Strength Certificate (2048-bit)" to return to the Duo Admin Panel OneLogin app's settings. Click SSO near the top of the screen again.
-
You'll need to provide information from the OneLogin "SSO" page to the Duo Admin Panel, so keep this page open.
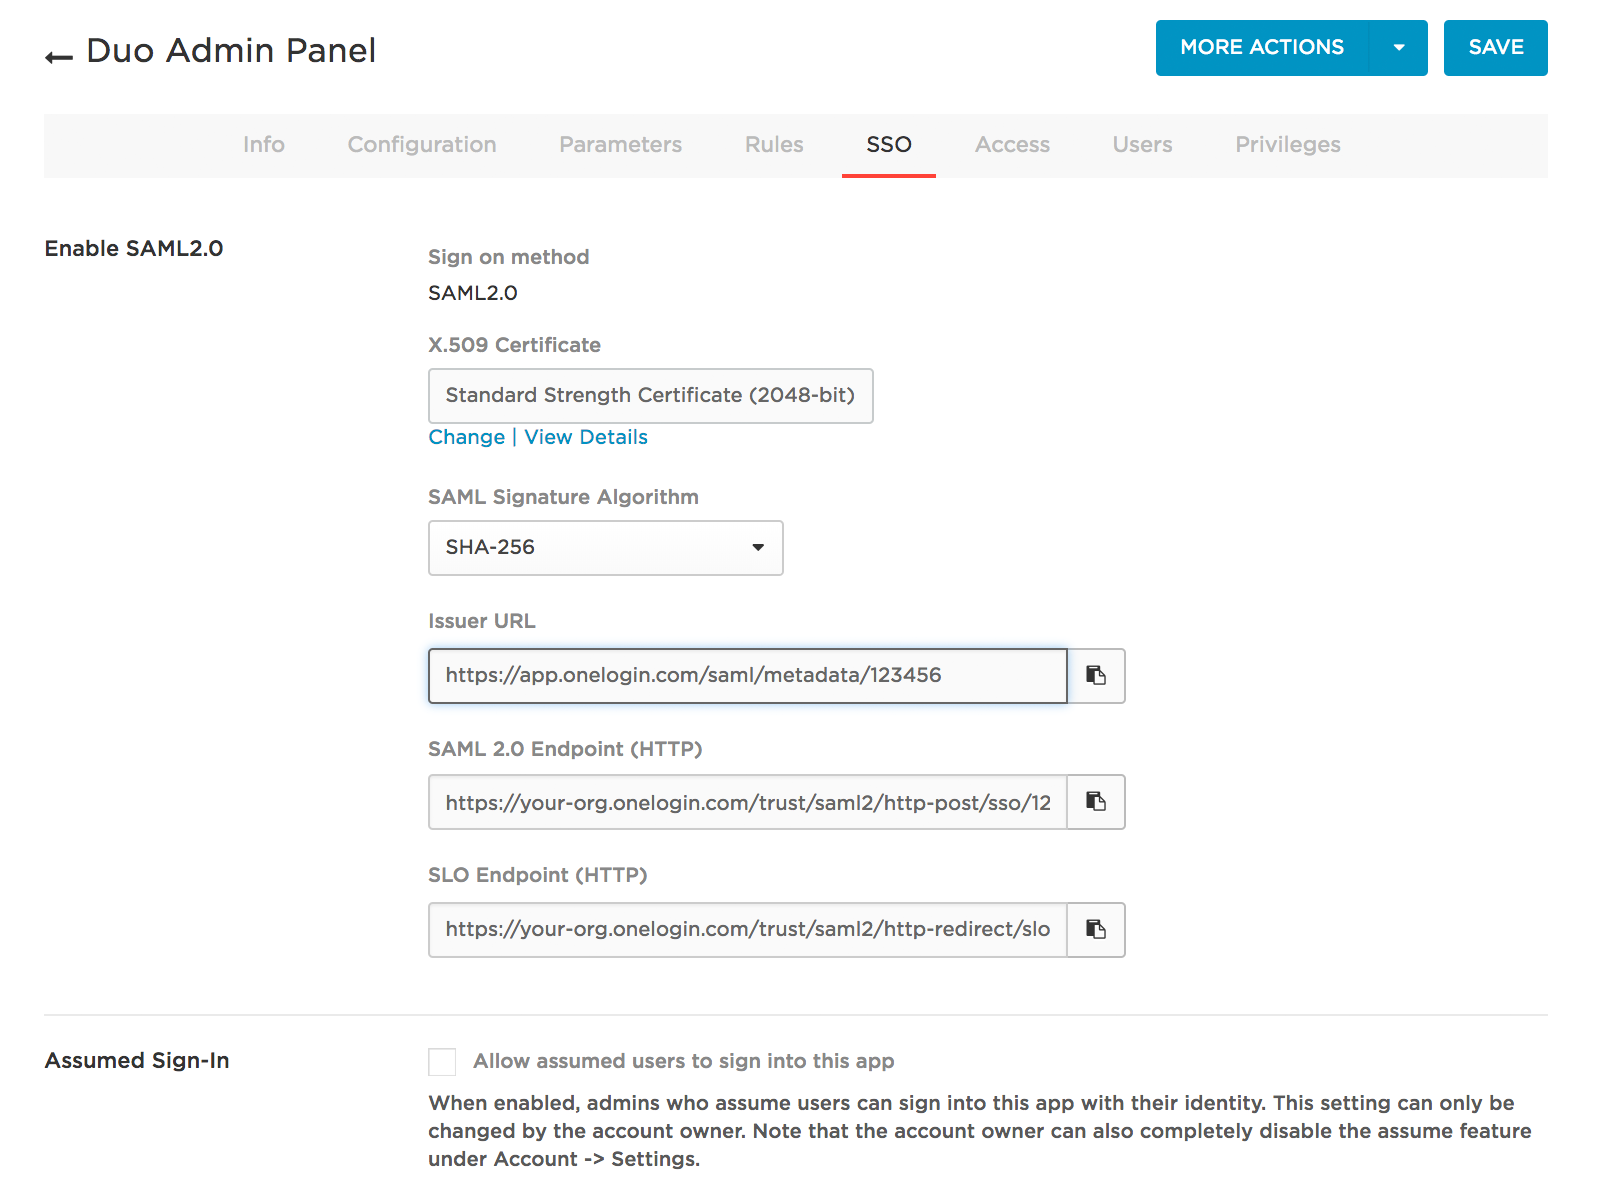
Complete Duo Admin Panel Configuration
-
Return to the "Single Sign-On with SAML Configuration" section of the "Administrator Login Settings" page in the Duo Admin Panel.
-
Select either the Optional or Required "Authentication with SAML" option to expose the SAML Identity Provider Settings if no longer selected.
-
Change the "Identity provider" to OneLogin.
-
Leave the "Configuration method" set to Manual entry.
-
Copy the Issuer URL from the OneLogin SSO page and paste it into the Duo Admin Panel's Entity ID or issuer ID field.
Example: https://app.onelogin.com/saml/metadata/123456
-
Copy the SAML 2.0 Endpoint (HTTP) from the OneLogin SSO page and paste it into the Duo Admin Panel's Assertion consumer service URL or single sign-on URL field.
Example: https://your-org.onelogin.com/trust/saml2/http-post/sso/123456
-
The "Certificate" is the OneLogin certificate you downloaded earlier. Click the Choose File button to select the onelogin.pem file. Upload the certificate.
-
Click the Save button at the top right of the page.
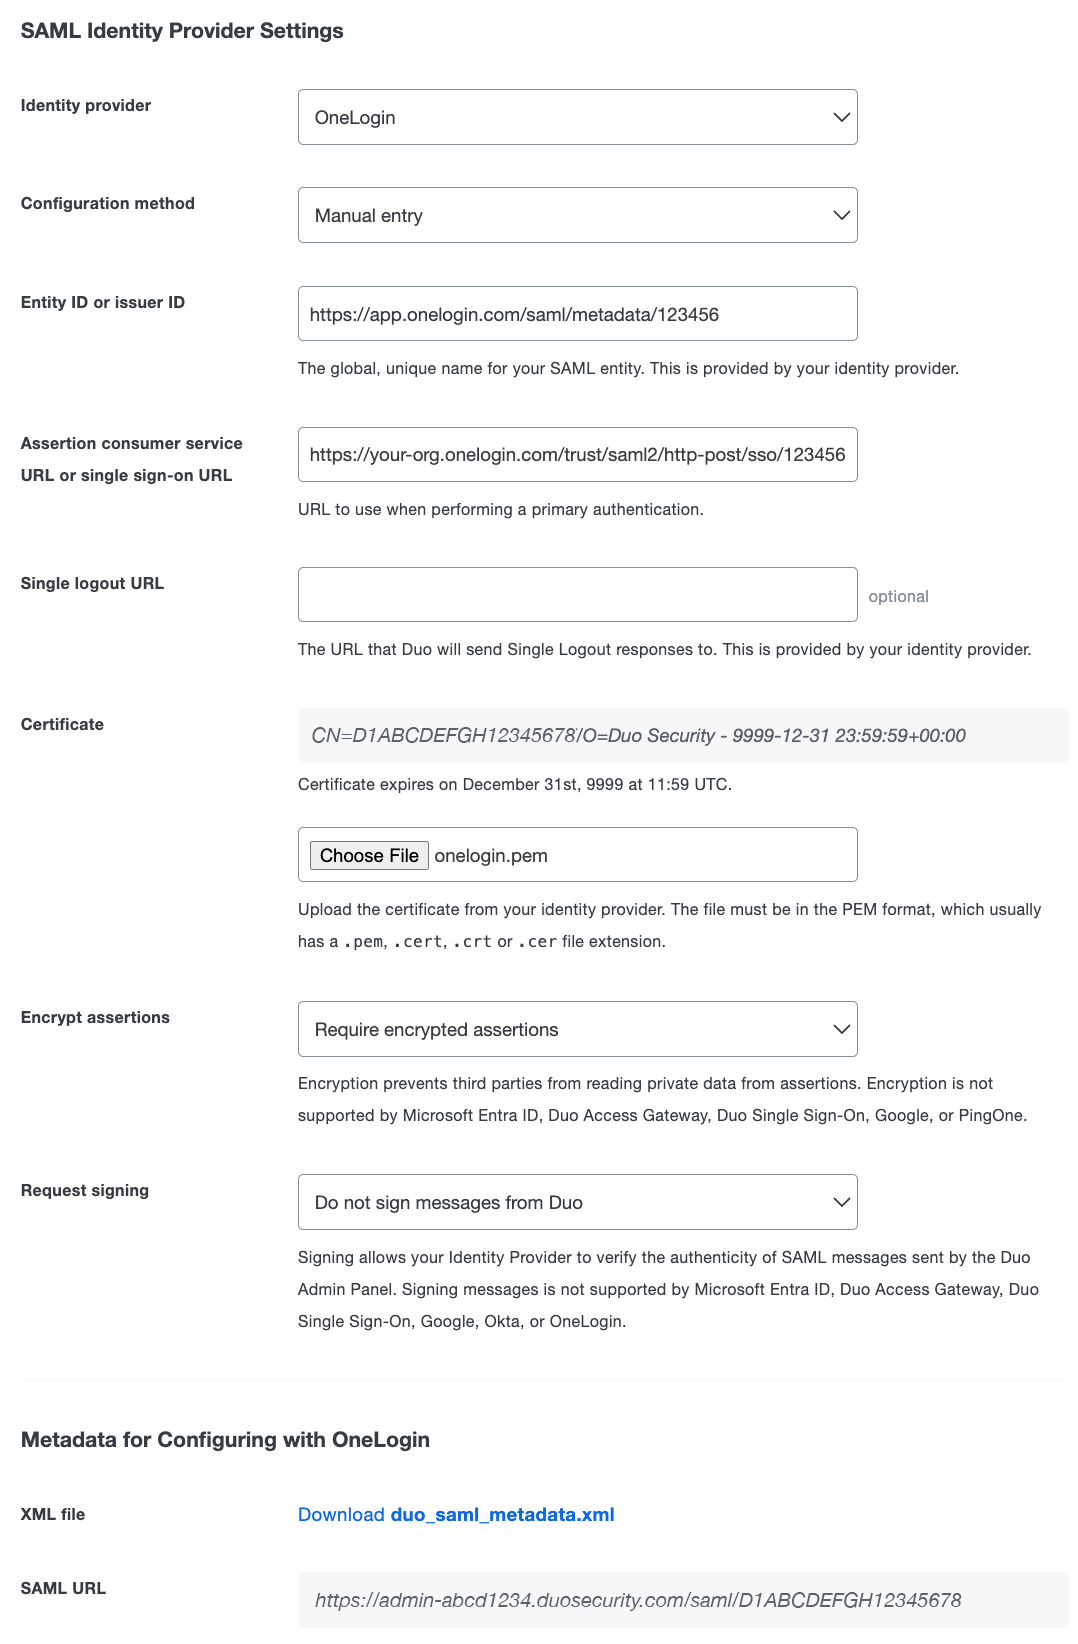
Remember to assign the new "Duo Admin Panel" OneLogin application to the users who will log into the Duo Admin Panel with SSO.
Configuring Duo administrator SSO using PingOne requires entering information from the Duo Admin Panel into PingOne and vice-versa.
Start Duo Admin Panel Configuration
-
Navigate to the "Single Sign-On with SAML Configuration" section of the "Administrator Login Settings" page in the Duo Admin Panel.
-
Select either the Optional or Required "Authentication with SAML" option to expose the SAML Identity Provider Settings.
-
Change the "Identity provider" to PingOne.
-
The default "Request signing" option is set to Do not sign messages from Duo. Select Sign messages from Duo if you want Duo to send signed SAML messages to your identity provider. If "Sign messages from Duo" is selected, the signing certificate information will be included in the Duo metadata file you will upload to PingOne later.
-
Click the Save button at the top right of the page.
-
Scroll down to the "Metadata for Configuring with PingOne" section and click the Download duo_saml_metadata.xml link to download a copy of the metadata file. The downloaded file name is duo_saml_metadata.xml. This metadata file is uniquely generated for your Duo customer account and must be used to complete SSO configuration before it expires 30 days from download. Once you use the metadata file to configure SSO, the configuration does not expire.
Configure the Duo Admin Panel Application in PingOne
-
In another browser tab or window, log into the PingOne Admin portal.
-
Navigate to the "Applications" page and click the New Application drop-down. Select the "New SAML Application" option.
-
Enter a name, description, and category for the Duo Admin Panel app.
-
Click the Select File button next to the "Upload Metadata" field. Select the duo_saml_metadata.xml file you downloaded from the Duo Admin Panel earlier. Uploading the file fills in the required fields for you.
-
Download the PingOne IdP metadata by clicking the "SAML Metadata" Download link. You'll need this metadata file to finish configuration of the Duo Admin Panel.
-
Click Continue to Next Step. No other attributes are required, so click Save and Publish, and then click Finish on the next page.
Complete Duo Admin Panel Configuration
-
Return to the "Single SignOn with SAML Configuration" section of the "Administrator Login Settings" page in the Duo Admin Panel.
-
Select either the Optional or Required "Authentication with SAML" option to expose the SAML Identity Provider Settings if no longer selected.
-
Change the "Identity provider" to PingOne.
-
Change the "Configuration method" to From file.
-
The "Metadata File" is the SAML XML metadata you downloaded earlier from PingOne. Click the Choose File button to select the PingOne metadata file.
-
Click the Save button at the top right of the page.
Configuring Duo administrator SSO using PingFederate requires entering information from the Duo Admin Panel into PingFederate and vice-versa.
Start Duo Admin Panel Configuration
-
Navigate to the "Single Sign-On with SAML Configuration" section of the "Administrator Login Settings" page in the Duo Admin Panel.
-
Select either the Optional or Required "Authentication with SAML" option to expose the SAML Identity Provider Settings.
-
Change the "Identity provider" to PingFederate.
-
The default "Encrypt assertions" option is set to Require encrypted assertions. Select Require unencrypted assertions if you do not want to use encryption.
-
The default "Request signing" option is set to Do not sign messages from Duo. Select Sign messages from Duo if you want Duo to send signed SAML messages to your identity provider.
-
Click the Save button at the top right of the page.
-
Scroll down to the "Metadata for Configuring with PingFederate" section. You will need to copy information from here to paste into PingFederate to complete SSO setup. If you are using encrypted assertions or signed messages it is important to save the single sign-on configuration before configuring PingFederate ensure the Duo metadata includes the information necessary for encryption.
Configure the Duo Admin Panel Application in PingFederate
-
In another browser tab or window, log into your PingFederate admin console.
-
Navigate to the "IdPConfiguration" page under "SP CONNECTIONS" and click Create New.
-
On the "SP Connection - Connection Type" page under "Connection Template" make sure that BROWSER SSO PROFILES is the only option checked. Click Next.
-
On the "SP Connection - Connection Options" page under "Browser SSO" make sure that BROWSER SSO is the only option checked. Click Next.
-
On the "SP Connection - Import Metadata" next to "METADATA" select URL.
Return to the Duo Admin Panel and copy the Metadata URL from the "Metadata for Configuring with PingFederate" section of the "Administrator Login Settings" page. Paste the Metadata URL from Duo into the NEW URL field.
The Duo Admin Panel Metadata URL looks like:
https://admin-abcd1234.duosecurity.com/saml/D1ABCDEFGH12345678/metadata. -
Leave EXISTING URL NAME at the default selection and ENABLE AUTOMATIC RELOADING selected and click Load Metadata. The page will reload and say "Metadata successfully loaded". Click Next.
-
Review the information on the "SP Connection - Metadata Summary" page and click Next.
-
On the "SP Connection - General Info" page some fields should already be populated with information from the Duo metadata. You may fill out the other optional information. Click Next.
-
On the "SP Connection - Browser SSO" page click Configure Browser SSO.
-
On the "SP Connection - Browser SSO - SAML Profiles" page under "Single Sign-On (SSO) Profiles", check the boxes next to IDP-INITIATED SSO and SP-INITIATED SSO. Leave the boxes under "Single Logout (SLO) Profiles" unchecked. Click Next.
-
On the "SP Connection - Browser SSO - Assertion Lifetime" page you can change how long a SAML assertion to PingFederate remains valid. Unless you're comfortable with SAML we recommend leaving these settings at their defaults. Click Next.
-
On the "SP Connection - Browser SSO - Assertion Creation" page click Configure Assertion Creation.
-
On the "SP Connection - Browser SSO - Assertion Creation - Identity Mapping" page select STANDARD and click Next.
-
On the "SP Connection - Browser SSO - Assertion Creation - Attribute Contract" page verify that under "Subject Name Format" urn:oasis:names:tc:SAML:1.1:nameid-format:unspecified is selected. Leave all other options on the page at their defaults. Click Next.
-
On the "SP Connection - Browser SSO - Assertion Creation - Authentication Source Mapping" page click Map New Adapter Instance.
-
On the "SP Connection - Browser SSO - Assertion Creation - IdP Adapter Mapping - Adapter Instance" page next to "Adapter Instance" select the authentication source you'd like to use to verify the credentials for users logging into the Duo Admin Panel via SAML. The Duo Admin Panel requires an IdP attribute from the source directory whose value matches the e-mail address of the existing Duo admin user. Click Next.
-
On the "SP Connection - Browser SSO - Assertion Creation - IdP Adapter Mapping - Mapping Method" page under "Adapter Contract" select the option USE ONLY THE ADAPTER CONTRACT VALUES IN THE SAML ASSERTION and click Next.
-
On the "SP Connection - Browser SSO - Assertion Creation - IdP Adapter Mapping - Attribute Contract Fulfillment" page next to "SAML_SUBJECT" click the drop-down under "Source" and select Adapter. The page will reload. Under "Value" select the name of the attribute that contains the e-mail address value. Click Next.
-
The settings on the "SP Connection - Browser SSO - Assertion Creation - IdP Adapter Mapping - Issuance Criteria" page can be left at the defaults unless you'd like to limit the scope of which users can access this service provider. Please consult your PingFederate documentation for more information. Click Next.
-
On the "SP Connection - Browser SSO - Assertion Creation - IdP Adapter Mapping - Summary" page review the information for correctness then click Done.
You'll return to the "SP Connection - Browser SSO - Assertion Creation" page. Click Next.
-
On the "SP Connection - Browser SSO - Assertion Creation" page click Done and then click Next.
-
On the "SP Connection - Browser SSO - Protocol Settings" page click Configure Protocol Settings.
-
On the "SP Connection - Browser SSO - Protocol Settings - Assertion Consumer Service URL" page there should already be an "Endpoint URL" populated from the Duo metadata. Click Next.
-
On the "SP Connection - Browser SSO - Protocol Settings - Allowable SAML Bindings" page make sure that only POST and REDIRECT are selected. Uncheck all other options. Click Next.
-
On the "SP Connection - Browser SSO - Protocol Settings - Signature Policy" page verify that REQUIRE AUTHN REQUESTS TO BE SIGNED WHEN RECEIVED VIA THE POST OR REDIRECT BINDINGS is unchecked and ALWAYS SIGN THE SAML ASSERTION is checked. Click Next.
-
On the "SP Connection - Browser SSO - Protocol Settings - Encryption Policy" page select NONE and click Next.
-
On the "SP Connection - Browser SSO - Protocol Settings - Summary" page review the information and click Done.
-
On the "SP Connection - Browser SSO - Protocol Settings" page click Next.
-
On the "SP Connection - Browser SSO - Summary" page click Done.
-
On the "SP Connection - Browser SSO" page click Next.
-
On the "SP Connection - Credentials" page click Configure Credentials.
-
On the "SP Connection - Credentials - Digital Signature Settings" page select your SAML IdP signing certificate from the drop-down next to SIGNING CERTIFICATE.
Check the boxes next to INCLUDE THE CERTIFICATE IN THE SIGNATURE <KEYINFO> ELEMENT and INCLUDE THE RAW KEY IN THE SIGNATURE <KEYVALUE> ELEMENT.
Select RSA SHA256 from the drop-down next to "Signing Algorithm" and click Done.
-
On the "SP Connection - Credentials" page click Next.
-
On the "SP Connection - Activation & Summary" page next to "Connection Status" select ACTIVE.
-
Scroll to the bottom of the page and click Save. You'll return to the home page.
-
Click Server Configuration on the left side menu.
-
Under "Administrative Functions" select Metadata Export.
-
On the "Export Metadata - Metadata Role" page select I AM THE IDENTITY PROVIDER (IDP) and click Next.
-
On the "Export Metadata - Metadata Mode" page select USE A CONNECTION FOR METADATA GENERATION and click Next.
-
On the "Export Metadata - Connection Metadata" page select the Duo Admin Panel service provider you configured earlier in PingFederate in the drop-down. Click Next.
-
On the "Export Metadata - Metadata Signing" page select the IdP SAML signing certificate you chose while configuring the Duo Admin Panel service provider earlier in the drop-down.
Check the boxes next to INCLUDE THE CERTIFICATE IN THE SIGNATURE <KEYINFO> ELEMENT and INCLUDE THE RAW KEY IN THE SIGNATURE <KEYVALUE> ELEMENT.
Select RSA SHA256 from the drop-down next to "Signing Algorithm" and click Next.
-
Review the information on the "Export Metadata - Export & Summary" page. Click Export to download the PingFederate Identity Provider XML file. Once you've retrieved the file click Done.
Complete Duo Admin Panel Configuration
-
Return to the "Single SignOn with SAML Configuration" section of the "Administrator Login Settings" page in the Duo Admin Panel.
-
Select either the Optional or Required "Authentication with SAML" option to expose the SAML Identity Provider Settings if no longer selected.
-
Change the "Identity provider" to PingFederate.
-
Change the "Configuration method" to From file.
-
The "Metadata File" is the PingFederate Identity Provider XML file you downloaded earlier from the PingFederate console. Click the Choose File button to select the PingFederate metadata file.
-
Click the Save button at the top right of the page.
Configuring Duo administrator SSO using Shibboleth requires entering information from the Duo Admin Panel into Shibboleth and vice-versa.
Duo Admin Panel Configuration
-
Obtain the metadata XML file for your Shibboleth IdP.
If you cannot obtain the metadata XML file, gather the following information: EntityID, the Single Sign On URL for the HTTP-Redirect binding, and the signing certificate for your Shibboleth IdP.
-
Navigate to the "Single Sign-On with SAML Configuration" section of the "Administrator Login Settings" page in the Duo Admin Panel.
-
Select either the Optional or Required "Authentication with SAML" option to expose the SAML Identity Provider Settings.
-
Change the "Identity provider" to Shibboleth.
-
If you have the Shibboleth IdP metadata XML file, change the "Configuration method" to From file. Click Choose File to select your Shibboleth IdP metadata XML file.
If you do not have the Shibboleth IdP metadata XML file, change the "Configuration method" to "Manual Entry" and enter the "EntityID" from Shibboleth as the Entity ID or Issuer ID and the "Single Sign On URL for the HTTP-Redirect binding" from Shibboleth as the Assertion consumer service URL or single sign-on URL. Optionally, you can enter the single logout URL from Shibboleth into the Single logout URL field.
Click Choose file next to the Certificate field and select the Shibboleth IdP's signing certificate file.
-
The default "Encrypt assertions" option is set to Require encrypted assertions. Select Require unencrypted assertions if you do not want to use encryption. If "Require encrypted assertions" is selected, the encryption certificate information will be included in the Duo metadata file you will upload on Shibboleth later.
-
The default "Request signing" option is set to Do not sign messages from Duo. Select Sign messages from Duo if you want Duo to send signed SAML messages to your identity provider. If "Sign messages from Duo" is selected, the signing certificate information will be included in the Duo metadata file you will upload on Shibboleth later.
-
Click the Save button at the top right of the page.
-
Scroll to "XML File" in the "Metadata for Configuring with Shibboleth" section and click the Download duo_saml_metadata.xml link to download a copy of the metadata file. The downloaded file name is duo_saml_metadata.xml. This metadata file is uniquely generated for your Duo customer account and must be used to complete SSO configuration. By default it expires 30 days from download. To remove this expiration, delete the
validUntilattribute from themd:EntityDescriptorelement in the XML file.If you are using encrypted assertions or signed messages it is important to save the single sign-on configuration before downloading the Duo metadata to ensure it includes the certificate information necessary for encryption and/or signing.
Configure the Duo Admin Panel Application in Shibboleth
-
Add the duo_saml_metadata.xml file you downloaded from the Duo Admin Panel to your Shibboleth configuration, and create a new Metadata Provider that points to it.
-
If necessary, add a new relying party profile for the Duo Admin Panel. Ensure that the profile that will be used for the Admin Panel has the SAML2.SSO auth flow, and enable the
urn:oasis:names:tc:SAML:2.0:nameid-format:persistent nameIDformat if it isn't enabled. -
Define the mail attribute
urn:oid:0.9.2342.19200300.100.1.3and release it. This value will be used to identify administrators in the Duo Admin Panel, so it must match the administrator email addresses configured in the Admin Panel. -
If necessary, enable Persistent NameID generation.
If your SAML 2.0 identity provider isn't listed by name, use the Custom Identity Provider. You'll need to consult your IdP vendor's documentation to learn how to add the a custom service provider, and use those instructions to set up the Duo Admin Panel application.
When configuring your IdP for the Duo Admin Panel application, be sure to send your users email address as a Persistent NameID in the SAML assertion.
-
Navigate to the "Single Sign-On with SAML Configuration" section of the "Administrator Login Settings" page in the Duo Admin Panel.
-
Select either the Optional or Required "Authentication with SAML" option to expose the SAML Identity Provider Settings.
-
Change the "Identity provider" to Custom Identity Provider.
-
If your identity provider makes the XML metadata for configuring a service provider available, you can download or copy it from your IdP and enter it in the Duo Admin Panel by changing the Configuration method to From file or Paste as appropriate, and either upload an XML file or paste metadata information into the field provided. Proceed to step 7.
-
If your identity provider doesn't offer their metadata in XML format, change the Configuration method to Manual entry.
Enter the Entity ID or Issuer ID and the Assertion consumer service URL or single sign-on URL obtained from your IdP. Optionally, you can enter in your IdP's Single logout URL.
-
Download your identity provider's signing certificate, select it for upload to Duo using the Choose file button, and upload your IdP's certificate.
-
If your identity provider supports encrypted SAML assertions, the default "Encrypt assertions" option is set to Require encrypted assertions. Select Require unencrypted assertions if you do not want to use encryption. If "Require encrypted assertions" is selected, the encryption certificate information will be included in the Duo metadata file you will upload on your identity provider.
-
If your identity provider supports signed messages, the default "Request signing" option is set to Do not sign messages from Duo. Select Sign messages from Duo if you want Duo to send signed SAML messages to your identity provider. If "Sign messages from Duo" is selected, the signing certificate information will be included in the Duo metadata file you will upload on your identity provider.
-
Adjust the security settings for your identity provider in the "Advanced SAML Options" section. Most IdPs do not require any changes. Verify SHA signature support and signing requirements with your identity provider before changing these settings, as they decrease security for SSO logins.
-
Click the Save button at the top right of the page.
-
Copy the metadata information for the Duo Admin Panel service provider application and provide it to your identity provider. If your IdP supports XML metadata file upload or paste you can download the duo_saml_metadata.xml file from Duo and upload or copy it to your IdP. This metadata file is uniquely generated for your Duo customer account and must be used to complete SSO configuration before it expires 30 days from download. Once you use the metadata file to configure SSO, the configuration does not expire.
If you are using encrypted assertions or signed messages it is important to save the single sign-on configuration before downloading the Duo metadata to ensure it includes the information necessary for encryption and/or signing.
Test SSO Login
The admin login SSO experience seen after entering your username differs depending on whether you set the "Authentication with SAML" option to "Optional" or "Required".
SSO Login Required
Click the Continue to identity provider button to be taken to your organization's identity provider (IdP) where you'll sign in with your primary user credentials.

SSO Login Optional
Clicking the Log in using Single Sign On button takes you to your organization's IdP to complete primary authentication.
If you created a password for the Duo Admin Panel you may use that instead of SSO. Click Log in using password to show the password entry form. Enter your administrator password, and click Log in.

Once you complete sign-in at your IdP or via password you'll be sent back to Duo to complete two-factor authentication to finish logging on to the Admin Panel.

SAML Certificate Expiration
When the SAML identity provider's signing certificate, the Duo encryption certificate, or the Duo signing certificate expires, Duo administrators without the Owner role who are required to sign in to the Admin Panel with SSO will no longer be able to sign-in. A Duo Owner administrator can still log in with a password instead of SSO in order to update expired certificates. Updating certificates in use prior to expiration ensures no Duo administrators required to log in with SSO become blocked from access.
We will send a warning email to Duo administrators with the Owner role 90, 60, 30, 7, and 1 day(s) before certificate expiration, and every 30 days after certificate expiration.
Update the SAML Identity Provider Signing Certificate in Duo
- Log in to your identity provider to obtain an updated signing certificate for the Duo Admin Panel SSO integration which you created during initial configuration.
- Download the new signing certificate from your identity provider.
- Log into the Duo Admin Panel as an Owner and navigate to Users → Administrators → Admin Login Settings and then scroll down to the "Single Sign-On with SAML Configuration" section.
- Locate the "Certificate" setting and click Choose File.
- Select the new signing certificate you downloaded from your identity provider.
- The certificate information should indicate the new certificate was uploaded by showing the common name information (
CN=...) and the new expiration date.
Update the Duo Encryption or Signing Certificate in Your SAML Identity Provider
IMPORTANT: Updating the Duo encryption or signing certificate will incur a small amount of downtime during which your organization's administrators will not be able to use SSO to log into the Admin Panel.
-
Log into the Duo Admin Panel as an Owner and navigate to Users → Administrators → Admin Login Settings and then scroll down to the "Metadata for Configuring with your Identity Provider" section.
-
Determine whether you want to rotate the encryption certificate or the signing certificate.
-
Click Regenerate certificate underneath the certificate you want to rotate. This generates a new certificate with a new expiration date.
SSO sign-in to the Duo Admin Panel will stop working as soon as you regenerate the certificate. You must update your identity provider with the newly-generated certificate to restore SSO access.
-
Log into your identity provider and follow the same steps you originally used to configure SSO with your identity provider to re-upload your configuration metadata file (which contains the updated certificate information) to your identity provider.
Troubleshooting
Need some help? Try searching our Knowledge Base articles or Community discussions. For further assistance, contact Support.