Duo Protection for Bomgar Remote Support and Privileged Access with Duo Access Gateway
Last updated:
Duo Access Gateway reaches Last Day of Support on October 26, 2023 for Duo Essentials, Advantage, and Premier customers. As of that date Duo Support may only assist with the migration of existing Duo Access Gateway applications to Duo Single Sign-On. Customers may not create new DAG applications after May 19, 2022. Please see the Guide to Duo Access Gateway end of life for more details.
Use the Duo Single Sign-on for BeyondTrust application to protect BeyondTrust with Duo Single Sign-On, our cloud-hosted identity provider featuring Duo Central and the Duo Universal Prompt.
Duo Federal customers may still use Duo Access Gateway for SAML applications after October 26, 2023.
Overview
As business applications move from on-premises to cloud hosted solutions, users experience password fatigue due to disparate logons for different applications. Single sign-on (SSO) technologies seek to unify identities across systems and reduce the number of different credentials a user has to remember or input to gain access to resources.
While SSO is convenient for users, it presents new security challenges. If a user's primary password is compromised, attackers may be able to gain access to multiple resources. In addition, as sensitive information makes its way to cloud-hosted services it is even more important to secure access by implementing two-factor authentication and zero-trust policies.
This application requires Bomgar Cloud for Remote Support or Bomgar 16.1.1 and higher.
If you’re looking to protect non-SAML logins to your Bomgar Remote Support or Privileged Access services, please see our instructions for RADIUS authentication.
Duo Access Gateway
Duo Access Gateway (DAG), our on-premises SSO product, layers Duo's strong authentication and flexible policy engine on top of Bomgar logins using the Security Assertion Markup Language (SAML) 2.0 authentication standard. Duo Access Gateway acts as an identity provider (IdP), authenticating your users using existing on-premises or cloud-based directory credentials and prompting for two-factor authentication before permitting access to Bomgar.
Duo Access Gateway is included in the Duo Premier, Duo Advantage, and Duo Essentials plans, which also include the ability to define policies that enforce unique controls for each individual SSO application. For example, you can require that Salesforce users complete two-factor authentication at every login, but only once every seven days when accessing Bomgar. Duo checks the user, device, and network against an application's policy before allowing access to the application.
Deploy or Update Duo Access Gateway
-
Install Duo Access Gateway on a server in your DMZ. Follow our instructions for deploying the server, configuring DAG settings, and adding an Authentication Source.
-
Add the attributes from the table below that correspond to the Duo attributes Mail attribute, First Name attribute, and Last Name attribute in the "Attributes" field when configuring your Active Directory or OpenLDAP authentication source in the DAG admin console, separated by a comma. For example, if Active Directory is your authentication source, enter mail,givenName,sn in the "Attributes" field.
Duo Attribute Active Directory OpenLDAP Mail attribute mail mail First name attribute givenName gn Last name attribute sn sn If your organization uses other directory attributes than the ones listed here then enter those attribute names instead. If you've already configured the attributes list for another cloud service provider, append the additional attributes not already present to the list, separated by a comma.
-
After completing the initial DAG configuration steps, click Applications on the left side of the Duo Access Gateway admin console.
-
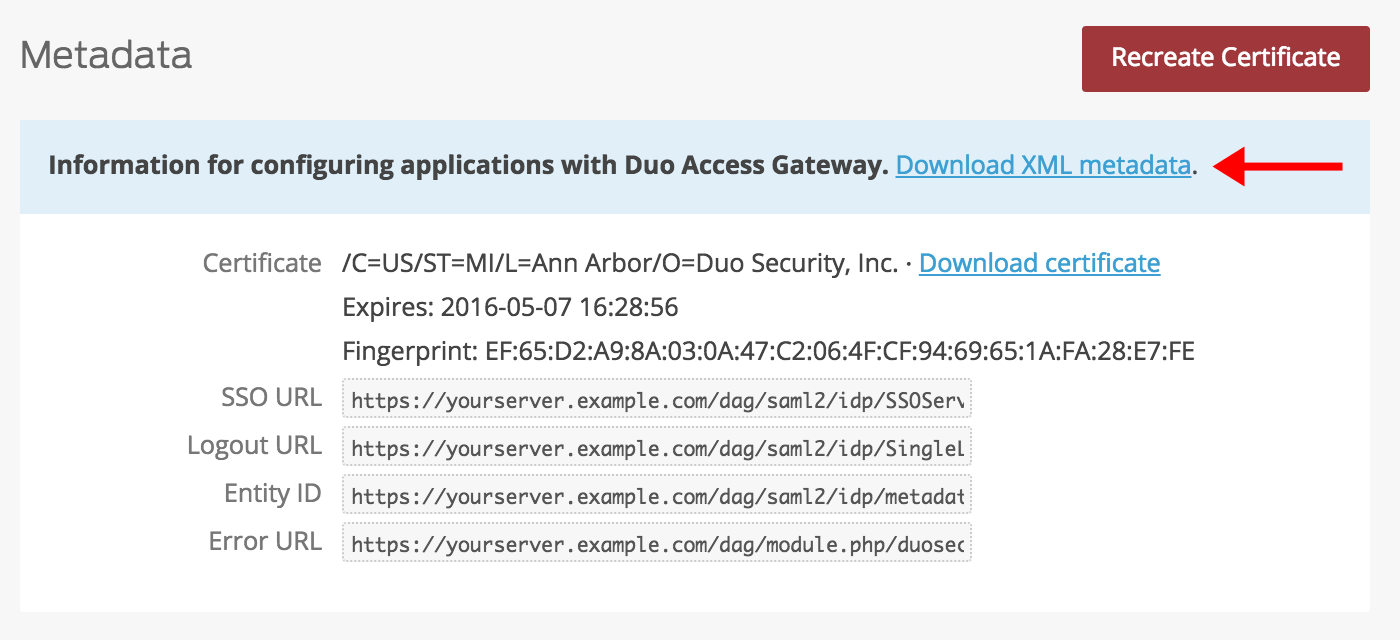
Scroll down the Applications page to the Metadata section. This is the information you need to provide to Bomgar when configuring SSO. Click the Download XML metadata link to obtain the DAG metadata file (the downloaded file is named "dag.xml").
Create the Bomgar Application in Duo
-
Log in to the Duo Admin Panel and navigate to Applications → Application Catalog.
-
Locate the entry for Bomgar with the "DAG" label in the catalog. Click the + Add button to start configuring Bomgar. See Protecting Applications for more information about protecting applications with Duo and additional application options.
-
No active Duo users can log in to new applications until you grant access. Update the User access setting to grant access to this application to users in selected Duo groups, or to all users. Learn more about user access to applications. If you do not change this setting now, be sure to update it so that your test user has access before you test your setup.
This setting only applies to users who exist in Duo with "Active" status. This does not affect application access for existing users with "Bypass" status, existing users for whom the effective Authentication Policy for the application specifies "Bypass 2FA" or "Skip MFA", or users who do not exist in Duo when the effective New User Policy for the application allows access to users unknown to Duo without MFA. -
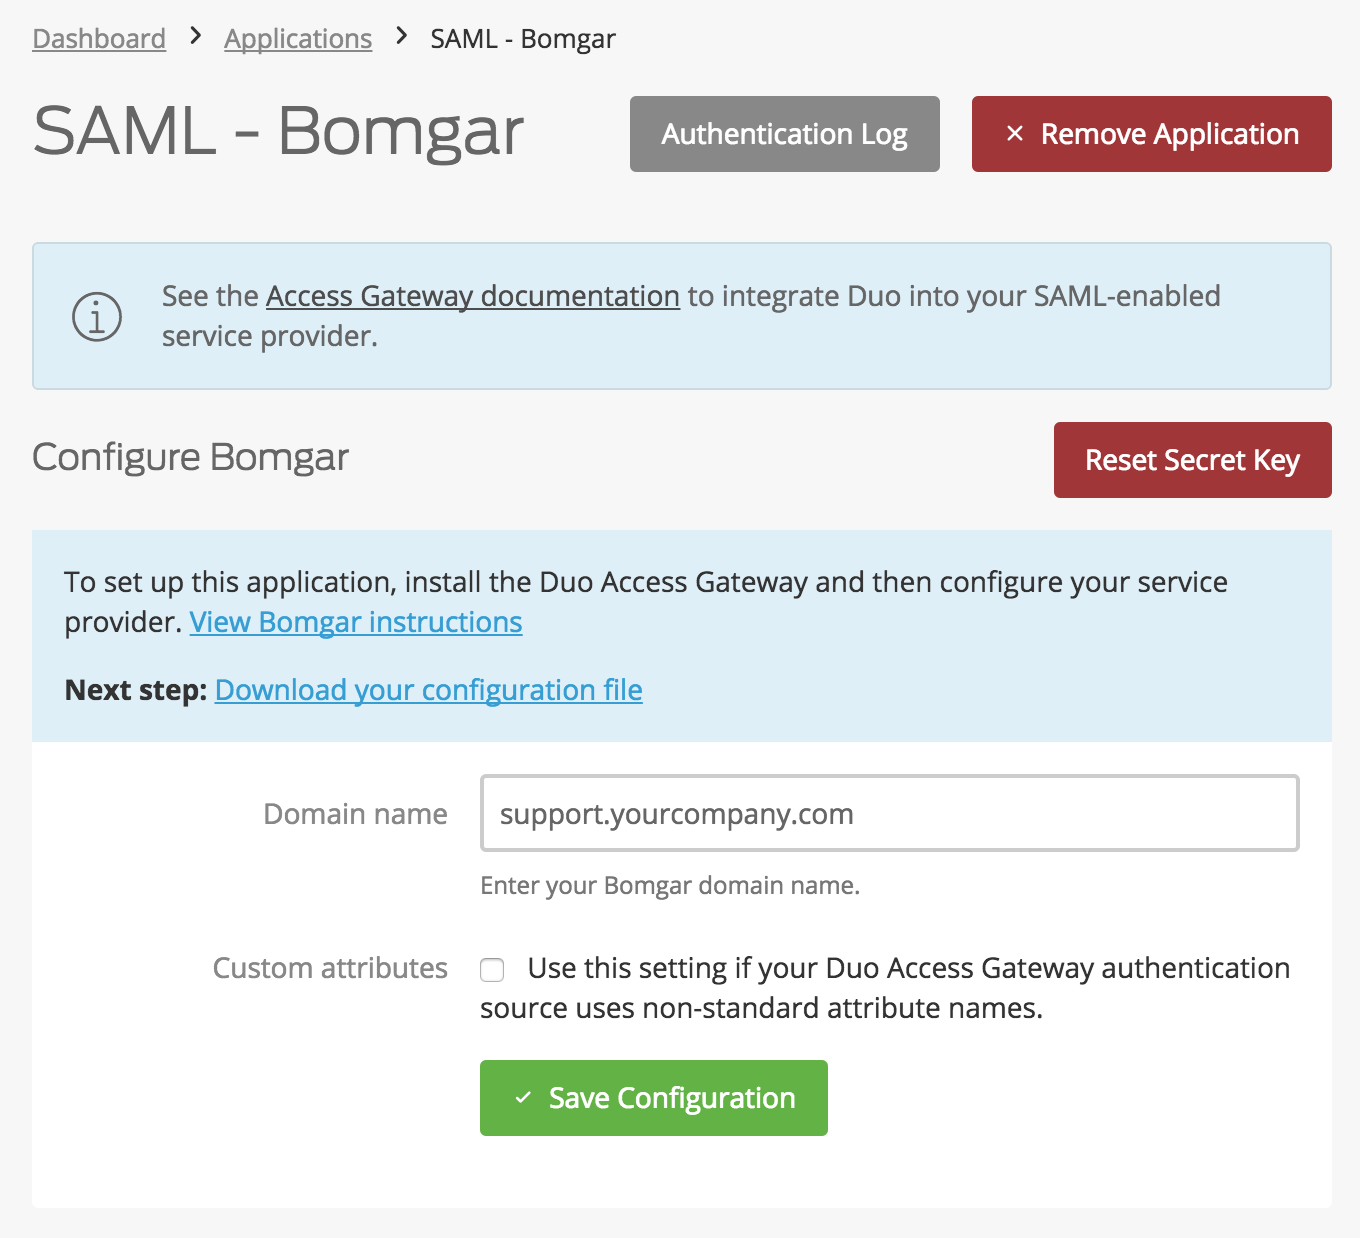
The Domain name is the domain URL used when logging into your company's Bomgar. For example, if your Bomgar login URL is https://support.yourcompany.com/login then enter support.yourcompany.com as the domain name in Duo.
-
Bomgar uses the Mail attribute, First Name attribute, and Last Name attribute when authenticating. We've mapped Mail attribute, First Name attribute, and Last Name attribute to DAG supported authentication source attributes as follows:
Duo Attribute Active Directory OpenLDAP SAML IdP Google Azure Mail attribute mail mail mail email mail First Name givenName gn givenName given_name givenName Last Name sn sn sn family_name surname If you are using a non-standard attributes for your authentication source, check the Custom attributes box and enter the name of the attributes you wish to use instead.
-
Click Save Configuration to generate a downloadable configuration file.
-
You can adjust additional settings for your new SAML application at this time — like changing the application's name from the default value, enabling self-service, or assigning a group policy — or come back and change the application's policies and settings after you finish SSO setup. If you do update any settings, click the Save button at the bottom of the page when done.
-
Click the Download your configuration file link to obtain the Bomgar application settings (as a JSON file).
Important: This file contains information that uniquely identifies this application to Duo. Secure this file as you would any other sensitive or password information. Don't share it with unauthorized individuals or email it to anyone under any circumstances!
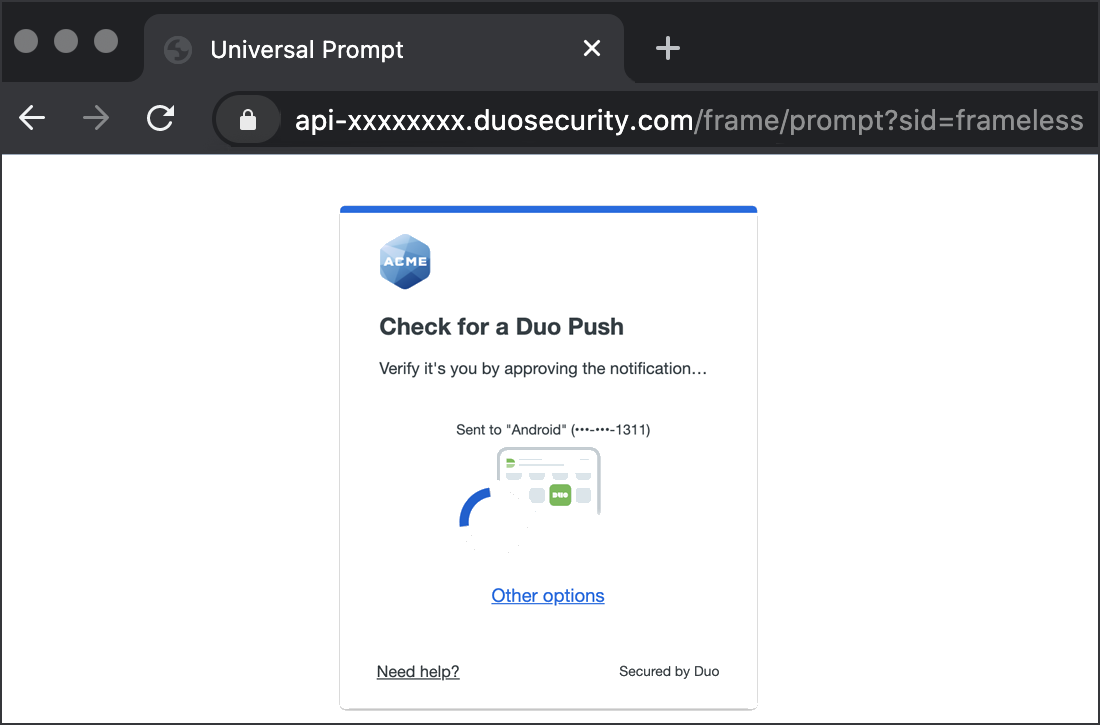
Duo Universal Prompt
The Duo Universal Prompt provides a simplified and accessible Duo login experience for web-based applications, offering a redesigned visual interface with security and usability enhancements.
| Universal Prompt | Traditional Prompt |
 |
 |
Read the Universal Prompt Update Guide for more information about the update process and the new login experience for users.
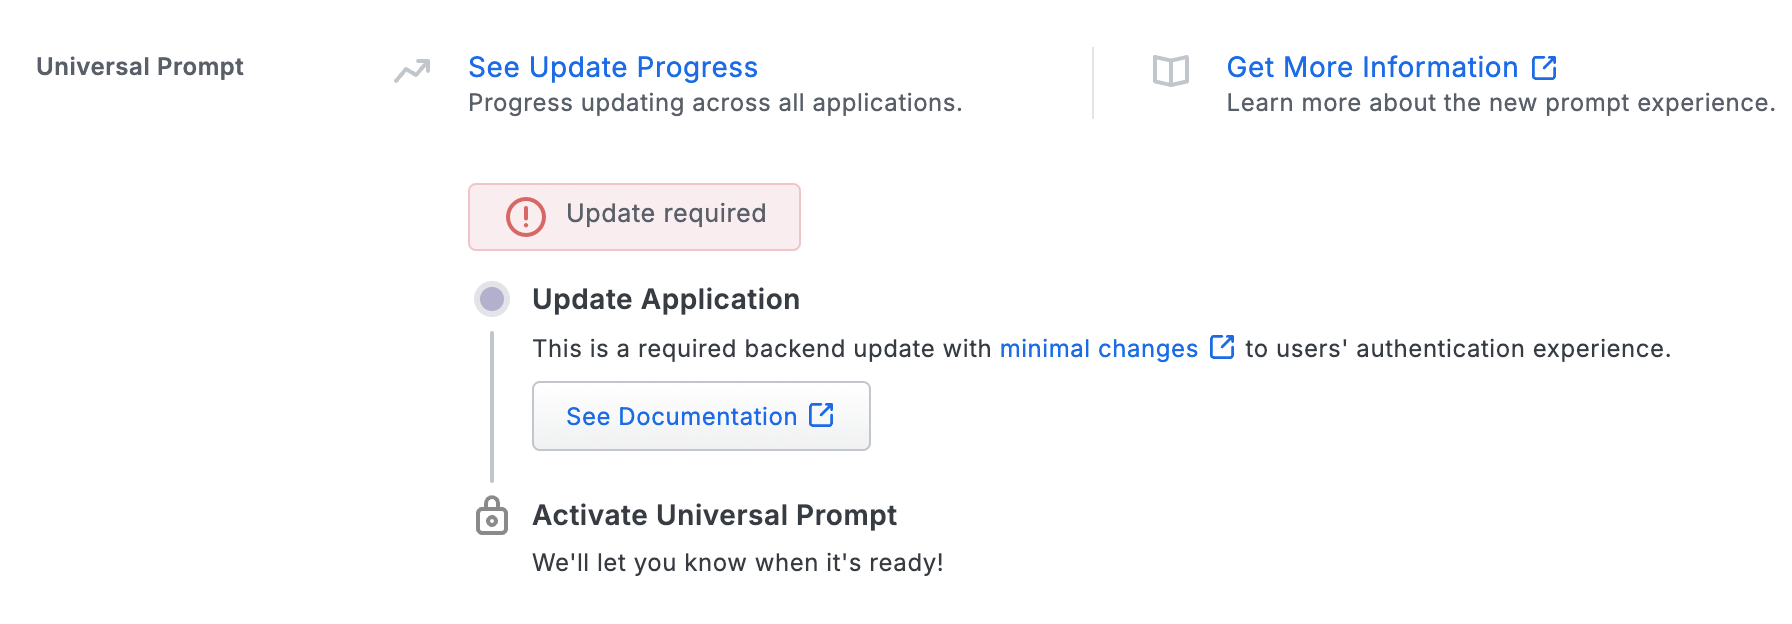
Duo Access Gateway Universal Prompt support is available to Duo Federal customers only starting with version 2.0.0. Activating Universal Prompt for DAG applications requires the following steps:
- Enable Use frameless in the local DAG server admin console on the **General** page.
- Complete the federation steps in this document for your SAML app.
- Log in as an end user and complete Duo authentication to the SAML application now federated with your Duo Access Gateway server. This first authentication shows the traditional Duo prompt in a redirect instead of an iframe.
- You then activate the Universal Prompt for all users of that specific DAG SAML application.
The "Universal Prompt" section of your DAG SAML app shows the status as "Update Required" when you first create it. The status will change after you log into the application and complete Duo authentication to the SAML application now federated with your Duo Access Gateway server.
Add the Bomgar Application to Duo Access Gateway
Before you do this, verify that you updated the "Attributes" list for your Duo Access Gateway authentication source as specified here.
-
Return to the Applications page of the DAG admin console session.
-
Click the Choose File button in the "Add Application" section of the page and locate the Bomgar SAML application JSON file you downloaded from the Duo Admin Panel earlier. Click the Upload button after selecting the JSON configuration file.
-
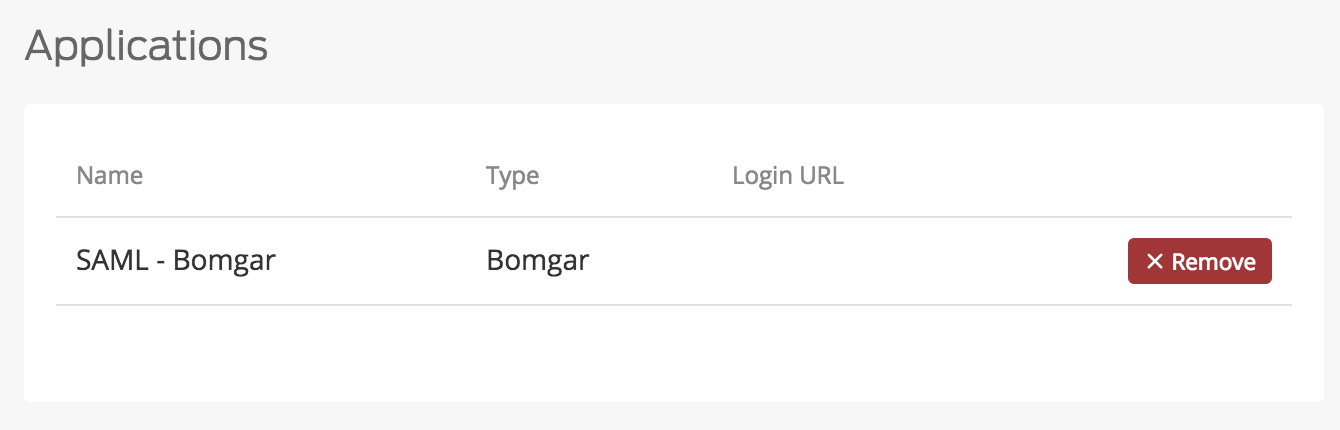
The Bomgar SAML application is added.
Enable Bomgar SSO
Add the Duo Access Gateway as a new single sign-on provider for Bomgar.
-
Log in to the Bomgar Remote Support administrative interface.
-
In the menu, navigate to USERS & SECURITY → SECURITY PROVIDERS.
-
Select SAML from the drop-down menu then click Create Provider. You will be taken to a new page.
-
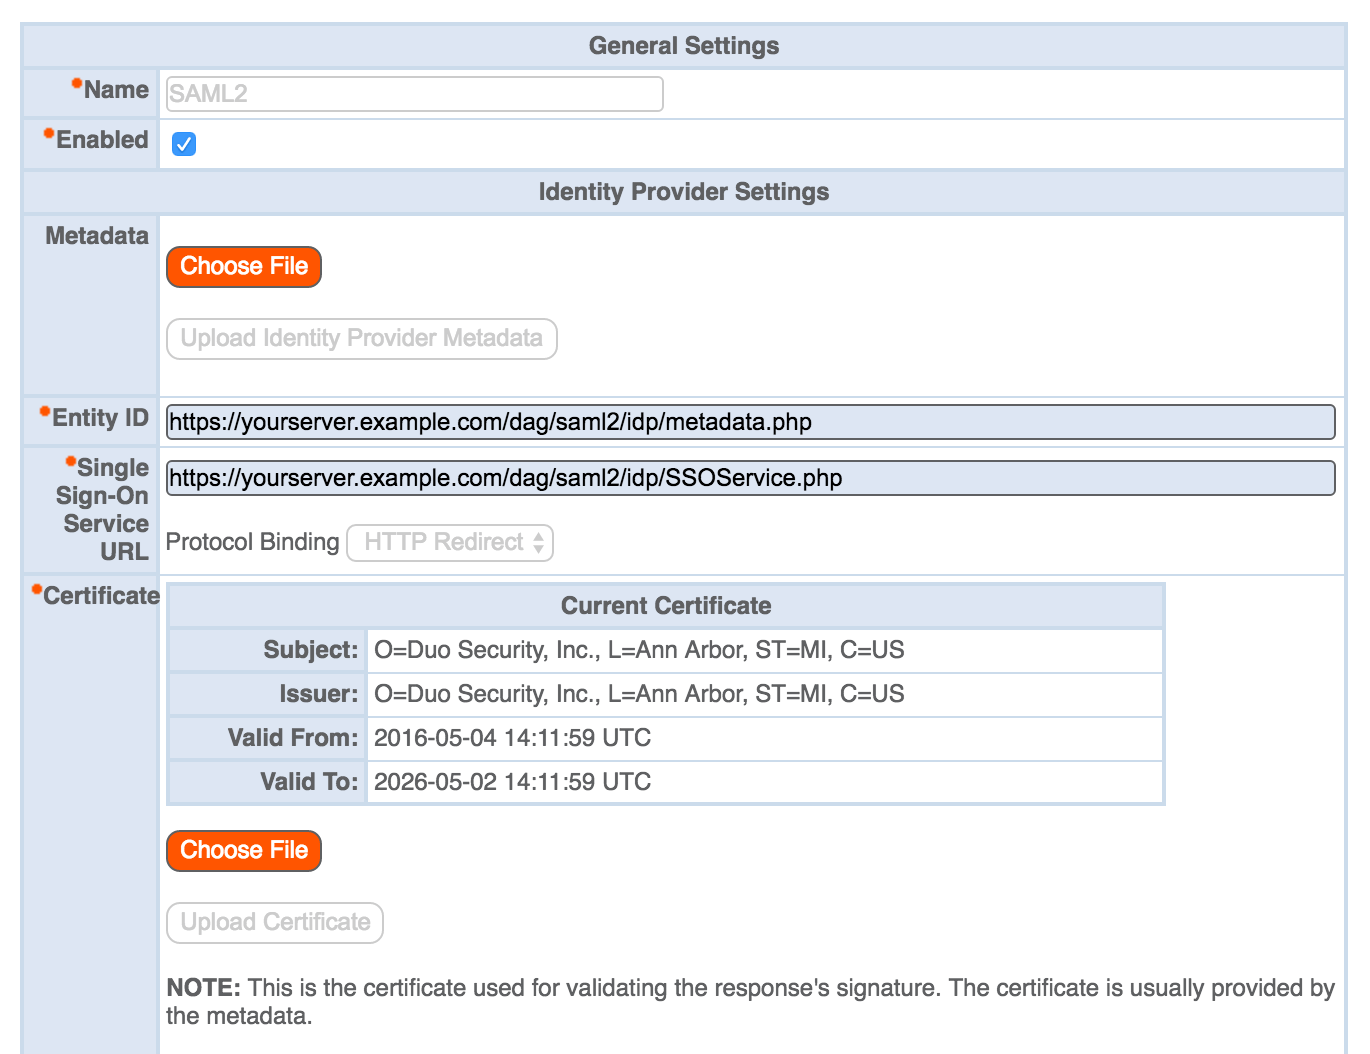
Under the "Identity Provider Settings" section click Choose File next to Metadata and select the metadata dag.xml file you downloaded earlier. Click Upload Identity Provider Metadata. The page will automatically populate information from your metadata file.
-
In the "Service Provider Settings" section make sure your Entity ID is similar to the Domain name you entered in Create the Bomgar Application in Duo. If you entered a domain name of support.yourcompany.com your Entity ID should be https://support.yourcompany.com.
-
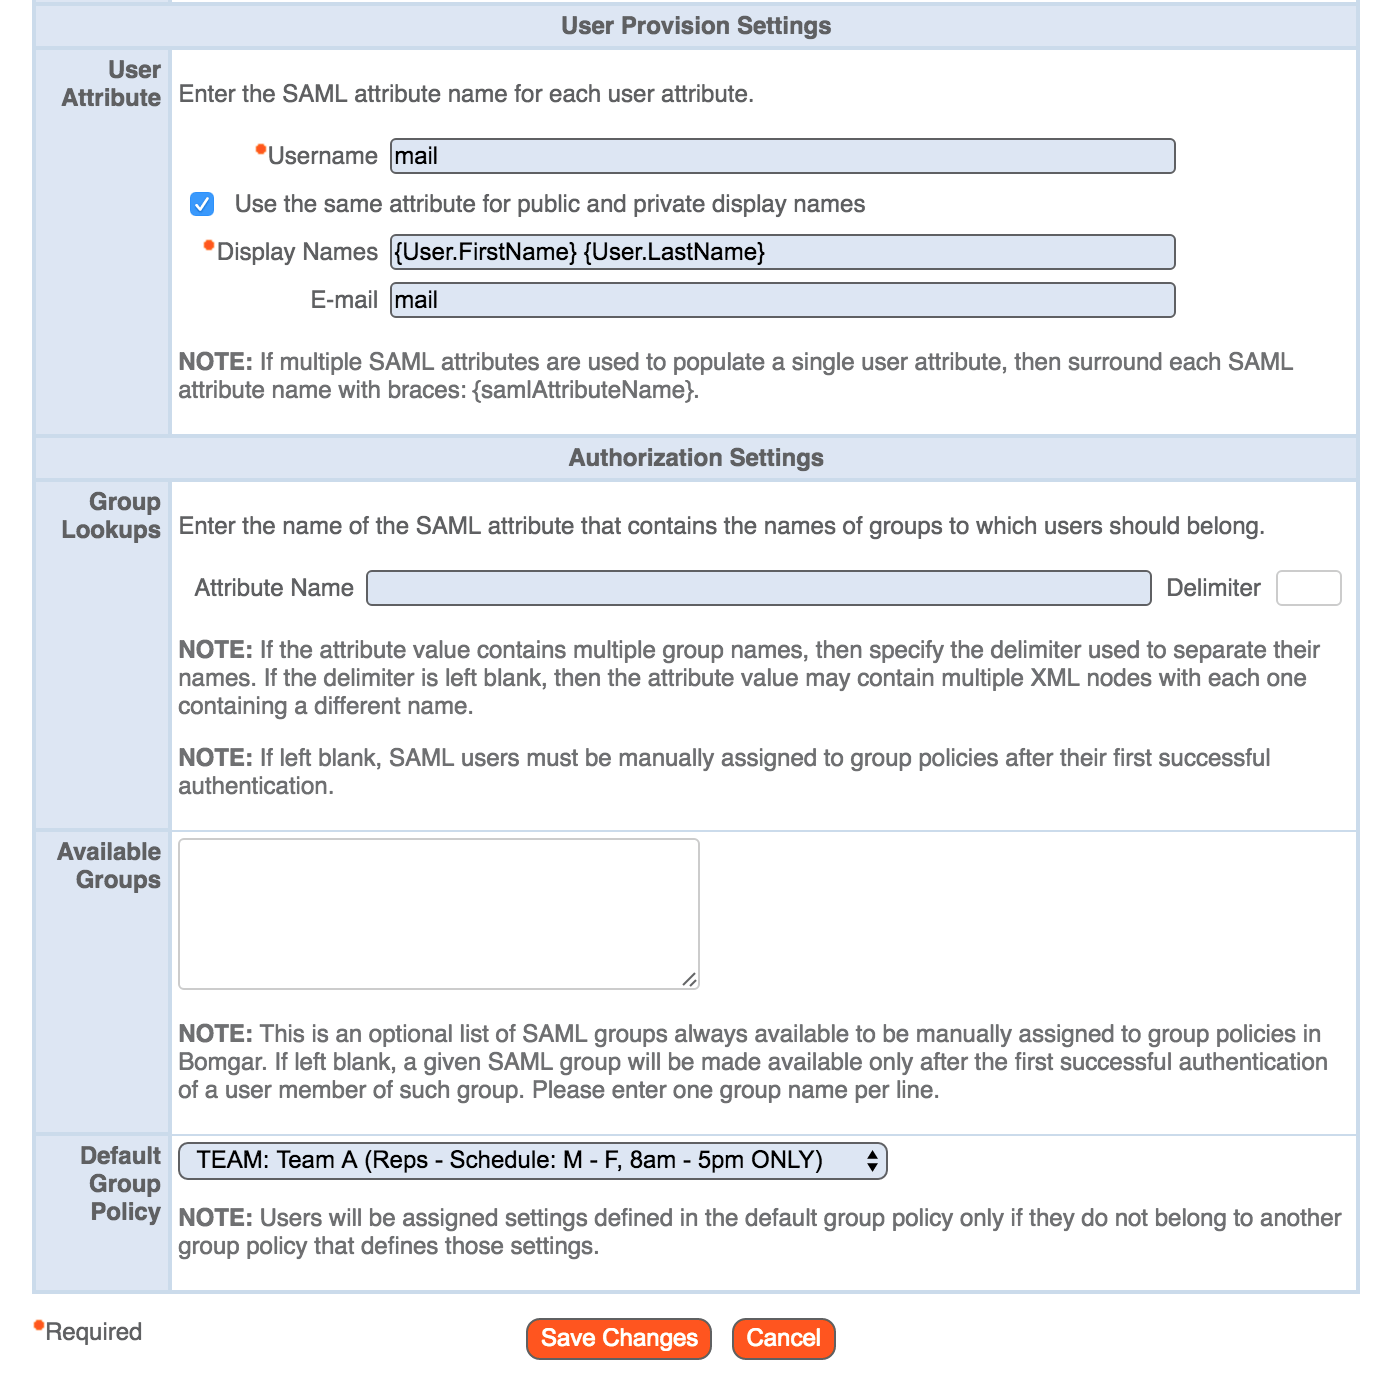
Scroll down to the "User Provision Settings" section and add the following attributes into corresponding fields:
Bomgar Field Attribute Username mail Display Names {User.FirstName}{User.LastName} E-mail mail -
Under "Authorization Settings" delete the value out of the Attribute Name field for Group Lookups and then hit the tab button. The Available Groups field should change from blue to white.
-
Select default permissions for newly provisioned users by selecting a group policy from the Default Group Policy drop-down. Users can be added to other group policies later.
-
When you've entered all required information click Save Changes.
Learn more about Bomgar SSO at the Bomgar Support site.
Log in with SSO
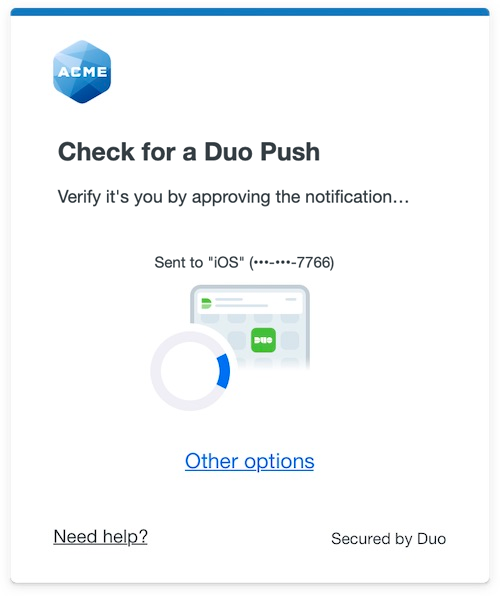
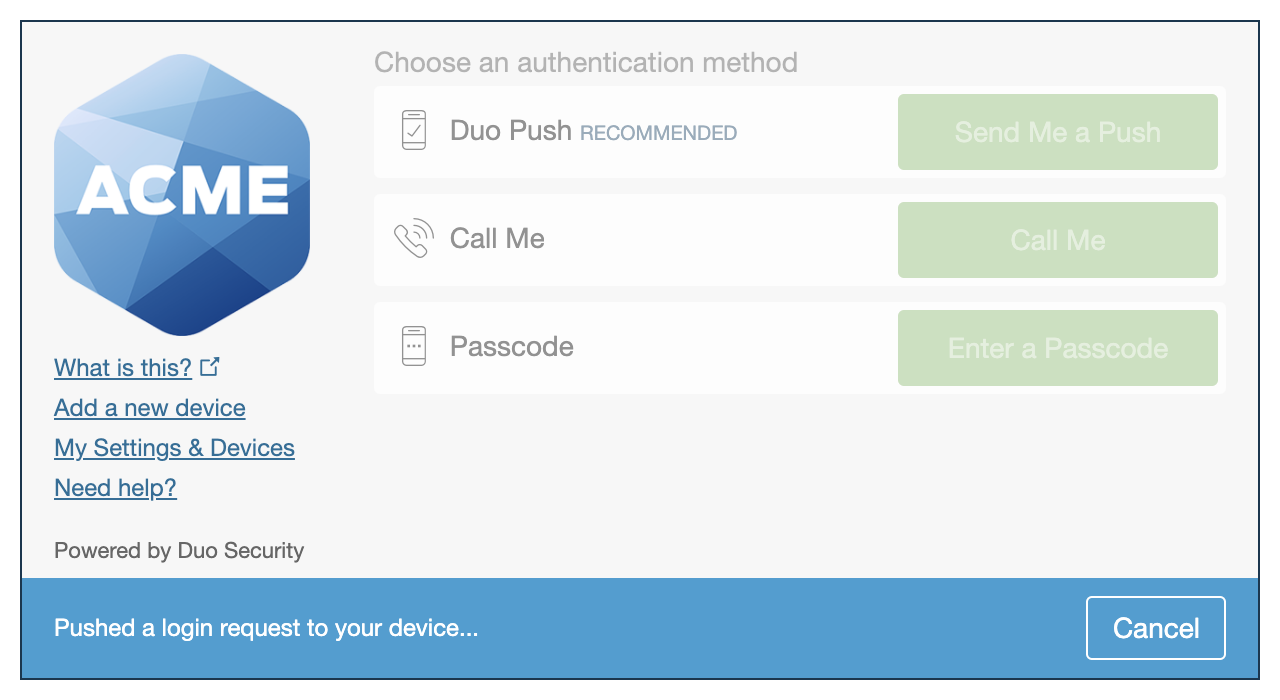
Navigate to your Bomgar login page eg. https://support.yourcompany.com/login and click the Use SAML Authentication link. This redirects to the Duo Access Gateway login page. Enter your primary directory logon information, approve Duo two-factor authentication, and get redirected back to the Bomgar site after authenticating.

To log in using the Bomgar Console select SAML Credentials from the "Authenticate Using" drop-down. Click Login and a browser will open that redirects to the Duo Access Gateway login page. Enter your primary directory logon information, approve Duo two-factor authentication. After you've successfully authenticated a special Bomgar file will be downloaded. Click on the Bomgar file and it will log you into the Bomgar Console.
Congratulations! Your Bomgar users now authenticate using Duo Access Gateway.
Activate Universal Prompt
Once you authenticate to your newly-federated SAML application, the "Universal Prompt" section of the application's details page in the Admin Panel reflects this status as "Ready to activate", with these activation control options:
- Show traditional prompt: (Default) Your users experience Duo's traditional prompt via redirect when logging in to this application.
- Show new Universal Prompt: Your users experience the Universal Prompt via redirect when logging in to this application.

Enable the Universal Prompt experience by selecting Show new Universal Prompt, and then scrolling to the bottom of the page to click Save.
Once you activate the Universal Prompt, the application's Universal Prompt status shows "Activation Complete" here and on the Universal Prompt Update Progress report.
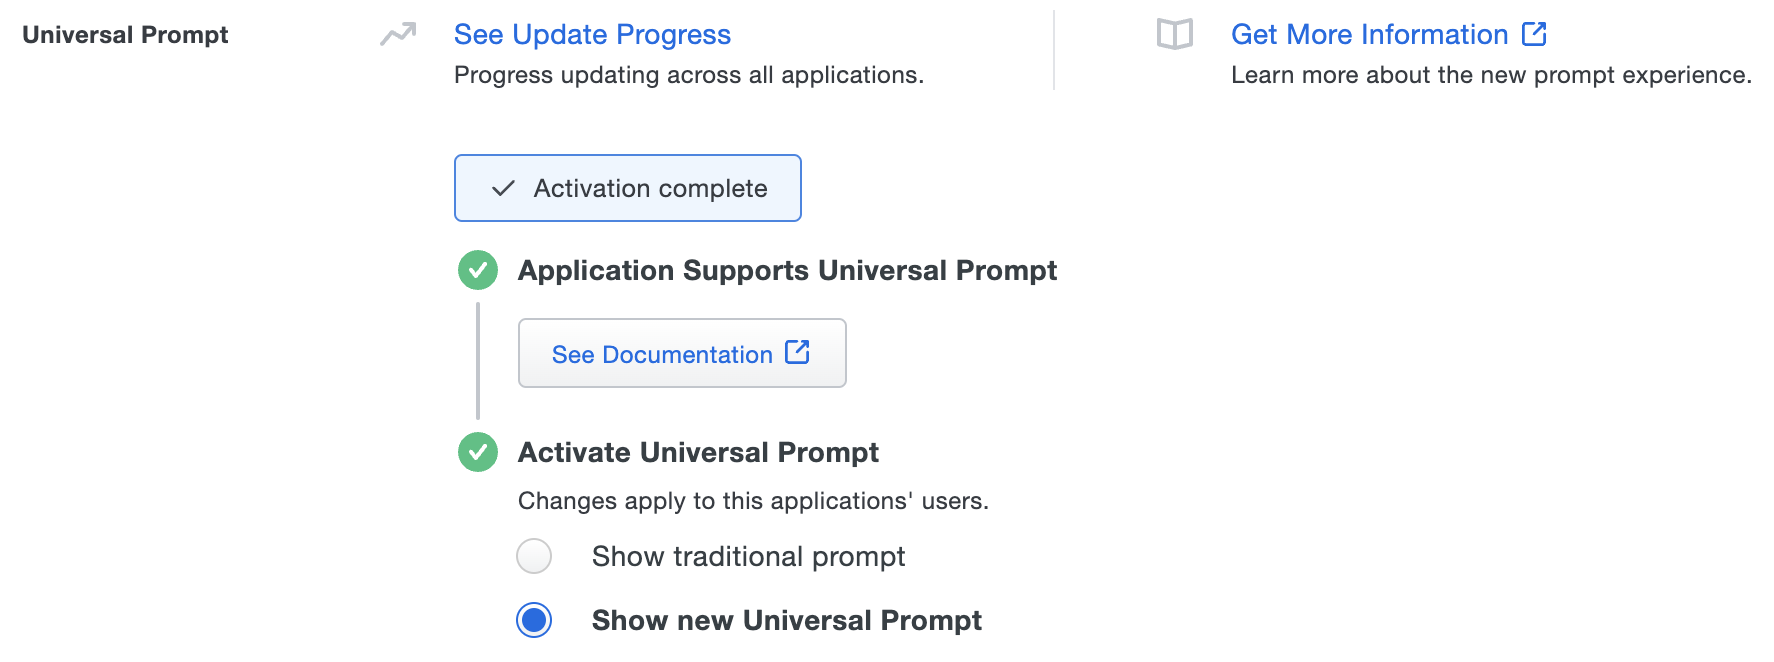
The next time your users log in to this application, they will see the new Universal Prompt experience instead of the traditional Duo prompt.
If you plan to permit use of WebAuthn authentication methods (security keys, U2F tokens, or Touch ID) in the traditional Duo Prompt, Duo recommends configuring allowed hostnames for this application and any others that show the inline Duo Prompt before onboarding your end-users.
The Duo Universal Prompt has built-in protection from unauthorized domains so this setting does not apply.
Add Ownership and Risk Information
Go to the "Ownership and Risk" section of the application's page in the Duo Admin Panel to assign application owners and classify the application's risk level. Cisco Identity Intelligence automatically imports this information to populate relevant fields for Duo Advantage and Premier customers. Duo Essentials and Duo Federal plans exclude Cisco Identity Intelligence features.
You may set any of the following:
- Technical Owner: Search for and assign Duo users responsible for technical configuration and maintenance of this application.
- Business Owner: Search for and assign Duo users responsible for business decisions and access approvals related to this application.
- Application Sensitivity: Select this application's risk level from the drop-down list. Default: Not Set.
- Compliance Requirements: Select any applicable regulatory frameworks for this application (SOX (Sarbanes-Oxley), HIPAA, PCI-DSS, etc.) from the list.
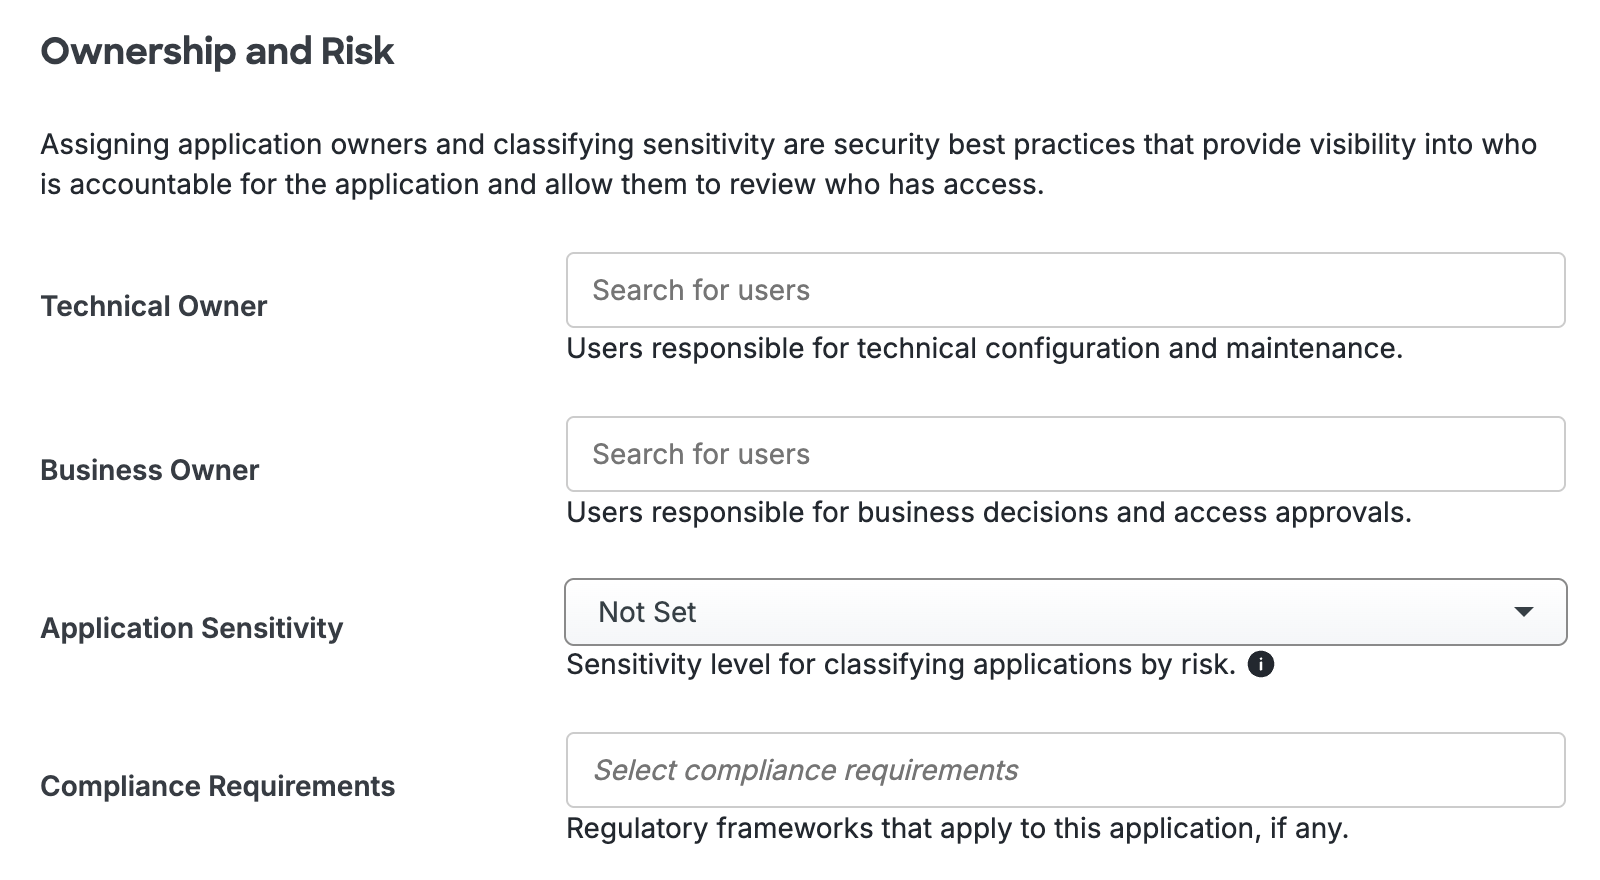
Scroll to the bottom of the page and click Save to apply your changes.
Grant Access to Users
If you did not already grant user access to the Duo users you want to use this application be sure to do that before inviting or requiring them to log in with Duo.
Microsoft AD FS
Microsoft's Active Directory Federation Services (AD FS) is a popular choice for SSO because it easily integrates with the AD identity store many organizations already have deployed. Duo's support for cloud applications and SSO drops in to an existing AD FS installation to provide secondary authentication after a user passes primary authentication (successful Active Directory logon).
If you don't already have AD federation running the first step is to install and configure Microsoft AD FS in your organization. Deployment Guides for AD FS versions 2.1, and 3.0/4.0 are available from Microsoft.
Once your AD FS services are up and running, the second step is to configure the SSO partnership between your AD FS service and the external cloud resource, in this case Bomgar. Learn more about configuring Bomgar SSO with AD FS at the Bomgar Support site.
After you have successfully configured and tested AD FS SSO login to Bomgar using your AD domain credentials, you can then install the Duo AD FS integration. AD FS protection is included with Duo Essentials, Duo Advantage, and Duo Premier plans.
With the Duo integration for AD FS installed, users pass primary authentication to the AD FS service as usual. Once primary authentication succeeds, users are forwarded to the Duo service for secondary authentication. After approving logon using one of Duo's authentication methods, the user is fully logged in to Bomgar.
Other Identity Partners
Using a third-party SSO provider for cloud application access? Duo partners with leading cloud SSO providers like Okta and OneLogin to secure access with our strong and flexible authentication platform.
You can also use Duo two-factor authentication with CAS and Shibboleth on-premises IdPs.
Troubleshooting
Need some help? Try searching our Knowledge Base articles or Community discussions. For further assistance, contact Support.