Duo Access Gateway for Linux
Last updated:
Duo Access Gateway reached Last Day of Support on October 26, 2023 for Duo Essentials, Advantage, and Premier customers. As of that date, Duo Support may only assist with the migration of existing Duo Access Gateway applications to Duo Single Sign-On. Please see the Guide to Duo Access Gateway end of life for more details.
Learn more about Duo Single Sign-On, our cloud-hosted identity provider featuring Duo Central and the Duo Universal Prompt.
Duo Federal customers may still use Duo Access Gateway for SAML applications after October 26, 2023.
This guide takes you through Duo Access Gateway installation and configuration on Linux. Want to host the Duo Access Gateway on Windows? See our instructions for deploying the Duo Access Gateway on Windows.
Overview
Duo Access Gateway secures access to cloud applications with your users’ existing directory credentials (like Microsoft Active Directory or Google Workspace accounts) using the Security Assertion Markup Language (SAML) 2.0 authentication standard. SAML delegates authentication from a service provider to an identity provider, and is used for single sign-on solutions (SSO).
Duo provides SAML connectors for enterprise cloud applications like Google Workspace, Amazon Web Services, Box, Salesforce and Microsoft Office 365. Duo Access Gateway also ships with the ability for the customer to provide their own SAML "metadata" and connect to just about any app that supports the 2.0 standard.
Protected cloud applications redirect your users to the Duo Access Gateway server on your network. Duo Access Gateway acts as a SAML identity provider (IdP), authenticating your users using your existing primary authentication source for credential verification, and then prompting for two-factor authentication before permitting access to the SAML application.
Duo Access Gateway is supported in Duo Federal plans.
The Duo Access Gateway supports local Active Directory (AD) and OpenLDAP directories as identity sources, as well as on-premises or cloud SAML IdPs.
You can also use the Duo Access Gateway with Azure AD (now known as Microsoft Entra ID) and Google directories or third-party IdPs hosted in the cloud.
Define Duo policies that enforce unique controls for each individual SSO application. For example, you can require that Salesforce users complete two-factor authentication at every login, but only once every seven days when accessing Google Workspace. Duo checks the user, device, and network against an application's policy before allowing access to the application.
Before moving on to the deployment steps, it's a good idea to familiarize yourself with Duo administration concepts and features like options for applications, available methods for enrolling Duo users, and Duo policy settings and how to apply them. See all Duo Administrator documentation.
Duo Access Gateway and Universal Prompt
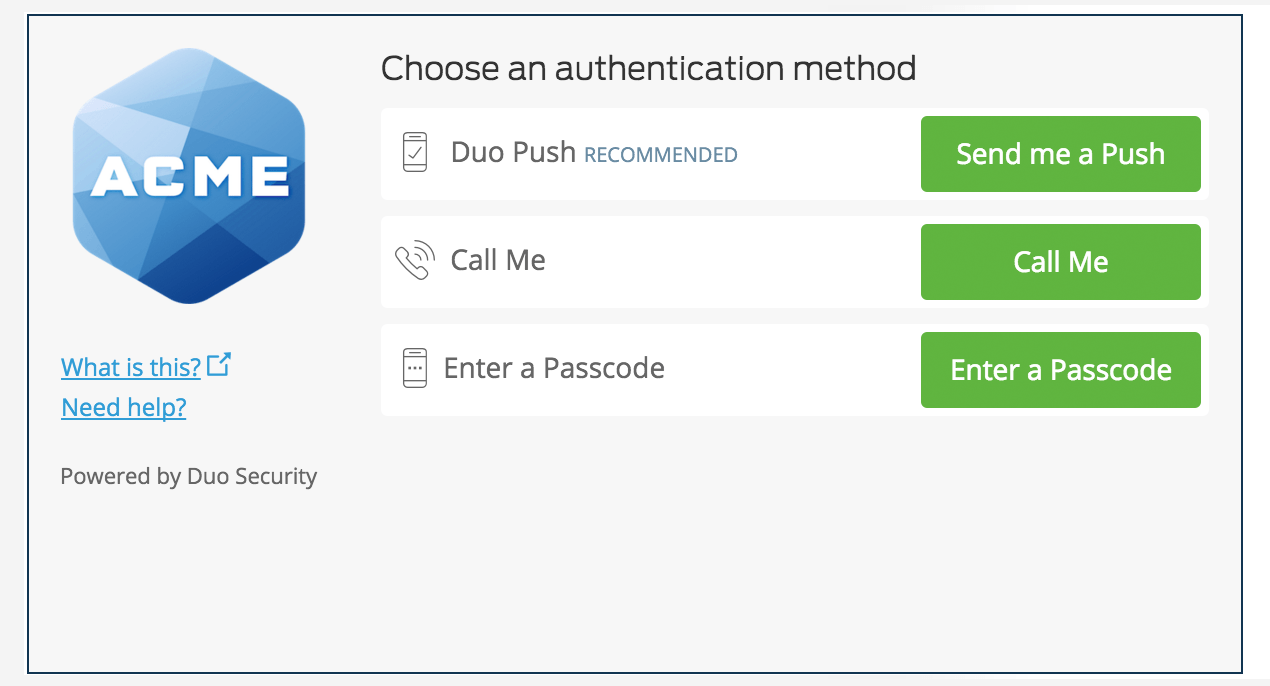
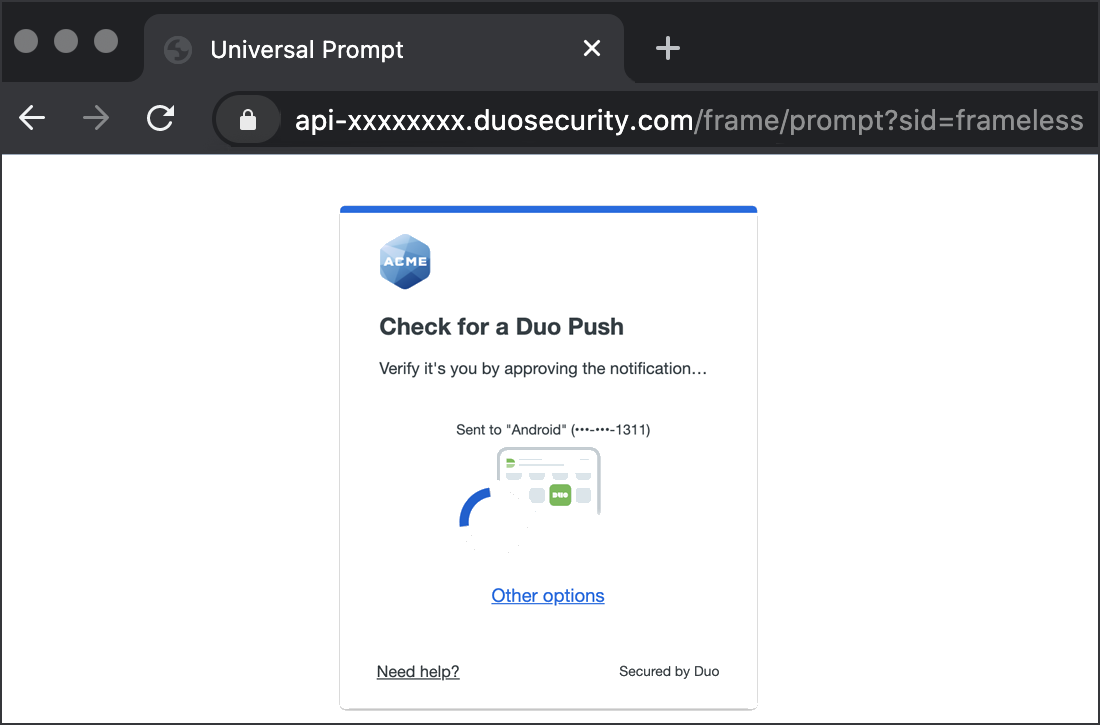
Duo's next-generation authentication experience, the Universal Prompt, provides a simplified and accessible Duo login experience for web-based applications, offering a redesigned visual interface with security and usability enhancements.
| Universal Prompt | Traditional Prompt |
 |
 |
Prior to the Duo Access Gateway end of life in October 2023, Duo commercial plan customers migrated to Duo Single Sign-On, which includes support for the Duo Universal Prompt.
Duo Access Gateway Universal Prompt support is available to Duo Federal customers only starting with version 2.0.0. Activating Universal Prompt for DAG applications requires the following steps:
- Enable frameless 2FA in the local DAG server admin console.
- Log in as an end user and complete Duo authentication to a service provider application federated with your Duo Access Gateway server. This first authentication shows the traditional Duo prompt in a redirect instead of an iframe.
- You then activate the Universal Prompt for all users of that specific DAG SAML application.
You must repeat these steps for each SAML application you federate with Duo Access Gateway.
Universal Update Progress
Click the See Update Progress link to view the Universal Prompt Update Progress report. This report shows the update availability and migration progress for all your Duo applications. You can also activate the new prompt experience for multiple DAG SAML applications after completing the first federated login from that report page instead of visiting the individual details pages for each application.
Prerequisites
This application communicates with Duo's service on SSL TCP port 443 using TLS 1.2 or later.
Firewall configurations that restrict outbound access to Duo's service with rules using destination IP addresses or IP address ranges aren't recommended, since these may change over time to maintain our service's high availability. If your organization requires IP-based rules, please review Duo Knowledge Base article 1337.
See Duo Knowledge Base article 2152 for additional TLS version and SSL cipher support details.
Before you deploy the Duo Access Gateway for Linux, make sure to complete these requirements.
Deploy a DMZ Server
-
Deploy a physical or virtual modern 64-bit Linux server in your perimeter network (or DMZ). The minimum system requirements for the Duo Access Gateway host are:
- Form Factor: Physical or virtual machine
- Processor: Two processors of 2 GHz or faster
- Memory: 4 GB RAM or greater
- Disk Storage: 20 GB or greater
- Operating System: See the Install Docker section of this document for supported Linux flavors and versions
-
Open ports 80 and 443 in the perimeter firewall for HTTP and HTTPS external traffic to and from the server (HTTP automatically redirects to HTTPS).
-
Port 8443 will be used for administrative purposes. Restrict traffic to this port to only authorized networks.
-
Open a port for LDAP (default 389) or LDAPS (default 636) traffic from the server to your internal Active Directory Domain Controller(s) or OpenLDAP directory server if you are using an on-premises directory.
-
Create an Internet resolvable fully qualified DNS entry for external access (e.g. yourserver.example.com). Your users need to access the Duo Access Gateway server using that fully qualified name when logging in to cloud hosted services.
-
Purchase an SSL certificate for your server from a commercial certificate authority (CA), using the fully qualified DNS name of your Duo Access Gateway server as the common name (e.g. yourserver.example.com). You may also use a wildcard SSL certificate.
Install Docker
Docker is a tool that allows Duo Access Gateway to run inside its own self-contained environment, called a “container”, on top of your host operating system.
Click one of the tabs below to view Docker installation instructions for your Linux platform.
CentOS 7, CentOS Stream 8 or 9
These directions will walk you through installing the free Docker Community Edition for CentOS.
- Log into your Duo Access Gateway server locally or through SSH with a user that has sudo permissions. Any time you use the
sudocommand you may be prompted to enter your password. - Docker requires a 64-bit operating system. Please verify your installation of CentOS is 64-bit by typing:
The output should contain x86_64 if the operating system is 64-bit. The output would be similar to:uname -r3.10.0-327.el7.x86_64 - Install yum-utils on your server. Type:
sudo yum install -y yum-utils - Add the Docker repository to your yum repository by typing:
The output should be similar to:sudo yum-config-manager --add-repo https://download.docker.com/linux/centos/docker-ce.repoAdding repo from https://download.docker.com/linux/centos/docker-ce.repo - Make sure your existing packages are up to date. This may take a few minutes. Type:
When packages are finished updating you should see output similar to:sudo yum makecacheMetadata Cache Created! - If wget is not installed on your system, install it by typing:
When wget is finished installing you should see output similar to:sudo yum install -y wgetRunning transaction Installing : wget-1.14-13.el7.x86_64 1/1 Verifying : wget-1.14-13.el7.x86_64 1/1 Installed: wget.x86_64 0:1.14-13.el7 Complete! - Install Docker by typing:
When Docker is finished installing you should see output similar to:sudo yum install -y docker-ce docker-ce-cli containerd.io docker-buildx-plugin docker-compose-pluginComplete! - Enable the Docker service by typing:
You should see output similar to:sudo systemctl enable docker.serviceCreated symlink from /etc/systemd/system/multi-user.target.wants/docker.service to /usr/lib/systemd/system/docker.service. - Start the Docker daemon by typing:
sudo systemctl start docker - Check that Docker has installed properly by typing:
You should see output similar to:sudo docker psCONTAINER ID IMAGE COMMAND CREATED STATUS PORTS NAMES - Add your user to the Docker group so Docker commands don't require sudo. Type:
sudo usermod -aG docker $(whoami) - Log out of your Duo Access Gateway box and back in for the group changes to take effect.
- Check that Docker is functioning without using sudo by typing:
You should see output similar to:docker psCONTAINER ID IMAGE COMMAND CREATED STATUS PORTS NAMES
Fedora 36 or 37
These directions will walk you through installing the free Docker Community Edition for Fedora.
- Log into your Duo Access Gateway server locally or through SSH with a user that has sudo permissions. Any time you use the
sudocommand you may be prompted to enter your password. - Docker requires a 64-bit operating system. Please verify your installation of Fedora is 64-bit by typing:
The output should contain x86_64 if the operating system is 64-bit. The output would be similar to:uname -r4.8.16-300.fc25.x86_64 - Install dnf-plugins-core on your server. Type:
sudo dnf -y install dnf-plugins-core - Add the Docker repository to your dnf repository by typing:
The output should be similar to:sudo dnf config-manager --add-repo https://download.docker.com/linux/fedora/docker-ce.repoAdding repo from: https://download.docker.com/linux/fedora/docker-ce.repo - Make sure your existing packages are up to date. This may take a few minutes. Type:
When packages are finished updating you should see output similar to:sudo dnf makecacheMetadata Cache Created! - If wget is not installed on your system, install it by typing:
When wget is finished installing you should see output similar to:sudo dnf install -y wgetRunning transaction Installing : wget-1.14-13.el7.x86_64 1/1 Verifying : wget-1.14-13.el7.x86_64 1/1 Installed: wget.x86_64 0:1.14-13.el7 Complete! - Install Docker by typing:
When Docker is finished installing you should see output similar to:sudo dnf install -y docker-ce docker-ce-cli containerd.io docker-buildx-plugin docker-compose-pluginComplete! - Enable the Docker service by typing:
You should see output similar to:sudo systemctl enable docker.serviceCreated symlink from /etc/systemd/system/multi-user.target.wants/docker.service to /usr/lib/systemd/system/docker.service. - Start the Docker daemon by typing:
sudo systemctl start docker - Check that Docker has installed properly by typing:
You should see output similar to:sudo docker psCONTAINER ID IMAGE COMMAND CREATED STATUS PORTS NAMES - Add your user to the Docker group so Docker commands don't require sudo. Type:
sudo usermod -aG docker $(whoami) - Log out of your Duo Access Gateway box and back in for the group changes to take effect.
- Check that Docker is functioning without using sudo by typing:
You should see output similar to:docker psCONTAINER ID IMAGE COMMAND CREATED STATUS PORTS NAMES
Ubuntu 18.04 and later
These directions will walk you through installing the free Docker Community Edition for Ubuntu.
- Log into your Duo Access Gateway server locally or through SSH with a user that has sudo permissions. Any time you use the
sudocommand you may be prompted to enter your password. - Update the apt package index by typing:
You should see output similar to:sudo apt-get updateHit:1 http://us-west-1.ec2.archive.ubuntu.com/ubuntu focal InRelease Get:2 http://us-west-1.ec2.archive.ubuntu.com/ubuntu focal-updates InRelease [114 kB] Get:40 http://security.ubuntu.com/ubuntu focal-security/multiverse Translation-en [5488 B] Get:41 http://security.ubuntu.com/ubuntu focal-security/multiverse amd64 c-n-f Metadata [528 B] Fetched 26.0 MB in 5s (5050 kB/s) Reading package lists... Done - Install packages to allow apt to use a repository over HTTPS by typing:
You should see output similar to:sudo apt-get install -y ca-certificates curl gnupg lsb-releaselsb-release set to manually installed. ca-certificates set to manually installed. Processing triggers for libc-bin (2.31-0ubuntu9.9) ... - Add Docker's official GPG key by typing:
sudo mkdir -m 0755 -p /etc/apt/keyrings curl -fsSL https://download.docker.com/linux/ubuntu/gpg | sudo gpg --dearmor -o /etc/apt/keyrings/docker.gpg - Use the following command to set up the repository:
echo \ "deb [arch=$(dpkg --print-architecture) signed-by=/etc/apt/keyrings/docker.gpg] https://download.docker.com/linux/ubuntu \ $(lsb_release -cs) stable" | sudo tee /etc/apt/sources.list.d/docker.list > /dev/null - Update the apt package index by typing:
You should see output similar to:sudo apt-get updateFetched 442 kB in 1s (584 kB/s) Reading package lists... Done -
Install Docker Engine, containerd, and Docker Compose by typing:
You should see output similar to:sudo apt-get install -y docker-ce docker-ce-cli containerd.io docker-buildx-plugin docker-compose-pluginThe following NEW packages will be installed: containerd.io docker-buildx-plugin docker-ce docker-ce-cli docker-ce-rootless-extras docker-compose-plugin docker-scan-plugin pigz slirp4netns 0 upgraded, 9 newly installed, 0 to remove and 31 not upgraded. Processing triggers for systemd (245.4-4ubuntu3.19) ... - Add your user to the Docker group so Docker commands don't require sudo. Type:
sudo usermod -aG docker $(whoami) - Log out of your Duo Access Gateway box and back in for the group changes to take effect.
- Check that Docker is functioning without using sudo by typing:
You should see output similar to:docker psCONTAINER ID IMAGE COMMAND CREATED STATUS PORTS NAMES
Debian 10 and 11
These directions will walk you through installing the free Docker Community Edition for Debian.
- Log into your Duo Access Gateway server locally or through SSH with a user that has sudo permissions. Any time you use the
sudocommand you may be prompted to enter your password. - Update your package database by typing:
You should see output similar to:sudo apt-get updateReading package lists... Done - Ensure that APT works with HTTPS and that CA certificates are installed. Type:
You should see output similar to:sudo apt-get install -y ca-certificates curl gnupg lsb-releaseProcessing triggers for libc-bin (2.19-18+deb8u7) ... Processing triggers for systemd (215-17+deb8u6) ... Processing triggers for dbus (1.8.22-0+deb8u1) ... - Add the official Docker repository GPG keys to your server by typing:
You should see output similar to:sudo mkdir -m 0755 -p /etc/apt/keyrings \ curl -fsSL https://download.docker.com/linux/debian/gpg | sudo gpg --dearmor -o /etc/apt/keyrings/docker.gpgResolving download.docker.com (download.docker.com)... 54.192.192.196, 54.192.192.15, 54.192.192.26, ... Connecting to download.docker.com (download.docker.com)|54.192.192.196|:443... connected. HTTP request sent, awaiting response... 200 OK Length: 3817 (3.7K) [binary/octet-stream] Saving to: ‘STDOUT’ - 100%[===========================================================================================================================================>] 3.73K --.-KB/s in 0s 2017-05-19 12:07:50 (374 MB/s) - written to stdout [3817/3817] OK - Add the Docker repository to to your APT sources by typing:
echo \ "deb [arch=$(dpkg --print-architecture) signed-by=/etc/apt/keyrings/docker.gpg] https://download.docker.com/linux/debian \ $(lsb_release -cs) stable" | sudo tee /etc/apt/sources.list.d/docker.list > /dev/null - Update your package database again by typing:
You should see output similar to:sudo apt-get updateReading package lists... Done - Install Docker by typing:
When the install is finished, you should see output similar to:sudo apt-get install -y docker-ce docker-ce-cli containerd.io docker-buildx-plugin docker-compose-pluginProcessing triggers for systemd (215-17+deb8u6) ... Processing triggers for initramfs-tools (0.120+deb8u2) ... update-initramfs: Generating /boot/initrd.img-3.16.0-4-amd64 Processing triggers for dbus (1.8.22-0+deb8u1) ... - Check that Docker has installed properly by typing:
You should see output similar to:sudo docker psCONTAINER ID IMAGE COMMAND CREATED STATUS PORTS NAMES - Add your user to the Docker group so Docker commands don't require sudo. Type:
sudo usermod -aG docker $(whoami) - Log out of your Duo Access Gateway box and back in for the group changes to take effect.
- Check that Docker is functioning without using sudo by typing:
You should see output similar to:docker psCONTAINER ID IMAGE COMMAND CREATED STATUS PORTS NAMES
Red Hat Enterprise Linux 7 and later on s390x (IBM Z)
These directions will walk you through installing the free Docker Community Edition for RHEL.
- Log into your Duo Access Gateway server locally or through SSH with a user that has sudo permissions. Any time you use the
sudocommand you may be prompted to enter your password. - Docker requires a 64-bit operating system. Please verify your installation of RHEL is 64-bit by typing:
The output should contain x86_64 if the operating system is 64-bit. The output would be similar to:uname -r3.10.0-327.el7.x86_64 - Install yum-utils on your server. Type:
sudo yum install -y yum-utils - Add the Docker repository to your yum repository by typing:
The output should be similar to:sudo yum-config-manager --add-repo https://download.docker.com/linux/rhel/docker-ce.repoLoaded plugins: fastestmirror adding repo from: https://download.docker.com/linux/rhel/docker-ce.repo grabbing file https://download.docker.com/linux/rhel/docker-ce.repo to /etc/yum.repos.d/docker-ce.repo repo saved to /etc/yum.repos.d/docker-ce.repo - Make sure your existing packages are up to date. This may take a few minutes. Type:
When packages are finished updating you should see output similar to:sudo yum makecacheMetadata Cache Created! - If wget is not installed on your system, install it by typing:
When wget is finished installing you should see output similar to:sudo yum install -y wgetRunning transaction Preparing : 1/1 Installing : wget-1.21.1-7.el9.x86_64 1/1 Running scriptlet: wget-1.21.1-7.el9.x86_64 1/1 Verifying : wget-1.21.1-7.el9.x86_64 1/1 Installed products updated. Installed: wget-1.21.1-7.el9.x86_64 Complete! - Install Docker by typing:
When Docker is finished installing you should see output similar to:sudo yum install -y docker-ce docker-ce-cli containerd.io docker-buildx-plugin docker-compose-pluginComplete! - Enable the Docker service by typing:
You should see output similar to:sudo systemctl enable docker.serviceCreated symlink from /etc/systemd/system/multi-user.target.wants/docker.service to /usr/lib/systemd/system/docker.service. - Start the Docker daemon by typing:
sudo systemctl start docker - Check that Docker has installed properly by typing:
You should see output similar to:sudo docker psCONTAINER ID IMAGE COMMAND CREATED STATUS PORTS NAMES - Add your user to the Docker group so Docker commands don't require sudo. Type:
sudo usermod -aG docker $(whoami) - Log out of your Duo Access Gateway box and back in for the group changes to take effect.
- Check that Docker is functioning without using sudo by typing:
You should see output similar to:docker psCONTAINER ID IMAGE COMMAND CREATED STATUS PORTS NAMES
SUSE Enterprise Linux 15 and later
- Docker requires a 64-bit operating system. Please verify your installation of SUSE Enterprise Linux is 64-bit by typing:
The output should contain x86_64 if the operating system is 64-bit. The output would be similar to:uname -a(Linux localhost 5.3.18-22-default #1 SMP Wed Jun 3 12:16:43 UTC 2020 (720aeba) x86_64 x86_64 x86_64 GNU/Linux - If wget is not installed on your system, install it by typing:
sudo zypper install -y wget - Add the required repository to your server by typing:
The output should be similar to:sudo SUSEConnect -p sle-module-containers/15.2/x86_64 -r ''Registering system to SUSE Customer Center Updating system details on https://scc.suse.com ... Activating sle-module-containers 15.2 x86_64 ... -> Adding service to system ... -> Installing release package ... Successfully registered system - Install Docker and Docker Compose by typing:
sudo zypper install -y docker docker-compose docker-compose-switch - Enable the Docker service by typing:
You should see output similar to:sudo systemctl enable docker.serviceCreated symlink from /etc/systemd/system/multi-user.target.wants/docker.service to /usr/lib/systemd/system/docker.service. - Start the Docker daemon by typing:
sudo service docker start - Check that Docker has installed properly by typing:
You should see output similar to:sudo docker psCONTAINER ID IMAGE COMMAND CREATED STATUS PORTS NAMES - Add your user to the Docker group so Docker commands don't require sudo. Type:
sudo usermod -aG docker $(whoami) - Log out of your Duo Access Gateway box and back in for the group changes to take effect.
- Check that Docker is functioning without using sudo by typing:
You should see output similar to:docker psCONTAINER ID IMAGE COMMAND CREATED STATUS PORTS NAMES
Install Duo Access Gateway
-
Download the Duo Access Gateway YML file and save it to your Duo Access Gateway server. Download the YML file by typing:
wget --content-disposition https://dl.duosecurity.com/access-gateway-latest.ymlYou should see output similar to:
--2026-05-20 14:04:19--  https://dl.duosecurity.com/access-gateway-latest.yml
 Resolving dl.duosecurity.com (dl.duosecurity.com)... 143.204.130.123, 143.204.130.84, 143.204.130.4, ...
 Connecting to dl.duosecurity.com (dl.duosecurity.com)|143.204.130.123|:443... connected.
 HTTP request sent, awaiting response... 200 OK
 Length: 625 [application/octet-stream]
 Saving to: ‘access-gateway-3.0.0.yml’
 access-gateway-3.0.0.yml       100%[====================================================>]     625  --.-KB/s    in 0s
 2026-05-20 14:04:19 (14.9 MB/s) - ‘access-gateway-3.0.0.yml’ saved [625/625]
Note the actual file name that was saved, you'll need this in future steps. View checksums for Duo downloads here.
Save this YML file in a persistent directory location for future use; it will be required for later use when deploying, updating, or interacting with your Duo Access Gateway server.
-
The following command instructs Docker Compose to download Duo Access Gateway and install it. Specify the YML file downloaded in the last step in the command. Note that your YML file name may reflect a different version than the example command shown. Replace the file name in the example with your downloaded YML file's actual name.
Type:
docker compose -p access-gateway -f access-gateway-3.0.0.yml upThis may take a few minutes. Once completed the text output will be similar to:
Creating access-gateway -
You can verify that your Duo Access Gateway container is running by typing:
docker psYou should see output showing the container with a status of "up" similar to:
CONTAINER ID IMAGE COMMAND CREATED STATUS PORTS NAMES
3aea70b8e1a8 duosecurity/dag@sha256:c3c2855ad5ada0f70296ba5276d0d8271c25596f42a96c283faca7c2f2100eda "bash -c /bin/run-con" 4 minutes ago Up 4 minutes 0.0.0.0:8443->8443/tcp, 0.0.0.0:443->4443/tcp, 0.0.0.0:80->8000/tcp access-gateway
Configure Duo Access Gateway
Initial Duo Access Gateway Configuration
-
In a browser navigate to https://URL-OF-ACCESS-GATEWAY:8443 from an internal network to log into the Duo Access Gateway admin console. Your browser warns you about an untrusted certificate the first time you access the page. Dismiss the warning and continue onto the page.
-
You must choose a new admin password at initial log on.

-
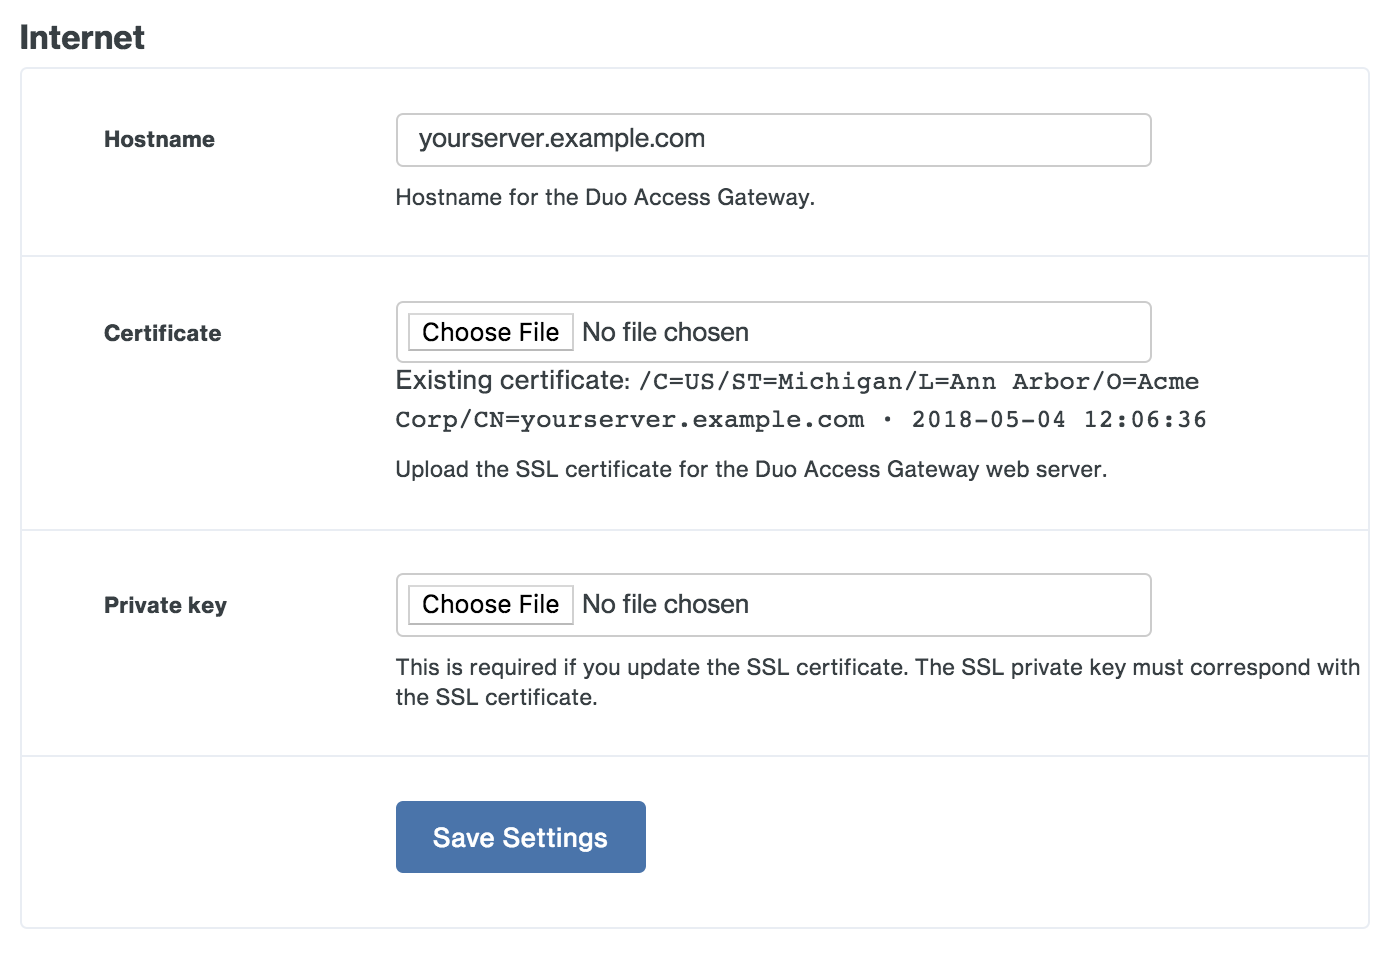
On the "Duo Access Gateway: Internet setup" page fill in the following fields and then click Submit.
Option Description Hostname Enter the fully-qualified external domain name (FQDN) of the server. This should be FQDN addressable to the Internet (eg. portal.yourcompany.com). Certificate Upload the certificate file you purchased earlier for the Duo Access Gateway server. The certificate should be Base64-encoded X.509 (pem, cer, or crt) and include the entire certificate bundle. The certificates should be ordered from top to bottom: certificate, issuing certificates, and root certificate. Private Key Upload the private key file related to the certificate you purchased earlier for the Duo Access Gateway server. Private keys should be formatted as Base64-encoded X.509 (pem, cer, or crt). The private key must not be encrypted. 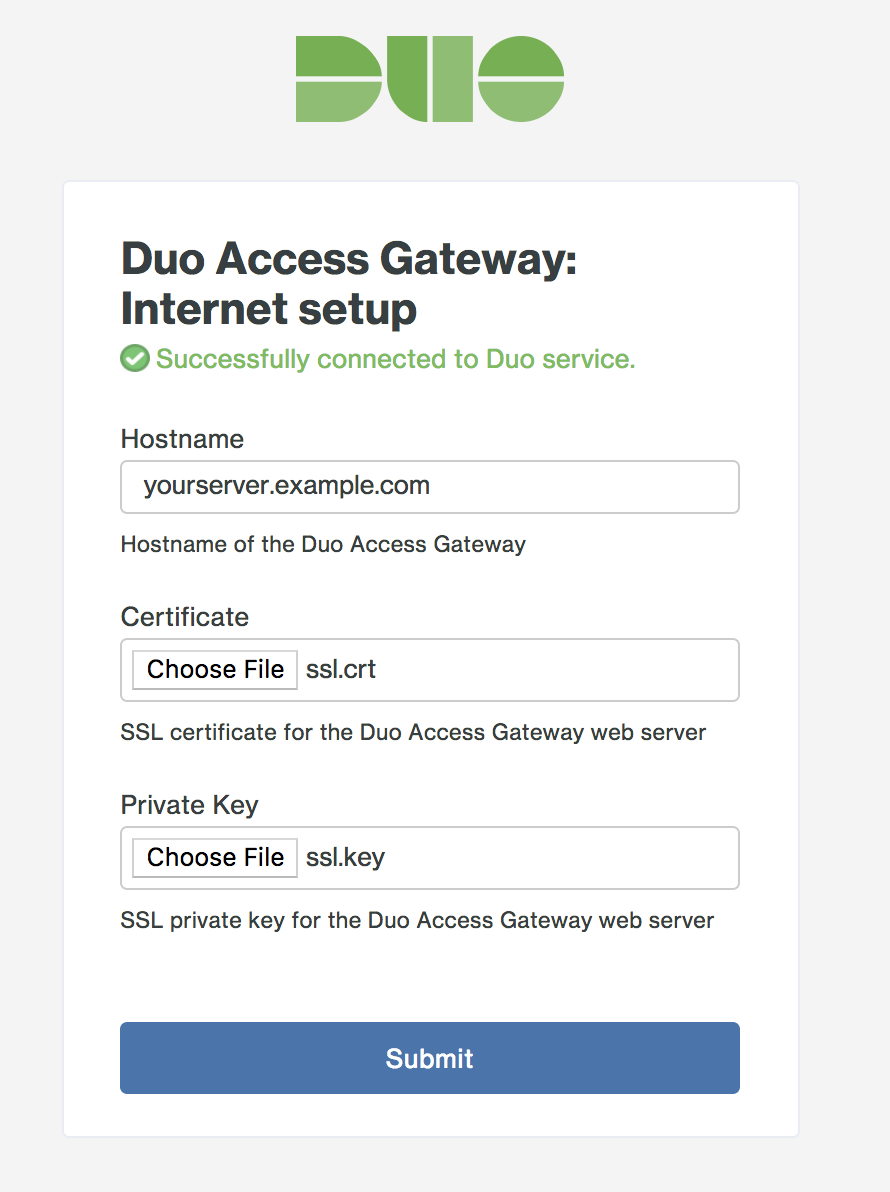
-
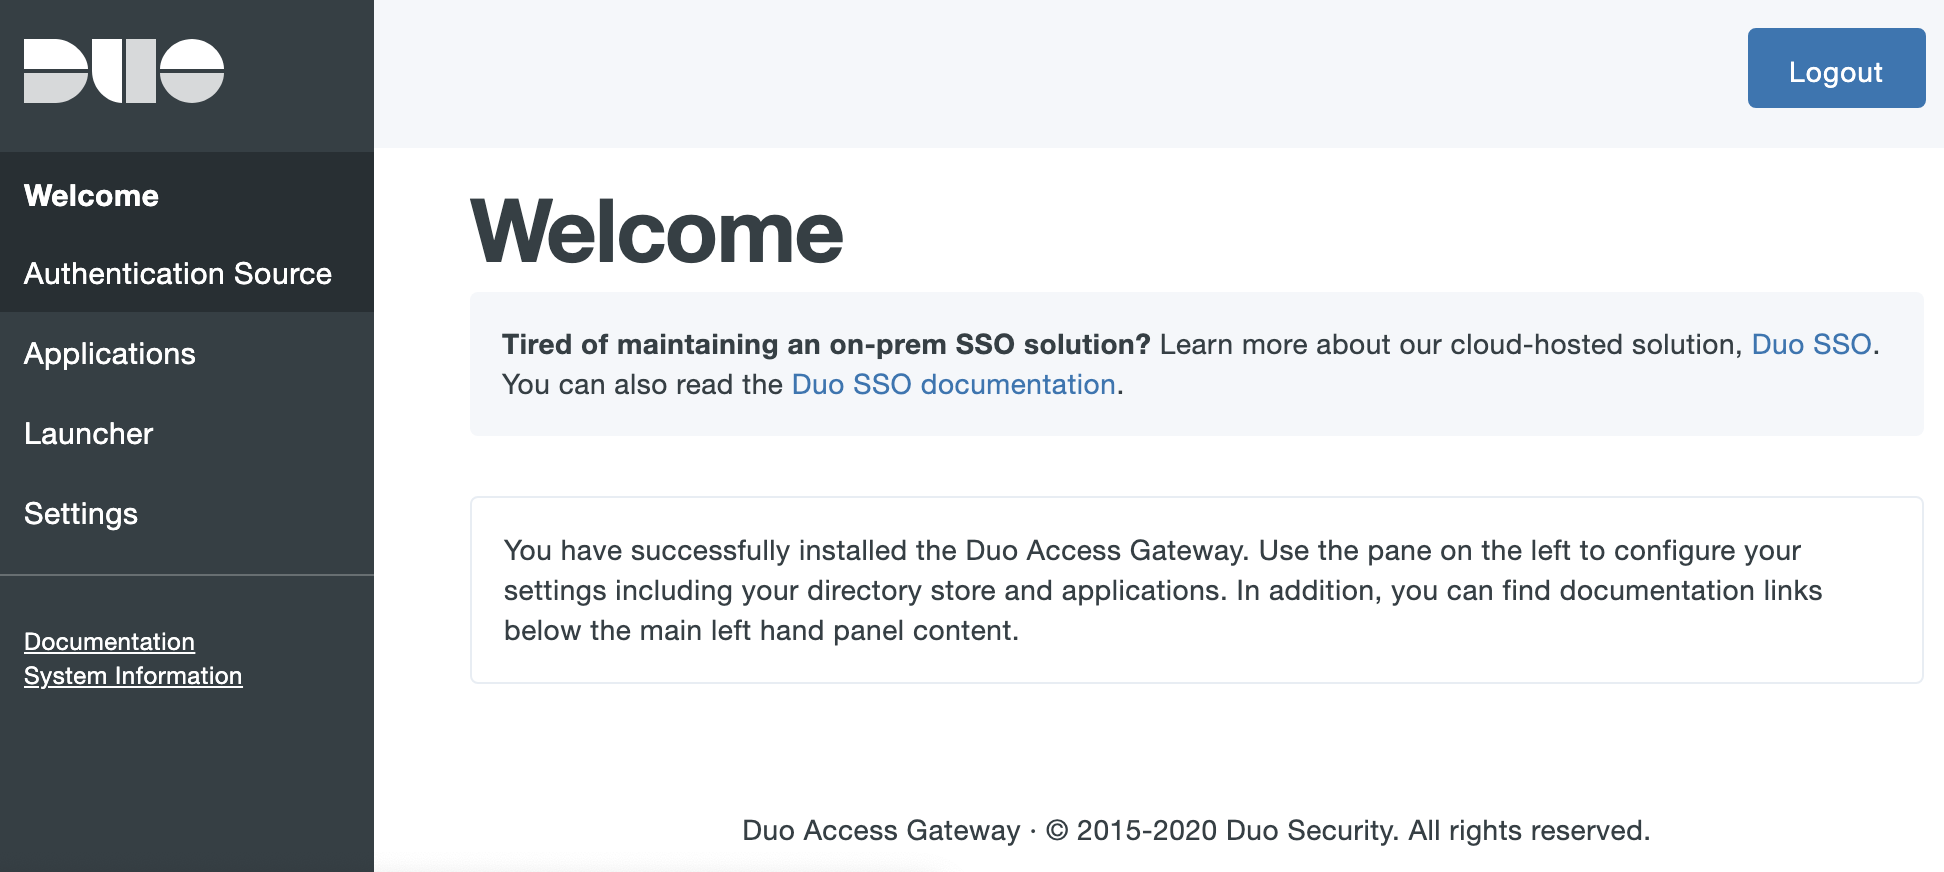
Saving your configuration redirects you to the Duo Access Gateway admin console.
The Duo Access Gateway admin console navigation links include:
- Applications: Add and remove cloud applications.
- Authentication Source: Configure primary authentication.
- Launcher: Enable the optional application launcher portal.
- Settings: Change global configuration options.
- Documentation: Link to the online Duo Access Gateway documentation page.
- System Information: View details about your Duo Access Gateway server, such as operating system build, fully qualified hostname, and PHP version.
Configure Your Authentication Source
Duo Access Gateway supports the following authentication sources:
- Active Directory
- OpenLDAP
- SAML IdP
- Google (OpenID Connect)
- Microsoft Azure (OpenID Connect) (now known as Microsoft Entra ID)
-
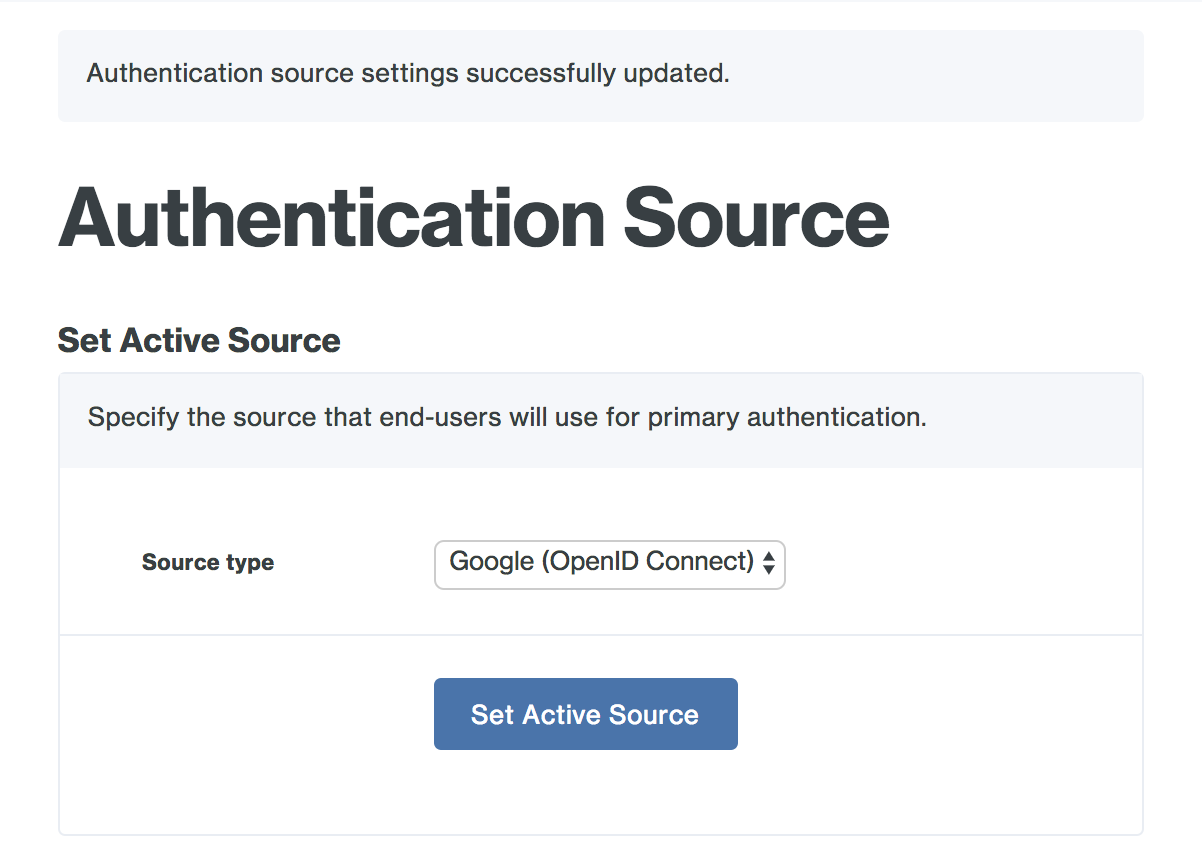
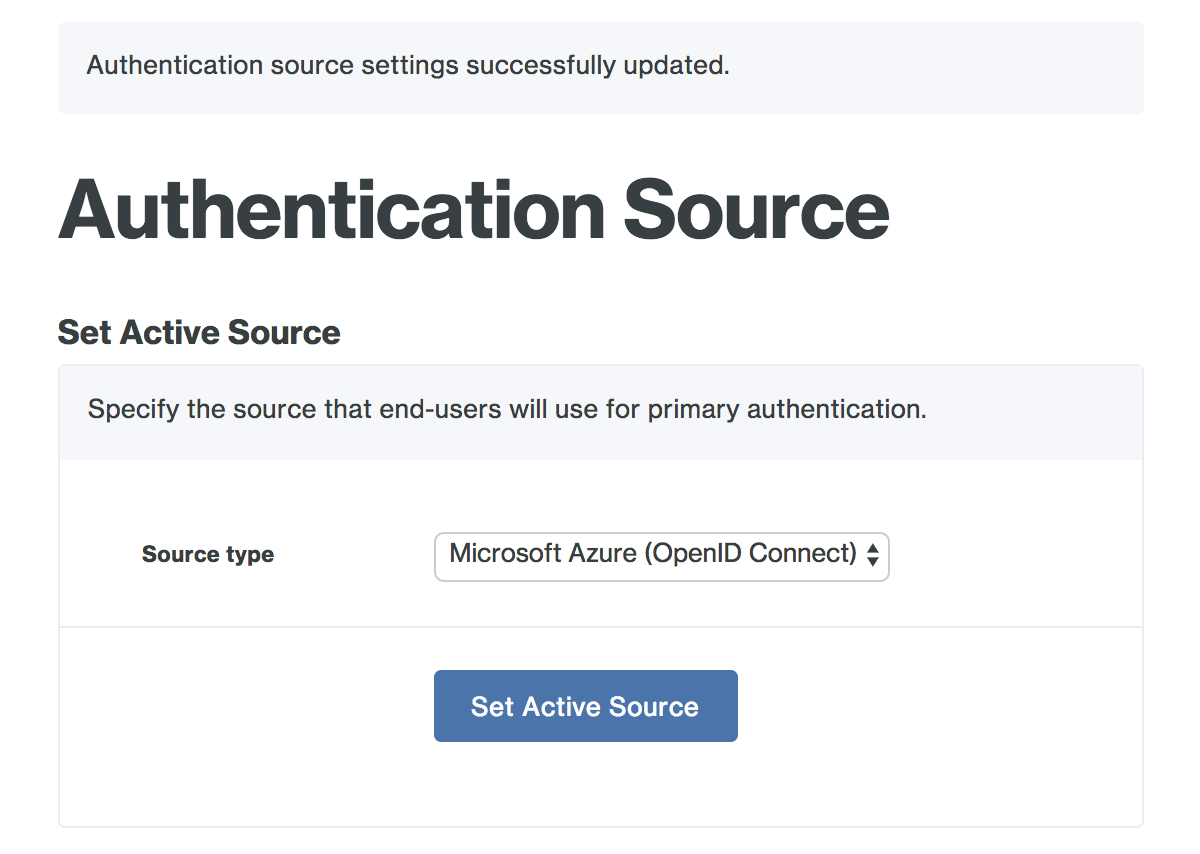
In the Duo Access Gateway admin console, click Authentication Source. You'll notice that the Source type drop-down under Set Active Source has no options. You'll need to configure and save an authentication source before you can set one as active. Your first configured authentication source is automatically set as your active source.
-
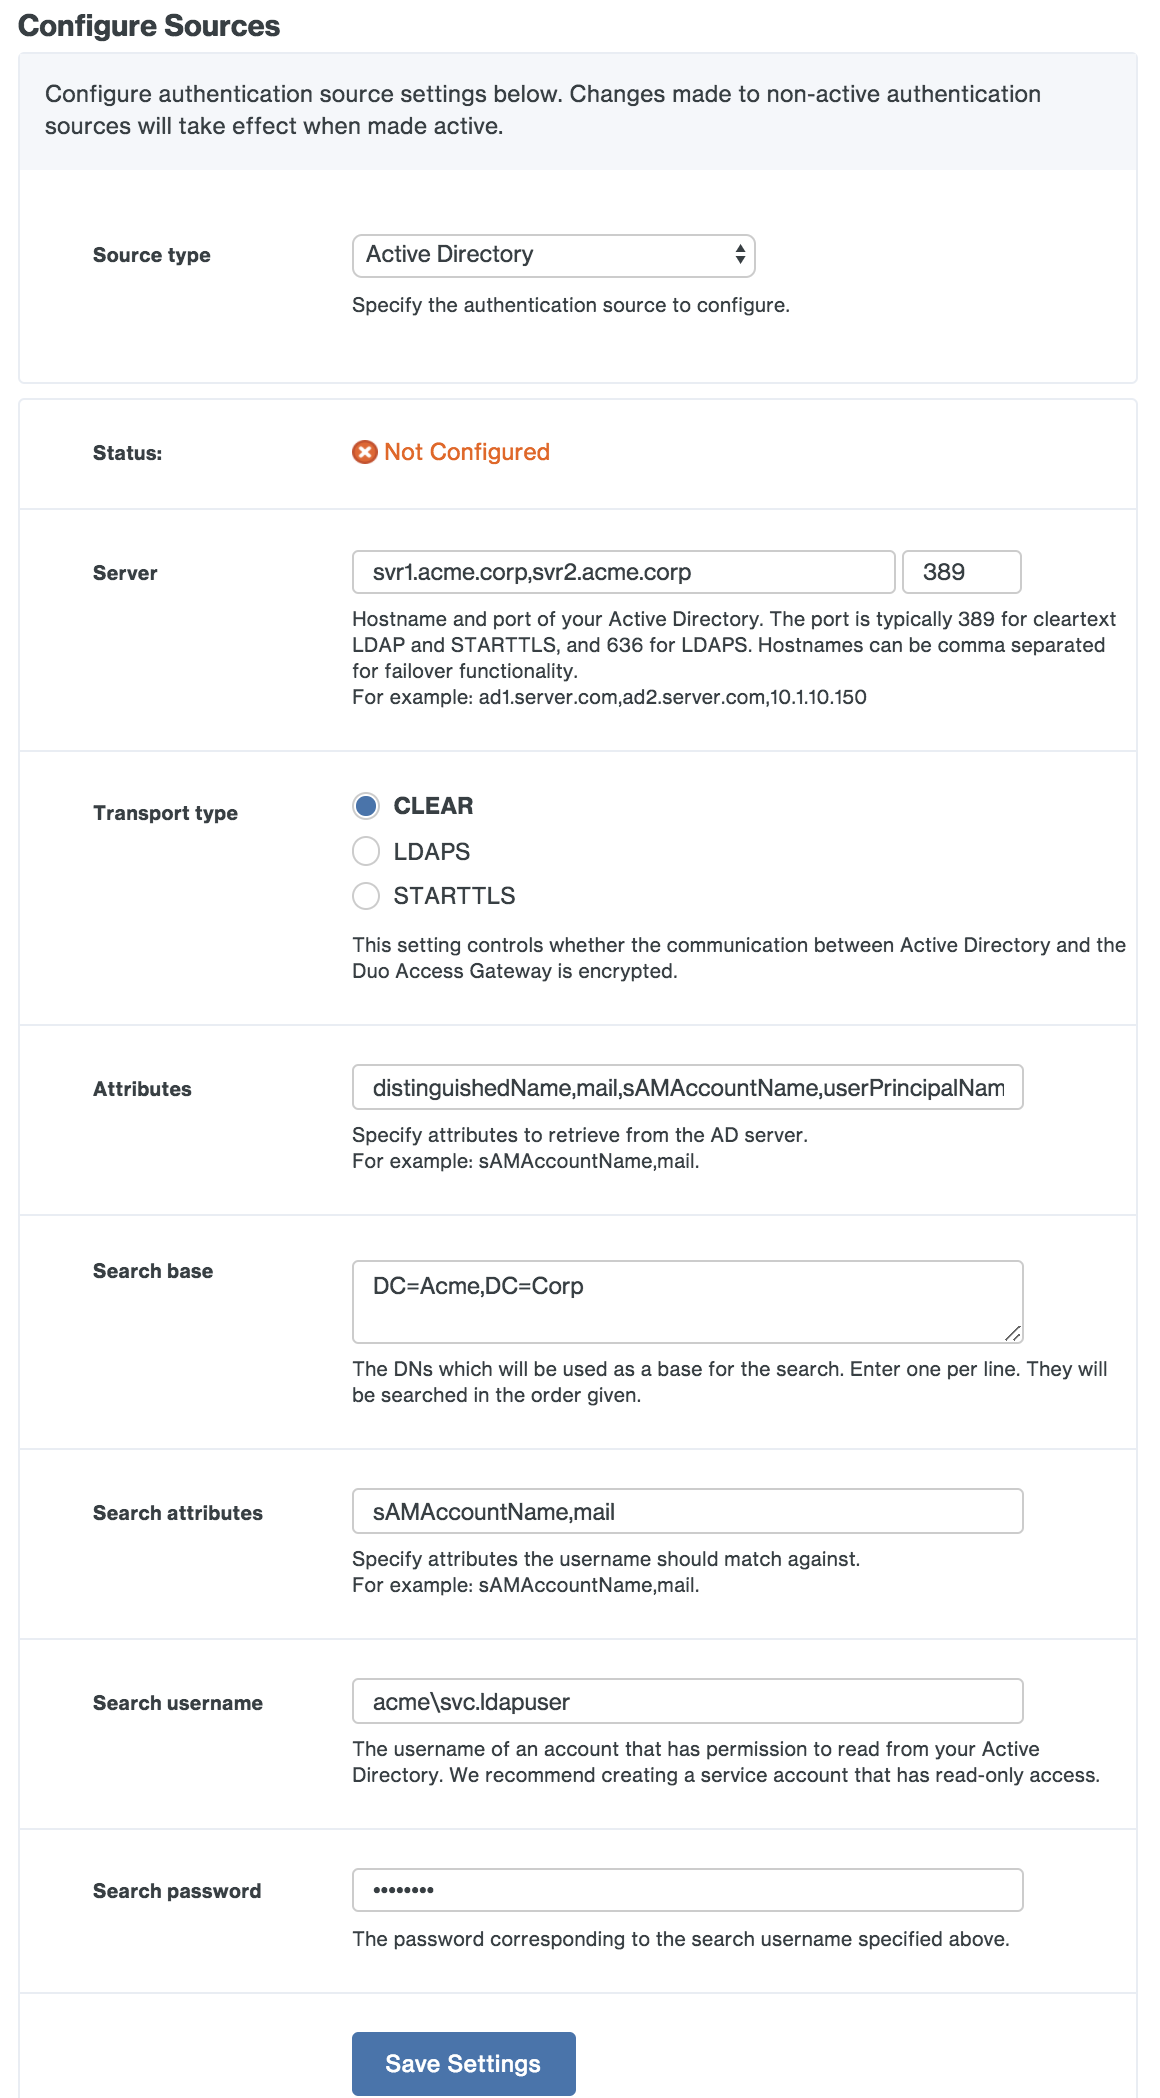
In the Configure Sources section, select your desired Source type from the drop-down and enter your configuration settings.
Active Directory
| Server | The hostname or IP address of your domain controller. If entering more than one domain controller prefix the DC hostname or IP address with ldap:// and separate the entries with commas, for example ldap://dc1.acme.corp,ldap://dc2.acme.corp. If you will be using STARTTLS or LDAPS transport types then you should specify server hostnames here that match the server hostnames in your domain controller's SSL certificate. |
| Port | Enter the port used to communicate with Active Directory. The default port for LDAP and STARTTLS is 389, while the default port for LDAPS is 636. To search the Global Catalog the default port is 3268. |
| Transport type | This determines how the connection between the Duo Access Gateway and the Active Directory server is encrypted. The default, CLEAR, is unencrypted. Select STARTTLS or LDAPS to encrypt LDAP authentication traffic. If you select STARTTLS or LDAPS you will need to provide the certificate chain for your directory server's SSL certificate as the AD Certificate. |
| AD Certificate | In order to secure LDAP connections to your AD domain server using LDAPS or STARTTLS protocols, you'll need the PEM formatted certificate from the certificate authority (CA) that issued your AD domain controller's SSL certificate. The hostname that the DC's cert was issued to should match the hostname you specified in the "Server" field. To obtain the PEM formatted version of the AD domain controller certificate's issuing CA certificate, view the "Certification Path" tab of the DC's certificate properties and double-click the issuing certificate to view it. Export the issuing CA certificate as a Base-64 encoded X.509 (CER) format. Open the issuing CA certificate you exported in a text editor. Copy the file contents (including the BEGIN and END wrapper) and paste into the SSL CA certs field on your AD domain configuration page. You may need to export all the certs in the CA (such as root CA and intermediate CA) in the certification path and paste them all into this page. It is not required that you provide the actual certificate issued to the domain controller, unless it is using a self-signed certificate (where the cert is issued to and issued by the same host). If you do use a self-signed certificate to secure communications to your domain controller, the certificate's key usage must include "Certificate Signing". |
| Attributes | Enter the AD user attributes required for SSO login. Many cloud service providers use the mail or sAMAccountname attributes. Check your service provider's SSO documentation for the specific attributes required. |
| Search base | Enter the DN that corresponds to a container or OU in your directory structure containing the user accounts for SSO. You can enter multiple DNs in this field, one per line. Example DNs: CN=Users,dc=acme,dc=corp (searches the built-in Users container), OU=Employees,OU=US,DC=acme,DC=corp (searches within an organizational unit hierarchy), OU=Users,DC=EMEA,DC=acme,DC=corp (searches an OU in a child domain) |
| Search attributes | Enter the AD attribute or attributes with values that match what users type into the Username field on the login page. Separate multiple attribute names with commas, for example sAMAccountName,mail. |
| Search username | Enter the NTLM formatted username (e.g. DOMAIN\User) of an AD domain account that has permission to bind to Active Directory and perform LDAP queries. |
| Search password | Enter the password for the search username account. |
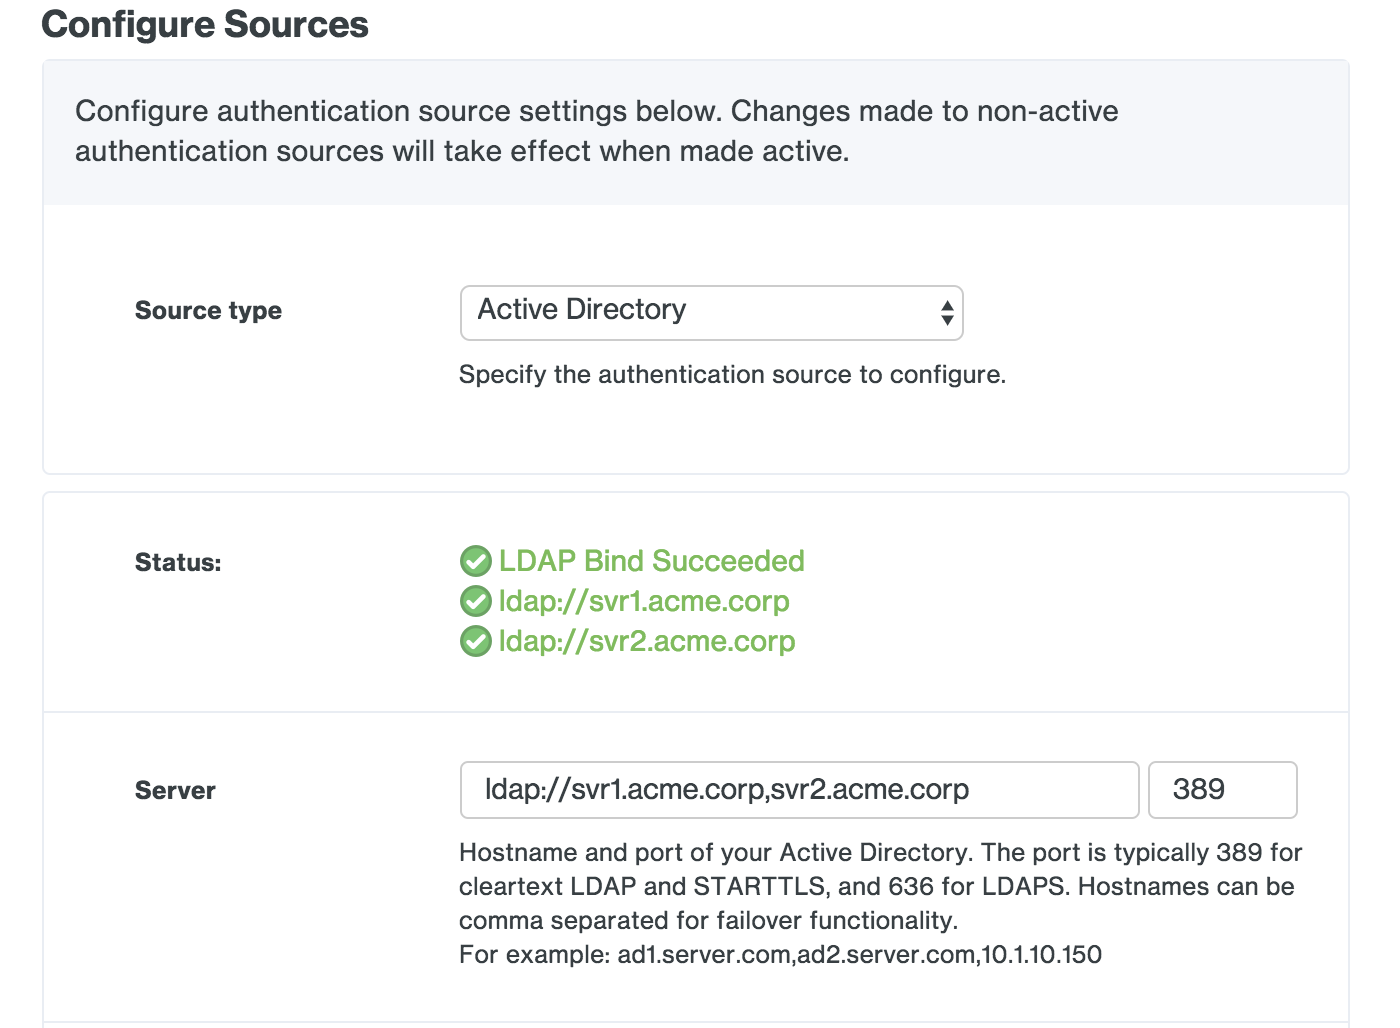
Save your Active Directory settings. If this is your first configured authentication source, the Duo Access Gateway sets this as your active source and contacts the domain controller using the provided information. If this is not your first configured authentication source you'll need to set this one as the active source using the drop-down under Set Active Source to test connectivity.
If you do not see a "Bind Succeeded" message please double-check your configuration information and verify the Duo Access Gateway server has the necessary connectivity to your domain controllers.
OpenLDAP
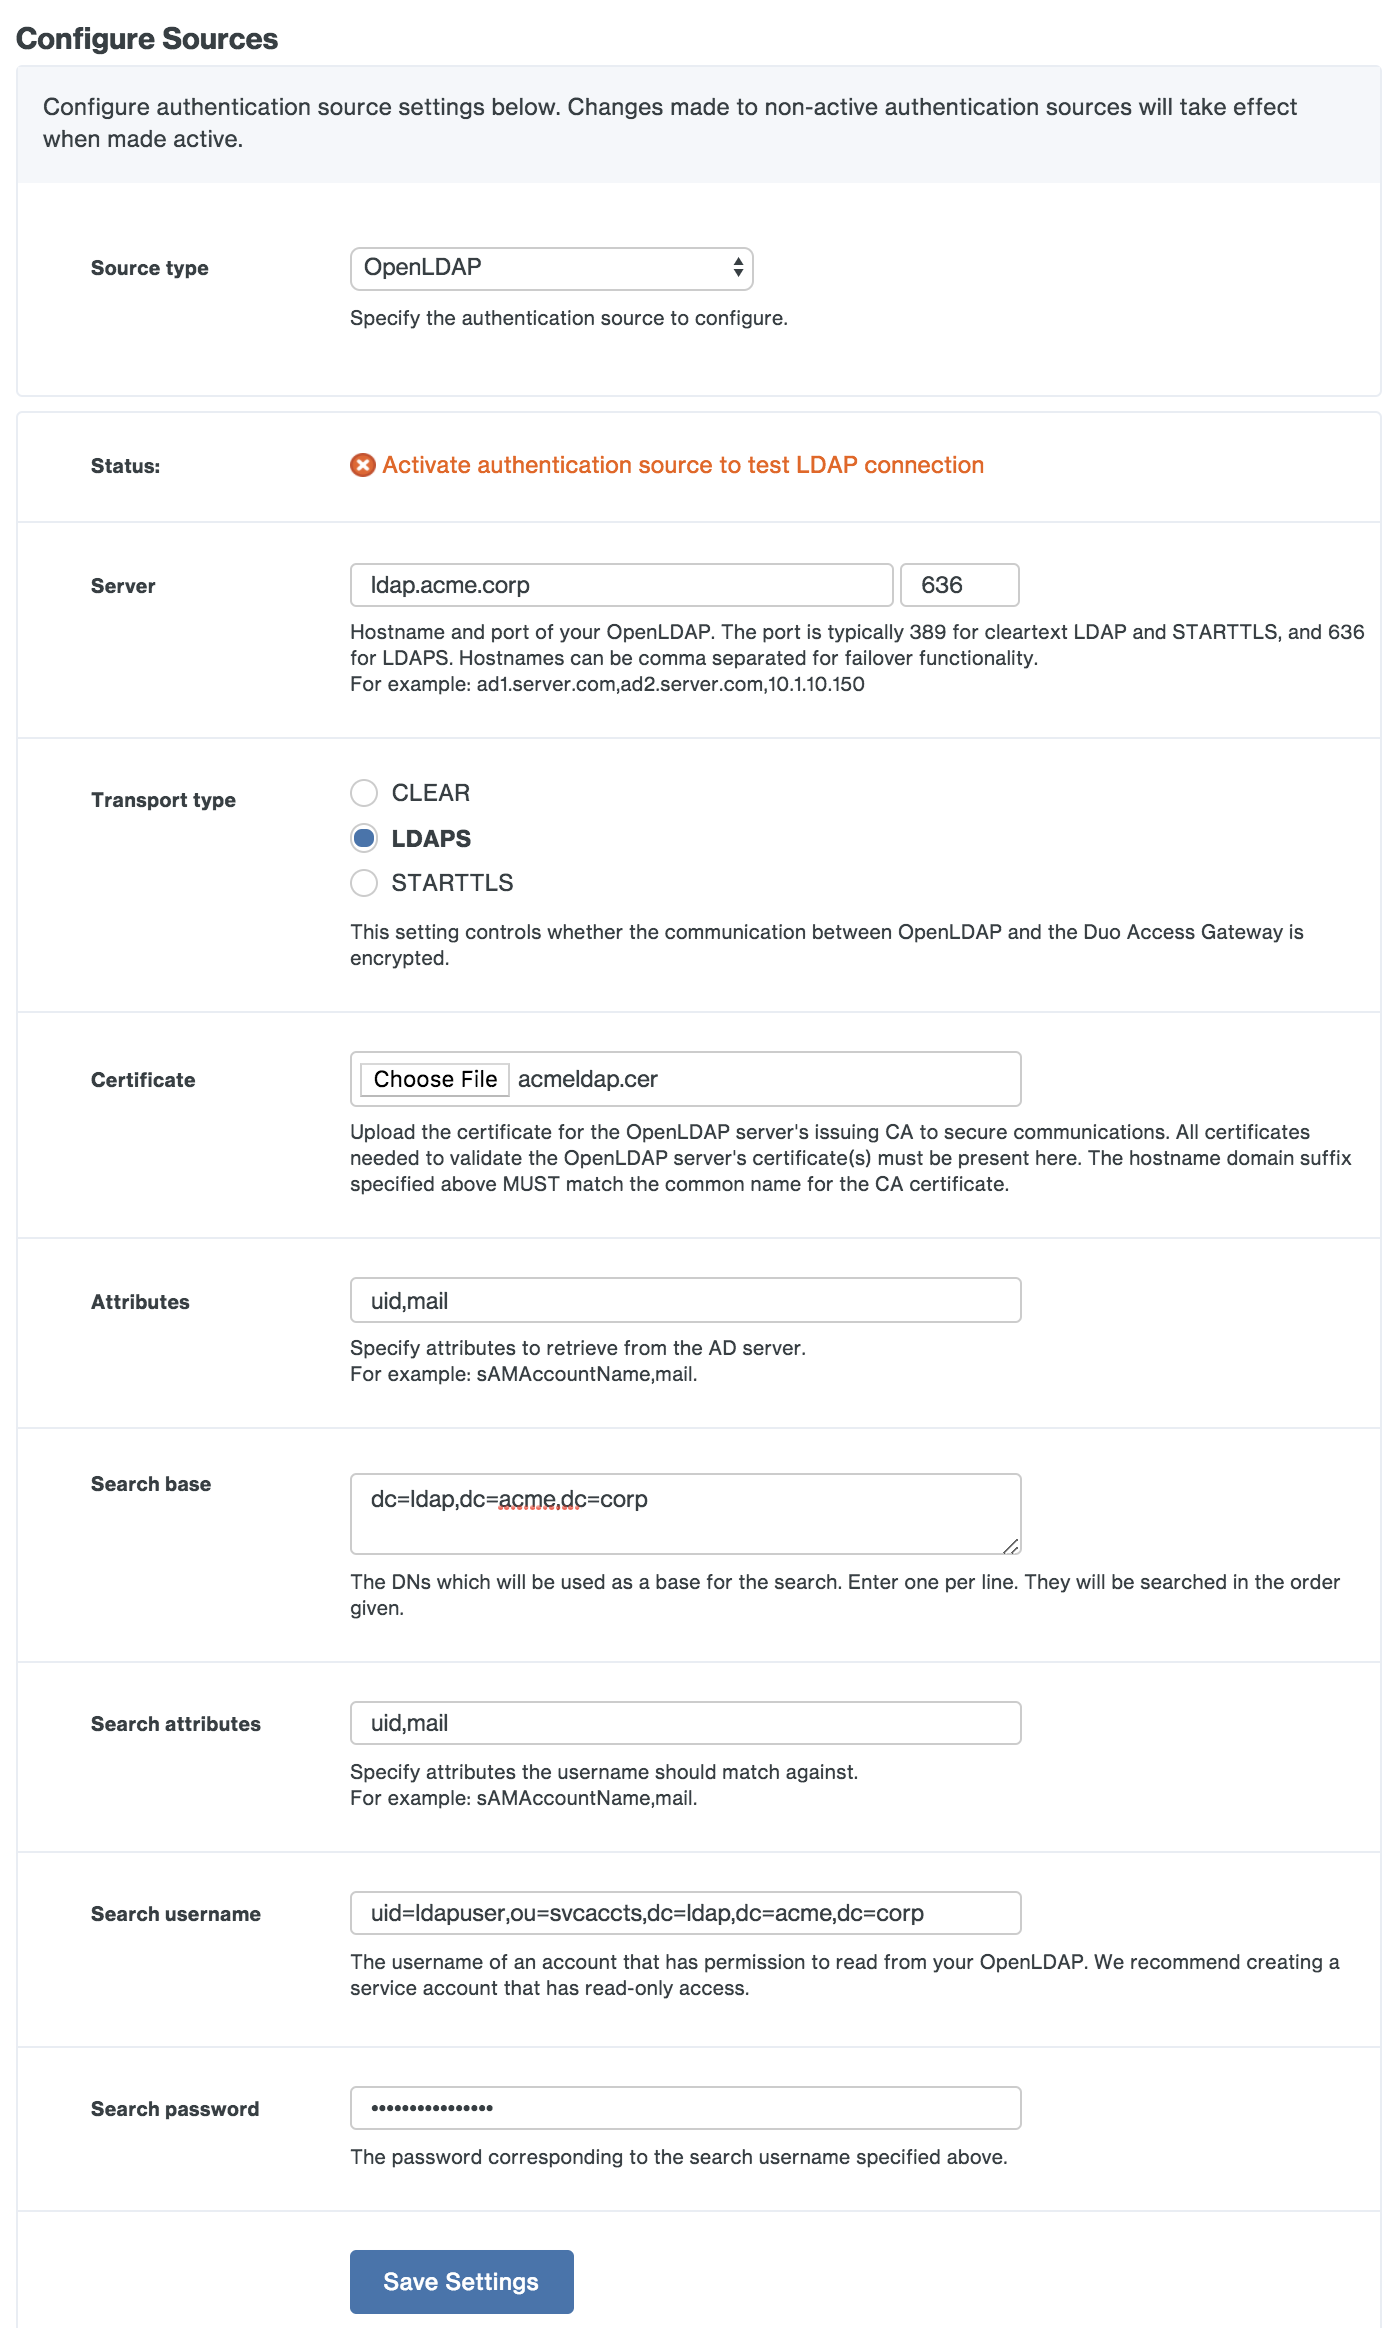
| Server | The comma-separated hostname(s) of your LDAP directory server(s). If you will be using STARTTLS or LDAPS transport types then you should specify server hostnames here that match the server hostnames in your directory server's SSL certificate. |
| Port | Enter the port used to communicate with OpenLDAP. The default port for LDAP and STARTTLS is 389, while the default port for LDAPS is 636. |
| Transport type | This determines how the connection between the Duo Access Gateway and the OpenLDAP server is encrypted. The default, CLEAR, is unencrypted. Select STARTTLS or LDAPS to encrypt LDAP authentication traffic. If you select STARTTLS or LDAPS you will need to provide the certificate chain for your directory server's SSL certificate as the Certificate. |
| Certificate | To use STARTTLS or LDAPS encryption you’ll need the certificate from your OpenLDAP directory server certificate’s issuing CA or CA chain. If you have an intermediate CA export all the certs (such as root CA and intermediate CA) in the certification path and combine them into one file using a text editor. Copy the certificate file to the Duo Access Gateway server; then click the Browse button to select the exported certificate. Additionally, the hostname that the LDAP server's cert was issued to should match the hostname you specified in the "Server" field. |
| Attributes | Enter the OpenLDAP user attributes required for SSO login. Many cloud service providers use the mail or uid attributes. Check your service provider's SSO documentation for the specific attributes required. |
| Search base | Enter the DN that corresponds to a container or OU in your directory structure containing the user accounts for SSO. You can enter multiple DNs in this field, one per line. Example DNs: ou=Employees,ou=US,dc=acme,dc=corp (searches within an organizational unit hierarchy), dc=acme,dc=corp (searches the entire domain) |
| Search attributes | Enter the LDAP attribute or attributes with values that match what users type into the Username field on the login page. Separate multiple attribute names with commas, for example uid,mail. |
| Search username | Enter the dn of an OpenLDAP service account that has permission to bind to the directory and perform LDAP queries. Example service account DN: uid=ldapuser,ou=SvcAccts,dc=acme,dc=corp |
| Search password | Enter the password for the search username account. |
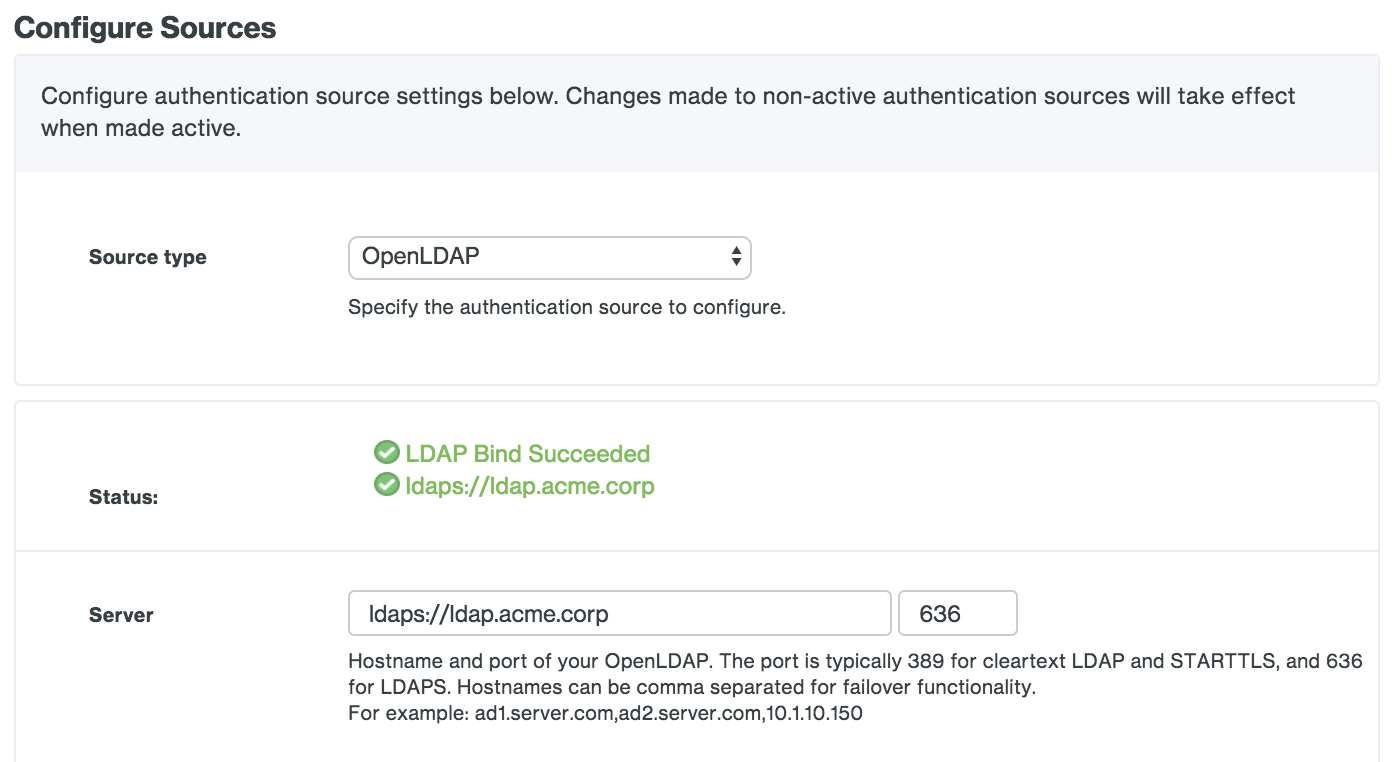
Save your OpenLDAP settings. If this is your first configured authentication source, the Duo Access Gateway sets this as your active source and contacts the directory server using the provided information. If this is not your first configured authentication source you'll need to set this one as the active source using the drop-down under Set Active Source to test connectivity.
If you do not see a "Bind Succeeded" message please double-check your configuration information and verify the Duo Access Gateway server has the necessary connectivity to your directory.
SAML IdP
| Entity ID | The global, unique name for your SAML entity. This is provided by your primary authentication identity provider. |
| Single sign-on URL | The authentication URL for your identity provider. |
| Single logout URL | The logout URL for your identity provider. |
| Certificate | Download the token signing certificate for your identity provider, and then click the Browse button to select the exported certificate. |
| Duo Username Attribute | The Duo Access Gateway uses the NameID SAML attribute as the username default. If you need to use a different username attribute, check the box next to the "Specify an alternate SAML attribute to use as the Duo username instead of NameID" option, and type in your username attribute in the space provided. |
| Disable Scoping | Check this box to disable sending scoping information if you're configuring AD FS as your SAML IdP. |
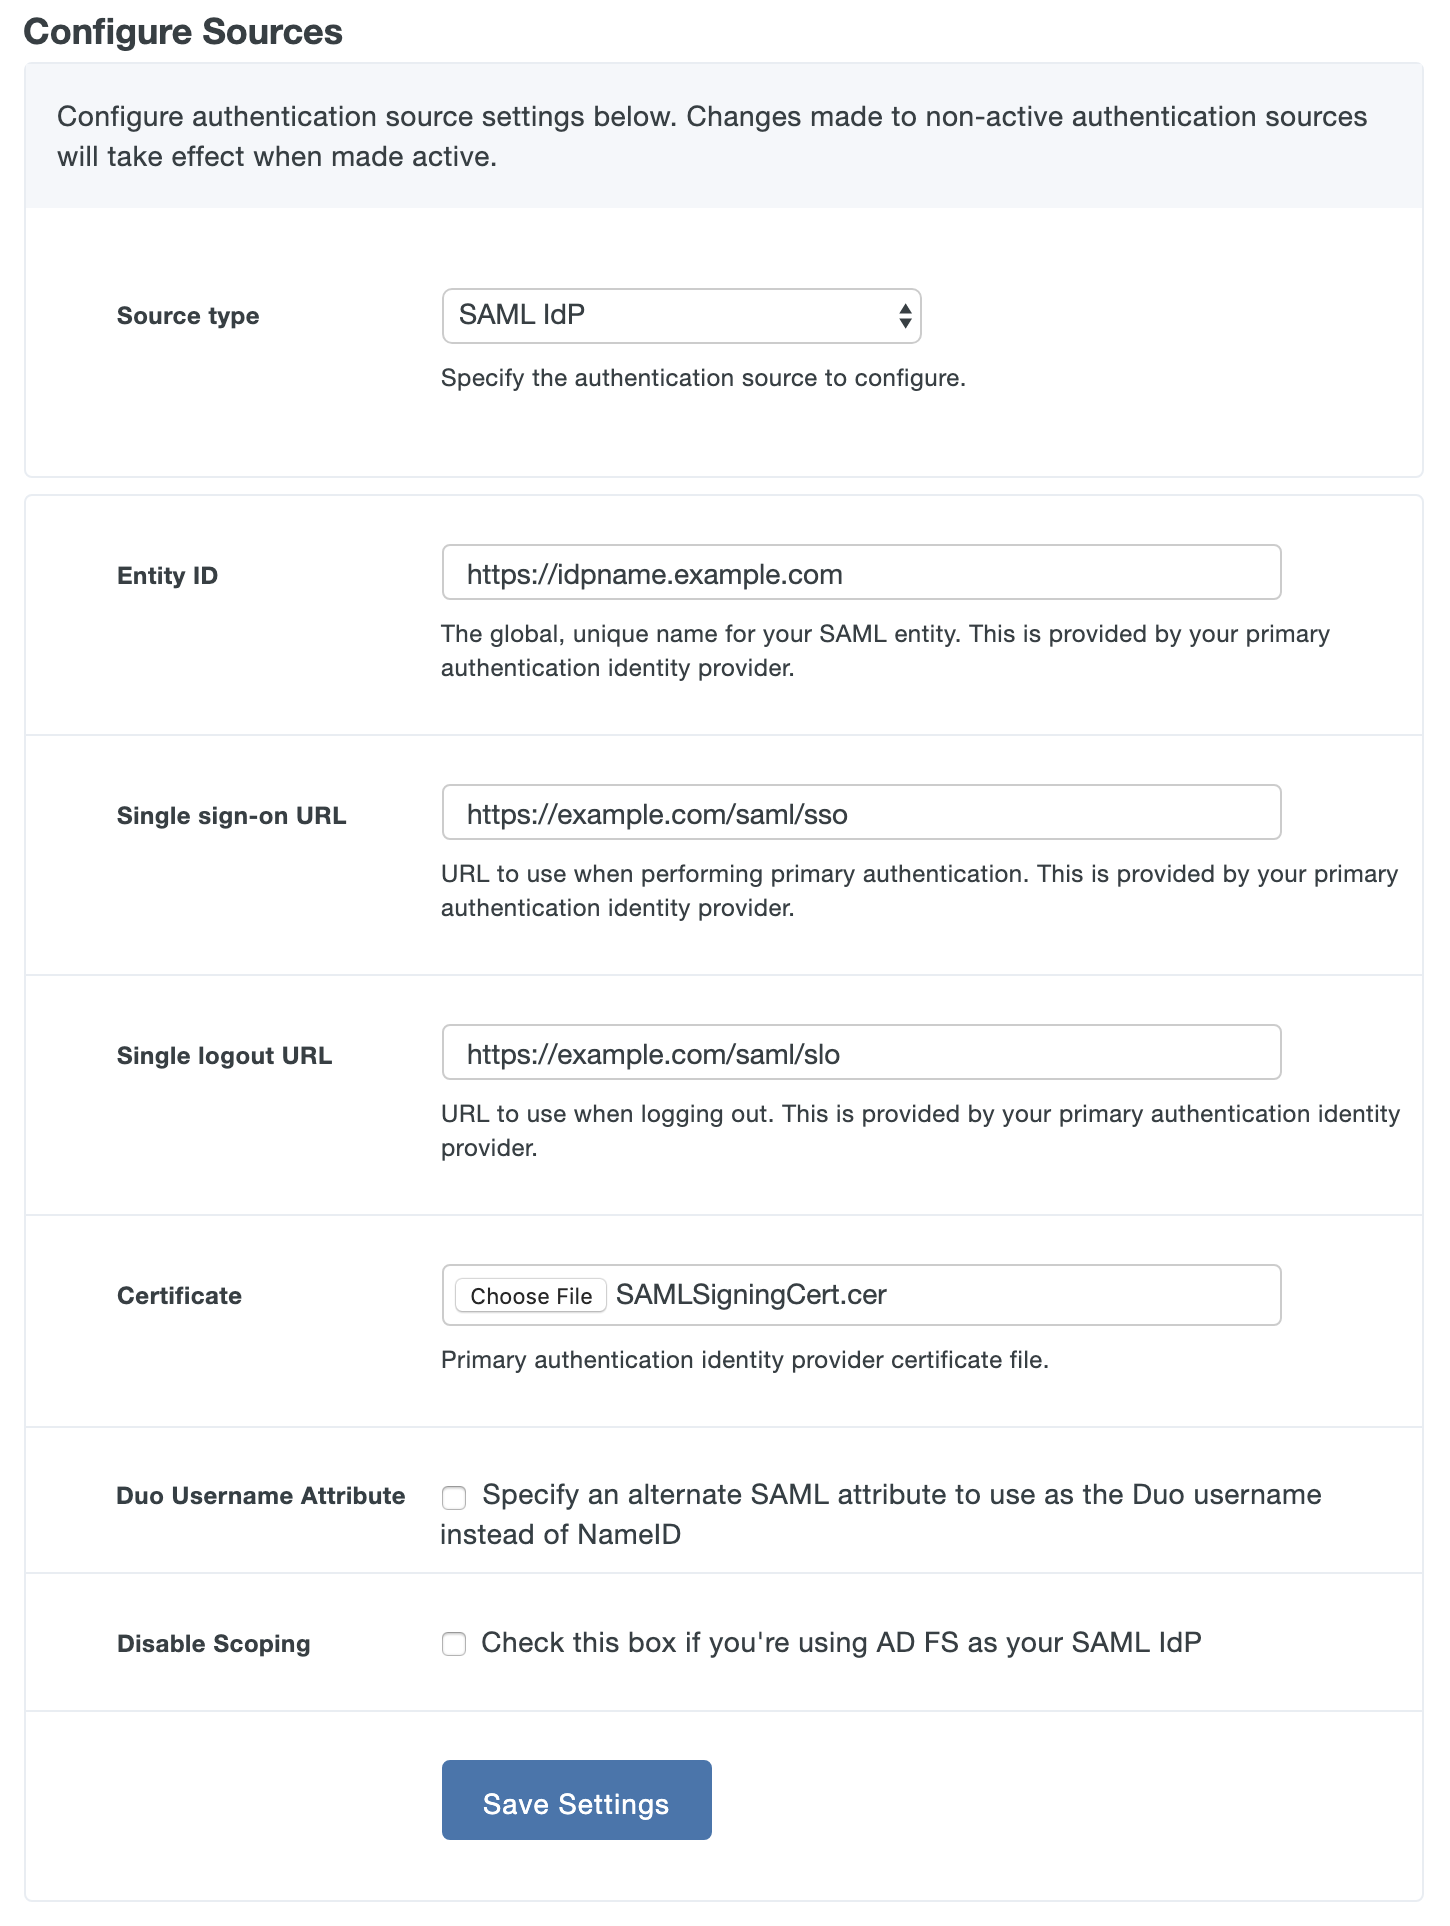
Save your SAML IdP settings.

If this is your first configured authentication source, the Duo Access Gateway sets this as your active source. If this is not your first configured authentication source you'll need to set this one as the active source using the drop-down under Set Active Source.
You'll need to ensure that your SAML IdP passes these attributes in its responses to the Duo Access Gateway:
| IdP Attribute | Duo Access Gateway Attribute |
|---|---|
| Email Address | |
| Username | sAMAccountName |
| First Name | givenName |
| Last Name | sn |
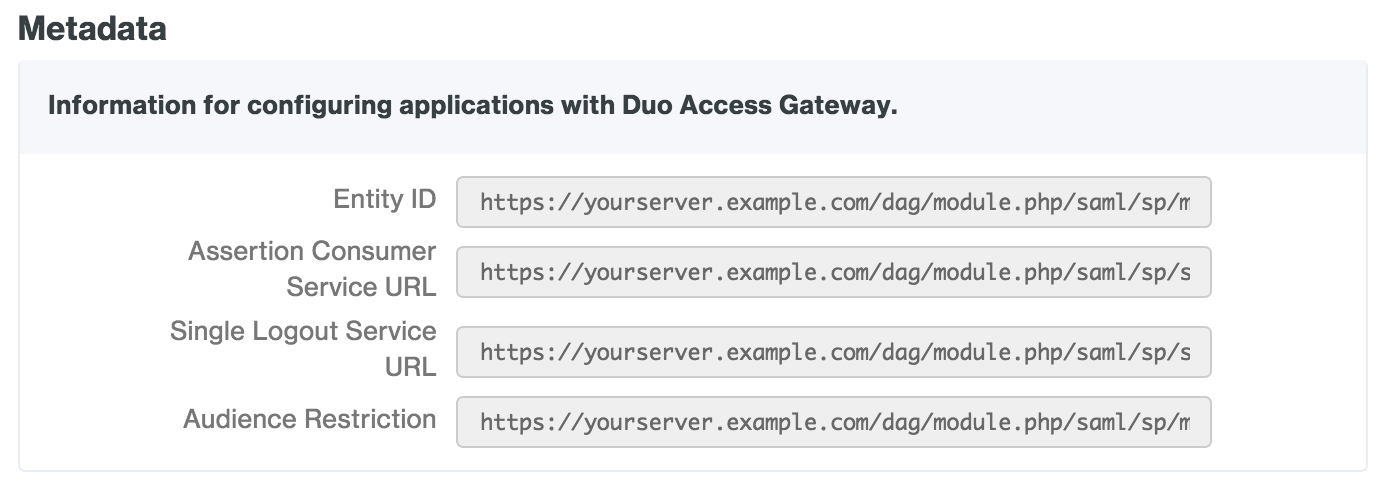
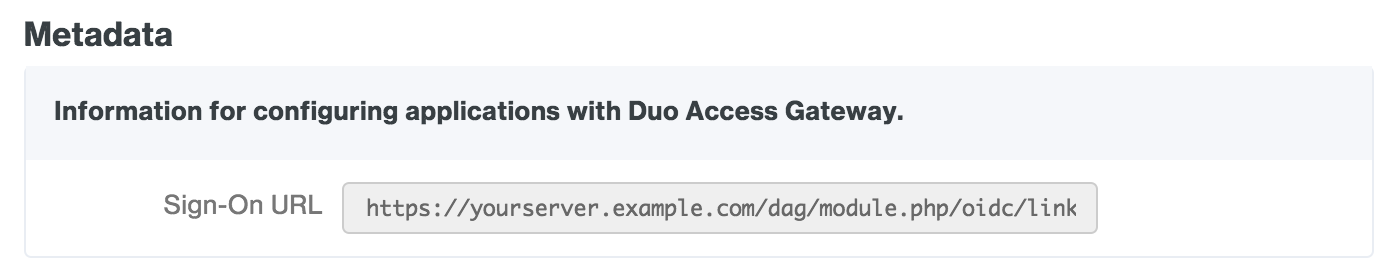
You will also need to provide some information about your Duo Access Gateway server to your SAML IdP provider. You can find this information in the "Metadata" section at the bottom of the SAML IdP authentication source configuration page in the Duo Access Gateway console.
Google (OpenID Connect)
Before you can configure Google OpenID Connect as an authentication source you'll need to create an OAuth project in Google and collect some information to input into the Duo Access Gateway configuration page.
-
Log in to the Google Developers Console as an administrator for your Google Workspace account.
-
If you do not already have an active project, click the Create Project button to create a new one. Give the new project a name and click Create. The page refreshes after creating your new project. You can also use an existing project.
-
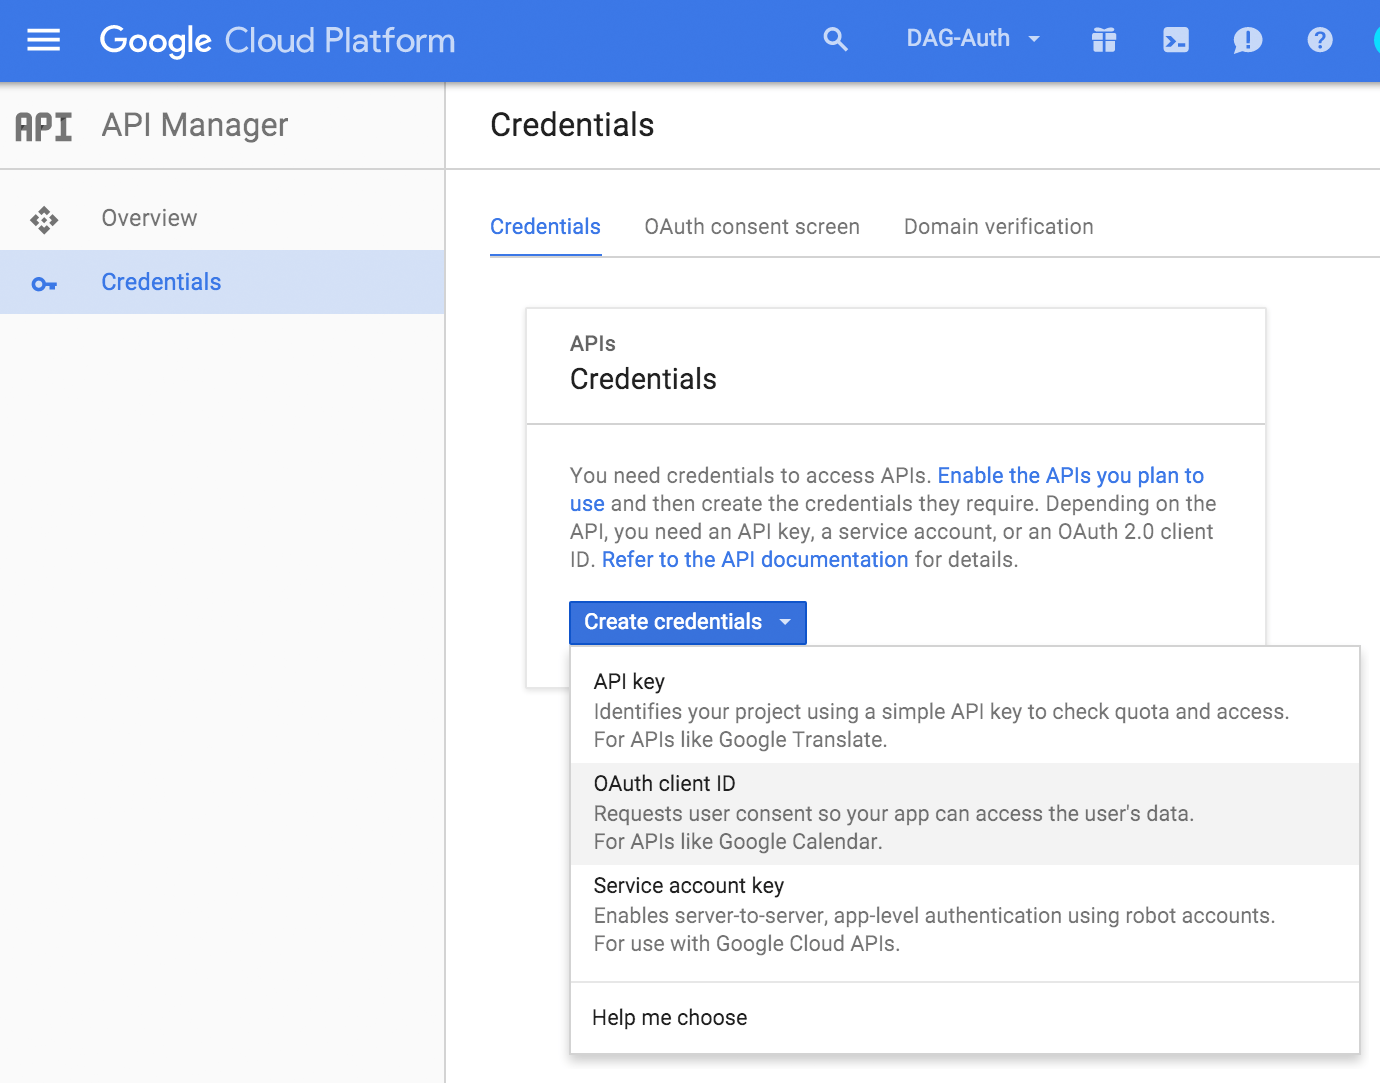
Click the Enable and manage APIs link on the Dashboard. Once in the API Manager, click Credentials on the left, then click the Create credentials button and select OAuth client ID from the list.
-
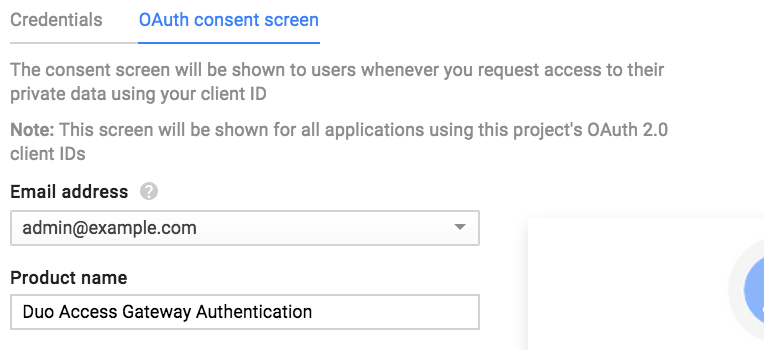
If you created a new project you may need to first click Configure consent screen and enter a Product Name on the "OAuth consent screen" properties page. Click Save to return to the "Create client ID" page.
-
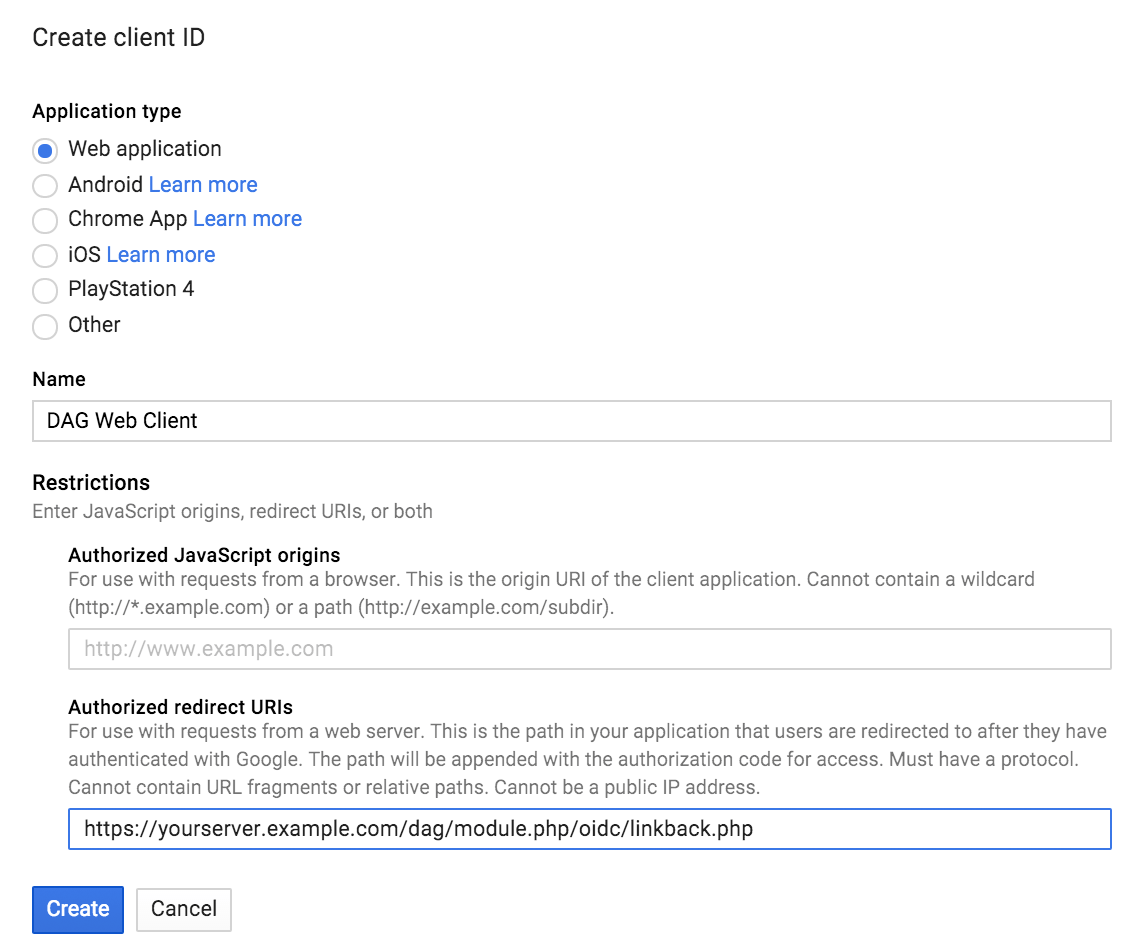
On the "Create client ID" page select Web application. Enter a descriptive Name for the new web client ID, and then enter the redirect URI for your Duo Access Gateway server (for example, https://yourserver.example.com/dag/module.php/oidc/linkback.php, replacing "yourserver.example.com" with the FQDN of your Duo Access Gateway server). You can find this in the "Metadata" section at the bottom of the Google (OpenID Connect) authentication source configuration page in the Duo Access Gateway console.

After pasting in the information click Create.
-
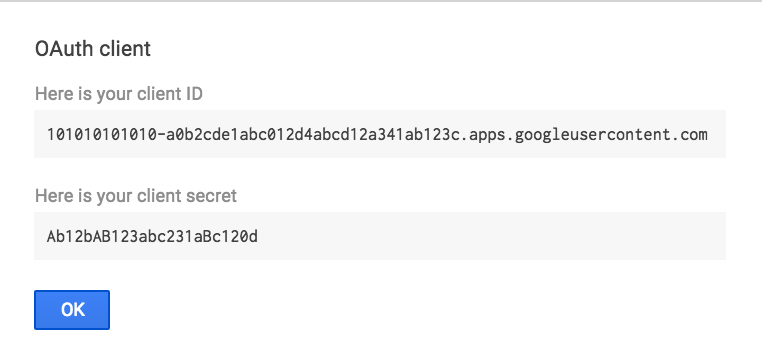
Make note of your client ID and client secret values. You'll need to enter these in the Duo Access Gateway admin console.
-
Return to the Duo Access Gateway admin console and enter the following information for the Google (OpenID Connect) authentication source.
Property Value Domain Enter your organization's Google Workspace domain. Client ID Enter the Google OAuth web application client ID from the Google Developers Console. Client Secret Enter the Google OAuth web application client secret from the Google Developers Console. 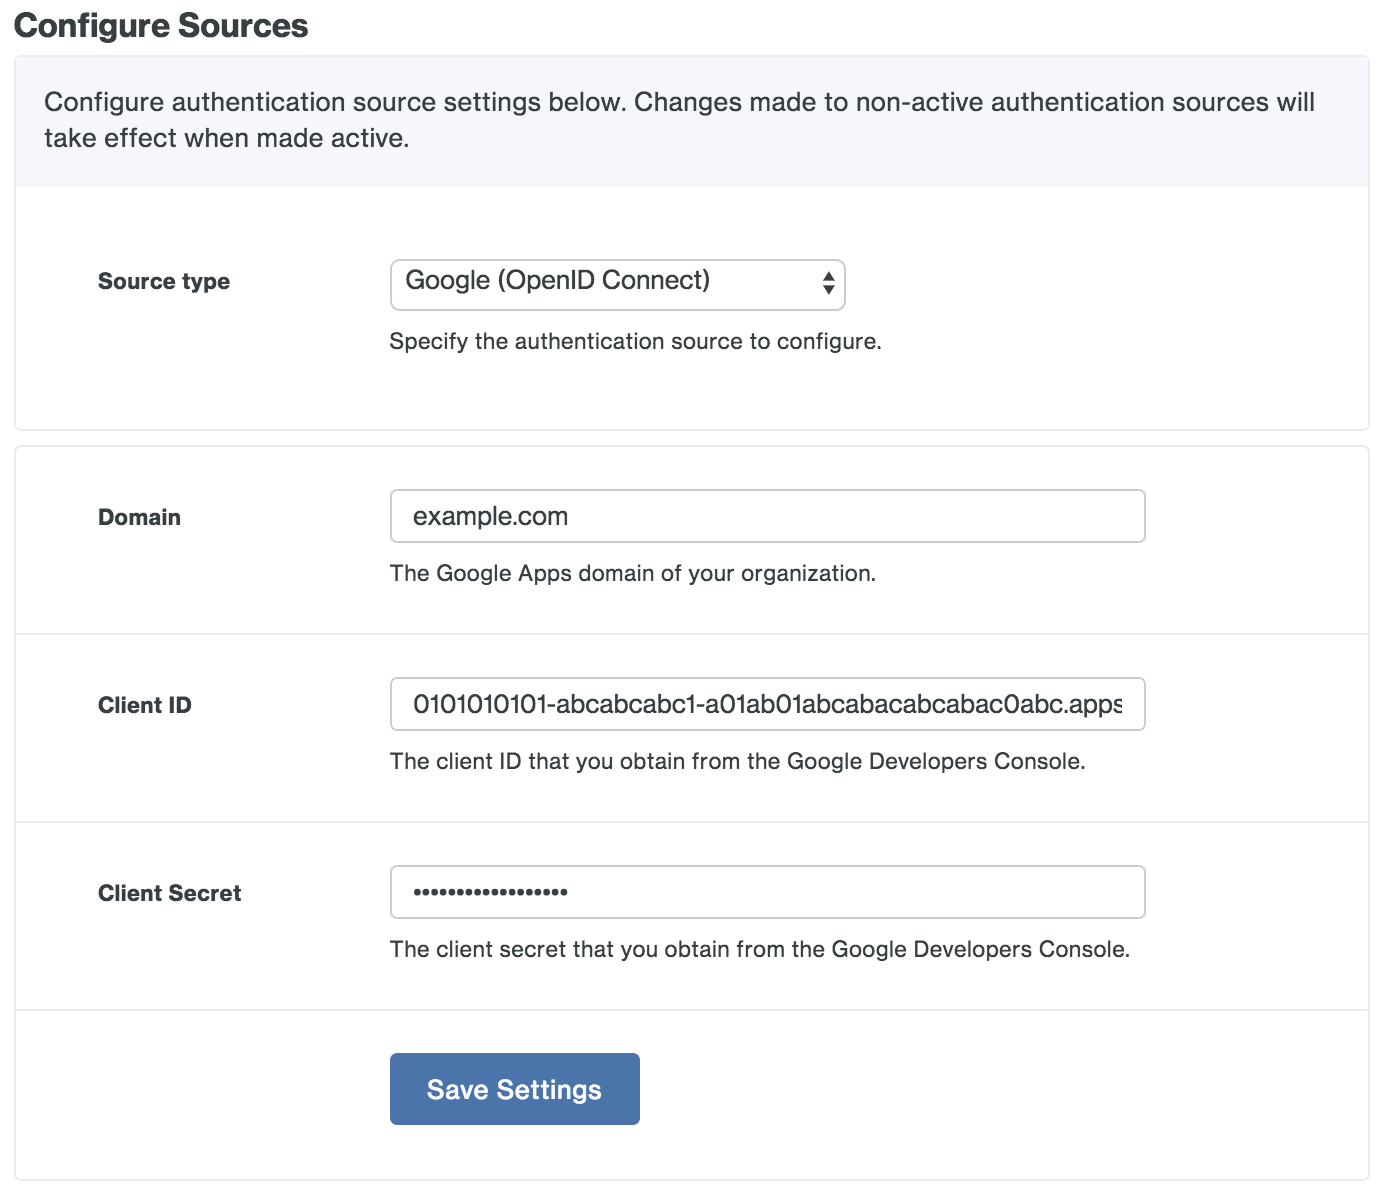
-
Save your Google (OpenID Connect) settings. If this is your first configured authentication source, the Duo Access Gateway sets this as your active source. If this is not your first configured authentication source you'll need to set this one as the active source using the drop-down under Set Active Source.
For more information about Google OpenID Connect and Google's OAuth 2.0 APIs please see Google's OpenID Connect guide.
Microsoft Azure (OpenID Connect)
In order to use the Duo Access Gateway with Microsoft Entra ID (formerly known as Azure Active Directory), the Entra ID domain must be synced with an on-premises Active Directory domain so that the "mail" attribute is populated, or the Entra domain users must be provisioned with an Office 365 email address.
Before you can configure Azure OpenID Connect as an authentication source you'll need to create a web application in Entra ID and collect some information to input into the Duo Access Gateway configuration page.
-
Enter your Azure organization's email domain on the Duo Access Gateway Azure (OpenID Connect) authentication source configuration page as the Domain.
-
Log in to the Microsoft Azure Administrator console as an Entra ID administrator.
-
Click Microsoft Entra ID on the left and then click on the domain you want to use with the Duo Access Gateway.
-
Click on App registrations in the "Manage" section.
-
Click New registration.
-
Enter a descriptive name for the application and select Accounts in this organizational directory only under "Supported account types".
-
Under "Redirect URI (optional)" set the drop-down to Web. Locate the Sign-On URL in the "Metadata" section at the bottom of the Microsoft Azure (OpenID Connect) authentication source configuration page in the Duo Access Gateway console. This will look like https://yourserver.example.com/dag/module.php/oidc/linkback.php, where "yourserver.example.com" is the FQDN of your Duo Access Gateway server.
Copy the url and paste it into the text field in the Azure portal next to the Web drop-down.
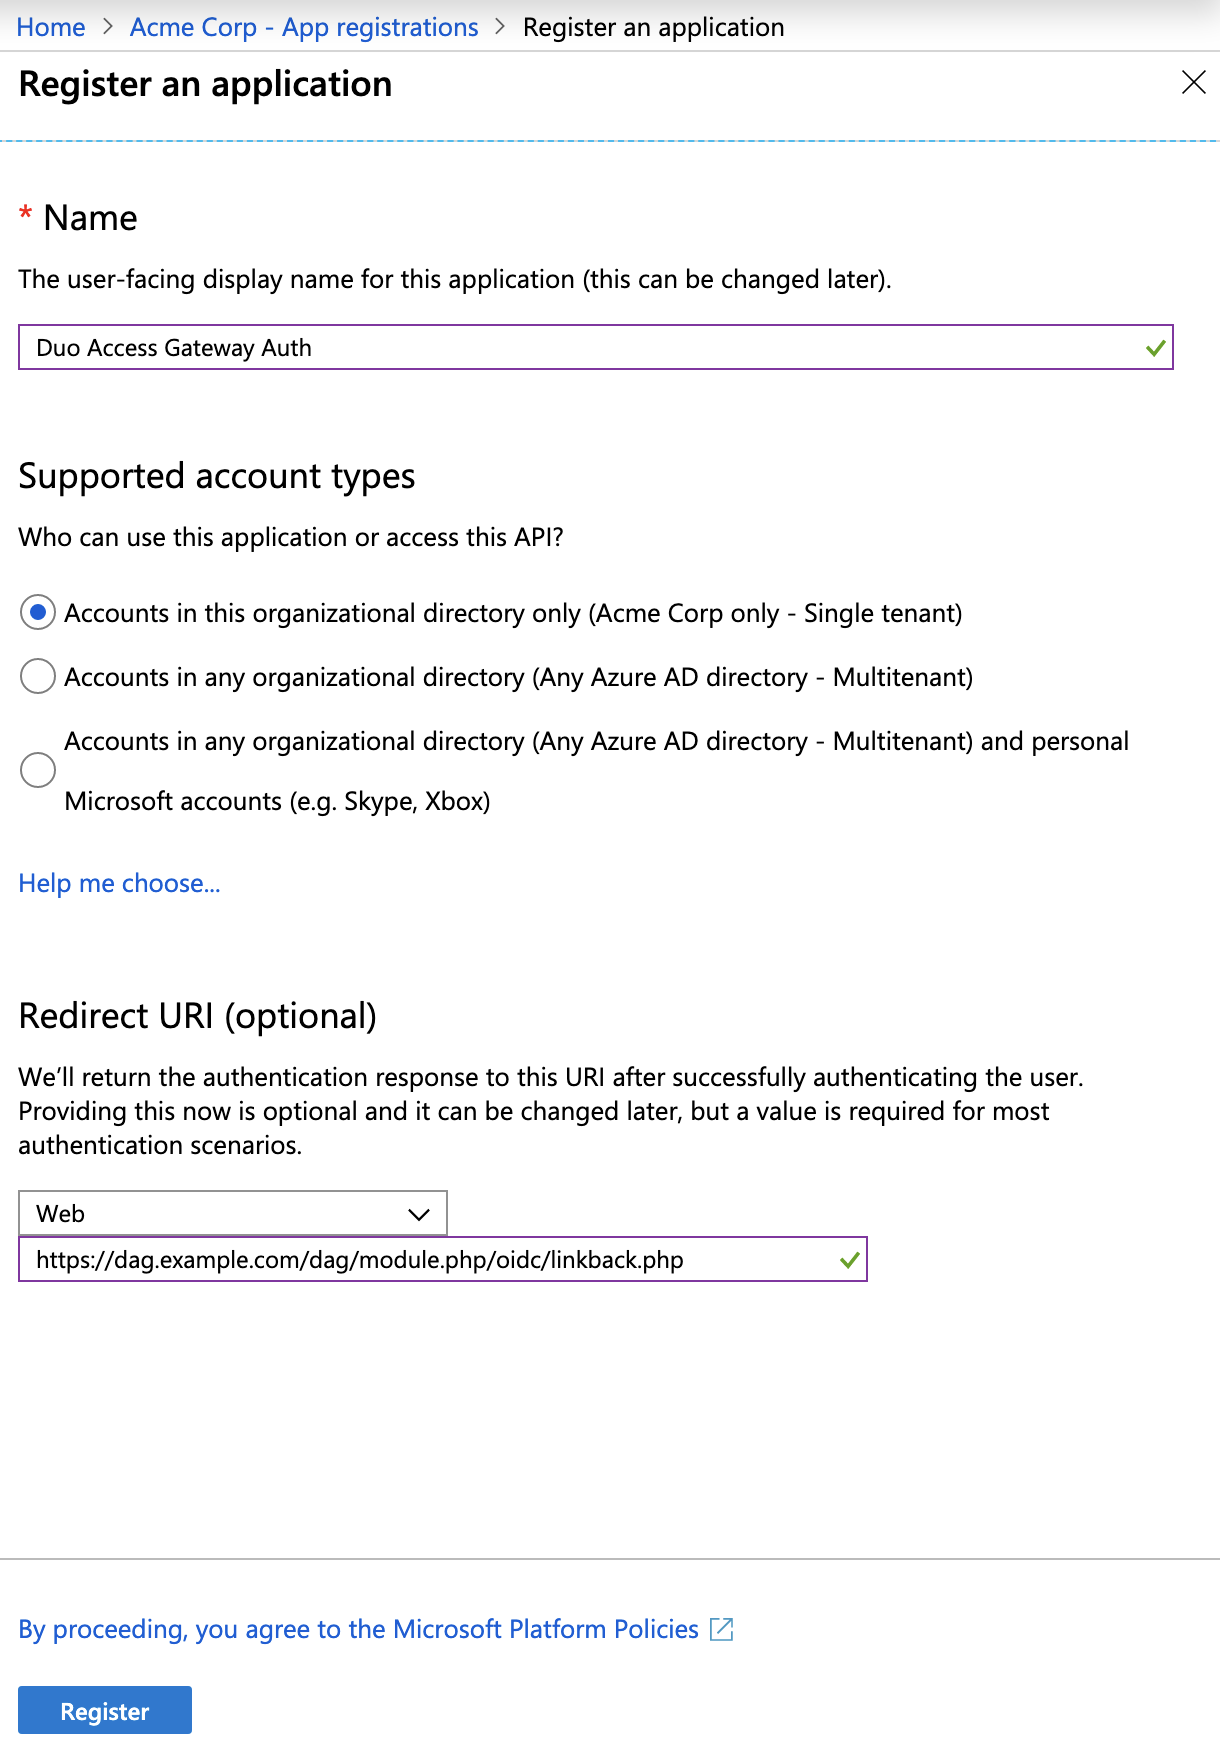
After entering all information click Register to complete new app registration.
-
Locate the Application (client) ID for your newly registered app. Copy this and paste it into the Duo Access Gateway admin portal as the Azure Client ID.
-
Locate the Directory (tenant) ID for your Entra ID domain, copy it, and paste it into the Duo Access Gateway admin portal as the Azure Tenant ID.
-
Click Add an Application ID URI under "Application ID URI" on the Overview blade.
-
At the top of the "Expose an API" click Add next to Application ID URI. Copy the Sign-On URL from the Duo Access Gateway's "Metadata" section again, and paste it into Azure as the App ID URI. Click Save.
-
Click Certificate & secrets in the "Manage" section of your domain's blade.
-
Under "Client secrets" click New client secret. In the Description leave a comment then under "Expires" select Custom and set the Start date to today and the End date to two years from today (the maximum). This creates a new key, but the key value is hidden until you save your changes. Click Add.
-
The new key's value is shown after you save. Copy the Value and paste it into the Duo Access Gateway admin portal as the Azure (OpenID Connect) Key.
This is your only chance to view the key value! If you leave this blade before entering the key value into the Duo Access Gateway, then you can't view the same key's value again and you'll have to create a new one.
-
Return to the Duo Access Gateway admin console and verify that you've entered the following information for the Azure (OpenID Connect) authentication source.
Tenant ID The Directory ID of your Entra ID domain. Client ID The Application ID for the Entra ID registered app you created for the Duo Access Gateway. Key The key value from the Entra ID registered app you created for the Duo Access Gateway. 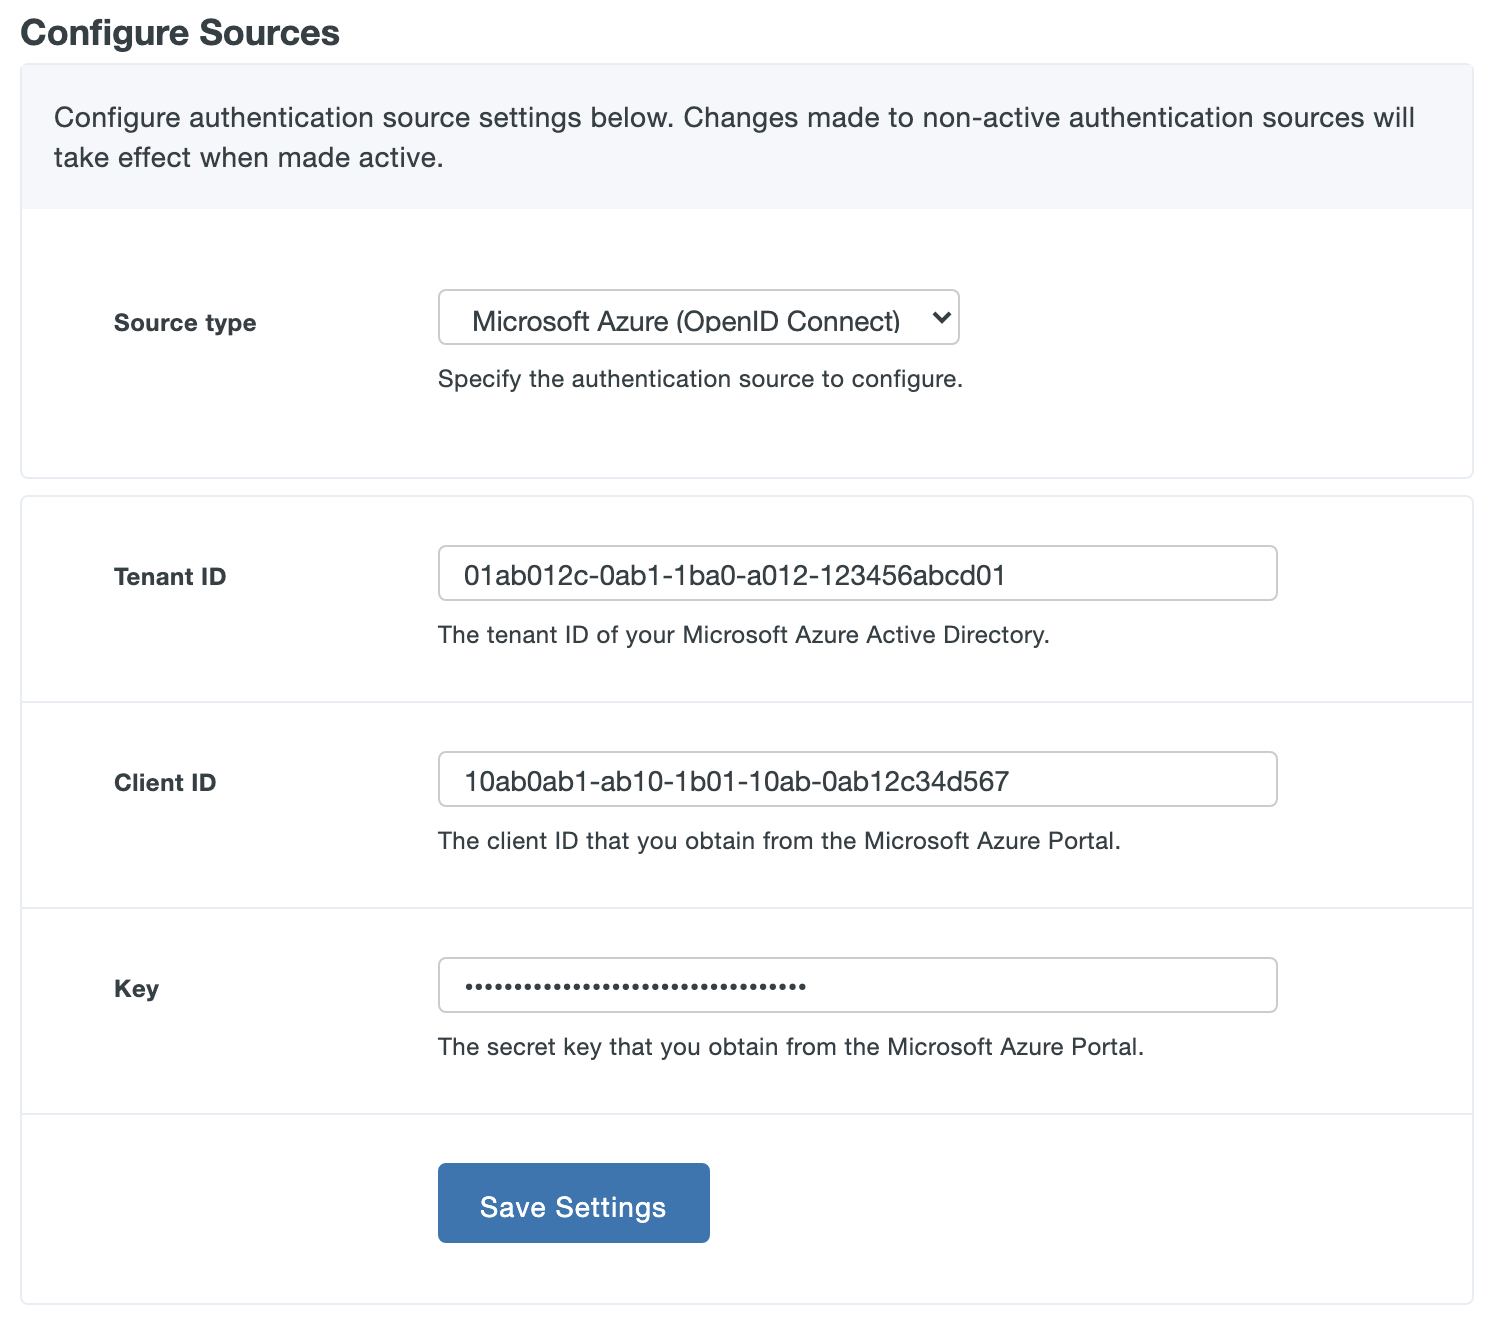
-
Save your Microsoft Azure (OpenID Connect) settings. If this is your first configured authentication source, the Duo Access Gateway sets this as your active source. If this is not your first configured authentication source you'll need to set this one as the active source using the drop-down under Set Active Source.
For more information about Microsoft Entra ID apps please see Quickstart: Register an application with the Microsoft identity platform.
Additional Settings
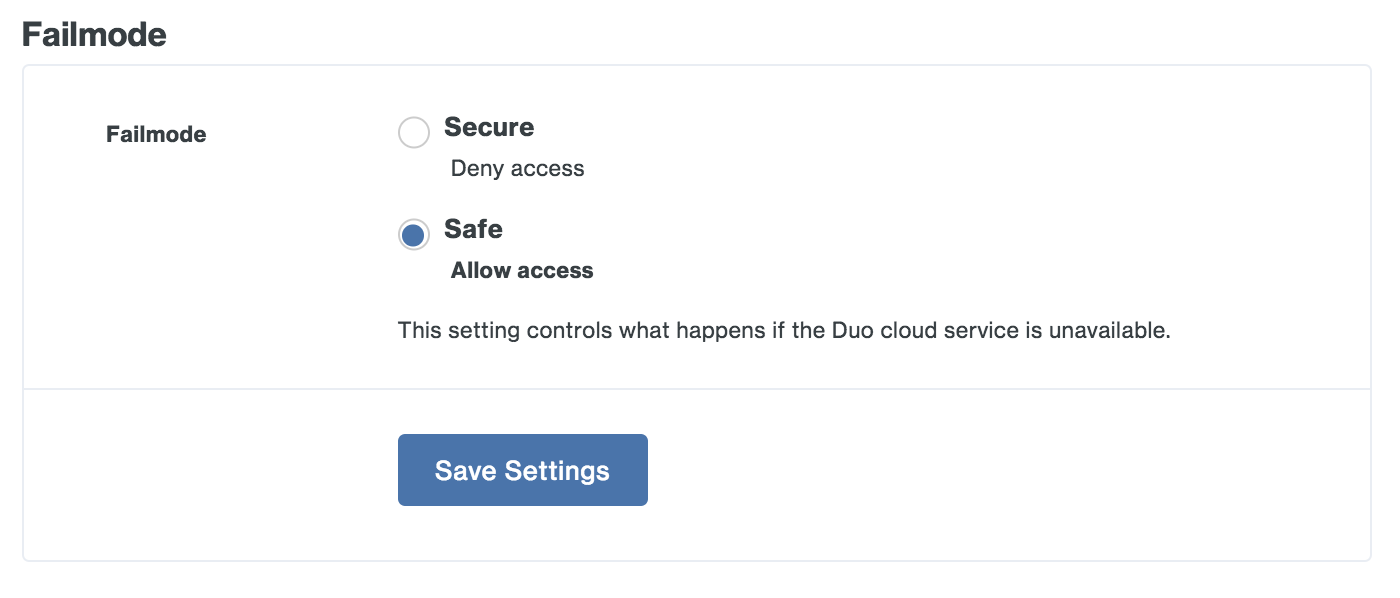
Fail Mode
The fail mode determines whether to permit or deny user logons if the Duo Access Gateway server is unable to contact Duo’s service. If the fail mode is safe, users who successfully pass primary authentication may access the cloud application without completing two-factor authentication. If the fail mode is secure then DAG requires that all users perform 2FA. If the user's client browser or application is then able to contact Duo and complete two-factor authentication then users proceed to the application. If the user's client also cannot contact Duo for 2FA, then the user cannot access the application.
Note that when fail mode is "Secure" and the user is able to perform 2FA and access the DAG launcher page when the DAG itself cannot contact Duo no "User access" application restrictions apply, as the DAG would not be able to obtain the user's Duo group memberships from Duo's service. In that scenario users may see applications in the launcher to which they do not have access.
Session Management
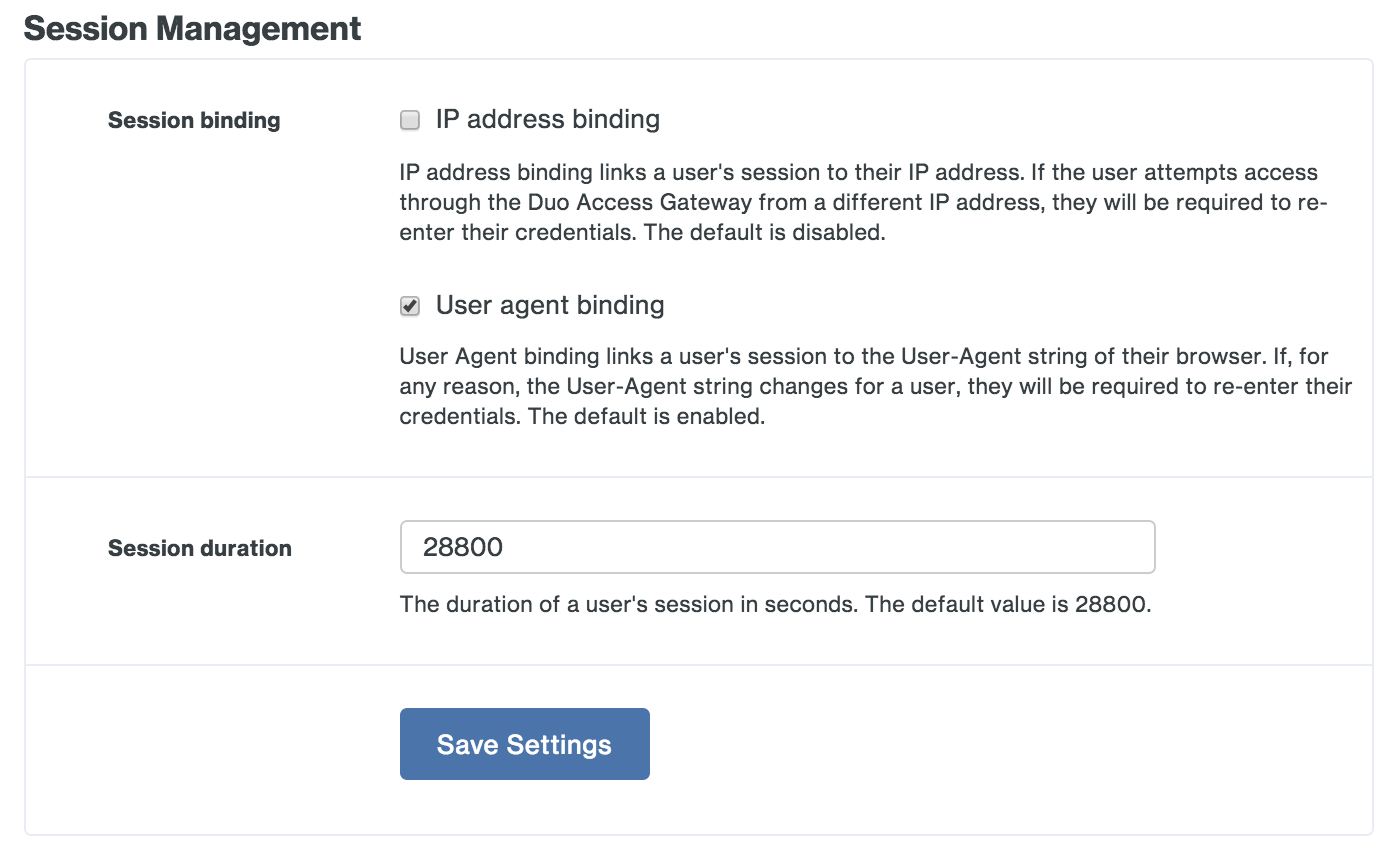
Session binding has two options, IP address binding and User agent binding.
Enabling the IP address binding option associates an authenticated Duo Access Gateway session to the client's IP address. Once users authenticate to a Duo protected cloud service they are not prompted again for primary authentication until the session lifetime is reached or the client's IP address changes. Users do not need to reauthenticate when their client IP changes if this setting remains disabled.
The User agent binding option associates an authenticated Duo Access Gateway session to the client browser's reported user agent (the information that identifies the browser type and version to web servers). By default, users need to reauthenticate if their reported browser information changes. Disable this option if you do not want users to reauthenticate to the Duo Access Gateway if their browser User-Agent changes after initial authentication.
The Session duration setting defines the maximum lifetime of a user's SSO session. Once a user successfully completes primary authentication at the Duo Access Gateway, the user will not have to repeat primary authentication again for subsequent service provider logon redirects to Duo Access Gateway within the configured session lifetime. Whether the user needs to perform secondary authentication depends on the Duo 2FA policies applied to that SAML application or to the user.
General
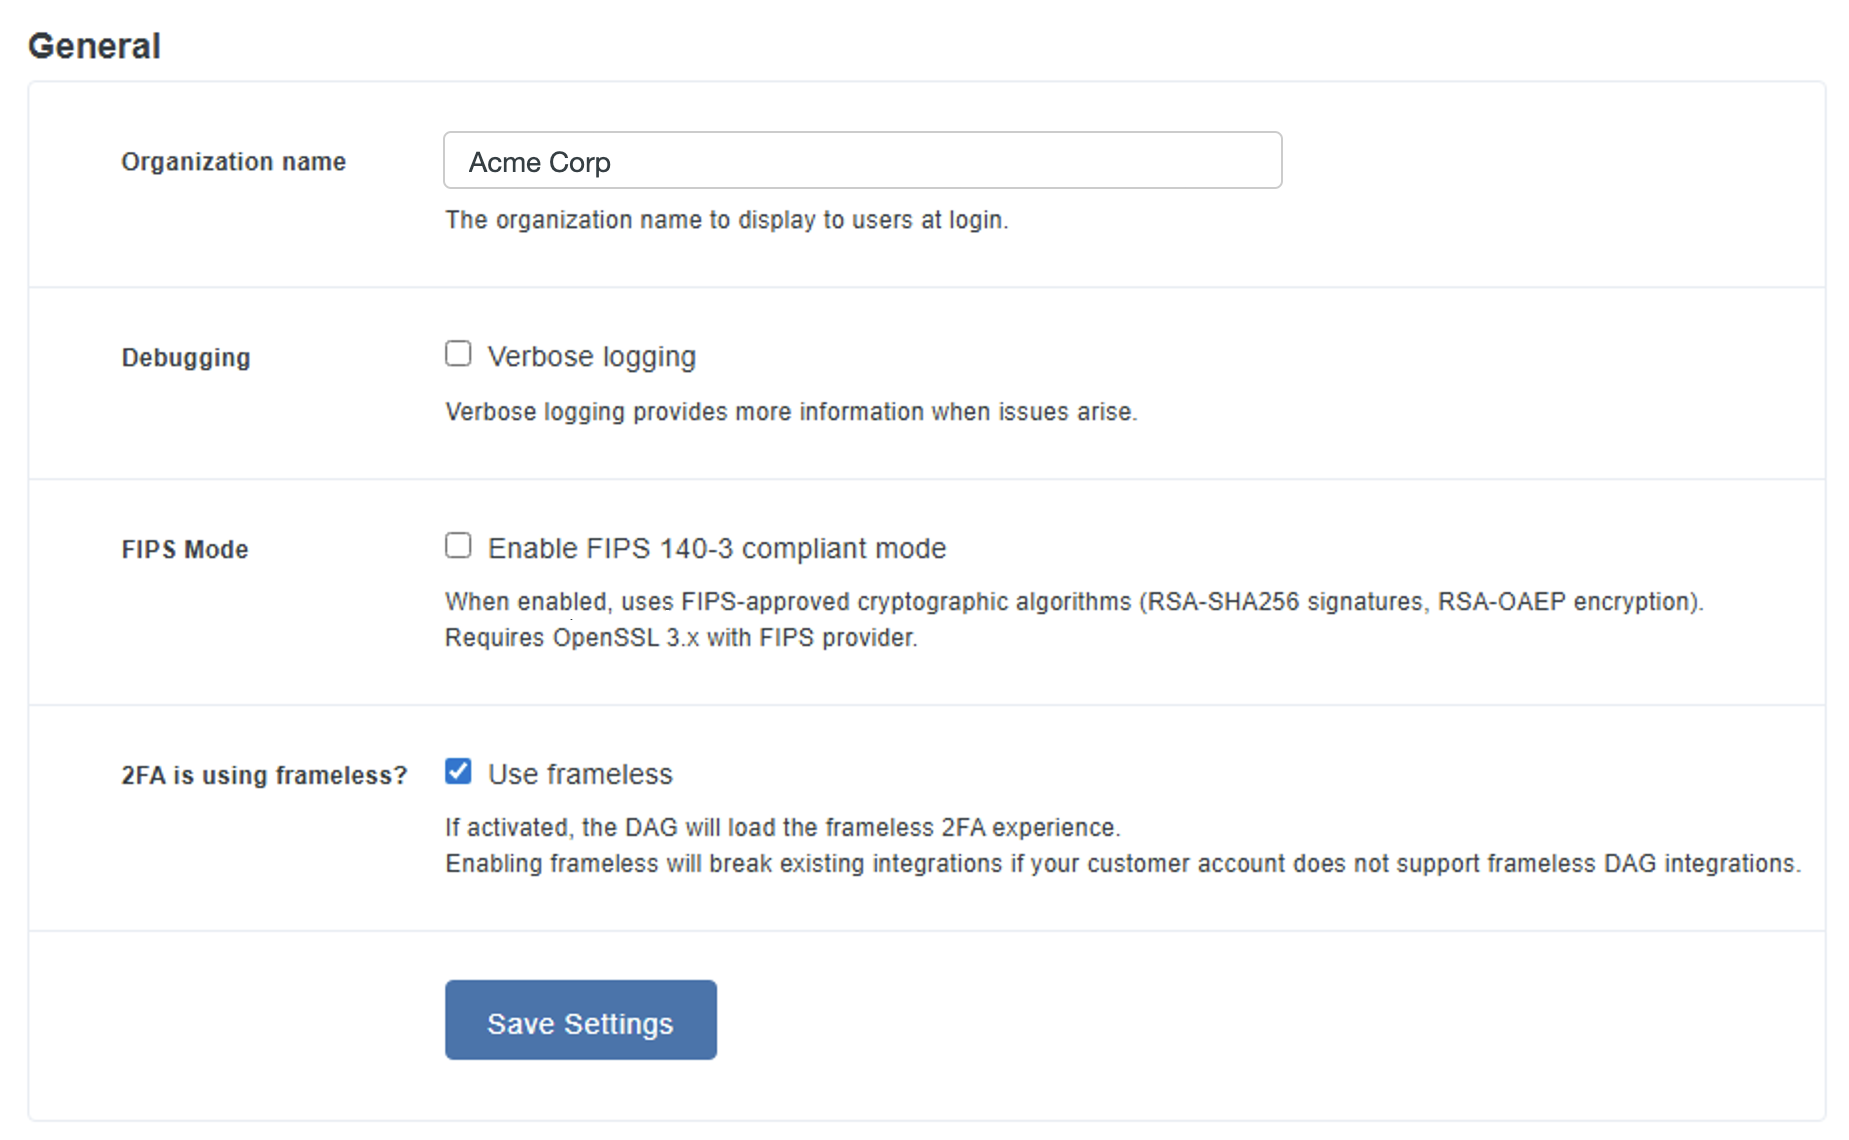
Here you can configure settings for your Duo Access Gateway server.
-
The Duo Access Gateway end-user logon page displays the Organization Name you enter here within the text of the primary authentication prompt.
-
Enable the Verbose logging option when troubleshooting Duo Access Gateway issues.
-
Enable the Enable FIPS 140-3 compliant mode option if you want to use FIPS 140-3. See FIPS 140-3 Mode for more information.
-
You must update the 2FA is using frameless? by checking the Use frameless box so you can activate the Duo Universal Prompt experience for your DAG application users. Without this option enabled the Duo Admin Panel will not allow you to activate Universal Prompt for a given DAG SAML application.
Click Save Settings when done.
Internet
Change the fully-qualified hostname of the Duo Advantage Server, or update the SSL certificate used for HTTPS connections.
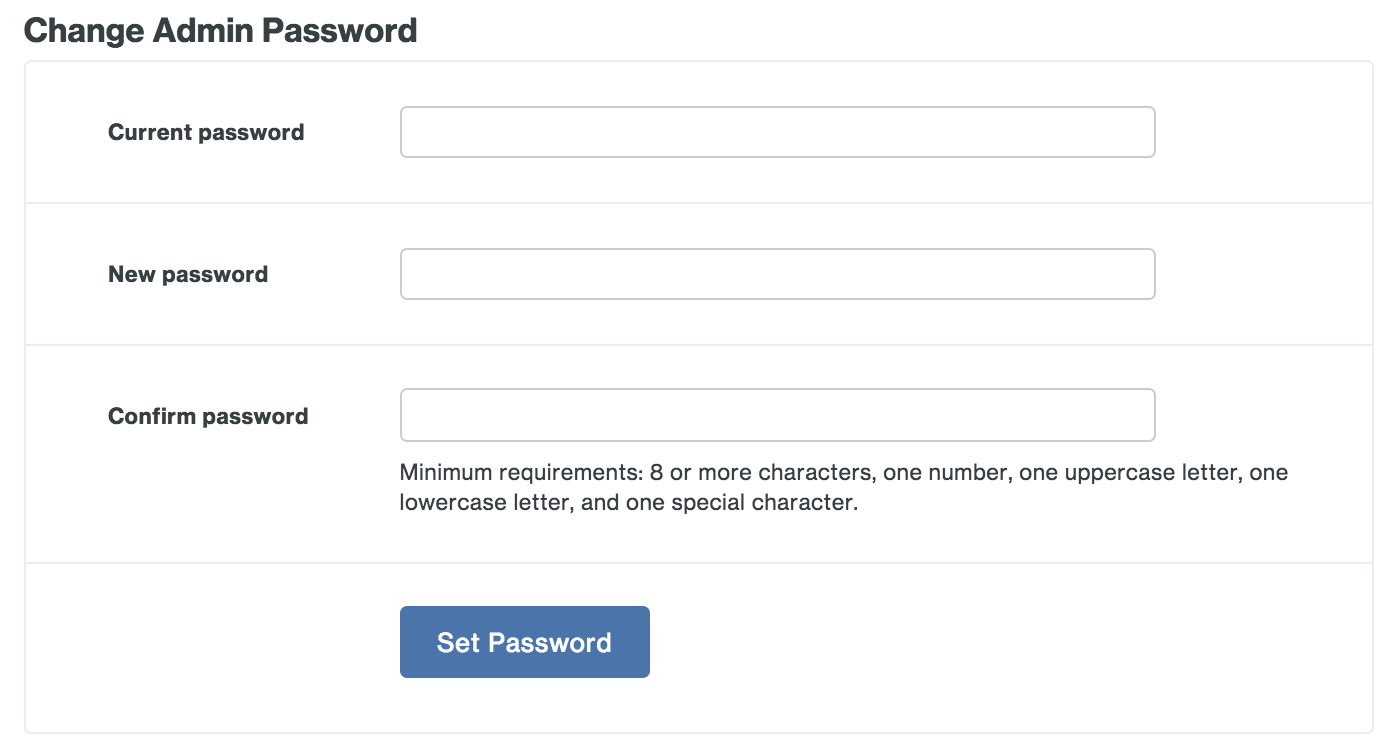
Change Admin Password
Set a new administrator password. We require a strong password that uses a mix of uppercase and lowercase letters, numbers, and special characters.
Create a Cloud Application in Duo
Duo has pre-configured SAML configurations for many popular cloud applications, like Salesforce, Google Workspace, and Amazon Web Services.
We've mapped the most common authentication source attributes as follows:
| Duo Attribute | Active Directory | OpenLDAP | SAML IdP | Azure | |
|---|---|---|---|---|---|
| Mail attribute | |||||
| First name attribute | givenName | gn | givenName | given_name | givenName |
| Last name attribute | sn | sn | sn | family_name | surname |
| Username attribute | sAMAccountName | uid | sAMAccountName |
If your configured authentication source uses a different attribute than these mapped defaults, you'll have the opportunity to change it when creating the service provider application in Duo.
To provision one of the Duo supported service providers:
-
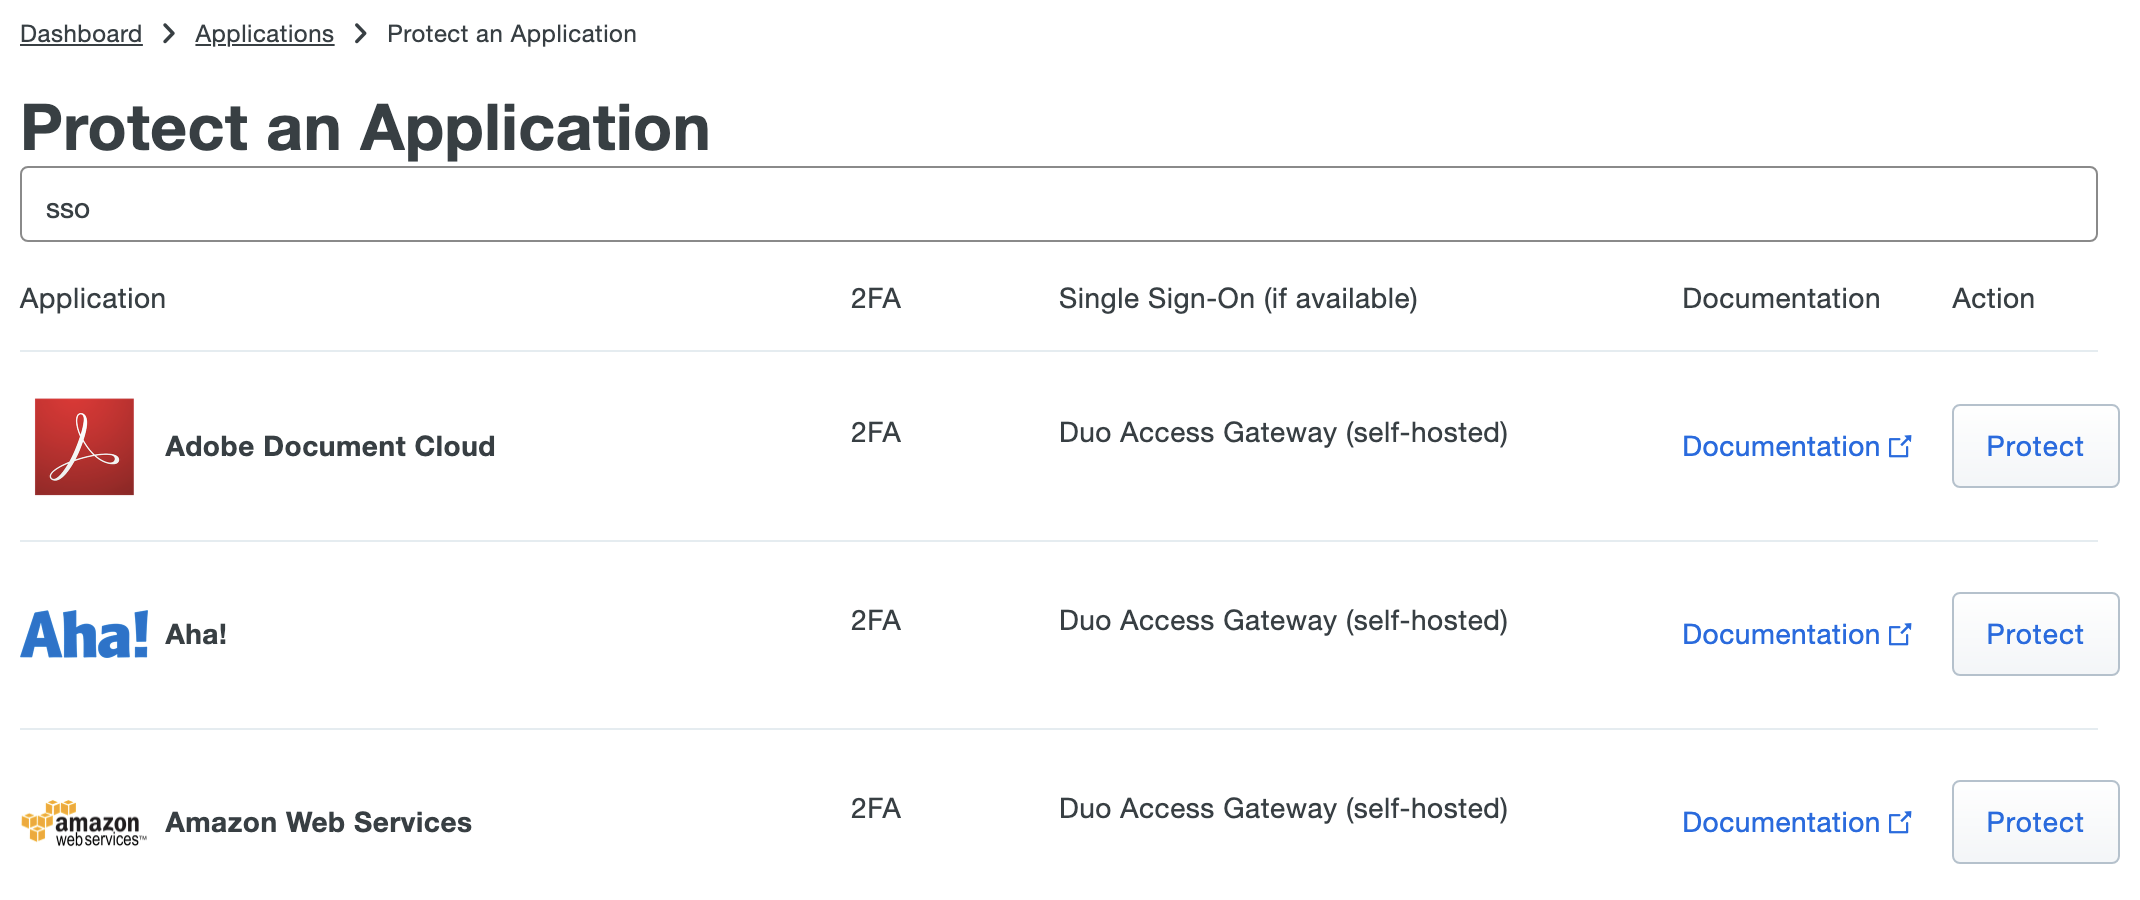
Log in to the Duo Admin Panel and navigate to Applications → Application Catalog.
-
Choose your cloud service from the list of applications. Duo Access Gateway supported cloud apps have "Duo Access Gateway (self-hosted)". Click the Protect link next to your cloud service application's name.
-
Some Duo SAML applications require you to input additional information from your service provider to complete the application's configuration. Refer to the instructions for your cloud service for more information about the specific information required. Additionally, if your authentication source isn't using the Duo default attributes you can customize the attribute mapping.
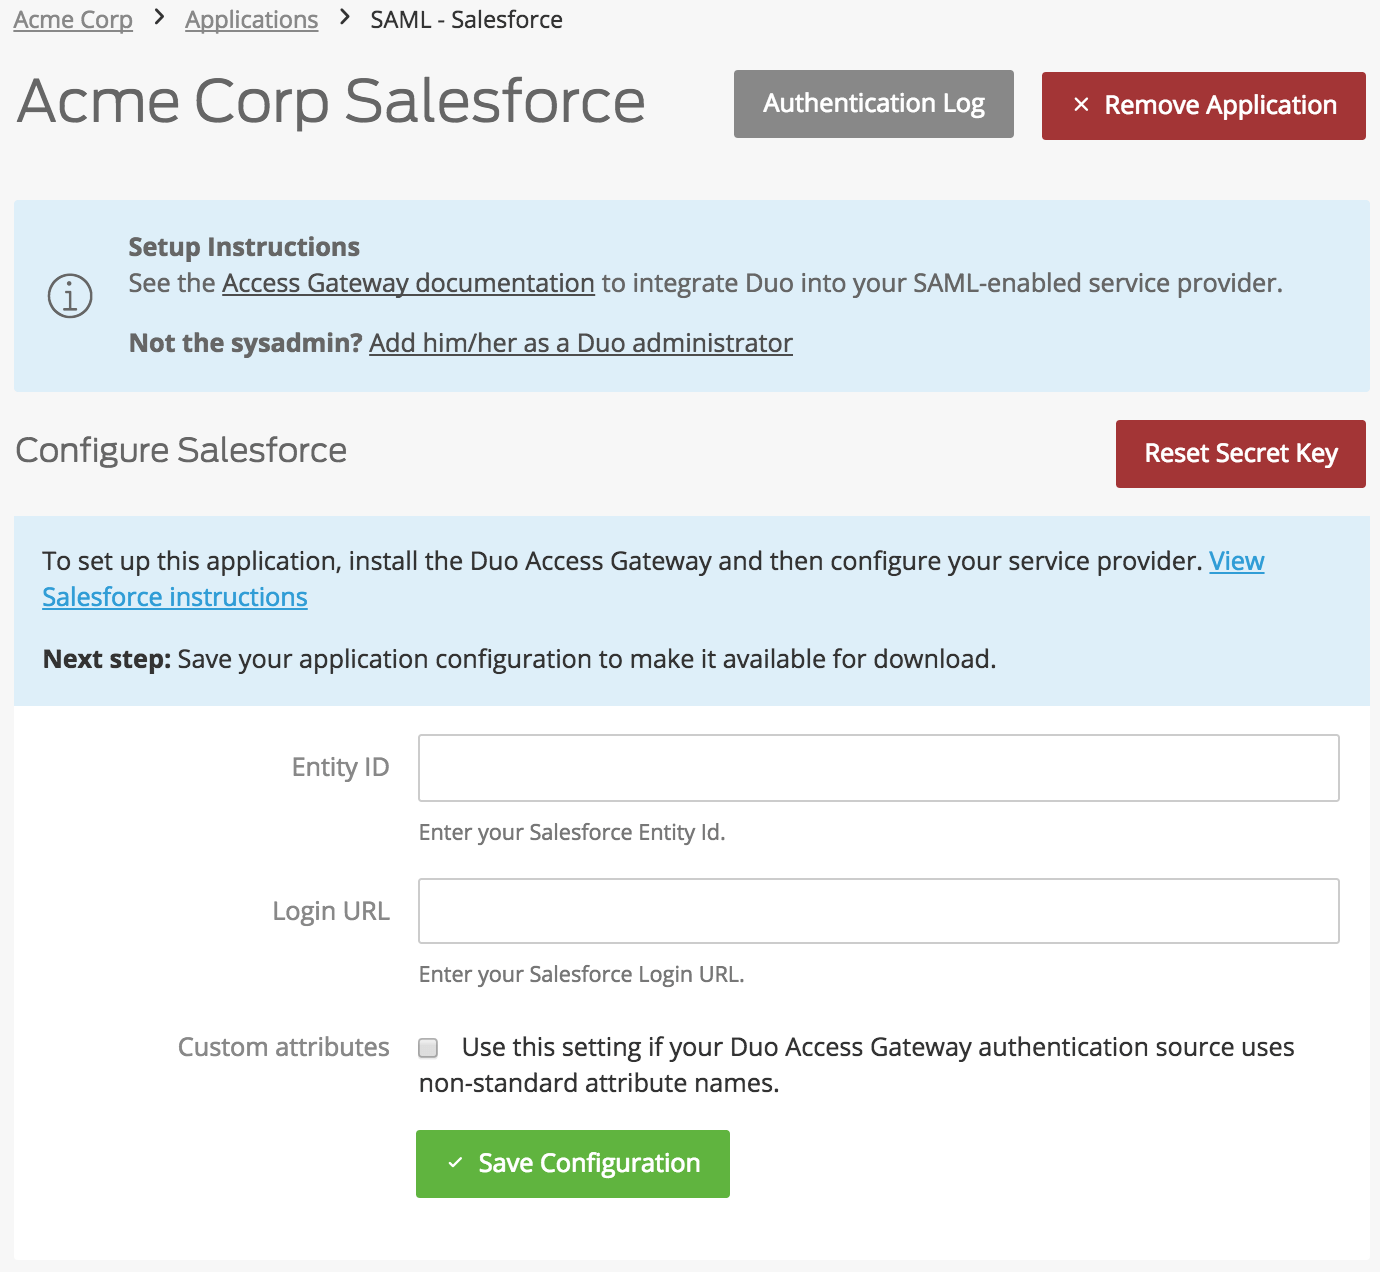
When all required information for the service provider is entered (or if you made no changes), click the Save Configuration button.
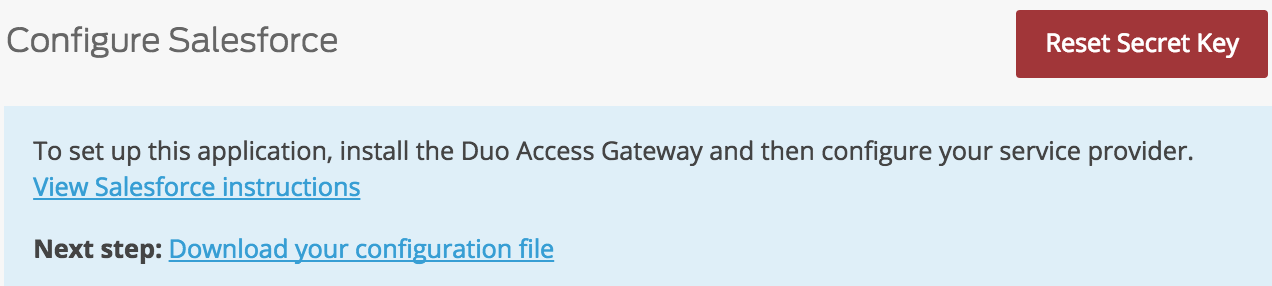
-
Saving the service provider configuration creates a configuration file that you will import to the Duo Access Gateway. Click the Download your configuration file link to download the SAML application's JSON file.
You can also create a generic SAML Service Provider application in Duo, which requires you to input information about your cloud application.
Enter the following information about your cloud app vendor in the Service Provider section:
Name Description Service Provider Name The name of the service provider. Entity ID The service provider identifier. Assertion Consumer Service The URL where your service provider receives SAML assertions. Service Provider Login URL Enter the URL for IdP-initiated logins if your service provider specifies one. Default Relay State If your service provider requires a specific RelayState parameter, enter it here. Use your service provider's SSO instructions to complete the SAML Response section:
Name Description NameID format Format of NameID when sent to the service provider. NameID attribute The authentication source attribute used to identify the user to the service provider. This attribute is sent as the NameID. This is often a user's e-mail address ("mail" or "email"). Send attributes By default, Duo Access Gateway sends only the NameID IdP attribute to a service provider. Change this option to "All" if your service provider requires additional attributes included in the SAML response. Mapping or creating any additional attributes will also cause Duo Access Gateway to send all attributes. Signature Algorithm Select the encryption strength supported by your service provider. Defaults to SHA-256. Sign response Leave this option enabled if Duo Access Gateway needs to sign the SAML response to the service provider. Uncheck the box if the response should not be signed. Sign assertion Leave this option enabled if Duo Access Gateway needs to sign the SAML assertion to the service provider. Uncheck the box if the assertion should not be signed. Map attributes If your service provider requires specific names for the attributes sent by the Duo Access Gateway identity provider, you can map the authentication source attributes to the required names here. Enter the attribute name from your authentication source on the left, and the new attribute name on the right. Consult your service provider's documentation for the required attribute names. Create attributes If your service provider requires that the Duo Access Gateway identity provider sends an attribute with a specific value, you can define that here. Enter the new attribute name on the left, and the static attribute value on the right. Consult your service provider's documentation for the required attribute names.
Here's an example generic SAML Service Provider configuration
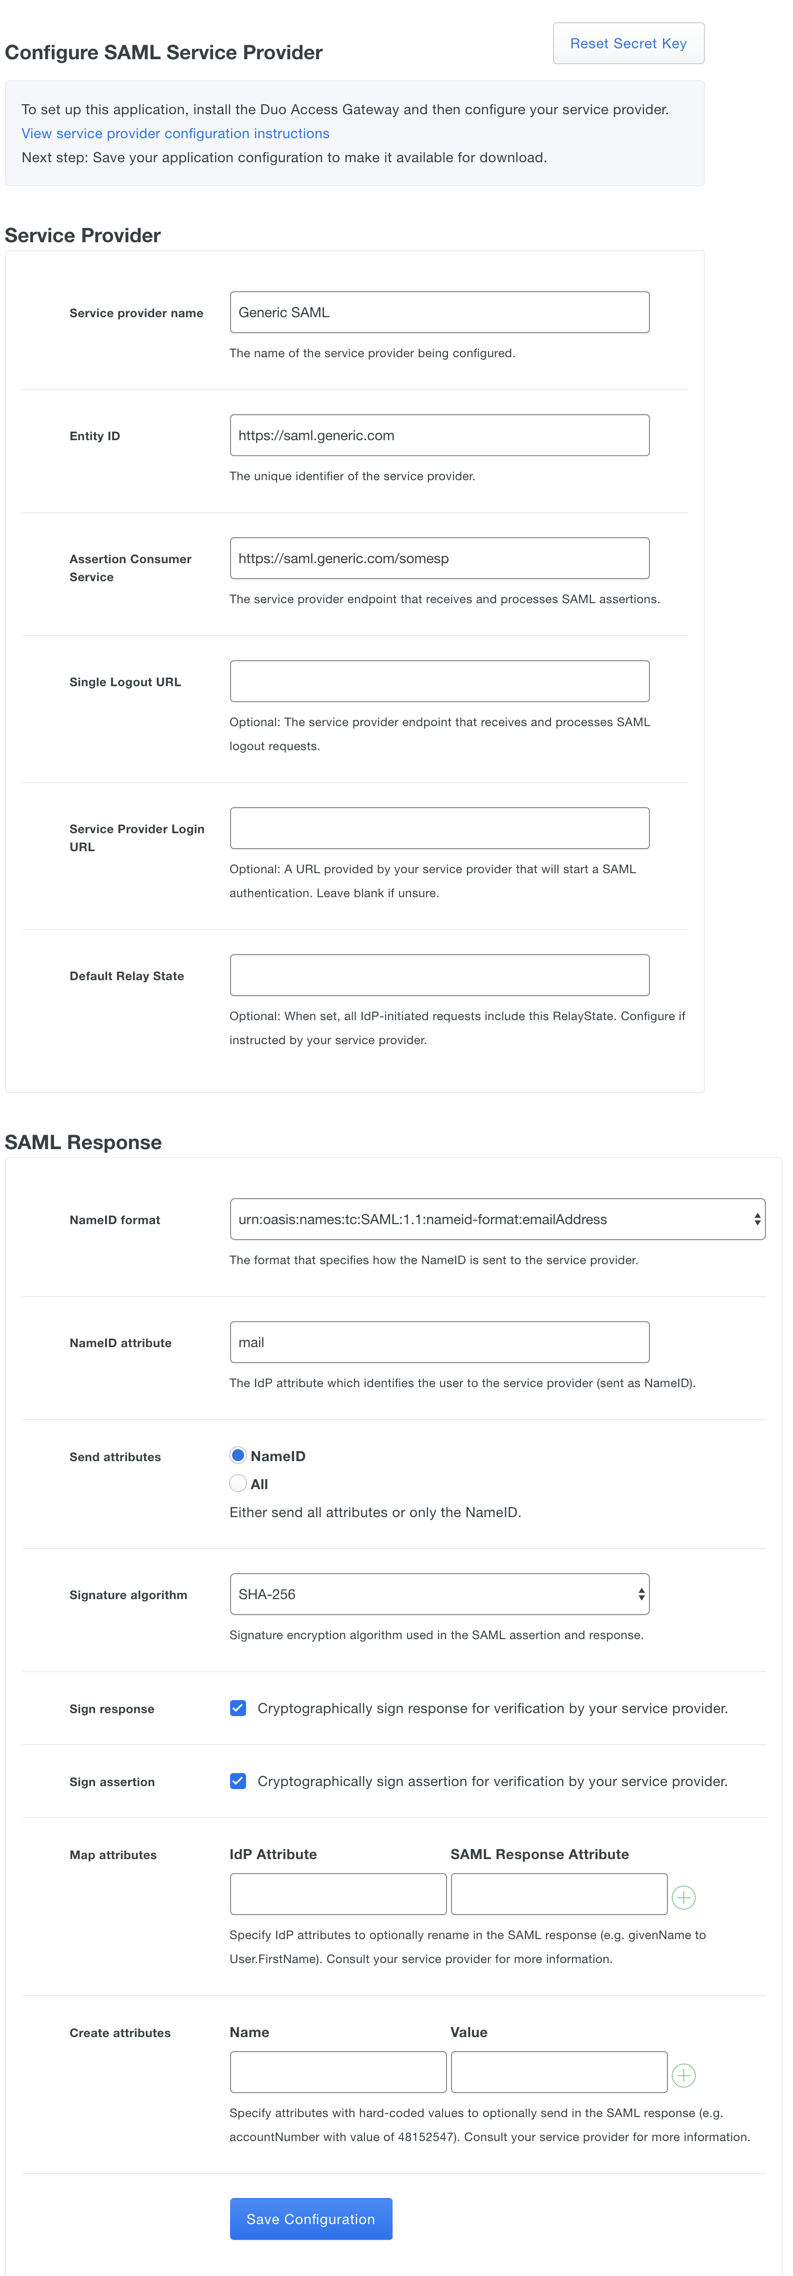
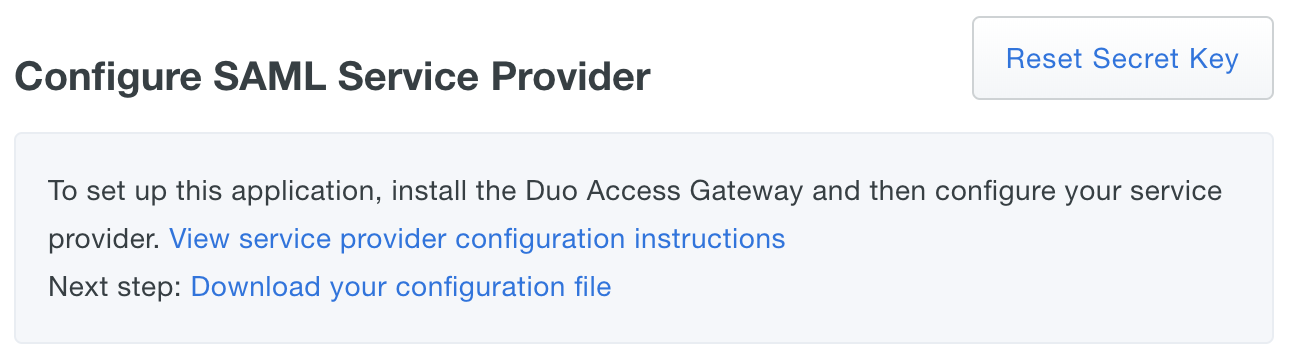
After entering the service provider information click the Save Configuration button and download the configuration file.
If your service provider requires IdP-initiated logins using SSO, the login URL is composed of the URL to your Duo Access Gateway logon page plus the entity id of the service to which you are authenticating, e.g. https://yourserver.example.com/dag/saml2/idp/SSOService.php?spentityid=Your_SP_Entity_ID.
Add a Cloud Application to Duo Access Gateway
-
Navigate to https://URL-OF-ACCESS-GATEWAY:8443 from an internal network to log into the Duo Access Gateway admin console. Log in with the administrator password and click Applications.
-
Click the Choose File button in the "Add Application" section of the page and locate the SAML application JSON file you downloaded from the Duo Admin Panel earlier. Click the Upload button after selecting the JSON configuration file.
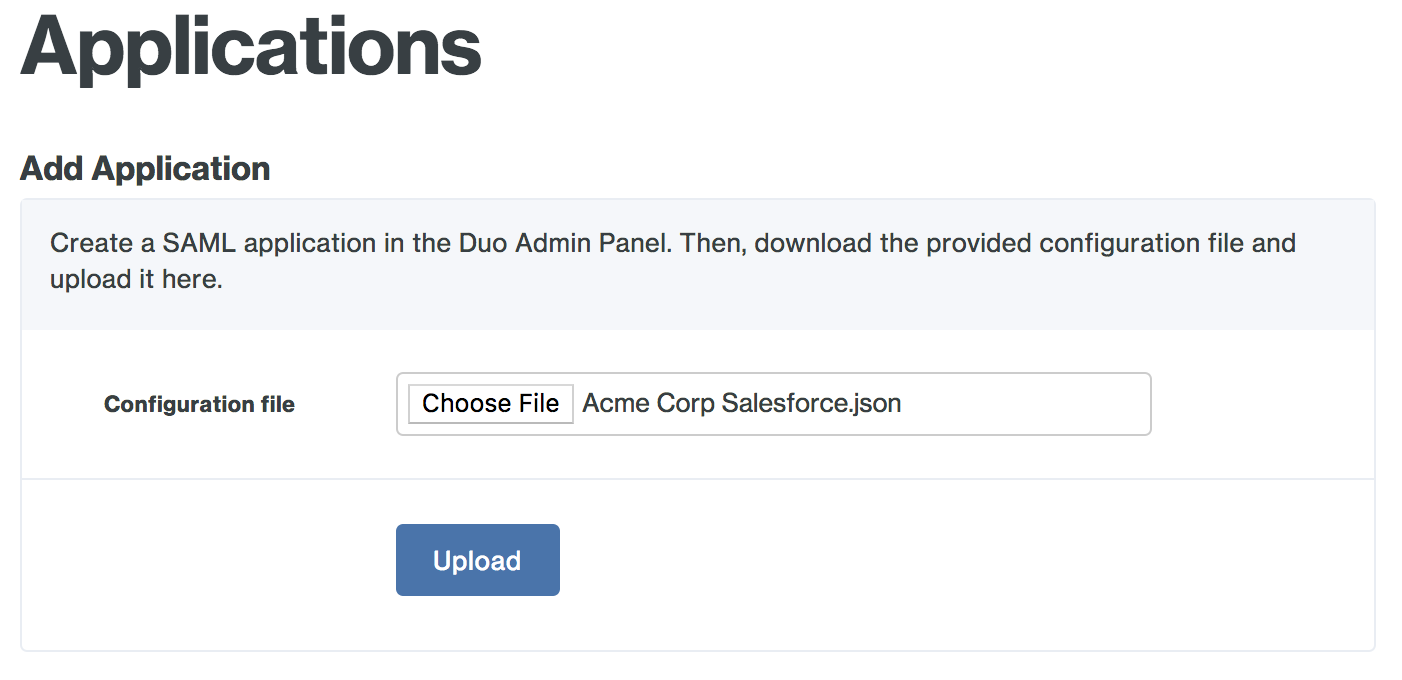
-
The new SAML application is added.
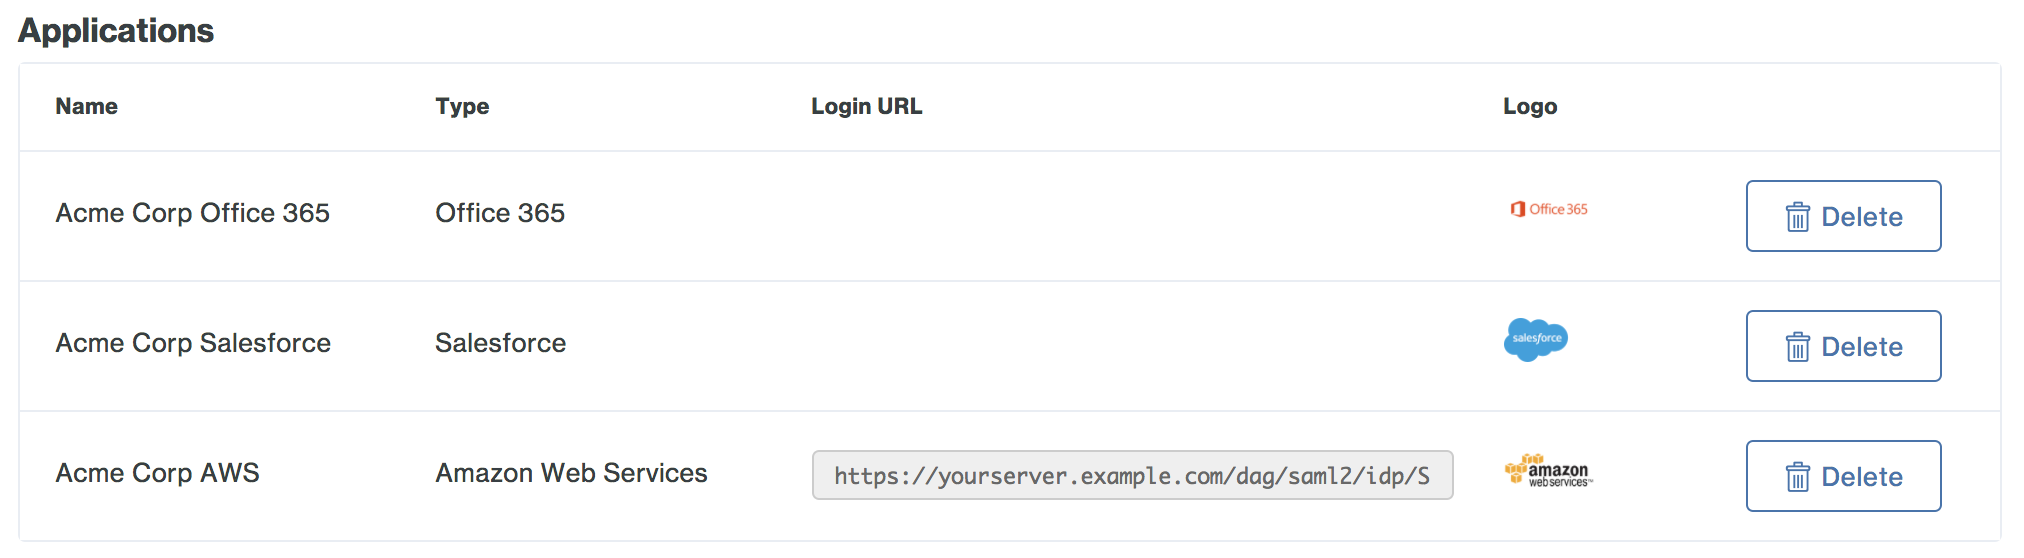
-
You may want to customize the logo shown for a generic SAML application, as this logo is shown to users in the Duo Access Gateway Launcher. Duo's pre-defined SAML applications show the service provider's logo, while generic SAML apps show a Duo logo by default.
To change the logo shown, click the Edit Logo button to the right of the SAML SP-initiated logon URL and default logo.

-
Select a PNG image to use for the generic SAML application's logo and then click Save
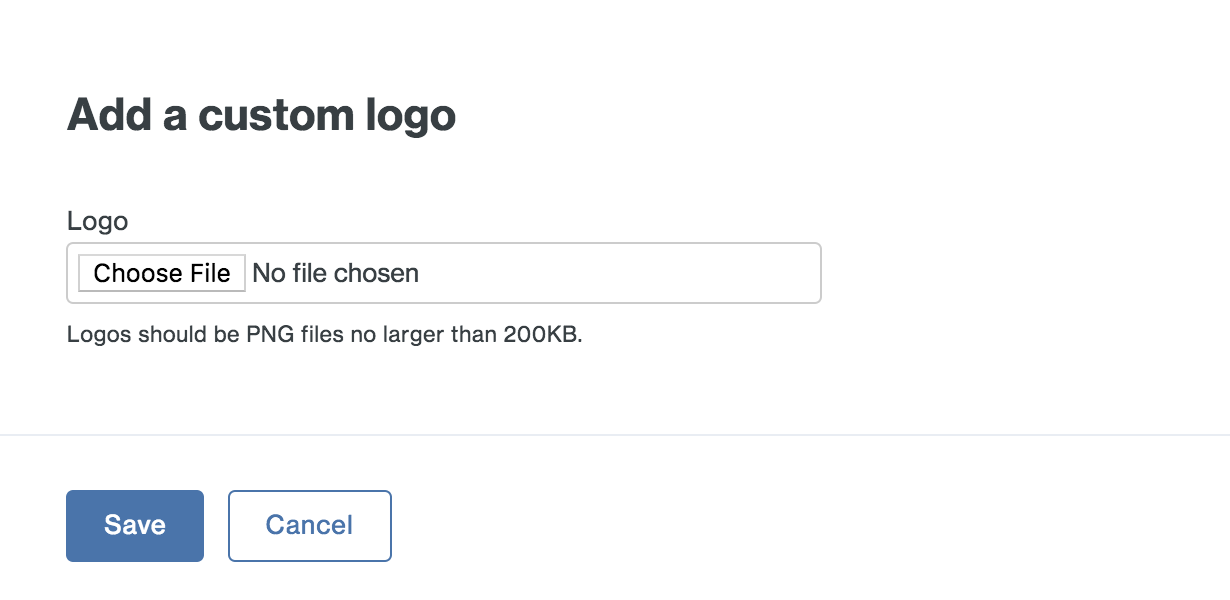
-
Your generic SAML application now has a custom logo.

Configure your Service Provider
You'll need to make some changes in your cloud application to add Duo Access Gateway authentication. Refer to our service provider configuration guides.
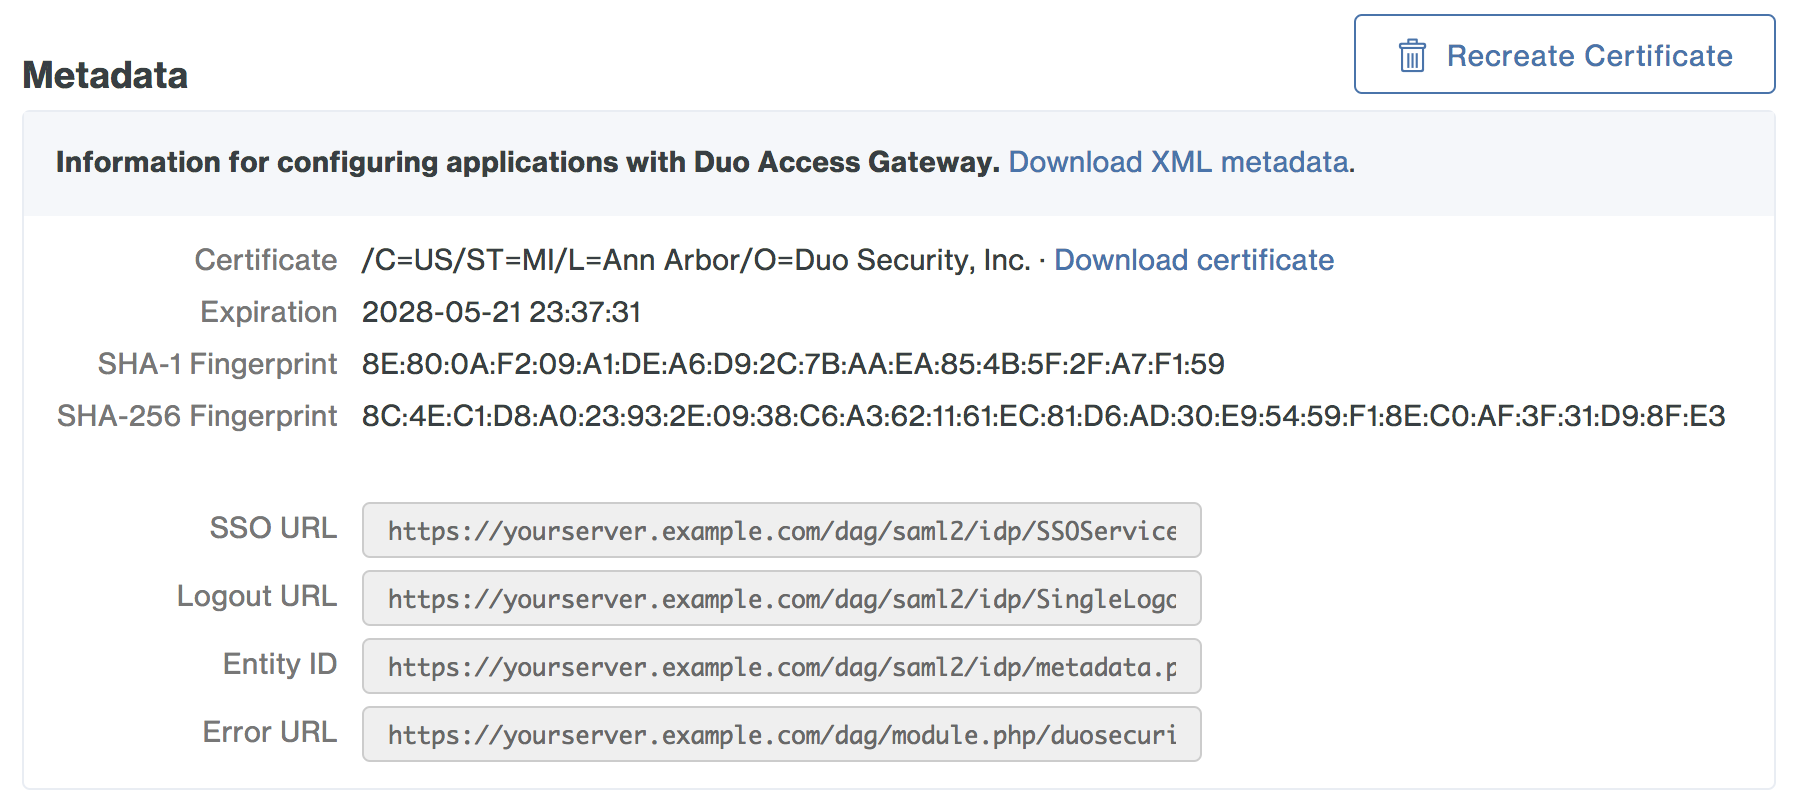
If you're adding Duo protection to another cloud application using the our generic SAML Service Provider application, check with the service provider for SSO instructions. You'll need to provide some information about Duo Access Gateway to that service provider, like URL information, a metadata file, a certificate file, or a certificate thumbprint. You can find this information in the "Metadata" section at the bottom of the Duo Access Gateway console's "Applications" page.
Enable the Duo Access Gateway launcher
Streamline user access to your apps by enabling the Duo Access Gateway Launcher. The launcher provides a portal from which users can access Duo Access Gateway protected service provider applications or other non-SAML applications configured in Duo with just a click. You can even add bookmarks for organization web sites that don't use Duo authentication.
The company logo shown in the launcher is the logo you configured in the General Settings in the Duo Admin Panel. The Duo Access Gateway launcher is unaffected by changes to the Duo branding General settings option, and always shows the "powered by Duo Security" text.
To use the Duo Access Gateway Launcher, you'll need to create a specific application in the Admin Panel, just like you do for a service provider, and then use that information to configure the launcher application in the Duo Access Gateway console.
-
Log in to the Duo Admin Panel and navigate to Applications → Application Catalog.
-
Choose Duo Access Gateway Launcher from the list of applications. Click Protect this Application to get your integration key, secret key, and API hostname. (See Getting Started for help.)
If you plan to permit use of WebAuthn authentication methods (security keys, U2F tokens, or Touch ID), Duo recommends configuring allowed hostnames for the Launcher and any other SSO application before onboarding any end-users.
-
No users can access the DAG Launcher until you grant access. Update the User access setting to grant access to this application to users in selected Duo groups, or to all users. Learn more about user access to applications.
-
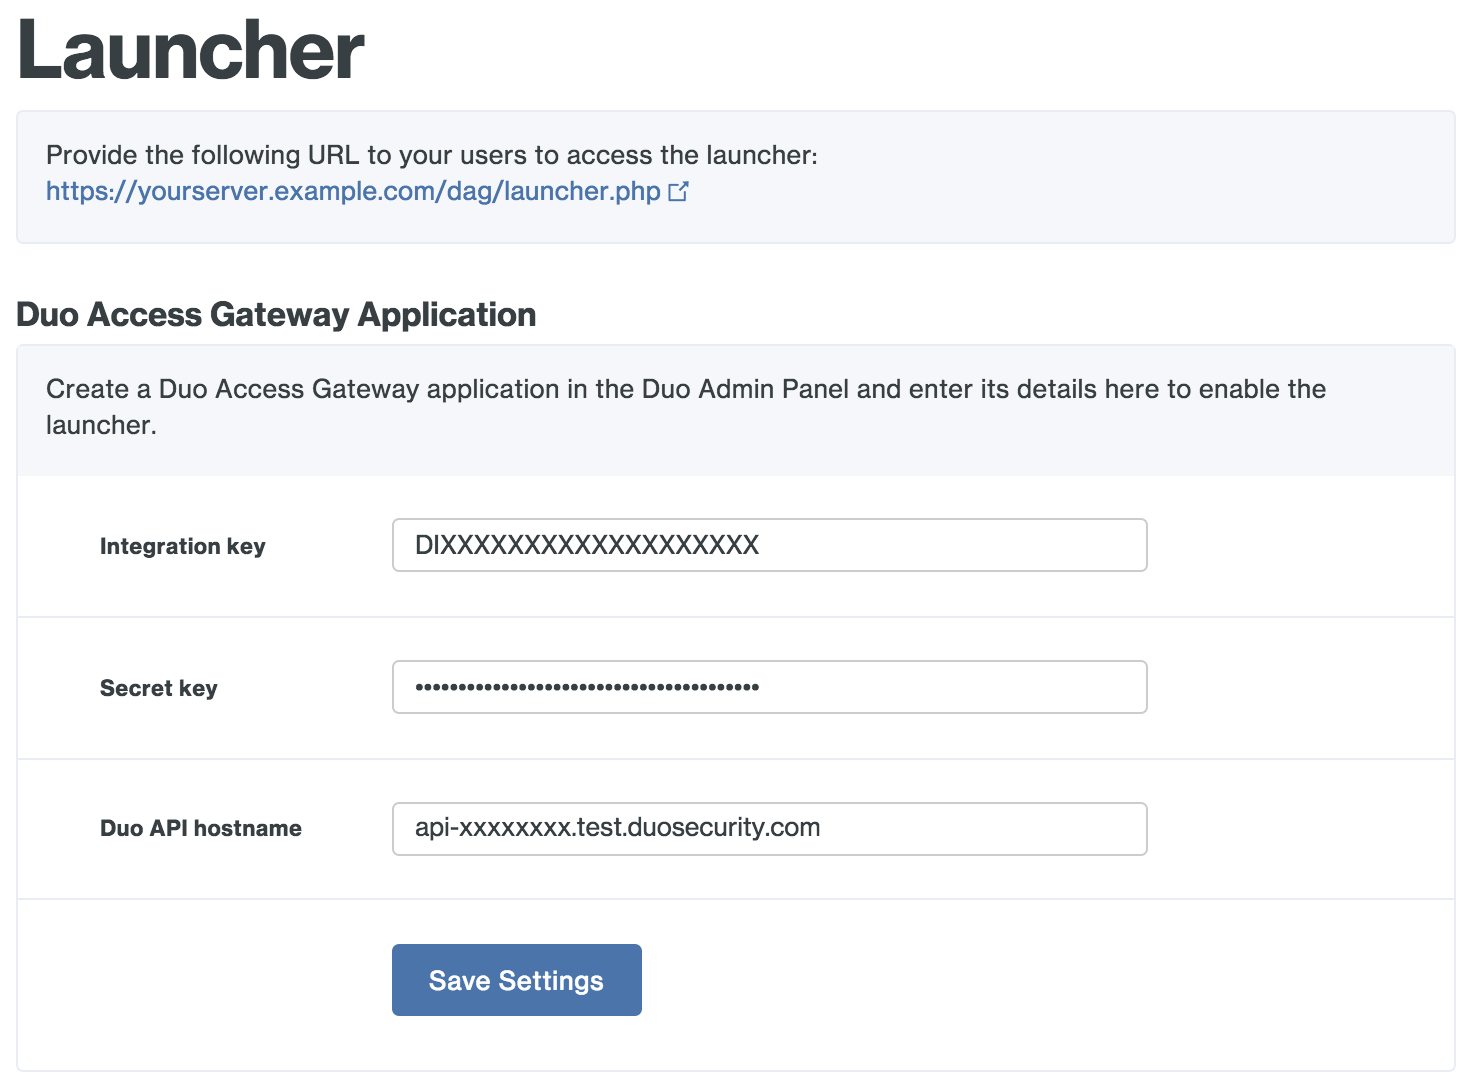
Log in to the Duo Access Gateway console at https://URL-OF-ACCESS-GATEWAY:8443 with the administrator password and click Launcher on the left.
-
Enter the integration key, secret key, and API hostname from the Duo Access Gateway Launcher application you created earlier and click Save Setting. This enables the launcher page URL for access.
-
If you have other Duo-protected web applications that you'd like to link directly from the Duo Access Gateway launcher you can add them in the "Duo Web Applications" configuration section. These can be Duo Network Gateway published internal applications or any other externally accessible browser-based Duo application that shows the inline Duo prompt (like OWA, Confluence, etc.).
Click the Add a Duo Web Application link and in the pop-up enter this information for the Duo web application you'd like to add:
- Name: A descriptive name for the application shown to end users in the launcher. Example: "Acme Wiki"
- URL: The URL used to access the application. Example: "https://wiki.acme.corp"
- Logo: Choose a PNG file less than 200 KB. This logo is shown to end users in the launcher. (Optional)
- Application: Start typing in this field to retrieve a list of the Duo applications you've already created in Duo. Click to select the Duo application you're adding to the launcher. If any group restrictions exist on the Duo application they'll affect whether a given user sees the web application tile in the launcher. Example: "Confluence"
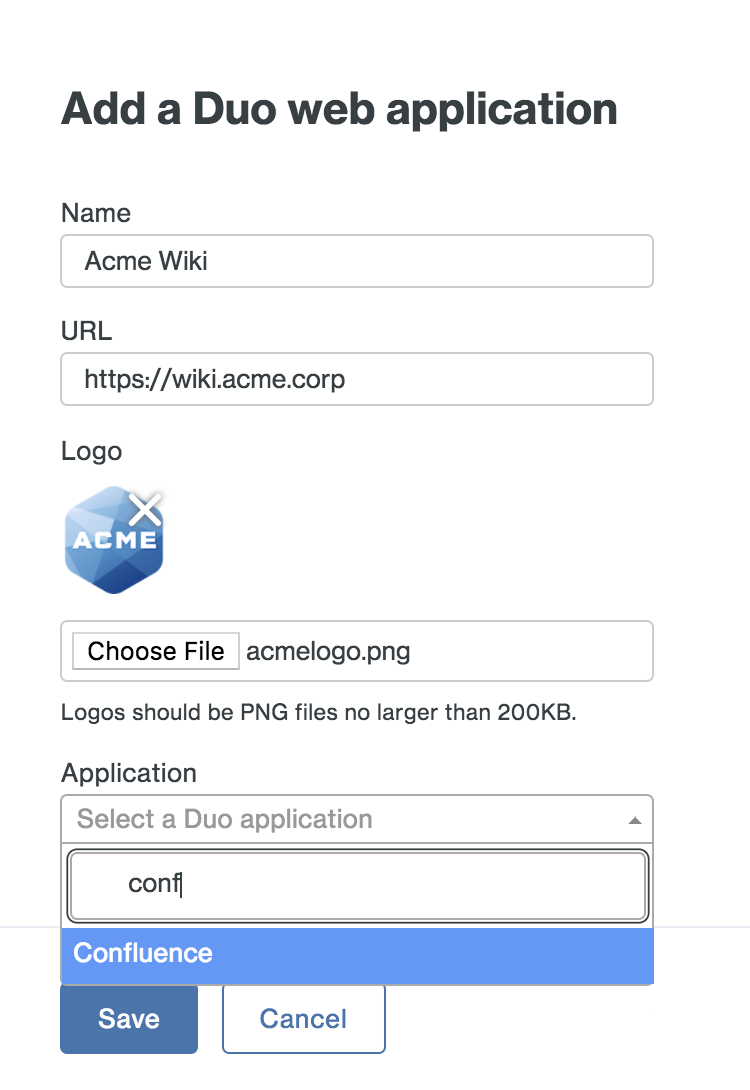
Click the Save button when done. The web application link is added.
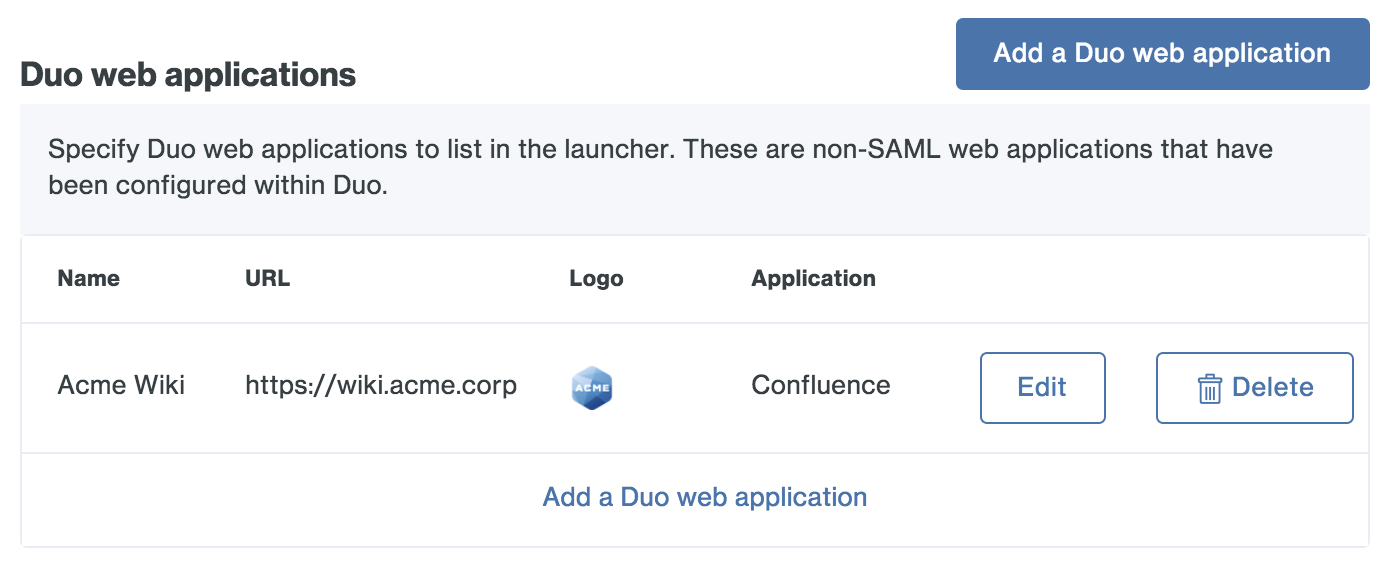
Repeat these steps for all Duo web applications you want to show end users in the launcher.
-
Provide your users with one-click shortcuts to any web application not protected by Duo by adding it as a bookmark.
For each bookmark you'd like to add, enter this information:
- Name: A descriptive name for the application shown to end users in the launcher. Example: "Conference Room Calendar"
- URL: The URL used to access the application. Example: "https://rooms.acme.corp"
- Logo: Choose a PNG file less than 200 KB. This logo is shown to end users in the launcher. (Optional)
- Group Access: New bookmarks display to all users by default. You can use Duo groups to control which users see a bookmark. Check the Only allow access from users in certain groups box and start typing in the group selection field to retrieve a list of Duo groups. Click each group that contains the users you want to see the new bookmark in the launcher. Example: "CorpHQ_Users".
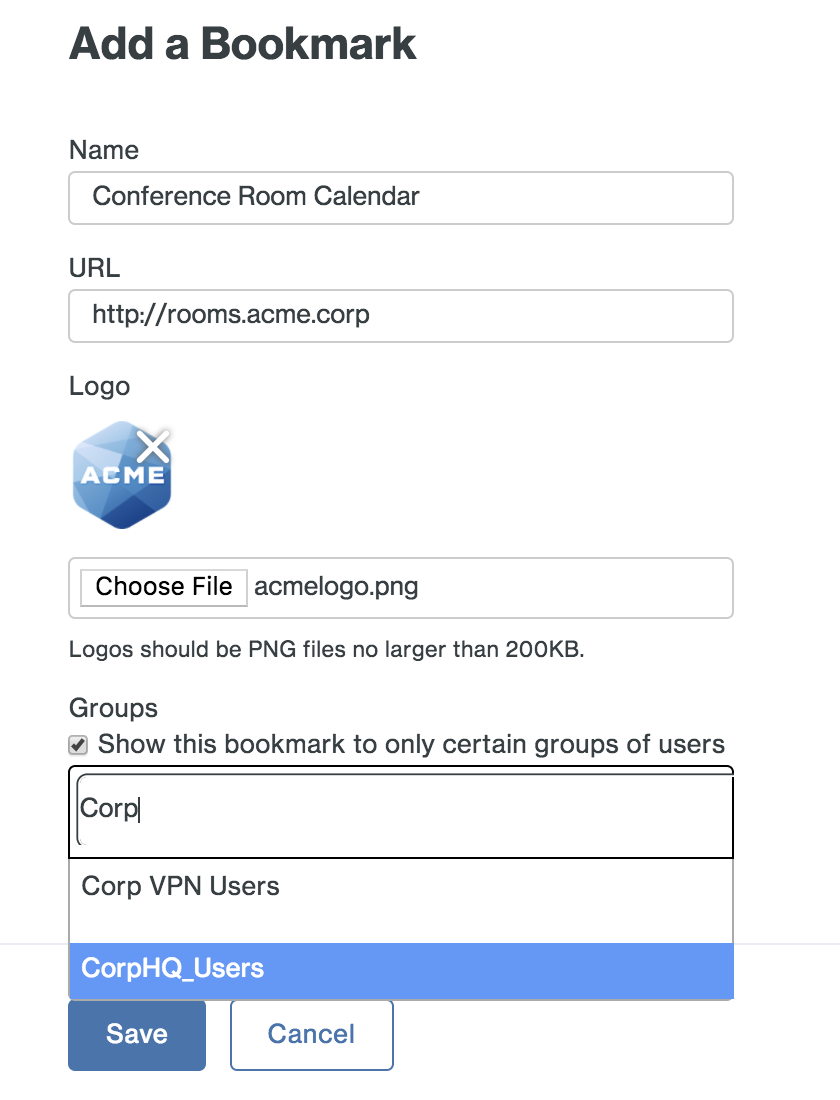
Click the Add button when done. The web application link is added.
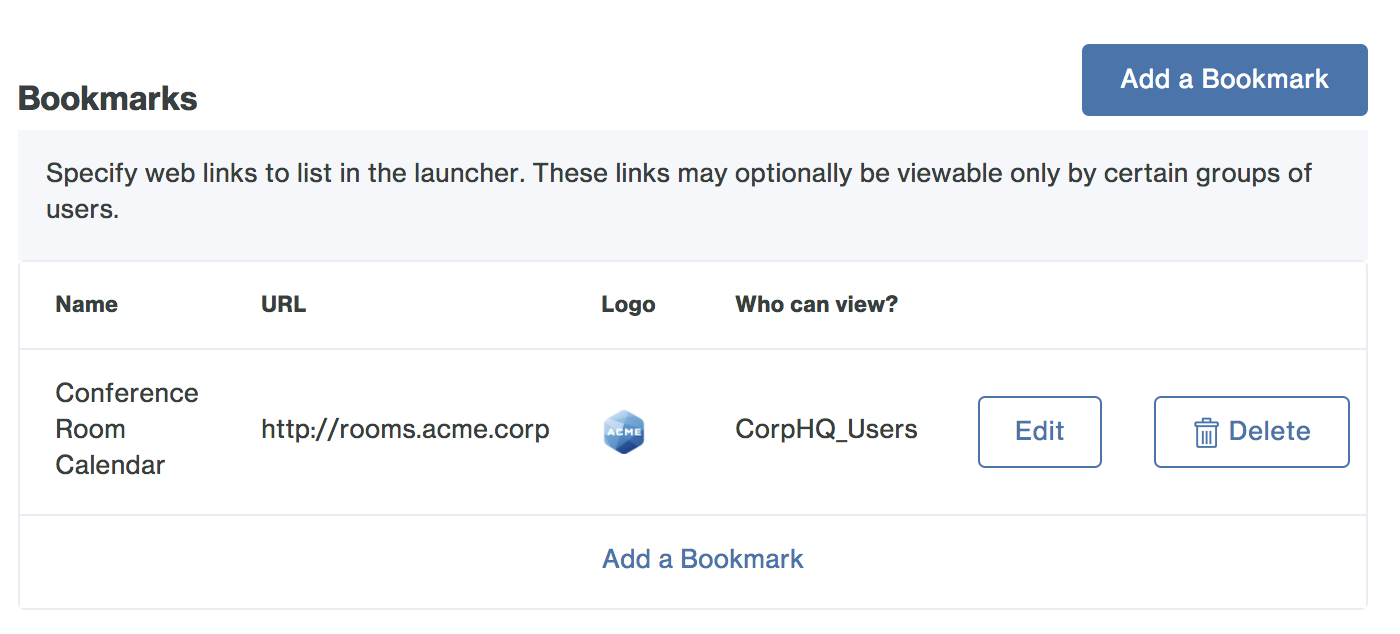
Repeat these steps for all web application bookmarks you want to show end users in the launcher.
-
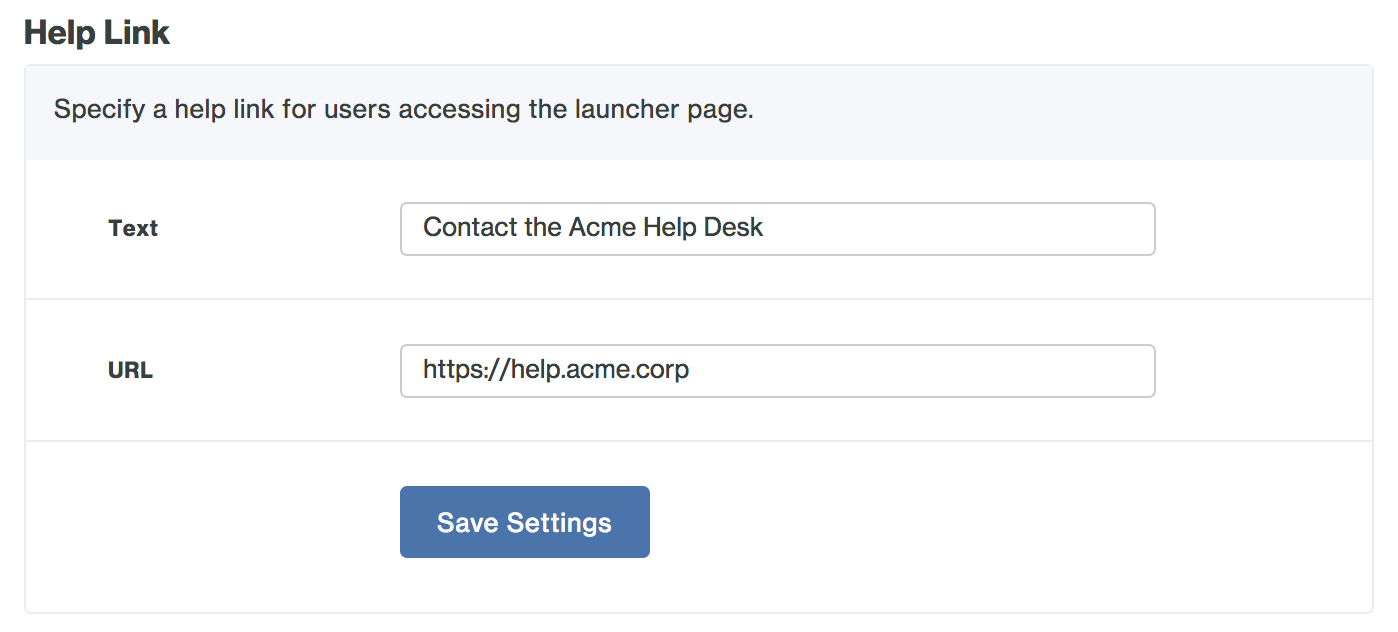
You can optionally change Text of the "Need help?" or the URL destination so that it points to a web page of your choosing instead of the Duo end user documentation. If you customize the help link, be sure to click Save Settings.
-
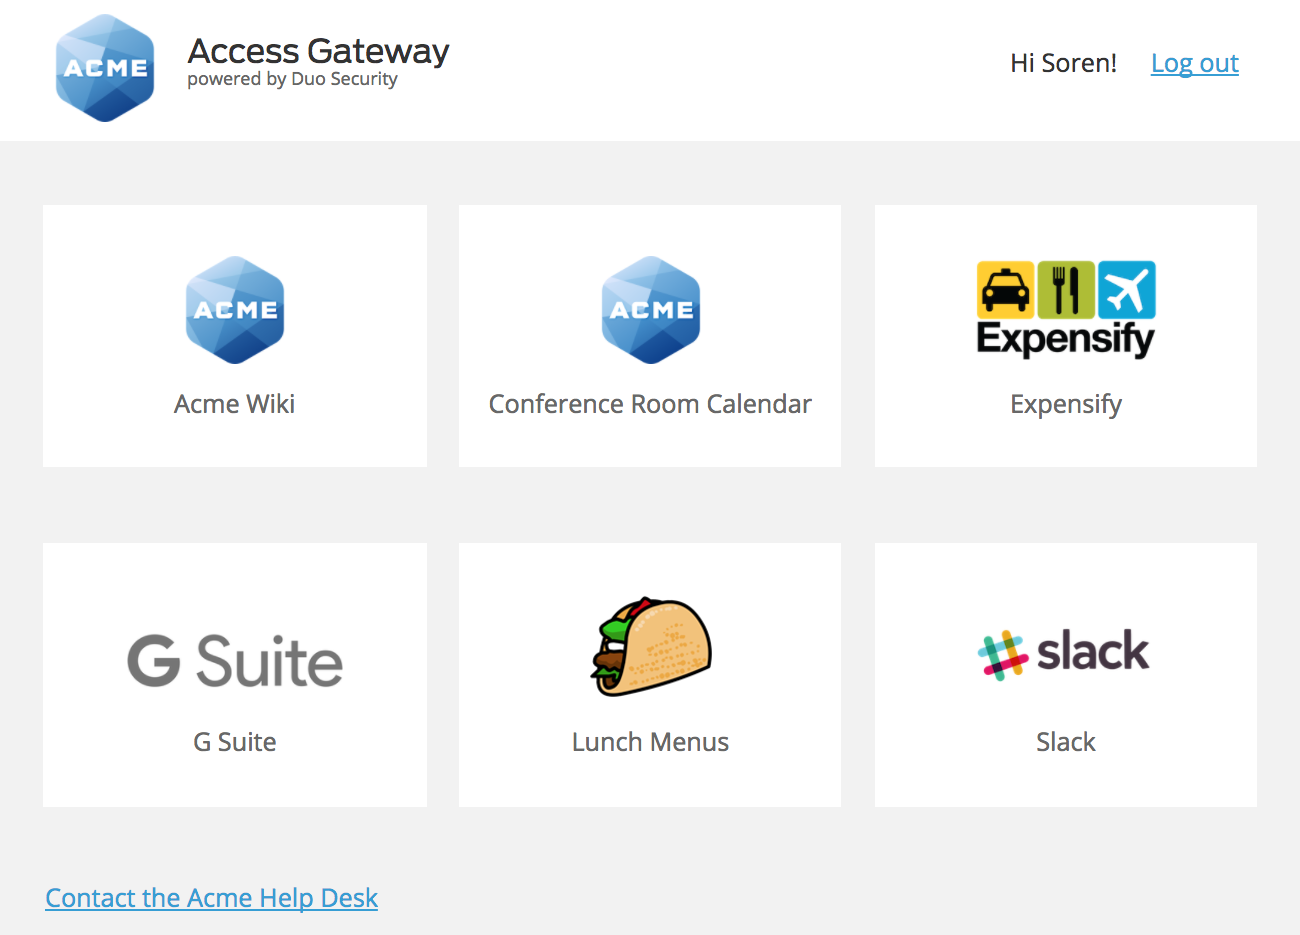
Give your users the launcher link mentioned at the top of the page, e.g. https://yourserver.example.com/dag/launcher.php. The three different types of launcher links all display as tiles to the user.
Based on the example information from steps 2 and 3, and knowing that the SAML applications Slack, Expensify, and Workspace were all uploaded to the Duo Access Gateway earlier, the different types of application links are shown thusly:
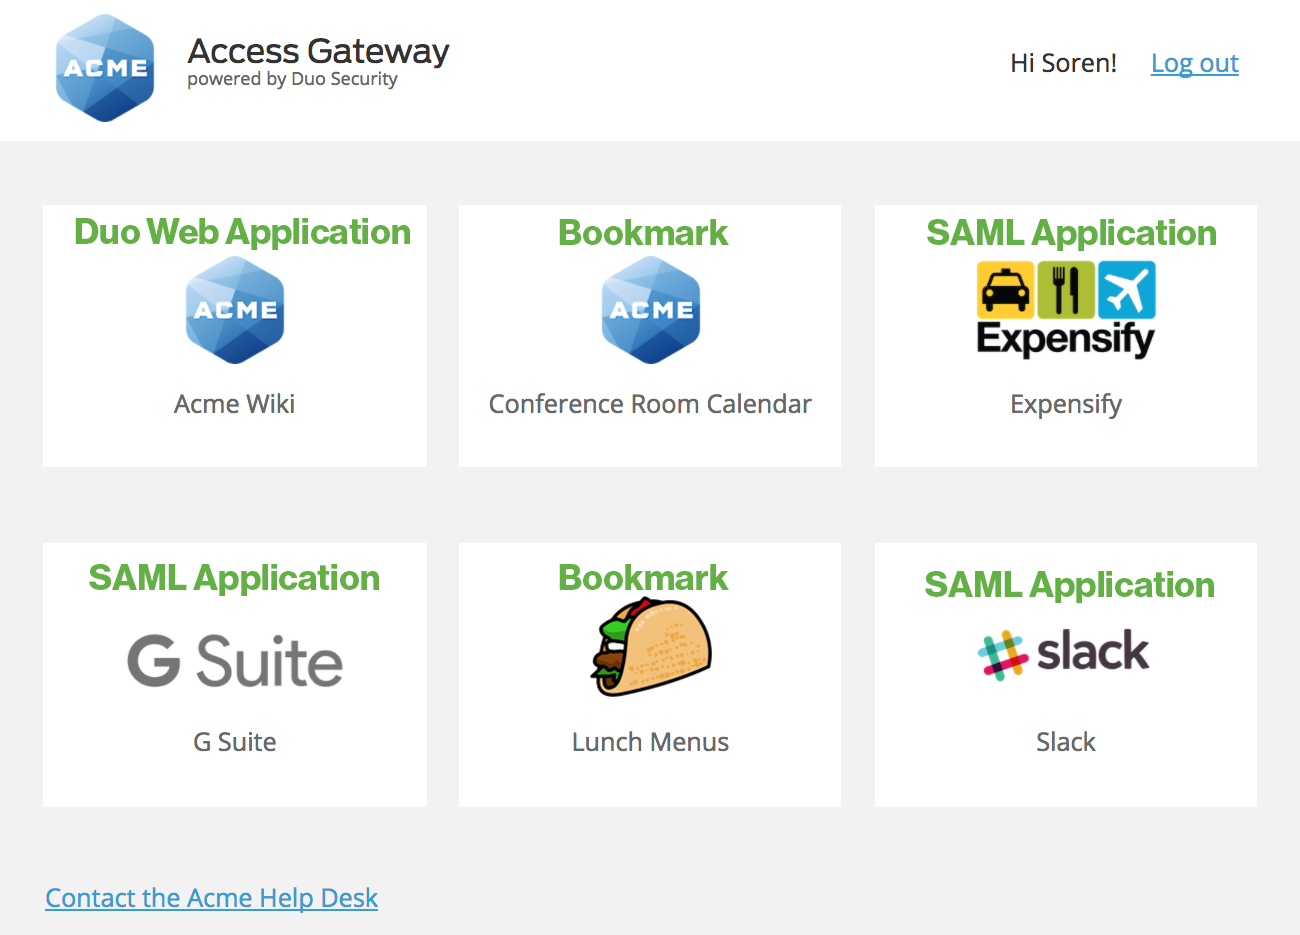
When your users access the Duo Access Gateway launcher they'll first log in with their primary credentials, and then complete Duo two-factor authentication. After that users see a list of all the SAML applications you've configured for use with the Duo Access Gateway, as well as the non-SAML web applications using Duo that you added to the launcher configuration and any other web app bookmarks created.
By default, users perform Duo authentication when logging into the Duo Access Gateway launcher, and again when launching any SAML or Duo Web applications using the shortcuts in the Duo Access Gateway launcher. You can eliminate the second prompt for Duo authentication by assigning a Remembered Devices policy to the Duo Access Gateway Launcher application, to your SAML applications which has the trust-application option enabled, and to the Duo web applications you added to the launcher. With this policy, your users will not need to authenticate to Duo again when accessing an app that shares the same policy. See the Remembered Devices policy documentation for details.
You can also restrict which application links display for a given user in the launcher. When creating your SAML service provider application in the Duo Admin Panel, choose the Enable only for permitted groups option in the "User access" setting and select the Duo groups that contain the users you want to access that application. You can do the same thing for any Duo Web applications added to the launcher. When a user who is not a member of the specified group(s) logs in to the launcher, the applications which have group restrictions are not shown. See the Using Groups documentation for more information and detailed instructions.
Test Your SAML Setup
To verify your setup, log on to your configured cloud service provider. You'll be redirected to the Duo Access Gateway login page.

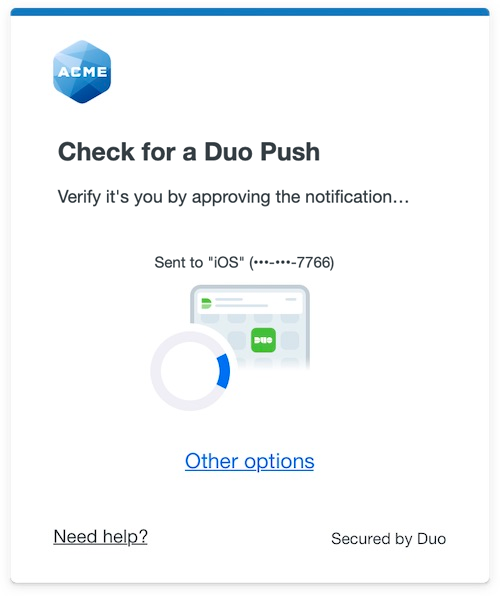
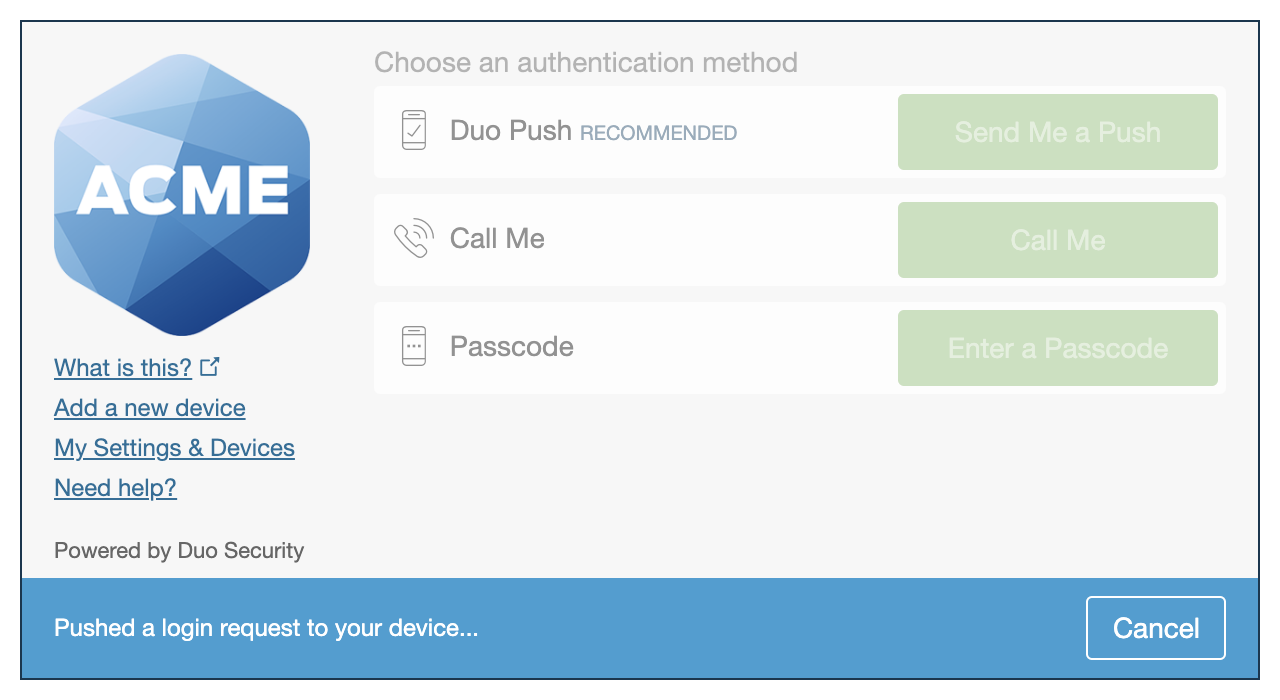
Enter your primary username and password. The Duo authentication prompt appears after successful primary authentication.
Approving the Duo authentication request completes login to the cloud application.
Enable Duo Universal Prompt
Once you log in to a given SAML application via the Duo Access Gateway, you can return to that application's details page in the Duo Admin Panel and enable the Universal Prompt. When you view the DAG SAML app you logged into with DAG in the Duo Admin Panel, the Universal Prompt details show that the application is ready for the new prompt experience. The status "Ready to Activate" for updated applications reflects that you've done all the work required to update your application for the Universal Prompt.
Use the activation control options to determine the login experience for your users:
-
Show traditional prompt: Your users experience Duo's traditional prompt via redirect when logging in to this application.
-
Show new Universal Prompt: Your users experience the Universal Prompt via redirect when logging in to this application. Default selection for newly-created supported applications.
Change the Activate Universal Prompt setting to show the Universal Prompt and then scroll to the bottom of the page and click Save. Once you activate the Universal Prompt, the application's Universal Prompt status shows "Activation Complete" here and on the Universal Prompt Update Progress report.
The next time you or any of your organization's users log into that application with the Duo Access Gateway, the login experience features the Duo Universal Prompt instead of the traditional Duo Prompt.
Activation of the Universal Prompt is a per-application change. Activating it for one DAG application does not change the login experience for your other Duo applications. You must log in to each DAG application you federate once with the traditional Duo prompt before you can then activate Universal Prompt for that application. Until you do so, your users continue to see the traditional Duo prompt experience.
Application ready for Universal Prompt

Upgrading Duo Access Gateway
Upgrading Duo Access Gateway preserves all your server settings and application configurations. To perform an upgrade:
-
Before upgrading back up your configuration.
-
Clean up older unused Duo Access Gateway Docker images by typing:
docker rmi $(docker images --format " " | grep duosecurity | cut -f 2 -d ' ')Ignore any
error responsemessages you see. You should see output similar to:Untagged: duosecurity/access-gateway@sha256:16d5e71a3280c11766996de561b48b283b866ec93613f1bb65490def6ff29c64 Deleted: sha256:6893259e27b3311895279cde328012879f4e92c9823245d05adf9926fed3c0b4 Error response from daemon: conflict: unable to delete 3627aad0d196 (cannot be forced) - image is being used by running container 2acb91f391a7 -
Download the latest version of the Duo Access Gateway YML file by typing:
wget --content-disposition https://dl.duosecurity.com/access-gateway-latest.ymlYou should see output similar to:
--2026-05-20 14:04:19--  https://dl.duosecurity.com/access-gateway-latest.yml
 Resolving dl.duosecurity.com (dl.duosecurity.com)... 143.204.130.123, 143.204.130.84, 143.204.130.4, ...
 Connecting to dl.duosecurity.com (dl.duosecurity.com)|143.204.130.123|:443... connected.
 HTTP request sent, awaiting response... 200 OK
 Length: 625 [application/octet-stream]
 Saving to: ‘access-gateway-3.0.0.yml’
 access-gateway-3.0.0.yml       100%[====================================================>]     625  --.-KB/s    in 0s
 2026-05-20 14:04:19 (14.9 MB/s) - ‘access-gateway-3.0.0.yml’ saved [625/625]
Note the saved file name; you'll need this in future steps. View checksums for Duo downloads here.
-
Pull down the new Duo Access Gateway image file using the YML file downloaded in the previous step. Note that your YML file name may reflect a different version than the example command shown. Replace the file name in the example with your downloaded YML file's actual name.
Type:
docker compose -f access-gateway-3.0.0.yml pull -
Type the following command to upgrade your existing Duo Access Gateway to the new version from the YML file you downloaded:
docker compose -p access-gateway -f access-gateway-3.0.0.yml up -dNote that the new YML file names may reflect different versions than the example command shown. Replace the file name in the example with your newly downloaded YML file's actual name.
-
The Duo Access Gateway server shuts down and starts up with the newer version; preserving your existing settings. The upgrade process is complete with no further action required. The output will look similar to:
Recreating access-gateway
Logging
Duo Access Gateway records the following events:
- Administrator console logons
- Primary user authentication success and failure
- Secondary user authentication success
- Errors
To view the log output, log into the Duo Access Gateway server and run the following command, replacing the example Duo Access Gateway YML name with your current file's actual name:
docker compose -p access-gateway -f access-gateway-3.0.0.yml logs -fTo enable debug output to the existing dag.log file, navigate to Settings in the Duo Access Gateway admin console. Scroll down to the "General" section and check the box next to Debugging. Click Save Changes when done.
Backup and Restore
Export the container configuration from the command line to back up your Duo Access Gateway configuration.
-
SSH into your Duo Access Gateway Docker host. Ensure your Duo Access Gateway containers are running with the
docker pscommand. You can't export information from stopped containers. -
Run the following command to export your Duo Access Gateway configuration as files into the newly-created directory
datain your current location.docker cp access-gateway:/data dataThese files contain all your Duo Access Gateway secrets and SSL keys. Be sure to secure this data.
You'll need the full contents of the data directory to restore your Duo Access Gateway configuration.
-
SSH into the server hosting the Duo Access Gateway Docker containers. If this is a disaster recovery scenario you should run through all the initial Duo Access Gateway container installation steps, stopping when you get to the "Configure Duo Access Gateway".
-
From the same directory that contains the exported
datafolder, issue this command to restore the previously exported configuration:docker cp data/. access-gateway:/data -
After restoring the
datacontents run this command to set the proper file permissions on the restored configuration folder and files:docker exec -ti --user=0 access-gateway chown -R www-data:www-data /data
High Availability
We recommend deploying a second Duo Access Gateway server with the same configured SAML applications to serve as a standby replacement for the primary Duo Access Gateway server. You can use the Backup and Restore commands to export the Duo Access Gateway configuration from the first Linux host and then import the config into the second Linux host.
You can also configure a load balancer in front of two identically configured Duo Access Gateway servers for active/active or active/passive high availability. Configure a health check that attempts to load the DAG's entity ID URL i.e. https://yourserver.example.com/dag/saml2/idp/metadata.php. In this scenario we recommend 8-hour persistence to match the lifetime of the Duo session cookie. Consult your load balancer solution documentation for guidance.
FIPS 140-3 Mode
By default, Duo Access Gateway disables FIPS mode and uses OpenSSL's default provider, which supports all cryptographic algorithms. With FIPS mode enabled, DAG uses only FIPS-validated cryptographic algorithms compliant with FIPS 140-3.
Prerequisites
Verify these items before you enable FIPS 140-3 on your DAG server:
- You have installed Duo Access Gateway 3.0.0 or later.
- All the applications you plan to federate and any authentication source you use supports FIPS algorithms and RSA-SHA256 signatures.
- All certificates should have RSA keys of at least 2048 bits (recommended: 3072 or 4096 bits) and SHA-256 or stronger signatures.
If you're enabling FIPS 140-3 on an existing DAG server already federated with SAML applications:
- Check your SAML service provider configurations in the
metadata/saml20-sp-remote.phpandmetadata/saml20-idp-remote.phpfiles on your DAG server. - Note any configurations using
certFingerprint. These will generate warnings after you enable FIPS mode. The resolution will be to re-save your SAML IdP configuration after verifying FIPS mode.
Enable FIPS Mode
Set the environment variable DAG_FIPS_MODE=1 when starting the container.
Docker Run
docker run -e DAG_FIPS_MODE=1 -v accessgateway_data:/data duosecurity/access-gateway:latestDocker Compose
Add the DAG_FIPS_MODE=1 environment variable to your access-gateway-n.n.n.yml file:
services:
  access-gateway:
    image: duosecurity/access-gateway:latest
    environment:
      - DAG_FIPS_MODE=1
    volumes:
      - accessgateway_data:/data
    # ... other configuration
Update General Settings
Enable the FIPS mode option in the Duo Access Gateway admin console's "General" settings.
Verify FIPS Mode
After starting DAG with FIPS mode enabled, you can verify it's working with this command:
# Check FIPS providers are loaded (must set env vars for interactive shell)
docker exec -it <container_id> sh -c "
  export LD_LIBRARY_PATH=/usr/local/lib
  export OPENSSL_CONF=/data/config/ssl/openssl-fips.cnf
  openssl list -providers
"
The command output should show fips and base providers, and not include default providers.
Your startup logs will also indicate FIPS mode status:
[FIPS] FIPS mode requested via DAG_FIPS_MODE=1
[FIPS] Copying FIPS config to /data/config/ssl/openssl-fips.cnf
[FIPS] OPENSSL_CONF set to /data/config/ssl/openssl-fips.cnf
[FIPS] FIPS provider loaded successfully
Address Certificate Fingerprint Warnings
If you identified any SAML configs with certFingerprint earlier, after enabling FIPS mode you may see warnings like this:
FIPS mode: SHA-1 certificate fingerprint detected. Consider updating metadata to use SHA-256 fingerprints for full FIPS compliance.
Update the certificate fingerprints to SHA-256 by re-saving your SAML IdP configuration.
- Log in to the Duo Access Gateway admin console.
- Navigate to Authentication Source (SAML IdP).
- Click Save without making any changes.
FIPS Mode Algorithm Restrictions
These FIPS-approved algorithms are available in FIPS mode:
- AES (128, 192, 256-bit)
- SHA-2 family (SHA-256, SHA-384, SHA-512)
- SHA-3 family
- RSA (2048-bit and above)
- ECDSA/ECDH (P-256, P-384, P-521)
- HMAC
- TLS 1.2 and 1.3 with FIPS-approved cipher suites
These non-compliant algorithms are not allowed:
- MD5 (except in specific legacy contexts)
- SHA-1 for signatures
- DES, 3DES (in most contexts)
- RSA keys smaller than 2048 bits
- Non-approved elliptic curves
Disable FIPS Mode
If you need to disable FIPS mode after enabling it:
-
Deselect the FIPS mode option in the Duo Access Gateway admin console's "General" settings.
-
Run this Docker command to disable FIPS:
docker run -e DAG_FIPS_MODE=0 -v accessgateway_data:/data duosecurity/access-gateway:latest
If you edited your access-gateway-n.n.n.yml file to add DAG_FIPS_MODE=1 environment variable, edit the file again to either remove the FIPS variable or set it to 0.
Known Issues
-
AD username format for Duo Access Gateway primary logon must be entered as sAMAccountName ("username") or email/userPrincipalName ("username@example.com"). NTLM logon ("DOMAIN\username") is not supported at this time.
-
SP user provisioning is not supported at this time.
-
Authentication sources other than Active Directory do not provide group membership information to the Duo Access Gateway. Therefore, these authentication sources cannot be used with service providers that verify group membership to provide access, such as Amazon Web Services or Meraki.
Troubleshooting
Need some help? Take a look at the Duo Access Gateway Frequently Asked Questions (FAQ) page or try searching our Duo Access Gateway Knowledge Base articles or Community discussions. For further assistance, contact Support.
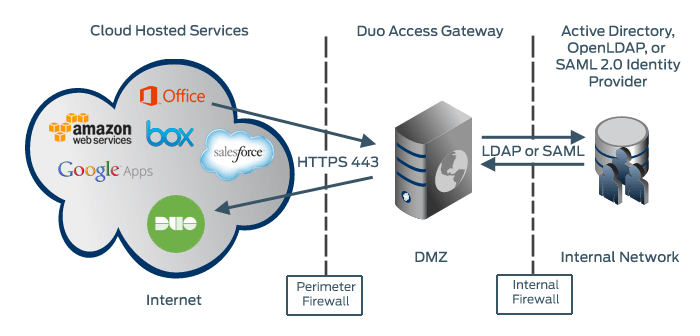
Network Diagram
On-premises Authentication
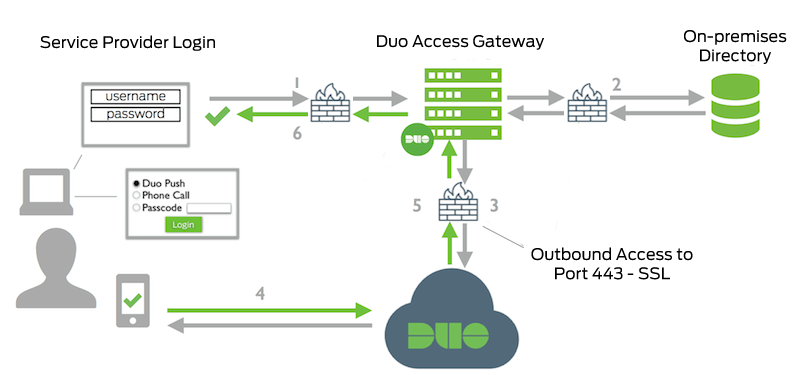
- Service Provider to Duo Access Gateway connection initiated
- Primary authentication to on-premises directory or IdP
- Duo Access Gateway connection established to Duo Security over TCP port 443
- User completes Duo two-factor authentication via the interactive web prompt served from Duo's service and their selected authentication factor.
- Duo Access Gateway receives authentication response
- Service Provider session authenticated
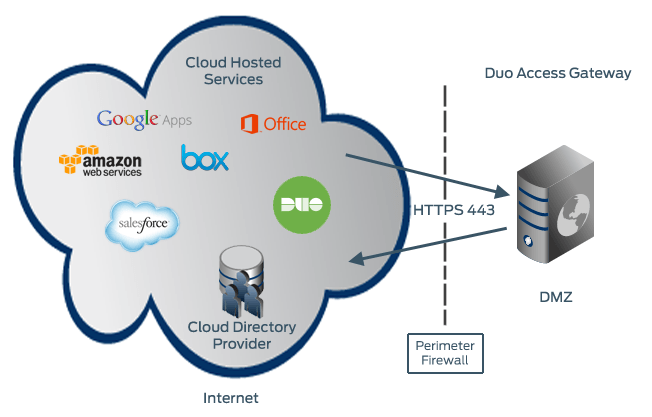
Cloud Authentication
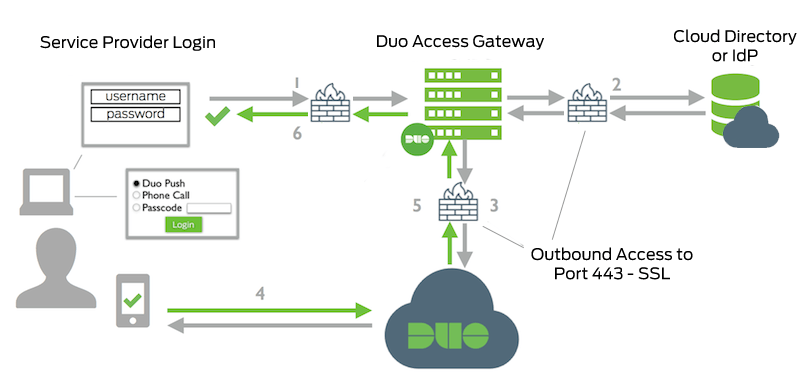
- Service Provider to Duo Access Gateway connection initiated
- Primary authentication to cloud directory or IdP
- Duo Access Gateway connection established to Duo Security over TCP port 443
- User completes Duo two-factor authentication via the interactive web prompt served from Duo's service and their selected authentication factor.
- Duo Access Gateway receives authentication response
- Service Provider session authenticated