Duo Administration - Manage Users
Last updated:
Overview
Create, manage, and delete your Duo users from the Duo Admin Panel. These user accounts allow your end-users to log in to Duo-protected services and applications with two-factor authentication.
To access the Duo Admin Panel:
-
Navigate to Duo Admin Panel.
-
Enter your Duo administrator account credentials.
-
Complete two-factor authentication.
See Accessing the Duo Admin Panel for detailed Duo Admin Panel login instructions.
The browser used to access the Duo Admin Panel must support TLS 1.2, which most modern browsers do by default. If you have issues accessing the site, please update your browser to a recent version of Chrome, Firefox, Edge, Safari, etc. or check your browser’s SSL implementation here: https://www.ssllabs.com.
Duo no longer supports use of Internet Explorer to access the Admin Panel. Microsoft ended Internet Explorer desktop application support on June 15, 2022. Please use one of Duo's supported browsers.
About Users
Users (identified by their usernames) are shared between applications, so a user only needs to complete enrollment and activation in Duo once to gain access to multiple applications. User access can be restricted to specific applications through permitted groups for individual applications.
A "fully-enrolled" Duo user is an end user who accesses Duo-protected services or applications, who exists in Duo as a user with an associated authentication method. A partially-enrolled user is one who exists in Duo with a username but has no authentication methods registered. These users still need to complete device enrollment and activation to fully use Duo. Users may or may not have Duo Directory passwords, depending on your identity provider configuration.
Certain user management operations have Duo administrative role requirements. These are noted where applicable. Additionally, some user attributes may be set as private. If an administrator's assigned administrative role lacks permission to view and set private attributes then the values for those attributes will be read-only and obscured from that admin's view in the Admin Panel everywhere it's shown.
Duo administrator accounts are managed separately from Duo users. Please see Managing Duo Administrators for more information.
List Users
-
Log in to the Duo Admin Panel and navigate to Users → Users in the left sidebar. At the top of the page, you see a summary of the total number of Duo users in your organization, as well as counts of "Not Enrolled" users without any authentication devices (including those with Pending Enrollment status), inactive users who haven't authenticated with Duo for the past 30 days, users pending deletion in the Trash view, and users with bypass or locked out status. Click a status count to filter users in that category. You can also search for users by name or email.
The Users table shows usernames, email addresses, the number of assigned phones and tokens, the user's status, and the date and time of the last login.
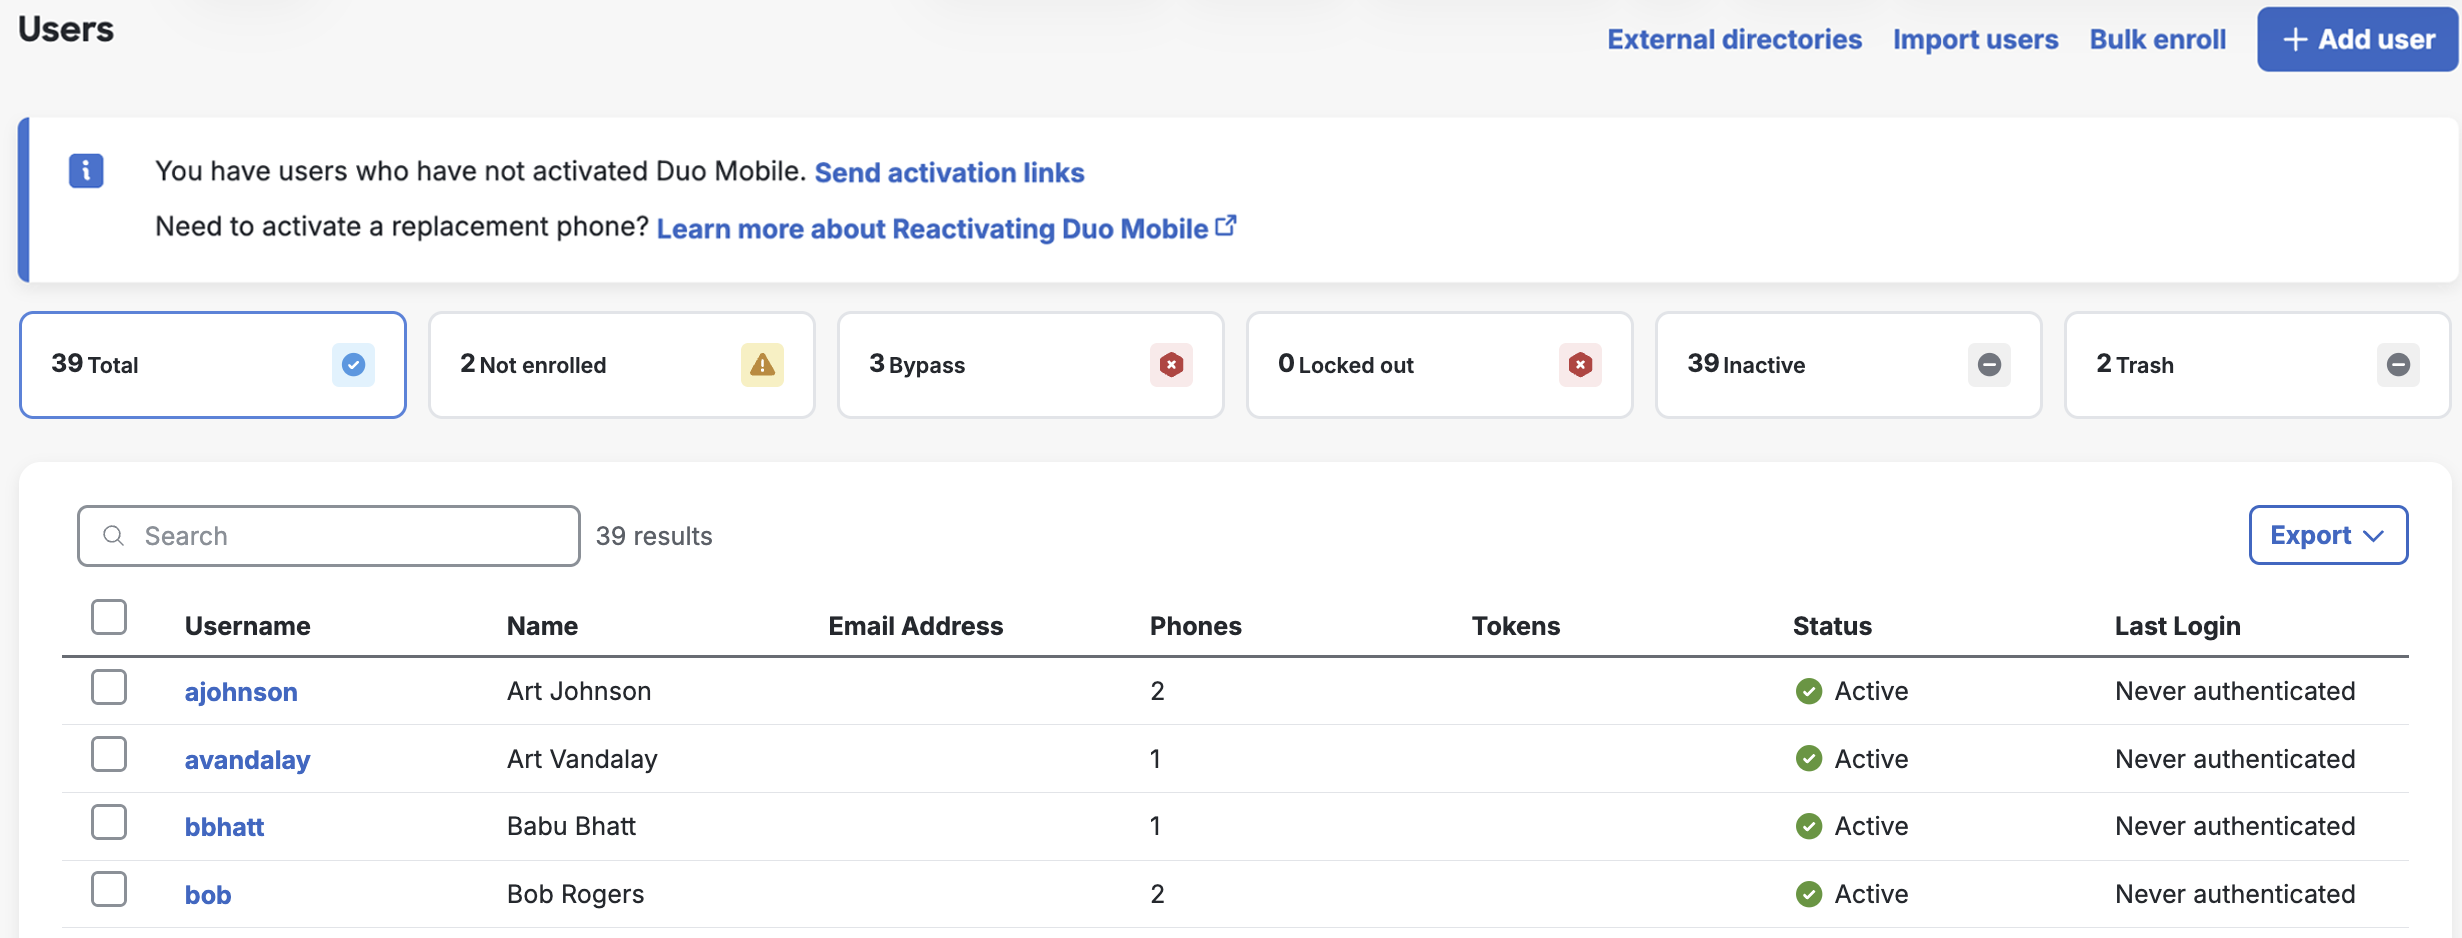
Click the Export button in the upper right side of the log display and select from the available export options, which may include CSV or JSON which will download a copy of the log. You may also select Print which will go directly to your browser's print dialog or URL to obtain a direct link to your current users view. If you've filtered your current view (like by entering search text in the box), the report only includes the filtered results.
-
Clicking on a user's name displays details about that user, including Duo Directory password and device enrollment status, all associated authentication factors (phones, hardware tokens, passkeys, security keys, etc.), and endpoints. Scroll through the page to view all the user's information.
Enroll Users
Admins have several options when it comes to enrolling new users in Duo, such as self-enrollment, Active Directory sync, OpenLDAP sync, Entra ID sync, Google, Okta, and Generic Inbound SCIM. The Enrolling Users documentation covers all of our enrollment methods in detail.
Duo administrator accounts are only used to log on to the Admin Panel. They can't be used to access devices or applications using Duo two-factor authentication. Be sure to also enroll your Duo administrators as Duo end users if they need to log on to Duo-protected services or applications.
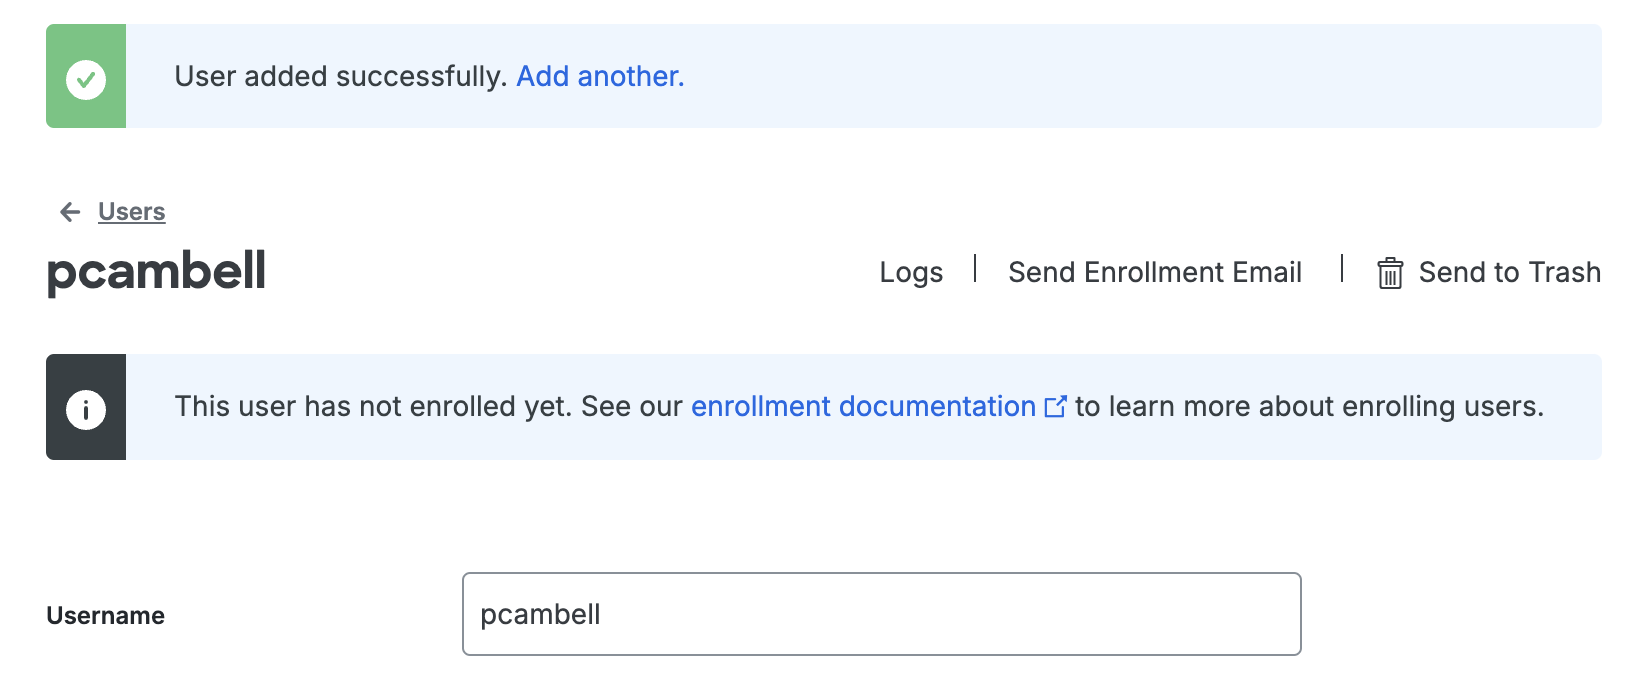
Send Enrollment Emails to Existing Users
Role required: Owner, Administrator, User Manager, Security Analyst, or Help Desk (when permitted in the "Help Desk" global setting).
When a user already exists in Duo with an email address present in the user's details, but has yet to set their Duo password or register any authentication devices, you can send an enrollment email to the user from the Admin Panel. If an enrollment email was already sent to the user by any method (manually by a Duo admin, automatically as part of directory sync, etc.) but the user did not receive it or deleted it without enrolling, you can resend the email.
If your organization uses e-mail filtering, be sure to allow the sender no-reply@duosecurity.com.
-
Log in to the Duo Admin Panel.
-
Search for the user using the search bar at the top of the page, or navigate to Users → Users in the left sidebar and locate the user to which you want to send or resend an enrollment email. Click through to the user's details page.
-
In the "Device enrollment" section, scroll to Send an enrollment email.
-
Click Send email. If the user has no valid email address present in the "Email" field, you'll receive an error. Update the email information for the user (clicking Save when done) and try sending the enrollment email again.
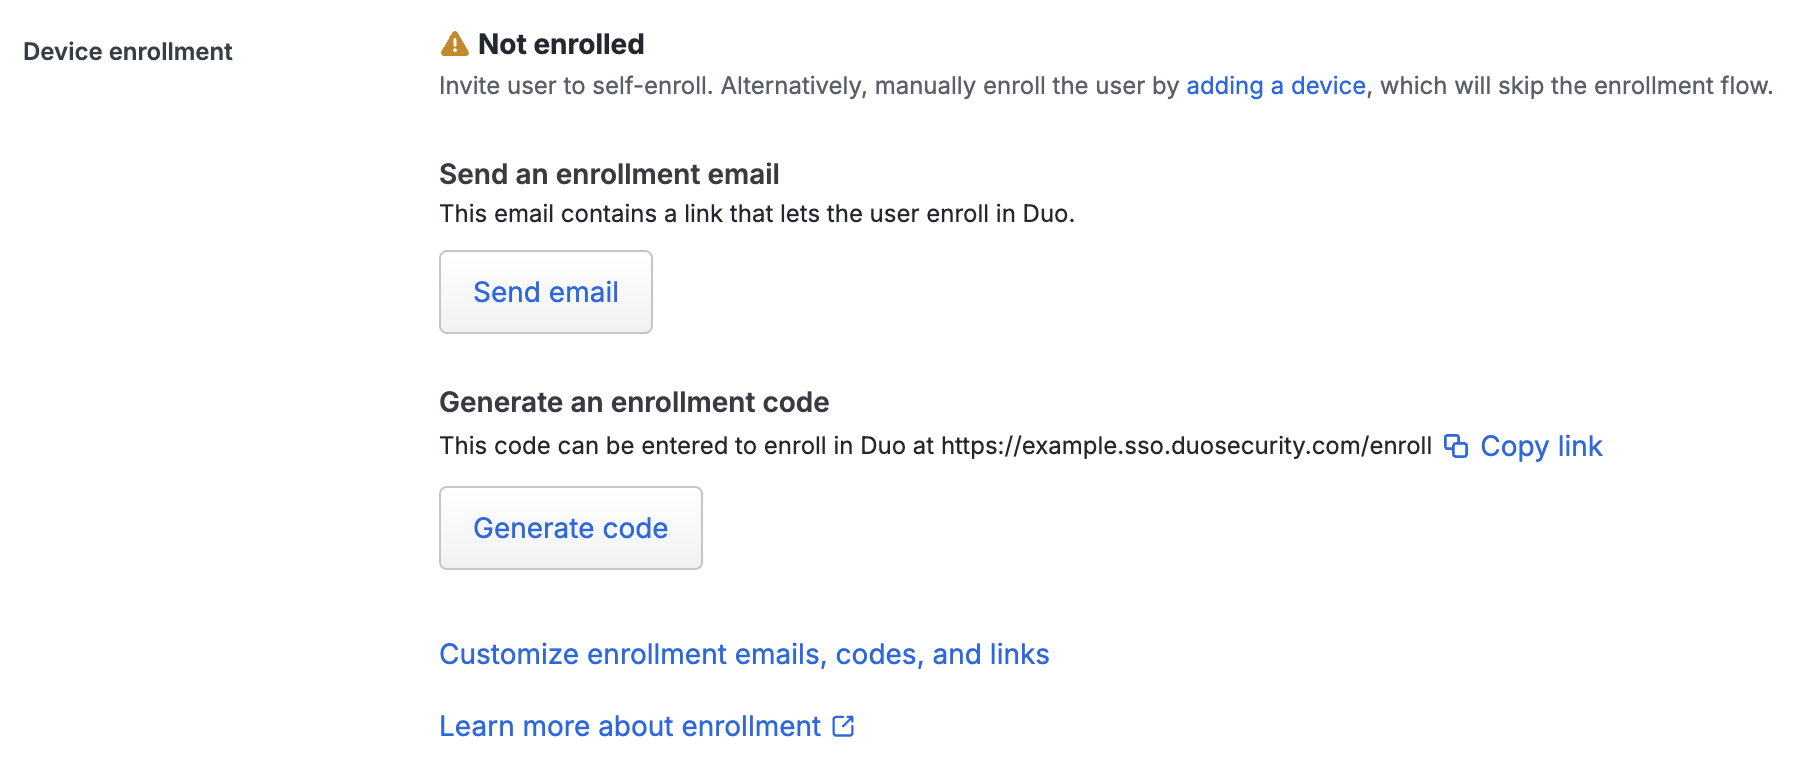
Generate Enrollment Codes for Existing Users
Role required: Owner, Administrator, User Manager, Security Analyst, or Help Desk (when permitted in the "Help Desk" global setting).
When a user already exists in Duo with an email address present in the user's details, but has yet to set a Duo password or register any authentication devices, you can send an enrollment code to the user that they can use to enroll in Duo.
If your organization uses e-mail filtering, be sure to allow the sender no-reply@duosecurity.com.
-
Log in to the Duo Admin Panel.
-
Search for the user using the search bar at the top of the page, or navigate to Users → Users in the left sidebar and locate the user to which you want to send an enrollment code. Click the user name to access the user's details page.
-
In the "Device enrollment" section, scroll to Generate an enrollment code.
-
Click Generate code. If the user has no valid email address present in the "Email" field, you'll receive an error. Update the email information for the user (clicking Save when done) and try generating the enrollment code again.

-
Copy the enrollment link and new enrollment code from the Admin Panel and provide them to the user in a secure manner so they can complete enrollment using that code.
After you generate the enrollment code, you can invalidate it by clicking on the Invalidate button.
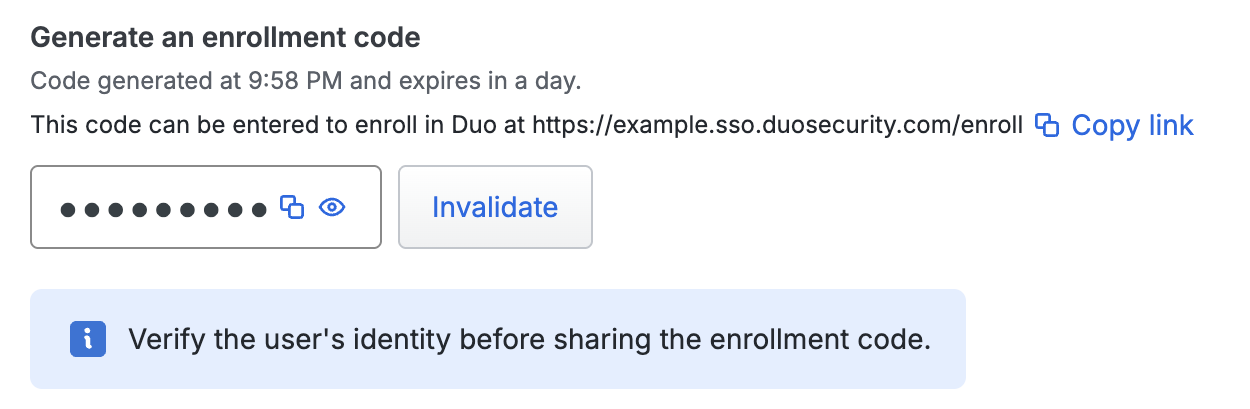
If you invalidate the enrollment code, you can generate another code by clicking on the Regenerate code button.
The enrollment code expires by default 24 hours after generation. You can change the enrollment code expiration value from the Settings page.
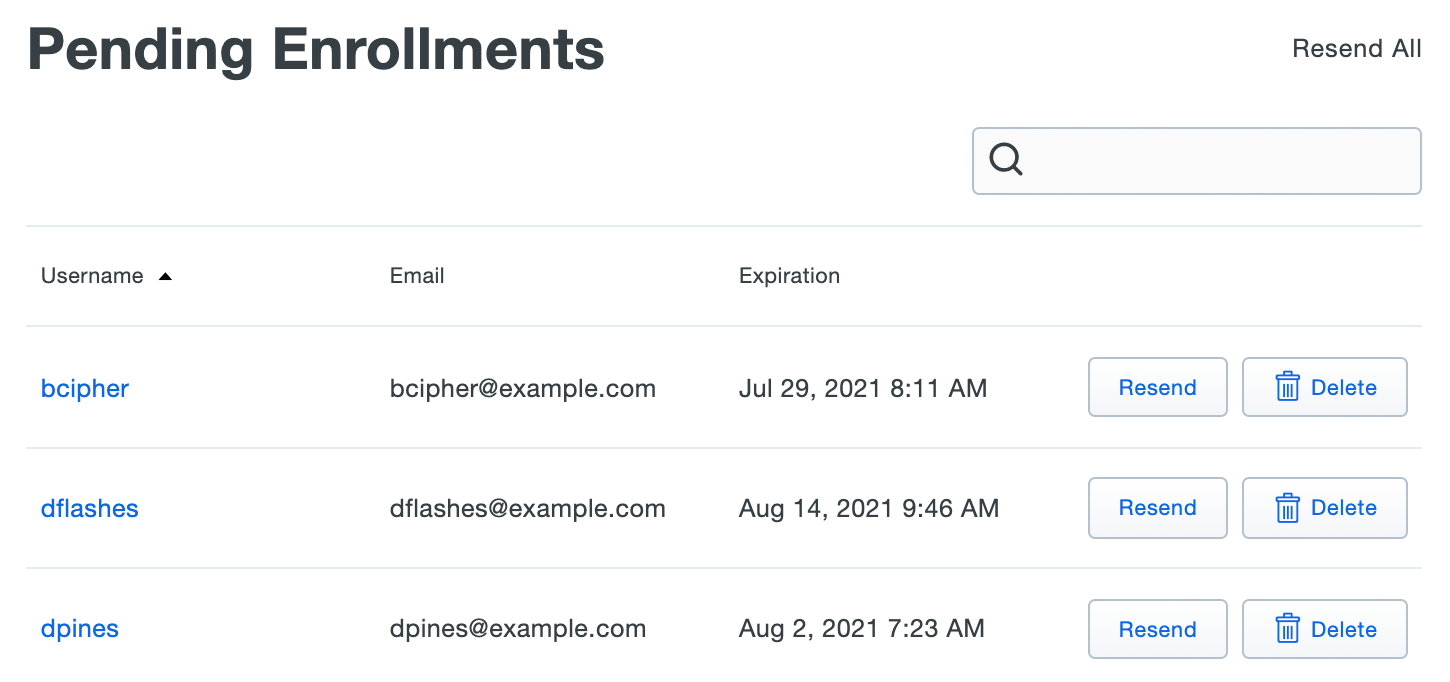
Pending Enrollments
Role required: Owner, Administrator, or User Manager.
The Pending Enrollments table shows users who were created by bulk enrollment or directory import and automatically emailed an enrollment link, but have not yet completed enrolling their 2FA devices in Duo. For each user that has not completed enrollment, you see the user's email address and the expiration date for the enrollment link previously sent.
If you need to send the user another copy of the enrollment link email, click the Resend button, or click Resend All to send the email again to all users with outstanding enrollment links. Resending the email does not change the current enrollment link's expiration date and uses the same email address that was used when the original enrollment was sent.
Click Delete to remove a pending enrollment. Deleting a pending enrollment immediately invalidates any unexpired enrollment link previously sent to that user. The user associated with the pending enrollment remains in Duo, so you can send them a new enrollment link via email.
Create Users Manually
To add larger numbers of new users to Duo we recommend using one of our enrollment methods or the user import utility over creating users manually.
Role required: Owner, Administrator, or User Manager.
-
Log in to the Duo Admin Panel. From the Dashboard page you can click the Add New... button in the top right and then click User. Otherwise, navigate to Users → Users in the left sidebar, then click the Add User button.
-
Enter a username and any additional attribute values on the page and click the Add User button.
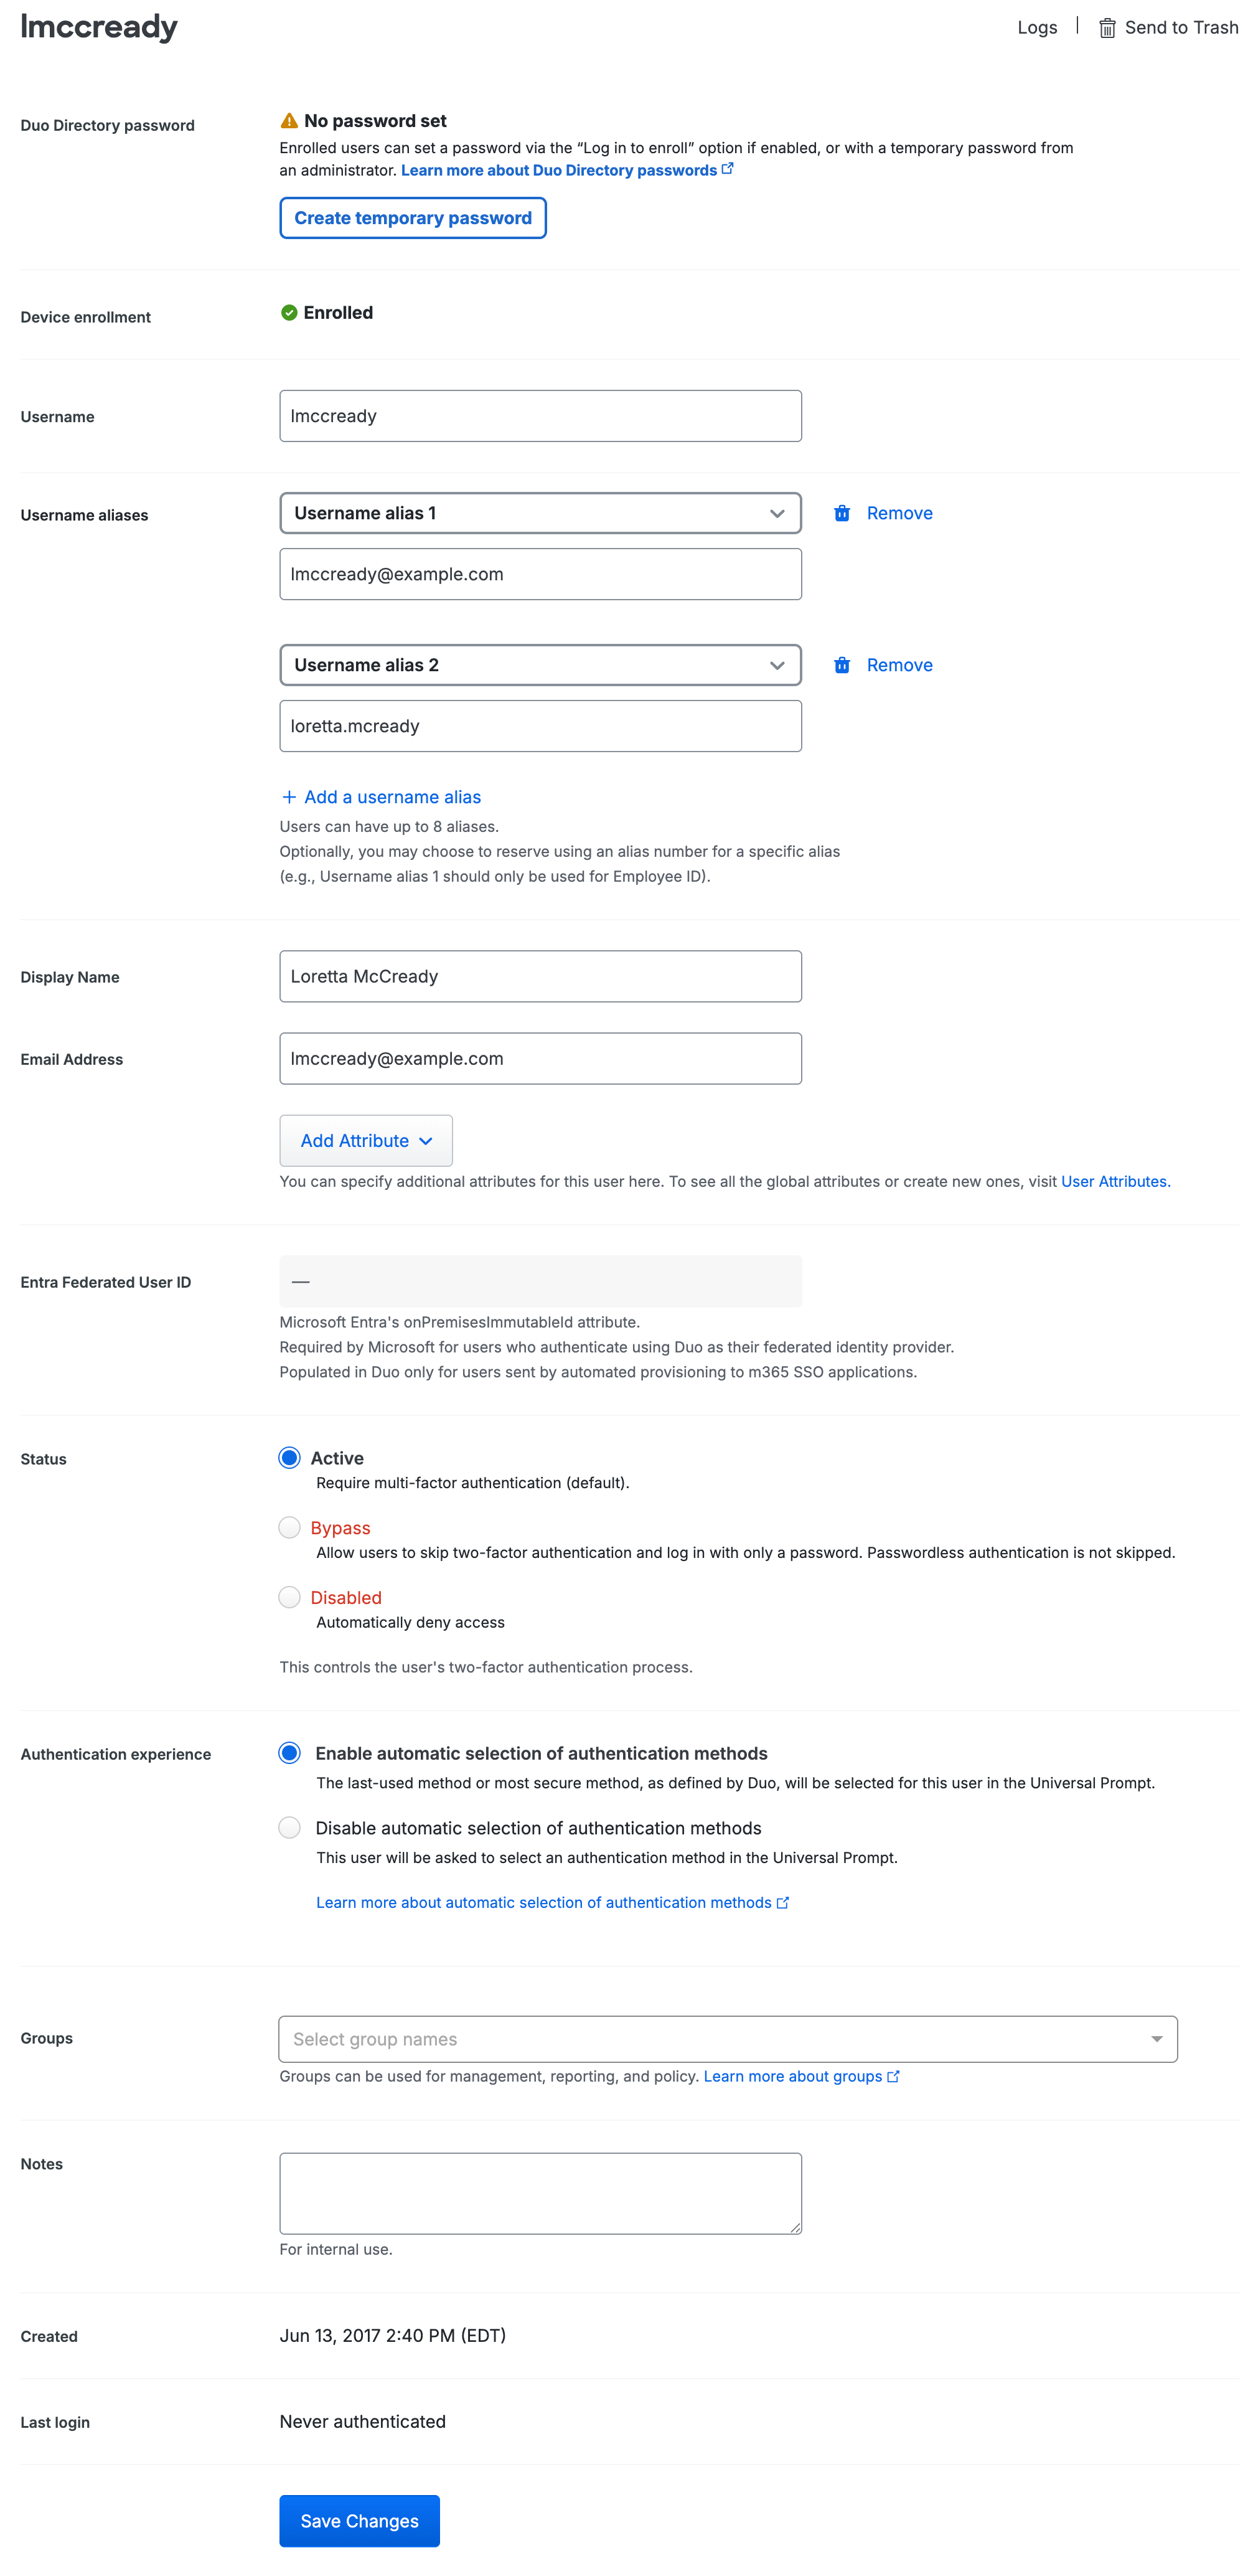
User Attribute Description Username Required The username should match the primary login used to access the Duo protected service. Display Name The full name of the user. Email Address The user's email address. First Name The user's given name. Last Name The user's surname or family name. 
-
The new user is created.
You can now perform additional user management tasks, such as entering more user attribute values, adding username aliases, changing the new user's status, attaching a phone to the user, adding the user to a group, and more.
Duo User Fields
| Username |
Required.The user's primary Duo username. Typically this matches the primary authentication login name your users submit to Duo. |
| Username Aliases |
You can specify up to eight aliases for use when users log in to different Duo-protected services with different username formats by clicking Add a username alias, choosing which alias number to define, and entering the alternate login name. Suppose your users log in to a VPN client with an Active Directory sAMAccountName ( All Duo usernames and username aliases must be unique per user, and you cannot manually define an alias number for a user that is already sourced from a directory sync. |
| Display Name |
The full name of the user. |
| Email Address |
The user's email address. Enrollment and activation emails sent by Duo use this destination address. Must have a value to perform Duo identity verification for the user. |
| Status |
The user's Duo status. One of "Active", "Bypass", or "Disabled". See Changing User Status for more information. |
| Authentication Experience |
The user's authentication experience. Automatic selection of authentication methods can be enabled or disabled. See Change User Authentication Experience for more information. |
| Groups |
A list of Duo groups containing the user. |
| Notes |
Free text field for additional user information. |
Create Users via Sync
Role required: Owner, Administrator, User Manager, Security Analyst, or Help Desk.
When you configure directory sync for Duo, user information gets imported from an external source directory on a twice-daily schedule to create new users, update the status or information for existing users, or remove users.
Administrators with the Owner, Administrator, or User Manager roles may create and manage synchronization with Entra ID, Active Directory, OpenLDAP, Google, Okta, and Generic Inbound SCIM directories. These admins may also run manual full syncs or sync an individual account into Duo. Admins with the Help Desk and Security Analyst roles aren't able to run full syncs or change any of the directory sync options, but they can create or update an individual user by running a single-user sync.
Refer to the instructions for your directory type to learn how to set up directory synchronization and run full and individual user syncs to update your Duo users.
Create Users from CSV Import
Role required: Owner, Administrator, or User Manager.
Create, update, or delete users in bulk with the Import Users feature. Click the Import Users link at the top of the "Users" page to upload a CSV file in the Admin Panel with user information like username, email address, Duo group memberships, attached phones, and more.

See the instructions for Importing Users to learn more about managing users with CSV files.
Update Users
Role required: Owner, Administrator, User Manager, Security Analyst, or Help Desk (limited).
To add or update existing user detail information, like changing an email address or adding a username alias, visit the user's page in the Duo Admin Panel and enter the new information.
Help Desk admins have limited edit privileges on users. They can change a user's display name, email address, and update the notes field. They may not change the username, or add or update username aliases.
Update Users Managed by a Directory
Role required: Owner, Administrator, or User Manager.
When a Duo user is synced with any external directories, you won't be able to update many fields directly, such as the user's email address or group memberships.
Fields managed by directory sync are read-only in the Admin Panel. The only way to update that information is to make the changes in the source directory and sync them over, which updates the Duo user's properties.
Full directory syncs and individual user syncs can be initiated from the directory sync properties page, or by viewing the properties for a sync-managed Duo user and clicking the Sync this user link at the top right of the page.
Consult the Entra ID, Active Directory, OpenLDAP, Google, Okta, or Generic Inbound SCIM documentation for more information about configuring directory sync and updating users.
Attach Authentication Devices to Users
Please refer to the Managing 2FA Devices documentation to learn how to assign, update, and delete phones, hardware tokens, passkeys, and more to your end users.
Remove and Restore Users
Role required: Owner, Administrator, User Manager, Security Analyst (limited), or Help Desk (limited).
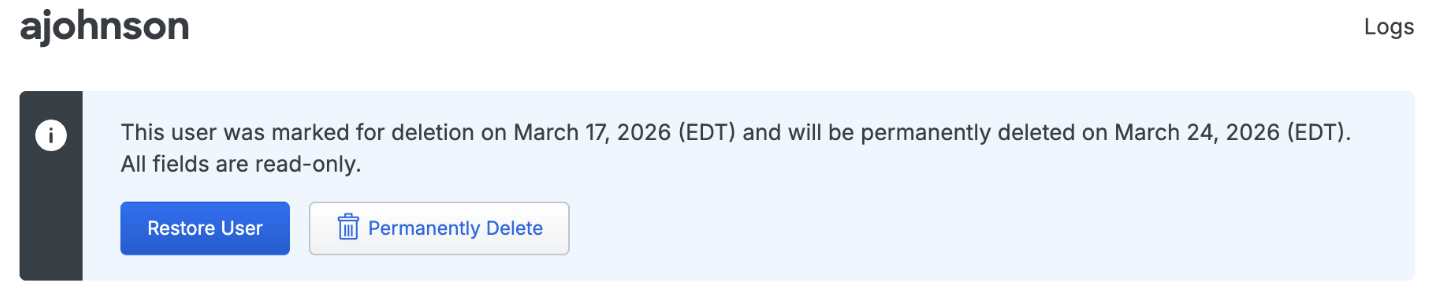
Removing a Duo user is a two-step process. User accounts removed manually from the Admin Panel, purged for inactivity, or deleted by directory sync first get sent to the Trash. User accounts get permanently deleted after the specified Trash duration. The Trash duration is configurable to be 1 to 30 days, with the default being 7 days.
A removed account may be restored at any time from the Trash while awaiting permanent deletion. When you restore an account from the Trash, all associated endpoint and authentication device information stays with the account.
User removal, user restoration from Trash, and permanent user deletion options differ depending on how the user account was sent to the Trash:
-
User accounts not managed by any directory sync may be manually removed, restored from the Trash, or permanently deleted from the Admin Panel.
-
Users managed by directory sync may not be manually removed from the Admin Panel. A user account managed by directory sync is sent to the Trash if the user is removed from the configured sync group (or the sync group is removed from the directory configuration). Users sent to the Trash by a directory sync may only be restored from the Trash by a sync; admins may not manually restore a user account managed by directory sync. However, admins can permanently delete synced accounts from the Trash during the seven day waiting period for permanent deletion.
-
A Duo admin can manually restore or permanently delete inactive user accounts from the Trash. If an admin restores an inactive account from the Trash but the user does not log in, it gets removed for inactivity the next day. If a user authenticates during the seven day waiting period for permanent deletion the account is no longer inactive and is automatically restored from the Trash.
Admins with the Help Desk or Security Analyst role aren't able to manually remove a user, permanently delete a user, or restore a user from the Trash, but they can mark an individual user for pending deletion or restore a user from the Trash by running a single-user sync.
Remove a Single User
-
Log in to the Duo Admin Panel and navigate to Users → Users in the left sidebar.
-
Select a user from the list by clicking their username.
-
Click the Actions button above the list and select Remove.
-
The user account is sent to the Trash and the user's status changes to Disabled.
The user account will be permanently deleted in seven days with no further action. Viewing the user shows the expected permanent deletion date.
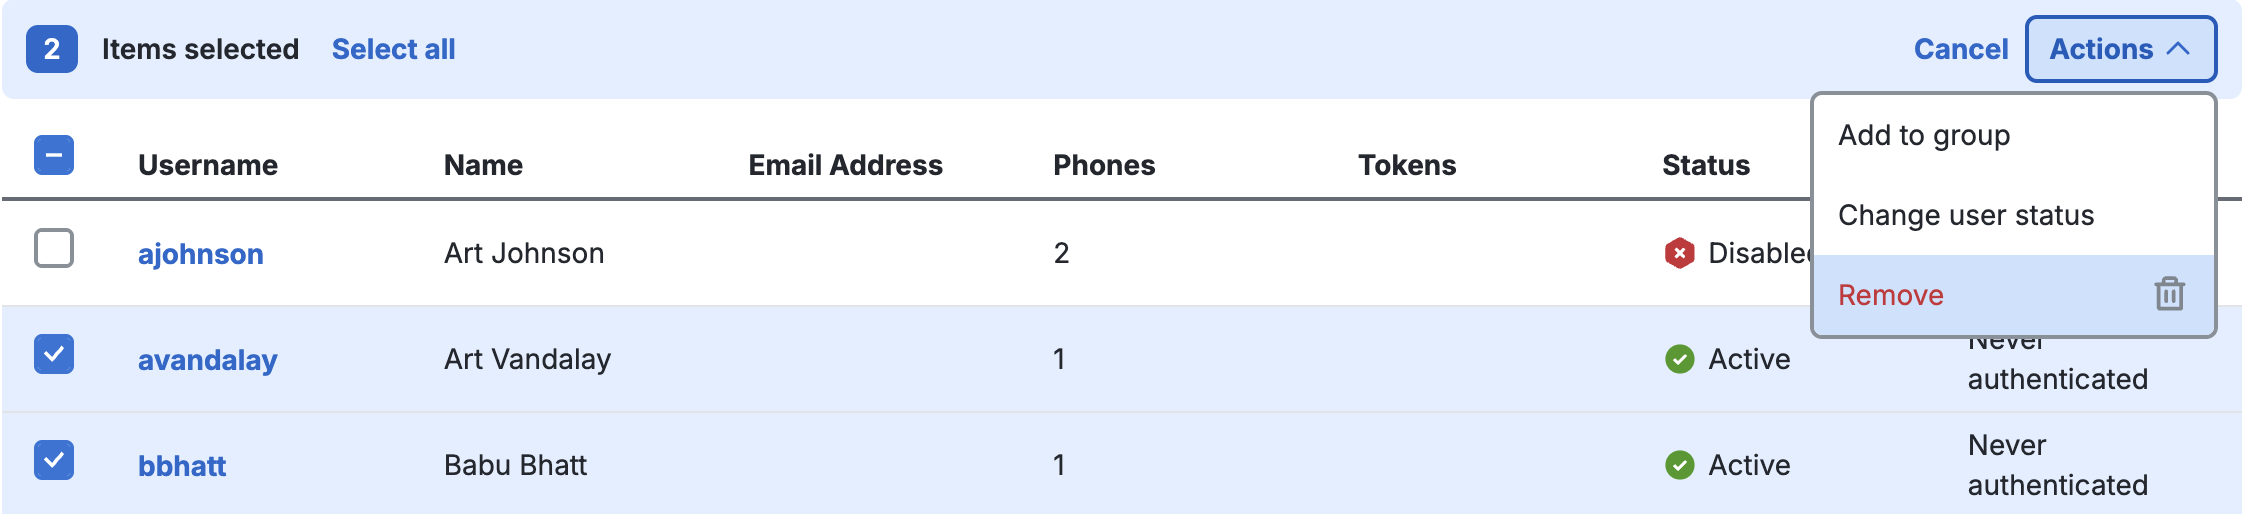
Remove Multiple Users
-
Log in to the Duo Admin Panel and navigate to Users → Users in the left sidebar.
-
Select multiple users from the Users view by clicking the checkbox to the left of the username. You can also click the topmost checkbox next to the "Username" column header to select all users on the current page.
-
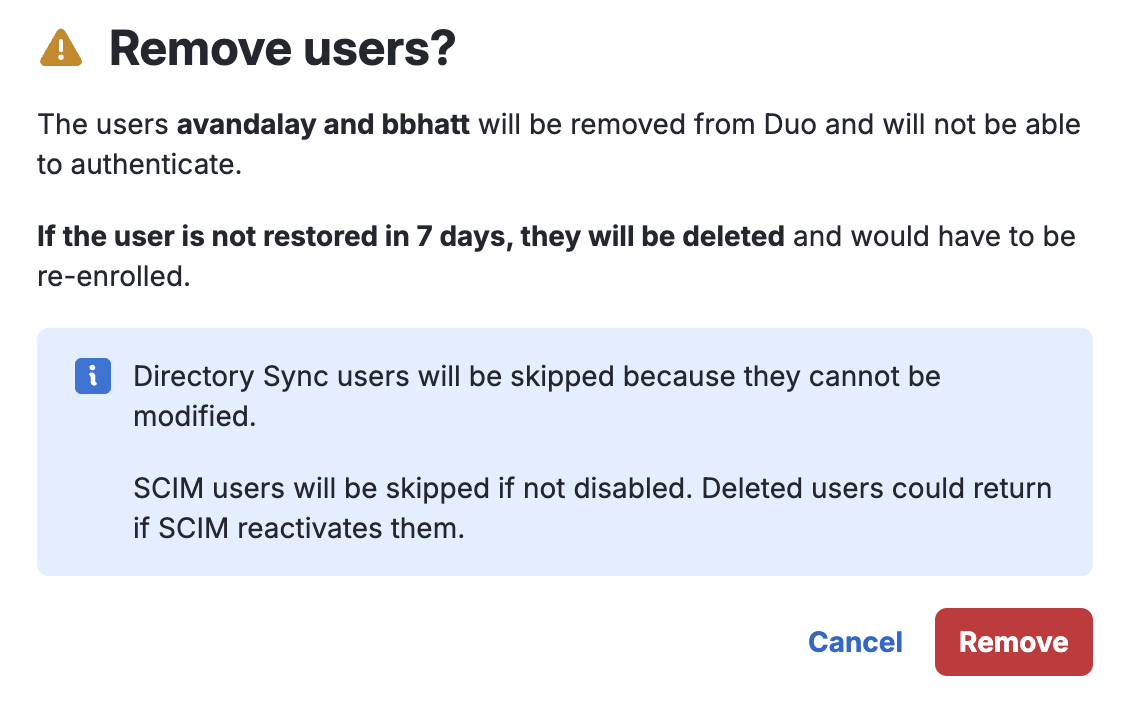
Click the Actions button above the list and select Remove.
-
Click the Remove button on the pop-up confirmation dialog. Note that this operation won't have any effect on users managed by a directory sync.
-
The selected user accounts are sent to the Trash.
View Users in the Trash
-
Log in to the Duo Admin Panel and navigate to Users → Users in the left sidebar.
-
Access the Trash user view by clicking the Trash count shown at the top of the Users page.
The table shows usernames, email addresses, the number of assigned phones and tokens, and the date and time of the last login. The status for all removed users is given as Pending Deletion, which means these users are effectively disabled and await permanent deletion after seven days.
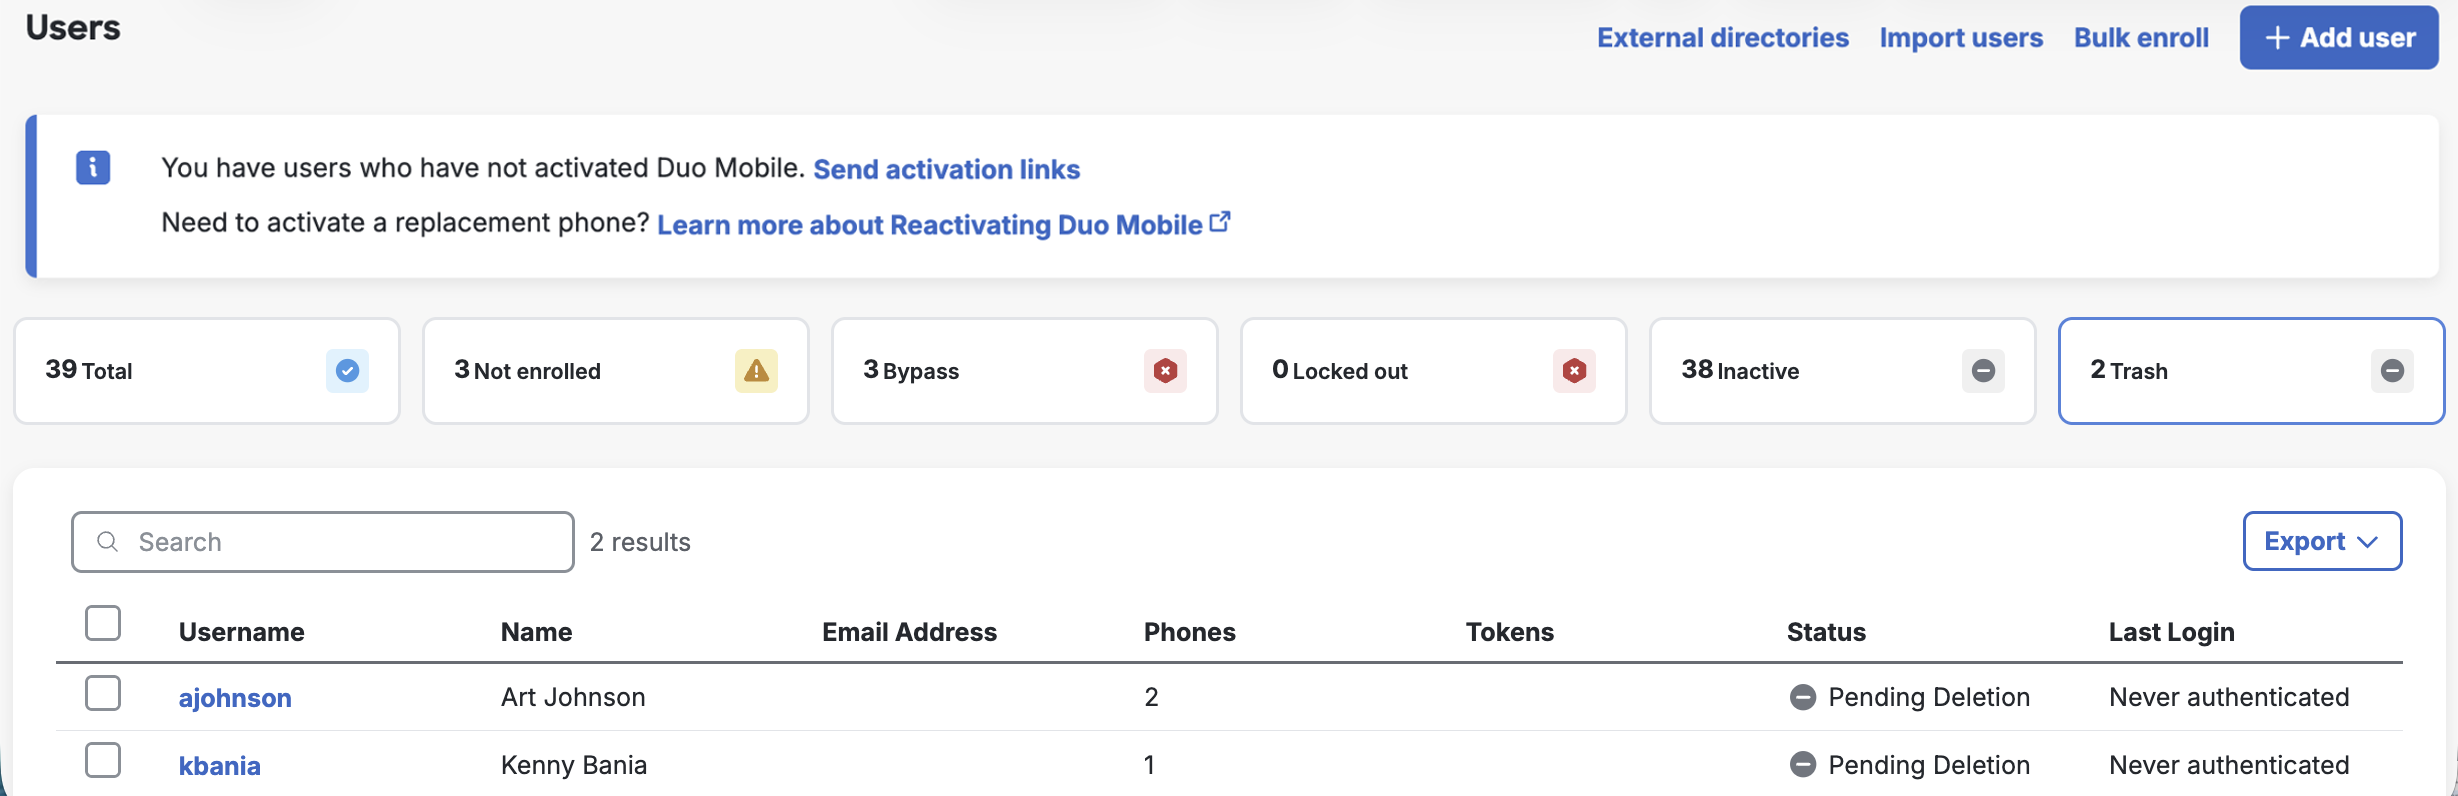
Click a user in the Trash view to see when the account was marked for deletion and when Duo will permanently delete it. You may also choose to restore that user or permanently delete the user.
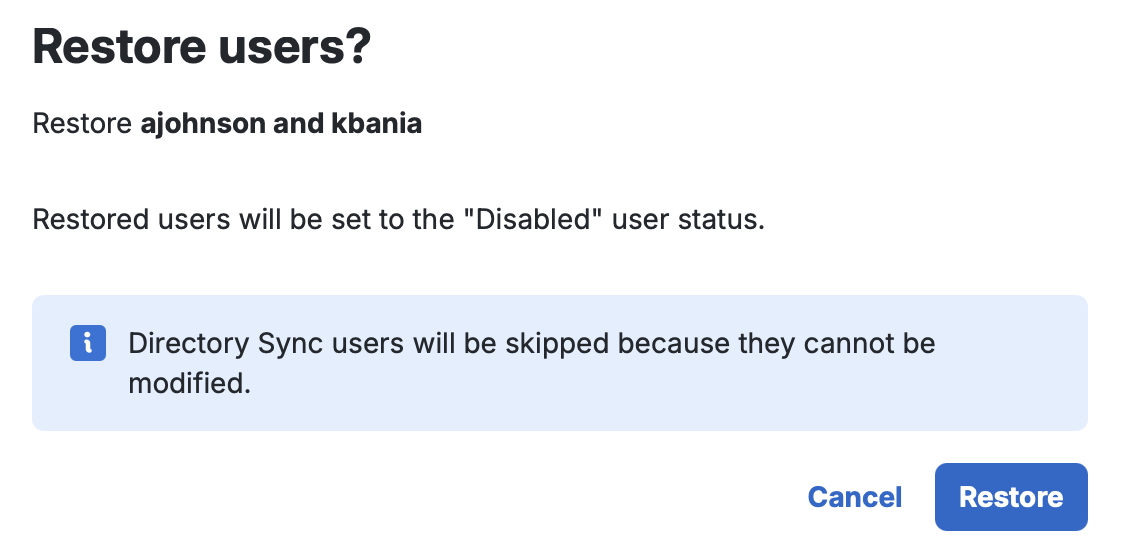
Restore Users from Trash
Only users unmanaged by a directory sync may be restored from the Trash. Restoring a user returns the account to the regular Users view and unmarks the user account for permanent deletion, but does not restore user account status from Disabled to Active, so the restored users still may not log in with Duo. You'll need to change the restored user account status back to Active (or Bypass) before the user can log in again.
-
Log in to the Duo Admin Panel and navigate to Users → Users in the left sidebar. Click the Trash count at the top of the page.
-
Select a single user or multiple users from the Trash view by clicking the checkbox to the left of the username. You can also click the topmost checkbox next to the "Username" column header to select all users on the current page.
-
Click the Actions button above the list and select Restore.

-
Click the Restore button on the pop-up confirmation dialog. Note that this operation won't have any effect on users managed by a directory sync.
-
The selected user accounts are restored to the regular Users view and are no longer marked for deletion.
-
Update the status of restored user account(s) to from Disabled to Active/Bypass.
Permanently Delete Users
Accounts get permanently deleted from the Trash after seven days. You can permanently delete an account manually during those seven days if you wish. This applies to both standard deleted users and users sent to the Trash by directory sync.
When a Duo user account gets permanently deleted, any phones and endpoints not associated with another user get deleted from Duo at the same time. If the user gets added back to Duo after permanent deletion they must re-enroll their phones or have tokens reassigned before authenticating.
-
Log in to the Duo Admin Panel and navigate to Users → Users in the left sidebar. Click the Trash count at the top of the page to view users pending deletion.
-
Select a single user or multiple users from the Trash view by clicking the checkbox to the left of the username. You can also click the topmost checkbox next to the "Username" column header to select all users on the current page. You can permanently delete up to 100 users at a time.
-
Click the Actions button and select Permanently Delete.

-
Click the Permanently Delete button on the pop-up confirmation dialog.
-
The selected user accounts (and attached phones and endpoint devices) are permanently deleted from Duo.
Update Duo Password
If a Duo-hosted user forgets their login password or wants to change it, or if you need to force a password change due to a security issue or alert, you can set a temporary password or expire a user's password to force a change from the Admin Panel.
Updating or expiring a Duo-hosted user's password will also end any existing remembered device sessions.
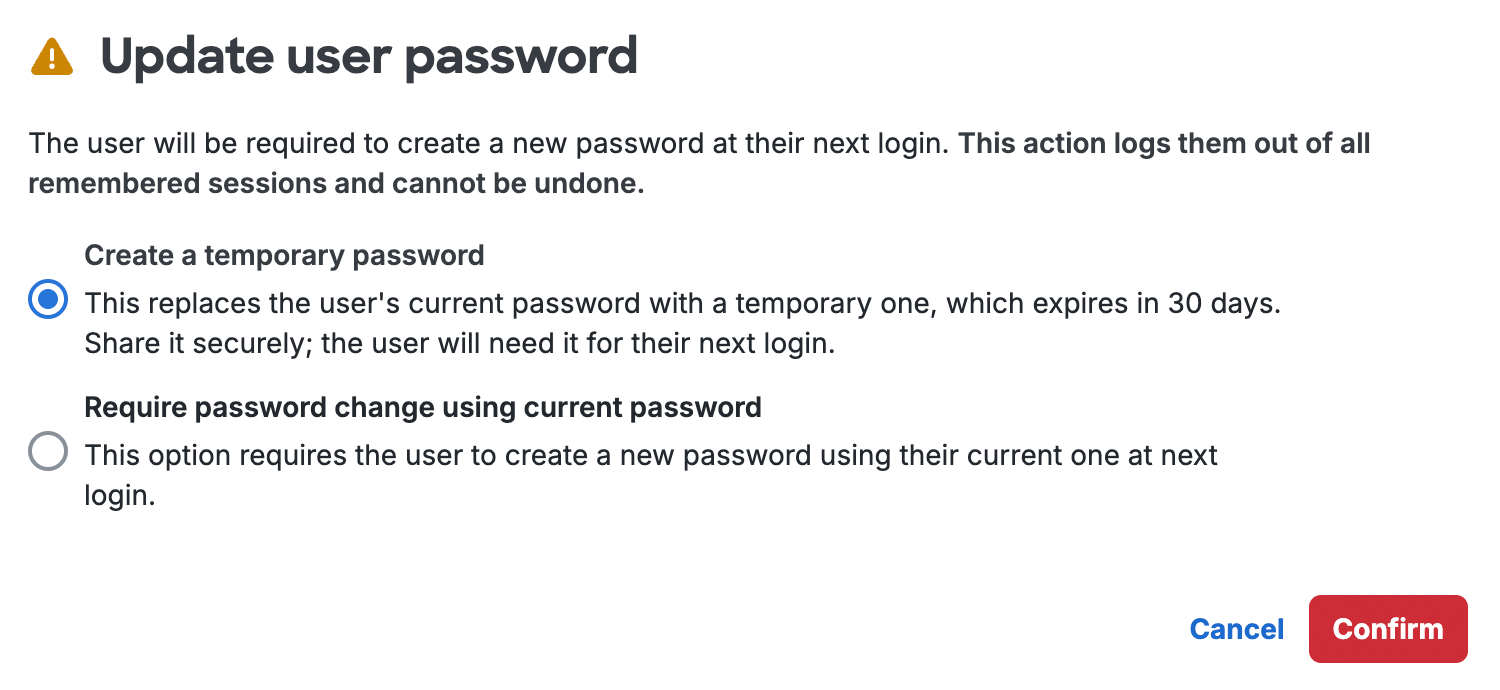
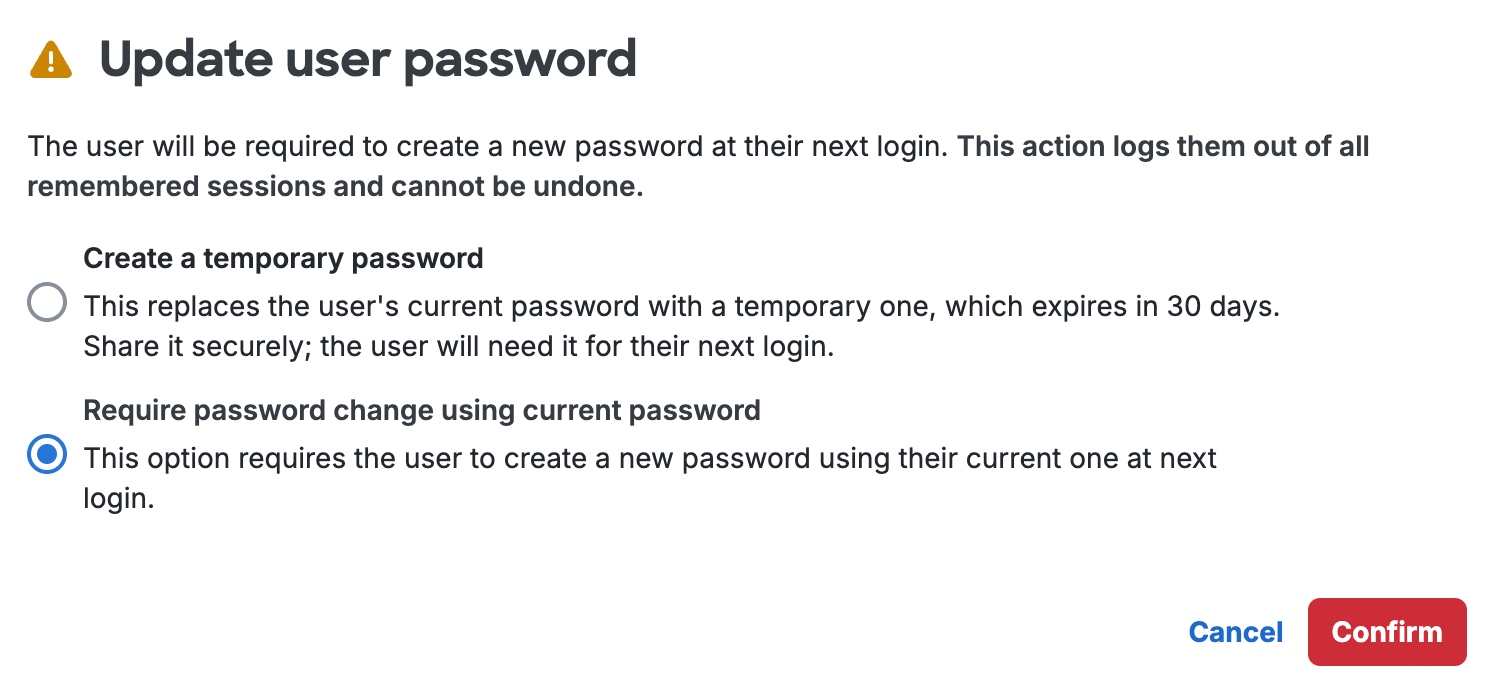
Set a Temporary Password
To update a Duo-hosted user's password to a temporary password:
-
Log in to the Duo Admin Panel and navigate to Users → Users in the left sidebar.
-
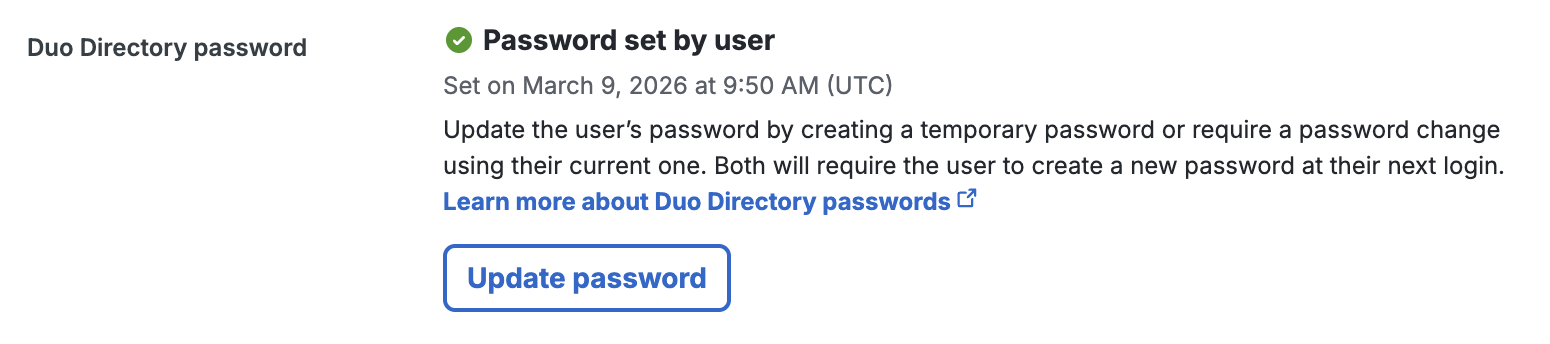
Select a user by clicking their username. A Duo-hosted user will have a "Duo Directory Password" section at the top of their details page, which shows the last date and time the password was set.
-
Click Update password. In the "Update user password" dialog choose Create a temporary password and click Confirm.
-
The "Temporary password generated" dialog lets you copy or view the user's new temporary password. This password is valid for thirty days. Be sure to copy the temporary password now to provide to the user, as you won't be able to view it again once you click Close and permanently hide password.
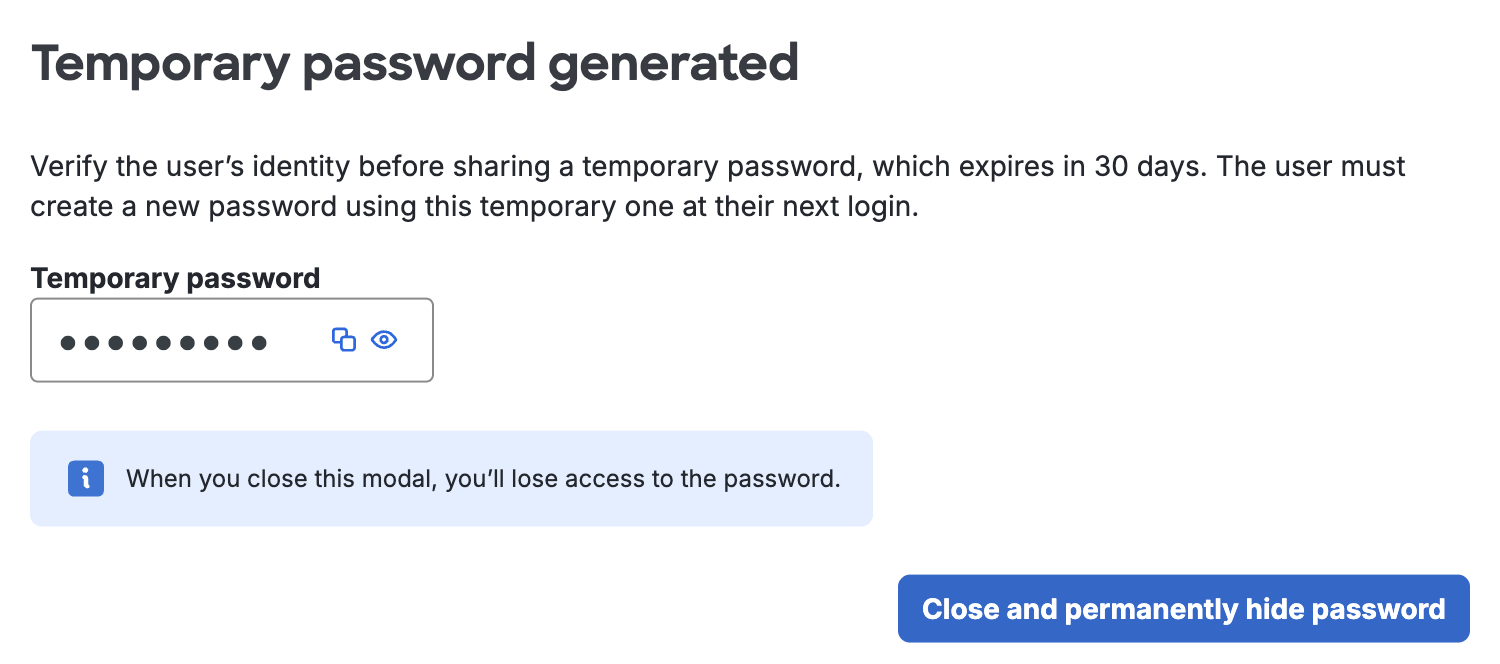
-
Communicate the temporary password to the user via a secure method. If the user misplaces the temporary password before completing their password change, return to the user's details page in the Admin Panel and click Regenerate temporary password to create another password so they may try again.
The user can create a new password by logging in to Duo Single Sign-On — at your organization's Duo Central link or while logging into a Duo SSO application. They will enter the temporary password at the login page and receive the new password prompt.
While they have a temporary password, Duo ignores any effective status or policy calculation that would allow them to bypass Duo authentication. After verifying their identity with one of their registered MFA authentication methods they may set a new login password.
Force a Password Change
To require that a Duo-hosted user change their password the next time they log in:
-
Log in to the Duo Admin Panel and navigate to Users → Users in the left sidebar.
-
Select a user by clicking their username. A Duo-hosted user will have a "Duo Directory Password" section at the top of their details page, which shows the last date and time the password was set.
-
Click Update password. In the "Update user password" dialog choose Require password change using current password and click Confirm.
-
The user's Duo Directory password information refreshes to show they must change their password the next time they log in.

If they aren't able to log in with their existing password, click Create a temporary password to generate a password they can use instead.
The next time the user logs in to Duo Single Sign-On — at your organization's Duo Central link or while logging into a Duo SSO application — they enter their username and current password as usual and receive the expired password prompt. After verifying their identity with one of their registered MFA authentication methods they may set a new login password.
Activate Duo Mobile
Role required: Owner, Administrator, User Manager, Security Analyst, or Help Desk.
Users will occasionally need to have Duo Mobile activated or re-activated on their device. For example, a new user may have a problem during enrollment, or an existing user may lose or replace a phone or tablet.
To activate or reactivate Duo Mobile for a user from the user's details page:
-
Log in to the Duo Admin Panel and navigate to Users → Users in the left sidebar.
-
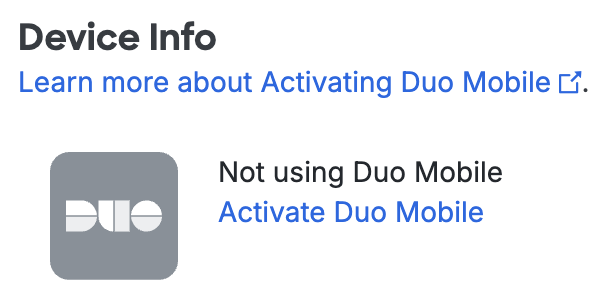
Select a user by clicking their username, then scroll down to the "Phones" section of the page. If the phone attached to the user is a type that permits use of Duo Mobile (where the "Platform" information is a named mobile platform like "Android" or "iOS", or "Generic Smartphone" if the specific platform is not known), then you can click the Activate Duo Mobile or Reactivate Duo Mobile link to the right of the phone's information.

-
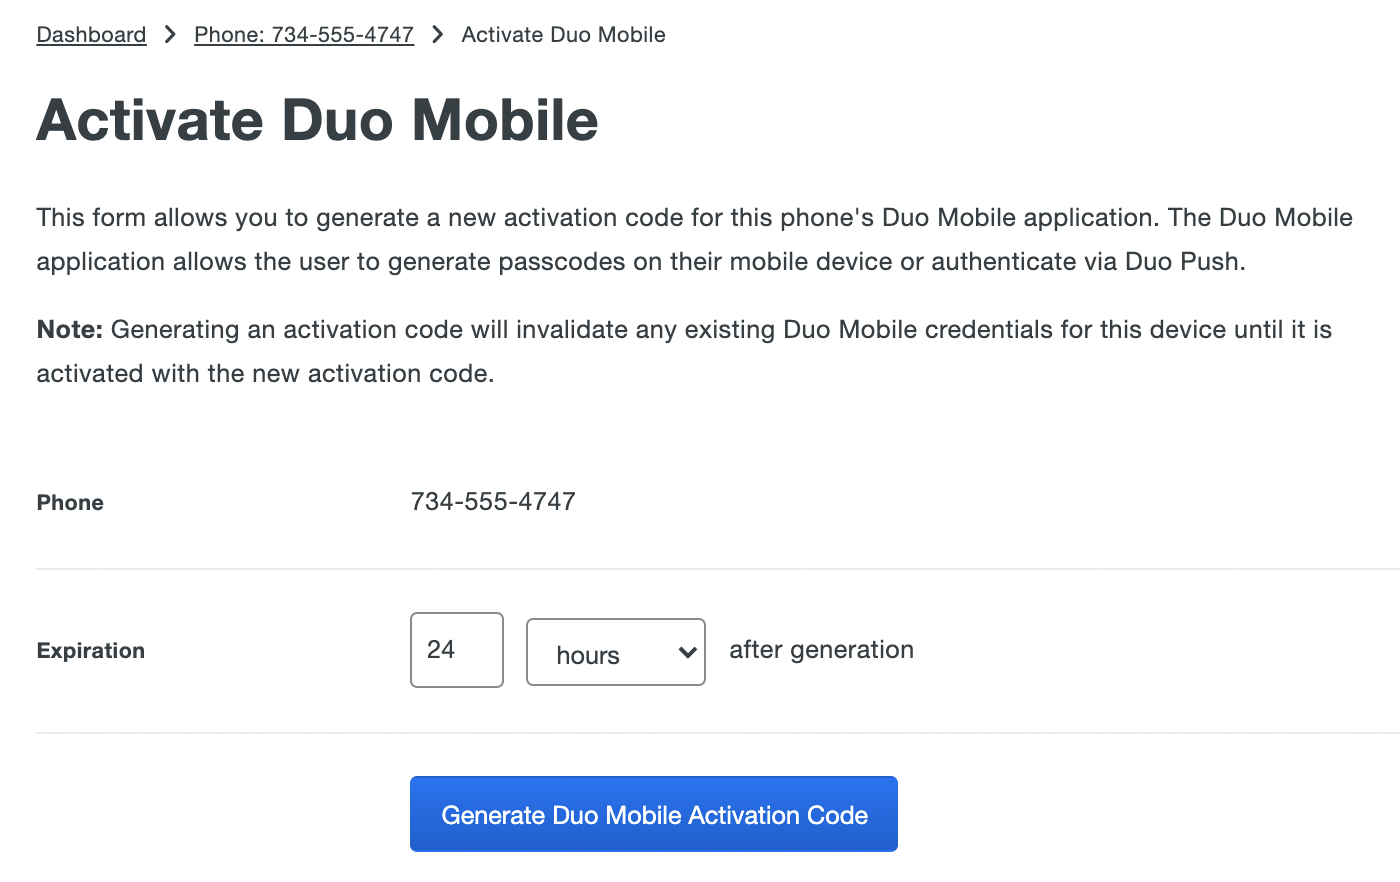
On the next page you can adjust the lifetime for the mobile activation code (by default these expire 24 hours after generation). Click the Generate Duo Mobile Activation Code button once you're ready to issue a new activation code for this device.
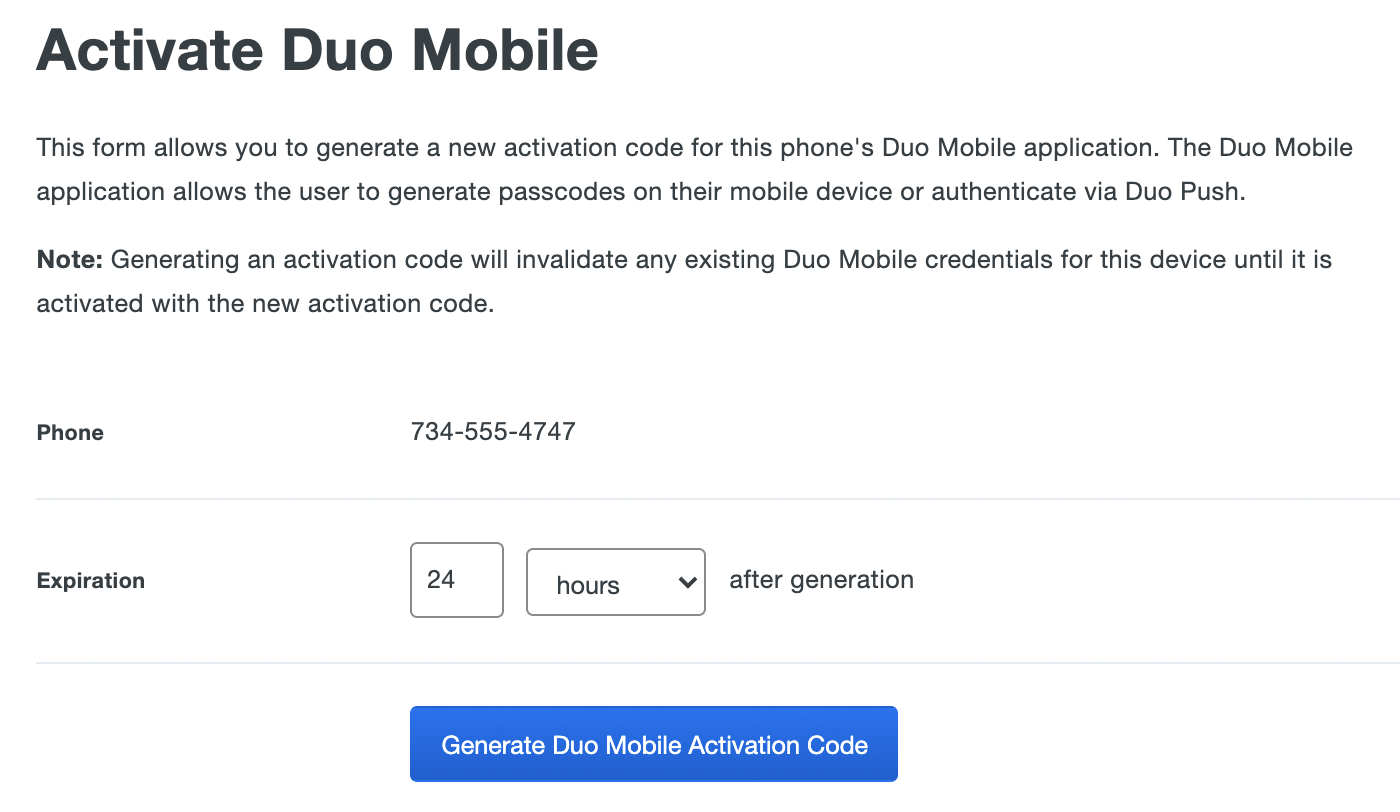 Regenerating an activation code invalidates an existing activation!This will immediately invalidate any existing Duo Mobile credentials for that device. The Duo Mobile app on that device will need to be activated with the new activation code to restore access.
 -
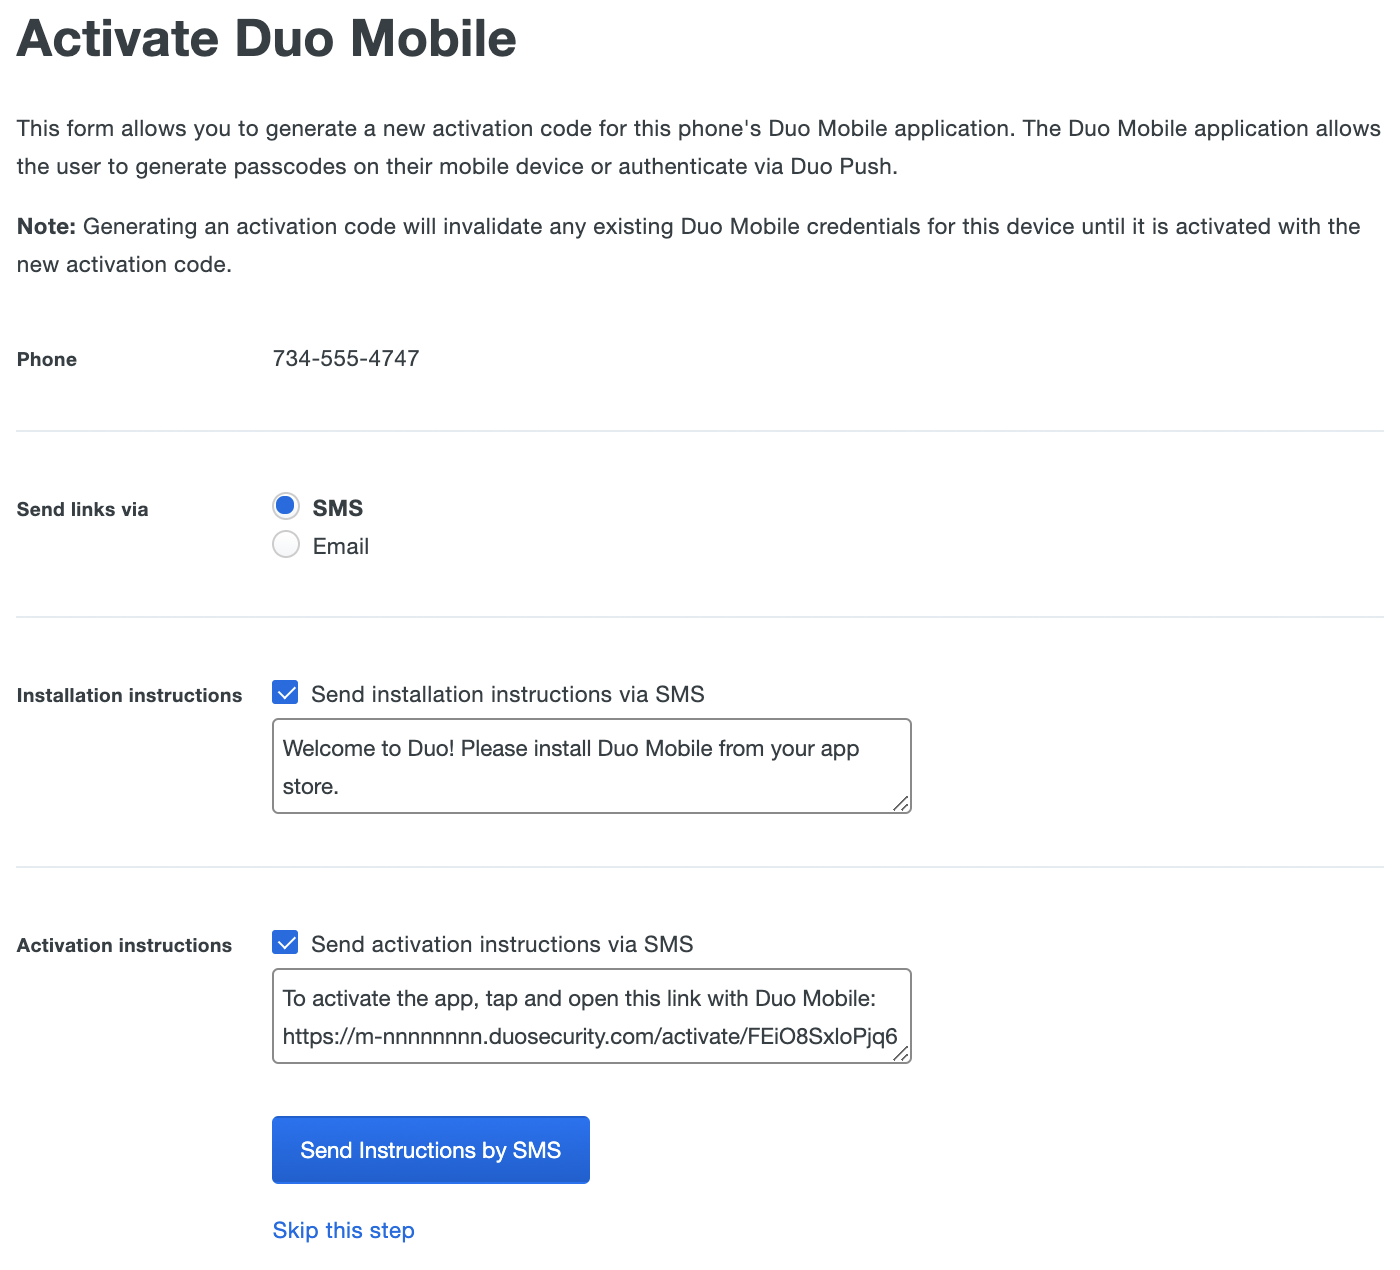
If the device you're activating is a phone (with a phone number), and you select that you want to send the links with SMS, then you'll see two text messages that you can send. The first has a link that helps the user install Duo Mobile. The second message has a code that the user can use to immediately add the account to their Duo Mobile app.
You can edit the contents of either message as you wish, just be sure to leave the activation URL in the "Activation instructions" intact. Click the Send Instructions by SMS button to send the text messages to the user's phone. These instructions can also be copied and pasted into an email to the user, if that's preferable.
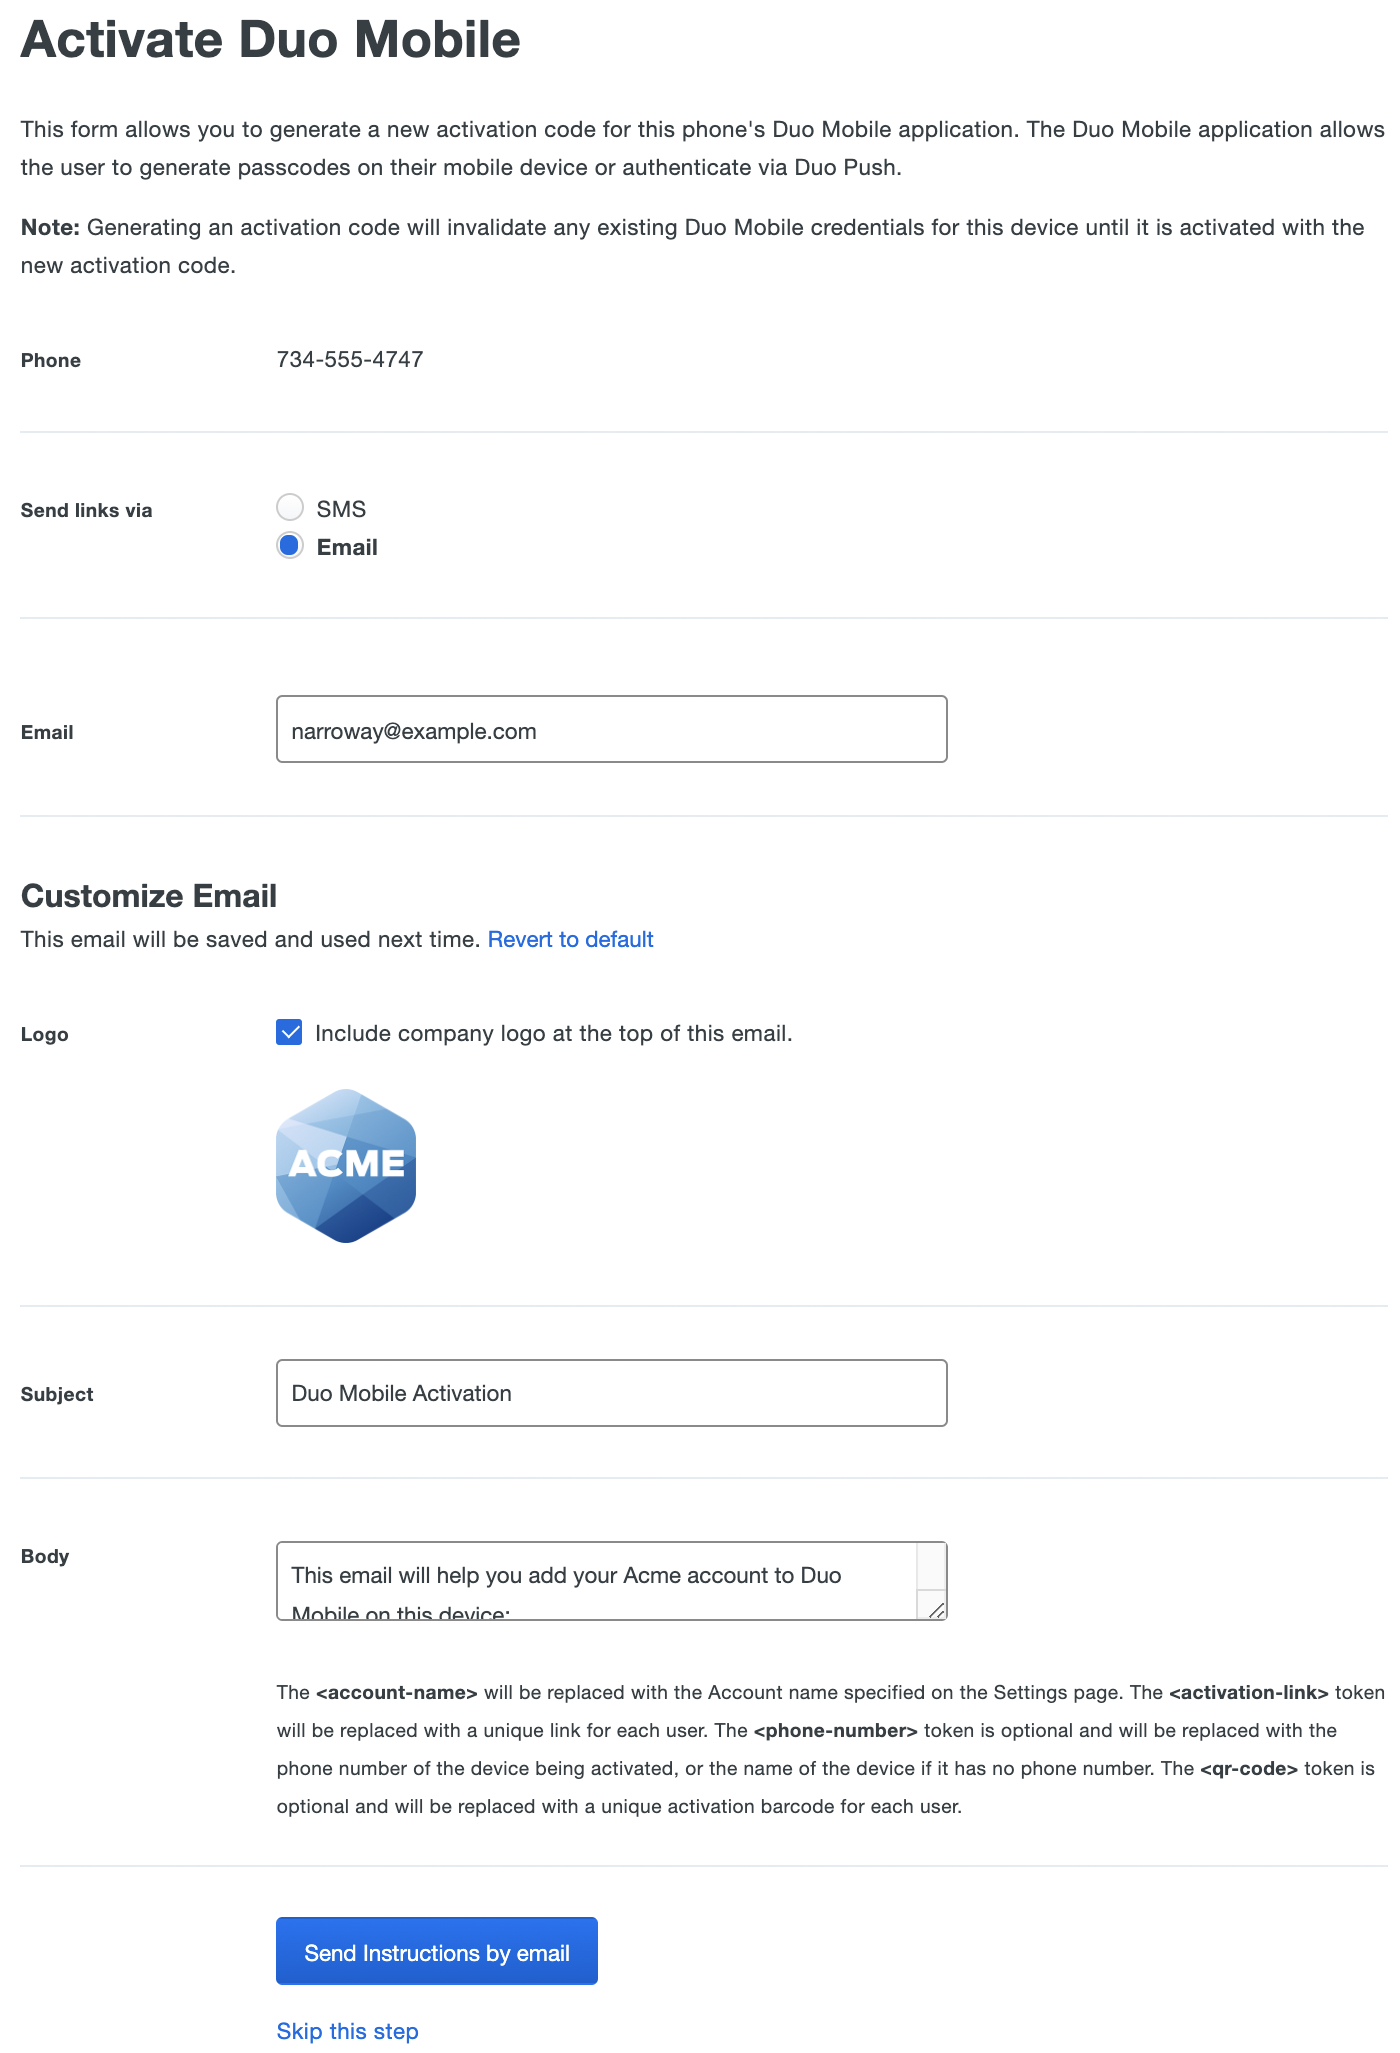
You can send the activation link in an email message by choosing to send the links by Email Address instead of SMS. If the Duo user has an email address set then that address will be automatically present in the Email Address field. You can change this destination email address if you need to, or enter it if the Duo user has no email address saved. You may also choose whether to include your organization's logo in the message, or modify the subject or content before clicking Send Instructions by Email. If the device being activated is attached to more than one user, the email address field will not auto-populate.
If the device you're activating is an Apple or Android tablet you see the same email message form, but without a phone number shown for the device and no SMS option.
To activate or reactivate Duo Mobile for a user from the phone's details page:
-
Log in to the Duo Admin Panel and navigate to Users → Users in the left sidebar.
-
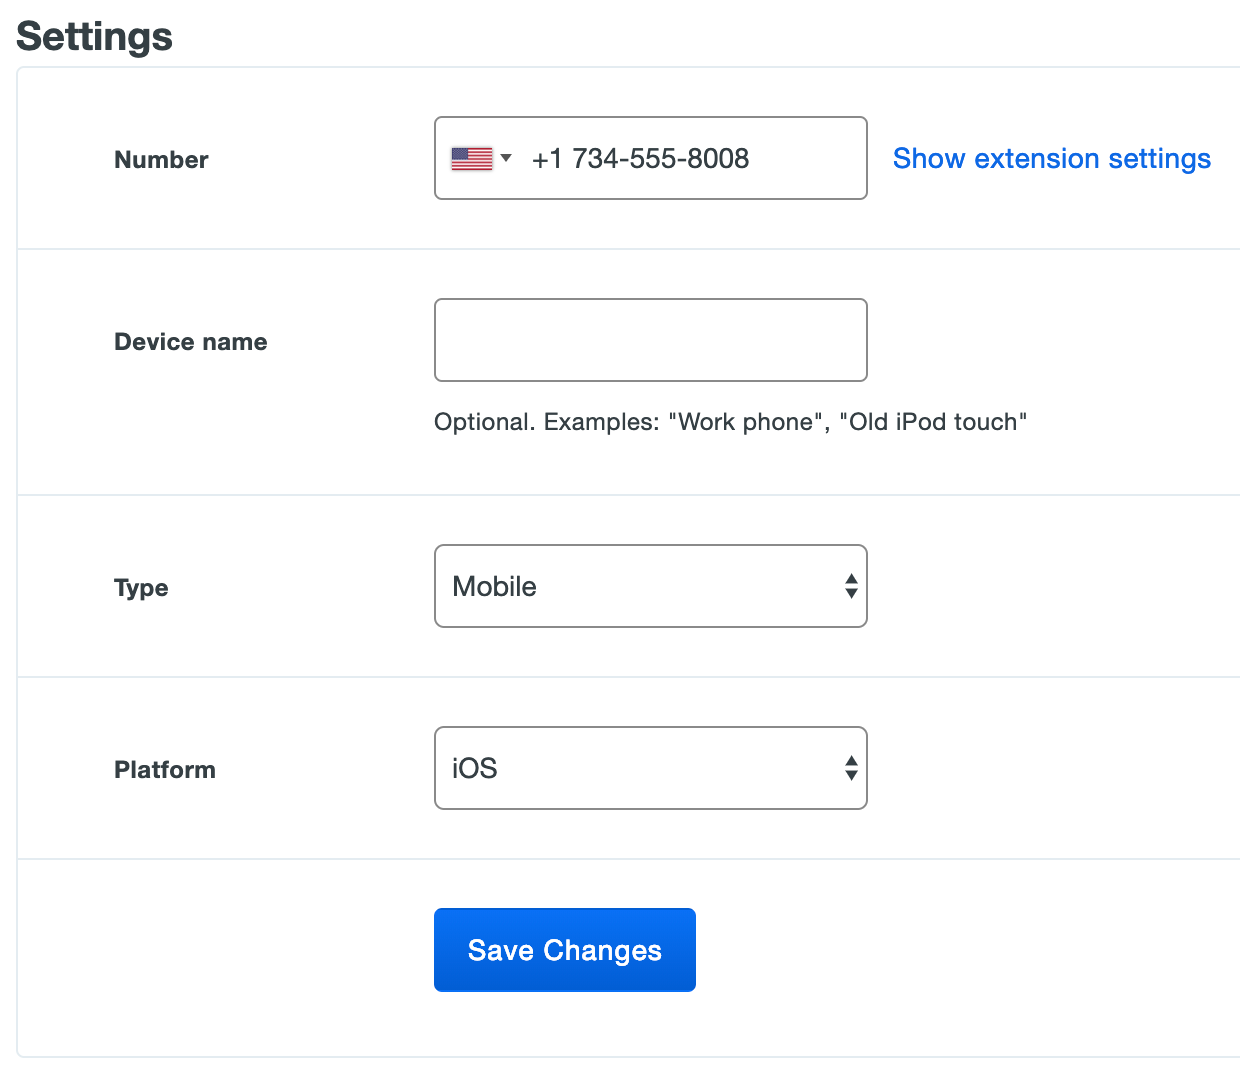
Select a user by clicking their username, then scroll down to the "Phones" section of the page. Click on the alias or number of the device you need to activate.
-
Make sure that the device's "Type" is Mobile and that the "Platform" is correctly set to a mobile device operating system or to "Generic Smartphone". Click the Save Changes button when you're done.
-
Once the page refreshes, click the Activate Duo Mobile (or Reactivate Duo Mobile) link in the "Duo Mobile" section near the top of the page.
-
On the next page you can adjust the lifetime for the mobile activation code (by default these expire 24 hours after generation). Click the Generate Duo Mobile Activation Code button once you're ready to issue a new activation code for this device.
 Regenerating an activation code invalidates an existing activation!This will immediately invalidate any existing Duo Mobile credentials for that device. The Duo Mobile app on that device will need to be activated with the new activation code to restore access.
 -
If the device you're activating is a phone (with a phone number), and you select that you want to send the links with SMS, then you'll see two text messages that you can send. The first has a link that helps the user install Duo Mobile. The second message has a code that the user can use to immediately add the account to their Duo Mobile app.
You can edit the contents of either message as you wish, just be sure to leave the activation URL in the "Activation instructions" intact. Click the Send Instructions by SMS button to send the text messages to the user's phone. These instructions can also be copied and pasted into an email to the user, if that's preferable.
You can send the activation link in an email message by choosing to send the links by Email Address instead of SMS. If the Duo user has an email address set then that address will be automatically present in the Email Address field. You can change this destination email address if you need to, or enter it if the Duo user has no email address saved. You may also choose whether to include your organization's logo in the message, or modify the subject or content before clicking Send Instructions by Email.
If the device you're activating is an Apple or Android tablet you see the same email message form, but without a phone number shown for the device and no SMS option.
You can also send activation emails or text messages in batches. See Activating Duo Mobile After Enrollment for more information.
Verify End-User Identities
As a best practice, your Duo administrators or IT help desk staff should verify end-user identities before performing account-related actions. From the Duo Admin Panel, administrators can perform a simple user verification by sending a Duo Push request to the currently-activated device attached to the user, or they can perform high-assurance user verification with a government-issued ID.
Verify Users with Duo Push
Available in: Duo Essentials, Duo Advantage, and Duo Premier
Role required: Owner, Administrator, User Manager, Security Analyst, or Help Desk.
Before you or another admin in your organization makes a change at the request of a Duo user, like resetting a locked-out user back to "Active" status, you may want to verify the user's identity. In addition to question and answer responses, you can send a Duo Push request to the end user as another validation method.
-
Log in to the Duo Admin Panel and navigate to Users → Users in the left sidebar.
-
Select a user by clicking their username or use the search bar at the top to locate the user.
-
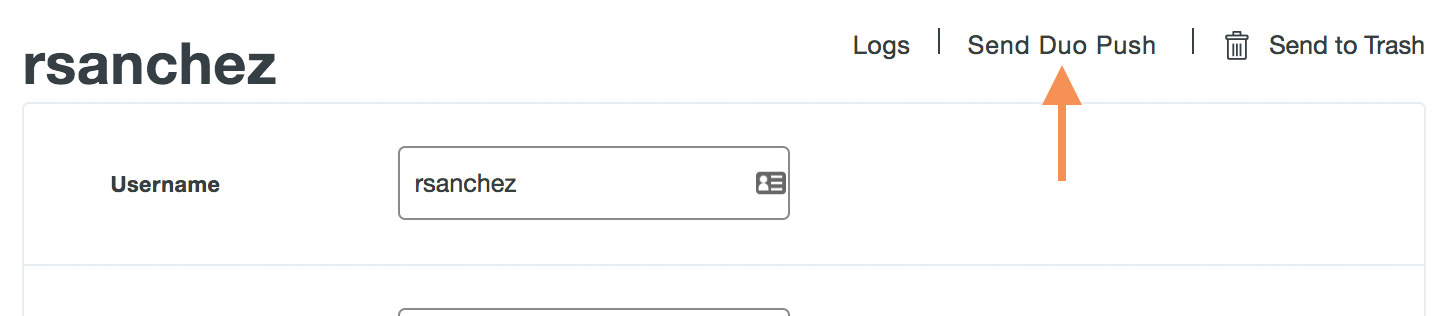
If the user has a smartphone attached with Duo Mobile activated then you'll see a Send Duo Push link in the top right. If you don't see the link, you may need to assist the user with activating their phone for Duo Push.
-
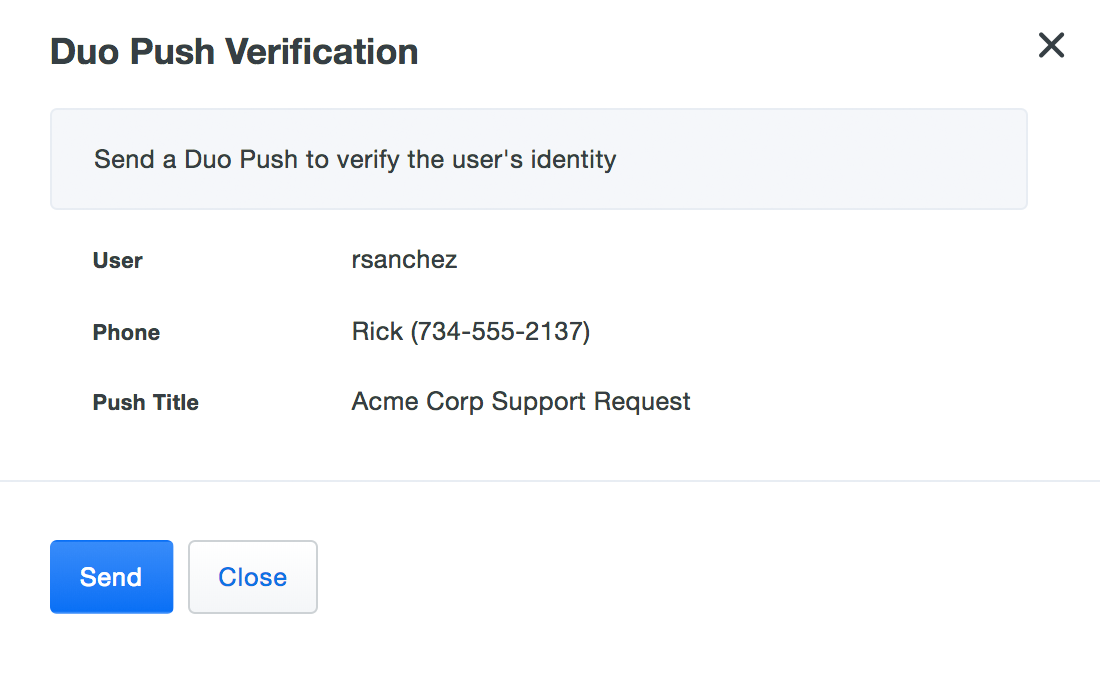
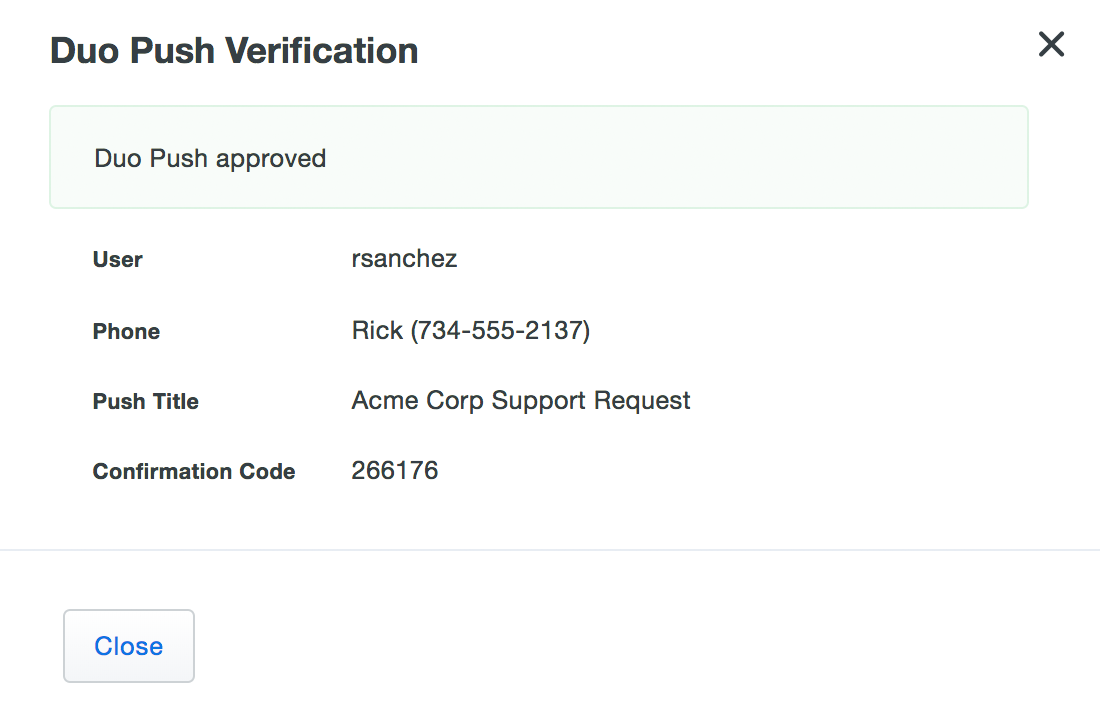
The "Duo Push Verification" screen shows you the user's default Duo Push device. Confirm the user has access to this device, then click the Send button.
-
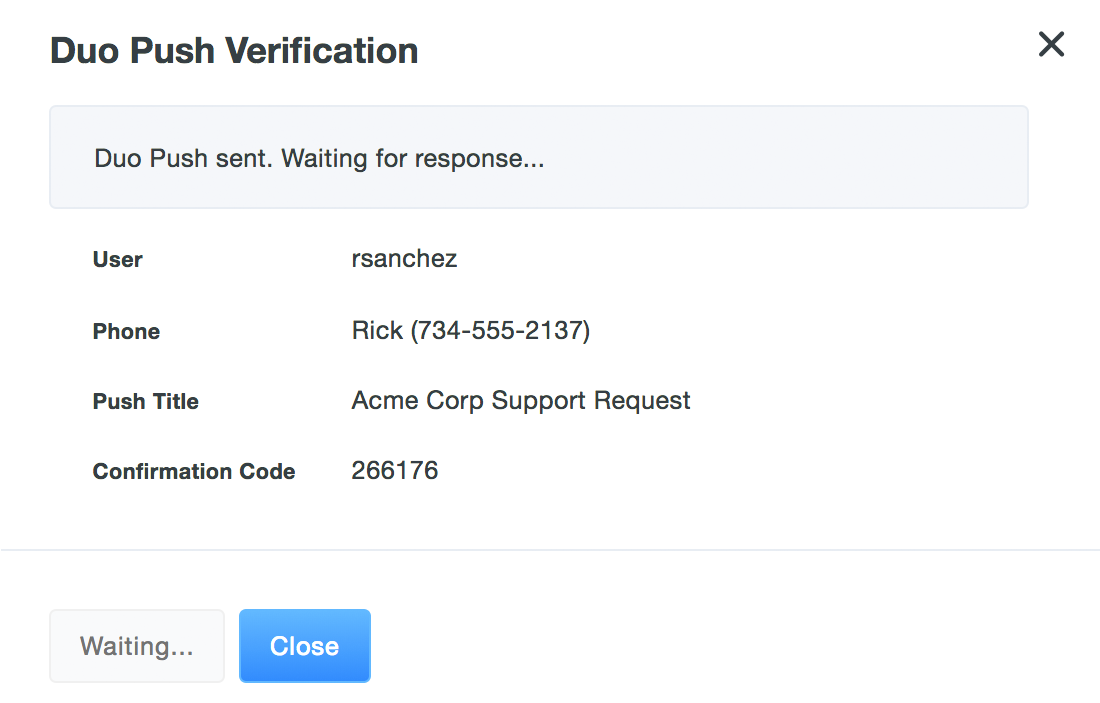
The Duo Push approval request sent to the user contains the same "Confirmation Code" shown in the Admin Panel. You can read the code off to the user so they know the request came from you, and then instruct them to approve the request.
-
Once the user approves your verification request, click Close to return to the user's properties page.
Watch this video to see a Help Desk scenario with push verification of the end user in action.
You can also send a verification push via the Admin API.
Verify Users with Government ID
Duo integrates with Persona to offer integrated identity verification (IDV) workflows which provide high-assurance of user identities before allowing critical workforce user lifecycle actions in your organization.
See the Duo Identity Verification documentation to learn how to set up and use government ID verification.
Change User Status
Role required: Owner, Administrator, User Manager, Security Analyst (limited), or Help Desk.
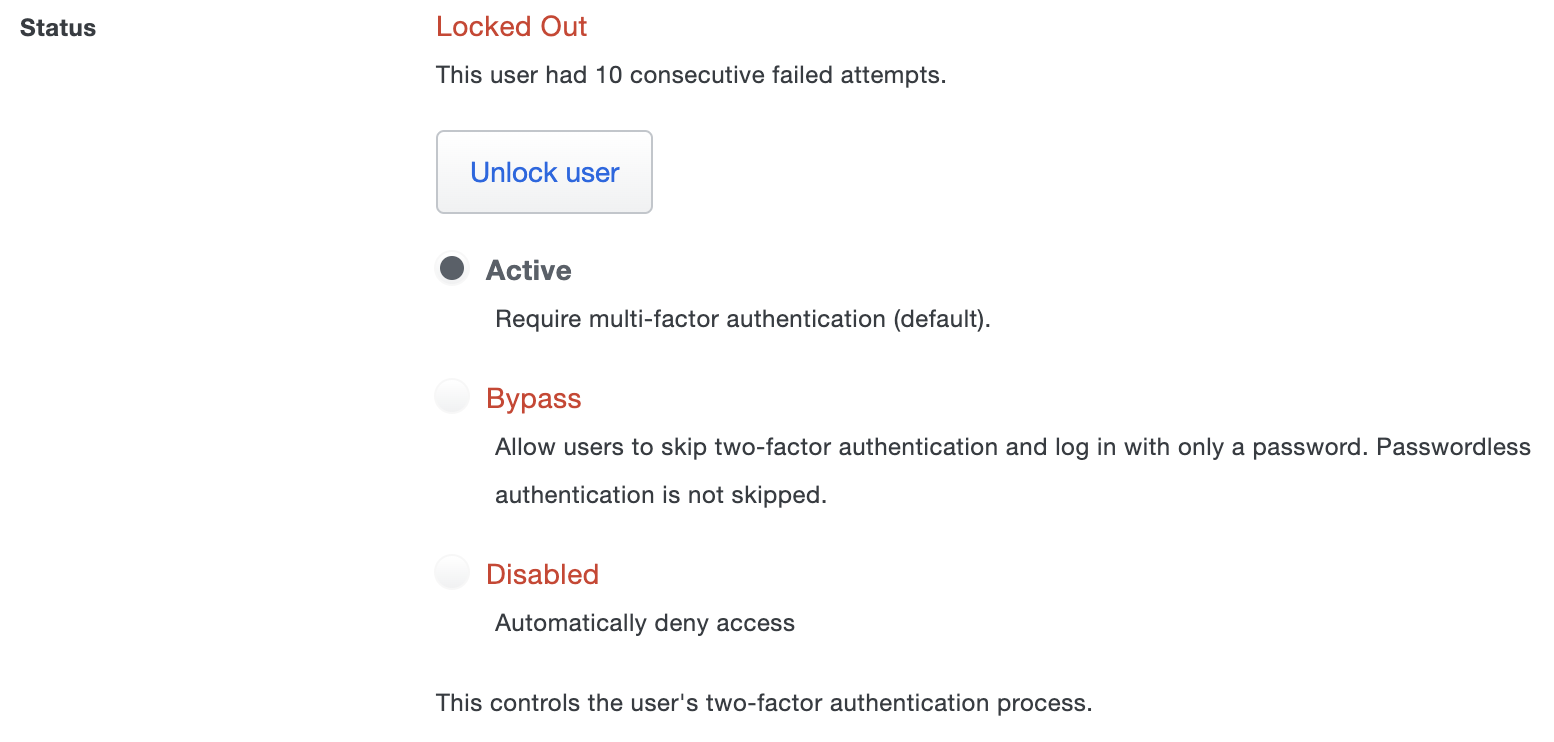
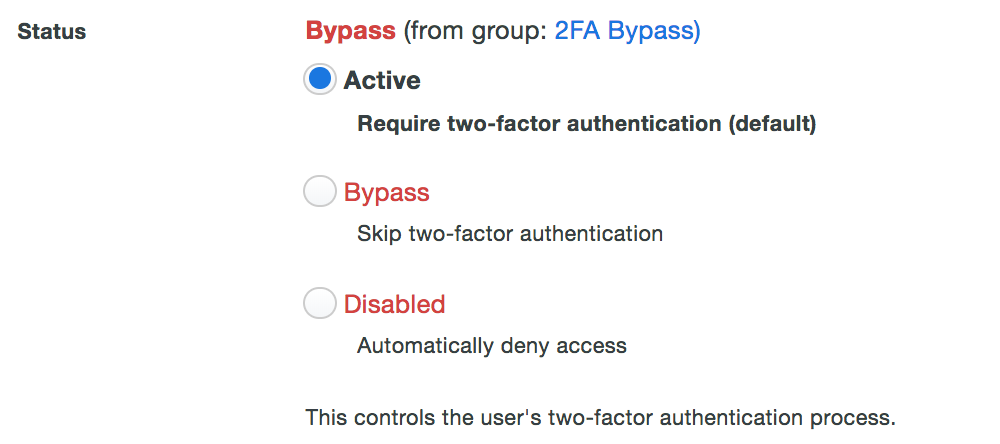
A Duo user's status can be one of the following:
- Active - The user is required to use Duo two-factor authentication at log on. This is the default status for new users.
- Bypass - The user is not required to use Duo two-factor authentication at log on and is not subject to any policy setting restricting access. The bypass event is recorded in the Duo authentication log.
- Disabled - The user is not permitted to use Duo two-factor authentication, and log on is denied. When a user is managed by Entra ID or AD directory sync, "Disabled" status is determined by the user's status in the source directory. Disabling a user invalidates existing remembered device sessions.
- Locked Out - The number of failed Duo authentications exceeds the "Unenrolled users" or "Failed attempts" threshold defined in the Lockout and Fraud settings, or the user account was locked out via Trust Monitor or Admin API. This status is only visible while an account is locked out, and cannot be manually set by an admin. The reason for the lockout is shown underneath the "Locked Out" status:
- "Failed attempts" - The user was locked out due to excessive authentication attempts.
- "Not enrolled" - The user was locked out due to being not enrolled for a given period of time after the user was created.
- "Admin disabled"/"Trust Monitor" - The user was locked out by an admin from Duo Trust Monitor.
- "Admin API disabled" - The user has been locked out by someone using the Admin API who set a user’s status to “locked out”.
Owners, Administrators, and User Manager role admins are able to change the status for an individual user to any of the available options. You can restrict User Manager admins' ability to apply bypass status to users in User manager settings.
Help Desk role admins can only change a "Locked Out" or "Disabled" user's status to "Active", and cannot assign "Bypass" or "Disabled" status.
Change a Single User's Status
-
Log in to the Duo Admin Panel and navigate to Users → Users in the left sidebar.
-
Select a user by clicking their username. You will see the user's current status in the "Status" section of the user properties page:
-
Click the Unlock user button to allow a locked-out user to log in again, or select the desired status, then scroll down and click the Save Changes button. Note that you cannot set the status of users managed by directory sync to "Disabled".
If a user's lockout reason is "Not enrolled" due to the Lockout and Fraud setting, changing their status to "Active" will allow them to complete enrollment. Once changed to "Active" status, users have 3 days to enroll, or they will be locked out again.
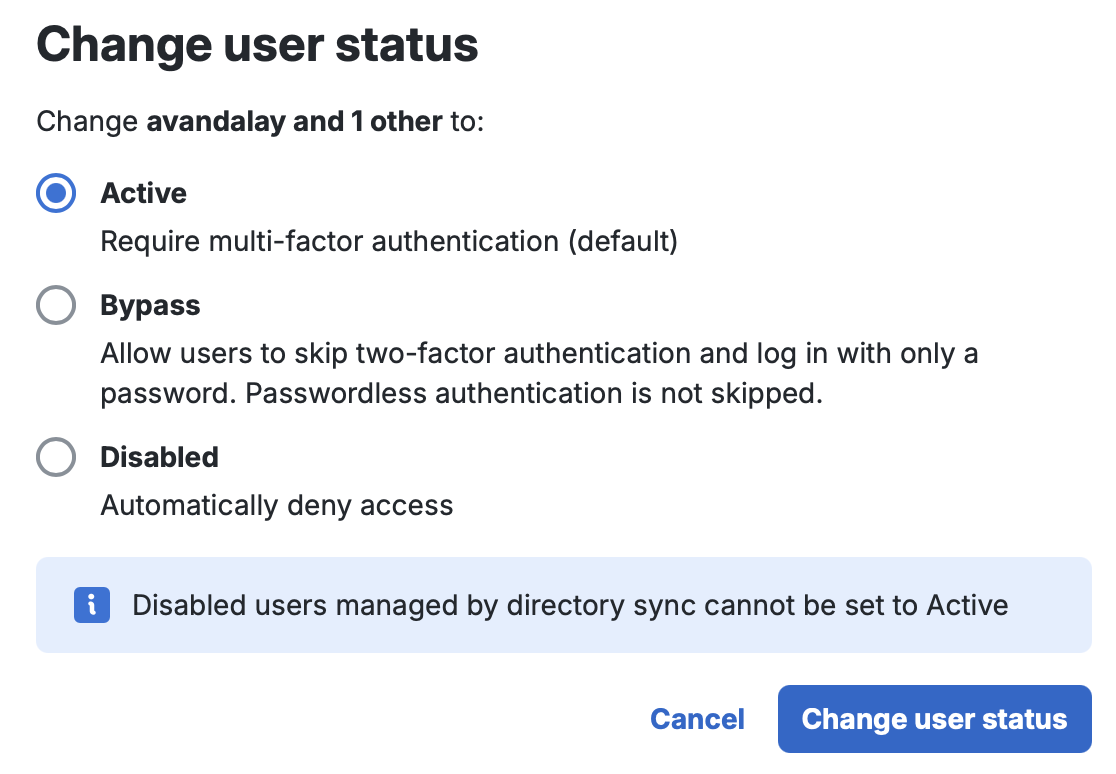
Change Multiple Users' Status
-
Log in to the Duo Admin Panel and navigate to Users → Users in the left sidebar.
-
Select multiple users (or a single user) from the Users view by clicking the checkbox to the left of the username. You can also click the topmost checkbox next to the "Username" column header to select all users shown on the current page (up to 100 depending on how many are shown per page).
-
Click the Actions button and select Change User Status.
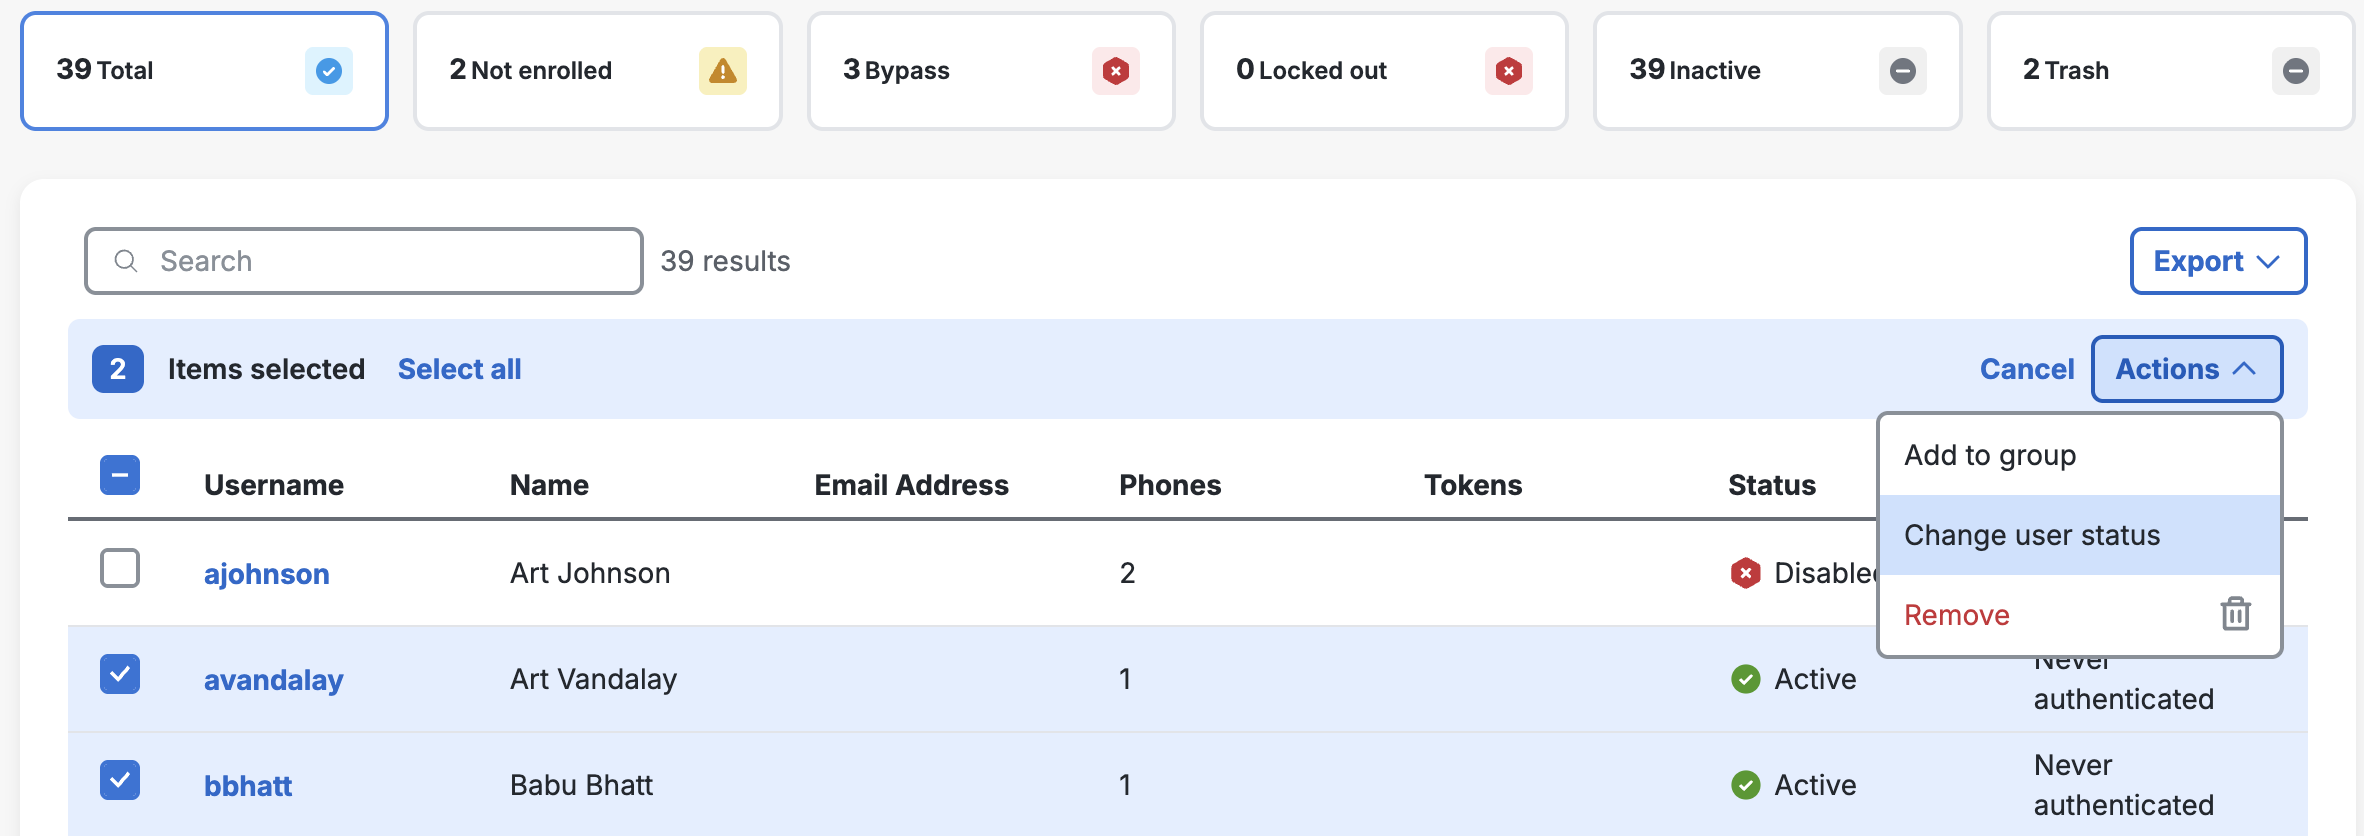
-
Select the desired new status for these users and then click the Change User Status button on the pop-up confirmation dialog. Note that you cannot set the status of users managed by directory sync to "Disabled".
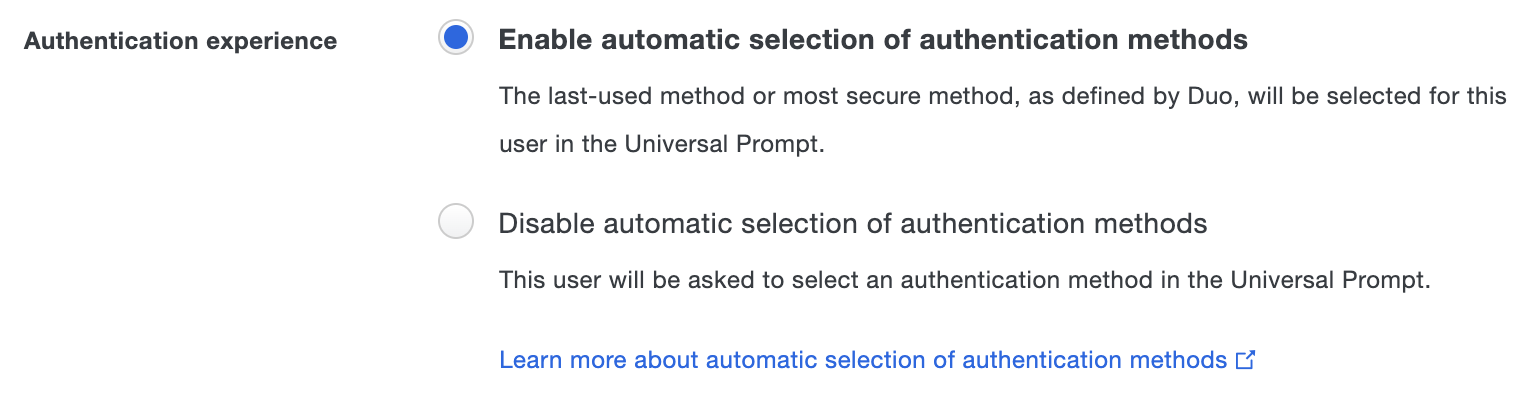
Change User Authentication Experience
The Duo Universal Prompt has built-in automatic authentication method selection behavior that makes it easier for users to access their protected applications by automatically choosing the most-secure factor. If automatic selection interferes with a user's authentication experience, you can turn it off for an individual user.
Role required: Owner, Administrator, User Manager, Security Analyst, or Help Desk.
-
Log in to the Duo Admin Panel and navigate to Users → Users in the left sidebar.
-
Select a user by clicking their username and then scroll down to the "Authentication Experience" setting.
-
Select the desired authentication experience.
- Enable automatic selection of authentication methods: The user is automatically prompted to use their last used authentication method when authenticating. This is selected by default.
- Disable automatic selection of authentication methods: The user selects an available method to complete authentication. The last-used or most-secure authentication method is shown first on the list.
-
Scroll down and click the Save Changes button.
Please note that this setting is effective only for the Universal Prompt. This setting does not apply to Duo Passwordless authentication, which will continue to automatically use the registered passwordless authenticator for a given device.
Assign User Status with Groups
Duo groups can be used to automatically assign a status to group members. When the status of a user is managed by a Duo group, the user's properties page indicates which group determines the user's status and the effective setting.
For more information using Duo groups to control user status, see Group Settings.
When users are imported into Duo by Entra ID or Active Directory synchronization the "Disabled" status in Duo is determined by the user's status in the connected directory and cannot be modified from the user's properties page in the Duo Admin Panel. See our guides to Active Directory synchronization or Entra ID synchronization for details.
Manage Remembered Devices Sessions
If you enabled remembered devices in your Duo policies, your users may create a remembered device session when logging in to browser-based protected applications or Duo Authentication for Windows Logon that lets them skip two-factor authentication for subsequent logins for the duration you allow. You may invalidate an existing remembered devices session for an individual user from the Admin Panel, which will require them to complete 2FA at their next Duo-protected application access or login.
Role required: Owner, Administrator, User Manager, Security Analyst, or Help Desk.
-
Log in to the Duo Admin Panel and navigate to Users → Users in the left sidebar.
-
Select a user by clicking their username and then scroll down to the "Manage" section.
-
Click the Require 2FA on Next Auth button next to "Reset Remembered Devices".
-
Confirm that you want to end the user's current remembered device session.

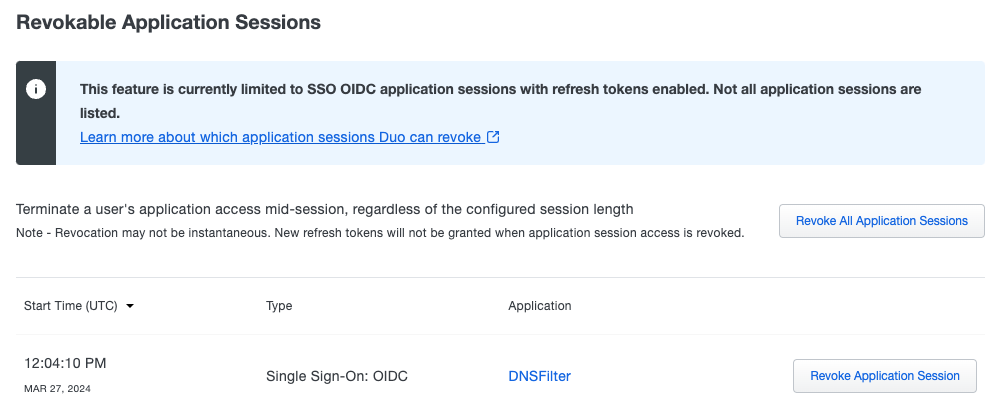
Revokable Application Sessions
In the "Revokable Application Sessions" table, you can view all active OIDC refresh tokens for a user. Revoking a user's refresh tokens can be useful if a user's account is compromised or you want to force them to authenticate again. If you revoke a refresh token, the user will be required to authenticate again.
Role required: Owner, Administrator, User Manager, Security Analyst, or Help Desk.
-
Log in to the Duo Admin Panel and navigate to Users → Users in the left sidebar.
-
Select a user by clicking their username and then scroll down to the "Revokable Application Sessions" section.
-
Revoke an individual token by clicking the Revoke Application Session button next to the corresponding application. To revoke all of a user's refresh tokens at once, you can click Revoke All Application Sessions.
Bypass Codes
A bypass code is a temporary passcode created by an administrator for a specific user. These are generally used as "backup codes," so that enrolled users who are having problems with their mobile devices (e.g., mobile service is disrupted, the device is lost or stolen, etc.), who temporarily can't use their enrolled mobile devices (on a plane without mobile data services), or who don't have any of their registered authentication methods available can still access their Duo-protected systems.
Bypass codes expire after being used the allowed number of times, or after an administrator-defined amount of time. A user can have up to 100 active bypass codes.
Like any other authentication method, use of a bypass code can establish a trusted browser or local session if you've enabled a remembered devices policy. The trusted session will last up to the limit defined in your remembered devices policy, and isn't invalidated when a bypass code expires. This could result in access being granted to an application for longer than the bypass code validity period.
A user must have a valid Duo authentication device enrolled (like a passkey, phone, or hardware token) in order to use a bypass code to authenticate. Bypass codes are not intended for long-term use as a user's only authentication method.
Bypass codes must be enabled in your authentication methods policy options to use them for 2FA or passwordless authentication. You can also limit your Help Desk administrators' ability to create or customize bypass codes on the Settings page.
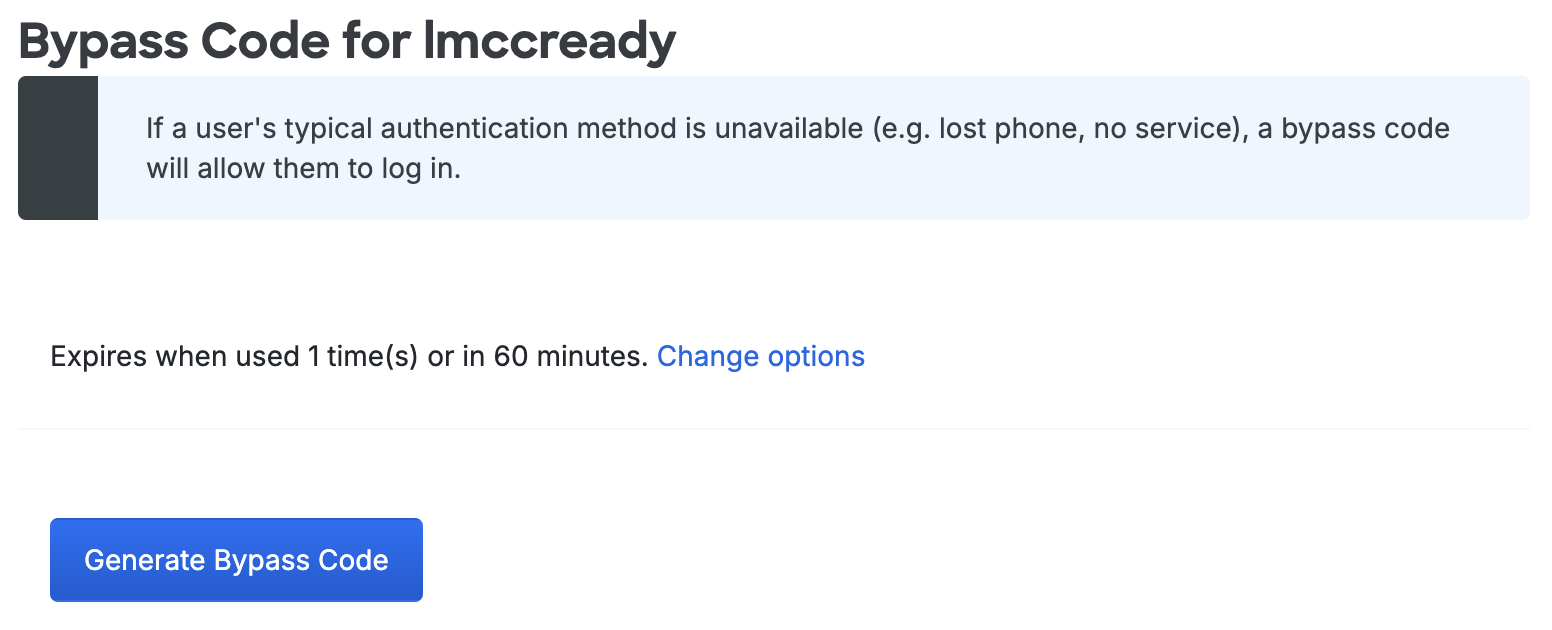
Generate a Bypass Code
Role required: Owner, Administrator, User Manager, Security Analyst, or Help Desk (when permitted in the "Help Desk" global setting).
To generate a bypass code:
-
Log in to the Duo Admin Panel and navigate to Users → Users in the left sidebar.
-
Select a user by clicking their username. Scroll down to the bottom of the user properties page and click the Add Bypass Code button. Help Desk admins won't see this button if the "Do not allow Help Desk admins to create bypass codes" option is selected on the Settings page.

-
By default, bypass codes are randomly generated and expire after a single use or in 60 minutes, whichever happens first. If you're satisfied with the defaults, click Generate Bypass Code.
To define the code or change the code's options, click the Change options link. Help Desk admins won't see this link if the "Do not allow Help Desk admins to customize bypass codes" option is selected on the Settings page.
You can change these options:
-
Code generation: Select Use this code instead and type in a nine-digit numeric string if you don't want a random code generated.
-
Code expiration: You can enter a value greater or less than the default expiration of 60 minutes, or select Never for no expiration.
-
Code reuse: You can allow reuse beyond the one-time default. Either enter the number of times the code may be reused, or select Unlimited. Note that the code will always expire after one use when used to bypass passwordless authentication.
-
Endpoint verification: The default option requires endpoint verification only when the bypass code is used to bypass passwordless authentication. You can require endpoint verification for any use of this bypass code — either 2FA and passwordless — by choosing Always required.
Endpoint verification requires that the device used for accessing the Duo-protected application either have a browser cookie present from a previous successful Duo authentication, or Duo Desktop collected a signed device health report during authentication. You must enable the Require the app and Require devices to be registered using Duo Desktop options in your Duo Desktop policy options for Duo Desktop endpoint verification. Enabling Duo Passport also enables device registration with Duo Desktop to satisfy this requirement.
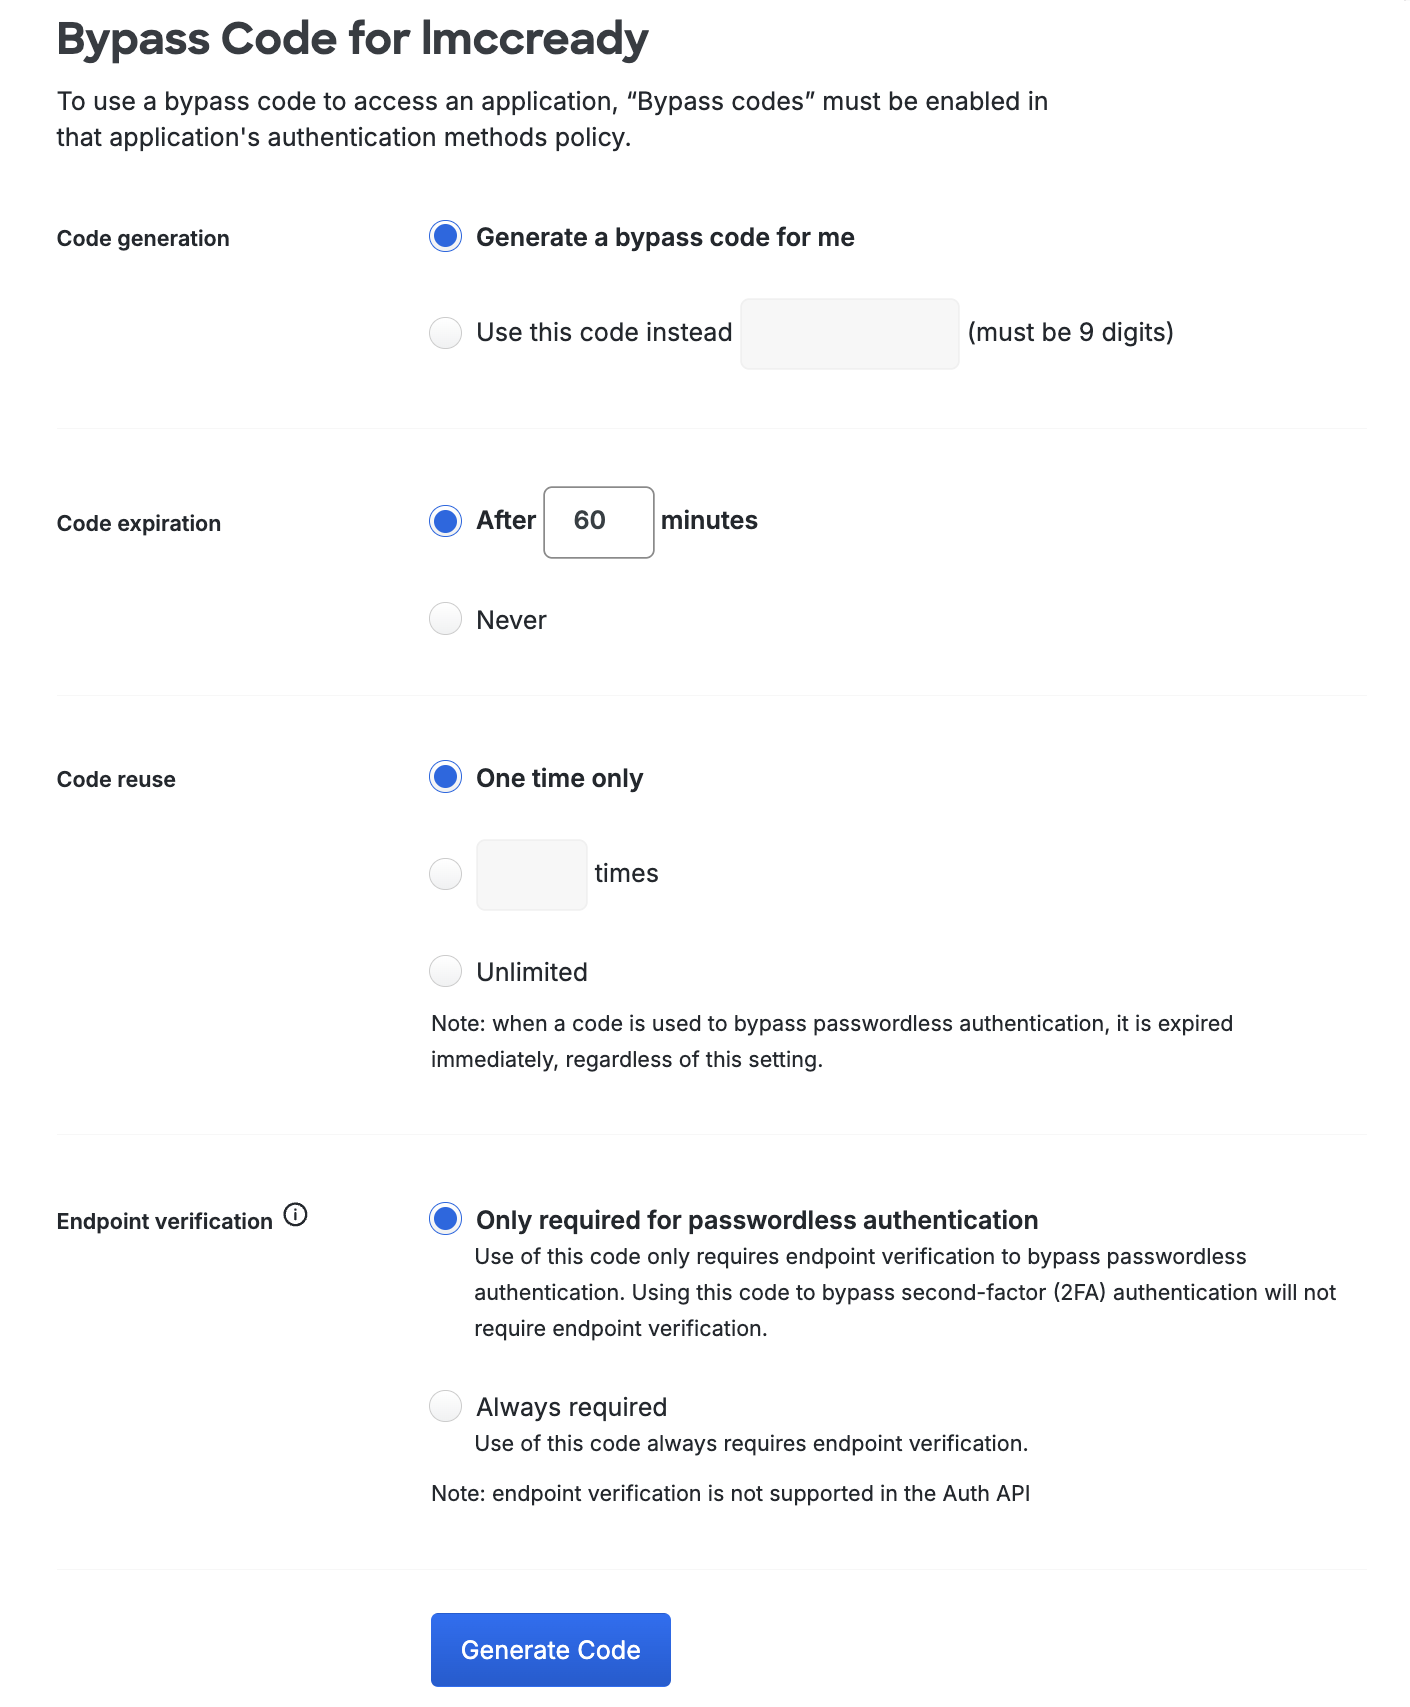
Once you've finished adjusting these options, click Generate Code to generate the bypass code.
-
-
To view the bypass code after creation click Jump to Bypass Codes in the banner at the top of the user properties page.

-
You can copy or view the bypass code by clicking on the copy icon or view icon next to the hidden bypass code. The bypass code can be used immediately.
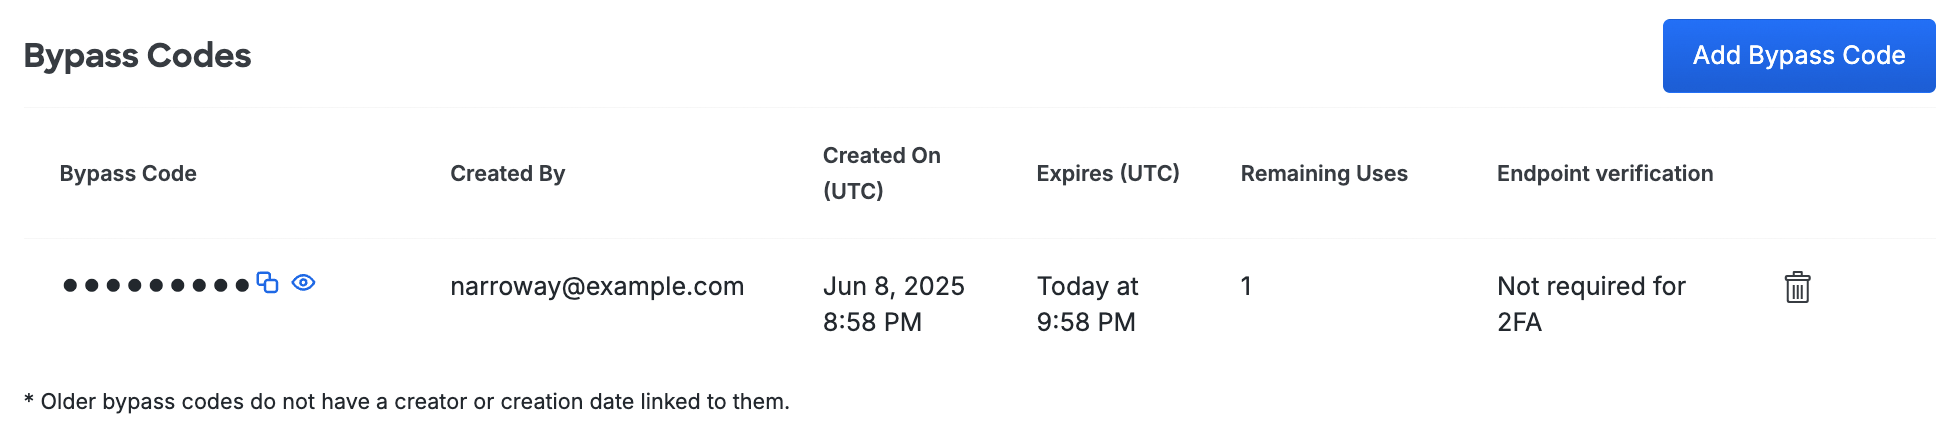
Bypass Code Notifications
The user will receive a notification informing them of bypass code creation if you have user notifications enabled. If they respond to the notification and indicate they did not receive the code, then that bypass code is deleted.
View and Delete Bypass Codes
To view a list of all current bypass codes, navigate to Users → Bypass Codes in the left sidebar.
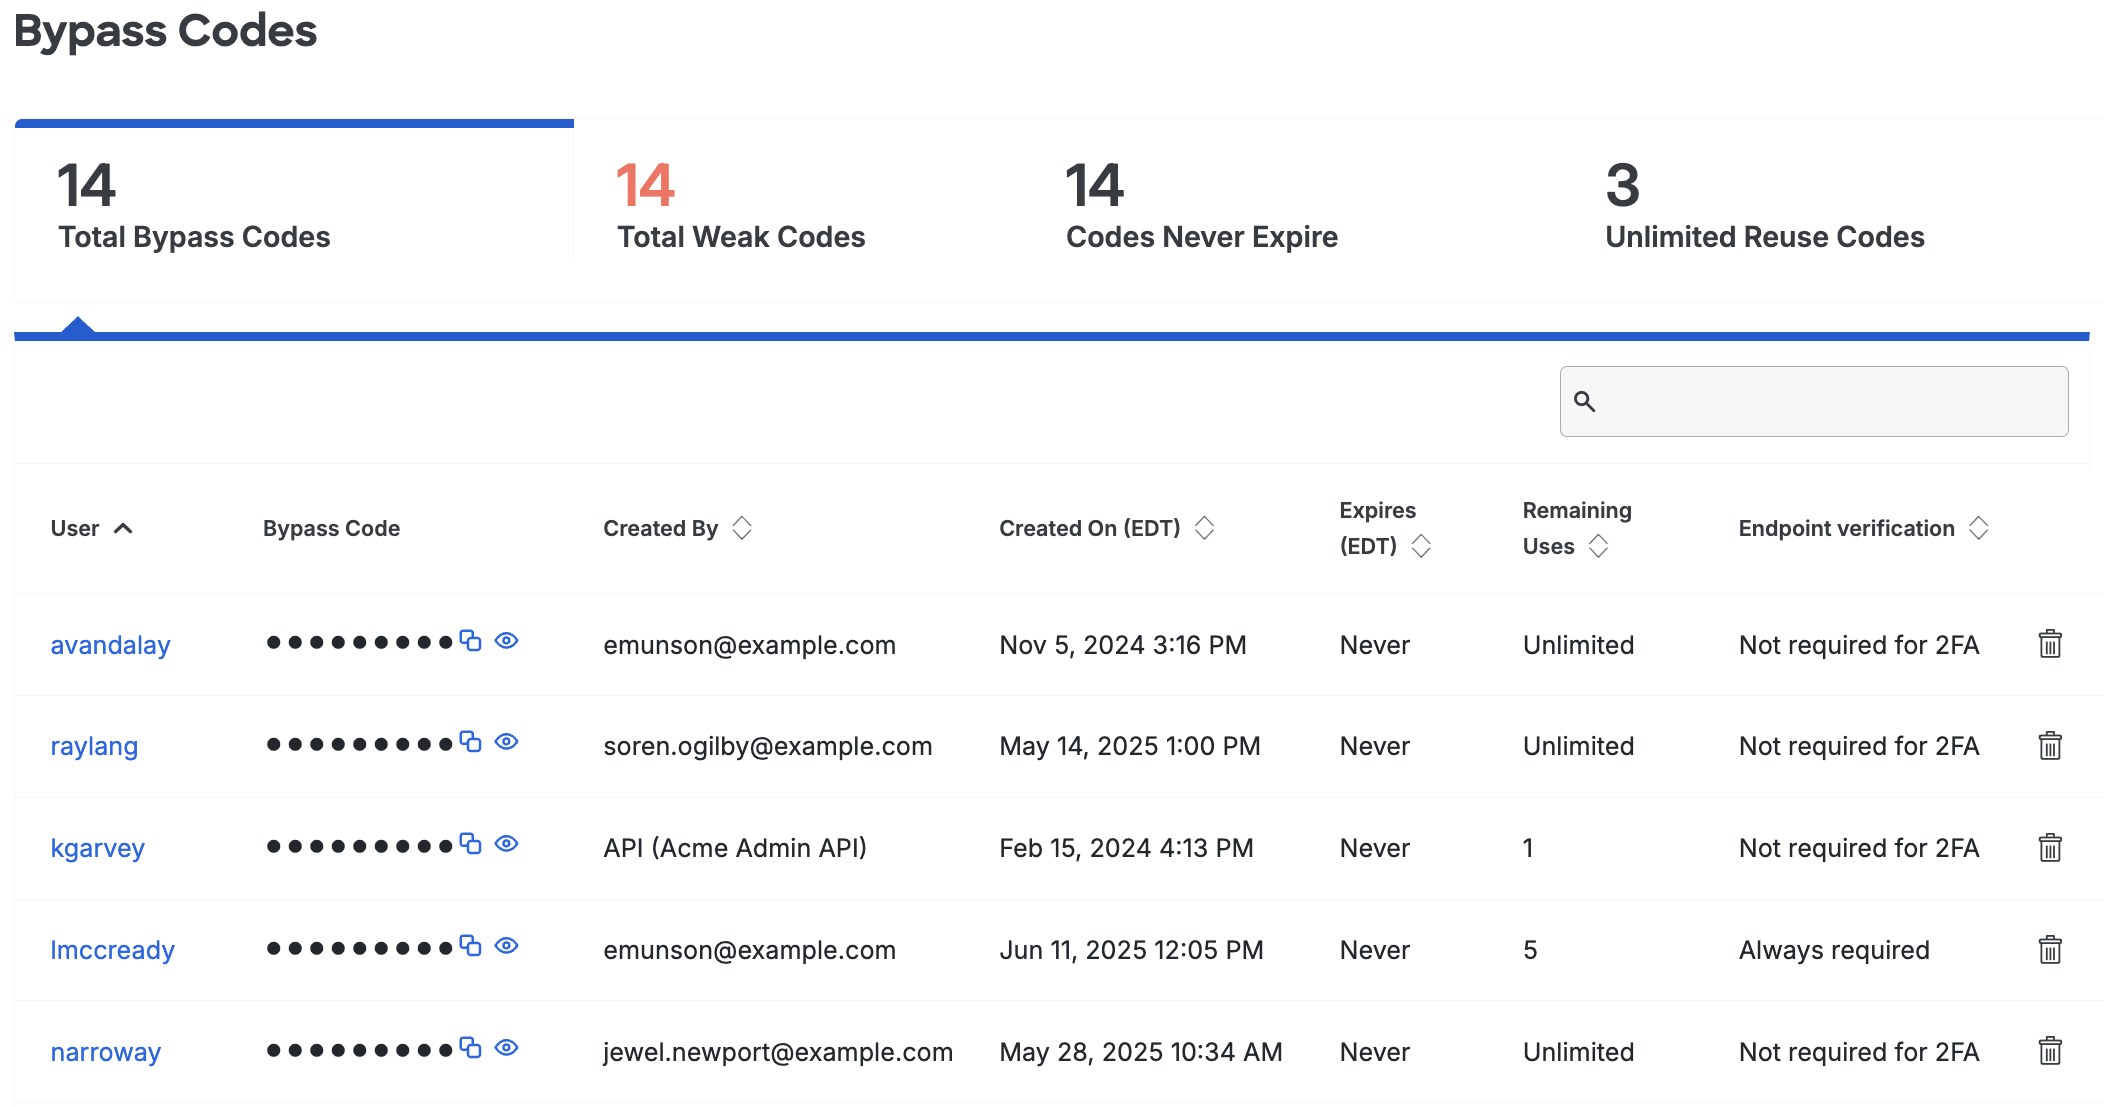
You'll see at a glance the total number of valid bypass codes and counts of "weak" bypass codes (meaning bypass codes that have no expiration or unlimited use), codes without expiration, and codes with unlimited reuse permitted. The table lists which users have bypass codes, which Duo admin created that bypass code (or the name of your API application if the bypass code was created programmatically via the Admin API), when the codes will expire or run out of uses, and whether use requires endpoint verification. Click each type of user count to filter by that category.
To copy or view a bypass code click on the copy icon or view icon next to the hidden bypass code.
To delete a user's bypass code, click the trash-can icon on the far right of the table. Confirm deletion of the bypass code when prompted.
View detailed information about bypass code creation and deletion events, such as whether the bypass code was manually or automatically generated, how many minutes the code is valid, and the total number of uses for the bypass code in the Administrator Actions or Activity Log reports.
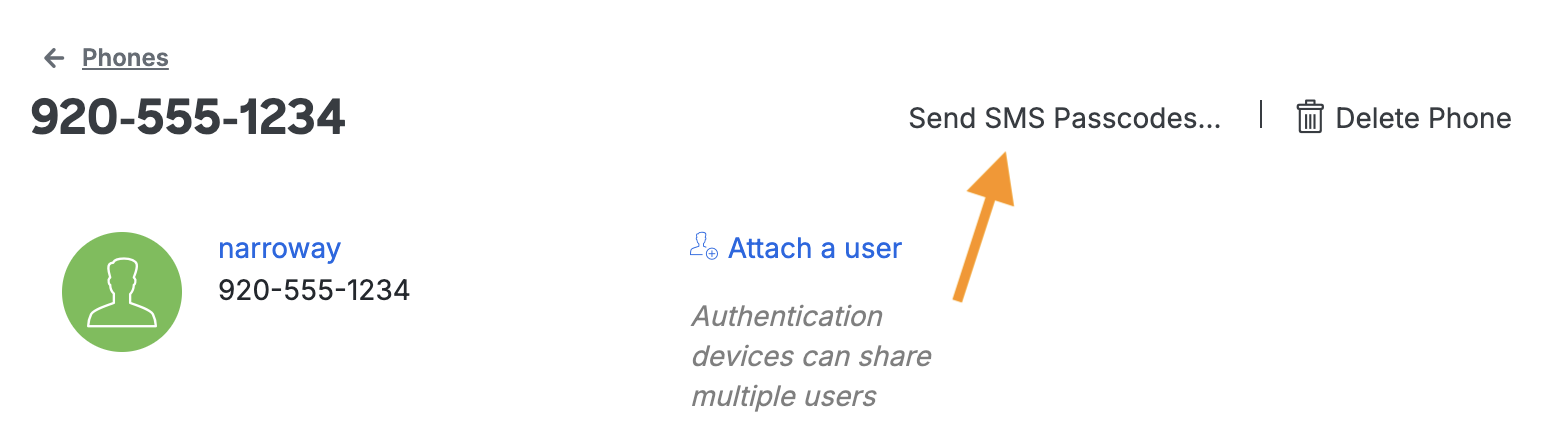
Send SMS Passcodes
Role required: Owner, Administrator, User Manager, Security Analyst, or Help Desk.
Duo users who aren't able to receive pushes or phone calls due to spotty mobile coverage, or traditional mobile phone users who aren't able to install the Duo Mobile smartphone app may rely on batches of passcodes sent over SMS. Administrators can send new batches of SMS passcodes to their users whenever they choose. All old codes are invalidated when a new batch is sent. To send passcodes:
-
Log in to the Duo Admin Panel and navigate to Users → Users in the left sidebar.
-
Select a user by clicking their username, then scroll down to the "Phones" table on the user's properties page and click on the device that will receive the passcodes.

-
Make sure that the device's "Type" is Mobile. Click the Save Changes button after making any changes.
-
Click the Send SMS Passcodes... link near the top of the page.
-
On the next page click the Send SMS Passcodes button.
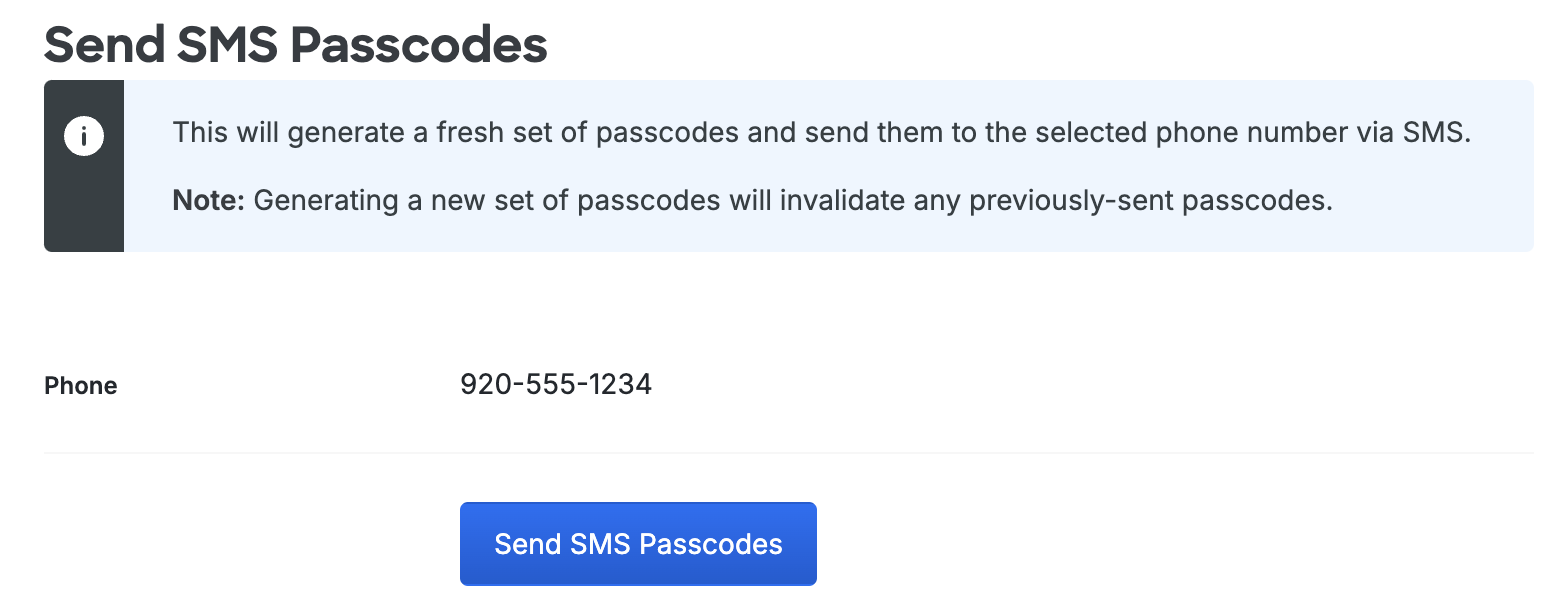
The SMS passcode batch size and other settings can be configured in the SMS passcodes section of the Duo Settings page. To get to this page click Settings in the left sidebar.
Clear Risk-Based Factor Selection Step-Up
Please see the Risk-based Factor Selection documentation to learn more about authentication step-up states and how an administrator can manually clear step-up for a user.
Use Groups
Assigning Duo users to groups simplifies user management. It's especially handy for quickly defining application access or assigning user status. See the Using Groups documentation for more information and detailed instructions.
Duo's Duo Premier, Advantage, and Essentials plans let you create granular security policies and apply them to selected groups and applications. See the Policy & Control documentation for more information.
Troubleshooting
Need some help? Try searching our Knowledge Base articles or Community discussions. For further assistance, contact Support.