Duo Directory Sync Generic Inbound SCIM for Duo Users
Last updated:
Overview
Import Duo end-users directly from an external directory into Duo with Duo Security's generic inbound SCIM integration.
Duo Directory Sync is a one-way operation. No information from Duo is imported into your external directory.
The Directory Sync feature is part of the Duo Premier, Duo Advantage, and Duo Essentials plans.
The SCIM token expires every 90 days. You will need to regenerate the token in Duo and update it in your external directory for continued inbound provisioning. See Regenerate Bearer Token for more information.
Supported Features
- Create users and groups
- Update user attributes
SCIM provisioning from external directories does not support import and management of Duo administrators.
Prerequisites
Before setting up generic inbound SCIM provisioning, ensure you have the following:
- An external directory that supports outbound SCIM provisioning of users and groups.
- An admin account in the external directory with sufficient privileges to configure provisioning.
- You must have the Duo Owner, Administrator, or User Manager admin role to set up and manage import of external directory users into Duo.
Role required: Owner, Administrator, or User Manager.
Directory Sync Updates Existing Users
Before executing any external directory synchronization with Duo, understand the effect that synchronization can have on accounts with the duplicate Duo usernames. Suppose that you already have some active Duo users, and one or more of these users have the same username in your external directory. Provisioning these users from your external directory will cause the existing Duo users' information to be merged with, and in some cases overwritten by the external directory information, such as email addresses present in Duo changing to match the value stored in the external directory.
If you synchronize multiple directories and there are non-unique usernames among those directories, the net result is that there will be only one Duo user created with that username, and the sync that creates the user will continue to own and manage the user.
Set Up SCIM Integration
You will need to create the generic SCIM integration in Duo and optionally map any additional user attributes. When your setup is complete, you'll receive API credentials you'll need to configure in your external directory to create the connection.
To start setting up generic inbound SCIM integration:
-
Log in to the Duo Admin Panel.
-
Navigate to Users → External Directories or click the External Directories link on the "Users" page.
-
Click the Add External Directory button and select Generic Inbound from the list.
-
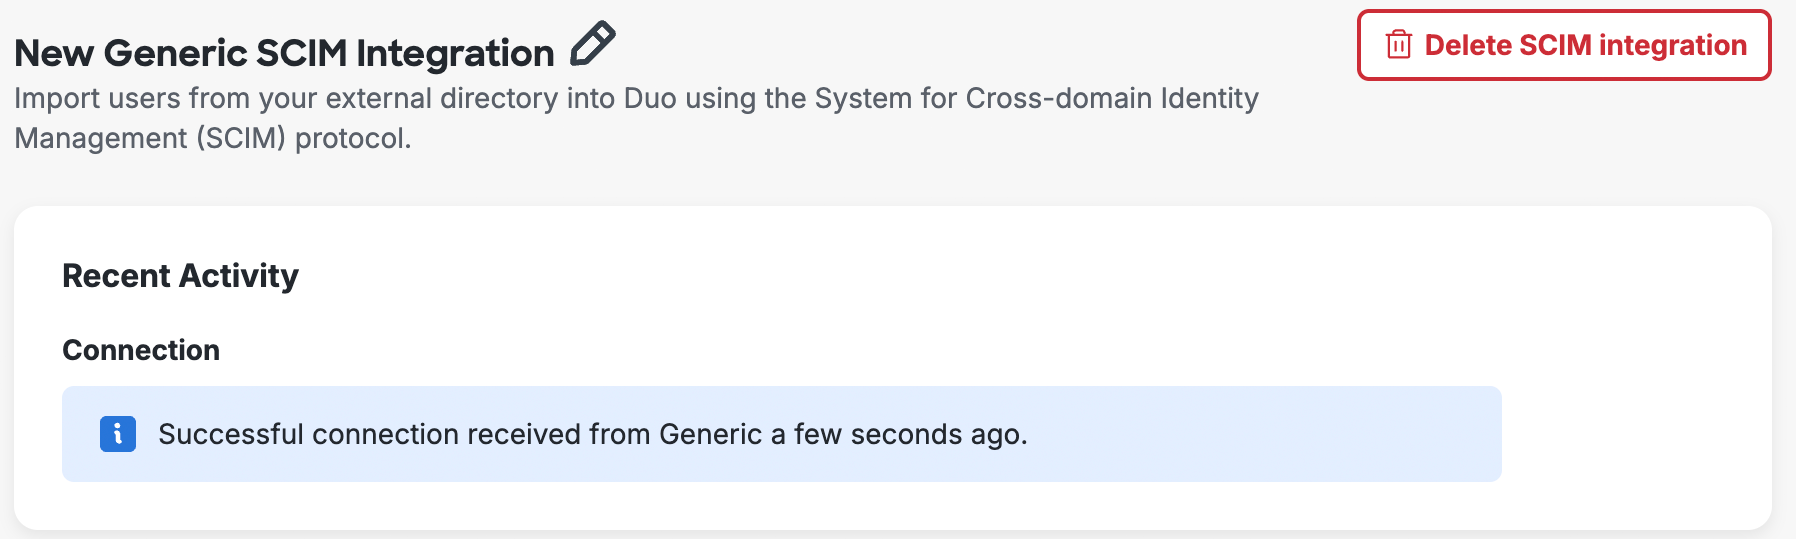
The new SCIM connection's name defaults to "New Generic SCIM Integration". Click the pencil icon to the right of the name if you'd like to change it to something different, clicking Save to apply the new name.

You can click Save progress at any time to save your configuration without creating the API credentials.
Attribute Mapping
Make changes here if you want to customize which attribute values get imported from your external directory into Duo.
The required Duo "Username" attribute is mapped by default to the SCIM attribute userName.
To import additional user attributes from your external directory:
-
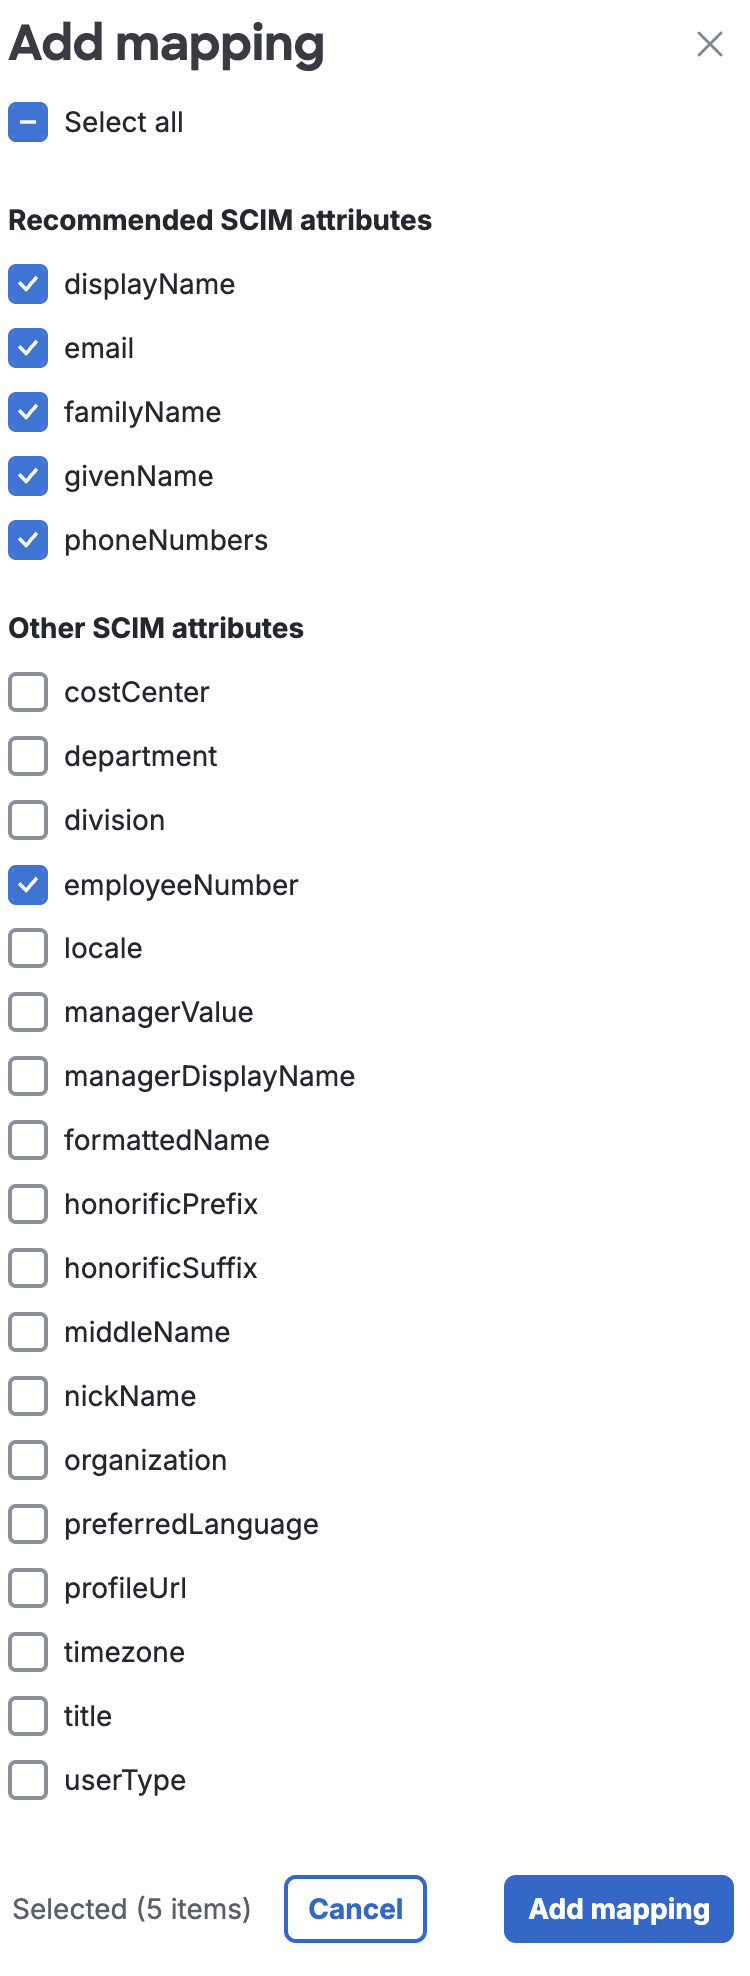
Click + Add mapping to open the "Add mapping" list of available attributes.
-
Select the additional user attributes you want to import from your external directory into Duo. You can select individual attributes, or use Select all to add all SCIM attributes listed. Click Add mapping when done.
-
For each additional attribute, use the Duo user attribute drop-down to select a destination attribute in Duo for the imported information. If there's already a suggested Duo user attribute you can use the suggestion or change it to something else. Some attributes may already have a Duo user attribute defined which cannot be changed.
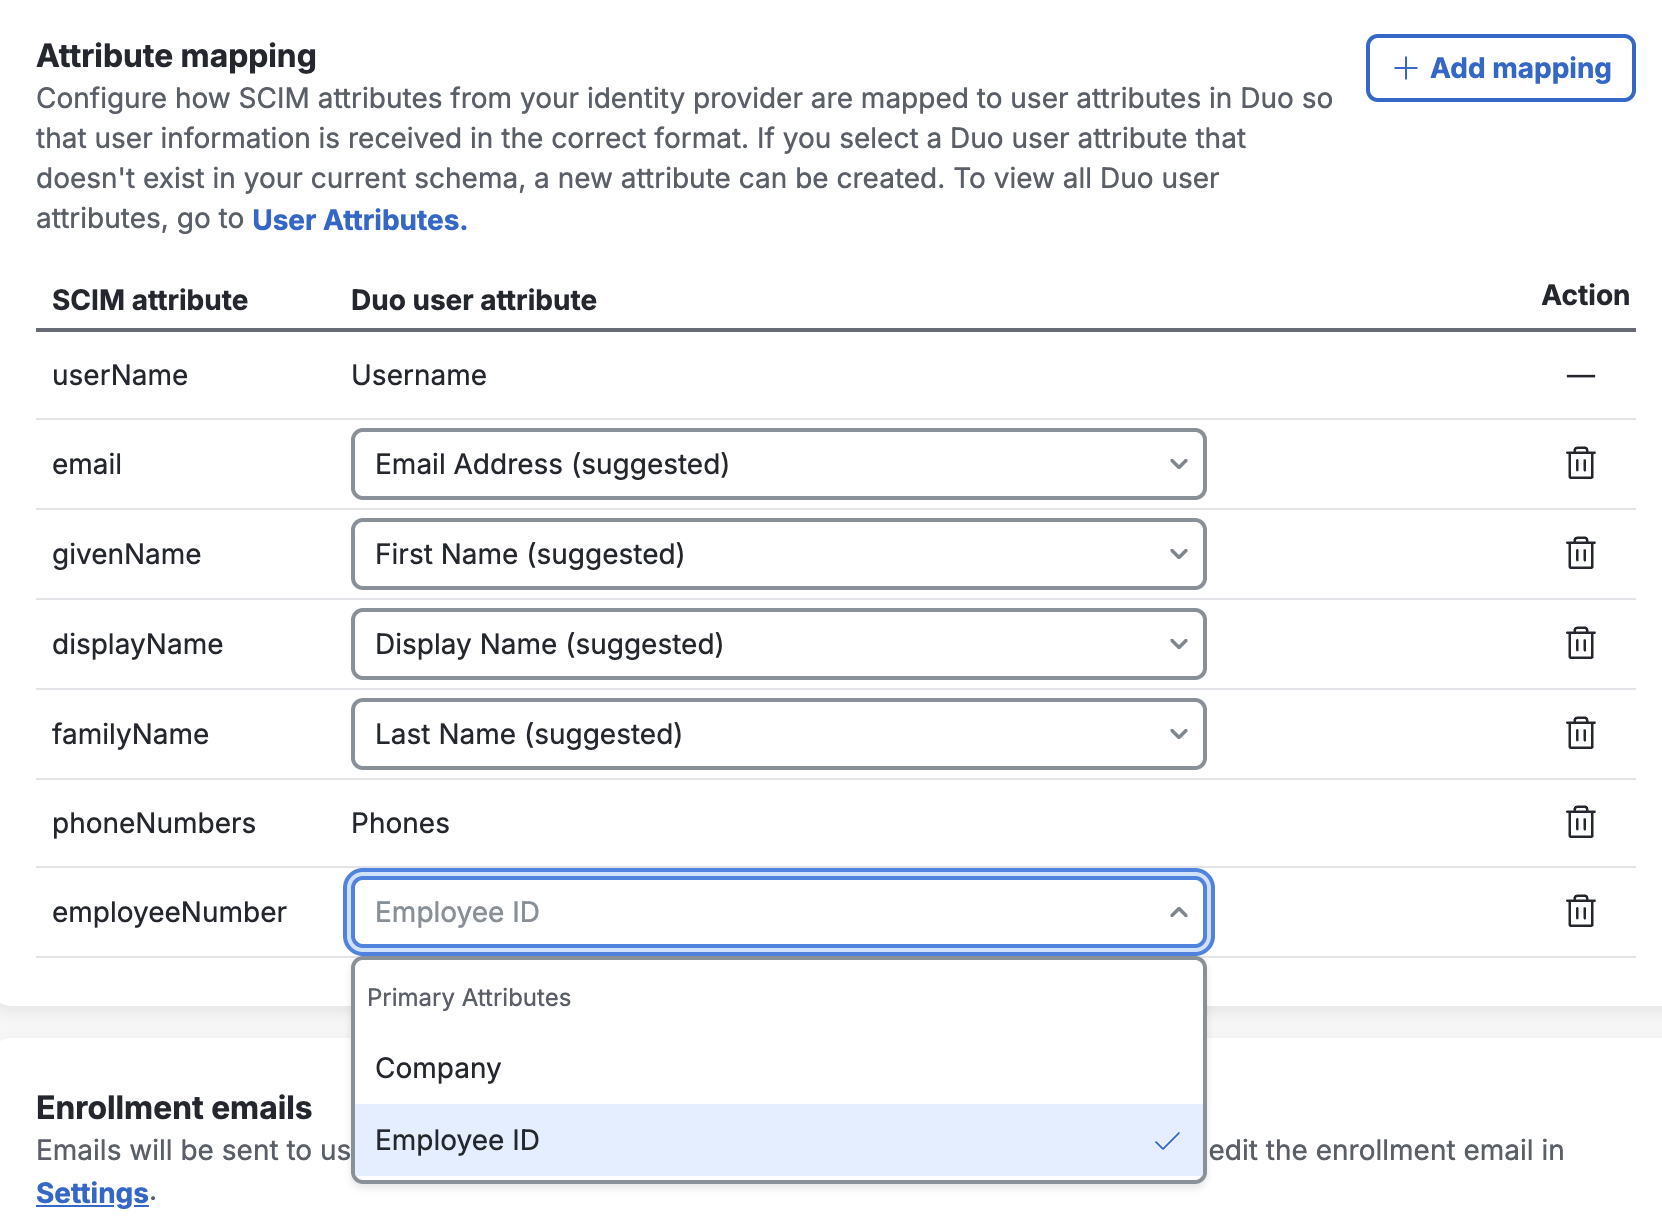
If you don't already have a Duo user attribute created to map a given external directory attribute to, you can create a new user attribute to use for mapping by typing in the desired Duo user attribute name and clicking + Add.
Delete any added attribute you don't want to map by clicking the trash can icon to the right.
Enrollment Emails
Select the Send enrollment emails to synced users option if you want imported users to automatically receive an enrollment email. Only users imported with active status, a valid email address, and who do not already have any enrolled authentication devices in Duo receive an emailed link. The email address is populated from your external directory.
Default: Not enabled.
The enrollment link sent when a user is first imported is valid for 30 days. Duo sends an emailed enrollment reminder if the user hasn't yet completed enrollment after two days, and then a second reminder if the user remains unenrolled eight days after the first reminder.
If the user does not complete the enrollment process after 30 days has elapsed, the original enrollment link expires and a new enrollment link is generated and sent to the user. This entire 30-day cycle repeats until the user completes Duo enrollment.
The contents of the enrollment email subject and body can be changed on the global Settings. The enrollment email body should contain the placeholder text "<enrollment-link>", which will be replaced by the link to the enrollment form when the email is sent. The sent message will have a non-editable header added, informing the user it's an automated message sent by Duo and to contact their organization's Duo admins or IT support group with any questions.
If your organization uses e-mail filtering, be sure to allow the sender no-reply@duosecurity.com.
Duo Premier and Duo Advantage Plan Users: Global Policy settings affect access to the enrollment portal. Do not apply any global restrictions that could prevent user enrollment. For example, if you configure the User Location policy setting to deny access to a country, then the policy will also block any of your users who attempt to enroll in Duo from that country via an emailed enrollment link. The New User Policy setting for the enrollment portal is always "Require Enrollment".
Finish Generic Inbound SCIM Setup
Click Complete Setup to finish creating the new generic external directory SCIM integration in Duo. The page refreshes to show the information you need to enter in your external directory in the "API Credentials" section.

Leave this page open in your browser.
Configure SCIM in the External Directory
Consult your external directory's documentation for instructions on how to configure outbound SCIM provisioning. You will need to provide the Duo API credentials information to your external directory's outbound provisioning configuration:
- Base URL - This is sometimes called the "SCIM service URL" in the external directory.
Example:https://api-nnnnnnnn.duosecurity.com/scim/v2 - Bearer Token
The SCIM token expires every 90 days. You will need to regenerate the token in Duo and update it in the external directory for continued inbound provisioning. See Regenerate Bearer Token for more information.
We recommend enabling these provisioning options if available in your directory: Create Users, Update User Attributes, and Deactivate Users.
Verify the mappings for the attributes the external directory will provision into Duo via SCIM if you wish. The default mappings should suffice for most organizations.
To complete your setup you will most likely need to assign the outbound provisioning configuration to groups or users in your external directory.
Save your outbound provisioning configuration in the external directory and verify that it is connected to Duo and pushing user and group information. Return to your generic inbound SCIM page in the Duo Admin Panel.
Verify Provisioning
When you return to your generic SCIM integration in the Duo Admin Panel, you should now see a successful connection. If not, return to your external directory and double-check your outbound provisioning configuration.
The users or groups you assigned to outbound SCIM provisioning to Duo in your external directory have been created in Duo. If you did configure group provisioning then the imported groups show up in the "SCIM Managed Groups" section of the page.
If you don't push group information from the external directory into Duo, the users you import via SCIM won't be members of any groups. Users managed by external directory sync can't be manually added to groups in Duo, so you won't be able to apply any group-based policies or privileges to these users.
User Enrollment and Activation
After importing users from your directory into Duo, your next step is to have them activate their devices for Duo authentication (if you chose not to send enrollment emails to synced users when creating your directory in Duo). On the Users page you'll see a notification bar indicating that users have not yet activated the Duo Mobile smartphone app. Click the link in the notification bar to begin the process of sending these users activation links via SMS message or email.

For more information on user activation, see Activating Duo Mobile After Enrollment.
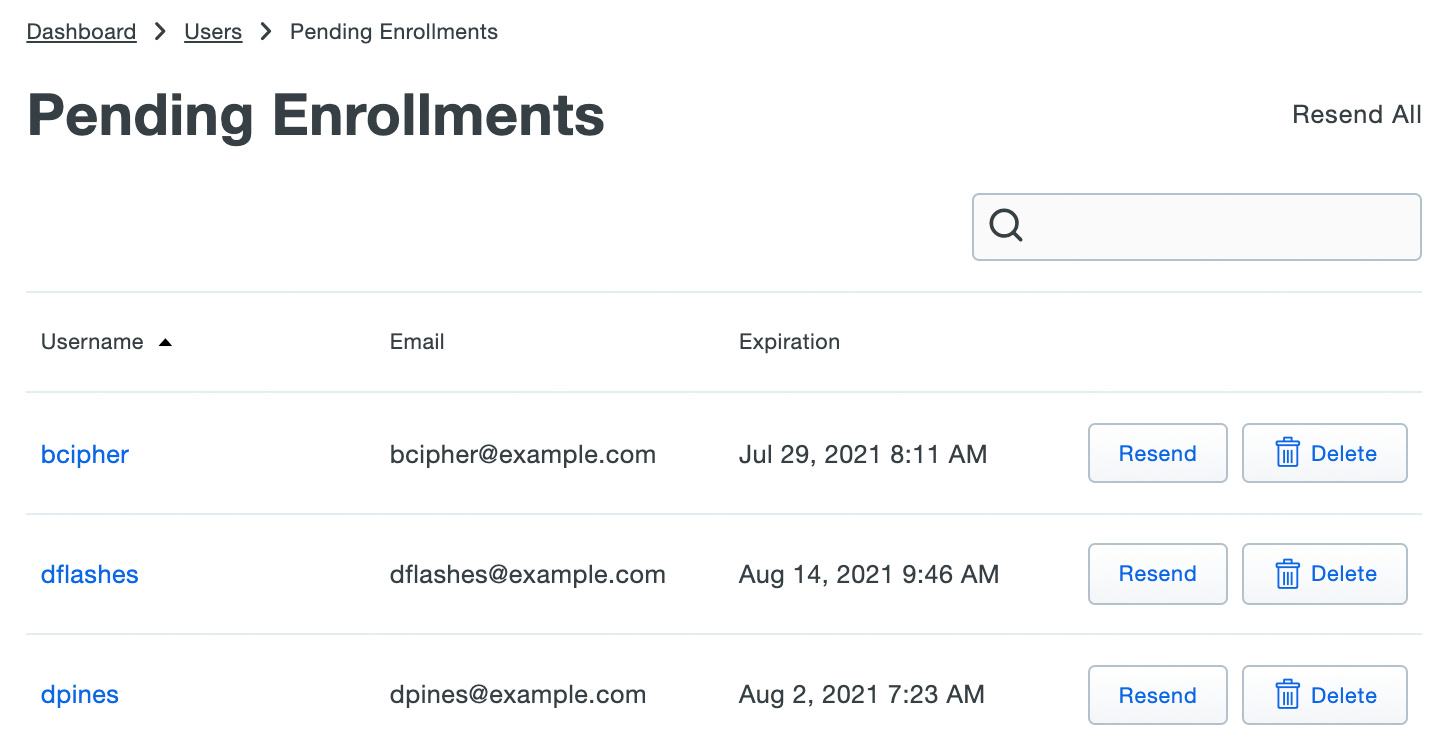
If you did choose to send enrollment emails to synced users automatically, the Pending Enrollments table shows which users created by directory sync and SCIM integrations (or bulk enrollment) have not yet completed enrolling their 2FA devices in Duo, along with the user's email address and the expiration date for the enrollment link previously sent.
If you need to send a user another copy of the enrollment link email, click the Resend button on the right of that user's information, or click Resend All to send the email again to all users with outstanding enrollment links. Resending the email does not change the current enrollment link's expiration date and uses the same email address that was used when the original enrollment was sent.
Click Delete to remove a pending enrollment. Deleting a pending enrollment immediately invalidates any unexpired enrollment link previously sent to that user. The next time directory sync runs, a new enrollment link will be emailed to that user, as long as they remain a member of a synced group and the external directory configuration still has the "Enrollment Email" option enabled.
Manage User Sync
Role required: Owner, Administrator, or User Manager except where noted in the sections below.
Once configured, you can update the sync settings and attributes.
To access your configured sync:
-
Log in to the Duo Admin Panel. Navigate to Users → External Directories or click the External Directories link on the "Users" page.
-
The "SCIM Integrations" tab lists all your inbound SCIM external directory connections and shows their connection status, type, and last update time. Select the integration you want to manage by clicking on its name in the list.
-
Perform your management actions from the properties page.
Update Users or Groups
If you want to change the users or groups you assigned to the application, or initiate an immediate push from your external directory to Duo, log into your external directory's administrator console and make the changes.
When you update users in your external directory, changes get pushed immediately to Duo.
Regenerate Bearer Token
The generic SCIM integration's bearer token expires every 90 days. When the Duo SCIM integration's bearer token expires then pushes from your external directory will fail. We'll send an "Action required" email to all the Duo administrators with the "Owner" role to let them know starting 15 days before the token expires.
When you visit your external directory configuration page in the Duo Admin Panel, the bearer token will show it's expired. You'll need to regenerate the token and update your external directory's outbound SCIM configuration with the new token information to resume pushes.
-
Log in to the Duo Admin Panel.
-
Navigate to Users → External Directories or click the External Directories link on the "Users" page.
-
Go to the "SCIM Integrations" tab and click on the disconnected generic SCIM integration.
-
The "API Credentials" section of the page shows that the token has expired. Click Regenerate token to create a new one. Keep this browser tab open.
-
Open the Duo provisioning configuration in your external directory's administrative interface for editing.
-
Copy the new Bearer token value from the Duo Admin Panel and paste it into your external directory's provisioning configuration. The base URL does not change.
-
Save your changes to your external directory provisioning configuration.
Delete External Directories
Deleting a directory from Duo doesn't delete or disable any of the previously imported objects. When you delete a directory from Duo, then the users, phones, and groups formerly managed by that directory remain available and get converted to unmanaged Duo objects that can be manually updated or deleted.
-
Users previously imported remain available and retain the status previously assigned, whether applied to the synced group or to the individual user. Any authentication devices associated with the user remain available. The users retain their former group memberships. You may manually or programmatically delete the users formerly managed by the sync from Duo.
-
Groups previously synced remain available and retain the same members and status assigned when they were managed by the sync. The group name changes from Group name from type of sync "name of sync" to Group name (formerly from "name of sync"). You may manually or programmatically delete the groups formerly managed by the sync from Duo as long as they are not also used as a Duo Single Sign-On (SSO) routing rule condition.
-
Phones previously imported remain in Duo attached to the same users. Activation status remains unchanged.
To delete an external directory SCIM integration, click Delete SCIM Integration at the top-right of that integration's details page and confirm that you want to delete that integration.
Manage Synced Users and Groups
Sync Multiple Directories in Duo
You can configure multiple syncs with different source directories of any type and import all those users and groups into Duo. If you do this, ensure that the users you select for import have unique names.
If the same username exists in two different sync directory sources, the first sync you create will create or manage the user. Subsequent syncs with the same username get a sync error preventing the sync from affecting those users with the message "Cannot sync a user belonging to another directory sync unless that sync is paused". You can view the error in the Activity Log report for that sync's "completed" event. This error only affects the user in question; it doesn’t halt the sync.
If you want a different sync to be allowed to manage those users (for example to migrate users from one sync to another), you will need to pause the automatic scheduled syncs on the directory sync which currently manages those users.
Update Synced User Information
User attributes imported from an external directory cannot be edited in Duo via the Admin Panel, Admin API, or CSV import. This always applies to the required attributes username, display name, email address, plus phone numbers (if you chose to import phones), and group memberships. Changes to these user attributes should be made in the external directory and then synced over to Duo.
You may edit Duo user properties that aren't imported from an external directory via the Admin Panel, Admin API, or CSV import, including those that correspond with optional SCIM sync attributes you chose not to import. However, if you update your SCIM integration to begin importing values for a previously unconfigured optional attribute, the sync will overwrite any previously configured values with the information imported from your external directory.
Examples:
-
You do not specify an attribute mapping for Notes when you create your generic inbound SCIM configuration. The sync imports the username, email address, and name information from the external directory, but imports no notes information. You can edit the "Notes" field for synced Duo users, but you may not edit the "Username", "Display Name", "First Name", "Last Name", or "Email Address" properties for synced users.
-
You specify a source attribute for Username Alias 1 but not for the remaining aliases. The sync imports values for "Username Alias 1" from the external directory, and no other aliases. You can't edit "Username Alias 1" for a synced user, but you can edit additional aliases beyond the first.
-
You do not specify a source attribute for Username Alias 1. The sync creates users with no aliases, and you manually add values for "Username Alias 1" to some Duo users from the Admin Panel. You update your generic inbound SCIM configuration to add a source attribute for Username Alias 1. The next push updates the "Username Alias 1" value for all provisioned users to match the value in the external directory, overwriting the aliases you added manually.
Bypass Status for Synced Users
Users imported from an external directory may have bypass status assigned individually or at the group level. See the Using Groups and User Status Administration documentation for more information.
Disabled Status for Synced Users
Duo does not continuously sync user status as an attribute from external SCIM directories. Changing a user's status field in your directory does not automatically update their status in Duo unless the identity provider sends an explicit SCIM request (such as a PATCH with active: false) to deactivate the user, as described in Deactivate or Delete Synced Users. Administrators may also update the status of a user managed by inbound SCIM to "Disabled" from the Duo Admin Panel or Admin API.
You may disable a group of provisioned users by changing the status of that group in Duo to Disabled. This prevents any user who is a member of that group from logging in with Duo, regardless of that individual user's status. See the Using Groups and Group Status Administration documentation for more information.
Deactivate or Delete Synced Users
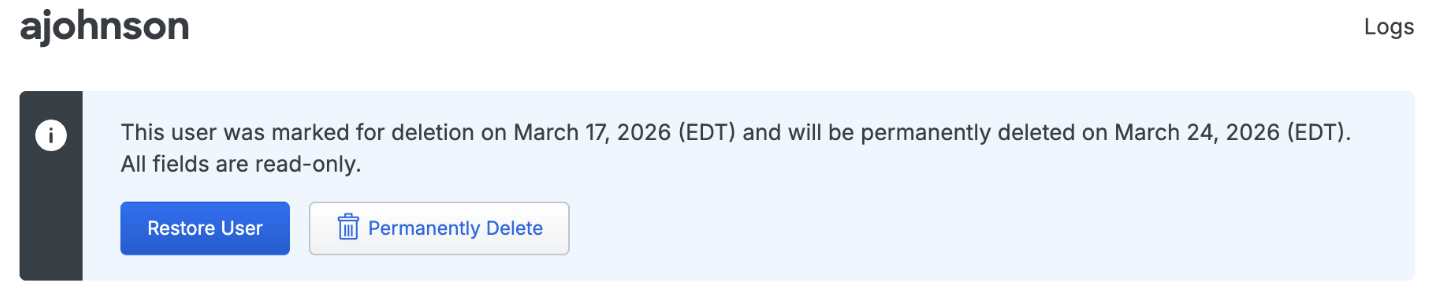
You may not delete a synced user from Duo as long as the external directory is actively managing that user. When your identity provider deactivates a user, it sends a SCIM request to Duo (typically a PATCH with active: false) that sets the user's status to "Disabled", so the user can no longer authenticate to Duo. Duo removes the SCIM source link, disconnecting the user from sync management. The user remains in Duo, and their properties become editable. If your identity provider sends a SCIM DELETE request for a user, Duo sends that user to the Trash, marked as "Pending Deletion", and the user can no longer authenticate to Duo.
To fully remove a deactivated user, you can manually delete the disabled user from the Admin Panel or via the Admin API. Deleted users are sent to the Trash and marked as "Pending Deletion."
If you reactivate the user in your identity provider, it sends a new SCIM request to re-enable the user in Duo, and inbound SCIM resumes management of the user. This applies whether the user is in "Disabled" status or is in the Trash pending deletion (within the seven-day window before permanent deletion).
Locate users pending deletion in the Trash view, accessed by clicking the Trash count shown at the top of the Users page.
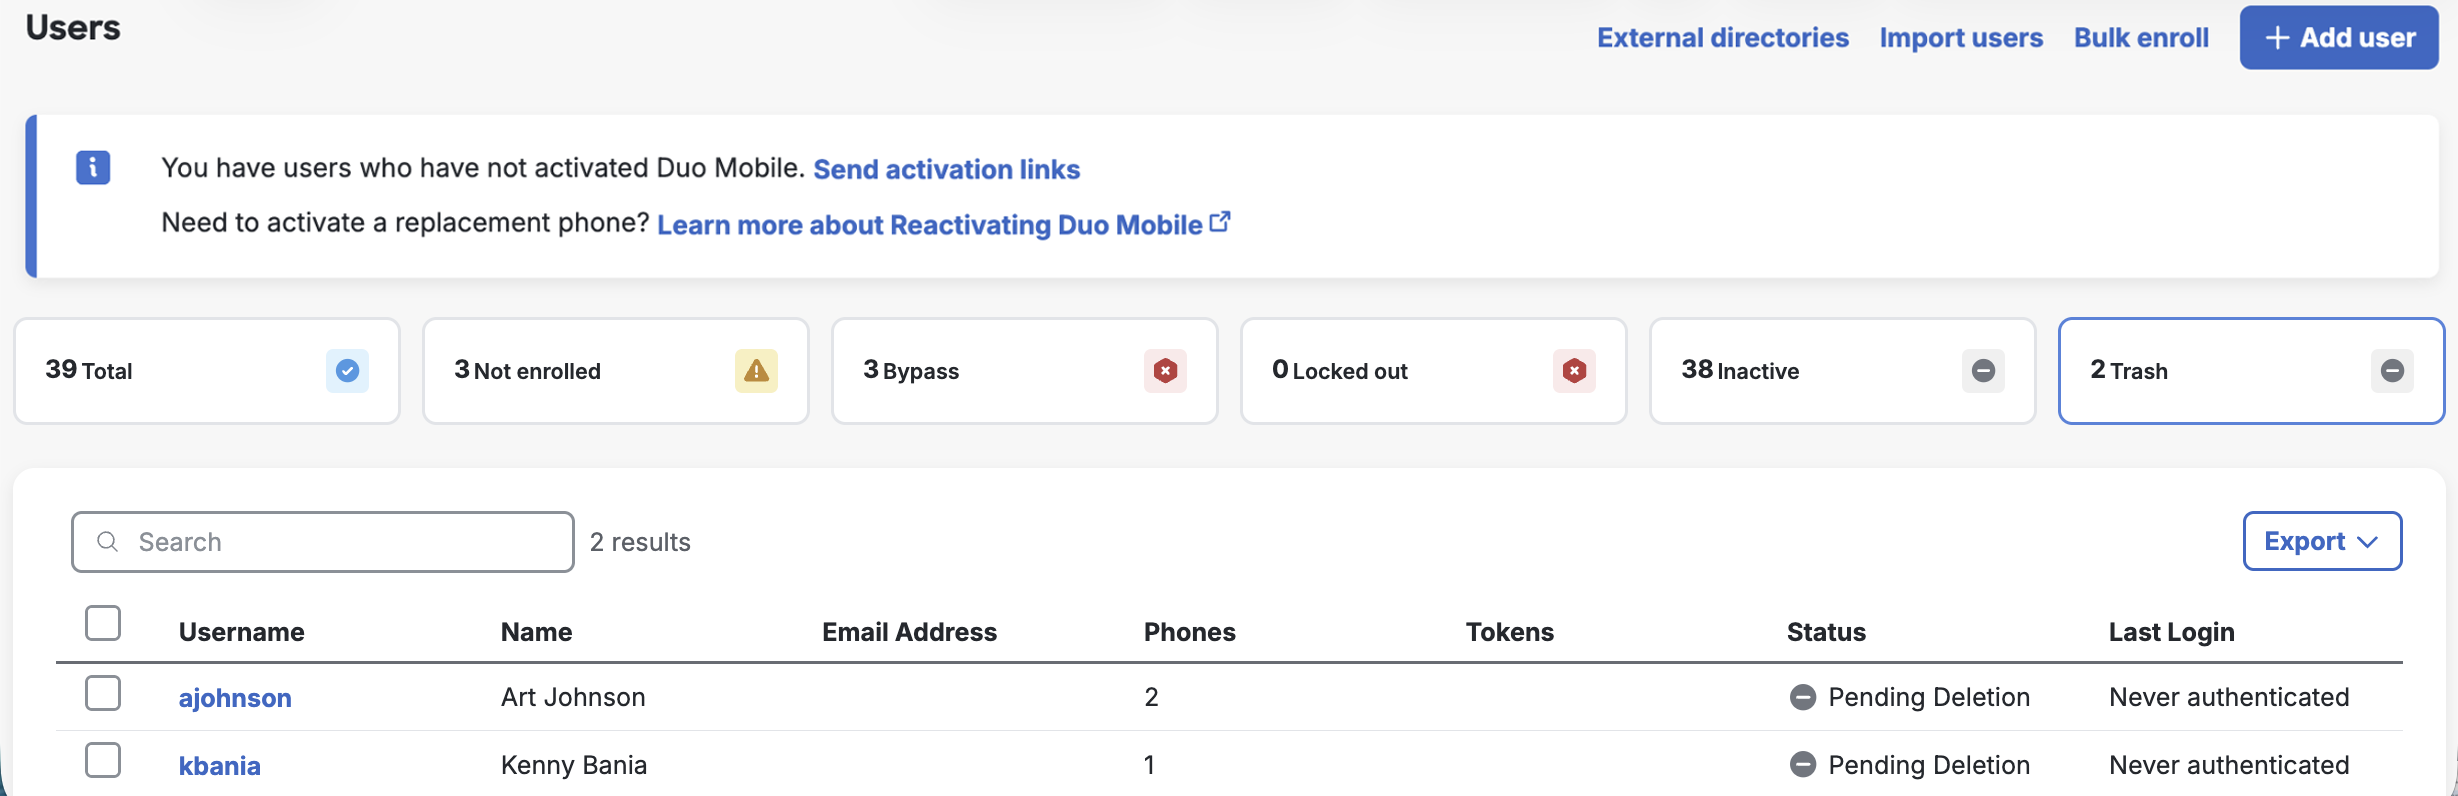
If the deleted user is not restored from the Trash or reconnected to an external directory account via provisioning within seven days, the user is automatically and permanently deleted from Duo. The user's properties show the target date for deletion. A Duo admin can manually delete a user from the Trash via the Permanently Delete link at any time during those seven days.
Manage Provisioned Groups
Duo groups provisioned from an external directory may only be managed by the sync. You can't change the group's members interactively from the Admin Panel interface, via CSV import, or programmatically with the Admin API.
To update the members of a managed group, make the necessary changes in the source directory so they may be pushed over the SCIM connection.
Groups managed by SCIM provisioning are identified as such in the Admin Panel and Admin API output. When viewing groups in the Admin Panel, you'll see from Generic SCIM Sync "name of SCIM integration" appended to the group's name or as the group's description. In Admin API output the sync information is appended to the group's name.
You can have multiple syncs managing groups with the same name (such as a "Duo Users" group managed by AD sync and also a "Duo Users" group managed by a generic SCIM sync), or even a manually created "Duo Users" group not managed by any sync. Each sync-managed group only contains Duo user members managed by the same directory sync, and an unmanaged group can only contain users also not managed by any directory sync.
Removing a group from the directory's configuration in Duo marks any members of that group for deletion if they are not members of another synchronized group, and converts the group to unmanaged so it can be modified or deleted from the Duo Admin Panel or Admin API. Duo updates the group's name to indicate it was once managed by directory sync, changing from Group name from Generic SCIM Sync "name of SCIM integration" to Group name (formerly from "name of SCIM integration"). You cannot delete groups formerly managed by the generic SCIM sync from Duo as long as a Duo Single Sign-On (SSO) routing rule condition uses them.
Delete Provisioned Groups
To delete a group from Duo that is managed by generic inbound SCIM provisioning you can unassign the outbound SCIM provisioning configuration from the group in the external directory so that the sync no longer manages that group in Duo, allowing you to manually delete it.
If your external directory has an option to delete groups in the provisioning target when you delete groups from the directory you can enable it so that SCIM provisioning configuration can delete groups from Duo.
Troubleshooting
Need some help? Take a look at the Generic Inbound SCIM Frequently Asked Questions (FAQ) page or try searching our generic inbound SCIM Knowledge Base articles or Community discussions. For further assistance, contact Support.
Network Diagram
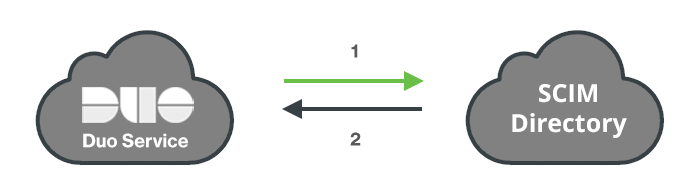
- Duo connects to the external SCIM directory.
- Users and groups pushed from the external SCIM directory to Duo's service.