Skip navigation
Documentation

Duo Trusted Endpoints - Active Directory Domain Services

Last Updated: December 15th, 2023

Certificate-based Trusted Endpoint verification for Active Directory DS will reach end-of-life in a future release. Migrate existing Active Directory Domain Services Certificate Deployment management integrations to Active Directory with Duo Desktop. Learn more about the end-of-life timeline and migration options in the Duo Trusted Endpoints Certificate Migration Guide.

Overview

Duo's Trusted Endpoints feature secures your sensitive applications by ensuring that only known devices can access Duo protected services. When a user authenticates via the Duo Prompt, we'll check for the presence of Duo Desktop or a Duo device certificate on that endpoint. You can monitor access to your applications from trusted and untrusted devices, and optionally block access from unmanaged, untrusted devices.

Trusted Endpoints is part of the Duo Essentials, Duo Advantage, and Duo Premier plans.

Requirements

Ensure you have the following access and privileges:

Active Directory with Duo Desktop

This integration relies on having Duo Desktop present on your Active Directory (AD) domain-joined Windows endpoints. When users authenticate to applications protected with Duo's browser-based prompt, Duo matches the domain information reported by Duo Desktop with the management integration configuration.

Prerequisites

  • The Windows client systems must be directly joined to the Active Directory domain that you specify (via SID) during Active Directory with Duo Desktop configuration for trusted status confirmation.

  • The logged-in Windows user must be a domain account from the Active Directory domain that you specify (via SID), or trust verification during Duo authentication will fail.

  • Deploy Duo Desktop to your Windows endpoints. Refer to the Duo Desktop documentation to learn about different options for deploying the application.

    Note that you do not need to configure a Duo Desktop policy in order to use Active Directory Domain Services with Duo Desktop for endpoint verification.

Create the Active Directory with Duo Desktop Integration

  1. Log in to the Duo Admin Panel and navigate to Trusted Endpoints.
  2. If this is your first management integration, click the Get started button at the bottom of the Trusted Endpoints introduction page. If you're adding another management integration, click the Add Integration button you see at the top of the page instead.
  3. On the "Add Management Tools Integration" page, locate Active Directory Domain Services in the list of "Device Management Tools" and click the Add this integration selector.
  4. Choose Windows from the "Recommended" options, and then click the Add button.

The new Active Directory with Duo Desktop integration is created in the "Disabled" state. You'll turn it on when you're ready to apply your Duo trusted endpoints policy.

Please note that this integration requires Duo Desktop to be installed on the device to be considered trusted.

Keep the Admin Panel open in your browser to complete the next steps of obtaining your domain information and providing it to the Duo management integration.

Configure Active Directory with Duo Desktop

  1. Log in to a domain controller or other Windows system with the RSAT package installed.

  2. Launch PowerShell and paste in this cmdlet string:

    (Get-ADDomain | Format-Table -Property DomainSID -HideTableHeaders | Out-String).Trim() | clip

    This obtains the security identifier (SID) value for your AD domain and copies it to your clipboard automatically. You shouldn't see any output in the PowerShell window.

    If you receive an error message stating "The term 'Get-ADDomain' is not recognized as the name of a cmdlet, function, script file, or operable program" then the ActiveDirectory PowerShell module may not be installed on the system where you ran the command. Install RSAT or locate a different system that has the module installed.

  3. Return to the Active Directory with Duo Desktop management integration in the Admin Panel and paste in the copied domain SID in the field provided. It will look similar in format to S-1-5-21-1004336348-1177238915-682003330.

  4. Click Save.

At this point the configured integration is disabled and applies to no users until you finish your deployment

Support for Multiple Domains

If you have endpoints in multiple domains with which you'd like to perform management verification with Duo Desktop, create a new Active Directory with Duo Desktop management integration for each domain, and configure each management integration with the unique SID for each domain. This also applies to child domains in a forest or external trusted domains.

Finish Trusted Endpoints Deployment

Once your managed computers have Duo Desktop installed, you can update the Trusted Endpoints policy to start checking for management status as users authenticate to Duo-protected services and applications.

When your trusted endpoints policy is applied to your Duo applications, return to the Active Directory with Duo Desktop management integration in the Admin Panel. The "Change Integration Status" section of the page shows the current integration status (disabled by default after creation). You can choose to either activate this management integration only for members of a specified test group or groups, or activate for all users.

Enable Trusted Endpoints Management Integration

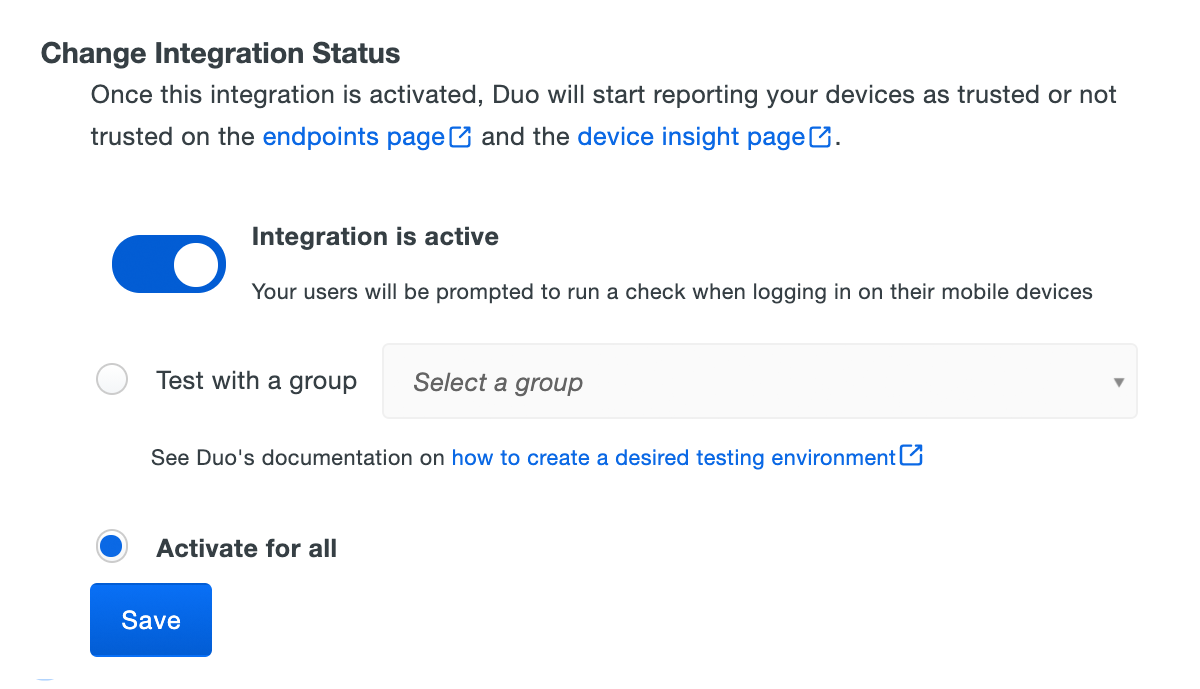
Duo Premier and Duo Advantage customers: The Device Insight and Endpoints pages in the Duo Admin Panel show trusted and untrusted access device status.

As more of your devices have Duo Desktop installed you can change the integration activation to apply to all users (if you just targeted test groups before), adjust your trusted endpoints policy to expand the target group, apply it to additional protected services, or start blocking access to applications from devices that do not pass the managed endpoint check. See the Trusted Endpoints documentation for more information.

Removing the Active Directory Management Integration

Deleting a trusted endpoints Active Directory management tool integration from the Duo Admin Panel immediately prevents identification of domain-joined devices from that configured domain using Duo Desktop. Be sure to unassign your trusted endpoints policy from all applications or remove the "Trusted Endpoints" configuration item from your global policy before deleting an existing Active Directory with Duo Desktop integration from "Trusted Endpoints Configuration". Leaving the policy settings in place after deleting a management tools integration may inadvertently block user access to applications.

If you also have a legacy AD DS certificate-based management integration system configured, deleting the new Active Directory Domain Services integration that uses Duo Desktop does not invalidate any certificates issued by the legacy AD DS integration.

Leaving the policy settings in place after deleting a management tools integration may inadvertently block user access to applications.

Active Directory Domain Services Certificate Deployment

Before enabling the Trusted Endpoints policy on your applications, you'll need to deploy the Duo device certificate to your managed devices. This guide walks you through using Active Directory Domain Services (AD DS) and Group Policy Objects (GPOs) to enable automatic certificate enrollment on your domain-joined Windows computers.

End of Life Information

Certificate-based Trusted Endpoint verification using Active Directory will reach end of support in a future release. We recommend that new Trusted Endpoints deployments use Active Directory with Duo Desktop.

Customers with existing Active Directory Domain Services Trusted Endpoints configuration should consider migrating your certificate-based AD integration to Active Directory with Duo Desktop.

Use of Duo Desktop for trust attestation provides several advantages over the use of device certificates:

  • It provides a more accurate assessment of your domain member computers, and removes concerns about long-lived certificates present on devices no longer managed by your organization.
  • It extends support to Firefox users. Trusted Endpoint certificate detection only works with Chrome, Edge, Safari, and Internet Explorer (depending on the management system).
  • Improves trust detection for web browsers and thick client applications.

Duo continues to support existing AD certificate deployments and will do so until the integration reaches end-of-support status.

Prerequisites

  • Access to the Duo Admin Panel as an administrator with the Owner, Administrator, or Application Manager administrative roles.
  • An Active Directory domain account which is a member of both the Enterprise Admins and Domain Admins groups.
  • A domain-joined Windows 2016 server to host the Duo Certificate Gateway software. The full specifications for this server are detailed in the Deploy the Duo Certificate Proxy section of this guide.

Video Overview


Create the Active Directory Domain Services Integration

  1. Log in to the Duo Admin Panel and navigate to Trusted Endpoints.
  2. If this is your first management integration, click the Get started button at the bottom of the Trusted Endpoints introduction page. If you're adding another management integration, click the Add Integration button you see at the top of the page instead.
  3. On the "Add Management Tools Integration" page, locate Active Directory Domain Services in the list of "Device Management Tools" and click the Add this integration selector.
  4. Choose Windows from the "Legacy" options, and then click the Add button.

The new Active Directory Domain Services integration is created in the "Disabled" state. You'll turn it on when you're ready to apply your Duo trusted endpoints policy.

Deploy the Duo Certificate Proxy

Provision a host server then install and configure the Duo Certificate Proxy.

Prepare the Duo Certificate Proxy Server

  1. Set up a Windows server to host the Duo Certificate Proxy and join it to the same AD domain as the users and computers who will be authenticating from trusted endpoints. Do not install on a domain controller or an Enterprise PKI.

    The minimum system requirements for the Duo Certificate Proxy are:

    • Form Factor: Physical or virtual machine
    • Processor: Two processors of 2 GHz or faster
    • Memory: 8 GB RAM or greater
    • Disk Storage: 100 GB or greater
    • Network Adapter: Single network adapter with TCP/443 outbound Internet access
    • Operating System: Windows Server 2016 (server core or full desktop)
  2. Apply all critical and important updates to the server from Windows Update, including the .NET Framework 4.5.2.

  3. If deploying the Duo certificate proxy on Windows 2012 R2, install the Windows 10 Universal C Runtime (CRT) on the server. Skip this step if deploying on Windows 2016.

  4. If the server is running a local firewall, you'll need to open up TCP ports 135 and 1024-65535 for DCOM and RPC inbound access from your domain computers to the Duo Certificate Proxy. Here's how to permit access to these ports in the Windows Firewall:

    1. Go to Control PanelWindows Firewall and click Advanced Settings on the left.
    2. Right-click the Inbound Rules node, and click New Rule.
    3. On the "Rule Type" page, select Custom; click Next.
    4. On the "Program" page, set the rule to All programs; click Next.
    5. On the "Protocol and Ports" page, select TCP as the Protocol Type", RPC Dynamic Ports as the "Local Port", and Specific Ports as the "Remote Port" from the drop-down menus. Enter 135, 1024-65535 in the "Remote port" field, and then click Next.
    6. On the "Scope" page, leave both "Which local IP addresses does this rule apply to?" and "Which remote IP addresses does this rule apply to?" set to Any IP Address. Click Next.
    7. On the "Action page, select Allow the connection, and click Next.
    8. On the "Profile" page, select only the Domain network option, and then click Next.
    9. On the "Name" page, enter a name to identify the rule, for example, Duo RPC/DCOM. Click Finish.

    Verify that the new Windows Firewall inbound rule is enabled.

    Inbound RPC/DCOM Firewall Rule
  5. If you have blocked HTTP access on TCP port 80, you should also open that up to the certificate proxy destination server before proceeding.

Install and Configure the Duo Certificate Proxy

  1. Log on to the server as a domain user who is a member of both the Domain Admins and Enterprise Admins groups. If you were added to either of those groups during your current logon session then you need to log out and back in for your new privileges to take effect.

  2. Download and launch the Duo Certificate Proxy installer (view checksums for Duo downloads here). Follow the on-screen prompts to install the application. Specify the destination folder (the default location is C:\Program Files\Duo Security\Duo Certificate Proxy\).

  3. Leave the Launch Duo Certificate Proxy Wizard option checked on the final screen of the installer, and click Finish. The Duo Certificate Proxy wizard opens automatically.

    Duo Certificate Proxy Installer - Welcome

    The wizard verifies that you are an AD enterprise and domain admin when you click Next on the welcome page.

  4. Switch to your Duo Admin Panel browser window, open to the "Active Directory Domain Services" management tools integration. Click to view the secret key in the "Install the Duo Certificate Proxy" section of the page (step 2), and then select and copy the revealed secret key to your clipboard.

    AD DS Secret Key in Duo Admin Panel
    Treat your secret key like a password
    Don't share it with unauthorized individuals or email it to anyone under any circumstances!
  5. Return to the Duo Certificate Proxy Wizard and paste the secret key you just copied from the Admin Panel into the "Paste secret key here" box. Click Next.

    Duo Certificate Proxy Wizard - Input Secret Key
  6. Choose the certificate type (or types) you wish to deploy, based on the certificate lifetimes you want used in your environment.

    Long-lived certificates These certificates expire one year from issuance. This is the best option for most Duo deployments.
    Short-lived certificates These certificates expire one week (seven days) from issuance. Select this option when you have users who need certificates reissued more frequently than the one year default. For example, you have virtual desktop users whose VDI endpoints are redeployed periodically, or a group of contractors who aren't expected to use the same workstations for a year.
    1 Day certificates These certificates expire one day after they're issued. Typically this option is used for testing trusted endpoints verification, and shouldn't be used for production.
    Duo Certificate Proxy Wizard - Select Certificate Type

    You can select one or multiple certificate types, and assign your selected certificate types to different user groups in the next step.

  7. Specify the AD group or groups containing the users who will receive the Duo certificate for each type of certificate you selected in the next step. When piloting trusted endpoints in your environment we recommend targeting a group of test users during initial configuration. You can return to the Duo Certificate Proxy configuration wizard later to add additional groups after verifying certificate enrollment and trusted endpoint reporting and access for the test group.

    Either click the Select button and type in all or part of an AD domain group, or type in the full name of the AD target group directly into the configuration wizard and click Validate to check the group name against AD. To specify more than one group separate the group names with a comma (without any spaces before or after the comma).

    Duo Certificate Proxy Wizard - Select Long-lived Groups

    Click Next after validating the domain group name(s).

    If you enabled more than one certificate type (e.g. both long-lived and short-lived), repeat the group selection operation for each certificate type.

    Duo Certificate Proxy Wizard - Select Short-lived Groups

    Note that you may not assign different certificate types to the same AD group.

  8. Pick the trust configuration method. If your organization has an existing PKI OR if you have Windows 10 or Windows Server 2016+ clients that you plan to verify as Duo trusted, select the Trust the Duo root option. If no public key infrastructure (PKI) exists in your environment (such as Active Directory Certificate Services) and no Windows 10 or Server 2016+ systems will authenticate as Duo trusted endpoints, select the first option Install Duo root certificate as untrusted.

    Duo Certificate Proxy Wizard - Trust Config

    Do not choose the Manual setup of Duo root option without first contacting Duo Support.

  9. Double-check your selected certificate types, domain group assignments, and trust configuration. If everything looks correct, click Confirm.

    Duo Certificate Proxy Wizard - Confirmation
  10. You've completed the initial Duo Certificate Proxy configuration. Exit the wizard and proceed to Group Policy configuration.

    Duo Certificate Proxy Wizard - Finish

Configure Duo Group Policy

Create a new Group Policy object (GPO) for Duo certificate deployment and browser configuration, and then apply the new GPO to target users. For additional information about using GPOs, please see Microsoft's Group Policy documentation collection.

Create the Duo Certificate GPO

  1. On your domain controller or another system with the Windows Remote Server Administration Tools installed, launch the Group Policy Management console (GPMC).

  2. Expand your forest and navigate down the tree to Group Policy Objects. Right-click the Group Policy Objects folder and click New. Enter a name for the new GPO (such as "Duo Certificate Policy") and click OK.

  3. Right-click the new GPO created in step 2 and click Edit.

  4. To enable automatic retrieval of the Duo device certificate by domain clients, navigate to User Configuration\Policies\Windows Settings\Security Settings\Public Key Policies and double-click Certificate Services Client - Auto-Enrollment in the right pane of the policy editor.

  5. On the "Enrollment Policy Configuration" settings tab, set the "Configuration Model" to Enabled and enable both the Renew expired certificates, update pending certificates, and remove revoked certificates and Update certificates that use certificate templates options.

    Auto-Enrollment Group Policy

    Click OK to close the Auto-Enrollment properties window.

  6. To enable automatic selection of the Duo certificate by Internet Explorer on the client endpoints, navigate to User Configuration\Preferences\Windows Settings\Registry.

  7. Download these XML files from Duo and save them in a location accessible from the GPMC console: hkcu_v2.xml (4 kb) and hklm_v2.xml (4 kb

  8. Return to the Group Policy editor window. Copy the downloaded hkcu_v2.xml XML file (from an Explorer window — not the file contents) and paste it into the "Registry" pane on the right of the GPO editor window. When asked if you are sure you want to import the pasted document, click Yes.

    This adds registry settings under the following keys to the GPO:

    HKEY_CURRENT_USER\Software\Microsoft\Windows\CurrentVersion\Internet Settings\Zones\1
    HKEY_CURRENT_USER\SOFTWARE\Policies\Microsoft\Windows\CurrentVersion\InternetSettings\ZoneMap\Domains\duosecurity.com

    AD DS HKCU Registry Settings in GPO

    These registry values allow Internet Explorer and Edge to automatically select the Duo device certificate when requested by the Duo browser prompt. If you don't push these registry settings to your Windows clients, then Internet Explorer prompts users to manually select the Duo certificate during authentication.

  9. Copy and paste the downloaded hklm_v2.xml XML file (from an Explorer window — not the file contents) into the "Registry" pane on the right of the GPO editor window. Confirm import of the pasted document by clicking Yes.

    This adds registry settings under the following keys to the GPO:

    HKEY_LOCAL_MACHINE\SOFTWARE\Policies\Google\Chrome\AutoSelectCertificateForUrls
    HKEY_LOCAL_MACHINE\SOFTWARE\Policies\Microsoft\Edge\AutoSelectCertificateForUrls
    HKEY_LOCAL_MACHINE\Software\Microsoft\Windows\CurrentVersion\Internet Settings\Zones\1
    HKEY_LOCAL_MACHINE\SOFTWARE\Policies\Microsoft\Windows\CurrentVersion\InternetSettings\ZoneMap\Domains\duosecurity.com

    AD DS HKLM Registry Settings in GPO

    These registry values let Internet Explorer, Edge Chromium, and Chrome automatically select the Duo device certificate when requested by the Duo browser prompt without prompting the user interactively to select the certificate.

  10. When you've finished configuring all settings, close the Group Policy editor window.

Apply the Duo GPO to Domain Users

  1. Click the Delegations tab of the new Duo certificate GPO, and then click the Advanced button in the lower right corner.

  2. Click the Add... button on the "Security" tab. Enter Domain Computers in the "Select Users, Computers, Service Accounts, or Groups" dialog, and click OK.

  3. Click on the Domain Computers group in the "Group or user names" list to select it. In the "Permissions for Domain Computers" area in the bottom half of the security settings window check the boxes for Read and Apply group policy in the "Allow" column. Click OK.

    AD DS GPO Delegation Config
  4. The default GPO security filtering applies the new policy to all domain authenticated users. Restrict this new GPO so that it applies to only members of the domain group(s) you specified during Duo Certificate Proxy configuration.

    Click the Scope tab of the new Duo certificate GPO. In the "Security Filtering" section, click Authenticated Users to select and then click Remove.

    Next, click the Add button under "Security Filtering". Select the same domain group(s) you selected on the "Select AD Group" page of the Duo Certificate Proxy configuration wizard and click OK. Those groups are added to the "Security Filtering" list alongside the Domain Computers group.

    AD DS GPO Scope Config
  5. The final step is linking the policy. Right-click on your domain in the left side of the GPMC console and select Link an Existing GPO.... Select the new Duo certificate GPO in the list of Group Policy objects and click OK. The "Links" section of the GPO's "Scope" tab shows the linked locations.

    AD DS GPO Scope Config
  6. Exit the Group Policy Management Console.

Verify Your Setup

Confirm that the Duo Certificate Proxy is working by manually applying the Duo GPO settings on an endpoint.

  1. Log on to a domain-joined client PC as a member of the pilot group specified during the Duo Certificate Proxy group selection and in the Duo certificate GPO scope.

  2. Open a command prompt window and type in this command:

    gpupdate /force
  3. After the policy update completes, type in this command:

    gpresult /v

    In the gpresult output, look for the your new Duo GPO in the "Applied Group Policy Objects" list.

    AD DS GPO Verification
  4. If the Duo certificate enrollment GPO was successfully applied, check that the Duo certificate was successfully obtained via the Duo Certificate Proxy server. In the same command prompt window where you ran gpresult, type in this command:

    certmgr.msc
  5. Expand Certificates - Current User\Personal\Certificates. Look for the Duo Device Authentication certificate in the list.

    AD DS Certificate Verification
  6. Finally, verify the Chrome and Internet Explorer registry changes from the GPO. In the same command prompt window where you ran gpresult, type in these commands to check for the new IE and Chrome settings.

    reg query "HKEY_CURRENT_USER\Software\Microsoft\Windows\CurrentVersion\Internet Settings\Zones\1"
     reg query HKEY_LOCAL_MACHINE\SOFTWARE\Policies\Google\Chrome\AutoSelectCertificateForUrls

    You should see the information highlighted in the image below.

    AD DS Registry Verification

Finish Trusted Endpoints Deployment

Once your domain users' computers apply the new certificate GPO settings and receive the Duo certificate you can configure the Trusted Endpoints policy to start checking for the certificate as users authenticate to Duo-protected services and applications. The Device Insight and Endpoints pages in the Duo Admin Panel show which access devices have the Duo certificate present.

Return to the Active Directory Domain Services management integration in the Duo Admin Panel and click the Activate button at the bottom of the page so that the Device Insight and Endpoints pages in the Duo Admin Panel show trusted and untrusted access device status.

As more of your devices receive the Duo certificate you can change the integration activation to apply to all users (if you just targeted test groups before), adjust your trusted endpoints policy to expand the target group, apply it to additional protected services, or start blocking access to applications from devices that do not have the Duo certificate. See the Trusted Endpoints documentation for more information.

Expand Duo Certificate Configuration to Additional Groups

If you expand your trusted endpoints rollout by targeting additional user groups (as opposed to adding new users to the groups selected during initial configuration), you'll also need to add those additional groups to the Duo certificate GPO scope and the Duo Certificate Proxy configuration.

To add additional groups to the GPO scope:

  1. Launch the Group Policy Management Console (GPMC) and view the "Scope" tab of the Duo certificate GPO.

  2. Click the Add button under "Security Filtering". Select the domain group(s) you want to add to the policy and click OK.

To add additional groups to the Duo Certificate Proxy:

  1. Log on to the Duo proxy server as an enterprise and domain administrator.

  2. Launch the Duo Certificate Proxy Configuration application from the Start Menu.

  3. Proceed through the wizard to the "Select AD Group" page. Type in the additional group name or names, separating each with a comma. Click the Validate button to verify your input.

    Duo Certificate Proxy Wizard - Select Groups
  4. Continue moving through the configuration wizard. Confirm the group changes and exit the wizard after completing the update.

    Duo Certificate Proxy Wizard - Select Groups

Removing the AD DS Management Integration

Deleting a trusted endpoints management tool integration from the Duo Admin Panel immediately invalidates issued Duo device authentication certificates. Be sure to unassign your trusted endpoints policy from all applications or remove the "Trusted Endpoints" configuration item from your global policy before deleting an existing AD DS integration from "Trusted Endpoints Configuration". You should also unlink or delete your auto-enrollment GPO in the Group Policy Management console.

Leaving the policy settings in place after deleting a management tools integration may inadvertently block user access to applications.

Certificate Enrollment Network Diagram

Duo Certificate Enrollment Process
  1. Domain user logs on to AD member workstation client.
  2. Client receives auto-enrollment GPO from domain controller.
  3. Client submits certificate enrollment request to the on-premises Duo Certificate Proxy.
  4. The Duo Certificate Proxy forwards the request to Duo's cloud-hosted PKI.
  5. Duo's PKI issues the device certificate and sends it back to the Duo Certificate Proxy.
  6. The Duo Certificate Proxy delivers the Duo device certificate to the domain user's Personal certificate store on that workstation.

Troubleshooting

Need some help? Take a look at our Trusted Endpoints Knowledge Base articles or Community discussions. For further assistance, contact Support.