Duo Trusted Endpoints - Generic Management with Duo Desktop
Last updated:
Overview
Duo's Trusted Endpoints feature secures your sensitive applications by ensuring that only known devices can access Duo protected services. When a user authenticates via the Duo Prompt, we'll compare device identifiers collected by Duo Desktop installed on that endpoint with the identifiers of known Windows, macOS, and Linux devices stored in Duo. You can monitor access to your applications from trusted and untrusted devices, and optionally block access from devices not trusted by your organization.
Trusted Endpoints is part of the Duo Essentials, Duo Advantage, and Duo Premier plans.
Before enabling the Trusted Endpoints policy on your applications, you'll need to create a device cache with the identifying information for your known devices in Duo's service using the Device API. This guide walks you through the process of uploading those identifiers to Duo and applying the trusted endpoints policy to users.
Prerequisites
-
Deploy Duo Desktop to your Windows, macOS, and Linux endpoints. Refer to the Duo Desktop documentation to learn about different options for deploying the application and supported operating system versions.
Note that you do not need to configure a Duo Desktop policy in order to use Duo Desktop to determine device trust.
-
Whether you choose to use Duo's provided script to upload your device cache or to create your own script, you must first collect your trusted device identifiers.
Requirements
- Access to the Duo Admin Panel as an administrator with the Owner, Administrator, or Application Manager administrative roles.
- Access to your existing endpoint management system if you plan to export device identifiers from that system. Consult your management system vendor to learn how to export the necessary information.
- Access to run a command on your Windows, macOS, and Linux systems to obtain your endpoint device identifiers if you will not export them from an existing endpoint management system. You can run the command locally on each endpoint or script the command to run remotely.
Collect Device Identifiers
Collect the required device identifiers for your endpoints. Depending on the approach you take to upload your device information to Duo you will create a CSV (comma-separated values) file or JSON list with this information.
The required device identifier attributes are:
-
Windows: The unique device identifier is the MachineGUID. This value is present in the registry at
HKEY_LOCAL_MACHINE\SOFTWARE\Microsoft\Cryptographyand looks like82be363f-5c10-j05h-p00l-d4d80d4156c7.One way to collect this value from your Windows endpoints is to run this PowerShell command at each workstation:
Get-ItemProperty -Path HKLM:\SOFTWARE\Microsoft\Cryptography -Name "MachineGuid" -
macOS: The unique device identifier is the hardware UUID. This value looks like
942477A1-F1C1-58B2-A2D2-B8CA8DA1A671.One way to collect this value from your macOS endpoints is to run this command in the Terminal application at each workstation:
ioreg -d2 -c IOPlatformExpertDevice | awk -F\" '/IOPlatformUUID/{print $(NF-1)}' -
Linux: The unique device identifier is the product/system UUID. This value looks like
3669cf64-3561-11ee-be56-0242ac120002.Starting with Duo Desktop 4.7.0, if the product/system UUID is not available (for example, on virtual machines or containers that do not expose it), the identifier falls back to
/etc/machine-idformatted as a UUID with dashes.Use the following command to collect the identifier from your Linux endpoints. It attempts to read the product/system UUID first and falls back to
/etc/machine-idif that is not available:sudo grep -iE '[1-9a-f]' /sys/class/dmi/id/product_uuid 2>/dev/null || sed -E 's/(.{8})(.{4})(.{4})(.{4})(.{12})/\1-\2-\3-\4-\5/' /etc/machine-id
Create the Generic with Duo Desktop Integration
- Log in to the Duo Admin Panel and navigate to Devices → Trusted Endpoints.
- If this is your first management integration, click the Get started button at the bottom of the Trusted Endpoints introduction page. If you're adding another management integration, click the Add Integration button you see at the top of the page instead.
- On the "Add Trusted Endpoint Integrations" page, locate Generic Integrations in the list of integrations.
- Choose Windows, macOS, or Linux from the "Select operating system" drop-down, and then click the Add button.
The new Generic with Duo Desktop integration is created in the "Disabled" state. You'll turn it on when you're ready to apply your Duo trusted endpoints policy.
Please note that this integration requires Duo Desktop to be installed on the device to be considered trusted.
Keep the Duo Admin Panel open in your browser. You'll need the information from the Generic with Duo Desktop management integration page to create your device identifiers upload script.
Choose your Device Cache Upload Method
If you want to use Duo's provided Device API script to upload and maintain your trusted device cache (recommended), proceed to the next section Create Device Cache with Duo Script. This approach requires Python 3 and a CSV file with device information.
If you would rather create your own script using your preferred language to upload and maintain your trusted device cache via Device API, skip the next section and go to Create Device Cache with Custom Script.
Create Device Cache with Duo Script
We recommend using the Python Device API script automatically generated for you when you created your Generic with Duo Desktop management integration to create and maintain your trusted device cache in Duo.
Download the Duo Script
Important: The downloaded device cache script contains information that uniquely identifies this management integration to Duo. Secure this file as you would any other sensitive or password information. Don't share it with unauthorized individuals or email it to anyone under any circumstances!
-
Return to your Generic with Duo Desktop management integration page in the Duo Admin Panel if you navigated away.
-
Scroll down to the "Approach 1: Use Duo's implementation script" section of the management integration page.
-
Click the Download Script button on the page. The downloaded script is named
device_cache_sync.py.
Create CSV File
Create a CSV file with the Windows, macOS, or Linux device identifiers you collected from your endpoints.
Do not mix Windows, macOS, and Linux device identifiers in a single file for upload to Duo. When you created your Generic with Duo Desktop management integration you selected a single operating system. If you upload identifiers from a different OS using the script for that integration (such as uploading macOS identifiers to a Windows integration), the mismatched OS device will not be seen as trusted.
Create separate management integrations for Windows, macOS, and Linux and always match the device OS of your identifiers to the OS selected for your management integration.
CSV File Format
- The CSV file must contain a single column of device identifiers (the Windows MachineGUIDs, macOS Hardware UUIDs, or Linux product/system UUIDs).
- The first line of the CSV file (the header) must contain the column name
device_id. - The device identifier values in the file must be unique.
A properly-formatted device identifiers CSV file will look like this (example containing Windows MachineGUIDs):
device_id
6984852C-7921-4D8A-AE8C-1B605AD58903
93EA2EAC-0B93-4687-ADDD-44E3AB95D659
7450C1F3-C8FB-4EF0-B445-6FBB5217A399
6143340E-912A-4D40-9840-1624CD77E90D
8FBCEB28-ED33-48C7-9E2D-62ABC5F13794
9BC0D145-904C-498D-8654-8A7617954E8A
A9462540-756E-450A-A39A-F38E967EB575
C45689E3-4DD4-404A-B584-55572A1B2EFB
07280453-53D8-4F8C-A63F-DA3EE93479AE
E0FEFB56-0FE4-4938-B294-5414C0E111D5
Prepare a System to Run the Script
You will need a system where you can run the Duo Python device cache script. Since you will need to rerun the script periodically to refresh your stored device identifiers, it's a good idea to set this up on a system that will be persistently available.
Once you have determined the system you'll use to run the device cache script:
-
Install Python 3.9 or later on the workstation. The script is not compatible with Python versions before 3.9. Verify your installed Python version.
localhost $ python --version Python 3.9.11 -
Install the open-source
duo-client Python libraryinto the Python 3 environment on your workstation with this command:pip install duo-clientThe tested minimum duo-client version is 4.3.0.
-
Copy the
device_cache_sync.pyscript you downloaded from Duo earlier to this system. -
Copy the CSV file containing device identifiers for the unique management integration to this system.
Run the Device Cache Script
-
Run the
device_cache_sync.pyscript to upload your first cache from the CSV file, using the following syntax:python device_cache_sync.py --infile <your-device-identifiers-file.csv> -
The script will upload the device identifier information from your CSV file into Duo in batches of 1,000 devices until all identifiers from the file have been imported.
localhost $ python device_cache_sync.py --infile devices.csv
 Starting Duo Device Sync Script Version: 1.1.0 Duo_Client Version: 5.0.1
 Starting device sync
 Attempting to create new cache for mkey: DME0XUC77ATL3FNIO5TB
 New cache created cache_key: DC5N756LZBQC9CAV59BY
 Attempting to upload devices count: 999
 999, devices uploaded
 Attempting to activate device cache cache_key: DC5N756LZBQC9CAV59BY
 Activated device cache cache_key: DC5N756LZBQC9CAV59BY
 Devices synced: 999
To see all the options available in the script, use the command python device_cache_sync.py --help.
At this point the configured integration is disabled and applies to no users until you finish your deployment.
Create Device Cache with Custom Script
You can write your own Duo Device API script to handle the creation and maintenance of your trusted device cache in Duo. You will need the hostname and key information from the management integration page in your script.
Important: The Device API script you create will provide information that uniquely identifies this management integration to Duo. Secure this file as you would any other sensitive or password information. Don't share it with unauthorized individuals or email it to anyone under any circumstances!
-
Return to your Generic with Duo Desktop management integration page in the Duo Admin Panel if you navigated away.
-
Scroll down to the "Approach 2: Create a custom script" section of the management integration page.
-
As you create your Device API script, use the Management system key value on the integration page to replace
[mkey]in the Device API examples. -
Take note of the API Hostname, Integration Key, and Secret Key values shown for the management integration. You need this information to connect to the Device API and authenticate your requests. See the Duo Device API documentation for more information about API request authentication.
Your script should handle the following operations:
-
Create a new device cache with pending or active status.
-
Add your device identifiers to the cache in batches of up to 1,000 devices.
-
Activate the cache before use if it was not created with active status.
Create a Device Cache
Create a new device cache:
POST /device/v1/management_systems/[mkey]/device_cacheThis newly created device cache works as a staging area in which you upload pages of device identifiers. The new device cache has a pending state by default and will not be examined for trust checks until the cache activation.
The response contains the cache_key required to perform subsequent operations on this newly created cache.
This endpoint has a single parameter, active, which expects the value to be a string of “True” if you are creating an active cache directly.
A new pending cache cannot be created until the existing pending cache is either deleted or activated, and a new active cache cannot be created until the existing active cache has been deleted.
See full details for this endpoint in the Device API documentation.
Add Devices to the Device Cache in Batches
Add devices to the device cache before or after cache activation:
POST /device/v1/management_systems/[mkey]/device_cache/[cache_key]/devicesThis endpoint has a single parameter, devices, which expects the value to be a JSON serialized list of dictionaries. Each dictionary has a required key called device_id where the value is the string for the device identifier of the trusted endpoint.
[
  {
    "device_id": "93EA2EAC-0B93-4687-ADDD-44E3AB95D659"
  },
  {
    "device_id": "7450C1F3-C8FB-4EF0-B445-6FBB5217A399"
  }
]
Do not mix Windows, macOS, and Linux device identifiers in a single file for upload to Duo. When you created your Generic with Duo Desktop management integration you selected a single operating system. If you upload identifiers from a different OS using the script for that integration (such as uploading macOS identifiers to a Windows integration), the mismatched OS device will not be seen as trusted.
The full JSON string must be URL-encoded and presented to the API as the value of the form parameter devices.
This endpoint can upload up to 1,000 devices in a single batch. Repeat calling this endpoint until all batches of trusted endpoint identifiers have been stored in the cache.
See full details for this endpoint in the Device API documentation.
Delete Devices from the Device Cache
Delete devices from the device cache before or after cache activation:
DELETE /device/v1/management_systems/[mkey]/device_cache/[cache_key]/devicesThis endpoint has a single parameter, devices, which expects the value to be a list of strings. The value of the strings are the device identifiers (device_id) to delete.
[
  {"93EA2EAC-0B93-4687-ADDD-44E3AB95D659","7450C1F3-C8FB-4EF0-B445-6FBB5217A399"
  }
]
Only deletes device identifiers that exist in the given cache_key.
See full details for this endpoint in the Device API documentation.
Retrieve a Device from the Device Cache
Verify a given device with device_id exists in a device cache:
GET /device/v1/management_systems/[mkey]/device_cache/[cache_key]/devicesThis endpoint has a single parameter, device_id, which expects the value to be a string with a single device identifier to find.
93EA2EAC-0B93-4687-ADDD-44E3AB95D659If the device identifier exists in the given device cache the response includes the date the device was added to the cache and the specified device_id.
See full details for this endpoint in the Device API documentation.
Activate the Device Cache
Activate a specified pending cache:
POST /device/v1/management_systems/[mkey]/device_cache/[cache_key]/activateUpdates the specified pending cache to be the active cache for use when evaluating trust checks.
This request deletes the existing active cache for the management integration, replacing it with the pending cache that was just activated.
The original active device cache is no longer examined when evaluating trust checks if an active cache exists.
See full details for this endpoint in the Device API documentation.
Delete a Device Cache
If you need to delete an active or pending device cache:
DELETE /device/v1/management_systems/[mkey]/device_cache/[cache_key]See full details for this endpoint in the Device API documentation.
Retrieve Device Cache Information
Retrieve a specified cache:
GET /device/v1/management_systems/[mkey]/device_cache/[cache_key]If you need to retrieve the caches for this integration:
GET /device/v1/management_systems/[mkey]/device_cacheThere should be at most one active cache and one pending cache.
To remove identifiers from a cache, either delete specific device IDs via the API or upload a new cache.
See full details for these endpoints in the Device API documentation.
Verify Device Cache Information
Before proceeding to the next step, check the uploaded device cache to ensure its returning the expected of identifiers before setting this integration's status to active.
To verify device identifier uploads performed by the Duo-provided script, look at the script’s output. It will report how many devices it attempted to upload, how many device uploads succeeded, and the device cache activation status.
Verify device identifier uploads made by your custom Device API script with a GET Device API request to view the active cache and then verifying the count of synced devices (device_count) in the response.
GET /device/v1/management_systems/[mkey]/device_cacheSee full details for this endpoint in the Device API documentation.
At this point the configured integration is disabled and applies to no users until you finish your deployment.
Restrict Network Access to the API
Optionally specify which IP addresses or ranges are allowed to use this Admin API application in Networks for API Access. If you do not specify any IP addresses or ranges, this Device API application may be accessed from any network.
The Device API performs the IP check after verifying the authentication signature in a request. If you restrict the allowed networks for API access and see logged events for blocked Device API requests from unrecognized IP addresses, this may indicate compromise of your Device API application's secret key.
Finish Trusted Endpoints Deployment
Once your device identifiers have been uploaded you can set the Trusted Endpoints policy to start checking for managed device status as users authenticate to Duo-protected services and applications.
When your trusted endpoints policy is applied to your Duo applications, return to the generic trusted endpoint management integration in the Admin Panel. The "Change Integration Status" section of the page shows the current integration status (disabled by default after creation). You can choose to either activate this management integration only for members of a specified test group, or activate for all users. If you created more than one generic integration, you must activate each one individually.
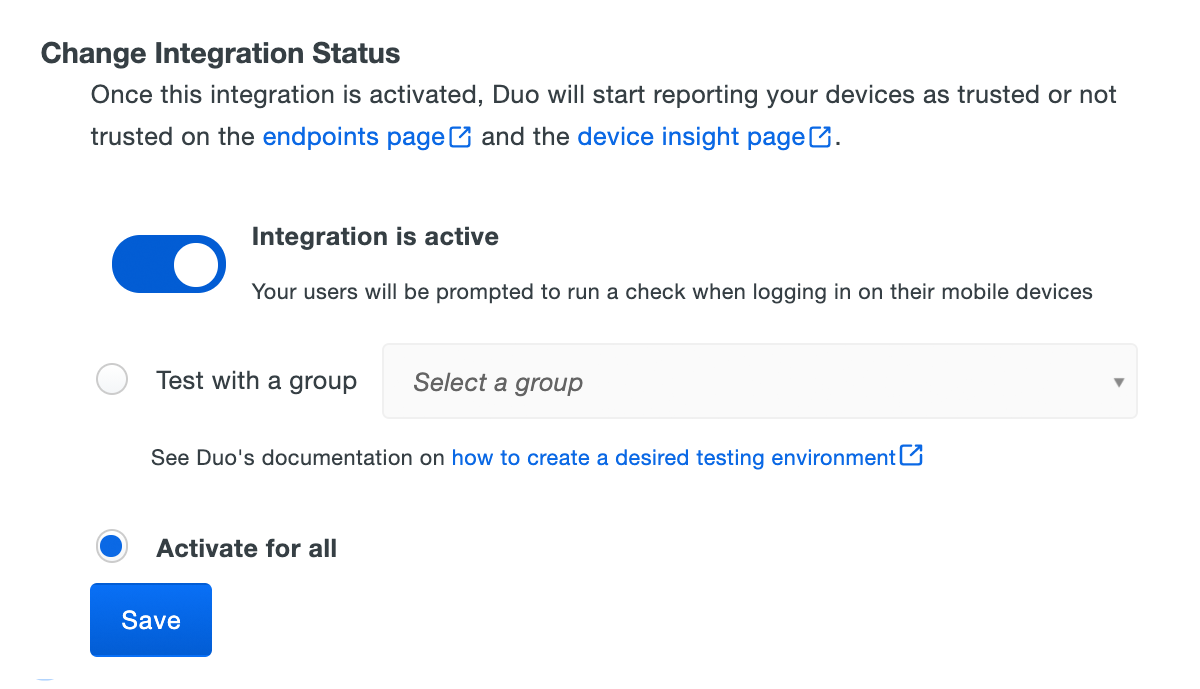
Duo Premier and Duo Advantage plans: The Device Insight and Endpoints pages in the Duo Admin Panel show which access devices are trusted/managed.
Verify Your Setup
When Windows users access Duo-protected resources, Duo Desktop provides device information to Duo. If the information from the device matches the information you imported into Duo, Duo grants access to the trusted device.
Update Endpoint Identifiers Periodically
Upload the device identifiers using Duo's Device API. Daily syncs are recommended as caches do not expire and can become stale.
If you chose to use the Duo-provided sync script, be aware that each time you run it then it will:
- Delete the device cache created the last time you ran the script, including deletion of the previously uploaded device IDs.
- Create and activate a new device cache with all the identifiers from the CSV file you specify
infile.
Your CSV file should contain all identifiers you want to trust at the time you run it, whether they are device IDs you imported before or not. Edit your previously uploaded CSV file, deleting identifiers for any devices you no longer wish to trust, and adding identifiers for any new devices to be trusted. You must still be sure not to mix identifiers from different operating systems in a single file.
Run the script with --help to see all options.
Removing the Generic Management Integration
Deleting a trusted endpoints management tool integration from the Duo Admin Panel can prevent user authentication. Be sure to unassign your trusted endpoints policy from all applications or remove the "Trusted Endpoints" configuration item from your global policy before deleting an existing Generic with Duo Desktop integration from "Trusted Endpoints Configuration".
Leaving the policy settings in place after deleting a management tools integration may inadvertently block user access to applications.
Troubleshooting
Need some help? Take a look at our Trusted Endpoints Knowledge Base articles or Community discussions. For further assistance, contact Support.