Skip navigation
Documentation

Duo Trusted Endpoints - Manual Certificate and Duo Desktop

Last Updated: December 15th, 2023
macOS Certificate Users: Changes required to support macOS 12.3

The macOS 12.3 update removes Python, which was a required dependency for the certificate enrollment script prior to April 7, 2022. After updating a macOS client to 12.3, the Duo Python script fails to perform new certificate issuance and existing certificate renewals.

To address this, download the replacement Duo certificate shell script from the Duo Admin Panel and use it instead of the Python script to issue Duo device trust certificate going forward.

Certificate-based Trusted Endpoint verification for manual certificate deployment will reach end-of-life in a future release. Migrate existing Certs for macOS, Windows, or Linux management integrations to Manual with Duo Desktop. Learn more about the end-of-life timeline and migration options in the Duo Trusted Endpoints Certificate Migration Guide.

Overview

Duo's Trusted Endpoints feature secures your sensitive applications by ensuring that only known devices can access Duo protected services. When a user authenticates via the Duo Prompt, we'll check for the presence of Duo Desktop or a Duo device certificate on that endpoint. You can monitor access to your applications from trusted and untrusted devices, and optionally block access from unmanaged, untrusted devices.

Trusted Endpoints is part of the Duo Essentials, Duo Advantage, and Duo Premier plans.

Requirements

  • Access to the Duo Admin Panel as an administrator with the Owner, Administrator, or Application Manager administrative roles.

Manual with Duo Desktop

When a user authenticates via the Duo Prompt, we'll compare device identifiers collected by Duo Desktop installed on that endpoint with the identifiers of known Windows, macOS, and Linux devices stored in Duo. You can monitor access to your applications from trusted and untrusted devices, and optionally block access from devices not trusted by your organization.

Duo can verify your device’s trusted status with Duo Desktop without the need for a third party management system. Create a "Manual with Duo Desktop Trusted Endpoint" integration to add, manage and remove trusted endpoints. These device identifiers that you provide will be compared to the device identifier values collected by Duo Desktop to determine the endpoint’s trust status. You can add the device IDs manually or via CSV upload. The steps below walk you through how to do this.

Prerequisites

Collect Device Identifiers

Collect the required device identifiers for your endpoints. Depending on the approach you take to upload your device information to Duo, you may create a CSV file.

Windows

  • The unique device identifier is the Machine GUID. This value is present in the registry at:

    HKEY_LOCAL_MACHINE\SOFTWARE\Microsoft\Cryptography
  • This value will look like 82be363f-5c10-j05h-p00l-d4d80d4156c7.

  • One way to collect this value from your Windows endpoints is to run this PowerShell command at each workstation:

    Get-ItemProperty -Path HKLM:\SOFTWARE\Microsoft\Cryptography -Name "MachineGuid"

macOS

  • The unique device identifier is the hardware UUID. This value looks like D44E2E05-5C10-J05H-P00l-D4D46B79D663.

  • One way to collect this value from your macOS endpoints is to run this command in the Terminal application at each workstation:

    ioreg -d2 -c IOPlatformExpertDevice | awk -F\" '/IOPlatformUUID/{print $(NF-1)}'

Linux

  • The unique device identifier is the product/system UUID. This value looks like 3669cf64-3561-11ee-be56-0242ac120002.

  • One way to collect this value from your Linux endpoints is to run this command from the terminal at each workstation:

    sudo dmidecode --string system-uuid

Create a Trusted Endpoints Manual Enrollment Integration

  1. Log in to the Duo Admin Panel and navigate to Trusted Endpoints.

  2. If this is your first management integration, click the Configure Management Tools Integration button at the bottom of the page. If you're adding another management integration, click the Add Integration button you see instead.

  3. On the "Add Management Tools Integration" page, locate Manual Enrollment, select your operating system from the "Recommended" options and then click the Add button.

Add Trusted Device IDs Manually

The first step to trusting your users' devices is to add those device identifiers to your Manual Enrollment trusted device inventory. You can do this by manually adding individual device identifiers in the Duo Admin Panel.

  1. Navigate to the Manual Enrollment integration you created.

  2. Check to see that the "Enter Device IDs" option is selected.

  3. Add up to 25 device identifiers. See how to collect device identifiers.

  4. Add a trust expiry date for each device identifier. The default date is one year from the current date. Newly added rows will inherit the trust expiry date of the row above it.

  5. Add an optional description per device identifier. A description is recommended to assist in keeping track of the device identifiers through search functionality.

  6. Click Add to Inventory.

  7. Repeat steps 3-5 as necessary until your inventory contains your trusted endpoints. You do not have to add all of your trusted endpoints at once, you can add to and remove from your inventory as needed. Your trusted endpoints will remain in your inventory until you delete them.

Add Trusted Device IDs via CSV Upload

You can also add devices to your Manual Enrollment trusted device inventory by uploading a CSV file containing those device identifiers. This is a good way to add many devices at once. You can switch between manually adding devices to the inventory and CSV uploads at will. Both methods will build upon the same trusted endpoint inventory for a given trusted endpoints integration.

Create a CSV File

Create a CSV file with the Windows, macOS, or Linux device identifiers you collected from your endpoints.

The CSV file should contain the following fields:

  • device_id (required): device identifier
  • trust_expiry_date (required): date the device should no longer be trusted in the format YYYY-MM-DD
  • description (optional): description of your choosing up to 255 characters

A properly-formatted device identifiers CSV file will look like this for Windows MachineGUIDs:

device_id,trust_expiry_date,description
6984852C-7921-4D8A-AE8C-1B605AD58903,2024-12-31,device1
7450C1F3-C8FB-4EF0-B445-6FBB5217A399,2024-12-31,device2
8FBCEB28-ED33-48C7-9E2D-62ABC5F13794,2024-12-31,device3
9BC0D145-904C-498D-8654-8A7617954E8A,2024-12-31,device4
A9462540-756E-450A-A39A-F38E967EB575,2024-12-31,device5
C45689E3-4DD4-404A-B584-55572A1B2EFB,2024-12-31,device6
07280453-53D8-4F8C-A63F-DA3EE93479AE,2024-12-31,device7
E0FEFB56-0FE4-4938-B294-5414C0E111D5,2024-12-31,device8

Upload CSV File

  1. Navigate to the Manual Enrollment integration you created.

  2. Check to see that the "Import Device IDs" option is selected.

  3. Click Choose File to select your created CSV file.

  4. Click Upload devices to add devices in your CSV file to your inventory.

Finish Trusted Endpoints Deployment

Once your managed computers have Duo Desktop installed, you can update the Trusted Endpoints policy to start checking for management status as users authenticate to Duo-protected services and applications.

When your trusted endpoints policy is applied to your Duo applications, return to the manual enrollment integration in the Admin Panel. The "Change Integration Status" section of the page shows the current integration status (disabled by default after creation). You can choose to either activate this management integration only for members of a specified test group, or activate for all users. If you created more than one manual enrollment integration, you must activate each one individually. You will still be able to edit your inventory when the integration is activated.

Enable Trusted Endpoints Management Integration

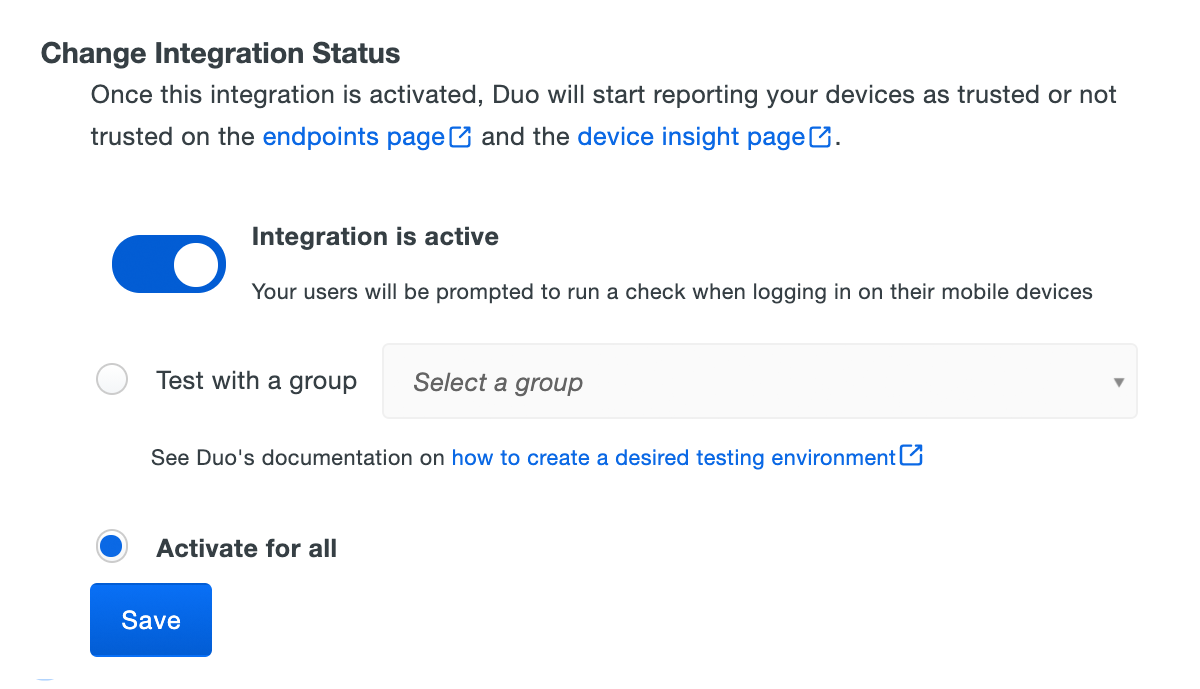
The Device Insight and Endpoints pages in the Duo Admin Panel show trusted and untrusted access device status.

Verify Your Setup

When users access Duo-protected resources, Duo Desktop provides device information to Duo. If the information from the device matches the information stored in Duo, Duo grants access to the trusted device.

Manage Your Trusted Device Inventory

From the Manual Enrollment integration page, you can click the View managed devices button to see a table view of your trusted device inventory. Here, you can search, view statuses, edit properties, and remove devices from your inventory.

Search for a Trusted Device

A trusted device in inventory can be found by searching for any part of the device identifier or its description. Use the search function of the trusted device table on the Manual Enrollment integration page.

View a Trusted Device’s Status

When adding trusted devices to your inventory, a trust expiry date is also required in addition to the device identifier. This trust expiry date determines when a device is no longer considered trusted. A trusted device will become expired at 00:00:00 UTC on the chosen expiry date. Expired devices are not removed from the inventory but will not be trusted in the same way as if they were not in the inventory. They are also shown with an "Expired" label in the table to indicate that they have expired.

Edit a Trusted Device

Edit the properties of one or more trusted devices by selecting the checkbox next to the device in the trusted devices table on the Manual Enrollment integration page. Select either the "Edit descriptions" or "Change trust expiry dates" option in the drop-down menu. Enter your new description or date and click the "Save" button. This change will apply to all devices that you selected.

Remove a Trusted Device

Remove one or many trusted devices by selecting the checkbox next to the device in the trusted devices table on the Manual Enrollment integration page. Then select the "Delete device IDs" option in the drop-down menu. Finally, click the "Delete Devices" button to confirm.

Remove all Trusted Devices

If you have a need to remove all trusted devices from your inventory, at this time the recommended approach is to remove the Manual Enrollment integration and create a new one.

Removing the Manual Enrollment Integration

Deleting a trusted endpoints management tool integration from the Duo Admin Panel can prevent user authentication. Be sure to unassign your trusted endpoints policy from all applications or remove the "Trusted Endpoints" configuration item from your global policy before deleting an existing Manual with Duo Desktop integration from "Trusted Endpoints Configuration".

Leaving the policy settings in place after deleting a management tools integration may inadvertently block user access to applications.

Manual Certificate Instructions

When a user authenticates via the Duo Prompt, we'll check for the presence of a Duo device certificate on that endpoint. You can monitor access to your applications from devices with and without the Duo certificate, and optionally block access from devices without the Duo certificate.

Before enabling the Trusted Endpoints policy on your applications, you'll need to deploy the Duo device certificate to your managed devices.

Once a client authenticates to Duo with this certificate, it becomes associated with that particular endpoint. Therefore, you'll need to repeat the process of downloading and installing a unique Duo certificate from the Duo Admin Panel for each individual system.

Duo's trusted endpoints certificate check works in Google Chrome, Apple Safari, and Internet Explorer browsers.

End of Life Information

Certificate-based Trusted Endpoint verification for manual certificate deployment will reach end-of-life in a future release. Consider migrating your manual certificate integration to Manual with Duo Desktop. Use of Duo Desktop for trust attestation provides several advantages over the use of device certificates:

  • It provides a more accurate assessment of your domain member computers, and removes concerns about long-lived certificates present on devices no longer managed by your organization.
  • It extends support to Firefox users. Trusted Endpoint certificate detection only works with Chrome, Edge, Safari, and Internet Explorer (depending on the management system).
  • Improves trust detection for web browsers and thick client applications.

Duo continues to support existing manual certificate deployments and will do so until the integration reaches end-of-life status in a future update.

Chrome OS Clients

Create the Manual Enrollment Integration

  1. Log in to the Duo Admin Panel and navigate to Trusted Endpoints.
  2. If this is your first management integration, click the Get started button at the bottom of the Trusted Endpoints introduction page. If you're adding another management integration, click the Add Integration button you see at the top of the page instead.
  3. On the "Add Management Tools Integration" page, locate Manual Enrollment in the list of "Device Management Tools" and click the Add this integration selector.
  4. Choose Certs for Chrome OS from the "Legacy" options, and then click the Add button.

The new Manual Enrollment integration is created in the "Disabled" state. You'll turn it on when you're ready to apply your Duo trusted endpoints policy.

Download the Duo Certificate

  1. Click on Chrome OS (Disabled) under "Which device would you like to enroll?" to open the certificate download form.

  2. Enter and confirm an eight character password in Password fields of the Manual Enrollment page's "Download Certificate" section, and then choose one of the certificate lifetime options:

    1 year certificates These certificates expire one year from issuance. This is the best option for most Duo deployments.
    7 days certificates These certificates expire one week (seven days) from issuance. Select this option when you have users who need certificates reissued more frequently than the one year default. For example, you have virtual desktop users whose VDI endpoints are redeployed periodically, or a group of contractors who aren't expected to use the same workstations for a year.
    Certificate Download from Duo Admin Panel
  3. Click the Download Certificate button. The Duo device authentication certificate downloads as a PKCS#12 (.p12) file. Remember, this certificate should only be used to identify one user's system.

The new manual certificate integration is still inactive at this point. Import the certificate to your client system first before returning here to enable it.

Import the Certificate

The certificate import steps should be run under the context of the workstation user, not as an administrator.

  1. Copy the downloaded .p12 file to the trusted Chrome OS client.

  2. Open the Chrome Settings page by navigating to chrome://settings in the address bar. Once on the Settings page, scroll to the bottom and click Show advanced settings.

  3. Click the Manage certificates button under "HTTPS/SSL".

  4. While on the "Your Certificates" tab, click the Import and Bind to Device... button and browse to the downloaded .p12 certificate file. Click Open.

  5. Enter the password set for the file in the Duo Admin Panel when prompted and click OK. The "Your Certificates" tab now lists the "Duo Device Authentication" certificate. Click Done.

    Chrome Certificate Manager
  6. Chrome for Enterprise and Google Workspace admins should apply a Chrome policy that selects the Duo device certificate automatically during authentication. Without this, the browser asks the user to select a certificate manually before displaying the Duo authentication prompt.

    To do this, go to the Chrome management page in the Google Admin console and navigate to DevicesChromeSettingsUsers & browsers. Leave the top organizational unit selected to apply to all users, or choose specific OUs as targets.

    Locate the policy setting ContentClient certificates and set it to the following:

    {"pattern": "https://[*.]duosecurity.com", "filter": {}}

    See Set Chrome policies for users or browsers at Google Chrome Enterprise Help for more information.

Activate the Certificate Management Integration

  1. Return to the Duo Admin Panel and view the Manual Enrollment management integration for your Chrome OS device.

  2. Scroll down to the Activate step and click the toggle to enable trusted device reporting for Chrome OS devices.

    Enable Manual Enrollment for Chrome OS

After that, you can choose other OS platforms to enable in this manual enrollment management integration, or go straight to activating the integration.

iOS Clients

Create the Manual Enrollment Integration

  1. Log in to the Duo Admin Panel and navigate to Trusted Endpoints.
  2. If this is your first management integration, click the Get started button at the bottom of the Trusted Endpoints introduction page. If you're adding another management integration, click the Add Integration button you see at the top of the page instead.
  3. On the "Add Management Tools Integration" page, locate Manual Enrollment in the list of "Device Management Tools" and click the Add this integration selector.
  4. Choose Certs for iOS from the "Legacy" options, and then click the Add button.

The new Manual Enrollment integration is created in the "Disabled" state. You'll turn it on when you're ready to apply your Duo trusted endpoints policy.

Download the Duo Certificate

  1. Click on iOS (Disabled) under "Which device would you like to enroll?" to open the certificate download form.

  2. Enter and confirm an eight character password in Password fields of the Manual Enrollment page's "Download Certificate" section, and then choose one of the certificate lifetime options:

    1 year certificates These certificates expire one year from issuance. This is the best option for most Duo deployments.
    7 days certificates These certificates expire one week (seven days) from issuance. Select this option when you have users who need certificates reissued more frequently than the one year default. For example, you have virtual desktop users whose VDI endpoints are redeployed periodically, or a group of contractors who aren't expected to use the same workstations for a year.
    Certificate Download from Duo Admin Panel
  3. Click the Download Certificate button. The Duo device authentication certificate downloads as a PKCS#12 (.p12) file. Remember, this certificate should only be used to identify one user's system.

The new manual certificate integration is still inactive at this point. Import the certificate to your client system first before returning here to enable it.

Import the Certificate

The certificate import steps should be run under the context of the iOS device user, not as an administrator.

  1. Email or AirDrop the downloaded .p12 certificate file to the trusted iOS device and tap the file to open the "Install Profile" screen.

  2. Tap Install on the top right side of the "Install Profile" screen.

  3. If the iOS device has passcode protection you'll need to enter the code to continue.

  4. If you receive a warning stating that "The profile is not signed" then tap Install again to continue.

  5. Enter the password set for the certificate file in the Duo Admin Panel when prompted and tap Next.

  6. After verifying the password iOS installs the new certificate profile. Tap Done.

Verify the Certificate

To confirm that the Duo certificate profile was created, go to the Settings and tap GeneralProfiles & Device Management. The Duo Device Authentication profile contains the imported certificate.

Duo iOS Certificate Verification

At this point the configured integration is disabled and applies to no users until you finish your deployment.

Linux Clients

Create the Manual Enrollment Integration

  1. Log in to the Duo Admin Panel and navigate to Trusted Endpoints.
  2. If this is your first management integration, click the Get started button at the bottom of the Trusted Endpoints introduction page. If you're adding another management integration, click the Add Integration button you see at the top of the page instead.
  3. On the "Add Management Tools Integration" page, locate Manual Enrollment in the list of "Device Management Tools" and click the Add this integration selector.
  4. Choose Certs for Linux from the "Legacy" options, and then click the Add button.

The new Manual Enrollment integration is created in the "Disabled" state. You'll turn it on when you're ready to apply your Duo trusted endpoints policy.

Download the Duo Certificate

  1. Click on Linux (Disabled) under "Which device would you like to enroll?" to open the certificate download form.

  2. Enter and confirm an eight character password in Password fields of the Manual Enrollment page's "Download Certificate" section, and then choose one of the certificate lifetime options:

    1 year certificates These certificates expire one year from issuance. This is the best option for most Duo deployments.
    7 days certificates These certificates expire one week (seven days) from issuance. Select this option when you have users who need certificates reissued more frequently than the one year default. For example, you have virtual desktop users whose VDI endpoints are redeployed periodically, or a group of contractors who aren't expected to use the same workstations for a year.
    Certificate Download from Duo Admin Panel
  3. Click the Download Certificate button. The Duo device authentication certificate downloads as a PKCS#12 (.p12) file. Remember, this certificate should only be used to identify one user's system.

The new manual certificate integration is still inactive at this point. Import the certificate to your client system first before returning here to enable it.

Import the Certificate

The certificate import steps should be run under the context of the workstation user, not as an administrator.

  1. Copy the downloaded .p12 file to the trusted Linux workstation.

  2. Launch the Google Chrome browser and open the Settings page by navigating to chrome://settings in the address bar. Once on the Settings page, scroll to the bottom and click Show advanced settings.

  3. Click the Manage certificates button under "HTTPS/SSL".

  4. While on the "Your Certificates" tab, click the Import and Bind to Device... button and browse to the downloaded .p12 certificate file. Click Open.

  5. Enter the password set for the file in the Duo Admin Panel when prompted and click OK. The "Your Certificates" tab now lists the "Duo Device Authentication" certificate. Click Done.

    Chrome Certificate Manager
  6. Chrome for Business and Google G Suite admins should apply a Chrome policy that selects the Duo device certificate automatically during authentication. Without this, the browser asks the user to select a certificate manually before displaying the Duo authentication prompt.

    To do this, go to the Chrome management page in the Google Admin console and click User settings for your organization.

    Locate the policy setting AutoSelectCertificateForUrls and set it to the following:

    {"pattern": "https://[*.]duosecurity.com", "filter": {}}

    See Set Chrome policies for users help for more information.

    This policy setting may also be configured on the Linux workstation by editing (or creating) /etc/opt/chrome/policies/managed/policy.json to add the same pattern string.

At this point the configured integration is disabled and applies to no users until you finish your deployment.

macOS Clients

Create the Manual Enrollment Integration

  1. Log in to the Duo Admin Panel and navigate to Trusted Endpoints.
  2. If this is your first management integration, click the Get started button at the bottom of the Trusted Endpoints introduction page. If you're adding another management integration, click the Add Integration button you see at the top of the page instead.
  3. On the "Add Management Tools Integration" page, locate Manual Enrollment in the list of "Device Management Tools" and click the Add this integration selector.
  4. Choose Certs for macOS from the "Legacy" options, and then click the Add button.

The new Manual Enrollment integration is created in the "Disabled" state. You'll turn it on when you're ready to apply your Duo trusted endpoints policy.

Deploy the Duo Certificate

  1. Click on Mac OS X (Disabled) under "Which device would you like to enroll?" to open the certificate download form.

  2. Choose one of the certificate lifetime options:

    1 year certificates These certificates expire one year from issuance. This is the best option for most Duo deployments.
    7 days certificates These certificates expire one week (seven days) from issuance. Select this option when you have users who need certificates reissued more frequently than the one year default. For example, you have virtual desktop users whose VDI endpoints are redeployed periodically, or a group of contractors who aren't expected to use the same workstations for a year.
    Certificate Download from Duo Admin Panel
  3. Click Download Script. The actual name of the downloaded script will be similar to duo_cert_enrollment-3.6.sh.

The new manual certificate integration is still inactive at this point. Copy the script to your client system and run it first before returning here to enable it.

Install and Run the Script

  1. Copy the downloaded script to the trusted Mac OS client.

  2. Launch the Terminal app and change directory (cd directory-path) to the location where you copied the downloaded enrollment script.

    For example, if you copied the Duo script to the "Documents" folder in your home directory, type this command to switch to that directory:

    cd ~/Documents
  3. Run the script in Terminal with the following command. Enter your sudo password when prompted.

    /bin/bash duo_cert_enrollment-3.6.sh

    This script enrolls the Mac OS client as a Duo trusted endpoint by obtaining a device certificate from Duo, and also configures Safari and Chrome (if present) to automatically select the Duo certificate during authentication.

  4. IMPORTANT! Make sure to delete the Duo script from that Mac OS client when done. If your end user has access to the script they could run it on other devices to obtain Duo certificates for those endpoints without your knowledge.

Verify the Certificate

To confirm that the Duo enrollment script worked, launch the Mac OS Keychain Access application and make sure the Duo Device Authentication certificate exists in the "duo-auth" keychain.

Duo macOS Certificate Verification

At this point the configured integration is disabled and applies to no users until you finish your deployment.

Windows Clients

Create the Manual Enrollment Integration

  1. Log in to the Duo Admin Panel and navigate to Trusted Endpoints.
  2. If this is your first management integration, click the Get started button at the bottom of the Trusted Endpoints introduction page. If you're adding another management integration, click the Add Integration button you see at the top of the page instead.
  3. On the "Add Management Tools Integration" page, locate Manual Enrollment in the list of "Device Management Tools" and click the Add this integration selector.
  4. Choose Certs for Windows from the "Legacy" options, and then click the Add button.

The new Manual Enrollment integration is created in the "Disabled" state. You'll turn it on when you're ready to apply your Duo trusted endpoints policy.

Download the Duo Certificate

  1. Click on Windows (Disabled) under "Which device would you like to enroll?" to open the certificate download form.

  2. Enter and confirm an eight character password in Password fields of the Manual Enrollment page's "Download Certificate" section, and then choose one of the certificate lifetime options:

    1 year certificates These certificates expire one year from issuance. This is the best option for most Duo deployments.
    7 days certificates These certificates expire one week (seven days) from issuance. Select this option when you have users who need certificates reissued more frequently than the one year default. For example, you have virtual desktop users whose VDI endpoints are redeployed periodically, or a group of contractors who aren't expected to use the same workstations for a year.
    Certificate Download from Duo Admin Panel
  3. Click the Download Certificate button. The Duo device authentication certificate downloads as a PKCS#12 (.p12) file. Remember, this certificate should only be used to identify one user's system.

The new manual certificate integration is still inactive at this point. Import the certificate to your client system first before returning here to enable it.

Import the Certificate

The certificate import steps should be run under the context of the workstation user, not as an administrator.

  1. Copy the downloaded .p12 file to the trusted Windows workstation.

  2. Double-click the .p12 file to launch the Windows Certificate Import Wizard. Leave the Current User store location selected on the first screen of the wizard, and click Next.

    Windows Certificate Import Wizard - Step 1
  3. The full path to the certificate file is already present. Click Next.

    Windows Certificate Import Wizard - Step 2
  4. Enter the password set for the file in the Duo Admin Panel and select the Include all extended properties option. Click Next.

    Windows Certificate Import Wizard - Step 3
  5. Leave the Automatically select the certificate store based on the type of certificate option selected and click Next.

    Windows Certificate Import Wizard - Step 4
  6. Click Finish to complete the import process. If you receive a security warning asking if you want to import the "Duo Endpoint Validation Root CA 1" certificate, click Yes.

    Windows Certificate Import Warning
  7. After a successful import, verify the Duo certificate. Launch a Windows command prompt and type in this command:

    certmgr.msc
  8. Expand Certificates - Current User\Personal\Certificates. Look for the Duo Device Authentication certificate in the list.

    Windows Certificate Verification
  9. Delete the .p12 certificate file when finished since it can't be used to identify another device.

  10. Configure Internet Explorer so that it selects the Duo device certificate automatically during authentication. Without this, the browser asks the user to select a certificate manually before displaying the Duo authentication prompt.

    To do this, open a command prompt window and enter in these commands:

    reg add "HKEY_CURRENT_USER\Software\Microsoft\Windows\CurrentVersion\Internet Settings\Zones\1" /v 1A04 /t REG_DWORD /d 00000000 /f
     reg add "HKEY_CURRENT_USER\Software\Microsoft\Windows\CurrentVersion\Internet Settings\Zones\1" /v 1406 /t REG_DWORD /d 00000000 /f
     reg add "HKEY_CURRENT_USER\Software\Policies\Microsoft\Windows\CurrentVersion\Internet Settings\ZoneMap\Domains\duosecurity.com" /v "*" /t REG_DWORD /d 00000001 /f

    From an elevated command prompt (Run as "Administrator"), enter these commands:

    reg add "HKEY_LOCAL_MACHINE\SOFTWARE\Microsoft\Windows\CurrentVersion\Internet Settings\Zones\1" /v 1A04 /t REG_DWORD /d 00000000 /f
     reg add "HKEY_LOCAL_MACHINE\SOFTWARE\Microsoft\Windows\CurrentVersion\Internet Settings\Zones\1" /v 1406 /t REG_DWORD /d 00000000 /f
  11. On clients with Edge Chromium browser, enter this command from the elevated prompt to configure Edge to automatically select the Duo device certificate during authentication:

    reg add "HKEY_LOCAL_MACHINE\Software\Policies\Microsoft\Edge\AutoSelectCertificateForUrls" /v 1 /d "{\"pattern\":\"https://[*.]duosecurity.com/frame\", \"filter\":{}}"
  12. If Chrome is installed on the client, configure Google Chrome to automatically select the Duo device certificate during authentication without displaying a prompt to the user as well.

    From an elevated command prompt (Run as "Administrator"), enter this command:

    reg add "HKEY_LOCAL_MACHINE\Software\Policies\Google\Chrome\AutoSelectCertificateForUrls" /v 1 /d "{\"pattern\":\"https://[*.]duosecurity.com/frame\", \"filter\":{}}"

    To configure Chrome using Local GPO, please refer to the Local Policy for Chrome Devices guide.

At this point the configured integration is disabled and applies to no users until you finish your deployment.

Finish Trusted Endpoints Deployment

Once you've installed the Duo certificate on your endpoints you can configure the Trusted Endpoints policy to start checking for the certificate as users authenticate to Duo-protected services and applications.

When your trusted endpoints policy is applied to your Duo applications, return to the Manual Enrollment trusted endpoint management integration in the Admin Panel. The "Change Integration Status" section of the page shows the current integration status (disabled by default after creation). You can choose to either activate this management integration only for members of a specified test group, or activate for all users. If you created more than one Manual Enrollment integration, you must activate each one individually.

Enable Trusted Endpoints Management Integration

The Device Insight and Endpoints pages in the Duo Admin Panel show which access devices have the Duo certificate present.

As more of your devices receive the Duo certificate you can change the integration activation to apply to all users (if you just targeted test groups before), adjust your trusted endpoints policy to expand the target group, apply it to additional protected services, or start blocking access to applications from devices that do not have the Duo certificate. See the Trusted Endpoints documentation for more information.

Removing the Manual Enrollment Management Integration

Deleting a trusted endpoints management tool integration from the Duo Admin Panel immediately invalidates issued Duo device authentication certificates. Be sure to unassign your trusted endpoints policy from all applications or remove the "Trusted Endpoints" configuration item from your global policy before deleting an existing Manual Enrollment integration from "Trusted Endpoints Configuration".

Leaving the policy settings in place after deleting a management tools integration may inadvertently block user access to applications.

Troubleshooting

Need some help? Take a look at our Trusted Endpoints Knowledge Base articles or Community discussions. For further assistance, contact Support.