Duo Trusted Endpoints - Jamf Pro Managed Devices
Last updated:
Overview
Duo's Trusted Endpoints feature secures your sensitive applications by ensuring that only known devices can access Duo protected services. When a user authenticates via the Duo Prompt, we'll check for the presence of Duo Desktop. You can monitor access to your applications from trusted and untrusted devices, and optionally block access from unmanaged, untrusted devices.
Trusted Endpoints is part of the Duo Essentials, Duo Advantage, and Duo Premier plans.
Before enabling the Trusted Endpoints policy on your applications, you'll need to establish API access from Duo to Jamf, then deploy Duo Mobile to your managed iOS devices, or deploy Duo Desktop to Windows and macOS managed systems.
This guide walks you through Jamf configuration for macOS endpoint clients and iOS mobile devices.
Mobile Trusted Endpoints and Verified Duo Push: Trusted endpoint verification of iOS devices with Duo Mobile uses the standard Duo Push approval process and will not prompt for a Duo Push verification code, even if the effective authentication methods policy for the user and application has "Verified Duo Push" enabled.
Requirements
Ensure you have the following access and privileges:
- Access to the Duo Admin Panel as an administrator with the Owner, Administrator, or Application Manager administrative roles.
- Access to the Jamf Pro Dashboard as an administrator with the rights to create roles, accounts, certificate authorities, and device profiles, and to create new policies and apply them to user targets.
Duo's trusted endpoints solution supports both Jamf Cloud and on-premises Jamf Pro deployments.
Create a Jamf API User
Create a read-only API user in Jamf for Duo to obtain managed macOS and iOS endpoint information. Determine whether you plan to create a standard (local) account or an account from your LDAP directory before you begin. You must have previously configured LDAP directory services in Jamf in order to create a new LDAP account.
You only need to create one Jamf API user for Duo to use with iOS and macOS.
-
Log in to Jamf Pro as an administrator and click on the Setting icon in the left panel.
-
Click the System tab and search for the User accounts and groups section.
-
Click + New. Select Create Standard Account or Create Standard Group as desired (additional options may be available), and then click Next.
-
If you chose to create a standard account:
- Enter a username for the new account on the "New Account" page.
- Set the "Access Level" to Full Access.
- Set the "Privilege Set" to Auditor.
- Enter and verify a password for the new user. You will need to provide this to Duo. Do not force a password change.
- Click Save.
-
If you chose to create an LDAP account:
- Enter the LDAP username in the "Search Users" field of the "Search LDAP Directory Service" page and click Next..
- If the search found the correct user, click the Add button to the right of the LDAP user's information in the search results.
- On the "New Account" page, set the "Access Level" to Full Access.
- Set the "Privilege Set" to Auditor.
- Click Save.
Jamf with Duo Desktop
This integration relies on having Duo Desktop present on your Jamf-managed endpoints. When users authenticate to applications protected with Duo's browser-based prompt, Duo matches the device identifiers reported by Duo Desktop with managed device information obtained from Jamf in a nightly sync via read-only API access (note this sync can't be manually initiated or rescheduled at this time).
Prerequisites
-
The minimum recommended Jamf version for this integration is 10.28. Jamf versions prior to 10.28 may encounter errors during the nightly sync process with Duo.
-
Deploy Duo Desktop to your Jamf-managed endpoints. Refer to the Duo Desktop documentation to learn about different options for deploying the application.
Note that you do not need to configure a Duo Desktop policy in order to use Jamf with Duo Desktop.
Create the Jamf Pro with Duo Desktop Integration
- Log in to the Duo Admin Panel and navigate to Devices → Trusted Endpoints.
- If this is your first management integration, click the Get started button at the bottom of the Trusted Endpoints introduction page. If you're adding another management integration, click the Add Integration button you see at the top of the page instead.
- On the "Add Trusted Endpoint Integrations" page, locate Jamf Pro in the list of integrations.
- Choose macOS from the "Select operating system" drop-down, and then click the Add button.
The new Jamf Pro with Duo Desktop integration is created in the "Disabled" state. You'll turn it on when you're ready to apply your Duo trusted endpoints policy.
Please note that this integration requires Duo Desktop to be installed on the device to be considered trusted.
Keep the Duo Admin Panel open in your browser. You'll need to refer back to the Jamf Pro with Duo Desktop management integration page to complete the configuration steps.
Enter the Jamf User Information in Duo
Enter the Jamf Pro user credentials in Duo to perform the device information sync.
-
On the Jamf Pro with Duo Desktop management integration page in the Duo Admin Panel, scroll down to the "2. Provide account credentials" section.
-
Enter the username for the Jamf Pro standard or LDAP user you created into the "Jamf Pro account username" field.
-
Enter the password for the Jamf Pro standard or LDAP user in the "Jamf Pro account password" field. If you added an LDAP account, the password is the user's LDAP directory password.
-
Enter your Jamf Pro domain in the last field on the page. This is the same as the URL at which you access your Jamf Pro account. For example, if you access Jamf Pro at https://acmecorp.jamfcloud.com, then you'd enter acmecorp.jamfcloud.com as the domain name, without the "https://" prefix.
-
Click the Test Configuration button to verify your setup. If you do not receive a "Configuration Successful!" message, double-check that you provided the right account and domain information.
-
If testing your configuration was successful, click Save & Configure.
At this point the configured integration is disabled and applies to no users until you finish your deployment.
Verify macOS Device Information with Search
After you configure the connection between Jamf and Duo you can verify that a given device's information is being pulled into Duo by searching for the device identifier from the Duo Admin Panel. See Search for Device Identifiers to learn how.
iOS Configuration
This integration relies on having the Duo Mobile app present and activated on your Jamf-managed iOS endpoints. When users authenticate to applications protected with Duo's browser-based prompt, Duo matches the device identifiers reported by the Duo Mobile app with managed device information obtained from Jamf in a nightly sync via read-only API access (note this sync can't be manually initiated or rescheduled at this time).
Create the Jamf Pro with App Config Integration
- Log in to the Duo Admin Panel and navigate to Devices → Trusted Endpoints.
- If this is your first management integration, click the Get started button at the bottom of the Trusted Endpoints introduction page. If you're adding another management integration, click the Add Integration button you see at the top of the page instead.
- On the "Add Trusted Endpoint Integrations" page, locate Jamf Pro in the list of integrations.
- Choose iOS from the "Select operating system" drop-down, and then click the Add button.
The new Jamf Pro with App Config integration is created in the "Disabled" state. You'll turn it on when you're ready to apply your Duo trusted endpoints policy.
Please note that this integration takes advantage of managed app configuration and therefore Duo Mobile must be installed by your MDM for the device to be considered trusted.
Keep the Duo Admin Panel open in your browser. You'll need to refer back to the Jamf Pro with App Config management integration page to complete the configuration steps.
Enter the Jamf User Information in Duo
Enter the Jamf Pro user credentials in Duo to perform the device information sync.
-
On the Jamf Pro with App Config management integration page in the Duo Admin Panel, scroll down to the "2. Provide account credentials" section.
-
Enter the username for the Jamf Pro standard or LDAP user you created into the "Jamf Pro username" field.
-
Enter the password for the Jamf Pro standard or LDAP user in the "Jamf Pro Password" field. If you added an LDAP account, the password is the user's LDAP directory password.
-
Enter your Jamf Pro domain in the last field on the page. This is the same as the URL at which you access your Jamf Pro account. For example, if you access Jamf Pro at https://acmecorp.jamfcloud.com, then you'd enter acmecorp.jamfcloud.com as the domain name, without the "https://" prefix.
-
Click the Test Configuration button to verify your setup. If you do not receive a "Configuration Successful!" message, double-check that you provided the right account and domain information.
-
If testing your configuration was successful, click Save & Configure.
Configure Duo Mobile Management in Jamf
Jamf will need to manage the Duo Mobile app on users' iOS devices. By having Jamf manage the Duo Mobile , Jamf will be able to provide Duo with additional attributes from the iPhones and iPads to verify the device’s information.
-
Under the "Devices" section of Jamf Pro, select Mobile Device Apps.
-
On the "Mobile Device Apps" page, select + New.
-
In the "Choose an App Type" window, select App Store app or apps purchased in volume and click Next.
-
Search for Duo Mobile and when found add Duo Mobile for iOS.
-
On the "New Mobile Device App" page's "General" tab, check the Enabled box and configure the following options:
- Enable Schedule Jamf Pro to automatically check the App Store for app updates and set a sync time.
- Enable Automatically Force App Updates.
- Enable Make app managed when possible.
- Enable Convert unmanaged app to managed.
- Enable Remove app when MDM profile is removed.
-
Click the "Scope" tab and select All Mobile Devices under "Targets and Target Mobile Devices".
-
Click the "App Configuration" tab.
-
Return to your Jamf Pro with App Config management integration page in the Duo Admin Panel and copy the AppConfig XML provided in step 4.7. Paste this into the Preferences field on the "App Configuration" tab.
-
Click Save.
At this point the configured integration is disabled and applies to no users until you finish your deployment.
Verify iOS Device Information with Search
After you configure the connection between Jamf and Duo you can verify that a given device's information is being pulled into Duo by searching for the device identifier from the Duo Admin Panel. See Search for Device Identifiers to learn how.
Finish Trusted Endpoints Deployment
Once your managed computers have Duo Desktop installed, you can update the Trusted Endpoints policy to start checking for management status as users authenticate to Duo-protected services and applications.
When your trusted endpoints policy is applied to your Duo applications, return to the Jamf Pro with Duo Desktop management integration in the Admin Panel. The "Change Integration Status" section of the page shows the current integration status (disabled by default after creation). You can choose to either activate this management integration only for members of a specified test group, or activate for all users.
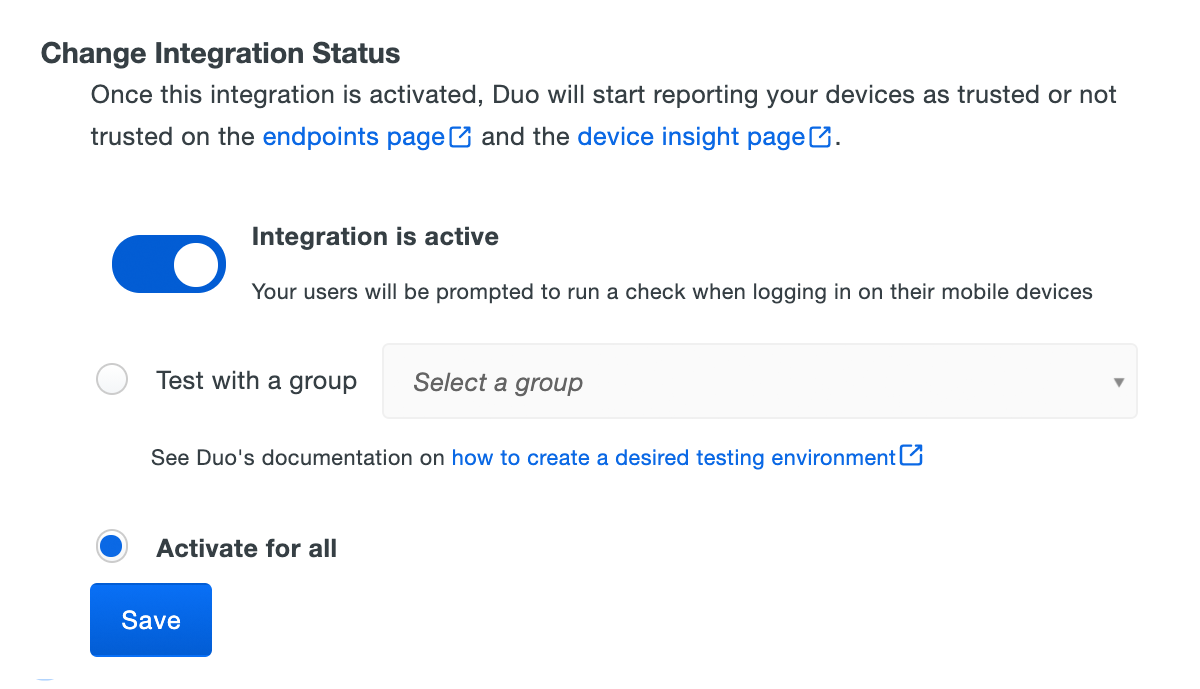
The Device Insight and Endpoints pages in the Duo Admin Panel show trusted and untrusted access device status.
As more of your devices have Duo Desktop installed you can change the integration activation to apply to all users (if you just targeted test groups before), adjust your trusted endpoints policy to expand the target group, apply it to additional protected services, or start blocking access to applications from devices that do not pass the managed endpoint check. See the Trusted Endpoints documentation for more information.
Removing the Jamf Pro Management Integration
Deleting a trusted endpoints management tool integration from the Duo Admin Panel immediately prevents identification of Jamf-managed devices using Duo Desktop. Be sure to unassign your trusted endpoints policy from all applications or remove the "Trusted Endpoints" configuration item from your global policy before deleting an existing Jamf Pro integration from "Trusted Endpoints Configuration".
Leaving the policy settings in place after deleting a management tools integration may inadvertently block user access to applications.
Verify Your Setup
macOS with Duo Desktop
When macOS users access Duo-protected resources, the installed Duo Desktop provides device information to Duo. If the information from the device matches the information synced from Jamf, Duo grants access to the trusted device.
iOS App Config
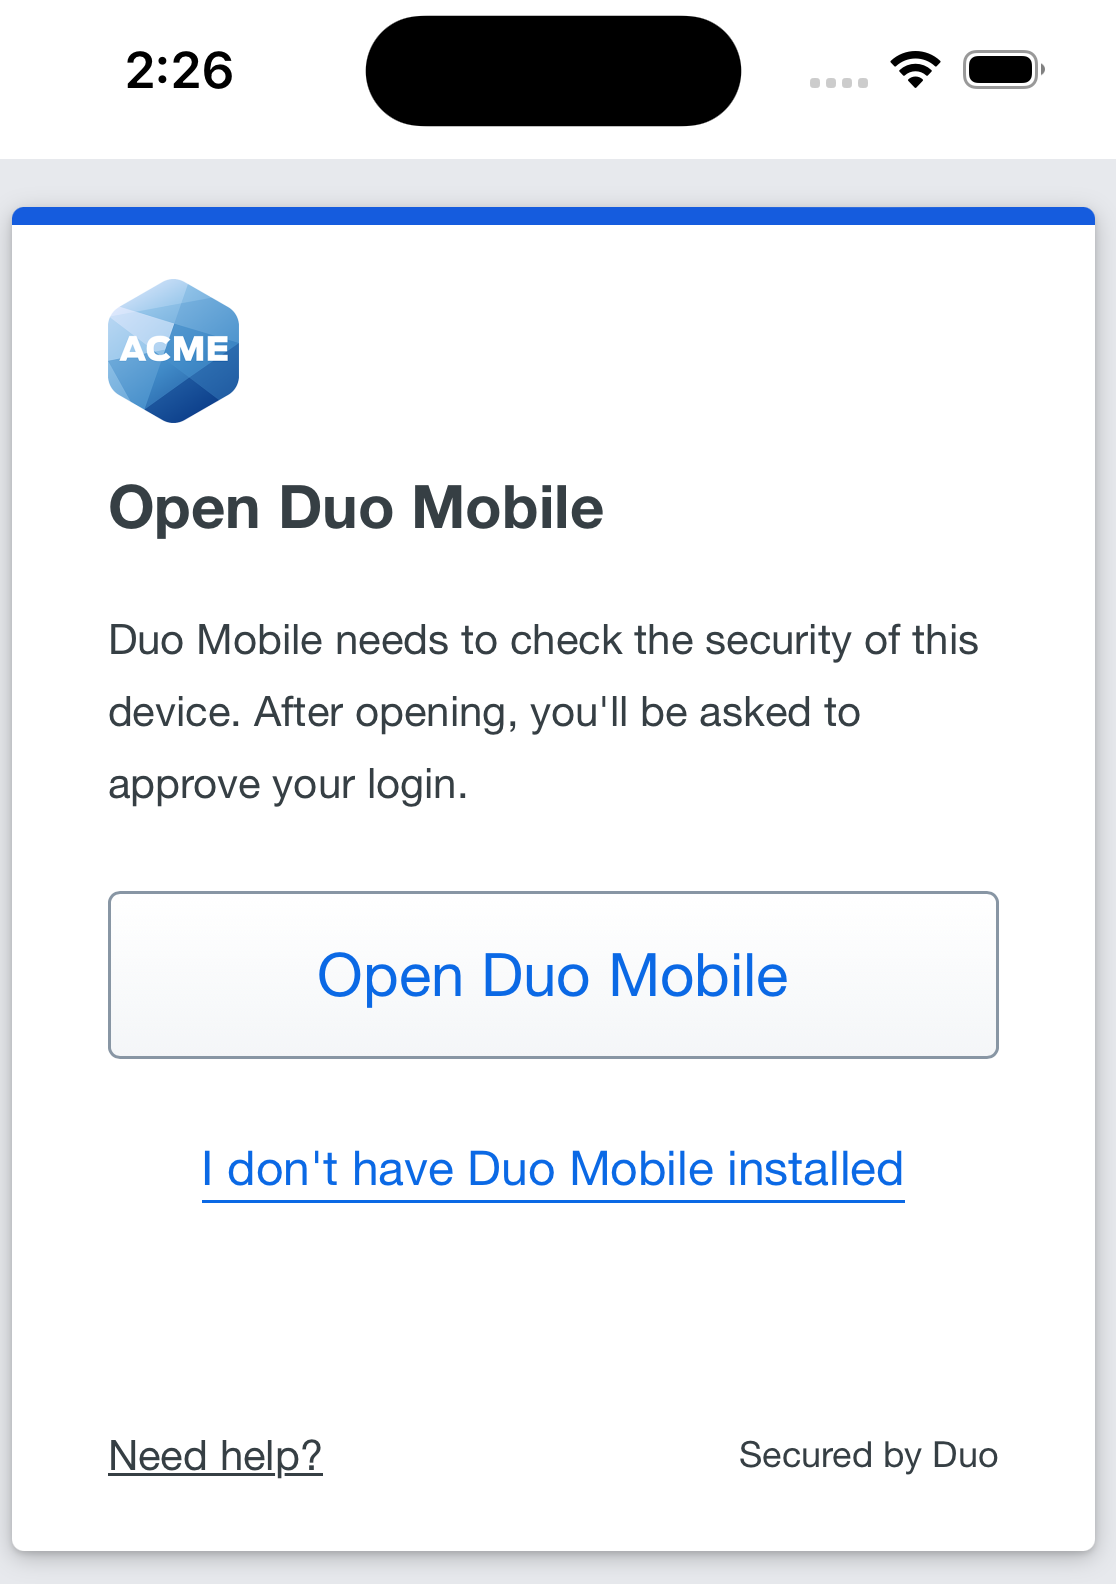
iOS users see a device trust dialog when authenticating to a protected resource via the Duo Prompt.
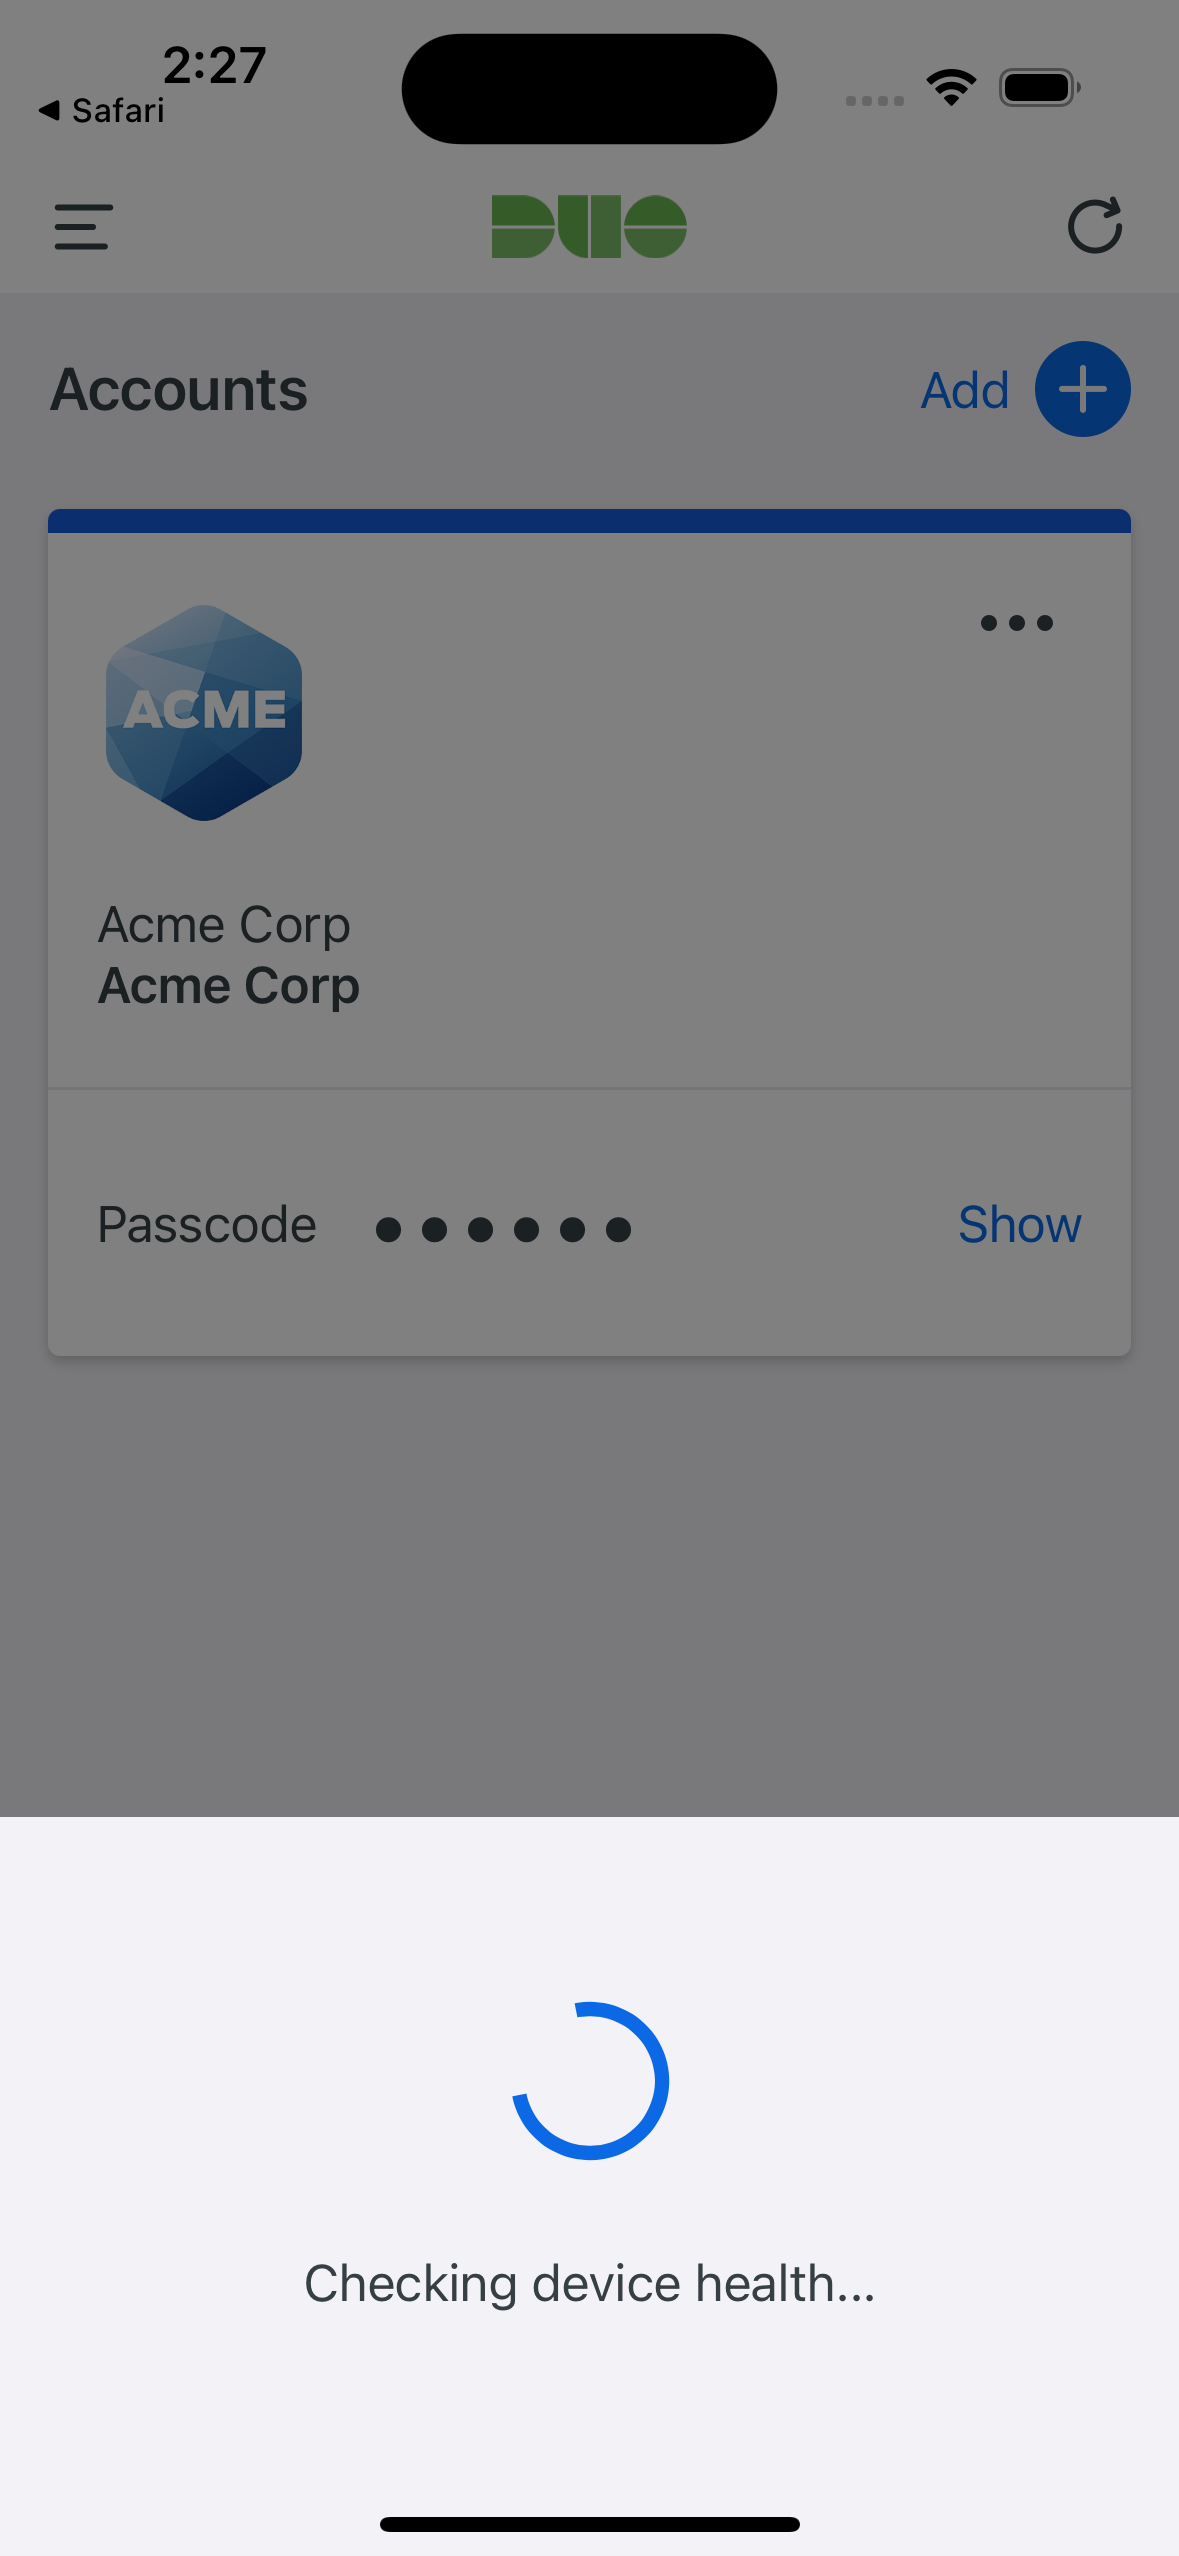
Duo uses the information synced from Jamf to perform a permissions check to verify device information.
If Duo successfully verifies the device information, and the user has Duo Mobile activated for Duo Push, then the user receives a login request on their phone. Approving the request grants access to the protected application.
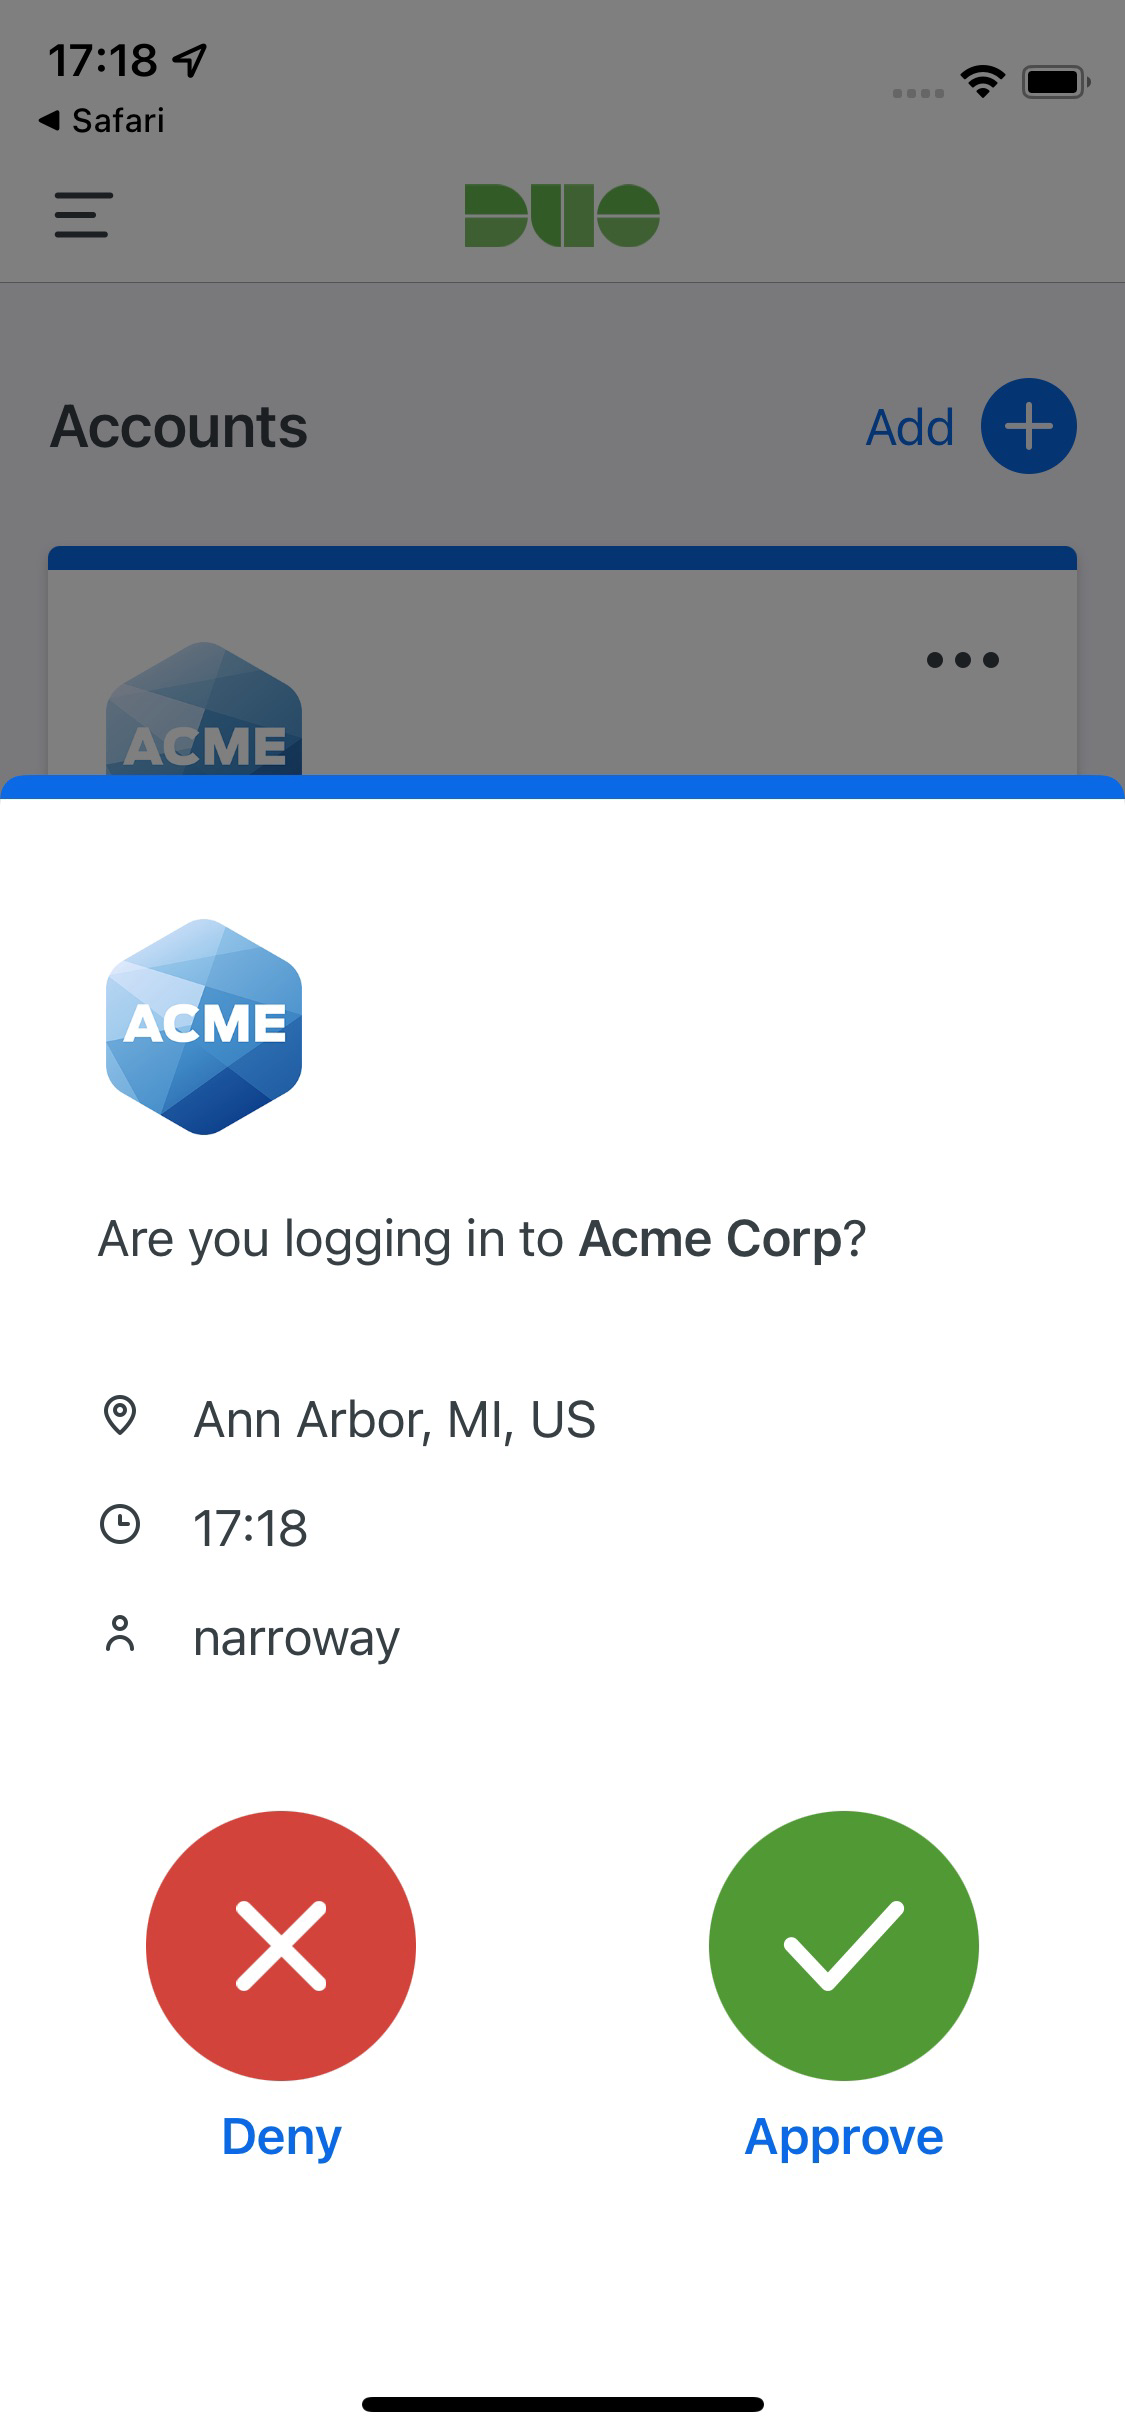
After approving the Duo authentication request on iOS, users tap the top-left of the Duo Mobile app to return to the application and complete login. The "Second Factor" logged for these approvals is shown as "Duo Mobile Inline Auth" in the Duo authentication log.
If the user does not have Duo Mobile activated for push, or does not approve the Duo request before it times out, the user returns to the Duo Prompt, where they may select from the available factors to complete 2FA.
Finish Trusted Endpoints Deployment
Once your managed computers have Duo Desktop installed you can configure the Trusted Endpoints policy to start verifying trust status as users authenticate to Duo-protected services and applications.
Return to the Jamf Pro management integration in the Duo Admin Panel and click the Activate button at the bottom of the page so that the Device Insight and Endpoints pages in the Duo Admin Panel show trusted and untrusted access device status.
The Device Insight and Endpoints pages in the Duo Admin Panel show trusted and untrusted access device status.
As more of your devices have Duo Desktop you can change the integration activation to apply to all users (if you just targeted test groups before), adjust your trusted endpoints policy to expand the target group, apply it to additional protected services, or start blocking access to applications from untrusted devices. See the Trusted Endpoints documentation for more information.
Search for Device Identifiers
If you configured Duo Desktop for macOS or Duo Mobile for iOS with App Config to determine device trust, you may want to search for specific device identifiers to verify that the identifier information for a given trusted device exists in Duo. This can be useful to verify a device you expect to be trusted was imported from Jamf into Duo.
To search for a device identifier in Duo:
-
Log in to the Jamf administration website, navigate to Computers → Search Inventory, and select a device to view. If you are looking for a device identifier, then go to Devices → Search Inventory).
-
Locate the Jamf with Duo Desktop or Jamf with App Config device management integration you want to search for a device identifier in the list and click on it to view its details.
-
In the Check if devices have synced section, enter the identifier for the device you want to check and click Search.
-
A message appears indicating if the device identifier was either found or not found. If the device identifier is not found, check your Jamf API configuration and wait 24 hours.
Use these instructions to find the device identifier to search in Jamf.
- Log in to the Jamf administration website, navigate to Computers → Search Inventory, and select a device to view.
- Select Hardware.
- The "UDID" is the device identifier. Copy this value and use it to perform the search in Duo.
Removing the Jamf Pro Management Integration
Deleting a trusted endpoints management tool integration from the Duo Admin Panel immediately prevents identification of Jamf-named devices. Be sure to unassign your trusted endpoints policy from all applications or remove the "Trusted Endpoints" configuration item from your global policy before deleting an existing Jamf Pro integration from "Trusted Endpoints Configuration". You should also disable your Duo policy in Jamf.
Leaving the policy settings in place after deleting a management tools integration may inadvertently block user access to applications.
Troubleshooting
Need some help? Take a look at our Trusted Endpoints Knowledge Base articles or Community discussions. For further assistance, contact Support.