Duo Single Sign-On for OAuth 2.1 and OIDC
Last updated:
About Duo Single Sign-On
Duo Single Sign-On is our cloud-hosted SSO product which layers Duo's strong authentication and flexible policy engine on top of application logins using the Security Assertion Markup Language (SAML) 2.0 or OpenID Connect (OIDC) authentication standards. Duo Single Sign-On acts as an OpenID provider (OP), authenticating your users using Duo Directory, your existing on-premises Active Directory (AD), or any SAML 2.0 IdP, and prompting for two-factor authentication before permitting access to your service provider application.
Duo Single Sign-On is available in Duo Premier, Duo Advantage, and Duo Essentials plans, which also include the ability to define policies that enforce unique controls for each individual SSO application. For example, you can require that users of one application complete two-factor authentication at every login, but only once every seven days when accessing a different application. Duo checks the user, device, and network against an application's policy before allowing access to the application.
Duo Single Sign-On can also act as an OAuth 2.1-compliant authorization server supporting the client credentials grant type allowing secure machine-to-machine interactions by generating an access token with scoped permissions for one machine which can be sent and then validated by another machine. The Duo OAuth 2.1 / OIDC application also supports multiple OAuth clients and OIDC simultaneously.
OAuth 2.1 offers some security improvements over OAuth 2.0, such as:
- Redirect URIs must have an exact string match.
- Clients must now use PKCE.
- Removal of insecure grants.
These default attributes automatically map certain attributes from your authentication source.
| Default Attribute | Active Directory | SAML IdP |
|---|---|---|
<Username> |
sAMAccountName | Username |
<Email Address> |
||
<Display Name> |
displayName | DisplayName |
<First Name> |
givenName | FirstName |
<Last Name> |
sn | LastName |
<AMR> |
Not Applicable | Not Applicable |
AMR will be reported as [`pwd`, `auth-factor-dependent`].
Create Your Cloud Application in Duo
-
Log in to the Duo Admin Panel and navigate to Applications → Application Catalog.
-
Locate the entry for OAuth 2.1 / OIDC - Single Sign-On with the "SSO" label in the catalog. Click the + Add button to start configuring OAuth 2.1 / OIDC - Single Sign-On. See Protecting Applications for more information about protecting applications with Duo and additional application options. You'll need the information on the OAuth 2.1 / OIDC - Single Sign-On page later to complete your setup.
-
No active Duo users can log in to new applications until you grant access. Update the User access setting to grant access to this application to users in selected Duo groups, or to all users. Learn more about user access to applications. If you do not change this setting now, be sure to update it so that your test user has access before you test your setup.
This setting only applies to users who exist in Duo with "Active" status. This does not affect application access for existing users with "Bypass" status, existing users for whom the effective Authentication Policy for the application specifies "Bypass 2FA" or "Skip MFA", or users who do not exist in Duo when the effective New User Policy for the application allows access to users unknown to Duo without MFA.These tabs contain the configuration information for OAuth 2.1 / OIDC clients:
- Metadata
- General
- Scopes
- Access Policy
- Clients
-
The Metadata tab shows where you can get OAuth provider information about Duo Single Sign-On to provide to your client.
Name Description Issuer Unique entity related to the OAuth 2.1 provider that issues a set of claims. This is also the base URL of every endpoint below. OAuth Discovery URL Returns basic information about OAuth 2.1 provider such as endpoint URLs and supported configuration methods. This will also include the supported scopes for this OAuth 2.1 provider once you save the Duo application. OIDC Discovery URL Returns basic information about OpenID provider such as endpoint URLs and supported configuration methods. This will also include the supported scopes for this OpenID provider once this page has been configured and saved. Authorization URL URL that the client will redirect the user's browser to along with an authentication request. Token URL URL used by a client to retrieve the access, id, and refresh tokens from the OAuth 2.1 \ OIDC provider. JWKS URL URL that returns a list of signing keys to validate the signatures of JWTs signed by this OAuth 2.1 \ OIDC provider. UserInfo URL Client may present an access token to this endpoint to retrieve claims. Token Introspection URL URL where a client can validate an access token. 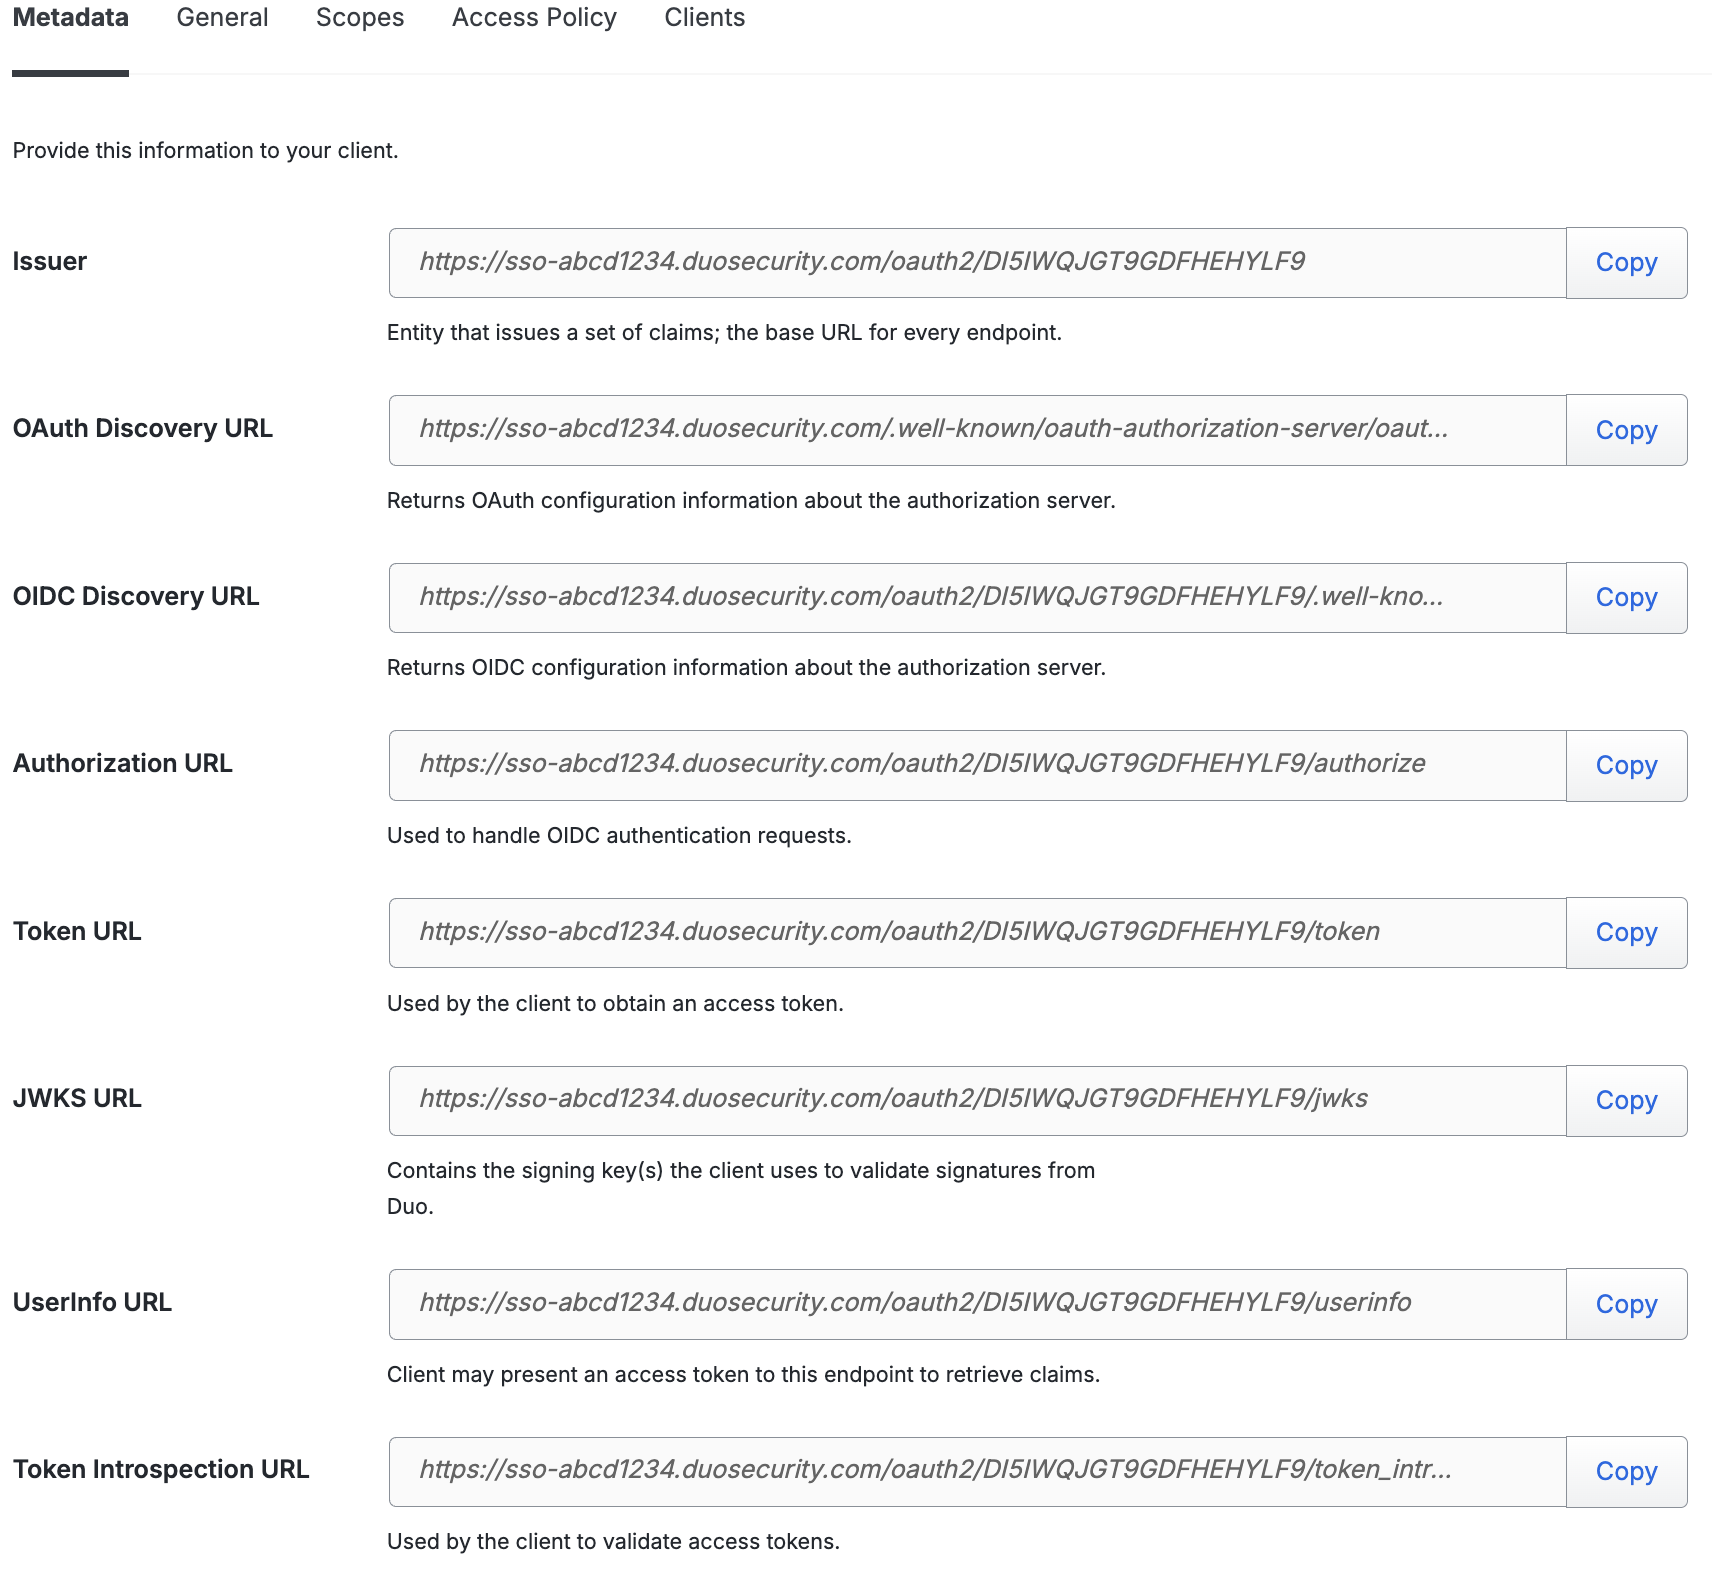
Configure Your Client
You'll need to provide some information about Duo Single Sign-On to your cloud application provider, like URL information, client ID, and client secret. You can find this information on the Metadata tab of the application page in the Duo Admin Panel.
Refer to your client's SSO configuration guide for instructions.
Update your Application in Duo
-
Return to the application page in your Duo Admin panel.
-
Configure your grants and client URLs on the General tab.
Name Description Grant Type Modify the authorization code and/or refresh tokens. Name Description Authorization Code Under "Authorization Code" you can configure a few additional settings:
- Allow PKCE only authentication: Checking this box will allow Single Page Applications (SPAs) that are unable to store a client secret to retrieve tokens by just completing a Proof Key for Code Exchange (PKCE) authentication.
- Access Token Lifetime: This is the length of time an issued access token is valid for. The lifetime can be 5 to 60 minutes. Default is 60 minutes.
Refresh Tokens Refresh tokens enable the client to request and be issued a refresh token, which can then be used to obtain updated access, id, and refresh tokens without requiring the user to log in interactively again. A refresh token will be issued if the authentication request includes
offline_accessas one of the requested scopes.
After checking the box next to "Refresh Tokens", you can configure a few additional settings:
- Refresh Token Absolute Lifetime: The length of time after an original user authentication that refresh tokens can be exchanged for additional tokens. Once this time has been exceeded, the user will need to authenticate again. The lifetime can be 60 minutes to 180 days. Default is 30 days.
- Refresh Token Inactivity Lifetime: The length of time an individual unused refresh token will be valid before it expires. The lifetime can be 5 minutes to 7 days. Default is 24 hours.
When Refresh Tokens is enabled, you can grant and configure offline_access scopes for users and clients.
If you would like to invalidate all refresh tokens related to this application, click the Revoke Refresh Tokens button, and then click Revoke in the pop-up window.
Client Credentials Enable this grant to allow authorization of machine-to-machine communication or background jobs that do not require user interaction Sign-In Redirect URLs The URLs where Duo SSO will send the authentication response based on the redirect URL in the request. Enter the redirect URLs provided by your client. Wildcard URLs, while not recommended, can be used but must start with "https://" and must only be wildcarding a subdomain. If you need more than one redirect URL you can enter more by clicking + Add Sign-In Redirect URL. Resource URLs Specify resource URLs used to validate resources and scopes exposed during authorization and token requests. If you need more than one resource URL you can enter more by clicking + Add Resource URL. 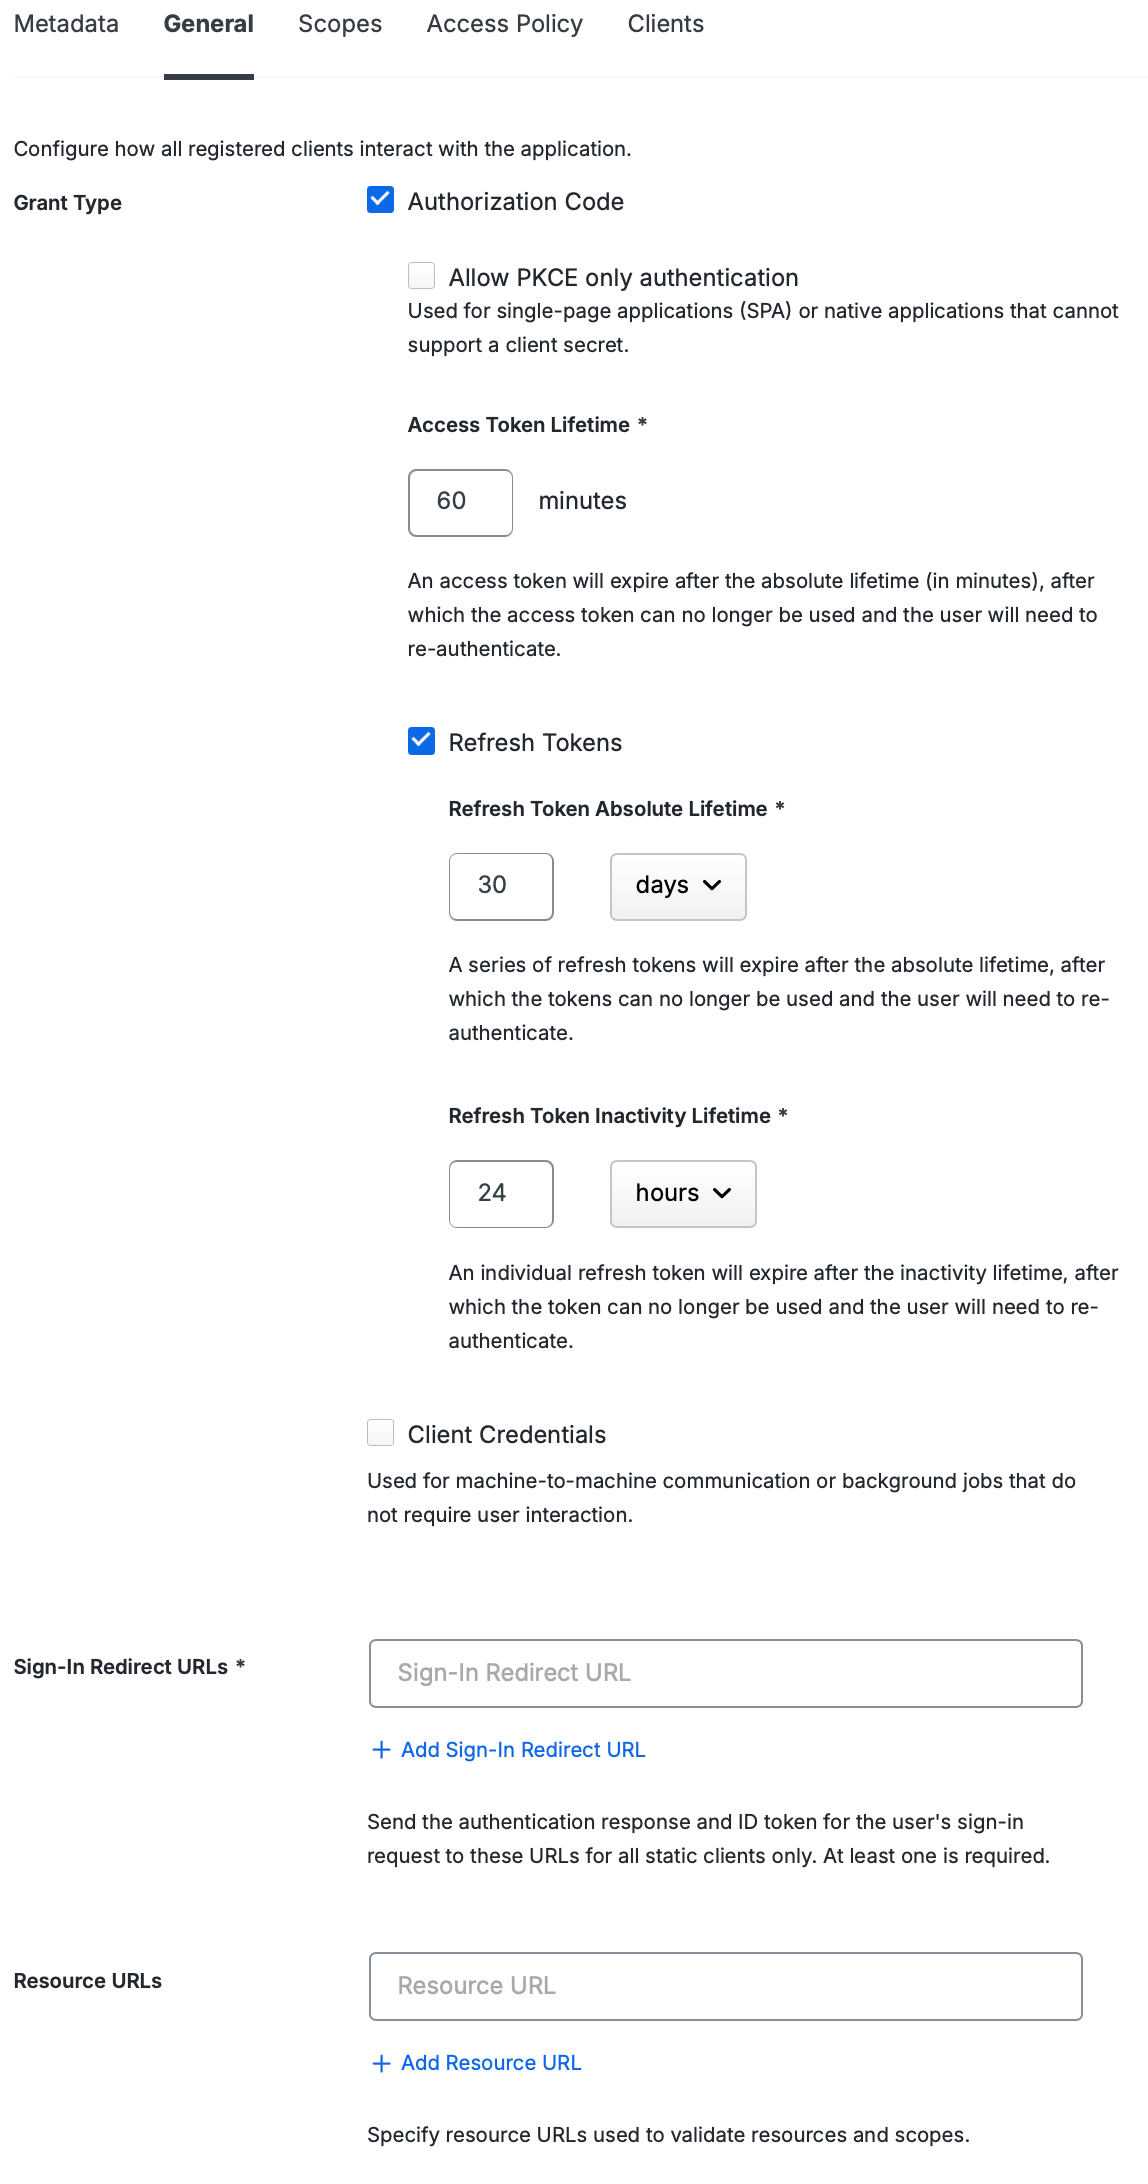
-
The Scopes tab provides information used by the client during authentication to authorize access to a user's details. Each scope returns a set of user attributes (claims) that are required to be mapped to an IdP attribute. When an OAuth 2.1 or OIDC request is sent to Duo SSO only the claims from the requested scopes will be sent back in the response.
Refer to your client documentation to complete the information on the Scopes tab:
Under the "Default Scopes" section you'll find checkboxes that show standard scopes that are commonly used in OAuth and OIDC flows. Default claims are already mapped to an authentication source using default attributes. The authentication method reference ('amr') claim is always reported as part of the ID Token. On the left side under IdP Attribute you can select our pre-configured attributes which will automatically pick the correct attribute based on your authentication source from the drop-down or type in the name of an attribute from your authentication source. The right side Claim corresponds to the name of the claim that attribute will be associated with.
Name Description openid A required claimless scope when doing an OIDC authentication. This scope cannot be disabled. profile Automatically populates three standard claims given_name,family_name,namemapped to three default attributes. You can change these values or remove them by clicking the trash can icon on the left-hand side. You can add additional claim mappings by clicking Add claim. If enabled, this scope must always have at least one claim.email Automatically populates one standard claim emailmapped to a default attribute. You can change these values or remove them by clicking the trash can icon on the left-hand side. You can add additional claim mappings by clicking Add claim. If enabled, this scope must always have at least one claim.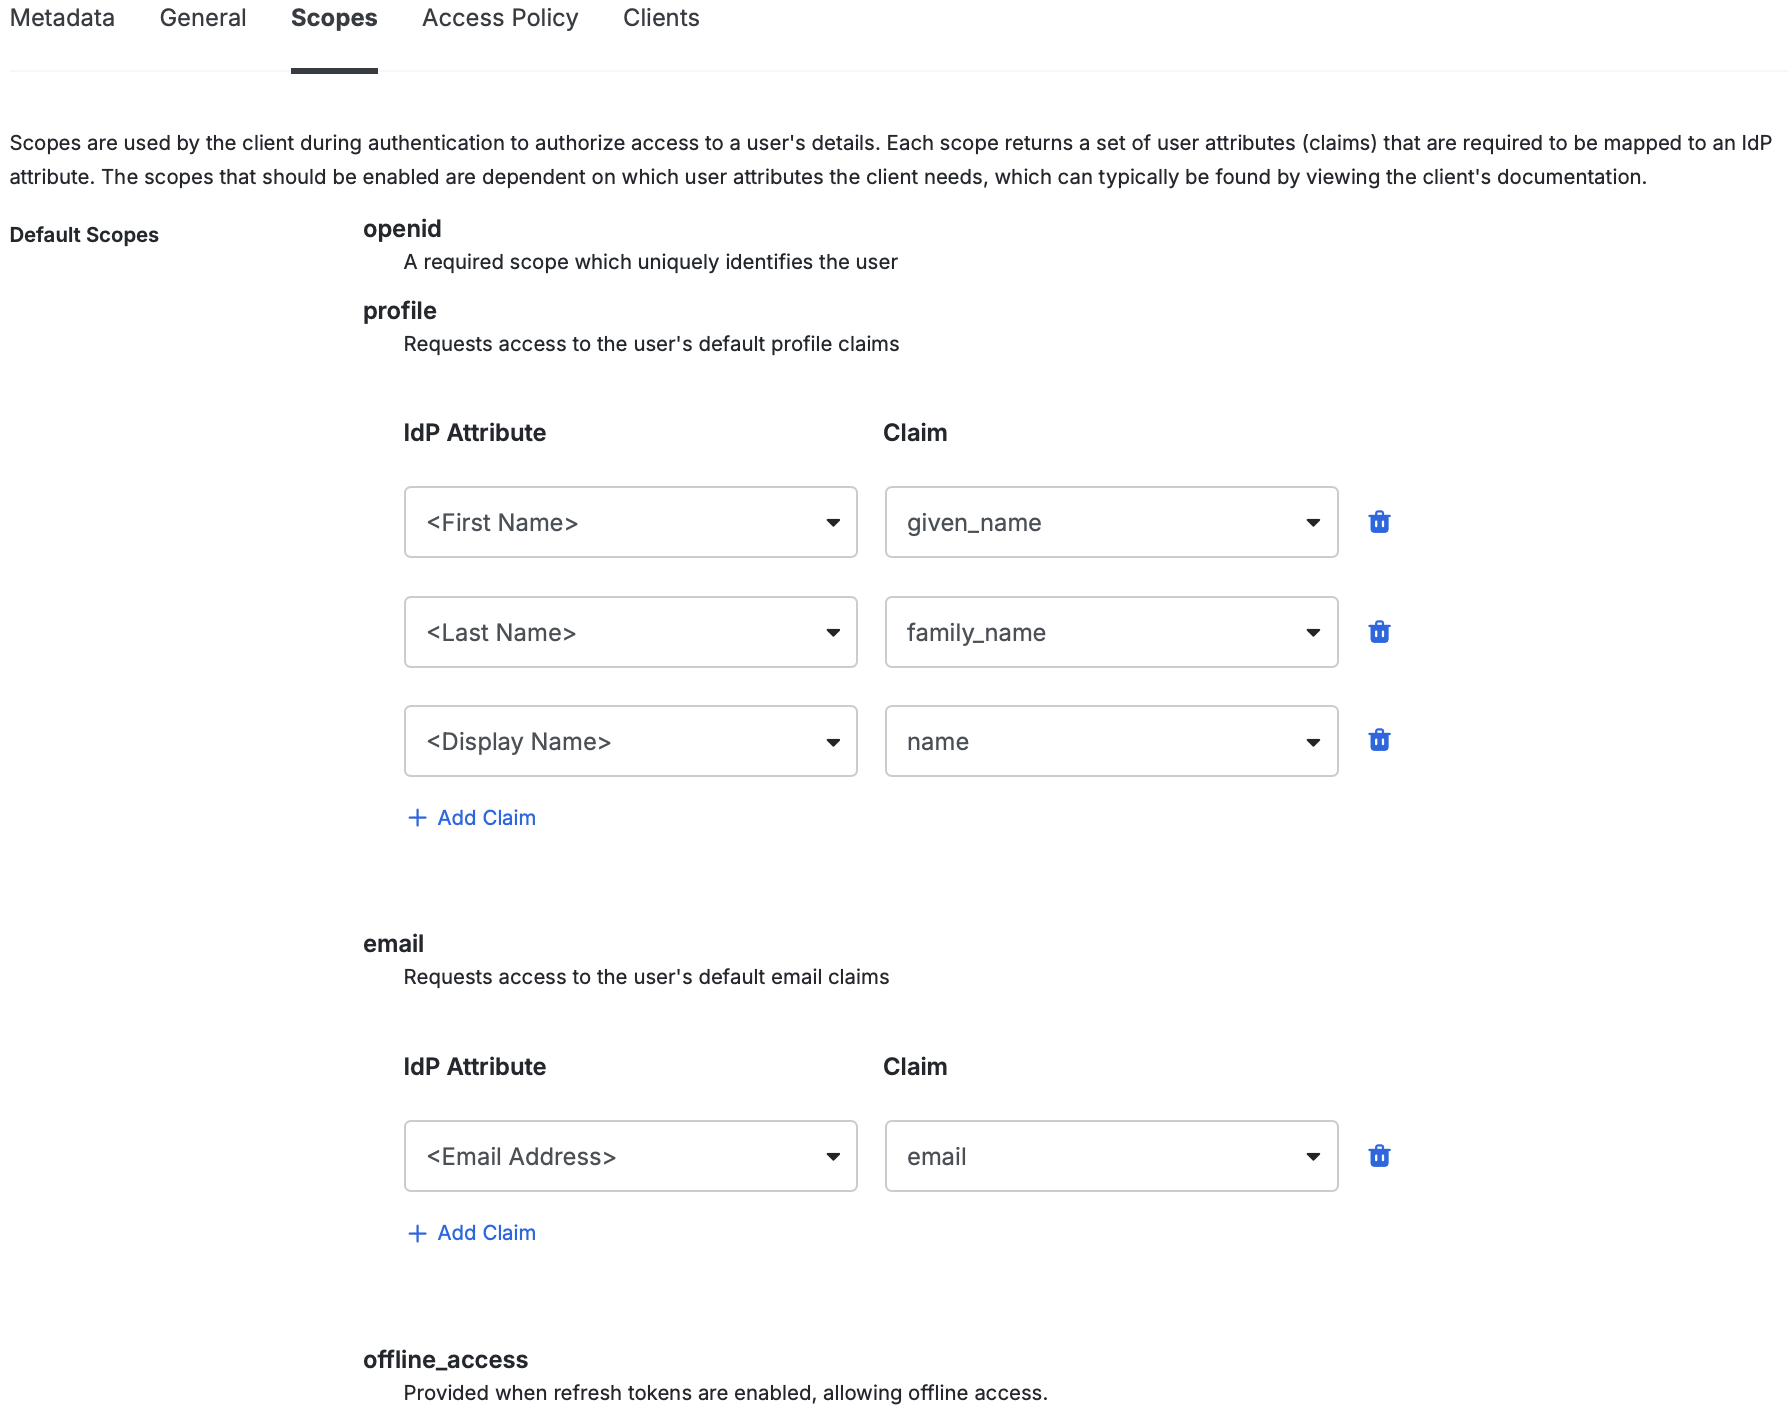
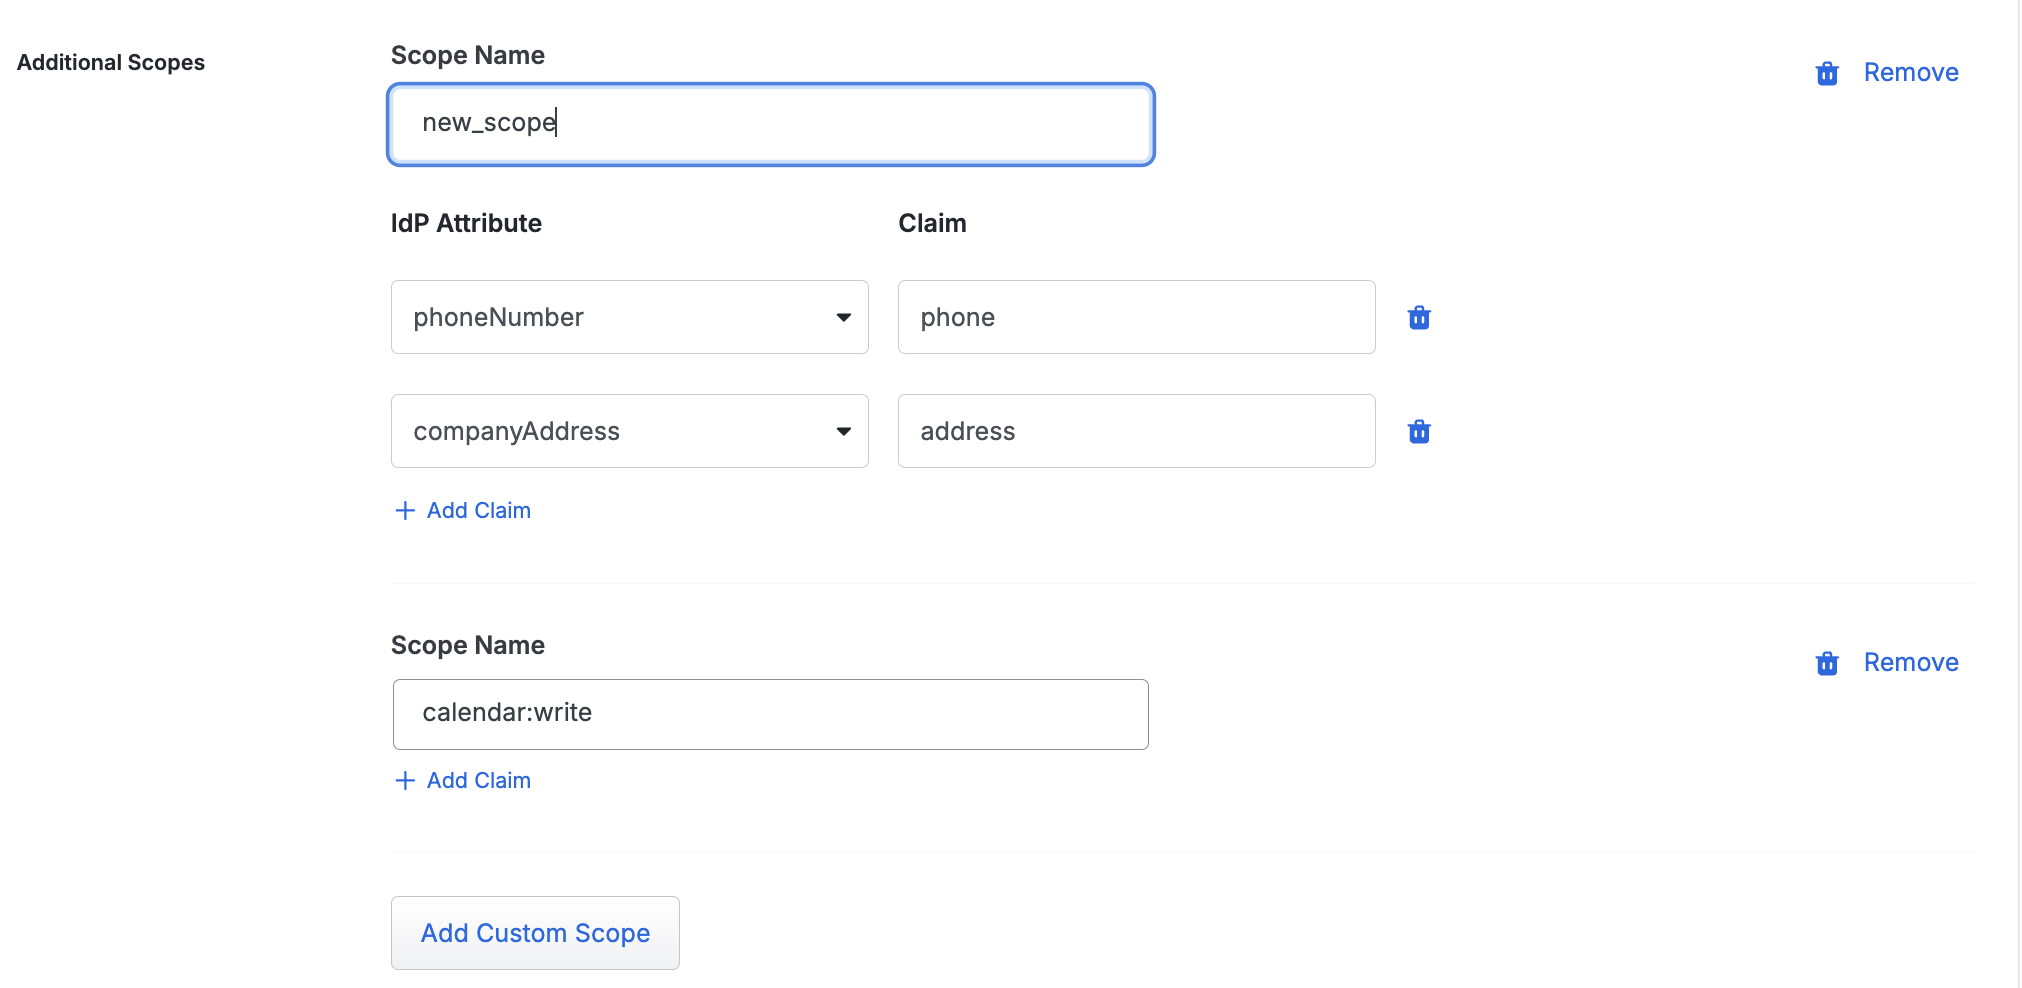
If you require additional scopes you can click the Add Custom Scope button which will allow you to type the name of a scope. If this scope should not contain claims you can continue on or you can click Add Claim under the scope name to add claim mappings for the scope.
-
You can optionally define claim transformations now or later.
-
Complete the Scope Authorization section on the Access Policy tab to define scopes that all users can have access to and map groups to those scopes.
-
Enable options for client self-registration on the Clients tab. Clients may register automatically using Client ID Metadata Documents (CIMD) or Dynamic Client Registration.
-
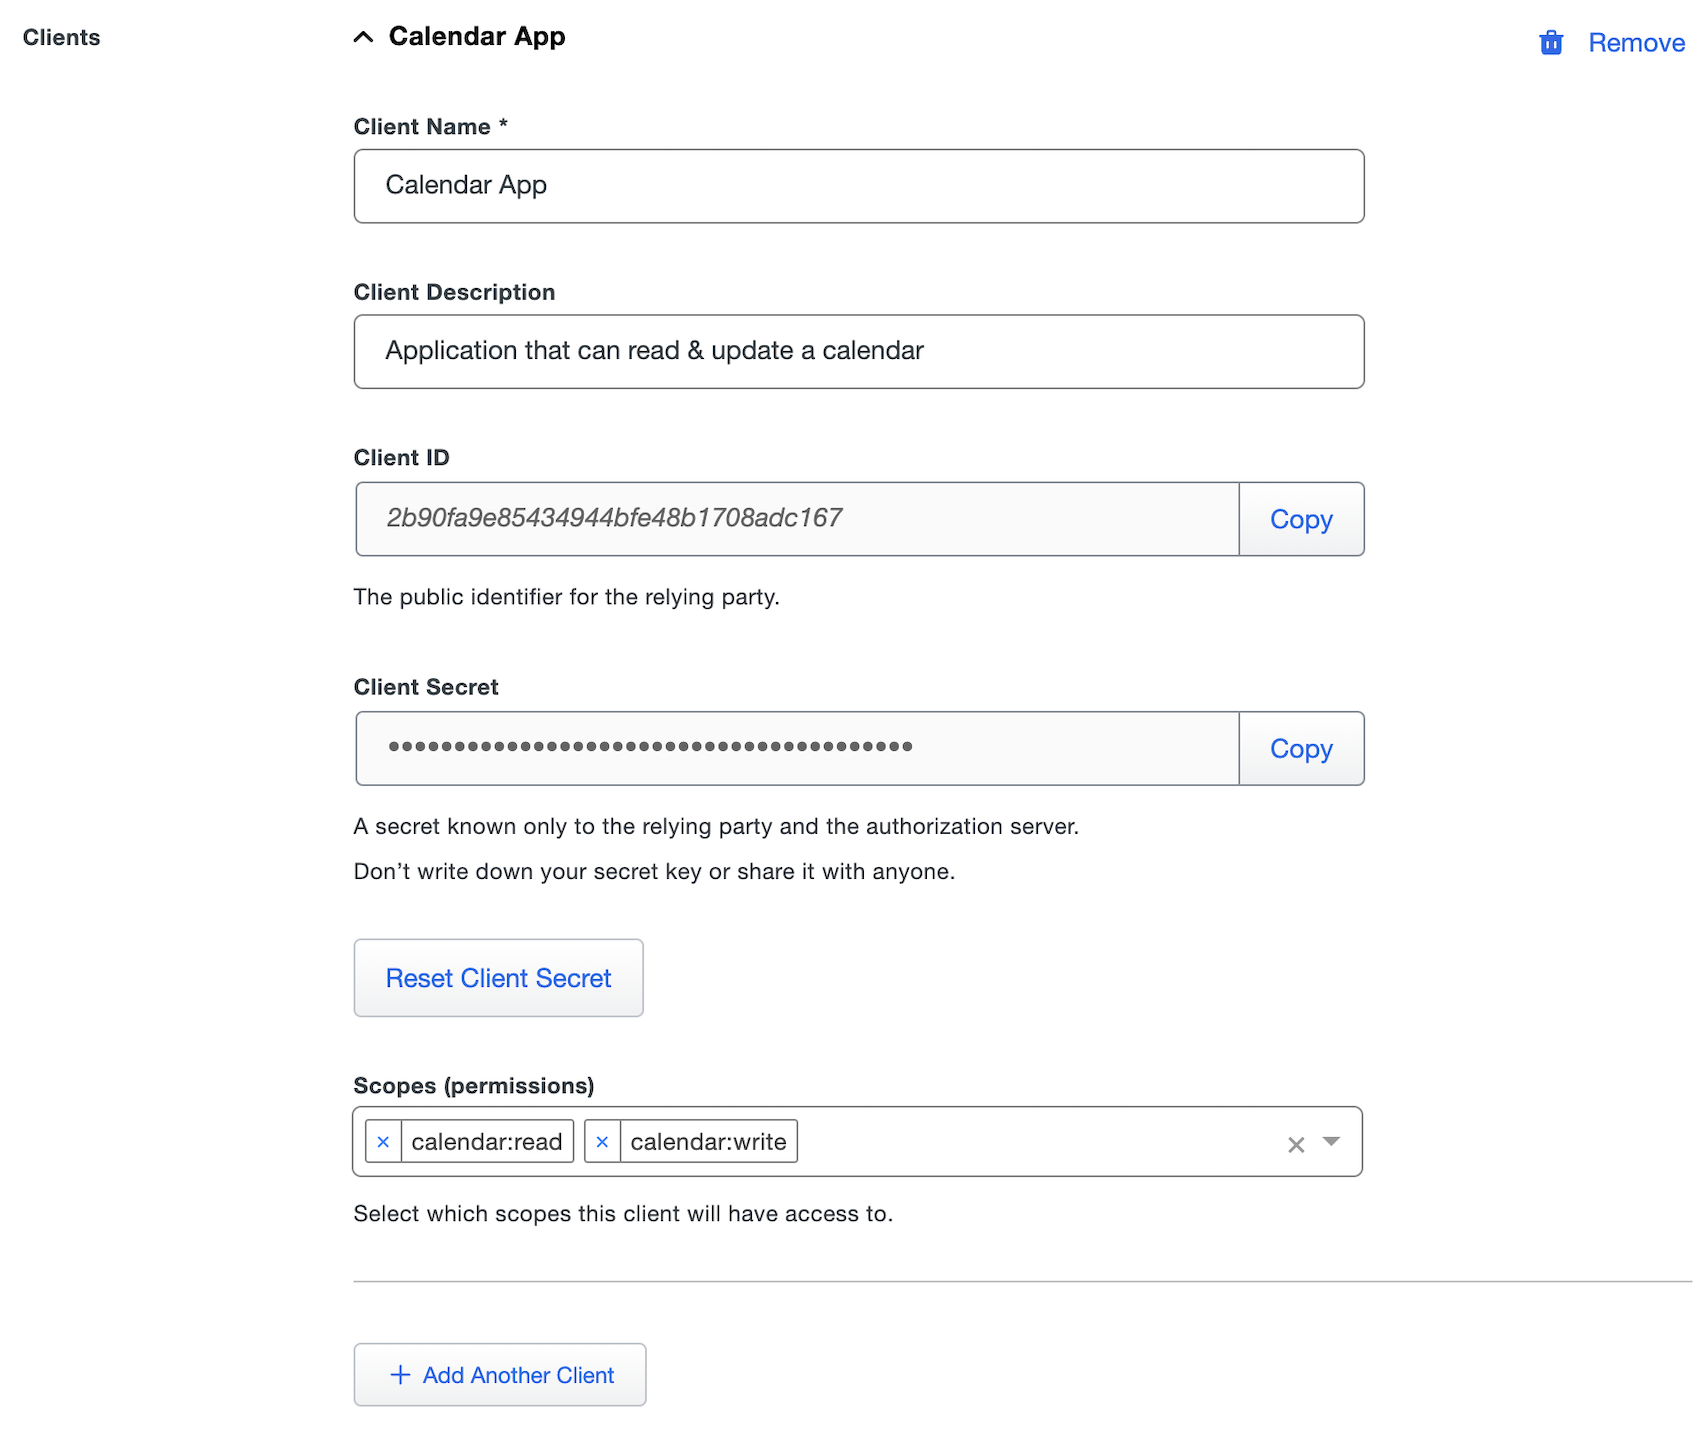
If you will not use CIMD or DCR, then once scopes have been added you can create clients by scrolling down to the "Confidential Client Registration" section. Confidential clients are relying parties that will make calls to either generate an access token or validate an access token from the OAuth 2.1 provider.
Use the table below to understand what information each client needs to send when they register:
Name Description Client Name A friendly name for the client that allows you to identify it. Client Description A description of how this client is used. Optional. Client ID The public identifier of the client. Client Secret A secret that is only held by the client and OAuth 2.1 provider. This secret is used to make authenticated requests against the OAuth 2.1 provider. You must save the page to generate the secret for a new client. You can reset the secret after creating this client by clicking the Reset Client Secret button. Once the secret is reset the old secret will be rejected. Scopes (permissions) You can select the different scopes added on the "Scopes" tab. Only scopes added here will be available for the client to request when generating an access token. If you'd like to add additional clients you can click Add Another Client.
-
You can adjust additional settings for your new SSO application at this time — like changing the application's name from the default value, enabling self-service, or assigning a group policy.
-
Scroll down to the bottom of the page and click Save. This will allow you view the "Client Secret" for any new clients created during this save.
Global token introspection for Duo SSO provides a centralized and secure method for validating access tokens across OIDC and OAuth applications, enhancing security and efficiency. For more information about global token introspection, see KB article 8875.
Claim Transformations
Claim transformations is an advanced feature that allows you to modify a claim value before it is sent to the OIDC client. The most common reason to modify a claim is that the service provider requires a claim in a certain format that isn't available from your authentication source. An example is that some clients offer sandbox environments but require that the username end in .sandbox. This isn't something you'd typically have stored in your authentication source so you wouldn't be able to protect that sandbox account using OIDC. Claim transformations solves this problem by allowing you to modify your claims.
Claim transformations work by operating on a list of rules from top to bottom to transform a claim into exactly what you need. The attribute selected on the first line is used as the primary attribute to be transformed. All rules after the primary attribute was specified will continue to modify this same attribute. The list of rules can be seen below.
When specifying attributes use the attribute name from your authentication source as shown in the claims for your enabled OIDC scopes for this application, such as the <Email Address> attribute from the email claim in the "Email" OIDC scope. These can be the default attributes from the pre-created claims, or custom attributes you create in your claims.
When creating a transformation rule you can use it to create a temporary attribute. Temporary attributes create variables via the transformation language then can be reused for more complex transformations. When you create a temporary attribute and give it a name, you can then specify that temporary attribute by name in subsequent rules.
Each rule should be on its own separate line and go in order from top to bottom of how you'd like the claim transformed.
Rule format is:
$RULE_NAME $OPTION="$OPTION_VALUE"
A rule can have more than one option and the option name must always be followed by an = and the option value encapsulated in quotes.
| Rule Name | Description | Options |
|---|---|---|
use |
Always used as the first rule to define the primary attribute to modify. The attribute name should always be surrounded by quotes. |
No options. |
prepend |
This rule allows you to prepend static text or the value of another attribute from your authentication source to the start of your primary attribute. |
|
append |
This rule allows you to append static text or the value of another attribute from your authentication source to the end of your primary attribute. |
|
insert_before |
This rule allows you to add static text or the value of another attribute from your authentication source before a delimiter that you specify. |
|
insert_after |
This rule allows you to add static text or the value of another attribute from your authentication source after a delimiter that you specify. |
|
join |
This rule joins the values of an attribute, which is an array of strings, into a single string separated by a specified separator. |
join separator=","
|
keep_before |
This rule removes text from your attribute after the delimiter, keeping only what was before it. |
|
keep_after |
This rule removes text from your attribute before the delimiter, keeping only what was after it. |
|
make_uppercase |
Uppercases the entire text of the attribute. |
No options |
make_lowercase |
Lowercases the entire text of the attribute. |
No options |
format_ad_groups |
This rule automatically filters Active Directory groups from their LDAP path name to only contain the group names. |
|
remove |
This rule allows you to remove the first or all occurrences of static text or the value of another attribute from your authentication source to your primary attribute. |
|
Examples
Below are some examples of different scenarios and how you can transform the claims to solve your problem.
Example 1
A client requires that all your email addresses end in .sandbox but you don't have an attribute in your authentication source that does.
You have an email attribute named mail and your user's email is jdoe@example.com.
use "mail"
append text=".sandbox"
- Line 1 picks the mail attribute from your authentication source to use for all rules below it. The example user's
mailattribute value isjdoe@example.com. - Line 2 appends the static text value specified to the end of the
mailattribute. This changes the example value tojdoe@example.com.sandbox
Example 2
You need to change the domain of an email address attribute to be from acme.corp to example.com.
You have an email attribute named mail and your user's email is jdoe@acme.corp.
use "<Email Address>"
keep_before delimiter="@"
append text="@example.com"
- Line 1 picks the mail attribute from your authentication source to use for all rules below it. The example user's
mailattribute value isjdoe@acme.corp. - Line 2 keeps only the text before the delimiter character
@. This changes the example value tojdoe. - Line 3 appends the text value to the end of the
mailattribute's value. This changes the example value tojdoe@example.com.
Example 3
You want to create an attribute that has a "no-reply" email address for a department, but no such attribute value exists in your identity store.
You have a custom department attribute that contains department names, and your email domain is example.com.
First, create a temporary attribute rule with the temporary attribute name set to noreply_prefix:
use "department"
append text="-no-reply"
- Line 1 picks the
departmentattribute from your authentication source, with an example value ofsales. - Line 2 appends the text value
-no-replyto the end of thedepartmentattributes value, resulting in the temporary attributenoreply_prefixwith the valuesales-no-reply.
Next, create a normal transformation rule to create the claim using the resulting email address via transformation:
use "noreply_prefix"
append text="@example.com"
- Line 1 uses the
noreply_prefixattribute created by the temporary attribute transformation rule preceding this rule in the stack. - Line 2 appends the email domain
example.comto the temporary attribute's value, resulting in the email addresssales-no-reply@example.com
How to enable claim transformations
-
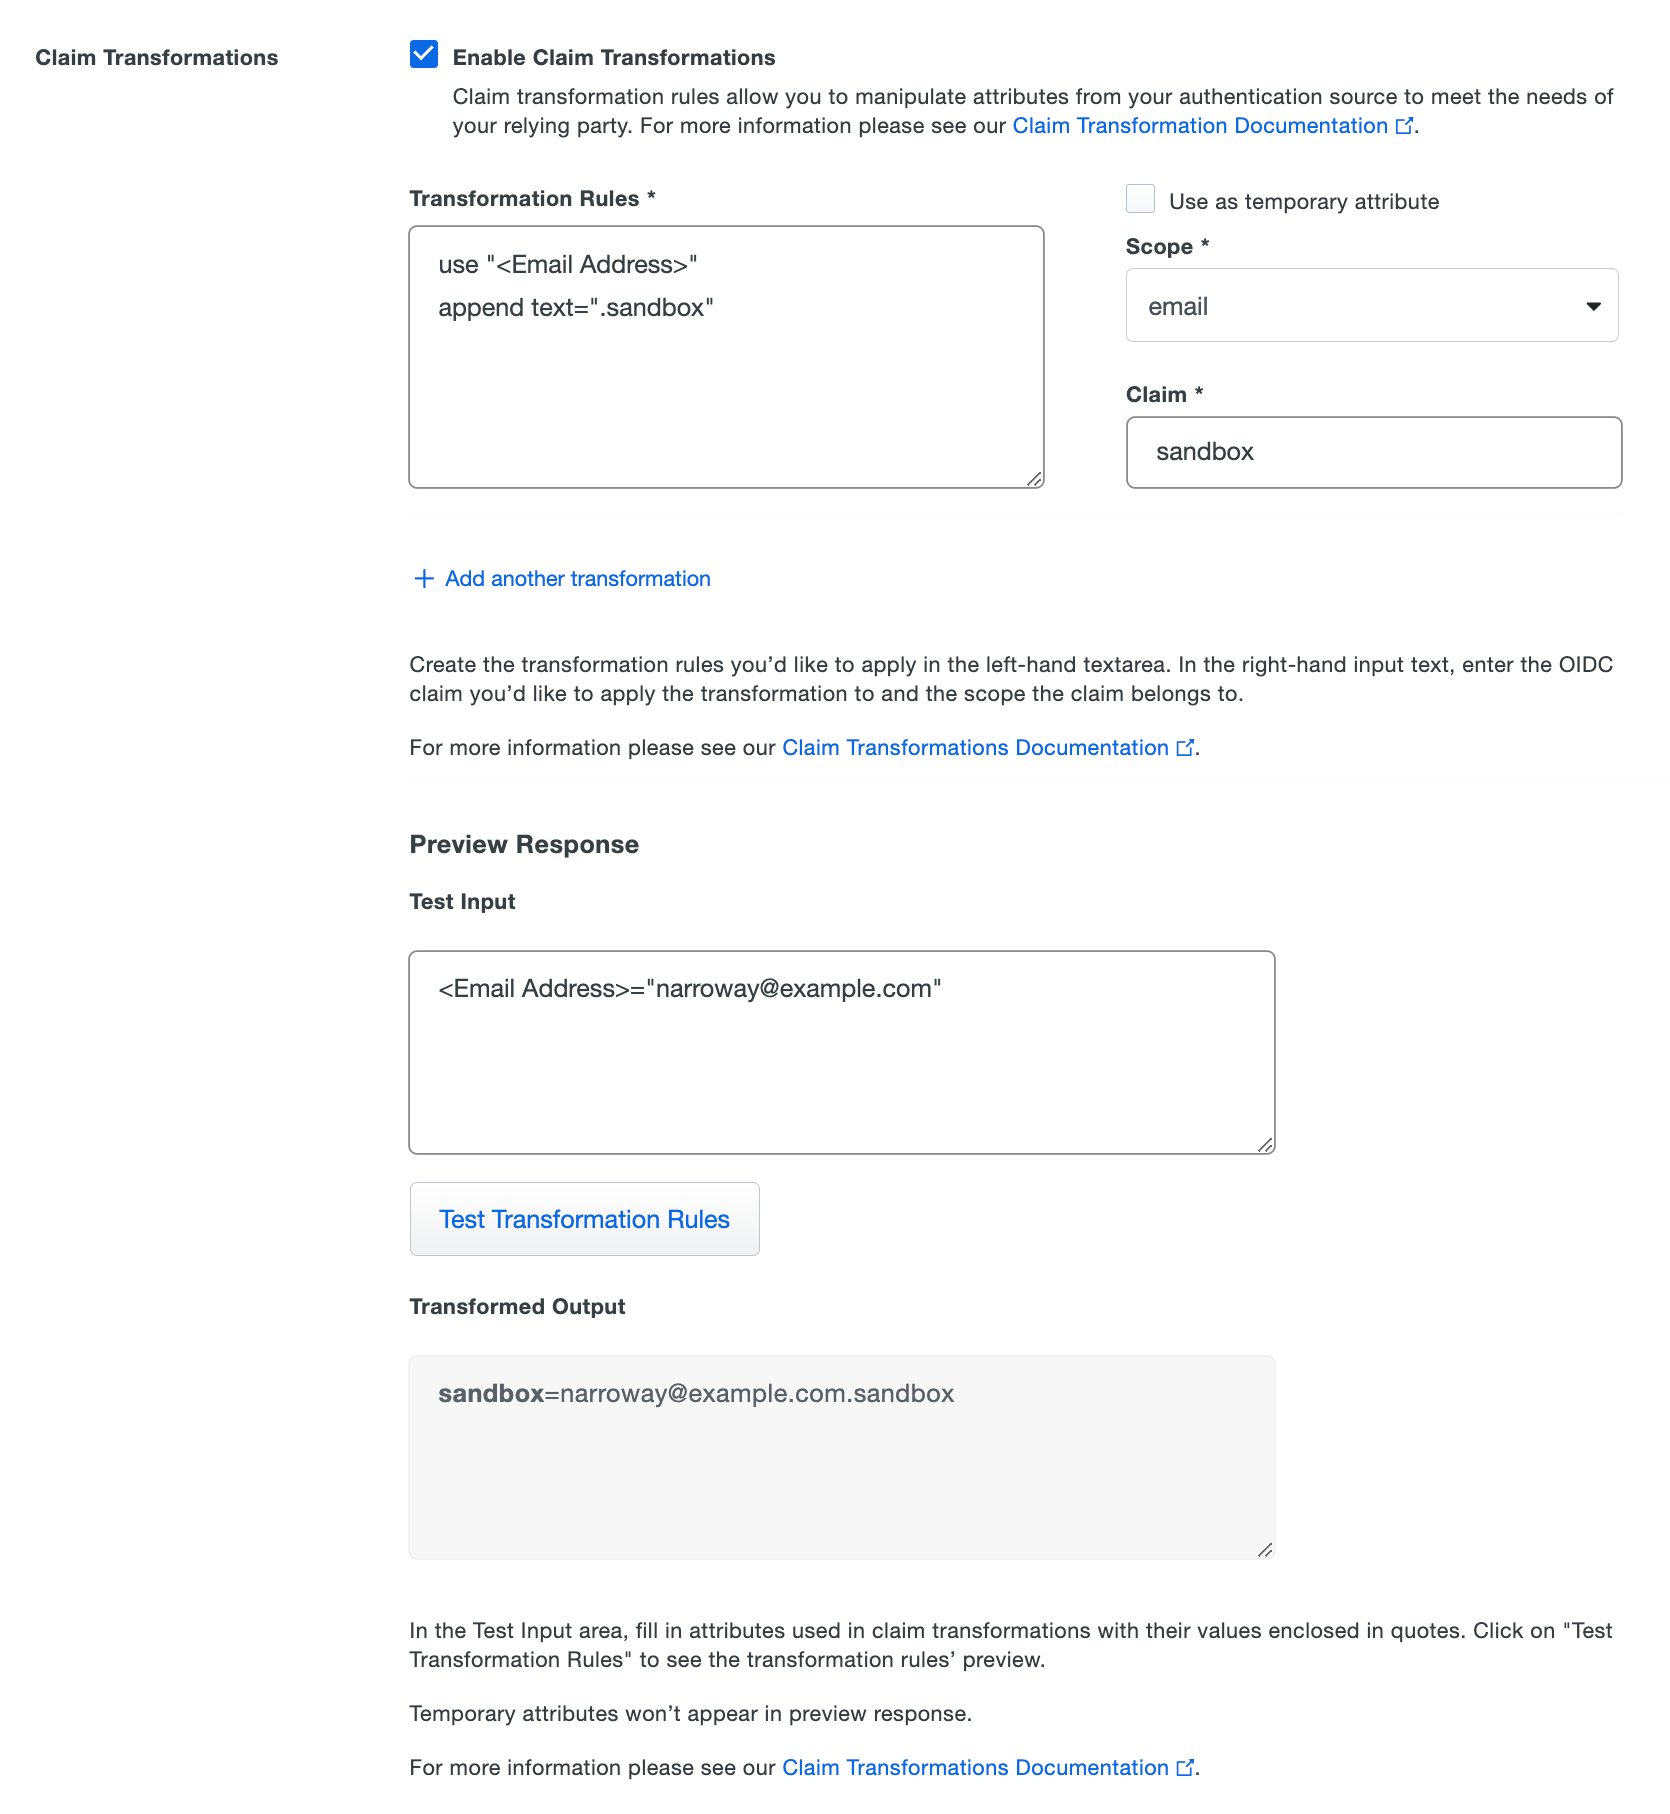
Next to Claim Transformations check the box for Enable Claim Transformations. New options will appear below.
-
On the left-hand side under Transformation Rules you can use the rules above to fill out the textbox with how you'd like to transform a claim.
-
If you want to use this rule to create a temporary attribute, select the Use as temporary attribute option on the right-side of the rules editor, and specify the name you want to use for the resulting attribute in the Temporary Attribute Name box.
-
If not creating a temporary attribute, then on the right-hand side you select a scope this transformed claim will be mapped to from the Scope drop-down.
-
Under Claim type in the new claim name you want sent to your client.
-
If you'd like to add additional attributes to transform click Add another transformation.
Preview Response
Use the "Preview Response" tool to test the outcome of your transformation rules and see what will be sent in the OIDC response.
-
Provide values for attributes used in transformations in the Test Input box. Enclose attribute values in quotes.
If you're transforming AD groups, you will need to enclose the AD group values in quotes and separate multiple groups with commas.
-
After you specify all values for attributes used in transformation rules, click Test Transformation Rules. If all transformation rules are correct, the "Transformed Output" section shows the transformed attributes with rules applied.
Validation errors for any transformation rules will be shown underneath the "Test Input" area. If any of the test input values provided are incorrect, you will see an error message describing which provided attributes are incorrect. Correct the transformation rule or test input information and try the test again.
Scope Authorization
Scope authorizations define scopes granted to users by group membership.
- On the "Access Policy" tab, next to Scope Authorization, use the Scopes granted to all users drop-down menu and select the scopes you want to grant. Choose any of the default scopes or custom scopes you may have added.
- Click the +Add Group Assignment button.
- Use the Groups drop-down menu to select group names.
- Use the Granted Scopes drop-down menu to select granted scopes.
- Click Save.

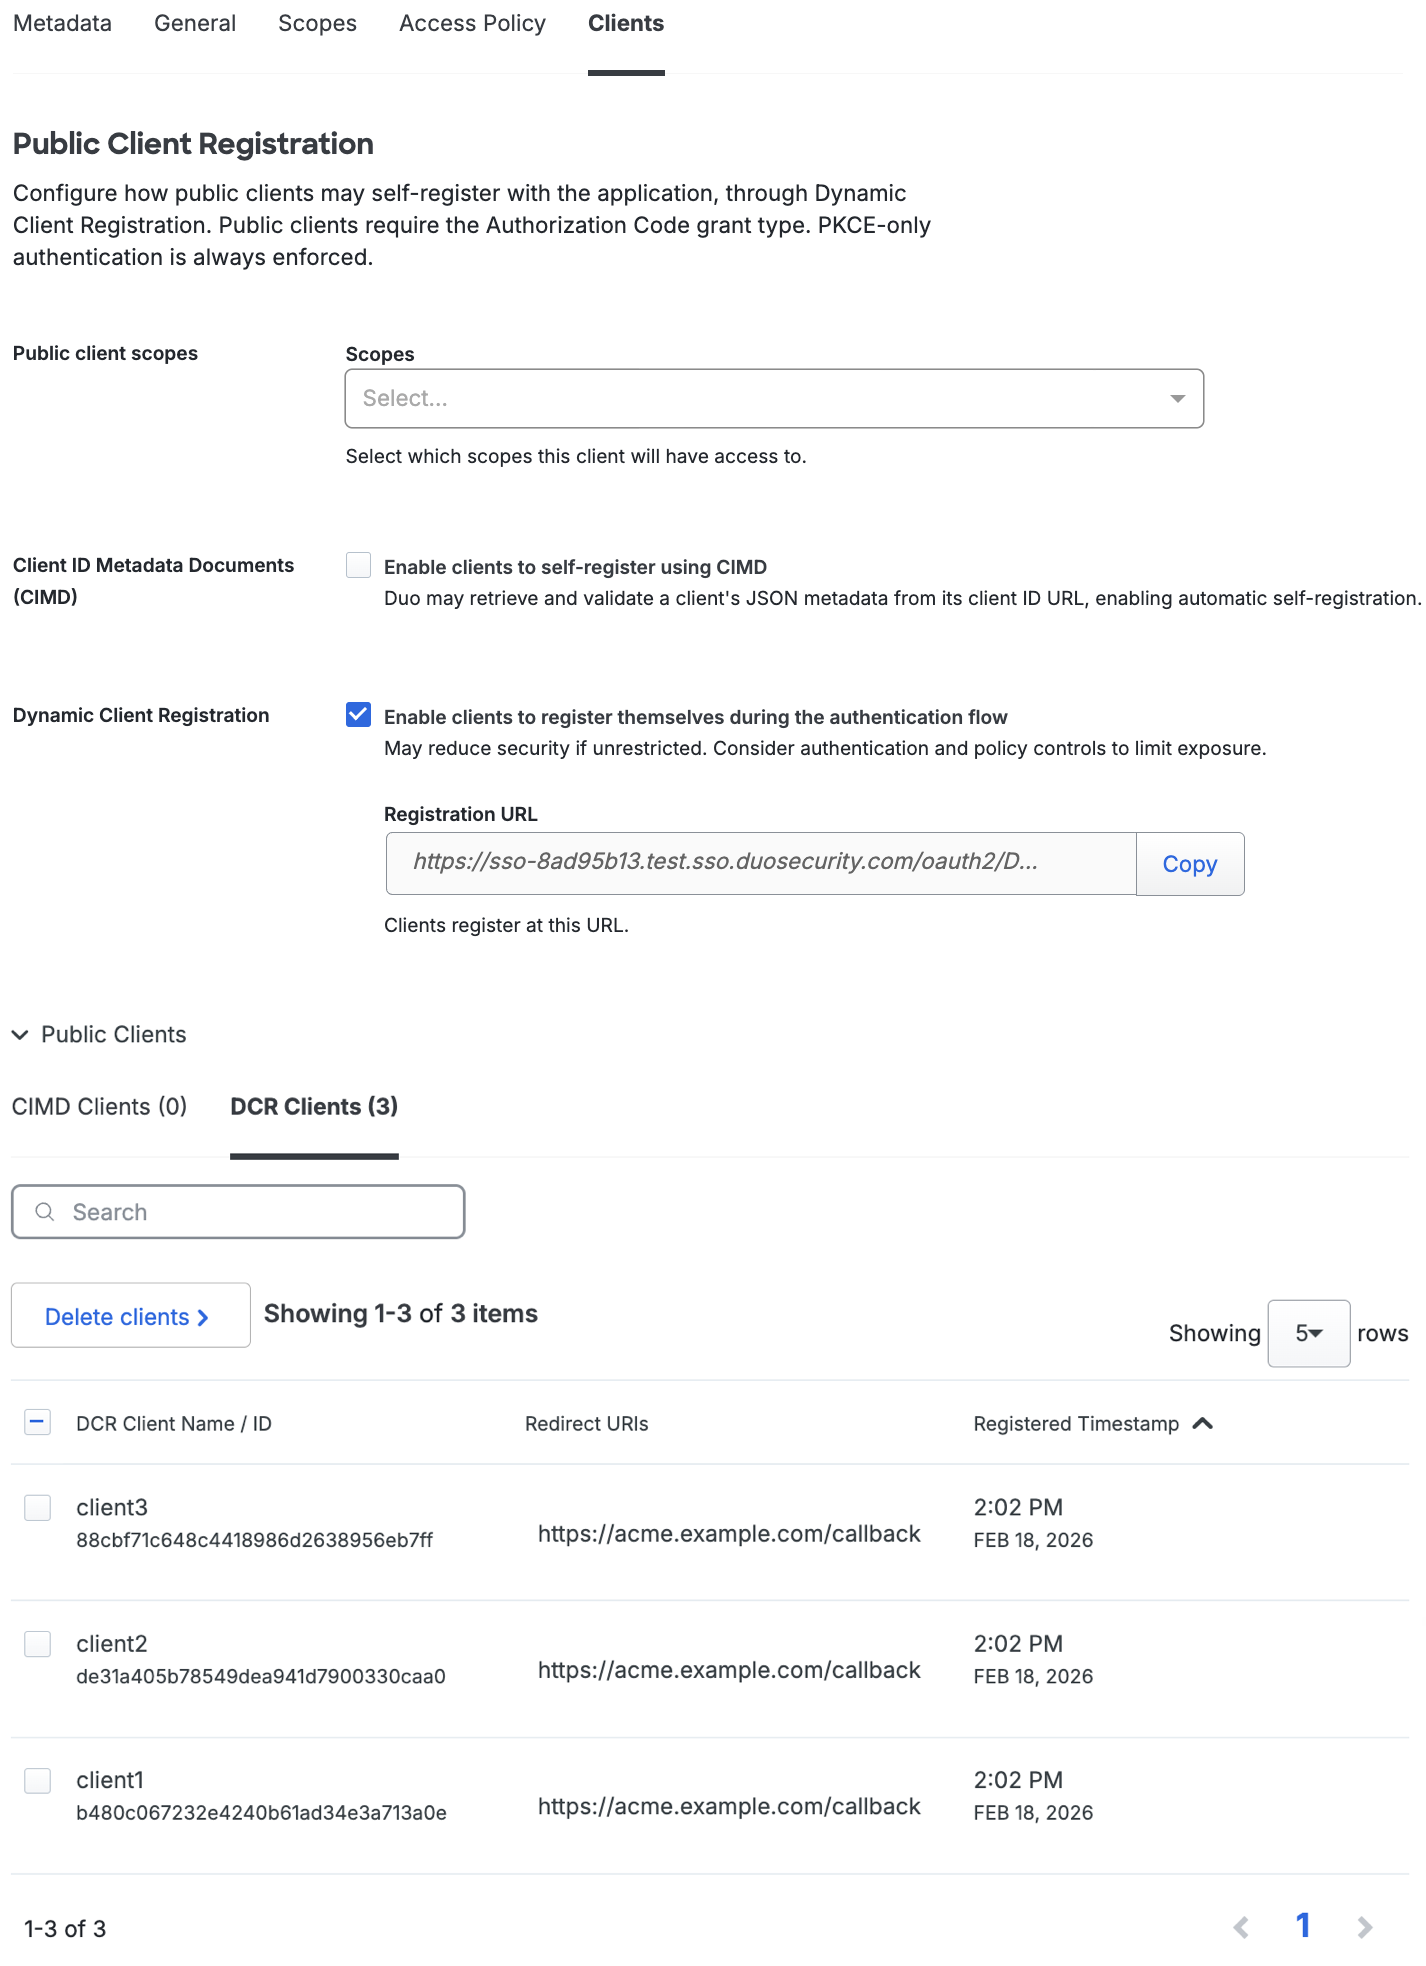
Public Client Registration
Configure public client registration options and manage registered clients on the "Clients" tab.
Public Client Scopes
Use the Scopes drop-down menu to select scopes available to your public clients. Choose any of the default scopes or custom scopes you may have added.
Client ID Metadata Documents
Enable your public clients to self-register dynamically using Client ID Metadata Documents (CIMD).
To enable CIMD registration:
-
On the "Clients" tab, enable the Authorization Code grant type on the General tab of this application's properties if not already enabled.
-
Check the Enable clients to self-register using CIMD option on the "Clients" tab.
-
Click Save.
Dynamic Client Registration
Enable your public clients to register themselves dynamically by providing them a Duo registration URL. Once registered, you can view and manage your public clients by returning to your OAuth application in the Admin Panel.
To enable dynamic client registration:
- On the "Clients" tab, enable the Authorization Code grant type on the General tab of this application's properties if not already enabled.
- Check the Enable clients to register themselves during the authentication flow option in the "Dynamic Client Registration" section.
- Click Save.
Manage or Delete Public Clients
The "Public Clients" section of the page lists your registered CIMD and DCR clients:
- CIMD: The "CIMD Clients" tab shows registered clients, sortable by the "First Active At" column. Use the search box to look for registered CIMD clients by name. Note: You are not allowed to delete CIMD clients.
- DCR: The "DCR Clients" tab shows registered clients, sortable by the "Registered Timestamp" column. Use the search box to look for registered DCR clients by name or client id.
Use the table below to understand what information each DCR and CIMD client needs to send when they register:
| Name | Description |
|---|---|
| Client Name | A friendly name to identify the client. Required for DCR & CIMD. Included in the registration request for DCR and metadata document for CIMD. |
| Client ID | Document URL for metadata. Required for CIMD, not for DCR. The client identifier must exactly match the document URL in the request. |
| Redirect URIs | List of URLs. The requested redirect_uri must match one in this list. Required for both DCR & CIMD. Included in the registration request for DCR and metadata document for CIMD. |
Use the search box to look for registered clients by name.
To delete a DCR client:
-
Click on the "DCR Clients" tab and then select the specific clients you want to delete by clicking the checkbox to the left of the client name. If you want to delete all clients, there's no need to select them.
-
Click on the Delete clients drop-down, and opt to either delete the selected clients or to Delete all clients.
Duo Universal Prompt
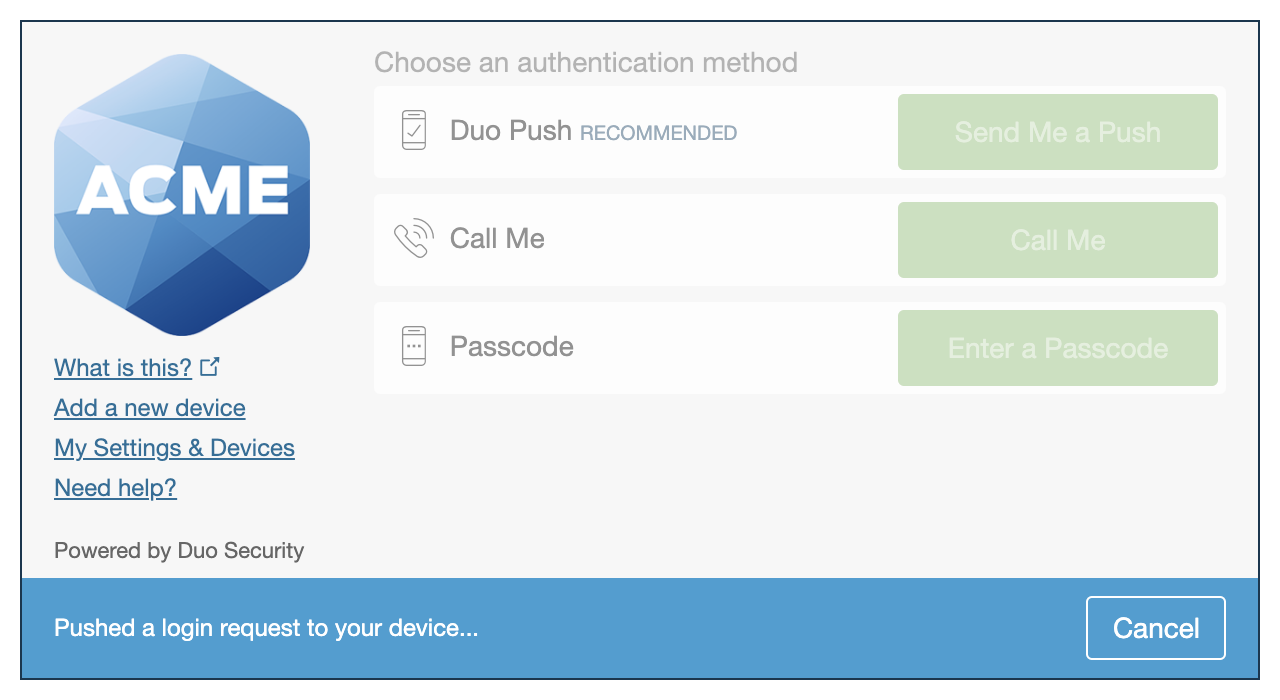
The Duo Universal Prompt provides a simplified and accessible Duo login experience for web-based applications, offering a redesigned visual interface with security and usability enhancements.
| Universal Prompt | Traditional Prompt |
 |
 |
We've already updated the Duo generic OIDC client application hosted in Duo's service to support the Universal Prompt, so there's no action required on your part to update the application itself. If you created your generic OIDC client application before March 2024, you can activate the Universal Prompt experience for users from the Duo Admin Panel. generic OIDC client applications created after March 2024 have the Universal Prompt activated by default.
If you created your generic OIDC client application before March 2024, it's a good idea to read the Universal Prompt Update Guide for more information, about the update process and the new login experience for users, before you activate the Universal Prompt for your application.
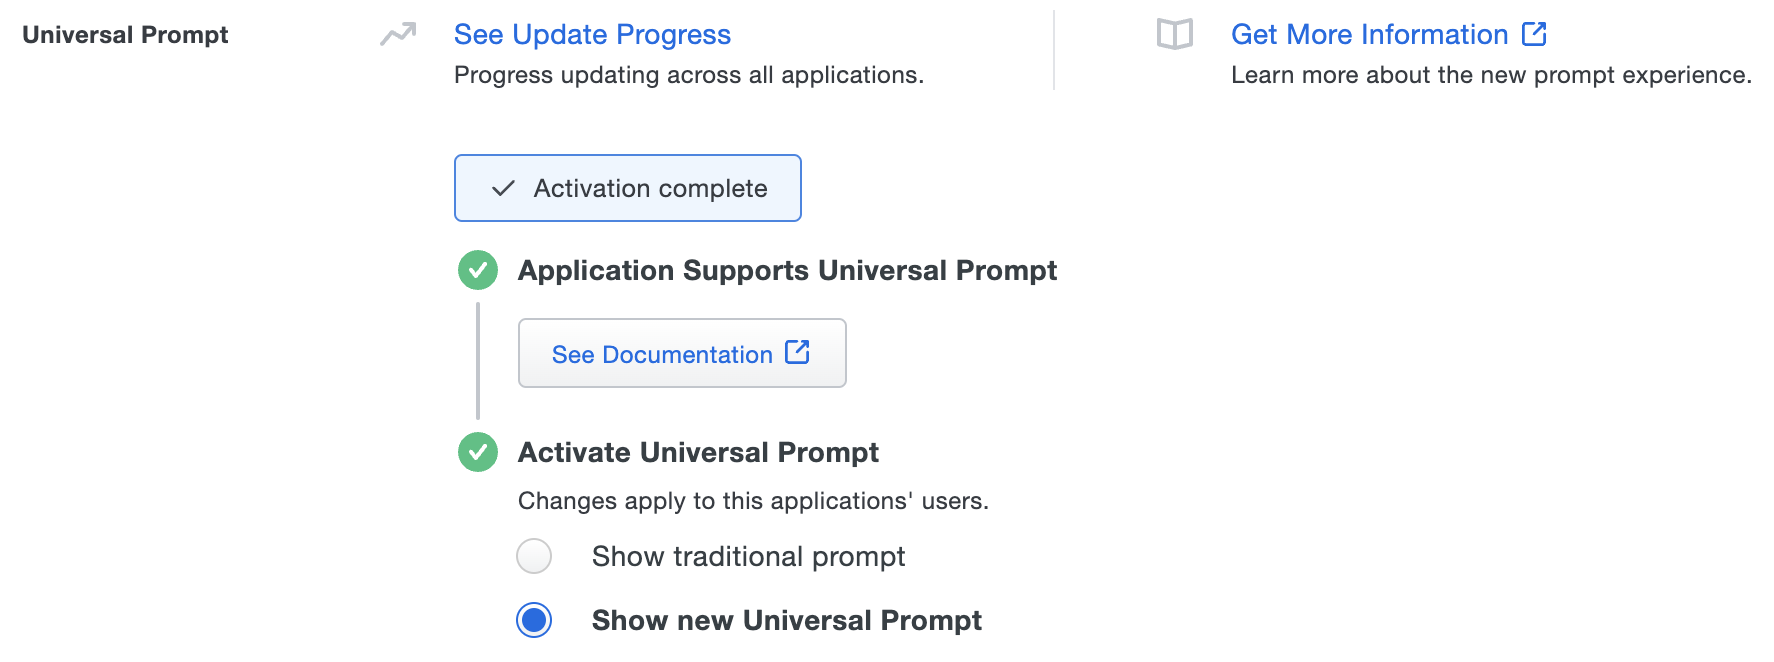
Activate Universal Prompt
Activation of the Universal Prompt is a per-application change. Activating it for one application does not change the login experience for your other Duo applications.
The "Universal Prompt" area of the application details page shows that this application is "Ready to activate", with these activation control options:
- Show traditional prompt: Your users experience Duo's traditional prompt via redirect when logging in to this application.
- Show new Universal Prompt: (Default) Your users experience the Universal Prompt via redirect when logging in to this application.
The application's Universal Prompt status shows "Activation complete" here and on the Universal Prompt Update Progress report.
Should you ever want to roll back to the traditional prompt, you can return to this setting and change it back to Show traditional prompt. However, this will still deliver the Duo prompt via redirect, not in an iframe. Keep in mind that support for the traditional Duo prompt ended for the majority of applications in March 2024.
Universal Update Progress
Click the See Update Progress link to view the Universal Prompt Update Progress report. This report shows the update availability and migration progress for all your Duo applications. You can also activate the new prompt experience for multiple supported applications from the report page instead of visiting the individual details pages for each application.
Verify SSO
You can log into most OIDC applications using SSO by visiting their website directly. Refer to your client's configuration guide for instructions for testing an OAuth 2.1 setup.
You can log into your application using Duo Central, our cloud-hosted portal which allows users to access all of their applications in one spot. You can add your OIDC applications to Duo Central by following the Add Application Tiles section of the page either entering in the base URL for the application you'd like users to access or provide an RP-initiated login URL if provided by the client.
When you log into an application provided by Duo's Single Sign-On, you will be redirected to Duo Single Sign-On to begin authentication.
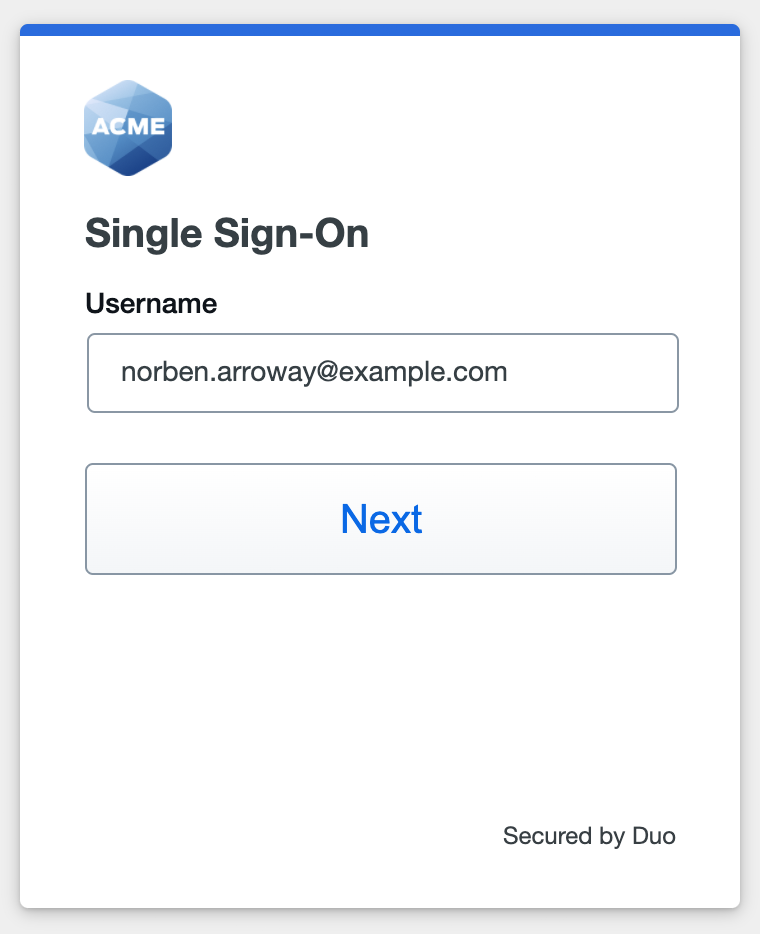
Duo SSO Login
Enter the primary username (email address) on the Duo SSO login page and click or tap Next.
Enter the Duo Directory or AD primary password and click or tap Log in to continue.
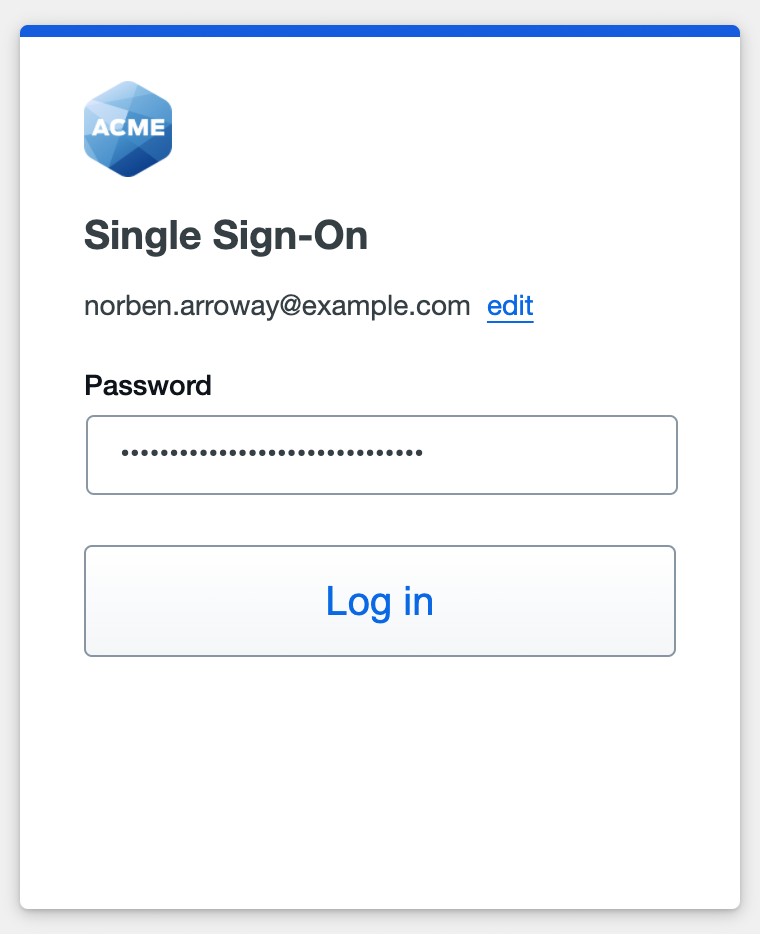
Enable Duo Passwordless to log in to Duo SSO without entering a password in the future.
SAML Login
With a SAML identity provider as the Duo SSO authentication source, Duo SSO immediately redirects the login attempt to that SAML IdP for primary authentication. Users do not see the Duo SSO primary login screen.
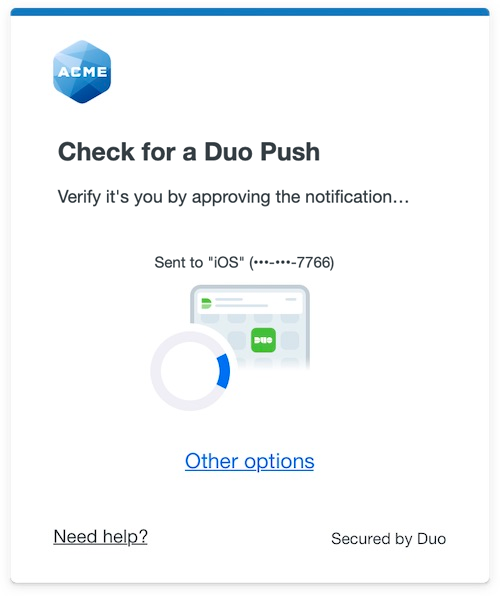
Duo Authentication
Successful verification of your primary credentials redirects back to Duo. Complete Duo two-factor authentication when prompted and then get redirected back to the client application to complete the login process.
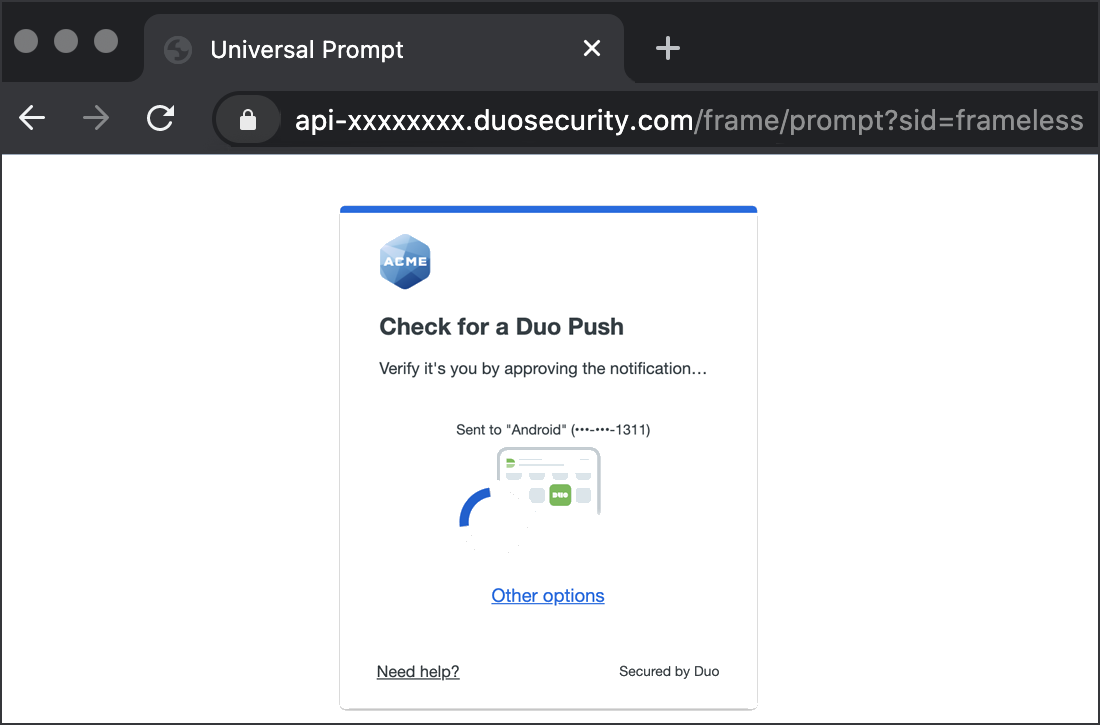
*Universal Prompt experience shown.
Grant Access to Users
If you did not already grant user access to the Duo users you want to use this application be sure to do that before inviting or requiring them to log in with Duo.
Enable Remembered Devices
To minimize additional Duo two-factor prompts when switching between your client application and your other Duo Single Sign-On SAML applications, be sure to apply a shared "Remembered Devices" policy to your SAML applications.
OpenID Request Examples
Certain OpenID endpoints used throughout the authentication flow may require the Client to make requests with specific data to the endpoint. The below information will highlight each endpoint with its specific requirements and an example of the request to/and response from our service.
All URLs start with the "Issuer" under the "Metadata" tab. Example URLs will be used below.
Discovery URL
Unauthenticated metadata endpoint that returns configuration information about the authorization server including which grant types and scopes are configured.
GET /.well-known/openid-configurationExample Response
{
   "issuer":"https://sso-abc1def2.sso.duosecurity.com/oidc/DIABC123678901234567",
   "authorization_endpoint":"https://sso-abc1def2.sso.duosecurity.com/oidc/DIABC123678901234567/authorize",
   "token_endpoint":"https://sso-abc1def2.sso.duosecurity.com/oidc/DIABC123678901234567/token",
   "jwks_uri":"https://sso-abc1def2.sso.duosecurity.com/oidc/DIABC123678901234567/jwks",
   "response_types_supported":[
      "code"
   ],
   "subject_types_supported":[
      "public"
   ],
   "id_token_signing_alg_values_supported":[
      "RS256"
   ],
   "introspection_endpoint":"https://sso-abc1def2.sso.duosecurity.com/oidc/DIABC123678901234567/token_introspection",
   "userinfo_endpoint":"https://sso-abc1def2.sso.duosecurity.com/oidc/DIABC123678901234567/userinfo",
   "scopes_supported":[
      "openid",
      "email",
      "profile"
   ],
   "response_modes_supported":[
      "query",
      "fragment"
   ],
   "grant_types_supported":[
      "authorization_code"
   ],
   "token_endpoint_auth_methods_supported":[
      "client_secret_basic",
      "client_secret_post",
   ],
   "introspection_endpoint_auth_methods_supported":[
      "client_secret_basic",
      "client_secret_post"
   ],
   "code_challenge_methods_supported":[
      "S256"
   ]
}
JWKS URL
Unauthenticated endpoint that returns JSON Web Key Set (JWKS) information about the authorization server that can be used to validate signatures signed by the server.
GET /jwksExample Response
{
   "keys":[
      {
         "kty":"RSA",
         "use":"sig",
         "alg":"RS256",
         "kid":"6f1636b67f198fc9c594cbbd85d406d145c50db0869e92f03d4c864c2e35b9aa",
         "n":"vkDLxi_fCM9mhWY2z_im85BcCepwOKyCPDQSvHXRv-PN2k0TawS-yQrZPScMsIOFkSnLEY1k7BRUrXK0YVsLPUFgyoKWQnXltsmWL06XNeFwTzZs67HgWgIA3CaIa9Ph8gbtpvBayjsc_CuHCts25-sJEheFw1teioJBDJFPC18ZwniKC8cbkoWBrf1y0FEHXlGmsaAXY7uGdfPQWw2GCfnQds9YwIRre_KFkwvhC9xhJ_syMSd0TEaZSJXUflN3Vph8MEjkZ12AzIeb-1wV1PULVIReKFubTOVL1mOvL_X9qmtU3b004BbIyKUY5gSEDSKAHfULj0jXgdazmUavrW3kmza9LYCpNgNDFJH1y6J90HV2t8E3dFRRLXHVsnF7ImcQuH2gX_kVL5jP0KH3FcmKtDf0uoiVX7dHC0ohWyRemROVkjgmJYvds4mVKjaulwICltk9GSH0Fe9x13fy9R668KzpFDbtIZdrAa2cztFggQKTKjgEStKfctlC-yS2jMGATUI96XOKK0ZPo0Bf8xB5cEOsdGSREcMXVk4PcrfUAzeFTkA2JlruYQ42JyCvEEVfvxelxyJlB8iplelZJGCEnJday_ilywCJWPYqiuMWzl5ctKdzRdY823ZyzlNLv5jGKlpfd8iywD6JkO578nmrjSVx9yI9KwbQJWD-Yos",
         "e":"AQAB"
      },
      {
         "kty":"RSA",
         "use":"sig",
         "alg":"RS256",
         "kid":"5a23604dc51e1c568c43d0294cce1e7a0fd496d20ba55531d48b8dccbe21aa30",
         "n":"7PGr5CD-FWKTKbOQqOM964-AhwIpfhmrCf2u7L_HF_ZDM3eyP__KGAePdhMCDcMrQbCFWpXURDN8KnpDmuM5sMRn2j3QDM4YyabWb4MbIlc0OvHYNf113EKwb_VxphUFkmPAwF4X73uxeIv12ZSrz7rgMi-Ujj7dZwl6JaZvpzyFE8wLKw_MJ__sgME6-dp1zvGitepMJURPZDNph767gcA-Gw08snFJXCOdv8SyXKvVQkrxtzNzT8PWKwjeIVQW0LNySMj7nj93ruIOAjqk9WGJO5_CYobBl-QDC15BMK_capjgMEWLHlulrnL9Xsws_SixmcZqtK40AdmD1OIYcHNbXbLc0ELVip0ibvsqr1bh9lyFvyHJ0HVf_5jIUGBNndFq0NHoraRSFxCJ1l9_riYLGBsMaLFucqsqjeh_DV81hvsfJXYVom0gvdAjKA6e4QxQdc1GF0YIc4S5ojElo3S1350x_SKhwmufkQ6dcshHHT8DJSijdLRMtCLVzpQbhQpFA0QgUfTYpAScrAu59LsedYitmobWKTkq9VQcz5lHPDSudcpKOi9EjUR2UgpRDFyrG09Bi01ax6tT6RFfut-0_EOwAndIMn3Gm9cnnInpIG-eMbYMZmu0tFHFfOknQYISt1qUWyVOItOzlVKxMkF5wZ3WygCz8xRZ7wsmVDM",
         "e":"AQAB"
      }
   ]
}
Authorization URL
URL to start a new authentication usually redirected here from the client. Once the request is sent the user will be asked to authenticate through Duo Single Sign-On. Upon successful authentication they will be redirected back to the client with information.
GET /authorizeParameters
Below is the information that you'll need to complete a Authorize URL request.
| Parameter | Required? | Description |
|---|---|---|
client_id
|
Required |
The client ID for the application found on the "Metadata" tab of the application's Duo Admin Panel. Example: |
code_challenge
|
Required |
A challenge for PKCE that will relate to a |
code_challenge_method
|
Required |
If |
response_type
|
Required |
Authorization Code Flow is the only supported response type so the value |
redirect_uri
|
Required |
The URI making the request. This must match one of the redirect URIs defined for the client in the Duo Admin Panel. |
scope
|
Required |
A space separated list of requested scopes for the authentication. Example: |
nonce
|
Recommended |
A value that will be returned in the ID token as a way to mitigate replay attacks. |
login_hint
|
Optional |
The email address of the user from the client that can be used to automatically fill in the Email Address field on the SSO login page. |
prompt
|
Optional |
Options to prompt users for reauthentication. Options: |
response_mode
|
Optional |
The way the authorization response is returned to the client. Options: |
state
|
Optional |
A value that will be returned in the response. Clients can use this remember state of a request. |
Authorization Request Format
curl --get
"https://sso-abc1def2.sso.duosecurity.com/oidc/DIABC123678901234567/authorize" \
--data-urlencode "client_id=$clientId" \
--data-urlencode "code_challenge=$codeChallenge" \
--data-urlencode "code_challenge_method=$codeChallengeMethod" \
--data-urlencode "response_type=code" \
--data-urlencode "redirect_uri=$redirectUri \
--data-urlencode "scope=openid email profile" \
--data-urlencode "state=hb98d207c5"
Authorization Request Example Response
Upon successful authentication the user will be redirected back to the client with a code needed to retrieve the tokens. The state parameter might also be sent if the initial request contained it.
$redirectUri?code=xeojklgvbcri998e4g8m&state=hb98d207c5Token URL
URL used by the client to retrieve the access, id, and refresh tokens after a user has successfully authenticated to the authorization server and has returned to the client with an auth code. This endpoint can also be used to submit refresh tokens to get new access, id, and refresh tokens without requiring the user to do another interactive login.
POST /tokenParameters
Below is the information that you'll need to complete a Token URL request.
| Parameter | Required? | Description |
|---|---|---|
client_id
|
Required |
The client ID for the application found on the "Metadata" tab of the application's Duo Admin Panel. Example: |
client_secret
|
Required |
The client secret for the application found on the "Metadata" tab of the application's Duo Admin Panel. Example: |
grant_type
|
Required |
Requires the value |
code
|
Required* |
Only required if |
code_verifier
|
Required |
Code that validates the code_challenge sent in during the authorize endpoint to satisfy Proof Key for Code Exchange. |
refresh_token
|
Required* |
Only required if |
redirect_uri
|
Required |
The redirect uri that was used in the authorization request. |
Token Request Format
curl -v -X POST \
-H "Content-type:application/x-www-form-urlencoded" \
"https://sso-abc1def2.sso.duosecurity.com/oidc/DIABC123678901234567/token" \
-d "client_id=$clientId" \
-d "client_secret=$clientSecret" \
-d "grant_type=authorization_code" \
-d "code=$code" \
-d "code_verifier=$codeVerifier" \
-d "redirect_uri=$redirectUri"
Token Request Example Response
"access_token": "eyJraWQiOiAiNmYxNjM2YjY3ZjE5OGZjOWM1OTRjYmJkODVkNDA2ZDE0NWM1MGRiMDg2OWU5MmYwM2Q0Yzg2NGMyZTM1YjlhYSIsICJhbGciOiAiUlMyNTYiLCAidHlwIjogImp3dCJ9.eyJpc3MiOiAiaHR0cHM6Ly9zc28tYWJjMWRlZjIuc3NvLmR1b3NlY3VyaXR5LmNvbS9vaWRjL0RJQUJDMTIzNjc4OTAxMjM0NTY3IiwgInN1YiI6ICJiMWNlZTRlNTVkZWM1YTY2NTU0NmFkZGE4ZWQxYmViMjlkMDdlYzJjOTkyMjE0MzhjZWRmZDYzYzUwZGI1OTQ1IiwgImF1ZCI6ICJESUFCQzEyMzY3ODkwMTIzNDU2NyIsICJleHAiOiAxNjgxMTM4MzcxLCAiaWF0IjogMTY4MTEzNDc3MSwgInNjb3BlIjogImVtYWlsIHByb2ZpbGUgb3BlbmlkIn0.IGNxpZbPjQW6RVzf9r35nVMWRH_TGTLgmvY6yLguZRuGvYuX1PtRpqzHl7iN69TfSzlRqHRj5SVrH4tN8R_73W0pLppNObCHCnNBgsCMsp8KRidihtHANwHuXe-E501WJ5aPaDwypmwIR6PH-p0fSCHFuldNFOUGO9J21p6FGzBPx_rjVm9zImtinxTLD4DP1_EoSCfjGqFHk7dLvpUmURb9hb3VJeP0pS1TP3AjVYzgGG3ChDioh1GLedoj9ICdxZ2SjY6oVZgh9R9-d9t2CzTif0xdl1Rv0OMU-rEH_qesAYvCQMRvXSSF-wET502DLivvj3d5MADO947g2garm1I9DSrV1nWFYugKC8HvrsbEwwD-EHTE8KaGbqPhixFJIFIQiVpqYb6Ro87wBT4zpycdV6IA56xYOFw6SAsPGXq-kCKf0ljeEPt9Gvq5ioyQ53V57a3J8xl12x7NsflAwOIBdgk-Y61YNnY0fWMfQJKf-z1NW9OCfXtzkBIZhDF7xpmOebPVmZECl03hM5hc8Yewku3QEWsXAepbBWUEsPmO0Bg5Yrf02IX6x2hW-vGDFT8YbjYlDsqF-CjHr3hWSSlDl0YvhYtMyHO5SSux300vHfg1URyHPsnpREp5JOyX0JFMoPv8Ar4NmzSn1znIawvp31bhZ0Idatw02olLDWE",
"token_type": "Bearer",
"expires_in": 3600,
"id_token": "eyJraWQiOiAiNmYxNjM2YjY3ZjE5OGZjOWM1OTRjYmJkODVkNDA2ZDE0NWM1MGRiMDg2OWU5MmYwM2Q0Yzg2NGMyZTM1YjlhYSIsICJhbGciOiAiUlMyNTYiLCAidHlwIjogImp3dCJ9.eyJlbWFpbCI6ICJ0ZXN0QGV4YW1wbGUuY29tIiwgIm5hbWUiOiAiVGVzdCBVc2VyIiwgImdpdmVuX25hbWUiOiAiVGVzdCIsICJmYW1pbHlfbmFtZSI6ICJVc2VyIiwgImlzcyI6ICJodHRwczovL3Nzby1hYmMxZGVmMi5zc28uZHVvc2VjdXJpdHkuY29tL29pZGMvRElBQkMxMjM2Nzg5MDEyMzQ1NjciLCAic3ViIjogImIxY2VlNGU1NWRlYzVhNjY1NTQ2YWRkYThlZDFiZWIyOWQwN2VjMmM5OTIyMTQzOGNlZGZkNjNjNTBkYjU5NDUiLCAiYXVkIjogIkRJQUJDMTIzNjc4OTAxMjM0NTY3IiwgImV4cCI6IDE2ODExMzUwNzEsICJpYXQiOiAxNjgxMTM0NzcxLCAibm9uY2UiOiAiQUJDMTIzIiwgImF0X2hhc2giOiAiaXFqWTllR3JzemZtYjhXcVU1RTNWZyIsICJhdXRoX3RpbWUiOiAxNjgxMTM0NzYxfQ.uFDOvGw-K4GlKiOV6p2j22LOWqTIlGqtWG1NZkyrsxXnzve-wl_xundfLALytmc-lsdmHOwYsMy-QfEvrFhqoFR4AGDE-La_inTdSQob-hSsf-UX8yhu4JnY4X-6a6i556sGvhpnV9j27iWgJYKdibAsY5BAyY2pgmpLV3CDf6T5yoyaQv2CqbFDaAtEz76_9SjDaW1rqKoyYlIrJHiAAGiUL845LYpC2WOr5jjLZAOonPNtJreQwR9oAqU0MK362lxjnyswP4H7eTJwe9SvHHyTM4Z237QBXXUY7FIGzqESXSVX3K3EmCDOcktO9VrhOwdiBy_OsCtdaJshFAhlk3m9VL_q1pAfUJKO81McEwz7EMYzG8X6qRTheZXDaFdkzw8naR7pGTgkJ0xezVVCvqzym1TF6h1CmJDApkRqZ4XEJQD09j7F4-D1eiEJM-rCD7lJz2Mw00AOJlqzaLbKfjPtMXorr40bK5kIy5ikVv-Jop4PtXxSNejIf0nLCy2jBPi_SN_IIJVbYvFU70LbgI0CR-b6BjsfyoiotF7q3KnGXNVDEdGO_Bv9-WHdkyMFAB88gCyuNfwzLEyNA2f6F0cg3ulUa0UMc-p-uXFVSDrYrbV_eAsVKtLS1c2CbRbkWymbCBn3z7XnXKXC4ei3UZs3ZgjChZqxx44-OyiF9S8"
Token Introspection URL
URL takes an access token or refresh token and provides information about the token including if it is still active, which scopes it has access to, and when the token expires.
POST/token_introspectionParameters
Below is the information that you'll need to complete a Token URL request.
| Parameter | Required? | Description |
|---|---|---|
client_id
|
Required |
The client ID for the application found on the "Metadata" tab of the application's Duo Admin Panel. Example: |
client_secret
|
Required |
The client secret for the application found on the "Metadata" tab of the application's Duo Admin Panel. Example: |
token
|
Required |
The access or refresh token that will be inspected. This should be presented in the same format that it was retrieved from the /token endpoint earlier. |
token_type_hint
|
Optional |
Can be either |
Token Introspection Request Format
The client ID and client secret separated by a : must be base64 encoded before being sent. The example below does this but may not work on all systems.
curl -v -X POST \
-H "Content-type:application/x-www-form-urlencoded" \
-H "Authorization: Basic $(echo -n "$clientId:$clientSecret"| base64)" \
"https://sso-abc1def2.sso.duosecurity.com/oidc/DIABC123678901234567/token_introspection" \
-d "token=eyJpc3MiOiAiaHR0cHM6Ly9zc28tYWJjMWRlZjIuc3NvLmR1b3NlY3VyaXR5LmNvbS9vaWRjL0RJQUJDMTIzNjc4OTAxMjM0NTY3IiwgInN1YiI6ICJiMWNlZTRlNTVkZWM1YTY2NTU0NmFkZGE4ZWQxYmViMjlkMDdlYzJjOTkyMjE0MzhjZWRmZDYzYzUwZGI1OTQ1IiwgImF1ZCI6ICJESUFCQzEyMzY3ODkwMTIzNDU2NyIsICJleHAiOiAxNjgxMTM4MzcxLCAiaWF0IjogMTY4MTEzNDc3MSwgInNjb3BlIjogImVtYWlsIHByb2ZpbGUgb3BlbmlkIn0"
Token Request Introspection Example Response
{
    "active": true,
    "scope": "profile email openid",
    "client_id": "DIABC123678901234567",
    "username": "test@example.com",
    "token_type": "access_token",
    "exp": 1681138371,
    "iat": 1681134771,
    "nbf": 1681134771,
    "sub": "b1cee4e55dec5a665546adda8ed1beb29d07ec2c99221438cedfd63c50db5945",
    "iss": "https://sso-abc1def2.sso.duosecurity.com/oidc/DIABC123678901234567"
}
User Info URL
URL takes an access token and provides information about the user.
GET/userinfoParameters
Below is the information that you'll need to complete a Token URL request.
| Parameter | Required? | Description |
|---|---|---|
token
|
Required |
The access token related to the user. This should be presented in the same format that it was retrieved from the /token endpoint earlier. |
User Info Request Format
curl -v -X GET \
-H "Authorization: Bearer eyJpc3MiOiAiaHR0cHM6Ly9zc28tYWJjMWRlZjIuc3NvLmR1b3NlY3VyaXR5LmNvbS9vaWRjL0RJQUJDMTIzNjc4OTAxMjM0NTY3IiwgInN1YiI6ICJiMWNlZTRlNTVkZWM1YTY2NTU0NmFkZGE4ZWQxYmViMjlkMDdlYzJjOTkyMjE0MzhjZWRmZDYzYzUwZGI1OTQ1IiwgImF1ZCI6ICJESUFCQzEyMzY3ODkwMTIzNDU2NyIsICJleHAiOiAxNjgxMTM4MzcxLCAiaWF0IjogMTY4MTEzNDc3MSwgInNjb3BlIjogImVtYWlsIHByb2ZpbGUgb3BlbmlkIn0" \
"https://sso-abc1def2.sso.duosecurity.com/oidc/DIABC123678901234567/userinfo"
Token User Info Example Response
{
"name": "Test User",
"given_name": "Test",
"family_name": "User",
"email": "test@example.com",
"sub": "b1cee4e55dec5a665546adda8ed1beb29d07ec2c99221438cedfd63c50db5945",
"user": "test@example.com"
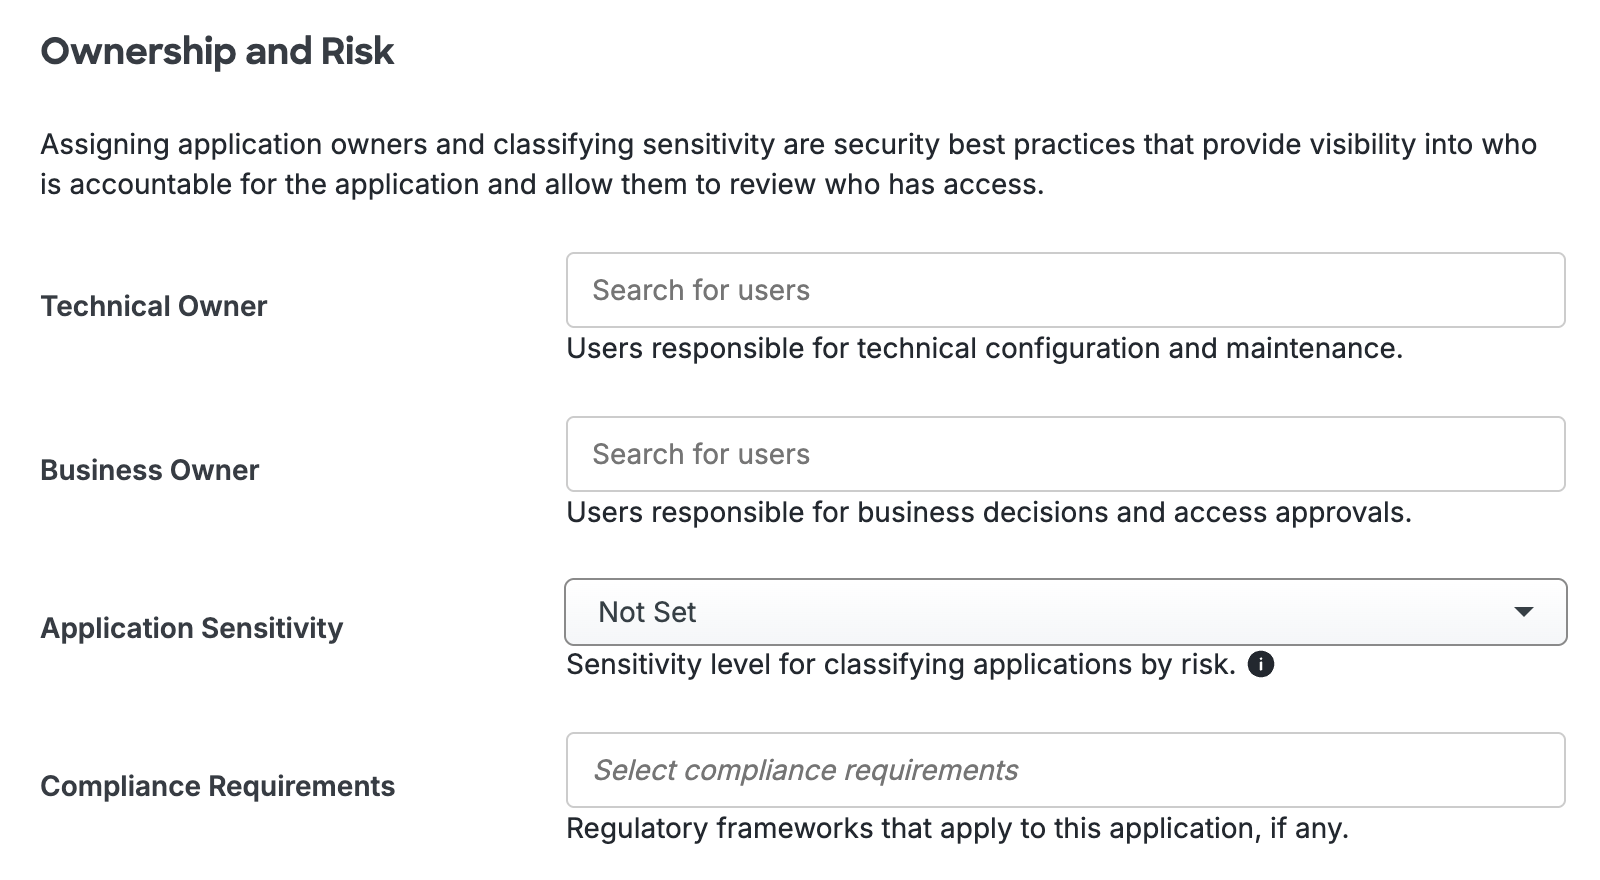
}Add Ownership and Risk Information
Go to the "Ownership and Risk" section of the application's page in the Duo Admin Panel to assign application owners and classify the application's risk level. Cisco Identity Intelligence automatically imports this information to populate relevant fields for Duo Advantage and Premier customers. Duo Essentials plans exclude Cisco Identity Intelligence features.
You may set any of the following:
- Technical Owner: Search for and assign Duo users responsible for technical configuration and maintenance of this application.
- Business Owner: Search for and assign Duo users responsible for business decisions and access approvals related to this application.
- Application Sensitivity: Select this application's risk level from the drop-down list. Default: Not Set.
- Compliance Requirements: Select any applicable regulatory frameworks for this application (SOX (Sarbanes-Oxley), HIPAA, PCI-DSS, etc.) from the list.
Scroll to the bottom of the page and click Save to apply your changes.
Automated Provisioning
This application does not support automated creation and management of users and groups from Duo using SCIM 2.0 provisioning.
Troubleshooting
Need some help? Try searching our Knowledge Base articles or Community discussions. For further assistance, contact Support.