Duo Solutions for Cisco AnyConnect or Cisco Secure Client VPN with ASA or Firepower
Last updated:
Duo can add two-factor authentication to ASA and Firepower VPN connections in a variety of ways. Learn more about these configurations and choose the best option for your organization.
Cisco ASA with AnyConnect or Cisco Secure Client
ASA SSL VPN using Duo Single Sign-On
Choose this option for the best end-user experience for ASA with a cloud-hosted identity provider.
With this SAML configuration, end users experience the interactive Duo Universal Prompt when using Cisco AnyConnect or Cisco Secure Client for VPN. The interactive MFA prompt gives users the ability to view all available authentication device options and select which one to use, self-enroll new or replacement 2FA devices, and manage their own registered devices. Duo WebAuthn authenticators like Touch ID and security keys supported in recent ASA and AnyConnect or Cisco Secure Client software releases.
This configuration also lets administrators gain insight about the devices connecting to the VPN and apply Duo policies such as Duo Desktop requirements or access policies for different networks (authorized networks, anonymous networks, or geographical locations as determined by IP address) when using AnyConnect or Cisco Secure Client.
Primary authentication and Duo MFA occur at the identity provider, not at the ASA itself.
Read the deployment instructions for ASA with Duo Single Sign-On
Requirements:
- Duo Single Sign-On with a configured authentication source
- Cisco ASA versions 9.7.1.24, 9.8.2.28, 9.9.2.1 or higher of each release
- Use of WebAuthn authenticators supported in ASA firmware 9.17 or later with external browser support enabled.
- AnyConnect 4.6 or later or Cisco Secure Client for normal authentication
- Trusted Endpoints certificate verification requires AnyConnect versions 4.7.04056 (Windows), 4.8.00175 (macOS), or 4.8.00807 (iOS) or later.
- Use of WebAuthn authenticators for 2FA and Duo Passwordless supported in AnyConnect 4.10.04065 or later.
Network Diagram:
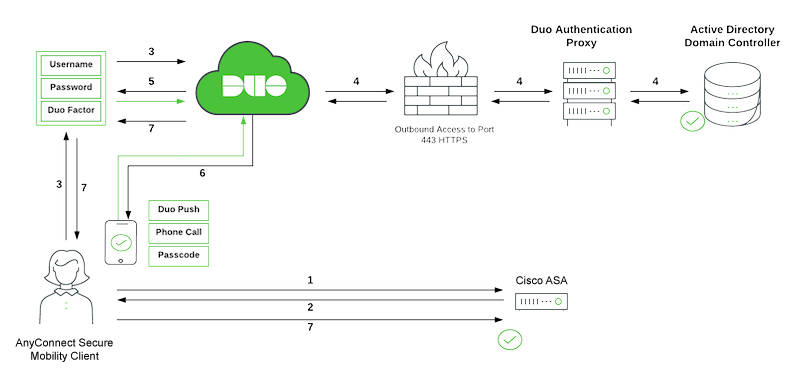
- VPN connection initiated to Cisco ASA.
- The ASA redirects to the Duo Single Sign-On (SSO) for SAML authentication.
- The user logs in with primary Active Directory credentials.
- Duo SSO performs primary authentication via an on-premises Duo Authentication Proxy to Active Directory (in this example).
- Duo Single Sign-On begins 2FA.
- User completes Duo two-factor authentication.
- Duo Single Sign-On redirects the user back to the ASA with response message indicating success.
ASA SSL VPN using Duo Access Gateway
Duo Access Gateway reached Last Day of Support on October 26, 2023 for Duo Essentials, Advantage, and Premier customers. As of that date, Duo Support may only assist with the migration of existing Duo Access Gateway applications to Duo Single Sign-On. Please see the Guide to Duo Access Gateway end of life for more details.
Learn more about Duo Single Sign-On, our cloud-hosted identity provider featuring Duo Central and the Duo Universal Prompt.
Duo Federal customers may still use Duo Access Gateway for SAML applications after October 26, 2023.
We recommend choosing ASA SSL VPN using Duo Single Sign-On instead of Duo Access Gateway.
With this SAML configuration, end users experience the interactive Duo Prompt when using Cisco AnyConnect or Cisco Secure Client for VPN. The interactive MFA prompt gives users the ability to view all available authentication device options and select which one to use, self-enroll new or replacement 2FA devices, and manage their own registered devices.
This configuration also lets administrators gain insight about the devices connecting to the VPN and apply Duo policies such as Duo Desktop requirements or access policies for different networks (authorized networks, anonymous networks, or geographical locations as determined by IP address) when using AnyConnect or Cisco Secure Client.
Primary authentication and Duo MFA occur at the identity provider, not at the ASA itself.
Read the deployment instructions for ASA with Duo Access Gateway
Requirements:
- Duo Access Gateway or a third-party SAML IdP with Duo MFA (AD FS, Azure AD, etc.)
- Cisco ASA versions 9.7.1.24, 9.8.2.28, 9.9.2.1 or higher of each release
- AnyConnect 4.6 or later or Cisco Secure Client for normal authentication (Trusted Endpoints has specific AnyConnect version requirements. See the ASA with SAML document for details.)
Network Diagram:
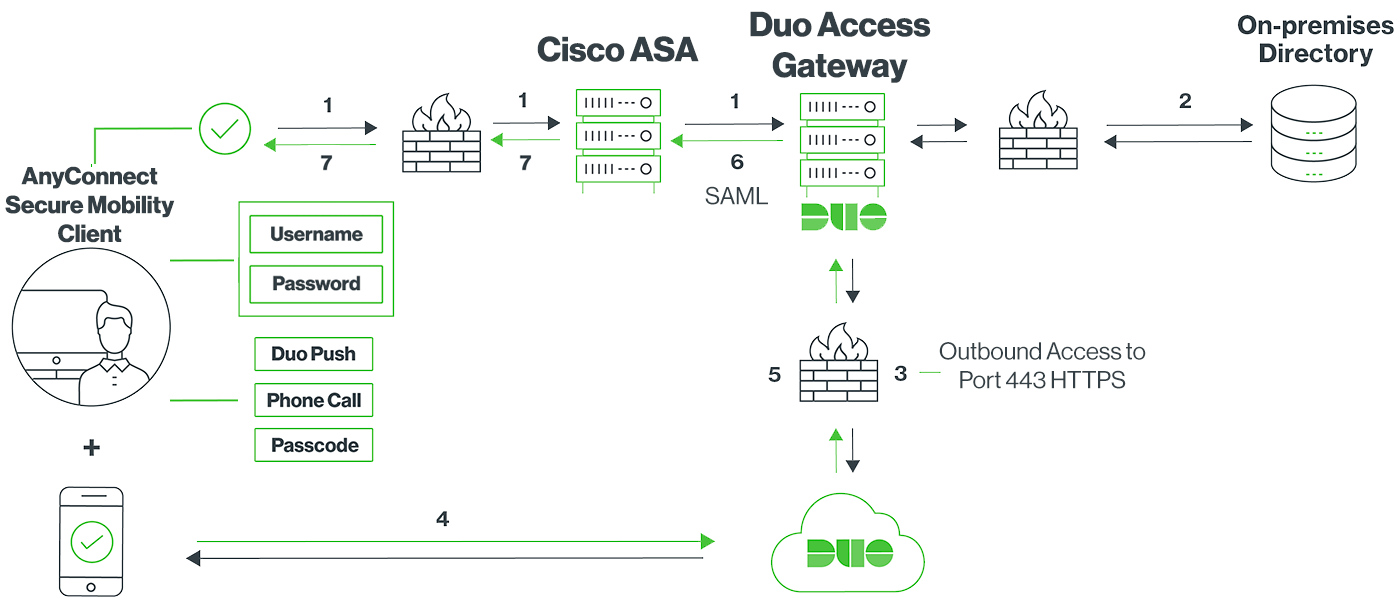
- VPN connection initiated to Cisco ASA, which redirects to the Duo Access Gateway for SAML authentication
- AnyConnect or Cisco Secure Client performs primary authentication via the Duo Access Gateway using an on-premises directory (example)
- Duo Access Gateway establishes connection to Duo Security over TCP port 443 to begin 2FA
- User completes Duo two-factor authentication.
- Duo receives authentication response and returns that information to the Duo Access Gateway
- Duo Access Gateway returns a SAML token for access
- Cisco ASA VPN access granted
ASA SSL VPN using RADIUS
Choose this option for ASA and AnyConnect or Cisco Secure Client deployments that do not meet the minimum product version requirements for SAML SSO. With this configuration, end users receive an automatic push or phone call for multi-factor authentication after submitting their primary credentials using AnyConnect or Cisco Secure Client or clientless SSL VPN via browser. Users may append a different factor selection to their password entry.
This configuration supports Duo policies for different networks (authorized networks, anonymous networks, or geographical locations as determined by IP address) when using AnyConnect or Cisco Secure Client, and supports configurable fail mode if the Authentication Proxy server cannot contact Duo's service.
Read the deployment instructions for ASA with RADIUS
Requirements:
- Duo Authentication Proxy
- Cisco ASA firmware version 8.3 or later
Network Diagram:
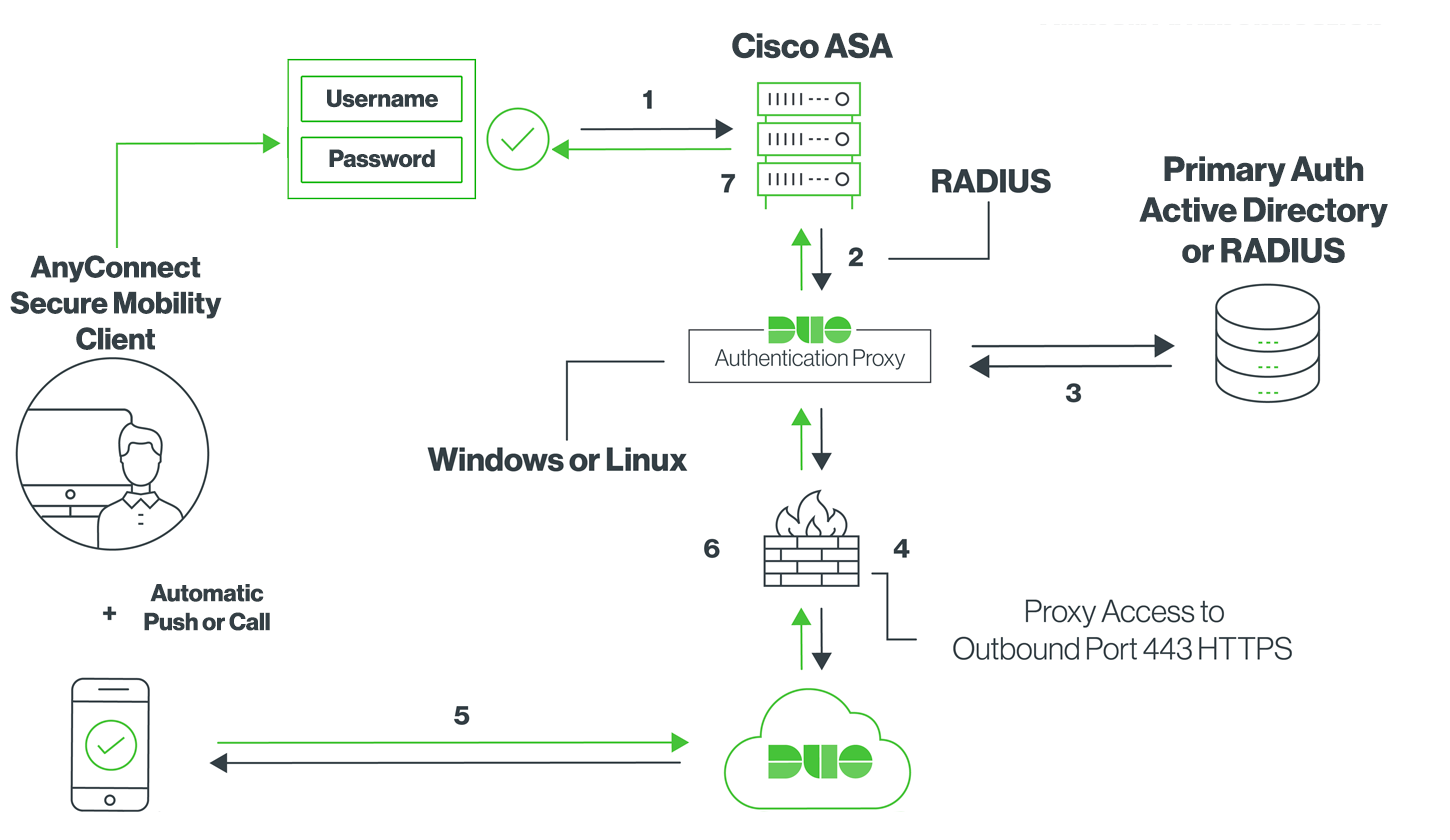
- Primary authentication initiated to Cisco ASA
- Cisco ASA sends authentication request to the Duo Authentication Proxy
- Primary authentication using Active Directory or RADIUS
- Duo Authentication Proxy connection established to Duo Security over TCP port 443
- Secondary authentication via Duo Security’s service
- Duo Authentication Proxy receives authentication response
- Cisco ASA VPN access granted
Cisco Firepower with AnyConnect or Cisco Secure Client
FTD VPN using Duo Single Sign-On
Choose this option for the best end-user experience for FTD with a cloud-hosted identity provider.
With this SAML configuration, end users experience the interactive Duo Universal Prompt when using AnyConnect or Cisco Secure Client for VPN. The interactive MFA prompt gives users the ability to view all available authentication device options and select which one to use, self-enroll new or replacement 2FA devices, and manage their own registered devices. Duo WebAuthn authenticators like Touch ID and security keys supported in recent Firepower and AnyConnect or Cisco Secure Client software releases.
This configuration also lets administrators gain insight about the devices connecting to the VPN and apply Duo policies such as Duo Desktop requirements or access policies for different networks (authorized networks, anonymous networks, or geographical locations as determined by IP address) when using AnyConnect or Cisco Secure Client.
Primary authentication and Duo MFA occur at the identity provider, not at the FTD itself.
Read the deployment instructions for FTD with Duo Single Sign-On
Requirements:
- Duo Single Sign-On with a configured authentication source
- Cisco FTD version 6.7.0 or later managed by FMC version 6.7.0 or later
- Use of WebAuthn authenticators supported in Firepower firmware 7.1.0 or later with external browser support enabled.
- AnyConnect 4.6 or later or Cisco Secure Client for normal authentication
- Trusted Endpoints certificate verification requires AnyConnect versions 4.7.04056 (Windows), 4.8.00175 (macOS), or 4.8.00807 (iOS) or later.
- Use of WebAuthn authenticators for 2FA and Duo Passwordless supported in AnyConnect 4.10.04065 or later.
Network Diagram:

- VPN connection initiated to Cisco FTD.
- The FTD redirects to the Duo Single Sign-On (SSO) for SAML authentication.
- The user logs in with primary Active Directory credentials.
- Duo SSO performs primary authentication via an on-premises Duo Authentication Proxy to Active Directory (in this example).
- Duo Single Sign-On begins 2FA.
- User completes Duo two-factor authentication.
- Duo Single Sign-On redirects the user back to the FTD with response message indicating success.
FTD VPN using RADIUS
Choose this option for Cisco Firepower Threat Defense (FTD) Remote Access VPN. With this configuration, end users receive an automatic push or phone call for multi-factor authentication after submitting their primary credentials using the AnyConnect Client or clientless SSL VPN via browser. Users may append a different factor selection to their password entry.
This configuration supports Duo policies for different networks (authorized networks, anonymous networks, or geographical locations as determined by IP address) when using AnyConnect or Cisco Secure Client.
Read the deployment instructions for Firepower with RADIUS
Requirements:
- Duo Authentication Proxy
- Cisco FTD version 6.3.0 or later managed by FMC version 6.3.0 or later
Network Diagram:
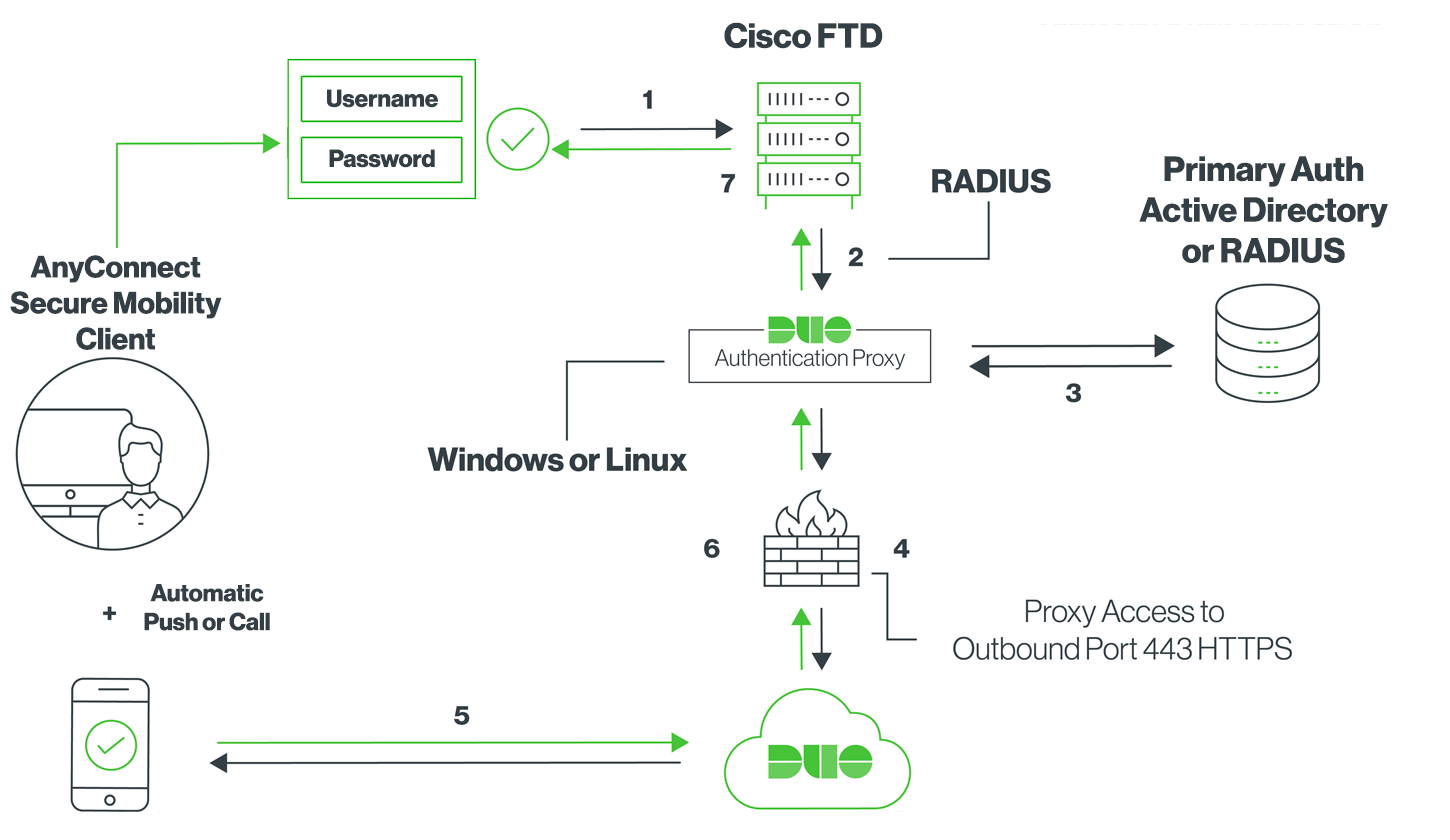
- Primary authentication initiated to Cisco FTD
- Cisco FTD sends authentication request to the Duo Authentication Proxy
- Primary authentication using Active Directory or RADIUS
- Duo Authentication Proxy connection established to Duo Security over TCP port 443
- Secondary authentication via Duo Security’s service
- Duo Authentication Proxy receives authentication response
- Cisco FTD VPN access granted
Cisco Identity Services Engine with AnyConnect or Cisco Secure Client
ISE with RADIUS
Choose this option for Cisco Identity Services Engine. With this configuration, end users receive an automatic push or phone call for multi-factor authentication after submitting their primary credentials using AnyConnect or Cisco Secure Client. Users may append a different factor selection to their password entry.
This configuration supports Duo policies for different networks (authorized networks, anonymous networks, or geographical locations as determined by IP address) when using AnyConnect or Cisco Secure Client.
Read the deployment instructions for ISE
Requirements:
- Duo Authentication Proxy
- Cisco ISE 2.4 or later
Network Diagram:
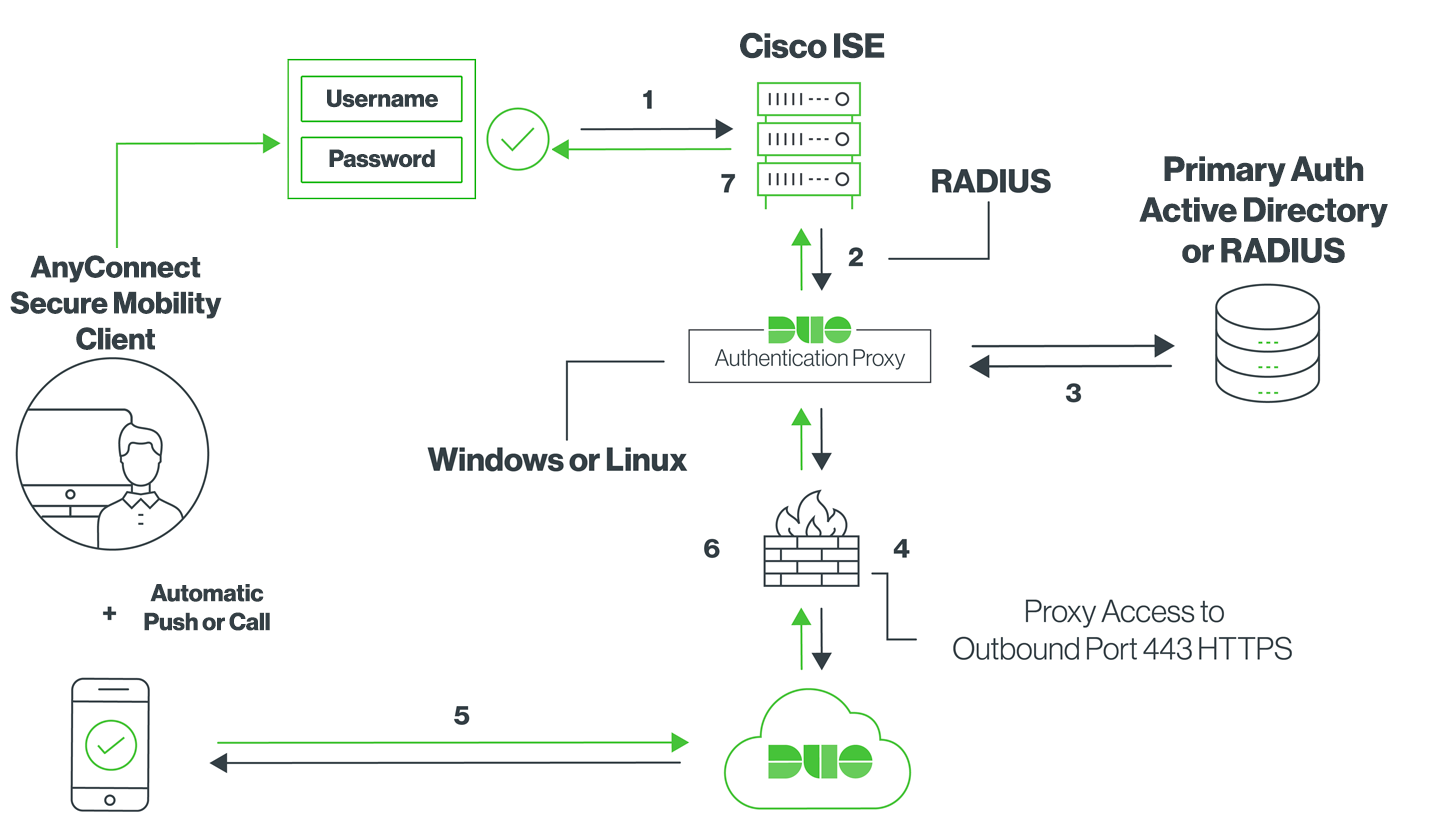
- Primary authentication initiated to Cisco ISE
- Cisco ISE sends authentication request to the Duo Authentication Proxy
- Primary authentication using Active Directory or RADIUS
- Duo Authentication Proxy connection established to Duo Security over TCP port 443
- Secondary authentication via Duo Security’s service
- Duo Authentication Proxy receives authentication response
- Cisco ISE access granted