Getting Started with Duo
Last updated:
With broad application support, Duo protects access to your organization's resources like VPN, email, web portals, cloud services, local operating system logins, etc. After successful primary authentication against the identity store of your choice, your users simply and securely complete multi-factor authentication using a platform authenticator like Touch ID or Windows Hello, a WebAuthn security key, or a request pushed to our Duo Mobile smartphone app. Users may also authenticate by answering a phone call or by entering a one-time passcode generated by the Duo Mobile app, a compatible hardware token, or received via SMS. Device policies verify that only the systems you trust can access your resources.
Try Duo for Free
With a free 30-day trial of our Duo Advantage plan, you can see for yourself how easy it is to get started with Duo's trusted access.
Your Duo Advantage trial comes with most of the features and functionality of a paid Duo Advantage subscription like:
- Your choice of primary identity store, including hosting user identities in Duo Directory.
- Single Sign-On and Passwordless
- Risk-Based Authentication
- Identity Security with Cisco Identity Intelligence
- Full access to Duo's Auth API, Admin API, and Web SDK
- And more!
What's Not Included in Trials
New Duo customer accounts don't automatically receive voice telephony. That means you won't be able to use phone calls as a two-factor authentication method for both administrators and end users. Duo Push, SMS passcodes, security keys, and hardware tokens all remain available.
You also won't be able to make these customizations:
- Changes to enrollment email text on the global "Settings" page or during bulk enrollment
- Changes to the text of the Duo Mobile activation email or SMS messages
- Changes to the SMS message prefix
- Setting a custom subdomain URL for Duo Single Sign-On
- Modifying the SSO Login Label custom branding in the global settings
If you require telephony or customized email and SMS messaging as part of your Duo evaluation or subscription, please contact your Duo sales executive or Duo Support.
During your 30-day Duo Advantage trial, you may choose to explore the Duo Premier edition instead. To convert your Duo Advantage trial to a Duo Premier trial, visit the "Billing" page in the Duo Admin Panel once you've logged in and click Try It Free under the Duo Premier plan description.
When your Duo Advantage trial ends, your account switches to the Duo Free plan automatically. You can continue using your Duo Free plan for up to 10 users at no cost. Paid features you enabled during your trial no longer have any effect. If you convert this free account to a paid subscription, we'll restore the settings created during the trial.
Guided Onboarding
Duo commits to providing you with the best experience possible. We want to be sure you have what you need, whether that be guidance on how to use our product or knowing where to go for help. The Duo Admin Panel onboarding journeys guide you through enrollment, setup, deployment, optimization, and monitoring your security setup.
To access guided onboarding:
-
Log in to the Duo Admin Panel.
-
Click on the Setup button at the top of your Duo dashboard.
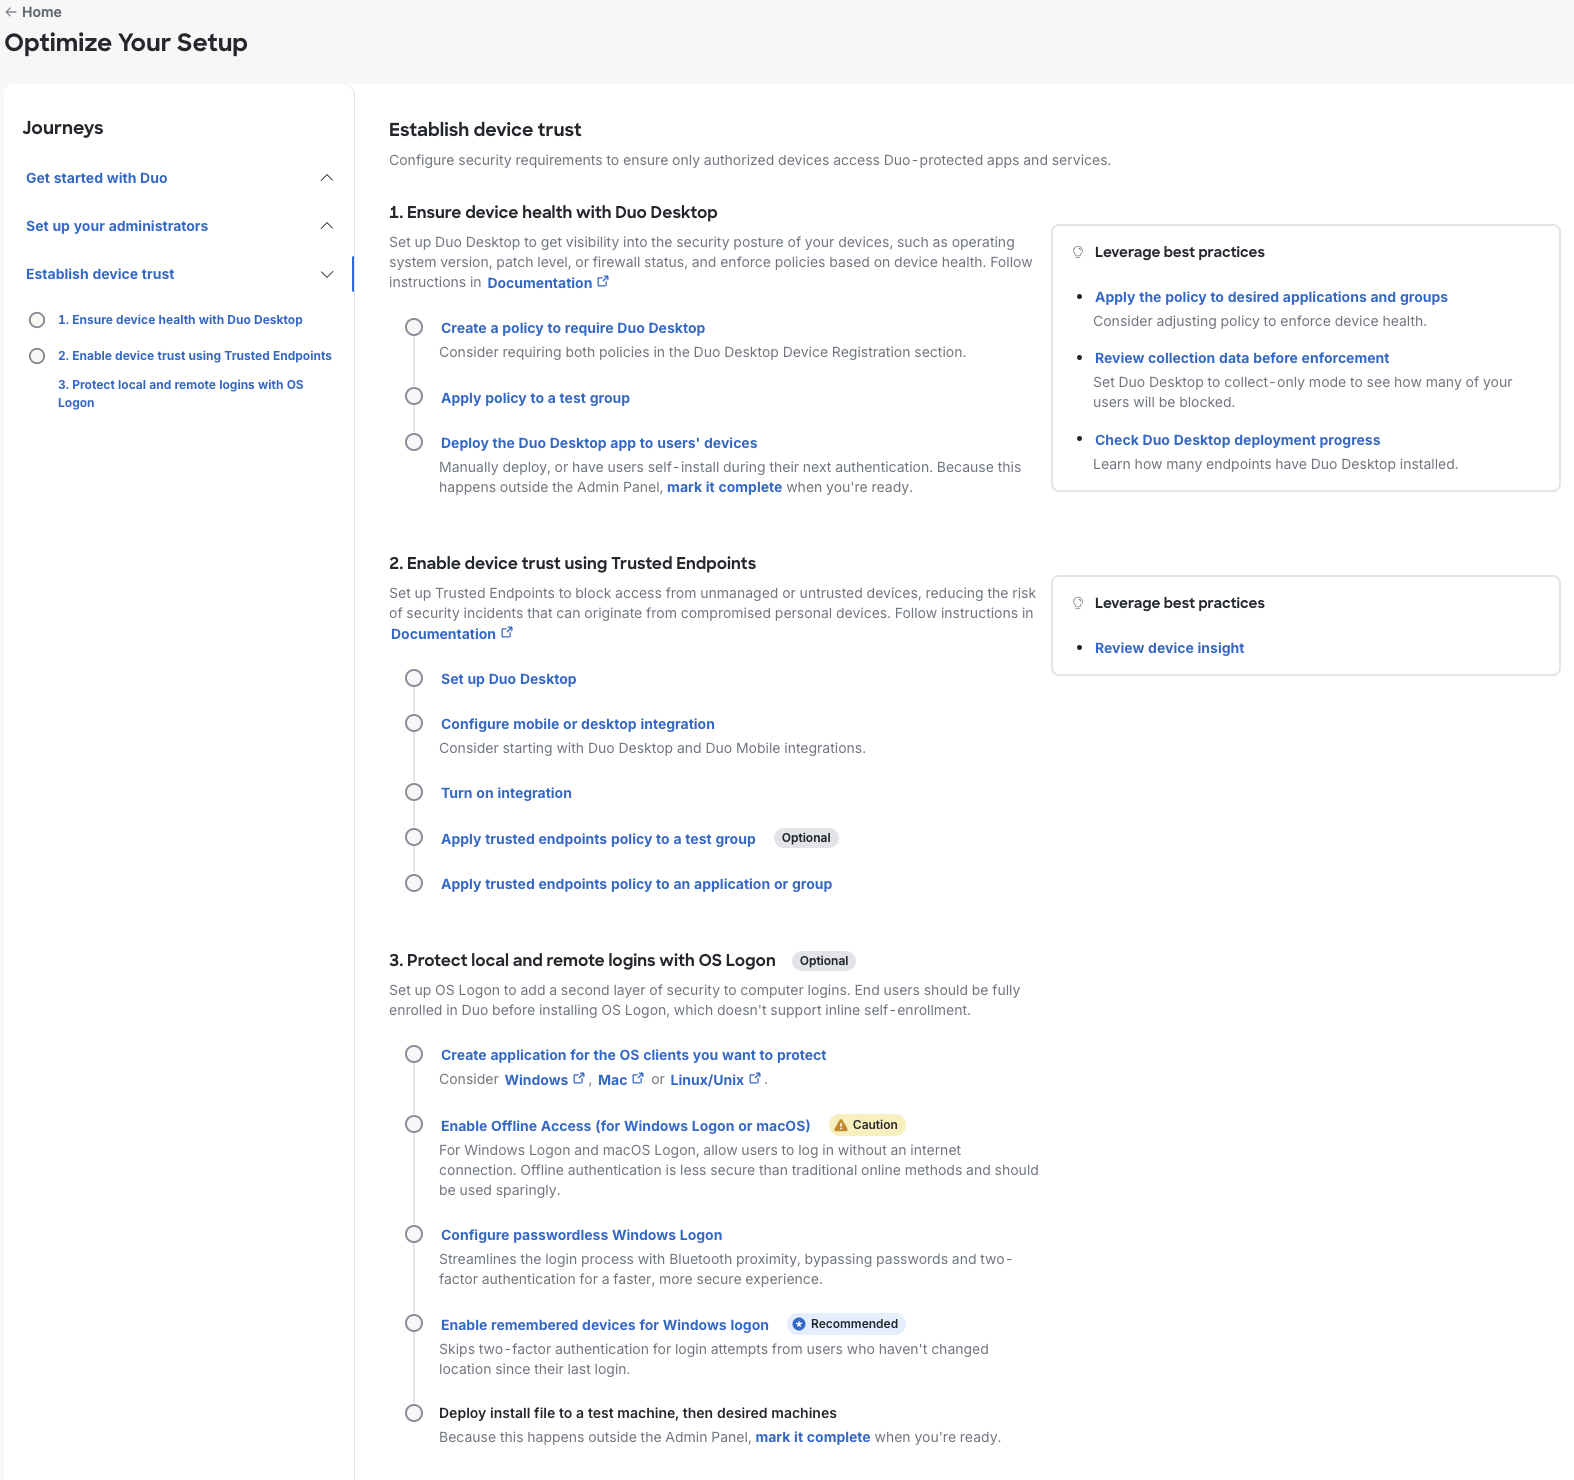
The Setup button directs you to the “Your Duo Setup” home page. The second-left navigation panel lists the onboarding journeys available to you. Each journey comprises multiple steps, shown as “Required” (default), “Optional”, “Caution”, or “Recommended”.
You may skip “Caution”, “Optional”, and “Recommended” steps and, in some cases, may manually mark the “Complete”. Each journey guides you through a specific set of tasks to achieve important milestones in your Duo setup. Each task links you to the "Admin Panel" page where you can perform the action described. If there is not a specific page in the application that corresponds to the task, documentation links will be provided.
Duo setup progress appears on the "Home" page.
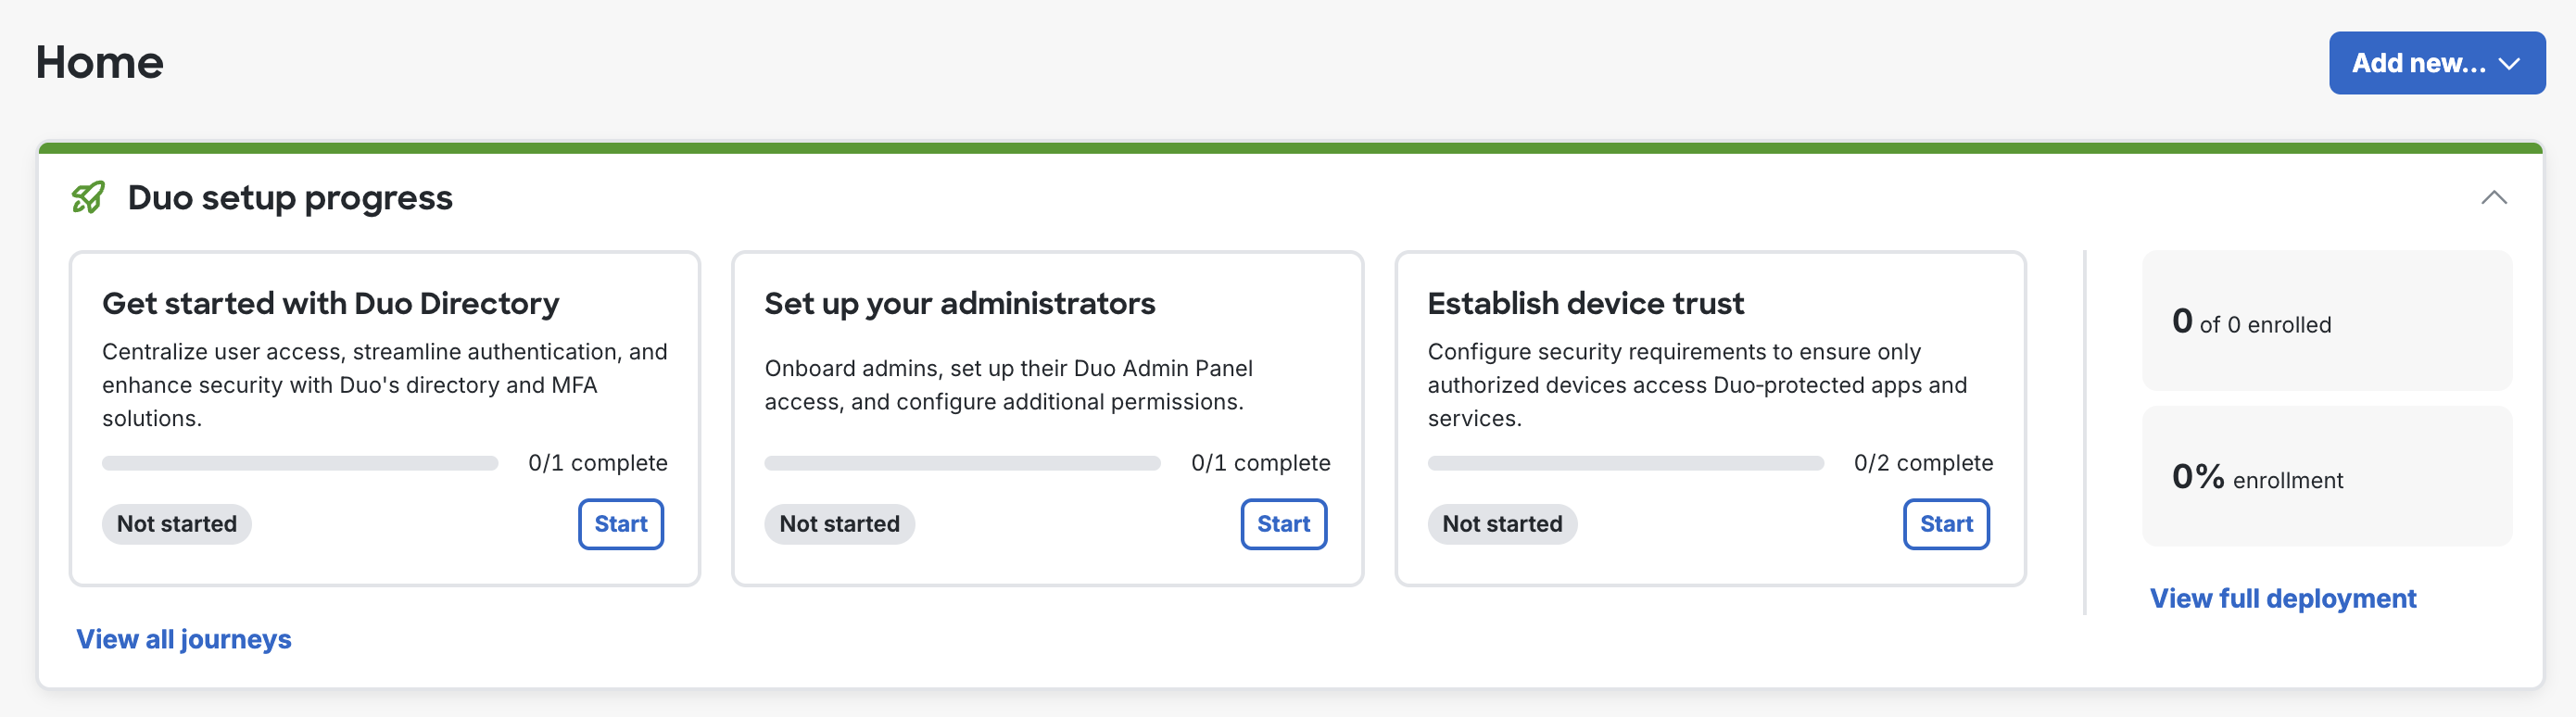
The journeys offered correspond with different parts of the product based on your Duo edition and the features implemented within your organization.
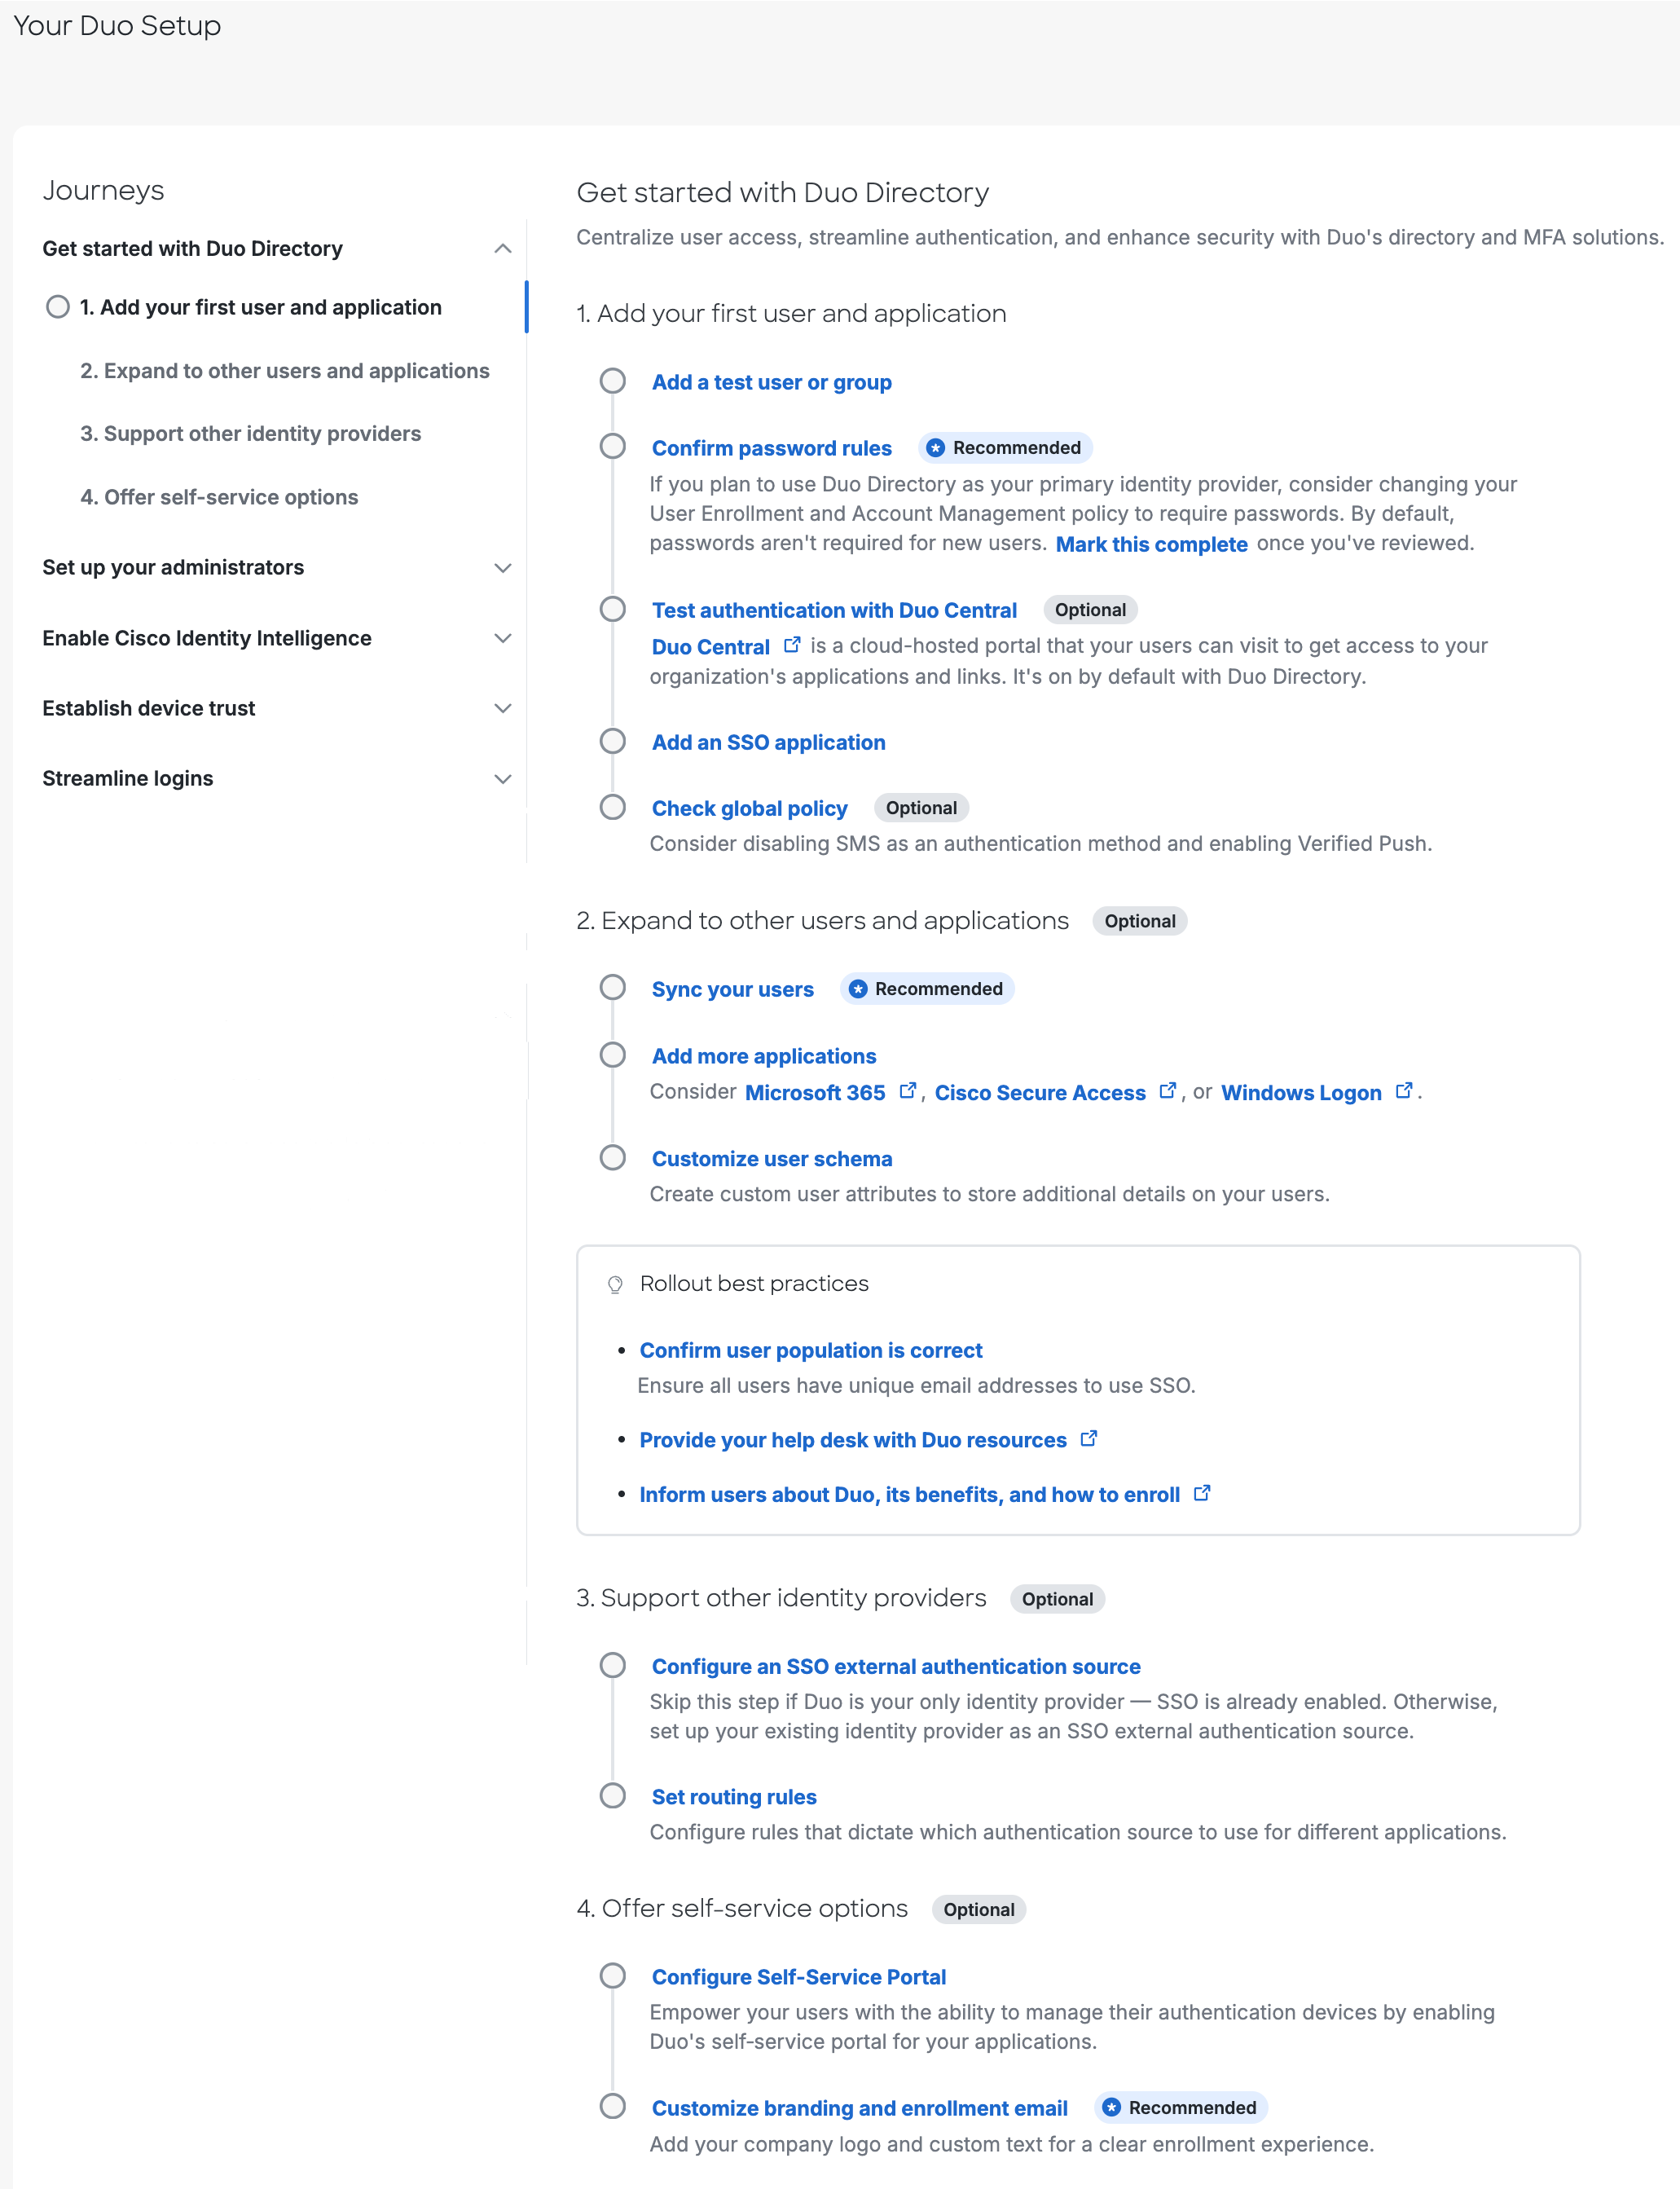
Get Started with Duo Directory
This journey guides you through basic setup steps for your Duo account.
-
Add your first user and application.
-
Add a test user or group.
-
Enroll your pilot users in Duo. We provide several methods for enrollment. Some applications also support self-enrollment by users in the Duo Universal Prompt when they access the protected service.
Your Duo administrator login can't also be used to log into the service or device now protected by a Duo application, so don't forget to enroll a Duo user account for yourself now, or complete user self-enrollment after you set up your first Duo application in the next step.
-
-
Confirm password rules. (Recommended)
- Passwords are not required for new users by default. Review password rules in global enrollment policy if you plan to manage passwords with Duo’s directory. Mark this complete once you’ve reviewed your password rules.
- If you plan to host your users in Duo and want them to use passwords for authentication, configure the password options in your enrollment policy.
-
Test authentication with Duo Central. (Optional)
-
Duo Central is a cloud-hosted portal that your users can visit to get access to your organization's applications and links or perform self-service device management tasks. Visit the Duo Central configuration page in the Admin Panel to find your Duo Central URL. Test user enrollment and access by logging in as one of the pilot users you created earlier.
You can customize the subdomain in your Duo Central URL later in your Duo Single Sign-On settings. Note that Duo plan trials may not create a custom subdomain URL.
-
-
Add an SSO application.
-
Decide which SAML or OIDC application you want to protect with Duo as a test. We recommend testing with a non-production application to start. Browse our SSO applications.
Note: Effective June 30, 2023, Duo's cloud service no longer supports TLS 1.0 or 1.1 connections or insecure TLS/SSL cipher suites. If you are unsure how this may affect your Duo deployment plans, please see the Duo Knowledge Base article to TLS support for Duo applications and TLS 1.0 and 1.1 end of support for additional information.
-
-
Check global policy. (Optional)
- This link will take you to the "Policies" page, where you can change default settings in the Global Policy, such as allowed authentication methods, or create new custom policies for application access and user management.
-
-
Expand to other users and applications. (Optional)
-
Sync your users. (Recommended)
- Duo’s new directory integrates with external IAM solutions to act as the orchestration and identity security layer for your security suite. Duo directory can segregate broker authentication for external directories and support SCIM integrations.
- If you are using an external user directory you can add it to Duo as a source for directory sync. Syncing your external directory will import users so you don't need to create them manually, and import groups that you can use to assign application access or target with custom policies. Once we detect two or more users or groups in your account, or you have set up the user directory sync selected in the “Tell us about your current setup” section, this step will automatically complete.
-
Add more applications.
- This task will take you to the to the "Application Catalog" page so that you may repeat the setup steps with multiple applications. This is an optional step.
-
Customize user schema.
- Optionally create custom user attributes to store more details on your users. Populate values for these custom attributes in Duo or import them from external directories.
-
-
Support other identity providers. (Optional)
-
Configure an SSO external authentication source.
- This step guides you in setting up an authentication source. You may skip this optional task. This task will auto-complete once you add either an Active Directory or SAML provider external authentication source.
- Skip this step if Duo is your exclusive identity provider. Otherwise, set up your existing IDP as an SSO authentication source.
-
Set routing rules.
- Routing rules direct your users to the correct authentication source when you have multiple sources present in your SSO configuration.
- Configure rules that dictate which authentication source to use for different applications. You may skip this optional task.
-
-
Offer self-service options. (Optional)
-
Configure Self-Service Portal.
- This step takes you to the "Self-Service Portal" page which provides settings to enable users to access the portal as well as apply specific access policies to the portal application. This step auto-completes once you enable the portal for some or all users.
-
Customize branding and enrollment email. (Recommended)
- This step will bring you to the "Custom Branding" section of the "Settings" page. From here you can set a logo, site colors, and an optional SSO login label. This step auto-completes once you set a custom logo. Note that Duo plan trials may not update some branding options.
-
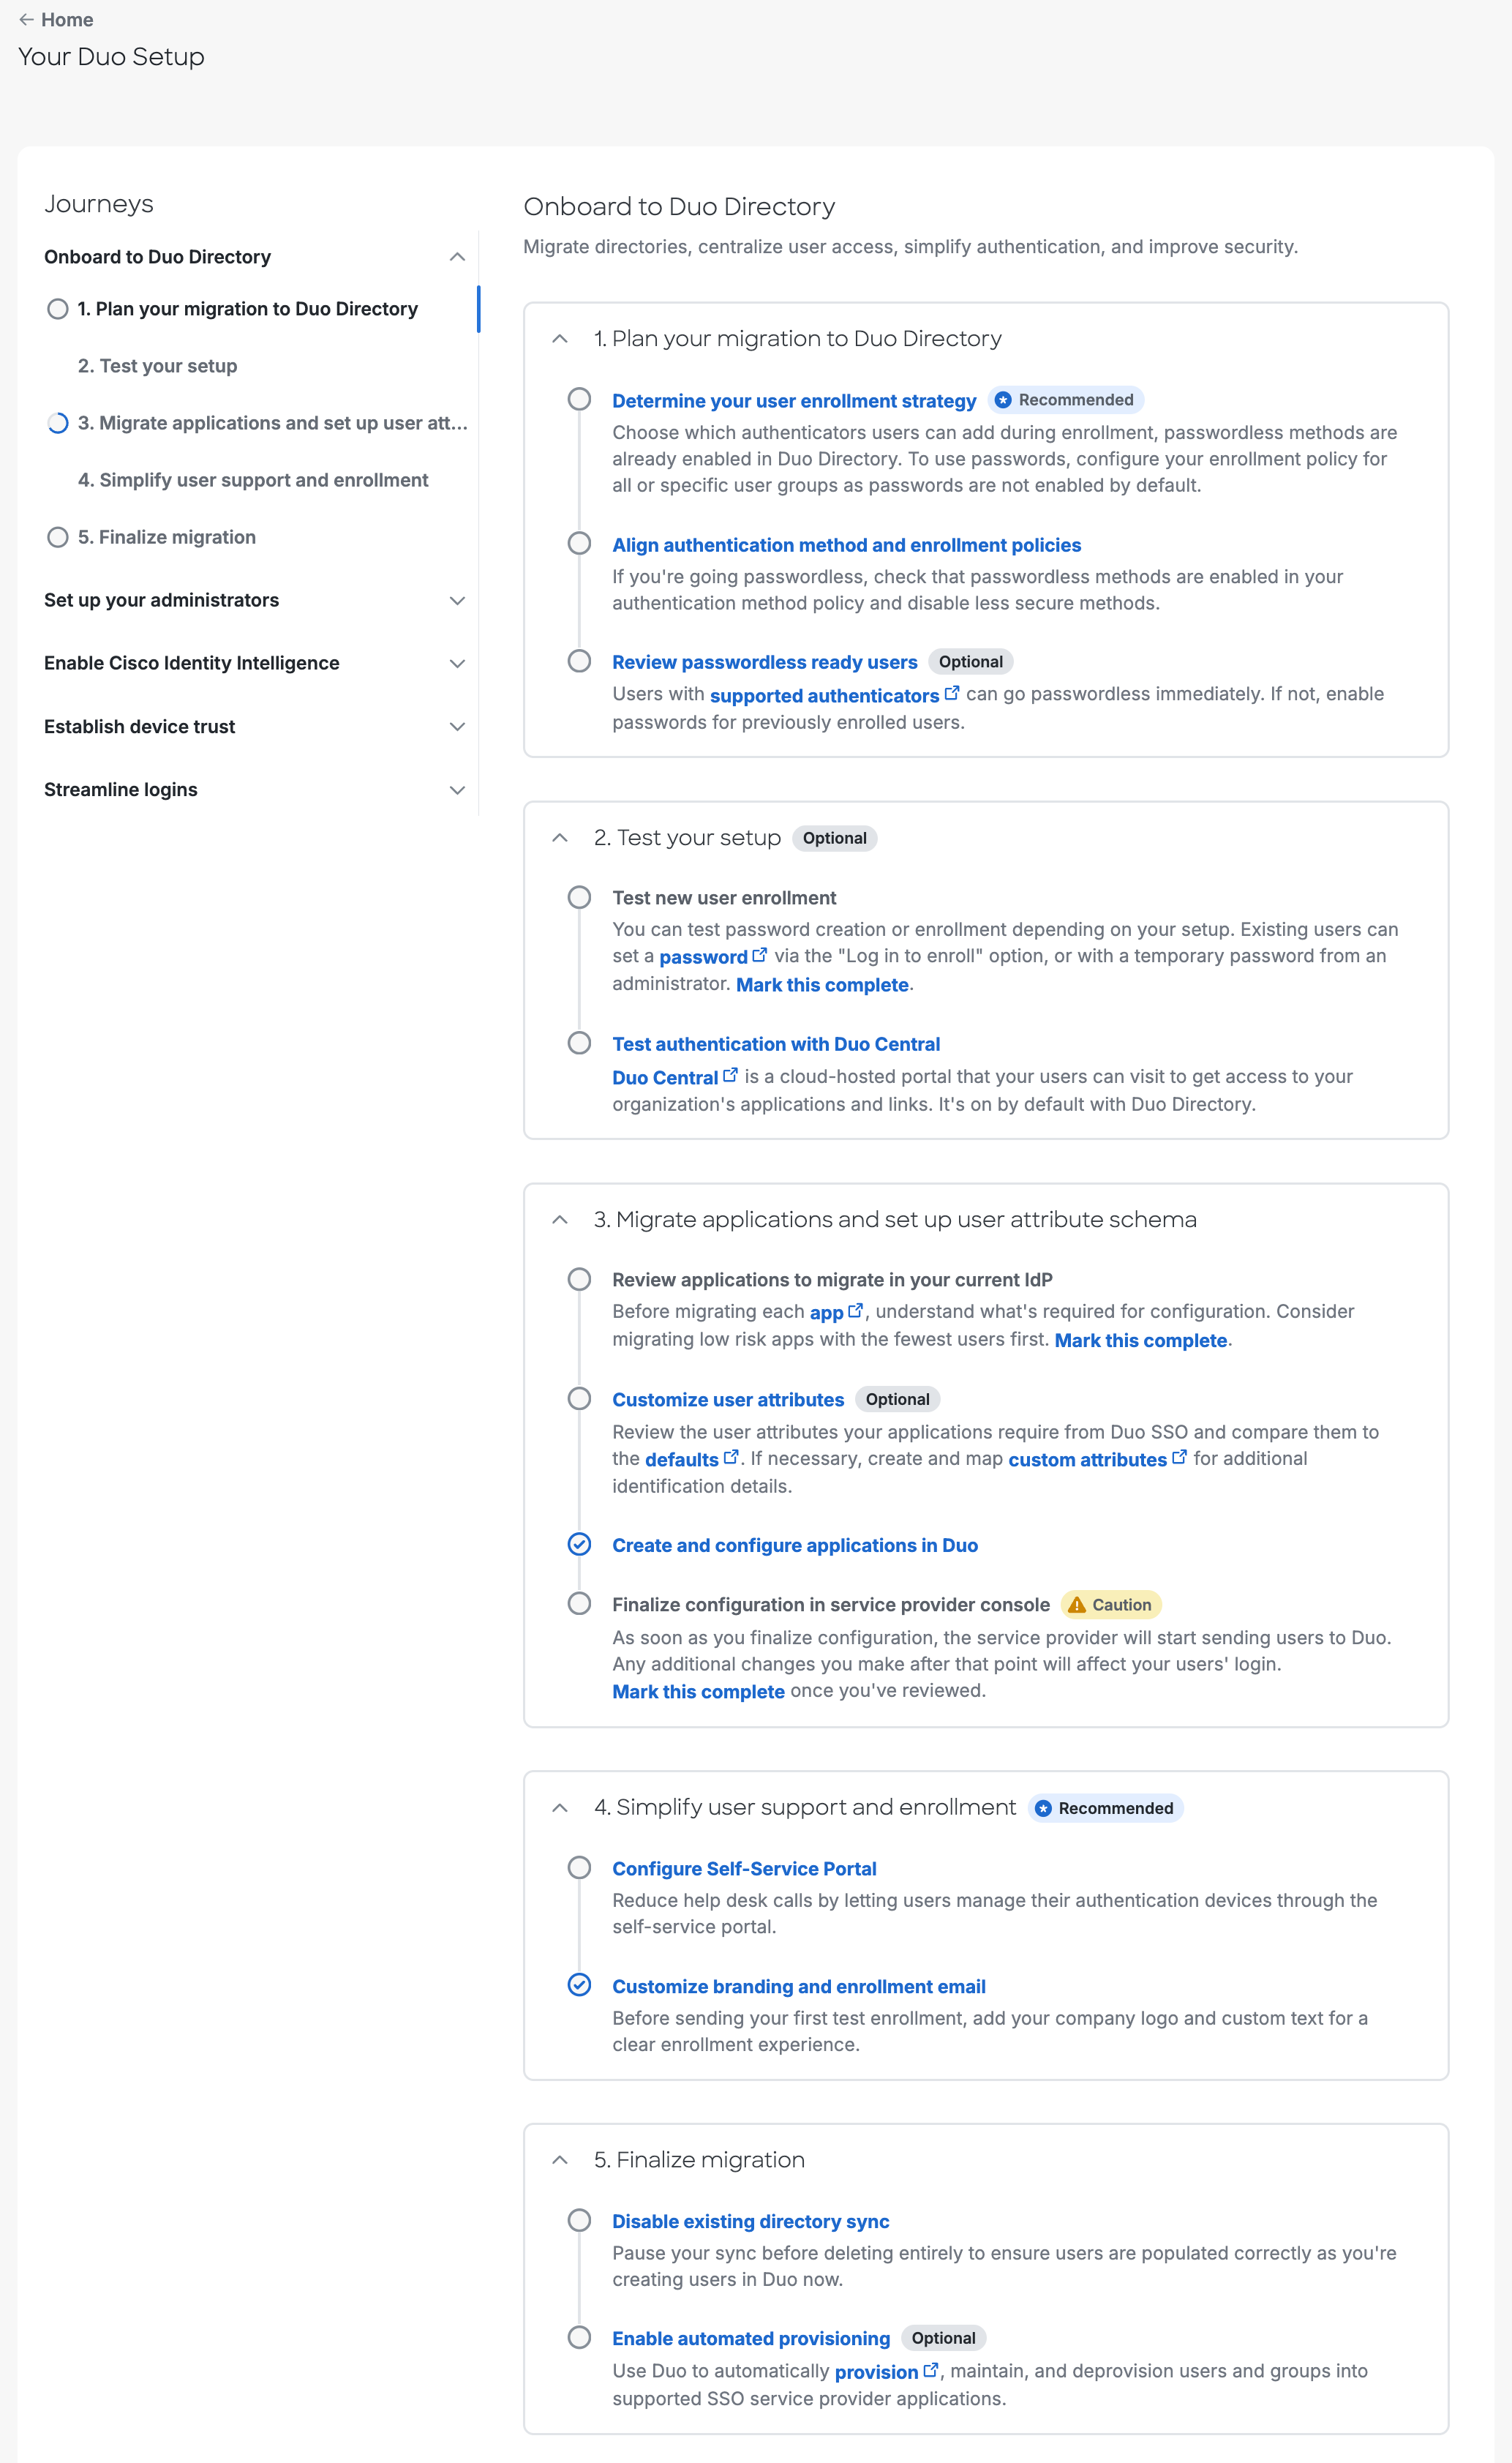
Onboard to Duo Directory
Customers who signed up for Duo before June 23, 2025 see "Onboard to Duo Directory" instead of "Get Started with Duo Directory". Some steps may be marked complete if you previously configured the required settings.
This journey describes the basic setup for migrating from your current identity provider (IdP) to your Duo Directory.
-
Plan your migration to Duo Directory.
-
Determine your user enrollment strategy. (Recommended)
-
To control settings for all users and all applications, edit the Global Enrollment Policy.
Note: Passwordless methods are already enabled by default in Duo Directory, while password authentification is not.
-
If your organization requires policy and controls that differ from the Global Enrollment Policy, you can create a Custom Enrollment Policy and assign it to user groups, applications, or applications for specific groups.
-
After you configure the enrollment and account management policies, enable them.
-
-
Align authentication method and enrollment policies.
- If you use passwordless authentification, ensure that passwordless methods are enabled in the selected policy and disable any less secure methods.
- After reviewing, this step is automatically marked as complete.
-
Review passwordless ready users. (Optional)
-
Enable passwords for previously enrolled users who have no supported authenticaticators.
Note: Users with supported authenticators can authenticate without a password.
After reviewing, this step is automatically marked as complete.
-
-
-
Test your setup. (Optional)
- Test new user enrollment.
- Depending on your authentication configuration, you can test user enrollment or password setup.
- Test authentication with Duo Central.
- To test user enrollment and access with Duo Central, use the active subdomain URL to log in as one of the pilot users you created earlier. On the “Sign-on” settings page, you can find the link. Also, you can customize the single sign-on experience to match your company’s brand.
- After a successful single sign on, refresh the page. The step is then marked as complete.
- Test new user enrollment.
-
Migrate applications and set up user attribute schema.
- Review applications to migrate in your current IdP.
- Before migrating applications to your current IdP, review the configuration requirements and mark this step complete.
- Customize user attributes. (Optional)
- Active attributes include a basic set of user attributes assigned by default. Compare them to the attributes your applications require from Duo SSO. If necessary, create and map custom attributes to store additional information about your users in Duo.
- Create and configure applications in Duo.
-
You can add and configure any of the available applications as needed.
Note: To complete this step, add at least one application.
-
- Finalize configuration in service provider console.
- Review the configuration before finalizing it. Once finalized, the service provider begins sending users to Duo, and any changes afterward affect user sign-in.
- Review applications to migrate in your current IdP.
-
Simplify user support and enrollment. (Recommended)
- Configure Self-Service Portal.
- Through a Self-Service Portal, users can add, update, and remove their authentication devices. On the “Self-Service Portal” page, you can enable user access, apply access policies, and edit self-service portal settings.
- Refresh the page to verify that the step is marked as complete.
- Customize branding and enrollment email.
- Customize the branding your users see in the Duo Prompt and other Duo feature areas including adding a company logo, setting site colors, and defining the SSO Login Label. Before sending your first test enrollment, add custom text to provide a clear enrollment experience. In addition, you can configure lockout settings, notifications about changes to users’ authentication devices, and related settings.
- Refresh the page to verify that the step is marked as complete.
- Configure Self-Service Portal.
-
Finalize migration.
- Disable existing directory sync.
- Pause directory sync before deleting it. This ensures that users are populated correctly when you create users in Duo.
- Enable automated provisioning (Optional).
- On the “Configured applications” page, you can configure automated provisioning for verified applications and generic SCIM automated provisioning for other Duo SSO applications. Applications without a Configure option do not support automated provisioning.
- After you add provisioning for at least one application, this step is automatically marked as complete.
- Disable existing directory sync.
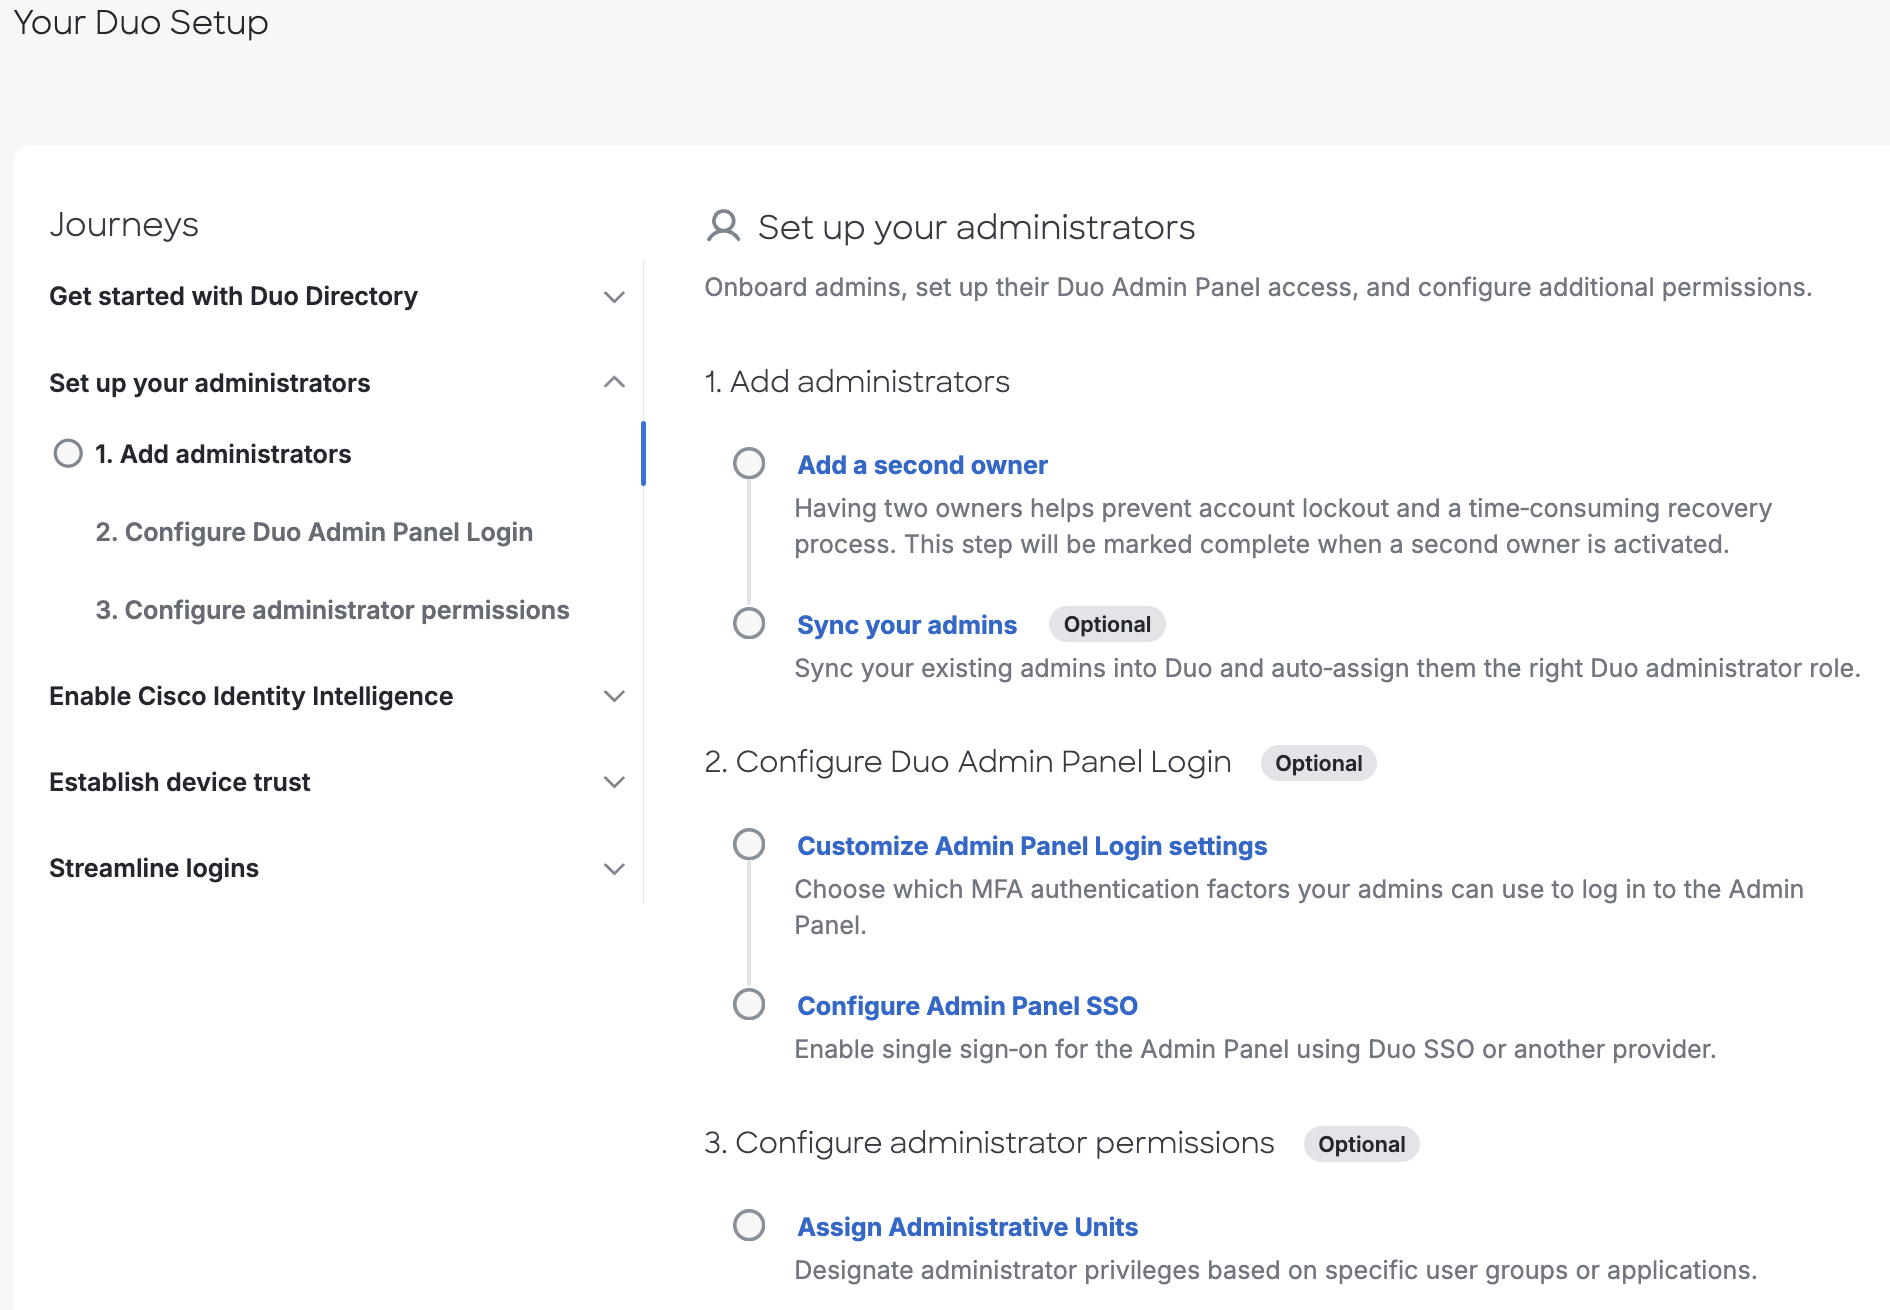
Set Up Your Administrators
This journey further secures administrator access to your Duo account.
-
Add administrators.
-
Add a second owner.
- This task will take you through the process of adding a second administrator with the "Owner" role to avoid account lockout. This step will guide you to the "Add Administrator" page which will allow you to add additional administrators and assign them specific administrative roles. This step will auto-complete after activating a second owner.
-
Sync your admins. (Optional)
- Sync your existing admins into Duo and auto-assign them the right Duo administrator role.
-
-
Configure Duo Admin Panel Login. (Optional)
-
Customize Admin Panel Login settings.
- This step takes you to the "Administrator Login Settings" page to configure admin password requirements, authentication methods, and access options. New accounts have SMS, voice, and Duo Mobile passcodes administrator authentication methods disabled by default.
-
Configure Admin Panel SSO.
- This step will allow you to log in the Duo Admin Panel using Duo Single Sign-On, Microsoft Entra ID, Google, or other SAML 2.0 providers.
-
-
Configure administrator permissions. (Optional)
- Assign Administrative Units.
- Granularly control which of your Duo administrators can manage specific applications and groups with Administrative Units.
- Assign Administrative Units.
Enable Cisco Identity Intelligence
This journey creates your Cisco Identity Intelligence tenant.
-
Add admins for SSO access to Identity Intelligence.
- Set up administrator access.
- This task will take you through the process of assigning users to a designated SSO group for Identity Intelligence access. Users must be in Duo Directory. For more information, see Identity Intelligence.
- Set up administrator access.
-
Connect Additional Identity Sources for Richer Insights.
- These integrations are configured in Duo and should be connected to Identity Intelligence for holistic user data.
Establish Device Trust
This journey configures device access policies and protecting operating system logons.
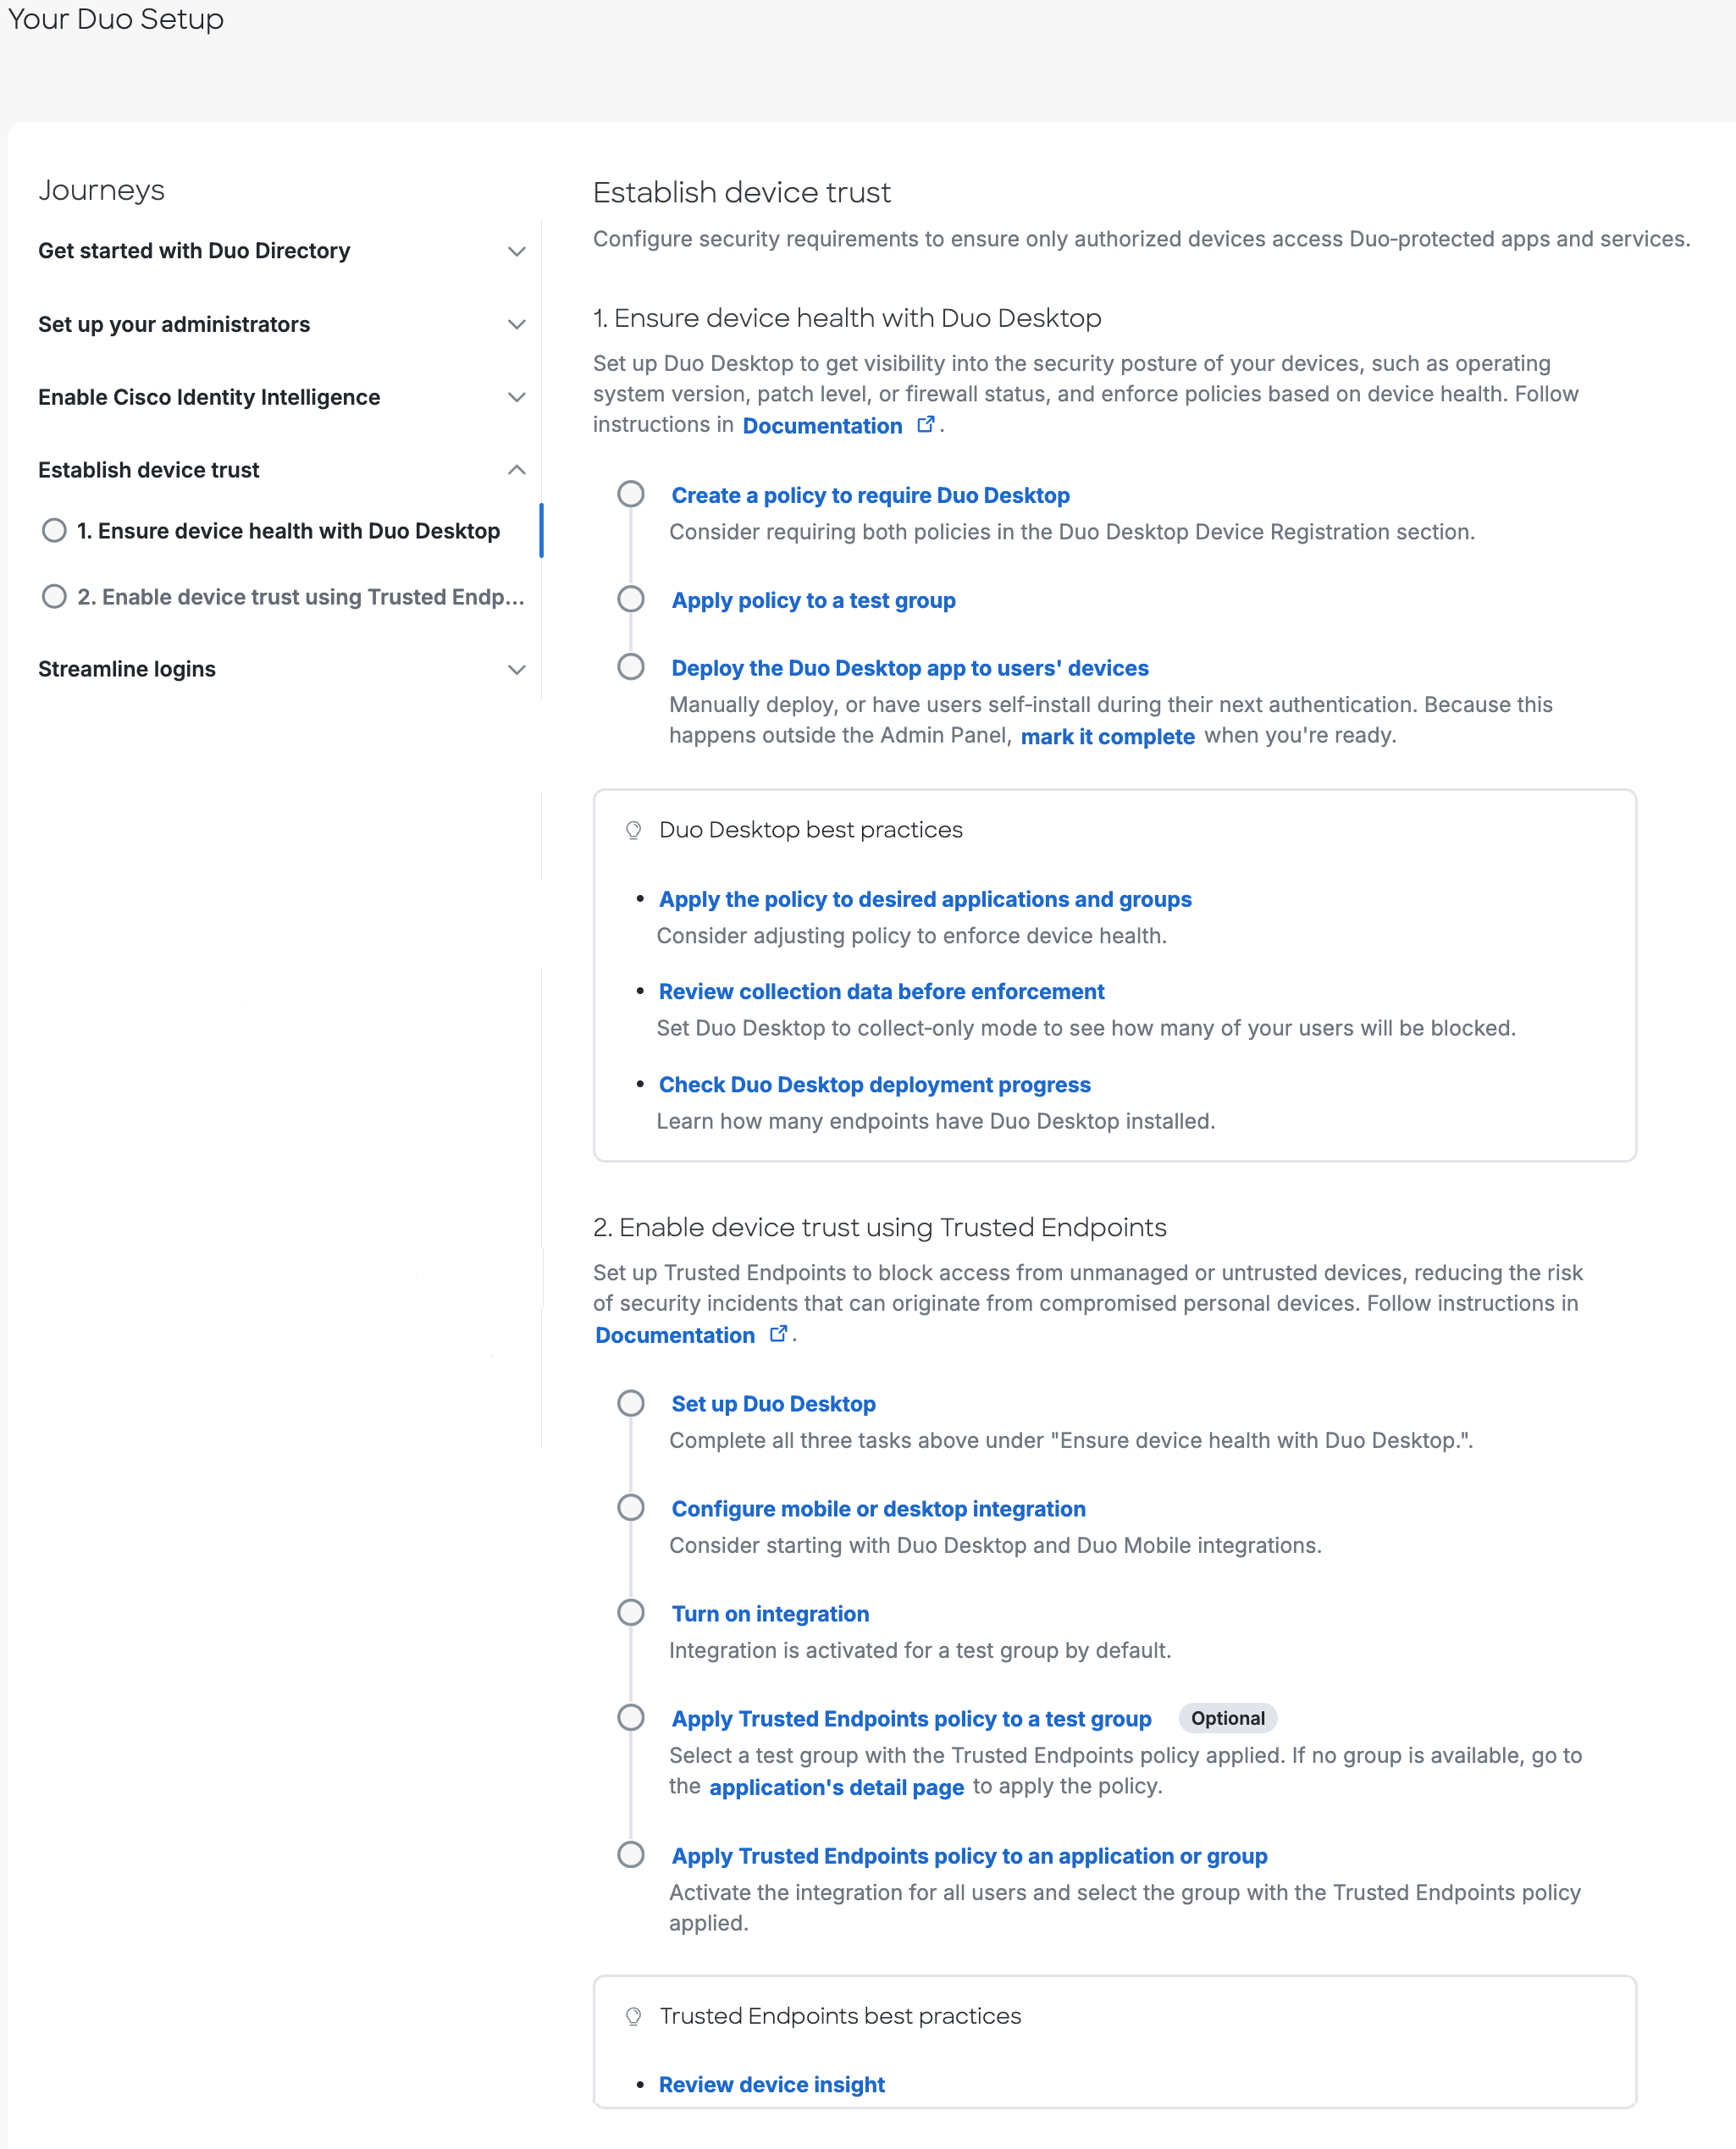
-
Ensure device health with Duo Desktop.
-
Create a policy to require Duo Desktop.
- This step takes you to the "Policies" page and from there you can require the Duo Desktop app for Linux, macOS, or Windows. This step will auto-complete after setting any of these options.
- You may also choose to require device registration using Duo Desktop.
-
Apply policy to a test group.
- This step takes you to the "Policies" page where you can configure and assign a policy for specific applications and groups.
-
Deploy the Duo Desktop app to users’ devices.
- This step takes you to the "Device Registration" page where you may choose to require device registration using Duo Desktop.
-
-
Enable device trust using Trusted Endpoints.
-
Set up Duo Desktop.
- This step takes you to the "Duo Desktop" page where you can learn more about how to configure and monitor Duo Desktop and Trusted Endpoints.
-
Configure mobile or desktop integration.
- From this step you may add integrations to serve as management tools for your devices, including Duo Mobile. This step will auto-complete once you add a device management tool. Additionally, if you add the integration as active, this will auto-complete the “Turn on integration” next step.
-
Turn on integration.
- This step is a follow-up to the previous step. Once you have added a device management tool integration, click on the underlined blue integration title. This will take you to the integration configuration page where you can make the integration active.
-
Apply Trusted Endpoints policy to a test group. (Optional)
- This step is a continuation of the previous two steps. Once you have added an active device management tool integration, click on the underlined blue integration title. This will take you to the integration configuration page where you can test with a group or activate for all.
-
Apply Trusted Endpoints policy to an application or group.
- This step is a continuation of the previous three steps. Once you have added an active device management tool integration, click on the underlined blue integration title. This will take you to the integration configuration page where you can test with a group or activate for all. When you select the “Activate for all” option, this step will auto-complete.
-
Streamline Logins
This journey helps strengthen security with smarter authentication and easier self-service for users.
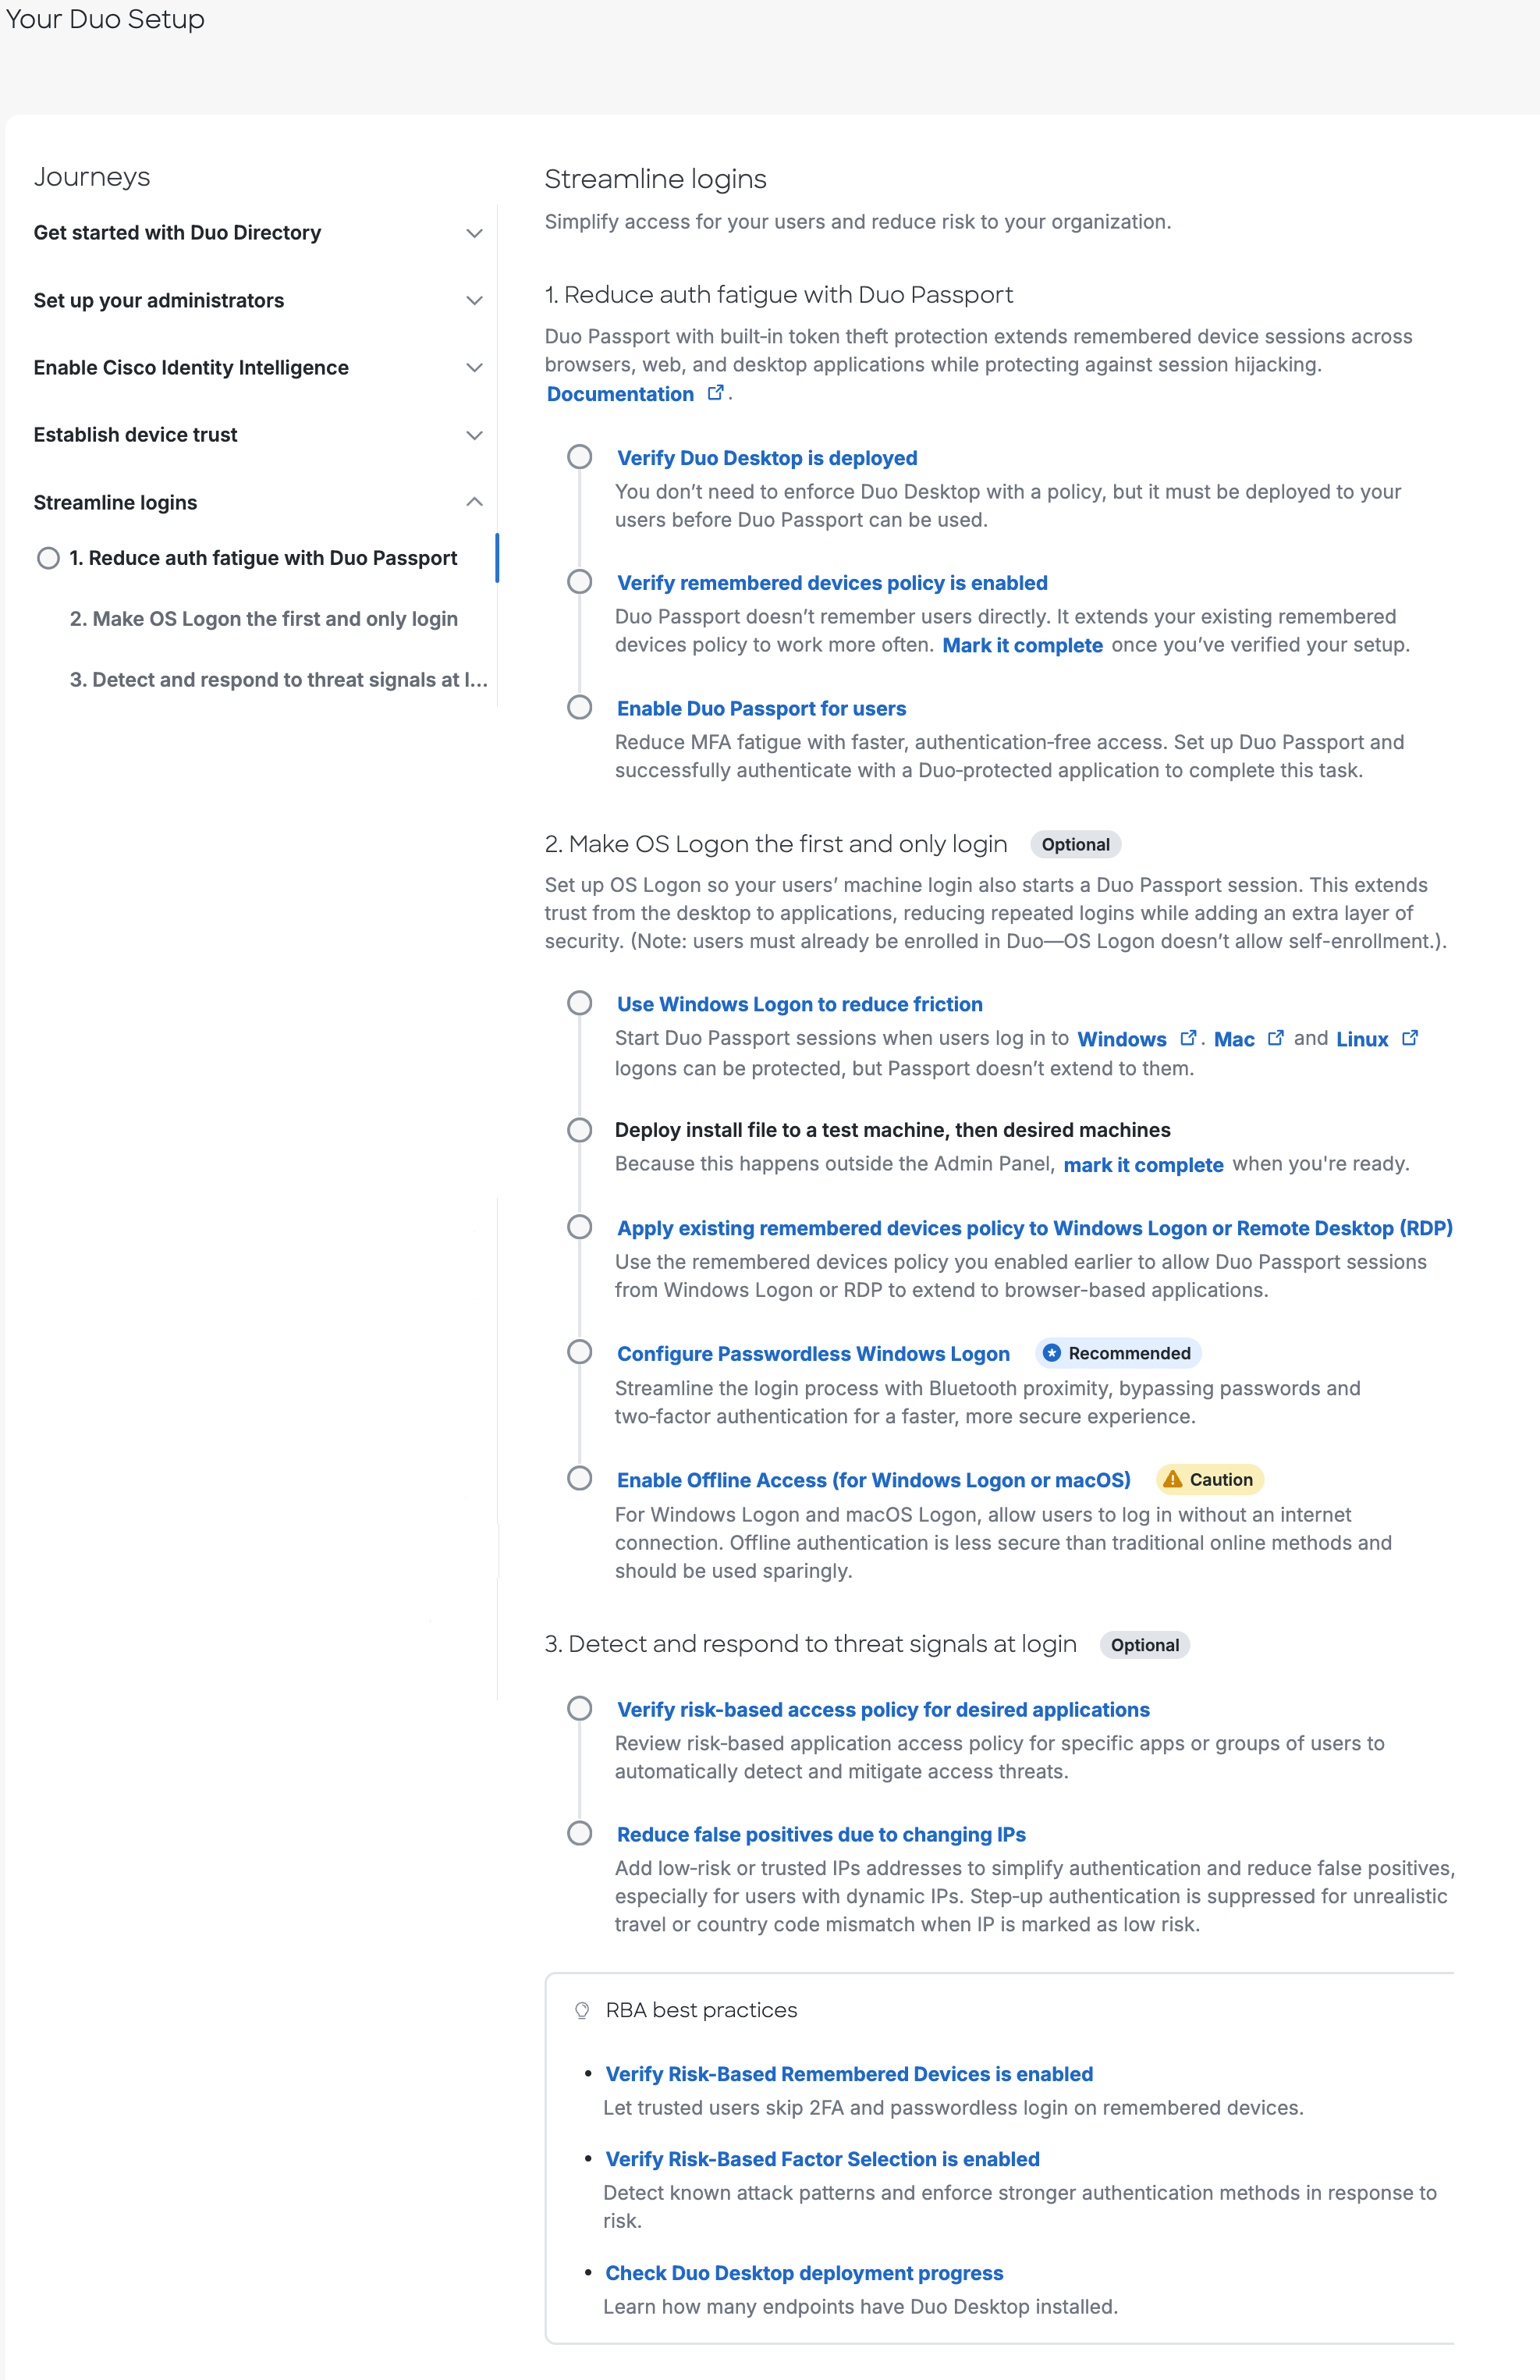
-
Reduce auth fatigue with Duo Passport.
-
Verify Duo Desktop is deployed.
- Duo Passport requires Duo Desktop. This step opens the Duo Desktop Deployment Progress report, where you can confirm how many of your endpoints have Duo Desktop installed.
-
Verify remembered devices policy is enabled.
- This step takes you to the "Policies" page. Ensure that you have remembered devices enabled in some or all policies. Mark this step complete after confirming your policies include remembered devices.
- The easiest way to set a consistent remembered devices policy for all applications is to enable it in the Global policy. Setting a consistent remembered device policy helps to ensure that remembered authentications in one application are usable by another. To do so, click on the "Actions" drop-down to the right of the "Global Policy" policy in the table, and choose Edit. Click on “Remembered Devices” and enable the Remember devices for browser-based applications setting.
-
Enable Duo Passport for users.
- This step takes you to the "Passport" page where you can enable Duo Passport, which shares device and session information across OS login, web browsers, and applications so that your users can gain access without having to complete multi-factor authentication every time. Once you have configured your desired settings, manually mark this step “Complete” to complete the journey.
-
-
Make OS Logon the first and only login. (Optional)
-
Use Windows Logon to reduce friction.
- This step takes you to the "Application Catalog" page where you can create applications to protect Windows, macOS, or Unix/Linux operating system local or remote logons.
-
Deploy install file to a test machine, then desired machines.
- This is a manual step. Download the installer for the application from Duo and distribute it to your target client systems. Manually mark this step complete once you have completed your OS logon deployment to complete the entire journey.
-
Apply existing remembered devices policy to Windows logon or Remote Desktop (RDP).
- On the "Microsoft RDP" application's details page there is a section for policy. Click Apply a policy and then select the policy you created with the remembered devices option set for browser applications. You may also apply remembered devices settings to all users and applications in the global policy. Click on the Edit Global Policy button under the "Global policy" section. Click on “Remembered Devices” and enable the Remember devices for browser-based applications setting.
-
Configure Passwordless Windows Logon. (Recommended)
- On the "Applications" page, click on a "Microsoft RDP" application. On that application's details page there is a section titled “Passwordless Settings”, where you can allow passwordless login to Windows via Duo Push. When enabled, your users will have the option of enrolling in Passwordless for OS Logon. Passwordless OS logon requires Duo Push to work. Disabling Duo Push in the effective policy for the application will cause your users to fall back to password logon.
-
Enable Offline Access (for Windows Logon or macOS). (Caution)
- This step is a continuation of the previous step. This step takes you to the "Applications" page which will show you which applications you have already created. Click on the "Microsoft RDP" or "macOS" application to configure. On the application configuration page there is a section titled “Offline Access Settings” where you can enable offline login and enrollment.
Caution: offline authentication is less secure than traditional online methods and should be used sparingly.
-
-
Detect and respond to threat signals at login. (Optional)
-
Verify risk-based access policy for desired applications.
- To enable risk-based factor selection, follow this step to the "Policies" page, and click to add or edit a policy. From here, click on "Risk-based factor selection" and enable Limit authentication methods based on risk, in the legacy policy editor enable Limit available authentication methods based on risk. These configuration options determine how your users will authenticate based on risk evaluation. This step auto-completes once you enable risk-based factor selection in the Global policy and save.
-
Reduce false positives due to changing IPs. (Optional)
- This step is a continuation of the previous step. Once the Risk-based factor selection policy setting is enabled and saved, you can add trusted networks to it which will reduce the number of times your users must authenticate by using risk-based protection to ensure a trusted connection from the specified locations. This step auto-completes once you add a trusted network.
-
Next Steps
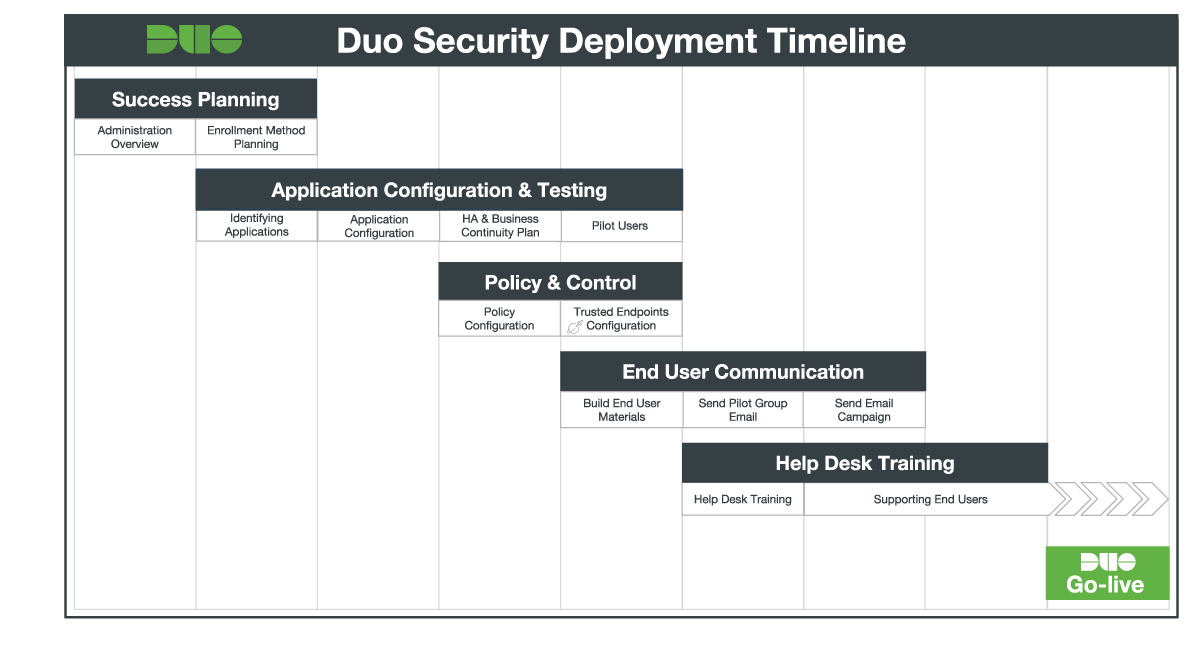
Now that you've experienced the ease of adding Duo protection to a test application and logging in to the application with Duo authentication, your next step is planning a full Duo deployment.
We've prepared a Liftoff guide that walks you through the stages of a typical organization Duo rollout.
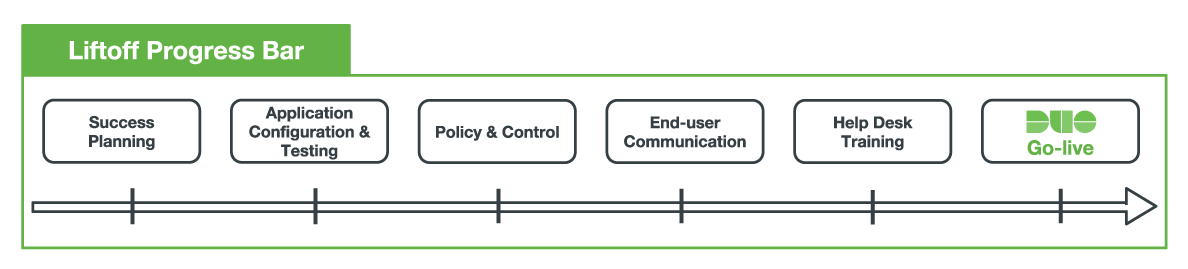
Our Liftoff guide includes timelines and milestones, configuration best practices, tips for employee communications and training your support staff, and more!
Try a Higher Edition for Free
To explore additional features and benefits, you can start a free trial of a higher edition by clicking Free Trial in the left sidebar.
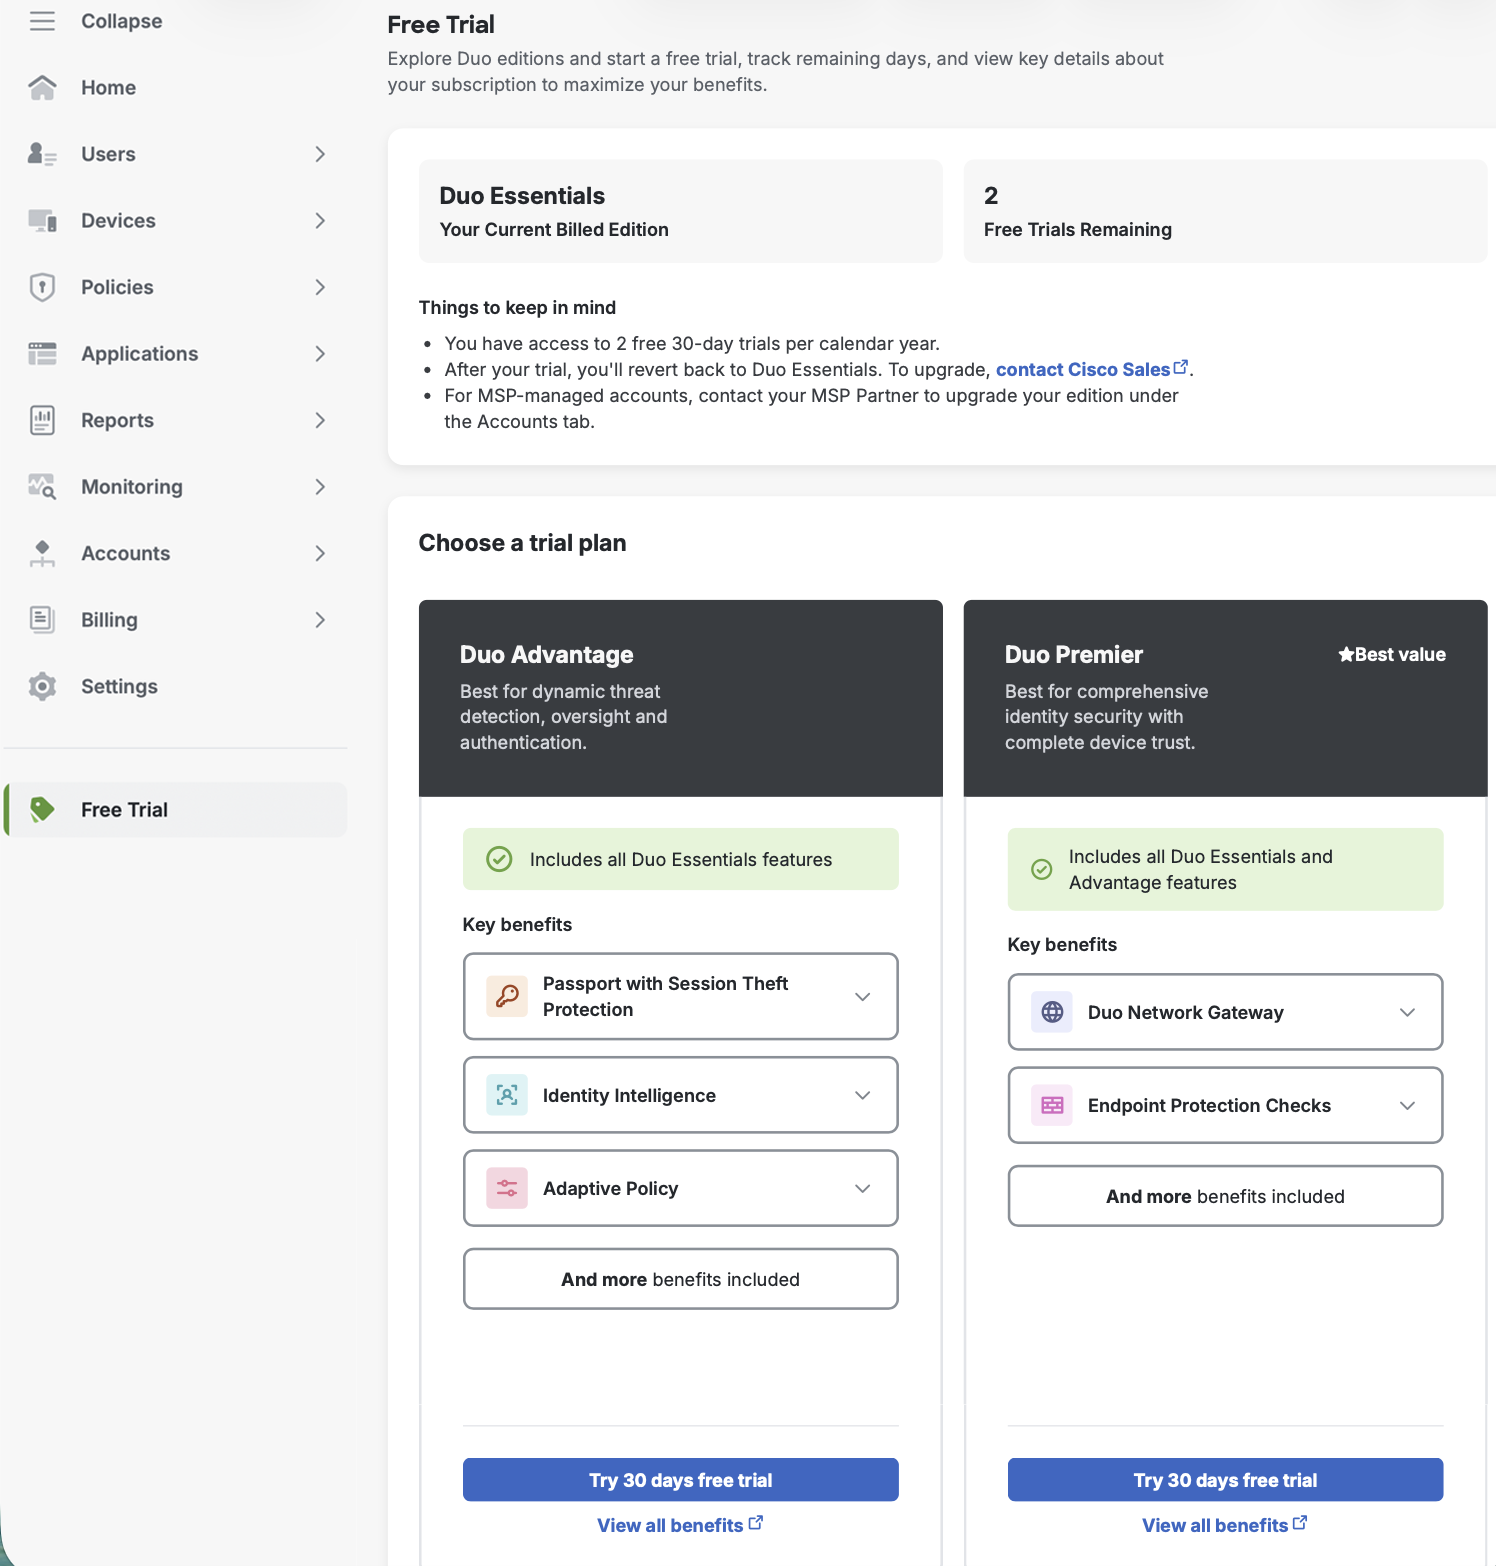
On the "Free Trial" page, you can view your current edition and start up to two 30-day trials per year. Available trial options depend on your current edition:
- Duo Essentials: you can choose either a Duo Advantage or Duo Premier plan.
- Duo Advantage: you can try the Duo Premier plan.
To compare editions and view all features, refer to the Editions and Pricing page.
If you have subaccounts, you can also start two additional free trials of a higher edition a year for them:
- To switch to your subaccount, go to Accounts → Accounts in the left sidebar and select the subaccount for which you want to start a trial.
- On the "Free Trial" page, choose a trial plan.
After the trial ends, your account automatically reverts to your previous paid edition. Any features of the higher edition enabled during the trial are no longer available. If you decide to upgrade to a higher edition, we will restore your trial settings.
Other Resources
Questions? Check our administration documentation and the rest of our documentation collections, the Duo Knowledge Base, or contact Duo Support for help.